- Details
- Written by
- Last Updated on 27 April 2019 | Print Email
In this article, you will understand the details about JAVA_HOME environment variable and how to set it on Windows 10.
What is JAVA_HOME?
By convention, JAVA_HOME is the name of an environment variable on the operating system that points to the installation directory of JDK (Java Development Kit) or JRE (Java Runtime Environment) – thus the name Java Home. For example:
JAVA_HOME = c:Program FilesJavajdk1.8.0_201
Why is JAVA_HOME needed?
To develop Java applications, you need to update the PATH environment variable of the operating system so development tools like Eclipse, NetBeans, Tomcat… can be executed because these programs need JDK/JRE to function. So the PATH environment variable should include JAVA_HOME:
PATH = Other Paths + JAVA_HOME
Other paths are set by various programs installed in the operating system. If the PATH environment variable doesn’t contain a path to JRE/JDK, a Java-based program might not be able to run. For example, typing java in the command prompt showing this error:
'java' is not recognized as an internal or external command, operable program or batch file.

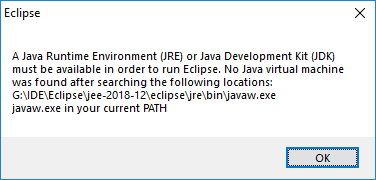
Or Eclipse will fail to launch:
How to set JAVA_HOME on Windows 10
Here are the visual steps to properly set value for the JAVA_HOME and update the PATH environment variables in order to setup Java development environment on your computer:
1. Firstly, you need to identify the Java home directory, which is typically under C:Program FilesJava directory. Open My Computer and navigate to this directory, you will see:
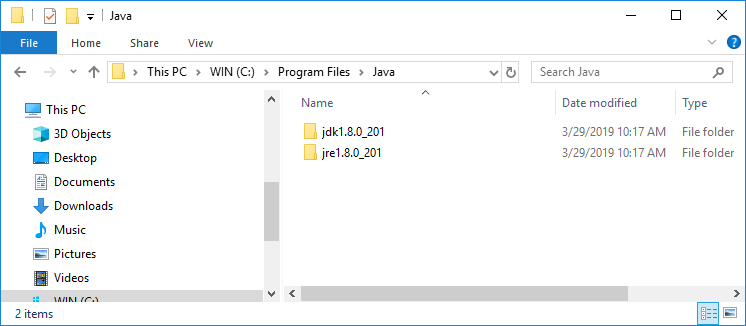
Here, the home of JDK is under C:Program FilesJavajdk1.80_201. The version number may vary, depending on the JDK you installed.
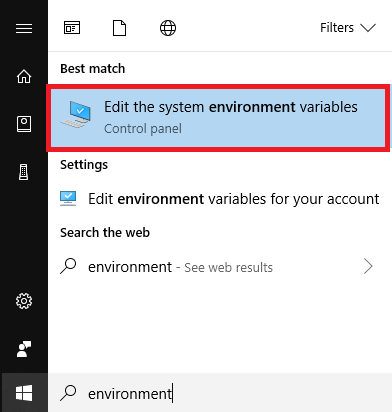
2. Open the System Environment Variables dialog by typing environment in the search area on Start menu. Click the suggested item Edit the system environment variables:
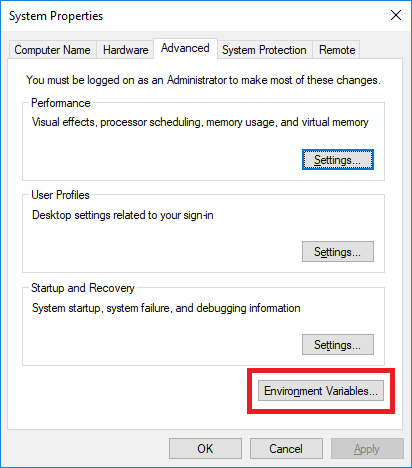
The System Properties dialog appears, click the button Environment Variables.
Then you will see this dialog:

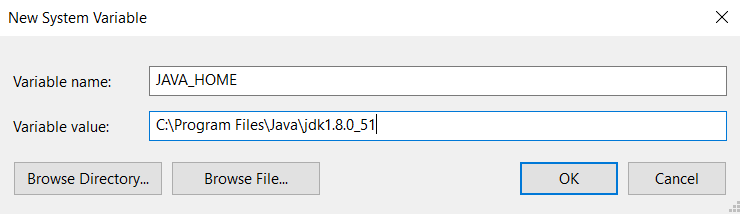
3.Create the JAVA_HOME environment variable by clicking the New button at the bottom. In the New System Variable form, enter the name and value as follows:
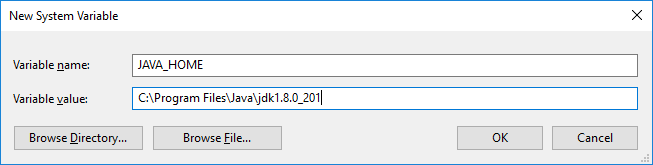
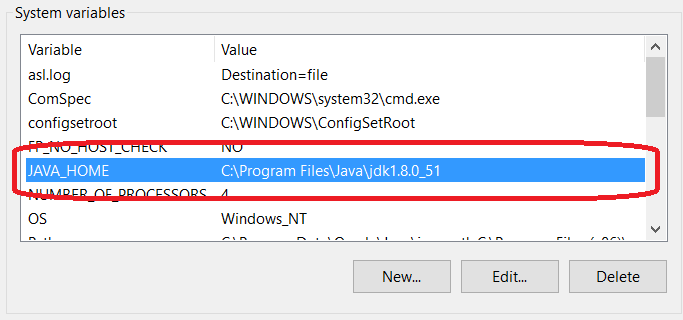
Click OK, and you will see the JAVA_HOME variable is added to the list.
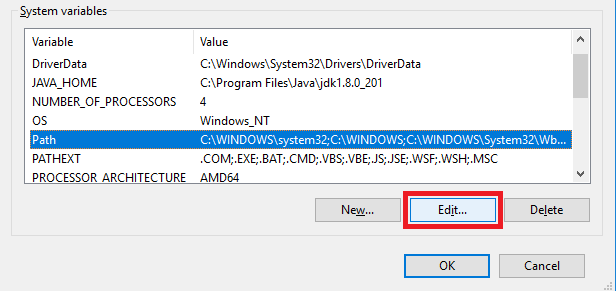
4.Update the PATH system variable. In the Environment Variables dialog, select the Path variable and click Edit:
Then in the Edit environment variable dialog, double click on the empty row just below the last text line, and enter %JAVA_HOME%bin as follows:
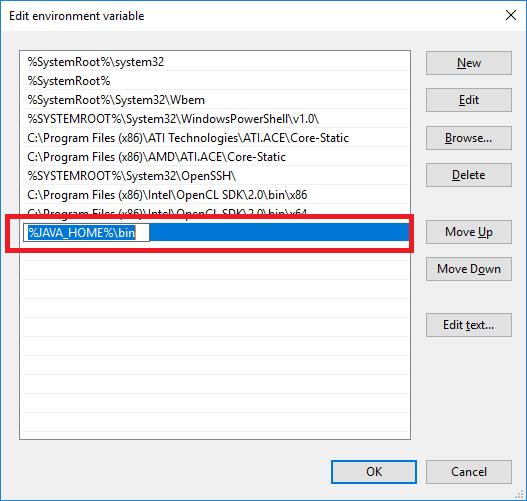
The percent signs tell Windows that it refers to a variable – JAVA_HOME, and the bin specifies the location of java.exe and javac.exe programs which are used to run and compile Java programs, as well as other tools in the JDK.
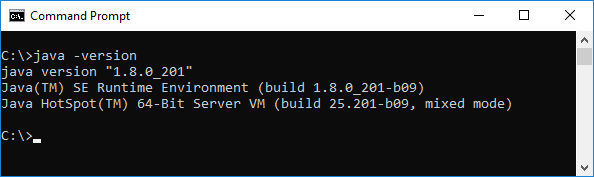
Click OK button to close all the dialogs, and you’re all set. Now you can open Eclipse or NetBeans to verify. Or open a command prompt and type in javac –version, you should see:
NOTES:
You can add the path to the bin directory of Java home directly into the PATH variable. But it’s strongly recommend to follow the above steps to setup a JAVA_HOME variable because many Java programs depend on it.
When you installed a JDK, you might not need to update the system variable because the installer already did it for you.
Learn more:
- How to set environment variables for Java using command line
- How to write, compile and run a hello world Java program for beginners
- What are JVM, JRE and JDK
- How to check Java version
About the Author:
 Nam Ha Minh is certified Java programmer (SCJP and SCWCD). He started programming with Java in the time of Java 1.4 and has been falling in love with Java since then. Make friend with him on Facebook and watch his Java videos you YouTube.
Add comment
I got a new laptop with Windows 10 and I want to set it up so I can use java and javac from the command line.
I have searched online but all the guides are for previous versions, and I don’t want to mess around with something I don’t understand.
![]()
informatik01
15.8k10 gold badges74 silver badges103 bronze badges
asked Aug 27, 2015 at 5:13
![]()
0
Just set the path variable to JDK bin in environment variables.
Variable Name : PATH
Variable Value : C:Program FilesJavajdk1.8.0_31bin
But the best practice is to set JAVA_HOME and PATH as follow.
Variable Name : JAVA_HOME
Variable Value : C:Program FilesJavajdk1.8.0_31

Variable Name : PATH
Variable Value : %JAVA_HOME%bin
answered Aug 27, 2015 at 5:31
![]()
isurujayisurujay
1,33610 silver badges15 bronze badges
3
Here are the typical steps to set JAVA_HOME on Windows 10.
- Search for Advanced System Settings in your windows Search box. Click on Advanced System Settings.
- Click on Environment variables button: Environment Variables popup will open.
- Goto system variables session, and click on New button to create new variable (HOME_PATH), then New System Variables popup will open.
- Give Variable Name: JAVA_HOME, and Variable value : Your Java SDK home path. Ex: C:Program Filesjavajdk1.8.0_151 Note: It should not include bin. Then click on OK button.
- Now you are able to see your JAVA_HOME in system variables list. (If you are not able to, try doing it again.)
- Select Path (from system variables list) and click on Edit button, A new pop will opens (Edit Environment Variables). It was introduced in windows 10.
- Click on New button and give %JAVA_HOME%bin at highlighted field and click Ok button.
You can find complete tutorials on my blog :
How to set JAVA_HOME in 64 bit Windows 10 OS
![]()
answered Dec 20, 2017 at 8:51
![]()
0
- Right click Computer
- Click the properties
- On the left pane select Advanced System Settings
- Select Environment Variables
- Under the System Variables, Select PATH and click edit,
and then click new and add path as C:Program
FilesJavajdk1.8.0_131bin (depending on your installation path)
and finally click ok - Next restart your command prompt and open it and try javac
answered Jun 7, 2017 at 7:40
![]()
0
To find the env vars dialog in Windows 10:
Right Click Start
>>  Click Control Panel  (Or you may have System in the list)
>>  Click System
>>  Click Advanced system settings
>>  Go to the Advanced Tab
>>  Click the "Environment Variables..." button at the bottom of that dialog page.
answered Mar 24, 2016 at 10:31
![]()
theINtoytheINtoy
3,2681 gold badge35 silver badges59 bronze badges
1
Its still the same concept, you’ll need to setup path variable so that windows is aware of the java executable and u can run it from command prompt conveniently
Details from the java’s own page: https://java.com/en/download/help/path.xml
That article applies to: •Platform(s): Solaris SPARC, Solaris x86, Red Hat Linux, SUSE Linux, Windows 8, Windows 7, Vista, Windows XP, Windows 10
answered Aug 27, 2015 at 5:21
![]()
2
if you have any version problems (javac -version=15.0.1, java -version=1.8.0)
windows search : edit environment variables for your account
then delete these in your windows Environment variable: system variable: Path
C:Program Files (x86)Common FilesOracleJavajavapath
C:Program FilesCommon FilesOracleJavajavapath
then if you’re using java 15
environment variable: system variable : Path
add path C:Program FilesJavajdk-15.0.1bin
is enough
if you’re using java 8
environment variable: system variable : JAVA_HOME
JAVA_HOME = C:Program FilesJavajdk1.8.0_271
add path = %JAVA_HOME%bin
answered Nov 27, 2020 at 8:27
![]()
1
Post Views: 8,227
In this post, we are going to see “How to set JAVA_HOME as environmental variables in Windows 10 Operating System?”
Simple step by step process to set JAVA_HOME in Windows 10, Share It… Click To Tweet
Prerequisite:
You already have installed the Java Development Kit (JDK) in your machine. Now, you can proceed with setting up the JAVA_HOME environment variable to point to the JDK installation directory.
Following are the steps to set JAVA_HOME in Windows:
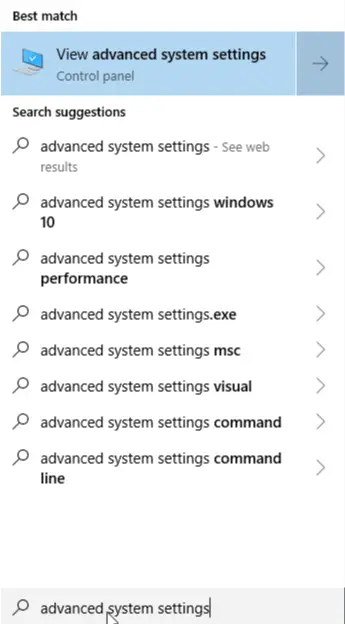
1. Type ‘advanced system settings’ in the search box present beside the Windows icon in the task bar and then click ‘View advanced system settings’ as shown in the below screenshot.
2. ‘Settings’ dialog will open and then, click ‘Advanced’ tab.
3. Click ‘Environment Variables’ button present at the bottom on the ‘Advanced’ tab.
4. ‘Environmental Variables’ window will open. Then, click ‘New’ present under System Variables.
5. Enter ‘JAVA_HOME’ in ‘Variable name’ field and enter JDK location in ‘Variable value’ field. JDK location is nothing but JDK directory created under Program Files during JAVA installation. Lets assume, you had installed jdk 1.8.0_51 in your windows OS then the installation path of JDK should be C:Program FilesJavajdk1.8.0_51 (NOTE: this path should be as per your operating system).
6. Click OK and you will see the JAVA_HOME listed in the system variable as in the screenshot below:
7. Under System Variables, select Path system variable and click the Edit button.
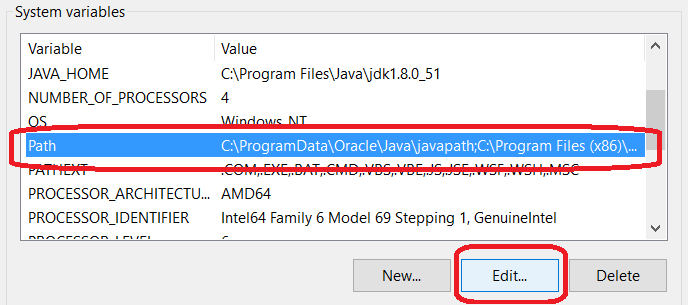
8. As you can see in the above screenshot, Path variable already has some value, so what you need to do is just add the %JAVA_HOME%bin; at the beginning of this value and click OK.
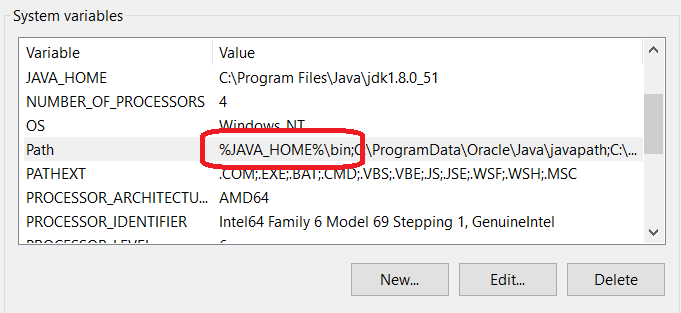
9. Now, Path variable should be updated with value inserted above in the below screenshot.
10. Now, click Apply and then OK.
NOTE:
You might need to restart Windows if changes don’t reflect.
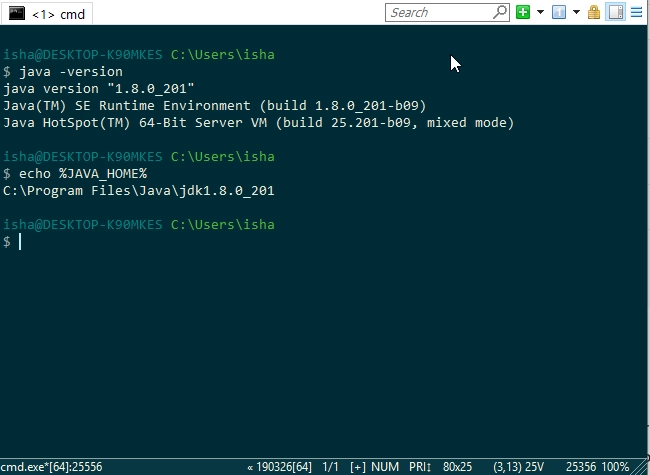
Once, you are done with all the steps, lets check if it’s perfectly setup. Lets launch ‘Command Prompt’ and run below commands one after the other and you would see results as shown in below screenshot:
command 1: java -version
command 2: echo %JAVA_HOME
That’s it, it’s that simple to set JAVA_HOME in Windows 10 🙂
Simple approach to set Java_HOME in windows, Share It… Click To Tweet
If you like this post , please check out my other useful blog posts:
- Create first Java project in Eclipse IDE
- Launch Eclipse IDE
Other Useful References:
- Eclipse Create Java Project – TutorialsPoint
- Creating your first Java project
-

Deepak Verma is a Test Automation Consultant and Software development Engineer for more than 10 years. His mission is to help you become an In-demand full stack automation tester.
He is also the founder of Techndeck, a blog and online coaching platform dedicated to helping you succeed with all the automation basics to advanced testing automation tricks.View all posts
