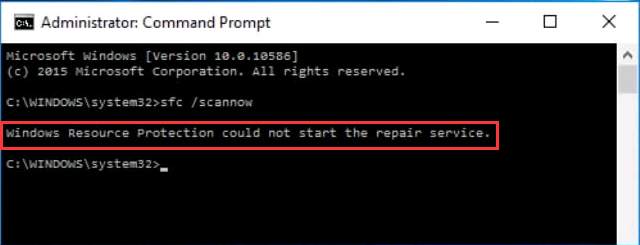
Повреждение системных файлов далеко не всегда означает крах Windows, всё зависит от того, какие именно компоненты были повреждены. Если они не являются для системы критичными, проблемы ограничатся сбоями в работе отдельных приложений и функций, к тому же такие неполадки часто удаётся устранить, запустив командой sfc /scannow встроенное средство восстановления системных файлов. Но и здесь пользователя может поджидать неприятность. Инструмент или не запускается, или запускается, но вскоре начатое сканирование завершается ошибкой «Защита ресурсов Windows не может выполнить запрошенную операцию».
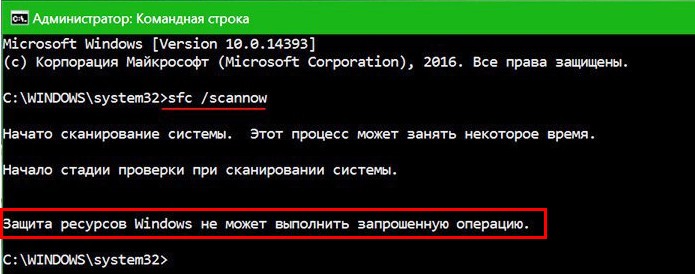
Означает ли это, что всё так плохо, что даже SFC не работает? Не всегда, просто во время проверки в системе происходит сбой или инструмент не может получить доступ к каталогу WinSxS, в коем расположены важные файлы. Вероятны и другие причины — повреждение файловой системы, наличие физически нечитаемых секторов на диске, отсутствие у пользователя соответствующих прав доступа. Что делать и с чего начинать поиск причин неполадки?
Для начала убедитесь, что командная строка запущена от имени администратора,
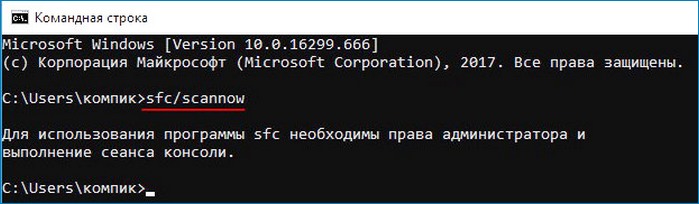
хотя вообще-то Windows должна сама об этом предупреждать. Если вы запускаете инструмент как положено с админскими привилегиями, а ошибка всё равно появляется, проверьте состояние файловой системы, выполнив тут же в консоли команду chkdsk C:
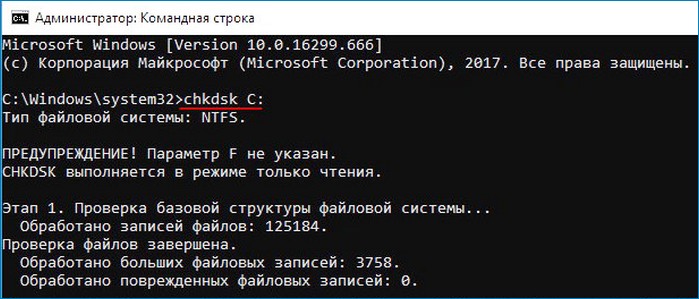
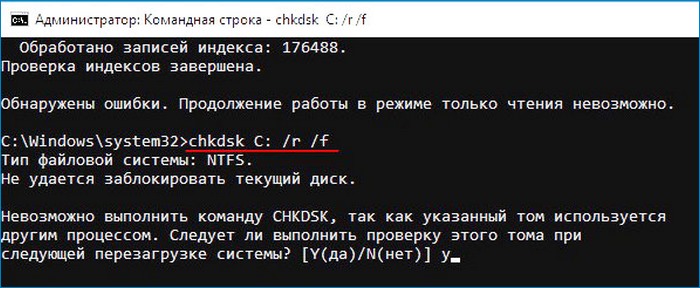
Если будут обнаружены ошибки, повторите команду, но уже с параметрами /r /f, как показано на скриншоте. Действие потребуется подтвердить вводом Y, при этом компьютер будет перезагружен, а сканирование и исправление выполнено до загрузки рабочего стола.
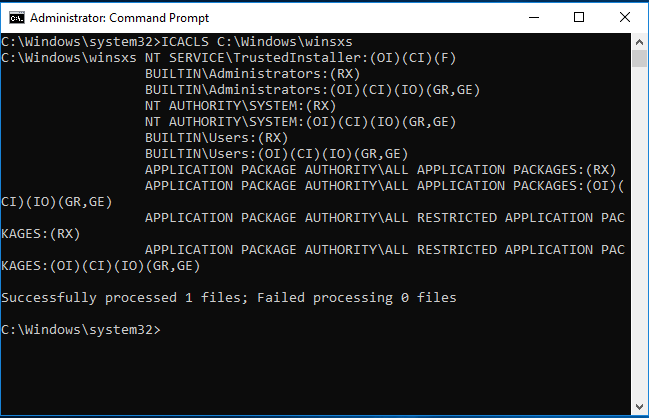
Причиной ошибки сканирования может быть ограничение доступа SFC к каталогу WinSxS. Попробуйте снять их, выполнив в консоли CMD команду
icacls c:windowswinsxs
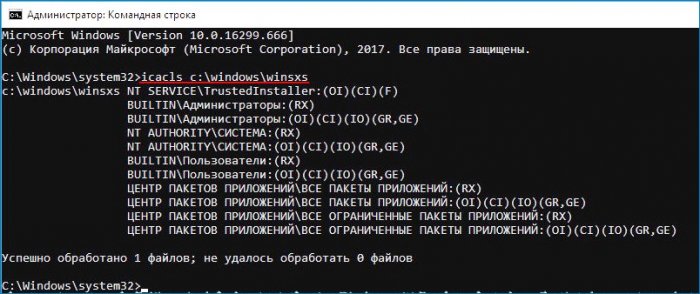
и перезагрузив компьютер.
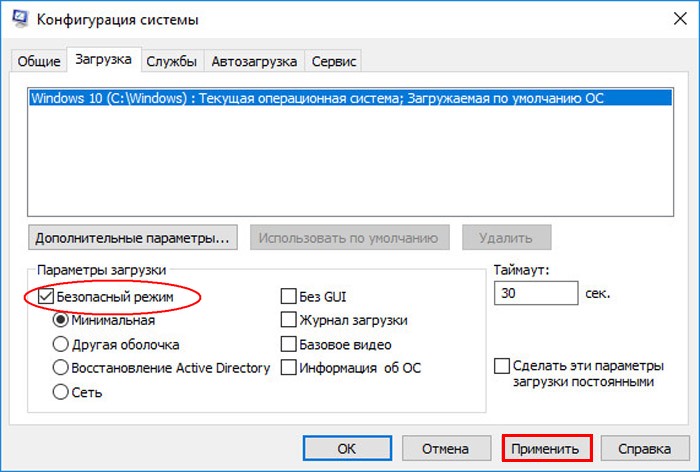
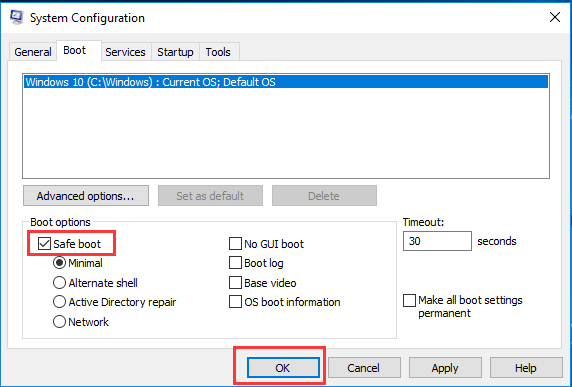
Следующий шаг — запуск процедуры сканирования SFC в безопасном режиме. Загрузиться в него проще всего с помощью утилиты msconfig, переключившись на вкладку «Загрузка» и установив галочку в соответствующем чекбоксе.
Далее всё как обычно, открываем командную строку с повышенными привилегиями и выполняем команду sfc/scannow.
Будет еще лучше, если запустить сканирование SFC оффлайн. Для этого нужно загрузиться с установочного диска Windows, при появлении окна мастера установки нажать Shift + F10,
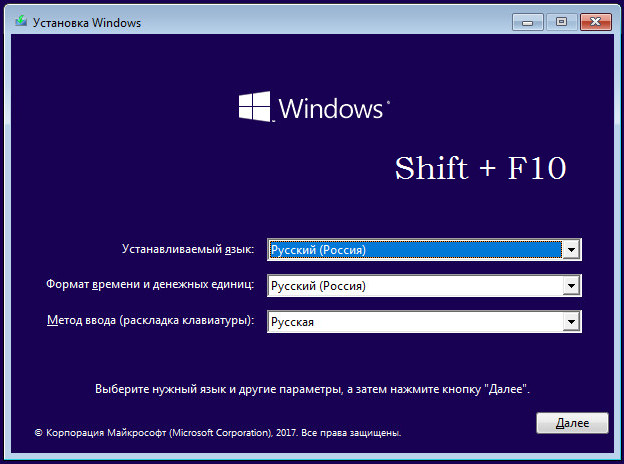
открыв тем самым командную строку, определить в ней буквы дисков, а затем выполнить такую команду:
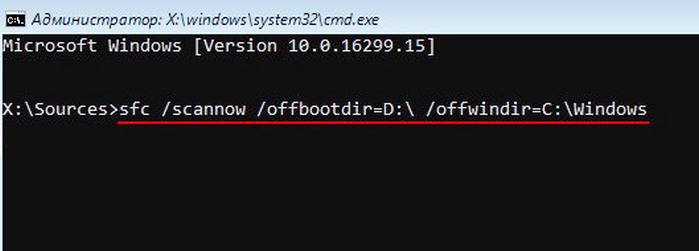
sfc /scannow /offbootdir=D: /offwindir=C:Windows
Где:
offbootdir=D: раздел, содержащий папку WinSxS.
offwindir=C:Windows — раздел с установленной ОС.
- Примечание: определить буквы томов в загрузочной среде проще всего с помощью Блокнота, запустив его командой notepad и выбрав Файл → Сохранить как.
Если приведенные выше способы не дали результатов, высока вероятность, что отказ защиты ресурсов Windows вызван повреждением самого хранилища системных компонентов, то есть содержимого папки WinSxS. Проверить его состояние можно командой
Dism /Online /Cleanup-Image /ScanHealth
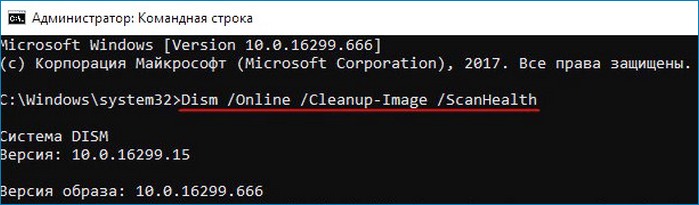
если она выдает сообщение о необходимости восстановление хранилища, выполняем в консоли такую команду:
Dism /Online /Cleanup-Image /RestoreHealth
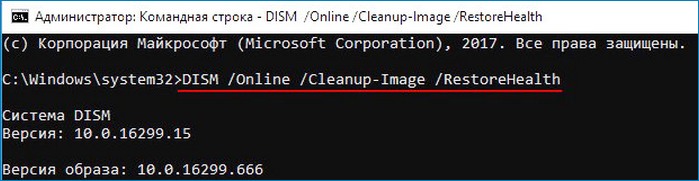
Компьютер при этом должен быть подключен к интернету, поскольку Windows может потребоваться подключиться к серверу Microsoft и скачать недостающие файлы. По завершении процедуры перезагружаемся. Теперь, когда хранилище восстановлено, sfc/scannow должна заработать как надо.
When something goes wrong with your computer and a Windows function fails, crashes or freezes, the most common recommendation is to run the SFC Scannow Command tool. Also known as the system file checker, this handy tool will scan your Windows system files to see if there is any corruption, damage, or inconsistencies. When these issues are found, the SFC will fix the files and typically solve your problem. Unfortunately, if the SFC isn’t working properly, you may get an error message when running it, stating that the “Windows resource protection could not perform the requested operation”. Let’s go over why this happens and how to fix this issue.

What Is The Cause Behind the Window Resource Protection SFC Scan Error?
While Microsoft hasn’t come out and directly stated what the cause is behind the “Windows resource protection could not perform the requested operation” SFC error, there are a few issues that could make it pop up.
- There is something preventing or conflicting with the SFC scan, and it cannot complete the check.
- There is a Windows server error.
- The SFC Scannow Command tool is malfunctioning.
Essentially, the requested operation (the scan) cannot be performed because something either went wrong with your SFC utility tool or there is an issue on the disk that is causing the scan to fail. Regardless of what causes the “Windows resource protection could not perform the requested operation” SFC error, there are a few ways you can fix it
If you have tried running your SFC scannow command tool numerous times and are getting the above error with an immediate failure to scan afterwards, then there are some solutions below you should try.
1. Run a CHKDSK of Your Hard Drive
The first thing you should do is check the condition of your hard drive disk with a CHKDSK scan of your hard drive. This is a necessary step, because if your disk is damaged or has corrupted system files on it, this could be what is causing the “Windows resource protection could not perform the requested operation” SFC error message. Here is how to run a CHKDSK on Windows 10.
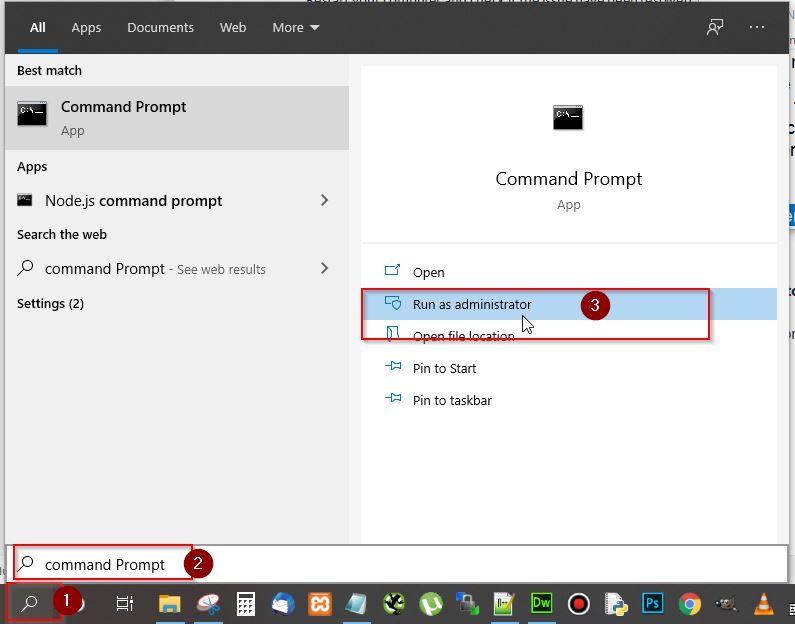
- In your computer’s search bar, type in Command Prompt.
- Right-click on the Command Prompt tool and run as an administrator.

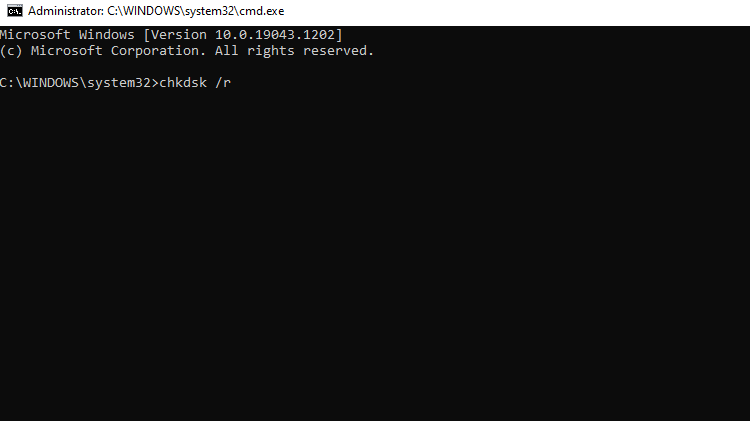
- In Command Prompt, type in “chkdsk C: /r”
Please note: replace “C” with the drive where your Windows system files are located. Permitting that the chkdsk is successful and either fixes any errors, your SFC scan should now work. Retry to confirm or move on to the next solution below. - Hit Enter.
- Press Y to confirm you want the chkdsk to run on restart.
- Restart your computer to allow chkdsk to run its scan.

2. Run Your SFC Scannow in Safe Mode
If for some reason the chkdsk run fails or cannot repair any damage or corruption present and you still get the “Windows resource protection could not perform the requested operation” SFC error, you can try running the SFC scan in Safe Mode.
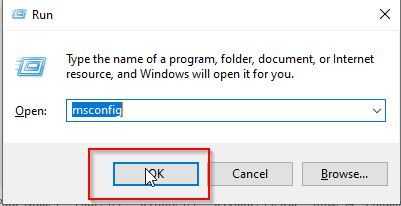
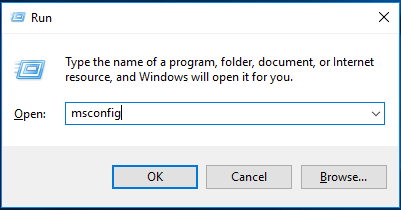
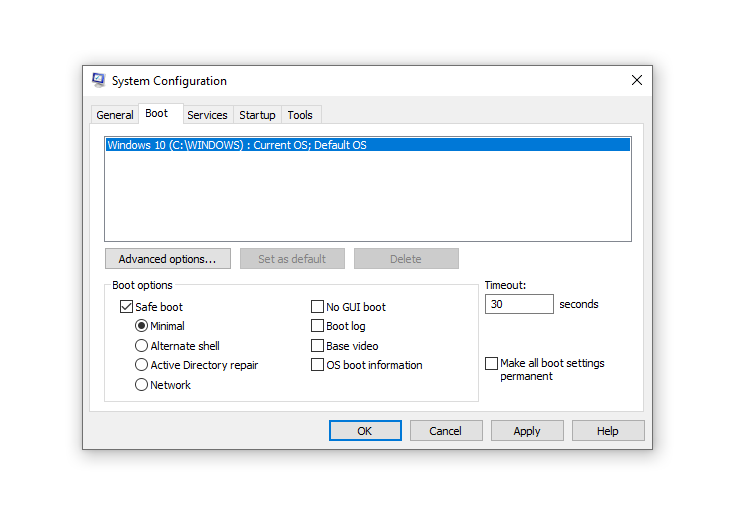
- In your computer’s search bar, type in msconfig. Hit enter on your keyboard and wait for the system configuration window to pop open.
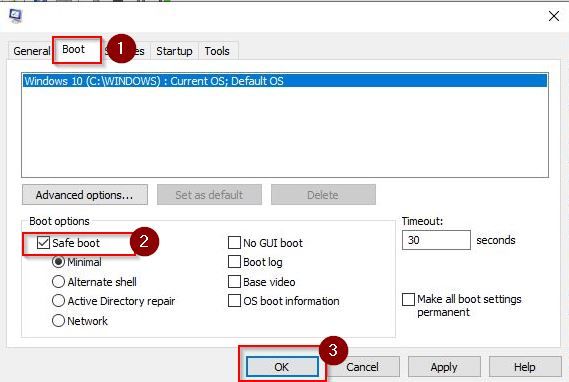
- Click onto the boot tab which is located beside the general tab at the top.
- Check the box for “safe boot” under the boot options.
- Make sure “minimal” is check marked and then hit okay, and apply.
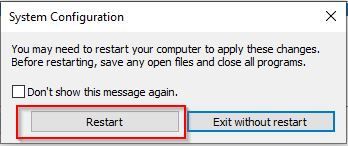
- Now restart your computer to reboot.

Now that you are in safe mode, run the SFC scan again. To do this, search for the Command Prompt tool, right-click to run as an administrator and open. Type in SFC /scannow [enter]. If the issue persists, move on to the next solution below.
3. Modify Security Descriptors in WinSXS Folder.
A lot of your Windows system updates and system files are stored in the WinSXS folder, and if your SFC utility tool cannot access this folder, it will fail and that is what prompts the error message. To get around this, you can modify the security descriptors of the folder.
- In your computer’s search bar, type in Command Prompt.
- Right-click on the Command Prompt tool and run as an administrator.
- In Command Prompt, type in ICACLS C:Windowswinsxs [enter].
- Reboot your computer for the change in description to take effect.
Now try running an SFC scan again.
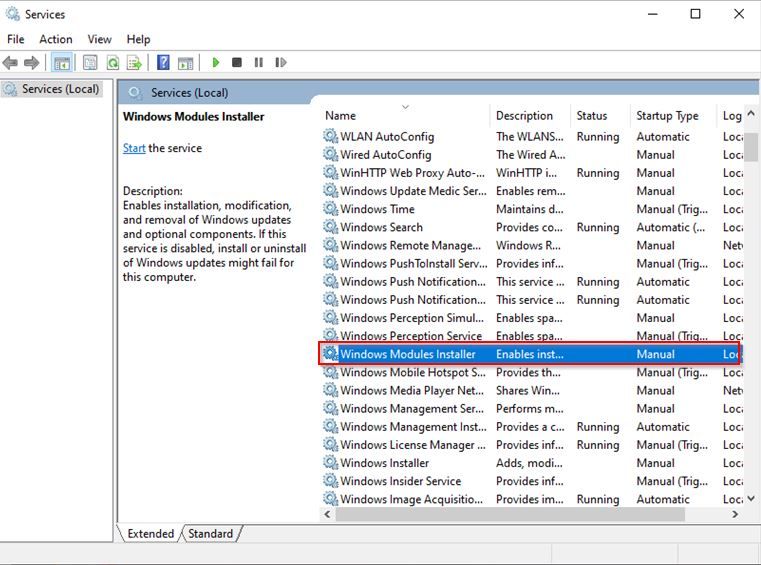
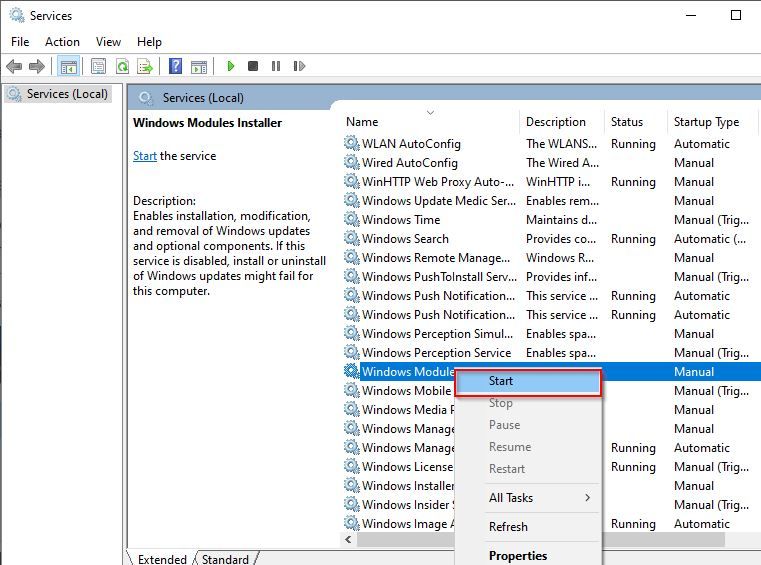
4. Enable Windows Module Installer.
If you have disabled the Windows Module Installer on your computer, SFC Scan is unlikely to work. This tool is what checks and installs all windows updates to your computer automatically. If you have it disabled, there might be bugs in your system which is causing the SFC scan to malfunction. Here is what to do.
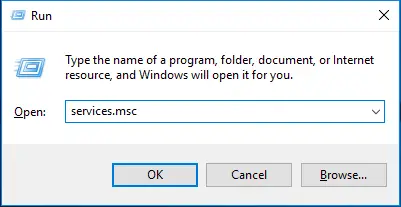
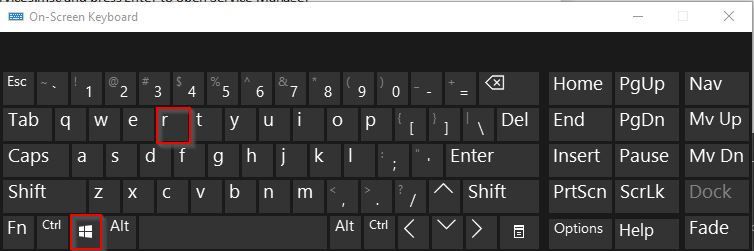
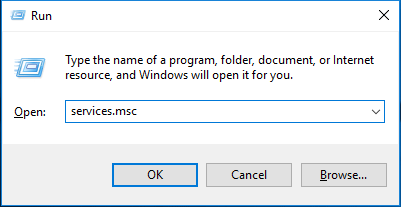
- Hit the Windows key on your keyboard + R to open the Run Dialogue box.
- Type in services.msc into the run dialogue box and hit okay.
- Find the Windows Module Installer in the list and right-click it.
- Choose to start it from the list.
Now try running the SFC Scannow Command tool and see if you get the same“Windows resource protection could not perform the requested operation” SFC error.
5. Run Recovery Commands.
If you are still getting the error at this point, and your current boot version of Windows is updated, you can boot into recovery mode and try to solve the issue this way by enabling the SFC scan utility via the command prompt. Here is how to do this.
- If your computer is on, restart it via the power options.
- When your computer begins its boot sequence, press F11 to enter recovery mode or use a bootable USB drive.
- Once you are in recovery mode, use the Command Prompt from the list of tools and hit run.
- Once Command Prompt is up and running, type in the following sfc/SCANNOW /OFFBOOTDIR=c: /OFFWINDIR=c:windows [enter].
Once the above command is entered and executed properly, exit recovery mode and boot like you normally would to your Windows desktop. Then open up Command Prompt from your computer’s search, run as an administrator, and run the SFC scan to see if the issue persists.
Still Not Working? Run An Automatic Repair or Complete a Fresh Install of Windows.
If you have gone through all of the above solutions and are still getting the “Windows resource protection could not perform the requested operation” SFC error, then it is recommended that you run an automatic repair. Here is how to run an automatic repair on Windows 10.
- You will need a Windows 10 bootable installation disk or create a Microsoft Media Creation Tool either on a blank disk or onto a blank USB flash drive.
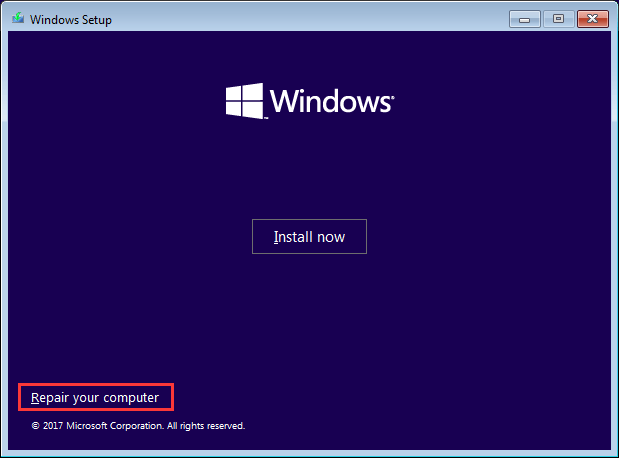
- Launch the media installation disk but instead of installing Windows, choose the “repair your computer” option which appears in the bottom left hand corner of the Windows Setup window.
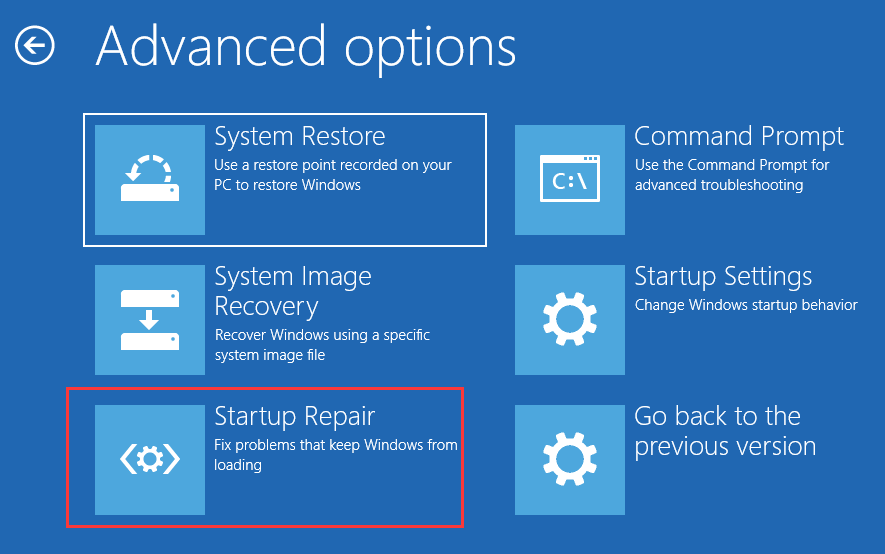
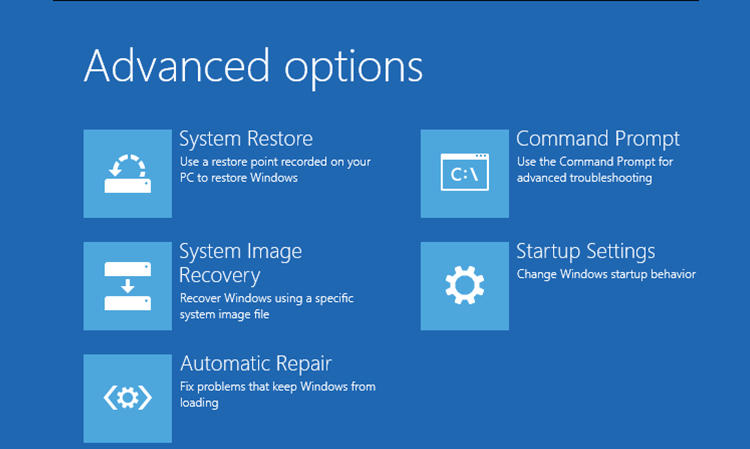
- Select the troubleshoot option and then choose advanced options.
- Run the startup repair from the advanced options screen and wait for the process to finish.

Once the repair is finished, restart your computer and check to see if the “Windows resource protection could not perform the requested operation” error is resolved.
Wrapping It Up
If running an automatic repair does not fix the issue and you cannot get any of the other above solutions to work, the last resort option is to do a fresh install of Windows. While this is a bit frustrating, it will get you back up and running without the error. If you have any questions about any of the methods discussed above, please let us know in the comments below!
Защита ресурсов Windows не может выполнить запрошенную операцию с SFC: причины и решения
Для нормальной работы операционной системы все файлы должны находиться в рабочем состоянии. Если системные файлы повреждены, то это не всегда означает полное прекращение работы Windows, часто проблемы ограничиваются периодическими сбоями. Ошибки могут происходить, как в самой операционной системе, так и в отдельных приложениях, к которым данные файлы относились. Чтобы решить проблему, пользователь может запустить встроенное средство восстановления системных файлов, которое проверит целостность файлов и заменит их, в случае такой необходимости. Но случается так, что при запуске проверки SFC появляется ошибка «Защита ресурсов Windows не может выполнить запрошенную операцию», что говорит о более серьезных проблемах.
Содержание
- Причины ошибки
- Как исправить ошибку?
- Метод 1: запускаемся в безопасном режиме
- Метод 2: проверяем наличие папок PendingDeletes и PendingRenames
- Метод 3: сканируем состояние файловой системы
- Метод 4: снимаем ограничение с папки WinSxS
- Метод 5: запускаем восстановление системных компонентов
Причины ошибки
Многие пользователи сразу же думают о том, что если даже SFC не работает, то это уже не исправить. В некоторых случаях эта проблема действительно возникает по причине сильного повреждения системных файлов, восстановление которых невозможно, необходимо производить переустановку ОС. Но в большинстве случаев, данная неисправность говорит о том, что при запуске инструмента возникает проблема, по которой он не может получить доступ к каталогу WinSxS, где располагаются критически важные системные файлы. В целом, можно выделить такие основные причины появления данной ошибки:
- повреждение файловой системы;
- наличие нечитаемых секторов на жестком диске;
- отсутствие прав администратора устройства;
- наличие вирусов в ОС.
Не стоит паниковать, проблему можно попытаться решить самостоятельно. Не нужно сразу спешить переустанавливать Windows или вызывать мастера.
Как исправить ошибку?
Есть несколько методов исправить данную ошибку, мы собрали их все. Нельзя точно сказать, какой метод поможет в определенном случае, у каждого пользователя свои причины появления проблемы, где-то поврежденные сектора на диске, где-то у пользователя нет прав администратора. Можно опробовать все способы и один из них скорее всего сработает.
Метод 1: запускаемся в безопасном режиме
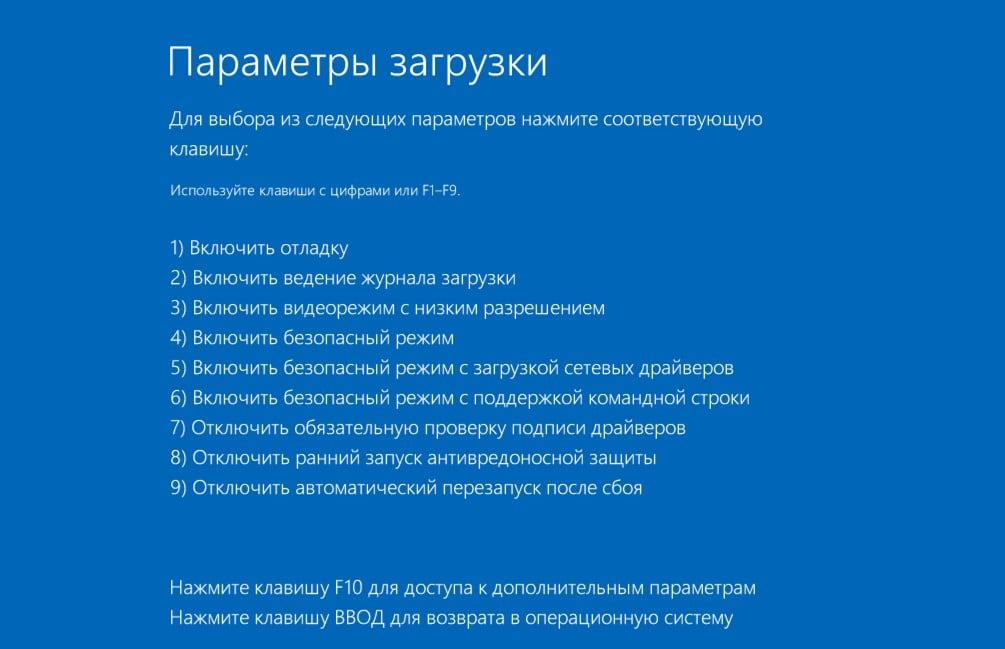
Изначально нужно попытаться запустить SFC в безопасном режиме. Если в системе есть вирусы, то они попросту могут блокировать доступ инструменту к системным папкам. В безопасном режиме все сторонние процессы будут отключены и можно будет выполнить проверку. Для того, чтобы загрузить свой компьютер в безопасном режиме, можно при загрузке нажимать клавишу F8, после этого выбрать способ запуска «Безопасный режим». Но есть и более простой способ, для него нужно выполнить следующие действия:
- Открыть диалоговое окно «Выполнить», нажав кнопки Win + R.
- После этого ввести команду «msconfig» и нажать кнопку Enter.
- В открывшемся окне перейти на вкладку «Загрузка».
- В параметрах загрузки установить галочку напротив «Безопасный режим».
- Перезагрузить компьютер.
После перезагрузки можно будет снова запустить инструмент по проверке файловой системы, все должно работать. Если этот способ не помог решить проблему, необходимо переходить к следующему.
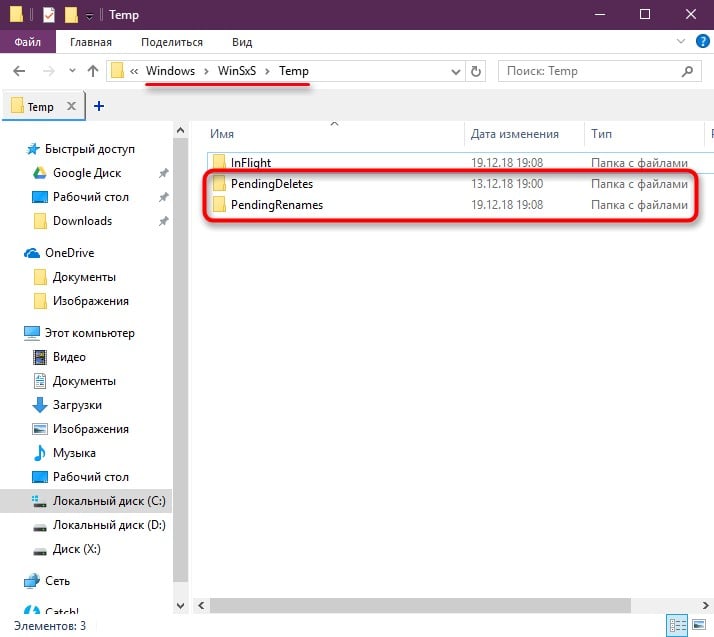
Метод 2: проверяем наличие папок PendingDeletes и PendingRenames
Следует убедиться в том, что папки PendingDeletes и PendingRenames есть в системе. Именно эти каталоги используются во время проверки, если они отсутствуют, то ошибка о невозможности выполнить запрошенную операцию будет вполне логичной. Инструмент для проверки системы обращается к папкам, но так как их нет, далее работать служба попросту не может, не удается записывать файлы логов, что делает сканирование бессмысленным. Папки должны находиться в системной директории %WinDir%WinSxSTemp. Необходимо зайти по этому пути и посмотреть, если ли там разделы с названием PendingDeletes и PendingRenames. Если их нет, можно создать вручную.
Метод 3: сканируем состояние файловой системы
В операционной системе Windows встроена утилита проверки целостности файлов. Утилита Chkdsk является очень полезным инструментом и дает возможность решить множество проблем. После ее запуска, служба начнет проверять целостность всей файловой системы, этот процесс отнимает довольно много времени, но позволяет восстановить нормальное состояние файловой системы. Если в ходе проверки будет обнаружена проблема, то о неисправных файлах будет выдано сообщение. Более того, утилита попытается самостоятельно восстановить этот системный файл, тем самым вернув нормальную работу ОС.
Как проанализировать системные файлы:
- Открыть диалоговое окно «Выполнить», нажав кнопки Win + R.
- После этого ввести команду «cmd» и нажать кнопку Enter.
- Откроется командная строка.
- В этой строке нужно указать команду chkdsk c: /f /r для проверки и восстановления файлов.
- Перезагрузить компьютер.
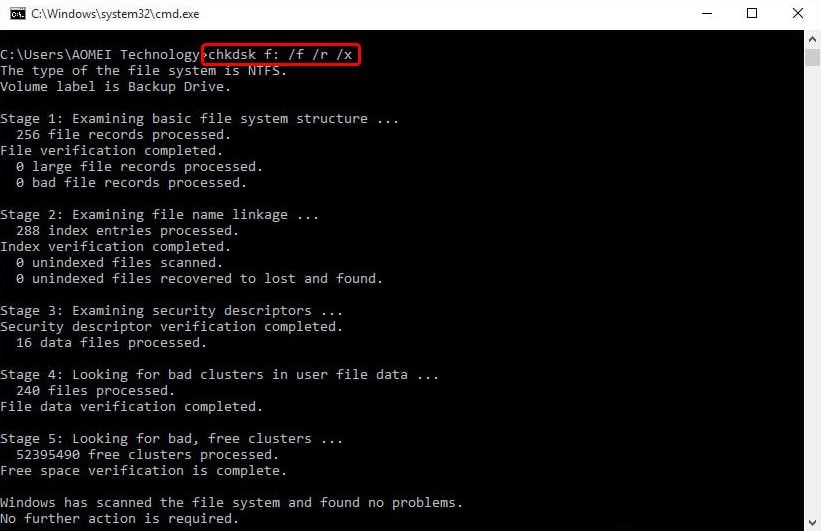
Процедура длительная, необходимо дождаться ее окончания. Запустится проверка после перезагрузки компьютера, так как при загруженной ОС некоторые системные файлы заняты теми или иными процессами, проверить их в этом случае будет невозможно. Можно также указать просто команду chkdsk c: /f, исключив /r, в этом случае утилита будет проверять систему и записывать ошибки, но не будет пытаться восстановить файлы.
Метод 4: снимаем ограничение с папки WinSxS
Если в каталоге WinSxS есть ограничения доступа, то SFC попросту не может получить доступ к файлам, которые необходимы для проверки, что и вызывает вышеупомянутую ошибку. В этом случае следует снять все ограничения с каталога WinSxS, чтобы восстановить нормальную работу службы проверки.
Как снять ограничения с WinSxS:
- Открыть диалоговое окно «Выполнить», нажав кнопки Win + R.
- После этого ввести команду «cmd» и нажать кнопку Enter.
- В командной строке ввести команду icacls c:/windows/winsxs и нажать Enter.
- Перезагрузить систему.
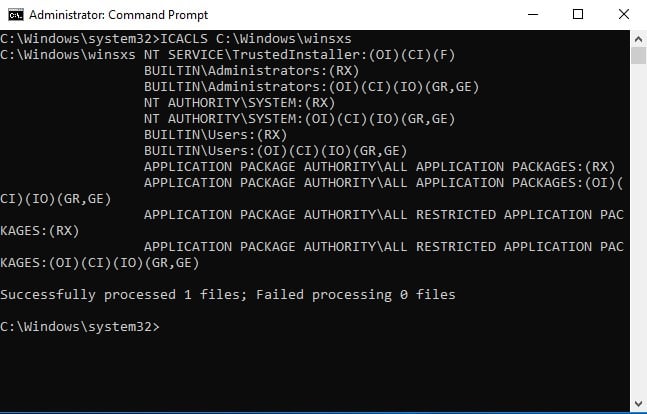
После этого с нужного каталога будут сняты все ограничения, защита ресурсов Windows должна получить доступ к файлам и выполнить все нужные проверки. Если и этот метод не помог в решении проблемы, то необходимо запустить восстановленный системный компонентов.
Метод 5: запускаем восстановление системных компонентов
Ошибка защиты ресурсов Windows может быть вызвана тем, что само хранилище системных компонентов было повреждено. Звучит все довольно страшно и серьезно, но восстановить его можно, даже неопытный пользователь во всем разберется. По сути, этим действием пользователь вернет в рабочее состояние все содержимое папки WinSxS, которая используется инструментом по защите ресурсов.
Для восстановление системных компонентов нужно выполнить следующее:
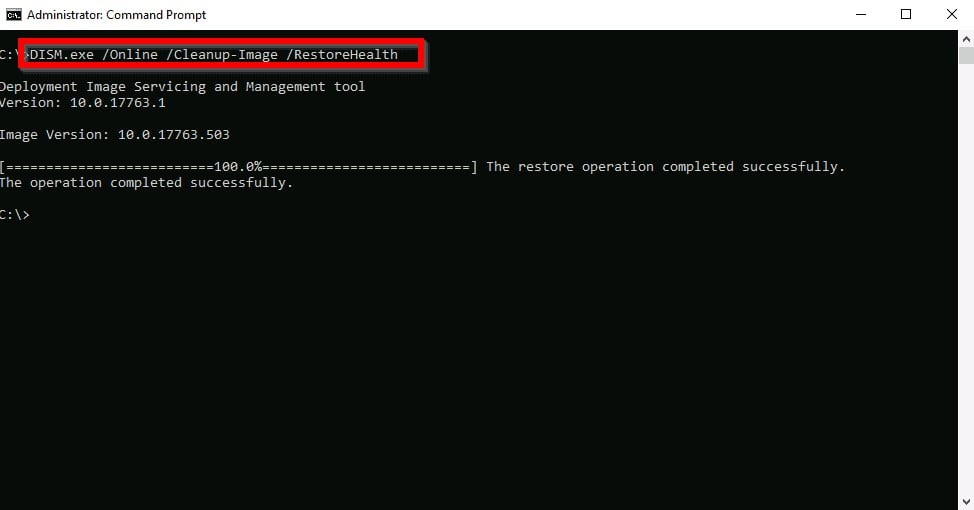
- Открыть командную строку.
- Ввести команду Dism /Online /Cleanup-Image /ScanHealth для проверки состояния системных компонентов.
- Если выполнение этой команды говорит о том, что нужно восстановить компоненты, то идем далее.
- Вводим команду Dism /Online /Cleanup-Image /RestoreHealth для восстановления, компьютер должен быть подключен к интернету, так как может идти загрузка файлов с сервера Microsoft.
После того, как выполнены все эти действия, ошибка «Защита ресурсов Windows не может выполнить запрошенную операцию» больше не будет появляться и SFC выполнит свою работу. Кому-то помог первый метод из данной инструкции, а кто-то дошел до последнего. В любом случае, пользователь самостоятельно может решить проблему, без переустановки самой операционной системы и потери личных файлов. По крайней мере в 96% случаев.
If you find your version of the Windows operating system not functioning properly, it may be due to corrupted files. The best way to fix this is by using the SFC to scan the OS and restore the files.
But what if SFC stops working suddenly while you were repairing the damaged files?
In this article, we will discuss all the possible solutions to get you out of such a situation. But first, let us understand what SFC is.
What is SFC?
SFC stands for System File Checker is an in-built tool present in all modern versions of Windows operating systems. This tool helps to check if the system files are corrupted and also repair registry data. SFC is integrated with Windows Resources Protection, and safeguards your important system files along with registry keys.
You can easily run the SFC using the command prompt. It is recommended to not close the command prompt until the scan is over.
But if SFC does not work and fails to run, it may show an error message like this –
Windows Resource Protection could not perform the requested operation
Other messages may notify you that “utility did not find integrity violations” or that SFC found corrupted files but could no repair them. You have to fix them yourself.
Let us now look at the solutions to this problem. In this article we will explains the following methods to resolve this error:
- Run SFC Scan in Safe Mode
- Run CHKDSK (Check Disk)
- Alter the Security Descriptions
- Enable Windows Module Service
- Scan Windows Installation for Error
- Run DISM Scan
- Repair Installation of Windows OS
- Reinstall the System
Solution 1: Run SFC Scan in Safe Mode
If the error message “Windows Resource Protection could not perform the requested operation” pops up while running SFC, you can try running it in Safe Mode. Here’s how you must go about it –
- Press Window + R to open the Run dialog box
- Next type msconfig in the run box and press Enter
- Now under the Boot tab select Safe boot and click OK
- Next, click on Restart to restart your system to make the changes applicable
Your system will now start in Safe Mode, therefore please check whether the Windows Resource Protection error is resolved.
There is yet another way to run SFC command in safe mode. The steps involved are –
- In Windows 10, click Restart. Then on the sign-in screen, click on Power> Restart while holding the Shift key. After the system restarts again, choose ‘Troubleshoot’ > ‘Advanced options’ > ‘Startup Settings’ > ‘Restart’
- Your system will restart yet again, and you will get options to boot it in Safe Mode
- Then open cmd with the option of Run as administrator
- Type sfc/ scannow and hit the Enter button to run SFC
Windows 7 users have to start their system and keep on hitting the F8 button before the Windows logo appears. Then choose Safe Mode under the Advanced Boot Options. The rest of the steps provided above can be followed to run SFC in Safe Mode.
Solution 2: Run CHKDSK (Check Disk)
At times, the data present in your hard drive might get corrupted, causing the SFC scan to crash and stop abruptly. You can run the chkdsk scan to solve this problem. This will fix system errors and ensure the data integrity of your hard disk.
To do this, follow the steps given below –
- Open the Windows Search Bar, type Command Prompt and click on Run As Administrator

- Type chkdsk /r command in the command prompt and press Enter
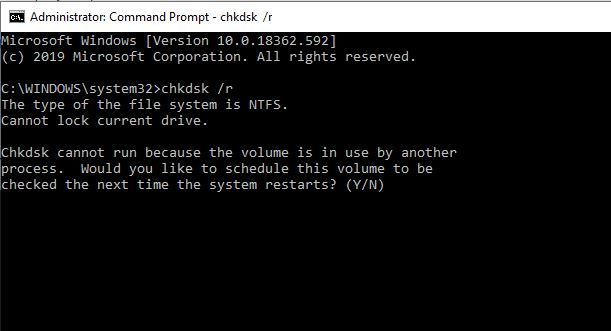
- You may receive a message that says ‘Chkdsk cannot run because the volume is in use by another process. Would you like to schedule this volume to be checked the next time the system restarts?’
- Just type Y and press Enter
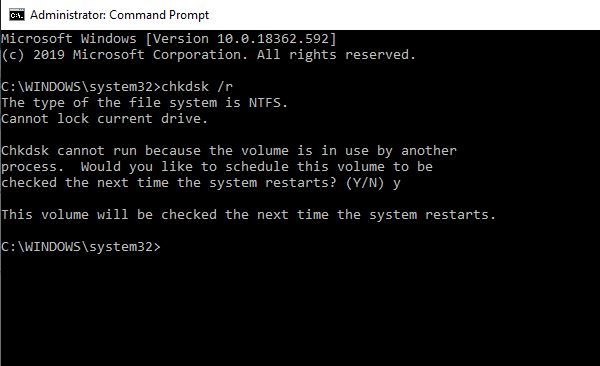
Now exit the command prompt and restart your computer. Wait until the chkdsk automatically detects and resolves any error in the hard disk. The process may take an hour depending upon the hard disk size.
After the process is over, you can run SFC again to check whether the error is resolved.
Solution 3: Alter the Security Descriptions
A security descriptor is a data structure that stores data about securable Windows objects. If the SFC command fails, it may be due to its lack of accessibility of the WinSxS folder. In that case, you have to change the security description of the folder manually.
Follow the steps given below –
- Open Window Search Bar, type Command Prompt and select Run As Administrator

- Next type ICACLS C:Windowswinsxscommand in the command prompt and press Enter
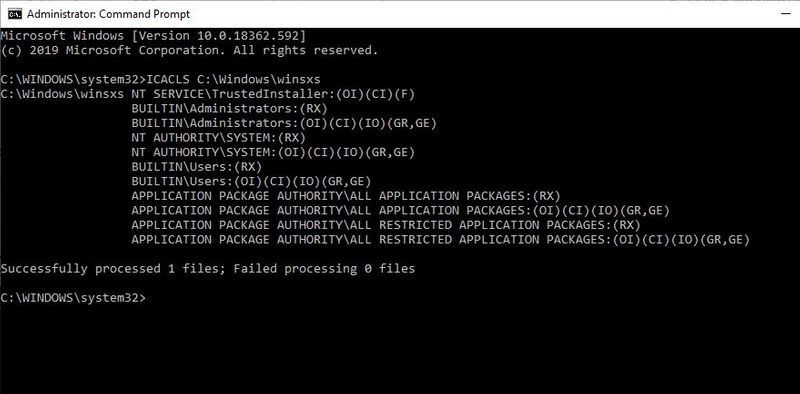
- Now exit the command prompt and restart your computer. Check if the issue has been resolved
Solution 4: Enable Windows Module Service
Windows Services are an important part of the Windows OS that helps in developing and managing crucial processes. They run in the background and start when the system is booted. They manage functions such as data backup, speaker sound, user credentials and also handle network connections.
While running the SFC, you may encounter the “Windows resource protection cannot perform the requested operation” error. This can happen when the Windows Module Installer service is disabled. You have to enable it manually in such a situation.
Please follow the steps below to do it –
- Open Window Search Bar, type Services and click on Open
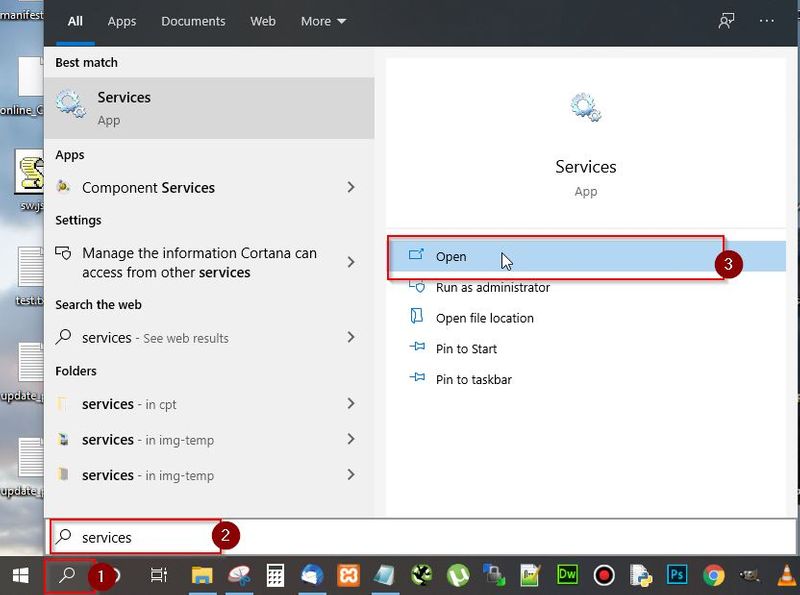
- Next in the Services window, scroll down and search for Window Modules Installer service
- Now right click on Window Modules Installer and select Start
- Next, reboot your system and check if the issue has been resolved
Another way to perform this is by using the command prompt –
- Open cmd and run it as administrator
- Type in the username and password if required
- Type sc config trustedinstaller start= autoand hit Enter
- Type net start trustedinstallerand hit Enter
After that try running the SFC scan.
Solution 5: Scan Windows Installation for Error
The SFC may be crashing due to problems in the currently booted version of Windows. So we will boot up the system into the recovery options. Then we will open cmd from there.
Please follow the steps below –
- Reboot your computer and go to recovery option
- Next open Command Prompt in recovery option
- Now type the following command and press enter
sfc /SCANNOW /OFFBOOTDIR=c: /OFFWINDIR=c:windowNow run the SFC scannow again to check whether it works.
Solution 6: Run DISM Scan
DISM stands for Deployment Image Servicing and Management that helps in creating, changing and repairing system images. You can use it to fix your system’s hidden recovery image. When SFC fails, DISM scan is the next best option to restore broken files. DISM has 3 options to fix a damaged system image:
- CheckHealth
- ScanHealth
- RestoreHealth
Please follow the steps below to run DSIM scan –
- Go to the Window Search Bar, type Command Prompt and click Run as Administrator
- In Command prompt, type «DISM /Online /Cleanup-Image /RestoreHealth» and press Enter

Exit command prompt and check if the “Windows Resource Protection could not perform the requested operation” has been solved.
Solution 7: Repair Installation of Windows OS
Another great way to fix the SFC issue is to perform a repair installation of Windows OS. This helps in fixing corrupted system files and components, without losing your programs and settings. This method repairs if something is wrong with your OS.
The process is very simple. Let us look at the steps involved –
- You will require a bootable version of Windows OS for this repair. You can get it by using the free Microsoft Media Creation Tool
- Download the ISO file from Google

- Launch the Media Creation Tool. You can mount it as a virtual drive or select the “Create installation media” to create an installation disc or a bootable pen drive
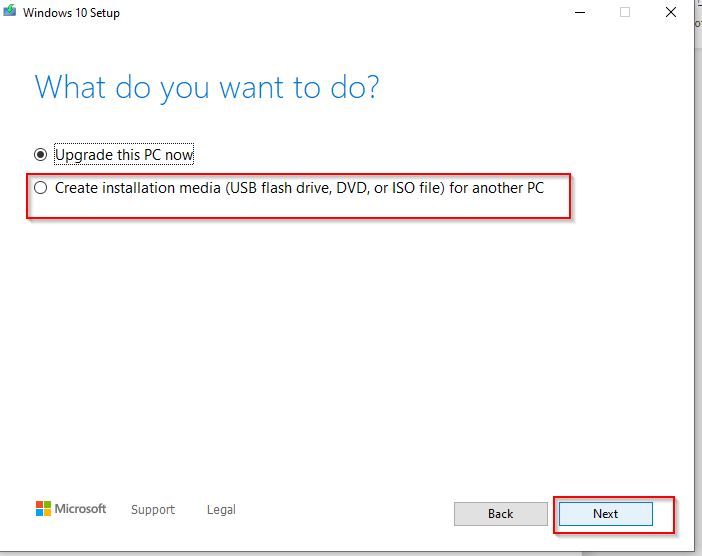
- After launching the setup, select Upgrade and click on Next
- Then click on Repair to continue
- Select Troubleshoot in the popup window. Then click on Advanced option
- Choose the Startup Repair option to initiate the process. This will take some time so be patient
- After completion of the process, run SFC to see whether it is working smoothly
Solution 8: Reinstall the System
If you followed the methods till now but all your efforts have gone in vain, you still have one card left to play. Yes, you guessed it right! It is the option of reinstalling the OS on your system.
But first backup all your data and files somewhere safe, such as an external hard drive. Then do the following –
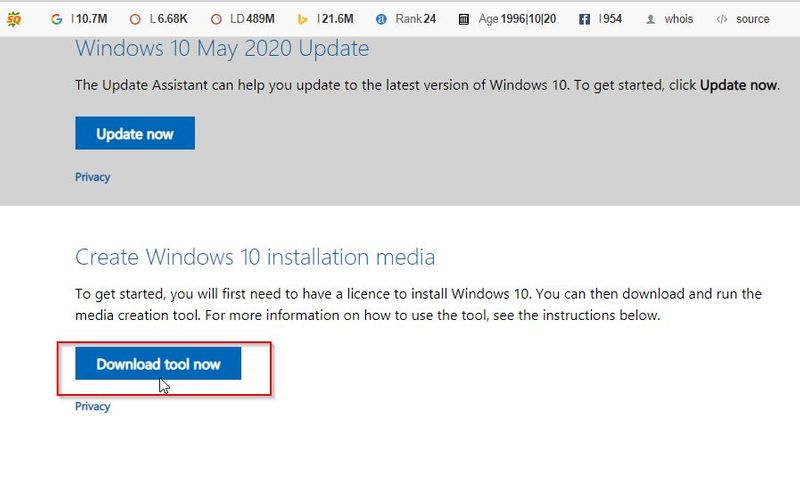
- Go to Google search bar and type Microsoft Media Creation Tool. Click on the relevant result

- Next, click on the Download tool now option.
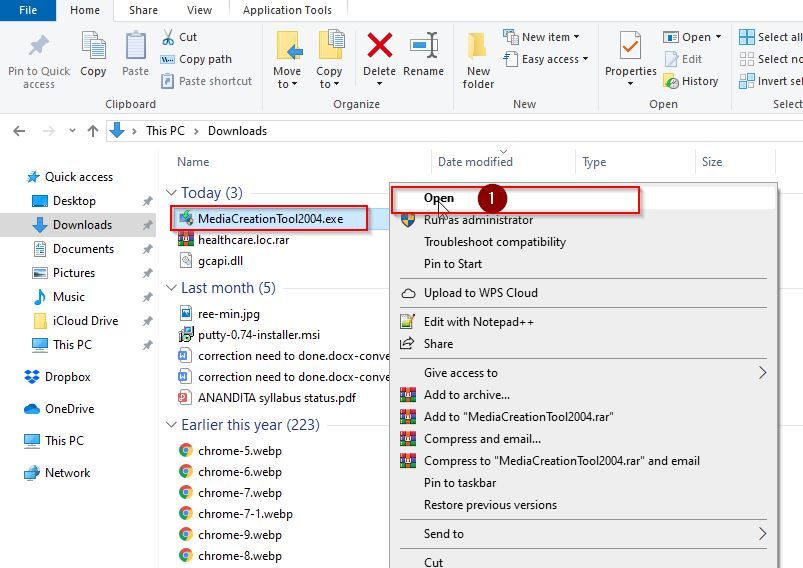
- Now, right-click on the downloaded file and select Open
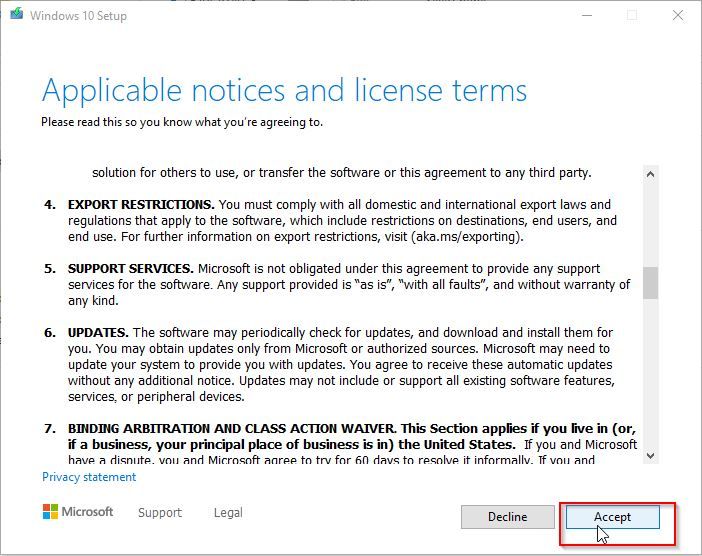
- Next click on Accept to accept the license term
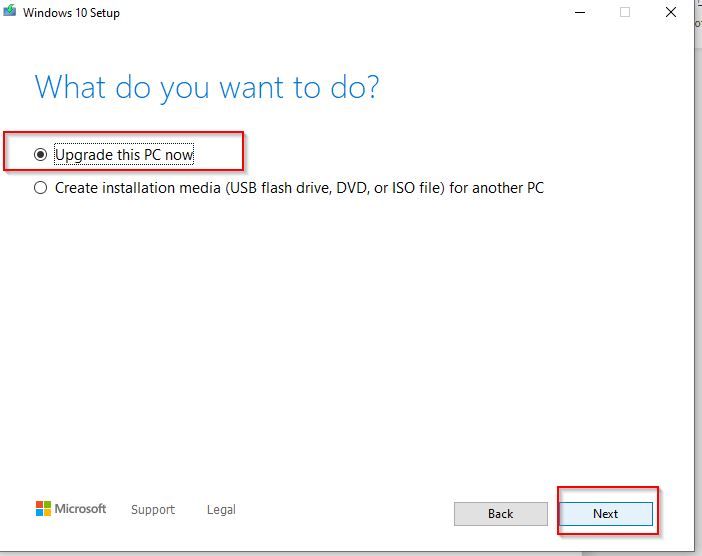
- Now select ‘Upgrade this PC now’ and then click next
- Now just follow the instructions prompted on the screen in order to complete the process
Conclusion
If you keep on trying all of the methods described above, the ‘Windows Resource Protection could not perform the requested operation’ error is bound to get out of way. But whatever you do, keeping a data backup and storing your important data securely is recommended. If you are still struggling with this issue, let us know in the comments section below.
The System File Checker is a user-friendly tool to check whether there is a corruption for system files. However, if it is not working, you may receive an error message Windows resource protection could not perform the requested operation. But this post will show how to solve the problem SFC scannow not working issue.
The Issue SFC Scannow Not Working
SFC is a very useful tool to check whether there is a corruption for system files. However, some uses complain that sometimes the System File Checker may fail to work. And they usually receive the following two error messages when SFC Scannow is not working.
- Windows resource protection could not perform the requested operation.
- Windows resource protection could not start the repair service.
Thus, do you know how to solve the issue SFC scannow? Just go on your reading, this post will show you how to solve the SFC error respectively.
Windows Resource Protection Could Not Perform the Requested Operation
One of the SFC error is the Windows resource protection could not perform the requested operation. You can see the error message in the following picture.

Thus, how can you solve the issue Windows resource protection could not perform the requested operations? You can read the following four methods.
Quick Video Guide:
Solution 1. Run SFC Scannow Command in Safe Mode
If you have encountered the issue Windows resource protection could not perform the requested operation, you can try to run SFC scannow command in safe mode to solve the problem. Here, we will show you how to solve the problem step by step.
Step 1: Press Windows key and R key together to launch Run box.
Step 2: Type msconfig in the box and hit Enter to continue.
Step 3: Then go to Boot tab, tick on Safe boot and click OK to continue.
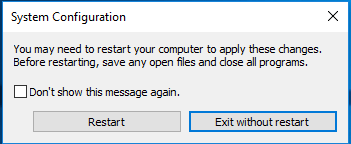
Step 4: Then restart your computer to apply this change. Click Restart to continue.
Then your computer will boot in safe mode and you can input SFC scannow command again to check whether the issue Windows resource protection could not perform the requested operation is solved.
Solution 2. Run Check Disk
If there are some errors on your hard disk, the SFC scannow not working issue can also occur. So in this situation, you can try to check the disk and try to solve the problem Windows resource protection could not perform the requested operation. And we will introduce how to check disk step by step.
Step 1: Type cmd in the search box of Windows 10 and right-click the Command Prompt to choose Run as administrator.
Step 2: Type chkdsk /r command in the popup command window and hit Enter to continue.
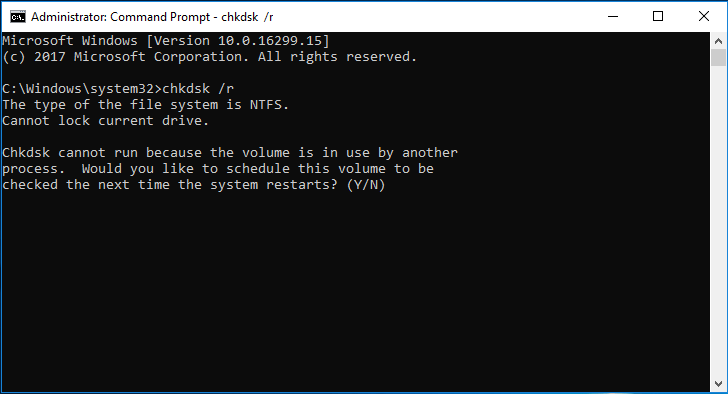
Step 3: Then you will receive a message that shows ‘Chkdsk cannot run because the volume is in use by another process. Would you like to schedule this volume to be checked the next time the system restarts?’. Thus, you need to type Y to continue.
Step 4: After that, close the command window and restart your computer. Then it will start to check the disk and fix the detected error automatically.
When the process of checking disk is finished, you can run SFC scannow again to check whether the issue Windows resource protection could not perform the requested operation is solved.
Solution3. Change Security Descriptors
A security descriptor contains the security information associated with a securable object. If SFC scan fails to access winsxs folder, the issue SFC scannow not working issue may also occur.
So in order to solve the issue SFC Windows resource protection could not perform the requested operation, you can try to change the security descriptors to solve SFC error. Here, we will show how to change security descriptors in detail.
Step 1: Type cmd in the search box of Windows 10 and right-click Command Prompt to choose Run as administrator.
Step 2: In the command window, type the ICACLS C:Windowswinsxs command and hit Enter to continue.
After that, you need to close the command window and restart your computer to check whether the issue SFC Windows resource protection could not perform the requested operations is solved.
Solution 4. Run Automatic Repair
If the above solutions are not working, you can try to go on this method to solve the issue Windows resource protection could not perform the requested operation. You can run Automatic Repair to solve SFC scannow not working problem. And we will show you how to run Automatic Repair step by step.
Step 1: Insert the Windows 10 bootable installation to your computer and boot your computer from it. If you don’t have the Windows 10 installation disc, you can click here to download the Microsoft Media Creation Tool and launch it to create an installation disc.
Step 2: Then you will enter the welcome interface and click Next to continue.
Step 3: Then click Repair your computer in the bottom-left corner to continue.
Step 3: You need to choose Troubleshoot in the popup window to continue.
Step 4: Click Advanced options to go to the next page.
Step 5: Choose the Startup Repair in the Advanced options screen and wait for the process to be completed.
Now, when the process is finished, you can restart your computer to check whether the Windows resource protection could not perform the requested operation is solved.
I have successfully solved the issue Windows resource protection could not perform the requested operation. Have a try now!Click to Tweet
Windows Resource Protection Could Not Start the Repair Service
As we have mentioned in the above part, this post focuses on two cases of SFC scannow not working issue. And the issue Windows resource protection could not perform the requested operation has been talked in the above paragraphs.
Now, we will talk about another issue Windows Resource Protection could not start the repair service.
When you are running SFC scannow command, you may receive the following error message which shows that Windows resource protection could not start the repair service.
This SFC error may occur when Windows Modules Installer services are disabled. Windows Modules Installer services have full access to Windows Resource Protection files and registry keys. If you want to use SFC scannow command to restore missing or corrupted WRP resources, Windows Modules Installer services need to be running.
Thus, if you receive the SFC error message Windows resource protection could not start the service, we can enable Windows Modules Installer to fix the problem. Now, we will show how to enable Windows Modules Installer step by step.
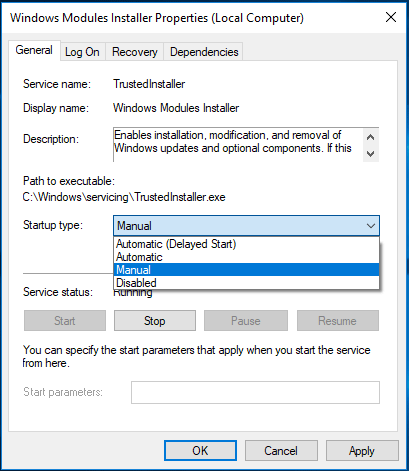
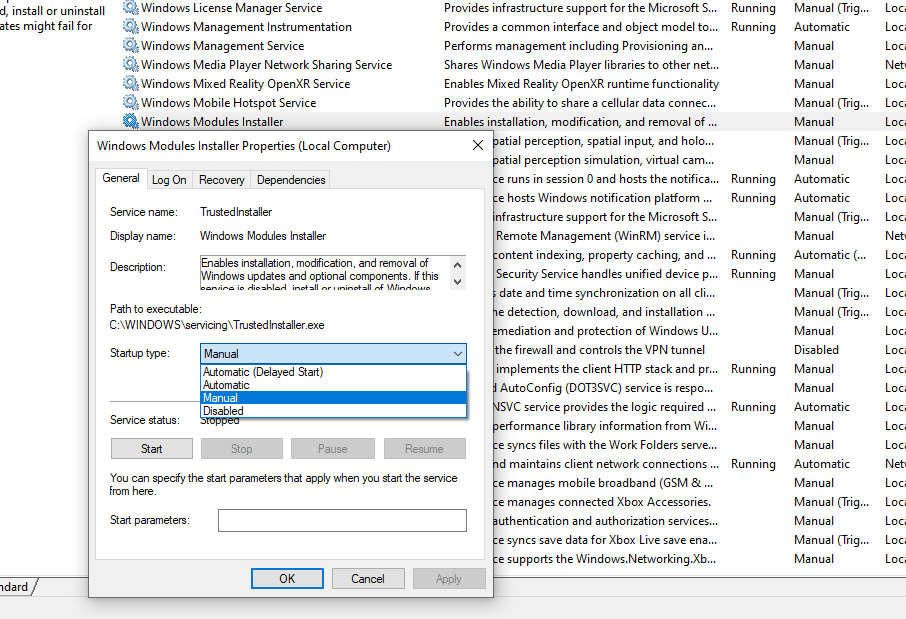
Step 1: Press Windows and R keys together to launch Run dialog, and input services.msc in the box, then click OK to continue.
Step 2: In the popup window, select the Windows Modules Installer and double-click it.
Step 3: You will see Windows Modules Installer Properties window, set Startup type as Manual, then click Apply and OK to confirm this change.
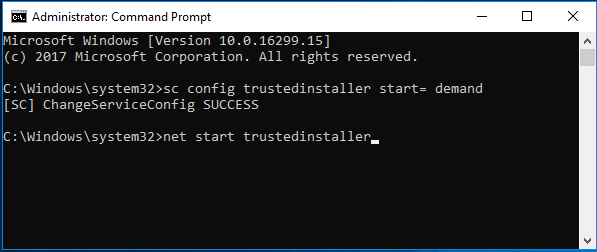
Step 4: Close the services window. Then type cmd in the search box of Windows 10 and right-click Command Prompt to choose Run as administrator.
Step 5: Type the following commands in the command window and hit Enter to continue after each command.
sc config trustedinstaller start= demand
net start trustedinstaller
When you have finished the above process, you can restart your computer and input the SFC scannow command to check whether the issue Windows resource protection could not start the repair services is solved.
Top Recommendation
Although SFC scannow command can scan for corruptions in Windows system files and restore corrupted files, things will become worse when SFC scannow is not working, in particular when the computer is corrupted and SFC scannow not working.
Therefore, we strongly suggest that you create a Windows image when your computer can work normally since not only you can use the backup image to perform some recovery actions especially when some accidents occur, but also can protect your data.
For instance, when your Windows 10 is corrupted or you don’t like the current Windows version, you can use the backup image to restore to an earlier date.
Thus, to create a backup image, many computer users choose the professional Window 10 backup software – MiniTool ShadowMaker. This free software can handle lots of backup matters with its various powerful features, such as system backup, files and folders backup, disk backup and so on.
The automatic backup software – MiniTool ShadowMaker can protect your computer well and can provide disaster recovery solutions when some accidents happen.
Therefore, in order to create a system image, you can get the MiniTool ShadowMaker from the following button which can be freely used within 30 days.
Free Download
After installing the free backup software, we will show you how to create a system image step by step with pictures.
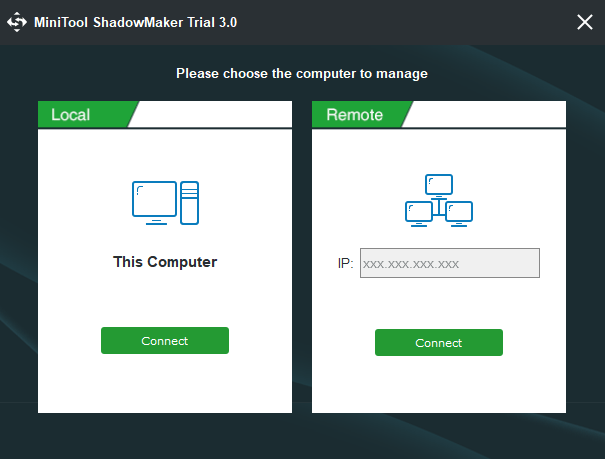
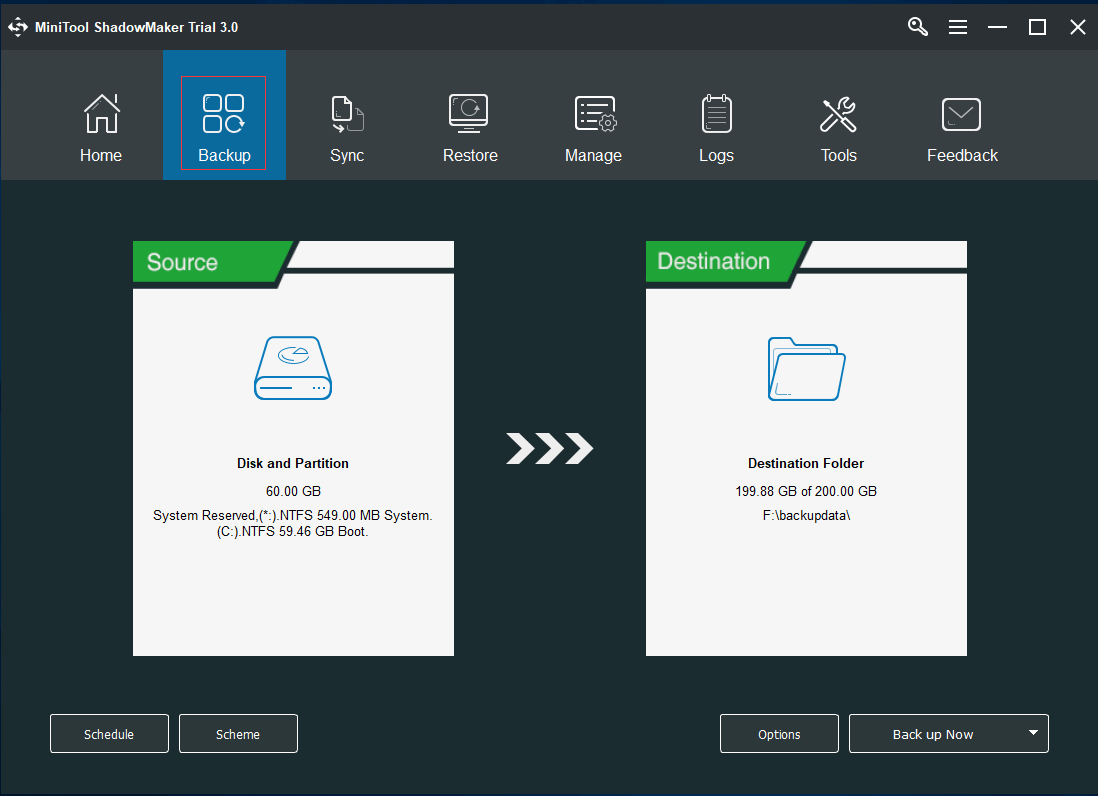
Step 1: Launch the software and click Keep Trial to continue. Then click Connect in This Computer to enter its main interface.
Step 2: Then, MiniTool ShadowMaker will remind you to back up if you haven’t performed any backup action with this backup tool. You just need to click SET UP BACKUP to continue. MiniTool ShadowMaker is set to back up the operating system by default.
Of course, you can also go to the Backup tab to select the Source tab and Destination tab to choose what you want to back up and where you want to save the backup image. In addition, it is recommended to choose an external hard drive as the destination path.
Step 3: Now, you can click Back up Now to perform backup action immediately. Of course, you can also click Back up Later to delay the backup process.
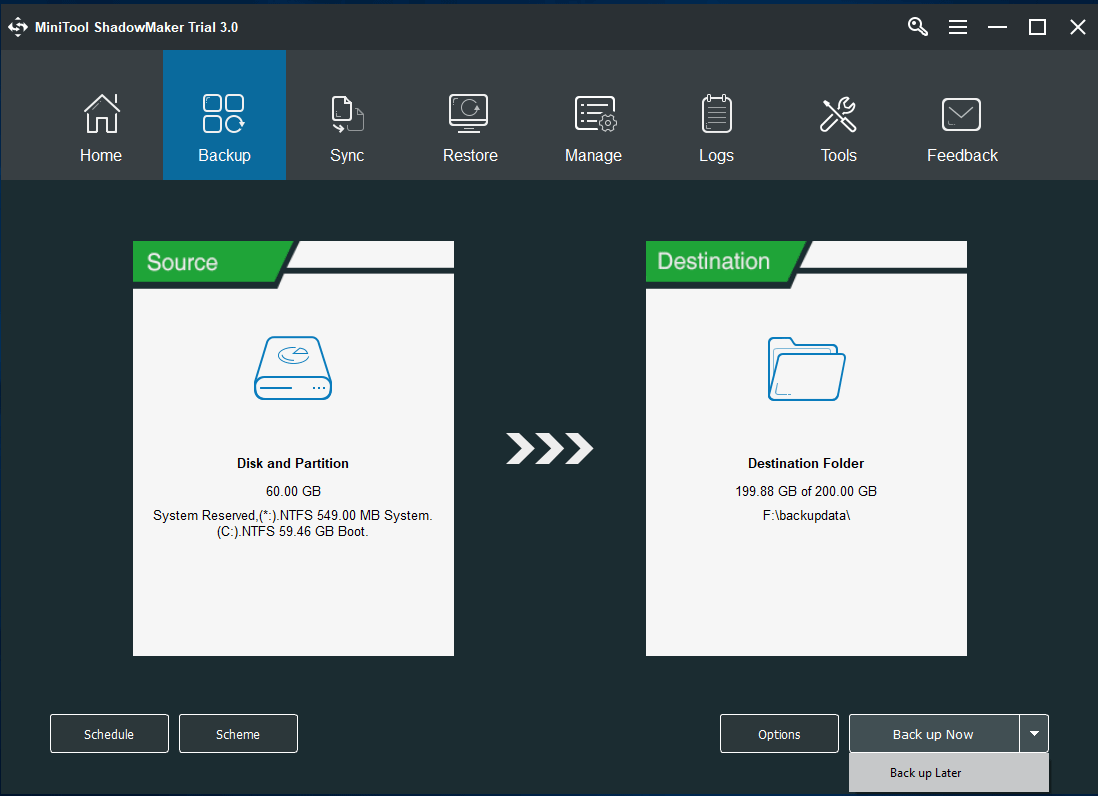
Note: In the bottom, you can see three options. The Schedule Setting helps you to set the backup matters on a regular basis such as daily/weekly/monthly so as to protect your PC and data well. Scheme which includes Full Scheme, Incremental Scheme, and Differential Scheme can help you to delete former backup versions so as to manage disk space. The Options can assist you in setting some advanced backup parameters.
Step 4: After successfully creating the backup image, you had better go to the Tools tab to create a bootable media which can be used to help you to restore to an earlier date or do some other recovery actions with the backup image at any time you want.
MiniTool ShadowMaker is a fantastic tool that can easily create a backup image within a few steps. With this backup software, you can protect your PC and important data and files well.Click to Tweet
Bottom Line
In conclusion, this article focuses on two cases of SFC scannow not working issue, which respectively are Windows resource protection could not perform the requested operation and Windows resource protection could not start the repair service.
Aiming at those two different situations, we also list different solutions to solve the SFC error. Now, it is your turn to have a try.
In addition, if you have any better solution to the SFC scannow not working issue, you can share it on the comment zone. Or if you have any problem with MiniTool ShadowMaker, you can feel free to contact us via the email [email protected].
Windows Resource Protection Could Not Perform the Requested Operation FAQ
How do I fix Windows Resource Protection could not perform the requested operation?
- Run SFC Scannow command in Safe Mode.
- Run check disk command.
- Change security descriptor.
- Run automatic repair.
How do I fix SFC Scannow?
- Scan the hard drive for errors.
- Enable the hidden Administrator Account.
- Set the computer to reboot in safe mode.
- Login as the Administrator User.
- Open an Administrative Command Prompt.
- Ensure that PendingDeletes and PendingRenames Folders exist.
- Run the SFC Scannow command in safe mode.
How do I start Windows Resource Protection?
- Open Command Prompt as administrator.
- Type the command sfc /scannow and hit Enter to continue.
- Then wait for the process to be finished.
How do I repair a file?
- Check hard drive.
- Run chkdsk command.
- Run sfc /scannow command.
- Change the file format.
- Use file repair software.
Over the past few weeks I have experienced several interesting problems between my two computers. Of particular note was an issue I discovered when the Event Viewer on my Windows 7 Ultimate 32-bit machine failed. After some troubleshooting I decided to attempt
SFC /scannow. I got the error message «Windows Resource Protection could not perform the requested operation.» This worried me. So I attempted to boot into WinRE from my Win 7 installation disk. The result in WinRE was the same. No good.
I scrounged forum after forum looking for an answer, but nothing worked. It seemed like everyone just gave up and reinstalled their OS, but I would not do that. So I kept exploring. CBS.log showed nothing of interest as sfc never made it past «Beginning
verification phase of system scan.»
Finally I found this article:
http://www.updatexp.com/scannow-sfc.html which, while interesting and comprehensive, did not directly solve my issue. It did, however, point me to the registry key:
HKEY_LOCAL_MACHINESOFTWAREMicrosoftWindowsCurrentVersionSetupSourcePath
This registry entry does not appear to exist in Win 7, but another entry in it’s vicinity caught my attention:
HKEY_LOCAL_MACHINESOFTWAREMicrosoftWindowsCurrentVersionProgramFilesDir
I had recently moved my program files dir to a different hard drive and placed a junction point in it’s place. In the process I had altered HKEY_LOCAL_MACHINESOFTWAREMicrosoftWindowsCurrentVersionProgramFilesDir to point to «D:Program Files», then
back to «C:Program Files» when the junction point was in place.
«C:Program Files» is incorrect!
the trailing backslash is incorrect, and must be removed!
with the ProgramFilesDir value set to «C:Program Files» I ran sfc /scannow and it scanned properly, finding several corrupt files (some of which required checking cbs.log to repair).
I can imagine that some virus maker somewhere will use this to break SFC in the future, but here’s your solution!
So to review: HKEY_LOCAL_MACHINESOFTWAREMicrosoftWindowsCurrentVersionProgramFilesDir cannot have a trailing backslash!
Tell your friends! 
Cheers,
Crosmanrond
Are you wondering how to fix ‘Windows Resource Protection Could Not Perform The Requested Operation ’ error message in command prompt?

Everybody who uses a PC and experiences a function fail on Windows that causes a freeze or crash knows how annoying it can be.
If this happens, the usual recommendation is to run the system file checker.
This is also known as the SFC Scannow Command tool and it will scan your system files in Windows, looking for inconsistences, corruption or damage.
If such issues are found, the tool then fixes the files and usually that’s the end of the problem.
However, if the SFC is not working correctly, you might get this error message: ‘The Windows resource protection could not perform the requested operation’.

What Causes “SFC/Scannow” Error?
There are several reasons why this might be happening, although Microsoft haven’t come forward with a fix. One of these could be the culprit:
- A Windows server error
- A malfunctioning SFC Scannow Command tool
- Something conflicting with or preventing the SFC scan, not letting it complete the check
Basically, the scan can’t be performed because of a disk issue causing it to fail or a problem with the SFC utility tool. There are multiple solutions to try if you are facing this error on your PC.
5 Possible Solutions To Fix The Sfc Scannow Error Message
If you have tried to run the SFC Scannow several times and it still won’t work, there are some solutions you can try to see if they help:
Fix #1: Run A Chkdsk Of The Hard Drive
This is the first thing to try. A CHKDSK scan will look at your hard drive and check for issues. Your disk might be corrupted or damaged, so this is an important thing to do.
This is how to run a CHKDSK scan:
- Type ‘Command Prompt’ in the search bar.
- Right-click the Command Prompt tool.
- Select “Run Command Prompt as an Administrator“.
- Type in “chkdsk c:/r” and press “Enter + Y” to confirm (note: replace c with whichever drive contains your Windows system files).
- Restart the PC and let CHKDSK run the scan.
- Retry the SFC scan to see whether it works now.
Fix #2: Run The Sfc Scannow Tool Using Safe Mode
If the first fix didn’t work or you are still seeing the error ‘Windows resource protection could not perform the requested operation’ you can try this fix next.
- Type “msconfig” in the search bar and press Enter.
- Click the boot tab (at the top next to the general tab).
- Check the ‘safe boot’ box under “Options“.
- Check ‘minimal’ and press OK and restart the PC.
After restarting PC do following:
- Search for the Command Prompt tool.
- Right-click to run it as administrator and open the tool.
- Type in “SFC/scannow” and press Enter.
Hopefully it will work now, else move on to fix #3.
Fix #3: Modify The Security Descriptions In The Winsxs Folder
Many Windows system files and updates are kept in the WinSXS folder.
If your SFC utility tool is unable to access this location, it is going to fail and then you will see the error message.
One way to fix this is to change the folder’s security descriptors:
- Run Command Prompt as administrator
- Now type in “ICACLS C:Windowswinsxs” and press Enter.
- Restart the PC and try to run the SFC scan again.
Fix #4: Enable The Windows Module Installer
SFC Scan probably won’t work if you have the Windows Module Installer disabled on your PC.
This tool is responsible for automatically checking and installing all Windows updates.
Disabling the Windows Module Installer might result in system bugs causing a malfunction of the SFC scan. Here is possible fix for this scenario:
- Open the “Run Dialog Box” by pressing the “Windows key + R” together.
- Type “services.msc” and press OK.
- Locate the “Windows Modular Installer” and right-click on it.
- Select “Start“.
- Try the SFC scan again.
Fix #5: Run Recovery Commands
If you are still seeing the ‘Windows resource protection could not perform the requested operation’ error message on the screen, and you have updated the current boot version of Windows, you can try this fix.
You will boot into recovery mode then enable the SFC scan utility via the command prompt:
Note: If the PC is powered on, restart it.
- Press F11 when the PC starts to boot up, to enter recovery mode (alternatively you can use a bootable USB drive).
- Once in recover mode, select the “Command Prompt” and click on “Run“.
- Type into Command Prompt following:
sfc/SCANNOW /OFFBOOTDIR=c: /OFFWINDIR=c:windows- Wait for the scan to execute then exit recovery mode.
- Boot in like you usually would to the Windows desktop and open Command Prompt.
- Run the SFC scan as an Administrator.
Still Not Working? Then Try This
If none of the above fixes have worked and you still see the ‘Windows resource protection could not perform the requested operation’ error, then you can run an automatic repair.
If that isn’t successful you might have to do a fresh Windows installation. This is how to run an automatic Windows repair:
- You can either use a Windows 10 bootable installation disk or make a Microsoft Media Creation Tool on a blank USB drive or blank disk.
- Launch the installation disk.
- Select ‘repair your PC’ instead of choosing to install Windows(this is in the bottom left hand corner of the setup window)
- Click on the “Troubleshooting” option and then on “Advanced Options“.
- On the Advanced Options screen click on “Run Startup Repair” and wait for it to finish.
- Restart the PC to see if the error is gone.
In Conclusion
Hopefully one of these solutions can solve the ‘Windows resource protection could not perform the requested operation’ error.
If nothing has worked though, you will need to do a fresh Windows installation.
This can be frustrating and time-consuming but it pretty much guarantees the error will be resolved.
System File Checker (SFC) is one of the most commonly used diagnostic tools on Windows. The tool is a common sight on many tutorials because it lets you fix any system integrity violations with a single command. However, on a bad day, the sfc /scannow command may throw you an error that reads «Windows Resource Protection could not perform the requested operation.»
This anomalistic error has everybody scratching their heads. How do you run diagnostics on a diagnostic tool? Let’s find out.
What Is Windows Resource Protection?
Windows Resource Protection (WRP) is a Windows resource that protects essential system files and folders and registry keys from being replaced. It protects these components to avoid application and OS failures.
Basically, if WRP can’t perform an operation, it’s because it thinks executing the function may make changes that could harm your system. This may or may not be true though. If you’re confident that what you’re doing isn’t going to harm your system (SFC is of course, harmless), go right ahead.
How to Fix the «Windows Resource Protection Could Not Perform the Requested Operation» Error
Fortunately, there are a couple of easy ways to put your quandary to rest. Before we look at the fixes, let’s look at what’s causing the problem:
- The problem is caused by a Windows server that contains an error.
- The SFC /scannow command has malfunctioned.
- The SFC scan is encountering a conflict from some other system component.
As such, we’ll be troubleshooting and fixing each of these individual points. Once done, you’ll hopefully have gotten rid of the error.
1. Use the CHKDSK Tool
What’s a better way to fix a diagnostic tool than with another diagnostic tool? The CHKDSK tool will help you check your HDD’s condition. If the tool finds any errors on the disk, you know what’s causing the problem with the SFC scan.
Press Win + R, type cmd, and press Ctrl + Shift + Enter to launch an elevated Command Prompt. Execute the following command:
chkdsk /r
You’ll likely see a message that says you need to schedule disk checking since the volume is in use by another process. Press Y to schedule disk checking when you next restart the computer.
Restart the computer and the CHKDSK tool will now fix any disk error your system may have. Once it’s complete, try running the sfc /scannow command again.
2. Use the SFC Tool in Safe Mode
If the previous method didn’t work for you, maybe a system component is conflicting with the SFC tool. First, try running the sfc /scannow command in Safe Mode to see if that resolves the issue.
Press Win + R, type msconfig, and press Enter. This should launch the System Configuration window. Switch to the Boot tab and look for Boot options at the bottom left of the window.
Check the box besides Safe boot and select the radio button next to Minimal. Press OK and reboot your PC.
This should help you boot into Sade Mode with only the essential processes running. Try executing the sfc /scannow command now and see if it works.
3. Use the SFC Tool in Windows RE
If for some reason you don’t want to boot into the Safe Mode, you can also use Windows Recovery Environment to run the SFC tool without any conflicting elements running.
To enter Windows RE, you’ll need to go to the Settings app. Press Win + I and navigate to Update Recovery. On the right pane, click on the Restart Now button under the Advanced startup. The computer will then restart and enter Windows RE.
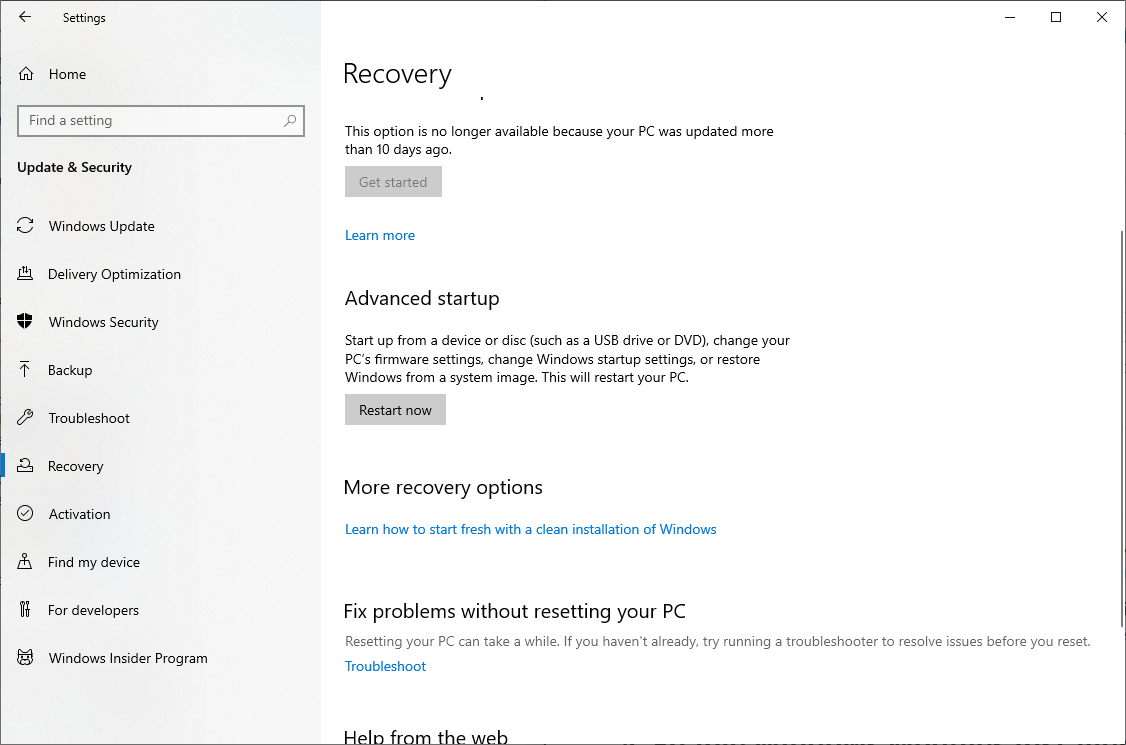
Once you’re in Windows RE, navigate to Troubleshoot > Advanced Options > Command Prompt. Run the SFC command now and see if the command executes successfully.
4. Enable the Windows Modules Installer
The TrustedInstaller service must be running on your system for it to be able to restore missing or corrupted WRP resources since it has full access to WRP files and registry keys. When you run the SFC tool, it triggers the service. However, if you’ve disabled the service, you might run into the aforementioned error.
To check if Windows Modules Installer is disabled, you’ll need to pay a visit to the Services console.
Press Win + R, type services.msc, and press Enter to launch the Services console. Look for Windows Modules Installer and double-click on it to open the service’s properties.
Check the service’s Startup type. If it’s disabled, change it to manual, and press OK.
Try running the sfc /scannow command now to see if the problem persists.
5. Perform an Automatic Repair
At this point, you may want to consider performing an automatic repair to perform a comprehensive check on anything that’s not quite working as it should on your system. Automatic repair doesn’t delete any files or revert any settings to default, so if it doesn’t find anything that needs fixing, it will leave your system just as it was before the scan.
If it finds something that needs fixing, it will either automatically repair it or let you know that it couldn’t fix the problem. Either way, this is certainly worth a shot if none of the previous options worked.
To perform an automatic repair, boot in Windows Recovery Environment (as illustrated in the third fix) and navigate to Troubleshoot > Advanced options > Automatic Repair.
Once the process starts, let it run.
If the Automatic Repair fixes the problem, try running the SFC command after a reboot. However, if no problems were found or if Windows RE couldn’t fix the problem, you may want to consider the last resort.
6. Reinstall Windows
Hopefully, you can now run the sfc /scannow command just fine. If you can’t, you may want to consider reinstalling Windows afresh. It’s a radical step, of course, but if you’ve meaning to do it for a while, now would be a good time.
You’ll get yourself a fresh copy of Windows if you dig that, but since you already have access to the OS, consider taking a backup of your computer so you don’t have to spend a lot of time getting everything in order from scratch after reinstalling Windows.
Can You Run ScanNow Now?
If you encounter the dreaded «Windows Resource Protection Could Not Perform the Requested Operation» error when using /sfc scannow, it can be a confusing task to fix it. Hopefully the above tips will help you get your troubleshooter back into shape.