С помощью встроенного пакета OpenSSH для Windows вы можете легко настроить безопасную передачу файлов между клиентом и серверов Windows по защищенному протоколу передачи файлов SFTP (Secure FTP). В этой статье мы покажем, как установить и настроить установить SFTP сервер в Windows 10/11 или Windows Server 2022/2019/2016/2012R2 с помощью встроенных средств (Win32-OpenSSH).
Содержание:
- Установка OpenSSH в Windows
- Настройка SFTP сервера на базе OpenSSH в Windows
- Подключение к SFTP серверу с помощью PowerShell и WinSCP
- Настройка SFTP аутентификации по ключам
Протокол SFTP (Secure File Transfer Protocol , Secure FTP или SSH FTP) это расширение протокола SSH, являющимся стандартом мира UNIX/Linux систем. Хотя с точки зрения пользователей он похож на FTP, но на самом деле это абсолютно другой протокол, не имеющий с FTP ничего общего. Данные между клиентом и сервером передаются по порту 22 через SSH туннель.
Основные преимущества протокола SFTP:
- Передача файлов и команд происходит внутри защищенной SSH-сессии;
- Для передачи файлов и команд используется одно соединение;
- Поддерживаются символические ссылки, доступны функций прерывания, возобновления передачи, удаления файла и другие;
- Обычно на каналах, где FTP работает медленно или с перебоями, SFTP-соединение работает более надежно и быстро;
- Возможность аутентификации с помощью SSH ключей.
Не нужно путать протоколы SFTP и FTPS. FTPS – это по сути обычный FTP с SSL сертификатом, а SFTP – это передача FTP данных и команд внутри SSH сессии.
В современные версии Windows по-умолчанию встроен порт OpenSSH для win32 (Win32-OpenSSH). Вы можете использовать его для организации защищенного SFTP сервера вместо таких сторониих продуктов как Core FTP, FileZilla, CYGWIN, OpenSSH, FTP Shell, IPSwitch и пр.
Установка OpenSSH в Windows
Пакет OpenSSH уже включен в операционную систему в современных билдах Windows 10 (начиная с 1803), Windows 11, Windows Server 2022/2019 в виде Feature on Demand (как и RSAT).
В этих версиях Windows вы можете установить сервер OpenSSH с помощью PowerShell:
Add-WindowsCapability -Online -Name OpenSSH.Server*
Или с помощью DISM:
dism /Online /Add-Capability /CapabilityName:OpenSSH.Server~~~~0.0.1.0
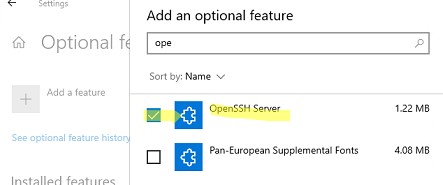
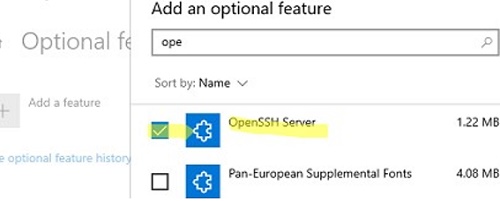
Также можно установить OpenSSH из графического интерфейса Windows 10 (Settings -> Apps -> Optional Features -> Add a feature -> Open SSH Server -> Install).
Чтобы проверить, установлен ли пакет:
Get-WindowsCapability -Online | ? Name -like 'OpenSSH*'
Исполняемые файлы OpenSSH находятся в каталоге:
C:windowssystem32OpenSSH
Конфигурационный файл sshd_config находится в каталоге C:ProgramDatassh (каталог создается после первого запуска службы).
Лог — c:windowssystem32OpenSSHlogssshd.log
Файл authorized_keys и ключи хранятся в каталоге %USERPROFILE%.ssh.
В предыдущих версиях Windows 10, в Windows 8.1 или в Windows Server 2016/2012 R2 вам придется скачать Win32-OpenSSH для Windows с GitHub и установить вручную (https://github.com/PowerShell/Win32-OpenSSH/releases). Нам нужна версия для 64 битной версии Windows: OpenSSH-Win64.zip (4,15 Мб).
- Распакуйте содержимое архива в целевой каталог, к примеру:
C:OpenSSH-Win - Запустите командную строку PowerShell с правами администратора и перейдите в каталог OpenSSH:
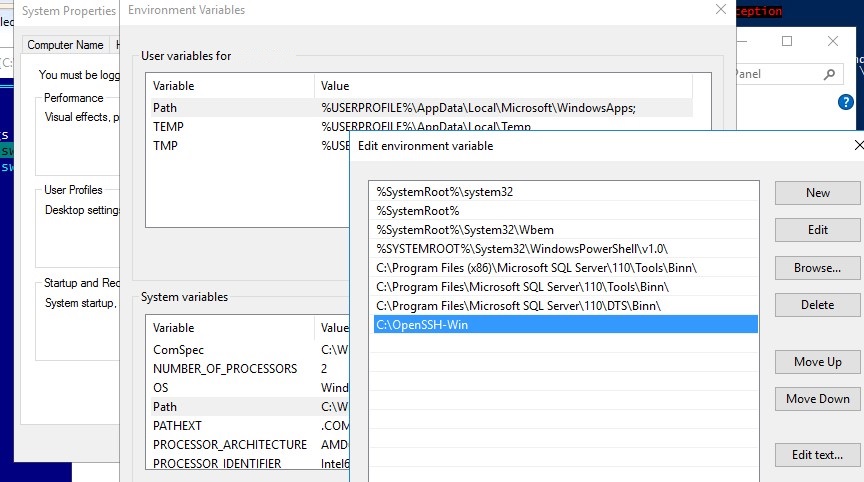
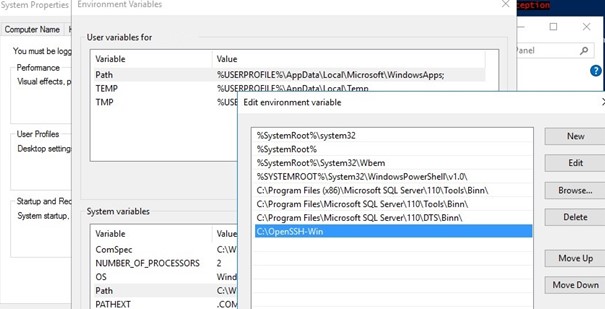
cd C:OpenSSH-Win - Добавьте путь к каталогу OpenSSH в переменную окружения Path;

- Установите сервер OpenSSH:
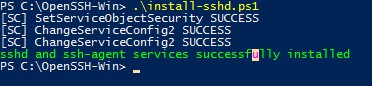
.install-sshd.ps1
должно появиться зеленое сообщение “sshd and ssh-agent services successfully installed”).
Настройка SFTP сервера на базе OpenSSH в Windows
Теперь вам нужно настроить OpenSSH для режима SFTP.
Включите автозапуск для службы SSHD и запустите ее с помощью следующих PowerShell команд управления службами:
Set-Service -Name sshd -StartupType ‘Automatic’
Start-Service sshd
С помошью PowerShell отройте в брандмауэре Windows порт TCP 22 для входящего трафика на SSH сервер:
New-NetFirewallRule -Protocol TCP -LocalPort 22 -Direction Inbound -Action Allow -DisplayName SSH
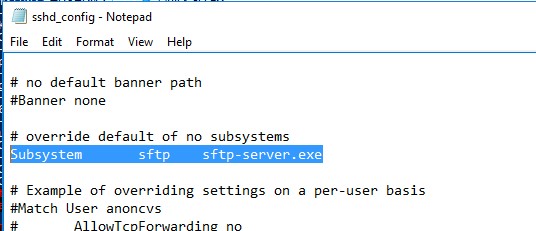
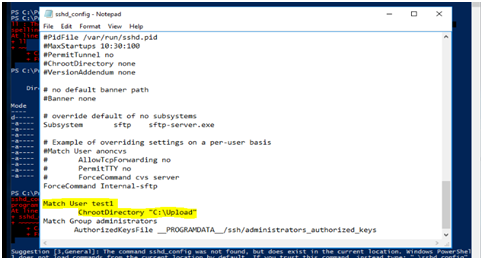
 Откройте в любом текстовом редакторе конфигурационный файл «C:ProgramDataSSHsshd_config», найдите и проверьте значение директивы Subsystem sftp. Здесь должен быть указан файл sftp-server.exe.
Рассмотрим полезные директивы в конфигурационном файле sshd_config:
# разрешить подключение к OpenSSH только для пользователей из этой группы
AllowGroups corpadmingroup
# включить аутентификацию по паролю (нельзя использовать ключи SSH)
AuthenticationMethods password
ForceCommand internal-sftp
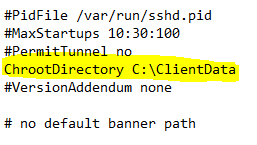
#каталог для SFTP пользователей (по умолчанию пользователь подключается в каталог со своим профилем в папке C:usersusername)
ChrootDirectory C:SFTPRoot
#Для каждого пользователя можно индивидуальную chrootdirectory:
Match User user1
ChrootDirectory c:SFTPRootuser1
ForceCommand internal-sftp
X11Forwarding no
 AllowTcpForwarding no
Match User user2
ChrootDirectory c:SFTPRootuser2
ForceCommand internal-sftp
X11Forwarding no
AllowTcpForwarding no
Подключение к SFTP серверу с помощью PowerShell и WinSCP
Теперь вы может подключиться к вашему SSH серверу на Windows по протоколу SFTP. Ниже мы покажем, как подключиться к SFTP серверу с помощью бесплатного клиента клиент WinSCP, консоли PowerShell и встроенной утилиты sftp.exe.
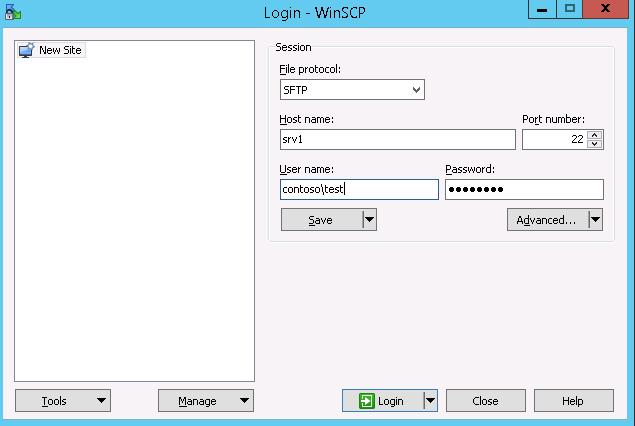
В окне настройки подключения выберите протокол передачи файлов SFTP, укажите имя сервера и данные учетной записи Windows (в формате
[email protected]
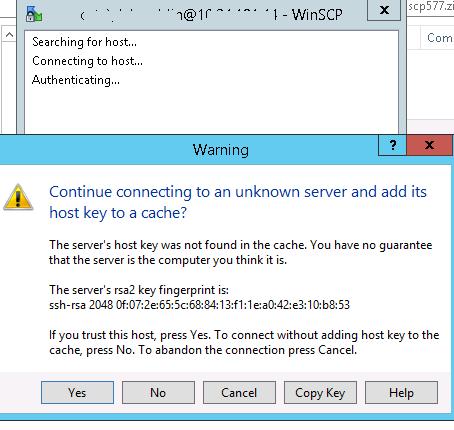
для доменных пользователей), под которой осуществляется подключение (возможно также настроить авторизацию по ключам). При первом подключении появится окно с предупреждением о том, что ключ хоста отсутствует в локальном кеше.
 При первом подключении появится окно с предупреждением о том, что ключ хоста отсутствует в локальном кеше.
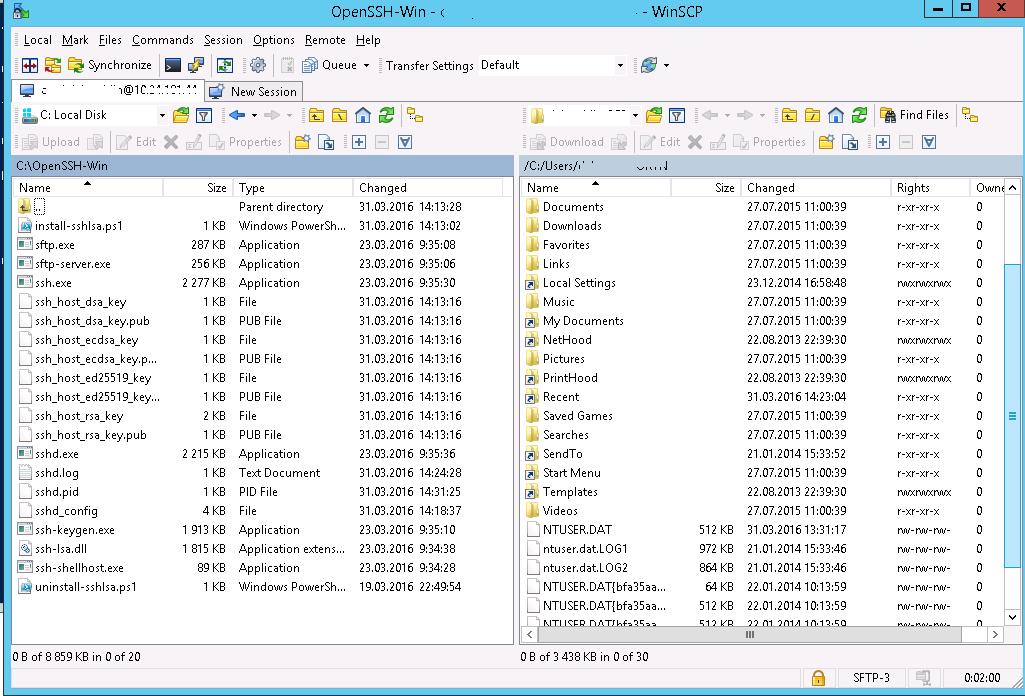
 Если все настроено правильно, клиент должен подключиться к SFTP серверу и отобразить список файлов в домашнем каталоге пользователя (по умолчанию каталог с профилем пользователя).
С помощью привычного интерфейса файлового менеджера можно безопасно копировать файлы между сервером и клиентом по защищённому протоколу SFTP.

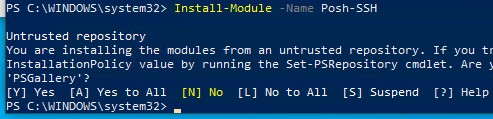
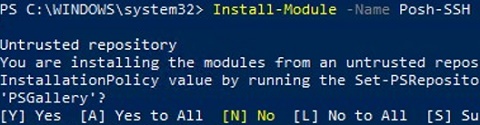
Для подключения к SFTP серверу из PowerShell можно использовать модуль Posh-SSH. Вы можете скачать установить модуль из PowerShell Gallery или офлайн:
Install-Module -Name Posh-SSH
Для подключения к SFTP серверу с помощью пароля, нужно получить имя пользователя и пароль через Get-Credential:
$usrCreds= Get-Credential
Теперь можно подключиться к вашем SFTPS серверу:
$SFTPSession = New-SFTPSession -ComputerName 192.168.13.200 -Credential $usrCreds
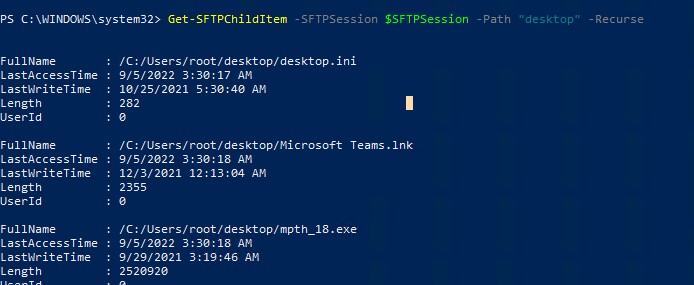
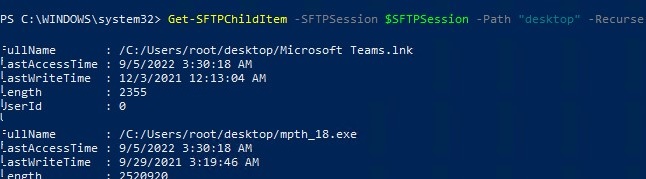
Теперь вы можете вывести список файлов в удаленном каталоге на SFTP сервере. В этом примере я получу список файлов на рабочем столе пользователя (профиль пользователя в этом случае будет являться корнем)
Get-SFTPChildItem -SFTPSession $SFTPSession -Path "desktop" –Recurse
Чтобы скачать файл с удаленного SFTP сервера:
Get-SFTPItem -SessionId $SFTPSession.SessionId -Path "desktop/OpenVPNScript.log" -Destination c:temp
Чтобы закачать файл с вашего компьютера на удаленный SFTP хост:
Set-SFTPItem -SessionId $SFTPSession.SessionId -Path C:Tempmytestfile.log -Destination “desktop”

Завершить SFTP сессию:
Remove-SFTPSession -SFTPSession $SFTPSession
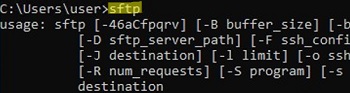
В Windows вы можете использоваться встроенную утилиту sftp.exe (устанавливается вместе с клиентом OpenSSH) для подключения к SFTP серверу.
Подключиться к sftp серверу:
sftp [email protected]
Подключиться с помощью ssh ключа:
sftp -i .ssh/id_rsa [email protected]
Вывести список файлов в удаленном каталоге:
pwd
Скачать файл с SFTP в локальный каталог на ваш компьютер:
get file-test1.txt
Загрузить файл с вашего компьютера на SFTP сервер:
put file-test2.txt
Закрыть сессию:
exit

Настройка SFTP аутентификации по ключам
Вы можете настроить SFTP аутентификацию по ключам. В этом случае при подключении к SFTP серверу вам не нужно будет указывать пароль пользователя.
Подробно настройка SSH аутентификации по ключам описана в этой статье.
Для этого нужно:
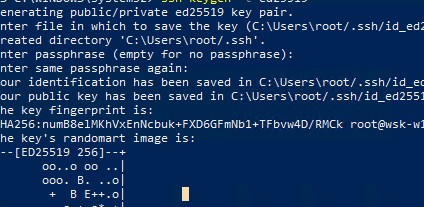
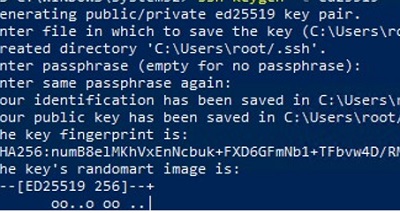
- Создать на вашем компьютере (SFTP клиент) ключи для пользователя, под которым вы будете подключаться к серверу:
ssh-keygen -t ed25519

- Утилита сгенерирует два файла
id_ed25519
(закрытый ключ для клиента) и
id_ed25519.pub
(открытый ключ для сервера); - Теперь нужно добавить ваш SSH ключ на сервер. Скопируйте файл id_ed25519.pub(или id_rsa.pub в зависимости от типа ключа) в каталог .ssh профиля пользователя, под которым вы будете подключаться к SFTP серверу. Переименуйте файл в authorized_keys (например для пользователя alex путь будет выглядеть так:
C:Usersalex.sshauthorized_keys
)
Теперь вы можете использоваться файл id_ed25519 для аутентификации на SFTP сервере в настройках WinSCP (настройки подключения Advanced -> to SSH > Authentication page -> Private key file).
Если вы хотите задать SSH ключ при подключении к SFTP из PowerShell, используйте такую команду:
New-SFTPSession -ComputerName 192.168.13.200 -Credential user1 -KeyFile C:Usersalex.sshid_ed25519" -Verbose
В этой статье мы покажем, как использовать Win32-OpenSSH для запуска SFTP-сервера в Windows 10 или Windows Server 2016 / 2012R2.
Что такое SFTP?
SFTP ( Secure File Transfer Protocol , Secure FTP или SSH FTP ) является расширением протокола SSH, являющегося стандартом в мире систем UNIX / Linux. С точки зрения пользователя, он похож на FTP, но на самом деле это совершенно другой протокол, не имеющий ничего общего с FTP . Данные передаются между клиентом и сервером через туннель SSH (TCP-порт 22).
Основные преимущества SFTP:
- Файлы и команды передаются в безопасном сеансе SSH;
- Одно соединение используется для отправки файлов и команд;
- Поддерживаются символические ссылки, передача прерываний / возобновлений, функции удаления файлов и т. Д .;
- Как правило, в каналах, где FTP работает медленно или не работает, SFTP-соединение работает быстрее и надежнее;
- Возможность аутентификации с использованием ключей SSH.
Не путайте протоколы SFTP и FTPS. По сути, FTPS — это простой FTP с сертификатом SSL, а SFTP — это протокол для отправки данных и команд FTP внутри сеанса SSH.
Реализация SFTP в Windows
Исторически операционные системы Windows не предоставляют никаких встроенных инструментов для запуска защищенного SFTP-сервера. Для этих целей использовались открытые или проприетарные решения, такие как Core FTP, FileZilla, CYGWIN, OpenSSH, FTP Shell, IPSwitch и т. Д. Однако несколько лет назад Microsoft выпустила свою версию порта OpenSSH для Win32. Этот проект называется Win32-OpenSSH .
Рассмотрим конфигурацию SFTP-сервера под управлением Windows 10 или Windows Server 2019/2016/2012 R2 с использованием пакета Win32 OpenSSH .
Установка Win32 OpenSSH на Windows 10 1803+ / Windows Server 2019
В Windows 10 build 1803 и новее, а также в Windows Server 2019 пакет OpenSSH уже включен в операционную систему в форме Feature on Demand (FoD), такой как RSAT .
Вы можете установить сервер OpenSSH в Windows 10 и Windows Server 2019, используя следующий командлет PowerShell:
Add-WindowsCapability -Online -Name OpenSSH.Server*
Или используя DISM:
dism /Online /Add-Capability /CapabilityName:OpenSSH.Server~~~~0.0.1.0
Также вы можете добавить OpenSSH сервер из Windows 10 GUI ( Настройки -> Приложения -> Дополнительные функции -> Добавить функцию -> Открыть SSH Server -> Установить ).
 сервера в Windows с помощью OpenSSH")
- Исполняемые файлы OpenSSH находятся в каталоге
c:windowssystem32OpenSSH:; - Sshd_config файл конфигурации находится в каталоге:
C:ProgramDatassh(этот каталог создается после первого запуска службы Sshd); - Лог — файл:
c:windowssystem32OpenSSHlogssshd.log; - Файл и ключи authorized_keys хранятся в директории:
%USERPROFILE%.ssh.
Установите Win32 OpenSSH на Windows Server 2016/2012 R2
В предыдущих версиях Windows 10 и Windows Server 2016/2012 R2 необходимо загрузить и установить OpenSSH с GitHub. Вам необходимо скачать версию пакета для Windows x64: OpenSSH-Win64.zip (3,5 МБ).
- Распакуйте архив в целевой каталог: C: OpenSSH-Win;
- Запустите привилегированный клиент PowerShell и перейдите в папку OpenSSH:
Cd C:OpenSSH-Win - Добавьте путь к каталогу OpenSSH в переменную среды Path (Свойства системы -> вкладка «Дополнительно» -> Переменные среды -> Выберите и измените системную переменную Path -> Добавить путь к папке OpenSSH);
 сервера в Windows с помощью OpenSSH")
- Установите сервер OpenSSH:
.install-sshd.ps1(должно появиться зеленое сообщение « Службы sshd и ssh-agent успешно установлены »);
 сервера в Windows с помощью OpenSSH")
- Сгенерируйте ключи SSH для сервера (необходим для запуска службы sshd):
ssh-keygen.exe –Assh-keygen: generating new host keys: RSA DSA ECDSA ED25519
![]()
- Включите автозапуск для службы SSHD и запустите его, используя следующие команды управления службой PowerShell:
Set-Service -Name sshd -StartupType ‘Automatic’
Start-Service sshd - Перезагрузите компьютер:
Restart-Computer - Используйте PowerShell, чтобы открыть TCP-порт 22 в брандмауэре Windows для входящего трафика SSH:
New-NetFirewallRule -Protocol TCP -LocalPort 22 -Direction Inbound -Action Allow -DisplayName SSH
 сервера в Windows с помощью OpenSSH")
Примечание . Предыдущая команда не будет работать в старых версиях Windows для настольных компьютеров. В этом случае используется другая команда:
netsh advfirewall firewall add rule name='SSH Port' dir=in action=allow protocol=TCP localport=22
- Откройте файл конфигурации SSHD (C: ProgramData SSH sshd_config) в любом текстовом редакторе. Найдите и проверьте значение директивы Subsystem sftp . SFTP-server.exe файл должен быть указан здесь.
 сервера в Windows с помощью OpenSSH")
Вы можете дополнительно настроить следующие параметры в файле конфигурации sshd_config:
AllowGroups corpsftp_users #разрешить подключение к OpenSSH только пользователям этой доменной группы
AuthenticationMethods password #включить аутентификацию по паролю (ключи SSH не могут быть использованы)
ForceCommand internal-sftp
ChrootDirectory C:inetpubwwwrootftpfolder #каталог по умолчанию для пользователей SFTP
Тестирование SFTP-соединения с использованием WinSCP
Попробуем подключиться к созданному SSH-серверу по протоколу SFTP. Для этого используйте бесплатный клиент WinSCP .
В окне конфигурации подключения выберите SFTP в качестве протокола передачи файлов, укажите имя сервера и учетные данные учетной записи Windows, которая используется для подключения (также можно настроить проверку подлинности ключа).
 сервера в Windows с помощью OpenSSH")
При первой попытке подключения появляется следующее уведомление о ключе хоста, не найденном в локальном кэше.
 сервера в Windows с помощью OpenSSH")
Если все настроено правильно, клиент подключится к SFTP-серверу и отобразит список файлов в домашнем каталоге пользователя (по умолчанию это каталог с профилем пользователя).
Используя знакомый интерфейс файлового менеджера ( например, Total Commander ), вы можете копировать файлы между сервером и клиентом. Файлы передаются с использованием безопасного SFTP.
 сервера в Windows с помощью OpenSSH")
Как удалить Win32 OpenSSH?
Чтобы правильно удалить Win32 OpenSSH из вашей системы:
- Запустите сеанс PowerShell с повышенными правами;
- Остановите службу SSHD:
Stop-Service sshd - Удалите службу sshd:
.uninstall-sshlsa.ps1<span>sshd успешно удален</span><span>
ssh—agent успешно удален</span>
You can use the built-in OpenSSH package in Windows to easily enable secure file transfers between the client and Windows server using the SFTP (Secure FTP) protocol. In this article, we will show how to install and configure an SFTP server on Windows 10 or Windows Server 2022/2019/2016/2012R2.
Contents:
- How to Install OpenSSH on Windows?
- How to Configure SFTP Server on Windows Using OpenSSH?
- Connecting to SFTP Server Using WinSCP or PowerShell
- Configuring SFTP Public Key Authentication
SFTP (Secure File Transfer Protocol, Secure FTP, or SSH FTP) is the extension of SSH protocol, which is the standard in the world of UNIX/Linux systems. From the user’s point of view, it is similar to FTP, but in fact, it is a completely different protocol, having nothing in common with FTP. Data between the client and the server is transmitted on port 22 through an SSH tunnel (TCP port 22).
The main advantages of SFTP:
- Files and commands are transferred within a secure SSH session;
- One connection is used to send both files and commands;
- Symbolic links, interrupt/resume the transfer, file delete functions, etc. are supported;
- SFTP connection is much faster and more reliable on WAN links where FTP is slow or intermittent;
- Possibility to authenticate using SSH keys.
Do not confuse SFTP and FTPS protocols. FTPS is essentially just a simple FTP with an SSL certificate, and SFTP is the protocol to transfer the FTP data and commands inside the SSH session.
The win32 port of OpenSSH (Win32-OpenSSH) is built into all modern versions of Windows by default. You can use it to configure a secure SFTP server instead of using third-party products like Core FTP, FileZilla, CYGWIN, FTP Shell, IPSwitch, etc.
How to Install OpenSSH on Windows?
The OpenSSH package is a part of the operating system in modern builds of Windows 10 (starting from 1803), Windows 11, and Windows Server 2022/2019 as a Feature on Demand (like RSAT).
On these versions of Windows, you can install the OpenSSH server using PowerShell:
Add-WindowsCapability -Online -Name OpenSSH.Server*
Or using DISM:
dism /Online /Add-Capability /CapabilityName:OpenSSH.Server~~~~0.0.1.0
Also, you can install OpenSSH server from Windows 10 GUI (Settings -> Apps -> Optional Features -> Add a feature -> Open SSH Server -> Install).
To check if a package is installed:
Get-WindowsCapability -Online | ? Name -like 'OpenSSH*'
- OpenSSH executables are located in the directory:
c:windowssystem32OpenSSH; - The sshd_config configuration file is located in
C:ProgramDatassh(this directory is created after the first start of the sshd service); - Log file:
c:windowssystem32OpenSSHlogssshd.log; - The authorized_keys file and keys are stored in a directory:
%USERPROFILE%.ssh.
On the previous earlier builds of Windows 10, Windows 8.1, and on Windows Server 2016/2012 R2, you will have to download Win32-OpenSSH for Windows from GitHub and install it manually (https://github.com/PowerShell/Win32-OpenSSH/releases). We need a version for Windows x64: OpenSSH-Win64.zip (4,15 MB).
- Extract the archive to the target folder: C:OpenSSH-Win;
- Open an elevated PowerShell prompt and switch to the OpenSSH folder:
Cd C:OpenSSH-Win - Add the path to the OpenSSH directory to the Path environment variable (System Properties -> Advanced tab -> Environment Variables -> Select and edit the Path system variable -> Add the path to the OpenSSH folder);

- Install the OpenSSH server:
.install-sshd.ps1(a green message should appear “sshd and ssh-agent services successfully installed”);If running PowerShell scripts on your computer is blocked by your PowerShell Execution Policy, you can run the script with this command:
powershell.exe -ExecutionPolicy Bypass -File install-sshd.ps1

How to Configure SFTP Server on Windows Using OpenSSH?
Now you need to configure OpenSSH on Windows for SFTP mode.
Enable autostart for the SSHD service and start it using the following PowerShell service management commands:
Set-Service -Name sshd -StartupType 'Automatic'
Start-Service sshd
Use the PowerShell to open TCP port 22 in the Windows Firewall for incoming SSH traffic:
New-NetFirewallRule -Protocol TCP -LocalPort 22 -Direction Inbound -Action Allow -DisplayName SSH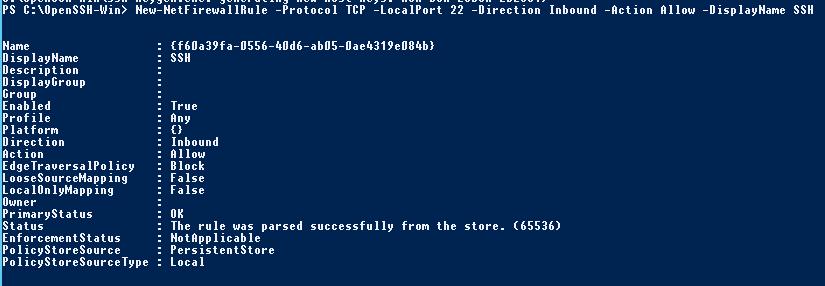
Note. The previous command won’t work in old desktop Windows versions. In this case, another command is used: netsh advfirewall firewall add rule name='SSH Port' dir=in action=allow protocol=TCP localport=22
Open the SSHD configuration file (C:ProgramDataSSHsshd_config) in any text editor. Find and check the value of the Subsystem sftp directive. The sftp-server.exe file should be specified here.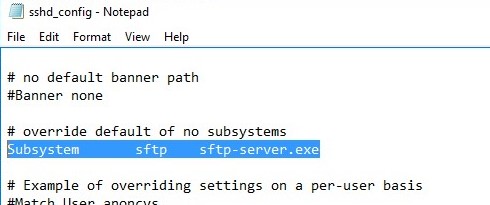
You can additionally configure the following parameters in the sshd_config configuration file:
# only allow users in this domain group to connect to OpenSSH
AllowGroups corpsftp_users
# enable password authentication (SSH keys cannot be used)
AuthenticationMethods password
#default (chrooot) directory for SFTP users  (by default, the user connects to the directory with his profile in the C:usersusername folder)
ChrootDirectory C:SFTP
ForceCommand internal-sftp
#You can set an individual chrootdirectory for each user:
Match User abrown
ChrootDirectory c:SFTPabrown
ForceCommand internal-sftp
X11Forwarding no
AllowTcpForwarding no

Match User jsmith
ChrootDirectory c:SFTPjsmith
ForceCommand internal-sftp
X11Forwarding no
AllowTcpForwarding no
Connecting to SFTP Server Using WinSCP or PowerShell
Now you can connect to your Windows SSH server using the SFTP protocol. Next, we’ll show you how to connect to an SFTP server using the free WinSCP client, the PowerShell console, and the built-in sftp.exe tool.
In the connection configuration window, select the SFTP as the file transfer protocol, specify the server name and the credentials of the Windows account (use the user@domain format for domain users), which is used for connection (it is also possible to configure public key authentication).

When you try to connect for the first time, the following notification of the host key not found in the local cache appears.
If everything is configured correctly, a client should connect to the SFTP server and display the list of files in the user’s home chroot directory (by default, it is the user’s profile directory).
Using the familiar file manager interface (like Total Commander), you can copy files between the server and the client using the secure SFTP protocol.
You can use the Posh-SSH module to connect to an SFTP server from PowerShell. You can download and install the module from the PowerShell Gallery or offline:
Install-Module -Name Posh-SSH
To connect to the SFTP server using a password, you need to get the username and password via Get-Credential:
$usrCreds= Get-Credential
Now you can connect to your SFTP server:
$SFTPSession = New-SFTPSession -ComputerName 192.168.3.20 -Credential $usrCreds
Now you can list the files in the remote directory on the SFTP server. In this example, I will get a list of files on the user’s Desktop (the user’s profile will be the root user folder/chroot in this case)
Get-SFTPChildItem -SFTPSession $SFTPSession -Path "desktop" –Recurse
Download a file from a remote SFTP server:
Get-SFTPItem -SessionId $SFTPSession.SessionId -Path "desktop/OpenVPNScript.log" -Destination c:PS
To upload a file from your computer to a remote SFTP host:
Set-SFTPItem -SessionId $SFTPSession.SessionId -Path C:PSmytestfile.log -Destination "desktop"
![]()
Close the SFTP session:
Remove-SFTPSession -SFTPSession $SFTPSession
On Windows, you can use the built-in sftp.exe console command (installed with the OpenSSH client) to connect to an SFTP server.
Connect to sftp server:
sftp user1@192.168.3.20
Connect using ssh private key:
sftp -i .ssh/id_rsa user1@192.168.3.20
List files in a remote directory:
pwd
Download the file from SFTP to a local directory on your computer:
get download_this_file_from_sftp.txt
Upload a file from your computer to an SFTP server:
put file_to_uplodad.txt
Close session:
exit
Configuring SFTP Public Key Authentication
You can enable SFTP key-based authentication in Windows. In this case, you can authenticate to the SFTP server without entering a password.
- Create SSH keys on your computer (SFTP client) for the user under which you will connect to the server:
ssh-keygen -t ed25519
- The ssh-keygen tool will generate two files id_ed25519 (private key for the client computer) and id_ed25519.pub (public key for the SFTP server);
- Now you need to add your SSH key to the Windows server (SFTP host). Copy the file id_ed25519.pub (or id_rsa.pub depending on the key type) to the .ssh directory of the user profile under which you will connect to the SFTP. Rename the file to authorized_keys (for example, the following key file is used for the user
max1:C:Usersmax1.sshauthorized_keys)
Now you can use the id_ed25519 file to authenticate on the SFTP server. You can set your key in the WinSCP settings (Advanced -> to SSH connection settings > Authentication page -> Private key file).
If you want to use an SSH key when connecting to SFTP from PowerShell, use the following command:
New-SFTPSession -ComputerName 192.168.3.20 -Credential remoteuser1 -KeyFile C:Usersmax1.sshid_ed25519" -Verbose
SFTP stands for SSH file transfer protocol or Secure File Transfer Protocol. This pacgage works over a secure connection and the advantage is the ability to leverage a secure connection to transfer files and traverse the filesystem on both local and remote system.
The following steps shows how to setup SFTP using OpenSSH on Windows 2016 Server
Step 1: Download the OpenSSH from the link https://github.com/PowerShell/Win32-OpenSSH/releases”>Make This Nofollow
Step 2: Locate the downloaded file, right-click and Extract All to C:Program FilesOpenSSH-Win64
Step 3: Modify the Path system environment variable by running the command “/” or add the variable in System Properties -> Environment variable path
To setup the environment variable using PowerShell –
- Open PowerShell as Administrator
- Setx PATH “$env:path; C:Program FilesOpenSSH-Win64” –m
You should see the following output-
SUCCESS: Specified value was saved
Step 4: Change to the OpenSSH directory
cd “C:Program FilesOpenSSH-Win64”
Step 5: Run the install script
.install-sshd.ps1
OR run in PowerShell as below
PS C:windowssystem32> powershell.exe –ExecutionPolicy Bypass –File install-sshd.ps1
Step 6: Enable automatic startup and start sshd and ssh-agent
Set-Service sshd -StartupType Automatic; Set-Service ssh-agent -StartupType Automatic; Start-Service sshd; Start-Service ssh-agent
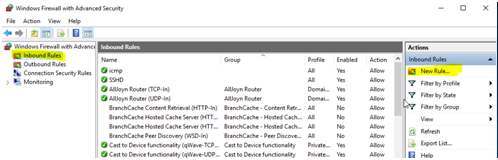
Step 7: Allow Access in Windows Firewall
a. Open Windows Firewall and create a new inbound rule for SFTP
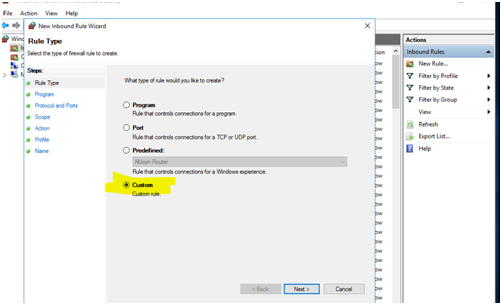
b. Create a new rule and select custom and select protocol and ports

c. Under the section Scope, let the rule apply to Any IP Address from remote and local IP addresses and click Next
d. Under Action, select Allow the connection and click Next
e. Name the Rule and select Finish
To enable port via PowerShell, please execute the follow command
>New-NetFirewallRule -Name sshd -DisplayName ‘OpenSSH SSH Server’ -Enabled True -Direction Inbound -Protocol TCP -Action Allow -LocalPort 22 -Program “C:System32OpenSSHsshd.exe”
Step 8: Edit the sshd_config file and make the following changes to add path and user /group
Step 9: Stop and restart the sshd services by executing the following command
Net stop sshd
Net start sshd
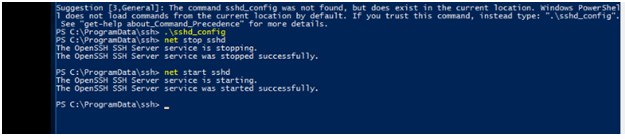
SFTP Is configured successfully using OpenSSH
At Velan, our server support engineers can help you setup sftp server using OpenSSH on Windows 2016 server. We troubleshoot problems like these for our clients every day. If you are interested in our service, please fill the Quick connect form to get in touch with us
Posted in
: NetScaler
By Rasmus Kindberg
Translate with Google ⟶
3 years ago
For a recent customer engagement we needed to provide internal and external users with the ability to upload/download files through SFTP to a specific backend-server. For security reasons we decided to tunnel the SFTP traffic through the customer’s Netscaler, and so for this setup you need to do some Netscaler configuration and then the actual SFTP server configuration on the backend server.
The native FTP software available as an addon in IIS does not support SFTP, and we do not wish to use regular FTP since username/passwords will be sent in clear text over the network. FTPS was not an option for us since the FTP client the users will be using does not support it.
Another important factor or requirement is to have AD authentication available, so admins don’t have to manage specific SFTP accounts and also so users don’t have to remember an additional username/password for SFTP. So I looked at a few freeware options for SFTP server (Turbo SFTP for example), but none of them really worked that great. Finally I ended up using the OpenSSH version for Windows (https://github.com/PowerShell/Win32-OpenSSH/releases) since this satisfied all the requirements.
Below are the steps to installing and configuring OpenSSH for Windows.
- Download ”OpenSSH-Win64.zip” from https://github.com/PowerShell/Win32-OpenSSH/releases
- Extract downloaded zip file
- Create folder ”C:Program Files (x86)OpenSSH-Win64” and copy the extracted files there
- Run below in cmd (run cmd as admin):
powershell.exe -file ”C:Program Files (x86)OpenSSH-Win64install-sshd.ps1” - Run services.msc and change Startup Type from Manual to Automatic for the two new services ”OpenSSH Authentication Agent” and ”OpenSSH SSH Server”
- Edit file ”C:ProgramDatasshsshd_config” in notepad and add below text at top of file. Note that any group names and folder paths specified in the config must be specified using lowercase letters (but whether the real group/folder names are lowercase or not doesn’t matter). See https://github.com/PowerShell/Win32-OpenSSH/wiki/sshd_config for more info
-
#CUSTOM
#Restricts logon through SFTP to only these users
AllowGroups mydomainsomerandomadgroup
#We specify that we only allow logons for connections originating from IP 192.168.1.101. #In this case this IP is the Netscaler Subnet IP, the IP the Netscaler will use to communicate with the backend server.
#We don't want to allow any device/person, except our Netscaler, to be able to connect to our SFTP server.
AllowUsers *@192.168.1.101
#Specifies that we're using passwords and not SSH keys to authenticate
AuthenticationMethods password
#Forcing SFTP functionality, needed for ChrootDirectory parameter below
ForceCommand internal-sftp
#Specify the default folder the user sees after SFTP authentication. Without this, users will see C:usersmyuser as default folder, which is not usually preferable.
ChrootDirectory C:inetpubwwwrootftpfolder
#Below three parameters are recommended as best practice to prevent certain security bypassing
AllowTcpForwarding no
PermitTunnel no
GatewayPorts no
- Restart service ”OpenSSH SSH Server” (any changes to config file above won’t take effect until service is restarted)
- Optional: Open port 22 in the Windows Firewall on the backend server so Netscaler can communicate with it.
- Now you can use SFTP to connect to this server using AD credentials (just entering sAMAccountName is sufficient). Only users in AD grup ’mydomainSomeRandomADGroup’ are allowed to logon. Access to any subfolders in C:inetpubwwwrootftp through SFTP will be dictated by NTFS rights. I suggest using AD groups + NTFS rights to control which subfolders the users should be able to read/write to.
The Netscaler configuration is quite trivial. After below you probably want to create an internal and external dns, such as ’myapp.mydomain.com’, pointing to 192.168.1.15 internally and the external IP (which gets NATed to 172.16.1.155 in firewall) so that users can specify ’myapp.mydomain.com’ in their SFTP client (instead of IP addresses).
add ns acl A-ANY-CS-INTERNAL_15_SFTP-TCP_22 ALLOW -destIP = 192.168.1.15 -destPort = 22 -protocol TCP -priority 70
add ns acl A-ANY-CS-DMZ_155_SFTP-TCP_22 ALLOW -destIP = 172.16.1.155 -destPort = 22 -protocol TCP -priority 80
add server myserver.mydomain.local 192.168.2.25 -comment "SFTP server"
add service SVC-APPNAME-SFTP myserver.mydomain.local TCP 22 -healthMonitor YES -gslb NONE -maxClient 0 -maxReq 0 -usip NO -useproxyport YES -cltTimeout 180 -svrTimeout 360 -CKA NO -TCPB NO -CMP NO -appflowLog DISABLED -CIP ENABLED X-MS-Forwarded-Client-IP -netProfile NP_INTERNAL_SNIP
add lb monitor MON-APPNAME-SFTP TCP -LRTM ENABLED -destPort 22 -interval 20 -resptimeout 15 -netProfile NP_INTERNAL_SNIP-MON
bind service SVC-APPNAME_SFTP -monitorName MON-APPNAME-SFTP
add lb vserver LB-EXT_APPNAME_SFTP TCP 192.168.1.15 22 -persistenceType SOURCEIP -timeout 30
add lb vserver LB-INT_APPNAME_SFTP TCP 172.16.1.155 22 -persistenceType SOURCEIP -timeout 30
bind lb vserver LB-INT_APPNAME_SFTP SVC-APPNAME_SFTP
bind lb vserver LB-EXT_APPNAME_SFTP SVC-APPNAME_SFTP
Tags
: ftp, openssh, sftp
В статье я покажу, как настроить настроить SFTP-сервер в Windows с помощью OpenSSH.
Беспроводная передача данных в локальной сети — это не ноу-хау. Уже многие таким образом обмениваются файлами во внутренней сети. Часто для этого используется подключение по протоколу FTP.
Настраивается FTP-сервер и с помощью FTP-клиента другие компьютеры сети могут к нему подключиться. Но поскольку протокол FTP небезопасен, вам следует подумать об отказе от него в пользу чего-то лучшего. Для тех, кто не вкурсе, существует более безопасный протокол передачи файлов, который называется SFTP. Он шифрует передаваемые данные. Использование безопасного протокола SFTP может гарантировать, что никто не сможет подключиться и перехватить данные.
Содержание
- SFTP-сервер в Windows
- Настройка SFTP-сервера в Windows с помощью OpenSSH
- Установка OpenSSH (и активация необходимых сервисов)
- Открытие порта SSH в брандмауэре Windows
- Тестирование SFTP-сервера
- Тестирование SFTP-сервера в Windows
- Тестирование SFTP-сервера в Android
- Заключение
Все хорошо, но есть одна проблема чтобы настроить SFTP-сервер нужен SSH, а его во всех версиях Windows — нет. Если вам нужен SFTP-сервер придется использовать OpenSSH.
OpenSSH — это реализация SSH с открытым исходным кодом, и рекомендует использовать сам Microsoft. OpenSSH по умолчанию включен в Windows 10 и Windows Server 2019. Но вы можете использовать рассмотренный в статье метод с любой версией Windows.
Настройка SFTP-сервера в Windows с помощью OpenSSH
Настройка SFTP-сервер в Windows состоит из двух частей:
- Установка OpenSSH
- Открытие порта SSH для работы SFTP
Установка OpenSSH (и активация необходимых сервисов)
- Загрузите OpenSSH с GitHub.
- Распакуйте архив в папку Program Files.
- Откройте PowerShell от имени администратора и вставьте следующую команду в окно, чтобы перейти к папке:
<strong>cd «C:Program FilesOpenSSH—Win64</strong>».
- Для работы SSH требуются две службы: sshd и ssh-agent. Чтобы установить их, введите следующую команду в окно PowerShell:
<strong>powershell.exe —ExecutionPolicy Bypass —File install—sshd.ps1</strong>.
Вы должны увидеть сообщение «Службы sshd и ssh-agent успешно установлены». - Закройте окно PowerShell.
- Вы можете запустить службы вручную или настроить их автоматическое открытие с помощью Services.msc. Это создаст папку
<strong>C:ProgramDatassh</strong> с вашим ключом хоста, который имеет важное значение для работы службы.
Примечание. Службы называются агентом проверки подлинности OpenSSH и сервером SSH OpenSSH.
Открытие порта SSH в брандмауэре Windows
- SSH использует порт 22 для передачи / аутентификации, который закрыт в Windows, потому что SSH не включен по умолчанию. Чтобы открыть его, откройте брандмауэр Windows из панели управления.
- Нажмите на Входящие правила (на левой панели).
- На правой панели нажмите новое правило, выберите Порт и нажмите Далее.
- Введите число 22 в поле «Определенные локальные порты» и нажмите «Далее».
- Выберите «Разрешить подключение», нажмите «Далее» и выберите «Частный» для опции сети.
- Дайте правилу имя. Например, SSH или OpenSSH.
- Нажмите на Готово.

Тестирование SFTP-сервера
Давайте проверим, работает ли SFTP-сервер. Для этого вам нужен SFTP-клиент. Я буду испоьзовать бесплатный SFTP-клиент WinSCP, но вы можете использовать любой другой, поддерживающий SFTP, например, FileZilla, FTP Rush или файловый менеджер с поддержкой SFTP, такой как Altap Salamander.
Для Android есть много вариантов; Total Commander и Ghost Commander имеют плагины SFTP, в то время как некоторые приложения, такие как Amaze File Manager или X-plore File Manager, имеют встроенную функцию SFTP.
Тестирование SFTP-сервера в Windows
Запустите WinSCP и выберите «SFTP» в качестве протокола. В поле имени хоста введите «localhost» (если вы тестируете компьютер, на котором вы установили OpenSSH). Вам нужно будет ввести имя пользователя и пароль Windows, чтобы программа могла подключаться к серверу. Нажмите сохранить и выберите логин.
Вы увидите всплывающее окно, подобное показанному ниже, которое спрашивает вас, доверяете ли вы серверу, к которому пытаетесь подключиться. Поскольку сервер является вашим собственным компьютером, вы можете разрешить это. В основном это ключ хоста, который аутентифицирует соединение, установленное устройством. Вы можете использовать это для передачи контента с одного компьютера на другой тоже.


Примечание. Если ваша учетная запись пользователя Windows не имеет пароля, вам потребуется использовать открытый ключ для аутентификации SFTP-сервера, который включает отдельный процесс. Вы можете создать другую учетную запись в системе для доступа к SFTP, но, возможно, потребуется сделать файлы доступными вне пользовательского каталога.
Тестирование SFTP-сервера в Android
Давайте использовать Amaze File Manager с открытым исходным кодом. Нажмите кнопку + и выберите «Облачное соединение». Выберите соединение SCP / SFTP, и должно появиться всплывающее окно. Найдите IP-адрес вашего компьютера с помощью командной строки и команды IP-конфигурации. Например, мой компьютер имеет адрес 192.168.1.9

Введите его в поле сервера, оставьте номер порта как 22 и введите имя пользователя и пароль Windows в соответствующих полях. Он должен подключиться к вашему компьютеру, и вы сможете получить доступ ко всему содержимому, доступ к которому может получить учетная запись Windows.
Заключение
Одним из основных преимуществ SFTP-сервера является то, что вы сможете легко получать доступ или передавать файлы по сети. Это не единственный способ делиться файлами, есть также небезопасный SMB и т.д., о которых мы рассказывали в этой статье.

 (4 оценок, среднее: 4,00 из 5)
![]() Загрузка…
Загрузка…
Introduction
In this tutorial, we will show you how to set up a SFTP server in Windows. If you have a cloud computer with V2 Cloud and you’re looking to setup a secure FTP server in your cloud computer instead, follow this link. The main difference between FTP and SFTP is the security aspect. Running applications that use SFTP for file transfers is the answer to protecting that data in transit.
This tutorial will provide the steps required to set up an SFTP Server using Windows Server 2019’s OpenSSH Server feature. Our SFTP client computer will be a Windows 10 computer, and we will be using Filezilla as the client application to connect to the server.
You can browse the different sections of this tutorial. This is what you need to setup a SFTP server in Windows:
- Configure the SFTP server feature (OpenSSH Server) in Windows Server 2019
- Create the root SFTP directory
- Create the user account that will be used for file transfers
- Install and configure the SFTP client for data transfers
- Perform an SFTP transfer between client and server
Note: the terms “directory” and “file folder” refer to the same object. They are used interoperably in this tutorial.
Section 1: Configure the SFTP server feature (OpenSSH Server) in Windows Server 2019
STEP 1
Login to your server. Then type apps and features in the search bar. Under Apps and Features (the section in the middle of the page), click Manage optional features.

STEP 2
Scroll among the options, find OpenSSH Server, click it, then click Install.

The installation will now begin in the background. We are going to make some changes to the Windows Services to allow for the newly installed OpenSSH server to be started automatically.
STEP 3
Type services in the search bar. Then click the Services Desktop app. Locate the OpenSSH SSH Server option from the list. Right-click it, then select Properties.

STEP 4
Change the Startup type to Automatic. Click Start afterward.


STEP 5
Once the service has started the Service status: will change from Stopped to Running. Click OK to proceed.

STEP 6
Locate the OpenSSH Authentication Agent service. Right-click it, then select Properties.

STEP 7
Repeat Steps 3 to 5 where you will make the same changes as you did with the OpenSSH SSH Server with this service (OpenSSH Authentication Agent).
When done, you’ll notice the status of the two services is now set to Running.

STEP 8
Browse to the following folder, C:\ProgramData\ssh in the address bar. You may have to type the location as the ProgramData folder is normally hidden by default. Click the “drop-down arrow” beside Text documents then select All Files. Select sshd_config from the files list, then click Open.


STEP 9
When the sshd_config file opens, click Ctrl+F on your keyboard to launch the Find app. Type “root”, then click Find Next. We are looking for the entry #ChrootDirectory.

STEP 10
Edit the entry to this ChrootDirectory C:\SFTPRoot. This is the location where our SFTP files will be stored from the server side. Click File then click Save.

Let’s now create the actual folder/root directory we just referenced as our location to save SFTP files.
Section 2: Create the root SFTP directory
STEP 11
Browse to the C:\ drive on your server. Right-click in any empty space then select New from the drop-down menu then click Folder. Name the folder SFTPRoot. Ensure that it is exactly the same as the folder name referenced in the path in Step 10.


Now let us add the user account on this server that will be used to do the SFTP transfers.
Section 3: Create the user account that will be used for file transfers
STEP 11
Open the Server Manager, then select Tools and click Computer Management.

STEP 12
Click the drop-down arrow beside Local Users and Groups. Click the Users folder. In the middle pane, right-click on any white space and select New User from the drop-down menu.

STEP 13
Create the user account by entering your username and password. Record these credentials as we will be using them for our SFTP transfers. Uncheck the option User must change password at next logon and check the options User cannot change password and Password never expires. Click Create once finished.

Now let us find and record the IP address of our SFTP server. This will be needed along with the username and password we just created for our SFTP connection.
STEP 14
Type cmd at the search bar. Select Command Prompt. Type ipconfig at the prompt then hit the Enter key on your keyboard.

The Ip address of our server is 192.168.50.4.
Our server-side configuration is now complete. We now need to configure our client computer to connect to this newly configured SFTP server and transfer data to it.
Section 4: Install and configure the SFTP client for data transfers
In this example, we will be using Filezilla as our SFTP client. To continue, download the Filezilla client application and install it on your computer. Let’s now create our SFTP site.
STEP 15
Launch the Filezilla app. Click the File option from the menu bar then click Site Manager.

STEP 16
Select the My Sites folder under the left section under Select entry: Then click the New site button.

STEP 17
Name the site, we’ll call it SFTP-Site1. On the General tab in the left section of the Site Manager window, configure the following; Protocol: SFTP – SSH File Transfer Protocol, Host:
192.168.50.4, Port: 22, Logon Type: Normal, User: the User/username that will be used to connect to the SFTP site/server, Password: password for the user. When done click Connect.

STEP 18
Save the password and click OK. Click OK at the Unknown host key pop-up box. Note, you can check the checkbox Always trust the host, add this key to the cache.

Once connected successfully the following will be what you’ll see.

We’ll now proceed to create and configure the remote SFTP directory.
STEP 19
Right-click in any white space in the bottom-right-hand quadrant of the Filezilla GUI window. Then select Create Directory. This will create a file folder in the root SFTP folder on the SFTP server.

STEP 20
Create a name for the new directory, then click OK.

You’ll now see that our newly created directory has been created successfully on our client computer.

If we browse to the SFTPRoot folder on the SFTP server, we’ll see that our directory has been automatically created.

Now that our two sites have been configured. Let’s move on to the final step to perform a secure file transfer.
STEP 21
Select the “source file folder”, from the top left-hand file folder listing with the label Local site: that has the file/files that you want to transfer to your server. Our folder is C:UsersKurwinDownloads. On the Remote site: select your destination file folder. Locate your file under the bottom-left hand file listings then right-click it and select Upload.

You’ll now see that your file has been transferred successfully.

SFTP server verifies our successful transfer. We see our file in our target directory within our root directory.

That’s it. We have now successfully set up a SFTP server in a Windows environment.
 There is a better way to do IT with V2 Cloud
By using V2 Cloud, you get access to a fully-integrated virtual desktop solution, without the traditional complexity of other cloud providers.
There is an easier way to enable secure remote access to employees without sacrificing end-user experience and performance.
V2 Cloud offers a cloud desktop infrastructure with
- No hidden fees
- No complicated setup
- No contracts
- Flat-rate pricing model
We’re the #1 virtualization solution for small businesses. Create virtual desktops, servers, and applications to improve productivity and significantly reduce your IT costs.
Learn more about V2 Cloud and our cloud VDI solution. Get started with a risk-free 7-day trial, and experience the simplicity, scalability and power of V2 Cloud.

- Remove From My Forums
-
Question
-
HI guys, could anyone point me in the right direction to setup sftp on windows server 2016? I read that there’s native support for it, but having a brain fart at the moment. In the mean time, the box is setup and has ftp & ftps configured and working
properly.
All replies
-
You’ll reach more experts in microsoft dedicated forums over here.
https://forums.iis.net/1043.aspx/1?Security
Regards, Dave Patrick ….
Microsoft Certified Professional
Microsoft MVP [Windows Server] Datacenter ManagementDisclaimer: This posting is provided «AS IS» with no warranties or guarantees, and confers no rights.
-
Proposed as answer by
Friday, November 2, 2018 1:58 PM
-
Proposed as answer by
-
https://blogs.msdn.microsoft.com/powershell/2017/12/15/using-the-openssh-beta-in-windows-10-fall-creators-update-and-windows-server-1709/
https://www.bleepingcomputer.com/news/microsoft/how-to-install-the-built-in-windows-10-openssh-server/
-
Proposed as answer by
Travis HuangMicrosoft contingent staff
Friday, November 2, 2018 9:33 AM
-
Proposed as answer by
Documentation » Using WinSCP » Guides » Other »
You may want to install a secure FTP server on Windows either as standalone file storage or to have means of editing your website hosted on IIS (Internet Information Services) web server. In both cases, you can use an optional FTP Server component of the IIS. It can be installed standalone or along with a Web Server.1
- Installing FTP Server
- On Windows Server 2022, Windows Server 2019, Windows Server 2016 and Windows Server 2012
- On Windows Server 2008 R2
- On Windows Desktop (Windows 11, Windows 10, Windows 8, Windows 7 and Windows Vista)
- Opening IIS Manager
- Creating Certificate for the FTPS Server
- Servers behind external Firewall/NAT
- Windows Firewall Rules
- Restarting FTP Service
- Adding FTP Site
- To a Web Site
- Standalone FTP Site
- Connecting to Your FTPS Server
- Further reading
Installing FTP Server
On Windows Server 2022, Windows Server 2019, Windows Server 2016 and Windows Server 2012
- In Windows Server Manager go to Dashboard and run Manage > Add Roles and Features.
Advertisement
- In Add Roles and Features wizard:
- Proceed to Installation Type step and confirm Role-based or feature-based installation.
- Proceed to Server Roles step and check Web Server (IIS) role. Note that it is checked already, if you had IIS installed as a Web Server previously. If your are prompted to install IIS Management Console tool, confirm it.
- Proceed to Web Server Role (IIS) > Role Services step and check FTP Server role service. Uncheck Web Server role service, if you do not need it.
- Proceed to the end of the wizard and click Install.
- Wait for the installation to complete.

Advertisement
Skip to the next step.
On Windows Server 2008 R2
If you do not have IIS installed yet:
- In Windows Server Manager go to Roles node and in Roles Summary panel click Add Roles.
- In Add Roles wizard:
- Proceed to Server Roles step and check Web Server (IIS) role.
- Proceed to Role Services step and check FTP Server > FTP Service role service. Uncheck Web Server role service, if you do not need it. Make sure Management Service > IIS Management Console role service is checked.
- Proceed to the end of the wizard and click Install.
- Wait for the installation to complete.
If you have IIS installed already (i.e. as a Web Server):
- In Windows Server Manager go to Roles node and in Web Server (IIS) > Role Services panel click Add Role Services.
- In Add Role Services wizard:
- Check FTP Server > FTP Service role service.
- Make sure that Management Service > IIS Management Console is checked.
- Confirm with Next button.
- Proceed to the end of the wizard and click Install.
- Wait for the installation to complete.

Advertisement
Skip to the next step.
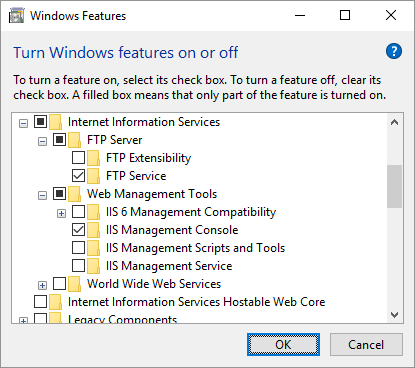
On Windows Desktop (Windows 11, Windows 10, Windows 8, Windows 7 and Windows Vista)
- Go to Control Panel > Programs > Programs and Features > Turn Windows features on or off.
- On a Windows Features window:
- Expand Internet Information Services > FTP Server and check FTP Service.
- Expand Internet Information Services > Web Management Tools and check IIS Management Console, if it is not checked yet.
- Confirm with OK button.
- Wait for the installation to complete.
Opening IIS Manager
- Go to Control Panel > System and Security > Administrative Tools (Windows Tools on Windows 11) and open Internet Information Services (IIS) Manager.
- Navigate to your Windows server node.
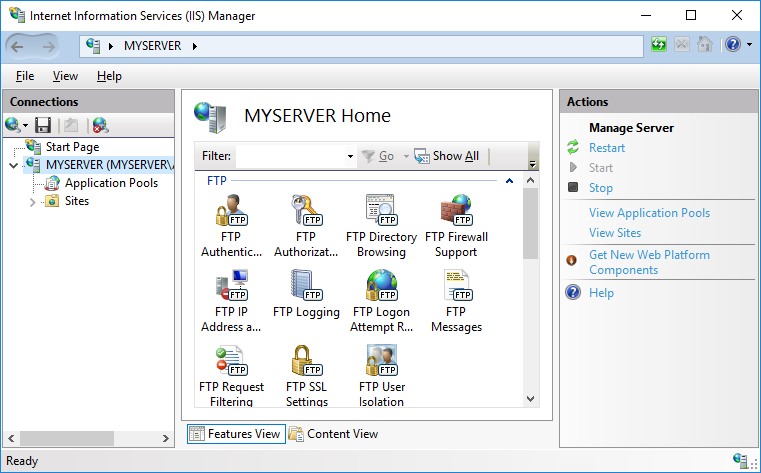
Advertisement
Creating Certificate for the FTPS Server
You need a TLS/SSL certificate to secure your FTP server. Ideally, you should acquire the certificate from a certificate authority.
You may also create a self-signed certificate locally, but in such case users of your FTPS server will be warned, when connecting to the server.
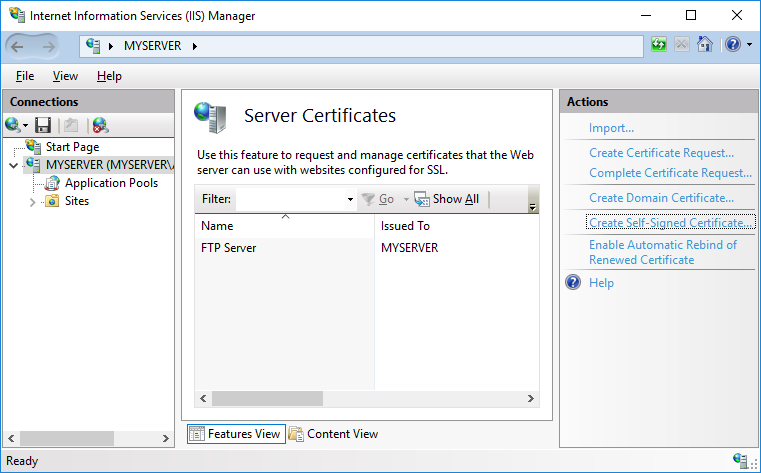
To create the self-signed certificate:
- In IIS Manager, open IIS > Server Certificates.
- Click on Create Self-Signed Certificate action.
- Specify a certificate name (e.g. “FTP Server”) and submit with OK.
Self-signed certificates created by old versions of IIS Manager do not work with FTPS clients that check for key usage violations.2 To create a certificate with a correct key usage, use New-SelfSignedCertificate PowerShell as an Administrator:
New-SelfSignedCertificate -FriendlyName "FTP Server" -CertStoreLocation cert:localmachinemy -DnsName ftp.example.com
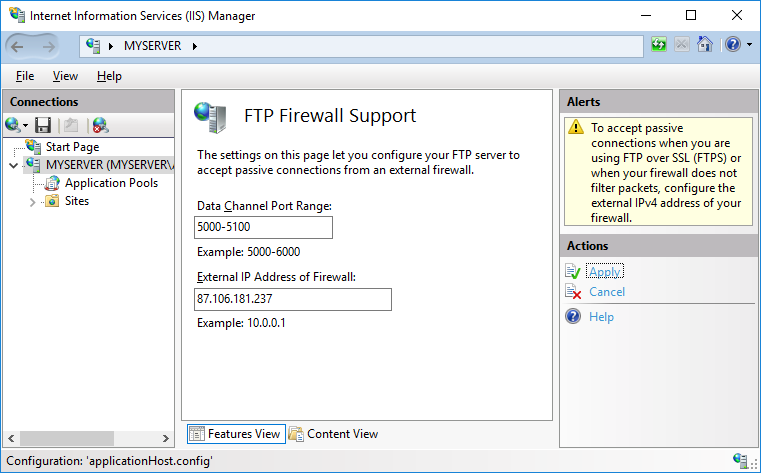
Servers behind external Firewall/NAT
If your server is behind an external firewall/NAT, you need to tell the FTP server its external IP address, to allow passive mode connections.
- In IIS Manager, open FTP > FTP Firewall Support.
- Specify your server’s external IP address.
For Microsoft Azure Windows servers you will find the external IP address in Public IP address section of the virtual machine page.
When behind an external firewall, you need to open ports for data connections (obviously in addition to opening an FTP port 21 and possibly an implicit TLS/SSL FTP port 990). You won’t probably want to open whole default port range 1024-65535. In such case, you need to tell the FTP server to use only the range that is opened on the firewall. Use a Data Channel Port Range box for that. Any time you change this range, you will need to restart FTP service. Learn how to open ports on Microsoft Azure.
Advertisement
Click Apply action to submit your settings.
Some external firewalls are able to monitor FTP control connection and automatically open and close the data connection ports as needed. So you do not need to have whole port range opened all the time, even when not in use. This won’t work with the secure FTPS as the control connection is encrypted and the firewall cannot monitor it.
Windows Firewall Rules
An internal Windows firewall is automatically configured with rules for the ports 21, 990 and 1024-65535 when IIS FTP server is installed.
The rules are not enabled initially on some versions of Windows.3 To enable or change the rules, go to Control Panel > System and Security > Windows Defender Firewall4 > Advanced Settings > Inbound Rules and locate three “FTP server” rules. If the rules are not enabled, click on Actions > Enable Rule.
Restarting FTP Service
While the internal Windows firewall is automatically configured to open FTP ports when FTP server is installed, this change does not seem to apply, until FTP service is restarted. The same is true for changing data channel port range.
To restart FTP service go to Control Panel > System and Security > Administrative Tools (Windows Tools on Windows 11) and open Services. Locate Microsoft FTP Service and click Restart service.5
Adding FTP Site
To a Web Site
If you want to add FTP server to manage your existing web site remotely, locate your web site node in IIS Manager and:
- Click Add FTP Publishing action.
- In Add FTP Site Publishing wizard:
- On an initial Binding and SSL Settings step, select Require SSL to disallow non-encrypted connections and select your certificate.
- On Authentication and Authorization Information step, select Basic authentication and make sure Anonymous authentication is not selected. Select which users (Windows accounts) you allow to connect to the server with what permissions. You can choose All users or select only some. Do not select Anonymous users.
- Submit with Finish button.
Advertisement
Your secure FTPS server is now running and can be connected to.

Standalone FTP Site
If you want to add a standalone FTP server to store/exchange files, locate Sites node (folder) of your Windows server in IIS Manager and:
- Click Add FTP Site action.
- In Add FTP Site wizard:
- On an initial Site Information step, give a name to your FTP site (if it’s the only site you are going to have, simple “FTP site” suffice) and specify a path to a folder on your server’s disk that is going to be accessible using FTP.
- On a Binding and SSL Settings step, select Require SSL to disallow non-encrypted connections and select your certificate.
- On Authentication and Authorization Information step, select Basic authentication and make sure Anonymous authentication is not selected. Select which users (Windows accounts) you allow to connect to the server with what permissions. You can choose All users or select only some. Do not select Anonymous users.
- Submit with Finish button.
Your secure FTPS server is now running and can be connected to.
Connecting to Your FTPS Server
For connecting to a Microsoft Azure Windows instance, see a specific guide.
Start WinSCP. Login Dialog will appear. On the dialog:
- Select FTP protocol and TLS/SSL Explicit encryption.
- Enter your Windows server hostname to Host name field. Avoid using an IP address to allow WinSCP to verify that the hostname matches with host the server’s certificate was issued to (not applicable to self-signed certificates).
- Specify username and password for Windows account you want to connect with (when using domain accounts, you need to specify a full username with format
domainusername). - You may want to save your session details to a site so you do not need to type them in every time you want to connect. Press Save button and type site name.
- Press Login to connect.
- If you are using self-signed certificate, you will be prompted to accept it.
Advertisement

Further reading
- Installing secure FTP server on Microsoft Azure using IIS;
- Installing SFTP/SSH Server on Windows using OpenSSH;
- Upload files to FTP server or SFTP server;
- Automate file transfers (or synchronization) to FTP server or SFTP server.
Last modified: 2022-10-21 by martin – Currently locked by: 178.175.132.72