![]()
- Home
-
Topics
-
- Airbrush
- American
- Art
- Art & Design
- Articles & News Stories
- Arts & Architecture
- Arts & Ideas
- Automobiles
- Baseball
- Bills
- Biography
- Biography & Memoir
- Book
- Book Excerpts
- Books
- Books — Fiction
- Books — Non-fiction
- Brochures
- Business & Economics
- Business & Leadership
- Business/Law
- Calendars
- California
- Chick Lit
- Children’s Literature
- Christian
- Comic Fiction & Satire
- Comics
- Computers & Technology
- Contemporary Fiction
- Contemporary Women
- Cooking & Food
- Corporate Finance
- Court Filings
- Court Records
- Crafts
- Creative Writing
- Criminal Procedure
- Crosswords
- Current Economy
- Databases
- Diet & Nutrition
- Documents
- Economic Conditions
- Economic History & Theory
- Education
- Emigration & Immigration Studies
- Energy
- Environmental Economics
- Essays
- Essays & Theses
- Ethnic & Minority Studies
- Ethnicity, Race & Gender
- Faith & Spirituality
- Family Sagas
- Fan Fiction
- Fantasy
- Fiction & Literature
- Film
- Finance
- Food & Wine
- Gadgets
- Games & Puzzles
- Genealogy
- Genre Fiction
- Government & Politics
- Government Documents
- Graphic Art
- Health & Lifestyle
- Health & Medicine
- Health & Wellness
- Historical
- History
- History, Criticism & Theory
- Homework
- Horror
- Humor
- Industries
- Information Technology & Theory
- Instruction manuals
- Internet & Technology
- Japanese
- Jewish
- Journals
- Law
- Legal
- Legal forms
- Letters
- Literature
- Magazines/Newspapers
- Contact
- Upload
- Login / Register
- Home
- Topics
- Documents
- Siebel Install Guide For Windows
Published on October 2021 | Categories: Documents | Downloads: 4 | Comments: 0 | Views: 66

Comments
Content
Sponsor Documents
![]()
Steps involved in Installing Siebel Server in Linux/Unix environment.
Siebel Server Installation and Setup Steps.
Installing Siebel Software
Documents to be followed.
- Server Installation Guide
- Web Client Administration Guide
Steps:
- Prepare for Installation
Verify prerequisites
Supported HW, Supported OS, Required Third-party SW
ID which SW on which machines
Fast Ethernet between SS + DB Server
- What Naming conventions should be used? (i.e. GW1, D1, S1, W1)
- What Directory Structures should be used?
- Siebel Service Owner Account/OS Account
- Need Siebel Service Owner account for Enterprise server processes
Siebel Monitoring Account for Resonate
RDBMS Account(s)
Install RDBMS + Create Siebel Database
- Empty database/tablespace with miniimum requirements based on your project’s sizing
- Oracle, DB2, SQLServer
Create Siebel File System
- Must be accessible from machines running ES + Clients
- Must support long and case-sensitive filenames
Install and Verify Siebel Software
Install Siebel Gateway Server
- May install on M machines in high-availability environment
- Verify by viewing directory + log files + seeing that NT/UNIX process is running
Install Siebel Enterprise Server
- · Run Enterprise prior to 1st Siebel Server (subsequent SS will specify this ES)
- · Must specify name of a SINGLE database
Install Siebel Server
Inspect SESsetup.log; verify NT/UNIX process is running for each SS
Install Siebel Database Server
- Run install.ksh
- Run grantusr.sql
Creates Siebel default users
- · Table owner = SIEBEL
- · Verify: log files + db connectivity + schema + seed data + repository data
Installation of Siebel Web Server Extension
- Install WebServer
- Install SWSE (eappweb.exe install program)
- Inspect virtual diectories.
Siebel Third-party products
- Post Installation
- Verify Client
- License Keys : Entered using tools
Related Posts
Installing
Siebel Tools and Web Client can be very daunting sometimes, especially when
you trying to install a new Version of Siebel on a new operating system. I spent many
weeks to get my Siebel 8.1.1.10 (technically ver 8.1.1.10.0) self learning environment on Windows 8 and as expected process was difficult.
Every step in installing there was some sort of issue, I have created list of issues I found and the work around. I have divided steps into posts:
Downloading Siebel Jar file from Oracle
Creating Siebel Install Image
Installing Siebel 8.1.1
Patching Siebel 8.1.1.10
Before proceeding with the steps please be informed about following:
- Siebel 8.1.1.10 Tools and Client can not be
installed at directly, you will have to install Siebel 8.1.1 first and
then create patch-set to install Siebel 8.1.1.10. However it is possible to create single Siebel 8.1.1.10 Server installation image. - You should have administrator privileges and have the latest version of JRE from java.com
- You would need oracle accoun to access and download all the files from Oracle Software Delivery Cloud required for Siebel 8.1.1 and Siebel 8.1.1.10
Disclaimer: Windows 8 is not supported/recommended platform for Siebel, please use solutions provided at your own discretion.
With the beginning of a new year, many of us try to catch up with the latest Siebel developments such as Open UI or simply want an easy-access self-study environment consisting of the Siebel Developer/Mobile Web Client, Sample Database and Siebel Tools. The following post is an updated version of the installation instructions I compiled some time ago.
It will guide you through all necessary steps to download, extract, install and setup Siebel CRM Developer Web Client, Tools and the Sample Database for Siebel 8.1.1.11, including Open UI.
Process for installing a Siebel CRM 8.1.1.11 self-study environment:
- Register/log in at Oracle’s Software Delivery Cloud (aka E-Delivery)
- Read and understand the license agreement
- Use a download manager
- Verify hard- and software
- Download the installation archives
- Extract the installation archives
- Run the Network Image Creator
- Prepare the browser
- Change compatibility settings and privileges for installer executables
- Install the Siebel Mobile/Developer Web Client base version (8.1.1.0)
- Apply the Siebel Mobile/Developer Web Client patch (8.1.1.11)
- Install the Siebel Sample Database
- Install Siebel Tools base version (8.1.1.0)
- Apply the Siebel Tools patch (8.1.1.11)
- Copy the new SRF file
- Change permissions on Siebel installation folders
- Modify the tools.cfg file and client .cfg files
- Manage shortcuts
- Get started with the Siebel Sample Database
(Note: Steps 1 and 3 to 7 can be skipped if you’re lucky enough to find the installers on one of your corporate network drives)
Step 1: Register/log in at Oracle’s Software Delivery Cloud (aka E-Delivery)
Oracle makes Siebel CRM software available for download on its Software Delivery Cloud. If you want to download software from there, you have to register with your name, company and e-mail address. You will receive a notification after approximately one business day that you can now use the Software Delivery Cloud.

Step 2: Read and understand the license agreement
“a nonexclusive, nontransferable limited license to use the programs only for the purpose of developing, testing, prototyping and demonstrating your application, and not for any other purpose”
Step 3: Use a download manager
Because of the size of the .zip archives you’re going to download onto your hard disk, it is highly recommended to use a download management tool such as Free Download Manager (FDM).
FDM is my tool of choice because of a nice feature called “ZIP Preview” which allows you to preselect the content of the zip file before starting the download.

The ZIP Preview is especially useful to uncheck all the unneeded language packs, so that your final download size is much smaller (and faster).
When you decide to install FDM, you will notice that it creates plug-ins for your browser(s). To initiate the download in FDM, you simply click the link within your browser as usual and the download will be forwarded to FDM.
Step 4: Verify hard- and software
If you have access to My Oracle Support, you can access the system requirements and platform documentation via the Certifications tab as indicated here. For a self-study environment as installed in this article, you are fine if you have a recent laptop or desktop with at least 4 GB of RAM and (of course) Windows 7 64 bit. If you use virtual machines, ensure that you place them on high-speed disks and reserve enough RAM for best performance.
In addition, ensure that you have installed modern versions of your favorite browser, keeping in mind that if you intend to run Siebel in High-Interactivity (aka “ActiveX”) mode, you must have Microsoft Internet Explorer 7 or 8 and not any higher version available. For best performance of Siebel Open UI, you should consider installing Google Chrome or Mozilla Firefox in addition to MS IE.
Personally I prefer virtual machines because of the greater flexibility. Some companies do not allow their employees to install software on corporate laptops, so running a (privately owned) virtual machine is sometimes the only option (sad, but true).
Step 5: Download the installation archives
Now it’s time to log in to Oracle’s Software Delivery Cloud and search for Siebel CRM forMicrosoft Windows (64 bit). As we are going to download and install Siebel Industry Applications (SIA) 8.1.1, we have to click the hyperlink for
Siebel Industry Applications Innovation Pack 2013 Release 8.1.1.11 Media Pack for Microsoft Windows
Then we download the following archives and save them in a single directory. If your download manager allows to control the files to download within an archive, please refer to the list of .jar files below each package. Note that in this article we only cover the English-American (enu) language pack. If you want to download additional language packs, please ensure to include the language-specific files identified by the three-letter language code as part of the name (e.g. deu for German).
Siebel Industry Applications Version 8.1.1.11 Siebel Client (Starter Installation Requirement): V39882-01.zip
SBA_8.1.1.11_Base_Windows_Siebel_Web_Client.jar
SBA_8.1.1.11_enu_Windows_Siebel_Web_Client.jar
Siebel Industry Applications Version 8.1.1.11 Siebel Tools (Starter Installation Requirement): V39881-01.zip
SBA_8.1.1.11_Base_Windows_Siebel_Tools.jar
SBA_8.1.1.11_enu_Windows_Siebel_Tools.jar
Siebel Industry Applications Version 8.1.1.11 Sample Database Files: V39852-01.zip
SBA_8.1.1.11_Base_Windows_Siebel_Sample_Database.jar
SBA_8.1.1.11_enu_Windows_Siebel_Sample_Database.jar
Siebel Industry Applications Version 8.1.1.11 ImageCreator Files (Starter Installation Requirement): V39861-01.zip
all files
Siebel Industry Applications Version 8.1.1.11 Siebel Repository Files: V39883-01.zip
srf.zip (extract this file and keep only the files for the languages you want to install)
Siebel Business Applications Version 8.1.1.0 Siebel Client: V36459-01_1of2.zip
SBA_8.1.1.0_Base_Windows_Siebel_Web_Client.jar
SBA_8.1.1.0_enu_Windows_Siebel_Web_Client.jar
Siebel Business Applications Version 8.1.1.0 Siebel Tools: V36460-01.zip
SBA_8.1.1.0_Base_Windows_Siebel_Tools.jar
SBA_8.1.1.0_enu_Windows_Siebel_Tools.jar
Step 6: Extract the installation archives
Most probably you are using a Microsoft Windows machine for the files, so it is recommended to use 7-Zip to extract the content of the downloaded zip archives into a single folder.
As a result of the extract, we have a folder full of .jar files and the files for the Network Image Creator.
 |
| Click to enlarge. |
Step 7: Run the Network Image Creator
The Siebel Network Image Creator (snic) is needed to create the final installer directories and files. To launch it, you have to open a Windows command shell (aka DOS box) and navigate to the directory containing the extracted .jar files. Next, set the JAVA_HOME environment variable to the location of the Java runtime environment (JRE) on your machine using a command similar to the following (of course, if you haven’t installed the JRE yet, it is time to do so now):
set JAVA_HOME=C:Program FilesJavajre1.7.0_45
Your Java version and install folder might vary.
Next, launc the image creator by issuing the following command:
snic.bat
The wizard will launch and guide you through the network image creation process. Basically the image creator asks for the following:
- Whether you want to create a new image or add a language pack (select “create a new image”).
- Enter the path where to store the installer images. (enter a suitable path)
- The version (8.1.1.0 or 8.1.1.11, see below)
- The OS platform (select “Windows”)
- The products (select “Siebel Tools”, “Siebel Web Client” and “Siebel Sample Database”)
- The languages (select at least “ENU”)

Because the Siebel Developer Web Client and Siebel Tools must be installed with the base installer (8.1.1.0) first and then applying the patch (8.1.1.11), we must invoke the snic twice, once for each version. When the second run has finished, you will find the following directory structure in the location you provided in step 2.

Step 8: Prepare the browser
As indicated above, you should have a version of Microsoft Internet Explorer not higher than 8. The following settings are recommended for running the Siebel High-Interactivity client flawlessly. You might not be able to complete this step because of security restrictions on your laptop or in your corporation. In this case, please contact your IT administrator.
Make IE the default browser
Because the installer for the Siebel Developer Web Client will try to pre-load the ActiveX controls, it launches an HTML page. This will only work as intended when Internet Explorer is the default browser for your system. To set IE as the default browser, open the Windows Control Panel, go to Default Programs, and click Set your default programs.
Next, select Internet Explorer in the list and click Set this program as default.
Note: you can change your default browser to the one you love more than IE once the installation is finished.
Pop-up Blocker settings:
- In Internet Explorer, go to Tools – Pop-up Blocker – Pop-up Blocker Settings.
- Add http://localhost, http://%5Bshort machine name] and http://%5Bfully qualified machine name] to the allowed sites list (see screenshot below for an example)
Alternatively, set the blocking level to “Low” or disable the Pop-up Blocker entirely (if applicable).
Security settings:
- In Internet Explorer, go to Tools – Internet Options – Security.
- Select the Trusted Sites icon and click the Sites button.
- Add http://localhost, http://%5Bshort machine name] and http://%5Bfully qualified machine name] to the Websites list (see screenshot below for an example)
- Set the security level for the Trusted Sites zone to “Low”.
Alternatively, click the Custom Level… button and set all ActiveX related entries to “Enable” or “Prompt”.
 |
| Internet Explorer settings for trusted sites. |
Internet Explorer 9 settings
For those on Internet Explorer 9, you should say a big thank you to Richard who postedthese additional steps:
- Add http://localhost, http://%5Bshort machine name] and http://%5Bfully qualified machine name] to the list of compatibility mode sites.
- Go to Tools – Manage Add-ons and set the Java Add On parameter to “Enabled“.
Note: Even if you manage to run the web client in IE 9, you will face problems with the Siebel Tools applet editor as described by siebelish here. (Note that in IP 2013 this problem should be corrected, but I wasn’t yet able to verify that).
Step 9: Change compatibility settings and privileges for installer executables
Since we are installing on Windows 7 and Siebel 8.1.1.x clients are not officially supported on that OS, we have to switch the compatibility mode for oui.exe, module.exe (for Siebel_Web_Client and Siebel_Tools), install.exe and setup.exe (for the sample Siebel_Sample_Database) back to “Windows XP“. To be on the safe side, also check the “Run this program as an administrator” flag. To do so, right-click on the file in Windows Explorer, go to Properties and in the Compatibility tab, change the settings similar to the screenshot below.

Here is a list of files and their location for which you will have to change the compatibility settings as described above:
..8.1.1.0WindowsClientSiebel_Web_ClientDisk1installoui.exe
..8.1.1.0WindowsClientSiebel_ToolsDisk1installoui.exe
..8.1.1.11WindowsClientSiebel_Web_ClientDisk1installmodule.exe
..8.1.1.11WindowsClientSiebel_ToolsDisk1installmodule.exe
..8.1.1.11WindowsClientSiebel_Sample_Databaseinstall.exe
..8.1.1.11WindowsClientSiebel_Sample_DatabaseSetup.exe
Step 10: Install the Siebel Mobile/Developer Web Client base version (8.1.1.0)
The following procedure describes the installation of the Siebel Mobile Web Client for use with the Siebel Sample Database. Important: Don’t use or start any other programs until the installation is finished.
- Navigate to the 8.1.1.0WindowsClientSiebel_Web_ClientDisk1install folder of the installation image and double-click the oui.exe file.
- Follow the wizard and keep the default settings (except where noted below). Take a note of the installation folder (you need it for the sample database installer).
- Select the desired language packs (always include American English).
- At the client type selection, select “Mobile Web Client”.
- Keep the defaults in the remaining dialogs. You can always change the settings later in the client configuration file (.cfg).
- During the installation, Internet Explorer is launched to pre-load the Siebel ActiveX controls. When prompted, allow the execution of any ActiveX content. You will be prompted to close the IE window so that the installer can continue.
Step 11: Apply the Siebel Mobile/Developer Web Client patch (8.1.1.11)
Next, we will apply patch 8.1.1.11 (aka Innovation Pack 2013) right away as follows:
- Navigate to the 8.1.1.11WindowsClientSiebel_Web_ClientDisk1install folder of the installation image and double-click the setup.bat file.
- Click Next in the Welcome screen.
- Ensure that the client home you defined in step 10.2 is selected and click Next.
- Click Install.
- Wait until the dialog displays a success message and exit the installer.
Step 12: Install the Siebel Sample Database
The installer for the Siebel Sample Database can be found in the Siebel_Sample_Database folder of the installation image. We can follow the procedure below to install the sample database. Again: Don’t use or start any other programs until the installation is finished.
- Double-click the install.exe file in the Siebel_Sample_Database folder.
- Select a language for the installation dialogs.
- Keep the defaults in all dialogs except for those described below.
- Select the custom installation type.
- Change the installation directory to the client’s installation folder (this is important).
- In the language selection, select only “English (American)”. Selecting additional language packs only copies non-english seed data files and does not change the database. You can use these seed data files to produce a sample database specific to a language pack of your choice but you can only import one language.
- Keep the defaults in the remaining dialogs and wait for the installation to finish.
Step 13: Install Siebel Tools base version (8.1.1.0)
To install the Siebel Tools base version (8.1.1.0), follow these steps:
- Double-click the oui.exe file in the8.1.1.0WindowsClientSiebel_ToolsDisk1install folder of the installation image.
- Keep the defaults in the dialogs except for the following.
- Choose a suitable path and home.
- In the file system path dialog select the path which points to the SAMPLEFILES folder in the client installation directory.
- Wait for the installer to finish before you use or launch any other program.
Step 14: Apply Siebel Tools patch (8.1.1.11)
To apply the Siebel Tools patch (8.1.1.11), follow these steps:
- Double-click the setup.bat file in the 8.1.1.11WindowsClientSiebel_ToolsDisk1install folder of the installation image.
- Click Next in the Welcome screen.
- Ensure that the client home you defined in step 10.2 is selected and click Next.
- Click Install.
- Wait until the dialog displays a success message and exit the installer.
Step 15: Copy the new SRF file
Copy the siebel_sia.srf file you extracted from the srf.zip archive to the correct language specific directory in the OBJECTS folder of both the Developer Web Client and Siebel Tools.
Step 16: Change permissions on Siebel installation folders
To be able to edit .cfg files and for other reasons, we should ensure that our user account has full control over all files and subfolders in the installation directories. One way to do that is as follows:
- In Windows Explorer, navigate to the uppermost installation folder for the Siebel software.
- Right-click the folder and select Properties.
- Click the Security tab.
- Select the Authenticated Users group.
- Click the Edit button.
- Set the Full Control permission level to “Allow”.
- Click OK.
- Click the Advanced button.
- Click the Change Permissions button.
- Click the check box named “Replace all child permissions….“.
- Click OK.
- Click Yes.
- Click OK.
Step 17a: Modify the tools.cfg file for use with the Siebel Sample Database
The following steps are necessary to be able to connect Siebel Tools to the Siebel Sample Database. Remember we installed the sample database into the client installation directory. What we do is change the ConnectString parameter in the tools.cfg file to point to the sample database file (sse_samp.dbf) in the client directory.
- Open the uagent.cfg file in the client’s BINENU directory with Notepad.
- Copy the value of the ConnectString parameter in the [Sample] section of theuagent.cfg file to the clipboard.
- Open the tools.cfg file in the Siebel Tools BINENU directory with Notepad.
- Overwrite the value of the ConnectString parameter in the [Sample] section of thetools.cfg file with the value you copied in step 6.
- Save and close all files.
Step 17b: Modify the client .cfg files
Now, we prepare the client configuration files and (optionally) create .cfg files for running the Siebel Client in Open UI mode.
- Navigate to the client install folder and open the BINENU directory.
- Open the client .cfg file of your choice (e.g. uagent.cfg for Siebel Call Center)
- Set the EnableFQDN parameter to FALSE.
- To create a .cfg file for Open UI, it is recommended to copy an existing .cfg file and rename it to something like uagent_oui.cfg.
- In the copied file, find the [InfraUIFramework] section and add the following line:
EnableOpenUI = TRUE
Repeat these steps for every application you want to use. For example, for Siebel Marketing, you would choose the market.cfg file.
Step 17: Manage Shortcuts
The installers place a bunch of pre-built shortcuts into your start menu. To ensure proper execution of your shortcuts, set the compatibility for all shortcuts you want to use to “Windows XP” and check the “Run this program as administrator” flag.
If you don’t have MS Internet Explorer set as your system default browser, you must add a string similar to the following to the shortcuts which launch high-interactivity clients.
/b “C:Program Files (x86)Internet Exploreriexplore.exe”
Here is an example shortcut to launch Siebel Call Center in Open UI mode in the default browser:
D:siebelclientBINsiebel.exe /c D:siebelclientbinenuuagent_oui.cfg /d sample /u SADMIN /p SADMIN
If you want to switches siebel.exe and siebdev.exe:
siebel.exe, as we all know, is the engine behind the non-zero-footprint flavour of Siebel applications, namely the Mobile Web Client or the Developer Web Client. Some call it fat client, some call it dedicated web client, depending mostly on the year when they first heard about it. Discussions whether the Mobile Web Client is a different installer than the Developer Web Client and whether the Developer Web Client is the same thing as the fat client often reach religious depths.
The installer places a bunch of shortcuts in the windows start menu which usually follow the syntax of
<path to siebel.exe> /c <path to .cfg file>
So /c is a mandatory switch because any Siebel applications consists of the very same executable along with a different configuration file from which it reads the rest of its knowledge.
In order to please the more inquisitive among you, find below a complete list of switches that you can use with siebel.exe. If you know of any other switch, please inform us.
Typical switches (used in shortcuts)
/c Path to .cfg file (required), directory path defaults to <client_installdir>binenu
/d Datasource (as in .cfg file), defaults to local
/l language (optional, language pack must be installed), defaults to enu
/u Username (optional)
/p Password (optional)
/s Path to spool file (optional, to spool all SQL generated by siebel.exe)Extra switches
/b Path to Browser executable (optional, for multi-browser testing of customer or partner (SI) applications)
/h Debug Mode (used with Siebel Tools for debugging)
/ctsim (often confused with /ctisim, which does not work 😉 CTI Simulation mode (used for demo; no longer valid with Siebel 8.1.1.x and later because Oracle removed the demo driver dll)
/editseeddata allows modification of seed data, often referred to in maintenance release guides
/webservice (followed by a port number) can be used since fix pack 8.1.1.2 to use the Developer Web Client to test Siebel inbound web services.
/z will cause the Developer Web Client to navigate to the Workflow Simulator Wait View. This switch is obviously intended for the Workflow Simulator functionality.And now for siebdev.exe:
siebdev.exe is the engine behind Siebel Tools, which is the only application that does not run in a browser window. However, Siebel Tools is defined in the Siebel Repository and the siebdev.exe works just like the siebel.exe. That is, it reads a .cfg file and an .srf file (the file that newbies usually try to compile to during their first steps with Siebel Tools).
So siebdev.exe accepts most of the switches that siebel.exe does, namely /c, /d, /u, /pand /s.
But there are some additional switches, used in conjunction with the “classic” ones. They have been passed along from consultant mouth to consultant ear for eons before they found their way into the documentation.
/bv runs all validation rules for the entire repository, so take your time
/batchimport automates the import of .sif files
/batchexport automates the export of objects to .sif files
/bc allows to run batch compilation
/tl language (typically used with /bc for multiple language deployments)
/applybatchpatch is used for applying batch patches, or patches in batches.
Step 18: Get started with the Siebel Sample Database
Congratulations! You can now launch all Siebel CRM applications from the Start Menu and connect to the Sample data source.
Of course, there’s the Siebel Administrator account (SADMIN) to start with. The passwords in the sample database are equal to the account name. But there are more meaningful demo user accounts in the sample database.
Make sure you take a look into the Demo Users Reference (in the Siebel bookshelf) so you are one step ahead of the competition ;-).
 |
| Siebel Call Center 8.1.1.11 (slightly altered vanilla theme) in Open UI mode. |
It has become a tradition at this humble blog that we provide instructions how to create an easy-access self-study environment consisting of the Siebel Developer/Mobile Web Client, Sample Database and Siebel Tools. The following post is an updated version of previous instructions and has been updated to reflect all necessary steps to download, extract, install and setup Siebel CRM Developer Web Client, Tools and the Sample Database for Siebel 8.1.1.14 (or 8.2.2.14), better known as Innovation Pack 2014.
Process for installing a Siebel CRM IP 2014 self-study environment:
- Register/log in at Oracle’s Software Delivery Cloud (aka E-Delivery)
- Read and understand the license agreement
- Use a download manager
- Verify hard- and software
- Download the installation archives
- Extract the installation archives
- Run the Network Image Creator
- Prepare the browser
- Install the Siebel Mobile/Developer Web Client
- Install the Siebel Sample Database
- Install Siebel Tools
- Modify the .cfg files
- Manage shortcuts
- Get started with the Siebel Sample Database
(Note: Steps 1 and 3 to 7 can be skipped if you’re lucky enough to find the installers on one of your corporate network drives).
Step 1: Register/log in at Oracle’s Software Delivery Cloud (aka E-Delivery)
Oracle makes Siebel CRM software available for download on its Software Delivery Cloud. If you want to download software from there, you have to register with your name, company and e-mail address. You will receive a notification after approximately one business day that you can now use the Software Delivery Cloud.

Step 2: Read and understand the license agreement
«… a nonexclusive, nontransferable, limited license to internally use the Programs, subject to the restrictions stated in this Agreement, only for the purpose of developing, testing, prototyping, and demonstrating Your application and only as long as Your application has not been used for any data processing, business, commercial, or production purposes, and not for any other purpose.«
Step 3: Use a download manager
Because of the size of the .zip archives you’re going to download onto your hard disk, it is highly recommended to use a download management tool such as Free Download Manager (FDM).
FDM is my tool of choice because of a nice feature called «ZIP Preview» which allows you to preselect the content of the zip file before starting the download.

The ZIP Preview is especially useful to uncheck all the unneeded language packs, so that your final download size is much smaller (and faster).
When you decide to install FDM, you will notice that it creates plug-ins for your browser(s). To initiate the download in FDM, you simply click the link within your browser as usual and the download will be forwarded to FDM.
Step 4: Verify hard- and software
If you have access to My Oracle Support, you can access the system requirements and platform documentation via the Certifications tab as indicated here. For a self-study environment as installed in this article, you are fine if you have a recent laptop or desktop with at least 4 GB of RAM and (of course) Windows 7 64 bit. If you use virtual machines, ensure that you place them on high-speed disks and reserve enough RAM for best performance.
In addition, ensure that you have installed modern versions of your favorite browser, keeping in mind that if you intend to run Siebel in High-Interactivity (aka «ActiveX») mode, you must have Microsoft Internet Explorer 8 and not any higher version available. For best performance of Siebel Open UI, you should consider installing Google Chrome or Mozilla Firefox in addition to MS IE.
Personally I prefer virtual machines because of the greater flexibility. Some companies do not allow their employees to install software on corporate laptops, so running a (privately owned) virtual machine is sometimes the only option (sad, but true).
Step 5: Download the installation archives
Now it’s time to log in to Oracle’s Software Delivery Cloud and search for Siebel CRM for Microsoft Windows (64 bit). As we are going to download and install Siebel Industry Applications 8.1.1.14, we have to click the hyperlink for
Siebel Industry Applications Innovation Pack 2014 Release 8.1.1.14 Media Pack for Microsoft Windows
Then we download the following archives and save them in a single directory. If your download manager allows to control the files to download within an archive, please refer to the list of .jar files below each package. Note that in this article we only cover the English-American (enu) language pack. If you want to download additional language packs, please ensure to include the language-specific files identified by the three-letter language code as part of the name (e.g. deu for German).
Siebel Industry Applications Version 8.1.1.14 Siebel Client (Starter Installation Requirement):
SBA_8.1.1.14_Base_Windows_Siebel_Web_Client.jar
SBA_8.1.1.14_enu_Windows_Siebel_Web_Client.jar
Siebel Industry Applications Version 8.1.1.14 Siebel Tools (Starter Installation Requirement):
SBA_8.1.1.14_Base_Windows_Siebel_Tools.jar
SBA_8.1.1.14_enu_Windows_Siebel_Tools.jar
Siebel Industry Applications Version 8.1.1.14 Sample Database Files:
SBA_8.1.1.14_Base_Windows_Siebel_Sample_Database.jar
SBA_8.1.1.14_enu_Windows_Siebel_Sample_Database.jar
Siebel Industry Applications Version 8.1.1.14 ImageCreator Files (Starter Installation Requirement):
all files
Step 6: Extract the installation archives
Most probably you are using a Microsoft Windows machine for the files, so it is recommended to use 7-Zip to extract the content of the downloaded zip archives into a single folder.
As a result of the extract, we have a folder full of .jar files and the files for the Network Image Creator.
Step 7: Run the Network Image Creator
The Siebel Network Image Creator (snic) is needed to create the final installer directories and files. To launch it, you have to open a Windows command shell (aka DOS box) and navigate to the directory containing the extracted .jar files. Next, set the JAVA_HOME environment variable to the location of the Java runtime environment (JRE) on your machine using a command similar to the following (of course, if you haven’t installed the JRE yet, it is time to do so now):
set JAVA_HOME=C:Program FilesJavajre1.7.0_45
Your Java version and install folder might vary.
Next, launch the image creator by issuing the following command:
snic.bat
The wizard will launch and guide you through the network image creation process. Basically the image creator asks for the following:
- Whether you want to create a new image or add a language pack (select «create a new image»).
- Enter the path where to store the installer images. (enter a suitable path)
- The OS platform (select «Windows»)
- The products (select «Siebel Tools», «Siebel Web Client» and «Siebel Sample Database»)
- The languages (select at least «ENU»)

Wait until the wizard completes the extraction process and verify that the installer packages are now present in the path you provided.
Step 8: Prepare the browser
The following settings are recommended for running the client installer and the High-Interactivity client flawlessly. You might not be able to complete this step because of security restrictions on your laptop or in your corporation. In this case, please contact your IT administrator.
Make IE the default browser
Because the installer for the Siebel Developer Web Client will try to pre-load the ActiveX controls, it launches an HTML page. This will only work as intended when Internet Explorer is the default browser for your system. To set IE as the default browser, open the Windows Control Panel, go to Default Programs, and click Set your default programs.
Next, select Internet Explorer in the list and click Set this program as default.
Note: you can change your default browser back to the one you love more than IE once the installation is finished.
Pop-up Blocker settings:
- In Internet Explorer, go to Tools — Pop-up Blocker — Pop-up Blocker Settings.
- Add http://localhost, http://[short machine name] and http://[fully qualified machine name] to the allowed sites list (see screenshot below for an example)
Alternatively, set the blocking level to «Low» or disable the Pop-up Blocker entirely (if applicable).
Security settings:
- In Internet Explorer, go to Tools — Internet Options — Security.
- Select the Trusted Sites icon and click the Sites button.
- Add http://localhost, http://[short machine name] and http://[fully qualified machine name] to the Websites list (see screenshot below for an example)
- Set the security level for the Trusted Sites zone to «Low».
Alternatively, click the Custom Level… button and set all ActiveX related entries to «Enable» or «Prompt».
Update: With IE 8, the setting «Only allow approved domains to use ActiveX without prompt» should be set to disabled as per MOS Document Id 1270206.1 (thanks to Tobias for the hint).
 |
| Internet Explorer settings for trusted sites. |
Internet Explorer 9 settings
For those on Internet Explorer 9, you should say a big thank you to Richard who posted these additional steps:
- Add http://localhost, http://[short machine name] and http://[fully qualified machine name] to the list of compatibility mode sites.
- Go to Tools — Manage Add-ons and set the Java Add On parameter to «Enabled«.
Step 9: Install the Siebel Mobile/Developer Web Client
The following procedure describes the installation of the Siebel Mobile Web Client for use with the Siebel Sample Database. Important: Don’t use or start any other programs until the installation is finished.
- Navigate to the 8.1.1.4WindowsClientSiebel_Web_ClientDisk1install folder of the installation image and double-click the setup.bat file.
- Uncheck the option to receive security updates and confirm.
- Choose «New Installation» to install a new instance. If you want you can choose «Migrate Installation» if you wish to upgrade an existing client instance to IP 2014.
- Provide a meaningful destination folder.
- Select the desired language packs (always include American English).
- At the client type selection, select «Mobile Web Client». Check the «Activate Open UI» option if you want all .cfg files to contain the EnableOpenUI parameter set to TRUE.
- During the installation, Internet Explorer is launched to pre-load the Siebel ActiveX controls. When prompted, allow the execution of any ActiveX content. You will be prompted to close the IE window so that the installer can continue.
Step 10: Install the Siebel Sample Database
The installer for the Siebel Sample Database can be found in the Siebel_Sample_Database folder of the installation image. We can follow the procedure below to install the sample database. Again: Don’t use or start any other programs until the installation is finished.
- Double-click the install.exe file in the Siebel_Sample_Database folder.
- Select a language for the installation dialogs.
- Keep the defaults in all dialogs except for those described below.
- Select the custom installation type.
- Change the installation directory to the client’s installation folder (this is important).
- In the language selection, select only «English (American)». Selecting additional language packs only copies non-english seed data files and does not change the database. You can use these seed data files to produce a sample database specific to a language pack of your choice but you can only import one language.
- Keep the defaults in the remaining dialogs and wait for the installation to finish.
Step 11: Install Siebel Tools
To install Siebel Tools, follow these steps:
- Double-click the setup.bat file in the 8.1.1.4WindowsClientSiebel_ToolsDisk1install folder of the installation image.
- Uncheck the option to receive security updates and confirm.
- Choose «New Installation» to install a new instance. If you want you can choose «Migrate Installation» if you wish to upgrade an existing Tools instance to IP 2014.
- Provide a meaningful destination folder.
- Keep the defaults in the remaining dialogs except for the following:
- In the file system path dialog select the path which points to the SAMPLEFILES folder in the client installation directory.
- Wait for the installer to finish before you use or launch any other program.
Step 12a: Modify the tools.cfg file for use with the Siebel Sample Database
The following steps are necessary to be able to connect Siebel Tools to the Siebel Sample Database. Remember we installed the sample database into the client installation directory. What we do is change the ConnectString parameter in the tools.cfg file to point to the sample database file (sse_samp.dbf) in the client directory.
- Open the uagent.cfg file in the client’s BINENU directory with Notepad.
- Copy the value of the ConnectString parameter in the [Sample] section of the uagent.cfg file to the clipboard.
- Open the tools.cfg file in the Siebel Tools BINENU directory with Notepad.
- Overwrite the value of the ConnectString parameter in the [Sample] section of the tools.cfg file with the value you copied in step 2.
- Save and close all files.
Step 12b: Modify the client .cfg files
Now, we prepare the client configuration files and (optionally) create .cfg files for running the Siebel Client in Open UI mode.
- Navigate to the client install folder and open the BINENU directory.
- Open the client .cfg file of your choice (e.g. uagent.cfg for Siebel Call Center)
- Set the EnableFQDN parameter to FALSE.
- If you want to run HI and Open UI in parallel, it is recommended to create separate .cfg files. For example if you chose to activate Open UI during the client installation, copy an existing file such as uagent.cfg and rename the copy to uagent_hi.cfg or similar.
- In the copied file, find the [InfraUIFramework] section and add the following line:
EnableOpenUI = FALSE
Repeat these steps for every application you want to use. For example, for Siebel Marketing, you would choose the market.cfg file.
Step 13: Manage Shortcuts
If you don’t have MS Internet Explorer set as your system default browser, you must add a string similar to the following to the shortcuts that launch high-interactivity clients.
/b «C:Program Files (x86)Internet Exploreriexplore.exe»
Note that you must point to the 32-bit version of IE to run the HI client. For Open UI, you can use any modern browser (IE 10+, Firefox, Chrome, Safari, etc.) in its 32-bit or 64-bit variant.
Here is an example shortcut to launch Siebel Call Center in Open UI mode in the default browser:
D:siebelclientBINsiebel.exe /c D:siebelclientbinenuuagent.cfg /d sample /u SADMIN /p SADMIN
Check out this post for additional switches for siebel.exe and siebdev.exe.
Step 14: Get started with the Siebel Sample Database
Congratulations! You can now launch all Siebel CRM applications from the Start Menu, connect to the Sample data source and explore Siebel standard functionality.
Of course, there’s the Siebel Administrator account (SADMIN) to start with. The passwords in the sample database are equal to the account name. But there are more meaningful demo user accounts in the sample database.
Make sure you take a look into the Demo Users Reference (in the Siebel bookshelf) so you are one step ahead of the competition ;-).
 |
| Siebel Call Center IP 2014 |
Summary
Quite a stretch but with a bit of effort you will soon be able to call a Siebel CRM IP 2014 self-study environment your own. Now you are ready to explore the latest and greatest features such as Open UI and Siebel Mobile Applications on your own computer.
have a nice install day
@lex
This article requires that you have an Amazon AWS instance set up, as detailed in the previous article in this series. Downloading installation files should be something which is fairly simple, however in the Oracle scheme of things, the simplest of things can sometimes be the toughest. The first thing which needs to be done before the download is to
This article requires that you have an Amazon AWS instance set up, as detailed in the previous article in this series.
Downloading installation files should be something which is fairly simple, however in the Oracle scheme of things, the simplest of things can sometimes be the toughest. The first thing which needs to be done before the download is to get a proper browser installed on our Amazon instances, rather than the default Internet Explorer 11. For this article, we will use Chrome as our preferred browser.
We need the following applications other than the Siebel installation files.
- Java Development Kit (the latest version): While the download of the Siebel installation files does not require this, the extract and the creation of the installation image definitely requires this.
- Siebel Installation Files.
- Oracle Database Server Installation files.
The first step is to log on to the server we created (see previous article) with the 200 GB volume for the D drive. The zip files are fairly large and will need the additional disk space.
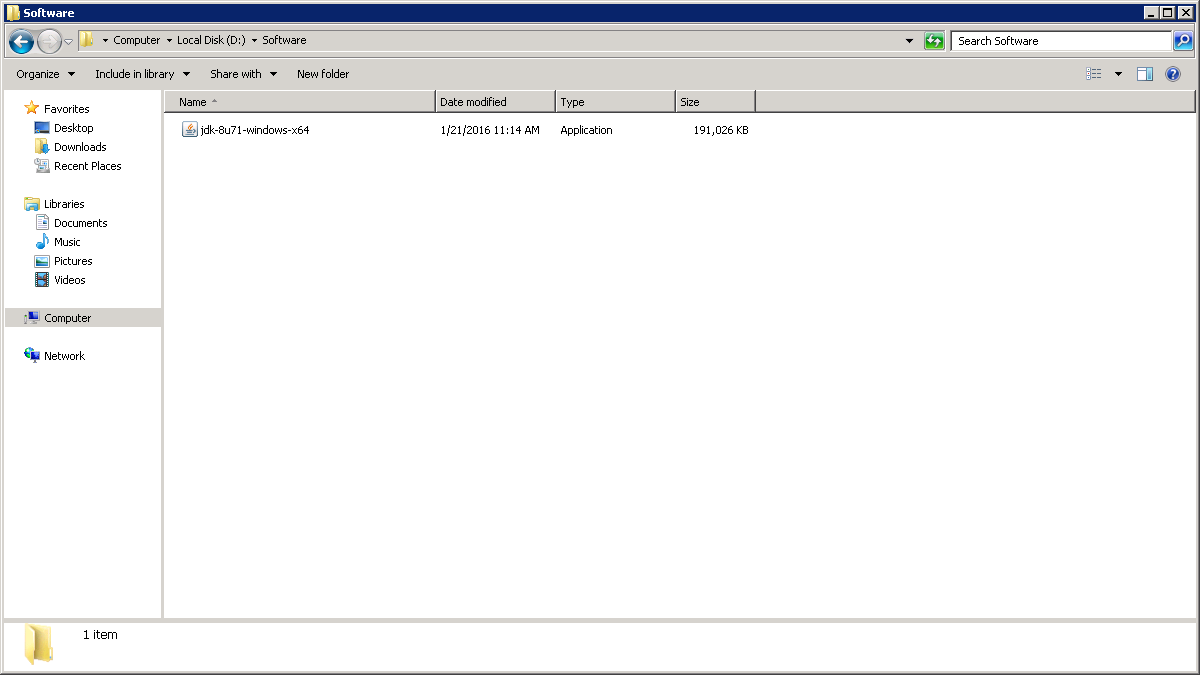
Create a folder called Software on the volume.
Create 2 subfolders in this folder called Siebel_Install_Zips and Oracle_Database_Zips.
Start the Chrome browser. Change the download location to D:Software. This is available in Settings->Advanced Settings->Downloads.
Download Java
Use Chrome to navigate to http://www.oracle.com/technetwork/java/javase/downloads/jdk8-downloads-2133151.html.
Accept the license agreement and Download the file jdk-8u71-windows-x64.exe.
Download the Siebel Installation Files
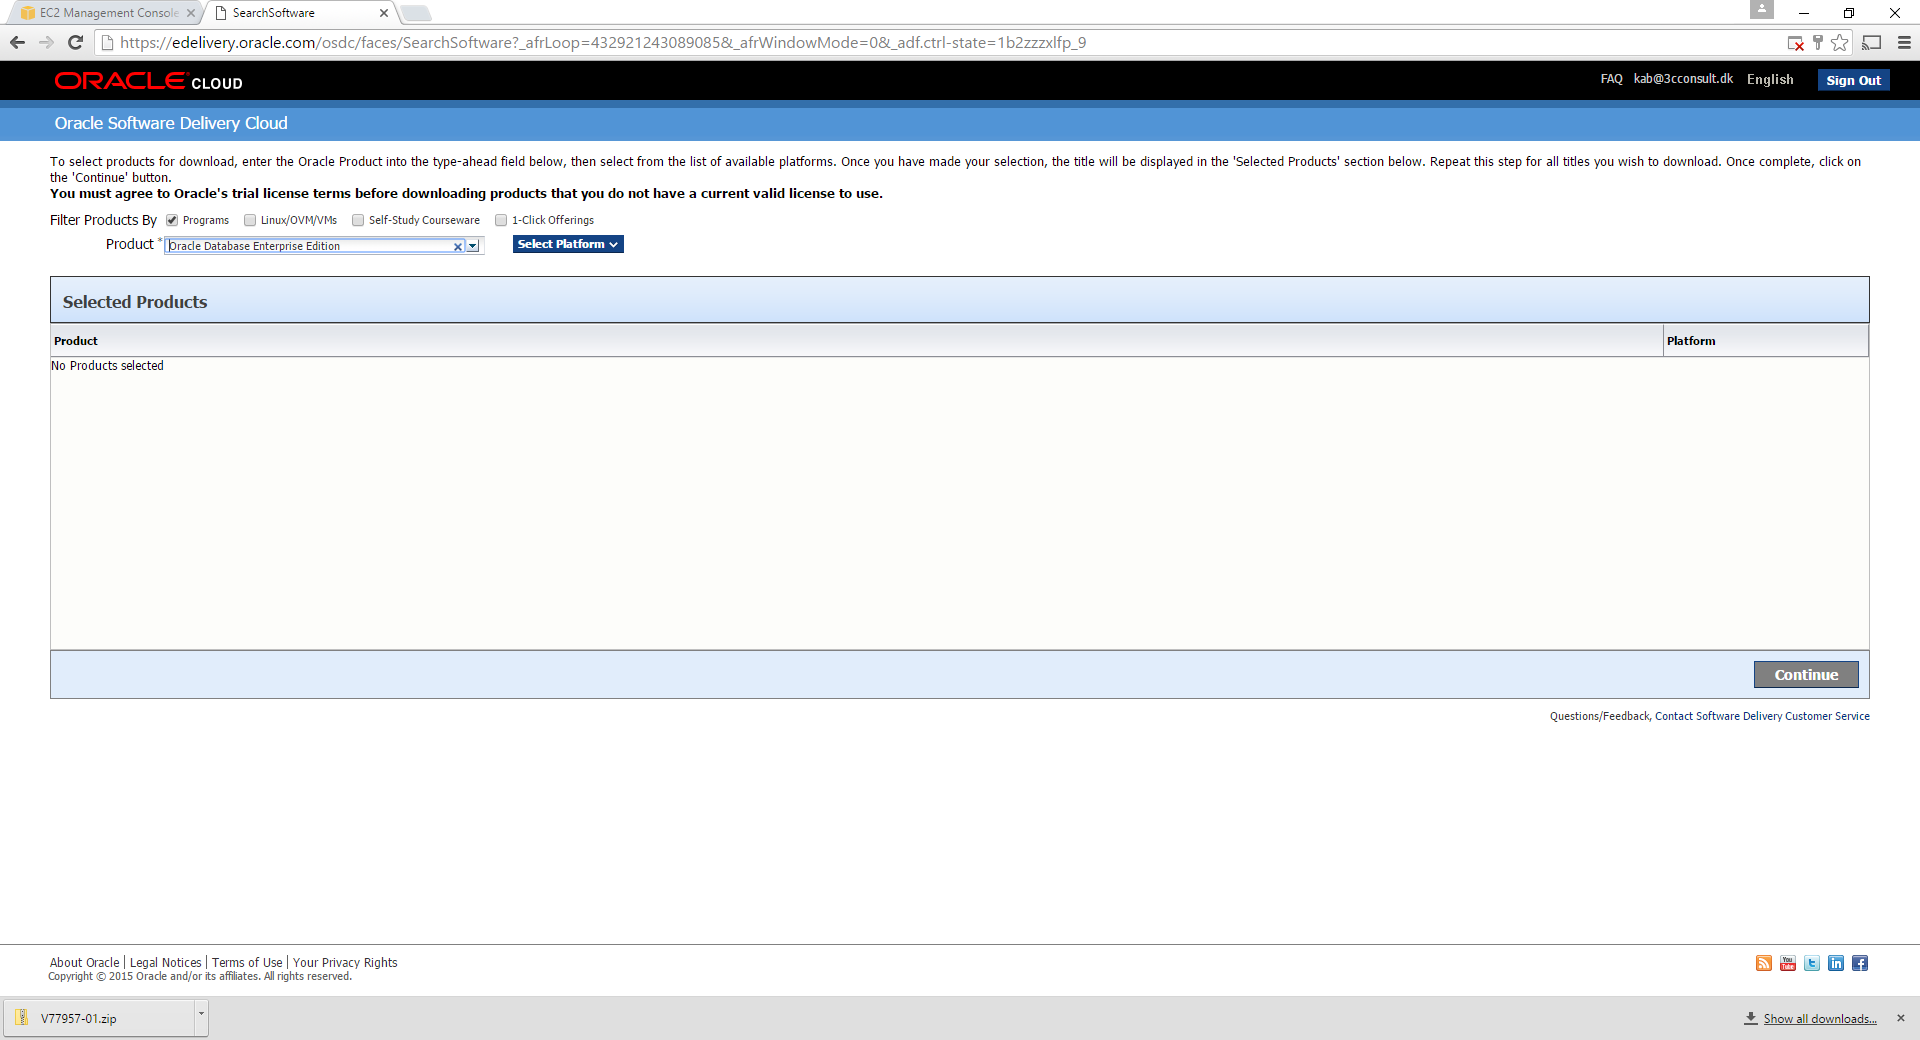
Change the Download folder on Chrome to D:SoftwareSiebel_Install_Zips. Navigate to edelivery.oracle.com (a valid Oracle account is required).
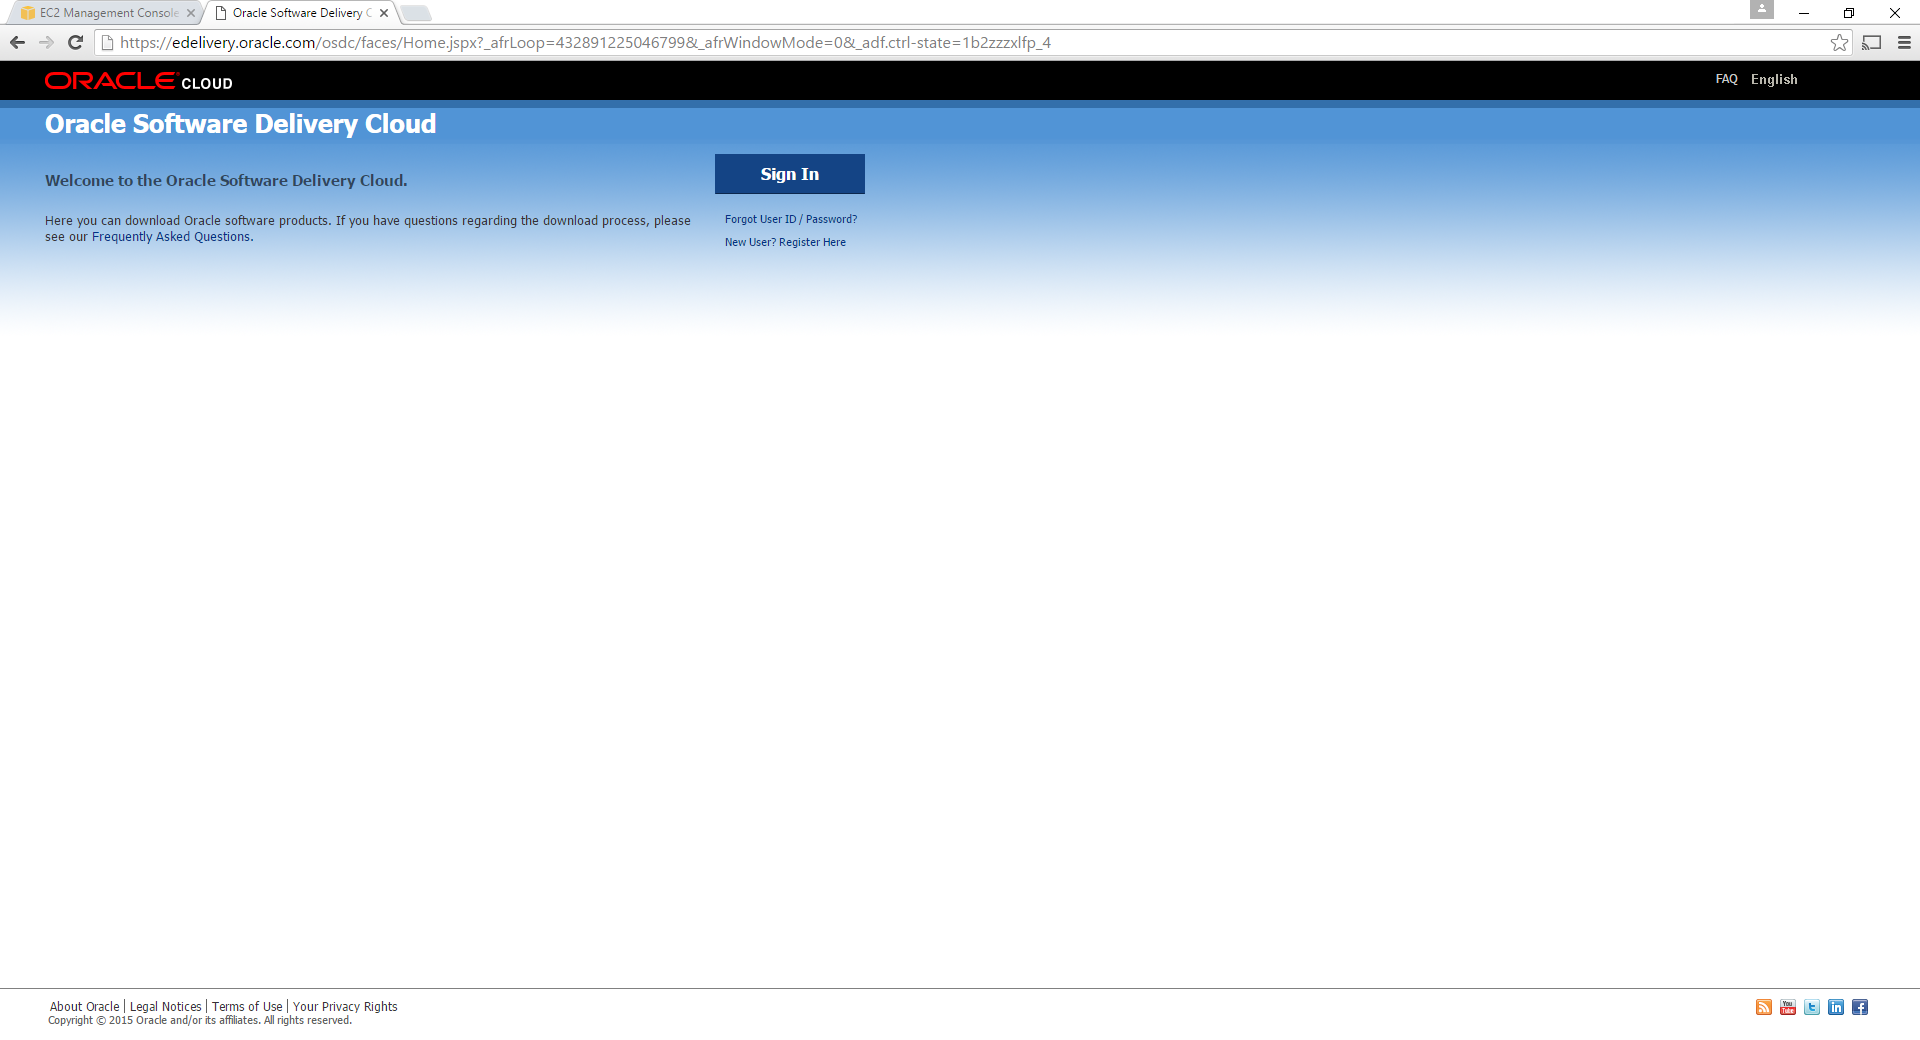
Sign in to the website with your Oracle account.
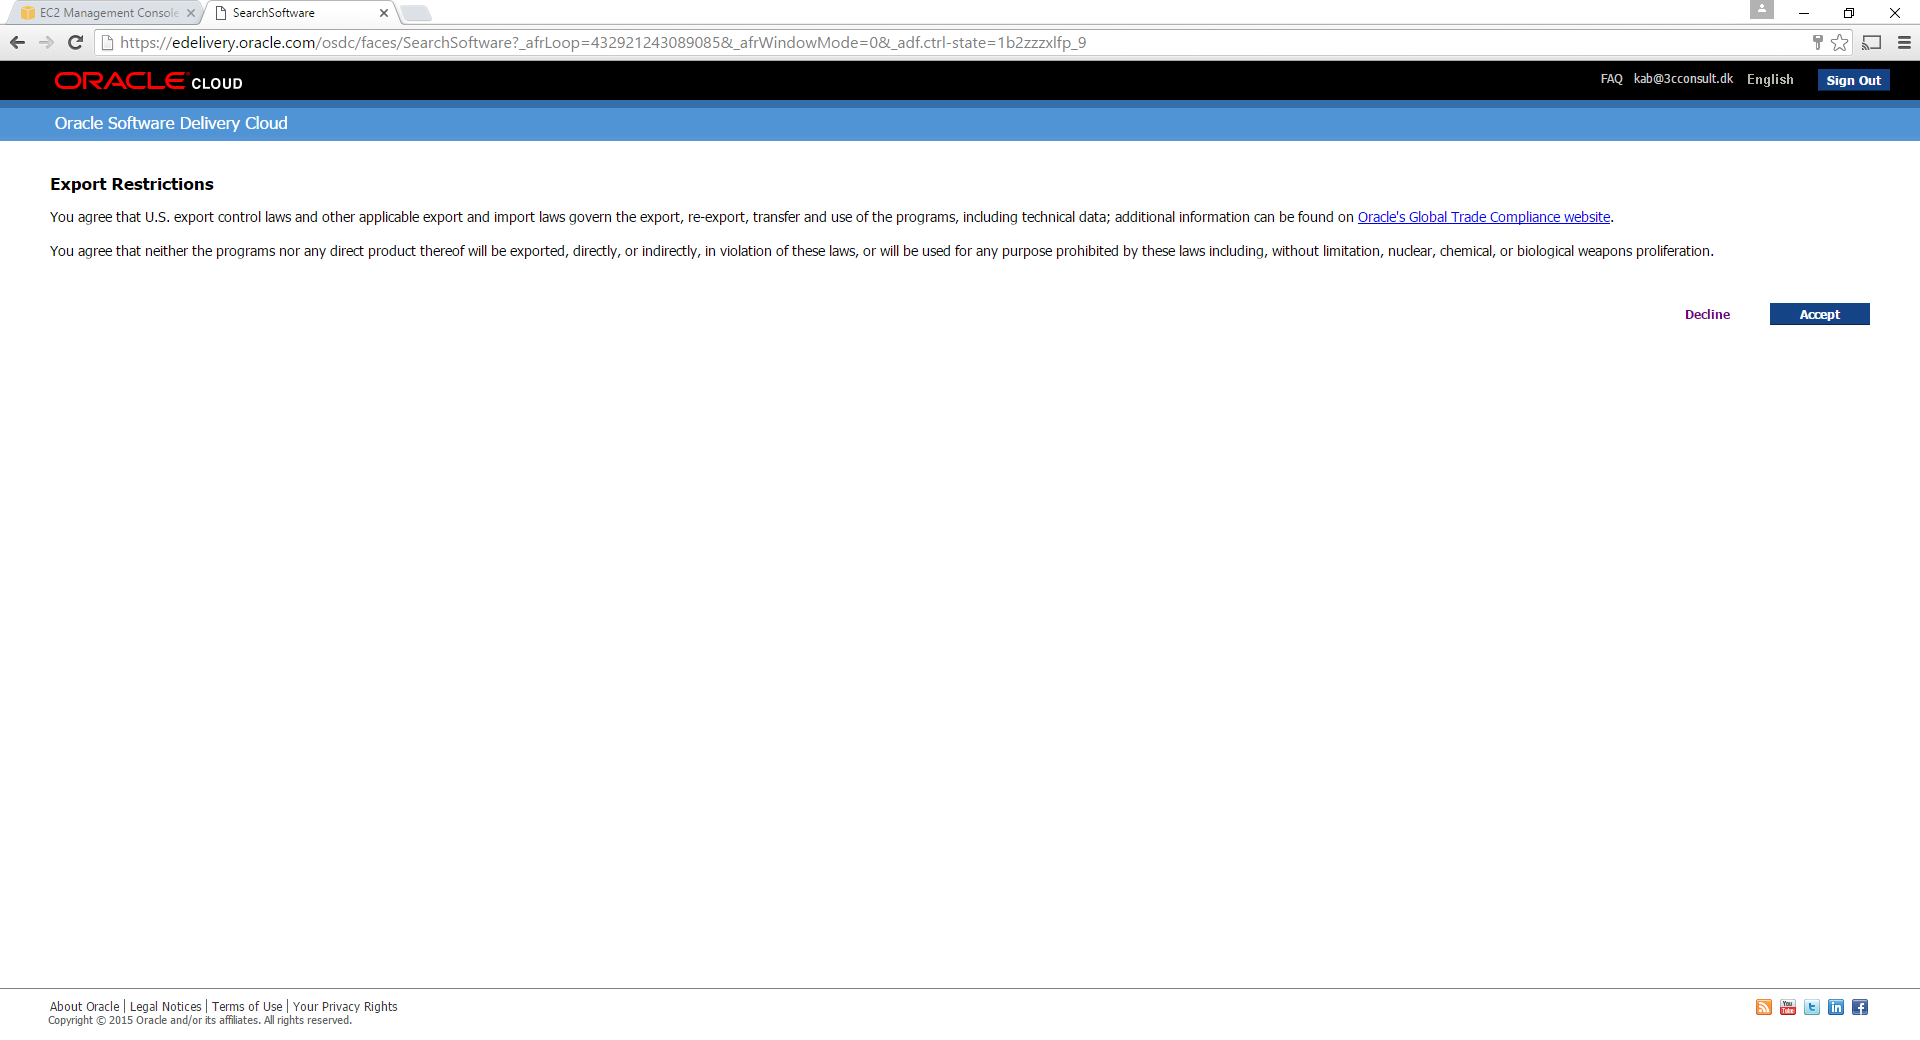
Accept the export restrictions as applicable. Search for “Siebel CRM Base”.
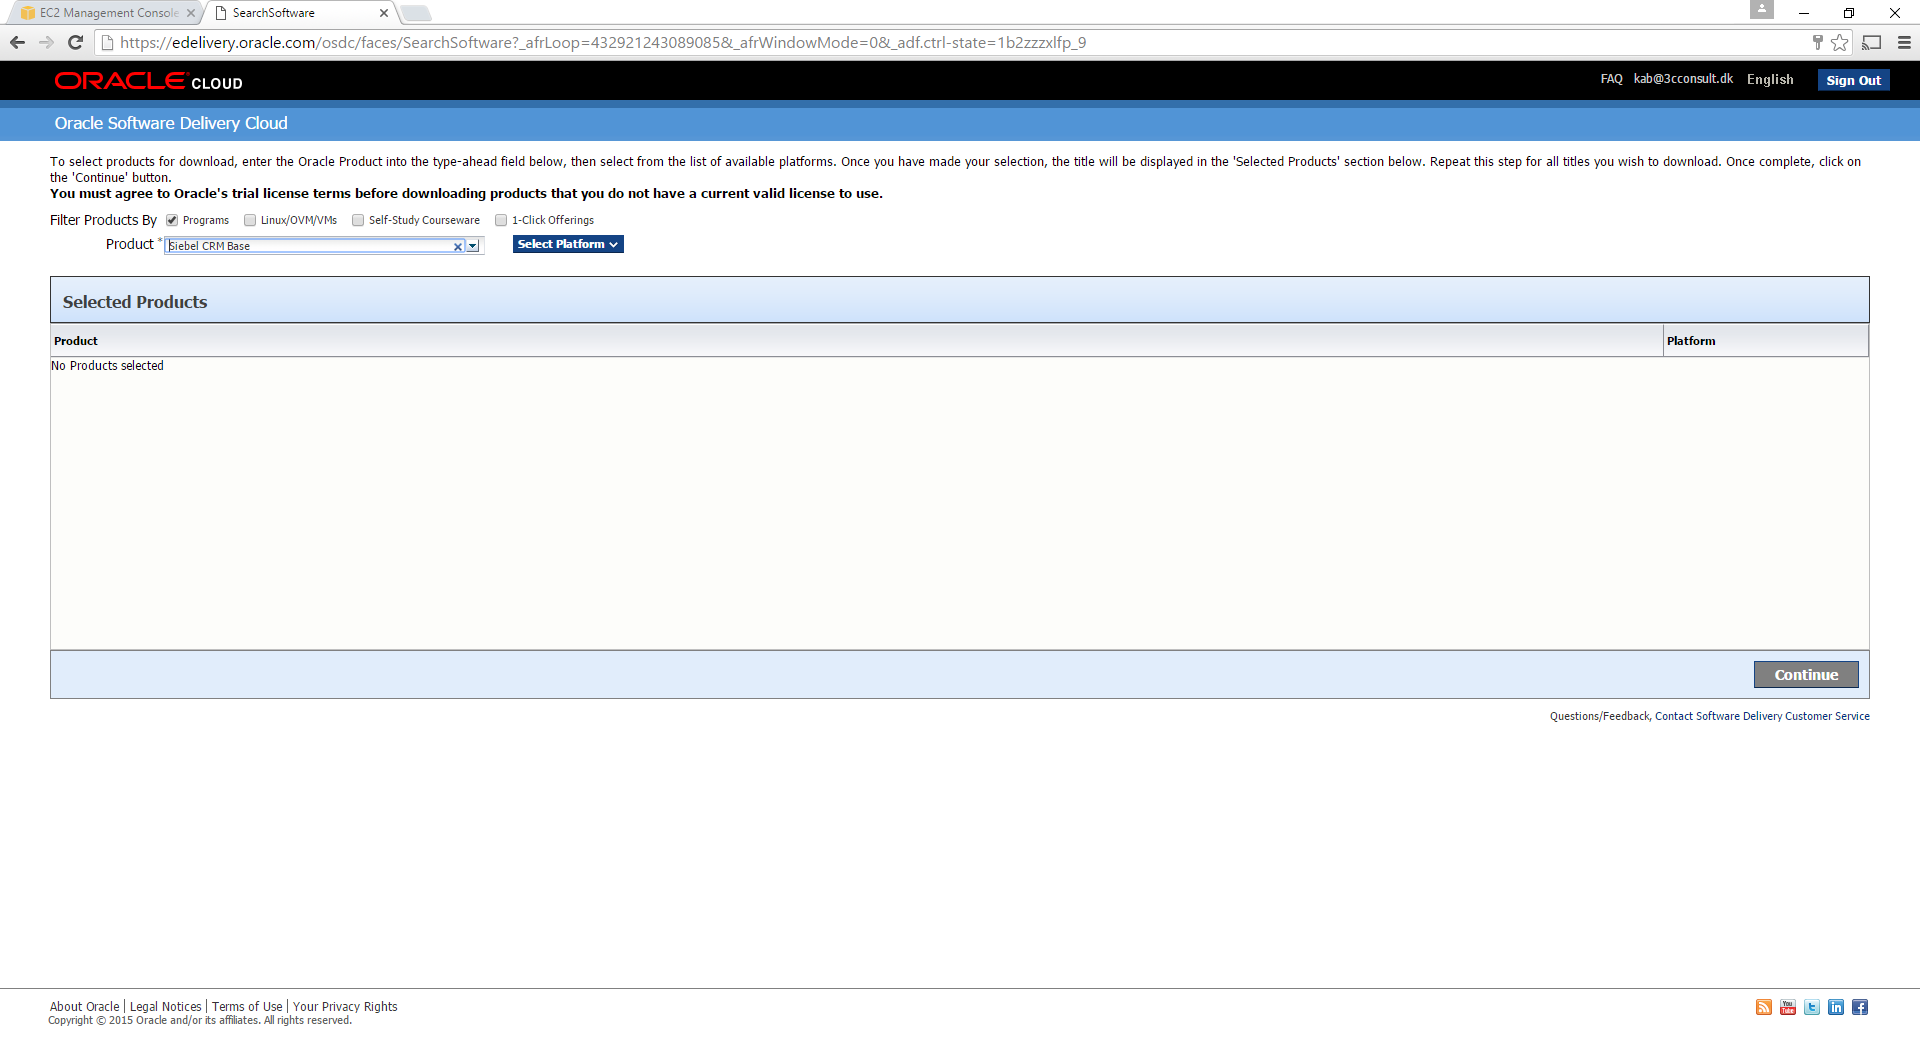
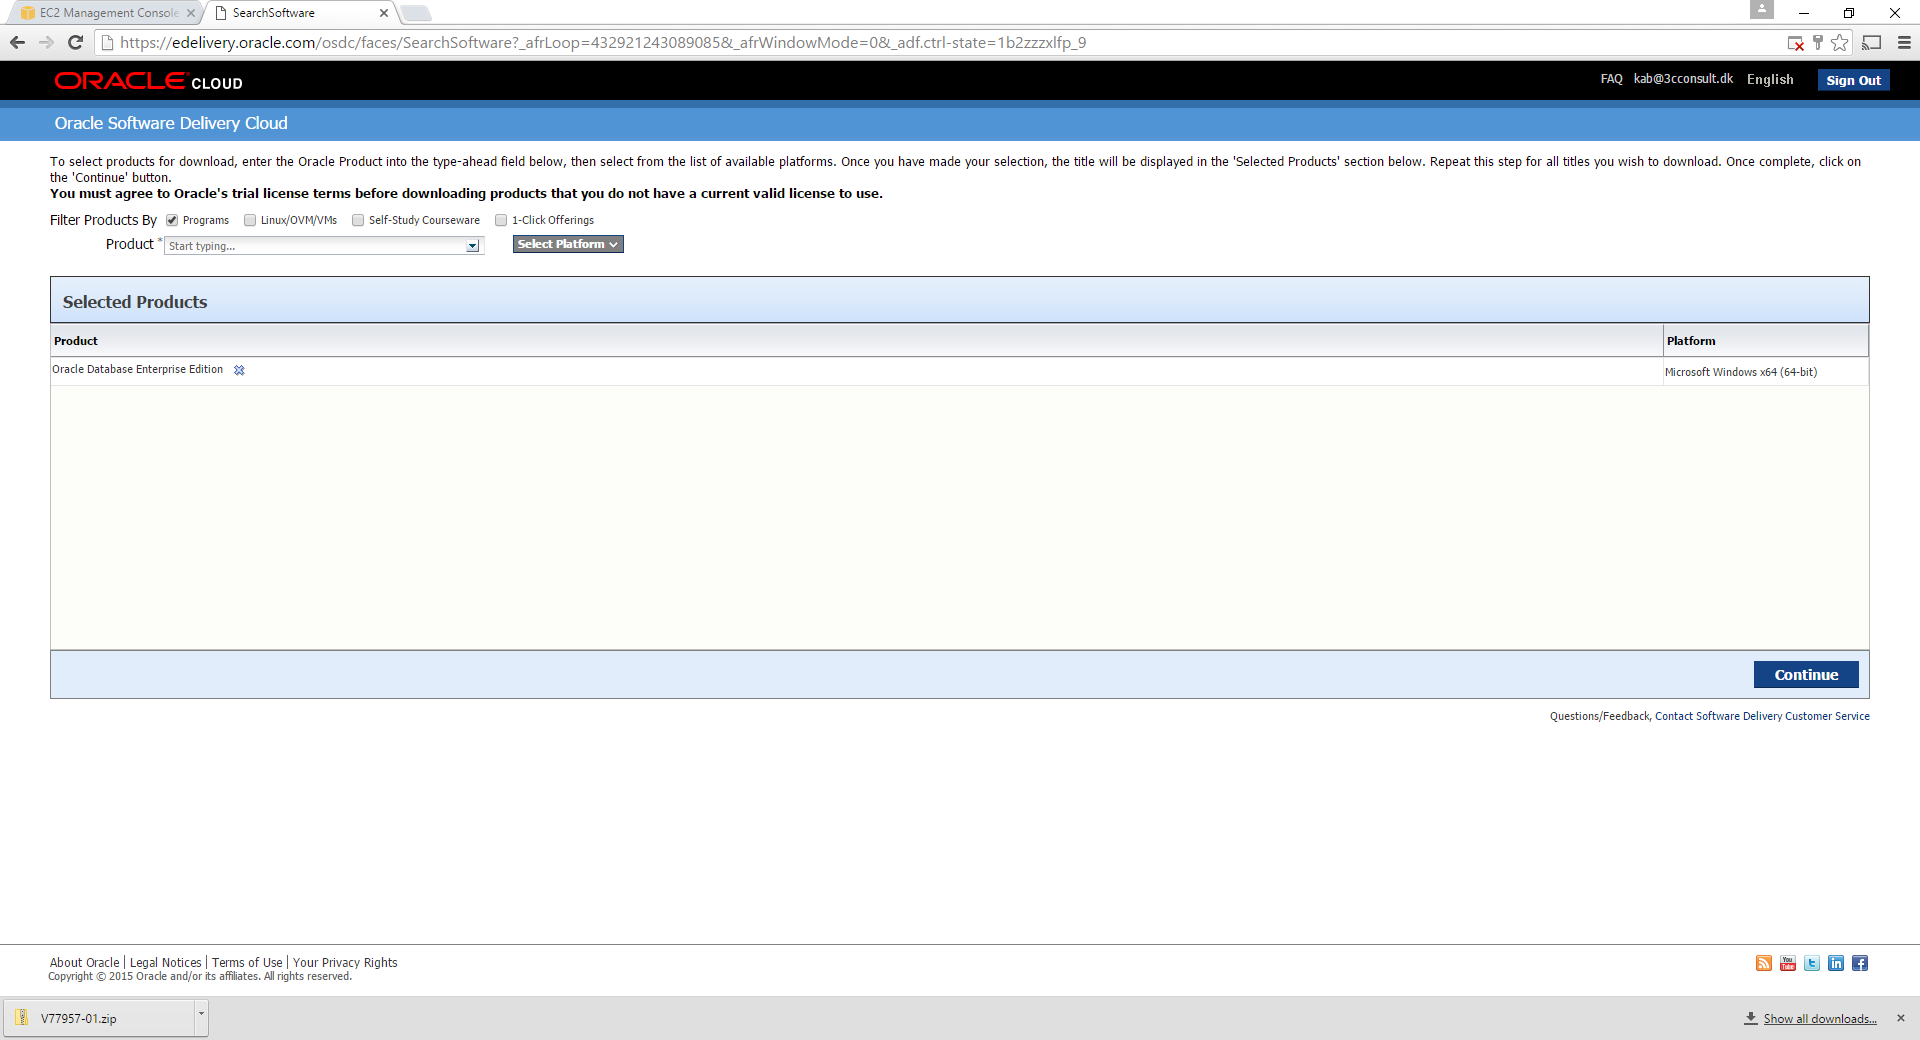
The platform needs to be set to Microsoft Windows x64 (64-bit).
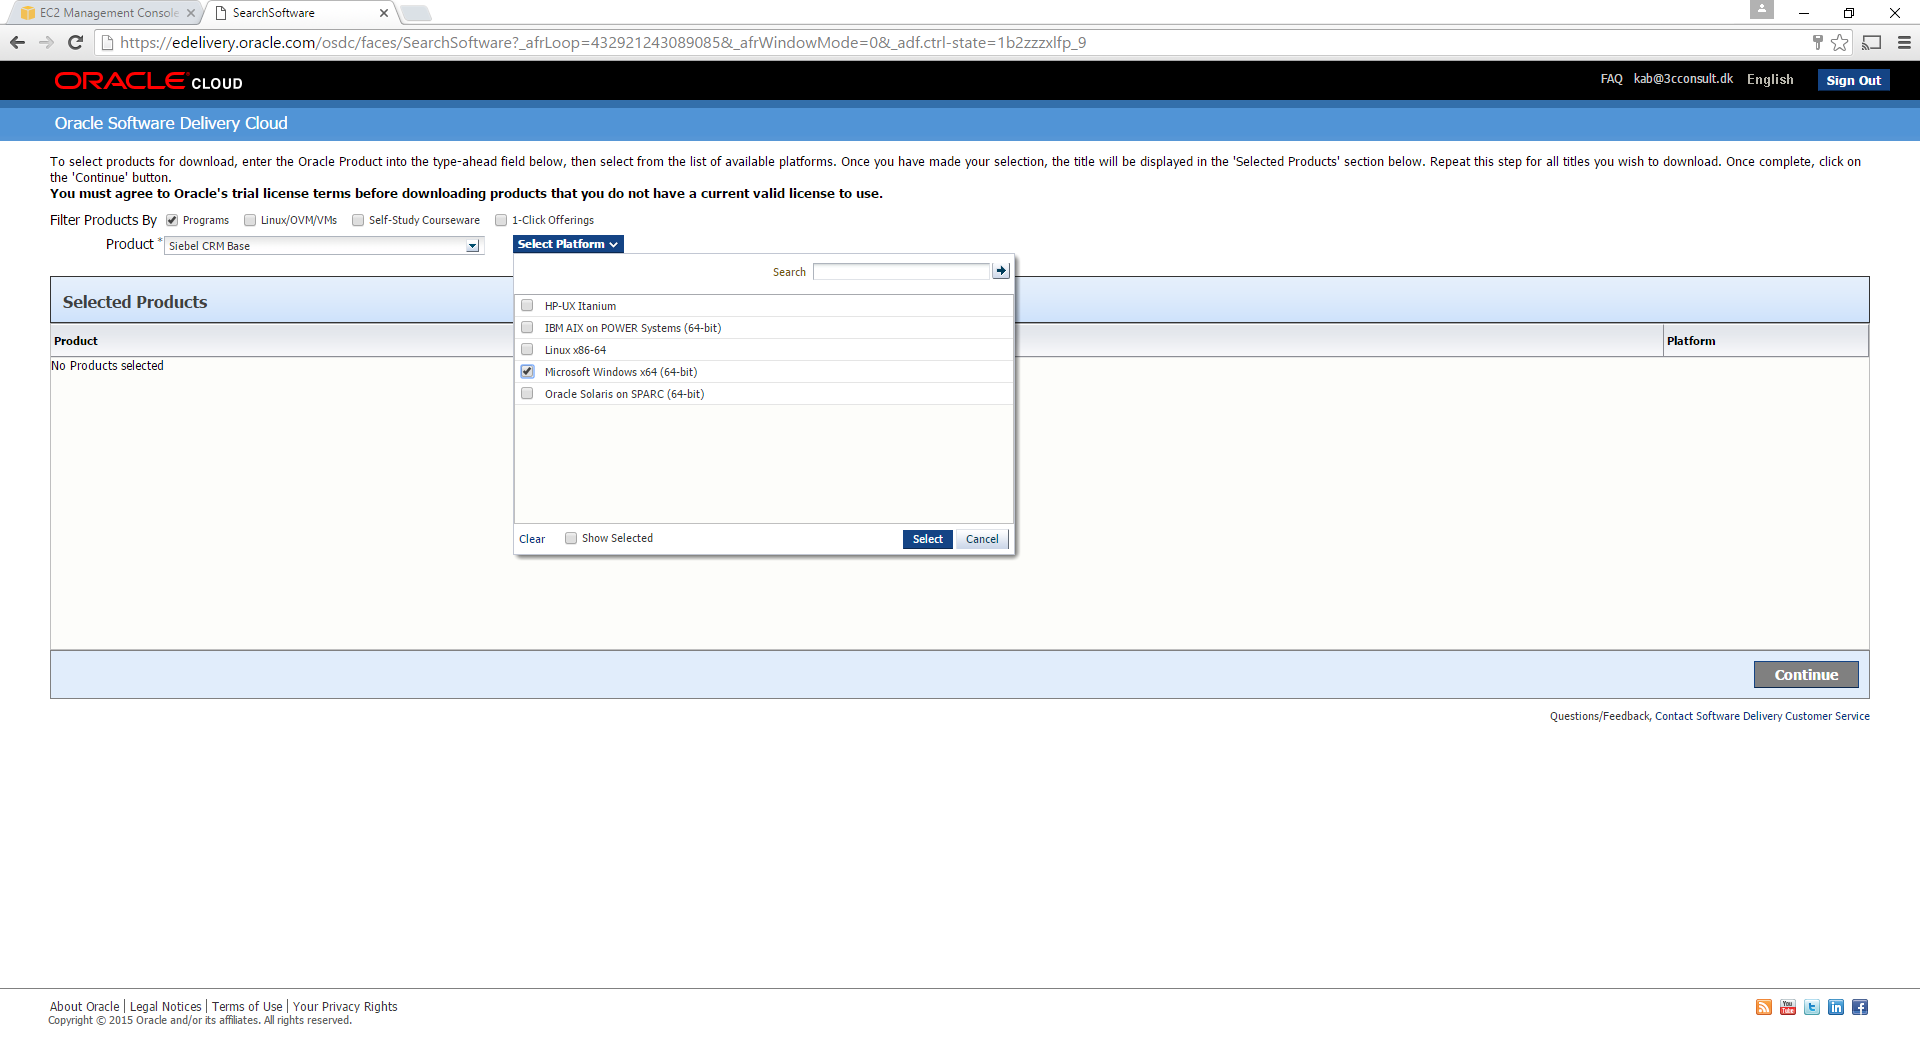
Click Select once the Windows 64 Bit is selected.

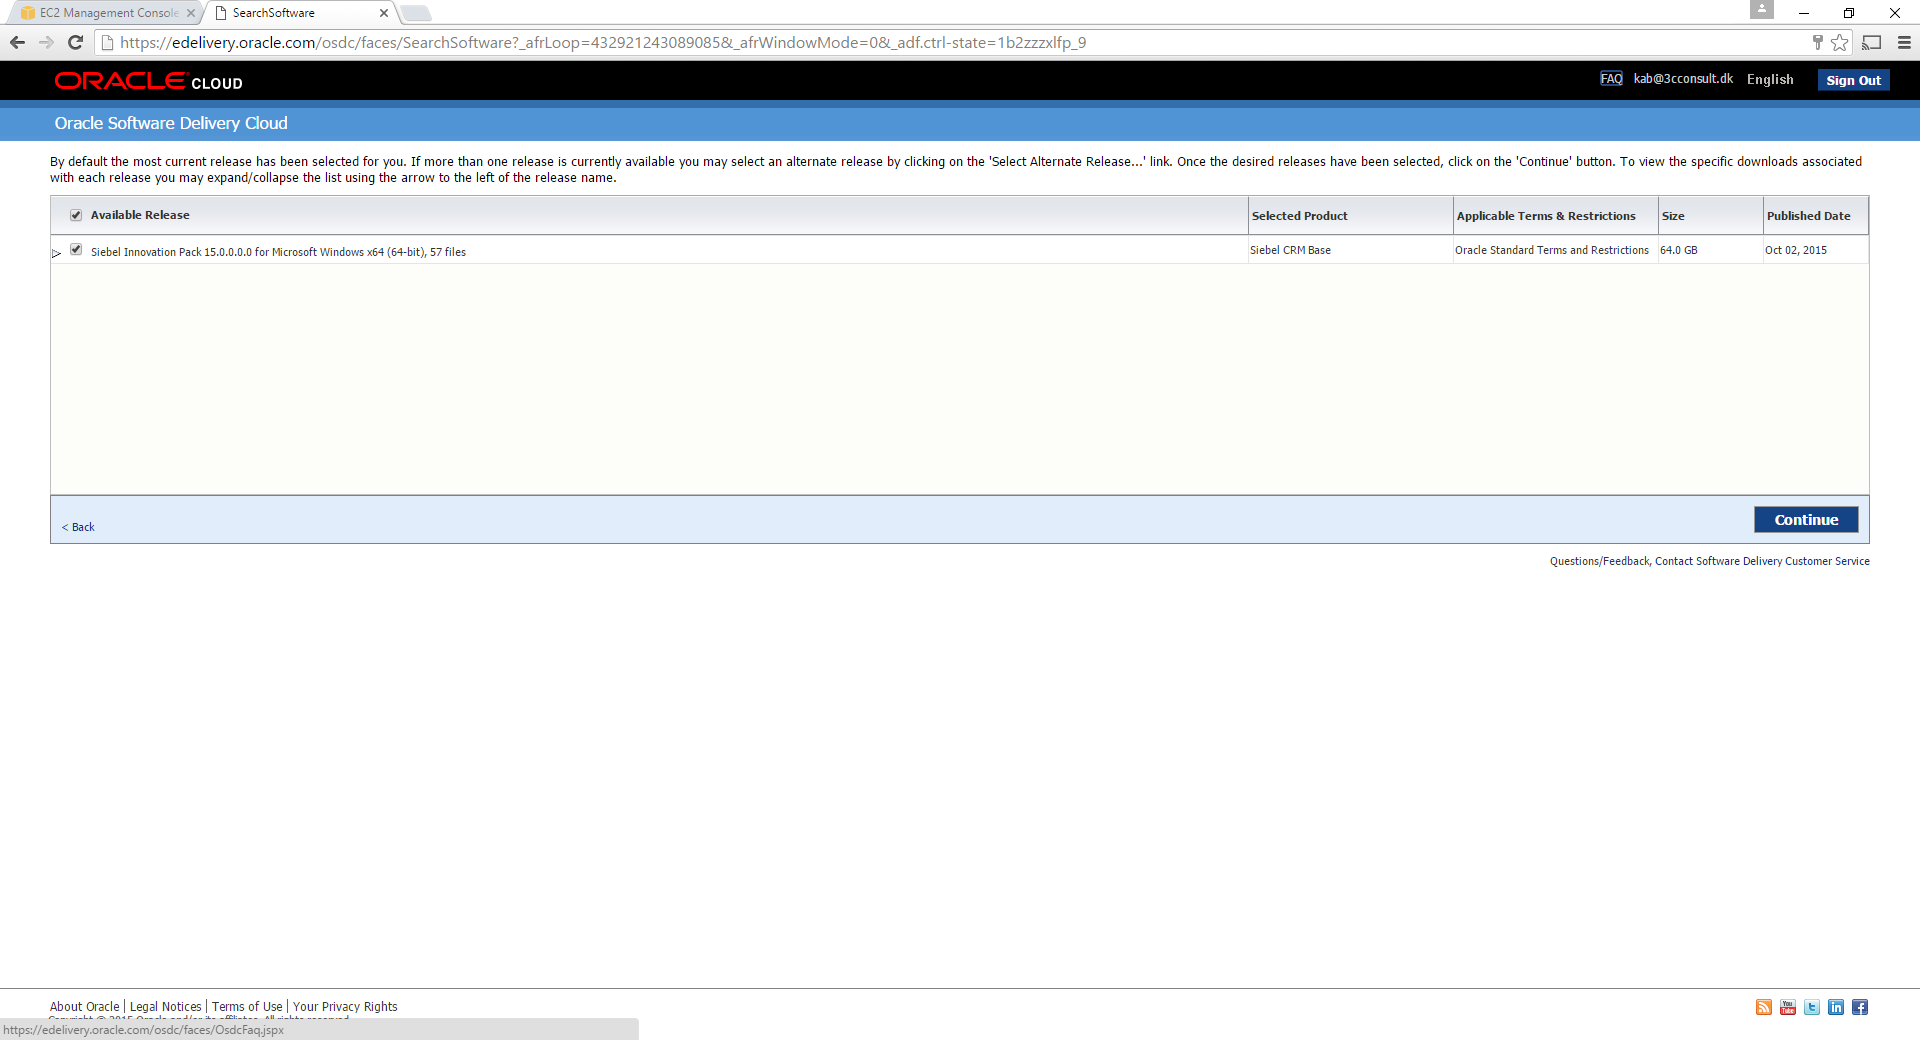
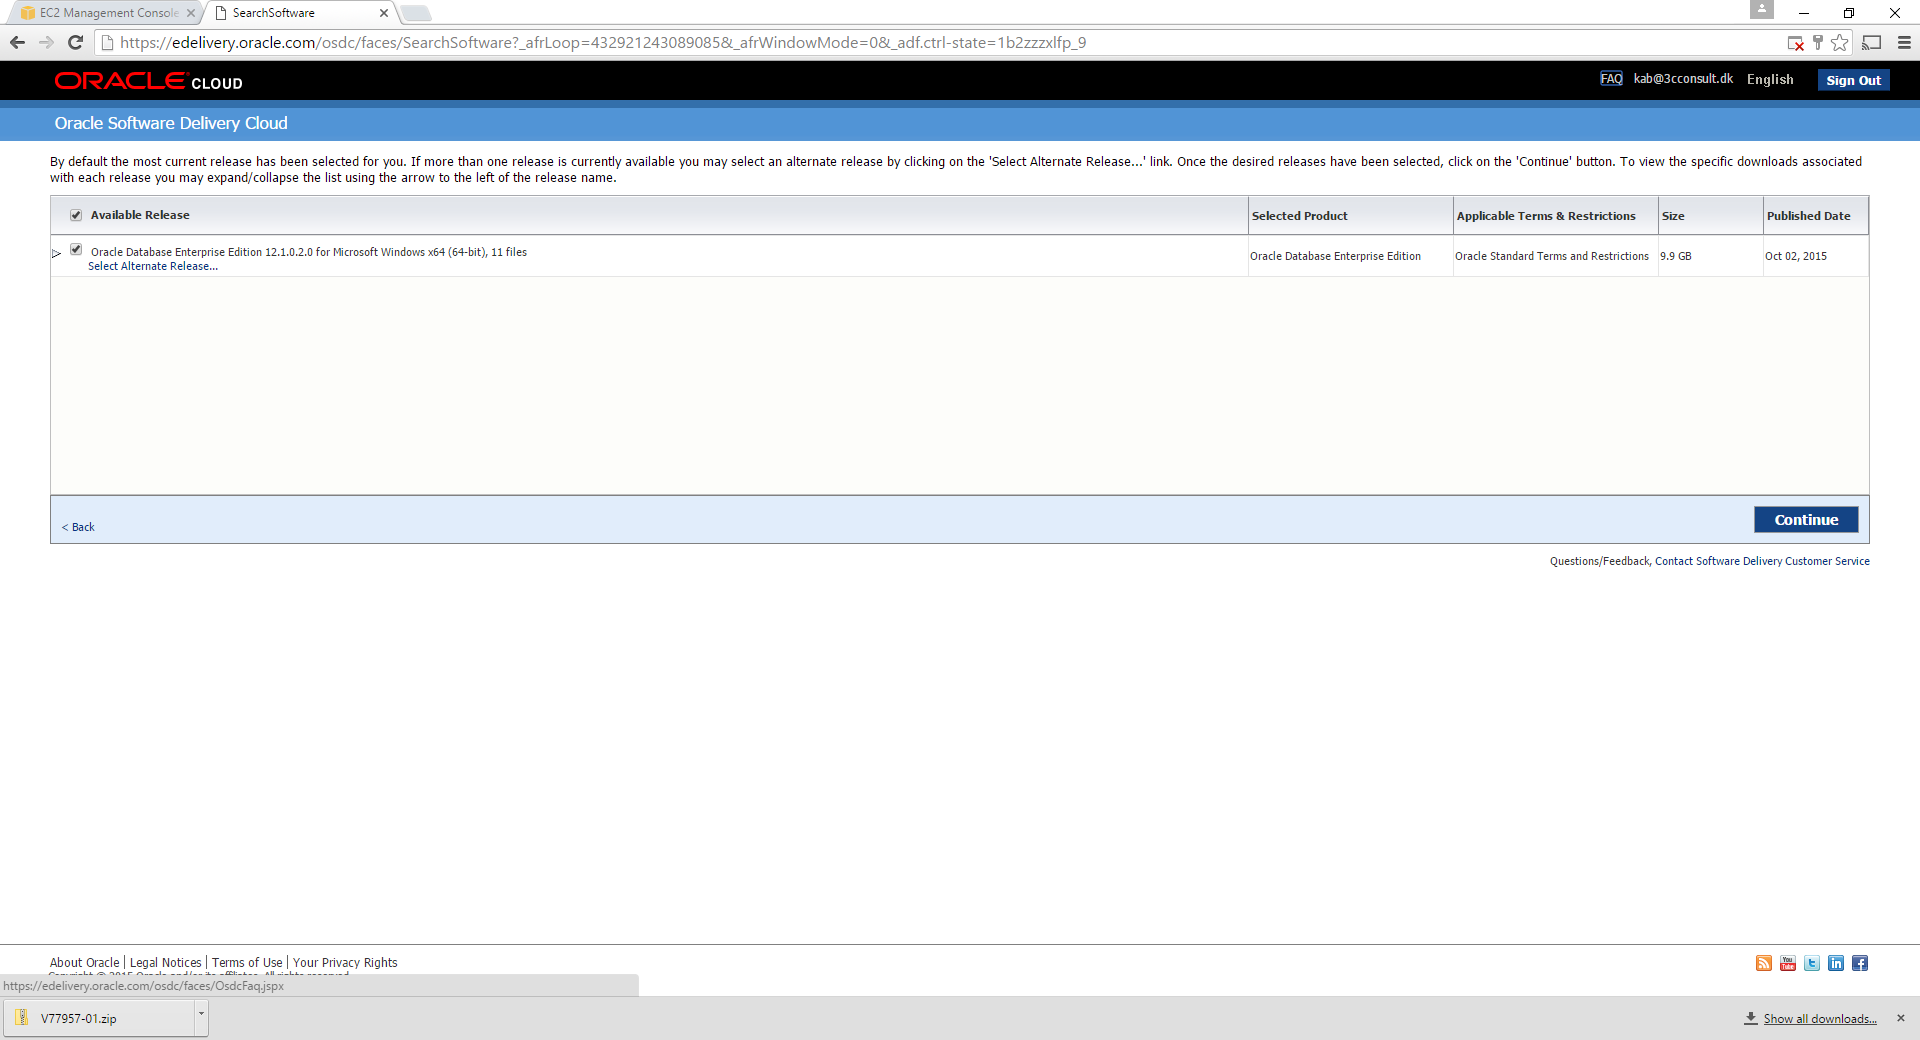
Click on continue. Select the Available release and click on Continue.
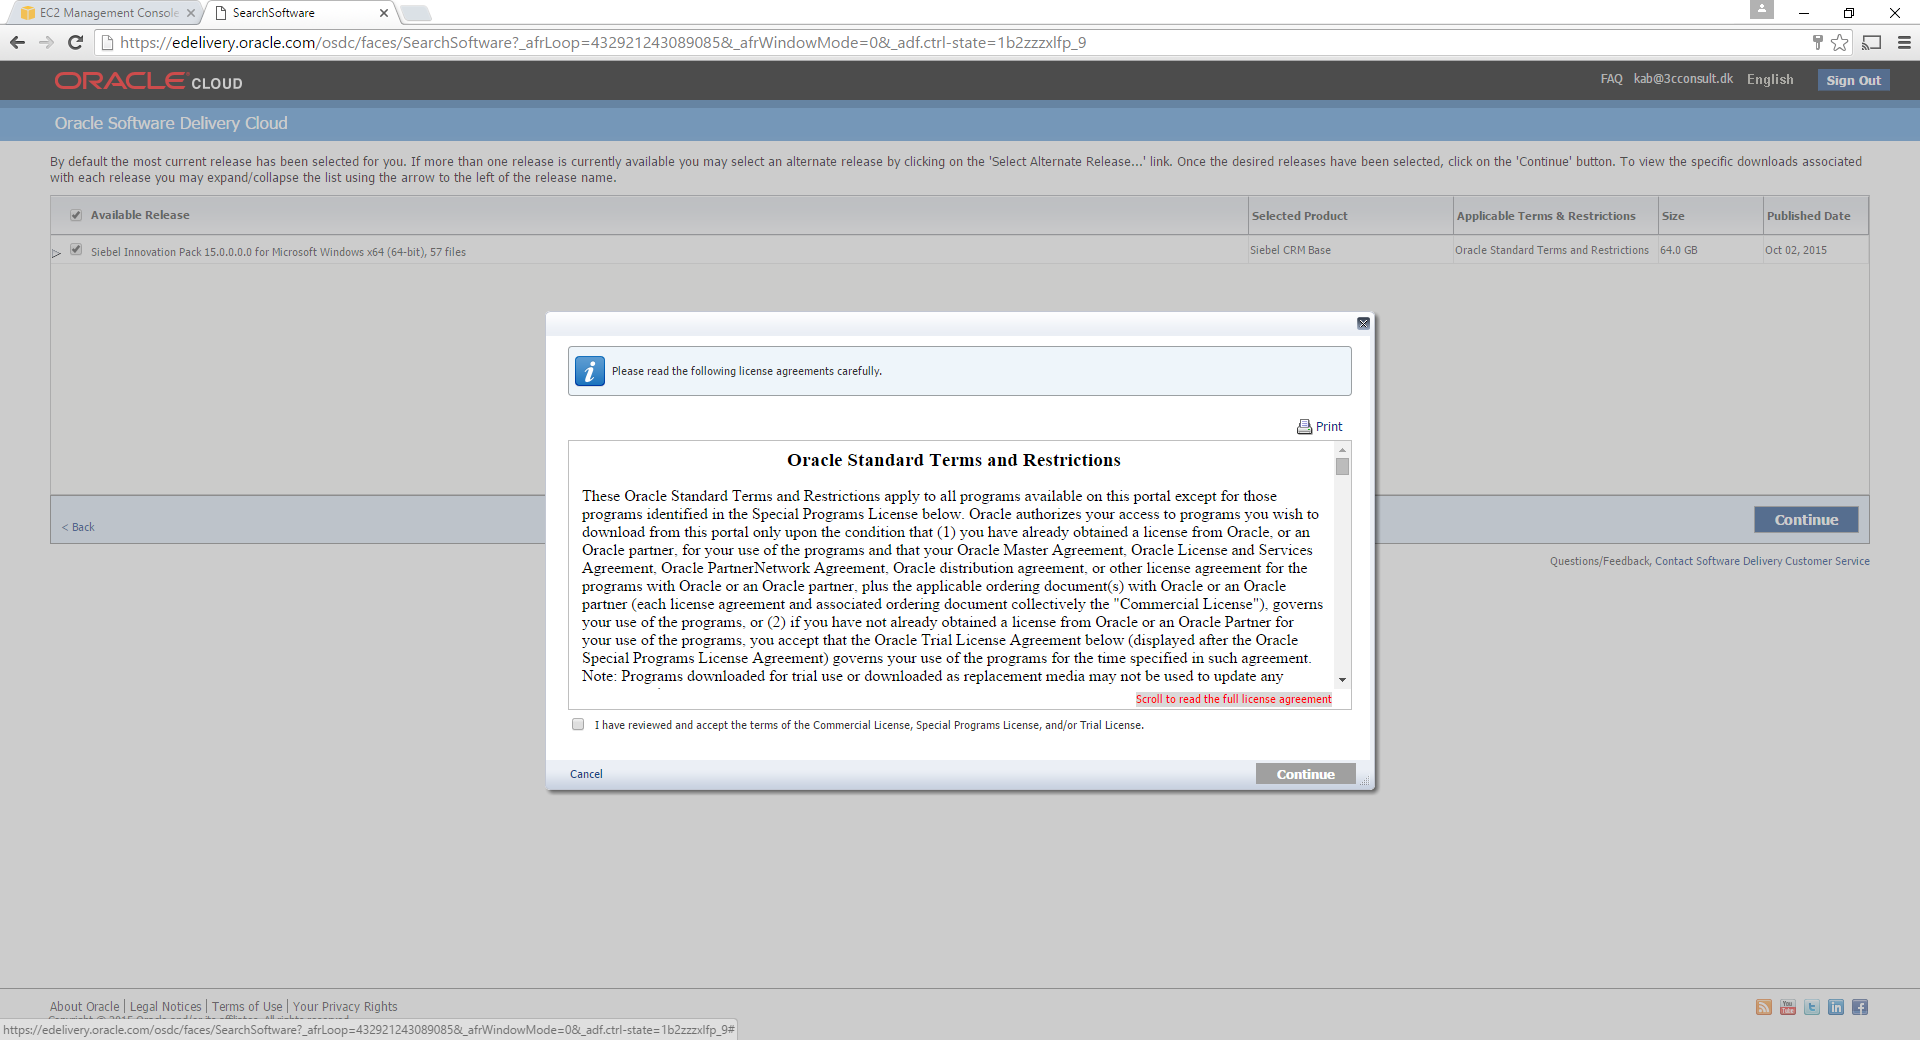
Accept the Oracle Terms and restrictions and click on Continue.
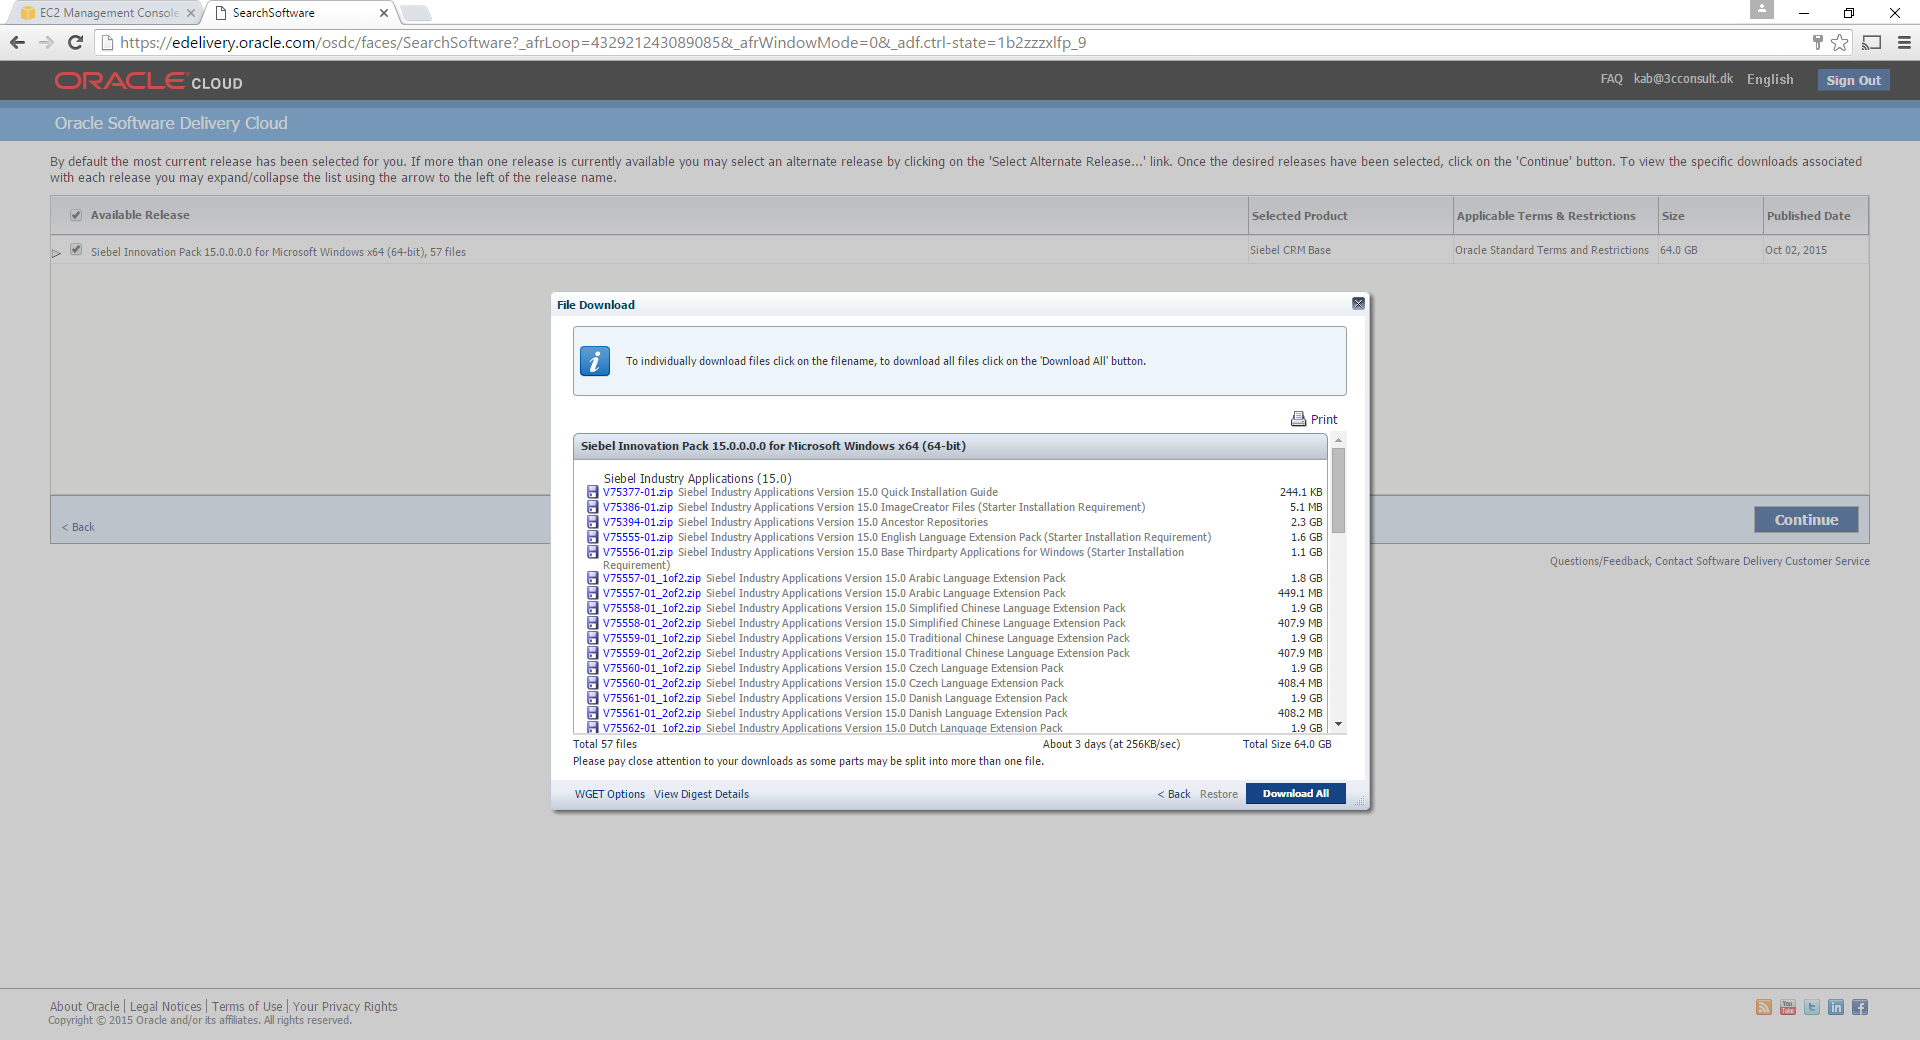
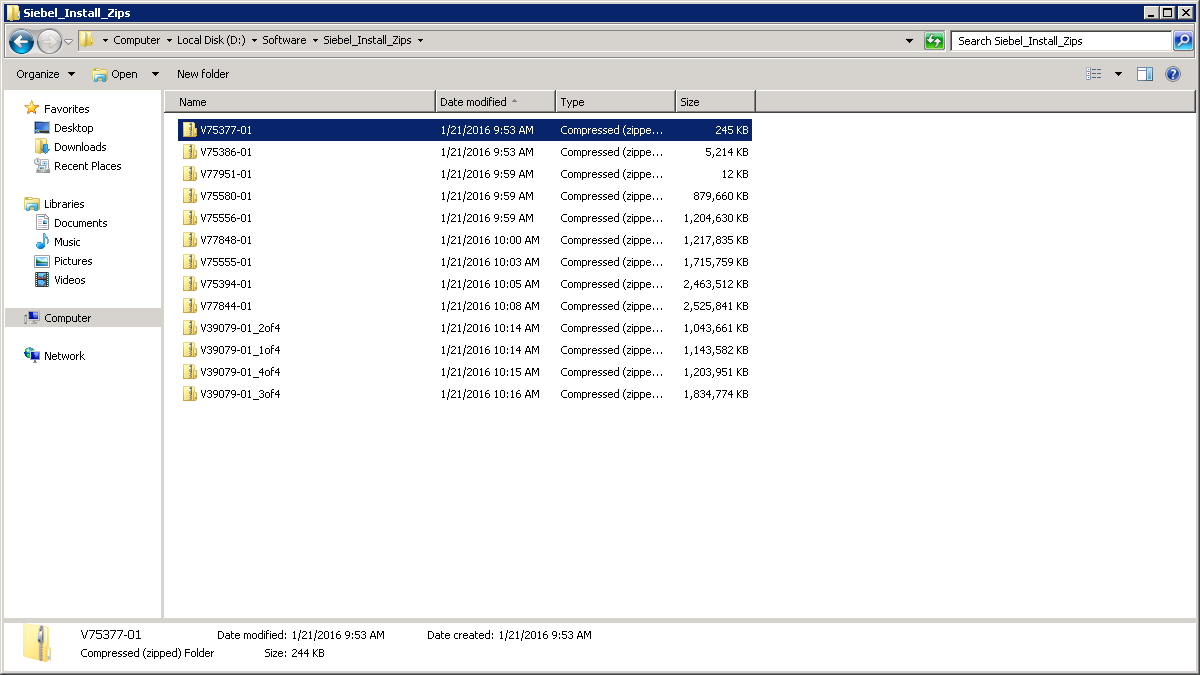
The Zip files are listed for download. We do not need to download all the files. For a Basic English installation the following files are required:
- V75377-01.zip: Siebel Industry Applications Version 15.0 Quick Installation Guide
- V75386-01.zip: Siebel Industry Applications Version 15.0 ImageCreator Files (Starter Installation Requirement)
- V75394-01.zip: Siebel Industry Applications Version 15.0 Ancestor Repositories
- V75555-01.zip: Siebel Industry Applications Version 15.0 English Language Extension Pack (Starter Installation Requirement)
- V75556-01.zip: Siebel Industry Applications Version 15.0 Base Thirdparty Applications for Windows (Starter Installation Requirement)
- V75580-01.zip: Siebel Industry Applications Version 15.0 CRM Desktop
- V77842-01.zip: Siebel Industry Applications Version 15.0 Siebel Tools (Starter Installation Requirement)
- V77844-01.zip: Siebel Industry Applications Version 15.0 Siebel Client (Starter Installation Requirement)
- V77848-01.zip: Siebel Industry Applications Version 15.0 Base Applications for Windows (Starter Installation Requirement)
- V77951-01.zip: Siebel Industry Applications Version 15.0 ReadMe
- V77957-01.zip: Siebel Industry Applications Version 15.0 Bookshelf
The SES (Secure enterprise Search) files are optional and need to be downloaded only if SES is deployed in the enterprise. Otherwise these can be ignored.
- V39079-01_1of4.zip: Oracle Secure Enterprise Search 11g Release 2 (11.2.2.2.0) for Windows (x64)
- V39079-01_2of4.zip: Oracle Secure Enterprise Search 11g Release 2 (11.2.2.2.0) for Windows (x64)
- V39079-01_3of4.zip: Oracle Secure Enterprise Search 11g Release 2 (11.2.2.2.0) for Windows (x64)
- V39079-01_4of4.zip: Oracle Secure Enterprise Search 11g Release 2 (11.2.2.2.0) for Windows (x64)
Download the Oracle Database Server Installation Files
Change the software download location to D:SoftwareOracle_Database_Zips.
In the delivery homepage, search for Oracle Database server Enterprise Edition.
The Platform needs to be the same as before, Microsoft Windows x64 (64-bit).
Click on Continue.
Click on Continue and accept the license agreement.

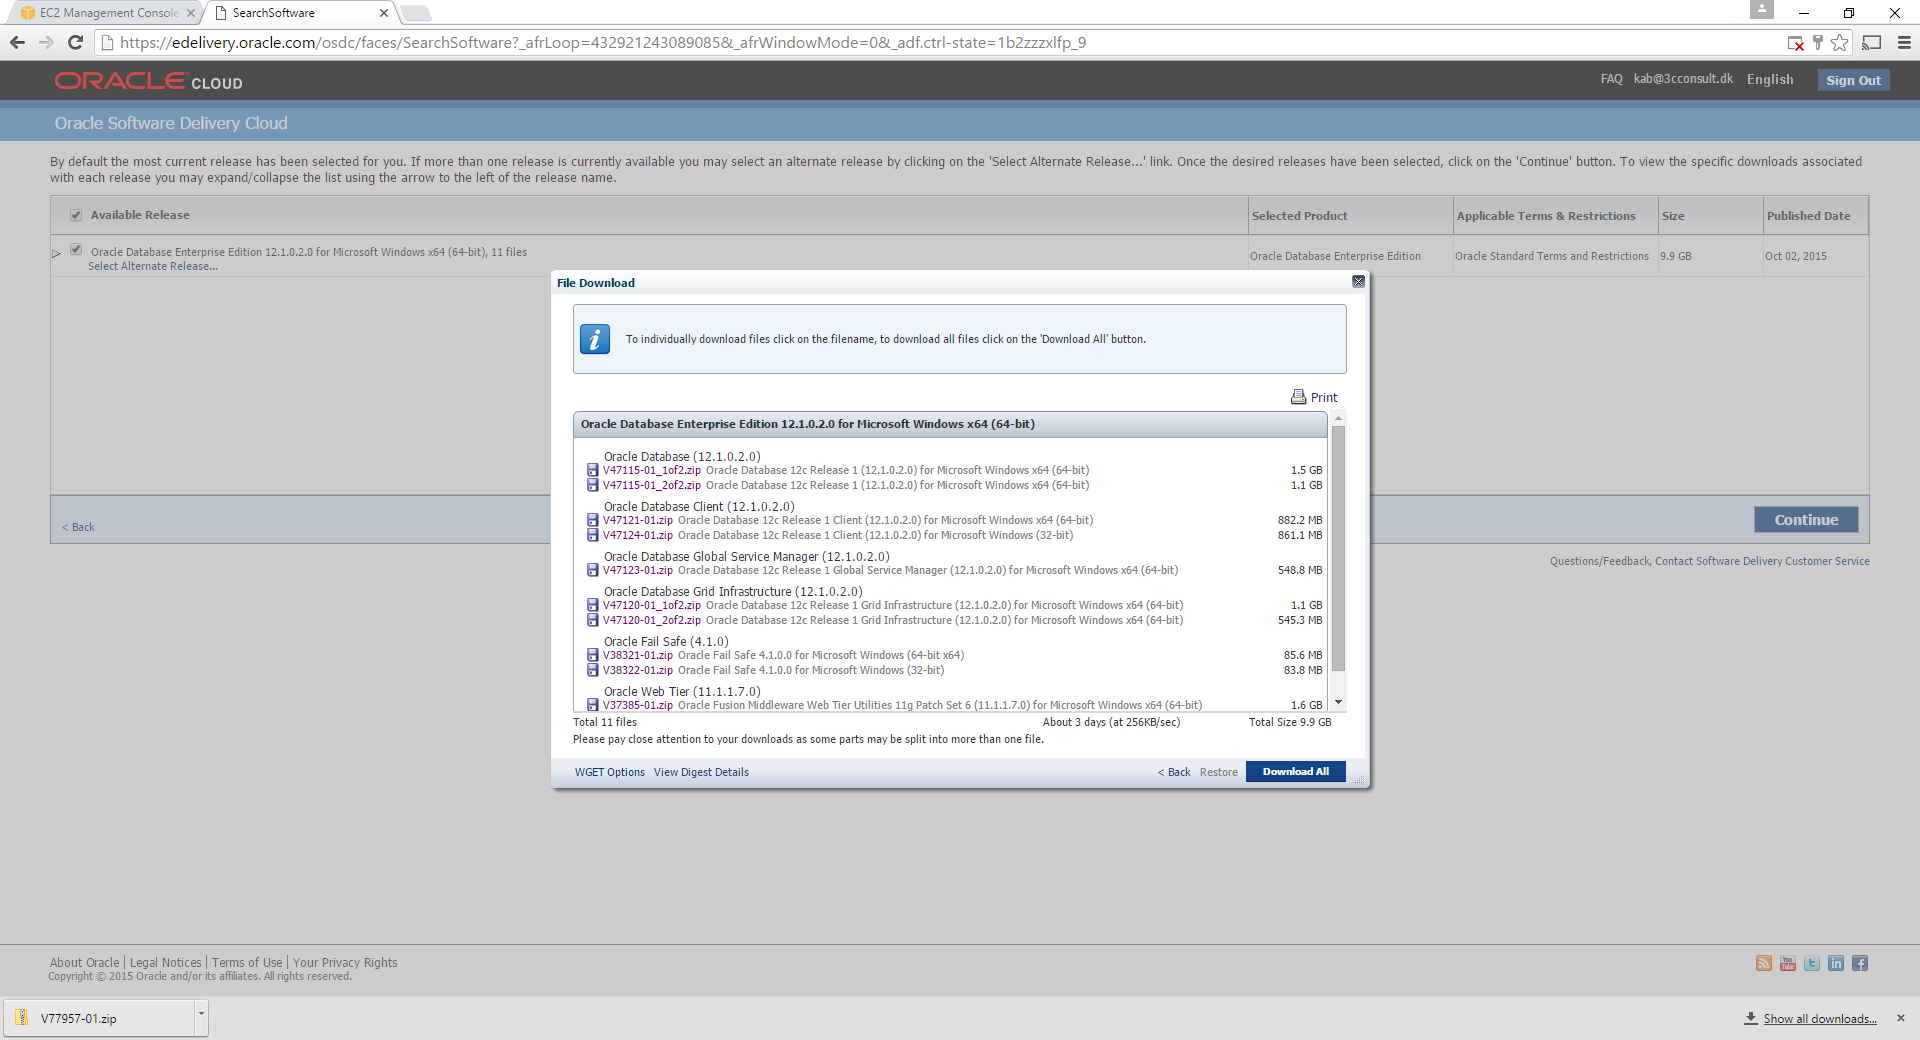
Only the following files need to be downloaded:
- V47115-01_1of2.zip: Oracle Database 12c Release 1 (12.1.0.2.0) for Microsoft Windows x64 (64-bit)
- V47115-01_2of2.zip: Oracle Database 12c Release 1 (12.1.0.2.0) for Microsoft Windows x64 (64-bit)
The client does not need to be downloaded as the Oracle Client supported by Siebel is a part of the Siebel installation zip files.
This concludes the download of the relevant files required for a basic Siebel Installation. The next article in the series covers what to do with these downloaded files and how to create a Siebel installation image.