If you’re tired of having to remember or reset your password, try using Windows Hello or a FIDO 2–compliant security key to sign in to your Microsoft account instead. All you’ll need is a device running Windows 11 and the Microsoft Edge browser. (This functionality is not available yet on Xbox or phones.)
What is Windows Hello?
Windows Hello is a more personal way to sign in, using your face, fingerprint, or a PIN. You can use Windows Hello to sign in to your device on the lock screen and sign in to your account on the web.
What is a security key?
A security key is a physical device that you can use instead of your user name and password to sign in. It may be a USB key that you could keep on your keychain, or an NFC device like a smartphone or access card. Since it’s used in addition to a fingerprint or PIN, even if someone has your security key, they won’t be able to sign in without your PIN or fingerprint.
Security keys are usually available for purchase from retailers that sell computer accessories.
Tip: You may sometimes hear security keys referred to as FIDO2 keys. FIDO stands for Fast IDentity Online and the standards are set and managed by the FIDO Alliance.
How to sign in with Windows Hello
Follow these steps to set up Windows Hello and then sign in to your Microsoft account in Microsoft Edge:
-
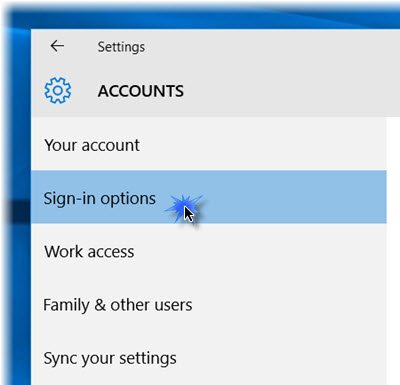
Select Start > Settings > Accounts > Sign-in options.
-
Under Ways to sign in, select a Windows Hello item to add.
To add Windows Hello as a sign in method for your Microsoft account:
-
Go to the Microsoft account page and sign in as you normally would.
-
Select Security > Advanced security options.
-
Select Add a new way to sign in for verify.
-
Select Use your Windows PC.
-
Follow the instructions to set up Windows Hello as a method for signing in.
How to sign in with a security key
There are different types of security keys that you can use, like a USB key that you plug in to your device or an NFC key that you tap on an NFC reader. Make sure to familiarize yourself with the type of security key you have by reading the instruction manual from the manufacturer.
To sign into Windows
-
Go to Start > Settings > Accounts > Sign-in options.
-
Select Security Key.
-
Select Manage and follow the instructions.
To add a security key as a sign in method for your Microsoft account:
-
Go to the Microsoft account page and sign in as you normally would.
-
Select Security > More security options.
-
Select Add a new way to sign in or verify.
-
Select Use a security key.
-
Identify what type of key you have (USB or NFC) and select Next.
-
You will be redirected to the setup experience where you will insert or tap your key.
-
Create a PIN (or enter an existing PIN if you have already created one).
-
Take the follow-up action by touching either the button or gold disk if your key has one (or read the instruction manual to figure out what else it might be).
-
Name your security key so that you can distinguish it from other keys.
-
Sign out and open Microsoft Edge, select Use Windows Hello or security key instead, and sign in by inserting or tapping your key.
Note: Your security key manufacturer might provide software that can help you manage your key, such as by changing the PIN or creating a fingerprint.
Manage your keys
Follow these steps to delete keys that you have set up for your account:
-
Go to the Microsoft account page and sign in as you normally would.
-
Select Security > Advanced security options. Manage your security keys under Ways to prove who you are.
If you’re tired of having to remember or reset your password, try using Windows Hello or a FIDO 2–compliant security key to sign in to your Microsoft account instead. All you’ll need is a device running Windows 10 Version 1809 or later and the Microsoft Edge browser. (This functionality is not available yet on Xbox or phones.)
What is Windows Hello?
Windows Hello is a more personal way to sign in, using your face, fingerprint, or a PIN. You can use Windows Hello to sign in to your device on the lock screen and sign in to your account on the web.
What is a security key?
A security key is a physical device that you can use instead of your user name and password to sign in. It may be a USB key that you could keep on your keychain, or an NFC device like a smartphone or access card. Since it’s used in addition to a fingerprint or PIN, even if someone has your security key, they won’t be able to sign in without your PIN or fingerprint.
Security keys are usually available for purchase from retailers that sell computer accessories.
How to sign in with Windows Hello
Follow these steps to set up Windows Hello and then sign in to your Microsoft account in Microsoft Edge:
-
Go to the Start menu and select Settings .
-
Go to Accounts > Sign-in options.
-
Under Manage how you sign in to your device, select a Windows Hello item to add.
To add Windows Hello as a sign in method for your Microsoft account:
-
Go to the Microsoft account page and sign in as you normally would.
-
Select Security > More security options
-
Select Add a new way to sign in for verify
-
Select Use your Windows PC
-
Follow the dialogs to set up Windows Hello as a method for signing in.
How to sign in with a security key
There are different types of security keys that you can use, like a USB key that you plug in to your device or an NFC key that you tap on an NFC reader. Make sure to familiarize yourself with the type of security key you have by reading the instruction manual from the manufacturer.
-
Go to the Microsoft account page and sign in as you normally would.
-
Select Security > More security options
-
Select Add a new way to sign in or verify
-
Select Use a security key
-
Identify what type of key you have (USB or NFC) and select Next.
-
You will be redirected to the setup experience where you will insert or tap your key.
-
Create a PIN (or enter an existing PIN if you have already created one).
-
Take the follow-up action by touching either the button or gold disk if your key has one (or read the instruction manual to figure out what else it might be).
-
Name your security key so that you can distinguish it from other keys.
-
Sign out and open Microsoft Edge, select Use Windows Hello or security key instead, and sign in by inserting or tapping your key.
Note: Your security key manufacturer might provide software that can help you manage your key, such as by changing the PIN or creating a fingerprint.
Manage your keys
Follow these steps to delete keys that you have set up for your account:
-
Go to the Microsoft account page and sign in as you normally would.
-
Select Security > More security options and under Windows Hello and security keys, select Manage your sign-in methods.
Содержание
- Windows hello usb key
- usb ключ для windows
- Популярные Похожие записи:
- 21 Responses to Создаем usb ключ защиты средствами Windows
- Как создать USB-ключ безопасности в Windows 10
- Что такое YubiKey
- Как создать USB-ключ безопасности
- Расширенные настройки USB Raptor
- Sign in to your Microsoft account with Windows Hello or a security key
- What is Windows Hello?
- What is a security key?
- How to sign in with Windows Hello
- How to sign in with a security key
- Manage your keys
- What is Windows Hello?
- What is a security key?
- How to sign in with Windows Hello
- How to sign in with a security key
- Manage your keys
- Отключение запроса ключа безопасности windows hello
- Что такое windows hello
- windows hello в windows 10 как отключить запрос пин-кода для доступа к учетной записи
- Служба windows hello в Windows 10. Отключение запроса ключа безопасности и других методов входа.
- Сведения о приложении Windows Hello и его настройке
- Статьи по теме
Windows hello usb key

usb ключ для windows
Давайте разберемся, что мы делаем и для чего. После всех проделанных действий у нас будет создан usb ключ для windows, из обычной флешки. Он будет выступать ключом входа в систему, если еще проще. Когда он вставлен в компьютер, то вы можете залогиниться, если нет, то не сможете войти, наличие пароля на вход не обязательно.
Выберите флешку поменьше, так как на ней будет небольшой файл-ключик, зачем флешку так не рационально использовать, так как ей потом особо не попользуешься, да и вирусы могут попасть, если вы конечно не произвели Защиту флешки от вирусов. Может у вас найдется в закромах флеха на 2 гб, хотя это щас уже почти раритет.
Нажимаем Win+R у вас откроется окно Выполнить. Введите в нем
У вас откроется оснастка Управление дисками.


Щелкаем по ней правым кликом и выбираем пункт Изменить букву диска или пусть к диску.

Тут нам для флешки, а точнее будущего usb защитника, нужно изменить букву на А.

У меня получилось вот так.


У вас откроется окно Защита БД учетных записей Windows, тут вам нужно будет нажать обновить, для того чтобы сделать usb ключ для windows.
Нажимаем кнопку обновить. В итоге у вас откроется окно Ключ запуска, в нем ставим переключатель на Хранить ключ запуска на дискете. Требуется вставлять дискету при запуске системы. Этим мы и делаем нашу флешку токеном для windows.

Вас попросят подтвердить, что вы согласны с копирование ключа на нее.

Как видим, все готово

Посмотрим на его содержимое.

В итоге у вас пропишется маленький файл размеров 8 кб, под именем StartKey

Теперь перезагружаемся и видим, перед окном ввода логина и пароля вот такое сообщение.

Нажимаем для примера кнопку ок, без флешки и видим следующее.
Не найден файл ключа запуска на дискете, вставленной в привод А.

Вставляем usb key для windows и логинимся. Как видите, двух факторная аутентификация работает нормально.
Отключить все это можно теми же шагами, единственное в Окне ключ выберите пункт

Вам потребуется чтобы ваш usb ключ защиты был вставлен.

Все теперь ключ храниться локально.

Если хотите увеличить безопасность вашего компьютера, то вот вам реальный способ это сделать, ни один ребенок не сможет без вас попасть на компьютер.
Популярные Похожие записи:
21 Responses to Создаем usb ключ защиты средствами Windows
Здравствуйте. А не подскажите как подобным способом можно защитить только 1 учетку локальную/доменную?
Добрый день, если честно не пробовал, но мне кажется не получиться, так как если ключ не вставлен то до логина вам не дадут пройти.
Windows 7 не видит ключ на флешке, хотя он там есть…. что делать?
А в какой файловой системе форматировалась флешка?
Если такая защита стоит на другом ПК то можно ли этот ключ сделать не на защищёном и будет ли тогда ключ работать?
Здравствуйте. Сын стёр файл с флэшки. Ноутбук зависат при загрузке, просит …. Как быть?
Тут уже только вынимать диск и подключать его к другому компьютеру, вытаскивать от туда данные, потом переустанавливать систему, просто если бы легко было взломать, этой технологии был бы грош цена.
Правильно ли я понимаю, что копирование файла ключа на вторую (третью/четвёртую) флешку решит проблему при возможной потери/неисправности оригинальной флешки?
Огромное спасибо за статью.
Правильно я понимаю
Если включить этот ключ с usb
И в добавок защифровать всю инфу на дисках
(Есть такая функция)
То без usb ключа, следовательно без системы
уже ни какие танцы с бубном
Не помогут извлеч инфу с дисках?
Если потерял флэшку как включають ноут?
Только переустановка и вытаскивание данных с помощью Live-cd
Здравствуйте! Спасибо работает. usb key нужен только при загрузке системы. Потом флешку можно извлечь. У меня на windows 7 (64) получилась так: на флешке переименованной в (A) ключ видит и разблокирует систему, а вот копию на другой флешке не видит. Предполагаю из за того, что другая флешка имеет букву диска отличную от (A) – у меня определялась как (F). Попробовал назначить букву (A). Копия заработала., но перестал определятся ключ на флешке1. Переименовался. Получается, что копию usb key невозможно использовать. и при утрате оригинала неизбежны проблемы. Кто подскажет? Спасибо.
Интересное тестирование, а если сделать клон флешки с помощью утилит?
Я бы попробовал снять образ с оригинальной флэшки-ключа и смонтировать его на другую флэшку. Если и так не получится — останется думать что имеют значения идентификаторы VID&PID. За этим — уже только прошивка контроллера, от чего флэшка вполне вероятно может стать нерабочей.
блин помогите его удалить потому што я хотел сохранить там апароль которие поставили родаки а потом понял што комп без флешкине запускается срочно помогите
здравстуйте, такая проблема, ключ на флэшке-оригинале есть, раньше система включалась нормально, а потом резко не извлекает из нее ключ этот и всё. может она как-то поменяла букву диска. система не включается больше. как быть?
В безопасном режиме пробовали загружаться, и если флешку подключить на другом компьютере, у нее видится файловая система? Можно попробовать поискать на ней ошибки, штатными средствами Windows
Благодарю за полезную информацию по созданию ключа.Пригодилось.
Здравствуйте!
Скажите, пожалуйста, а зачем при создании usb ключа, менять букву флешки?
Если её, к примеру, не менять, а оставить стандартной по умолчанию, то Windows сможет запускаться тогда с каждой флешки, на которой установлен StartKey?
Я почему спрашиваю? Ведь если единственная флешка, на которой создан StartKey, вдруг выйдет из строя, то с другой флешки система не запустится, даже при наличии на ней StartKey, поскольку система видит её под другой буквой. Поэтому, можно ли создать, две или три флешки с usb ключом под одной буквой, чтобы Windows запускался не с одной, а с любой?
_https://support.microsoft.com/ru-ru/help/4025993/syskey-exe-utility-is-no-longer-supported-in-windows-10-windows-server
Дополнительная информация
Syskey — это внутренний корневой ключ шифрования Windows, используемый для шифрования других конфиденциальных данных о состоянии ОС, таких как хеш пароля учетной записи пользователя. Утилиту SysKey можно использовать для добавления дополнительного уровня защиты путем шифрования syskey с целью использования внешнего пароля. В этом состоянии ОС блокирует процесс загрузки и запрашивает у пользователей пароль (интерактивно или путем считывания с гибкого диска).
К сожалению, ключ шифрования syskey и использование syskey.exe больше не считаются безопасными. Syskey основан на слабом шифровании, которое легко взломать в современных условиях. Данные, защищенные syskey, очень ограничены и не охватывают все файлы и данные на томе ОС. Утилита syskey.exe также использовалась злоумышленниками как вирус-вымогатель.
Active Directory ранее поддерживает использование внешнего шифрования syskey для IFM мультимедиа. При установке контроллера домена с использованием IFM носителя необходимо также предоставить пароль внешнего syskey. К сожалению, в этой защите присутствуют те же проблемы безопасности.
Источник
Как создать USB-ключ безопасности в Windows 10

В интересах безопасности данных некоторые люди обращаются к сторонним USB-устройствам, которые служат ключами безопасности для их ПК. Без подключения такого устройства ваш компьютер не будет разблокирован. Это очень просто.
Есть два способа получить один из этих ключей безопасности, чтобы добавить дополнительный уровень защиты: вы можете купить готовый или создать свой собственный.
Давайте рассмотрим оба метода, а также то, как, на самом деле, создать свой собственный USB-ключ безопасности, используя старый флэш-накопитель.
Что такое YubiKey
В качестве примера укажем компанию Yubico, которая создала YubiKey – USB-флешку, совместимую с Windows Hello, и рядом других сервисов, которые необходимо поддерживать в безопасности, таких как LastPass, KeePass, Google, Dropbox и Evernote.
Как только вы получите его, всё, что вам нужно сделать, это подключить к компьютеру, зарегистрировать, и вы готовы к работе. Есть несколько разных вариантов YubiKey. У вас есть стандартный YubiKey, который подключается через USB, Nano YubiKey, который намного меньше, и YubiKey NEO, который может подключаться как через NFC, так и через USB.
Как создать USB-ключ безопасности
Прежде чем приступить к этой работе, помните, что создание ключа безопасности USB для вашего ПК имеет некоторые недостатки. Если вы потеряете USB-ключ, вам будет нелегко попасть на ваш компьютер, особенно если вы отключите возможность ввода пароля в качестве резервной возможности. Вы также потеряете возможность использовать один из USB-портов на вашем ПК, пока активна блокировка.
Существует несколько вариантов, когда речь заходит о программном обеспечении, используемом для этого процесса, но USB Raptor, Rohos Logon Key и Predator являются некоторыми из них, хотя последние два являются платными. Rohos Logon Key стоит 34 доллара, а Predator – 10 долларов.
Поскольку USB Raptor бесплатен, мы покажем вам, как его настроить, используя Windows 10 и старый флэш-накопитель. На самом деле, не имеет значения, сколько места на флэш-накопителе, потому что всё, что будет создано, это файл размером 1 КБ.
USB Raptor откроется. На этом этапе вы можете подключить флэш-накопитель к компьютеру. Как только он подключен, вы сможете продолжить следующие шаги.
Как только вы извлечёте USB-накопитель, включится USB Raptor. Появится фиолетовый экран с логотипом USB Raptor. Только когда вы снова подключите USB-ключ, он разблокируется практически мгновенно.
Расширенные настройки USB Raptor
Выше представленная инструкция охватывает простую конфигурацию, которую рекомендует USB Raptor, но есть довольно много расширенных настроек, которые вы можете изменить, установив флажок рядом с Advanced configuration в правом верхнем углу окна.
Здесь вы можете выбрать, хотите ли вы использовать пароль в качестве резервной копии в случае, если вы потеряете USB-накопитель, должна ли быть задержка блокировки при извлечении USB-накопителя или нет, должен ли проверяться серийный номер USB-накопителя (для предотвращения копирования файла) и многое другое.
Конечно, USB Raptor прекрасно работает без изменения расширенных настроек, поэтому вам не нужно настраивать то, что вам не нужно.
Источник
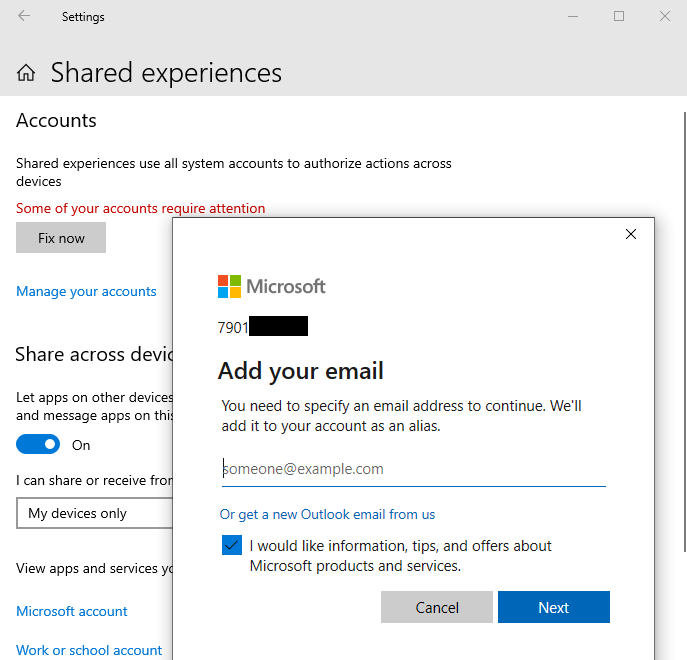
Sign in to your Microsoft account with Windows Hello or a security key
If you’re tired of having to remember or reset your password, try using Windows Hello or a FIDO 2–compliant security key to sign in to your Microsoft account instead. All you’ll need is a device running Windows 11 and the Microsoft Edge browser. (This functionality is not available yet on Xbox or phones.)
What is Windows Hello?
Windows Hello is a more personal way to sign in, using your face, fingerprint, or a PIN. You can use Windows Hello to sign in to your device on the lock screen and sign in to your account on the web.
What is a security key?
A security key is a physical device that you can use instead of your user name and password to sign in. It may be a USB key that you could keep on your keychain, or an NFC device like a smartphone or access card. Since it’s used in addition to a fingerprint or PIN, even if someone has your security key, they won’t be able to sign in without your PIN or fingerprint.
Security keys are usually available for purchase from retailers that sell computer accessories.
How to sign in with Windows Hello
Follow these steps to set up Windows Hello and then sign in to your Microsoft account in Microsoft Edge:
Select Start > Settings > Accounts > Sign-in options.
Under Ways to sign in, select a Windows Hello item to add.
To add Windows Hello as a sign in method for your Microsoft account:
Go to the Microsoft account page and sign in as you normally would.
Select Security > Advanced security options.
Select Add a new way to sign in for verify.
Select Use your Windows PC.
Follow the instructions to set up Windows Hello as a method for signing in.
How to sign in with a security key
There are different types of security keys that you can use, like a USB key that you plug in to your device or an NFC key that you tap on an NFC reader. Make sure to familiarize yourself with the type of security key you have by reading the instruction manual from the manufacturer.
Go to the Microsoft account page and sign in as you normally would.
Select Security > More security options.
Select Add a new way to sign in or verify.
Identify what type of key you have (USB or NFC) and select Next.
You will be redirected to the setup experience where you will insert or tap your key.
Create a PIN (or enter an existing PIN if you have already created one).
Take the follow-up action by touching either the button or gold disk if your key has one (or read the instruction manual to figure out what else it might be).
Name your security key so that you can distinguish it from other keys.
Sign out and open Microsoft Edge, select Use Windows Hello or security key instead, and sign in by inserting or tapping your key.
Note: Your security key manufacturer might provide software that can help you manage your key, such as by changing the PIN or creating a fingerprint.
Manage your keys
Follow these steps to delete keys that you have set up for your account:
Go to the Microsoft account page and sign in as you normally would.
Select Security > Advanced security options. Manage your security keys under Ways to prove who you are.
If you’re tired of having to remember or reset your password, try using Windows Hello or a FIDO 2–compliant security key to sign in to your Microsoft account instead. All you’ll need is a device running Windows 10 Version 1809 or later and the Microsoft Edge browser. (This functionality is not available yet on Xbox or phones.)
What is Windows Hello?
Windows Hello is a more personal way to sign in, using your face, fingerprint, or a PIN. You can use Windows Hello to sign in to your device on the lock screen and sign in to your account on the web.
What is a security key?
A security key is a physical device that you can use instead of your user name and password to sign in. It may be a USB key that you could keep on your keychain, or an NFC device like a smartphone or access card. Since it’s used in addition to a fingerprint or PIN, even if someone has your security key, they won’t be able to sign in without your PIN or fingerprint.
Security keys are usually available for purchase from retailers that sell computer accessories.
How to sign in with Windows Hello
Follow these steps to set up Windows Hello and then sign in to your Microsoft account in Microsoft Edge:
Go to Accounts > Sign-in options.
Under Manage how you sign in to your device, select a Windows Hello item to add.
To add Windows Hello as a sign in method for your Microsoft account:
Go to the Microsoft account page and sign in as you normally would.
Select Security > More security options
Select Add a new way to sign in for verify
Select Use your Windows PC
Follow the dialogs to set up Windows Hello as a method for signing in.
How to sign in with a security key
There are different types of security keys that you can use, like a USB key that you plug in to your device or an NFC key that you tap on an NFC reader. Make sure to familiarize yourself with the type of security key you have by reading the instruction manual from the manufacturer.
Go to the Microsoft account page and sign in as you normally would.
Select Security > More security options
Select Add a new way to sign in or verify
Identify what type of key you have (USB or NFC) and select Next.
You will be redirected to the setup experience where you will insert or tap your key.
Create a PIN (or enter an existing PIN if you have already created one).
Take the follow-up action by touching either the button or gold disk if your key has one (or read the instruction manual to figure out what else it might be).
Name your security key so that you can distinguish it from other keys.
Sign out and open Microsoft Edge, select Use Windows Hello or security key instead, and sign in by inserting or tapping your key.
Note: Your security key manufacturer might provide software that can help you manage your key, such as by changing the PIN or creating a fingerprint.
Manage your keys
Follow these steps to delete keys that you have set up for your account:
Go to the Microsoft account page and sign in as you normally would.
Select Security > More security options and under Windows Hello and security keys, select Manage your sign-in methods.
Источник
Отключение запроса ключа безопасности windows hello
В попытке угнаться за MacOS разработчики из Microsoft оснастили windows 10 рядом функций, хорошо знакомым пользователям MacBook и iMac. Одной из них стала методика защиты данных пользователя и самого устройства. Эта служба носит название windows hello и позволяет многое.
Что такое windows hello
Данная функция тесно связана с учетной записью пользователя. Идентифицирует его по различным признакам. Только он может выполнить вход в систему. Для этого необходимо предоставить личные данные.
По своему желанию пользователь может настроить тот способ распознавания, который поддерживает его система. Данные, которые он предоставляет, отправляются в Майрософ в зашифрованном виде. Казалось бы, все продумано. Но не редки случаи, когда у владельцев аккаунтов возникают проблемы с доступом. В этой статье будет дан ответ на вопрос – как отключить windows hello и удалить все данные, связанные с этой службой.
Это может потребоваться в моменты, когда продуманный на первый взгляд компонент системы начинает доставлять неудобства. К примеру, сложный и надежный пароль стал забываться. Владелец ПК не может получить к нему доступ, потому что сканер отпечатка пальцев работает некорректно. Наконец, ему может просто надоесть каждый раз вставлять в USB разъем ключ безопасности.
К счастью, методы, описанные ниже, достаточно просты. Применить их на практике может ПК-пользователь любого уровня. Начинающим, правда, предложенные варианты покажутся неочевидными.
windows hello в windows 10 как отключить запрос пин-кода для доступа к учетной записи
Те, кто используют для защиты от вирусов встроенное в систему средство, будут видеть предложение его создать не только во время инсталляции системы. Предложение настроить вход в аккаунт по оригинальному шифру будет поступать и от антивируса. В результате даже те, кому защищенный доступ к аккаунту не нужен совсем. Как же это все отключить?
После этого доступ к компьютеру будет предоставляться в обычном режиме. То есть, без участия windows hello и всех, входящих в эту службу методик безопасности.
Служба windows hello в Windows 10. Отключение запроса ключа безопасности и других методов входа.
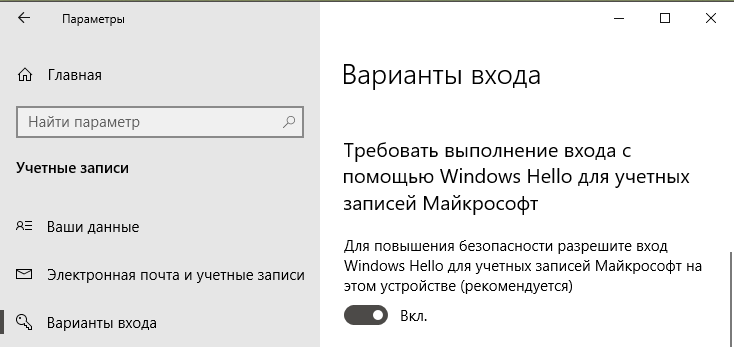
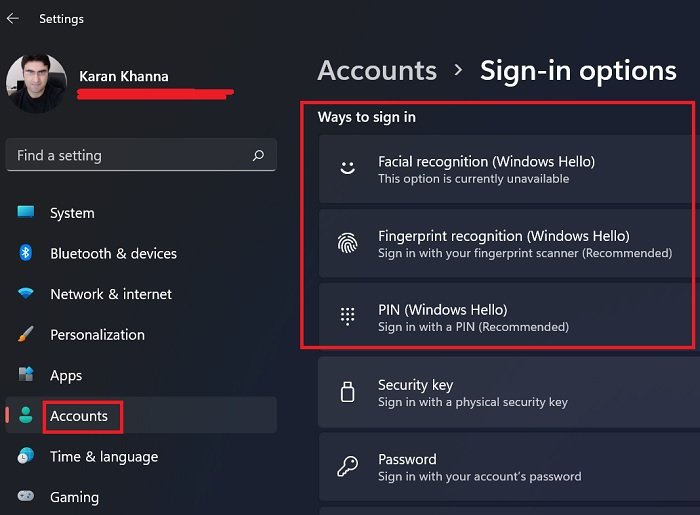
Операционная система, именуемая в народе «Десяткой», предлагает множество способов идентификации личности. Чтобы она не требовала никаких данных при входе, необходимо сделать следующее:
Теперь можно возвращаться в раздел «Варианты входа», и удалить данные лица, отпечатка пальцев, пароля, и графического пароля. Для этого поочередно входить в каждый раздел, и там нажимать удалить. Исключение составляет лишь опция «Ключ безопасности». Для ее деактивации понадобится выполнить следующие действия.
После этого все компоненты данной службы будут полностью отключены. Пользователь сможет беспрепятственно входить в систему. Теперь важно, чтобы пользователь не попытался снова ограничить себе доступ к учетной записи.
Источник
Сведения о приложении Windows Hello и его настройке
Windows Hello — это индивидуально настраиваемый и более безопасный способ получить мгновенный доступ к устройствам Windows 11 с помощью ПИН-кода, распознавания лица или отпечатков пальцев. Вам потребуется настроить ПИН-код при настройке входа с использованием отпечатков пальцев или распознавания лица. Впрочем, можно входить в систему с использованием только ПИН-кода.
Эти варианты упрощают процедуру входа на ваш компьютер и делают ее безопаснее, поскольку ваш ПИН-код связан только с одним устройством, а для резервного копирования он связывается с вашей учетной записью Майкрософт.
Нажмите кнопку выше, чтобы перейти непосредственно к параметрам, или выполните следующие действия для настройки Windows Hello:
В разделе Способы входа приведены три варианта входа с помощью Windows Hello:
Выберите Распознавание лиц Windows Hello, чтобы настроить вход с использованием функции распознавания лица с помощью инфракрасной камеры вашего компьютера или внешней инфракрасной камеры.
Выберите Распознавание отпечатков пальцев Windows Hello, чтобы настроить вход с помощью сканера отпечатков пальцев.
Выберите ПИН-код Windows Hello, чтобы настроить вход с помощью ПИН-кода.
Статьи по теме
Windows Hello — это индивидуально настраиваемый и более безопасный способ получить мгновенный доступ к устройствам Windows 10 с помощью ПИН-кода, распознавания лица или отпечатков пальцев. Вам потребуется настроить ПИН-код при настройке входа с использованием отпечатков пальцев или распознавания лица. Впрочем, можно входить в систему с использованием только ПИН-кода.
Эти варианты упрощают процедуру входа на ваш компьютер и делают ее безопаснее, поскольку ваш ПИН-код связан только с одним устройством, а для резервного копирования он связывается с вашей учетной записью Майкрософт.
Нажмите кнопку выше, чтобы перейти непосредственно к параметрам, или выполните следующие действия для настройки Windows Hello:
В разделе Управление входом на устройство вы увидите три варианта входа с помощью Windows Hello:
Выберите Распознавание лиц Windows Hello, чтобы настроить вход с использованием распознавания лица с помощью инфракрасной камеры вашего компьютера или внешней инфракрасной камеры.
Выберите Распознавание отпечатков пальцев Windows Hello, чтобы настроить вход с сканера отпечатков пальцев.
Выберите ПИН-код Windows Hello, чтобы настроить вход с ПИН-кодом.
Источник
В подборках нововведений версии 20H1 можно было услышать примерно такую песню:
Теперь проще выполнить беспарольный вход в систему при помощи идентификации лица, отпечатка пальца или PIN-кода. Просто разрешите в настройках идентификацию при помощи Windows Hello.
Вряд ли автор понимает, о чем он пишет. Поэтому вполне объяснима реакция участника чата инсайдеров на такую формулировку.

Между тем, я недавно рассказывал в блоге про эту фичу, но фокусировался на решении проблемы с исчезновением настройки автоматического входа. Сегодня я продолжу тему и постараюсь расставить точки над i.
Как обычно, термины учетная запись Microsoft, аккаунт Microsoft и MSA обозначают одно и то же.
[+] Сегодня в программе
История вопроса
Беспарольный вход впервые появился в декабре 2018 года в сборке 18305, когда реализовали возможность добавлять в систему имеющуюся учетную запись Microsoft без пароля.
В Параметрах упоминание о беспарольном входе появилось в июле 2019 года в сборке 18936.
В октябрьской сборке 18995 сделали еще один шаг – вход с ПИН-кодом в безопасный режим. Так убрали последнее препятствие к полностью беспарольной аутентификации в ОС Windows.
В финальной версии 20H1 название фичи в параметрах изменилось. Беспарольный вход исчез из заголовка, уступив место Windows Hello.
Читатели со стажем помнят Microsoft Passport, систему аутентификации Microsoft. В начале пути Windows 10 она входила в состав системы. Позже компания объединила технологию с Windows Hello.
Windows Hello
Это современная система аутентификации Microsoft, которая привязана к устройству, построена на двухфакторной или двухэтапной аутентификации и заменяет пароли. С помощью Hello можно входить в:
- аккаунты Active Directory и Azure Active Directory (Windows Hello for Business)
- учетную запись Microsoft
- сервисы, поддерживающие FIDO2
Контекст этой статьи – домашняя среда, поэтому дальше речь пойдет про последние два пункта.
Регистрация аккаунта Microsoft на устройстве и вход в систему
Вход в учетную запись Microsoft с Windows Hello на устройстве с Windows 10 осуществляется только с помощью ПИН-кода и биометрии.
Пароль в сферу Hello не входит.
При регистрации аккаунта Microsoft на устройстве ПИН-код, идентификатор лица и отпечаток пальца защищаются парой криптографических ключей, которые генерируются аппаратно при наличии TPM 2.0 или программно.
Для регистрации MSA на устройстве требуется двухэтапная аутентификация, в т.ч. возможна беспарольная. Сервер Microsoft получает публичный ключ и ассоциирует его с аккаунтом пользователя, таким образом устанавливаются доверительные отношения.
Когда вы смотрите в камеру или проводите пальцем по сканеру отпечатков, полученные данные сверяются с ключами Hello. При успехе вы получаете токен аутентификации на вход в систему и доступ к сервисам с аккаунта компании на этом устройстве.
Назначение аппаратного ключа
С помощью аппаратного ключа FIDO2 можно входить без ввода пароля с зарегистрированной на устройстве учетной записью Microsoft на сайты и в приложения. Это финализировали в версии 1809, и в анонсе есть хорошее описание принципа аутентификации с ключом.
В Windows 10 аппаратный ключ можно задействовать при регистрации аккаунта Microsoft на устройстве, после чего входить в MSA с помощью Hello, т.е. ПИН-кода или биометрии.
Однако нельзя просто воткнуть флэшку и войти в учетную запись Microsoft на устройстве с Windows 10. Это работает только с аккаунтами Azure Active Directory, в т.ч. для Hybrid Azure AD.
В параметрах есть ссылка на KB4468253, где в частности говорится: аппаратный ключ используется в дополнение к ПИН-коду или биометрии, поэтому владеющий только ключом человек не сможет выполнить вход в аккаунт. Подтекст такой, что сначала надо выполнить вход в систему с Windows Hello, т.е. аутентификация двухфакторная.
Вы знаете ПИН-код или обладаете биологической особенностью (лицо, отпечаток пальца) и владеете ключом.
Конечно, если вы вошли в систему с Hello и оставили ПК без присмотра, злоумышленник может вставить ключ и авторизоваться с вашей MSA на сайте.
Как создать учетную запись Microsoft без пароля
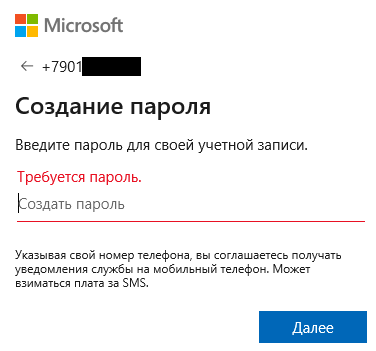
Беспарольный аккаунт Microsoft создается с номером телефона, нежели с заданным вами адресом электронной почты. В интернетах мне попадались инструкции о том, как это сделать в Windows 10, но их авторы явно не пробовали пройти процесс 
Создать учетную запись Microsoft без пароля можно только в сторонних мобильных ОС 🙈
В Android и iOS в приложениях Microsoft Office (Word, Excel, Office и т.д.) вы можете создать MSA, указывая номер телефона. Если при попытке входа система определяет, что такого аккаунта нет, она предлагает создать новый. Пароль не требуется, а создание учетной записи подтверждается кодом в SMS.
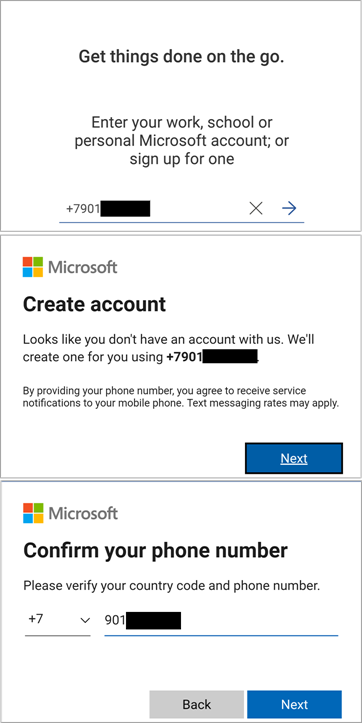
Затем вы можете (и я рекомендую) использовать вместо SMS беспарольную 2FA в приложении Microsoft Authenticator.
Если же создавать MSA на сайте Microsoft https://signup.live.com/ или в параметрах Windows 10, указывая номер телефона, система требует задать пароль.
Причину эксклюзивности мобильных ОС объяснил мне в Твиттере глава подразделения Microsoft Identity.
Most laptops/PCs can’t receive an SMS code. So we see a lot of drop off in user success when a phone is required to complete a flow from a PC.
— Alex Simons (@Alex_A_Simons) August 11, 2020
Видимо, значительный процент людей пытается вводить несуществующие номера телефонов или домашние номера, куда SMS не проходит ¯_(ツ)_/¯
Однако если учетная запись Microsoft без пароля уже создана, начиная с версии 1903, вы можете добавить ее на устройство уже во время установки Windows. После установки это можно сделать в Параметры – Учетные записи в разделах:
- Ваши данные — при переключении с локального аккаунта на свою MSA
- Семья и другие пользователи – при создании аккаунта для другого человека или отдельного профиля для своей MSA
Как я объяснил выше, учетная запись Microsoft регистрируется на устройстве при первой успешной аутентификации, а дальше вы входите в систему с Hello.
При желании вы можете задать пароль в настройках безопасности аккаунта. Адрес электронной почты добавляется там же в настройках профиля, но об этом Windows 10 вам будет напоминать сама.
Ключевая особенность беспарольного входа в версии 20H1+
Сводка изменений в двух версиях Windows 10 такова:
- 1903 — можно использовать на устройстве с Windows 10 аккаунт [Microsoft], требующий аутентификации, но не имеющий пароля в принципе
- 20H1 — можно отключить вход с паролем в учетную запись Microsoft, а также входить с ПИН-кодом в безопасный режим
Теперь можно вернуться к началу статьи и недоуменной реакции на нововведения у людей, которые в ноутбуках входили в аккаунт с помощью биометрии еще лет дцать назад, благодаря ПО и драйверам вендоров.
Ранее биометрический вход существовал наряду с парольным, даже если сам пароль был пустой. Равно как в такой аккаунт всегда можно было войти с паролем. Теперь, создав MSA без пароля или включив беспарольный вход, вы входите только с ПИН-кодом и биометрией.
В этом и заключается отличие от предыдущих версий Windows 10, более старых ОС Windows и решений вендоров.
Преимущества беспарольного входа и MSA без пароля
Я недавно проводил опрос и выяснил, что MSA в Windows 10 используют меньше половины людей даже в самой прогрессивной группе моей аудитории. Поэтому большинству читателей до беспарольных аспектов еще далеко. Впрочем, они и не сулят потребителям манны небесной.
- Требование Windows Hello. Поскольку Hello привязано к устройству, пароль не передается по сети. Такой подход укрепляет безопасность, но здесь основные бенефициары – организации, а домашним пользователям это ничего не дает.
- Учетная запись Microsoft без пароля. Если у вас нет пароля, вы его не забудете, равно как не сольете случайно посторонним лицам, например, попав под фишинговую атаку. Тут кроме пользы нет вреда, но нельзя терять контроль над номером телефона.
Подводные камни беспарольного входа
Есть несколько аспектов, которые вам надо учитывать, форсируя вход с Windows Hello и/или используя аккаунт Microsoft без пароля.
Невозможен автоматический вход в систему
Применимо к: требование входа с Hello / беспарольная MSA
Это я разбирал в прошлой статье в контексте форсирования входа с Hello. Если оно выключено, у беспарольной MSA ожидаемо есть возможность настройки автоматического входа. Но там надо задавать пароль, в т.ч. пустой, которого у аккаунта нет в принципе.
Недоступен вход с графическим паролем
Применимо к: требование входа с Hellо / беспарольная MSA
Первое логично следует из отключения парольного входа, а у второго нет никаких паролей в вариантах входа вне зависимости от того, требуется Hello для входа или нет.
Невозможно удаление ПИН-кода
Применимо к: требование входа с Hello / беспарольная MSA
На форум пришел человек, у которого была неактивна кнопка удаления. Нестыковка коллекционная, конечно, хотя вполне объяснимая.

Логика такова: если ломается сканер отпечатков и/или камера, ПИН-код – единственный способ входа без пароля.
Невозможен вход в локальную среду восстановления
Применимо к: беспарольная MSA
В отличие от безопасного режима, в среду восстановления с ПИН-кодом не войти. Для доступа к опциям восстановления (удаление исправлений) и диагностическим инструментам Windows RE (командная строка) требуется пароль администратора. Поэтому войти в беспарольную учетную запись Microsoft не получится, даже если вы переключились на нее с локального аккаунта, у которого пароль был установлен.
На картинке видно, что изначально использовался локальный аккаунт Admin, который я переключил на беспарольную MSA. Пароль от Admin ожидаемо не подходит.
В качестве обходного пути можно загрузиться в RE с установочной флэшки – в этом случае пароль администратора не запрашивается.
Еще одна неочевидная альтернатива – шифрование диска BitLocker, в том числе автоматическое. При входе в локальную RE требуется ввести 48-значный пароль восстановления, после чего экран с выбором администратора и вводом пароля уже не появляется.
Невозможно подключение по RDP или вход в сетевую папку
Применимо к: беспарольная MSA / MSA с паролем при беспарольной регистрации
У этих граблей два варианта.
Беспарольная MSA
Подключение по RDP и вход в сетевую папку подразумевают парольную аутентификацию, а для беспарольной MSA просто нечего указывать в качестве пароля. Однако по RDP можно подключиться к имеющей пароль MSA, даже если требование Hello включено, т.е. локальный вход с паролем невозможен.
MSA с паролем при беспарольной регистрации на устройстве
Проблема возникает, если добавление MSA на устройство проводится без ввода пароля, т.е. аутентификация выполняется по уведомлению в приложении Microsoft Authenticator. В этом случае Windows не с чем сравнить пароль, который вы вводите при подключении по RDP или входе в сетевую папку. Решение я опубликовал в своем канале Telegram.
Примечание. При использовании MSA с паролем вы можете столкнуться с проблемой подключения к ВМ на Hyper-V в режиме расширенного сеанса.
Литература (EN)
- Windows Hello for Business
- Why a PIN is better than a password
- Building a world without passwords
- Advancing Windows 10 as a passwordless platform
- Secure password-less sign-in for your Microsoft account using a security key or Windows Hello
Заключение
Несколько лет назад Microsoft взяла курс на беспарольную аутентификацию и с тех пор следует ему. Windows Hello отлично сочетается с облачными сервисами компании (Azure AD) и даже укрепляет безопасность традиционной инфраструктуры.
Домашним пользователям перепадает с корпоративного стола, но для них беспарольная технология еще не обрела законченный вид. С другой стороны, большинство людей до сих пор использует пароли Qwert321 для всех аккаунтов, сторонится MSA, двухфакторной аутентификации и прочих решений, защищающих учетные записи и личные данные.
Наверное, со временем беспарольные аккаунты станут мейнстримом, но для этого также понадобятся усилия Apple, Google и множества других компаний.
Конкретных дискуссионных тем я сегодня не предлагаю. Статья разъясняет технические нюансы, не играя на эмоциях, а MSA мы обсуждали в прошлый раз. Однако ваши вопросы и мысли по теме я всегда рад видеть в комментариях!
On Windows 10, Windows Hello is a feature that allows you to use biometric authentication (such as your face or fingerprint) or a PIN to sign in to your account without the need to type complicated passwords.
Starting with the October 2018 Update (version 1809), Windows 10 introduces support for FIDO2 and CTAP2 security standards that allows to extend the same password-less experience to sign in to a Microsoft account online using Windows Hello or a security key. (As long as you use Microsoft Edge to access your account.)
In this guide, you’ll learn the steps to configure Windows Hello face, fingerprint, or PIN to sign in to your Microsoft account online without the use of password on Windows 10.
To set up Windows Hello to sign in to your Microsoft account online, use these steps:
-
Open Microsoft Edge.
-
Sign in to your account.
-
Click on the Security tab.
-
Click the more security options link.

Microsoft account Security tab -
Under “Windows Hello and security keys,” click the Set up Windows Hello link.
Microsoft account Windows Hello and security key settings Quick Tip: If you don’t see the options as shown in the screenshot above, then you’re not running the version of Windows 10 that supports this feature, or you’re not using Microsoft Edge.
-
Click the Next button.
Windows Hello setup wizard -
Confirm your Microsoft account password. (In my case using a PIN password.)

Windows Security prompt -
Type a descriptive name for the sign-in method. (This will help to identify on which device you signed in using Windows Hello.)
Set up a Windows Hello name for the password-less authentication -
Click the Next button.
-
Click the Got it button.


Once you’ve completed the steps, you can start signing in to your Microsoft account online using Windows Hello face, fingerprint, or PIN.
You’ll also get an email notification letting you know of the security change in your account.
Signing in using Windows Hello
To sign in using Windows Hello, use these steps:
-
Open the Microsoft account sign-in page.
-
Click the Sign in with Windows Hello or a security key link.
Microsoft account sign-in page -
Select your Windows Hello authentication method.
Sign in with Windows Hello to a Microsoft account without password -
Continue signing in to your account.


After completing the steps, you’ll get access to your Microsoft account without using a password.
If you’re not running the Windows 10 October 2018 Update (version 1809), you can use these steps to upgrade.
We may earn commission for purchases using our links to help keep offering the free content. Privacy policy info.
All content on this site is provided with no warranties, express or implied. Use any information at your own risk. Always backup of your device and files before making any changes. Privacy policy info.
Written By
published
October 31, 2016
Did you know that with Windows Hello, you can sign into your Windows 10 devices* in less than two seconds**? Windows Hello uses biometric sensors to recognize your face or fingerprint instantly and unlocks your device without needing a password.
To get started, check to see if your device works with Windows Hello:
Go to Windows Settings (or simply type Windows key + I) > select Accounts > Sign-in options > Windows Hello
If it doesn’t, you have a couple of options. Consider buying a new PC, fingerprint accessory or camera accessory so that you can use the facial unlock or biometric security capabilities of Windows Hello.
Here’s how to set up Windows Hello:

Open the Settings menu (or simply type Windows key + I). Go to Accounts > Sign-in options > Set up > Get started. Type in your PIN when asked, or create one if you don’t have one already. You can always keep and use your PIN as a backup if you need.
To set up face recognition, keep looking at the screen. For fingerprint recognition, touch or swipe the finger you want to register on the sensor. You can also improve face recognition, add, or remove additional fingerprints, at any time, from the same place.
Share your PC? Here’s how to add multiple profiles:

Open the Settings menu and go to Accounts > Family & other people. Select “Add a family member” or “Add someone else to this PC,” and type in their Microsoft account email address.
Sign out from your account and ask the other person to sign in. They will be prompted to set up a new profile, including setting up Windows Hello.
Head over here to learn more about Windows Hello, or how Windows Hello protects your privacy. Have a great week!
*Windows Hello biometrics sign-in requires specialized hardware including a Windows Hello capable device, fingerprint reader, illuminated IR sensor or other biometric sensors.
** Based on average time comparison between typing a password respectively detecting a face or fingerprint to authentication success.
A new feature in Windows 11/10, Windows Hello brings biometric security to the new operating system from Microsoft. This feature eliminates the need to login into any Windows device using passwords and is a more secure way to sign in to your Windows device, app or service. This post will show you how to set up and use Windows Hello in Windows 11/10 to sign in.
Windows Hello supports facial recognition and works by scanning the iris. It also supports fingerprints. The highlight of it is the Infrared Technology support that allows the facial recognition feature to work in almost all kinds of lighting situations. The departure from the normal behavior of having to enter a password every time you log in is thus very welcome.
Read: PIN vs Password in Windows – Which offers better security?
While most options have changed significantly while migrating from Windows 10 to Windows 11, the case of Windows Hello is like the same wine in a different bottle. However, the description and text for the Windows Hello options have changed, thus making it difficult to understand what is what. The procedure to set up and use Windows Hello in Windows 11 sign-in is as follows:
- Right-click on the Start button and select Settings.
- In the Settings menu, go to the Accounts tab in the left pane.
- In the right pane, click on Sign-in options.
- In the menu for Ways to sign in, there are login options. The options which mention “(Windows Hello)” are the ones associated with Windows Hello.
- Simply add your identity to the one which matches your needs.
How to use Windows Hello in Windows 10
When you this feature, your device will authenticate you with a camera or fingerprint reader. Setting up Hello is pretty easy.
Press Win+I to open the Settings app. Click on ‘Accounts‘ section. Under the Accounts section, select Sign-in options.
Scroll down, and you will see Windows Hello. This section allows you to sign in to Windows 10, apps and services using your Fingerprint or Face.
Clicking on the desired option will open a Get started wizard, which you can follow to complete the formalities.
Related: How to disable Windows Hello prompt using GPEDIT or REGEDIT.
You can set up a Fingerprint by clicking on one of the available options – Add a fingerprint, Add another fingerprint or Remove one. Press your thumb to your device’s fingerprint scanner to register it.
You can also set up your ‘Face‘. Face your camera and allow it to capture the 3D view of your face
Your device must have a Windows Hello compatible camera and a fingerprint scanner and must also meet other Windows Hello requirements. Check out the list of PCs that support Windows Hello.
Once done, you can click the Improve recognition tab to perform more captures. You can also configure whether it should auto-unlock as soon as you become visible and if turning your head is required. Now when the machine is locked, you should see a small eye icon and text alongside it.
That’s it!
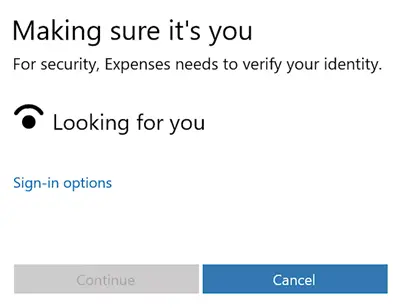
Once you have completed the procedure, whenever you need to sign in, whether its Windows 11/10, apps or services, you will see a Making sure it’s you screen. Once verified, it will display a Yup, it’s you message. Clicking on Continue will let you move forward.
This data that identifies your face, iris, or fingerprint never leaves your device. Windows does not store pictures of your face, iris, or fingerprint on your device or anywhere else. It is encrypted before it’s stored on your device.
This post shows how to set up Windows Hello or Fingerprint Reader on Windows or Surface devices.
What would happen if my hardware doesn’t support a certain Windows Hello login method?
In case your system lacks a certain hardware for Windows Hello login, then it would prompt We couldn’t find a <device> compatible with Windows Hello <feature>. Obviously, you wouldn’t be able to use that method.
In case you are sure your system has the connected hardware and you are still unable to access it for Windows Hello, try updating all drivers in your system using the Intel Driver and Support assistant.
Why does it prompt to set a PIN for Windows Hello when trying to use other login identity features?
It prompts to set a PIN because other identity features might fail. It is quite possible that the finger recognition tool fails to recognize your finger or the face recognition tool doesn’t identify your face. In such a situation, you could use the PIN. Thus, the PIN is mandatory for Windows Hello login.
Related: Windows Hello keeps asking me to set up a PIN
Why would you use the “Windows Hello only” feature?
Windows Hello makes your system safe because the password is a cloud-based identity for Microsoft single sign-on. However, Windows Hello is device based. Now the real power of Windows Hello lies in the fact that password login is disabled on your system. Thus, the option for the same has been provided. If you wish to use Windows Hello as the only possible method for logging in to your system, then please select the option for the same.
Isn’t Windows Hello mandatory for every Windows 11 system?
When you try booting in to your Windows 11 system for the first time, then the system does prompt for the Windows Hello creation but there’s a way to skip the procedure and most users are aware of the option now.
Learn more about Windows Hello and Microsoft Passport.
This week is all about enabling password-less sign-in with security keys on Windows 10. I know that a lot has been written about that subject already, but it’s that big that it still deserves a spot on my blog. Especially the Microsoft Intune configuration belongs on my blog. In this post I’ll show the required configurations that should be performed, by an administrator and the the user, to enable the user to use a security key as a sign-in method. My user will use a Yubikey 5 NFC security key. I’ll start this post with the authentication method policy that should be configured in Azure AD, followed by the steps for a user to register a security key. I’ll end this post by showing the different methods to configure security keys a sign-in method on Windows 10, by using Microsoft Intune, and the end-user experience.
Keep in mind that the best experience, for password-less sign-in with security keys, is on Windows 10 version 1903 or higher. This is caused by the fact that the PassportForWork CSP setting is introduced in Windows 10 version 1903.
Configure the authentication method
The first step in enabling password-less sign-in with security keys, is configuring the authentication method. Within Azure AD there is the Authentication method policy available, which is currently still in preview, that can be used to enable password-less authentication for users. Either all users, or a specific group of users. Within that policy it’s currently possible to enable FIDO2 security keys and Microsoft Authentication as password-less authentication options. The following three steps walk through the process of enabling FIDO2 security keys as a password-less authentication option for all users.
- Open the Azure portal and navigate to Azure Active Directory > Authentication methods > Authentication method policy (preview) to open the Authentication methods – Authentication method policy (preview) blade
- On the Authentication methods – Authentication method policy (preview) blade, select FIDO2 Security Key to open the FIDO2 Security Key settings blade
- On the FIDO2 Security Key settings blade, provide the following information and click Save
- ENABLE: Select Yes
- TARGET: Select All users (use Select users to only enable for specific users)
- Allow self-service set-up: Select Yes
- Enforce attestation: Select Yes

Figure 1: FIDO security keys

The key restriction policy settings are not working yet and should be left default for now.
Register security key as sign-in method
The second step is that the user must register a security key that can be used as sign-in method. That does require that the user already registered an Azure MFA method. If not, the user should first register an Azure MFA method. After registering an Azure MFA method, the following nine steps will walk the user through the process of adding an USB security key.
- Open the My Profile and navigate to Security info to open the Security info section
- On the Security info section, click Add method to open a dialog box
- On the Add method page, select Security key and click Add
- On the Security key page, select USB device and click Next
- A browser session will open to register the security key
- Insert the security key, touch it, provide a PIN and click Next
- Touch the security key another time and click Allow
- Provide a name for the security key and click Next
- On the Your all set page, click Done

Figure 2: Register security key

After registering a security key as a sign-in method, the user can already use the security key as a sign-in method for browser sessions.
Configure security keys as a sign-in option
The third and last step is to configure security keys as a sign-in option on Windows devices. Within Microsoft Intune there are multiple methods for enabling security keys as a sign-in option on Windows 10 devices. It’s also good to keep in mind that, even though password-less sign-in is supported starting with Windows 10, version 1809, the following configuration options are all for Windows 10, version 1903 or later. The reason for that is actually quite simple, as the required setting (UseSecurityKeyForSignin) is introduced in the PassportForWork CSP with Windows 10, version 1903.
Using Windows enrollment (Windows Hello for Business) settings
The first configuration option is by using the Windows Hello for Business settings that are available within the Windows enrollment settings. Those settings actually enable the administrator to configure the use of security keys for sign-in independent of actually configuring Windows Hello for Business. The biggest challenge with this approach is that it can’t be slowly implemented, as it’s all or nothing. The following two steps walk through this configuration.
- Open the Azure portal and navigate to Microsoft Intune > Device enrollment > Windows enrollment > Windows Hello for Business to open the Windows Hello for Business blade
- On the Windows Hello for Business blade, select Enabled with Use security keys for sign-in and click Save
This setting requires Windows 10, version 1903, or later, and is not dependent on configuring Windows Hello for Business.

Figure 3: Windows enrollment settings

Using Device configuration (Identity protection) settings
The second configuration option is by using the Identity protection device configuration profile. The Identity protection device configuration profile, provides the same configuration options as the Windows Hello for Business settings. The biggest difference is that the Identity protection device configuration profile can be implemented by using groups, which allows a phased implementation (and differentiation). The following four steps walk through this configuration.
- Open the Azure portal and navigate to Microsoft Intune > Device configuration > Profiles to open the Devices configuration – Profiles blade
- On the Devices configuration – Profiles blade, click Create profile to open the Create profile blade
- On the Create profile blade, provide the following information and click Create
- Name: Provide a valid name
- Description: (Optional) Provide a valid description
- Platform: Windows 10 and later
- Profile type: Identity protection
- Settings: See step 4
- On the Windows Hello for Business blade, select Enable with Use security keys for sign-in and click OK;

Figure 4: Device configuration

This setting requires Windows 10, version 1903, or later, and is not dependent on configuring Windows Hello for Business
Use Device configuration (Custom) settings
The third and last option is by using a Custom device configuration profile. That Custom device configuration profile, is actually identical to the Identity protection device configuration profile. The only difference is that it’s a OMA-URI configuration, so no simple UI switch. Even though it’s good to mention this option, to remember what the actual configuration is that’s done on the background. The following four steps walk through this configuration.
- Open the Azure portal and navigate to Microsoft Intune > Device configuration > Profiles to open the Devices configuration – Profiles blade
- On the Devices configuration – Profiles blade, click Create profile to open the Create profile blade;
- On the Create profile blade, provide the following information and click Create;
- Name: Provide a valid name
- Description: (Optional) Provide a valid description
- Platform: Windows 10 and later
- Profile type: Identity protection
- Settings: See step 4
- On the Custom OMA-URI Settings blade, provide the following information and click Add to open the Add row blade. On the Add row blade, provide the following information and click OK (and click OK in the Custom OMA-URI blade);
- Name: Provide a valid name
- Description: (Optional) Provide a valid description
- OMA-URI: ./Device/Vendor/MSFT/PassportForWork/SecurityKey/UseSecurityKeyForSignin
- Data type: Select Integer;
- Value: 1

Figure 5: Custom configuration

This setting requires Windows 10, version 1903, or later, and is not dependent on configuring Windows Hello for Business
End-user experience
Let’s end this post by having a look at the end-user experience. Below on the first row it starts with a static example of the sign-in experience on Windows 10 and in a browser. The second row is an example of the password-less sign-in experience of an user on Windows 10, version 1903, using a Yubikey 5 NFC security key. I’m specifically showing the experience when using the Other user sign-in option, as it will show that the user doesn’t need to provide a username nor a password. The user only needs to have the security key and the related PIN.

Figure 6: Windows 10 sign-in Figure 7: Browser sign-in 
Figure 8: Password-less sign-in experience


More information
For more information about password-less sign-in on Windows 10, see this doc named Enable passwordless security key sign in for Azure AD (preview).

If you use Windows 10 with a machine with a built-in camera or fingerprint reader, you may encounter the term “Windows Hello” while setting up sign-in methods. But what does it mean? Let’s find out.
First announced in 2015, “Windows Hello” is Microsoft’s fancy name for Windows 10’s non-password login security options. Several of those login options are biometric, which means that they use an aspect of your body for identity verification.
That includes scanning your face or fingerprint using methods similar to Apple’s Face ID and Touch ID to gain access to your Windows account. Windows Hello also allows using a PIN (personal identification number) as an alternative to a password or for times when biometric login methods fail.
Why Would I Want to Use Windows Hello?
If you’re tired of using a password to log in to your Windows account (or if you have trouble remembering it), a biometric alternative might be better. Biometric logins also offer an additional level of security, since you must be physically present during the login.
To use Windows Hello, your machine must either include built-in support for biometric logins or you’ll need to install a compatible biometric login device such as a webcam or a fingerprint reader. If you enable Windows Hello, Windows 10’s login by password will be disabled, although your account password may still be necessary to access some system functions.
RELATED: How to Log In to Your PC With Your Fingerprint or Other Device Using Windows Hello
How Do I Configure or Disable Windows Hello?
Accessing Windows Hello options in Settings is easy. First, open the Settings app by clicking the “gear” icon in your Start menu or by pressing Windows+i on your keyboard.

In Settings, click “Accounts.”
In “Accounts,” select “Sign-in options” in the sidebar.
At the top of the Sign-in options page, you’ll see a list of potential Windows Hello sign-in methods listed under the “Manage how you sign in to your device” section. Here’s what they mean.
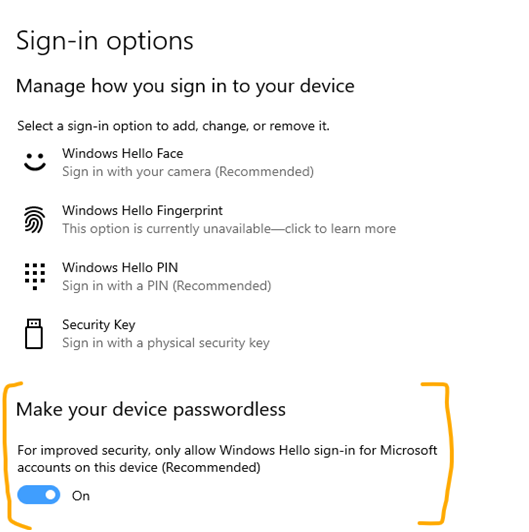
- Windows Hello Face: This allows you to log in with facial recognition. A special camera that supports this feature is required.
- Windows Hello Fingerprint: This lets you log in using a fingerprint reader, which can either be built-in on your laptop or a USB fingerprint reader that you plug in.
- Windows Hello PIN: This sets up a PIN number that serves as a backup in case biometric logins fail. You can also use it as your main login option instead of a password.
- Security Key: This allows you to sign in with a security key, which is a small physical device that either plugs into your USB port or is read by a special RFID reader device.
If Windows Hello is not currently enabled, you may also see “Password” and “Picture Password” options, which are not part of Hello. To change the settings for any of them, click the option and follow the instructions.
By default, when Windows Hello is enabled, you won’t be able to log in with a password. If you’d like to disable any one of the Windows Hello sign-in methods, you can click its item in the list, then select “Remove.” You can also locate the switch labeled “Require Windows Hello sign-in for Microsoft accounts” and flip it to “Off.”
After that, close Settings, and your changes will take effect immediately. You can test any login changes quickly by pressing Windows+L on your keyboard to lock your screen. Good luck!
RELATED: 10 Ways to Lock Your Windows 10 PC
READ NEXT
- › Basic Computer Security: How to Protect Yourself from Viruses, Hackers, and Thieves
- › 5 Ways to Speed Up Your Windows PC’s Login Process
- › How to Use Windows Hello Webcam Sign In on Windows 11
- › The 7 Best Registry Hacks for Windows 11
- › Samsung Launches Its First Webcam Monitor
- › Lenovo’s New ThinkPad X1 Fold Has a Bending 16.3-inch Screen
- › How to Boot Straight to the Desktop on Windows 10
- › How to Change Your Age on TikTok
How-To Geek is where you turn when you want experts to explain technology. Since we launched in 2006, our articles have been read billions of times. Want to know more?