Ошибки синего экрана (иногда называемые ошибками черного экрана или ошибками кода STOP) могут возникать, если серьезная проблема приводит к неожиданному закрытию или перезапуску Windows. При этом может появиться сообщение «Windows завершила работу, чтобы предотвратить повреждение компьютера».
Эти ошибки могут быть вызваны проблемами как с оборудованием, так и с программным обеспечением. Если перед возникновением ошибки «синий экран» вы добавили новое оборудование, то завершите работу компьютера, удалите это оборудование и перезапустите компьютер. Если во время перезапуска возникают проблемы, попробуйте запустить компьютер в безопасном режиме. Подробнее см. в статье Параметры запуска Windows (в том числе безопасный режим).
Кроме того, можно попробовать получить последние обновления из Центра обновления Windows, справку из других источников или восстановить Windows до более раннего состояния.
Получение последних обновлений
В Windows 7
Нажмите кнопку «Пуск»  , щелкните Все программы, а затем — Центр обновления Windows.
В Windows 8.1
-
Проведите пальцем от правого края экрана и нажмите кнопку Параметры, а затем выберите пункт Изменение параметров компьютера. (Если вы используете мышь, переместите указатель в правый верхний угол экрана, затем вниз и щелкните сначала Параметры, а затем Изменить параметры компьютера.)
-
Выберите элементы Обновление и восстановление и Центр обновления Windows.
-
Выберите пункт Проверить, а затем подождите, пока Windows не закончит поиск последних обновлений для компьютера.
-
Если Windows находит обновления, нажмите кнопку Установить обновления.
 Может потребоваться ввод пароля администратора или подтверждение выбора.
 Может потребоваться ввод пароля администратора или подтверждение выбора.
Прочтите и примите условия лицензии, а затем нажмите кнопку «Готово» (если это необходимо для установки обновления). При успешной установке обновления Центр обновления Windows сообщит об этом.
Получение помощи из других источников
Если эти решения не помогут решить проблему, вы можете получить помощь от служба поддержки Майкрософт и сообщества Майкрософт. Служба поддержки Майкрософт оказывает помощь по решению проблем, возникающих в различных версиях Windows. На страницах сообщества Майкрософт нафоруме Windowsпредлагаются решения от других пользователей, которые столкнулись с аналогичными проблемами с компьютерами.
Если компьютер поставляется с предустановленной windows, обратитесь к производителю компьютера.
Восстановление Windows до ранее сохраненного состояния
Вы можете восстановить Windows до более ранней точки во времени, называемой точкой восстановления. Средство восстановления системы не изменяет ваши личные файлы, но может удалить недавно установленные приложения и драйверы.
Если у вас возникли проблемы при запуске (загрузке) компьютера, вы можете восстановить Windows в среде восстановления Windows. Необходимые инструкции см. в статье Параметры запуска Windows (включая безопасный режим).
В Windows 7
-
Выполните прокрутку от правого края экрана и нажмите кнопку Поиск. (Если вы используете мышь, наведите указатель на правый верхний угол экрана, переместите указатель вниз, а затем щелкните Поиск.)
-
В поле поиска введите Панель управления и выберите Панель управления.
-
Введите восстановление в поле поиска на панели управления и выберите пункт Восстановление.
-
Нажмите кнопку Запуск восстановления системы и следуйте инструкциям.
Нужна дополнительная помощь?
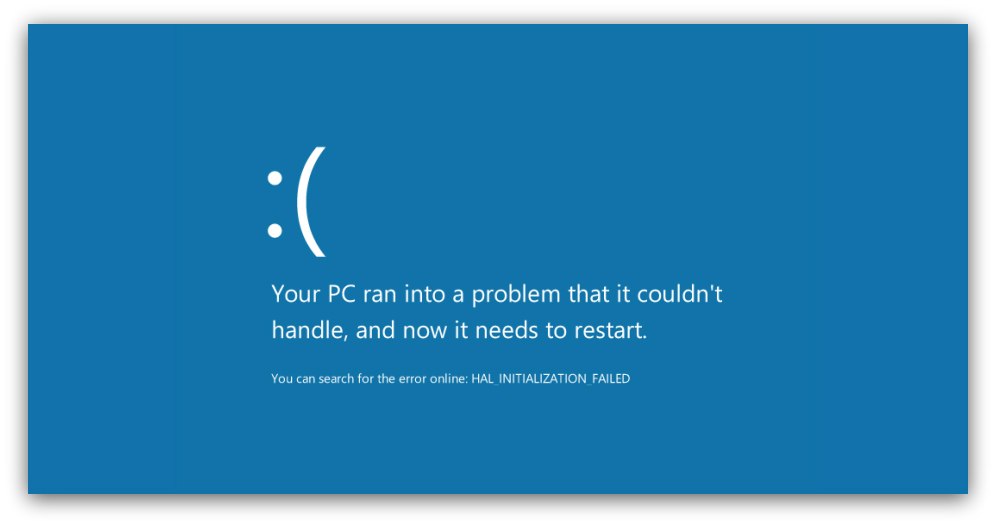
Ошибка типа «синий экран» (также известная как STOP-ошибка) может возникать в том случае, если проблема вызывает непредвиденное завершение работы или перезагрузку устройства. При этом может появиться «синий экран» с сообщением о том, что на вашем устройстве возникла проблема и его необходимо перезагрузить.
На этой странице рассматривается последовательность шагов по диагностике неполадок, которые помогут вам выявить причину возникновения ошибки типа «синий экран» и устранить ее.
Действия, описанные в этой статье, предназначены для диагностики и устранения распространенных STOP-ошибок со следующими кодами.
-
CRITICAL_PROCESS_DIED
-
SYSTEM_THREAD_EXCEPTION_NOT_HANDLED
-
IRQL_NOT_LESS_OR_EQUAL
-
VIDEO_TDR_TIMEOUT_DETECTED
-
PAGE_FAULT_IN_NONPAGED_AREA
-
SYSTEM_SERVICE_EXCEPTION
-
DPC_WATCHDOG_VIOLATION
Примечания:
-
Также могут отображаться шестнадцатеричные коды ошибок, например 0x0000000A, 0x0000003B, 0x000000EF, 0x00000133, 0x000000D1, 0x1000007E, 0xC000021A, 0x0000007B, 0xC000000F и другие.
-
Эта статья не содержит список кодов ошибок, но поскольку многие коды ошибок имеют одни и те же потенциальные решения, лучше всего будет выполнить описанные ниже действия для устранения ошибки типа «синий экран».
Хотя шаги на этой странице на первый взгляд могут показаться сложными, просто следуйте им по порядку, пошагово, и мы постараемся вернуть вас в нужное русло.
Нужна дополнительная помощь?
![]()
Download Article
![]()
Download Article
- Using General Fixes
- Fixing the «Critical Process Died» Error
- Fixing a Registry Error
- Restarting in Safe Mode
- Cleaning Setup Files
- Updating Windows
- Deleting Recently Added Apps
- Updating Drivers
- Restoring a Previous Version of Windows
- Resetting Windows
- Q&A
- Tips
- Warnings
|
|
|
|
|
|
|
|
|
|
|
|
This wikiHow teaches you how to fix the Blue Screen of Death (BSoD, Black screen in Windows 11) on a Windows computer. The BSoD is typically a result of improperly installed software, hardware, or settings, meaning that it is usually fixable. In some cases, though, the BSoD appears due to a corrupt operating system or hardware inside of the computer, meaning that you’ll either need to reinstall your operating system or take your computer into a tech department to have it fixed.
-
1
Consider your recent actions on the computer. Did you install a piece of software, plug in a new piece of hardware, download custom drivers, or change the settings? If so, the recent change you made is probably the reason for the Blue Screen of Death, so repairing it will depend on that change.
-
2
See if your computer is unusually hot. If you’ve been running your computer on high-performance settings for several hours—especially if the computer doesn’t have adequate circulation or if you live in a particularly warm environment—the Blue Screen of Death can appear. If so, turn off your computer the first chance that you get and leave it off for a few hours.
Advertisement
-
3
Run the Blue Screen troubleshooter. If this is the first time you’ve encountered a Blue Screen of Death on your computer, you can run your PC’s Blue Screen troubleshooter to try to diagnose the issue:
-
4
Remove any unnecessary hardware. Things like USB flash drives, Ethernet or HDMI cables, controllers, printer cables, SD cards, and so on can be removed from your computer without impacting the computer’s performance. Furthermore, flaws in hardware items such as these can trigger a Blue Screen of Death and continue to trigger it until they are removed.
- You can typically keep your mouse and keyboard plugged into your computer, especially if they came with the computer itself when it was brand-new.
-
5
Wait for your computer to restart. Once the Blue Screen of Death appears, Windows will diagnose the problem, attempt to fix whatever the issue is, and then restart. If your computer restarts like usual and doesn’t run into a Blue Screen error again, you can make some changes right from your desktop.
- If the BSOD appears again while your computer is attempting to restart, check its error code. If the error code is 0x000000EF, you should immediately skip ahead to the next part. If not, try rebooting in Safe Mode.
-
6
Run a virus scan. While rare, sometimes viruses can trick your computer into thinking that it’s malfunctioning, which can in turn cause the BSOD crash.
- If the virus scan comes up with any malicious software, remove it immediately.
- If the virus scan sends software settings suggestions (e.g., battery life) to you during the scan, try implementing them. A flawed setting may cause the BSoD to appear.


Advertisement
-
1
Understand what this error means. The «Critical Process Died» error refers to an instance in which an important hardware component (e.g., your hard drive) or a mandatory software attribute either didn’t start up correctly or stopped suddenly.
- This error can be trivial, but if you see it happen multiple times in a row or you’re unable to start your computer without running into the BSoD, it indicates a more serious issue.
-
2
Make sure you’ve encountered the correct error. The «Critical Process Died» error returns the code 0x000000EF. If you see a different code, skip to the next part.
-
3
Determine whether this is the first time you’re encountering this error. If you received this error once and then were able to use your computer normally, it may be that your computer had a minor problem when loading drivers. If you’ve received this error two or more times in a relatively short amount of time, however, you should proceed with attempting to fix the error.
- If you’re unable to use your computer without receiving this error, you need to take your computer into a reputable repair service or shop—it may be that your hard drive or processor is failing, in which case there’s nothing you can do from your end.
-
4
Open Start
. Click the Windows logo in the bottom-left corner of the screen. The Start menu will pop up.
-
5
Open Command Prompt in administrator mode. Type in command prompt to search for Command Prompt, then right-click
Command Prompt and click Run as administrator in the drop-down menu.
-
6
Click Yes when prompted. Doing so will open the Command Prompt window.
-
7
Enter the System File Checker command. Type in sfc /scannow and press ↵ Enter. Windows will begin scanning for issues.
-
8
Wait for the scan to complete. Windows will attempt to fix any issues it encounters. Once the scan is complete, you can proceed.
-
9
Restart your computer. Click Start
, click Power
, and click Restart in the pop-up menu.
-
10
Try running the Deployment Image Servicing and Management (DISM) service. If you still receive the «Critical Process Died» error on occasion but can still access your computer, try doing the following:
- Re-open Command Prompt in administrator mode.
- Type in Dism /Online /Cleanup-Image /CheckHealth and press ↵ Enter.
- Type in Dism /Online /Cleanup-Image /ScanHealth and press ↵ Enter.
- Type in Dism /Online /Cleanup-Image /RestoreHealth and press ↵ Enter.
- Wait for any processes to finish running, then restart your computer.
-
11
Take your computer into a reputable repair shop. If the steps in this section haven’t fixed the error or you’re unable to access your computer without the BSOD appearing, you’ll need to take your computer into a professional repair service. Since the «Critical Process Died» error often refers to hardware, your hard drive, processor, or RAM may be corrupted and in need of recovery.


Advertisement
-
1
Understand what this error means. This means that there was a problem reading or writing files in the computer registry, and some applications may stop working properly.[1]
-
2
Wait for automatic repair to fix your computer. If the registry error occurred while updating, your computer may fail to boot normally. Let automatic repair fix the broken registry keys and try again.
-
3
Reinstall any programs that fail to start. This error is severe enough to make your computer unresponsive when programs with missing registry keys are run. To do so, go to the app list in Settings, and click on «Repair» after clicking on «Modify».
-
4
Repair Windows. In severe cases, Windows will not start. Use installation media to repair Windows. Plug in the Windows installation media, select your language, then click on «Repair your computer». For more information on creating installation media, see Reinstall Windows.
-
5
Reinstall Windows. This should be done if all else fails. Use a Windows installer or a network connection to restore factory settings. This will remove all of your data, including files, product keys, apps, and browsing history.


Advertisement
-
1
Wait for the «Choose an option» screen to appear. If your computer restarts, is unable to fix the problem, and then restarts twice more, you’ll arrive at this screen.[2]
-
2
Click Troubleshoot. It’s a symbol of a screwdriver and a wrench on this page.
-
3
Click Advanced options. You’ll find this on the «Troubleshoot» page.
-
4
Click Startup Settings. It’s a gear-shaped symbol on the right side of the page.
-
5
Click Restart. You’ll find it in the lower-right side of the page.
-
6
Press the 4 key to select Safe Mode. Do so on the blue «Startup Settings» page. This will cause your computer to reboot into Safe Mode, which will load only the programs and hardware needed to make Windows run.


Advertisement
-
1
Open Start
. Click the Windows logo in the bottom-left corner of the screen.
-
2
Type disk cleanup into Start. Doing so searches your computer for the Disk Cleanup utility.
-
3
Click Disk Cleanup. It’s a flash drive-shaped icon at the top of the Start window.
-
4
Click Clean up system files. You’ll find this in the lower-left side of the window.
-
5
Check every box in the window. This will help get rid of all temporary files stored by your computer’s system, which may solve the BSOD.
-
6
Click OK. It’s at the bottom of the window. Doing so will prompt Disk Cleanup to delete the files.
- The deletion process may take a few minutes, especially if you’ve never deleted your computer’s temporary files.


Advertisement
-
1
Open Start
. Click the Windows logo in the bottom-left corner of the screen.
-
2
Open Settings
. Click the gear-shaped icon in the bottom-left corner of the Start window.
-
3
Click
Update & security. You’ll find this in the lower-left side of the Settings window.
-
4
Click the Windows Update tab. It’s in the top-left corner of the window.
-
5
Click Check for updates. This button is at the top of the page.
-
6
Wait for the updates to install. Once the updates finish installing, Windows will most likely restart.
- Windows may restart several times, and you may have to activate Safe Mode again before proceeding.


Advertisement
-
1
Open Start
. Click the Windows logo in the bottom-left corner of the screen.
-
2
Open Settings
. Click the gear-shaped icon in the bottom-left corner of the Start window.
-
3
Click Apps. It’s on the Settings page.
-
4
Click the Apps & features tab. You’ll find this in the upper-left side of the window.
-
5
Find a recently installed app. Any app that you recently installed needs to be removed, since flawed or broken apps can easily cause the BSOD to appear.
-
6
Click the app. Doing so will prompt a button to appear below the app.
-
7
Click Uninstall. It’s below the bottom-right corner of the app’s window.
-
8
Click Uninstall when prompted. This is below the app. Doing so will remove the app from your computer, though you may need to follow a couple of on-screen prompts to finalize the removal.
- You’ll repeat this process for each recently installed app here.


Advertisement
-
1
Open Start
. Click the Windows logo in the bottom-left corner of the screen.
-
2
Type device manager into Start. This searches for the Device Manager program.
-
3
Click
Device Manager. It’s at the top of the Start window.
-
4
Double-click a category of hardware. This will expand the hardware’s category and display any currently used items (e.g., flash drives, printers, etc.) that use that hardware function.
-
5
Select an item. Click on a piece of hardware that you recently installed in the menu below the hardware category.
- For example, if you recently installed a wireless keyboard for a laptop, you would select the wireless keyboard’s name after double-clicking the Keyboards hardware category.
-
6
Click the «Update» button. It resembles a black box with a green upward-facing arrow at the top of the window.
-
7
Click Search automatically for updated driver software. It’s the top option in the pop-up window. Doing so will search for drivers and install them if necessary.
-
8
Click Close when prompted. It’s at the bottom of the window.
-
9
Remove the item. If there is no update available for the item, try deleting it from Device Manager to see if that resolves the BSOD. To delete an item, click the item to select it, then click the red X icon at the top of the window.


Advertisement
-
1
Restart your computer to the «Startup Options» screen. Click Start
, click Power
, and hold down ⇧ Shift while clicking Restart.
- If you’re already at this screen because your computer attempted and failed to restart several times, skip this step.
-
2
Click Troubleshoot. It’s an image of a screwdriver and a wrench.
-
3
Click Advanced options. You’ll find this on the «Troubleshoot» page.
-
4
Click System Restore. It’s on the left side of the «Advanced Options» page.
-
5
Wait for your computer to finish restarting. This may take several minutes.
- You may need to log into your computer before proceeding.
-
6
Click Next. It’s at the bottom of the System Restore pop-up window.
-
7
Select a restore point. Click a restore point that’s set before today (e.g., before the Blue Screen of Death incident) to select it.
- System restore points are usually created when you update or install a significant piece of software or hardware.
- If you’ve never backed up your computer and you don’t see a restore point here, try resetting Windows instead.
-
8
Click Next.
-
9
Click Finish. It’s at the bottom of the window. Doing so will prompt your computer to begin restoring the selected backup.
-
10
Wait for your computer to finish restoring. Once it does, you can resume using your computer as usual.
- If the Blue Screen of Death reappears, you may need to restore an earlier backup.


Advertisement
-
1
Open Start
. Click the Windows logo in the bottom-left corner of the screen.
-
2
Open Settings
. Click the gear-shaped icon in the bottom-left corner of the Start window.
-
3
Click
Update & security. It’s on the Settings page.
-
4
Click Recovery. This tab is in the left-hand column of options.
-
5
Click Get started. It’s below the «Reset this PC» heading at the top of the window.
-
6
Select a reset option. Click one of the following options:
- Keep my files — Keeps your files and folders when resetting your PC.
- Remove everything — Completely clears your hard drive. Make sure that you have a backup of your documents and files stored elsewhere (e.g., an external hard drive) if you choose this option.
-
7
Click Next. It’s on a warning about not being able to go back to Windows 7.
- If you chose Remove everything in the last window, you’ll first click either Just remove my files or Remove files and clean the drive before this step.
-
8
Click Reset. It’s at the bottom of the window. Your computer will reset itself. This can take anywhere from a few minutes to a few hours.
-
9
Click Continue when prompted. This will take you to the desktop, which should now be functioning normally.
- If you’re still running into the BSOD at this point, it’s time to take your computer into a professional repair service to have it checked.


Advertisement
Add New Question
-
Question
What are other causes of a blue screen of death on Windows?

If your system runs fine, then the culprit may be the system registry. Just restore the system to its last good state.
-
Question
What is the blue screen of death?
It is when Windows itself crashes, usually with a message like, ‘Windows has been shut down to prevent damage to your computer.’
-
Question
What if I go into safe mode and my computer still crashes?
If your computer is crashing in safe mode, you probably need to reinstall Windows.
See more answers
Ask a Question
200 characters left
Include your email address to get a message when this question is answered.
Submit
Advertisement
-
The Blue Screen of Death isn’t as much of a death sentence as it used to be; more often than not, it’s simply because your computer was on for too long or can’t support a software update.
Thanks for submitting a tip for review!
Advertisement
-
Some computers are too old to be upgraded (i.e. upgrading a 2008 computer to Windows 10). Updating such a computer can cause it to crash into the BSoD.
Advertisement
About This Article
Thanks to all authors for creating a page that has been read 1,818,370 times.
Is this article up to date?
![]()
Download Article
![]()
Download Article
- Using General Fixes
- Fixing the «Critical Process Died» Error
- Fixing a Registry Error
- Restarting in Safe Mode
- Cleaning Setup Files
- Updating Windows
- Deleting Recently Added Apps
- Updating Drivers
- Restoring a Previous Version of Windows
- Resetting Windows
- Q&A
- Tips
- Warnings
|
|
|
|
|
|
|
|
|
|
|
|
This wikiHow teaches you how to fix the Blue Screen of Death (BSoD, Black screen in Windows 11) on a Windows computer. The BSoD is typically a result of improperly installed software, hardware, or settings, meaning that it is usually fixable. In some cases, though, the BSoD appears due to a corrupt operating system or hardware inside of the computer, meaning that you’ll either need to reinstall your operating system or take your computer into a tech department to have it fixed.
-
1
Consider your recent actions on the computer. Did you install a piece of software, plug in a new piece of hardware, download custom drivers, or change the settings? If so, the recent change you made is probably the reason for the Blue Screen of Death, so repairing it will depend on that change.
-
2
See if your computer is unusually hot. If you’ve been running your computer on high-performance settings for several hours—especially if the computer doesn’t have adequate circulation or if you live in a particularly warm environment—the Blue Screen of Death can appear. If so, turn off your computer the first chance that you get and leave it off for a few hours.
Advertisement
-
3
Run the Blue Screen troubleshooter. If this is the first time you’ve encountered a Blue Screen of Death on your computer, you can run your PC’s Blue Screen troubleshooter to try to diagnose the issue:
-
4
Remove any unnecessary hardware. Things like USB flash drives, Ethernet or HDMI cables, controllers, printer cables, SD cards, and so on can be removed from your computer without impacting the computer’s performance. Furthermore, flaws in hardware items such as these can trigger a Blue Screen of Death and continue to trigger it until they are removed.
- You can typically keep your mouse and keyboard plugged into your computer, especially if they came with the computer itself when it was brand-new.
-
5
Wait for your computer to restart. Once the Blue Screen of Death appears, Windows will diagnose the problem, attempt to fix whatever the issue is, and then restart. If your computer restarts like usual and doesn’t run into a Blue Screen error again, you can make some changes right from your desktop.
- If the BSOD appears again while your computer is attempting to restart, check its error code. If the error code is 0x000000EF, you should immediately skip ahead to the next part. If not, try rebooting in Safe Mode.
-
6
Run a virus scan. While rare, sometimes viruses can trick your computer into thinking that it’s malfunctioning, which can in turn cause the BSOD crash.
- If the virus scan comes up with any malicious software, remove it immediately.
- If the virus scan sends software settings suggestions (e.g., battery life) to you during the scan, try implementing them. A flawed setting may cause the BSoD to appear.
Advertisement
-
1
Understand what this error means. The «Critical Process Died» error refers to an instance in which an important hardware component (e.g., your hard drive) or a mandatory software attribute either didn’t start up correctly or stopped suddenly.
- This error can be trivial, but if you see it happen multiple times in a row or you’re unable to start your computer without running into the BSoD, it indicates a more serious issue.
-
2
Make sure you’ve encountered the correct error. The «Critical Process Died» error returns the code 0x000000EF. If you see a different code, skip to the next part.
-
3
Determine whether this is the first time you’re encountering this error. If you received this error once and then were able to use your computer normally, it may be that your computer had a minor problem when loading drivers. If you’ve received this error two or more times in a relatively short amount of time, however, you should proceed with attempting to fix the error.
- If you’re unable to use your computer without receiving this error, you need to take your computer into a reputable repair service or shop—it may be that your hard drive or processor is failing, in which case there’s nothing you can do from your end.
-
4
Open Start
. Click the Windows logo in the bottom-left corner of the screen. The Start menu will pop up.
-
5
Open Command Prompt in administrator mode. Type in command prompt to search for Command Prompt, then right-click
Command Prompt and click Run as administrator in the drop-down menu.
-
6
Click Yes when prompted. Doing so will open the Command Prompt window.
-
7
Enter the System File Checker command. Type in sfc /scannow and press ↵ Enter. Windows will begin scanning for issues.
-
8
Wait for the scan to complete. Windows will attempt to fix any issues it encounters. Once the scan is complete, you can proceed.
-
9
Restart your computer. Click Start
, click Power
, and click Restart in the pop-up menu.
-
10
Try running the Deployment Image Servicing and Management (DISM) service. If you still receive the «Critical Process Died» error on occasion but can still access your computer, try doing the following:
- Re-open Command Prompt in administrator mode.
- Type in Dism /Online /Cleanup-Image /CheckHealth and press ↵ Enter.
- Type in Dism /Online /Cleanup-Image /ScanHealth and press ↵ Enter.
- Type in Dism /Online /Cleanup-Image /RestoreHealth and press ↵ Enter.
- Wait for any processes to finish running, then restart your computer.
-
11
Take your computer into a reputable repair shop. If the steps in this section haven’t fixed the error or you’re unable to access your computer without the BSOD appearing, you’ll need to take your computer into a professional repair service. Since the «Critical Process Died» error often refers to hardware, your hard drive, processor, or RAM may be corrupted and in need of recovery.
Advertisement
-
1
Understand what this error means. This means that there was a problem reading or writing files in the computer registry, and some applications may stop working properly.[1]
-
2
Wait for automatic repair to fix your computer. If the registry error occurred while updating, your computer may fail to boot normally. Let automatic repair fix the broken registry keys and try again.
-
3
Reinstall any programs that fail to start. This error is severe enough to make your computer unresponsive when programs with missing registry keys are run. To do so, go to the app list in Settings, and click on «Repair» after clicking on «Modify».
-
4
Repair Windows. In severe cases, Windows will not start. Use installation media to repair Windows. Plug in the Windows installation media, select your language, then click on «Repair your computer». For more information on creating installation media, see Reinstall Windows.
-
5
Reinstall Windows. This should be done if all else fails. Use a Windows installer or a network connection to restore factory settings. This will remove all of your data, including files, product keys, apps, and browsing history.
Advertisement
-
1
Wait for the «Choose an option» screen to appear. If your computer restarts, is unable to fix the problem, and then restarts twice more, you’ll arrive at this screen.[2]
-
2
Click Troubleshoot. It’s a symbol of a screwdriver and a wrench on this page.
-
3
Click Advanced options. You’ll find this on the «Troubleshoot» page.
-
4
Click Startup Settings. It’s a gear-shaped symbol on the right side of the page.
-
5
Click Restart. You’ll find it in the lower-right side of the page.
-
6
Press the 4 key to select Safe Mode. Do so on the blue «Startup Settings» page. This will cause your computer to reboot into Safe Mode, which will load only the programs and hardware needed to make Windows run.
Advertisement
-
1
Open Start
. Click the Windows logo in the bottom-left corner of the screen.
-
2
Type disk cleanup into Start. Doing so searches your computer for the Disk Cleanup utility.
-
3
Click Disk Cleanup. It’s a flash drive-shaped icon at the top of the Start window.
-
4
Click Clean up system files. You’ll find this in the lower-left side of the window.
-
5
Check every box in the window. This will help get rid of all temporary files stored by your computer’s system, which may solve the BSOD.
-
6
Click OK. It’s at the bottom of the window. Doing so will prompt Disk Cleanup to delete the files.
- The deletion process may take a few minutes, especially if you’ve never deleted your computer’s temporary files.
Advertisement
-
1
Open Start
. Click the Windows logo in the bottom-left corner of the screen.
-
2
Open Settings
. Click the gear-shaped icon in the bottom-left corner of the Start window.
-
3
Click
Update & security. You’ll find this in the lower-left side of the Settings window.
-
4
Click the Windows Update tab. It’s in the top-left corner of the window.
-
5
Click Check for updates. This button is at the top of the page.
-
6
Wait for the updates to install. Once the updates finish installing, Windows will most likely restart.
- Windows may restart several times, and you may have to activate Safe Mode again before proceeding.
Advertisement
-
1
Open Start
. Click the Windows logo in the bottom-left corner of the screen.
-
2
Open Settings
. Click the gear-shaped icon in the bottom-left corner of the Start window.
-
3
Click Apps. It’s on the Settings page.
-
4
Click the Apps & features tab. You’ll find this in the upper-left side of the window.
-
5
Find a recently installed app. Any app that you recently installed needs to be removed, since flawed or broken apps can easily cause the BSOD to appear.
-
6
Click the app. Doing so will prompt a button to appear below the app.
-
7
Click Uninstall. It’s below the bottom-right corner of the app’s window.
-
8
Click Uninstall when prompted. This is below the app. Doing so will remove the app from your computer, though you may need to follow a couple of on-screen prompts to finalize the removal.
- You’ll repeat this process for each recently installed app here.
Advertisement
-
1
Open Start
. Click the Windows logo in the bottom-left corner of the screen.
-
2
Type device manager into Start. This searches for the Device Manager program.
-
3
Click
Device Manager. It’s at the top of the Start window.
-
4
Double-click a category of hardware. This will expand the hardware’s category and display any currently used items (e.g., flash drives, printers, etc.) that use that hardware function.
-
5
Select an item. Click on a piece of hardware that you recently installed in the menu below the hardware category.
- For example, if you recently installed a wireless keyboard for a laptop, you would select the wireless keyboard’s name after double-clicking the Keyboards hardware category.
-
6
Click the «Update» button. It resembles a black box with a green upward-facing arrow at the top of the window.
-
7
Click Search automatically for updated driver software. It’s the top option in the pop-up window. Doing so will search for drivers and install them if necessary.
-
8
Click Close when prompted. It’s at the bottom of the window.
-
9
Remove the item. If there is no update available for the item, try deleting it from Device Manager to see if that resolves the BSOD. To delete an item, click the item to select it, then click the red X icon at the top of the window.
Advertisement
-
1
Restart your computer to the «Startup Options» screen. Click Start
, click Power
, and hold down ⇧ Shift while clicking Restart.
- If you’re already at this screen because your computer attempted and failed to restart several times, skip this step.
-
2
Click Troubleshoot. It’s an image of a screwdriver and a wrench.
-
3
Click Advanced options. You’ll find this on the «Troubleshoot» page.
-
4
Click System Restore. It’s on the left side of the «Advanced Options» page.
-
5
Wait for your computer to finish restarting. This may take several minutes.
- You may need to log into your computer before proceeding.
-
6
Click Next. It’s at the bottom of the System Restore pop-up window.
-
7
Select a restore point. Click a restore point that’s set before today (e.g., before the Blue Screen of Death incident) to select it.
- System restore points are usually created when you update or install a significant piece of software or hardware.
- If you’ve never backed up your computer and you don’t see a restore point here, try resetting Windows instead.
-
8
Click Next.
-
9
Click Finish. It’s at the bottom of the window. Doing so will prompt your computer to begin restoring the selected backup.
-
10
Wait for your computer to finish restoring. Once it does, you can resume using your computer as usual.
- If the Blue Screen of Death reappears, you may need to restore an earlier backup.
Advertisement
-
1
Open Start
. Click the Windows logo in the bottom-left corner of the screen.
-
2
Open Settings
. Click the gear-shaped icon in the bottom-left corner of the Start window.
-
3
Click
Update & security. It’s on the Settings page.
-
4
Click Recovery. This tab is in the left-hand column of options.
-
5
Click Get started. It’s below the «Reset this PC» heading at the top of the window.
-
6
Select a reset option. Click one of the following options:
- Keep my files — Keeps your files and folders when resetting your PC.
- Remove everything — Completely clears your hard drive. Make sure that you have a backup of your documents and files stored elsewhere (e.g., an external hard drive) if you choose this option.
-
7
Click Next. It’s on a warning about not being able to go back to Windows 7.
- If you chose Remove everything in the last window, you’ll first click either Just remove my files or Remove files and clean the drive before this step.
-
8
Click Reset. It’s at the bottom of the window. Your computer will reset itself. This can take anywhere from a few minutes to a few hours.
-
9
Click Continue when prompted. This will take you to the desktop, which should now be functioning normally.
- If you’re still running into the BSOD at this point, it’s time to take your computer into a professional repair service to have it checked.
Advertisement
Add New Question
-
Question
What are other causes of a blue screen of death on Windows?
If your system runs fine, then the culprit may be the system registry. Just restore the system to its last good state.
-
Question
What is the blue screen of death?
It is when Windows itself crashes, usually with a message like, ‘Windows has been shut down to prevent damage to your computer.’
-
Question
What if I go into safe mode and my computer still crashes?
If your computer is crashing in safe mode, you probably need to reinstall Windows.
See more answers
Ask a Question
200 characters left
Include your email address to get a message when this question is answered.
Submit
Advertisement
-
The Blue Screen of Death isn’t as much of a death sentence as it used to be; more often than not, it’s simply because your computer was on for too long or can’t support a software update.
Thanks for submitting a tip for review!
Advertisement
-
Some computers are too old to be upgraded (i.e. upgrading a 2008 computer to Windows 10). Updating such a computer can cause it to crash into the BSoD.
Advertisement
About This Article
Thanks to all authors for creating a page that has been read 1,818,370 times.
Is this article up to date?
Почему появляется синий экран смерти и что с ним делать
Всё, что нужно знать о BSOD — проблеме, с которой может столкнуться каждый пользователь Windows.

Почему появляется синий экран смерти
Blue screen of death, он же BSOD и синий экран смерти, — это реакция Windows на критические ошибки в работе компьютера. На экране внезапно появляются белые надписи на синем фоне, после чего устройство обычно перезагружается, зависает или выключается.
После перезапуска система какое-то время работает нормально. Но потом, если не устранить ошибку, BSOD появляется снова.
Иногда к такому состоянию приводят ошибки в драйверах или выход из строя аппаратных частей компьютера. Причины также могут быть в сбое системных настроек, вирусах или даже установленных программах.

1 / 0
BSOD на Windows 7 и XP
2 / 0
BSOD на Windows 8 и 10
Что делать, если появился синий экран смерти
1. Воспользуйтесь службами Windows
Вам могут помочь специальные службы, встроенные в операционную систему.
Если у вас Windows 10, откройте раздел «Пуск» → «Параметры» (шестерёнка) → «Обновление и безопасность» → «Устранение неполадок». Прокрутите список доступных служб в самый конец и выберите «Синий экран». Кликните «Запустить средство устранения неполадок» и следуйте подсказкам системы.
Если у вас более старая версия ОС или упомянутое выше средство не сработало, откройте «Панель управления» Windows и перейдите в раздел «Центр безопасности и обслуживания». В некоторых версиях ОС этот путь может выглядеть так: «Панель управления» → «Система и безопасность» → «Центр поддержки».
Разверните вкладку «Обслуживание» и проверьте, отображаются ли здесь рекомендации по решению проблем Windows. Если да, воспользуйтесь предложенными советами.
Если ничего не помогает, переходите к следующему пункту.
2. Определите причину BSOD и найдите её решение
У появления синего экрана смерти могут быть сотни различных причин и у каждой — свои пути решения. Узнав причину BSOD на своём компьютере, вы сможете найти оптимальный способ устранить проблему.
На экране смерти Windows отображает код вызвавшей его ошибки. Он может выглядеть как набор чисел и букв (0x0000000F) или комбинация различных слов, написанных в верхнем регистре и часто связанных символами подчёркивания (SPIN_LOCK_ALREADY_OWNED).
Вам нужно ввести код ошибки в поисковике и найти таким образом индивидуальную инструкцию по исправлению. На синем экране может даже присутствовать специальный QR-код. Отсканировав его через мобильное устройство, вы попадёте на сайт Microsoft с интерактивным помощником по решению проблемы.
Если сразу после появления синего экрана компьютер перезагружается и вы не успеваете записать код ошибки, отключите автоматический перезапуск. Для этого кликните правой кнопкой мыши по значку «Этот компьютер» и выберите «Свойства» → «Дополнительные параметры системы». В открывшемся окне перейдите на вкладку «Дополнительно», нажмите «Параметры» и снимите флажок «Выполнить автоматическую перезагрузку».
Если вы не хотите искать нужную инструкцию и вникать в неё или найденное в Сети решение не помогает, воспользуйтесь перечисленными ниже способами.
3. Попробуйте простые универсальные меры
Эти общие меры влияют на многие параметры системы и помогают восстановить её нормальную работу. В том числе они могут исправить ошибки, которые приводят к синему экрану смерти.
- В настройках системы перейдите в «Центр обновления Windows» и проверьте наличие обновлений. Если они доступны, установите их.
- Проверьте систему с помощью антивирусных программ.
- Обновите драйверы. Вы можете зайти на сайт производителя вашего компьютера и скачать все драйверы для самостоятельной установки. Но можно воспользоваться и бесплатными сервисами вроде Driver Booster и DriverPack, которые скачивают и устанавливают драйверы автоматически.
- Протестируйте работу компьютера в безопасном режиме.
- Проверьте температуру процессора и видеокарты. Убедитесь, что компьютер не греется. Если показатели выше допустимых, охладите компьютер.
- Проверьте жёсткий диск и оперативную память на ошибки с помощью специальных утилит.
- Сбросьте настройки BIOS.
- Восстановите Windows до предыдущего состояния.
- Если экран смерти появляется при запуске компьютера и Windows не загружается, ознакомьтесь с этой инструкцией.
- Если ничего не помогает, попробуйте переустановить Windows.
Читайте также 🧐
- Как очистить Windows от мусора: 5 бесплатных инструментов
- Как раздать интернет с компьютера через кабель или Wi-Fi
- Что делать, если не включается компьютер
Узнайте подробнее что делать, чтобы убрать синий экран смерти Windows 10 и 7 и навсегда избавиться от его появления в дальнейшем.
Что такое синий экран смерти Windows 10 и 7?
Экран смерти (или BSoD) – это распространенное в сети название для главной ошибки в ОС Windows. Во время работы компьютера все действия внезапно прекращаются и на весь экран появляется синий экран с системным сообщением.
Появление BSoD не несет ничего хорошего и означает серьёзный сбой в аппаратной или программной части ПК. Стоит заметить, что разработчики Windows 7, 10 убрали привычный вид синего экрана смерти с непонятными для многих частями программного кода и сообщениями.
Теперь при появлении системной ошибки пользователь видит экран с грустным смайликом и краткое сообщение о проблеме. Если система выявила ошибку, которую нужно исправлять вручную, на дисплее будет отображен QR-код, просканировав который, пользователь перейдет на страницу сайта Microsoft с подробным руководством по решению неполадки.
Виды BSoD
В операционных системах Виндовс 8 и Виндовс 10 существует два вида экрана фатальной ошибки:
- Синий – чаще возникает из-за одноразового сбоя в работе ПК. Вылетает, если система «не тянет» запущенную игру, не хватает ресурса оперативной памяти, видеокарты или возникли ошибки в реестре;
- Красный – свидетельствует о наличии серьёзных проблем с подключенным оборудованием или об ошибке в выполнении кода ядром процессора.
Причины появления
Существует несколько случаев, когда может появиться синий экран смерти:
- В процессе установки новой копии ОС;
- В результате обновления текущей версии системы;
- При работе с ПК (загрузка отдельных программ, некорректная установка драйверного ПО или внесение изменений в системные настройки).
Причиной появления BSoD могут быть:
- Вирусные программы, которые установлены на ПК;
- Отсутствие совместимости межу драйвером и подключенным оборудованием. Также, проблема может заключаться в устаревшей версии драйвера;
- Некорректное обновление ОС вручную или с помощью служб апдейта;
- Одновременная работа сразу нескольких антивирусных программ в одной системе;
- Нехватка ресурса ОП и жесткого диска;
- Перегрев компьютера и попытки программного разгона видеокарты;
- Аппаратная поломка модуля памяти.
Коды ошибок синего экрана смерти и их значение – расшифровка

Прежде чем переходить к поэтапному решению проблемы появления блу скрина, необходимо ознакомиться с распространёнными кодами ошибок и их значениями. Во время появления ошибки в Windows 10 система автоматически покажет тип неполадки. Он указан мелким шрифтом внизу экрана.
Коды ошибок Windows:
- 0x0000000A – некорректное выполнение запущенного программного кода. Может возникать при работе с несовместимыми играми и приложениями. Также, может свидетельствовать о кратковременном сбое в системе;
- 0xC000000F – ошибка, которая была выявлена в BIOS. Возможно, вы выполняли программный разгон процессора или же компьютер просто сильно нагревается. Также, код ошибки может свидетельствовать о повреждении жесткого диска (тогда появится красный экран смерти);
- 0x0000007B – такой код ошибки возникает в процессе установки новой копии Windows. Неполадка указывает на несовместимость настроек БИОСа и установщика. Решение ошибки – замена в настройках BIOS интерфейса SATA на IDE;
- 0x0000003B – ошибка обновления Windows. Возможно, пакет с данными был загружен или установлен неверно. Требуется откат системы до предыдущей версии или повторное обновление;
- 0xC000021A – неустранимая ошибка системы. Как правило, появляется она редко и не имеет свойства повторяться при каждом включении системы. Рекомендуется обновить драйвера и удалить последние установленные программы;
- 0x000000EF – ошибка в выполнении процесса. Некорректное завершение работы программы может привести к синему экрану с таким кодом неполадки. Компьютер продолжает работу после этого синего экрана;
- 0x000000D1 – ошибка драйвера. Неполадка указывает на несовместимость драйверного ПО, его поражение вредоносной программой или же на устаревшую версию прикладной утилиты. Решение – автоматическая переустановка драйверов на ПК;
- 0x1000007E – необработанное исключение. Если разработчик программы не прописал в коде обработку возможной ошибки, в Виндовс может появиться синий экран смерти, который указывает на это исключение. Решение – перезагрузка системы и повторный запуск приложения;
- 0x00000133 – превышен таймаут выполнения операции. Может возникнуть абсолютно на любом устройстве, независимо от установленного апдейта ОС. Система неспособна удерживать прерывания в процессоре, поэтому возникает ошибка и начинается автоматическая перезагрузка ПК. Решение – очистка диспетчера задач от ненужных программ и удаление приложения, запросы которого система не может обработать.
Практика показывает, что написание кодов неполадок прямо на экране BSoD не дает никаких результатов, так как пользователи часто или совсем не читают системное сообщение, или же просто не понимают его смысла. Именно поэтому разработчики Виндовс 7 и 10 теперь добавили QR-коды на некоторые из экранов смерти.
Пока компьютер не перезагрузился вы можете просканировать этот код и попасть на официальную страницу Майкрософта с детальным описанием ошибки, причинами ее возникновения и рекомендациями по устранению синего ли красного экранов в дальнейшем.

Отключение автоматической перезагрузки
Если ваш компьютер или ноутбук очень быстро начинает перезагрузку после показа BSoD, после следующего запуска системы необходимо отключить перезагрузку. Таким образом, вы сможете самостоятельно выбрать время, когда компьютер выключится после появления блу скрина.
Следуйте инструкции:
- Нажмите на сочетание клавиш Win и Break;
- В открывшемся окне кликните на поле «Дополнительные параметры», а затем на вкладку «Загрузка»;
- Откройте дополнительные опции загрузки ОС и во всплывающем окне снимите флажок напротив поля «Автоматическая перезагрузка».

Что делать и как убрать синий экран смерти Windows?
К сожалению, нет единого как исправить синий экран смерти Windows 7, 10. Если он возникает периодически, можно попробовать выполнить пошаговые действия для устранения ошибки в дальнейшем.
Шаг 1 – Сканирование системы антивирусным ПО
На первом этапе устранения ошибок, связанных с появлением синего экрана, необходимо проверить систему на наличие вредоносных программ. Если у вас нет установленного антивируса, достаточно воспользоваться стандартным Защитником Windows 10. Он является надежным средством диагностики и устроения ошибок ПК, а также быстро выявляет вирусы.

Рекомендуем запускать расширенную проверку. Процесс сканирования может занять от 5 до 30 минут. После выполнения операции удалите все найденные грозы и перезагрузите компьютер.
Шаг 2 – Обновление драйверов
Для решения неполадок, связанных с драйверами оборудования, следует зайти в Диспетчер устройств. Для это кликните правой клавишей мышки на кнопке «Пуск» и выберите нужную утилиту:

Содержимое окна диспетчера устройств имеет древовидную структуру, каждый элемент которой отображает конкретную группу оборудования. Для обновления всей системы целиком, нажмите на имени компьютера правой кнопкой мышки и выберите пункт «Обновить конфигурацию». Нужное ПО будет автоматически загружено с сервера Майкрософт.

Шаг 3 – Настройка дампа памяти
Если блу скрин возник из-за попытки запуска Торрент-файла или из-за включения только что установленной игры, решить проблему поможет изменение дампа памяти:
- Зайдите в окно панели управления и откройте меню «Загрузка и восстановление»;
- В поле «Запись отладочной информации» выберите уровень «Малый дамп памяти».
- Сохраните настройки и перезапустите ПК.

Шаг 4 – Откат системы
Если все предыдущие методы не помогли и синий экран все еще периодически возникает в системе, необходимо сделать откат ОС до состояния, когда неполадка еще не возникала.
Восстановление ОС происходит за счет точки резервного копирования, которую вы или сама система сохранила в памяти устройства. Следуйте инструкции, чтобы выполнить откат ОС:
- Откройте панель поиска и введите в ней «Восстановление»;
- В результатах поиска выберите указанный на рисунке ниже пункт;

- В новом окне кликните на «Запуск восстановления системы», чтобы активировать работу утилиты-помощника;
- Выберите точку доступа, дата создания которой соответствует нормальной работе системы без возникновения синего экрана и нажмите «Далее».

В результате восстановления, вы получите сохраненную копию системы без установленных последних обновлений. Также, все файлы, папки и программы, которые были установлены после создания резервной копии, будут удалены с компьютера.
Шаг 5 – Автоматическая диагностика
Выявить неполадки системы, в следствии которых появляется БСоД можно и с помощью встроенной утилиты устранения неполадок. Запустите её, воспользовавшись поиском:

В окне помощника вы увидите все модули работы компьютера, которые поддаются сканированию. Поочередно нажимайте на каждый из них для запуска утилиты диагностики. В случае выявления неисправностей, программа автоматически применит исправления.

Если вы лучше воспринимаете информацию в форме видео, то посмотрите этот ролик:

Теперь вы знаете, как исправить синий экран смерти Windows 7, 10. Делитесь в комментариях своими способами, которые помогли вам избавиться от постоянного появления ошибки.