
Всем добрый день! Недавно столкнулся с проблемой умирания своего жесткого диска. Western Digital WD5000AAKX
Пошел в магазин и приобрел новенький Western Digital WD10EZEX. Старый выткнул- воткнул новый.
Поскольку имею в дополнительном пользовании только macbook, то записывал образ через boot camp- установка не определялась. Скачал эмулятор windows- сделал загрузочную флешку через rufus. После успешной установки компьютер перезагружается и начинается подготовка windows к использованию. Когда доходит дело до «загрузки устройств» процесс зависает, выдавая ошибку биоса MACHINE CHECK EXCEPTION. Пробовал править всё это дело загрузкой и прожигов разных флешек с разными редакциями. Пробовал даже оригинальный образ с сайта microsoft- проблема не исчезает.
Отключил sata dvd-привода — толку ноль.
Прогонял оперативную память через memtest86 — ошибок не найдено.
Всю голову уже переломал, не знаю куда и обратиться.
Вот спецификации компа:
ASUS p7p55d pro
Intel core i-5 760 @ 2,8 GHZ
ASUS Geforce gtx 650 -ti
память 2x Corsair 2GB DDR3 1333Mhz
бп Chieftec 600w
__________________
Помощь в написании контрольных, курсовых и дипломных работ, диссертаций здесь
 Здравствуйте.
Синим экраном пользователи прозвали ошибку ядра ОС, которая внезапно возникает (без предупреждения и не давая сохранить документы) и вынуждает компьютер уйти на перезагрузку. Причем, возникать она может как на настольных ПК, так и на ноутбуках (и ОС Windows 10/11 тоже не исключение, хотя системы стали гораздо стабильнее в этом плане). Пример ошибки см. на фото ниже. 👇
Не могу не отметить, что подобная ошибка «коварная», т.к. не всегда просто найти ее причину (к тому же, она может возникнуть на этапе загрузки ОС и не позволить исправить ее).
Как бы там ни было, в этой заметке представлю несколько наиболее типичных причин появления синего экрана, а также способы их устранения. Заметка рассчитана на начинающих пользователей.
Итак, ближе к теме…
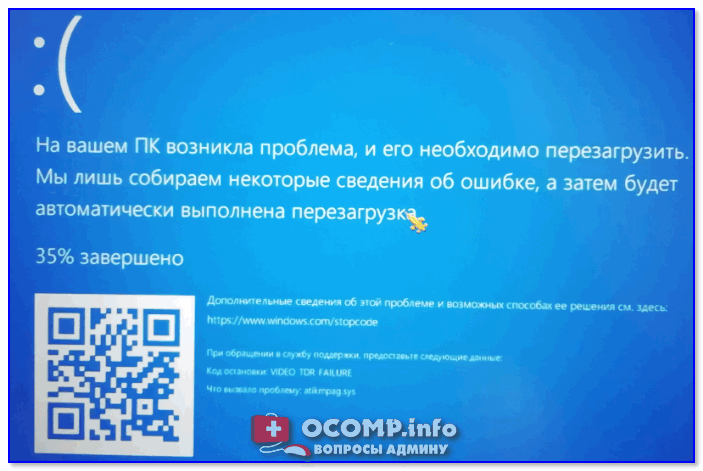
На вашем ПК возникла проблема и его необходимо перезагрузить / Пример подобной ошибки
*
Содержание статьи
- 1 Из-за чего появляется синий экран, и что можно сделать
- 1.1 При очевидной причине (установка сбойного драйвера, обновления ОС и пр.)
- 1.1.1 📌 Как восстановить систему
- 1.1.2 📌 Как откатиться к старому драйверу
- 1.2 При не очевидной причине: ошибка возникла внезапно
- 1.3 Если синий экран не дает загрузить Windows
- 1.4 Если ошибка появляется в игре
- 1.5 Диагностика: что проверить
- 1.5.1 Температуры ЦП, видеокарты
- 1.5.2 Стресс-тест (как себя ведет оборудование под нагрузкой)
- 1.5.3 Тестирование планок ОЗУ
- 1.5.4 Сбросить настройки BIOS
- 1.1 При очевидной причине (установка сбойного драйвера, обновления ОС и пр.)

→ Задать вопрос | дополнить
Из-за чего появляется синий экран, и что можно сделать
❶
При очевидной причине (установка сбойного драйвера, обновления ОС и пр.)
Под очевидной я понимаю ту причину, которая привела к ошибке сразу же после вашего действия (и вы это заметили). Например, установили новую программу — появился синий экран ⇒ причина понятна…👌 Кстати, в более половине случаев так и бывает (просто не все обращают на это внимание).
Стоит отметить, что наиболее часто синий экран возникает после подключения нового оборудования и установки драйвера на него. Сюда же можно отнести и обычное обновление драйверов, и ОС Windows.
Поэтому, если после установки какой-то программы/драйвера началась подобная проблема — просто удалите это ПО, или замените его на более старую версию (откатитесь к старому драйверу). Кстати, чаще всего (по моим наблюдениям) проблема возникает при обновлении драйвера видеокарты, и при установки 📌драйвера без цифровой подписи.
*
📌 Как восстановить систему
Самый надежный вариант восстановить работу ОС после установки сбойного ПО — это воспользоваться точкой восстановления (создаются они автоматически, правда, в разных версиях ОС эта опция может быть как включена, так и выключена).
Для запуска восстановления (универсальный способ):
- нажмите сочетание Win+R;
- введите в появившееся окно команду rstrui и нажмите OK.
rstrui — запуск восстановления
Далее должна запуститься функция восстановления системы и перед вами появится окно с точками восстановления (обратите внимание на даты, когда они были созданы и после установки каких программ). В моем случае есть три точки восстановления (см. скрин ниже).
В общем-то, если точки восстановления есть — просто откатите систему к одной из них, и проблема в большинстве случаев на этом и разрешается…
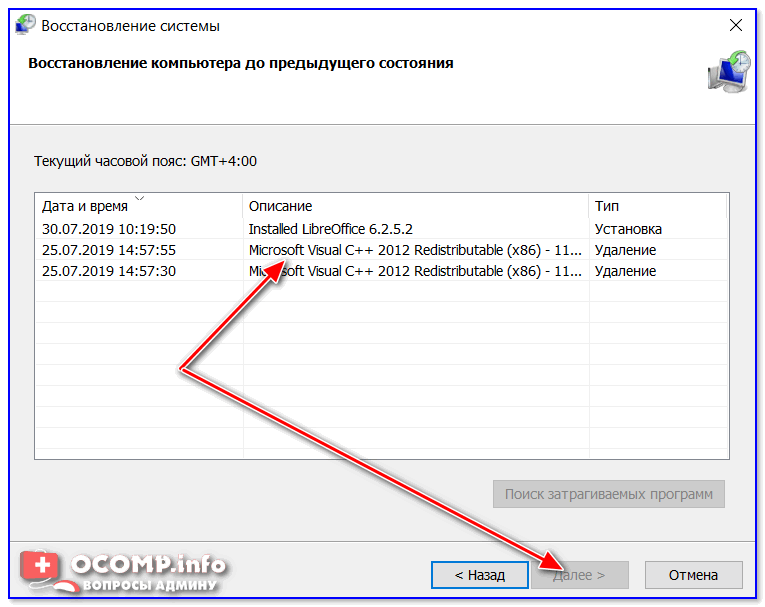
Выбор точки восстановления
Что делать, если точки восстановления нет:
- попробовать вручную удалить ПО, которое недавно было установлено;
- если в обычном режиме это не получается — загрузите систему в безопасном режиме и повторите операцию;
- воспользуйтесь рекомендациями инструкции по восстановлению Windows 10 (Windows 11).
*
📌 Как откатиться к старому драйверу
1) Сначала необходимо открыть 👉диспетчер устройств.
2) Далее найти то устройство, для которого нужно откатить драйвер (в моем примере я выбрал видеоадаптер), и открыть его свойства.
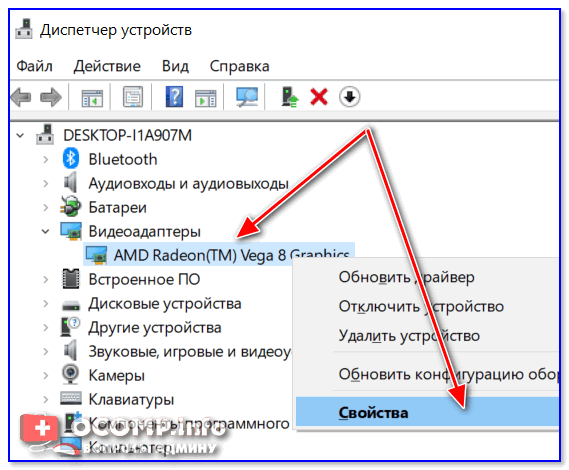
Свойства видеоадаптера
3) После перейти во вкладку «Драйвер» и нажать по кнопке «Откатить».
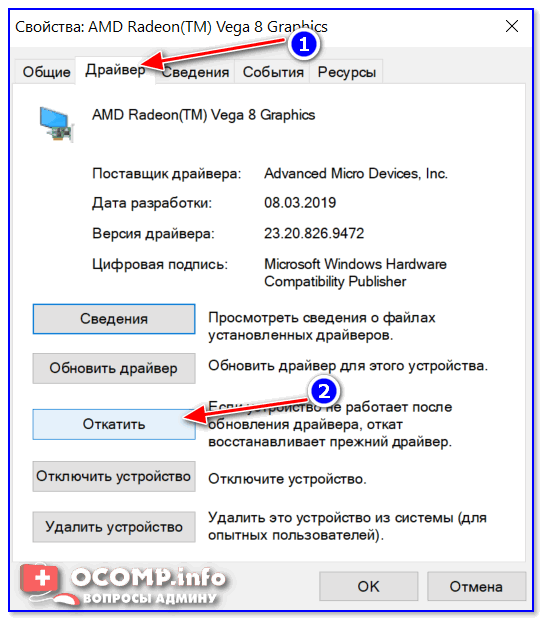
Откатить
❷
При не очевидной причине: ошибка возникла внезапно
Когда синий экран появился внезапно и нет какой-то явно-очевидной причины — разобраться с этим не всегда так просто…
Для начала я рекомендую сфотографировать (или записать) код ошибки, проблемный файл и т.д. (см. мои примеры ниже). Этот код ошибки (или конкретный проблемный файл) — могут очень существенно сузить круг проблем (а иногда и прямо указать на нее).

Пример ошибки
VIDEO TDR FAILURE (фото экрана с ошибкой)
Если вы не успели заснять ошибку, то есть спец. утилита 📌 BlueScreenView, позволяющая просмотреть дамп в Windows и найти все последние ошибки, связанные с синим экраном.
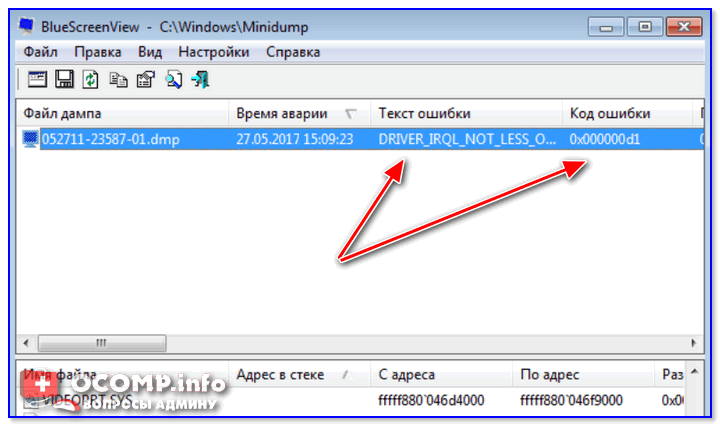
BlueScreenView — скрин окна утилиты
Далее, зная код ошибки, попробуйте воспользоваться специализированными сайтами и найти по нему причину проблемы:
- bsodstop.ru/kod-bsod
- allerrorcodes.ru
Обратите внимание, что на том же bsodstop.ru можно получить не только вероятную причину, но и ее решение. По крайней мере, начать разбираться с проблемой рекомендую именно с этого…
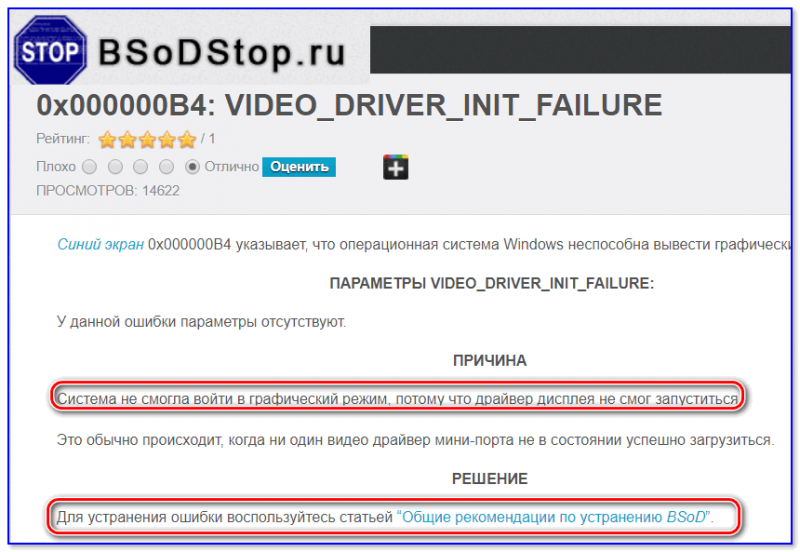
Причина, решение
Если код ошибки ничего не дал, попробуйте провести несколько шагов диагностики.
❸
Если синий экран не дает загрузить Windows
Примечание: т.е. он появляется сразу же во время начала загрузки ОС Windows (до появления рабочего стола).
Этот вариант синего экрана наиболее коварен, т.к. у неподготовленного пользователя складывается ощущение, что «система мертва» и уже ничего нельзя поделать…👀
Что можно посоветовать:
1) После 2-3-х неудачных загрузок с появлением критических ошибок — в большинстве случаев появляется окно с предложением восстановить работу устройства. Если причина ошибок связана с каким-нибудь недавно установленным ПО — рекомендую загрузиться в безопасном режиме и удалить его.
Также отсюда можно попробовать запустить восстановление системы (актуально, если у вас есть точка восстановления, об этом ниже).
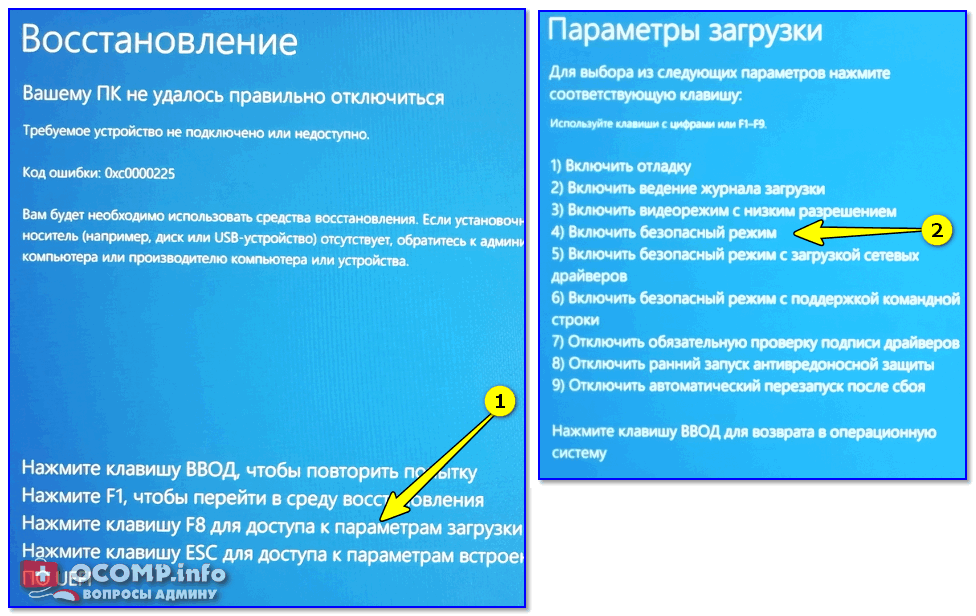
Безопасный режим
*
📌 В помощь!
Как зайти в безопасный режим || Windows 7÷11 — https://ocomp.info/kak-zayti-v-bez-rezh-windows.html
*
2) Если окно восстановление не появляется, можно загрузить ПК/ноутбук с помощью установочной флешки (как ее сделать). Разумеется, идеально, если она уже у вас есть (либо есть второй ПК, на котором ее можно быстро создать).
Примечание: для загрузки ПК/ноутбука с флешки — вам необходимо воспользоваться загрузочным меню (Boot Menu)…
Далее, когда появится первое окно с предложением установки — просто кликните в углу экрана по ссылке «Восстановление системы».
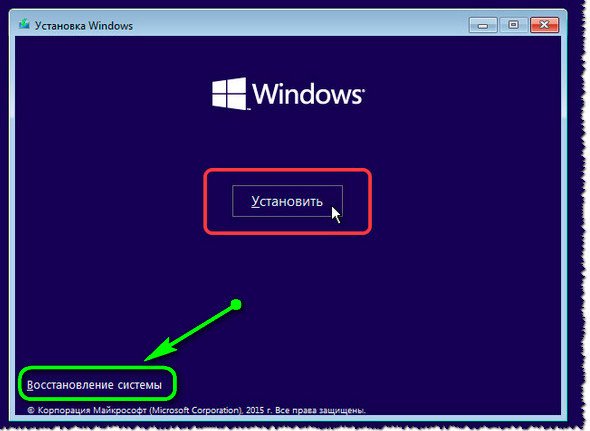
Windows 10 — начало установки
Далее перейдите в меню: «Диагностика / Доп. параметры / Восстановление системы».
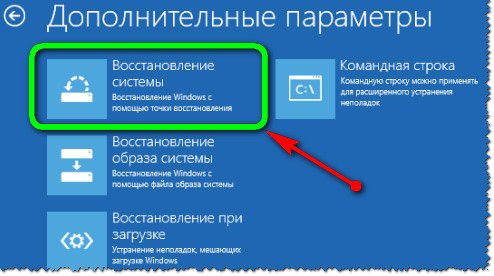
Восстановление системы / Windows 10
После должен запуститься мастер, который поможет вам откатить систему к предыдущему работоспособному состоянию (при наличии точек восстановления).
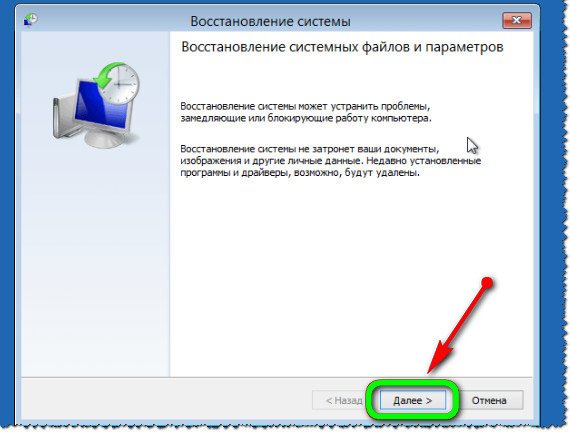
Начало восстановления
Возможно, вам также понадобиться восстановить загрузочные записи ОС (ссылка ниже в помощь).
📌 Инструкция!
Восстановление загрузочных записей Windows — https://ocomp.info/vosstanovlenie-windows-10.html#i-4
*
3) Попробуйте сбросить настройки BIOS.
4) Попробуйте установить еще одну ОС Windows на диск (либо переустановить старую).
5) Если предыдущее не помогло, возможно проблема в железе. Попробуйте отключить от ПК/ноутбука всё (до минимума): принтеры, сканеры, USB-переходники, доп. мониторы и т.д.
Рекомендую также обратить внимание на ОЗУ, попробуйте оставить только одну планку (если у вас их 2/3), поочередно установите и проверьте ее работу в разных слотах (не лишним было бы протестировать ее с помощью спец. утилиты).
❹
Если ошибка появляется в игре
1) Переустановите драйвера (в особенности на видеокарту). Загрузите их с официального сайта производителя вашего устройства.
Если есть возможность, попробуйте использовать другую ОС с более старой/новой версией видеодрайвера.
📌 В помощь!
1) Как установить вторую Windows на диск без потери данных — https://ocomp.info/kak-ustanovit-vtoruyu-windows.html
2) Как правильно переустановить драйвер на видеокарту — https://ocomp.info/kak-obnovit-drayver-na-videokartu.html
*
2) Проверьте файлы игры антивирусом, попробуйте ее переустановить. Измените графические настройки (отключите туман, мелкие частицы, вертикальную синхронизацию, различные фильтры и т.д.).
📌 В помощь!
Проверка файлов и системы на вирусы — https://ocomp.info/esli-antivirus-ne-vidit-virusov.html
*
3) Проведите стресс-тест видеокарты, просмотрите ее температуры, проверьте не перегревается ли она.
*
4) Отключите (удалите) различные утилиты для ускорения игр, просмотра за FPS и т.д.
❺
Диагностика: что проверить
Температуры ЦП, видеокарты
В играх, редакторах (и др. ресурсоемких программах) температура ЦП и видеокарты может существенно повышаться. Разумеется, если температура выходит за определенные пределы — это может приводить к различным ошибкам (в т.ч. и синему экрану).
Примечание: у ЦП есть определенный порог температуры, дойдя до которого — компьютер просто выключиться/перезагрузится (сработает защита от выхода из строя).
*
Для просмотра температуры чаще всего используют спец. утилиты (например, AIDA 64). Разумеется, смотреть за температурой нужно в динамике: т.е. запустите утилиту сразу же после загрузки Windows, а потом приступите к своей обычной работе за ПК (время от времени поглядывая за датчиками, особенно, когда слышите нарастающий гул кулеров).
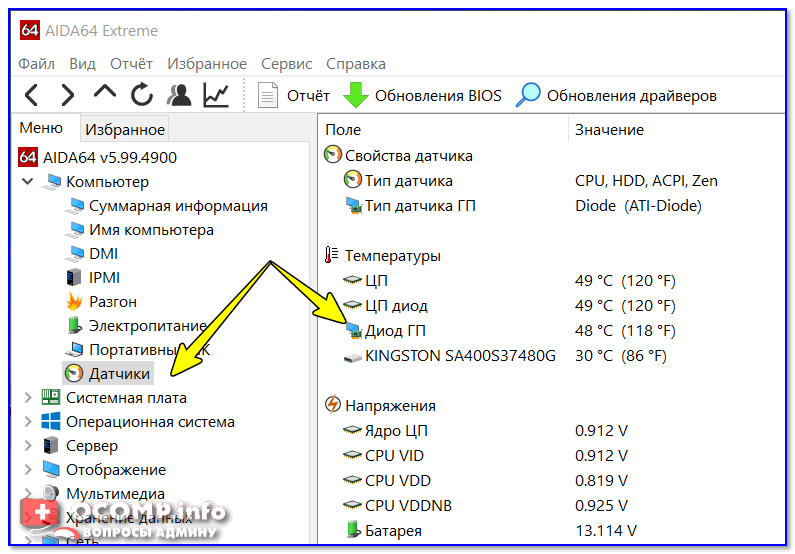
AIDA64 — просмотр температуры (вкладка датчики)
*
Примечание: у AIDA 64 датчики температур можно вывести в трей (рядом с часами) Windows. Таким образом вам не придется каждый раз сворачивать/разворачивать окно утилиты.
Если температура выйдет за границы оптимальной* — попробуйте выполнить ряд мер: почистить устройство от пыли, настроить параметры электропитания, заменить термопасту, и т.д.
Вообще, конечно, более эффективно проверить состояние железа компьютера позволяет стресс-тест (это когда спец. программа «искусственно» создает высокую нагрузку). Об этом ниже…
📌 В помощь!
Температура процессора Intel: как ее узнать; какую считать нормальной, а какую перегревом — https://ocomp.info/temperatura-protsessora-intel.html
*
Стресс-тест (как себя ведет оборудование под нагрузкой)
Стресс-тест позволяет узнать реальную частоту работы ЦП и видеокарты, их температуры, проверить стабильность системы, узнать обо всех слабых местах ПК/ноутбука. Нередко, стресс-тест — является единственным способом, позволяющим докопаться до причины нестабильной работы устройства.
Выполнить стресс-тест можно в различных программах и утилитах (в зависимости от того, что тестируете). У меня на блоге есть инструкция, как выполнить подобный тест в AIDA 64 — рекомендую!
📌 Инструкция!
Как выполнить стресс-тест процессора и системы в целом, держит ли он частоты, нет ли перегрева (AIDA 64) — [см. инструкцию]
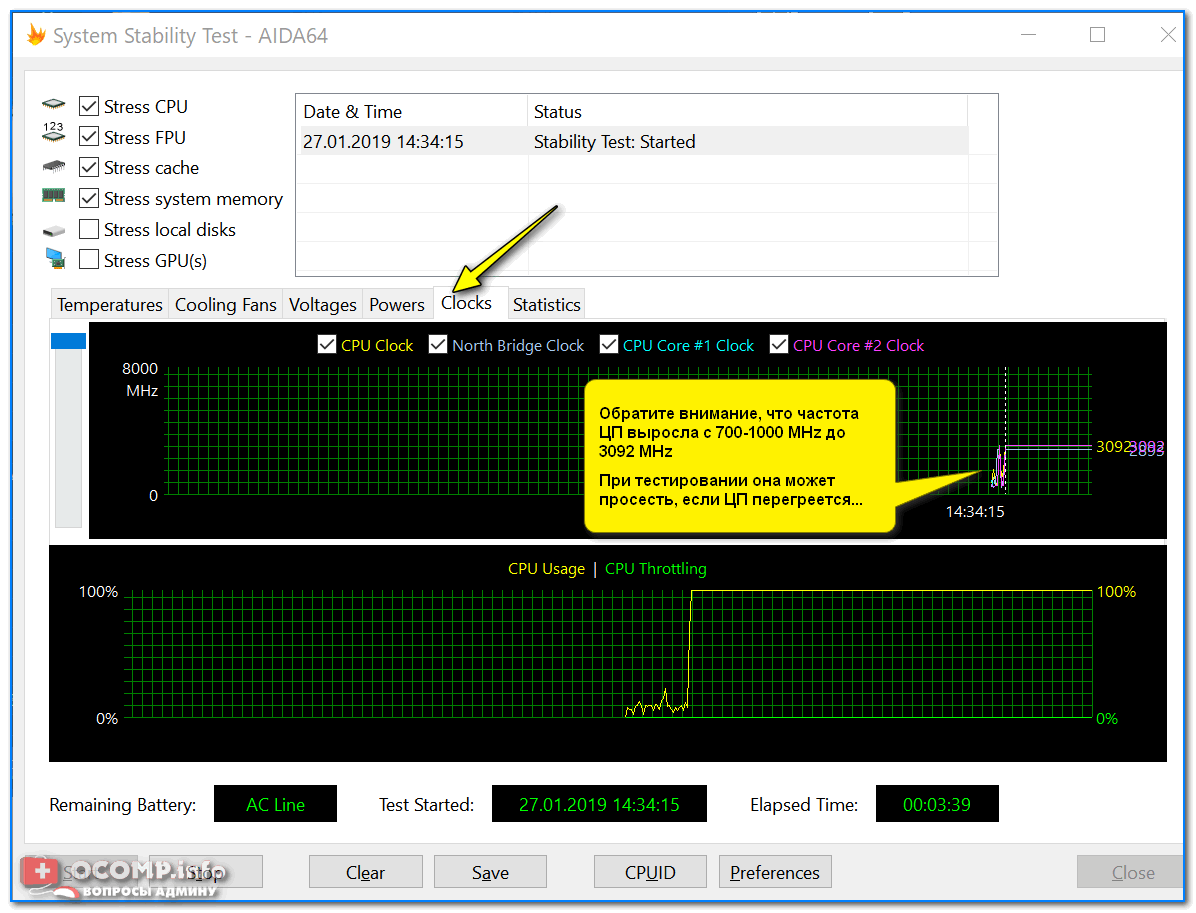
Частота работы ЦП / AIDA 64
Что касается непосредственно видеокарты — то для ее тестирования в дополнение к AIDA 64 можно порекомендовать утилиты OCCT и FurMark (они, кстати, также помогут оценить ее реальную производительность). О том, как с ними работать — см. инструкцию, ссылка на которую ниже.
Результаты теста в реальном времени / утилита OCCT
*
📌 В помощь!
Стресс-тест видеокарты: проверка на надежность и стабильность — https://ocomp.info/stress-test-videokartyi.html

*
Тестирование планок ОЗУ
Если синий экран возникает спонтанно, в не зависимости от запущенных и установленных программ, каких-то действий за ПК — возможно, что причиной этому планки ОЗУ. И при не ясной причине критических ошибок — рекомендуется подвергнуть их тестированию…
Сделать это можно как с помощью средства Windows (нажмите Win+R, и используйте команду mdsched), так и независимой утилиты (Memtest 86+). Разумеется, я бы порекомендовал использовать второй вариант…
📌 Инструкция!
Тест ОЗУ (RAM): проверка оперативной памяти на ошибки — https://ocomp.info/testirovanie-operativnoy-pamyati-test-ozu-ram.html
С памятью есть проблемы / утилита Memtest 86+
Кстати, также порекомендовал бы почистить контакты планок с помощью резинки и кисточки (разъемы на материнской плате не лишним было бы продуть). Если у вас используется несколько планок — попробуйте запустить компьютер с одной (возможно, что из-за одной из планок (или слота) и выскакивает синий экран…).

Чистка контактов памяти резинкой и кисточкой
*
Сбросить настройки BIOS
В BIOS есть ряд настроек, при изменении которых компьютер может перестать стабильно работать. Например, один из вариантов — это смена режима работы накопителя (AHCI, IDE) или изменение приоритета загрузки.
Стоит отметить, что подобные параметры не всегда меняются вручную — смена может произойти из-за севшей батареи или скачка в цепях электропитания (в этом случае прошивка BIOS может «сгинуть» (вы это сразу поймете, т.к. устройство перестанет включаться вовсе!) и восстановить ее можно будет только в сервисе на программаторе).
📌 В помощь!
Как сбросить настройки БИОС — https://ocomp.info/kak-sbrosit-nastroyki-bios.html

*
Дополнения по теме приветствуются…
Удачи!
👋
Первая публикация: 05.08.2019
Корректировка: 15.02.2022


Полезный софт:
-

- Видео-Монтаж

Отличное ПО для создания своих первых видеороликов (все действия идут по шагам!).
Видео сделает даже новичок!
-
- Ускоритель компьютера

Программа для очистки Windows от «мусора» (удаляет временные файлы, ускоряет систему, оптимизирует реестр).
-
- Aug 17, 2019
-
- 26
-
- 0
-
- 1,530
- 0
-
#1
Has anyone else encountered this problem before? Is there a fix or did I just waste money on a PC I can’t use now?

-
- Jun 12, 2015
-
- 61,167
-
- 5,188
-
- 166,290
- 10,454
-
#28
You wasted money on a PC you can’t use now. Nah, I’m JK.
That first part actually gave me a heart attack ya mad yoke XD Bravo.
Now you see why he is retired (just jokes)
Ah, okay. So the boot order is UEFI USB, then the SSD and then a non UEFI version of the USB tjat comes up automatically whenever it’s plugged in.
Now that boot order is wrong. USB shouldn’t be in it at all. ssd shouldn’t really either if its blank still. I would take USB out as that will only mess with install process.
your motherboard has boot over ride option. What it lets you do is boot off a drive once and then next boot it won’t see the drive and use normal ones. Page 57 here — https://download.msi.com/archive/mnu_exe/mb/E7C84v1.1.pdf
What you should do is put USB at boot
go into bios
go to save & exit screen
choose boot override
pick USB from list
PC will restart and boot from USB. When win 10 installation gets to stage it needs to restart it should just see the ssd at this stage and complete install.
Are the errors you getting BSOD or just windows isn’t working cause the install isn’t complete?
CSM is what swaps the boot method. The disappearing drives makes sense as Legacy boot method can’t see UEFI. You should leave it as UEFI.

-
- Jun 24, 2014
-
- 76,324
-
- 6,372
-
- 168,290
- 9,380
-
#2
So, when you created the installation media I’m assuming you used a different machine, yes? And did you choose the option to «create installation media for use on a different PC» or did you create installation media for use on THAT PC that you created it on?
Is this a cheapo generic thumb drive or a decent one? Model? Cheap USB thumb drives are not a good choice for this usually. Well, for anything really, but especially for stuff like this.
I would recommend you create the installation media again, and make sure to choose the «create installation media for use on a different PC» option.
Also, when performing the installation make sure you are plugged in to a USB port on the back of the motherboard, not one on the front case panel or a USB hub. And if there are USB 2.0 ports on the motherboard, it is usually a good idea to use those (black) rather than newer ports (Blue, red, etc.).
What are the full hardware specifications for the build AND, perhaps of greater importance, what is the BIOS version? If you are not sure, you can log into the BIOS and look on the main/general info tab in the BIOS.
-
- Aug 17, 2019
-
- 26
-
- 0
-
- 1,530
- 0
-
#3
I installed it onto the USB from my current PC and chose the installation media for use on a different PC. There was also a box already ticked at the bottom that said something about similar specs to my current PC so maybe that might be a factor or is that normal?
the USB was €10 and is a 32GB ADATA. Only got it today too.
The specs are a Ryzen 5 3600X CPU, an MSI MAG X570 Tomahawk Motherboard, an MSI Nvidia GeForce GTX 1660ti graphics card, a Kingston A2000 1TB SSD, 2 Corsair Vengeance Pros 16GB (8GBs between them), and the power source is a Corsair RM750x 750W ATX 80 plus gold power supply. There are also some fans and a CPU fan cooler too. The bios are MSI too.
Thanks as well for taking the time to reply.
-
- Jun 24, 2014
-
- 76,324
-
- 6,372
-
- 168,290
- 9,380
-
#4
-
- Aug 17, 2019
-
- 26
-
- 0
-
- 1,530
- 0
-
#5
BIOS release version? If you go into the BIOS the BIOS version will be listed on the main screen.
It says MSI Click Bios 5. And in advanced it says version E7C84AMS.120
I also plugged tye USB directly into the motherboard and while it hasn’t blue screened, it is now frozen on the section where you have to enter a product key. As I don’t have one I clicked the littke blue option to say I don’t and now it’s just not loading.
-
- Jun 24, 2014
-
- 76,324
-
- 6,372
-
- 168,290
- 9,380
-
#6
That. That is the BIOS version. It is two versions back from the current BIOS release version. I’m not sure why you are having installation problems but it’s probably a good idea to update to the latest BIOS version first, and then try again, and then we can look at other potential solutions IF that doesn’t resolve the issue. Adata is pretty sketchy as far as quality goes, so it might not be the worst idea to try a different flash drive if possible.
Where did you get your Windows installer from? Did you use the Microsoft media creation tool to make the installer or did you get it through some other source?
Which DIMM slots are your memory modules installed in? Are they in the 2nd and 4th slots (A2 and B2) or some other combination of slots?
Actually, this really sounds a lot like bent pins on the CPU and before you do anything else it might be a very good idea to pull the CPU and check it for one or more bent pins. You will need isopropyl alcohol to clean off the old thermal paste from the CPU cooler and heatsink and new paste to apply when you put it back together if you don’t find anything wrong. You will want to check VERY closely, because it only takes one bent pin and it doesn’t have to be bent very much in order to cause a problem.
-
- Aug 17, 2019
-
- 26
-
- 0
-
- 1,530
- 0
-
#7
E7C84AMS.120That. That is the BIOS version. It is two versions back from the current BIOS release version. I’m not sure why you are having installation problems but it’s probably a good idea to update to the latest BIOS version first, and then try again, and then we can look at other potential solutions IF that doesn’t resolve the issue. Adata is pretty sketchy as far as quality goes, so it might not be the worst idea to try a different flash drive if possible.
Where did you get your Windows installer from? Did you use the Microsoft media creation tool to make the installer or did you get it through some other source?
Which DIMM slots are your memory modules installed in? Are they in the 2nd and 4th slots (A2 and B2) or some other combination of slots?
Actually, this really sounds a lot like bent pins on the CPU and before you do anything else it might be a very good idea to pull the CPU and check it for one or more bent pins. You will need isopropyl alcohol to clean off the old thermal paste from the CPU cooler and heatsink and new paste to apply when you put it back together if you don’t find anything wrong. You will want to check VERY closely, because it only takes one bent pin and it doesn’t have to be bent very much in order to cause a problem.
I had some issues putting the fan cooler on so maybe I did ah heck it up. Hopefully not though. I’ll check it now and get back to you. Edit: thank feck they all look grand.
As for the installation tool I got it from the main Microsoft page.
The DIMMs are in the second and fourth slots. They were in the wrong slots originally but that was a quick correction.
I download the BIOS update onto the USB and then just plug it in like with the Windows installation, right?
-
- Jun 24, 2014
-
- 76,324
-
- 6,372
-
- 168,290
- 9,380
-
#8
Here is another.
-
- Aug 17, 2019
-
- 26
-
- 0
-
- 1,530
- 0
-
#9
I would HIGHLY recommend that you read a few tutorials on updating the BIOS before you do it. I think your board has BIOS flashback, which generally makes it EASIER, but it still takes a specific process including in some cases unpacking the downloaded BIOS update file (Unzipping it) and sometimes also needing to rename one of the files. There are various tutorials AND Youtube videos on doing this. Here is one.Here is another.
Grand stuff. I’ll use the old PC for all of this then go out and find some isopropyl in the morning. Fingers crossed this solves the issue. Might get a new USB to be safe too.
Cheers for all this help. It’s been relieving a lot of the stress building this thing has caused.
-
- Jun 24, 2014
-
- 76,324
-
- 6,372
-
- 168,290
- 9,380
-
#10
One thing to be VERY aware of is whether or not there is any chance of a motherboard standoff being in the wrong place under the motherboard. There should ONLY be enough standoffs installed in the motherboard tray to accommodate the exact number AND LOCATION of the mounting holes in the motherboard itself. I’ve seen a lot of users fill every standoff hole in the tray thinking they needed to, or they came preinstalled that way, and then the board is shorted out on the bottom because there is a standoff in a location where there is no mounting hole for the motherboard and it makes contact with something that it shouldn’t.
Worst case, I would recommend that you take it all back out of the case and try bench testing it to see if you can narrow things down IF the BIOS update does not help. Might actually be a good idea to do this BEFORE you update the BIOS, so that if there is a physical problem, you can catch it before you try flashing the BIOS and maybe encounter a problem.
How To — Motherboard bench testing

forums.tomshardware.com
-
- Aug 17, 2019
-
- 26
-
- 0
-
- 1,530
- 0
-
#11
Just realize that even those of us who’ve been doing this for literally DECADES, run into many of the same problems from time to time and have to reach out to others in order to work through the problem too. Sometimes electronics simply have a mind of their own or the stupidest little thing that you’d never think of could be causing the issue. I’ve literally seen dozens and dozens of users come here with wildly different issues ranging from won’t start at all to «I get this weird glitch» that have been solved by simply taking everything apart and putting it back together.One thing to be VERY aware of is whether or not there is any chance of a motherboard standoff being in the wrong place under the motherboard. There should ONLY be enough standoffs installed in the motherboard tray to accommodate the exact number AND LOCATION of the mounting holes in the motherboard itself. I’ve seen a lot of users fill every standoff hole in the tray thinking they needed to, or they came preinstalled that way, and then the board is shorted out on the bottom because there is a standoff in a location where there is no mounting hole for the motherboard and it makes contact with something that it shouldn’t.
Worst case, I would recommend that you take it all back out of the case and try bench testing it to see if you can narrow things down IF the BIOS update does not help. Might actually be a good idea to do this BEFORE you update the BIOS, so that if there is a physical problem, you can catch it before you try flashing the BIOS and maybe encounter a problem.
How To — Motherboard bench testing
Finding the problem through bench testing If you are here then it’s likely you have encountered a serious hardware issue and have been unable to resolve it using the standard no-POST troubleshooting procedures. If you have not yet attempted to resolve your issues using the no-POST…
forums.tomshardware.com
I’ll double check in the morning then. I got an NZXT case so a lot of those little nubs for the screws were already in for a full ATX which my motherboard is. There was a little nub in the centre as well which I am to understand is also for mounting as the motherboard came with a screw exactly like it. I can see it now it’s in one of the screw holes. Unless that’s the one that shouldn’t be there.
And the motherboard manual shows that they all need to be screwed in. From what I can see anyways, the manual doesn’t really go into details beyond «here are the holes, here are the screws you need. Have at it.»
I’ll double check tomorrow anyways, just in case there’s a mount I didn’t notice. Knowing my luck there probably is. Need to change the wiring a little anyways with some cabke extensions so no bother at all.
-
- Jun 24, 2014
-
- 76,324
-
- 6,372
-
- 168,290
- 9,380
-
#12
But, for micro ATX there are ALSO 9 holes, but they are not ALL in the same locations. Some of them ARE, but some of them are NOT. Some cases come with enough standoffs installed from the factory for BOTH types of installations, but usually they will only come with them installed for one or the other since both take exactly 9.
Reference:

-
- Aug 17, 2019
-
- 26
-
- 0
-
- 1,530
- 0
-
#13
For ATX motherboards there are 9 holes so there should be 9 standoffs that EXACTLY match the same locations. No more, no less.But, for micro ATX there are ALSO 9 holes, but they are not ALL in the same locations. Some of them ARE, but some of them are NOT. Some cases come with enough standoffs installed from the factory for BOTH types of installations, but usually they will only come with them installed for one or the other since both take exactly 9.
Reference:
Ah grand mine is the nine one then. They were in the locations for each hole and all.
-
- Jun 24, 2014
-
- 76,324
-
- 6,372
-
- 168,290
- 9,380
-
#14
-
- Aug 17, 2019
-
- 26
-
- 0
-
- 1,530
- 0
-
#15
Well, that is good. One less thing to worry about.
I still wanna check just to be safe now. I’m paranoid as all heck with stuff like this. I’ll also be getting the cleaning alcohol soon too so I’ll follow all the steps you sent me and hopefully this will be sorted.
Seriosuly cheers again for the help. My apologies if I got annoying at any point.
-
- Jun 24, 2014
-
- 76,324
-
- 6,372
-
- 168,290
- 9,380
-
#16
-
- Aug 17, 2019
-
- 26
-
- 0
-
- 1,530
- 0
-
#17
No worries. I get annoyed too when I have problems with hardware. Sometimes I want to do this. I don’t recommend or advise it though. LOL.
Oh I’ve been very close to that, I’m with ya there.
Is there anything else I can use to clean of the thermal paste other than isopropyl alcohol? Nowhere near me sells it.
-
- Jun 24, 2014
-
- 76,324
-
- 6,372
-
- 168,290
- 9,380
-
#18
-
- Aug 17, 2019
-
- 26
-
- 0
-
- 1,530
- 0
-
#19
Isopropyl (rubbing) alcohol is the only recommended product really. You COULD use other solvents, but you are taking a risk as most of them are either too light and won’t do a good job emulsifying the paste or are too harsh and might damage plastic or other components. Unless you live in a very undeveloped region, most everybody has some place near them that sells it. Pharmacies, drug stores, dollar stores, grocery stores, hardware stores and home centers all carry it. There’s really nothing else I’d comfortably recommend for this purpose except maybe a very light mineral spirit, maybe.
Ah righto then. I wasn’t aware hardware stores sold it. Everywhere I searched said you could only find it in pharmacies. I managed to get most of it off the cpu and cooler with cotton swabs, and feck that took a lot of patience. I’ll hopefully find some in the local hardware place and use it to finish the job then.
I’ll double check the motherboard nubs like you said too to be extra safe then get the updated BIOS. Fingers crossed this solves the issues.
-
- Jun 24, 2014
-
- 76,324
-
- 6,372
-
- 168,290
- 9,380
-
- Aug 17, 2019
-
- 26
-
- 0
-
- 1,530
- 0
-
#21
Good news: the bios updated without a hitch.
Bad news: the windows 10 installer is giving me the same errors again so I can only assume that means it’s the USB. At least there’s no blue screen or hard crash this time so that’s something.
-
- Jun 24, 2014
-
- 76,324
-
- 6,372
-
- 168,290
- 9,380
-
#22
How To — Windows 10 clean install tutorial
forums.tomshardware.com
-
- Aug 17, 2019
-
- 26
-
- 0
-
- 1,530
- 0
-
#23
Which USB port are you using to try and install from? Maybe try another, or try all of them, first. Then, try creating the media all over again. Are you creating your media and proceeding as outlined in my tutorial?
How To — Windows 10 clean install tutorial
Windows 10 Clean install tutorial This tutorial is intended to help you, step by step, to perform a clean install of Windows version 10, build 1709 or newer but can be equally applied to earlier installer versions which may simply lack some of the Cortana assisted settings screens but should…
forums.tomshardware.com
At first it was the USB port on the front of the pc but now I’ve been plugging it directly into the motherboard.
Yeah I’ve done most of the steps. It’s when it gets to the actual installation that the issues start. I made sure to prioritise the USB and SSD in the boot bios, then when it came to the part where you select unallocated space it has two more partitions with it but only let’s me delete one, then I select unallocated space, go through the whole thing of picking which version of Windows I want, it goes to the installation section and then gives me the error messages on the second loading bar when it reaches 12-13%.
-
- Jun 24, 2014
-
- 76,324
-
- 6,372
-
- 168,290
- 9,380
-
#24
-
- Aug 17, 2019
-
- 26
-
- 0
-
- 1,530
- 0
-
#25
This might be part of your problem. I would recommend downloading Gparted, create bootable media, use it to remove ALL of the partitions on the drive. Do NOT create new partitions. Do NOT perform any formatting. Just delete the partitions and remember to click on the required «apply these changes» before shutting it down. Then try the installation again.
I’ll do that now then. So I just put it onto the USB, plug it into the new PC and boot it normally, yeah? No need to go to BIOS or anything?
And again, I’m sorry to be bothering you with all this.
| Thread starter | Similar threads | Forum | Replies | Date |
|---|---|---|---|---|
|
|
Question Blue screen before install screen | Windows 10 | 3 | Friday at 6:47 AM |
|
|
Question Blank Blue Screen when installing windows 10 | Windows 10 | 7 | Dec 31, 2022 |
|
J
|
Question Blue screen of death when booting from Windows installer USB drive ? | Windows 10 | 7 | Nov 10, 2022 |
|
|
Question Why I am getting only blue screen when trying to boot Windows 10 installation ? | Windows 10 | 2 | Jul 16, 2022 |
|
B
|
Question Can’t install Windows 10 because of virus? | Windows 10 | 5 | Jun 27, 2022 |
|
|
Question Windows goes to black screen after 10 min use, unable to restart Windows, must install Windows again ? | Windows 10 | 10 | May 17, 2022 |
|
|
Question Windows won’t boot, repair tool stuck at black screen, installer tool stuck at blue screen ? | Windows 10 | 9 | Apr 15, 2022 |
|
|
[SOLVED] Black screen after installing UX Theme Patcher. Safe Mode isn’t even working on Windows 10 | Windows 10 | 1 | Feb 25, 2022 |
|
|
Question Unable to install windows blank blue screen then shutdown | Windows 10 | 2 | Feb 16, 2022 |
|
|
[SOLVED] UEFI Windows 10 installation USB not booting, just goes back to BIOS screen ? | Windows 10 | 1 | Feb 9, 2022 |


- Advertising
- Cookies Policies
- Privacy
- Term & Conditions
- Topics
-
- Aug 17, 2019
-
- 26
-
- 0
-
- 1,530
- 0
-
#1
Has anyone else encountered this problem before? Is there a fix or did I just waste money on a PC I can’t use now?
-
- Jun 12, 2015
-
- 61,167
-
- 5,188
-
- 166,290
- 10,454
-
#28
You wasted money on a PC you can’t use now. Nah, I’m JK.
That first part actually gave me a heart attack ya mad yoke XD Bravo.
Now you see why he is retired (just jokes)
Ah, okay. So the boot order is UEFI USB, then the SSD and then a non UEFI version of the USB tjat comes up automatically whenever it’s plugged in.
Now that boot order is wrong. USB shouldn’t be in it at all. ssd shouldn’t really either if its blank still. I would take USB out as that will only mess with install process.
your motherboard has boot over ride option. What it lets you do is boot off a drive once and then next boot it won’t see the drive and use normal ones. Page 57 here — https://download.msi.com/archive/mnu_exe/mb/E7C84v1.1.pdf
What you should do is put USB at boot
go into bios
go to save & exit screen
choose boot override
pick USB from list
PC will restart and boot from USB. When win 10 installation gets to stage it needs to restart it should just see the ssd at this stage and complete install.
Are the errors you getting BSOD or just windows isn’t working cause the install isn’t complete?
CSM is what swaps the boot method. The disappearing drives makes sense as Legacy boot method can’t see UEFI. You should leave it as UEFI.
-
- Jun 24, 2014
-
- 76,324
-
- 6,372
-
- 168,290
- 9,380
-
#2
So, when you created the installation media I’m assuming you used a different machine, yes? And did you choose the option to «create installation media for use on a different PC» or did you create installation media for use on THAT PC that you created it on?
Is this a cheapo generic thumb drive or a decent one? Model? Cheap USB thumb drives are not a good choice for this usually. Well, for anything really, but especially for stuff like this.
I would recommend you create the installation media again, and make sure to choose the «create installation media for use on a different PC» option.
Also, when performing the installation make sure you are plugged in to a USB port on the back of the motherboard, not one on the front case panel or a USB hub. And if there are USB 2.0 ports on the motherboard, it is usually a good idea to use those (black) rather than newer ports (Blue, red, etc.).
What are the full hardware specifications for the build AND, perhaps of greater importance, what is the BIOS version? If you are not sure, you can log into the BIOS and look on the main/general info tab in the BIOS.
-
- Aug 17, 2019
-
- 26
-
- 0
-
- 1,530
- 0
-
#3
I installed it onto the USB from my current PC and chose the installation media for use on a different PC. There was also a box already ticked at the bottom that said something about similar specs to my current PC so maybe that might be a factor or is that normal?
the USB was €10 and is a 32GB ADATA. Only got it today too.
The specs are a Ryzen 5 3600X CPU, an MSI MAG X570 Tomahawk Motherboard, an MSI Nvidia GeForce GTX 1660ti graphics card, a Kingston A2000 1TB SSD, 2 Corsair Vengeance Pros 16GB (8GBs between them), and the power source is a Corsair RM750x 750W ATX 80 plus gold power supply. There are also some fans and a CPU fan cooler too. The bios are MSI too.
Thanks as well for taking the time to reply.
-
- Jun 24, 2014
-
- 76,324
-
- 6,372
-
- 168,290
- 9,380
-
#4
-
- Aug 17, 2019
-
- 26
-
- 0
-
- 1,530
- 0
-
#5
BIOS release version? If you go into the BIOS the BIOS version will be listed on the main screen.
It says MSI Click Bios 5. And in advanced it says version E7C84AMS.120
I also plugged tye USB directly into the motherboard and while it hasn’t blue screened, it is now frozen on the section where you have to enter a product key. As I don’t have one I clicked the littke blue option to say I don’t and now it’s just not loading.
-
- Jun 24, 2014
-
- 76,324
-
- 6,372
-
- 168,290
- 9,380
-
#6
That. That is the BIOS version. It is two versions back from the current BIOS release version. I’m not sure why you are having installation problems but it’s probably a good idea to update to the latest BIOS version first, and then try again, and then we can look at other potential solutions IF that doesn’t resolve the issue. Adata is pretty sketchy as far as quality goes, so it might not be the worst idea to try a different flash drive if possible.
Where did you get your Windows installer from? Did you use the Microsoft media creation tool to make the installer or did you get it through some other source?
Which DIMM slots are your memory modules installed in? Are they in the 2nd and 4th slots (A2 and B2) or some other combination of slots?
Actually, this really sounds a lot like bent pins on the CPU and before you do anything else it might be a very good idea to pull the CPU and check it for one or more bent pins. You will need isopropyl alcohol to clean off the old thermal paste from the CPU cooler and heatsink and new paste to apply when you put it back together if you don’t find anything wrong. You will want to check VERY closely, because it only takes one bent pin and it doesn’t have to be bent very much in order to cause a problem.
-
- Aug 17, 2019
-
- 26
-
- 0
-
- 1,530
- 0
-
#7
E7C84AMS.120That. That is the BIOS version. It is two versions back from the current BIOS release version. I’m not sure why you are having installation problems but it’s probably a good idea to update to the latest BIOS version first, and then try again, and then we can look at other potential solutions IF that doesn’t resolve the issue. Adata is pretty sketchy as far as quality goes, so it might not be the worst idea to try a different flash drive if possible.
Where did you get your Windows installer from? Did you use the Microsoft media creation tool to make the installer or did you get it through some other source?
Which DIMM slots are your memory modules installed in? Are they in the 2nd and 4th slots (A2 and B2) or some other combination of slots?
Actually, this really sounds a lot like bent pins on the CPU and before you do anything else it might be a very good idea to pull the CPU and check it for one or more bent pins. You will need isopropyl alcohol to clean off the old thermal paste from the CPU cooler and heatsink and new paste to apply when you put it back together if you don’t find anything wrong. You will want to check VERY closely, because it only takes one bent pin and it doesn’t have to be bent very much in order to cause a problem.
I had some issues putting the fan cooler on so maybe I did ah heck it up. Hopefully not though. I’ll check it now and get back to you. Edit: thank feck they all look grand.
As for the installation tool I got it from the main Microsoft page.
The DIMMs are in the second and fourth slots. They were in the wrong slots originally but that was a quick correction.
I download the BIOS update onto the USB and then just plug it in like with the Windows installation, right?
-
- Jun 24, 2014
-
- 76,324
-
- 6,372
-
- 168,290
- 9,380
-
#8
Here is another.
-
- Aug 17, 2019
-
- 26
-
- 0
-
- 1,530
- 0
-
#9
I would HIGHLY recommend that you read a few tutorials on updating the BIOS before you do it. I think your board has BIOS flashback, which generally makes it EASIER, but it still takes a specific process including in some cases unpacking the downloaded BIOS update file (Unzipping it) and sometimes also needing to rename one of the files. There are various tutorials AND Youtube videos on doing this. Here is one.Here is another.
Grand stuff. I’ll use the old PC for all of this then go out and find some isopropyl in the morning. Fingers crossed this solves the issue. Might get a new USB to be safe too.
Cheers for all this help. It’s been relieving a lot of the stress building this thing has caused.
-
- Jun 24, 2014
-
- 76,324
-
- 6,372
-
- 168,290
- 9,380
-
#10
One thing to be VERY aware of is whether or not there is any chance of a motherboard standoff being in the wrong place under the motherboard. There should ONLY be enough standoffs installed in the motherboard tray to accommodate the exact number AND LOCATION of the mounting holes in the motherboard itself. I’ve seen a lot of users fill every standoff hole in the tray thinking they needed to, or they came preinstalled that way, and then the board is shorted out on the bottom because there is a standoff in a location where there is no mounting hole for the motherboard and it makes contact with something that it shouldn’t.
Worst case, I would recommend that you take it all back out of the case and try bench testing it to see if you can narrow things down IF the BIOS update does not help. Might actually be a good idea to do this BEFORE you update the BIOS, so that if there is a physical problem, you can catch it before you try flashing the BIOS and maybe encounter a problem.
How To — Motherboard bench testing
forums.tomshardware.com
-
- Aug 17, 2019
-
- 26
-
- 0
-
- 1,530
- 0
-
#11
Just realize that even those of us who’ve been doing this for literally DECADES, run into many of the same problems from time to time and have to reach out to others in order to work through the problem too. Sometimes electronics simply have a mind of their own or the stupidest little thing that you’d never think of could be causing the issue. I’ve literally seen dozens and dozens of users come here with wildly different issues ranging from won’t start at all to «I get this weird glitch» that have been solved by simply taking everything apart and putting it back together.One thing to be VERY aware of is whether or not there is any chance of a motherboard standoff being in the wrong place under the motherboard. There should ONLY be enough standoffs installed in the motherboard tray to accommodate the exact number AND LOCATION of the mounting holes in the motherboard itself. I’ve seen a lot of users fill every standoff hole in the tray thinking they needed to, or they came preinstalled that way, and then the board is shorted out on the bottom because there is a standoff in a location where there is no mounting hole for the motherboard and it makes contact with something that it shouldn’t.
Worst case, I would recommend that you take it all back out of the case and try bench testing it to see if you can narrow things down IF the BIOS update does not help. Might actually be a good idea to do this BEFORE you update the BIOS, so that if there is a physical problem, you can catch it before you try flashing the BIOS and maybe encounter a problem.
How To — Motherboard bench testing
Finding the problem through bench testing If you are here then it’s likely you have encountered a serious hardware issue and have been unable to resolve it using the standard no-POST troubleshooting procedures. If you have not yet attempted to resolve your issues using the no-POST…
forums.tomshardware.com
I’ll double check in the morning then. I got an NZXT case so a lot of those little nubs for the screws were already in for a full ATX which my motherboard is. There was a little nub in the centre as well which I am to understand is also for mounting as the motherboard came with a screw exactly like it. I can see it now it’s in one of the screw holes. Unless that’s the one that shouldn’t be there.
And the motherboard manual shows that they all need to be screwed in. From what I can see anyways, the manual doesn’t really go into details beyond «here are the holes, here are the screws you need. Have at it.»
I’ll double check tomorrow anyways, just in case there’s a mount I didn’t notice. Knowing my luck there probably is. Need to change the wiring a little anyways with some cabke extensions so no bother at all.
-
- Jun 24, 2014
-
- 76,324
-
- 6,372
-
- 168,290
- 9,380
-
#12
But, for micro ATX there are ALSO 9 holes, but they are not ALL in the same locations. Some of them ARE, but some of them are NOT. Some cases come with enough standoffs installed from the factory for BOTH types of installations, but usually they will only come with them installed for one or the other since both take exactly 9.
Reference:
-
- Aug 17, 2019
-
- 26
-
- 0
-
- 1,530
- 0
-
#13
For ATX motherboards there are 9 holes so there should be 9 standoffs that EXACTLY match the same locations. No more, no less.But, for micro ATX there are ALSO 9 holes, but they are not ALL in the same locations. Some of them ARE, but some of them are NOT. Some cases come with enough standoffs installed from the factory for BOTH types of installations, but usually they will only come with them installed for one or the other since both take exactly 9.
Reference:
Ah grand mine is the nine one then. They were in the locations for each hole and all.
-
- Jun 24, 2014
-
- 76,324
-
- 6,372
-
- 168,290
- 9,380
-
#14
-
- Aug 17, 2019
-
- 26
-
- 0
-
- 1,530
- 0
-
#15
Well, that is good. One less thing to worry about.
I still wanna check just to be safe now. I’m paranoid as all heck with stuff like this. I’ll also be getting the cleaning alcohol soon too so I’ll follow all the steps you sent me and hopefully this will be sorted.
Seriosuly cheers again for the help. My apologies if I got annoying at any point.
-
- Jun 24, 2014
-
- 76,324
-
- 6,372
-
- 168,290
- 9,380
-
#16
-
- Aug 17, 2019
-
- 26
-
- 0
-
- 1,530
- 0
-
#17
No worries. I get annoyed too when I have problems with hardware. Sometimes I want to do this. I don’t recommend or advise it though. LOL.
Oh I’ve been very close to that, I’m with ya there.
Is there anything else I can use to clean of the thermal paste other than isopropyl alcohol? Nowhere near me sells it.
-
- Jun 24, 2014
-
- 76,324
-
- 6,372
-
- 168,290
- 9,380
-
#18
-
- Aug 17, 2019
-
- 26
-
- 0
-
- 1,530
- 0
-
#19
Isopropyl (rubbing) alcohol is the only recommended product really. You COULD use other solvents, but you are taking a risk as most of them are either too light and won’t do a good job emulsifying the paste or are too harsh and might damage plastic or other components. Unless you live in a very undeveloped region, most everybody has some place near them that sells it. Pharmacies, drug stores, dollar stores, grocery stores, hardware stores and home centers all carry it. There’s really nothing else I’d comfortably recommend for this purpose except maybe a very light mineral spirit, maybe.
Ah righto then. I wasn’t aware hardware stores sold it. Everywhere I searched said you could only find it in pharmacies. I managed to get most of it off the cpu and cooler with cotton swabs, and feck that took a lot of patience. I’ll hopefully find some in the local hardware place and use it to finish the job then.
I’ll double check the motherboard nubs like you said too to be extra safe then get the updated BIOS. Fingers crossed this solves the issues.
-
- Jun 24, 2014
-
- 76,324
-
- 6,372
-
- 168,290
- 9,380
-
- Aug 17, 2019
-
- 26
-
- 0
-
- 1,530
- 0
-
#21
Good news: the bios updated without a hitch.
Bad news: the windows 10 installer is giving me the same errors again so I can only assume that means it’s the USB. At least there’s no blue screen or hard crash this time so that’s something.
-
- Jun 24, 2014
-
- 76,324
-
- 6,372
-
- 168,290
- 9,380
-
#22
How To — Windows 10 clean install tutorial
forums.tomshardware.com
-
- Aug 17, 2019
-
- 26
-
- 0
-
- 1,530
- 0
-
#23
Which USB port are you using to try and install from? Maybe try another, or try all of them, first. Then, try creating the media all over again. Are you creating your media and proceeding as outlined in my tutorial?
How To — Windows 10 clean install tutorial
Windows 10 Clean install tutorial This tutorial is intended to help you, step by step, to perform a clean install of Windows version 10, build 1709 or newer but can be equally applied to earlier installer versions which may simply lack some of the Cortana assisted settings screens but should…
forums.tomshardware.com
At first it was the USB port on the front of the pc but now I’ve been plugging it directly into the motherboard.
Yeah I’ve done most of the steps. It’s when it gets to the actual installation that the issues start. I made sure to prioritise the USB and SSD in the boot bios, then when it came to the part where you select unallocated space it has two more partitions with it but only let’s me delete one, then I select unallocated space, go through the whole thing of picking which version of Windows I want, it goes to the installation section and then gives me the error messages on the second loading bar when it reaches 12-13%.
-
- Jun 24, 2014
-
- 76,324
-
- 6,372
-
- 168,290
- 9,380
-
#24
-
- Aug 17, 2019
-
- 26
-
- 0
-
- 1,530
- 0
-
#25
This might be part of your problem. I would recommend downloading Gparted, create bootable media, use it to remove ALL of the partitions on the drive. Do NOT create new partitions. Do NOT perform any formatting. Just delete the partitions and remember to click on the required «apply these changes» before shutting it down. Then try the installation again.
I’ll do that now then. So I just put it onto the USB, plug it into the new PC and boot it normally, yeah? No need to go to BIOS or anything?
And again, I’m sorry to be bothering you with all this.
| Thread starter | Similar threads | Forum | Replies | Date |
|---|---|---|---|---|
|
|
Question Blue screen before install screen | Windows 10 | 3 | Friday at 6:47 AM |
|
|
Question Blank Blue Screen when installing windows 10 | Windows 10 | 7 | Dec 31, 2022 |
|
J
|
Question Blue screen of death when booting from Windows installer USB drive ? | Windows 10 | 7 | Nov 10, 2022 |
|
|
Question Why I am getting only blue screen when trying to boot Windows 10 installation ? | Windows 10 | 2 | Jul 16, 2022 |
|
B
|
Question Can’t install Windows 10 because of virus? | Windows 10 | 5 | Jun 27, 2022 |
|
|
Question Windows goes to black screen after 10 min use, unable to restart Windows, must install Windows again ? | Windows 10 | 10 | May 17, 2022 |
|
|
Question Windows won’t boot, repair tool stuck at black screen, installer tool stuck at blue screen ? | Windows 10 | 9 | Apr 15, 2022 |
|
|
[SOLVED] Black screen after installing UX Theme Patcher. Safe Mode isn’t even working on Windows 10 | Windows 10 | 1 | Feb 25, 2022 |
|
|
Question Unable to install windows blank blue screen then shutdown | Windows 10 | 2 | Feb 16, 2022 |
|
|
[SOLVED] UEFI Windows 10 installation USB not booting, just goes back to BIOS screen ? | Windows 10 | 1 | Feb 9, 2022 |
- Advertising
- Cookies Policies
- Privacy
- Term & Conditions
- Topics
При подготовке к установке Windows 10 или во время самого процесса могут возникнуть проблемы, которые не дадут завершить процедуру обновления. Бывают случаи, когда установка зависает, прерывается, выдаёт ошибку и другие подобные ситуации, выйти из которых можно самостоятельно, используя нижеприведённые инструкции.
Проблемы до начала установки системы
Для установки системы нужен установочный носитель, который рекомендуется создавать с помощью официальной программы Microsoft. После того как вы установите её, пройдёте первые шаги с выбором параметров и разрядности системы, вам предложат выбрать, какой из подключённых носителей превратить в установочный. В списке, предоставленном программой, может не оказаться флешки, которую вы хотели использовать для дальнейшей установки Windows 10. Произойти это может по следующим причинам:
- флешка не была правильно подготовлена. Флешка должна быть пустой, отформатированной в FAT32 или NTFS формате и иметь как минимум 4 ГБ общего объёма. Если хоть один из параметров не соблюдён, то программа установки Windows 10 не увидит флешку;
- USB-порт, в который воткнута флешка, неисправен, попробуйте перенести её в другой порт и проверьте результат, не забыв перезапустить программу;
- перезагрузите компьютер, возможно, с флешкой производятся какие-либо незавершённые операции, поэтому с ней нельзя работать, а после перезапуска устройства они все завершатся;
- проверьте, видит ли сам компьютер флешку, если нет, то проблема и причина заключается в нём;
- если ничего не помогло, то замените флешку или примените любой другой способ превращения ее в установочный носитель, например, скачайте образ системы и запишите его вручную.
Бесконечное получение обновлений
Если в процессе создания загрузочного носителя с новой операционной системой обновления ищутся бесконечно долго, необходимо закрыть центр обновлений:
- Одновременно зажав кнопки Win+R, откройте окошко «Выполнить».

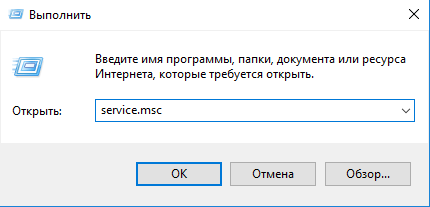
Открываем окошко «Выполнить» комбинацией Win+R - Используйте команду service.msc, чтобы открыть список служб.

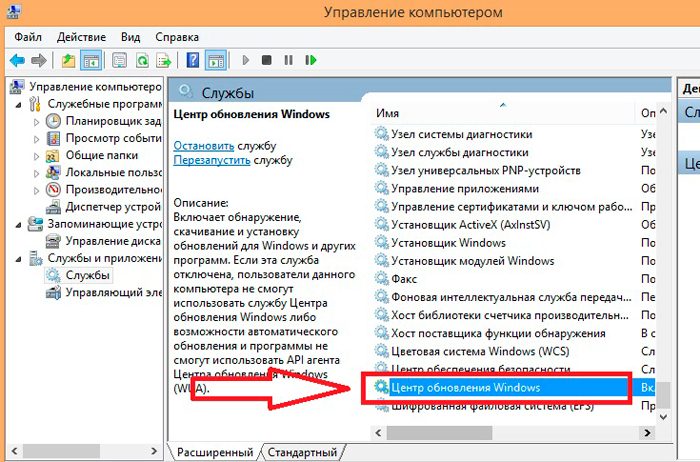
Выполняем команду service.msc - Отыщите в списке строку «Центр обновлений», кликните по ней правой кнопкой мыши и нажмите на функцию «Оставить». Готово, перезапустите приложение по созданию загрузочного носителя и пройдите процесс заново.

Останавливаем центр обновлений
Проблемы в процессе установки
Все нижеперечисленные ошибки и проблемы возникают во время установки: зависание, прерывание, некорректный итог процесса и т. д.
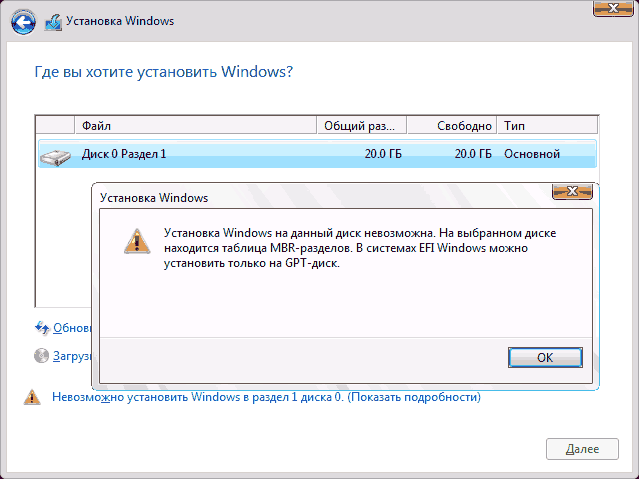
На диске находится таблица MBR-разделов
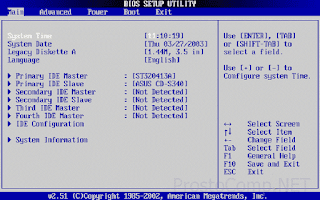
Данная ошибка возникает во время выбора диска или его раздела, отведённого под установку самой операционной системы. Появляется она из-за того, что жёсткий диск отформатирован в формате, не соответствующем режиму, который выставлен в BIOS. Избавиться от этой ошибки можно двумя способами: изменить режим работы в BIOS или переформатировать диск. Рекомендуется второй вариант, так как режим, выбранный в BIOS по умолчанию, наиболее оптимален. Переформатировать диск можно стандартным способом, но при этом потеряв все данные с него, или с помощью сторонней программы, при этом прервав процесс установки, но сохранив всю информацию.
Изменения параметров BIOS
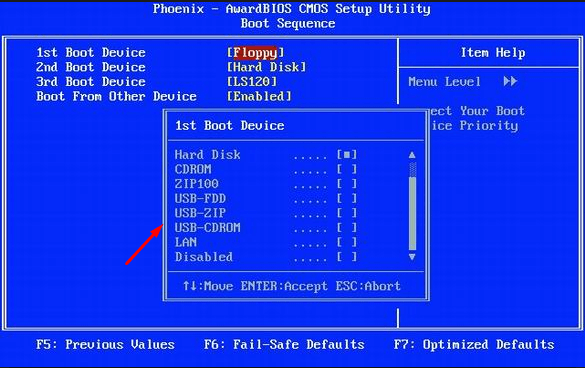
По умолчанию в BIOS активирован режим EFI, который работает только с дисками в GPT формате. Поскольку ваш диск работает в формате MBR, придётся изменить режим на Legacy. Для этого выключите компьютер, начните его включение и как только появятся первые признаки загрузки, нажмите клавишу F11, F12 или ESC для активации Boot Menu. Какая из возможных кнопок будет назначена в вашем случае, описано в небольшой сноске, появившейся на экране во время начала загрузки. В раскрывшемся списке вам нужно будет выбрать вашу флешку, но без приставки UEFI или EFI в названии.
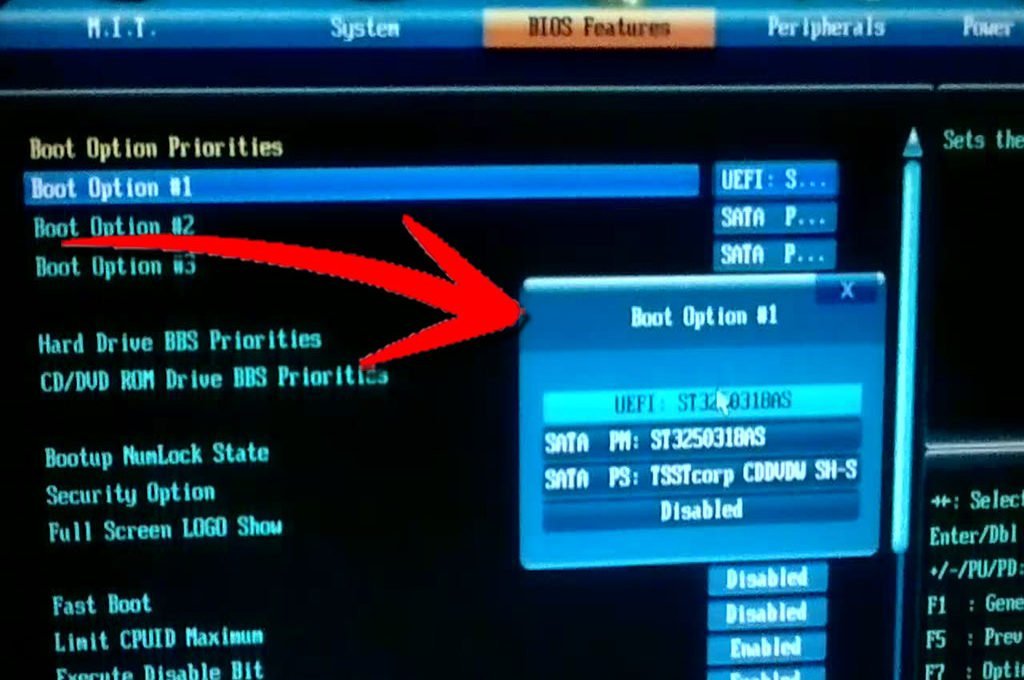
Также изменить очередность загрузки можно в самом BIOS, в разделе Boot или «Загрузка» поставив на первое место название флешки без приставок UEFI и EFI. После этого останется только выйти из Boot Menu или BIOS, предварительно сохранив новые параметры. Готово, можно продолжить установку Windows.
Изменение формата диска на MBR стандартным методом
Изменения формата будет производиться через командную строку. Минус этого метода заключается в том, что придётся удалить все данные, находящиеся на диски, так что заранее скопируйте их на другой носитель, чтобы сохранить.
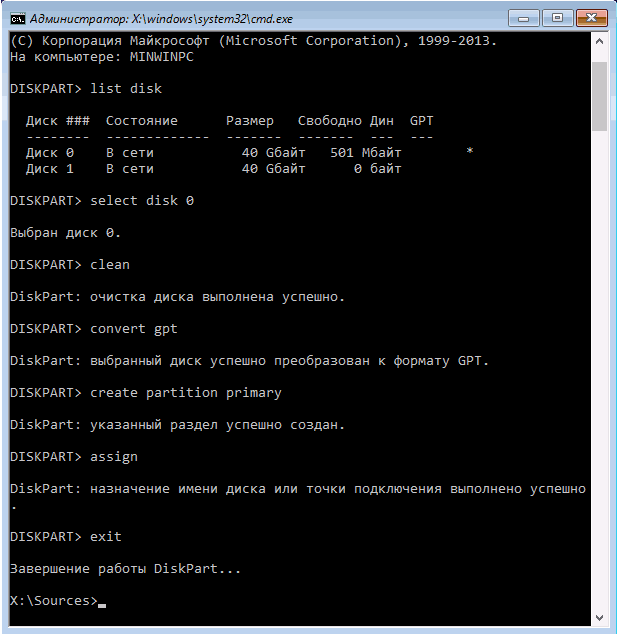
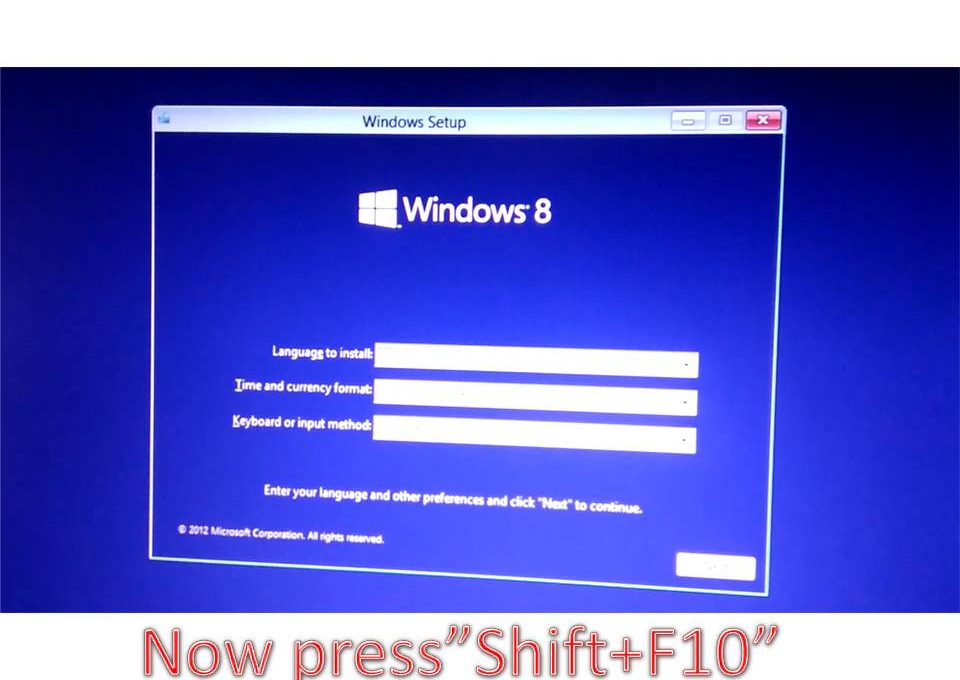
- Для запуска командной строки предназначена комбинация Shift + F10, которую можно использовать не покидая окошка установки ОС.

Зажимаем Shift+F10, чтобы войти в командную строку - В развернувшемся окне с командной строкой по очереди пропишите данные команды: diskpart — запускает процесс настройки диска, list disk — открывает список дисков, подсоединенных к ПК, вы должны выбрать из списка нужный и запомнить его номер, select disk X — выбор диска, где X — его номер, взятый на предыдущем шаге, clean — очищение диска, которое обязательно нужно выполнить, convert gpt — преобразование в формат GPT, exit — выход из командной строки.

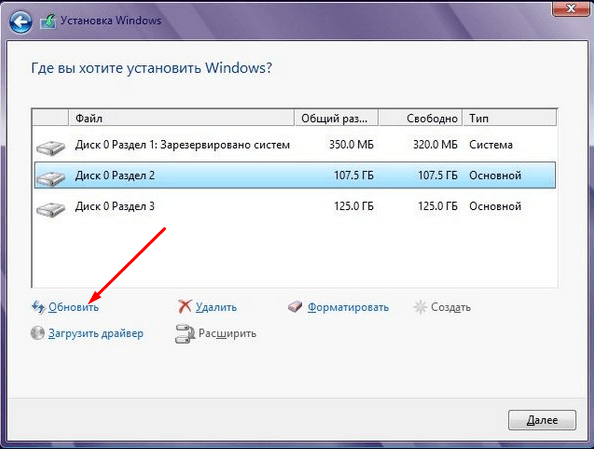
Выполняем команды для преобразование диска в GPT - Вернувшись к процессу установки, кликните по кнопке «Обновить», чтобы программа увидела, что диск был преобразован в нужный формат. Готово, можно продолжить установку.

Нажимаем кнопку «Обновить»
Изменение формата диска на MBR с помощью сторонней программы
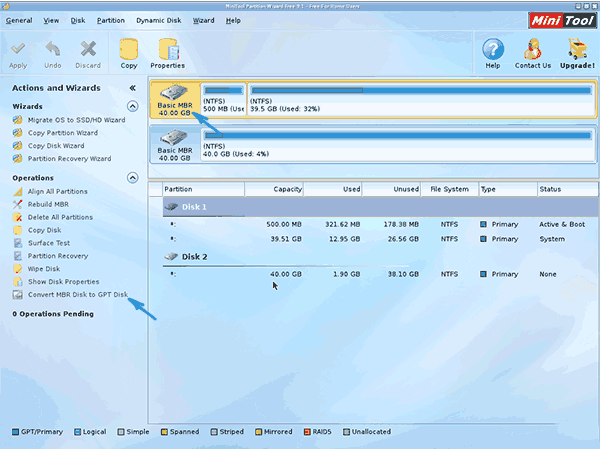
Для преобразования с помощью сторонней программы можно использовать приложение Minitool Partition Wizard Bootable, образ которого нужно скачать с официального сайта разработчика и записать на флешку, отформатированную в формате FAT32. Преимущество этого способа заключается в том, что вам не придётся удалять данные с диска, чтобы преобразовать его.
- После создания флешки с программой войдите в BIOS или Boot Menu и измените порядок загрузки так, чтобы на первом месте стоял нужный носитель. То есть сделайте то же самое, что делали для установки Windows, но для другой флешки. После того как программа загрузится, выберите нужный диск или все его разделы и кликните по кнопке Convert MBR Disk to GPT Disk.

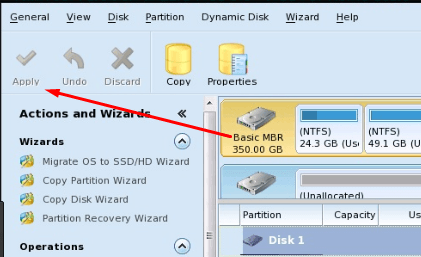
Кликаем по кнопке Convert MBR Disk to GPT Disk - Используйте кнопку Apply, чтобы начать операцию по преобразованию. Перевод диска в GPT формат может длиться более десяти минут, если на нём хранится много информации. Не прерывайте процесс, чтобы не вызвать дополнительных проблем.

Кликаем по кнопке Apply - Если при попытке начать конвертацию вы получаете уведомление о том, что выбранный диск является системным и изменять его нельзя, то выделите раздел диска, который обычно занимает 300–500 МБ, и кликните по кнопке Delete, чтобы удалить его. На нём расположены точки восстановления системы, которые не всегда можно конвертировать, поэтому их стоит удалить. После окончания очищения вернитесь к преобразованию и завершите процесс.

Удаляем разделы, кликнув по кнопке Delete
После того как диск будет преобразован в GPT формат, снова войдите в Boot Menu и загрузитесь с установочного носителя, чтобы вернуться к установке Windows 10.
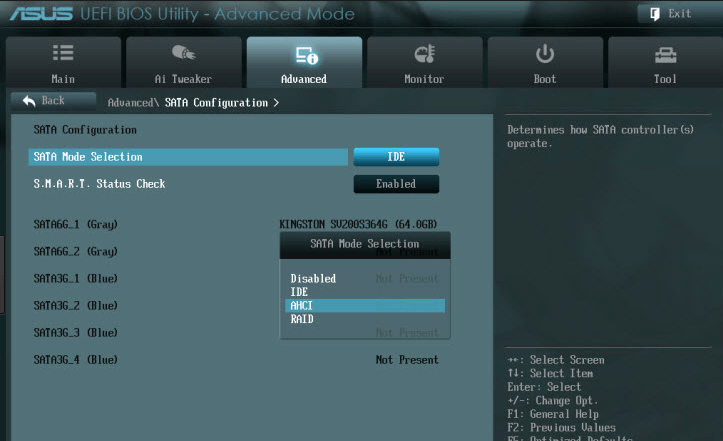
Система не устанавливается на SSD диск
Причина, по которой установить Windows на SSD диск не получается, скорее всего, заключается в том, что в BIOS установлен режим работы IDE вместо требуемого ACHI. Чтобы это исправить это, выполните следующие действия:
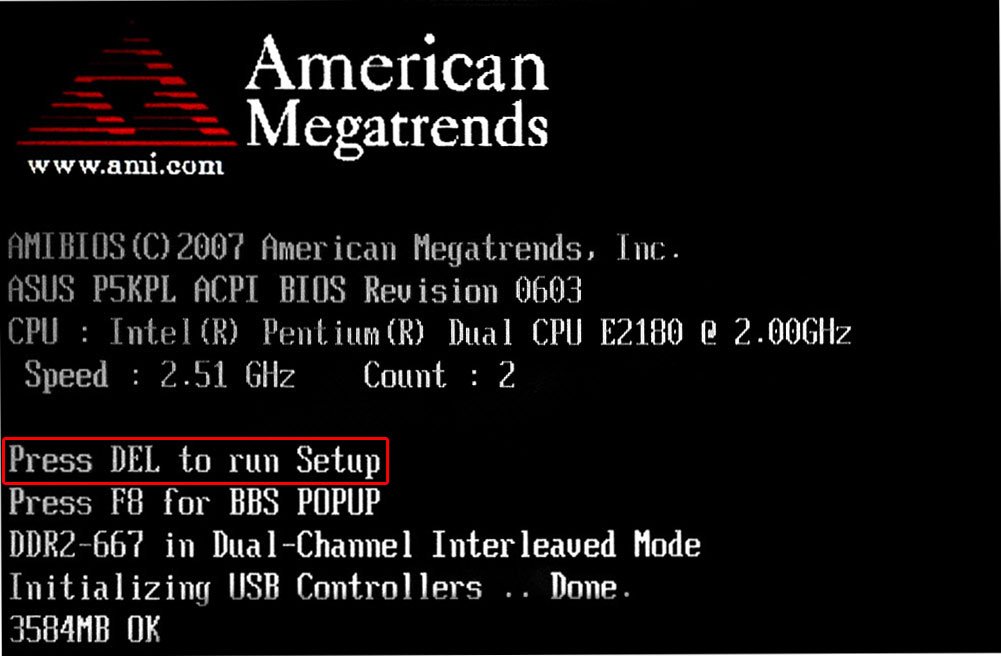
- Во время включения компьютера нажмите несколько раз клавишу Delete на клавиатуре, чтобы войти в BIOS. Для входа в меню настроек может использоваться и другая кнопка, это зависит от модели материнской платы, но во время загрузки компьютера на экране появляется сноска, в которой будет сказано, как войти в BIOS.

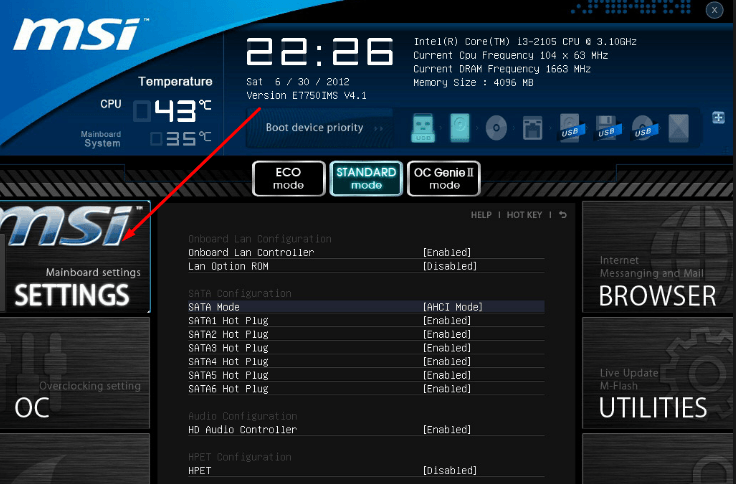
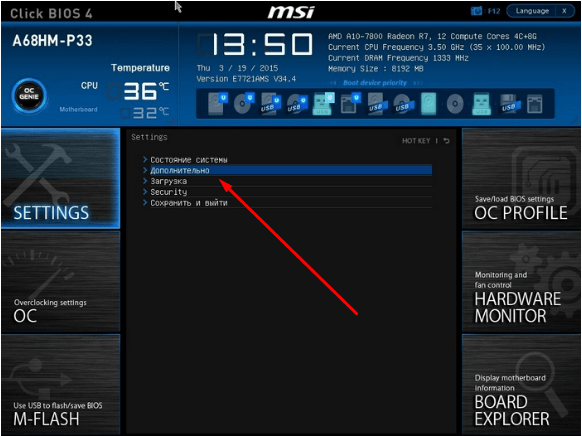
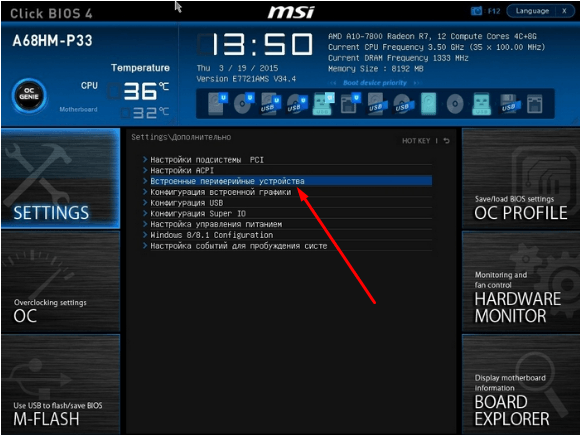
Входим в BIOS - После входа в BIOS вы увидите либо стандартный BIOS, либо более новую его версию UEFI. Также возможны варианты наличия русского языка и его отсутствия. Разделы в разных версиях BIOS могут называться по-разному, поэтому главная ваша задача — найти переключатель режима c IDE на ACHI. В одной из версий UEFI это делается так: сначала перейдите к разделу Setting.

Заходим в раздел Setting - Перейдите к дополнительным настройкам.

Открываем дополнительные настройки - Откройте подраздел «Встроенные периферийные устройства».

Входим в раздел «Встроенные периферийные устройства» - В блоке «Конфигурация SATA» найдите нужную строку и измените режим на ACHI. Готово, осталось выйти из BIOS, сохранив все внесённые изменения, и можно возвращаться к установке новой ОС.

Изменяем режим SATA на ACHI
Если изменение режима не помогло, то причину можно искать в следующих параметрах:
- к компьютеру подключено несколько дисков, это может вызывать сбой при установке, поэтому оставьте только один из них и попробуйте повторить установку снова;
- флешка, с которой производится установка, была отформатирована в формате NTFS, а не в FAT32, подходящем для SSD дисков. В этом случае нужно заново переформатировать носитель и снова записать на него образ системы;
- если ничего из вышеперечисленного не помогло, то попробуйте произвести установку с диска, иногда это помогает решить проблему.
В процессе установки появляется синий экран
Синий экран с текстом и описанием ошибки возникает в том случае, если программа установки наткнулась на непреодолимую ошибку и не может продолжить процесс. В этом случае она автоматически сотрёт все уже установленные файлы обновления и откатит систему до того момента, когда процедура установки ещё не была начата.

После того как откат закончится, вы можете заново начать установку. Возможно, на этот раз она пройдёт стабильно. Если нет, синий экран появился снова, нужно возвращаться к уже существующей на диске системе и удалять в ней все ненужные приложения и отключать все лишние подключённые к компьютеру устройства. Скорее всего, система не может корректно установить обновления именно из-за сторонних программ и устройств.
Если это не поможет, то скопируйте всю важную информацию с диска на сторонний носитель, и перейдите к ручной установке, во время которой можно удалить всю информацию с диска. Так и сделайте, сотрите все данные с разделов диска и проведите установку Windows 10 на чистый раздел.
В процессе установки появляется чёрный экран
Если во время установки системы появляется чёрный экран, на котором не отображается ничего или отображается только курсор мышки, то причин для такого поведения компьютера может быть несколько:
- первым делом, проверьте, не отошёл ли монитор, работает ли он. Скорее всего, причина не в этом, но проверить стоит;
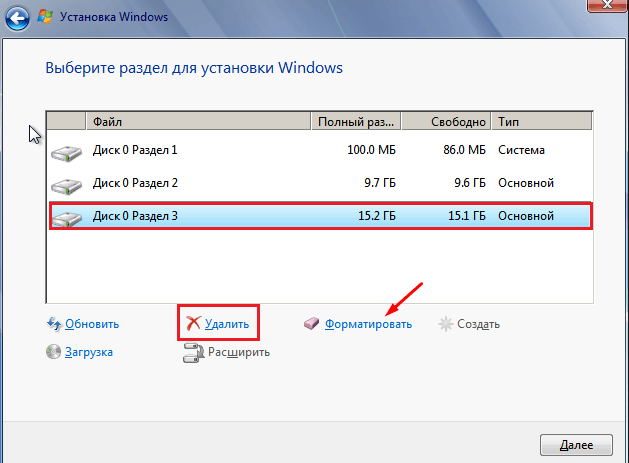
- процесс был прерван, завершён некорректно или наткнулся на какое-то системное повреждение, которое привело к его резкому обрыванию. Если у вас есть возможность, то выключите компьютер и начните процедуру установки заново. Выберите не обновление системы, а ручную установку, чтобы получить возможность очистить диск. Когда откроется окошко управления разделами диска, отформатируйте все блоки по очереди, данные с них будут удалены, но установка пройдёт корректно, так как ей не на чём будет споткнуться;

Кликаем по кнопке «Форматировать», чтобы очистить раздел - ещё одна причина появления чёрного экрана — обновления прошло успешно, но драйвера видеокарты для Windows 10 не подходят, поэтому она не может отобразить информацию на экран. Чтобы это исправить, необходимо загрузиться в безопасном режиме и установить последнюю версию драйверов. Как это сделать, описано ниже в статье.
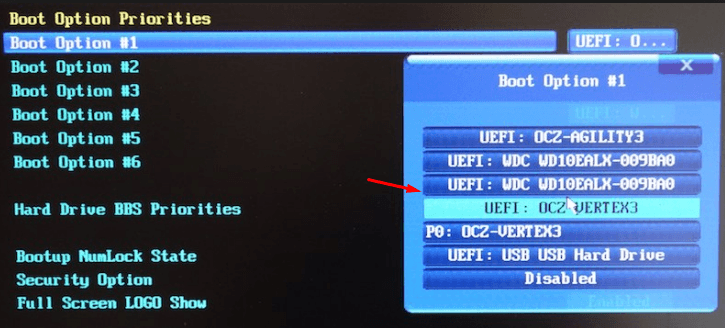
- перед установкой был выбран неправильный режим в BIOS. Возможно, модель вашей материнской платы поддерживает более новую версию BIOS — UEFI, поэтому во время изменения порядка загрузки на первое место нужно ставить установочный носитель, имя которого начинается с UEFI или EFI. Если вы этого не сделали, то установка пройдёт некорректно.

На первое место устанавливаем носитель UEFI
Но перед тем как решать проблему, просто подождите, возможно, система ещё производит процесс обновления в фоновом режиме. Задумываться о том, что пора решать проблему вручную, стоит, только если чёрный экран не двигается дольше, чем полчаса.
Обновление драйверов
- Чтобы войти в безопасный режим, мы воспользуемся командной строкой. Чтобы её вызвать, снова вернитесь к программе установки Windows 10, для этого выключите компьютер, зажав кнопку Power на 10–15 секунд, и включите его. После того как программа будет открыта, используйте комбинацию клавиш Shift+F10 для запуска командной строки.

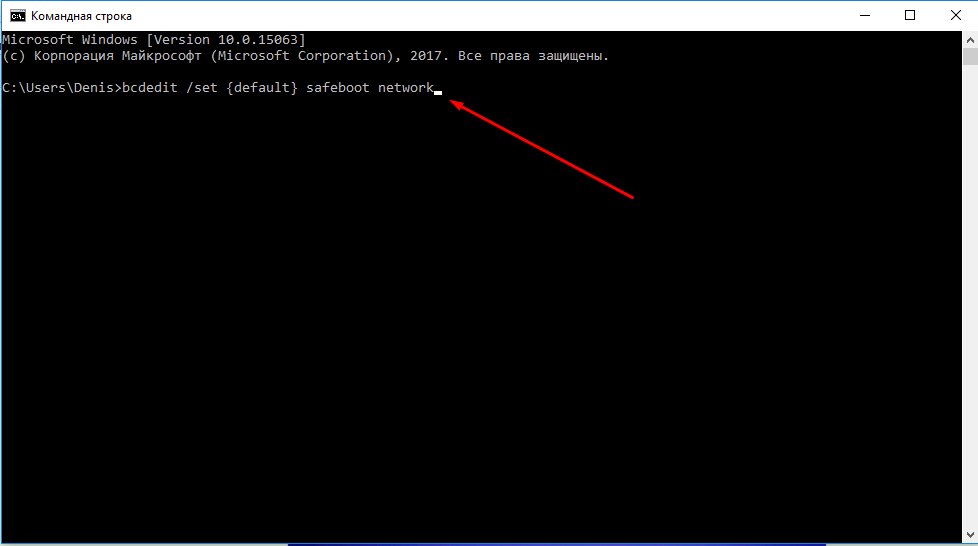
Активируем командную строку комбинацией Shift+F10 - Выполните команду bcdedit /set {default} safeboot network, потом команду shutdown /r и, когда вас попросят, подтвердите действие, нажав ещё раз клавишу Enter. Компьютер самостоятельно перезагрузится и включится в безопасном режиме.

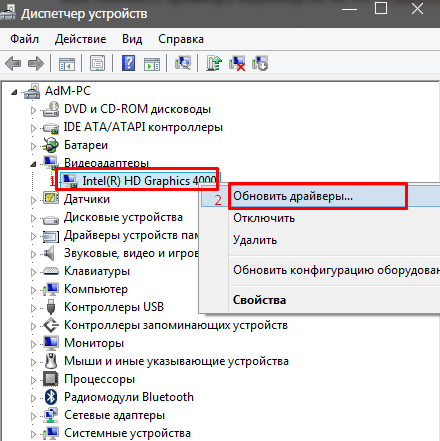
Выполняем команды bcdedit /set {default} safeboot network и shutdown /r - Когда включение завершится, откройте диспетчер устройств, найдите в общем списке видеокарту и, кликнув по ней правой кнопкой мыши, выберите пункт «Обновить драйвера». Пройдите процесс автоматического обновления или, если компьютер не сможет сам найти драйвера, скачайте их с официального сайта компании, создавшей видеокарту, и установите вручную.

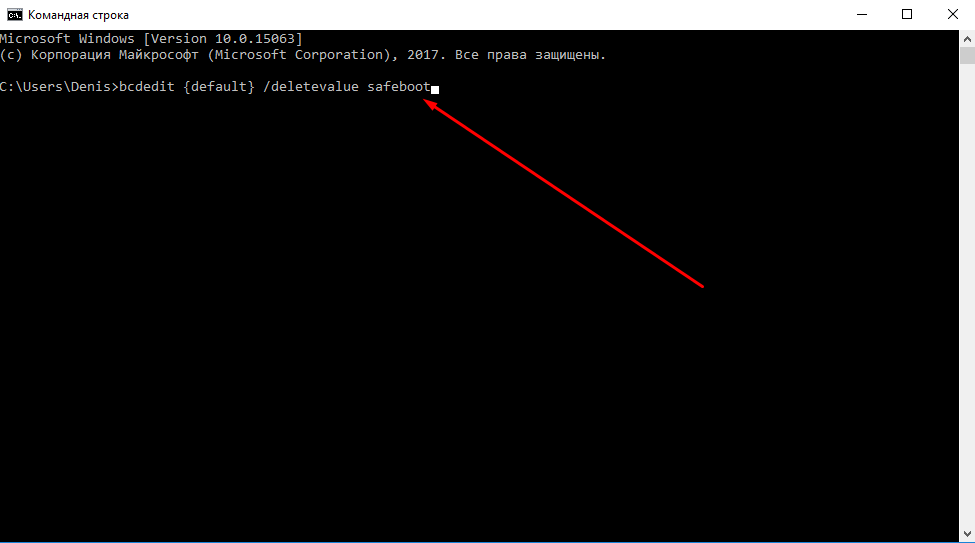
Обновляем драйвера видеокарты вручную или автоматически - После окончания обновления драйверов запустите командную строку с правами администратора, выполните команду bcdedit {default} /deletevalue safeboot, чтобы деактивировать автоматический запуск в безопасном режиме, выключите компьютер и вернитесь к процессу обновления до Windows 10.

Выполняем команду bcdedit {default} /deletevalue safeboot
Что делать, если процесс установки зависает
Процесс установки может зависнуть на следующих этапах:
- во время появления логотипа Windows;
- на этапе подготовки файлов;
- прямо во время установки, когда на экране отображается, что процесс завершён на 0, 10, 99, 32% или другое количество процентов.
Учитывайте, что процесс установки может держаться на одном проценте до нескольких часов, если компьютер не особо мощный или перегружен файлами. Поэтому сначала подождите не меньше двух часов, и только если после этого ничего не произойдёт, можете приступать к ручному устранению проблемы.
Однозначно сказать, почему зависание произошло в вашем случае, сказать нельзя, поэтому проверьте все варианты, которые могут вызвать зависание, поочерёдно:
- Отключите все лишние устройства от компьютера, оставьте подключёнными только клавиатуру, мышку и монитор. Также выньте лишние SATA кабели, идущие к порту для CD-дисков, и USB-флешки.
- Проверьте правильность настроек BIOS и правильность формата установочного носителя. Помните, что для SSD и HDD диска, BIOS и UEFI, GTP и MBR формата параметры будут отличаться. Где-то нужно включить режим ACHI, а где-то IDE, где-то форматировать в FAT32, а где-то в NTFS и так далее. Ориентируясь на тип и формат жёсткого диска, а также версию BIOS, найдите подходящие для вашей сборки характеристики в интернете и установите их.
- Перед тем как перейти к обновлению до Windows 10 не забудьте установить все доступные обновления на уже установленную операционную систему. Сделать это можно через встроенную программу «Центр обновлений», присутствующую и в Windows 7, и в Windows1, и в более старых версиях.
- Если установка зависает при использовании USB-флешки в качестве установочного носителя, то попробуйте произвести установку с CD-диска.
- Не забудьте убедиться в том, что ваш компьютер соответствует минимальным требованиям Windows 10, они представлены на официальном сайте Microsoft.
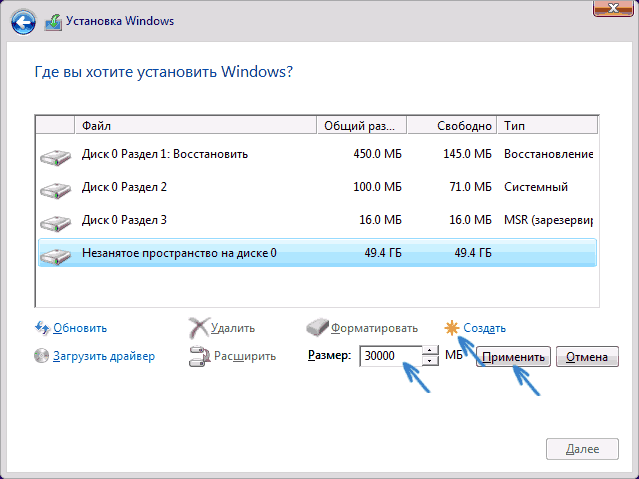
- Если не получатся установить систему поверх старой, уже установленной, Windows, то на шаге по управлению разделами жёсткого диска отформатируйте все блоки и установите Windows 10 на полностью чистый диск.
- Если вы устанавливаете систему не на чистый жёсткий диск, то удалите антивирус, он может помешать обновлению. Также сотрите все программы, вносящие изменения в интерфейс и другие системные параметры системы.
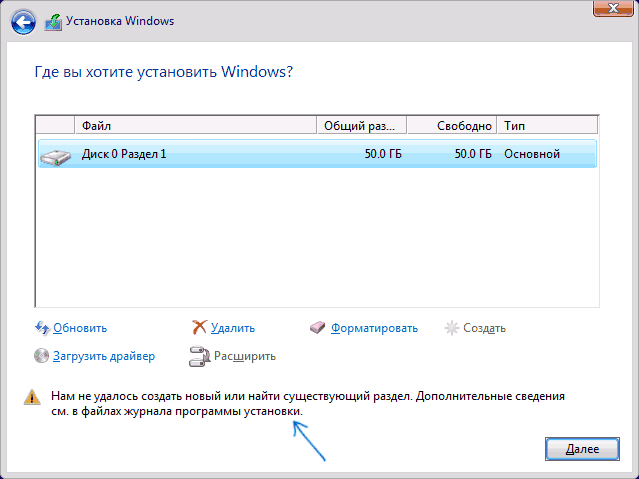
Ошибка «Не удалось создать новый раздел»
При ручной установке Windows иногда возникает ошибка, в которой говорится о том, что создать или найти существующий раздел невозможно. Появляется она, потому что на диске нет нераспределённой памяти и разделов, которые можно было бы отдать под установку операционной системы. Выход из этой ситуации: создать нужные разделы вручную. Сделать это можно двумя способами: через удаление уже имеющихся разделов и создание новых или через сокращение существующих разделов и распределение освободившейся памяти.
Стандартный метод
Удалить разделы и создать новые вы можете прямо в том же окошке, в котором получили ошибку.
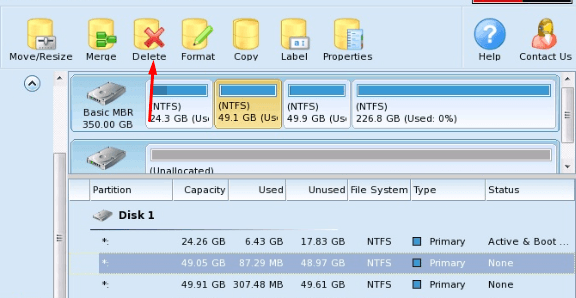
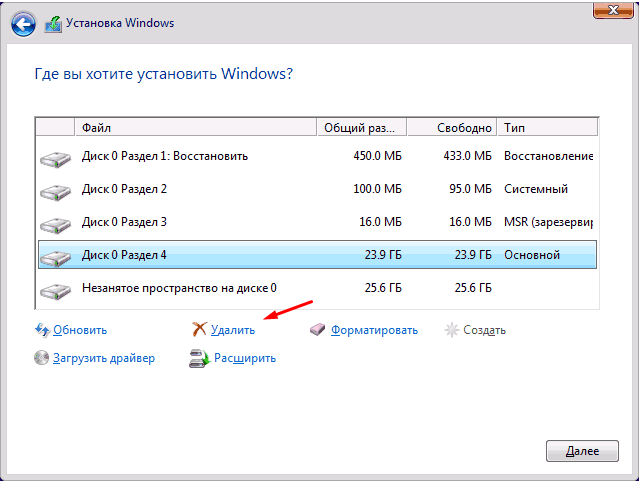
- Выберите имеющийся раздел с большим количеством памяти и кликните по кнопке «Удалить». Учтите, что все данные с него будут удалены. Если вы хотите сохранить информацию с раздела, то воспользуйтесь вторым способом, приведённым ниже.

Нажимаем кнопку «Удалить», чтобы стереть раздел - Освободившееся место попадёт в раздел «Нераспределённая память». Выберите этот раздел и кликните по кнопке «Создать», укажите, сколько места отведётся под создаваемый раздел и завершите процесс. Для системного раздела достаточно 700 МБ, но это минимальный порог, рекомендуется отвести под него хотя бы 20–40 ГБ, в лучше больше, так как рано или поздно он начнёт засоряться, а очистить системный раздел очень сложно. Оставшуюся память можно разбить на сколько угодно разделов или оставить нераспределённой.

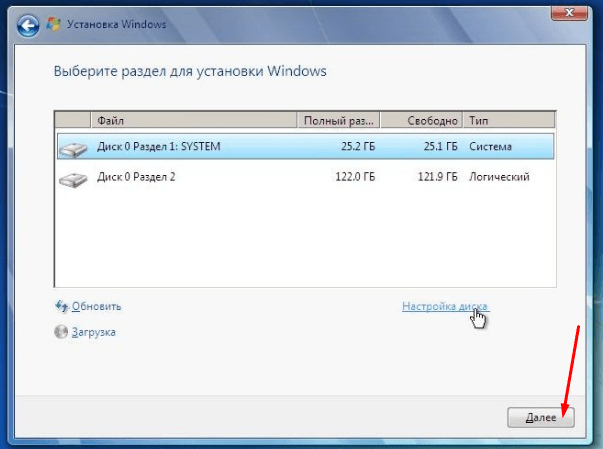
Нажимаем кнопку «Создать» и создаем новый раздел - Готово, выберите созданный вами раздел и установите на него Windows.

Нажимаем кнопку «Далее» и выполняем установку

Через командную строку
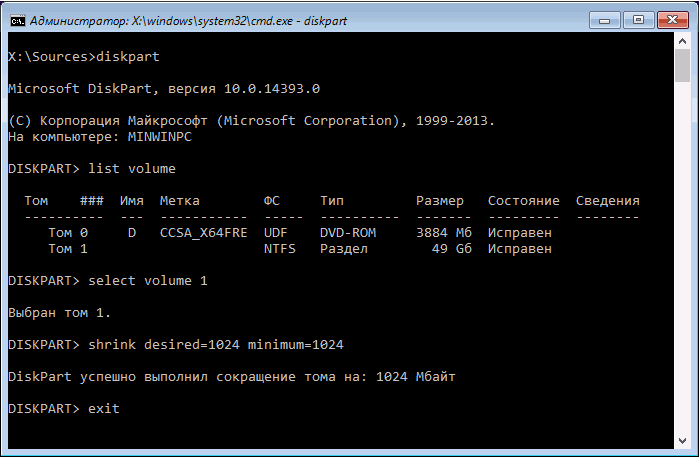
Используя командную строку, вы можете не удалять разделы, а сжимать их, не теряя при этом файлы, которые на нём находятся.
- Для перехода из процесса установки в командную строку используйте комбинацию клавиш Shift+F. В открывшемся окошке командной строки последовательно выполните следующие команды: diskpart — для перехода к работе с дисками, list volume — открывает список разделов жёстких дисков, вы должны выбрать из списка нужный и запомнить его номер, select volume X — выбор раздела, где X — его номер, полученный предыдущей командой, shrink desired=Y minimum=Y — сокращение раздела на указанное количество МБ, где Y– количество МБ, exit — выход из командной строки.

Выполняем команды, чтобы сжать раздел и освободить место - После выхода из командной строки вы вернётесь к управлению дисками и увидите, что появился новый раздел или нераспределённая память. Распределите её, кликнув по кнопке «Создать». Для системного раздела достаточно 700 МБ, но это минимальный порог, рекомендуется отвести под него хотя бы 20–40 ГБ, в лучше больше, так как рано или поздно он начнёт засоряться, а очистить системный раздел очень сложно. Оставшуюся память можно разбить на сколько угодно разделов или оставить нераспределённой.
Создаем новый раздел из нераспределённой памяти
Установка вызывает повторяющуюся перезагрузку компьютера
Компьютер перезагружается во время установки — это нормально, он может перезагрузиться пять — шесть раз, чтобы корректно настроить все нужные элементы. Но если эта операция повторяется слишком много раз, то нужно прерывать процесс вручную, возвращаться к уже установленной системе и выполнять следующие действия:
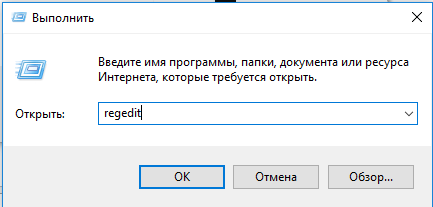
- Комбинацией Win+R вызовете окошко «Выполнить» и выполните в нём команду regedit, чтобы перейти к редактору реестра.

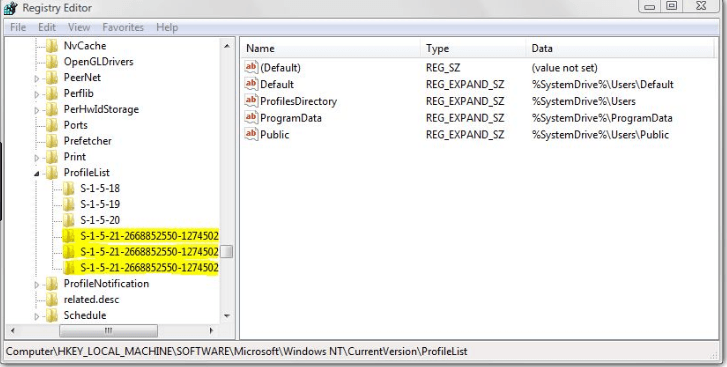
Выполняем команду regedit - Перейдите по пути HKEY_LOCAL_MACHINESOFTWAREMicrosoftWindows NTCurrentVersionProfileList. В нём находится список существующих учётных записей. Удалите те, которые вы не используете. Незадействованные аккаунты могли остаться от предыдущих систем. Стирайте аккуратно, чтобы не повредить актуальные учётные записи. После удаления всего лишнего вернитесь к установке системы и завершите её.

Стираем файлы, относящиеся к лишним учетным записям
Не появляется окно установочной программы
Если вы столкнулись с тем, что у вас не появляется окошко установочной программы, то выполните инструкции из пункта «Что делать, если процесс установки зависает», описанного выше в статье.

Драйверы устройства не найдены
Ошибка, сообщающая, что драйвера устройства не найдены, появляется при попытке установить Windows 10 по следующим причинам:
- Флешка USB0 подключена к порту 3.0 или, наоборот, флешка USB 3.0 подключена к порту 2.0. Переключите её в нужный порт и повторите установку.
- Образ системы был записан некорректно или был повреждён изначально. Перезапишите его. Лучше используйте нестандартную программу Microsoft, а записывайте образ с помощью UltraISO.
- Используйте для установки диск, а не флешку.
Итог: используйте другой носитель, порт или образ, чтобы избавиться от этой ошибки.
Ошибки с кодом при установке Windows 10
Если во время установки Windows возникают ошибки, в описании которых присутствует уникальный код, то лучшим выходом в этой ситуации станет поиск решения именно по этому коду. Ориентируясь на уникальный номер, который обычно выглядит примерно как 0xc1900101, вы сможете найти решение именно под ваш случай. Если в интернете его не будет, то обратитесь в официальную службу поддержки Microsoft и назовите им этот код, они предоставят вам инструкции по дальнейшим действиям.

Видео: проблемы во время установки Windows 10 и их решение
Итак, если во время установки Windows 10 возникают ошибки или процесс не доходит до конца, зависает или прерывается, то в первую очередь нужно проверить правильность настройки BIOS, установочного носителя и жёсткого диска. Следующий шаг — проверка компонентов компьютера и драйверов к ним. Лучший выход — очищение диска при помощи форматирования и установка системы на чистый раздел при помощи официальной программы Microsoft.
- Распечатать
Оцените статью:
- 5
- 4
- 3
- 2
- 1
(28 голосов, среднее: 4.1 из 5)
Поделитесь с друзьями!
Синий экран во время установки Windows
Привет всем читателям блога.Коротко сегодня хотел бы рассказать об ошибке, когда установщик вылетает в синий экран (BSoD),в самом начале установки Windows,(на ноутбуках частенько.)
Как исправить эту ошибку
Самое интересное то, что Винда еще не установлена, а БСоД уже тут как тут.
Исправляется очень просто – переключением режимов работы
жесткого диска с AHCI на IDE.
Как это сделать?
Необходимо перезагрузить компьютер, войти в БИОС (клавиша Del или F2),
найти строку, содержащую SATA в названии (чаще всего, SATA Mode),
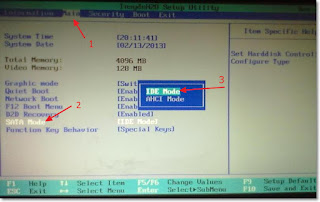
после чего сменить ее значение с AHCI на IDE.
Нажмите F10 для сохранения изменений и выйдите из BIOS.
Теперь все должно пройти нормально.
Как получать обновления для Windows XP,читайте далее
Как устранить наиболее частые ошибки Windows читайте далее
Вот так можно исправить эту ошибку.