Sometimes, you might encounter the USB driver error code 52: Windows cannot verify the digital signature for the drivers required for this device. Luckily, you can fix it by yourself. In this article, MiniTool Partition Wizard puts together some solutions to this issue and hope you can benefit from them.
Windows Digital Signatures
Based on Microsoft public key infrastructure technology, the Windows digital signatures are implemented to verify the identity of the software publisher or the driver vendor. The digital signature can protect your Windows from potential threats and infections of some malicious programs.
According to the explanation from Microsoft, Windows uses a valid digital signature to verify some information, including:
- The file, or the collection of files (such as a driver package), is signed.
- The signer is trusted.
- The certification authority that authenticated the signer is trusted.
- The collection of files was not altered after it was published.
In order to be installed and run on the latest Windows operating system, the drivers and programs must be digitally signed. However, there are still some legitimate programs or drivers that are not signed, and you may encounter certain problems while installing them.
About Windows Cannot Verify the Digital Signature Code 52
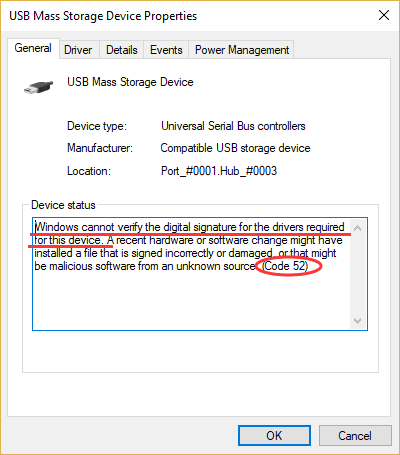
Sometimes, your USB ports might fail to recognize any hardware connected to your device, and you will see the error code 52 in the properties of the USB driver. The USB driver code 52 is a typical error related to the digital signature. It commonly occurs after updating or upgrading Windows and comes up with the following error message:
Windows cannot verify the digital signature for the drivers required for this device. A recent hardware or software change might have installed a file that is signed incorrectly or damaged, or that might be malicious software from an unknown source. (Code 52)
Besides, you might receive some other different error messages related to Windows digital signature, such as “Windows cannot verify the digital signature for this file. (0xc0000428)”, “Digital Signature not found”, and so on.
If you receive the digital signature error unluckily, take it easy. Some feasible solutions reported by the users are listed in the following contents, and you can work your way down the list until you fix the issue effectively.
7 Solutions to Windows Cannot Verify the Digital Signature
- Modify windows registry
- Update or uninstall the problematic driver
- Use System File Checker utility
- Scan for file system errors
- Disable integrity checks
- Disable driver signature enforcement
- Perform system restore
Fix 1: Modify Windows Registry
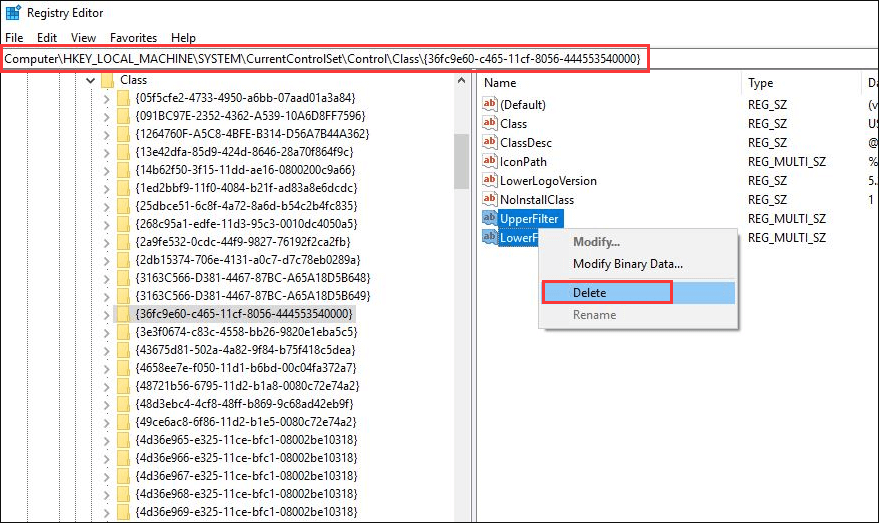
In most cases, this issue is caused by 2 registry entries named UpperFilters and LowerFilters, and some users have fixed the problem simply by deleting them. So, if you receive the “Windows cannot verify the digital signature for the drivers required for this device” error message, try deleting these registries at first. The steps are listed below.
Note: This is a risky solution as any improper operations for registries might bring unrecoverable damage for your system. Therefore, you had better back up your Windows registry in advance, so that you can restore the registry to the original status if this solution doesn’t work.
Step 1: Press Windows + R to invoke Run window. Type regedit and click OK to open Registry Editor.
Step 2: Navigate to the following path: ComputerHKEY_LOCAL_MACHINESYSTEMCurrentControlSetControlClass{36fc9e60-c465-11cf-8056-444553540000}.
Step 3: Keep the {36fc9e60-c465-11cf-8056-444553540000} key selected, and find the UpperFilters and LowerFilters entries in the right pane. Right-click them and choose Delete.
Step 4: Click OK to confirm the operation. Restart your computer and check if the error code 52 disppears.
Fix 2: Update or Uninstall the Problematic Driver
If this is just related to a specific device driver, perhaps the problem lies on the driver itself. In this case, it should be helpful to update or uninstall the problematic driver. You can follow the instructions below:
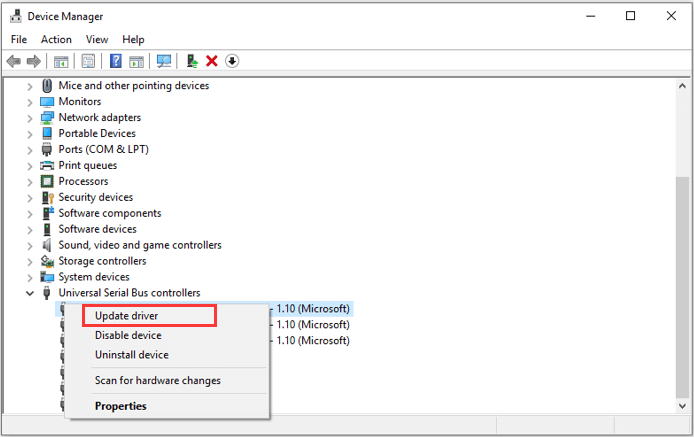
Step 1: Right-click the Start button and choose Device Manager to open it.
Step 2: Double-click Universal Serial Bus controllers to expand the category.
Step 3: Locate the problematic USB driver. Commonly, the device driver which runs into the error code 52 will be displayed with a yellow exclamation mark in Device Manger, and it may be named as Unknown USB Device.
Step 4: Right-click the problematic driver and choose Update driver.
Step 5: Choose the Search automatically for updated driver software option to proceed. If there are any updates detected, install them according to the onscreen instructions and then reboot your computer.
Note: If there are more than one problematic driver, perform the operation for the left drivers to make sure all of them are of the latest version.
Alternatively, you can also choose to uninstall the driver, which has effectively removed the USB error code 52 for some users. Just right-click the driver, choose Uninstall device, and click Uninstall to confirm the operation. Then, restart your system, and the default driver will be reinstalled automatically.
Fix 3: Use System File Checker Utility
The corrupted or missing system files could also trigger the “Windows cannot verify the digital signature for this file/driver” error message. To resolve the problem, you can use the built-in System File Checker utility referring to the tutorial below.
Step 1: Open Run window.
Step 2: Input cmd and press Ctrl + Shift + Enter to run Command Prompt as administrator.
Step 3: Type the command sfc /scannow in the console and press Enter to execute it.
Then, this tool will start scanning your system files and automatically replace the problematic files with a fresh cached copy. All you need to do is to wait patiently until the process is 100% completed. After that, restart your device and check if the USB error code 52 is resolved.
Fix 4: Scan for File System Errors
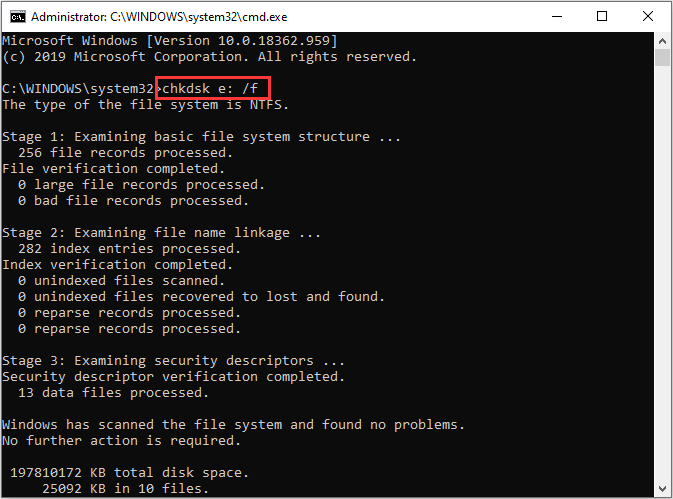
It’s said that this issue might have something to do with the file system error. So, you can try scanning your drives for file system errors and fixing them.
To do that, you can use the CHKDSK tool. Just launch Command Prompt with administrative privileges, input the command chkdsk e: /f, and press Enter. Restart your computer after the process is completed.
Tip: You need to replace e: with the drive letter of the partition you want to scan for. If you execute the command chkdsk /f without a drive letter, this tool will automatically check and fix the current drive (the system drive in almost all cases), which will require a reboot.
Besides, you can also use a professional program to check and fix file system errors for your hard drive. Here, MiniTool Partition Wizard is recommended for you. It can help you recover lost data, back up Windows, and of course, deal with the file system issues within a few clicks. Just click the following button to download it to have a try.
Free Download
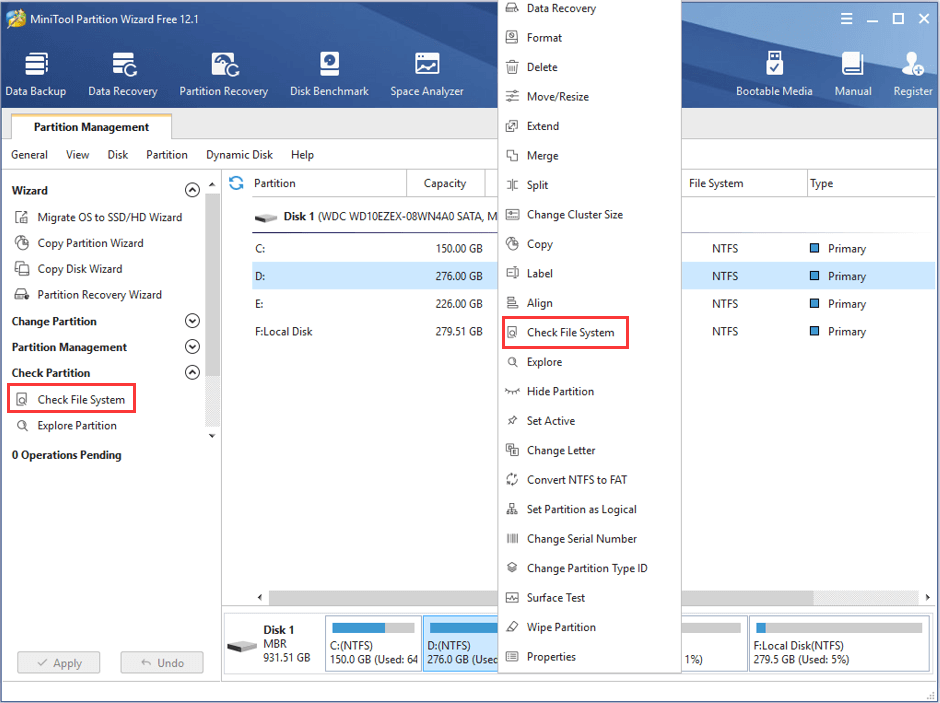
Step 1: Download and install MiniTool Partition Wizard Free on your computer. Launch it to get the main interface.
Step 2: Select the drive you want to scan for and choose Check File System feature from the left action panel. You can also activate this feature by selecting Check File System from the context menu after right-clicking the drive.
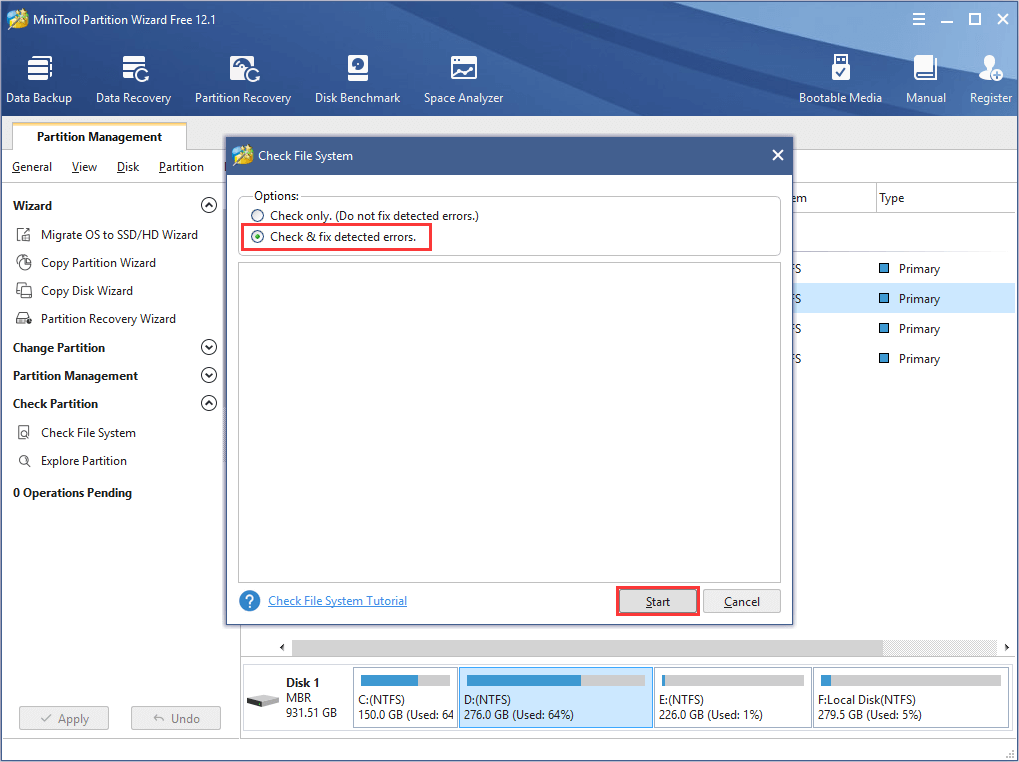
Step 3: In the pop-up window, choose Check & fix detected errors option and click Start button.
Fix 5: Disable Integrity Checks
As mentioned before, the “Windows cannot verify the digital signature for the drivers required for this device” error message appears when your Windows is trying to verify the digital signature and integrity of the device. In theory, disabling this option may resolve the problem and enable you to install the driver of the device again.
To disable integrity checks, you need to:
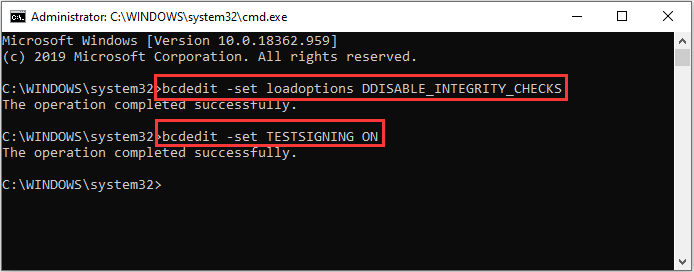
Step 1: Run Command Prompt as administrator.
Step 2: Input the following command lines and press Enter key after each to execute them:
- bcdedit -set loadoptions DDISABLE_INTEGRITY_CHECKS
- bcdedit -set TESTSIGNING ON
Step 3: Go to check if the USB error code 52 is fixed or not. If this doesn’t work, open the command console again and execute the following command lines this time:
- bcdedit /deletevalue loadoptions
- bcdedit -set TESTSIGNING OFF
Fix 6: Disable Driver Signature Enforcement
If the above methods fail to resolve the issue for you, perhaps you can disable driver signature enforcement. In this way, you will be able to install drivers for the problematic devices bypassing Windows checking for the signatures.
Here’s a simple guide.
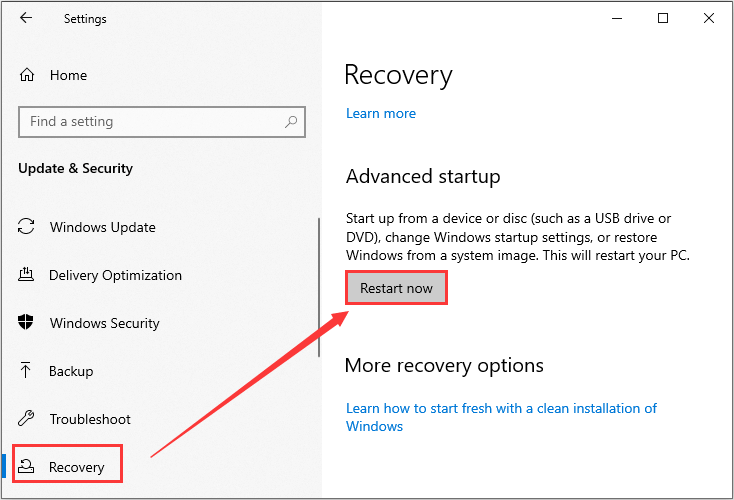
Step 1: Press Windows + I to open Settings.
Step 2: Go to Update & Security > Recovery and click Restart now button under Advanced startup section in the right pane.
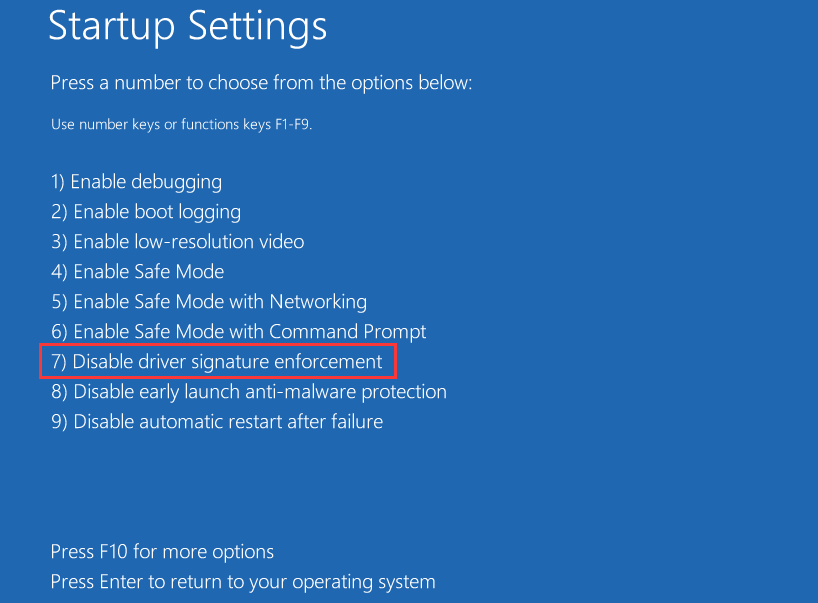
Step 3: When you enter Windows Recovery Environment, navigate to Troubleshoot > Advanced options > Startup Settings and then click Restart button.
Step 4: When you get the following interface, press 7 or F7 to choose the Disable driver signature enforcement option.
Then, your Windows will boot up automatically. You need to open Device Manager and try updating the problematic drivers referring to the steps mentioned above. Now, the USB error code 52 should be resolved.
For more information about driver signature enforcement and how to disable it, you can read this article: How to Disable Driver Signature Enforcement? Try These Methods.
Fix 7: Perform System Restore
Finally, you can perform system restore to bring your Windows back to a previous status, which may help you get rid of the “Windows cannot verify the digital signature for the drivers required for this device” issue.
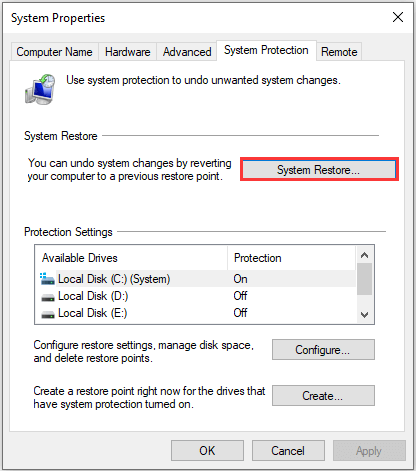
Step 1: Open Run dialog, input sysdm.cpl and click OK to access System Properties.
Step 2: Switch to the System Protection tab and click System Restore.
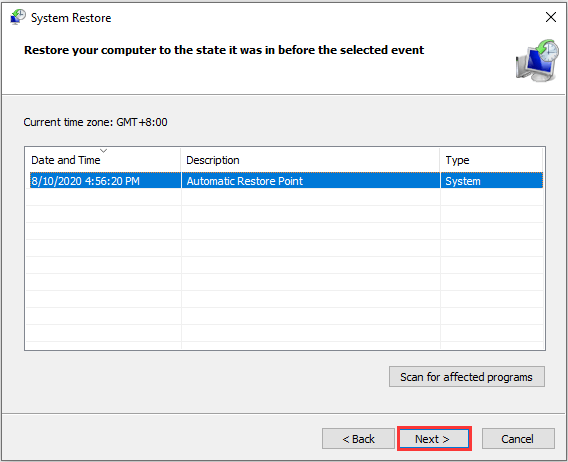
Step 3: Click Next to skip the welcome page. Then, choose a restore point and click Next button.
Tip: You can click Scan for affected programs to check the applications or services to be removed during the process.
Step 4: Click Finish button to confirm the operation, and a restart will be required to apply the changes.
Hopefully, the Windows digital signature issue will be removed successfully.
Here are 7 feasible methods to get rid of the “Windows cannot verify the digital signature for the drivers required for this device” error.Click to Tweet
Bottom Line
Have you resolved the “Windows cannot verify the digital signature for this file/driver” issue with the solutions introduced in this article? All we know about how to fix the issue is in this post. If you have better solutions, please leave a message in the comment zone below. We are desired to improve this article with your valuable suggestions.
If you want to explore more features of MiniTool Partition Wizard, you can check the user manual. For any questions, you can contact us via [email protected].
Windows Cannot Verify the Digital Signature FAQ
Can I install a driver without a digital signature?
To install a driver and make it work properly on your computer, the driver should be officially signed. But sometimes, you may want to install a drier without a digital signature. Yes, you can force an unsigned driver to install, but it may take some time. For the detailed information, you can check this guide.
How do I fix an invalid digital signature?
If you encounter the invalid digital signature installation error, you can try the following solutions:
- Make sure the downloaded executable is unblocked.
- Install the certificates manually through the properties of the executable file.
- Consult your group policy admin to temporarily disable restriction for the authentication of certificates.
What is the difference between signed and unsigned drivers?
The signed driver with a correct digital signature indicates that it is not damaged, corrupted, manipulated, or changed, and it is safe to use. It can be installed and work properly on Windows. The unsigned driver will be considered as a potentially malicious item by the system and it cannot be installed properly.
A signed driver might also turn to unsigned if its signature becomes invalid due to any tampering or changing.
Sometimes, you might encounter the USB driver error code 52: Windows cannot verify the digital signature for the drivers required for this device. Luckily, you can fix it by yourself. In this article, MiniTool Partition Wizard puts together some solutions to this issue and hope you can benefit from them.
Windows Digital Signatures
Based on Microsoft public key infrastructure technology, the Windows digital signatures are implemented to verify the identity of the software publisher or the driver vendor. The digital signature can protect your Windows from potential threats and infections of some malicious programs.
According to the explanation from Microsoft, Windows uses a valid digital signature to verify some information, including:
- The file, or the collection of files (such as a driver package), is signed.
- The signer is trusted.
- The certification authority that authenticated the signer is trusted.
- The collection of files was not altered after it was published.
In order to be installed and run on the latest Windows operating system, the drivers and programs must be digitally signed. However, there are still some legitimate programs or drivers that are not signed, and you may encounter certain problems while installing them.
About Windows Cannot Verify the Digital Signature Code 52
Sometimes, your USB ports might fail to recognize any hardware connected to your device, and you will see the error code 52 in the properties of the USB driver. The USB driver code 52 is a typical error related to the digital signature. It commonly occurs after updating or upgrading Windows and comes up with the following error message:
Windows cannot verify the digital signature for the drivers required for this device. A recent hardware or software change might have installed a file that is signed incorrectly or damaged, or that might be malicious software from an unknown source. (Code 52)
Besides, you might receive some other different error messages related to Windows digital signature, such as “Windows cannot verify the digital signature for this file. (0xc0000428)”, “Digital Signature not found”, and so on.
If you receive the digital signature error unluckily, take it easy. Some feasible solutions reported by the users are listed in the following contents, and you can work your way down the list until you fix the issue effectively.
7 Solutions to Windows Cannot Verify the Digital Signature
- Modify windows registry
- Update or uninstall the problematic driver
- Use System File Checker utility
- Scan for file system errors
- Disable integrity checks
- Disable driver signature enforcement
- Perform system restore
Fix 1: Modify Windows Registry
In most cases, this issue is caused by 2 registry entries named UpperFilters and LowerFilters, and some users have fixed the problem simply by deleting them. So, if you receive the “Windows cannot verify the digital signature for the drivers required for this device” error message, try deleting these registries at first. The steps are listed below.
Note: This is a risky solution as any improper operations for registries might bring unrecoverable damage for your system. Therefore, you had better back up your Windows registry in advance, so that you can restore the registry to the original status if this solution doesn’t work.
Step 1: Press Windows + R to invoke Run window. Type regedit and click OK to open Registry Editor.
Step 2: Navigate to the following path: ComputerHKEY_LOCAL_MACHINESYSTEMCurrentControlSetControlClass{36fc9e60-c465-11cf-8056-444553540000}.
Step 3: Keep the {36fc9e60-c465-11cf-8056-444553540000} key selected, and find the UpperFilters and LowerFilters entries in the right pane. Right-click them and choose Delete.
Step 4: Click OK to confirm the operation. Restart your computer and check if the error code 52 disppears.
Fix 2: Update or Uninstall the Problematic Driver
If this is just related to a specific device driver, perhaps the problem lies on the driver itself. In this case, it should be helpful to update or uninstall the problematic driver. You can follow the instructions below:
Step 1: Right-click the Start button and choose Device Manager to open it.
Step 2: Double-click Universal Serial Bus controllers to expand the category.
Step 3: Locate the problematic USB driver. Commonly, the device driver which runs into the error code 52 will be displayed with a yellow exclamation mark in Device Manger, and it may be named as Unknown USB Device.
Step 4: Right-click the problematic driver and choose Update driver.
Step 5: Choose the Search automatically for updated driver software option to proceed. If there are any updates detected, install them according to the onscreen instructions and then reboot your computer.
Note: If there are more than one problematic driver, perform the operation for the left drivers to make sure all of them are of the latest version.
Alternatively, you can also choose to uninstall the driver, which has effectively removed the USB error code 52 for some users. Just right-click the driver, choose Uninstall device, and click Uninstall to confirm the operation. Then, restart your system, and the default driver will be reinstalled automatically.
Fix 3: Use System File Checker Utility
The corrupted or missing system files could also trigger the “Windows cannot verify the digital signature for this file/driver” error message. To resolve the problem, you can use the built-in System File Checker utility referring to the tutorial below.
Step 1: Open Run window.
Step 2: Input cmd and press Ctrl + Shift + Enter to run Command Prompt as administrator.
Step 3: Type the command sfc /scannow in the console and press Enter to execute it.
Then, this tool will start scanning your system files and automatically replace the problematic files with a fresh cached copy. All you need to do is to wait patiently until the process is 100% completed. After that, restart your device and check if the USB error code 52 is resolved.
Fix 4: Scan for File System Errors
It’s said that this issue might have something to do with the file system error. So, you can try scanning your drives for file system errors and fixing them.
To do that, you can use the CHKDSK tool. Just launch Command Prompt with administrative privileges, input the command chkdsk e: /f, and press Enter. Restart your computer after the process is completed.
Tip: You need to replace e: with the drive letter of the partition you want to scan for. If you execute the command chkdsk /f without a drive letter, this tool will automatically check and fix the current drive (the system drive in almost all cases), which will require a reboot.
Besides, you can also use a professional program to check and fix file system errors for your hard drive. Here, MiniTool Partition Wizard is recommended for you. It can help you recover lost data, back up Windows, and of course, deal with the file system issues within a few clicks. Just click the following button to download it to have a try.
Free Download
Step 1: Download and install MiniTool Partition Wizard Free on your computer. Launch it to get the main interface.
Step 2: Select the drive you want to scan for and choose Check File System feature from the left action panel. You can also activate this feature by selecting Check File System from the context menu after right-clicking the drive.
Step 3: In the pop-up window, choose Check & fix detected errors option and click Start button.
Fix 5: Disable Integrity Checks
As mentioned before, the “Windows cannot verify the digital signature for the drivers required for this device” error message appears when your Windows is trying to verify the digital signature and integrity of the device. In theory, disabling this option may resolve the problem and enable you to install the driver of the device again.
To disable integrity checks, you need to:
Step 1: Run Command Prompt as administrator.
Step 2: Input the following command lines and press Enter key after each to execute them:
- bcdedit -set loadoptions DDISABLE_INTEGRITY_CHECKS
- bcdedit -set TESTSIGNING ON
Step 3: Go to check if the USB error code 52 is fixed or not. If this doesn’t work, open the command console again and execute the following command lines this time:
- bcdedit /deletevalue loadoptions
- bcdedit -set TESTSIGNING OFF
Fix 6: Disable Driver Signature Enforcement
If the above methods fail to resolve the issue for you, perhaps you can disable driver signature enforcement. In this way, you will be able to install drivers for the problematic devices bypassing Windows checking for the signatures.
Here’s a simple guide.
Step 1: Press Windows + I to open Settings.
Step 2: Go to Update & Security > Recovery and click Restart now button under Advanced startup section in the right pane.
Step 3: When you enter Windows Recovery Environment, navigate to Troubleshoot > Advanced options > Startup Settings and then click Restart button.
Step 4: When you get the following interface, press 7 or F7 to choose the Disable driver signature enforcement option.
Then, your Windows will boot up automatically. You need to open Device Manager and try updating the problematic drivers referring to the steps mentioned above. Now, the USB error code 52 should be resolved.
For more information about driver signature enforcement and how to disable it, you can read this article: How to Disable Driver Signature Enforcement? Try These Methods.
Fix 7: Perform System Restore
Finally, you can perform system restore to bring your Windows back to a previous status, which may help you get rid of the “Windows cannot verify the digital signature for the drivers required for this device” issue.
Step 1: Open Run dialog, input sysdm.cpl and click OK to access System Properties.
Step 2: Switch to the System Protection tab and click System Restore.
Step 3: Click Next to skip the welcome page. Then, choose a restore point and click Next button.
Tip: You can click Scan for affected programs to check the applications or services to be removed during the process.
Step 4: Click Finish button to confirm the operation, and a restart will be required to apply the changes.
Hopefully, the Windows digital signature issue will be removed successfully.
Here are 7 feasible methods to get rid of the “Windows cannot verify the digital signature for the drivers required for this device” error.Click to Tweet
Bottom Line
Have you resolved the “Windows cannot verify the digital signature for this file/driver” issue with the solutions introduced in this article? All we know about how to fix the issue is in this post. If you have better solutions, please leave a message in the comment zone below. We are desired to improve this article with your valuable suggestions.
If you want to explore more features of MiniTool Partition Wizard, you can check the user manual. For any questions, you can contact us via [email protected].
Windows Cannot Verify the Digital Signature FAQ
Can I install a driver without a digital signature?
To install a driver and make it work properly on your computer, the driver should be officially signed. But sometimes, you may want to install a drier without a digital signature. Yes, you can force an unsigned driver to install, but it may take some time. For the detailed information, you can check this guide.
How do I fix an invalid digital signature?
If you encounter the invalid digital signature installation error, you can try the following solutions:
- Make sure the downloaded executable is unblocked.
- Install the certificates manually through the properties of the executable file.
- Consult your group policy admin to temporarily disable restriction for the authentication of certificates.
What is the difference between signed and unsigned drivers?
The signed driver with a correct digital signature indicates that it is not damaged, corrupted, manipulated, or changed, and it is safe to use. It can be installed and work properly on Windows. The unsigned driver will be considered as a potentially malicious item by the system and it cannot be installed properly.
A signed driver might also turn to unsigned if its signature becomes invalid due to any tampering or changing.
Содержание
- Ошибка 577 Защитника Windows, не удается проверить цифровую подпись
- Windows не удалось запустить службу защитника
- Ошибка Защитника Windows 577, не удается проверить цифровую подпись
- 1] Проверить наличие остаточного ПО
- 2] Проверьте удаление Webroot
- 3] Включите Защитник Windows
- Ошибка при обновлении Windows служба хранилища Server 2016 или Windows Server 2016: Windows не может проверить цифровую подпись для этого файла
- Симптомы
- Причина
- Как исправить ошибку 0xc0000428 при установке Windows или запуске приложения?
- Значение ошибки 0xc0000428
- Причины возникновения ошибки
- 5 способов устранения ошибки 0xc0000428
- Удаление цифровой подписи файла
- Использование командной строки
- Запуск от имени администратора
- Отключение контроля учетных записей UAC
- Встроенная учетная запись администратора
- Исправление ошибки 0xc0000428 в Windows 10
- Исправление ошибки 0xc0000428, возникающей при запуске Windows 7
- Общие рекомендации
- Cómo reparar el error 577 de Windows Defender, no se puede verificar la firma digital (10.26.21)
- Video de Youtube: Cómo reparar el error 577 de Windows Defender, no se puede verificar la firma digital
- Системе Windows не удается проверить цифровую подпись этого файла
Ошибка 577 Защитника Windows, не удается проверить цифровую подпись
Когда оборудование или программное обеспечение установлено и не поставляется с файлом с цифровой подписью, это вызывает подозрение у любого антивируса и самой Windows. Антивирус Windows, также известный как Защитник Windows, выдает ошибку 577, когда не может проверить цифровую подпись.
Windows не удалось запустить службу защитника
Полное сообщение об ошибке выглядит следующим образом:
Windows не может запустить службу Защитника Windows. Ошибка 577: Windows не может проверить цифровую подпись для этого файла. В результате недавнего изменения оборудования или программного обеспечения мог быть установлен файл, который был неправильно подписан или поврежден, или это могло быть вредоносное ПО из неизвестного источника.

Ошибка Защитника Windows 577, не удается проверить цифровую подпись
Ошибка обычно возникает, когда вы включаете Защитник Windows, и именно тогда возникает конфликт с существующим программным обеспечением. Причиной проблемы может быть не просто какое-либо программное обеспечение, а программное обеспечение безопасности.
1] Проверить наличие остаточного ПО
Если вы установили новый антивирус или недавно удалили программное обеспечение, возможно, он оставил некоторые файлы, и удаление не завершено. Вам придется вручную искать файлы или скачать ccleaner и очистить систему.
Если это программное обеспечение безопасности, используйте эти программы для удаления антивирусов:
2] Проверьте удаление Webroot
Если вы использовали Webroot, возможно, он не был удален полностью и должным образом. Используйте этот инструмент из Webroot, чтобы завершить удаление и посмотреть, поможет ли он.
3] Включите Защитник Windows
Если вы хорошо знакомы с реестром, выполните следующие действия, чтобы включить Защитник Windows. Не забудьте сделать резервную копию реестра.
HKEY_LOCAL_MACHINESOFTWAREPoliciesMicrosoftWindows Defender
HKEY_LOCAL_MACHINESOFTWAREMicrosoftWindows Defender
Источник
Ошибка при обновлении Windows служба хранилища Server 2016 или Windows Server 2016: Windows не может проверить цифровую подпись для этого файла
В этой статье приводится решение проблемы, при которой при обновлении до Windows служба хранилища Server 2016 или Windows Server 2016 возникает ошибка (Windows не удается проверить цифровую подпись для этого файла).
Применяется к: Windows Server 2019, Windows Server 2016, Windows Server 2012 R2
Исходный номер КБ: 3193460
Симптомы
При попытке обновить систему до Windows служба хранилища Server 2016 или Windows Server 2016, процесс не удается завершить на 95 процентов, и вы получите следующее сообщение об ошибке:
Произошли следующие ошибки:
Windows не удается проверить цифровую подпись для этого файла. Недавние изменения оборудования или программного обеспечения, возможно, установили файл, который подписан неправильно или поврежден, или это может быть вредоносным программным обеспечением форме неизвестного источника Ошибка произошла во время автоматической установки. Необходимо настроить узлы вручную.
Эта проблема возникает, если верны следующие условия:
Причина
Эта проблема возникает из-за того, что некоторые OEM-системы отгрузки вместе с настраиваемой версией OOBE. Это обновление OOBE устанавливается с помощью службы визуализации развертывания и управления (DISM) и имеет специальную операцию переименования, которая заменяет основную функцию OOBE. Эта замена вызывает ошибку цифровой подписи.
Источник
Как исправить ошибку 0xc0000428 при установке Windows или запуске приложения?
Ошибка 0xc0000428 чаще всего появляется при запуске свежеустановленной операционной системы WIndows или во время перехода с 7-й версии на 10-ю. В результате становится невозможно работать на компьютере. Также сбой реже проявляется при установке новых программ или устройств на компьютерах с Windows 10. В статье рассмотрены все причины возникновения ошибки и детально разобраны способы ее устранения.
Значение ошибки 0xc0000428
Она означает, что операционная система Windows не запускается из-за некорректного состояния определенных системных файлов.

Причины возникновения ошибки
Чаще всего проблема возникает из-за следующих факторов:
В отношении сбоев при запуске или установке приложений причинами являются неактуальность цифровой подписи файла или истечение срока годности сертификата безопасности.
5 способов устранения ошибки 0xc0000428
Не стоит отчаиваться во время поиска того, как исправить 0xc0000428. Ниже рассмотрены 5 способов решения проблемы. Они размещены в порядке актуальности — самые эффективные в начале и наименее действенные в конце.
Удаление цифровой подписи файла
Это подходит для решения проблем при загрузке операционной системы. Действовать можно двумя способами:
В обоих случаях после удаления файла oem-drv64.sys обязательно нужно редактировать реестр, для чего следует выполнить такие действия:
Иногда после выполнения этих действий при загрузке операционной системы может потребоваться восстановление системы. В этом случае обязательно нужно иметь флешку (оптический диск), с которой устанавливалась эта версия Windows.
Использование командной строки
Командная строка — это эффективный способ решения любых программных ошибок. Однако его использование связано с большими трудностями для многих пользователей, так как нужно правильно вводить запросы. В результате подходы, которые рассмотрены ниже, требуют внимательности, поэтому все команды следует копировать. Они применяются для устранения неполадок при загрузке операционной системы.
Запуск от имени администратора
Это касается проблем при запуске или установке приложений. Если программа не открывается, то следует кликнуть на ее ярлык правой кнопкой мышки, выбрать пункт “Запуск от имени администратора”, подтвердить операцию, так как об этом появится оповещение на экране. Если не открывается установочный файл, то нужно выполнить с ним аналогичное действие.
Отключение контроля учетных записей UAC
Это касается неполадок при запуске или установке приложений. Необходимо выполнять следующие действия:
Следует учесть, что отключенный UAC снижает уровень защиты операционной системы перед зловредным программным обеспечением.
Встроенная учетная запись администратора
Это касается сбоев при запуске или установке приложений, если вышеуказанные способы не помогли. Действовать следует таким образом:
Исправление ошибки 0xc0000428 в Windows 10
Все способы решения проблемы 0xc0000428 Windows 10 рассмотрены ранее в статье. Следует только учесть характер проявления сбоя: во время запуска/установки операционной системы или запуска/установки программы.
Исправление ошибки 0xc0000428, возникающей при запуске Windows 7
Для решения проблемы 0xc0000428 Windows 7 следует пробовать методы, которые рассмотрены в разделах статьи “Удаление цифровой подписи файла” или “Использование командной строки”.
Общие рекомендации
Если проблема возникла при запуске/установке операционной системы, то следует:
Если сбой появляется при запуске/установке программы, то стоит:
Ошибка 0xc0000428 не позволяет запустить/установить операционную систему или программу. Для устранения неполадки чаще всего стоит применять лицензионное программное обеспечение, проводить очистку цифровой подписи, устанавливать более высокие права доступа, восстанавливать поврежденные системные файлы или работать в “Безопасном режиме”.
Источник
Cómo reparar el error 577 de Windows Defender, no se puede verificar la firma digital (10.26.21)
Puede que Windows Defender no sea el mejor anti-malware que existe, pero en realidad hace un buen trabajo al detectar y deshacerse de las entidades de malware. Además, viene preinstalado en las versiones de Windows 10, por lo que es bastante conveniente y fácil de usar. Sin embargo, al igual que con todos los programas de software antivirus, tiene sus propios defectos e imperfecciones, lo que significa que puede encontrar problemas a largo plazo.
Un problema común con Windows Defender es que Windows Defender no puede verificar la firma digital. Defender Error 577. ¿De qué se trata? Siga leyendo para encontrar respuestas.
¿Qué es el error 577 de Windows Defender?
Los usuarios de Windows 10 informaron que se encontraron con el error después de recibir una advertencia de la utilidad de seguridad y mantenimiento de que su sistema no está protegido por ningún software anti-malware. Y cuando intentaron iniciar Windows Defender para habilitar la protección en tiempo real, no parece suceder nada.
Para resolver el problema, algunos de ellos intentaron abrir el servicio asociado con el software. Después de hacerlo, terminan decepcionados cuando son recibidos por el error 577 de Windows Defender, no pueden verificar la firma digital.
Consejo profesional: escanee su PC en busca de problemas de rendimiento, archivos basura, aplicaciones dañinas y amenazas de seguridad.
que pueden causar problemas del sistema o un rendimiento lento.
Escaneo gratuito para problemas de PC3.145.873descargas Compatible con: Windows 10, Windows 7, Windows 8
Oferta especial. Acerca de Outbyte, instrucciones de desinstalación, EULA, Política de privacidad.
El código de error viene con este mensaje:
“Windows no pudo iniciar Windows Defender. Error 577: Windows no puede verificar la firma digital de este archivo. Un cambio reciente de hardware o software puede haber instalado un archivo que se firmó incorrectamente o está dañado, o que puede ser software malintencionado de una imagen desconocida «.
Según los expertos, el código de error suele aparecer en dispositivos con Windows 10 que utilizan una suite antimalware de terceros. Esto se debe a que Windows Defender puede estar bloqueando la configuración de directiva de grupo necesaria para ejecutar una solución antivirus externa. Por otra parte, hay casos en los que aparece el error porque la clave de registro asociada con Windows Defender está dañada.
¿Qué hacer con el error 577 de Windows Defender?
Solución # 1: Desinstale su suite antivirus externa
Recuerde siempre que cuando desinstale una suite antivirus de terceros, Windows se desactivará automáticamente la suite de seguridad incorporada, que es Windows Defender. Esto es para evitar problemas a largo plazo.
En caso de que el software antivirus que estaba ejecutando fuera una prueba, entonces el código de error puede activarse porque Windows 10 puede pensar que está ejecutando una solución antivirus externa.
Si tiene el mismo problema, su El primer curso de acción es deshacerse de cualquier rastro de su suite antivirus de terceros. Esto obligará a su sistema operativo a iniciar su paquete antivirus integrado.
Para desinstalar cualquier paquete antivirus externo, siga estos pasos:
Si su solución antivirus de terceros no es la culpable del error 577 de Windows Defender, intente editar la clave de registro asociada con la suite antimalware incorporada. Algunos usuarios de Windows 10 han logrado resolver el problema cambiando el valor de la clave DisableAntiSpyware.
Aquí hay una guía detallada sobre cómo editar el valor de la clave DisableAntiSpyware:
Si el error 577 de Windows Defender todavía le causa dolor de cabeza, use Restaurar sistema. A través de esto, puede restaurar su máquina a un estado anterior cuando Windows Defender estaba funcionando bien.
Esta solución funciona mejor si el código de error es provocado por un ataque de malware. Algunas entidades de malware tienen la capacidad de dañar Windows Defender hasta el punto de que ya no se pueda usar.
Para usar Restaurar sistema y resolver el error 577, siga estos pasos:
Video de Youtube: Cómo reparar el error 577 de Windows Defender, no se puede verificar la firma digital
Источник
Системе Windows не удается проверить цифровую подпись этого файла
Что делать если вы столкнулись с проблемой «Системе Windows не удается проверить цифровую подпись этого файла»? Давайте разбираться, чем могла быть вызвана эта ситуация.

Данная ситуация, возникает тогда включена обязательная проверка подписи драйверов. Не будем вдаваться для чего это нужно, но иногда это может сыграть с вами злую шутку. Поэтому можно смело отключать данную функцию.

Делается это следующим образом:
Зажимаем клавишу Shift и перезагружаем ваш компьютер.
После перезагрузки компьтера, пройдите по следующему пути: «Диагностика» — «Дополнительные параметры» — «Параметры загрузки» и нажмите кнопку «Перезагрузить».
После перезагрузки появится меню с различными параметрами, которые будут использоваться в этот раз в операционной системе Windows.

Нажимаем на клавишу 7 – отключить обязательную проверку цифровой подписи драйверов.
Готово! Ваша программа, игра или приложение теперь будет запускаться без ошибки «Системе Windows не удается проверить цифровую подпись этого файла».
Таким образом мы разобрались, ка устранить ошибку «Системе Windows не удается проверить цифровую подпись этого файла» Если статья была для вас полезной, то не забывайте чаще заходить к нам на сайт!
Источник
Что делать если вы столкнулись с проблемой «Системе Windows не удается проверить цифровую подпись этого файла»? Давайте разбираться, чем могла быть вызвана эта ситуация.
Данная ситуация, возникает тогда включена обязательная проверка подписи драйверов. Не будем вдаваться для чего это нужно, но иногда это может сыграть с вами злую шутку. Поэтому можно смело отключать данную функцию.
Делается это следующим образом:
Зажимаем клавишу Shift и перезагружаем ваш компьютер.
После перезагрузки компьтера, пройдите по следующему пути: «Диагностика» — «Дополнительные параметры» — «Параметры загрузки» и нажмите кнопку «Перезагрузить».
После перезагрузки появится меню с различными параметрами, которые будут использоваться в этот раз в операционной системе Windows.
Нажимаем на клавишу 7 – отключить обязательную проверку цифровой подписи драйверов.
Готово! Ваша программа, игра или приложение теперь будет запускаться без ошибки «Системе Windows не удается проверить цифровую подпись этого файла».
Таким образом мы разобрались, ка устранить ошибку «Системе Windows не удается проверить цифровую подпись этого файла» Если статья была для вас полезной, то не забывайте чаще заходить к нам на сайт!
 Одна из распространенных ошибок Windows 10, с которой можно столкнуться как при запуске ОС так и при её установке — «Не удалось проверить цифровую подпись этого файла», код ошибки 0xc0000428. В некоторых случаях появления синего экрана с этим кодом также указывается имя проблемного файла, частые варианты — oem-drv64.sys (для не вполне легальных ОС), winload.exe.
В этой инструкции подробно о возможных причинах этой ошибки и о способах её исправить в зависимости от ситуации и конкретного сценария появления проблемы.
Исправление ошибки 0xc0000428 при запуске Windows 10

В случаях появления ошибки «Не удалось проверить цифровую подпись этого файла» с кодом 0xc0000428 при запуске системы (при условии, что до этого Windows 10 запускалась нормально) среди причин можно предположить:
- Установку неподписанных драйверов устройств, в том числе виртуальных, которые может устанавливать стороннее прикладное ПО.
- Модификацию или замену системных файлов Windows 10, загрузчика системы, например, при использовании различных твиков системы, установке второй ОС на компьютер или ноутбук.
Сообщение об ошибке в нижней части, помимо прочего, предлагает нажать клавишу F8 для доступа к параметрам загрузки и именно её мы будем использовать для исправления ошибки:
- Нажмите F8, а если не сработает и у вас ноутбук — Fn+F
- Откроется окно выборов параметров загрузки, вам требуется пункт «Отключить обязательную проверку подписи драйверов» — F7 или Fn+F7 (можно также использовать просто клавишу 7 в верхнем ряду).

- В этот раз, при условии исправного загрузчика запуск Windows 10 должен произойти без проблем.
- Дальнейшие действия могут быть следующими: удаление проблемного драйвера и соответствующих ему служб (в случае oem-drvsys может привести к проблемам с активацией и, в некоторых случаях, запуском), софта, который его установил или отключение проверки цифровой подписи драйверов Windows 10 на постоянной основе, о чем — пункт 5.
- Второе можно сделать с помощью командной строки, запущенной от имени администратора, введя команду bcdedit.exe /set nointegritychecks on а после перезагрузки также отключив Secure Boot в БИОС. При желании, можно использовать сторонние программы, такие как EasyBCD для отключения проверки цифровой подписи: в этой программе потребуется зайти в «Дополнительные параметры» (Advanced Settings) — Вкладка «Дополнительно» (Advanced) и установить отметку отключения проверки цифровой подписи драйверов (Allow use of unsigned drivers), а затем сохранить настройки кнопкой Save Settings (в программе есть и русский язык интерфейса, но при его включении иногда часть интерфейса становится не видна, потому привожу информацию на английском). После перезагрузки отключите функцию Secure Boot, если она включена в БИОС/UEFI.

Если указанные шаги не помогли или варианты загрузки по F8 не работают, попробуйте выполнить восстановление загрузчика Windows 10, используя загрузочную флешку с системой (при ее отсутствии придется создать где-то на другом компьютере).
Также можно попробовать использовать точки восстановления системы при их наличии: загрузитесь с загрузочной флешки Windows 10, на экране после выбора языка внизу справа нажмите «Восстановление системы» и найдите точки восстановления в параметрах.
Примечание: если ошибка вызвана файлом oem-drv64.sys и вы решили его удалить (напомню, на нелицензионных ОС после этого возможны дополнительные проблемы), удалите также раздел реестра
HKEY_LOCAL_MACHINESYSTEMCurrentControlSetservicesoem-drv64
Ошибка 0xc0000428 при установке Windows 10
Причины появления рассматриваемой ошибки при установке Windows 10 на компьютер обычно диагностируются сложнее. Распространенными случаями являются следующие:
- Ошибка происходит при загрузке с установочной флешки — может возникать при использовании мультизагрузочных флешек и накопителей с загрузчиком Grub4DOS (такие, например, получаются при использовании WinSetupFromUSB). Попробуйте записать флешку другим образом, например с помощью Rufus. Также может помочь отключение Secure Boot в БИОС компьютера или ноутбука.
- Ошибка возникает при первой перезагрузке после начала установки. Здесь можно попробовать: если на компьютере стояла другая ОС, удалить раздел с загрузчиком от неё и заново запустить установку. Если установка выполняется на чистый диск, можно попробовать другой образ и отключение Secure Boot.
Если ни один из подходов не сработал в вашем случае, опишите в комментарии конкретную ситуацию, после чего возникла проблема и на какой файл указывает сообщение об ошибке, если такое указание присутствует. Я постараюсь помочь.
Пользователи ОС Windows знакомы с различными видами ошибок, в том числе критических, вследствие которых возникают знаменитые чёрные и синие «экраны смерти». Неполадки могут появляться при старте системы, во время работы, обновления или на разных этапах установки и могут быть вызваны программным либо аппаратным сбоем, при этом в большинстве случаев проблема легко решаема без привлечения к процессу специалистов. Сообщение, сопровождающееся кодом ошибки, отчасти помогает определить природу сбоя и устранить неисправность, хотя не всегда текст, описывающий ошибку достаточно информативен.

Например, нередко при запуске или установке Windows 7, 8, 10 возникает ошибка с кодом 0xc0000428, препятствующая дальнейшим действиям. Иногда сообщение даже указывает на проблемный файл и его расположение, а в сведениях о произошедшей ошибке можно увидеть пояснение к ней – «Системе не удаётся проверить цифровую подпись этого файла» или другую информацию. Когда сбойный файл не указывается, решение задачи усложняется. Почему появляется проблема и как от неё избавиться мы и рассмотрим.
Причины ошибки
Возникает BSOD ошибка 0xc0000428 спонтанно, часто на завершающем этапе установки Windows и при загрузке компонентов системы. В этом чаще всего виновен файл oem-drv64.sys, препятствующий процедуре ввиду отсутствия цифровой подписи, которую проверяет ОС. Иногда корректной установке может помешать неправильно заданный в BIOS режим, тогда его нужно будет поменять. Настройки могут слетать, что затем приводит ПК в состояние ошибки, код 0xc0000428. Кроме того, сбой может возникать, когда на компьютере стоит две операционные системы.
Ошибка 0xc0000428 может быть спровоцирована такими факторами:
- Попытка инсталляции нелегальной версии Windows.
- На одном из драйверов отсутствует цифровая подпись.
- Установка неподписанных драйверов на виртуальные машины, эмулирующие операционную систему.
- Отсутствие или повреждение драйвера, несоответствие версии ОС.
- Использование готовых .reg-файлов, позволяющих вносить изменения в реестр зависимо от внутреннего кода (твики реестра).
- Повреждение загрузчика.
От причины, по которой возникла ошибка 0xc0000428, напрямую зависит способ устранения проблемы. Поскольку знакомство с данным сбоем, как и с любым подобным, ничего хорошего не сулит, и проигнорировать его не получится, вопрос нужно решать путём выяснения и устранения источника этого явления.
Исправление ошибки 0xc0000428 при запуске Windows 10
Если проблема состоит в том, что в загрузке имеется элемент, не имеющий цифровой подписи, что проверяется системой, информация об этом появится в сообщении. Проверку идентификатора драйверов при загрузке Windows 7, 8, 10 можно отключить однократно или на всё последующее время работы системы, что часто помогает решить проблему. Иногда пользователь также видит и сведения о местонахождении некорректного системного файла, так что сбой можно устранить и путём его удаления. Таким образом, есть несколько вариантов устранения неисправности.
Однократное отключение проверки подлинности цифровой подписи
Рассмотрим сначала, как исправить ошибку 0xc0000428 при запуске Windows 7:
- Перезагружаем систему любым способом и жмём F8 до появления окна с выбором режима загрузки. Если это ноутбук, может потребоваться одновременное нажатие клавиш Fn+F
- Выбираем строчку «Отключение обязательной проверки подписи драйверов» или «Disable Driver Signature Enforcement» и нажимаем «Enter».

Выбор варианта загрузки Windows
Шаги по устранению проблемы на Windows 10 и 8:
- Для доступа к параметрам загрузки жмём F8 или, если у вас ноутбук, Fn+F
- Выбираем пункт 7 – «Отключить обязательную проверку подписи драйверов», для чего нажимает клавишу F7 или Fn+F Также можно нажимать 7 в верхнем ряду цифр.
Удаление проблемного файла
Далее следует удалить с жёсткого диска драйвер, создавший неприятность:
- Перезагружаем ПК и идём в параметры загрузки (F8).
- Жмём «Безопасный режим».
- Следуем по указанному в информации, сопровождающей ошибку, адресу (обычно это windowssystem32drivers) и удаляем драйвер oem-drvsys.
Потребуется перезагрузка, после чего система запросит восстановление средствами Windows, и активация ОС. Если в сведениях об ошибке был указан другой файл, нужно найти и установить подходящий драйвер. При удалении драйвера oem-drv64.sys бывают нередкими проблемы с активацией системы, реже с пуском, поэтому может потребоваться отключить проверку цифровой подписи в принципе.
*После старта также нужно будет обратиться к редактору реестра (вызываем консоль «Выполнить», удерживая клавиши Win+R, вводим команду regedit) и удалить
HKEY_LOCAL_MACHINESYSTEMCurrentControlSetservicesoem-drv64.
Отключение проверки идентификатора драйверов на постоянной основе
С этой целью часто применяют сторонний софт, но можно также осуществить процедуру вручную:
- Запускаем командную строку на правах администратора.
- В ней прописываемexe /set nointegritychecks on.
- Перезагружаем компьютер, затем идём в BIOS/UEFU.
- Здесь отключаем опцию Secure Boot, если она включена (переводим в положение Disabled).

Отключение обязательной проверки подписи драйверов
Восстановление при загрузке
Все вышеописанные действия эффективны, когда речь не идёт о повреждении загрузчика системы. Если проблема не была решена, восстановление загрузчика Windows можно выполнить, применив загрузочную флешку с соответствующей версией ОС или диск, для чего нажать внизу справа «Восстановление системы», выбрать из меню «Выбор действия», «Поиск и устранение неисправностей», затем переходим в «Дополнительные параметры» и жмём «Восстановление при загрузке».
Как альтернативный вариант можно прибегнуть к возврату к созданной ранее точке восстановления Windows. Если таковые имеются, их можно найти в параметрах, загрузившись с флешки с ОС и нажав «Восстановление системы», после чего перейдя по меню. Того же эффекта можно добиться, используя командную строку с правами администратора, в консоли потребуется ввести команду rstrui.
Ошибка 0xc0000428 при установке Windows 10
Причины, почему система не устанавливается и на одном из этапов процесса появляется BSOD, могут быть разными. От провоцирующего фактора, в результате которого возникла ошибка 0xc0000428 при установке ОС Windows 10, напрямую зависит, какой из способов будет эффективен. Если сбой сопровождается сообщением с указанием сбойного элемента, который не проходит проверку цифровой подписи, инструкция по устранению проблемы та же, что и в предыдущем случае, когда система не запускается. Когда же источник неприятности неизвестен, придётся его искать.

Вывод ошибки 0xc0000428 во время загрузки Виндовс
Варианты, как исправить сбой с кодом 0xc0000428 при установке Windows 10:
- Иногда мешает процессу неправильно заданный режим в BIOS, для чего необходимо поменять его на UEFI (идём в BIOS – «Boot» – «Boot Menu», здесь выставляем «UEFI»).
- Ошибка нередко бывает спровоцирована криво записанным образом на накопитель. Тогда необходимо перезаписать флешку. Например, если проблема возникла при использовании мультизагрузочного накопителя с загрузчиком Grub4DOS, стоит записать иным способом.
- Иногда также помогает отключение Secure Boot в BIOS.
- Исправление ошибки 0xc0000428, появившейся при перезагрузке системы на начальном этапе процесса установки, может заключаться в удалении раздела с загрузчиком предыдущей ОС (если стояла ранее), или, если Windows 10 устанавливается на отформатированный диск, тогда нужно использовать другой образ системы.
- В некоторых случаях исправить ошибку можно путём возврата к предыдущей версии операционной системы и повторной инсталляции.
Все вышеизложенные способы устранения сбоя с кодом 0xc0000428 при установке Windows эффективны в тех или иных ситуациях, при этом иногда, например, при невозможности установить причину явления или необходимости повторной записи образа, решение вопроса может занять немало времени. Как правило, после устранения проблема больше не возникает.