-

Open SourceAccess the open-source software you need for projects in any field, from data visualization to robotics.
-
User-friendlyWith our intuitive platform, you can easily search and install packages and create, load, and switch between environments.
-
TrustedOur securely hosted packages and artifacts are methodically tested and regularly updated.


Features

Anaconda Repository
Our repository features over 8,000 open-source data science and machine learning packages, Anaconda-built and compiled for all major operating systems and architectures.

Conda
Conda is an open-source package and environment management system that runs on Windows, macOS, and Linux. Conda quickly installs, runs, and updates packages and their dependencies. It also easily creates, saves, loads, and switches between environments on your local computer. It was created for Python programs, but it can package and distribute software for any language.
Anaconda Navigator
Our desktop application lets you easily manage integrated applications, packages, and environments without using the command line.
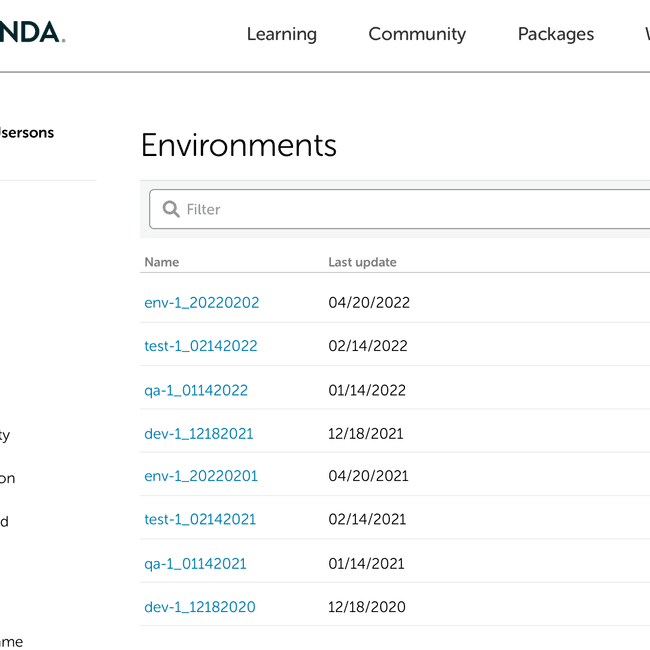
Cloud Environment Backup
Connect Anaconda Navigator to our community portal, Anaconda Nucleus, to securely store your local environments in the cloud.
Anaconda Distribution equips individuals to easily search and install thousands of Python/R packages and access a vast library of community content and support.
-
Students and Academics
Quickly get started with a no-cost, easy-to-use Python package and environment manager for educational and research use.
-
Practitioners and Hobbyists
Navigate unique challenges with a robust open-source package repository and toolkit supported with technical documentation and content from our community on Nucleus.
One in three of the G2000 use Anaconda
Anaconda Installers
Windows
Python 3.9
MacOS
Python 3.9
Linux
Python 3.9
Additional Installers
The archive has older versions of Anaconda Distribution installers. The Miniconda installer homepage can be found here.
|
win-64/python-3.9.16-h6244533_0.tar.bz2
anaconda
main
|
win-64/python-3.8.16-h6244533_2.tar.bz2
anaconda
main
|
win-64/python-3.7.16-h6244533_0.tar.bz2
anaconda
main
|
win-64/python-3.11.0-h966fe2a_2.tar.bz2
anaconda
main
|
win-64/python-3.10.9-h966fe2a_0.tar.bz2
anaconda
main
|
osx-arm64/python-3.9.16-hc0d8a6c_0.tar.bz2
anaconda
main
|
osx-arm64/python-3.8.16-hc0d8a6c_2.tar.bz2
anaconda
main
|
osx-arm64/python-3.10.9-hc0d8a6c_0.tar.bz2
anaconda
main
|
osx-arm64/python-3.11.0-hc0d8a6c_2.tar.bz2
anaconda
main
|
osx-64/python-3.9.16-h218abb5_0.tar.bz2
anaconda
main
|
osx-64/python-3.8.16-h218abb5_2.tar.bz2
anaconda
main
|
osx-64/python-3.7.16-h218abb5_0.tar.bz2
anaconda
main
|
osx-64/python-3.10.9-h218abb5_0.tar.bz2
anaconda
main
|
osx-64/python-3.11.0-h1fd4e5f_2.tar.bz2
anaconda
main
|
linux-s390x/python-3.9.16-hfaf5b9c_0.tar.bz2
anaconda
main
|
linux-s390x/python-3.8.16-hfaf5b9c_2.tar.bz2
anaconda
main
|
linux-s390x/python-3.7.16-hfaf5b9c_0.tar.bz2
anaconda
main
|
linux-s390x/python-3.11.0-hfaf5b9c_2.tar.bz2
anaconda
main
|
linux-s390x/python-3.10.9-hfaf5b9c_0.tar.bz2
anaconda
main
|
linux-ppc64le/python-3.9.16-hf689259_0.tar.bz2
anaconda
main
|
linux-ppc64le/python-3.7.16-hf689259_0.tar.bz2
anaconda
main
|
linux-ppc64le/python-3.8.16-hf689259_2.tar.bz2
anaconda
main
|
linux-ppc64le/python-3.11.0-hf689259_2.tar.bz2
anaconda
main
|
linux-ppc64le/python-3.10.9-hf689259_0.tar.bz2
anaconda
main
|
linux-aarch64/python-3.9.16-h89984f6_0.tar.bz2
anaconda
main
|
linux-aarch64/python-3.7.16-h89984f6_0.tar.bz2
anaconda
main
|
linux-aarch64/python-3.8.16-h89984f6_2.tar.bz2
anaconda
main
|
linux-aarch64/python-3.11.0-h89984f6_2.tar.bz2
anaconda
main
|
linux-aarch64/python-3.10.9-h89984f6_0.tar.bz2
anaconda
main
|
linux-64/python-3.9.16-h7a1cb2a_0.tar.bz2
anaconda
main
|
linux-64/python-3.8.16-h7a1cb2a_2.tar.bz2
anaconda
main
|
linux-64/python-3.7.16-h7a1cb2a_0.tar.bz2
anaconda
main
|
linux-64/python-3.11.0-h7a1cb2a_2.tar.bz2
anaconda
main
|
linux-64/python-3.10.9-h7a1cb2a_0.tar.bz2
anaconda
main
|
linux-s390x/python-3.10.8-hfaf5b9c_1.tar.bz2
anaconda
main
|
linux-s390x/python-3.8.15-hfaf5b9c_2.tar.bz2
anaconda
main
|
linux-s390x/python-3.9.15-hfaf5b9c_2.tar.bz2
anaconda
main
|
linux-s390x/python-3.7.15-hfaf5b9c_1.tar.bz2
anaconda
main
|
win-64/python-3.10.8-h966fe2a_1.tar.bz2
anaconda
main
|
osx-arm64/python-3.10.8-hc0d8a6c_1.tar.bz2
anaconda
main
|
win-64/python-3.8.15-h6244533_2.tar.bz2
anaconda
main
|
win-64/python-3.9.15-h6244533_2.tar.bz2
anaconda
main
|
win-64/python-3.7.15-h6244533_1.tar.bz2
anaconda
main
|
osx-arm64/python-3.8.15-hc0d8a6c_2.tar.bz2
anaconda
main
|
osx-arm64/python-3.9.15-hc0d8a6c_2.tar.bz2
anaconda
main
|
osx-64/python-3.9.15-h218abb5_2.tar.bz2
anaconda
main
|
osx-64/python-3.8.15-h218abb5_2.tar.bz2
anaconda
main
|
osx-64/python-3.7.15-h218abb5_1.tar.bz2
anaconda
main
|
osx-64/python-3.10.8-h218abb5_1.tar.bz2
anaconda
main
|
osx-64/python-2.7.18-h441ce09_3.tar.bz2
anaconda
main
Each software is released under license type that can be found on program pages as well as on search or category pages. Here are the most common license types:
Freeware
Freeware programs can be downloaded used free of charge and without any time limitations. Freeware products can be used free of charge for both personal and professional (commercial use).
Open Source
Open Source software is software with source code that anyone can inspect, modify or enhance. Programs released under this license can be used at no cost for both personal and commercial purposes. There are many different open source licenses but they all must comply with the Open Source Definition — in brief: the software can be freely used, modified and shared.
Free to Play
This license is commonly used for video games and it allows users to download and play the game for free. Basically, a product is offered Free to Play (Freemium) and the user can decide if he wants to pay the money (Premium) for additional features, services, virtual or physical goods that expand the functionality of the game. In some cases, ads may be show to the users.
Demo
Demo programs have a limited functionality for free, but charge for an advanced set of features or for the removal of advertisements from the program’s interfaces. In some cases, all the functionality is disabled until the license is purchased. Demos are usually not time-limited (like Trial software) but the functionality is limited.
Trial
Trial software allows the user to evaluate the software for a limited amount of time. After that trial period (usually 15 to 90 days) the user can decide whether to buy the software or not. Even though, most trial software products are only time-limited some also have feature limitations.
Paid
Usually commercial software or games are produced for sale or to serve a commercial purpose.
This tutorial will cover step by step instructions to install Anaconda on Windows. You will also learn how to update, write your first program and uninstall Anaconda. This is going to be awesome learning, in case you are a developer or exploring Anaconda and Python.
Let’s deep dive in with these topics —
Table of Contents
- 1 What is Anaconda
- 2 System requirement to Install Anaconda on Windows
- 3 Download Anaconda Python 3
- 4 How to install Anaconda on Windows 10 (with Python)
- 5 How to run Anaconda in Windows using CLI and GUI
- 6 How to update Anaconda in Windows 10
- 7 How to Uninstall Anaconda on Windows 10
- 8 Video
- 9 Conclusion
What is Anaconda
Anaconda {a.ka. Anaconda Python} is a Python and R programming language distribution for scientific computing. All predictive analytics, data science, machine learning and big data falls under scientific computing.
It’s helps to simplify package management and deployment. Anaconda is available for all platforms like Windows, macOS and Linux.
There are two version available to install Anaconda in Windows —
- Anaconda distribution or Individual edition, which are open source and free
- Anaconda Team Edition and Anaconda Enterprise Edition are paid
In this tutorial, I will cover the Anaconda individual edition. It comes with more than 250 packages automatically installed and over 7500 packages available in the PyPI repository.
Conda is an open-source, language-agnostic and cross-platform package manager. It helps to manage and deploy packages using the command line while Anaconda navigator is a GUI alternative to Conda.
System requirement to Install Anaconda on Windows
- Internet connection
- Windows 10 machine
- Approx. 2.7GB free disks pace.
** You don’t need python to be pre-installed because Python 3.8 automatically get install with Anaconda3.
Download Anaconda Python 3
Follow these steps to download Anaconda3 for Windows 10.
Step1.1- Visit Anaconda installers section on Anaconda.com
- Visit https://www.anaconda.com/products/individual > Scroll down on the page to the Anaconda installers section
- Select your Operating system
Step1.2- Download Installer «Anaconda» for Windows 10 ( 64-bit)
- Click on 64-bit Graphical installer (457 MB) to download Anaconda. If your system supports 32 bit only, then go for a 32-bit Graphical installer (403 MB) Anaconda download.
- Default Python 3.8 comes with it as a bundle. Later in this post, I will let you know, how to get the latest Python version 3.9 using Anaconda.

Alternatively, Just Click on below mentioned «Download buttons» to avoid all hassles.
Depending upon your internet speed, within couple of minutes, you will get «Anaconda3-2020.11-Windows-x86_64.exe» in your Download folder.

If you are in search of Old or Archive version of Anaconda installer for Windows 10, Then visit «https://repo.anaconda.com/archive/».
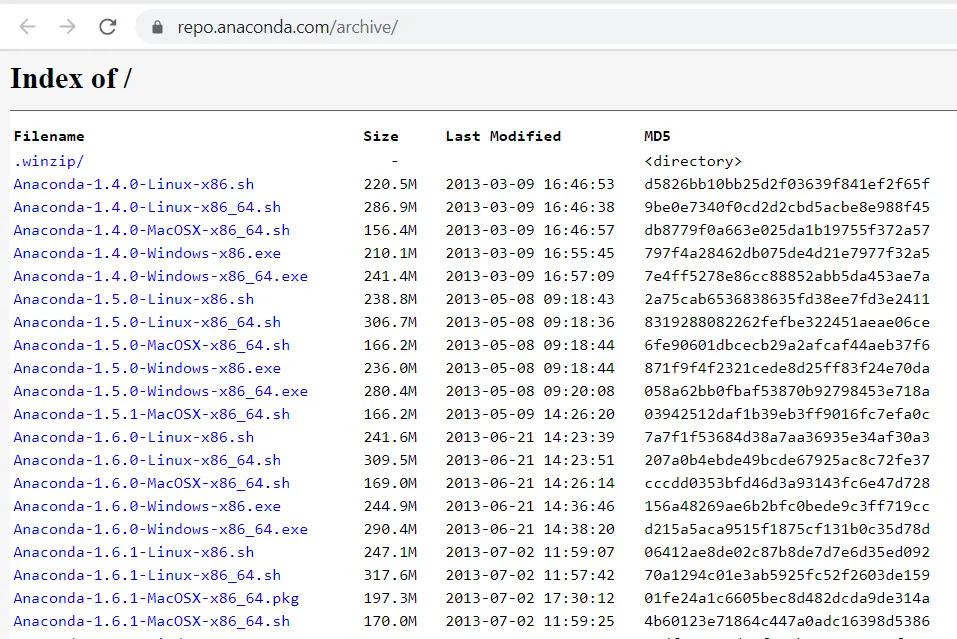
Step1.3- Verify MD5 Checksum Keys for Anaconda installer
You need to perform this step to make sure you have a legitimate copy of Anaconda.
- Visit «https://repo.anaconda.com/archive/» and search for your Anaconda installer.exe, which you just downloaded.
- Look for the MD5 checksum Key written in the 4th column against your exe file.
For example, I will show MD5 Key for «Anaconda3-2020.11-Windows-x86_64.exe» in the image for reference.

- Now Type «Command prompt» in Windows search bar and open it as administrator.
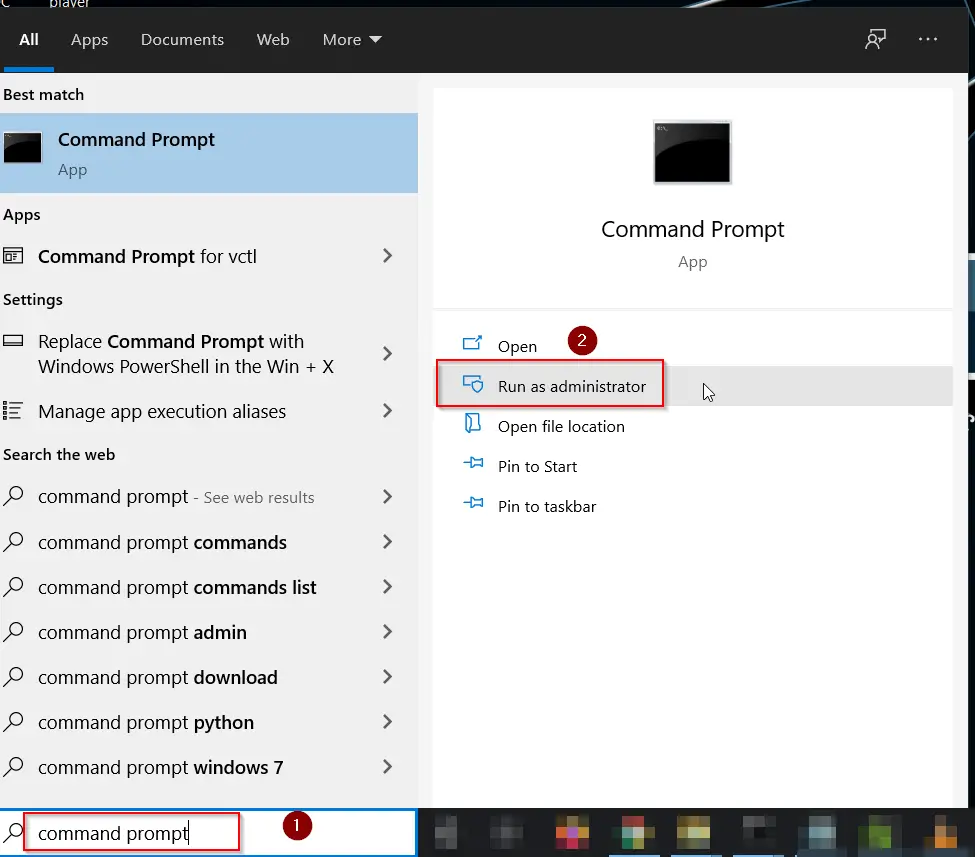
- Run the Certutil.exe command and provide the full path to your download file.
- Add MD5 in the last of your command. You will get a series of number.
- Match it with the key you got in Step1.3 from the Anaconda website. If all matches, you are good to proceed further.
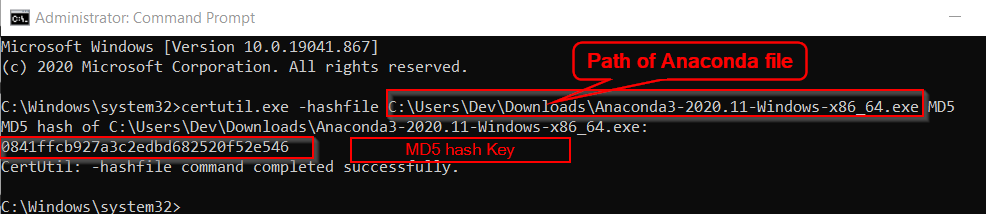
C:Windowssystem32>certutil.exe -hashfile "path to your anaconda file" MD5
For example, I have added «C:UsersDevDownloadsAnaconda3-2020.11-Windows-x86_64.exe» as the file path in the command.
Then I got 0841ffcb927a3c2edbd682520f52e546 MD5 Key. And If you will look closely, it matches with the key we noted in Step1.3.
> certutil.exe -hashfile "C:UsersDevDownloadsAnaconda3-2020.11-Windows-x86_64.exe" MD5

#Output#
MD5 hash of C:UsersDevDownloadsAnaconda3-2020.11-Windows-x86_64.exe:
0841ffcb927a3c2edbd682520f52e546
CertUtil: -hashfile command completed successfully.
Now we know, that our Anaconda installer file is a genuine copy. Let’s go ahead with the installation steps.
Installing Anaconda on Windows 10 is pretty straightforward. You just need to decide on few options carefully.
Let’s deep dive into Anaconda installation steps —
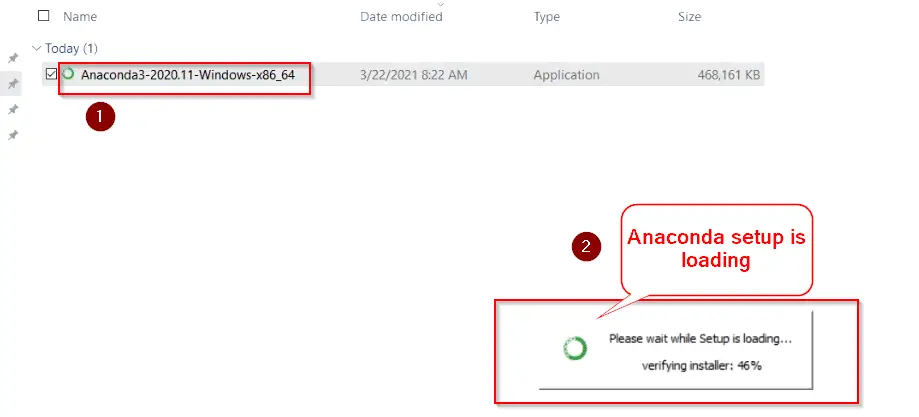
Step2.1- Run Anaconda3 (Python) installer
- Go to your «Download» directory, where the Anaconda installer exists.
- <Double click> on the Anaconda installer file to run the setup.
Step2.2- click Next on «Anaconda Welcome Screen»
Click Next on the «Welcome to Anaconda3 2020.11 (64-bit) setup» screen.
Make sure you have close all other applications before starting this setup. Because it may avoid updating important relevant system files. A system reboot will become mandatory in that case.

Step2.3- Accept End User License Agreement (EULA)
Select «I Agree» on End user license agreement page.

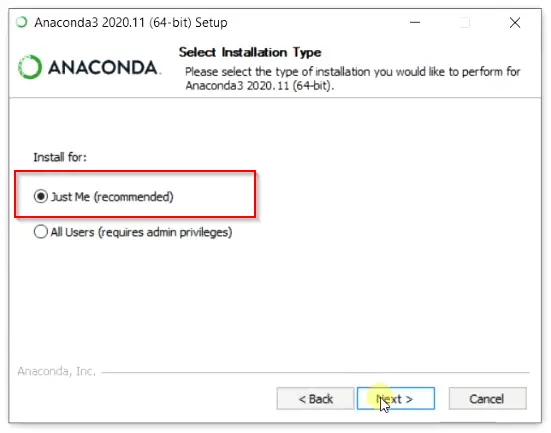
Step2.4- Select Anaconda installation type
On this screen you will get two options —
- Just me — It’s the recommended option. If you will select this option, you can install Anaconda on Windows without admin rights. But if your system is used by more than one user or developer. He or She will not be able to access it. I will go with the «Just me» option.
- All users — If you have a system, where more than one user will use Anaconda to develop scientific programs. You should select this option. Although you will require Admin rights on this system.
Also take a look on couple of extra steps, if you want to install Anaconda on Windows for multiple users.
Click Next —
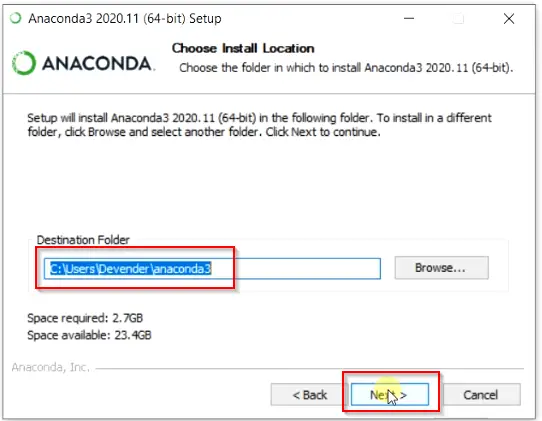
Step2.5- Choose Anaconda install location
Select Destination folder, where you want to install Anaconda on Windows 10 system. By default, Anaconda3 will get install in the «Users home directory«. For example, it is in C:usersDevenderanaconda3 in my case.
If you want to select different folder, then click Browse and choose your preferred folder.
I will go with default installation folder.
Hit Next, once you are ready.
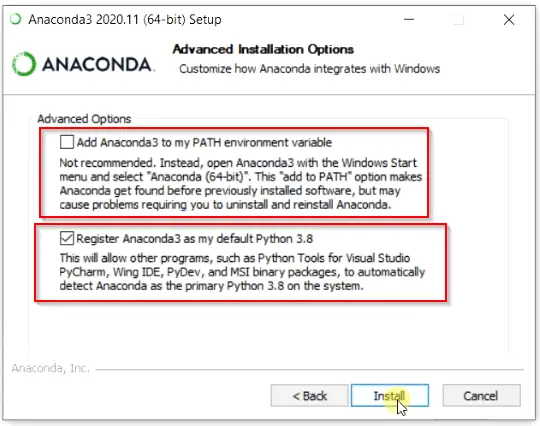
Step2.6- Choose Advance installation options
You have flexibility to customize your Anaconda integration with Windows. There are two options available —
a. Add Anaconda3 to my PATH variable — I will not recommend you to select this option. Because setting up the Anaconda PATH variable can mess up with your previously installed software. Alternatively, you can open Anaconda Shell or Navigator using the Windows start menu. Let’s don’t tick this check box.
b. Register Anaconda3 as my default Python 3.8 — You can go with this option because it helps other software to detect Python 3.8 as primary. If you don’t want to set Python 3.8 as default, in case you are using some other python version. You can uncheck this option also.
I don’t have any other software or Python installed. So I will leave «Register Anaconda3 as my default Python 3.8» selected.
Click on «Install» button to move further.
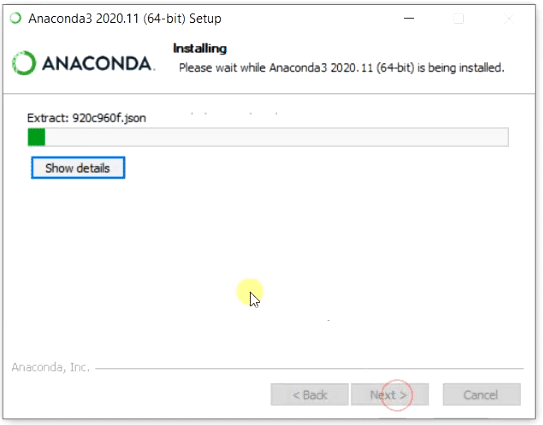
Step2.7- Let Anaconda installation complete
Now you can relax and get a cup of coffee. This setup will take few mins to install Anaconda on Windows 10.
You can tap on «Show details» to check the details of actions happening during installation.
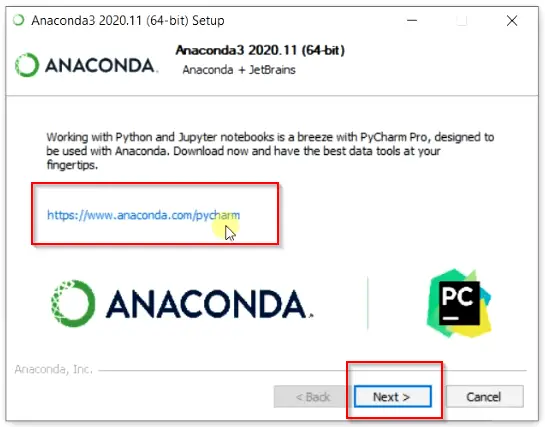
Step2.8- Install PyCharm Pro with Anaconda (Optional)
On this screen, Anaconda setup suggests you installing the PyCharm Pro editor. Actually, PyCharm is an IDE (integrated development environment) designed especially for Python programming by Jet Brains.
Let’s talk about PyCharm later in some other tutorial.
Click Next —
Step2.9- Finish Anaconda Installation Wizard
As soon as you will Finish completing the Anaconda3 setup. You will be redirected to the «Anaconda tutorial and the «Getting started» website of Anaconda.
Uncheck these two options on final screen to avoid redirection to Anaconda website for tutorial.
- Anaconda Individual Edition Tutorial
- Getting Started with Anaconda
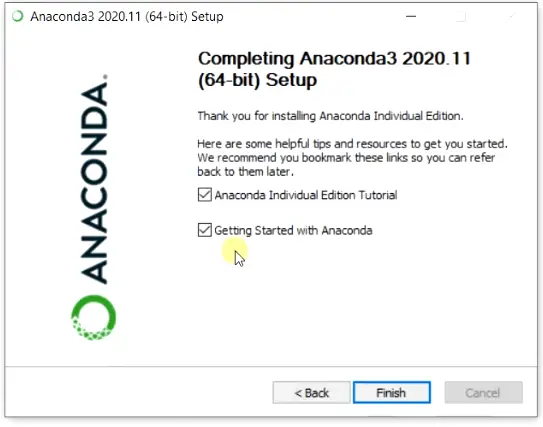
Congrats!! you are done with latest Anaconda installation in Windows.
How to run Anaconda in Windows using CLI and GUI
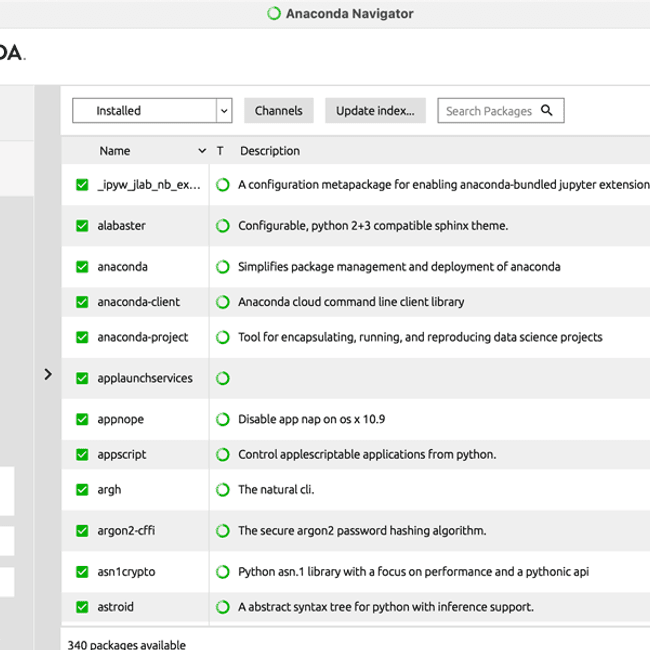
When you install Anaconda on Windows, you get a lot of bundled scientific packages with it like Spyder, Python and Jupyter notebook.
There are two methods to run Anaconda in Windows. If you are a CLI (Command Line Interface) fan, you can use Conda to run on the prompt.
In the case of GUI (Graphical User Interface), an Anaconda navigator can be used to manage packages, environment and launch applications.
I will show you both methods (Conda and Navigator) to create your first program. Just follow along :—
Step3.1 (CLI Method) — Create and Activate Anaconda environment
Let’s create our first test environment and run our first program in Python3.
Step3.1 (CLI Method) — Create and Activate Anaconda environment
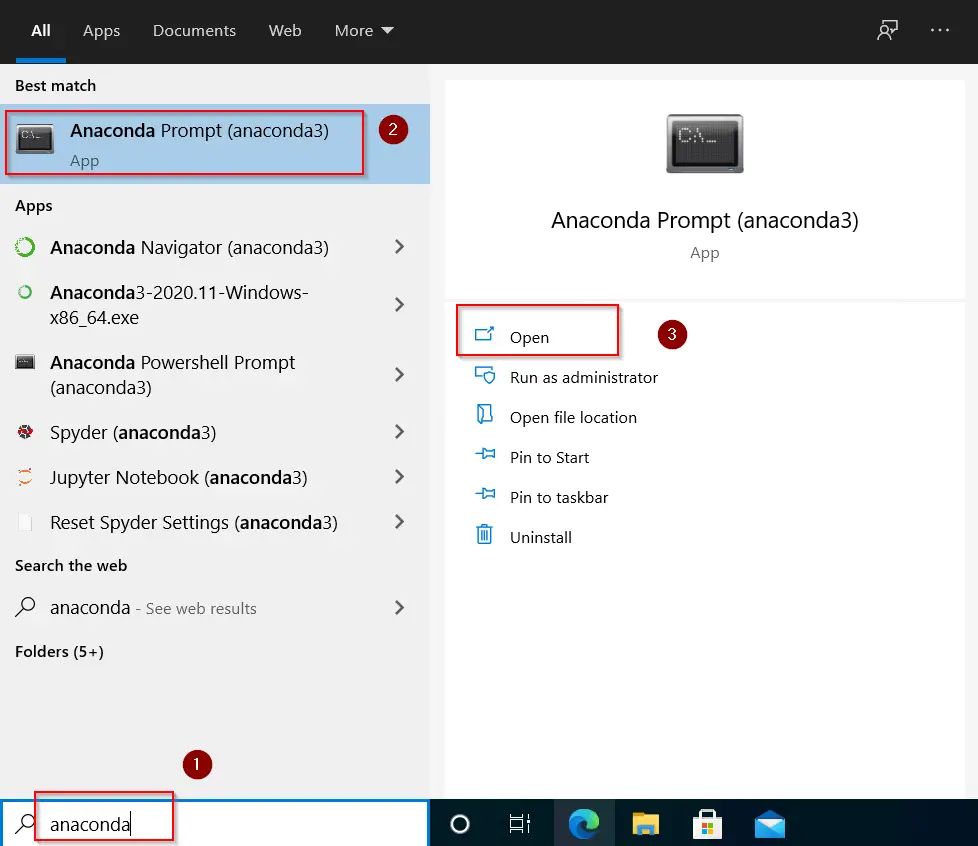
To create your first environment, you need to launch Anaconda3 prompt application.
- Type «Anaconda» in Windows search bar > Select Anaconda prompt application > Click Open
Step3.1.2 — Activate conda environment
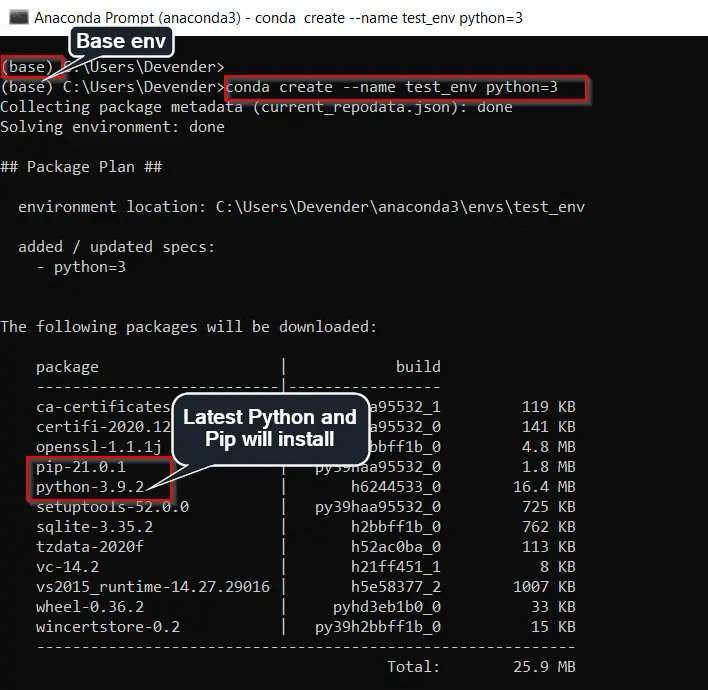
By-default, you will get base(root) environment in Anaconda shell prompt.
Run the «conda create» command to set up our first test environment (test_env) with Python3. It will also install the latest Python 3.9 and Pip 21.0 packages.
(base) C:UsersDevender>conda create --name test_env python=3
Please make a note, every environment is individual in Anaconda. You need to install required packages for each environment individually.
Press «y» to install packages.
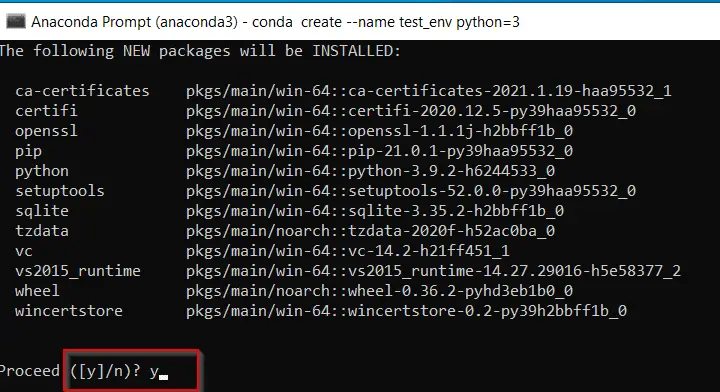
Anaconda will download, extract and install packages required. Once done, you can activate your environment with Conda activate command.
For example, test_env is the name of our newly create environment. So I will run this command —
(base) C:UsersDevender>conda activate test_env
It will switch from base(root) environment to «test_env» environment as shown in image.

** Please make a note running conda activate command without an environment name argument, drops you in the base environment. So make sure you give your environment name.
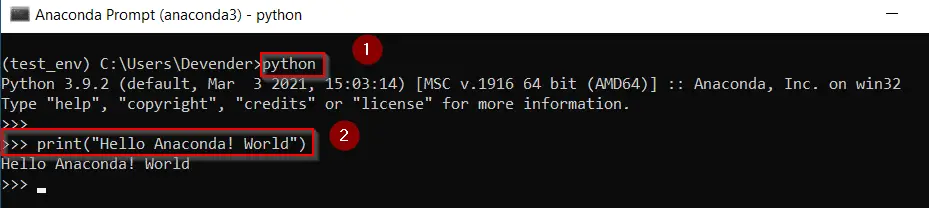
Step3.1.3 — Run your first python program
Now run Python and Type print(«your first program«) and check the output.
(test_env) C:UsersDevender>python
You will get «>>>» prompt. Type print(«Hello Anaconda! World») from your keyboard and press Enter.
# Type your first program code"
>>> print("Hello Anaconda! World")
Output should be «Hello Anaconda! World» as shown in image.
Type exit() to come out from Python prompt.
Hurray!! You have run your first python program in Anaconda successfully.
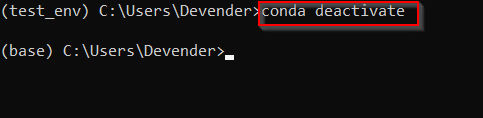
Step3.1.4 — Deactivate Conda environment
If you want to exit or want to deactivate any environment. You just need to run conda deactivate command.
For example, If I will run conda deactivate command inside my test_env environment. It will drop me to the default base environment as shown in the image.
(test_env) C:UsersDevender>conda deactivate
Step3.2 (GUI Method)- How to start Anaconda navigator and Launch Jupyter
Just to make things interesting, I will show you how to Launch the Anaconda navigator. Also, how to install and launch Jupyter notebook using Anaconda in your newly created test environment.
So follow these easy steps —
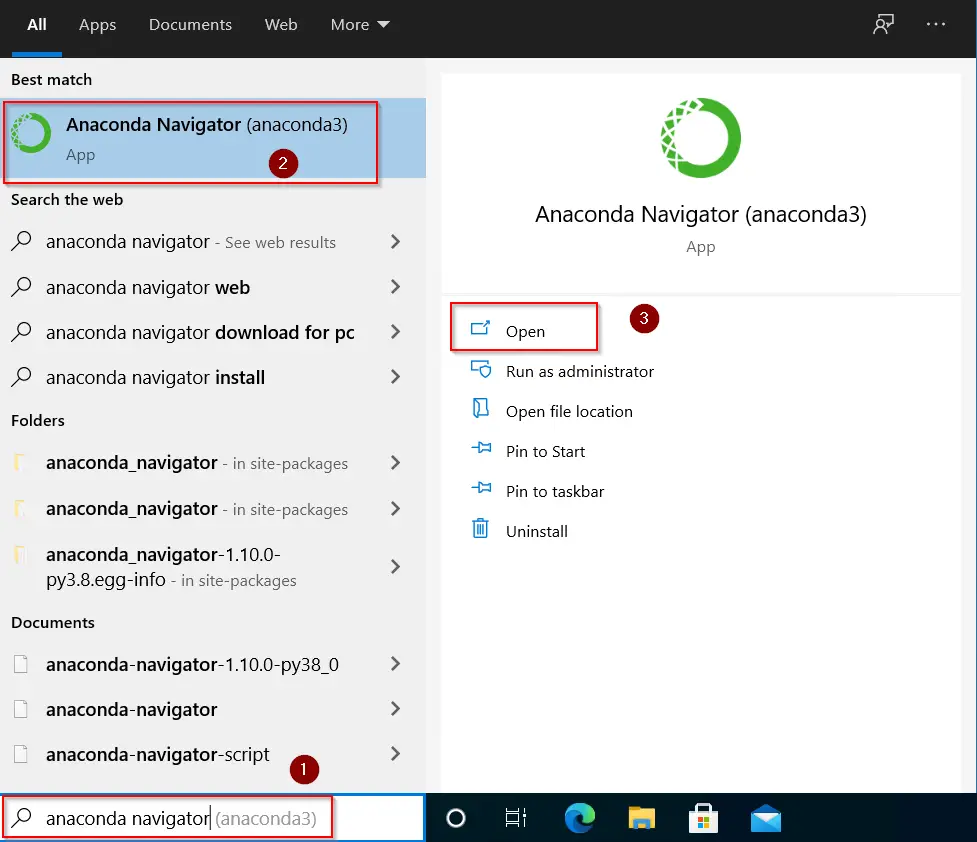
Step3.2.1 — Launch Anaconda Navigator in Windows 10
- Type «Anaconda Navigator» in Windows search bar > Select Anaconda Navigator > click Open.
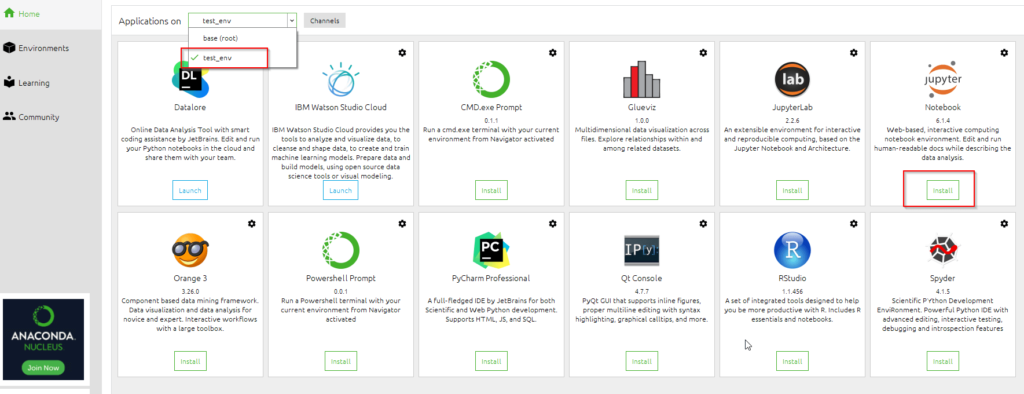
Step3.2.2 — Select your test environment (test_env) and install Jupyter notebook
Jupyter notebook is a web based tool to interactively develop and present data science projects.
You can launch Jupyter notebook from <start menu> or search bar also. But It will get launch from base(root) environment by-default.
Here I will show, how you can install and launch Jupyter notebook in your custom environment. For example, test_env in my case.
- Select your environment from drop down > click on the «install» button in Jupyter Notebook application.
- Please wait and let Jupyter notebook installation complete. You can monitor the progress in Navigator task bar.

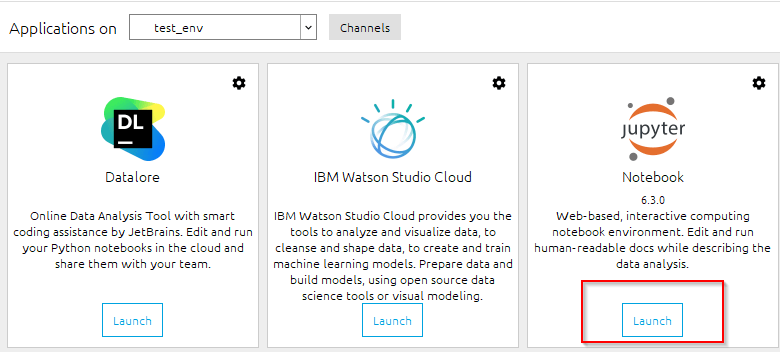
Step3.2.3 — Launch Jupyter Notebook in Anaconda navigator
Click on Launch button of Jupyter notebook.
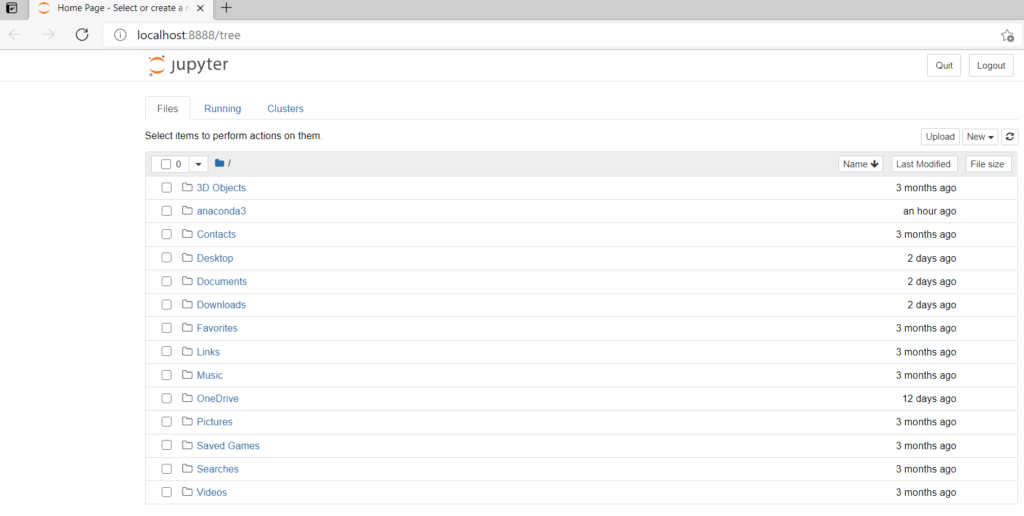
You will see a Jupyter home page in your default web browser. The default URL path of Jupyter notebook will be http://localhost:8888/tree.
Step3.2.4 — Create your first Jupyter Notebook with Python3
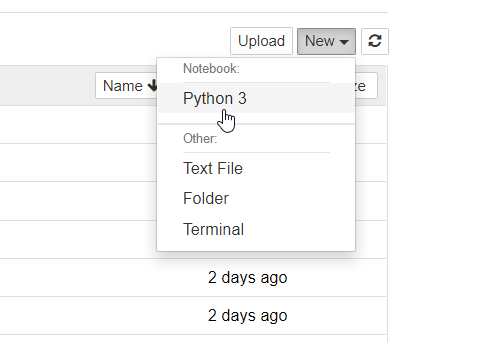
Select New > Python3 notebook.
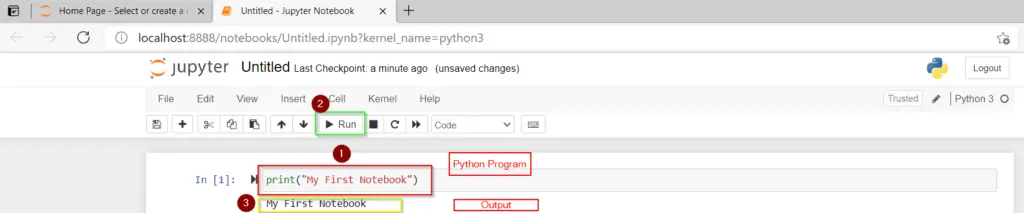
Step3.2.5 — Run first python program using Jupyter command cell
To run your first sample python program in Jupyter notebook. Follow these 3 steps —
- Type «print(«My First Notebook») in Jupyter command cell
- Click on Run button as shown in image
- You will see output as «My First Notebook«.
You can also save this file. Go to File > save as > provide the file name (path) and you are done. This was just the basic, For more details, checkout Jupyter documentation.
Enjoy! Anaconda and Jupyter in your development journey.
How to update Anaconda in Windows 10
You can update Anaconda in Windows 10 by 3 simple steps —
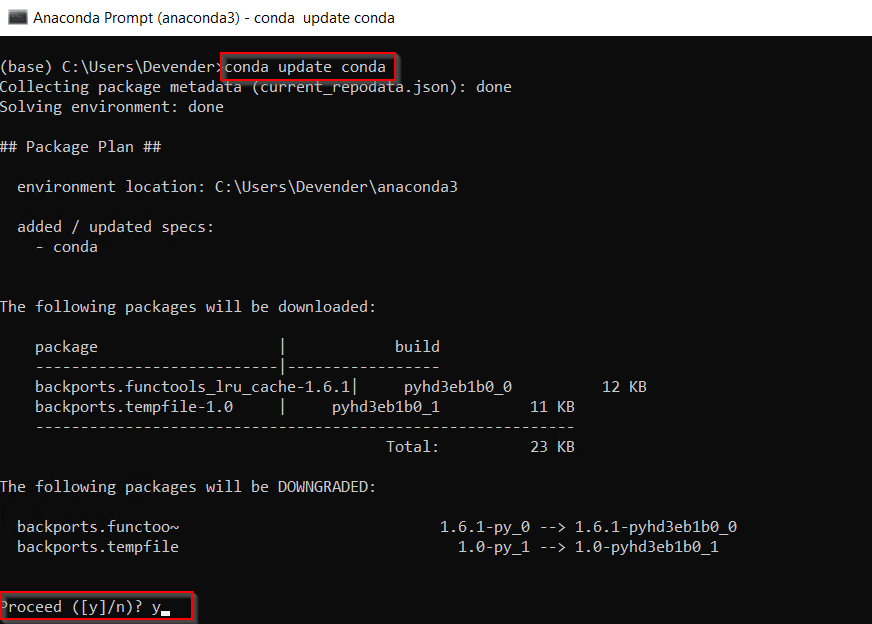
Step4.1- Update conda utility
First you need to update conda utility before upgrading Anaconda package in windows 10. To achieve this-
- Type «Anaconda» in Windows search bar > Select Anaconda prompt application > Click Open
- Run conda update command.
(base) C:UsersDevender>conda update conda
Press «y» to proceed
Step4.2- Update Anaconda package
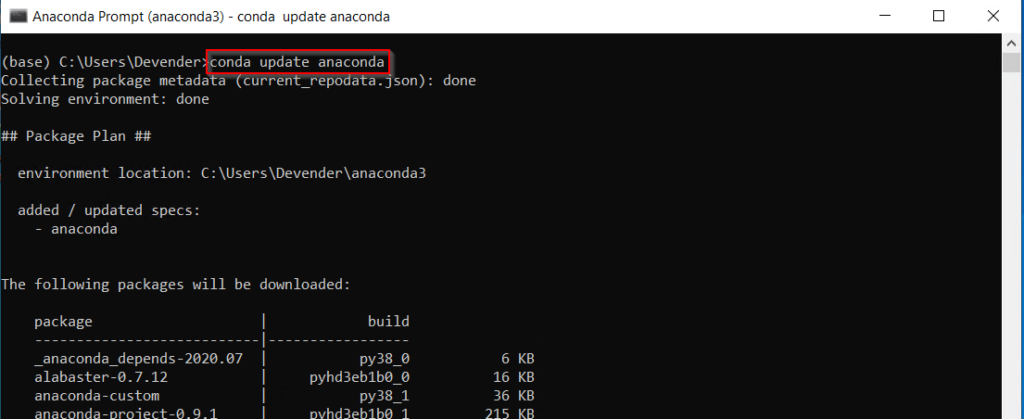
Run this command to update Anaconda packages to latest version —
(base) C:UsersDevender>conda update anaconda
Press «y» to install packages.
To update Anaconda to specific version, Run below mentioned command —
> conda update anaconda=VersionNumber
For example, to upgrade it to Anaconda 2020.11 version, type
> conda update anaconda=2020.11
How to Uninstall Anaconda on Windows 10
Till this point, We know how to install Anaconda on Windows 10 and how to update it to latest version.
Now I will show you how to remove Anaconda from Windows10 completely. Follow along with these simple steps —
Step5.1- Go to Add remove programs
**** First of all take backup of all your projects, you created using Anaconda to be on safer side.
Then type «Add remove programs» in Windows search bar and click Open.

Step5.2- Uninstall Anaconda and Python completely
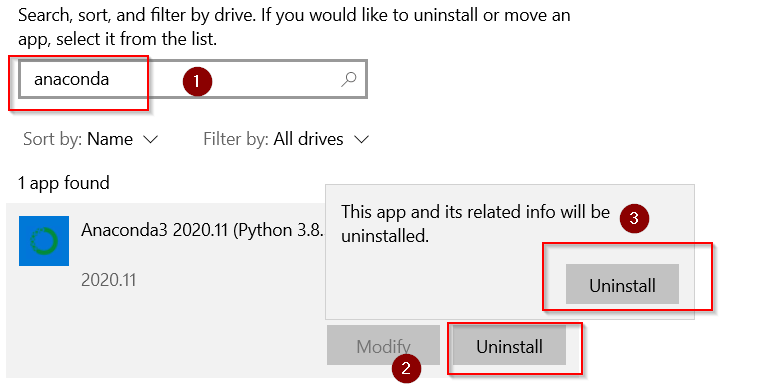
- In the «Apps and feature» window. Search for the «Anaconda» program > click Uninstall > then Uninstall again.
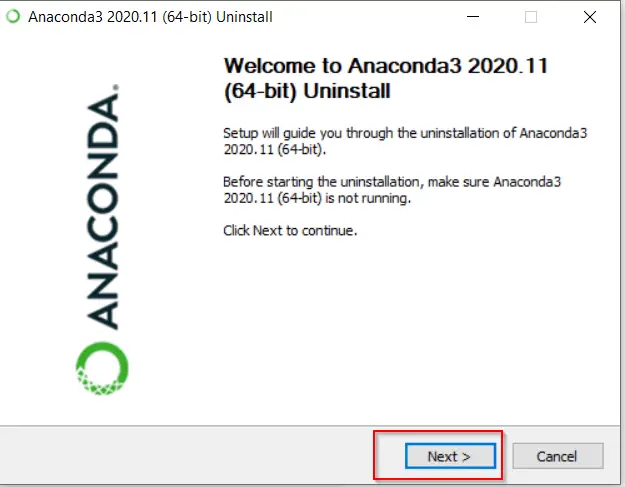
- Press Next on Anaconda welcome screen
- Click «Uninstall«.
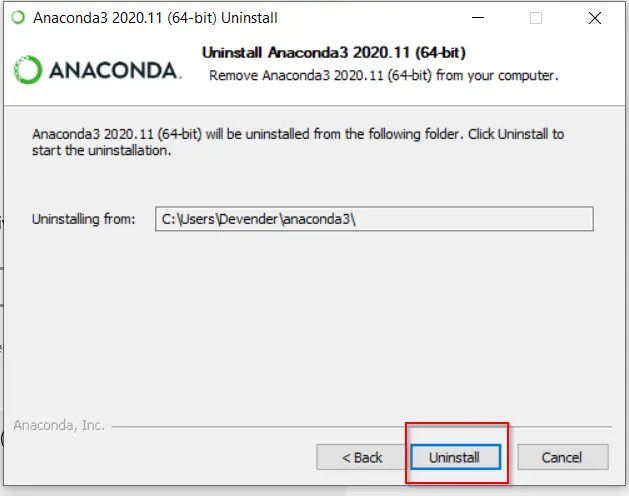
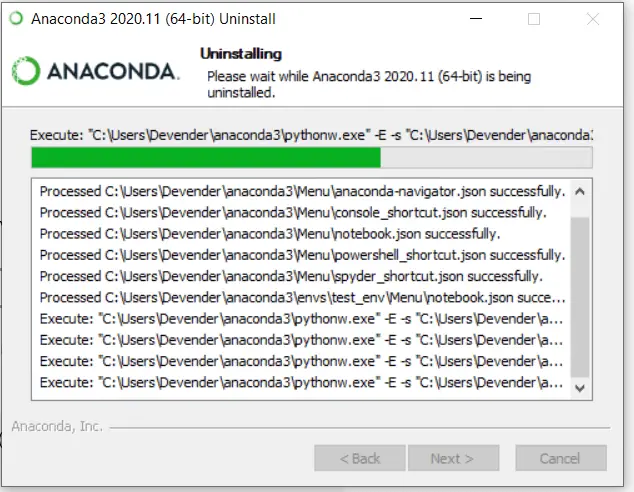
It will take a couple of minutes to uninstall anaconda and python 3.8.5 from your windows system.
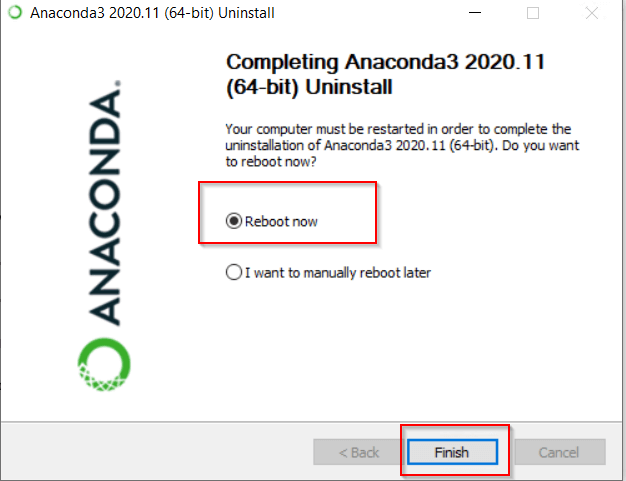
Click Next and then select Reboot Now or «I want to manually reboot later» as per your preference.
I will select reboot now and then Finish to complete uninstallation of Anaconda.
Important Tip
In a few rare cases, you may find the Anaconda3 folder, where you installed Anaconda. For example, in my case, it will reside in «C:usersDevenderanaconda3«. You can manually delete it if you find it after uninstallation of Anaconda.
You must be a happy soul now!!
Video
Check out this informative video on «How to Install Anaconda on Windows 10«. In case, you don’t like reading text or something is not clear in text instructions.
Conclusion
If you follow each and every instruction of this tutorial, You can install Anaconda on Windows 10 very easily. Even if you are a novice in the development world.
I wish you all the good luck for your future learnings. You can also download Anaconda cheat sheet to keep it handy.
Let me know, in case you have any feedback or suggestions for me.
v0.11.1 — implicitly add defaults channel
This fix brings some level of backwards compatibility with versions <0.11.0. The defaults channel is automatically added to the solve if not present in the anaconda-project.yml file. By adding nodefaults this behavior is disabled.
v0.11.0 — Linux and Mac arm support
In this release osx-arm64 and linux-aarch64 are officially supported. Also, anaconda-project respects the CONDA_SUBDIR env var if you need to switch your platform. For example, to prepare an osx-64 env on an M1 Mac.
An important breaking change is that anaconda-project will only install packages from channels listed in the anaconda-project.yml file and not from channels defined in your .condarc file.
This version drops support for Python 2.7 in the env where anaconda-project is installed. You can still use anaconda-project to make Python 2.7 environments. We just won’t be testing anaconda-project in a Python 2.7 Miniconda install.
bug fix: progress bars
fixed an issue where downloads with out content-length will fail
Progress bars
Progress bars have been added for
- file downloads during the prepare step
- project download and unarchive
Pip, conda-pack, and Docker
This version improves support for pip packages with the add-packages, remove-packages, list-packages, and lock commands.
Secondly, two new options for exporting projects.
anaconda-project archive --pack-envs <archive>will use conda-pack to include full Conda environments in the archiveanaconda-project dockerizewill use s2i-anaconda-project to build Docker images from your project
See the documentation for more details on how to use these new features.
Pinning, uploads, prepares…
v0.8.3: Merge pull request #206 from mcg1969/revprep