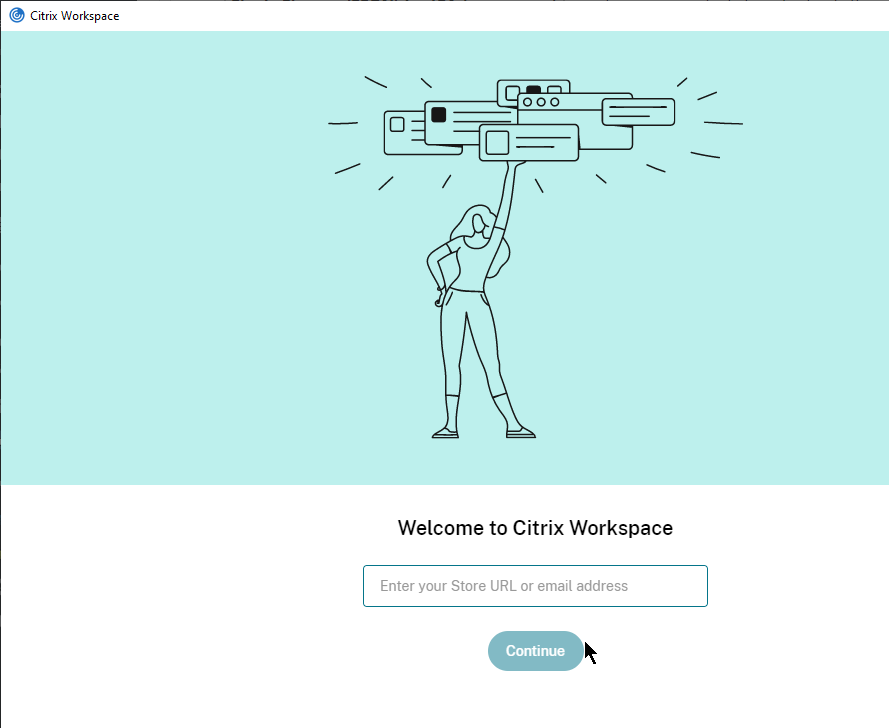
С помощью программы можно создать облачное рабочее пространство для хранения файлов и приложений. Есть возможность организовать общий доступ к данным.
Дата обновления:
14.03.2021
Разработчик:
Citrix Systems, Inc.
Версия Windows:
Windows 10
Citrix Workspace – приложение для Windows, позволяющее создавать виртуальные рабочие столы. Утилита представляет собой замену Citrix Receiver и используется для организации удаленной работы сотрудников. С помощью программы пользователи могут получить доступ к облачным службам, приложениям, сервисам и файлам.
Подключение
Для использования сервиса необходимо указать адрес рабочей электронной почты или облачного сервера. Затем будет доступно виртуальное рабочее пространство. Есть возможность настроить автоматический запуск приложения при старте операционной системы.
Удаленная работа
Главной задачей программы является организация удаленной работы сотрудников. Утилита позволяет пользователям получать доступ к офисным утилитам и инструментам из любой точки. Поддерживается функция создания папок для группировки ярлыков. Также с помощью программы можно обеспечить общий доступ к рабочим файлам и документам.
Безопасность
Для обеспечения защиты важной информации есть возможность настроить многофакторную аутентификацию, что помогает снизить вероятность взлома учетной записи пользователя. Кроме того, все данные передаются в зашифрованном виде. Администраторам доступен модуль обнаружения и предотвращения сетевых атак.
Особенности
- приложение распространяется бесплатно;
- утилита представляет собой облачную платформу для создания виртуальных рабочих пространств;
- есть возможность управлять полномочиями пользователей;
- доступна функция группировки приложений и файлов;
- поддерживается интеграция с JIRA, GSuite и другими сервисами;
- программа совместима с актуальными версиями Windows.
141 Мб (скачиваний: 1296)
![]() ChatGPT
ChatGPT
Windows XP, Windows Vista, Windows 7, Windows 8, Windows 8.1, Windows 10 Бесплатно
Чат бот от компании OpenAI, способный вести диалог, искать ошибки в программном коде, шутить и спорить на разные темы. Сервис создан на основе модели GPT 3.5.
ver 3.5
![]() EA app
EA app
Windows 7, Windows 8, Windows 8.1, Windows 10 Бесплатно
Приложение представляет собой платформу, позволяющую приобретать, скачивать и запускать компьютерные игры. Есть возможность обмениваться достижениями с друзьями.
ver 12.21.0.5278
![]() Мой спорт Тренер
Мой спорт Тренер
Бесплатно
Сервис представляет собой цифровую платформу, предназначенную для спортивных школ и организаций. С его помощью тренеры могут составлять расписание занятий.
ver
![]() BUFF Game
BUFF Game
Windows XP, Windows Vista, Windows 7, Windows 8, Windows 8.1, Windows 10 Бесплатно
Приложение позволяет геймерам получать баллы за выполнение игровых заданий. Есть возможность обменять бонусы на реальные товары или цифровые подарочные карты.
ver 0.5.0.45
![]() Toncoin
Toncoin
Windows XP, Windows Vista, Windows 7, Windows 8, Windows 8.1, Windows 10 Бесплатно
Утилита представляет собой криптовалютный кошелек, позволяющий хранить средства и совершать переводы. Можно получить информацию о балансе и список транзакций.
ver 1.0
![]() Ton Place
Ton Place
Windows XP, Windows Vista, Windows 7, Windows 8, Windows 8.1, Windows 10 Бесплатно
Социальная сеть, разработанная на основе блокчнейна TON. Пользователи могут публиковать новости, создавать сообщества по интересам и общаться с друзьями.
ver 1.0
![]() PokerStars
PokerStars
Windows XP, Windows Vista, Windows 7, Windows 8, Windows 8.1, Windows 10 Бесплатно
Официальный клиент одноименного покер рума. Программа позволяет принимать участие в турнирах и играть на деньги. Есть возможность получить бонус на первый депозит.
ver 7.46703
![]() Звонки ВКонтакте
Звонки ВКонтакте
Windows 10 Бесплатно
Приложение предназначено для проведения онлайн совещаний и видеоконференций с одновременным участием до 2048 человек. Поддерживается режим демонстрации экрана.
ver 1.0.2180
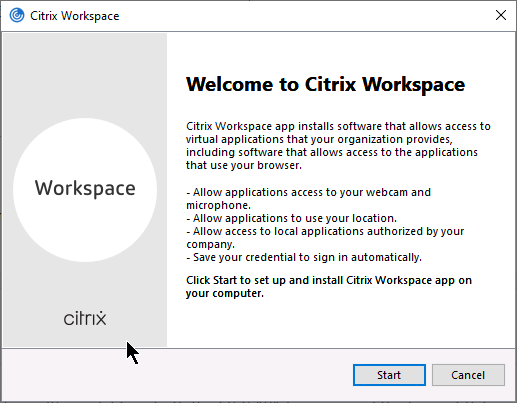
Citrix Workspace для ПК: Как скачать и установить на ПК Windows

Загрузите приложение, например Citrix Workspace, на ПК с Windows! Прямая загрузка ниже:
Кроме того, следуйте приведенным ниже инструкциям, чтобы использовать Citrix Workspace на своем ПК:
Чтобы получить Citrix Workspace работать на вашем компьютере легко. Вам обязательно нужно обратить внимание на шаги, перечисленные ниже. Мы поможем вам скачать и установить Citrix Workspace на вашем компьютере в 4 простых шага ниже:
1: Загрузить эмулятор приложения Andriod
Эмулятор имитирует / эмулирует устройство Android на вашем компьютере, облегчая установку и запуск приложений Android, не выходя из вашего ПК. Для начала вы можете выбрать одно из следующих приложений:
i. Nox App .
ii. Bluestacks .
Я рекомендую Bluestacks, так как он очень популярен во многих онлайн-уроках
2: Теперь установите программный эмулятор на ПК с Windows
Если вы успешно загрузили Bluestacks.exe или Nox.exe, перейдите в папку «Загрузки» на вашем компьютере или в любое место, где вы обычно храните загруженные файлы.
- Найдя его, нажмите его. Начнется процесс установки.
- Примите лицензионное соглашение EULA и следуйте инструкциям на экране.
Если вы сделаете все правильно, Программное обеспечение будет успешно установлено.
3: С помощью Citrix Workspace на компьютере
После установки откройте приложение эмулятора и введите Citrix Workspace в строке поиска. Теперь нажмите Поиск. Вы легко увидите желаемое приложение. Нажмите здесь. Это будет отображаться Citrix Workspace в вашем программном обеспечении эмулятора. Нажмите кнопку Установить, и ваше приложение начнет установку. Чтобы использовать приложение, сделайте это:
Вы увидите значок «Все приложения».
Нажмите, чтобы перейти на страницу, содержащую все ваши установленные приложения.
Вы увидите app icon. Нажмите, чтобы начать использовать ваше приложение. Вы можете начать использовать Citrix Workspace для ПК!
Другие источники загрузки
Скачать для Android — Ссылка 1 ↲
Бесплатно В iTunes ↲
отказ
Citrix Workspace разработан Citrix Systems, Inc.. Этот сайт не имеет прямого отношения к разработчикам. Все товарные знаки, зарегистрированные товарные знаки, названия продуктов и названия компаний или логотипы, упомянутые здесь, являются собственностью их соответствующих владельцев.
Если вы считаете, что это приложение / игра нарушает ваши авторские права, пожалуйста, Свяжитесь с нами здесь. Мы DMCA-совместимы и рады работать с вами. Пожалуйста, найдите DMCA страница здесь.
In Softonic we scan all the files hosted on our platform to assess and avoid any potential harm for your device. Our team performs checks each time a new file is uploaded and periodically reviews files to confirm or update their status. This comprehensive process allows us to set a status for any downloadable file as follows:
- Clean
-
It’s extremely likely that this software program is clean.
What does this mean?
We have scanned the file and URLs associated with this software program in more than 50 of the world’s leading antivirus services; no possible threat has been detected.
- Warning
-
This software program is potentially malicious or may contain unwanted bundled software.
Why is the software program still available?
Based on our scan system, we have determined that these flags are possibly false positives.
What is a false positive?
It means a benign program is wrongfully flagged as malicious due to an overly broad detection signature or algorithm used in an antivirus program.
- Blocked
-
It’s highly probable this software program is malicious or contains unwanted bundled software.
Why is this software program no longer available in our Catalog?
Based on our scan system, we have determined that these flags are likely to be real positives.
- Home
- Windows
- Browsers
- Citrix Workspace
A versatile workspace app
Automation is becoming more and more evident in our daily lives. This can be your coffee machine pouring your next cup of joe, or your Tesla driving you around town. It all leaves but one question, but what about my work?
Focus on what’s important
Citrix Workspace gives you the tools needed to be productive while providing a seamless experience.
Citrix adapts to your specific needs, giving you direct access to everything in one single workspace. You can quick access your files, your apps and configure it in a way that makes sense for you. The idea is that this results in more productivity and higher quality work. You can work smarter with personalized insights that will guide your work to its highest standard.
Furthermore, if you are an entrepreneur or a business owner you can protect your business’s future with integrated security that includes processes which automate detection and removal of any unwanted, or potential, threats to all users across every network.
Citrix works with some of the most influential partners in the tech industry. These include Microsoft, LG, Cisco, and Google Cloud. Citrix gives you the freedom to grow and offers the guidance that you need to be more effective at what you do. Citrix is building towards the future and adopting new techniques for every update to technology.
Where can you run this program?
Apart from installing the Chrome extension, you can run Citrix on all Windows, Mac, iOS, Linux, Android compatible operating systems.
Is there a better alternative?
No. VMware and XenApp provide competition, but Citrix currently seems to be the best choice available.
Our take
If you want to keep up with technology and push your productivity or business to the forefront of innovation and advancement, Citrix is a good program for you.
Should you download it?
Yes. You should download Citrix if you want to advance your work, your team and your business.
Highs
- Easy automation
- Organized
- Fast task completion
Lows
- Limited language options
- Some apps are slow
- Takes time to adapt
New Apps
-

Debut Video Capture Software
Capture images and videos for free with Debut Video Capture Software
-
Skype
If you need a tool to make calls online, Skype’s certainly a genuine option with lots to offer a certain kind of user
-
BitTorrent
File transfer service
-
PureVPN
Browse the internet anonymously with this VPN service
-
TeamViewer
Less time explaining, more time doing
-
Rainmeter
If you miss the Windows widgets of old, Rainmeter could be what you’re looking for.
-
Safe Exam Browser
Assessments without cheating
-
Discord
A unique chat app focused on gamers!
-
Origin
PC gaming service from game developers
-
Notepad++
Free and user-friendly open source code editor for users of all skill levels
✔ Наш обзор
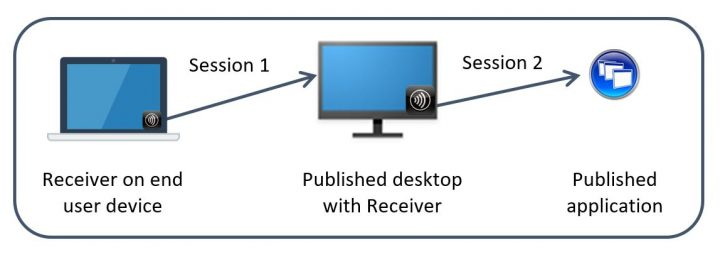
1. Citrix Workspace app lets you access your SaaS, web apps, mobile, virtual apps, files, and desktops to help you be as productive on the go as you are in the office.
Скриншоты

загрузить и установить Citrix Workspace на вашем персональном компьютере и Mac
Некоторые приложения, например, те, которые вы ищете, доступны для Windows! Получите это ниже:
| SN | заявка | Скачать | рецензия | Разработчик |
|---|---|---|---|---|
| 1. | Citrix Workspace
|
Скачать | 2.7/5 605 рецензия 2.7 |
Citrix |
Или следуйте инструкциям ниже для использования на ПК :
Выберите версию для ПК:
- Windows 7-10
- Windows 11
Если вы хотите установить и использовать Citrix Workspace на вашем ПК или Mac, вам нужно будет загрузить и установить эмулятор Desktop App для своего компьютера. Мы усердно работали, чтобы помочь вам понять, как использовать app для вашего компьютера в 4 простых шагах ниже:
Шаг 1: Загрузите эмулятор Android для ПК и Mac
Хорошо. Прежде всего. Если вы хотите использовать приложение на своем компьютере, сначала посетите магазин Mac или Windows AppStore и найдите либо приложение Bluestacks, либо Приложение Nox . Большинство учебных пособий в Интернете рекомендуют приложение Bluestacks, и у меня может возникнуть соблазн рекомендовать его, потому что вы с большей вероятностью сможете легко найти решения в Интернете, если у вас возникнут проблемы с использованием приложения Bluestacks на вашем компьютере. Вы можете загрузить программное обеспечение Bluestacks Pc или Mac here .
Шаг 2: установите эмулятор на ПК или Mac
Теперь, когда вы загрузили эмулятор по вашему выбору, перейдите в папку «Загрузка» на вашем компьютере, чтобы найти приложение эмулятора или Bluestacks.
Как только вы его нашли, щелкните его, чтобы установить приложение или exe на компьютер или компьютер Mac.
Теперь нажмите «Далее», чтобы принять лицензионное соглашение.
Чтобы правильно установить приложение, следуйте инструкциям на экране.
Если вы правильно это сделаете, приложение Emulator будет успешно установлено.
Шаг 3: Citrix Workspace для ПК — Windows 7/8 / 10/ 11
Теперь откройте приложение Emulator, которое вы установили, и найдите его панель поиска. Найдя его, введите Citrix Workspace в строке поиска и нажмите «Поиск». Нажмите на Citrix Workspaceзначок приложения. Окно Citrix Workspace в Play Маркете или магазине приложений, и он отобразит Store в вашем приложении эмулятора. Теперь нажмите кнопку «Установить» и, например, на устройстве iPhone или Android, ваше приложение начнет загрузку. Теперь мы все закончили.
Вы увидите значок под названием «Все приложения».
Нажмите на нее, и она перенесет вас на страницу, содержащую все установленные вами приложения.
Вы должны увидеть . Нажмите на нее и начните использовать приложение.
Шаг 4: Citrix Workspace для Mac OS
Привет. Пользователь Mac!
Шаги по использованию Citrix Workspace для Mac точно такие же, как для ОС Windows выше. Все, что вам нужно сделать, это установить Nox Application Emulator или Bluestack на вашем Macintosh. Вы можете получить Это здесь .
Спасибо за чтение этого урока. Хорошего дня!
Google play stats — Citrix Workspace
| Скачать | Разработчик | Рейтинг | Score | Текущая версия | Совместимость |
|---|---|---|---|---|---|
| Apk для ПК | Citrix Systems, Inc | 402,602 | 5 | 19.09.0.0 | Android 5.0+ |
Citrix Workspace На iTunes
| Скачать | Разработчик | Рейтинг | Score | Текущая версия | Взрослый рейтинг |
|---|---|---|---|---|---|
| Бесплатно На iTunes | Citrix Systems, Inc. | 208 | 4.38462 | 20.12.0 | 4+ |
Как скачать и установить Citrix Workspace в Windows 11
Чтобы использовать мобильные приложения в Windows 11, необходимо установить Amazon Appstore. Как только он будет настроен, вы сможете просматривать и устанавливать мобильные приложения из кураторского каталога. Если вы хотите запускать приложения Android на своей Windows 11, это руководство для вас..
Шаги по настройке компьютера и загрузке приложения Citrix Workspace в Windows 11:
- Проверьте, совместим ли ваш компьютер: Вот минимальные требования:
- RAM: 8GB (минимум), 16GB (рекомендованный)
- Хранение: SSD
- Processor:
- Intel Core i3 8th Gen (минимум или выше)
- AMD Ryzen 3000 (минимум или выше)
- Qualcomm Snapdragon 8c (минимум или выше)
- Processor Architecture: x64 or ARM64
- Проверьте, имеет ли Citrix Workspace собственную версию Windows. Сделай это здесь ». Если собственная версия отсутствует, перейдите к шагу 3.
- Установите Amazon Appstore из Microsoft Store. Сделай это здесь ». При выборе «Получить» начнется установка приложения и автоматически установится подсистема Windows для Android.
- После установки Amazon Appstore и приложение «Настройки подсистемы Windows для Android» появятся в меню «Пуск» и списке приложений. Откройте Amazon Appstore и войдите в свою учетную запись Amazon.
- Перейдите в магазин приложений Amazon и выполните поиск по слову « Citrix Workspace ». Откройте страницу приложения, щелкнув значок приложения. Нажмите «Установить». После установки нажмите «Открыть», чтобы начать использовать приложение Citrix Workspace.
Особенности и описания
Citrix Workspace app lets you access your SaaS, web apps, mobile, virtual apps, files, and desktops to help you be as productive on the go as you are in the office. If your company uses Citrix, you have the freedom to work on your favourite device from wherever you are. Just ask your IT department how to get started.
HOW TO USE CITRIX Workspace app
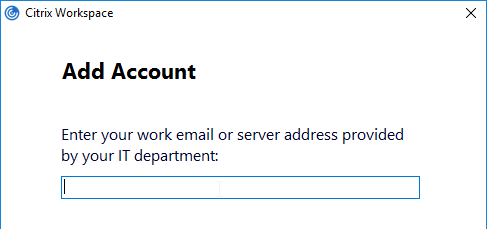
1. Open Citrix Workspace app and tap on Get Started.
2. Enter the Server or email address as instructed by Your IT Help Desk or system administrator.
3. Enter your User Name and Password.
4. Select the applications you want to use.
5. For adding multiple accounts, navigate to Settings and tap on Manage Accounts.
6. For Deleting/Editing Account already added navigate to Settings and tap on the Store.
HOW TO REPORT AN ISSUE TO CITRIX — Please contact your company’s IT support team before following these steps:
Option 1
1. Open Citrix Workspace app and tap ‘Settings’ and then ‘Support’.
2. Tap ‘Request Help from Support’; This generates an email with log file.
3. Send the email to your company’s IT support team.
Option 2
1. In the App Store, go to Citrix Workspace
2. Tap ‘Reviews’ and then tap ‘App Support’ found at the bottom right of the screen.
3. This launches the Citrix support forum where you can review reported issues OR
4. To report issues, tap the menu icon and create an account first.
заявка рецензия
-
Second screen
Add second screen on iPad Pro, not mirroring but second, iOS supports it!
-
Язык
Скачал приложение, при открытии приложение работает на корейском языке.
В виду незнания корейского не понимаю как поменять язык.
Попробовал все вкладки, так и не понять где можно поменять язык. -
Молодцы
Со временем стало почти идеально
Navigation
Workspace app is the new name for Receiver. This post applies to all Workspace app versions, including the Current Release version 2212, and the LTSR version 2203.2000.
- Change Log
- Workspace app versions
- Overview
- Workspace app Modules
- Workspace app Discovery and Beacon Process
- Virtual Monitors
- Uninstall Old Receiver Clients
- Installation and Configuration
- Administrator vs non-administrator
- Workspace app Auto-Update
- Splash Screen
- Add Account Wizard
- CitrixWorkspaceApp.exe Command line switches
- Workspace app Registry values
- Workspace app Group Policy settings
- Client-side Registry for Microsoft Edge
- Workspace app ADMX GPO Template
- Pass-through Authentication
- Automatically add StoreFront Accounts to Workspace app
- Control Shortcut placement on Desktop and Start Menu – and Workspace Control (Session Reconnect)
- Enable Prelaunch
- Control Device Mapping Prompts
- Desktop Lock
- Use Studio to configure Workspace app Accounts in Published Desktop
- Published Desktop – configure Workspace app to place shortcuts
- Script / Automate Workspace app and Receiver Self-Service
- Microsoft Teams
- Skype for Business
- Troubleshoot:
- Citrix QuickLaunch
- Workspace app Logging
- Clean up Duplicate Stores
💡 = Recently Updated
Change Log
- 2022 Dec 19 – updated article for Workspace app 2212; app protection GPO setting
- 2022 Nov 29 – Versions – updated for Workspace app 2203 CU2 (22.03.2000) LTSR
- 2022 Nov 4 – Versions – updated for Workspace app 1912 LTSR Cumulative Update 7 Hotfix 2
- 2022 Oct 31 – updated entire article for Workspace app 2210.5
- 2022 Apr 11 – Versions – updated for Workspace app 1912 LTSR Cumulative Update 7 Hotfix 1
- 2022 Apr 7 – Versions – updated for Workspace app 2203 CU1 (22.03.1000) LTSR
Workspace app Versions
Workspace app is the new name for Receiver.
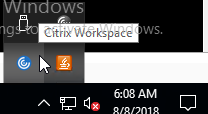
The systray icon for Workspace app is blue instead of black, but Workspace app is otherwise identical to Receiver, except for new features that are only in Workspace app (e.g., Browser Content Redirection, App Protection, Teams Optimization).
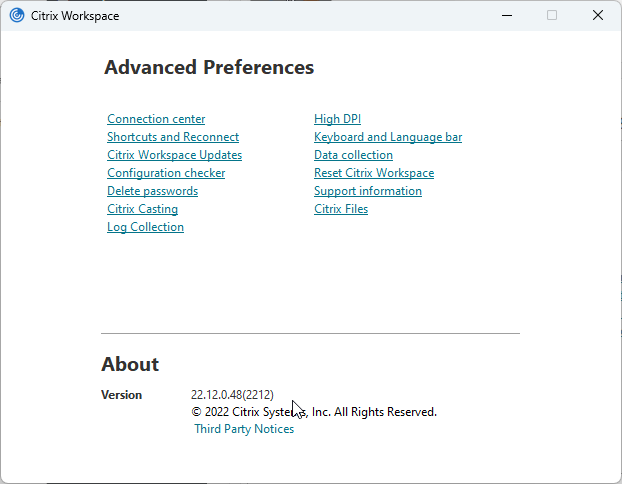
Workspace app uses a YYMM (year/month) versioning format, of which version 2212 (22.12.0.48) is the newest.
Workspace app 2009 and newer have the new Citrix logo.
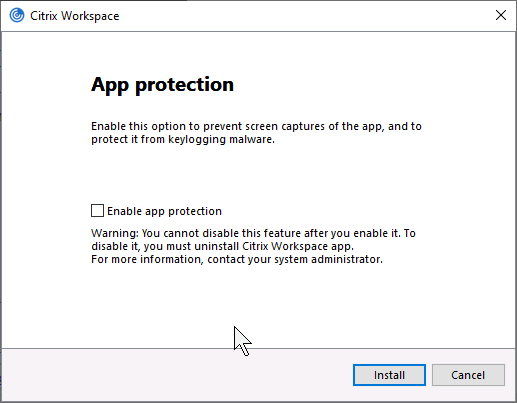
Workspace app 1912 and newer support App Protection. It’s available in both LTSR versions (1912 and 2203) and the Current Release 2212 version. See Enhancement to App Protection configuration at Citrix Docs to enable App protection for the authentication screen.
There are two LTSR (Long Term Service Release) versions of Workspace app: 22.03.2000, and 1912 Cumulative Update 7 Hotfix 2.
Workspace app Modules
The Workspace app installer deploys multiple modules. Here are the important ones:
- ICA Engine (wfica.exe) – process that uses the ICA protocol to connect to published apps and desktops.
- Self-Service (selfservice.exe) – gets icons from StoreFront and displays them in a Window. When an icon is clicked, Self-service passes the ICA file to the ICA Engine to establish a connection.
- Single Sign-on (SSON) for ICA (ssonsvr.exe) – captures user credentials and submits them to VDAs after an ICA connection is established
- Workspace Auto-Update (CitrixReceiverUpdater.exe) – Notifies users of Workspace app updates. The most recent name for this component is Citrix Workspace Update.
The PNAgent module is not included in Workspace app. The older Receiver Enterprise includes the PNAgent module, but does not include Self-Service. The last version of Receiver Enterprise is 3.4.
Custom ICA files are no longer supported. However, Ryan Butler has created a script that asks StoreFront for an ICA file. Explicit credentials are supported. Find the script at Github.
Workspace app Discovery and Beacon Process
If you are using Workspace app’s built-in user interface (instead of a web browser), then Workspace app first prompts you to perform discovery, which is also called Add Account.
The Citrix logo changed in Workspace app 2009 and newer.
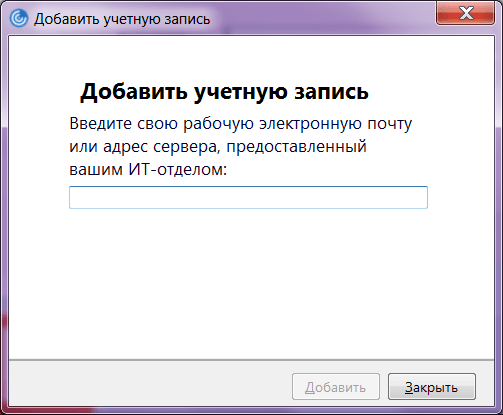
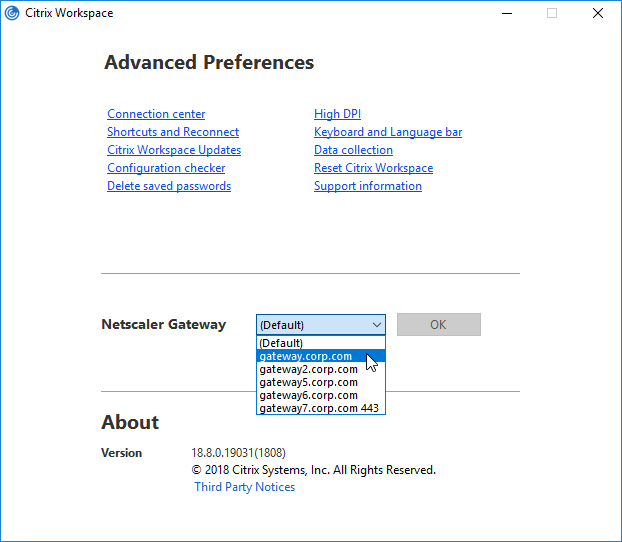
The Add Account wizard changed in Workspace app 2108 and newer. Enter a StoreFront FQDN, a Citrix Gateway FQDN, or Citrix Cloud Workspace FQDN. Just enter the FQDN. There’s no need to enter https or a path.
Workspace app will contact the FQDN and request download of the StoreFront Provisioning File.
- If you entered a StoreFront FQDN, then Workspace app will download the Provisioning File directly from the StoreFront server.
- If you entered a Gateway FQDN, then Gateway will first prompt the user to authenticate. After authentication, Gateway will connect to its configured Account Services address, and download the Provisioning File from StoreFront. The Account Services address is configured in the NetScaler Gateway Session Profile on the Published Applications tab.

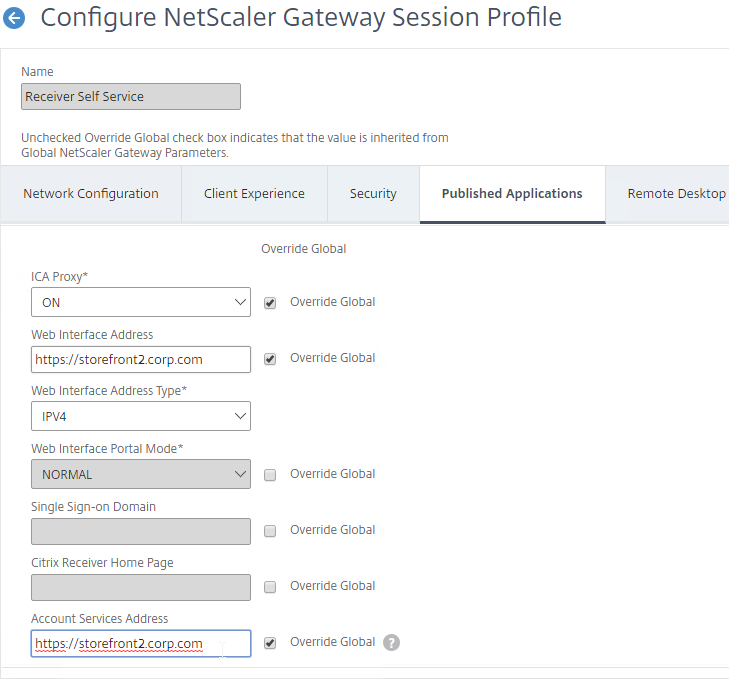
If your StoreFront server is configured with multiple stores, then the user will be prompted to select a store. Unfortunately, there’s no configuration option in NetScaler Gateway to force a particular store.
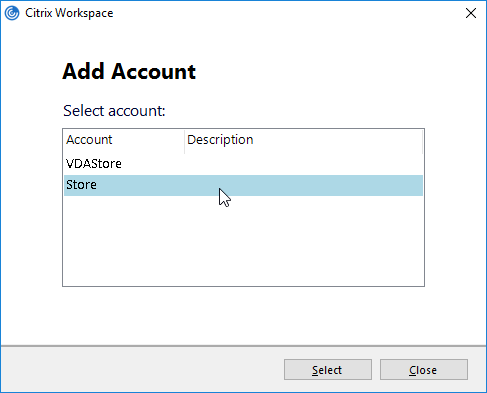
- One workaround is to hide the store that you don’t want visible externally. See How to configure Receiver to a Store that is not advertised for special syntax.

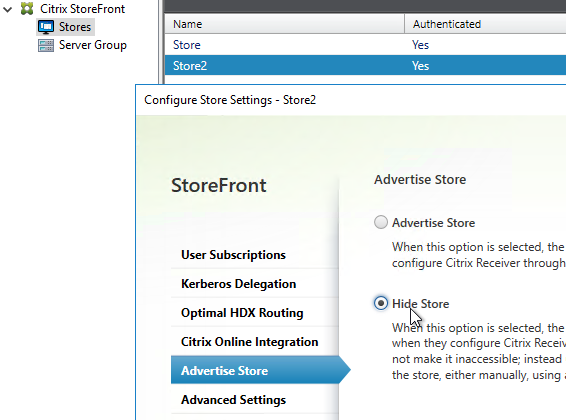
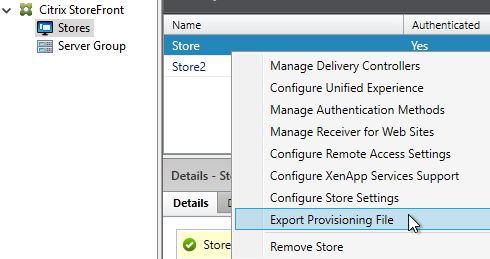
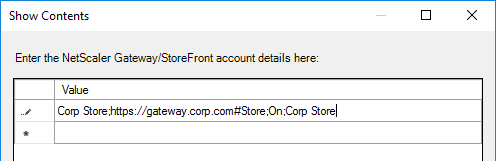
The Provisioning File downloaded from StoreFront is an XML document containing values for several items configured in the StoreFront console. You can export the Provisioning File from the StoreFront console by right-clicking a Store.
The ReceiverConfig.cr Provisioning File looks something like this:
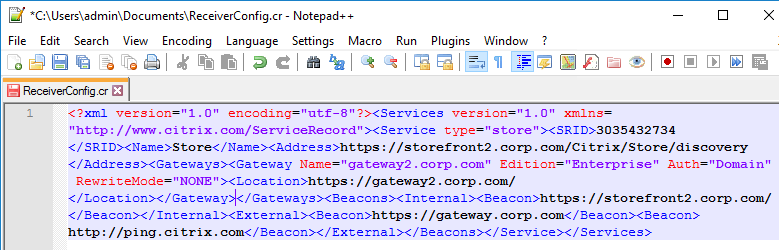
Here are the values in the Provisioning File:
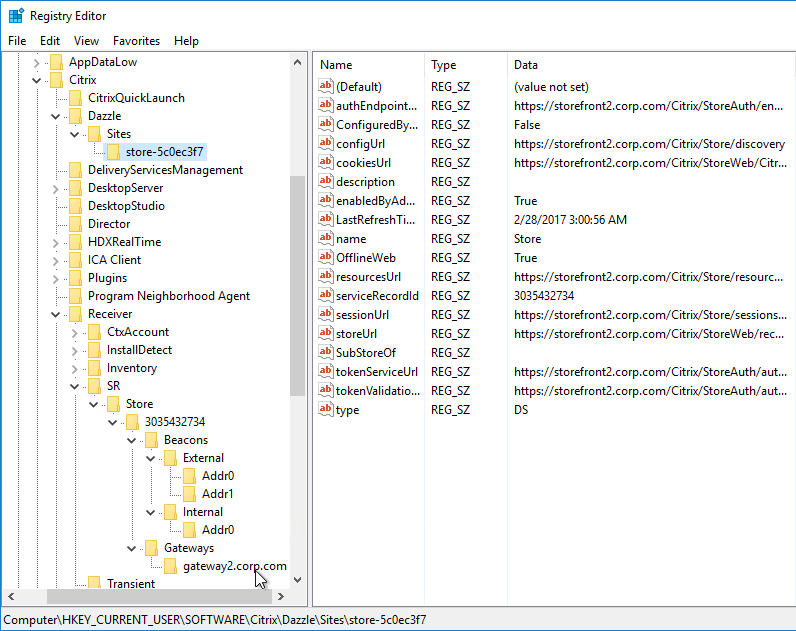
Workspace app reads the Provisioning File, and configures itself by inserting the file’s contents into the user’s registry. The values are located under HKCUSoftwareCitrixDazzleSites and HKCUSoftwareCitrixReceiverSR. If you performed discovery through NetScaler Gateway, notice that the internal Base URL is added to the user’s registry.
Once Workspace app is configured, it then performs the following steps:
- Attempt to connect to the Internal Beacon.
- If the Internal Beacon is reachable, connect directly to the StoreFront Base URL (Address).
- If the Internal Beacon is not reachable:
- Attempt to connect to the External Beacons. If the External Beacons are not reachable, then stop attempting to connect.
- Connect to the Gateway address configured in the Provisioning File. If there is more than one Gateway, connect to the Gateway that is marked as the Default.
Here are some interesting notes on this connection process:
- The FQDN you entered during Discovery has absolutely nothing to do with how Workspace app connects to StoreFront or Gateway. The actual connection process is controlled by the contents of the Provisioning File, not the Discovery address.
- If the Provisioning File has multiple Gateways defined, Workspace app uses whichever Gateway is marked as Default. Workspace app and Receiver completely ignore whatever Gateway FQDN you entered during Discovery. To use a non-default Gateway, the user must manually select the other Gateway in Workspace app’s / Receiver’s Advanced Preferences.

In StoreFront Console, if any configuration changes are performed that affect the Provisioning File, do the Workspace apps / Receivers reconfigure themselves automatically? Or do users have to remove Accounts and re-add (or Reset Citrix Workspace / Receiver) so the updated Provisioning File is imported?
Here are some additional methods of performing Workspace app Discovery:
Virtual Monitors
In Workspace app 1812 and newer, when connected to a published desktop on a single monitor, you can split the screen into virtual monitors. This feature is intended for large 4K monitors.
Uninstall Old Clients
Workspace app and Receiver 4.4 and newer includes Receiver Clean-Up, so, in theory, it’s not necessary to uninstall old clients first. For more details, see Citrix CTX135933 Upgrading to Citrix Receiver for Windows.
- In Workspace app 1908 and older (including Receiver), to run it silently, run CitrixWorkspaceApp.exe /RCU /Silent or CitrixReceiver.exe /RCU /Silent.
- In Workspace app 1909 and newer, /forceinstall switch is the replacement for /rcu switch.
For a reliable upgrade experience, write a script to remove the old clients, clean up the registry and file system, and then deploy the new Workspace app.
Citrix Blog Post Cookbook to Upgrade from Receiver 3.4 for Windows to Receiver 4.2.100 and Citrix Article CTX135933 Upgrading to Citrix Receiver for Windows contains step-by-step procedure to use Group Policy to uninstall Receiver Enterprise 3.4 and install/configure Workspace app.
The Receiver Clean-Up utility for Receiver 4.3 and older is designed to assist with the following scenarios:
- When errors occur during upgrade from an earlier version of Receiver, or Online Plug-in
- When unexpected behavior or performance is experienced after upgrade from an earlier Receiver or Online Plug-in
- If Receiver upgrade is not possible due to feature incompatibility and/or a clean uninstall is required
- The Receiver Clean-Up Utility removes components, files, and registry values of Online Plug-in 11.x, 12.x, and Receiver for Windows 3.x, 4.x (Online Plugin-in 13.x, 14.x). This includes the Offline Plug-in component if installed.
Citrix CTX325140: How to Remove Client Files Remaining on System after Uninstalling Receiver for Windows.
Blog posts from Shaun Ritchie:
- PowerShell Script to Uninstall all Versions of Citrix Client and Install Citrix Receiver 3.x
- Full list of Citrix Client Uninstall Strings
Installation and Configuration
Internet required – Recent versions of Workspace app (e.g., 2212) download and install Microsoft Edge WebView2 Runtime, .NET Framework 4.8, and Visual C++. Internet access is required for the Workspace app installer to download these install files. See Citrix Docs for details.
This section contains a summary of all common command line switches, registry keys, and policy settings for Workspace app and Receiver.
Links:
- Citrix Blog Post: Optimizing Citrix Receiver for Pre-launch and Single Sign-On
- Citrix CTX202002 How To Deploy Citrix Receiver for Windows Using SCCM 2012 R2
Workspace app 1912 CU5 and Workspace app 2105 and newer fix security vulnerabilities.
CitrixWorkspaceApp.exe current release version 22125, LTSR version 2203 CU2 (aka 22.03.2000), or LTSR version 1912 CU7 Hotfix 2 (aka 19.12.7002) can be installed by simply double-clicking it.
Administrator vs non-administrator
- Non-administrator – If a non-administrator installs Workspace app, then each non-administrator that logs in to the same workstation will have to reinstall Workspace app.
- Non-administrator installations are installed to %USERPROFILE%AppDataLocalCitrixICA Client for each user.
- Administrator – If CitrixWorkspaceApp.exe or CitrixReceiver.exe is installed using an administrator account. then the Workspace app only needs to be installed once.
- Administrator installations are installed to C:Program Files (x86)CitrixICA Client.
- Administrator installations of Workspace app 1912 and newer can be manually upgraded by non-administrators by clicking Check for Updates. Older versions cannot be upgraded by non-administrators.
- Conflicts – If an administrator install of Workspace app is performed on a machine that has non-administrator installs of Workspace app, then the two installations will conflict. Best option is to uninstall non-admin Workspace app and Receiver before installing admin Workspace app. Otherwise, the user’s profile probably has to be reset before Workspace app is functional again.
- Citrix article CTX249920 Workspace App for Windows – Your apps are not available at this time – Issue when installing Citrix Receiver in not elevated/per-user install mode describes the HKEY_CURRENT_USER registry keys that must be deleted to fix this issue.
- For a script to clean-up the per-user installs, see Mark DePalma at Citrix Receiver Per-User Install Cleanup.
Auto-Update
Workspace app supports auto-update.

Some notes:
To troubleshoot Auto-update, see Citrix CTX226779 Troubleshooting Citrix Receiver Updates.
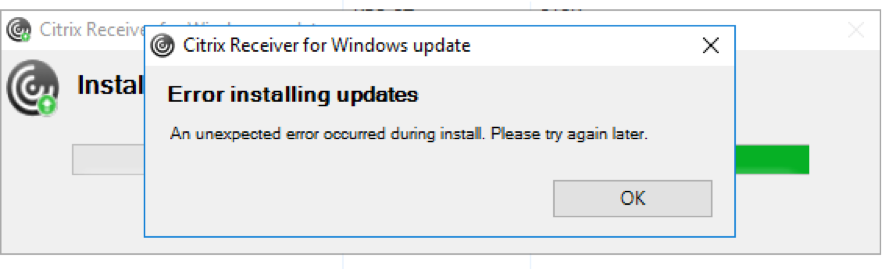
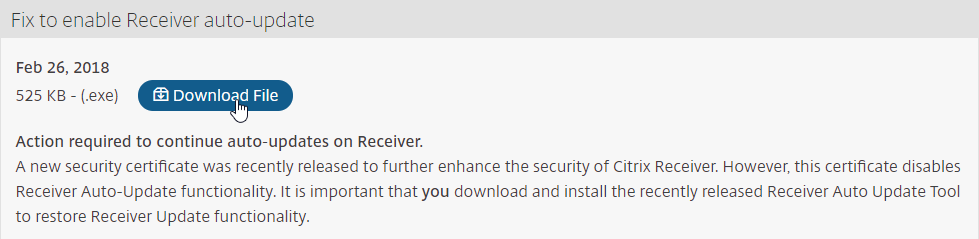
Auto-update is broken in Receiver for Windows 4.11 and older, and Receiver for Mac 12.9 and older. To fix it, manually upgrade to the next version (e.g. Workspace app for Mac), or install the Fix that can be downloaded from the Receiver download page (Source = CTX234657 Receiver Updater stops working with “Problem Checking for updates” error)
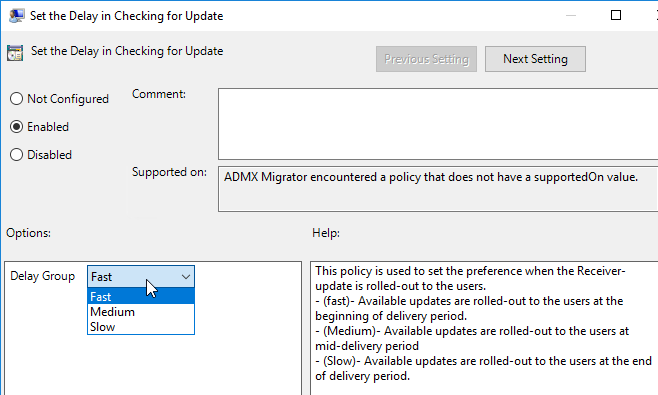
Auto-update is configured using Workspace app group policy under the Citrix Workspace Updates, Receiver Updates or Auto-Update node.
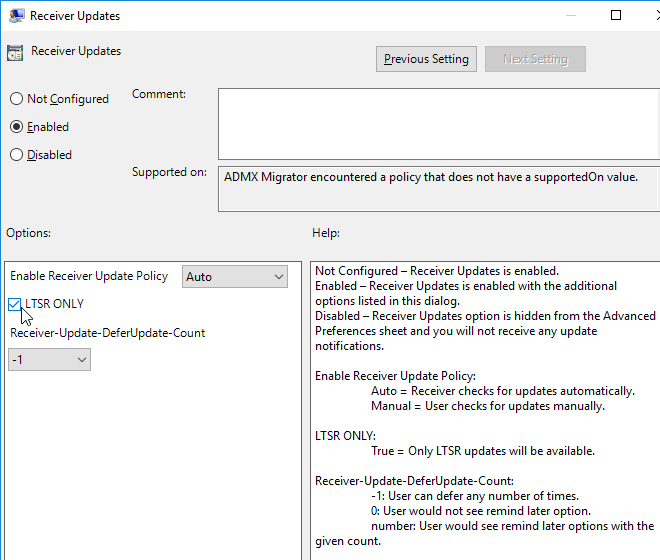
Workspace app Splash Screen
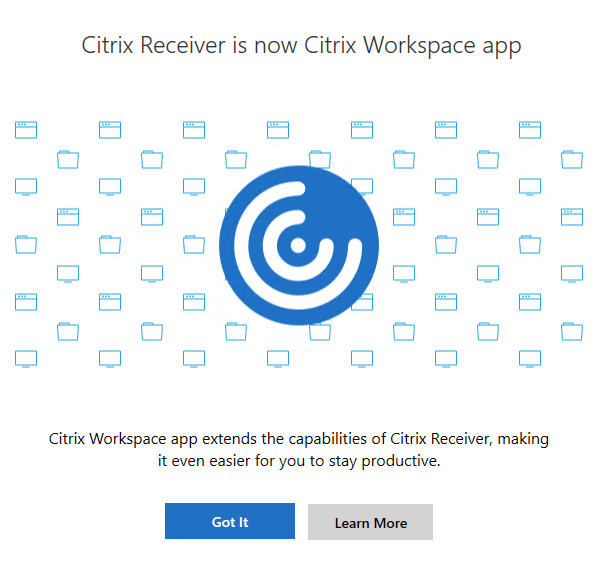
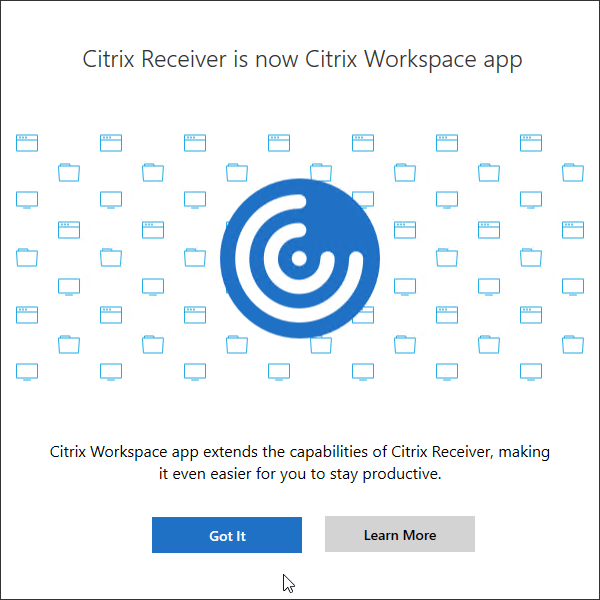
Workspace app shows a Splash Screen on first launch with the text “Citrix Workspace app extends the capabilities of Citrix Receiver”.
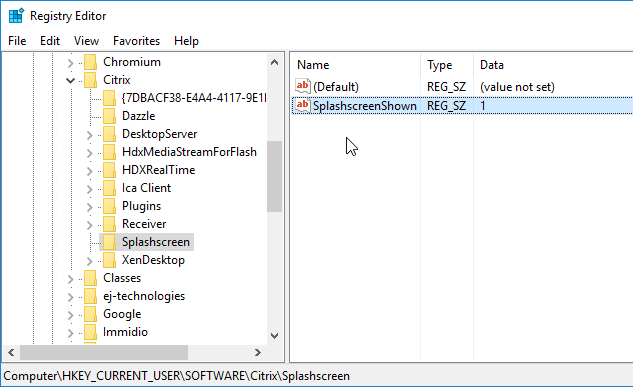
To prevent this splash screen, set the following registry value: (source = Dennis Span on Twitter)
- Key = HKEY_CURRENT_USERSOFTWARECitrixSplashscreen
- Value (REG_SZ) = SplashscreenShown = 1
Add Account Wizard
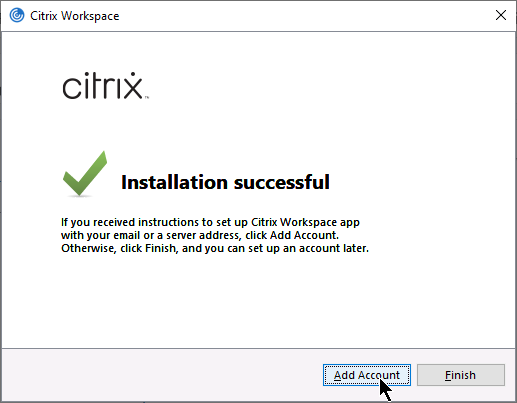
From Citrix CTX135438 How to Suppress the Add Account Window in Citrix Receiver for Windows: After installation, Workspace app will launch and ask you to add an account. If Workspace app, notice the checkbox Do not show this window automatically at logon.
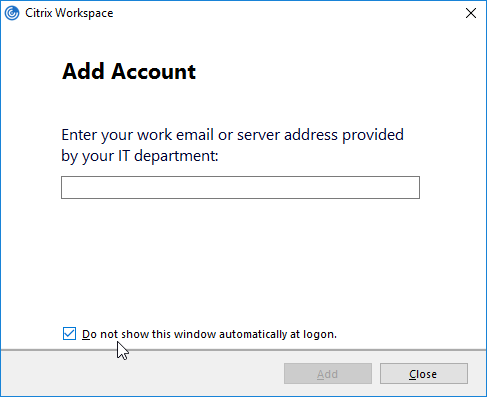
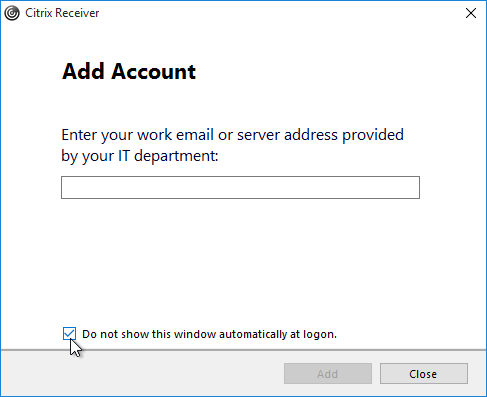
For Workspace app and Receiver 4.4 and newer, FTU (First Time Use aka Add Account Wizard) will be displayed only if a store is not configured. If a store is already configured via command line, GPO, or Citrix Studio, then FTU screen will not be available after installation. Otherwise, FTU can be suppressed by doing one of the following: (Note: Receiver 4.4.1000 and newer has a fix for preventing the Add Account wizard)
- Rename CitrixReceiver.exe to CitrixReceiverWeb.exe.
- Rename CitrixWorkspaceApp.exe to CitrixWorkspaceAppWeb.exe.
- Install using a command line switch:
- CitrixWorkspaceApp.exe /ALLOWADDSTORE=N
- CitrixReceiver.exe /ALLOWADDSTORE=N
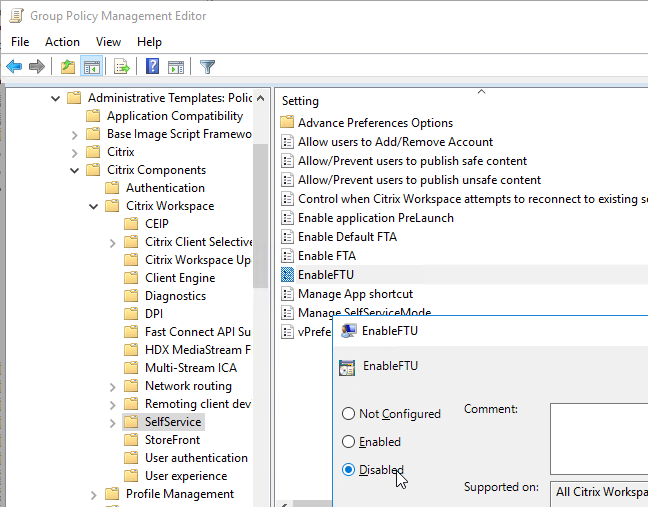
- Set the registry value: HKEY_LOCAL_MACHINESOFTWAREPoliciesCitrixEnableFTU=dword:00000000 (or EnableX1FTU =dword:0)
- Disable the EnableFTU policy setting in Receiver.admx.

- Change Registry values post installation to suppress the Add Account window. Under HKLMSoftwareWow6432NodeCitrixDazzle, set AllowAddStore value to N.
- Set the registry value: HKEY_LOCAL_MACHINESoftwareCitrixReceiverNeverShowConfigurationWizard (REG_SZ) = true
- Also see Suppressing Add Account dialog at Citrix Docs.
Discover Hidden Stores
When Receiver is first launched, it must perform Discovery, which is the process of downloading the .xml provisioning file from StoreFront. Discovery is performed by entering a StoreFront FQDN or Gateway FQDN. To discover a hidden store (a store that’s not advertised), add ?StoreName to the end of the FQDN. CTX214819 How to configure Receiver to a Store that is not advertised.
CitrixWorkspaceApp.exe / CitrixReceiver.exe Command line switches
CTX227370 Citrix Workspace app Commandline Tool contains a GUI tool to build your installer command line.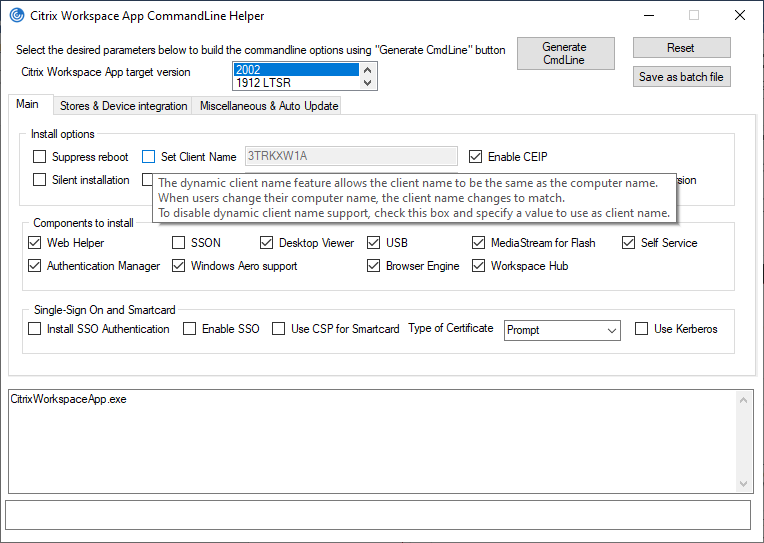
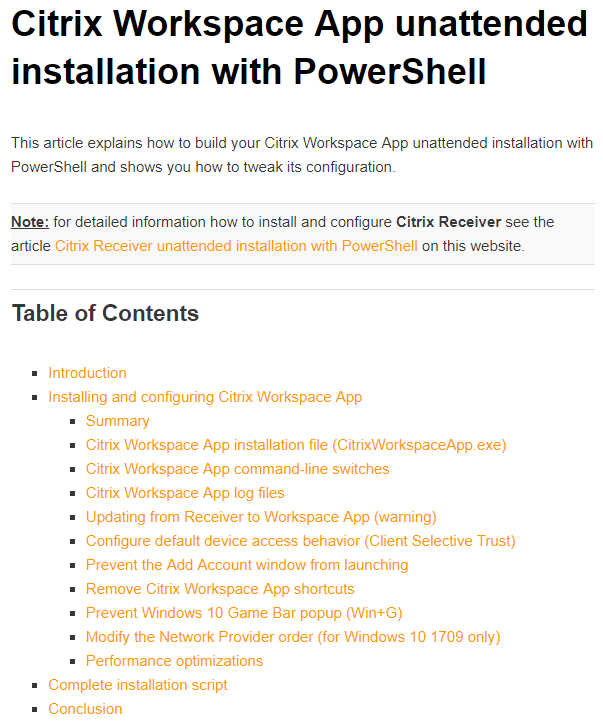
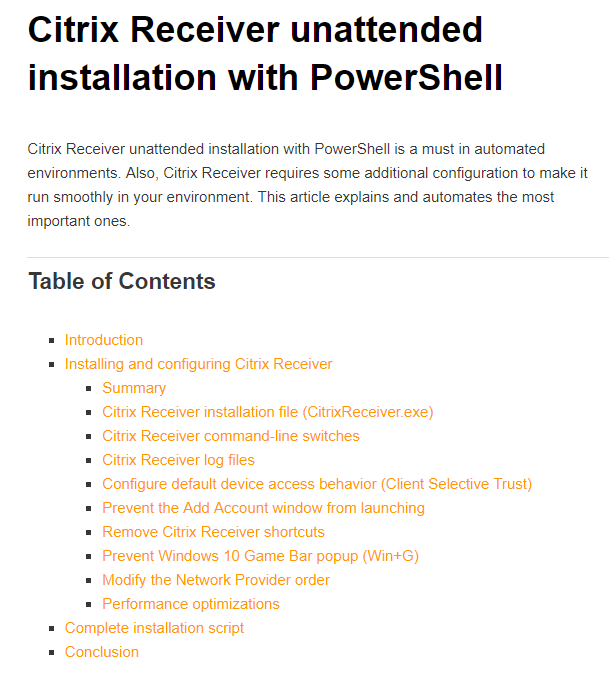
For unattended installation of Workspace app, see CTA Dennis Span Citrix Workspace App unattended installation with PowerShell or Citrix Receiver unattended installation with PowerShell.
Installer Command Line Switches are detailed at Configure and install Receiver for Windows using command-line parameters at Citrix Docs. Common Command line switches include the following:
- /silent
- /includeSSON – enables pass-through authentication. GPO configuration is also required as detailed below.
CitrixWorkspaceApp.exe /includeSSON

CitrixReceiver.exe /includeSSON
- /ALLOWADDSTORE=A – by default, only SSL (HTTPS) stores are accepted. To allow non-SSL stores:
CitrixWorkspaceApp.exe /ALLOWADDSTORE=A

CitrixReceiver.exe /ALLOWADDSTORE=A
- /STORE0 – To add a store from the installation command line:
CitrixWorkspaceApp.exe STORE0="AppStore;https://Citrix.corp.com/Citrix/MyStore/discovery;on;App Store"

CitrixReceiver.exe STORE0="AppStore;https://Citrix.corp.com/Citrix/MyStore/discovery;on;App Store"
- Workspace App and Receiver 4.10 and newer can discover the Store through NetScaler Gateway.
CitrixWorkspaceApp.exe STORE0="AppStore;https://gateway.corp.com#MyStore;On;App Store"

CitrixReceiver.exe STORE0="AppStore;https://gateway.corp.com#MyStore;On;App Store"
- Workspace App and Receiver 4.10 and newer can discover the Store through NetScaler Gateway.
- /SELFSERVICEMODE=False – disables the Self-Service interface and enables shortcut-only mode:
CitrixWorkspaceApp.exe /SELFSERVICEMODE=False

CitrixReceiver.exe /SELFSERVICEMODE=False
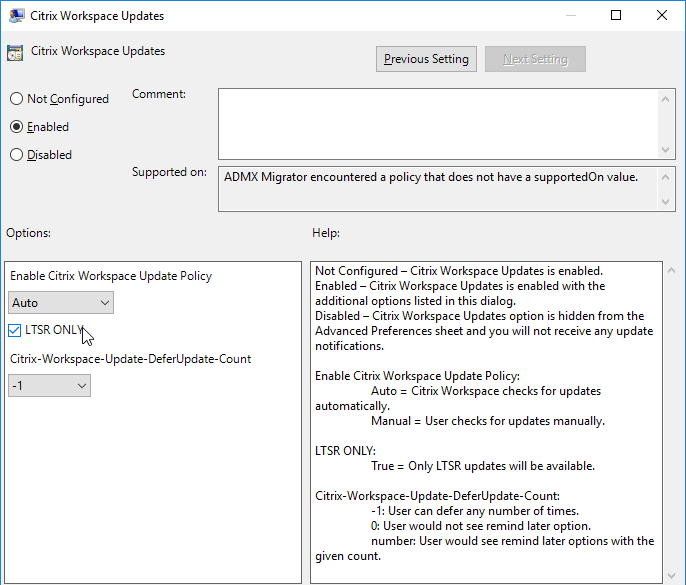
- /AutoUpdateCheck=auto /AutoUpdateStream=LTSR – enables Citrix Workspace Update notifications and sets it to LTSR Branch only. AutoUpdateCheck can also be set to manual or disabled. AutoUpdateStream can also be set to Current. See Configuring Citrix Workspace Updates at Citrix Docs.
CitrixWorkspaceApp.exe /AutoUpdateCheck=auto /AutoUpdateStream=LTSR

CitrixReceiver.exe /AutoUpdateCheck=auto /AutoUpdateStream=LTSR
- /ENABLEPRELAUNCH=True – enables prelaunch:
CitrixWorkspaceApp.exe /ENABLEPRELAUNCH=True

CitrixReceiver.exe /ENABLEPRELAUNCH=True
- /ALLOW_CLIENTHOSTEDAPPSURL=1 – enables Local App Access:
CitrixWorkspaceApp.exe /ALLOW_CLIENTHOSTEDAPPSURL=1

CitrixReceiver.exe /ALLOW_CLIENTHOSTEDAPPSURL=1
Registry values
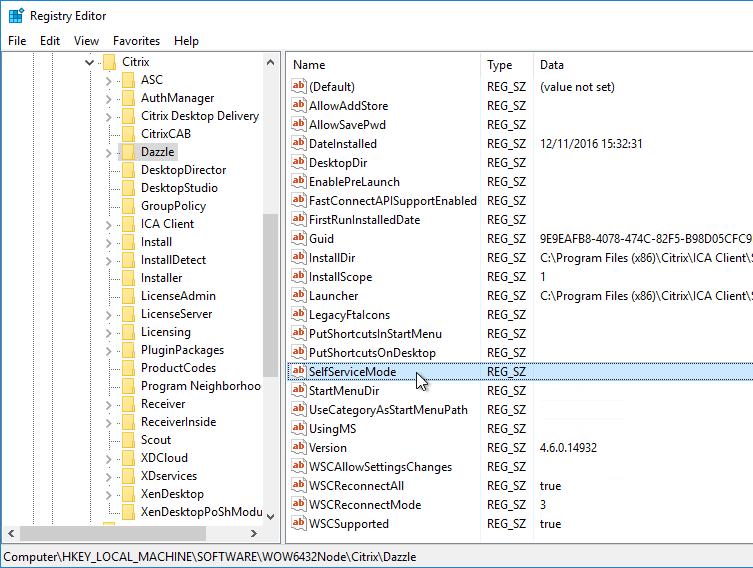
HKLMSoftwareWow6432NodeCitrixDazzle on the Workspace app machine. All are of type REG_SZ (string) unless specified. Note: several of these are configurable using the Reciever.admx group policy template.
- SelfServiceMode (REG_SZ) = False – Turns off Workspace app’s / Receiver’s Self-Service interface.
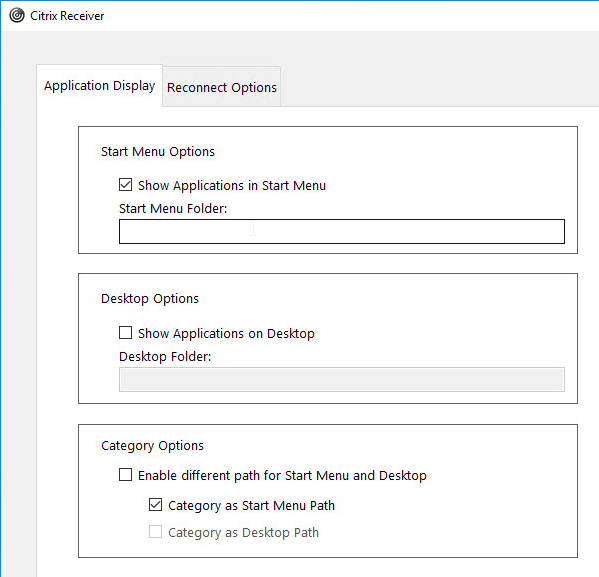
- PutShortcutsOnDesktop (REG_SZ) = True – If Self-Service interface is disabled, places all shortcuts on desktop.
- UseDifferentPathsforStartmenuAndDesktop (REG_SZ) = True
- UseCategoryAsStartMenuPath (REG_SZ) = True or False
- UseCategoryAsDesktopPath (REG_SZ) = True or False
- StartMenuDir (REG_SZ) = name of folder on Start Menu where shortcuts are placed.
- DesktopDir (REG_SZ) = name of folder on Desktop where shortcuts are placed
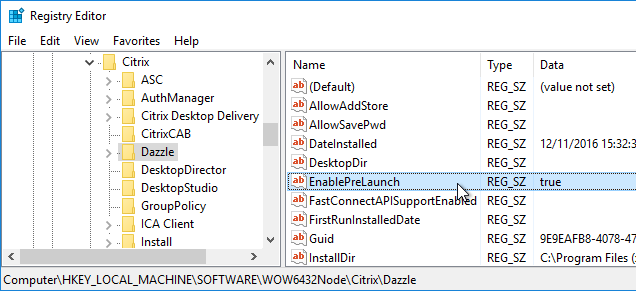
- EnablePreLaunch (REG_SZ) = True – If SSON is enabled then PreLaunch is already enabled by default.
- AllowAddStore (REG_SZ) = A – Only if using http (instead of https) to connect to StoreFront.
- AllowSavePwd (REG_SZ) = A – Only if using http (instead of https) to connect to StoreFront.
- UserDomainName (REG_SZ) = pre-filled domain name
- InitialRefreshMinMs (REG_SZ) = 1 – minimizes the launch delay before contacting store
- InitialRefreshMaxMs (REG_SZ) = 1 – minimizes the launch delay before contacting store
- RefreshMs (REG_SZ) = 3600000 (1 hour) – interval for Receiver icon refreshes. 1 hour is the default value.
- RefreshMs (REG_SZ) = 18000000 – Citrix CTX213755 Citrix Receiver Shows Authentication Window Periodically When Receiver is Not Opened
- MaxSimultaneousFetches (REG_DWORD) = 6 – improves the time of loading icons in Start Menu
- MaxSimultaneousSubscribes (REG_DWORD) = 6 – improves the time of loading icons in Start Menu
- DontWarnOfRemovedResources (REG_SZ) = True – prevents dialog boxes when resources are removed from the server. (or False)
- SilentlyUninstallRemovedResources (REG_SZ) = True – prevents dialog boxes when resources are removed from the server
- PreferTemplateDirectory (REG_SZ) = UNC path or local path containing shortcuts copied by the prefer keyword. Give the shortcuts a short name.
- PnaSSONEnabled (REG_SZ) = True – Enables Single Sign-on for PNAgent (Web Interface).
- WSCReconnectMode (REG_SZ) = 3 (default) – If this Workspace app is running inside a VDA published desktop, set it to 0.
- If you’re having trouble getting sessions to reconnect, see Receiver 4.3 Desktop will not auto-reconnect when logging into a machine at Citrix Discussions
- AlwaysUseStubs (REG_SZ) = True. Workspace app and Receiver 4.3.100 and newer don’t create .exe stubs by default. Set this to create .exe stubs. Also see Citrix CTX211893 Controlling Shortcut behavior in Receiver 4.3.100.
- DontCreateAddRemoveEntry (REG_SZ) = True – don’t create “Delivered by Citrix” entries in Programs and Features
- DesktopNameFormatString = format string for shortcut names – For example “{0}_{1}_{2}_{3}”. See the link for details.
- SelfServiceFlags (REG_DWORD) = 4 – prevents duplicate shortcuts when roaming and Desktop is redirected.
- SelfServiceFlags = 5 to stop external SSON from prompting for authentication
- ReEvaluateNetwork (REG_SZ) = true – for Beacon detection with Single FQDN
To prevent the Win+G popup on Windows 10 machines:
- HKEY_LOCAL_MACHINESOFTWAREPoliciesMicrosoftWindowsGameDVR
- AllowGameDVR (REG_DWORD) = 0
To allow adding non-HTTPS stores to Workspace app:
- HKLMSoftwareWow6432NodeCitrixAuthManager
- ConnectionSecurityMode (REG_SZ) = Any
To increase ICA bandwidth consumption over high latency links, set:
- HKEY_LOCAL_MACHINESOFTWAREWow6432NodeCitrixICA ClientEngineConfigurationAdvancedModulesTCP/IP
- OutBufCountClient2 = Number of OutBufs (default is 44)
- OutBufCountHost2 = Number of OutBufs (default is 44)
- See CTX125027 How to Optimize HDX Bandwidth Over High Latency Connections for some recommended values (multiples of 44)
To prevent beacon probing from using proxy, set:
- HKEY_LOCAL_MACHINESoftwareWOW6432NodeCitrixReceiverinventory
- BeaconProxyEnabled (REG_DWORD) = 0
To enable foreground progress bar, set:
- HKEY_LOCAL_MACHINESOFTWAREWow6432NodeCitrixICA Client
- ForegroundProgressBar (REG_DWORD) = 1
For client-to-server file type redirection, set:
- HKEY_LOCAL_MACHINESOFTWAREWow6432NodeCitrixICA ClientEngineConfigurationAdvancedModulesClientDrive
- NativeDriveMapping=”TRUE”
To fix USB devices that emulate a keyboard, set:
- HKEY_LOCAL_MACHINESOFTWAREWow6432NodeCitrixICA ClientEngineLockdown ProfilesAll RegionsLockdownVirtual ChannelsKeyboard
- KeyboardTimer=”10”
To prevent “USB Hub Power Exceeded” message, set (not needed in 4.2.100 and newer):
- HKLMSOFTWARECitrixICA ClientGenericUSB (same path for 32-bit and 64-bit, create the keys)
- DisableInternalDeviceCtlDispatchHook (DWORD) = 0x1
To override the devices that are mapped using optimized channels instead of generic USB, see Citrix CTX123015 How to Configure Automatic Redirection of USB Devices
Group Policy Settings
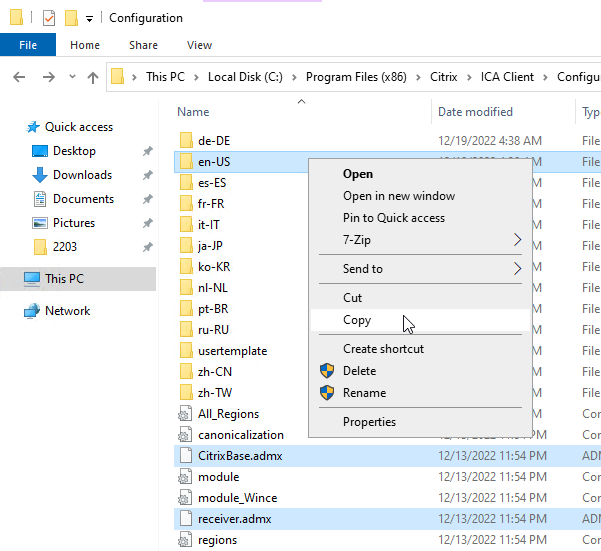
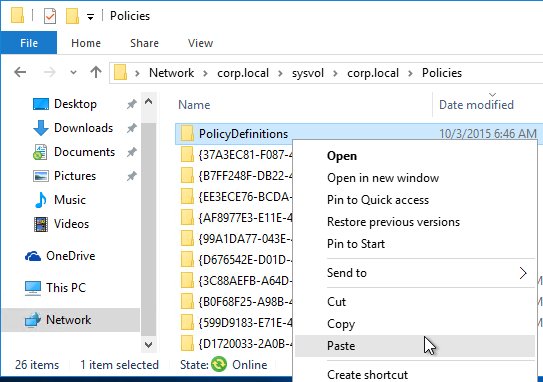
Copy the Workspace app ADMX template (C:Program Files (x86)CitrixICA ClientConfigurationreceiver.admx) to C:WindowsPolicyDefinitions (or Sysvol). Also copy receiver.adml to C:WindowsPolicyDefinitionsen-us (or Sysvol).
Edit a GPO that applies to client machines, go to Computer Configuration | Policies | Administrative Templates | Citrix Components | Citrix Workspace (or Receiver) and configure the following:
- To enable pass-through authentication: go to | User Authentication |.
- Local Username and Password – Check the top two boxes.
- Also add the StoreFront FQDN to the Local Intranet zone in Internet Explorer.
- Single Sign-on for NetScaler Gateway (Workspace app 1808 and newer)
- To add a store, go to | StoreFront |
- StoreFront Accounts List – see the help text
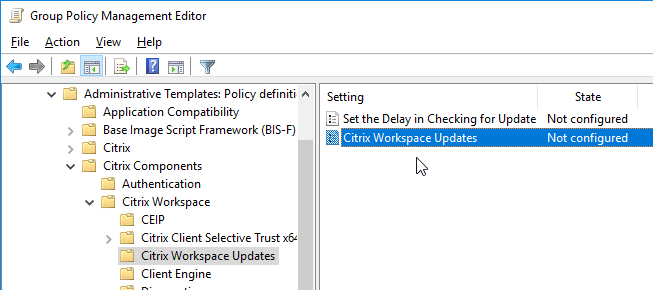
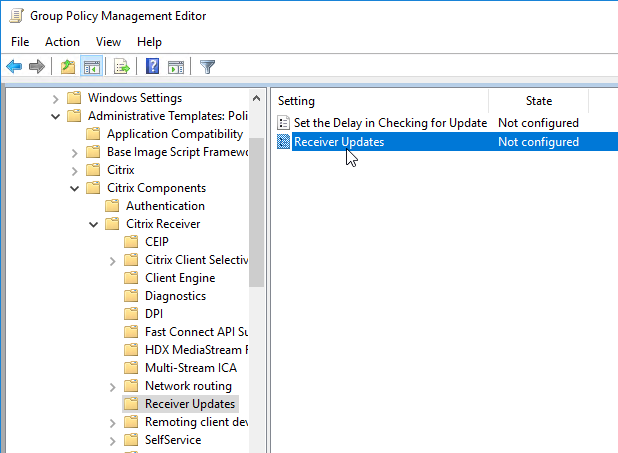
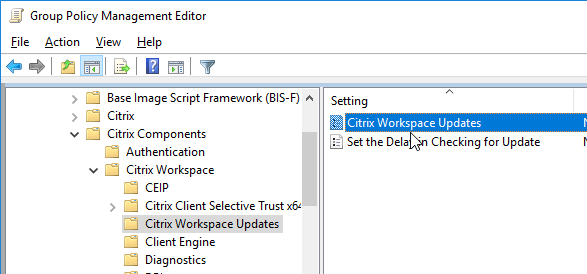
- To enable Auto-Update, go to |AutoUpdate| or |Receiver Updates| or |Citrix Workspace Updates|. (the node was renamed in 4.11 and Workspace app)
- Enable or Disable AutoUpdate or
- Receiver Updates or
- Citrix Workspace Updates
- To enable Local App Access, go to | User Experience |
- Local App Access Settings
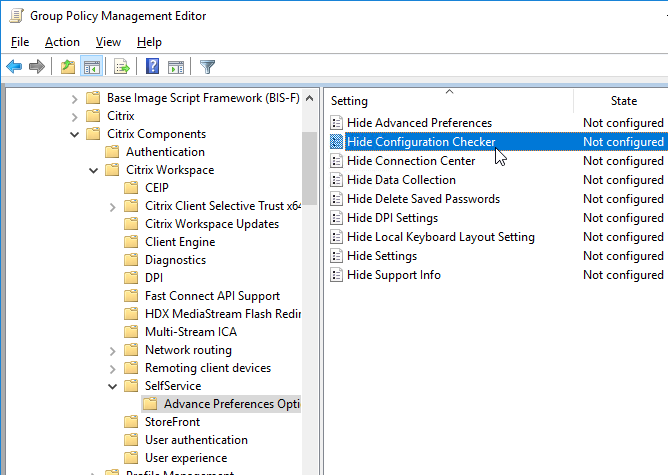
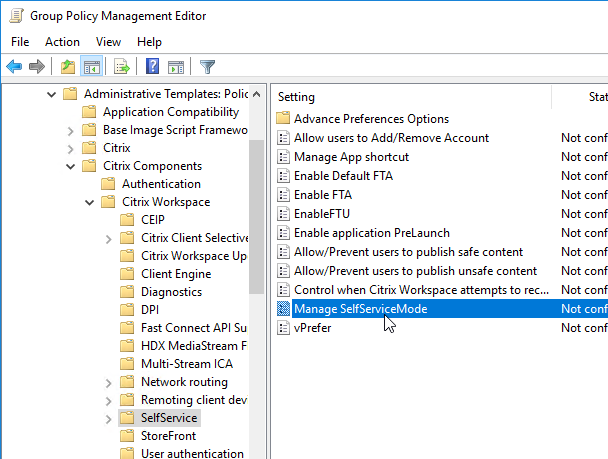
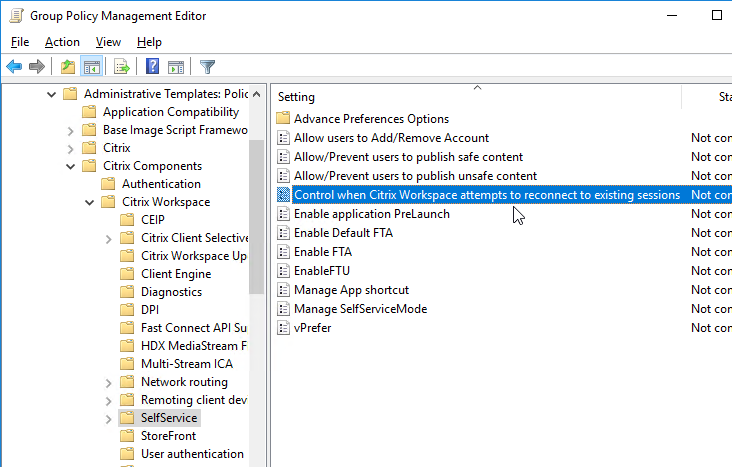
- To configure the Self-Service interface, go to | SelfService |
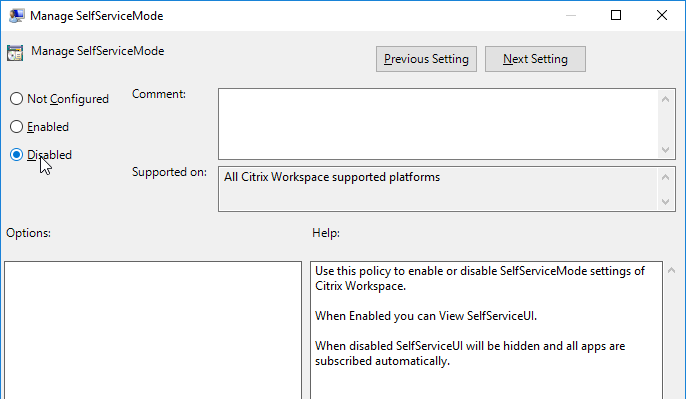
- Set Manage SelfServiceMode to Disabled to completely disable the Self-Service window. This causes all icons to be placed on the Start Menu.
- Enable Manage App Shortcut and configure it as desired.
- To allow the Self-Service window, but prevent it from automatically opening (reside in systray), tick Prevent Citrix Workspace (or Receiver) performing a refresh of the application list when opened. Source
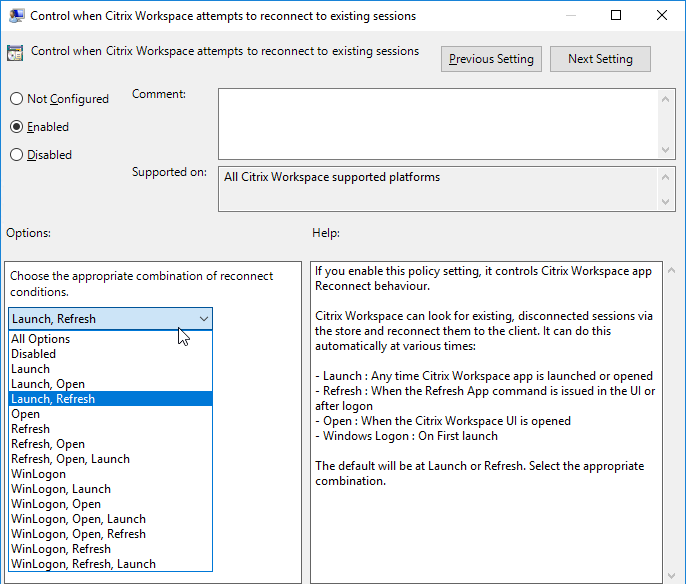
- Enable Control when Workspace (or Receiver) attempts to reconnect to existing sessions. If this is a VDA published desktop, set it to Disabled. Otherwise configure it as desired.
- Set Enable FTU to Disabled to prevent the Add Account wizard from displaying.
- Enable Allow/Prevent users to publish unsafe content if publishing content that’s opens a file or file share.
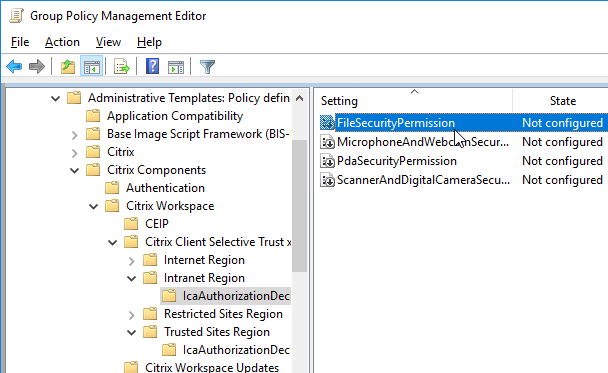
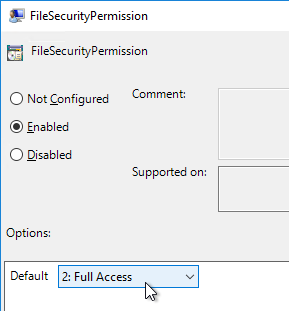
Enable automatic client drive and client microphone mapping.
- In a client-side GPO, add the GPO ADM template from http://support.citrix.com/article/CTX133565.
- Enable the setting Create Client Selective Trust Keys. See Below for details.
- Configure the FileSecurityPermission setting in one or more of the regions.
- Configure the MicrophoneAndWebcamSecurityPermission setting in one or more of the regions.
Citrix CTX203658 Start Menu Icons Set to Default (Blank Document) After Update to Receiver 4.3.100 – Windows 8 and newer
- Computer Configuration | Policies | Administrative Templates | Windows Components | File Explorer
- Allow the use of remote paths in file shortcut icons = enabled
Deploy Workspace app using Active Directory
To deploy Workspace app using Active Directory, configure a GPO with a computer startup script that runs the Workspace app installer executable. Citrix provides sample scripts that can be downloaded from one of the Workspace app download pages (Workspace app current release version 2212, LTSR version 2203 CU2 (aka 22.03.2000), or LTSR version 1912 CU7 (aka 19.12.7000), by expanding Downloads for Admins (Deployment Tools).
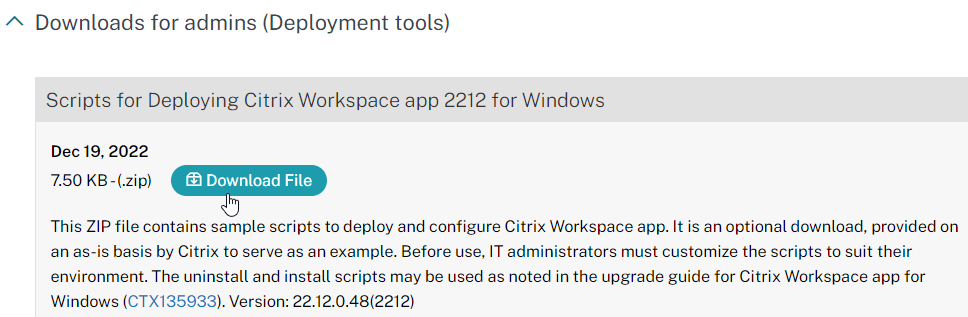
Also see CTA Dennis Span Citrix Receiver unattended installation with PowerShell.
Change Workspace App’s Store Configuration, including Reset Citrix Workspace / Receiver
You can change Workspace app’s / Receiver’s configured Store/Account with a couple command lines:
"C:Program Files (x86)CitrixICA ClientSelfServicePluginSelfService.exe" -deleteproviderbyname Corporate
"C:Program Files (x86)CitrixICA ClientSelfServicePluginSelfService.exe" -init -createprovider Corporate https://storefront.corp.com/Citrix/Store/discovery
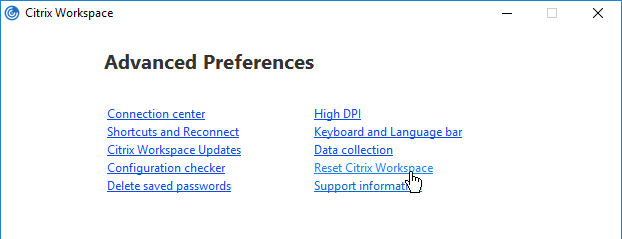
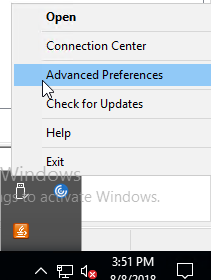
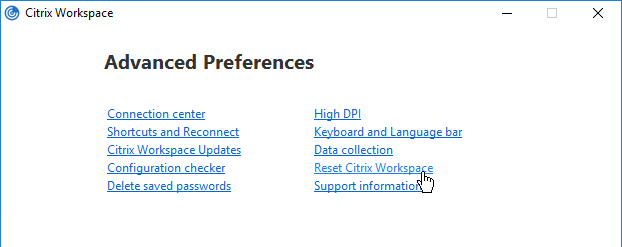
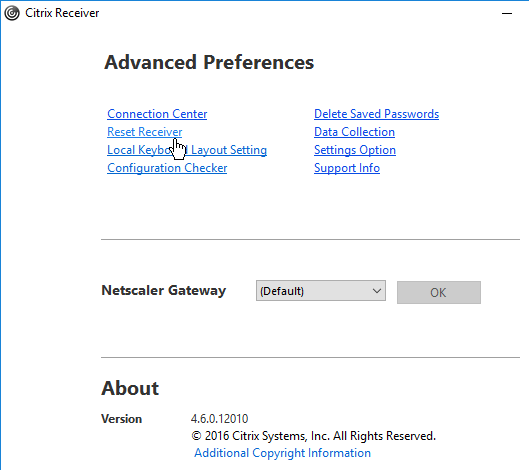
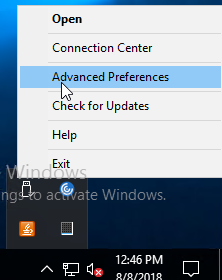
It is sometimes necessary to Reset Citrix Workspace or Reset Receiver by right-clicking the Workspace app systray icon, clicking Advanced Preferences, and clicking the Reset link. You can do this from the command line by running "C:Program Files (x86)CitrixICA ClientSelfServicePluginCleanUp.exe" -cleanUser -silent. See CTX140149 How to Reset Receiver Using the Command Line.
Receiver for Edge
The Receiver for Web experience in Microsoft Edge is not ideal. Every time a user clicks an icon, the user has the click the Open button after the .ica file is downloaded.

Citrix Blog Post Providing Full Receiver for Web Experience for Microsoft Edge has instructions for enabling the Receiver Launcher for Edge. Use your preferred text editor to open web.config for the RfWeb site you would like to configure (typically C:inetpubwwwrootCitrixStoreWebweb.config). Locate the line like this: <protocolHandler enabled="true" platforms="(Macintosh|Windows NT).*((Firefox/((5[3-9]|[6789][0-9])|ddd))|(Chrome/((4[2-9]|[56789][0-9])|ddd)))(?!.*Edge)". Remove (?!.*Edge) and save the file.
But once you do that, you get a new switch apps prompt every time you launch an icon from Edge.
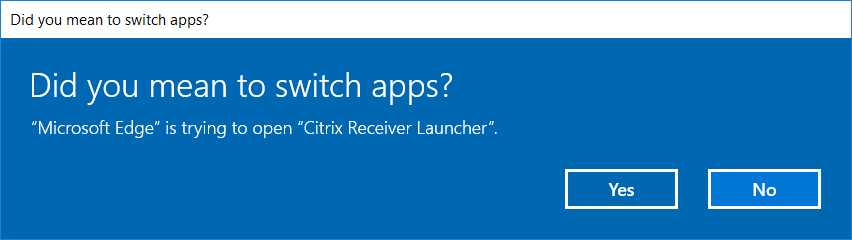
To stop the switch apps pop-up, on the client side, edit the registry, go to
HKEY_LOCAL_MACHINESOFTWAREMicrosoftInternet ExplorerProtocolExecutereceiver (create missing registry keys), create DWORD value WarnOnOpen, and set it to 0 (zero). You can use Group Policy Preferences to deploy this registry value.

Workspace app Group Policy ADMX Template
Many of the Workspace app configuration settings must be configured in group policy. These Workspace app settings are only available after installing the GPO templates.
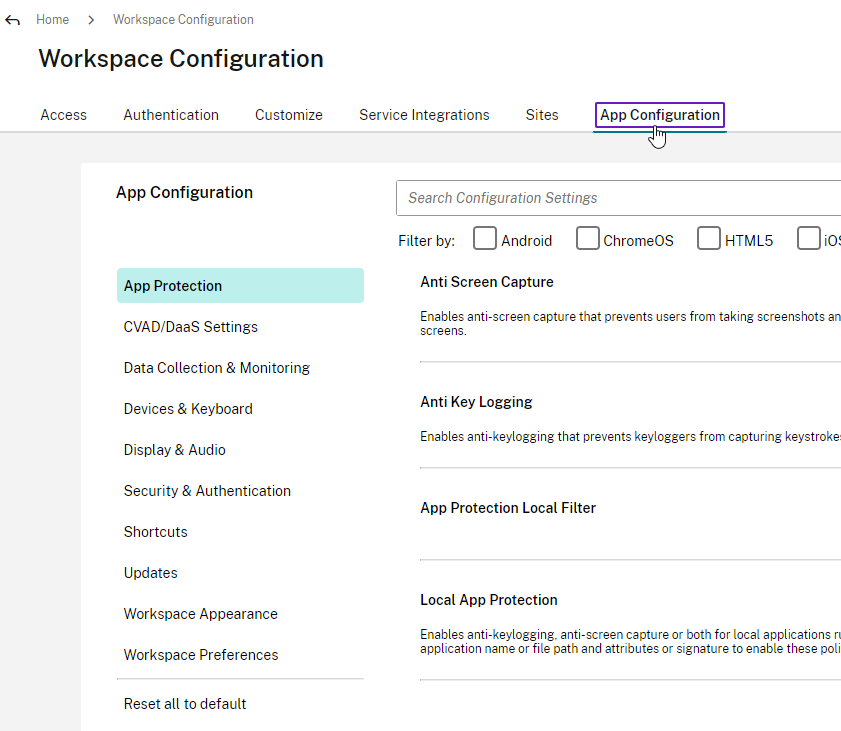
Alternatively, Citrix Cloud customers can use Global App Configuration Service to configure Workspace app. Today it’s a REST API, but Citrix has started adding a GUI at Workspace Configuration > App Configuration.
For GPO configuration:
- From a machine that has Workspace app installed, find the .admx and .adml files in the C:Program Files (x86)CitrixICA ClientConfiguration.
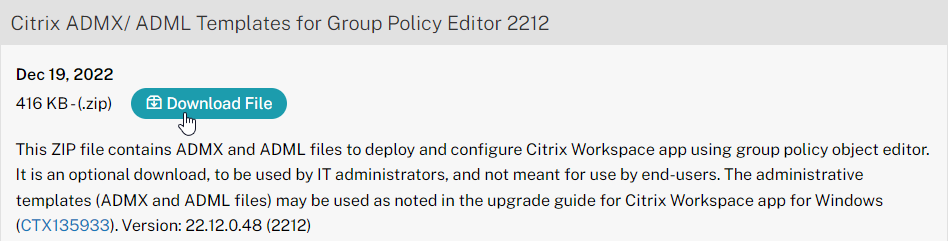
- You can also download the ADMX files from one of the Workspace app download pages (Workspace app current release version 2212, LTSR version 2203 CU2 (22.03.2000), or LTSR version 1912 CU7 (aka 19.12.7000), by expanding Downloads for Admins (Deployment Tools).

- You can also download the ADMX files from one of the Workspace app download pages (Workspace app current release version 2212, LTSR version 2203 CU2 (22.03.2000), or LTSR version 1912 CU7 (aka 19.12.7000), by expanding Downloads for Admins (Deployment Tools).
- Copy the CitrixBase.admx and receiver.admx files. Also copy the en-US folder. In Workspace app, the files are still named receiver.admx.

- Go to your domain’s SYSVOL share and in the Policies folder look for a PolicyDefinitions folder. If one exists, paste the .admx file directly into the PolicyDefinitions folder. If this folder doesn’t exist in SYSVOL, instead copy the .admx file to C:WindowsPolicyDefinitions. Overwrite any existing Receiver ADMX files.

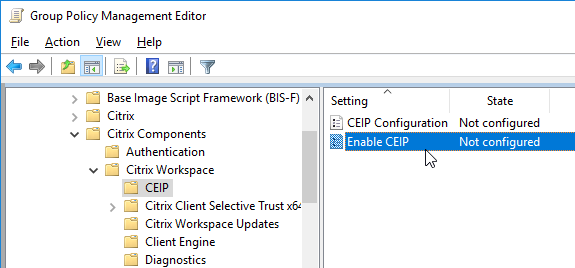
- The GPO settings can then be found at one of the following:
- Computer Configuration > Policies > Administrative Templates > Citrix Components > Citrix Workspace
- Computer Configuration > Policies > Administrative Templates > Citrix Components > Citrix Receiver
- For example, you can disable Customer Experience Improvement Program (CEIP) from here.
- See https://www.carlstalhood.com/delivery-controller-cr-and-licensing/#ceip for additional places where CEIP is enabled.

- Workspace app 1905 and newer has a setting to Disable sending data to 3rd party (e.g., Google Analytics).

- Workspace app 1905 and newer let you disable embedded browser caching.

- Workspace app 1905 and newer have NetScaler LAN Proxy under Network routing > Proxy.

- Workspace app 1808 and newer have User authentication | Single Sign-on for NetScaler Gateway.

- Citrix Workspace Updates, (aka AutoUpdate) can be configured using group policy. See Configuring Citrix Workspace Updates at Citrix Docs.

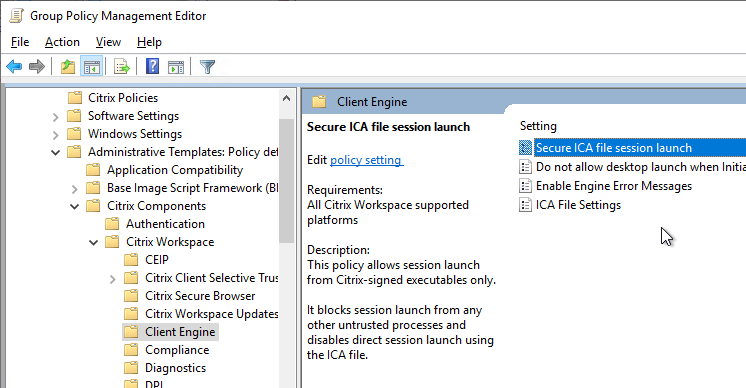
- Workspace app 1912 and newer can be configured to require in-memory ICA files only. The setting called Secure ICA file session launch is under the Client Engine node. See Citrix Docs for details on in-memory ICA files instead of writing ICA files to disk.

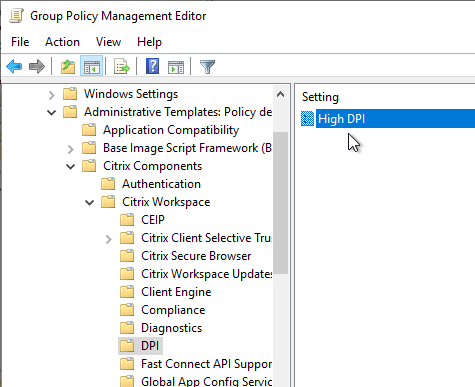
- The DPI node has a setting called High DPI that lets you disable DPI matching, which is enabled by default in Workspace App 2206 and newer.

- Workspace app has settings to hide Advanced Preferences, enable/disable showing the DPI option, and enable/disable H265.

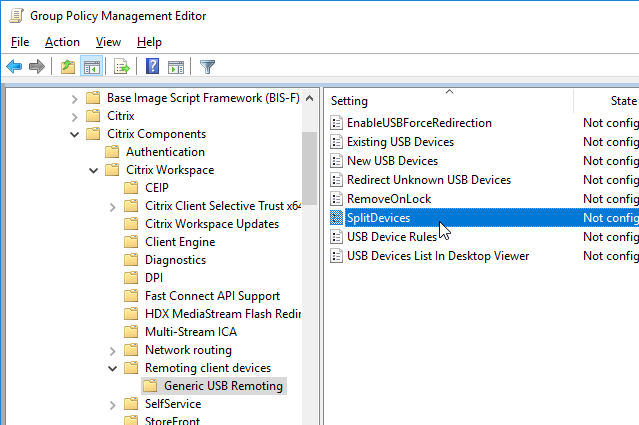
- Workspace app 4.8 and newer have SplitDevices GPO setting under Citrix Workspace | Remoting client devices | Generic USB Remoting. See Configuring composite USB device redirection at Citrix Docs.

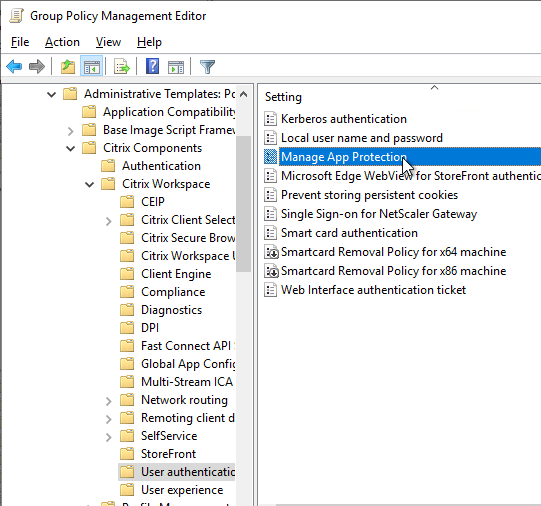
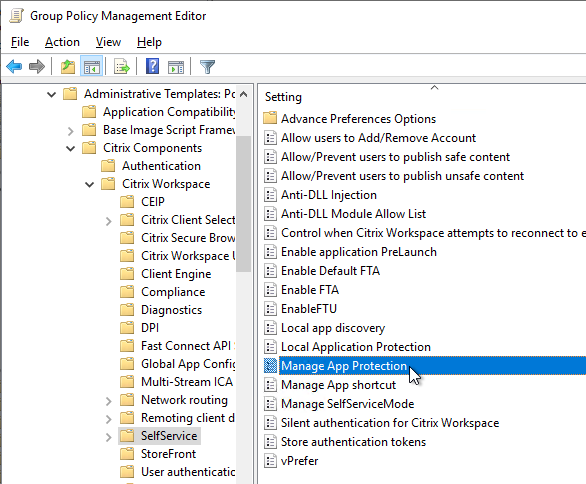
- Workspace app 2212 and newer by default disable App Protection for the authentication screen and icons list. To enable them, configure User authentication > Manage App Protection and SelfService > Manage App Protection.


Pass-through Authentication
Citrix blog post – A Comprehensive Guide to Enabling Pass-Through Authentication with XenDesktop 7.5
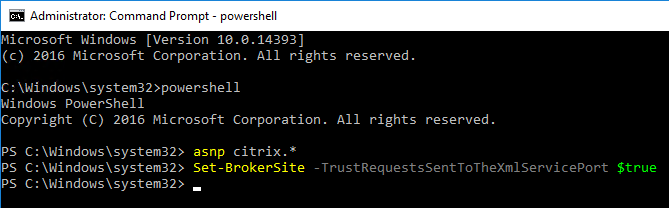
- Run the command
Set-BrokerSite -TrustRequestsSentToTheXmlServicePort $True from a Windows PowerShell command prompt on a Delivery Controller.
- In XenApp 6.5, this is a Citrix Policy > Computer > Trust XML Requests.
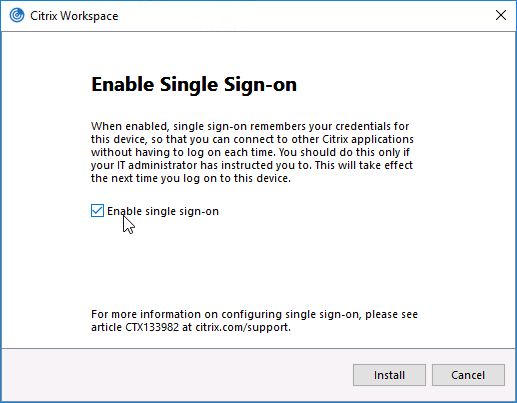
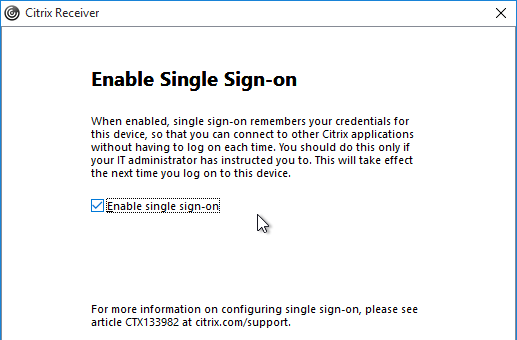
- Login to the PC as an administrator.
- If installing Workspace app, as an administrator, during installation, on the Enable Single Sign-on page, check the box next to Enable Single Sign-on. Then finish the installation.

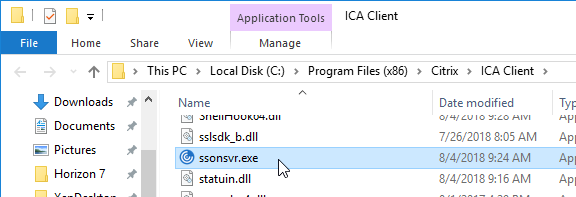
- To verify that SSON is installed, go to C:Program Files (x86)CitrixICA Client and look for the file ssonsvr.exe.

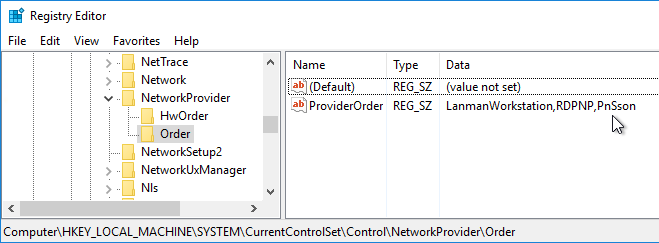
- And if you open regedit and go to HKLMSYSTEMCurrentControlSetControlNetworkProviderOrder, you should see PnSson in the ProviderOrder.
- Install the receiver.admx (and .adml) template into PolicyDefinitions if you haven’t already.
- Edit a GPO that is applied to the client PCs where the Workspace app is installed.
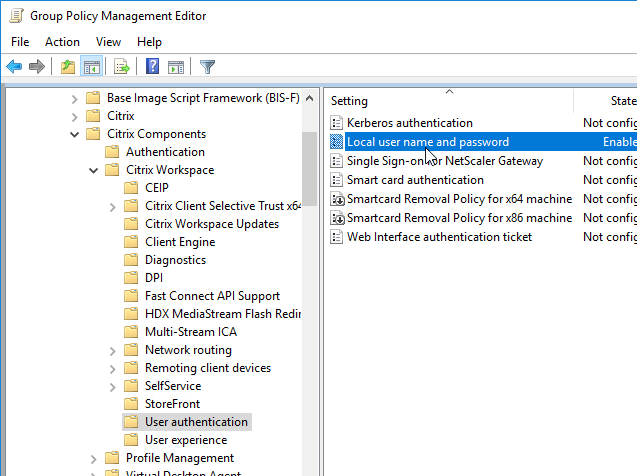
- Go to Computer Configuration > Policies > Administrative Templates > Citrix Components > Citrix Workspace.
- Expand Citrix Workspace and click User authentication.
- On the right, double-click Local user name and password.

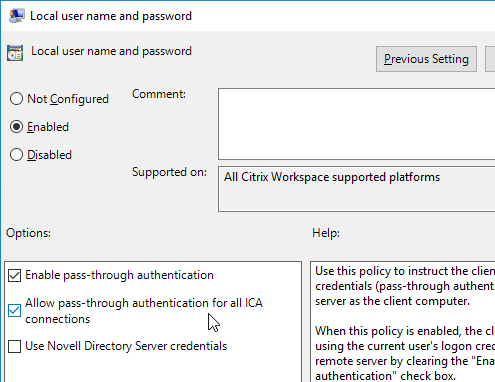
- Select Enabled and then check the box next to Allow pass-through authentication for all ICA connections. Click OK.

- In Workspace app 1808 and newer, you can enable Single Sign-on for NetScaler Gateway.

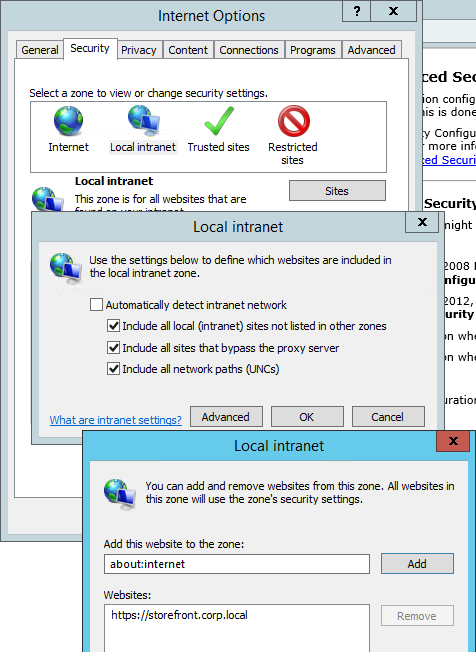
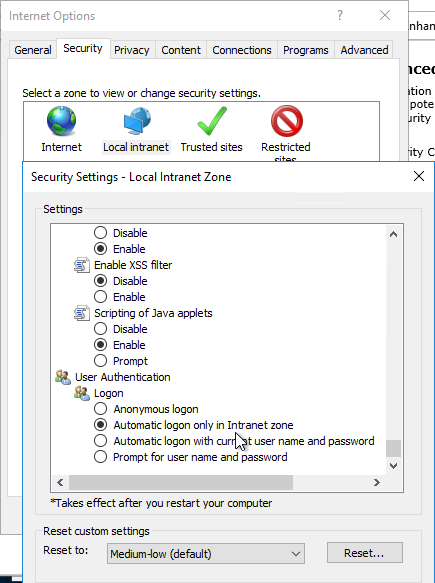
- Ensure that the internal StoreFront FQDN is in the Local Intranet zone in Internet Explorer. You can use a GPO to configure this on the client side.
- Local Intranet zone should have Automatic logon only in Intranet zone enabled.
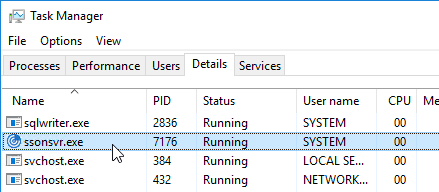
- Logoff Windows and log back on. In Task Manager you should now see ssonsvr.exe. This won’t appear unless you logoff and log back on.

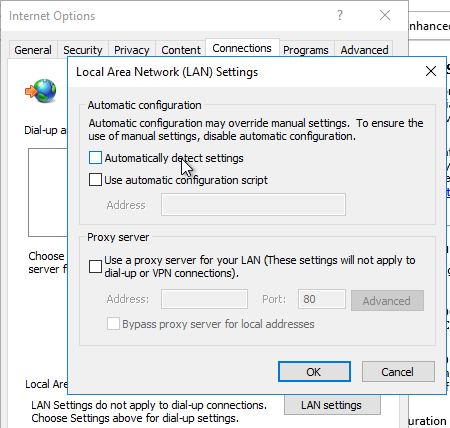
- If Workspace app won’t connect or is slow to enumerate icons, then you might have to disable Automatically detect settings in IE.
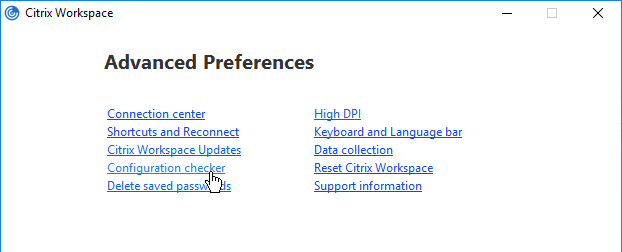
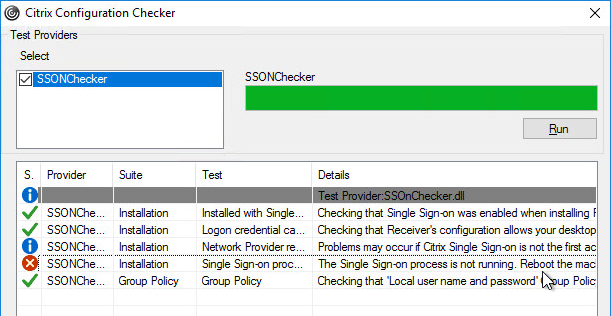
- Right-click the Workspace app icon and click Advanced Preferences.

- Click Configuration Checker.

- Check the box next to SSONChecker and click Run.

- The lines with red x will indicate the issue and corrective action.


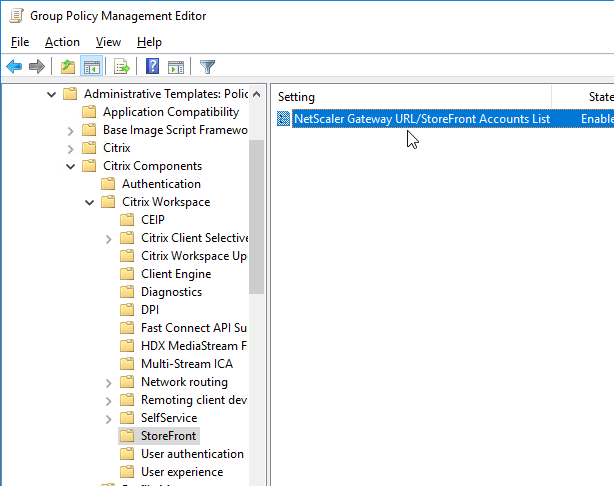
StoreFront Accounts
You can use a client-side GPO to add a store (Account) to Workspace app Self-Service.
- Install the receiver.admx (and .adml) template into PolicyDefinitions if you haven’t already.
- Edit a GPO that applies to endpoint devices that have Citrix Workspace app installed.
- Go to Computer Configuration > Administrative Templates > Policies > Citrix Components > Citrix Workspace > StoreFront.
- On the right, double-click NetScaler Gateway URL/StoreFront Accounts List.

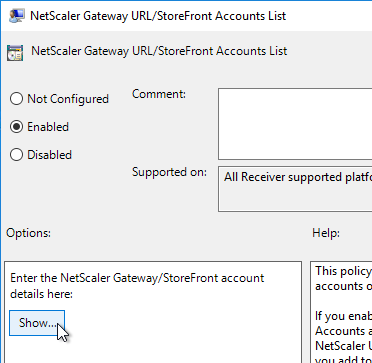
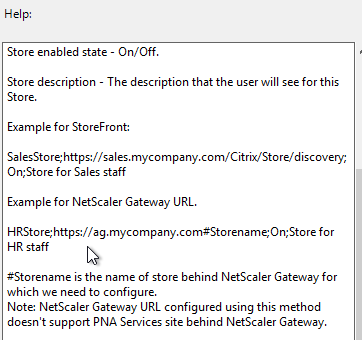
- Select Enabled, and then click Show.
- Enter a store path based on the example shown in the Help box. Workspace app lets you enter a Gateway path. Then click OK.
- Note: Gateway paths work in GPO, but might not work when specified in the CitrixWorkspaceApp.exe installation command line.
Published Shortcuts and Reconnect
Citrix CTX200924 How to Customize App Shortcuts with Receiver for Windows
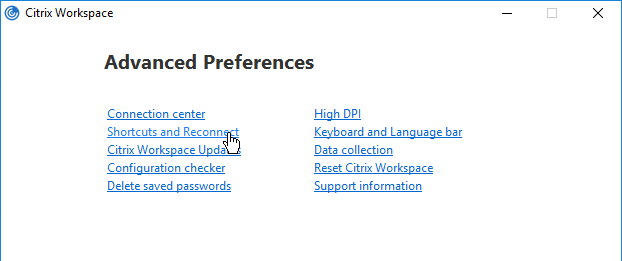
Workspace app has a user interface for setting Shortcut Paths. Right-click the Workspace app systray icon, click Advanced Preferences, and then click Shortcuts and Reconnect, or Settings Option.
From Citrix Docs Configuring application delivery: There are several methods of controlling how Workspace app displays shortcuts on the Start Menu and Desktop as detailed below:
- Workspace app Registry values
- receiver.admx GPO Template
- From StoreFront in C:inetpubwwwrootCitrixRoamingweb.config
- Published App Keywords (e.g. prefer).
- Workspace app and Receiver 4.2.100 and newer supports published app Delivery configuration for adding the shortcut to the desktop. This only works if the app is a Favorite, or if Favorites are disabled, or Mandatory Store.
Under HKLMSoftwareWow6432NodeCitrixDazzle (or HKCUSoftwareWow6432NodeCitrixDazzle) are several registry values related to shortcuts. Some of the settings only apply if SelfServiceMode is set to False. Here are some common options:
- SelfServiceMode – set to False so Receiver disables the Self-Service interface and automatically places all published shortcuts on the Start Menu and/or Desktop. More details in Configuring application delivery at Citrix Docs.
- PutShortcutsOnDesktop – set to True to place every app on the desktop
- DesktopDir – Workspace app places every shortcut on the desktop so it’s probably best to place them in a folder.
- StartMenuDir – If there is potentially a conflict between local apps and remote apps, then you should place the Start Menu shortcuts in a folder.
- PreferTemplateDirectory (with KEYWORDS:prefer=shortcutname) – copies the shortcutname from the template directory to the Start Menu and/or Desktop.
If you import the receiver.admx (and .adml) into the PolicyDefinitions folder, under Computer Configuration > Administrative Templates > Citrix Components > Citrix Workspace (or Receiver) is a node called SelfService.
Disable the Manage SelfServiceMode setting to hide the Workspace app Window.
Enable the Manage App shortcut setting to control placement of shortcuts.

Workspace app and Receiver 4.2.100 and newer have the ability to configure (or disable) Workspace Control using group policy. Enable the setting Control when Citrix Workspace attempts to reconnect to existing sessions and configure it as desired.
Prelaunch
Staring with Receiver 4.2, prelaunch is automatically enabled if Workspace app is installed with SSON enabled. Otherwise, set registry values to enable prelaunch. Receiver 4.2.100 prevents the prelaunch icon from appearing on the Start Menu.
- HKLMSoftware[Wow6432Node]CitrixDazzle
- EnablePreLaunch (REG_SZ) = true or false
Additional customizations can be configured at:
HKEY_LOCAL_MACHINESOFTWAREWow6432NodeCitrixICA ClientPrelaunch
- Name: State
- REG_SZ: 0 = disable, 1 = just-in-time pre-launch, 2 = scheduled pre-launch
- Name: Schedule
- REG_SZ: HH:MM|M:T:W:TH:F:S:SU where HH and MM are hours and minutes. M:T:W:TH:F:S:SU are the days of the week. For example, to enable scheduled pre-launch on Monday, Wednesday, and Friday at 1:45 p.m., set Schedule as Schedule=13:45|1:0:1:0:1:0:0 . The session actually launches between 1:15 p.m. and 1:45 p.m.
- Name: UserOverride
- REG_SZ: 0 = HKLM overrides HKCU, 1 = HKCU overrides HKLM
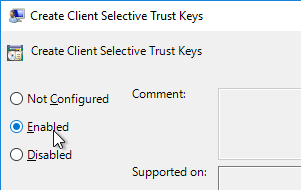
Device Access Behavior (Client Selective Trust)
When connecting to a XenApp/XenDesktop session, you might see the following:
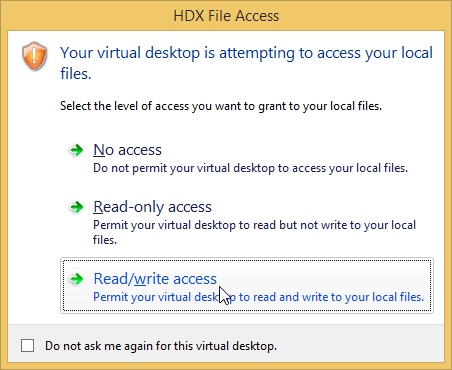
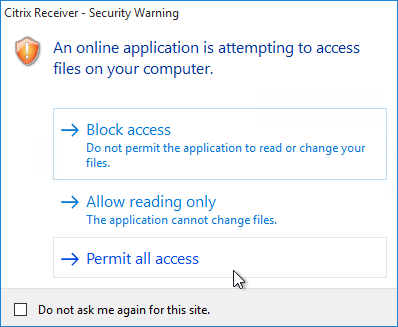
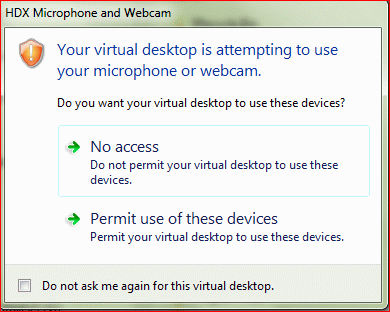
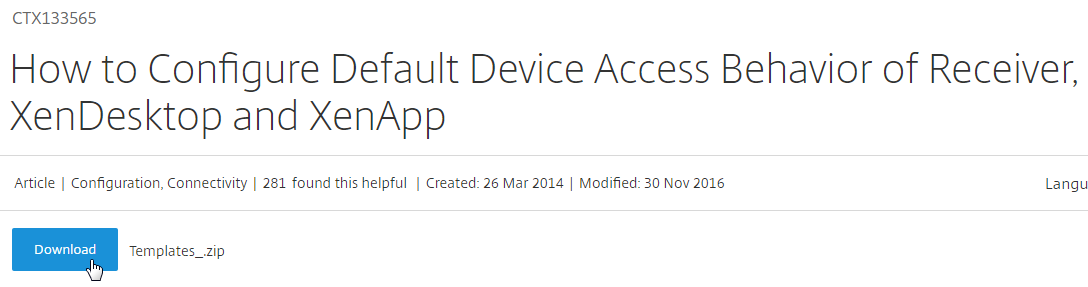
To configure the default behavior, see the Citrix Knowledgebase article How to Configure Default Device Access Behavior of Receiver, XenDesktop and XenApp. Note: there is a bug fixed in Receiver 4.2.100 and newer.
- Download the ADMX file from http://support.citrix.com/article/CTX133565.

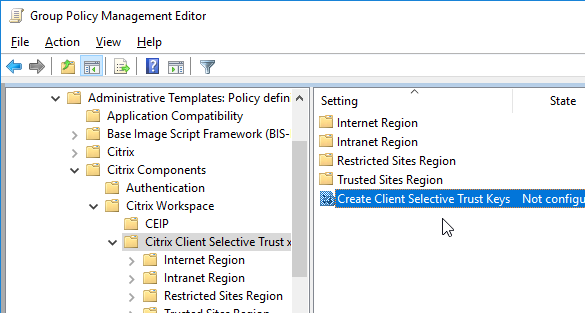
- Copy the .admx and .adml files to PolicyDefinitions (Sysvol, or C:Windows).
- The .adml file goes in the en-US folder.

- Edit a GPO that applies to the endpoint devices that are running Receiver.
- Go to Computer Configuration | Policies | Administrative Templates | Citrix Components | Citrix Workspace (or Receiver) | Citrix Client Selective Trust (x64).
- Enable the setting Create Client Selective Trust Keys.

- Then expand the regions, and configure the permission settings as desired.


Desktop Lock
As an alternative to Workspace app Desktop Lock, see Transformer in Citrix Workspace Environment Manager.

External links:
- Dale Scriven YouTube video – Citrix Desktop Lock installation and configuration
- Jarian Gibson and Andrew Morgan – Citrix Receiver Desktop Lock
- An alternative to Desktop Lock – ThinKiosk
Use Studio to configure Workspace app Accounts in Published Desktop
In published desktops, Workspace app can be used for placement of shortcuts on the user’s Start Menu and Desktop. Use group policy to hide the common program groups and then use Workspace app to place published applications back on the Start Menu and Desktop based on user’s group membership and subscription preference.
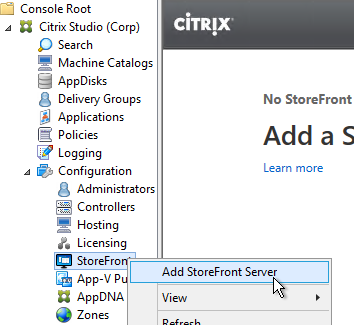
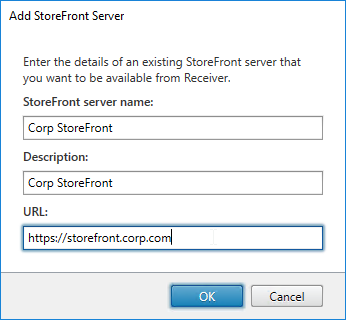
- In Citrix Studio, on the left, expand the Configuration node, right-click StoreFront and click Add StoreFront.
- Enter a descriptive name for the StoreFront server.
- Enter the internal https URL of the load balanced StoreFront servers. Add the path to your store (e.g. /Citrix/Store) and then /discovery on the end of the URL. The full URL would be similar to https://citrix.corp.com/Citrix/Store/discovery. Click OK.
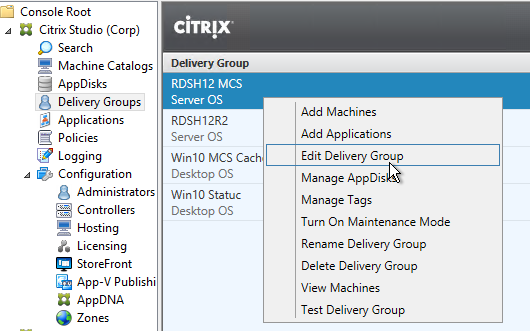
- Edit a Delivery Group that has a published desktop and Citrix Workspace app installed.
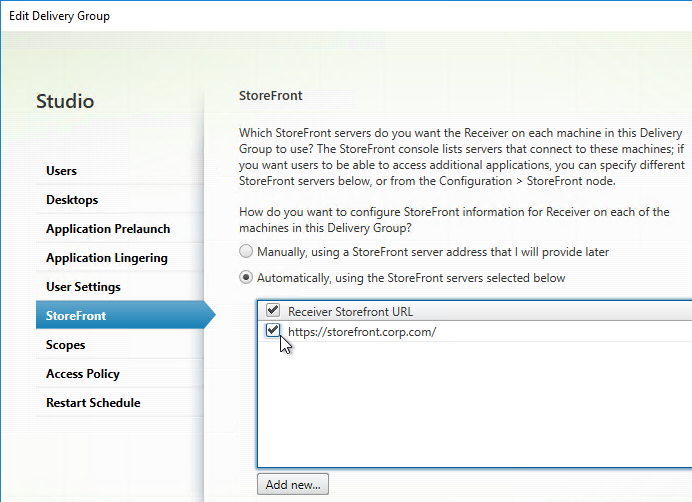
- On the StoreFront page, change the selection to Automatically, using the StoreFront servers selected below, and then check the box next to the StoreFront URL. Click OK. Now when users launch the published desktop, Workspace app will be automatically configured with this URL.
Published Desktop – use Workspace app to control Shortcuts
If you install Workspace app inside a published desktop (Workspace app on a VDA), then Workspace app can get icons from StoreFront and put those icons on the user’s published desktop Start Menu and Desktop. This is an alternative to using a User Experience Management product to control shortcut placement.
Note: Workspace app tends to be slow to create Start Menu shortcuts, so make sure you perform a Proof of Concept to determine how this functionality impacts logon times.
Configuration of Workspace app inside a published desktop is simplified if you have the following minimum versions:
- Workspace app installed inside the VDA
- VDA 7.17 or newer
- StoreFront 3.14 or newer
If you meet these minimum version requirements, then Workspace app installed in the VDA automatically tries to launch published applications on the same local VDA rather than trying to launch them from a different VDA (aka double-hop). This feature is called vPrefer.
- If you don’t meet these minimum version requirements, then you’ll need to use the older Prefer Keyword method of handling Workspace app shortcuts as detailed later.
- For a detailed explanation of vPrefer, see Citrix Blog Post VPrefer: Session Sharing Between a Published Desktop and a Published Application Made Easy

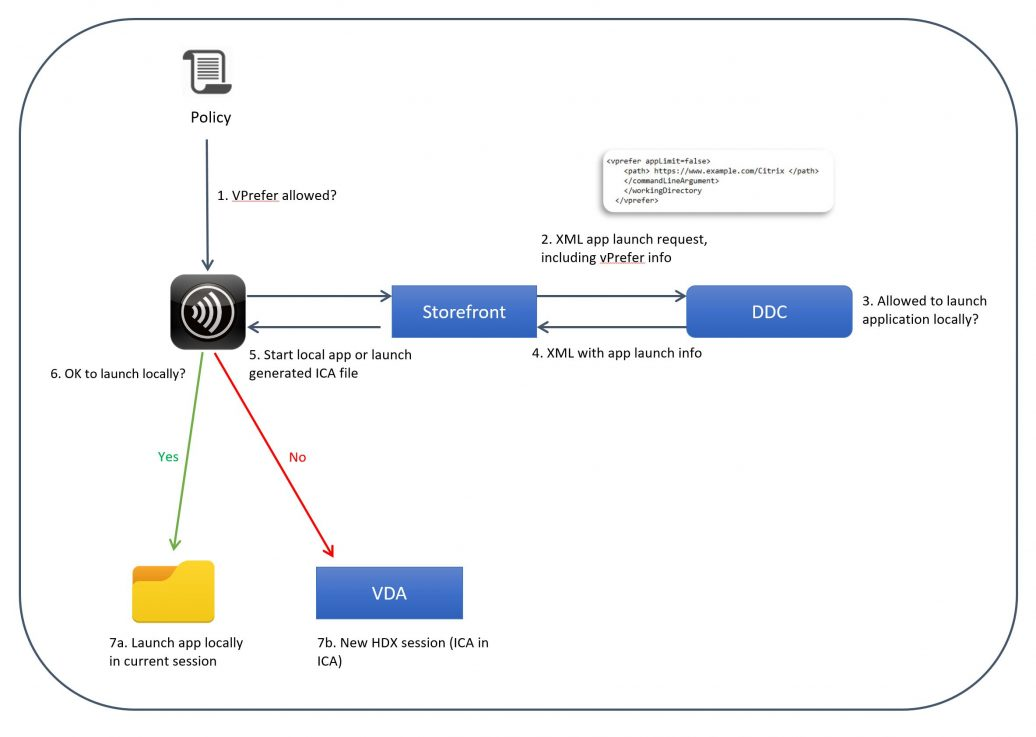
Do the following for all versions of Workspace app, VDA, and StoreFront, whether using the Prefer keyword or not:
- Make sure Workspace app or Receiver version 4.11 or newer is installed on the VDA.
- Install the Workspace app ADMX files if you haven’t already. For vPrefer, make sure they are the ADMX files from Workspace app.
- Enable the Group Policy setting Remove common program groups from Start Menu and apply it to non-administrators.
- This removes all Public (aka All Users) Start Menu shortcuts. Workspace app will re-add the shortcuts based on user group membership.
- On the VDA, configure the following Workspace app Registry keys (or corresponding settings in the receiver.admx GPO template):
- HKEY_LOCAL_MACHINESOFTWAREWow6432NodeCitrixDazzleWSCReconnectMode=”0″ so Workspace app doesn’t try to reconnect to the published desktop you’re already running.
- HKEY_LOCAL_MACHINESOFTWAREWow6432NodeCitrixDazzleSelfServiceMode to False. This turns off the Workspace app Self-Service GUI and acts like all icons are subscribed. Otherwise, only subscribed (favorited) icons would be placed on the Start Menu and Desktop.
- HKEY_LOCAL_MACHINESOFTWAREWow6432NodeCitrixDazzleUseCategoryAsStartMenuPath = True. This creates a Start Menu folder based on the published app’s configured Category.

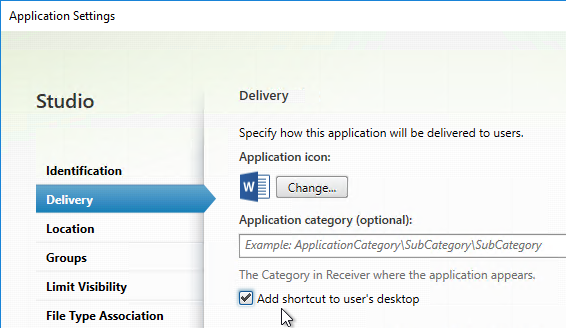
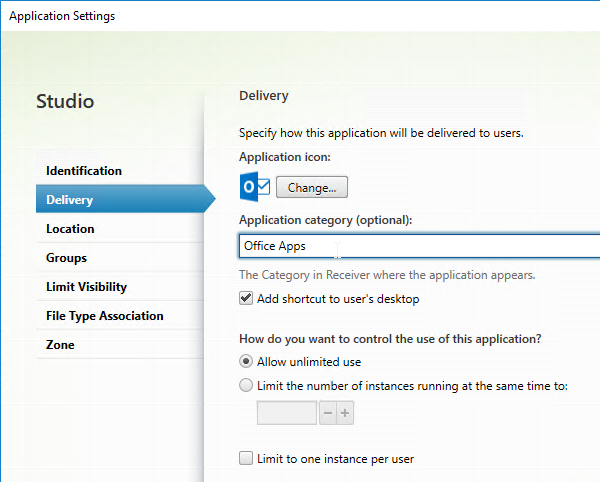
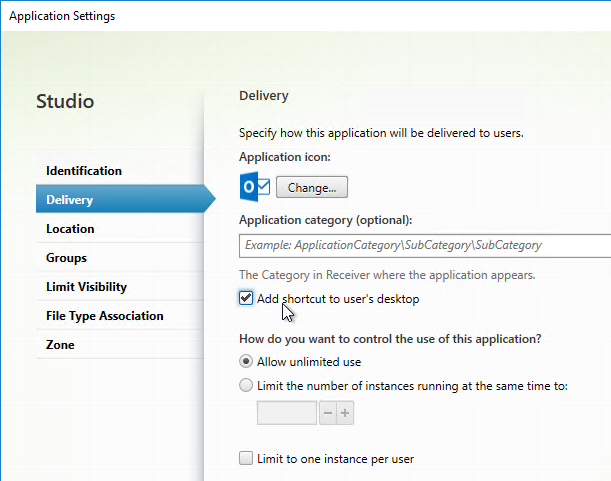
- Configure each desired published app to Add shortcut to user’s desktop.

- Or, configure HKEY_LOCAL_MACHINESOFTWAREWow6432NodeCitrixDazzlePutShortcutsOnDesktop = True to place all icons on the desktop.
- To control icon placement, configure the following registry values:
- HKEY_LOCAL_MACHINESOFTWAREWow6432NodeCitrixDazzleStartMenuDir to place published applications in a sub-folder. Note: Windows Server 2012 and Windows 10 and newer only supports a single level of Start Menu folders, so setting this effectively turns off published app categories.
- HKEY_LOCAL_MACHINESOFTWAREWow6432NodeCitrixDazzleDesktopDir to place published applications in a sub-folder on the desktop.
- Pass-through authentication:
- In a GPO that applies to the VDA, import the receiver.admx file, and set Local user name and password to Enabled. Check the box next to Allow pass-through authentication for all ICA connections.
- If you’re using Gateway internally, and if Workspace app 1808 or newer, then also enable Single Sign-on for NetScaler Gateway.
- In a user-level GPO that applies to the VDA, add the StoreFront FQDN to the Local Intranet zone. Make sure it is not in the Trusted Sites zone, or enable Automatic logon with current user name and password for the Trusted Sites zone.
- Make sure ssonsvr.exe is running after you login to the VDA. If not, troubleshoot it.
- When configuring Citrix Profile Management, make sure !ctx_startmenu! is not excluded from roaming.
- In Citrix Studio, configure a Delivery Group with delivery type = Desktop and Applications. Assign users to the delivery group, and the individual published applications (if visibility is limited).
- In Citrix Studio, edit each published application, and on the Delivery tab, specify a category. This will become the Start Menu folder name.
- If Workspace app Self Service Mode (GUI) is enabled, in Studio, edit each application, and add KEYWORDS:Auto and/or KEYWORDS:Mandatory to the published application description. This forces the applications to be subscribed/favorited. Only subscribed (or Favorite) apps are displayed in the Start Menu and Desktop. Unless you disable Workspace app’s SelfService interface as described earlier.
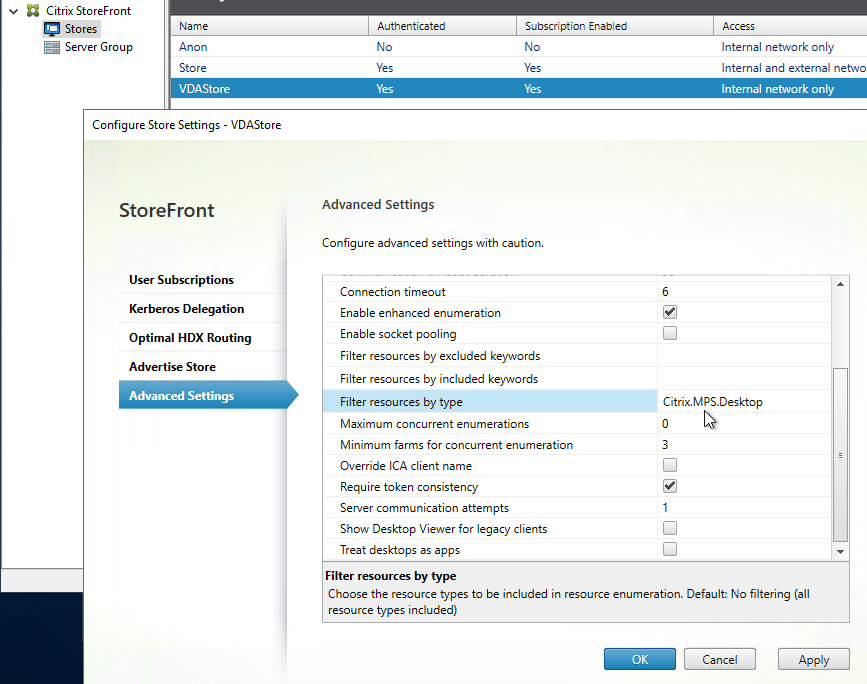
- Another option is to go to the StoreFront Console, click Stores on the left, and on the right, click Configure Store Settings, and click Disable User Subscriptions. This causes all apps to appear on the Start Menu and/or Desktop depending on Workspace app configuration.
- Create a group policy that applies to VDAs, and configure the group policy to define the Store URL for Workspace app similar to https://citrix.corp.com/Citrix/Store/discovery. Replace the FQDN with your load balanced StoreFront FQDN. Also replace the path to the store with your store path. Make sure there is /discovery on the end. By default, Workspace app and Receiver only support https.
- Your StoreFront store probably delivers both application and desktop icons. If you want to filter out the desktop icons, then create a new StoreFront store, and configure the Workspace app on the VDA to connect to the new Store.
- In StoreFront Console, click the store for VDAs, and click Configure Store Settings. On the Advanced Settings page, in the Filter resources by type row, choose Citrix.MPS.Desktop.

- For vPrefer in Workspace app, VDA 7.17 (or newer), and StoreFront 3.14 (or newer), edit a GPO that applies to the VDAs.
- Go to Computer Configuration | Policies | Administrative Templates | Citrix Components | Citrix Workspace (or Receiver) | SelfService.
- Edit the setting vPrefer. This setting is only in Workspace app ADMX templates from Workspace app.
- Set it to Allow all apps. Source = 7.17 vPrefer – not working with 32Bit Apps at Citrix Discussions.

- On your Delivery Controller, in PowerShell, run set-brokersite -TrustRequestsSentToTheXmlServicePort $true
- This is required for Pass-through Authentication from Workspace app.
- Configure your client devices to connect to the published desktop.
- When users connect to the published desktop, Workspace app will auto-launch and hopefully auto-login.
- If Workspace app Self-Service Mode is disabled, all published applications should automatically appear in the Start Menu and Desktop.
- If Workspace app Self-Service Mode is enabled, then only applications with KEYWORDS:Auto and/or KEYWORDS:Mandatory in the published application description will be displayed. Users can open the systray icon to subscribe to more applications.
- Users can copy icons from the Start Menu to the desktop. Make sure the user Copies the icon and doesn’t Move it.
- Users can then launch applications directly from the Start Menu, from the Desktop, or from the Workspace app (if the Self-Service interface is enabled).
- If Workspace app 4.11 (or newer), VDA 7.17 (or newer), and StoreFront 3.14 (or newer), then vPrefer is enabled by default. When launching an app icon that came from Workspace app, Workspace app checks the local VDA machine to see if the application can be launched on the local VDA instead of by creating a new Citrix double-hop session.
- If the application is installed locally on the VDA then the local application shortcut should launch quickly. If the application is on a different delivery group then a second (double-hop) Citrix HDX/ICA connection will be established.
- If the user deletes Workspace app shortcuts from the Start Menu, you can get them back by going to the systray icon and refreshing the applications. Or sometimes you have to reset Workspace app.

If you are running components older than Receiver 4.11, VDA 7.17, and StoreFront 3.14, then you’ll need to configure the prefer keyword to get Receiver delivered icons to launch on the local VDA instead of in a new double-hop Citrix connection.
- Enable the Group Policy setting Remove common program groups from Start Menu and apply it to non-administrators.
- For applications that are installed on the same VDA that is publishing the desktop, configure Group Policy Preferences to recreate the application shortcuts based on Active Directory group membership. Applications on other delivery groups are handled by Receiver.
- Or use the prefer keyword to copy shortcuts from the PreferTemplateDirectory.
- On the VDA, configure the following Receiver Registry keys (or corresponding settings in the receiver.admx GPO template):
- HKEY_LOCAL_MACHINESOFTWAREWow6432NodeCitrixDazzlePreferTemplateDirectory = a UNC path or local path containing shortcuts to be copied by the prefer keyword. This can point to C:ProgramDataMicrosoftWindowsStart Menu.
- In Citrix Studio, configure a Delivery Group with delivery type = Desktop and Applications. Assign users to the Delivery Group and the applications (if visibility is limited).
- In Studio, edit each application and change KEYWORDS:Prefer to KEYWORDS:prefer. Notice the lower case p. It doesn’t work with uppercase P.
- With the prefer keyword, if you publish an application that is also created using Group Policy Preferences, the Group Policy Preferences icon will take precedence. This is good. Otherwise the Receiver published application icon would result in a new Citrix double-hop session.
- See Ralph Jansen Citrix Receiver 4.1 Prefer keyword examples
- If using the prefer keyword with the PreferTemplateDirectory, enter it as KEYWORDS:prefer=shortcutname where shortcutname is the name of the shortcut that is copied from the Template directory.
- In Studio, edit each application and change KEYWORDS:Prefer to KEYWORDS:prefer. Notice the lower case p. It doesn’t work with uppercase P.
- Configure your client devices to connect to the published desktop.
- When users connect to the published desktop, Group Policy Preferences will create shortcuts to local applications.
- Receiver will auto-launch and hopefully auto-login.
- If Receiver Self-Service Mode is disabled, all published applications should automatically appear in the Start Menu and Desktop.
- If Receiver Self-Service Mode is enabled then only applications with KEYWORDS:Auto and/or KEYWORDS:Mandatory in the published application description will be displayed. Users can open the systray icon to subscribe to more applications.
- For published applications with KEYWORDS:prefer=shortcutname, Receiver should copy icons from the template directory to the Start Menu and/or Desktop. See below for considerations.
- Users can copy icons from the Start Menu to the desktop. Make sure the user Copies the icon and doesn’t Move it.
- Users can then launch applications directly from the Start Menu, from the Desktop, or from the Receiver (if Self-Service interface is enabled).
- If a local shortcut (e.g. Group Policy Preferences shortcut, or copied from template directory) matches a published application with KEYWORDS:prefer then the local shortcut will override the published application icon.
- If the application is installed locally on the VDA then the local application shortcut should launch quickly. If the application is on a different delivery group then a second (double-hop) Citrix HDX/ICA connection will be established.
- If the user deletes Receiver shortcuts from the Start Menu, you can get them back by going to the systray icon and refreshing the applications. Or sometimes you have to reset Receiver.
Notes regarding Prefer Template Directory
- Prefer Template Directory can point to C:ProgramDataMicrosoftWindowsStart Menu, which is the All Users Start Menu.
- The shortcuts copied from the Prefer Template Directory are renamed to match the published app name.
- For prefer local apps, any command line parameters specified in the published app are ignored. If you need these command line parameters, add them to the shortcut in the Prefer Template Directory.
- If you have multiple published apps pointing to the same prefer local shortcut, then only one copy will be made, and it will have the name of only one of the published apps. To workaround this, in the Prefer Template Directory, create separate shortcuts for each published app, and adjust the published app prefer keyword accordingly.
- Jan Hendrik Meier Automatic Shortcut generation for local installed applications in a Citrix XenDesktop / XenApp 7.x environment has a script that can create shortcuts based on the published apps with prefer keyword. These shortcuts can then be copied to your Prefer Template Directory.
How to Script/Automate Workspace app and Receiver Self-Service
From Citrix Knowledgebase article Driving the Citrix Receiver Self-Service Plug-in Programmatically: by default, Workspace app Self-Service (SSP) activities are driven by user interaction. However, SSP exposes sufficient information for its activities to be scripted.
When SSP builds a shortcut, it builds it to a small stub application in a file %appdata%CitrixSelfServiceapp-name-with-spaces-removed.exe for each resource. These files allow SSP to create a fake ‘install’ record for Add/Remove Software. Running these .exe files causes the application to launch. Note: Workspace app and Receiver 4.3.100 and newer don’t create stubs by default. To enable, set HKLMSoftwareWow6432NodeCitrixDazzleAlwaysUseStubs (REG_SZ) = true.
If you want to drive SSP directly for launch instead of through an .exe stub, look at the keys under HKCUSoftwareMicrosoftWindowsCurrentVersionUninstall. There will be keys in there named farm-name@@server-farm-name.app-friendly-name. In these keys you’ll find a LaunchString value that shows the relevant parameters. These parameters are user-independent and can therefore be cloned from a reference user to a general case. You can copy and reuse these parameters without interpretation.
Running the command selfservice.exe –init –ipoll –exit starts SSP, performs a refresh (interactive poll) from the current provider, and forces a clean exit.
Additional command line parameters are detailed at Driving the Citrix Receiver Self-Service Plug-in Programmatically.
Citrix Workspace app and Receiver come with a .dll file that implements the Citrix Common Connection Manager SDK. You can use the CCM SDK to do the following:
- Launch Sessions
- Disconnect Sessions
- Logoff Sessions
- Get Session Information
Citrix was kind enough to develop a PowerShell module that calls functions from the .dll. Get the CCMPowershellModule from Github. The PowerShell module contains functions like the following:
- CCMTerminateApplication
- CCMLaunchApplication
- CCMGetActiveSessionCount
- CCMDisconnectAllSessions
Launcher Scripts
Ryan C Butler Storefront ICA file creator at Github. See Create an ICA File from Storefront using PowerShell or JavaScript for more info.
Stan Czerno – Powershell Script to launch one or more Published Applications from Citrix Storefront 2.x through 3.11: the script launches a browser, connects to StoreFront (or NetScaler Gateway), logs in, and launches an icon. This is a very well-written script that uses a .dll file from Citrix Workspace app to display session information.
Citrix Solutions Lab StoreFront Launcher Script at Github. It attempts to closely resemble what an actual user would do by:
- Opening Internet Explorer.
- Navigating directly to the Receiver for Web site or NetScaler Gateway portal.
- Completing the fields.
- Logging in.
- Clicking on the resource.
- Logging off the StoreFront site.
David Ott StoreFront App/Desktop Launch Testing Script uses Internet Explorer to login to StoreFront and launch a resource. Sends email with the result. Uses wficalib.dll to get session information.
Microsoft Teams
Citrix and Microsoft jointly support the delivery of Microsoft Teams from Citrix Virtual Apps and Desktops using optimization for Microsoft Teams. The Teams optimization components are built into VDA and Workspace app. There is no need to install anything separately. The feature is based on Browser Content Redirection so don’t exclude that feature when installing the VDA.
Microsoft Teams optimization/offloading requires the following:
- Newest version of Microsoft Teams machine-wide installation (ALLUSER=1)
- Newest version of Citrix VDA
- Newest version of Citrix Workspace app.
Feature matrix and version support at Citrix Docs shows the required versions of Teams, Citrix VDA, and Citrix Workspace app for various Teams features.
See Citrix Docs Optimization for Microsoft Teams.
Skype for Business
Citrix has a HDX RealTime Optimization Pack for Workspace app that enables offloading of Skype for Business media protocols to the client device. Here are the available versions:
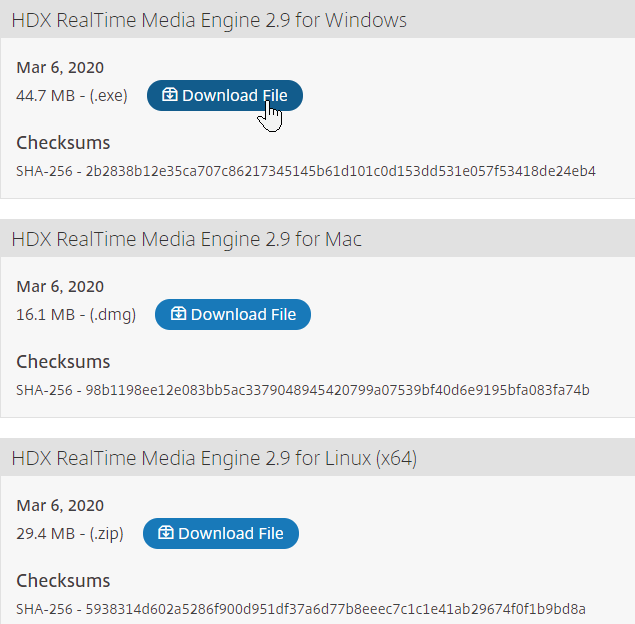
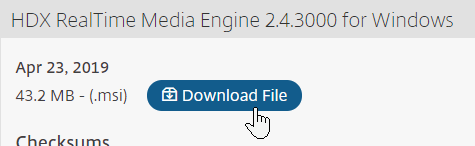
- Version 2.9 is a Long Term Service Release (LTSR). See HDX RealTime Optimization Pack 2.9 LTSR at Citrix Docs.
- Version 2.4.3000 (Cumulative Update 3) is a Long Term Service Release (LTSR). More details at CTX200466 Lifecycle Information for Citrix XenApp/XenDesktop HDX RealTime Optimization Pack
- Details on the 2.3 release can be found in Citrix Blog Post The Only Virtualization Solution for Skype Meetings Just Got Even Better!
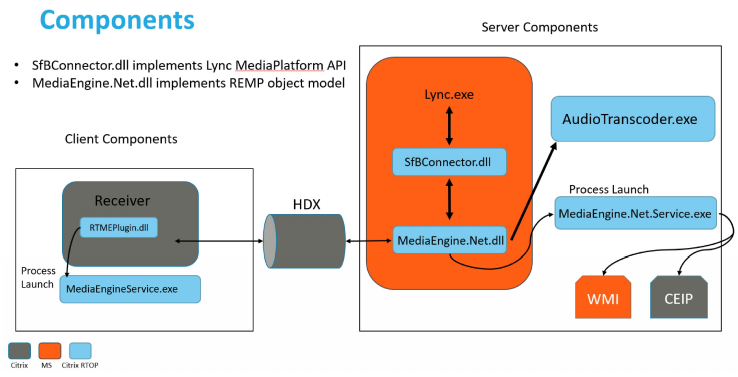
The HDX RealTime Optimization Pack comes in two pieces: the Connector (on the VDA), and the Media Engine (on the Workspace app machine). Usually both pieces must be the same version, but versions 2.3 and higher now allow version mixing.
- Connector 2.9 LTSR

- Connector 2.4.3000 LTSR

- Connector 2.4.3000 LTSR
- Media Engine 2.9 LTSR

- Media Engine 2.4.3000 LTSR

- Media Engine 2.4.3000 LTSR


24-page Citrix PDF Delivering Microsoft Skype for Business to XenApp and XenDesktop Users.
For Skype for Business Location Based Routing, you’ll need the following: (Source = Citrix Derek Thorslund at Location based routing at Citrix Discussions)
- Microsoft added support for Location Based Routing (LBR) with the virtualized Skype for Business 2016 client (and HDX RTOP 2.1 and above) in the Click-to-Run (C2R) download quite a long time ago, but it hasn’t yet been introduced in the MSI package.
- It requires setting IsLBRInVDIEnabled on the Skype for Business Server to True:
$x = New-CsClientPolicyEntry -Name "IsLBRInVDIEnabled" -Value "true"
Set-CsClientPolicy -Identity "<ClientPolicyName>” -PolicyEntry @{Add=$x}
When offloading voice and video to Workspace app machines, don’t forget to configure QoS on the client machines. See Citrix Blog Post Implementing the Citrix HDX RealTime Optimization Pack: Don’t Forget About QoS/DSCP.

Citrix CTX222459 RealTime Optimization Pack Capability Checker: It will list out endpoint hardware/software information which will be used to process audio and video. The tool is independent of RealTime Optimization Pack version and runs any Windows machine.
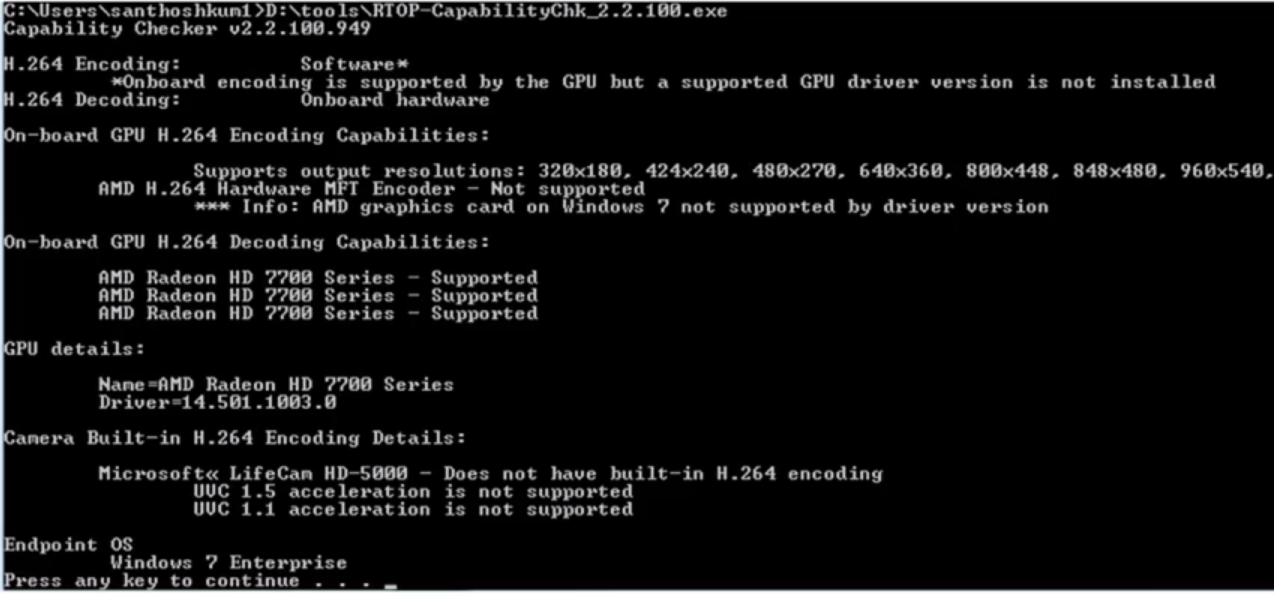
Citrix CTX214237 LOPper – Lync Optimization Pack Log Parser: parses log files generated by Citrix HDX RealTime Optimization Pack (HROP) when an audio/video call is made using Lync 2013/Skype for Business (SfB) and shows relevant information in a UI.
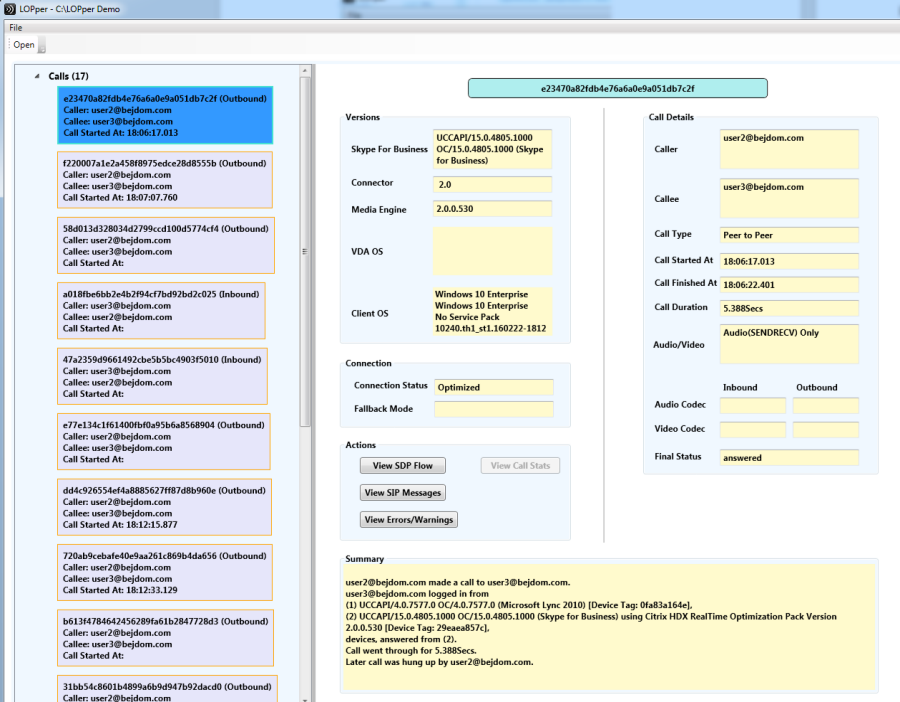
Troubleshooting – Citrix QuickLaunch
Citrix CTX219718 QuickLaunch Tool (Testing Application and Desktop Launch) lets you launch Citrix sessions directly from a Controller without needing StoreFront.
You enter a Controller address, credentials, and then it shows you the published resources. You can pick a resource, edit properties on the other tabs, and then Connect. This allows you to easily try different connection properties.
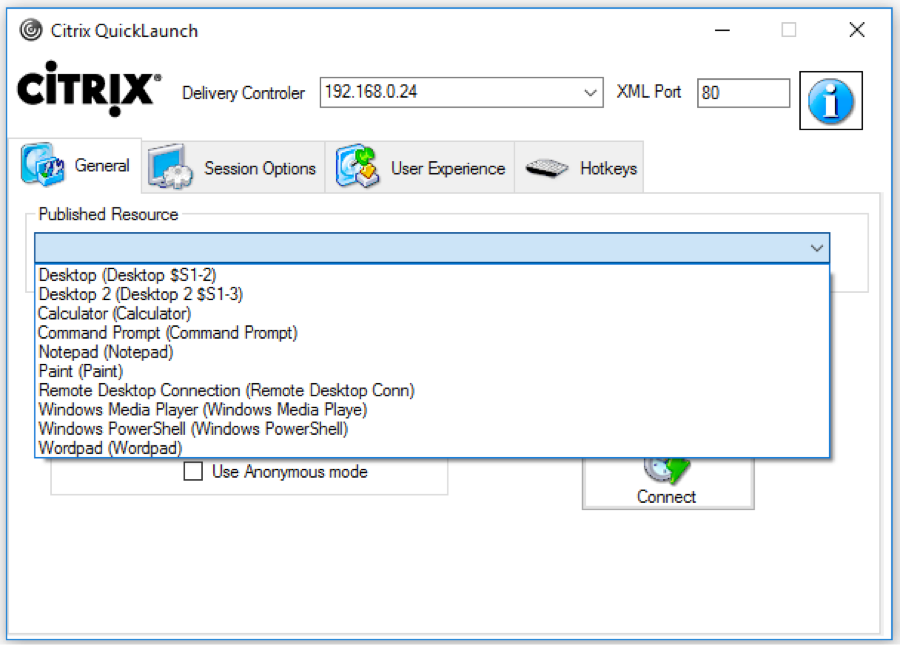
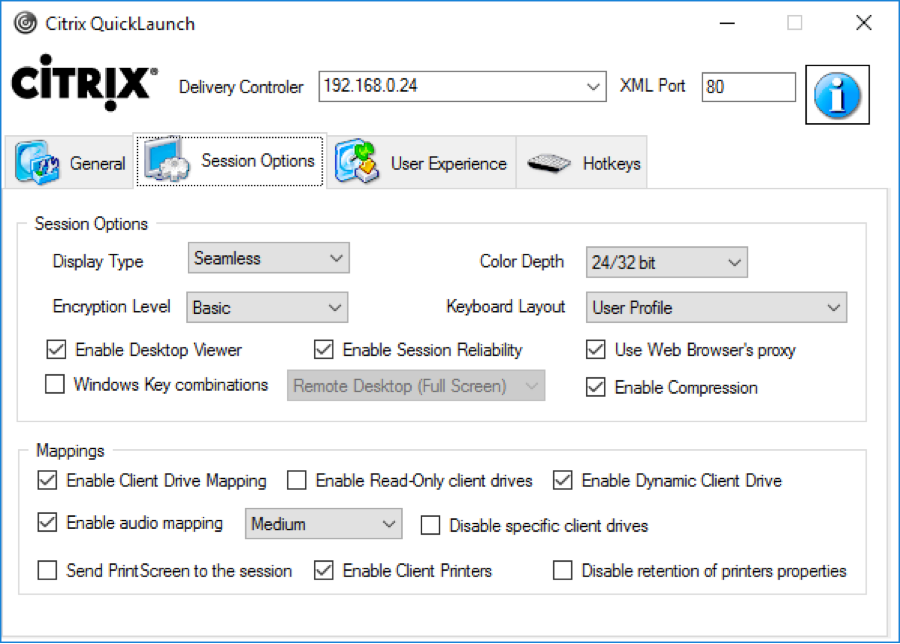
If you run into problems launching a session, use Sysinternals DebugView while running CQL in Debug mode (/debug switch).

Troubleshooting – Workspace app Logging
There are a couple methods of logging Workspace app for Windows operations. One method is CTX141751 Citrix Receiver Diagnostics Tool – For Windows, which creates a CDF trace that can be parsed by CDFControl.
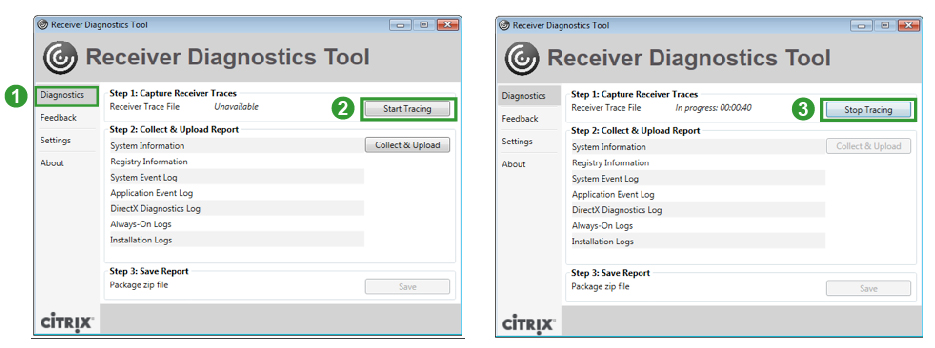
Another method is CTX132883 How to Enable Logging on Receiver for Windows Using Registry Entries. The logfiles in %USERPROFILE%AppdataLocalCitrix are human readable. And CTX206102 Enable SSON Logging Using Registry Key.
Instead of creating the registry keys manually, you can use the following .reg file provided by Wolfgang Thürr:
Windows Registry Editor Version 5.00

;only for x64 windows os
;import with admin rights
;restart your computer to activate the logging and tracing settings
;create C:TEMP for the launch ICA log and SSON logn (no environment variables can be used)

;general Workspace app and Receiver logging
;************************
;logpath: %USERPROFILE%AppdataLocalCitrixReceiver
[HKEY_LOCAL_MACHINESOFTWAREWow6432NodeCitrix]
"ReceiverVerboseTracingEnabled"=dword:00000001

;Authentication Manager logging
;******************************
;logpath: %USERPROFILE%AppdataLocalCitrixAuthManager
[HKEY_LOCAL_MACHINESOFTWAREWow6432NodeCitrixAuthManager]
"LoggingMode"="verbose"
"TracingEnabled"="True"
"SDKTracingEnabled"="True"

;Self Service logging
;********************
;logpath: %USERPROFILE%AppdataLocalCitrixSelfService
[HKEY_LOCAL_MACHINESOFTWAREWow6432NodeCitrixDazzle]
"Tracing"="True"
"AuxTracing"="True"
"DefaultTracingConfiguration"="global all –detail"

;save launch ICA
;***************
;logpath: C:TEMPica.log (no environemnt variables allowed)
[HKEY_LOCAL_MACHINESOFTWAREWow6432NodeCitrixICA ClientEngineConfigurationAdvancedModulesLogging]
"LogConfigurationAccess"="true"
"LogConnectionAuthorisation"="true"
"LogEvidence"="true"
"LogICAFile"="true"
"LogFile"="C:\TEMP\ica.log"
"LogStartup"="true"

;Receiver Always On Tracing
;**************************
;generates ETL Files for analyzing with CDFControl see CTX111961 for details
;can be configured or overruled by GPOs (icaclient.admx)
;path %USERPROFILE%AppDataLocalTempCTXReceiverLogs
[HKEY_LOCAL_MACHINESOFTWAREPoliciesCitrixICA ClientAoLog]
"EnableTracing"=dword:00000001

;Single Sign-on Logging
;**************************
;https://support.citrix.com/article/CTX206102
[HKEY_LOCAL_MACHINESOFTWAREWow6432NodeCitrixInstallSSON]
"DebugEnabled"="true"
"LogPath"="C:\Temp"
Troubleshooting – Duplicate Stores
Stores are sometimes duplicated in Workspace app, especially if you are running Workspace app inside a VDA. (h/t Dan High)
StoreFront URLs can be defined in several places:
- In Studio, go to Configuration > StoreFront and delete all URLs configured here.
- Look in GPOs for Computer Configuration > Administrative Templates > Policies > Citrix Components > Citrix Workspace > StoreFront > NetScaler Gateway URL/StoreFront Accounts List. Remove any URLs configured here.
- In the client-side registry, at HKLMSoftwareWow6432NodeCitrixDazzleSites, you might see store addresses that were specified during a command line installation of Workspace app.
- When Citrix Workspace app switches between StoreFront servers in multiple datacenters, it’s possible for each datacenter to be treated as a separate Workspace app site. This can be prevented by doing the following. From Juan Zevallos at Citrix Discussions:
- Match the Base URL in all datacenters.
- Match the SRID in all datacenters – The SRID can be safely edited in the C:inetpubwwwrootCitrixRoamingweb.config. Make sure to propagate changes to other servers in the group.
- Match the Delivery Controller names under “Manage Delivery Controllers” – The XML brokers can be different, but the actual name of the Delivery Controller/Farm must be identical.
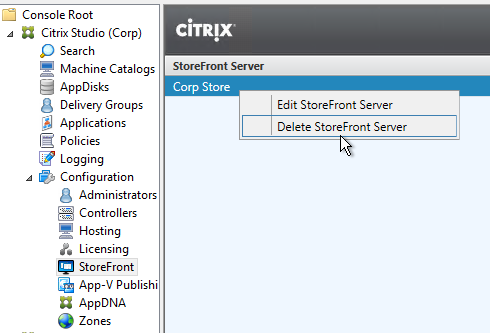

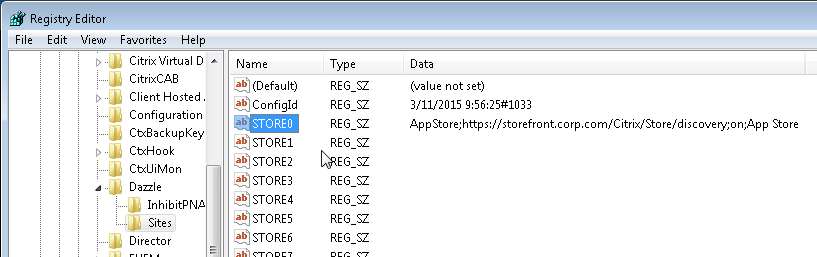
If you are running Workspace app on a VDA, once you’ve removed the configured URLs shown above, do the following to clean up the VDAs:
- On the VDA, HKEY_LOCAL_MACHINESOFTWAREPoliciesCitrix – Delete the number folders representing policy entries.
- On session host VDAs, HKEY_LOCAL_MACHINESOFTWAREWow6432NodeMicrosoftWindows NTCurrentVersionTerminal ServerInstallSoftwareCitrix – Remove the entries for storefront in the following folders.
- Under receiverctxaccount delete all entries.
- Under SRStore delete the entries.
- On the VDA, C:ProgramDataCitrixCseCache – Delete all files
- On the VDA, C:ProgramDataCitrixGroupPolicy – Delete all folders and files.
- Run gpupdate and logoff.
- In the user’s registry, HKEY_CURRENT_USER or the profile registry hive. Possible profile reset.
- Under SoftwareCitrixDazzleSites – Delete all entries.
- Under SoftwareCitrixReceiverctxaccount – delete all entries.
- Under SoftwareCitrixSRStore – delete the entries.
- Verify no cached profile folders for user on server.