Each software is released under license type that can be found on program pages as well as on search or category pages. Here are the most common license types:
Freeware
Freeware programs can be downloaded used free of charge and without any time limitations. Freeware products can be used free of charge for both personal and professional (commercial use).
Open Source
Open Source software is software with source code that anyone can inspect, modify or enhance. Programs released under this license can be used at no cost for both personal and commercial purposes. There are many different open source licenses but they all must comply with the Open Source Definition — in brief: the software can be freely used, modified and shared.
Free to Play
This license is commonly used for video games and it allows users to download and play the game for free. Basically, a product is offered Free to Play (Freemium) and the user can decide if he wants to pay the money (Premium) for additional features, services, virtual or physical goods that expand the functionality of the game. In some cases, ads may be show to the users.
Demo
Demo programs have a limited functionality for free, but charge for an advanced set of features or for the removal of advertisements from the program’s interfaces. In some cases, all the functionality is disabled until the license is purchased. Demos are usually not time-limited (like Trial software) but the functionality is limited.
Trial
Trial software allows the user to evaluate the software for a limited amount of time. After that trial period (usually 15 to 90 days) the user can decide whether to buy the software or not. Even though, most trial software products are only time-limited some also have feature limitations.
Paid
Usually commercial software or games are produced for sale or to serve a commercial purpose.

CRU makes periodic improvements to the software and firmware that are part of our product offerings. Please select from the list on the bottom of software updates.
Forensic Software
Ditto, Ditto DX, and Ditto Shark
View Webpage: Ditto Family Firmware
Forensic Software Utility
Learn more about the Forensic Software Utility >
Forensic Software Utility (for 64-bit versions of Windows)
Download: ForensicSoftwareUtility-3.2.0.11-x64.exe (7.29 MB)
Forensic Software Utility
(for 32-bit versions of Windows)
Download: ForensicSoftwareUtility-3.2.0.11-x86.exe (6.11 MB)
WriteBlocking Validation Utility
Learn more about the WriteBlocking Validation Utility >
WriteBlocking Validation Utility (64-bit Windows)
Download: WbValUtil-2.1.0.7-(2022.07.19)-x64.exe (12.68 MB)
Drive eRazer Ultra
Learn more about the Drive eRazer Ultra app >
Drive Erazer App 1.1.0.2
Download: DriveErazerApp-1.1.0.2.exe (7.95 MB)
Manual: Drive-eRazer-App_Manual_A9-000-0068_Rev1.1.pdf (171.58 KB)
Mouse Jiggler Software
Learn more about Mouse Jiggler >
Mouse Jiggler MJ-3 Script Creation Software v1.0.1 — Windows 32-bit
Download: Mouse_Jiggler_App_1.0.1.2_for_Windows_32-bit.zip (10.47 MB)
Mouse Jiggler MJ-3 Script Creation Software v1.0.1 — Windows 64-bit
Download: Mouse_Jiggler_App_1.0.1.2_for_Windows_64-bit.zip (11.54 MB)
Mouse Jiggler Software v1.0.1 — macOS 10.x Only (not compatible with macOS 11 or higher)
Download: Mouse_Jiggler_App_1.0.1.2_for_Mac.zip (9.07 MB)
Custom Resolution Utility (CRU) is an EDID editor that focuses on custom resolutions. CRU shows you how the monitor defines resolutions and other capabilities and gives you the power to change it. Add custom resolutions, remove unwanted resolutions, edit FreeSync ranges, and more. CRU creates software EDID overrides in the registry and does not modify the hardware.
Download: cru-1.5.2.zip — Source: cru-1.5.2-src.zip
A message from ToastyX:
Over the years, I have created various monitor-related software and provided support for free. I would like to continue providing updates and work on new ideas, but I need your support. If you find my software useful, please consider supporting me through Patreon:
![[Image: patreon.png]](https://www.monitortests.com/images/patreon.png)
Requirements:
- Windows Vista or later (Windows XP does not support EDID overrides)
- AMD/ATI or NVIDIA GPU with appropriate driver installed (Microsoft Basic Display Adapter driver does not support EDID overrides)
- Intel GPUs and laptops with switchable graphics are supported with one of these drivers:
- Newer Intel GPUs are supported with the latest drivers.
- 6th generation (Skylake): Intel Graphics Driver for Windows [15.45]
- 4th/5th generation (Haswell/Broadwell): Intel Graphics Driver for Windows [15.40]
- 4th generation (Haswell) for Windows 7/8.1: Intel Graphics Driver for Windows 7/8.1 [15.36]
- Older Intel GPUs are supported for external displays only using the alternative method described below.
Before making any changes, familiarize yourself with getting into safe mode using a recovery drive in case you can’t see the screen. If you don’t have a recovery drive, press and hold the power button to shut off the computer while Windows is booting. Doing this twice should give you recovery options that you can use to get into safe mode: Troubleshoot > Advanced options > Startup Settings > Restart
Getting started:
- Run CRU.exe. A UAC prompt may appear because it needs permission to access the registry.
- Choose a display from the drop-down list.
- «(active)» means the display is connected and recognized by the graphics driver.
- «*» means changes were made and an override was saved in the registry.
- Edit the configuration as desired. Please read the sections below for more information.
- Repeat steps 2-3 for other displays if required.
- The «Copy» and «Paste» buttons at the top can be used to copy the resolutions, extension blocks, and range limits if included. It will not copy the name or serial number, but it will copy the inclusion of these items using the display’s own information. Import follows the same logic unless «Import complete EDID» is selected.
- Click «OK» to save the changes.
- Run restart.exe to restart the graphics driver.
- If the display does not return after 15 seconds, press F8 for recovery mode. This will temporarily unload all the EDID overrides without deleting them. Restart the driver again to reload any changes.
- On some systems, the graphics driver might crash while restarting. If that happens, the driver might be disabled after rebooting. Simply run restart.exe again to enable the driver.
- Set the resolution in the Windows display settings. To set the refresh rate:
- Windows 10: right-click on the desktop > Display settings > Advanced display settings > Display adapter properties > Monitor tab
- Windows Vista/7/8/8.1: right-click on the desktop > Screen resolution > Advanced settings > Monitor tab
To reset a display back to the default configuration, use the «Delete» button at the top to delete the override from the registry and reboot. To reset all displays, run reset-all.exe and reboot. This can be done in safe mode if necessary.
Alternative method for Intel GPUs:
If you have an older Intel GPU, use the «Export…» button and choose «EXE file» for the file type to export a self-contained EDID override installer. Then run the .exe file and choose «Install EDID» to install the EDID override on all matching displays.
Detailed resolutions:
- Detailed resolutions are the preferred way to add custom resolutions. More detailed resolutions can be added using extension blocks.
- The first detailed resolution is considered the preferred or native resolution. At least one detailed resolution should exist to define the native resolution. All other resolutions can be removed if they are not needed. The graphics driver will automatically add some common lower resolutions as scaled resolutions. To edit the list of scaled resolutions for AMD and NVIDIA GPUs, use Scaled Resolution Editor.
- CRU adds monitor resolutions, not scaled resolutions. Lower resolutions can be scaled up to the native resolution by enabling GPU scaling in the graphics driver’s control panel, but higher resolutions won’t be scaled down by the GPU. Higher resolutions will only work if the monitor can handle them.
- Laptop displays usually don’t have scalers and can’t display non-native resolutions without GPU scaling. To add other refresh rates, add the refresh rate at the native resolution. The graphics driver will automatically add the refresh rate to lower scaled resolutions.
- EDID detailed resolutions are limited to 4095×4095 and 655.35 MHz pixel clock. If a value turns red, that means it’s invalid or out of limits. Use a DisplayID extension block to add resolutions with higher limits.
- Use the timing options to help fill in the values:
- Manual — Allows the timing parameters to be set manually. The dialog will always open in this mode. See also: Timing parameters explained
- Automatic PC — Uses standards common with PC monitors. Uses CTA-861 for 4:3/16:9 resolutions up to 1920×1080 @ 60 Hz, VESA DMT for 1360/1366×768 and 1600×900, CVT-RB otherwise.
- Automatic HDTV — Uses standards common with HDTVs. Uses CTA-861 for all TV resolutions if possible, VESA DMT for 1360/1366×768 and 1600×900, CVT-RB otherwise.
- Automatic CRT — Uses standards compatible with CRT monitors. Uses VESA DMT for 4:3/5:4 resolutions, CVT otherwise.
- Native PC/HDTV — Uses the 60 Hz «Automatic» timing parameters for all refresh rates. This may help when trying other refresh rates.
- Exact — Uses non-standard timing parameters to produce exact integer refresh rates.
- Exact reduced — Adjusts the «Exact» timing parameters to reduce the pixel clock if possible. This may help when trying higher refresh rates.
- Exact CRT — Uses timing parameters compatible with CRT monitors to produce exact integer refresh rates.
- VESA standards:
- CVT standard — Standard intended for CRT monitors.
- CVT-RB standard — Standard intended for LCD monitors. Reduces the blanking compared with CVT.
- CVT-RB2 standard — Newer standard intended for LCD monitors. Reduces the horizontal blanking compared with CVT-RB.
- GTF standard — Old standard commonly used with CRT monitors.
- Vertical total calculator — Calculates the vertical total required for the specified refresh rate and pixel clock. This can be used to implement Quick Frame Transport (QFT), which can help reduce crosstalk with backlight strobing at lower refresh rates.
- Pay attention to pixel clock limits:
- Single-link DVI is limited to 165 MHz and dual-link DVI is limited to 330 MHz unless the graphics driver is patched:
- AMD/ATI Pixel Clock Patcher
- NVIDIA Pixel Clock Patcher
- HDMI is treated as single-link DVI unless an «HDMI support» data block is defined in a CTA-861 extension block.
- HDMI 2.0 requires both an «HDMI support» data block and an «HDMI 2.0 support» data block.
- HDMI limits depend on the GPU:
- Newer GPUs with HDMI 2.0 support up to 600 MHz with HDMI 2.0 and up to 340 MHz with HDMI 1.x.
- AMD HD 7000-series and newer GPUs without HDMI 2.0 support up to 297 MHz. Older GPUs are limited to 165 MHz unless the driver is patched.
- AMD/ATI’s driver also listens to the maximum TMDS clock in the «HDMI support» data block. Make sure it’s enabled and set to 340 MHz.
- Intel GPUs without HDMI 2.0 support up to 300.99 MHz.
- DisplayPort limits are listed here: Common pixel clock limits
- Passive DisplayPort to HDMI adapters are limited to 165 MHz unless the driver is patched.
- These DisplayPort to HDMI 2.0 active adapters support up to 600 MHz pixel clock (Amazon affiliate links):
- Club 3D CAC-1080 DisplayPort 1.4 to HDMI 2.0b HDR Active Adapter
- Club 3D CAC-1180 Mini DisplayPort 1.4 to HDMI 2.0b HDR Active Adapter
- Club 3D CAC-1070 Displayport 1.2 to HDMI 2.0 Active Adapter
- Club 3D CAC-1170 Mini DisplayPort 1.2 to HDMI 2.0 Active Adapter
- Accell B086B-011B DisplayPort 1.2 to HDMI 2.0 Active Adapter
- Accell B086B-012B Mini DisplayPort 1.2 to HDMI 2.0 Active Adapter
- These DisplayPort to HDMI 1.4 active adapters support up to 300 MHz pixel clock (Amazon affiliate links):
- Accell B086B-006B UltraAV DisplayPort 1.2 to HDMI 1.4 Active Adapter
- Accell B086B-007B UltraAV Mini DisplayPort 1.2 to HDMI 1.4 Active Adapter
- Accell B086B-003B UltraAV DisplayPort 1.1 to HDMI 1.4 Active Adapter
- Accell B086B-008B UltraAV Mini DisplayPort 1.1 to HDMI 1.4 Active Adapter
- Single-link DVI is limited to 165 MHz and dual-link DVI is limited to 330 MHz unless the graphics driver is patched:
Standard resolutions:
- Standard resolutions are mostly useful for CRT monitors and for adding lower resolutions with LCD monitors. Do not add the native resolution as a standard resolution.
- AMD/ATI only supports the resolutions in the drop-down list. Other resolutions will be ignored by the driver. These will be listed in gray.
- NVIDIA does not support more than 8 standard resolutions. Additional resolutions will use up detailed resolution slots.
- Standard resolutions are limited to certain aspect ratios: 4:3, 5:4, 16:9, 16:10. Use detailed resolutions for other aspect ratios.
- The horizontal resolution is limited to 256-2288 and must be a multiple of 8. Use detailed resolutions for other resolutions.
- The refresh rate is limited to 60-123 Hz. Use detailed resolutions for other refresh rates.
Extension blocks:
- GPU-specific limtations:
- CRU can read extension blocks from displays connected to AMD and NVIDIA GPUs.
- CRU can’t read extension blocks with Intel GPUs or switchable graphics.
- Older drivers or GPUs may only support up to 3 extension blocks.
- Extension block types:
- CTA-861 extension blocks can contain additional detailed resolutions and data blocks such as TV resolutions, audio formats, and HDMI support. Note: NVIDIA requires at least 2 bytes left for data blocks or the driver will ignore all changes.
- Use VTB-EXT to add more standard resolutions. Note: AMD/ATI only supports one VTB-EXT block, and it must be the last block in the list.
- Use DisplayID to add resolutions greater than 4095×4095 or 655.35 MHz pixel clock. DisplayID 2.0 supports pixel clocks with three decimal places, but the driver or hardware might not support such precision.
- Default extension blocks are placeholders for the monitor’s original extension blocks. Extension blocks that can’t be read will appear as default extension blocks. Note: NVIDIA does not support default extension blocks and will ignore all changes if a default extension block exists.
- If you need to add an extension block manually, importing one of these files will provide a starting point:
- hdmi.dat — HDMI support only
- hdmi-audio.dat — HDMI support with audio
- hdmi-bitstream.dat — HDMI support with bitstreaming audio formats
- hdmi2.dat — HDMI 2.0 support only
- hdmi2-audio.dat — HDMI 2.0 support with audio
- hdmi2-bitstream.dat — HDMI 2.0 support with bitstreaming audio formats
- displayport-audio.dat — DisplayPort audio
Editing FreeSync/VRR ranges:
- For DisplayPort monitors, use the «Edit…» button at the top to edit the «V rate» under range limits, and make sure «Include if slot available» is checked. Note: NVIDIA has ranges hard-coded for some monitors. To get around this, change the device ID at the top to anything else, such as ABC1234 (3 letters, 4 hex digits).
- For HDMI FreeSync, edit the «FreeSync range» data block in the CTA-861 extension block.
- For HDMI 2.1 VRR, edit the «HDMI 2.1 support» data block in the CTA-861 extension block.
Export formats:
- .bin — Raw binary EDID compatible with most EDID tools
- .dat — Data file compatible with Phoenix EDID Designer and Advantiv EEditZ/EEditGold
- .inf — Unsigned monitor driver compatible with Windows Vista and later
- .txt — Text file containing whitespace-separated hexadecimal values (16 per line)
- .csv — Text file containing comma-separated hexadecimal values (one block per line)
- .exe — Self-contained EDID override installer (includes alternative method for Intel GPUs)
CRU can import all of the above formats and any reasonably formatted text file with hexadecimal values.
Command-line options:
- Exported .exe files:
- /i — Install EDID without prompting
- /r — Reset EDID without prompting
- reset-all.exe:
- /q — Reset without prompting
- restart.exe/restart64.exe:
- /q — Restart without prompting (or rename the file to restart-only.exe)
- /r — Activate recovery mode without prompting
Memory clock issues:
- The GPU will not reduce the memory clock when idle if the vertical blanking is too low because there won’t be enough time between refreshes to retrain the memory without screen corruption. Horizontal values can still be reduced if necessary.
- Older AMD/ATI GPUs require the «Automatic PC/HDTV» or «CVT-RB standard» vertical blanking to reduce the memory clock when idle.
- NVIDIA and newer AMD cards can handle some lower values depending on the resolution and refresh rate.
- Older AMD/ATI GPUs have a design limitation that causes video acceleration to scramble the screen if the vertical blanking is below standard with the GPU’s memory overclocked or with multiple monitors connected. Skype is known to trigger this problem. Either don’t overclock the GPU’s memory, or use the «Automatic PC/HDTV» or «CVT-RB standard» vertical blanking.
Changes in 1.5.2:
- Support up to 7 extension blocks
- NVIDIA can now read all extension blocks
- Detailed resolutions:
- Added 480p/480i/525p/525i to «Automatic CRT»
- Fixed «Exact» and «Exact reduced» for interlaced resolutions
- Added «Exact CRT» timing option
- Added «Vertical total calculator» timing option
- Audio formats: added «Auro-Cx» and «MPEG-D USAC» from CTA-861.6
- Colorimetry: added «sRGB» and «Default RGB» from CTA-861.6
Changes in 1.5.1:
- Audio formats: added new formats from CTA-861-G/H
- Colorimetry: added ICtCp from CTA-861-H
- DisplayID 2.0 detailed resolutions: fix «Reset» button resetting to 6 Hz when adding a new resolution
- Tiled display topology: split vendor and product IDs to accommodate OUIs (2.0) and non-letter IDs (1.3)
- List boxes now retain scroll position after editing
Changes in 1.5:
- Added DisplayPort YCbCr color formats and maximum color depth (use the «Edit…» button at the top)
- Added HDMI 2.1 features including maximum FRL rate, variable refresh rate, and display stream compression
- New and improved timing options for detailed resolutions:
- «LCD standard» has been split into «Automatic (PC)» and «Automatic (HDTV)» to better accommodate different display standards.
The main difference is how they handle resolutions greater than 1920×1080 @ 60 Hz and 21:9 resolutions. «PC» favors CVT-RB, while «HDTV» favors CTA-861. - «LCD native» has been split into «Native (PC)» and «Native (HDTV)» for the same reason.
- «LCD reduced» has been eliminated because it was too arbitrary and only worked for certain resolutions. Try «Exact reduced» for an alternative.
- «CRT standard» is now «Automatic (CRT)» and includes 4:3/5:4 VESA DMT resolutions. Use «CVT standard» for the old behavior.
- Added «Exact» and «Exact reduced» to calculate exact integer refresh rates.
- Added common display standards: CVT, CVT-RB, CVT-RB2, and GTF (previously «Old standard»)
- «LCD standard» has been split into «Automatic (PC)» and «Automatic (HDTV)» to better accommodate different display standards.
- Detailed resolutions can now calculate frequencies for all possible pixel clocks (up to 167772.16 MHz for DisplayID 1.3)
- CEA-861 extension blocks are now called CTA-861 to reflect the standard’s new name
- Added support for DisplayID 2.0 extension blocks
- Export now saves the original unmodified EDID if no changes were made
Changes in 1.4.2:
- List inactive displays with overrides installed
- Display properties: interpret «0» ID serial number as blank
- Detailed resolutions: «LCD reduced» will no longer go below 56 horizontal blanking
- DisplayID detailed resolutions: fixed interlaced calculations to match DisplayID standard
- HDMI 2.0 support: enable «SCDC present» by default when adding new data blocks
- Added .csv file export: outputs comma-separated hexadecimal values (one block per line)
- Added .exe file export: outputs self-contained EDID override installers (includes alternative method for Intel GPUs)
- reset-all.exe: Reset alternative method for Intel GPUs, added /q option
- restart.exe/restart64.exe: Faster restarts, recovery mode includes alternative method for Intel GPUs, added /r option
Changes in 1.4.1:
- Speaker setup: added new speakers from CTA-861-G
- HDMI support: fixed undefined latency data saving as 2 ms (since 1.3.99-p1)
- HDMI 2.0 support: preserve additional fields for HDMI 2.1
- FreeSync range: added support for editing FreeSync 2 ranges
- Added support for HDR static metadata blocks
Changes in 1.4:
- Added support for DisplayID extension blocks:
- Added support for «Type I» detailed resolutions.
- Added support for tiled display topology data blocks.
- Display properties: added support for ID serial number in EDID header
- Detailed resolutions: added «Automatic — Old standard» timing option for GTF
- TV resolutions: added new resolutions from CTA-861-G (requires driver support)
- Colorimetry: added DCI-P3 standard from CTA-861-G
Changes in 1.3.1:
- Fixed .inf export for Windows 10 Creators Update
- Detailed resolutions: use CEA-861 timing parameters for 3840×2160 @ 60 Hz with «LCD standard» (use «LCD reduced» for old values)
- Detailed resolutions: allow 0 back porch
- TV resolutions: disable «Native format» for resolutions that don’t support this option
- Do not add blank extension block if no extension blocks exist by default
- Allow invalid but possible product IDs when editing display properties
- Fixed ‘&’ character in monitor name and serial number not displaying correctly in detailed resolutions list box
- Improved row spacing between UI elements with higher DPI settings
Changes in 1.3:
- Added support for reading extension blocks from connected monitors with AMD/ATI and NVIDIA
- Automatically add blank extension block in registry and exported .inf files to work around NVIDIA driver issues
- Added support for multiple extension blocks
- Added support for importing other types of extension blocks
- Added support for VTB-EXT extension blocks (detailed/standard resolutions only)
- Changed default TMDS clock to 340 MHz for new HDMI data blocks
- Added support for HDMI 2.0 data blocks
- Added support for HDMI FreeSync data blocks
- Added BT.2020 formats in colorimetry data blocks
- Added text file export (outputs hex values)
- Improved UI scaling with higher DPI settings
- restart.exe/restart64.exe: fix Start menu, search box, and Radeon Settings not responding after restarting
Changes in 1.2.6:
- Fixed a bug affecting non-PnP monitors since 1.2.3 (invalid EDID version with new overrides)
Changes in 1.2.5:
- Include range limits by default if min/max horizontal values match and certain conditions are met (for FreeSync monitors)
- restart.exe/restart64.exe: restart Radeon Settings (cnext.exe)
Changes in 1.2.4:
- Made range limits compatible with FreeSync monitors
Changes in 1.2.3:
- Added basic support for range limits and serial number descriptors (use the «Edit…» button at the top)
- Show included descriptors in the detailed resolution list
- Added «Import complete EDID» option
Changes in 1.2.2:
- Detailed resolutions: added «LCD reduced» timing parameters for 2560×1440 @ 144 Hz and higher resolutions
- Extension block: added support for colorimetry and video capability data blocks
- Redesigned icon to scale better with Windows 10’s broken taskbar scaling
- Fixed how disabled buttons appear with Windows 10
Changes in 1.2.1:
- Detailed resolutions: added «LCD native» option
- TV resolutions: added support for 4:2:0 resolutions
- HDMI support: added support for HDMI resolutions, latency information, and supported content types
- Fixed access violation in comctl32.dll message with higher DPI settings
- Fixed layout issues with higher DPI settings and enabled DPI awareness
- restart.exe/restart64.exe: implemented a better recovery mode
Changes in 1.2:
- Added custom extension block editing
- Added support for more than 8 standard resolutions (AMD/ATI only)
- Added support for other standard resolutions (NVIDIA only)
- Updated reset-all.exe to reset Windows resolution settings
- Include new version of restart.exe/restart64.exe
Changes in 1.1.2:
- Fixed HDMI audio not working with older ATI GPUs
Changes in 1.1.1:
- Fixed monitors with invalid signal type information not working with AMD/ATI GPUs
- Added «LCD standard» timing parameters for 3840×2160 @ 30 Hz and 1366×768 @ 60 Hz (use «LCD reduced» for old values)
- Automatically enable extension block when importing extension block files
- Show number of slots left
Changes in 1.1:
- Import extension block from files (editing coming later)
- Automatically fill in likely native resolution when adding a detailed resolution
- Disable controls when deleting a monitor
Changes in 1.0.1:
- Fixed .inf export
- Added support for non-PnP monitors
- Changed monitor list sorting
Older versions:
Using older versions is not recommended. Newer versions fix problems and add features. Please report any issues with newer versions that did not exist with older versions. Make sure to run reset-all.exe when testing different versions.
- cru-1.5.1.zip
- cru-1.5.zip
- cru-1.4.2.zip
- cru-1.4.1.zip
- cru-1.4.zip
- cru-1.3.99-p1.zip
- cru-1.3.1.zip
- cru-1.3.zip
- cru-1.2.99-p2.zip
- cru-1.2.99-p1.zip
- cru-1.2.6.zip
- cru-1.2.5.zip
- cru-1.2.4.zip
- cru-1.2.3.zip
- cru-1.2.2.zip
- cru-1.2.1.zip
- cru-1.2.zip
- cru-1.1.2.zip
- cru-1.1.1.zip
- cru-1.1.zip
- cru-1.0.1.zip
- cru-1.0.zip
- cru-p6.zip
- cru-p4.zip
Описание
Custom Resolution Utility — программа для «разгона» монитора (увеличения частоты обновления экрана). Пользователь может выбрать подходящий режим из нескольких доступных профилей. Программа позволяет изменить разрешение и частоту кадров, при которых монитор может работать долгое время. Custom Resolution Utility (CRU) позволяет изменять данные параметры вручную.
Программу используют в основном геймеры, так как подобный разгон монитора может сделать картинку более плавной.
Недавно в Custom Resolution Utility был добавлен режим HDR (новая технология работы с изображениями). Использовать его можно даже в тех мониторах, где изначально он не был предусмотрен. Отзывы говорят, что разницу картинки видно невооруженным взглядом.
Если вы выберите неправильное разрешение или частоту, экран перестанет показывать вовсе. Однако можно вернуть исходные параметры изображения, зайдя через безопасный режим.
При разгоне монитора важно понимать, что производитель намеренно не предусматривал функционирование устройства в таком режиме. Поэтому постоянная работа с большей частотой может привести к быстрому выходу монитора из строя.
Функции и особенности программы Custom Resolution Utility — CRU 1.5.1 / 1.4.1:
- Изменение частоты и разрешения монитора;
- Режим HDR, улучшающий качество;
- Бесплатное распространение;
- Изменение неправильно выставленных параметров осуществляется только через безопасный режим;
- Совместимость с Windows от XP до 10.
Скриншоты


Скачать Custom Resolution Utility — CRU
Для полного комплекта мы рекомендуем вам также скачать Intel Driver & Support Assistant (программа для обновления драйверов Intel).
![]()
Разработчики стараются идти в ногу со временем и выпустили релиз своей программы для Windows 10, которая стабильно работает с драйверами современных видеокарт и библиотеками операционной системе.
Благодаря данному ПО, пользователи Виндовз 10 могут установить удобное разрешение и частоту обновления экрана.
Программа имеет целый ряд преимуществ:
- Небольшой размер;
- Не требует установки, запустить можно сразу с любого места на диске кликнув по исполняемому файлу;
- Понятный и интуитивный интерфейс на английском языке.
- Не требовательна к системным характеристикам компьютера.
Данный софт будет полезен, как для дизайнеров, которым нужна четкая, яркая картинка без мерцаний, так и геймерам желающим повысить частоту своего дисплея с 70 до 120 Гц. Чем больше герц, тем незаметнее мерцания экрана для глаз.
При первом запуске программа определит модель монитора и его возможности. В правой верхней части рабочей области вы можете установить желаемое разрешение и другие параметры.
После произведения всех настроек, необходимо перезагрузить видеодрайвер. Делается это при помощи программы restart, которая идет в комплекте с основным софтов.
При этом, настройки следует изменять крайне осторожно. Некоторые виды мониторов могут не поддерживать работу в режиме больше 100 Гц и способны выйти из строя. Однако современные дисплеи имеют защиту на этот случай. В случае некорректно выставленных настроек, после перезагрузки, пользователю будет предложено вернуться к заводским настройкам. В некоторых случаях дисплей может не включиться.
Для возврата к заводским настройкам, необходимо загрузить компьютер в безопасном режиме, и поменять настройки программы и запустить файл restart. После этого, монитор должен корректно заработать.
Как пользоваться Custom Resolution Utility
| Последняя версия | 1.4.2 |
| Обновлено | |
| Разработчик | ToastyX |
| Система | Windows Vista / Windows 7 / Windows 8 / Windows 10 |
| Язык | Английский и другие |
| Рейтинг пользователей |
|
| Лицензия | Бесплатная |
| Размер | 541.21 Кб |
Похожие программы для Windows:
Custom Resolution Utility — программное обеспечение, которое позволяет повышать частоту кадров монитора, которую он способен отрисовывать. Приложение своеобразно разгоняет монитор, делая изображение более плавным и приятным.

Данная функция позволяет несколько обновить монитор, если есть более современное и мощное железо, которое обеспечивает высокую частоту кадров, но заводские настройки монитора просто не позволяют увидеть зрительно необходимый результат.
Скачать бесплатно Custom Resolution Utility CRU 1.5.1
Пароль ко всем архивам: 1progs
Важно понимать, что повысить частоту отрисовки сцены в 2 раза не выйдет, так как программа только снимает программные ограничения, но не влияет на технические возможности самого устройства.
К примеру, можно настроить разрешение ажурна, а также выбыть частоту кадров в приделах возможного. Например, 50, 60 и 75, на что способны устаревшие модели мониторов. Однако в более новых моделях можно настраивать вплоть до 144 герц.
В последнем обновлении появилась активация функции HDR, которая позволит улучшить качество изображения, причем не только в играх. Мало того, ее можно включить даже в мониторах, где изначальная поддержка функции не заявлена, но работать она будет менее эффективно. Также имеется простой интерфейс.
Аналоги программы вы всегда можете найти в наших подборках:
Name already in use
A tag already exists with the provided branch name. Many Git commands accept both tag and branch names, so creating this branch may cause unexpected behavior. Are you sure you want to create this branch?
1
branch
0
tags
Code
-
Use Git or checkout with SVN using the web URL.
-
Open with GitHub Desktop
-
Download ZIP
Latest commit
![]()
Updated application with 4 parts:
1. CRU.exe
2. reset-all.exe
3. restart.exe
4. restart64.exe
0ec446a
Files
Permalink
Failed to load latest commit information.
Type
Name
Latest commit message
Commit time
Custom-Resolution-Utility-Tool
Custom Resolution Utility (CRU) is a small freeware utility which can tweak your NVIDIA and AMD graphic cards to create higher resolutions for your laptop/desktop displays.
As a portable application, CRU does not require installation and can be run without installation.
The layout of the program provides a list of currently supported resolutions for your monitor with the option to add new ones.
The application isn’t perfect, but if your monitor can support higher and/or different resolutions from what’s displayed in your graphics control panel, CRU will create EDID values in the registry so that you may select the resolutions in your graphics settings.
Currently supported GPUs are limited to some AMD/ATI and NVIDIA cards, as Intel GPUs are not supported.
It’s worth pointing out that you should have an idea of what your monitor and GPU are capable of.
If anything goes wrong, the download comes with an app called «reset-all.exe» which can be run to revert any changes you have made with Custom Resolution Utility.
Or else you can boot your system to Safe Mode to get rid of the changes.
Note: Upon testing this application, I was able to get my display of HP Pavilion Notebook — 15-au624tx that was capped at 60Hz; to 114 Hz without any issues.
Disclaimer: «Use this application at your own risk».
![]()
September 2nd, 2022 — Free — 100% Safe
Custom Resolution Utility (CRU) is an excellent choice for computers equipped with ATI or NVIDIA video cards because you can take advantage of better resolutions. No installation is going to be required for this tool to work.
This application will add new monitor resolutions instead of scaled ones, meaning that you’ll be able to set your new resolution that will be enjoyable if you want to have better resolutions.
It will not scale up the existing resolutions, which can help you create new resolutions without compromising the quality that often comes with upscaling.
Change Nvidia or AMD Resolutions
It doesn’t matter if you have an Nvidia or AMD graphics card. You’ll be able to use this application well.
You have to note that the application will most likely not work on laptops because it does not allow EDID overrides, meaning that it will not work with most laptop graphics cards.
The application does not require any installation whatsoever. You can plug it in and start using it. On the main window – which will open as you open the .exe file – you’ll find a list of all existing resolutions currently with your GPU.
From there, you’ll be able to create new and custom resolutions.
Create Custom Resolutions
This application’s main capability is the ability to give you the support to create new resolutions from scratch. You can tamper with detailed resolutions to change horizontal or vertical active resolutions for new results.
You can also alter some other details, such as sync polarity, sync width, blanking options, and many further detailed instructions.
It’s fair to say that this application will work best for users who already have a decent level of knowledge regarding resolutions.
Lower scaled resolutions will be added to the app automatically, although you can create one yourself, too. You can define parameters that will benefit your monitor – for instance. You can set it for the LCD standard monitor.
Conclusion
Custom Resolution Utility will help you enjoy higher or custom resolutions with almost any graphics card you might have.
Для работы проектов iXBT.com нужны файлы cookie и сервисы аналитики.
Продолжая посещать сайты проектов вы соглашаетесь с нашей
Политикой в отношении файлов cookie
Думаю, что многие попадали в ситуацию, когда в игре при резком повороте картинка рвалась, а желаемое разрешение экрана по той или иной причине было недоступно в настройках игры. В этом материале вы познаете настоящую магию, которая позволит вам не только устанавливать совершенно любое разрешение экрана в различных играх, но и существенно повысить плавность вашего игрового процесса.
Содержание
- Утилита и её возможности
- Что такое AMD FreeSync
- Разрешение в играх
- Гайд
- Поддержка AMD FreeSync по HDMI
- Выводы
- Видео по настройке (не включает шага с HDMI)
Custom Resolution Utility — это бесплатный OpenSource проект, который позволяет, вне зависимости от модели и производителя видеокарты, изменять настройки файла EDID (конфигурации экрана) через реестр без изменения оригинальных файлов драйвера. То есть мы получаем возможность добавлять и изменять любые настройки, вне зависимости от того, поддерживает ли их устройство или нет. Помимо всего прочего, утилита также содержит и множество полезных дополнительных функций для современного геймера. К таким функциям относится создание собственного разрешения экрана и активация технологии AMD FreeSync на любых видеокартах и мониторах.
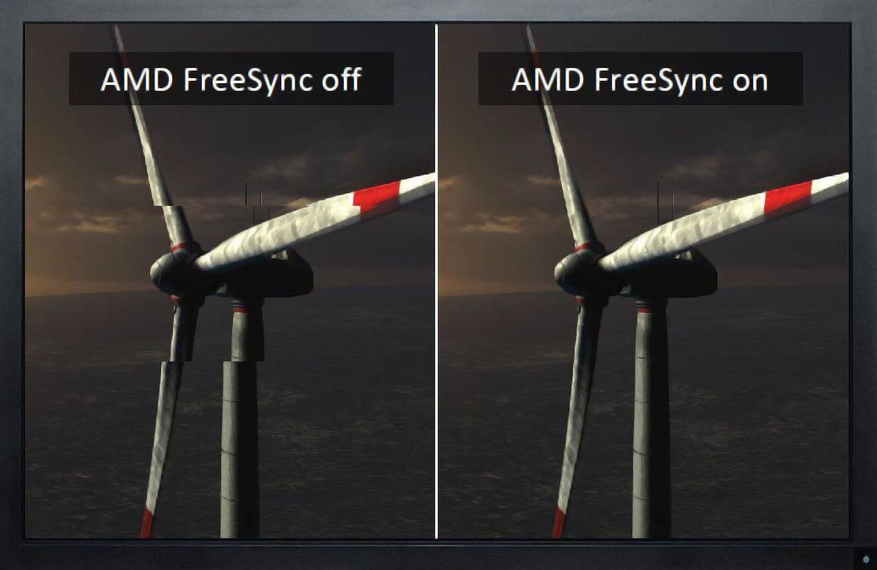
В отличие от VSync или G-Sync, которые также призваны бороться с разрывами изображения, AMD FreeSync полностью бесплатен и никак не влияет на производительность и задержку ввода в играх. Технология работает таким образом, что монитор обновляет изображение ровно в тот момент, когда подготовленный видеокартой кадр становится доступен.
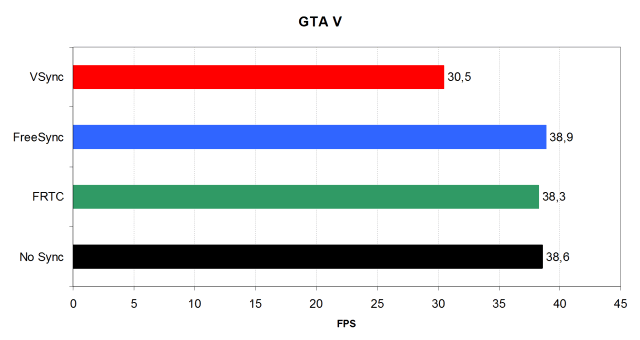
Такой принцип работы технологии не создаёт очереди кадров (конвеера) и игрок сразу получает картинку в режиме реального времени на своём мониторе, что позволяет избавиться от разрывов изображения и существенно повысить плавность игрового процесса без потери производительности. Потрясающая технология.
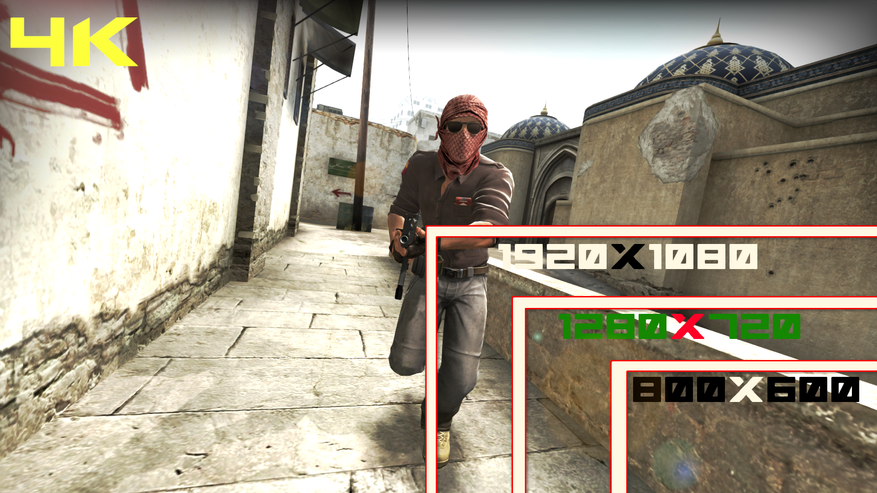
Зачем вообще создавать своё разрешение в играх, когда есть целый набор заранее подготовленных настроек? На самом деле всё весьма просто. Игнорируя косвенные причины в виде недоступности выбора нужного разрешения в само́й игре или простого желания таким образом увеличить FPS, всё это необходимо для преимущества над противником в сетевых шутерах.
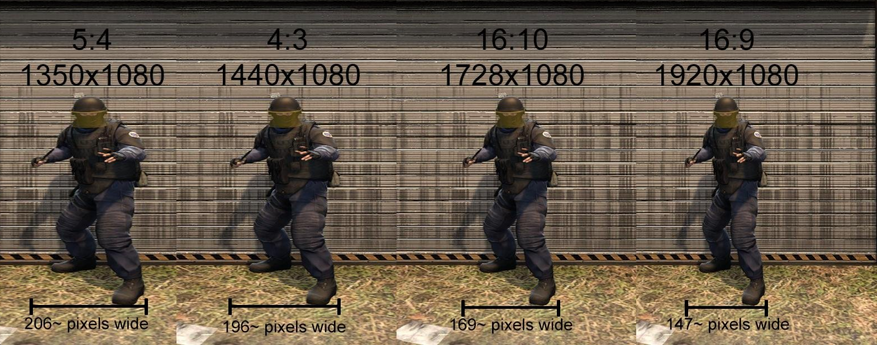
Изменяя соотношение сторон и играясь с разрешением экрана, модельки противника становятся более различимыми, что упрощает возможность попадания по ним. Надеюсь, что с тем зачем всё это нужно, разобрались. Переходим к гайду.
На самом деле в этой магии нет ничего сложного.
1. Скачиваем архив с утилитой и с помощью архиватора 7-zip распаковываем в любое удобное для вас место, где нет русских букв. Я всегда распаковываю на диск C. Если кто-то боится, то исходный код ПО всегда доступен здесь. После распаковки у вас будет доступно 4 файла:
- CRU.exe — сама программа.
- restart64.exe — применить настройки ПО.
- restart.exe — копия для 32-битных систем.
- reset-all.exe — удаление всех заданных параметров экрана.
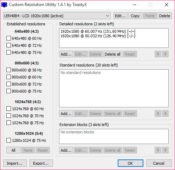
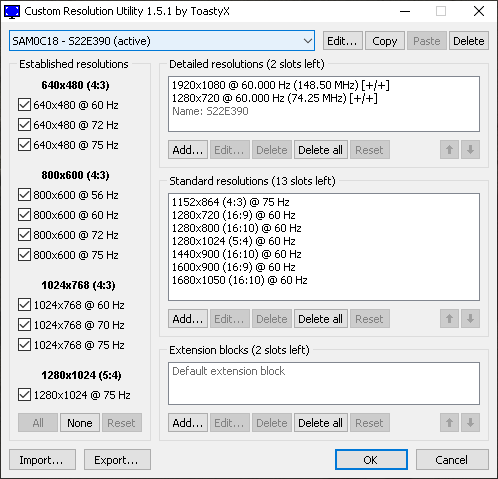
2. Запускаем CRU.exe через правый клик от имени администратора и в появившемся меню программы выбираем наш монитор.
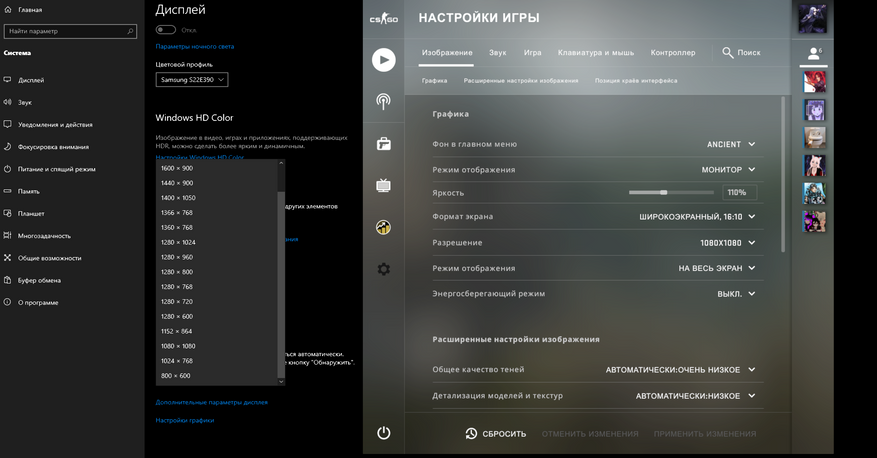
3. Нажимаем Add и добавляем копию своего разрешения или устанавливаем новое. Я для наглядности установлю разрешение 1080×1080, которого по умолчанию нет в списке Windows и CS: GO. Подтверждаем как показано на скриншотах. После добавления нажимаем restart64.exe и проверяем.
Теперь нам остаётся лишь активировать технологию AMD FreeSync, чтобы убрать разрывы. Напомню, что технология будет работать c любой видеокартой и на любом мониторе, если он подключён по HDMI, DisplayPort или DVI-D.
4. Вновь запускаем CRU.exe, выбираем своё разрешение и в самом нижнем меню нажимаем Add, а потом в новом окошке ещё раз в самом низу нажимаем Add. В появившемся меню выбираем FreeSync range и устанавливаем диапазон в зависимости от вашей герцовки. Свою герцовку вы можете узнать в дополнительных параметрах дисплея. В моём случае это 60-75 Гц. После добавления нажимаем restart64.exe и вновь выбираем в разрешение в настройках Windows. Радуемся халявному AMD FreeSync и возможности выбора любого читерского разрешения. (Не забудьте поменять герцовку или разогнать монитор, чтобы растянуть изображение).
Несмотря на заверения некоторых «специалистов» активировать AMD FreeSync на мониторе без поддержки технологии и будучи подключённым по HDMI, весьма просто. Метод почти полностью повторяет четвёртый шаг, а от нас лишь требуется добавить пару байтов, чтобы заставить HDMI работать с технологией.
Вновь выбираем своё разрешение и в самом нижнем меню нажимаем Add, а потом в новом окошке ещё раз в самом низу нажимаем Add. В появившемся меню выбираем HDMI (обратите внимание на версию своего кабеля). Дважды подтверждаем без изменений. Редактируем профиль HDMI через кнопку edit и добавляем поддержку FreeSync range. После добавления нажимаем restart64.exe. Должен заработать сразу после выбора разрешения или в панели управления видеокартой должен появится новый пункт с AMD FreeSync. Пруф доступен на Reddit и YouTube.
Доступно для видеокарт NVIDIA с версии драйвера 417.71 и GTX 1000+.
Вот, собственно, и всё. Меньше чем за 10 минут мы с вами активировали работу технологии AMD Freesync на не поддерживаемом мониторе и видеокарте, а также смогли найти способ обойти глупые запреты разработчиков, что существенно повысило плавность нашего игрового процесса и улучшило точность стрельбы. Уважайте свободу, играйте в хорошие игры и ни в коем случае не предавайте себя.
PS. Попробуйте для любимого шутера разрешение экрана 720×1080, возможно, что вы больше не заходите возвращаться к Full HD.