Overview
Certified 
What’s New
Features:
- C/C++ compiler
- Visual Profiler
- GPU-accelerated BLAS library
- GPU-accelerated FFT library
- GPU-accelerated Sparse Matrix library
- GPU-accelerated RNG library
- Additional tools and documentation
Highlights:
- Easier Application Porting
- Share GPUs across multiple threads
- Use all GPUs in the system concurrently from a single host thread
- No-copy pinning of system memory, a faster alternative to cudaMallocHost()
- C++ new/delete and support for virtual functions
- Support for inline PTX assembly
- Thrust library of templated performance primitives such as sort, reduce, etc.
- Nvidia Performance Primitives (NPP) library for image/video processing
- Layered Textures for working with same size/format textures at larger sizes and higher performance
- Faster Multi-GPU Programming
- Unified Virtual Addressing
- GPUDirect v2.0 support for Peer-to-Peer Communication
- New & Improved Developer Tools
- Automated Performance Analysis in Visual Profiler
- C++ debugging in CUDA-GDB for Linux and MacOS
- GPU binary disassembler for Fermi architecture (cuobjdump)
- Parallel Nsight 2.0 now available for Windows developers with new debugging and profiling features.
What’s New:
- Added a new API, cudaGraphNodeSetEnabled(), to allow disabling nodes in an instantiated graph. Support is limited to kernel nodes in this release. A corresponding API, cudaGraphNodeGetEnabled(), allows querying the enabled state of a node.
- Full release of 128-bit integer (__int128) data type including compiler and developer tools support. The host-side compiler must support the __int128 type to use this feature.
- Added ability to disable NULL kernel graph node launches.
- Added new NVML public APIs for querying functionality under Wayland.
- Added L2 cache control descriptors for atomics.
- Large CPU page support for UVM managed memory.
1.3. CUDA Compilers
11.6
- VS2022 Support: CUDA 11.6 officially supports the latest VS2022 as host compiler. A separate Nsight Visual Studio installer 2022.1.1 must be downloaded from here. A future CUDA release will have the Nsight Visual Studio installer with VS2022 support integrated into it.
- New instructions in public PTX: New instructions for bit mask creation — BMSK and sign extension — SZEXT are added to the public PTX ISA. You can find documentation for these instructions in the PTX ISA guide: BMSK and SZEXT.
- Unused Kernel Optimization: In CUDA 11.5, unused kernel pruning was introduced with the potential benefits of reducing binary size and improving performance through more efficient optimizations. This was an opt-in feature but in 11.6, this feature is enabled by default. As mentioned in the 11.5 blog here, there is an opt-out flag that can be used in case it becomes necessary for debug purposes or for other special situations.
- $ nvcc -rdc=true user.cu testlib.a -o user -Xnvlink -ignore-host-info
- In addition to the -arch=all and -arch=all-major options added in CUDA 11.5, NVCC introduced -arch= native in CUDA 11.5 update1. This -arch=native option is a convenient way for users to let NVCC determine the right target architecture to compile the CUDA device code to based on the GPU installed on the system. This can be particularly helpful for testing when applications are run on the same system they are compiled in.
- Generate PTX from nvlink: Using the following command line, device linker, nvlink will produce PTX as an output in addition to CUBIN:
- nvcc -dlto -dlink -ptx
- Device linking by nvlink is the final stage in the CUDA compilation process. Applications that have multiple source translation units have to be compiled in separate compilation mode. LTO (introduced in CUDA 11.4) allowed nvlink to perform optimizations at device link time instead of at compile time so that separately compiled applications with several translation units can be optimized to the same level as whole program compilations with a single translation unit. However, without the option to output PTX, applications that cared about forward compatibility of device code could not benefit from Link Time Optimization or had to constrain the device code to a single source file.
- With the option for nvlink that performs LTO to generate the output in PTX, customer applications that require forward compatibility across GPU architectures can span across multiple files and can also take advantage of Link Time Optimization.
- Bullseye support: NVCC compiled source code will work with code coverage tool Bullseye. The code coverage is only for the CPU or the host functions. Code coverage for device function is not supported through bullseye.
- INT128 developer tool support: In 11.5, CUDA C++ support for 128-bit was added. In this release, developer tools supports the datatype as well. With the latest version of libcu++, int 128 data type is supported by math functions.
cuSOLVER
New Features:
- New singular value decomposition (GESVDR) is added. GESVDR computes partial spectrum with random sampling, an order of magnitude faster than GESVD.
- libcusolver.so no longer links libcublas_static.a; instead, it depends on libcublas.so. This reduces the binary size of libcusolver.so. However, it breaks backward compatibility. The user has to link libcusolver.so with the correct version of libcublas.so.
cuSPARSE
New Features:
- New Tensor Core-accelerated Block Sparse Matrix — Matrix Multiplication (cusparseSpMM) and introduction of the Blocked-Ellpack storage format.
- New algorithms for CSR/COO Sparse Matrix — Vector Multiplication (cusparseSpMV) with better performance.
- Extended functionalities for cusparseSpMV:
- Support for the CSC format.
- Support for regular/complex bfloat16 data types for both uniform and mixed-precision computation.
- Support for mixed regular-complex data type computation.
- Support for deterministic and non-deterministic computation.
- New algorithm (CUSPARSE_SPMM_CSR_ALG3) for Sparse Matrix — Matrix Multiplication (cusparseSpMM) with better performance especially for small matrices.
- New routine for Sampled Dense Matrix — Dense Matrix Multiplication (cusparseSDDMM) which deprecated cusparseConstrainedGeMM and provides better performance.
- Better accuracy of cusparseAxpby, cusparseRot, cusparseSpVV for bfloat16 and half regular/complex data types.
- All routines support NVTX annotation for enhancing the profiler time line on complex applications.
Deprecations:
- cusparseConstrainedGeMM has been deprecated in favor of cusparseSDDMM.
- cusparseCsrmvEx has been deprecated in favor of cusparseSpMV.
- COO Array of Structure (CooAoS) format has been deprecated including cusparseCreateCooAoS, cusparseCooAoSGet, and its support for cusparseSpMV.
Known Issues:
- cusparseDestroySpVec, cusparseDestroyDnVec, cusparseDestroySpMat, cusparseDestroyDnMat, cusparseDestroy with NULL argument could cause segmentation fault on Windows.
Resolved Issues:
- cusparseAxpby, cusparseGather, cusparseScatter, cusparseRot, cusparseSpVV, cusparseSpMV now support zero-size matrices.
- cusparseCsr2cscEx2 now correctly handles empty matrices (nnz = 0).
- cusparseXcsr2csr_compress now uses 2-norm for the comparison of complex values instead of only the real part.
- NPPNew features:New APIs added to compute Distance Transform using Parallel Banding Algorithm (PBA):
- nppiDistanceTransformPBA_xxxxx_C1R_Ctx() — where xxxxx specifies the input and output combination: 8u16u, 8s16u, 16u16u, 16s16u, 8u32f, 8s32f, 16u32f, 16s32f
- nppiSignedDistanceTransformPBA_32f_C1R_Ctx()
Resolved issues:
- Fixed the issue in which Label Markers adds zero pixel as object region.
- NVJPEG
New Features:
- nvJPEG decoder added a new API to support region of interest (ROI) based decoding for batched hardware decoder:
- nvjpegDecodeBatchedEx()
- nvjpegDecodeBatchedSupportedEx()
cuFFTKnown Issues:
- cuFFT planning and plan estimation functions may not restore correct context affecting CUDA driver API applications.
- Plans with strides, primes larger than 127 in FFT size decomposition and total size of transform including strides bigger than 32GB produce incorrect results.
Resolved Issues:
- Previously, reduced performance of power-of-2 single precision FFTs was observed on GPUs with sm_86 architecture. This issue has been resolved.
- Large prime factors in size decomposition and real to complex or complex to real FFT type no longer cause cuFFT plan functions to fail.
- CUPTIDeprecations early notice:The following functions are scheduled to be deprecated in 11.3 and will be removed in a future release:
- NVPW_MetricsContext_RunScript and NVPW_MetricsContext_ExecScript_Begin from the header nvperf_host.h.
- cuptiDeviceGetTimestamp from the header cupti_events.h
Complete release notes can be found here.
Fast servers and clean downloads. Tested on TechSpot Labs. Here’s why you can trust us.

Last updated:
March 11, 2022
User rating:

23 votes
Popular apps
in For Developers
На этой странице вы всегда можете скачать по прямой ссылке последний официальный драйвер видеокарт NVIDIA GeForce для ноутбуков. Если же у вас стационарный компьютер, то перейдите на страницу драйверов для стационарных ПК.
Для Windows 7, 8 и 8.1 последняя версия драйвера под номером 472.12 предложена ниже:
| Для Windows 7 / 8 / 8.1 (64-bit) |
Вы также можете отдельно скачать последнюю версию GeForce Experience.
! Драйвер обеспечивает работу следующих видеокарт NVIDIA:
- Серия GeForce RTX 30 (для ноутбуков):
GeForce RTX 3080 Ti, GeForce RTX 3080, GeForce RTX 3070 Ti, GeForce RTX 3070, GeForce RTX 3060, GeForce RTX 3050 Ti, GeForce RTX 3050 - Серия GeForce RTX 20 (для ноутбуков):
GeForce RTX 2080, GeForce RTX 2070, GeForce RTX 2060, в том числе все версии Super и Max-Q - Серия GeForce MX500:
GeForce MX550 - Серия GeForce MX400:
GeForce MX450 - Серия GeForce MX300:
GeForce MX350, GeForce MX330 - Серия GeForce MX200:
GeForce MX250, GeForce MX230 - Серия GeForce MX100:
GeForce MX150, GeForce MX130, GeForce MX110 - Серия GeForce GTX 16 (для ноутбуков):
GeForce GTX 1660 Ti, GeForce GTX 1660, GeForce GTX 1650, в том числе все версии Super и Max-Q - Серия GeForce 10 (для ноутбуков):
GeForce GTX 1080, GeForce GTX 1070, GeForce GTX 1060, GeForce GTX 1050 Ti, GeForce GTX 1050 - Серия GeForce 900M:
GeForce GTX 980M, GeForce GTX 970M, GeForce GTX 965M, GeForce GTX 960M, GeForce GTX 950M, GeForce 945M, GeForce 940M, GeForce 940MX, GeForce 930M, GeForce 930MX, GeForce 920M, GeForce 920MX - Серия GeForce 800M:
GeForce GTX 880M, GeForce GTX 870M, GeForce GTX 860M, GeForce GTX 850M, GeForce 845M, GeForce 840M, GeForce 830M, GeForce GT 820M, GeForce 810M
!! Мобильные видеокарты серии GeForce 700M не работают с данной версией драйверов по причине прекращения их поддержки компанией NVIDIA. Последнюю актуальную версию для этих видеокарт вы можете загрузить перейдя по этой ссылке.
Содержание
- CUDA 7.0 Downloads
- Скачать бесплатно NVIDIA CUDA Toolkit 10.2.89
- Фирменный API
- Работа на языках С и С++
- Преимущества
- Недостатки
- CUDA Toolkit 6.5
- CUDA 6.5 Production Release
- Cuda toolkit windows 7 x64
- 1. Introduction
- 1.1. System Requirements
- 1.2. x86 32-bit Support
- 1.3. About This Document
- 2. Installing CUDA Development Tools
- 2.1. Verify You Have a CUDA-Capable GPU
- 2.2. Download the NVIDIA CUDA Toolkit
- Download Verification
- 2.3. Install the CUDA Software
- Graphical Installation
- Silent Installation
- Extracting and Inspecting the Files Manually
- 2.3.1. Uninstalling the CUDA Software
- 2.4. Using Conda to Install the CUDA Software
- 2.4.1. Conda Overview
- 2.4.2. Installation
- 2.4.3. Uninstallation
- 2.5. Use a Suitable Driver Model
- 2.6. Verify the Installation
- 2.6.1. Running the Compiled Examples
- 3. Pip Wheels
- 4. Compiling CUDA Programs
- 4.1. Compiling Sample Projects
- 4.2. Sample Projects
- 4.3. Build Customizations for New Projects
- 4.4. Build Customizations for Existing Projects
- 5. Additional Considerations
- Notices
- Notice
CUDA 7.0 Downloads
Please Note: There is a recommended patch for CUDA 7.0 which resolves an issue in the cuFFT library that can lead to incorrect results for certain inputs sizes less than or equal to 1920 in any dimension when cufftSetStream() is passed a non-blocking stream (e.g., one created using the cudaStreamNonBlocking flag of the CUDA Runtime API or the CU_STREAM_NON_BLOCKING flag of the CUDA Driver API).
Q: Where is the notebook installer?
A: Previous releases of the CUDA Toolkit had separate installation packages for notebook and desktop systems. Beginning with CUDA 7.0, these packages have been merged into a single package that is capable of installing on all supported platforms.
Q: What is the difference between the Network Installer and the Local Installer?
A: The Local Installer has all of the components embedded into it (toolkit, driver, samples). This makes the installer very large, but once downloaded, it can be installed without an internet connection. The Network Installer is a small executable that will only download the necessary components dynamically during the installation so an internet connection is required.
Q: Where do I get the GPU Deployment Kit (GDK) for Windows?
A: The installers give you an option to install the GDK. If you only want to install the GDK, then you should use the network installer, for efficiency.
Q: Where can I find old versions of the CUDA Toolkit?
A: Older versions of the toolkit can be found on the Legacy CUDA Toolkits page.
Q: Is cuDNN included as part of the CUDA Toolkit?
A: cuDNN is our library for Deep Learning frameworks, and can be downloaded separately from the cuDNN home page.
* Includes POWER8 cross-compilation tools.
Q: Where can I find the CUDA 7 Toolkit for my Jetson TK1?
A: Jetson TK1 is not supported by the CUDA 7 Toolkit. Please download the CUDA 6.5 Toolkit for Jetson TK1 instead.
Q: What is the difference between the Network Installer and the Local Installer?
A: The Local Installer has all of the components embedded into it (toolkit, driver, samples). This makes the installer very large, but once downloaded, it can be installed without an internal internet connection. The Network Installer is a small executable that will only download the necessary components dynamically during the installation so an internet connection is required to use this installer.
Q: Is cuDNN included as part of the CUDA Toolkit?
A: cuDNN is our library for Deep Learning frameworks, and can be downloaded separately from the cuDNN home page.
Q: What is the difference between the Network Installer and the Local Installer?
A: The Local Installer has all of the components embedded into it (toolkit, driver, samples). This makes the installer very large, but once downloaded, it can be installed without an internal internet connection. The Network Installer is a small executable that will only download the necessary components dynamically during the installation so an internet connection is required to use this installer.
Q: Is cuSOLVER available for the POWER8 architecture?
A: The initial release of the CUDA 7.0 toolkit omitted the cuSOLVER library from the installer. On May 29, 2015, new CUDA 7.0 installers were posted for the POWER8 architecture that included the cuSOLVER library. If you downloaded the CUDA 7.0 toolkit for POWER8 on or earlier than this date, and you need to use cuSOLVER, you will need to download the latest installer and re-install.
Q: What is the difference between the Network Installer and the Local Installer?
A: The Local Installer has all of the components embedded into it (toolkit, driver, samples). This makes the installer very large, but once downloaded, it can be installed without an internal connection. The Network Installer is a small executable that will only download the necessary components dynamically during the installation so an internet connection is required to use this installer.
Q: Is cuDNN included as part of the CUDA Toolkit?
A: cuDNN is our library for Deep Learning frameworks, and can be downloaded separately from the cuDNN home page.
Q: What do I do if the Network Installer fails to run with the error message «The package is damaged and can’t be opened. You should eject the disk image»?
A: Check that your security preferences are set to allow apps downloaded from anywhere to run. This setting can be found under: System Preferences > Security & Privacy > General
Источник

Среда разработки NVIDIA CUDA Toolkit поможет в создании программного обеспечения, использующего специальные алгоритмы вычислений. Разрабатываемые программы работают по технологии CUDA – особая архитектура параллельных вычислений, которые могут выполняться на видеочипах от NVIDIA.
Фирменный API
Главное отличие и преимущество программного обеспечения на CUDA – повышенная скорость выполнения задач и более эффективное использование ресурсов ПК. При наличии видеокарты (или встроенного GPU), поддерживающей «Куда», можно использовать ее для разгрузки центрального процессора. Графический чип принимает на себя часть исполняемых операций ЦП.
Кроме этого, NVIDIA CUDA Toolkit незаменима для разработки системных инструкций и драйверов, так как позволяет правильно организовать двусторонний доступ CPU-GPU, GPU-видеопамять.
Работа на языках С и С++
Входящий в состав среды компилятор позволяет работать с кодом, написанном на упрощенных диалектах языков C и C++. В ПО для разработчиков также входит множество библиотек с инструкциями для ускоренного выполнения графических и математических задач силами GPU, и отладчик/оптимизатор написанных приложений.
Преимущества
• создание быстрых и оптимизированных приложений по технологии CUDA;
• универсальный язык написания кода C и C++;
• большое количество инструментов, входящих в пакет;
• ускоренный обмен данными между кэшем ЦП и памятью видеочипа;
• поддержка на аппаратном уровне целочисленных и побитовых операторов.
Недостатки
• нет существенных недостатков.
Скачать бесплатно виртуальную среду разработки NVIDIA CUDA Toolkit вы можете по ссылке внизу статьи.
Источник
CUDA 6.5 Production Release
Read about 10 ways CUDA 6.5 improves performance and productivity in this blog by Mark Harris.
Review the latest CUDA 6.5 performance report to learn how much you could accelerate your code.
| Version | 64-bit | 32-bit | |
|---|---|---|---|
| Windows 8.1 Windows 7 |
Notebook | EXE | EXE |
| Desktop | EXE | EXE | |
| Win Server 2012 R2 | Desktop | EXE | |
| Win Server 2008 R2 | Desktop | EXE | EXE |
| Windows XP | Desktop | EXE | |
| Windows Getting Started Guide |
| Distribution | x86 64-bit | x86 32-bit |
|---|---|---|
| Fedora 20 | RPM RUN | |
| OpenSUSE 13.1 | RPM RUN | |
| RHEL 6 CentOS 6 |
RPM RUN | |
| RHEL 5 CentOS 5 |
RUN | |
| SLES 11 (SP3) | RPM RUN | |
| SteamOS 1.0-beta ** | RUN | |
| Ubuntu 14.04 ** | DEB * RUN | RUN |
| Ubuntu 12.04 ** | DEB * RUN | RUN |
| Linux Getting Started Guide |
Note:
* Includes ARMv7 cross-compilation tools.
** Includes x86 32-bit cross-compilation and profiling tools.
| ARMv8 64-bit *** | ARMv7 32-bit |
|---|---|
| Generic Display Driver | RUN |
| Generic CUDA Toolkit | RUN |
| Generic CUDA Samples | RUN |
| Ubuntu 14.04 | DEB * |
| Ubuntu 14.04 Cross-Compile (x86 64-bit) | DEB |
| Ubuntu 12.04 Cross-Compile (x86 64-bit) | DEB |
| L4T 21.2 | DEB ** |
| Linux Getting Started Guide |
* NOT to be used for L4T (Jetson TK1).
** ONLY to be used for Jetson TK1.
*** ARM-64 support has been tested on systems from Cirrascale and E4 based on the AppliedMicro X-Gene-C1 processor.
Q: Are the latest NVIDIA drivers included in the CUDA Toolkit installers?
A: For convenience, the installer packages on this page include NVIDIA drivers which support application development for all CUDA-capable GPUs supported by this release of the CUDA Toolkit. If you are deploying applications on NVIDIA Tesla products in a server or cluster environment, please use the latest recommended Tesla driver that has been qualified for use with this version of the CUDA Toolkit. If a recommended Tesla driver is not yet available, please check back in a few weeks.
Q: How does this release differ from the current CUDA 6.5 Release?
A: These toolkits contain support for the GeForce GTX980 and GTX970, including compatible drivers. In addition, driver support for older generation GPUs with SM1.x has been deprecated.
Q: What’s in the installer packages?
A: The installers include the CUDA Toolkit, CUDA samples, CUDA Tools including Nsight Visual Studio Edition (for Windows) and Nsight Eclipse Edition (for Linux / Mac OS X), and developer drivers.
Q: Will the installer replace the driver currently installed on my system?
A: The installer will provide an option to install the included driver, and if selected, it will replace the driver currently on your system.
Q: Why doesn’t the cuda-repo package install the CUDA Toolkit and Drivers?
A: When using RPM or Deb, the downloaded package is a repository package. Such a package only informs the package manager where to find the actual installation packages, but will not install them.
Q: How do I report issues or bugs?
A: Members of the CUDA Registered Developer Program can report issues and file bugs using links on the Report Issues section of the CUDA Registered Developer Home Page.
Q: Where can I find old versions of the CUDA Toolkit?
A: Older versions of the toolkit can be found on the Legacy CUDA Toolkits page.
Источник
The installation instructions for the CUDA Toolkit on MS-Windows systems.
1. Introduction
CUDA В® is a parallel computing platform and programming model invented by NVIDIA. It enables dramatic increases in computing performance by harnessing the power of the graphics processing unit (GPU).
This guide will show you how to install and check the correct operation of the CUDA development tools.
1.1. System Requirements
The next two tables list the currently supported Windows operating systems and compilers.
Table 1. Windows Operating System Support in CUDA 11.4
| Operating System | Native x86_64 | Cross (x86_32 on x86_64) |
|---|---|---|
| Windows 10 | YES | NO |
| Windows Server 2022 | YES | NO |
| Windows Server 2019 | YES | NO |
| Windows Server 2016 | YES | NO |
Table 2. Windows Compiler Support in CUDA 11.4
| Compiler* | IDE | Native x86_64 | Cross (x86_32 on x86_64) |
|---|---|---|---|
| MSVC Version 192x | Visual Studio 2019 16.x | YES | YES |
| MSVC Version 191x | Visual Studio 2017 15.x (RTW and all updates) | YES | YES |
* Support for Visual Studio 2015 is deprecated in release 11.1.
x86_32 support is limited. See the x86 32-bit Support section for details.
For more information on MSVC versions, Visual Studio product versions, visit https://dev.to/yumetodo/list-of-mscver-and-mscfullver-8nd.
1.2. x86 32-bit Support
Native development using the CUDA Toolkit on x86_32 is unsupported. Deployment and execution of CUDA applications on x86_32 is still supported, but is limited to use with GeForce GPUs. To create 32-bit CUDA applications, use the cross-development capabilities of the CUDA Toolkit on x86_64.
1.3. About This Document
This document is intended for readers familiar with Microsoft Windows operating systems and the Microsoft Visual Studio environment. You do not need previous experience with CUDA or experience with parallel computation.
Basic instructions can be found in the Quick Start Guide. Read on for more detailed instructions.
2.1. Verify You Have a CUDA-Capable GPU
You can verify that you have a CUDA-capable GPU through the Display Adapters section in the Windows Device Manager. Here you will find the vendor name and model of your graphics card(s). If you have an NVIDIA card that is listed in http://developer.nvidia.com/cuda-gpus, that GPU is CUDA-capable. The Release Notes for the CUDA Toolkit also contain a list of supported products.
2.2. Download the NVIDIA CUDA Toolkit
The CUDA Toolkit installs the CUDA driver and tools needed to create, build and run a CUDA application as well as libraries, header files, CUDA samples source code, and other resources.
Download Verification
The download can be verified by comparing the MD5 checksum posted at https://developer.download.nvidia.com/compute/cuda/11.4.2/docs/sidebar/md5sum.txt with that of the downloaded file. If either of the checksums differ, the downloaded file is corrupt and needs to be downloaded again.
To calculate the MD5 checksum of the downloaded file, follow the instructions at http://support.microsoft.com/kb/889768.
2.3. Install the CUDA Software
Graphical Installation
Install the CUDA Software by executing the CUDA installer and following the on-screen prompts.
Silent Installation
Table 3. Possible Subpackage Names
| Subpackage Name | Subpackage Description |
|---|---|
| Toolkit Subpackages (defaults to C:Program FilesNVIDIA GPU Computing ToolkitCUDAv 11.4 ) | |
| cudart_ 11.4 | CUDA Runtime libraries. |
| cuobjdump_ 11.4 | Extracts information from cubin files. |
| cupti_ 11.4 | The CUDA Profiling Tools Interface for creating profiling and tracing tools that target CUDA applications. |
| cuxxfilt_ 11.4 | The CUDA cu++ filt demangler tool. |
| demo_suite_ 11.4 | Prebuilt demo applications using CUDA. |
| documentation_ 11.4 | CUDA HTML and PDF documentation files including the CUDA C++ Programming Guide, CUDA C++ Best Practices Guide, CUDA library documentation, etc. |
| memcheck_ 11.4 | Functional correctness checking suite. |
| nvcc_ 11.4 | CUDA compiler. |
| nvdisasm_ 11.4 | Extracts information from standalone cubin files. |
| nvml_dev_ 11.4 | NVML development libraries and headers. |
| nvprof_ 11.4 | Tool for collecting and viewing CUDA application profiling data from the command-line. |
| nvprune_ 11.4 | Prunes host object files and libraries to only contain device code for the specified targets. |
| nvrtc_ 11.4 |
NVRTC runtime libraries. nvtx_ 11.4 NVTX on Windows. visual_profiler_ 11.4 Visual Profiler. sanitizer_ 11.4 Compute Sanitizer API. thrust_ 11.4 CUDA Thrust. cublas_ 11.4
cuBLAS runtime libraries. cufft_ 11.4
cuFFT runtime libraries. curand_ 11.4
cuRAND runtime libraries. cusolver_ 11.4
cuSOLVER runtime libraries. cusparse_ 11.4
cuSPARSE runtime libraries. npp_ 11.4
NPP runtime libraries. nvjpeg_ 11.4
nvJPEG libraries. nsight_compute_ 11.4 Nsight Compute. nsight_nvtx_ 11.4 Older v1.0 version of NVTX. nsight_systems_ 11.4 Nsight Systems. nsight_vse_ 11.4 Installs the Nsight Visual Studio Edition plugin in all VS. visual_studio_integration_ 11.4 Installs CUDA project wizard and builds customization files in VS. occupancy_calculator_ 11.4 Installs the CUDA_Occupancy_Calculator.xls tool. Samples Subpackages (defaults to C:ProgramDataNVIDIA CorporationCUDA Samplesv 11.4 ) samples_ 11.4
Source code for many example CUDA applications using supported versions of Visual Studio.
Note: C:ProgramData is a hidden folder. It can be made visible within the Windows Explorer options at (Tools | Options).
Driver Subpackages Display.Driver The NVIDIA Display Driver. Required to run CUDA applications.
Extracting and Inspecting the Files Manually
Sometimes it may be desirable to extract or inspect the installable files directly, such as in enterprise deployment, or to browse the files before installation. The full installation package can be extracted using a decompression tool which supports the LZMA compression method, such as 7-zip or WinZip.
2.3.1. Uninstalling the CUDA Software
All subpackages can be uninstalled through the Windows Control Panel by using the Programs and Features widget.
2.4. Using Conda to Install the CUDA Software
This section describes the installation and configuration of CUDA when using the Conda installer. The Conda packages are available at https://anaconda.org/nvidia.
2.4.1. Conda Overview
2.4.2. Installation
To perform a basic install of all CUDA Toolkit components using Conda, run the following command:
2.4.3. Uninstallation
To uninstall the CUDA Toolkit using Conda, run the following command:
2.5. Use a Suitable Driver Model
On Windows 7 and later, the operating system provides two under which the NVIDIA Driver may operate:
The TCC driver mode provides a number of advantages for CUDA applications on GPUs that support this mode. For example:
2.6. Verify the Installation
Before continuing, it is important to verify that the CUDA toolkit can find and communicate correctly with the CUDA-capable hardware. To do this, you need to compile and run some of the included sample programs.
2.6.1. Running the Compiled Examples
Start > All Programs > Accessories > Command Prompt
This assumes that you used the default installation directory structure. If CUDA is installed and configured correctly, the output should look similar to Figure 1.

The exact appearance and the output lines might be different on your system. The important outcomes are that a device was found, that the device(s) match what is installed in your system, and that the test passed.
If a CUDA-capable device and the CUDA Driver are installed but deviceQuery reports that no CUDA-capable devices are present, ensure the deivce and driver are properly installed.
Running the bandwidthTest program, located in the same directory as deviceQuery above, ensures that the system and the CUDA-capable device are able to communicate correctly. The output should resemble Figure 2.

The device name (second line) and the bandwidth numbers vary from system to system. The important items are the second line, which confirms a CUDA device was found, and the second-to-last line, which confirms that all necessary tests passed.
If the tests do not pass, make sure you do have a CUDA-capable NVIDIA GPU on your system and make sure it is properly installed.
3. Pip Wheels
NVIDIA provides Python Wheels for installing CUDA through pip, primarily for using CUDA with Python. These packages are intended for runtime use and do not currently include developer tools (these can be installed separately).
Please note that with this installation method, CUDA installation environment is managed via pip and additional care must be taken to set up your host environment to use CUDA outside the pip environment.
4. Compiling CUDA Programs
4.1. Compiling Sample Projects
The bandwidthTest project is a good sample project to build and run. It is located in the NVIDIA CorporationCUDA Samplesv 11.4 1_UtilitiesbandwidthTest directory.
4.2. Sample Projects
The sample projects come in two configurations: debug and release (where release contains no debugging information) and different Visual Studio projects.
A few of the example projects require some additional setup.
4.3. Build Customizations for New Projects
When creating a new CUDA application, the Visual Studio project file must be configured to include CUDA build customizations. To accomplish this, click File-> New | Project. NVIDIA-> CUDA->, then select a template for your CUDA Toolkit version. For example, selecting the «CUDA 11.4 Runtime» template will configure your project for use with the CUDA 11.4 Toolkit. The new project is technically a C++ project (.vcxproj) that is preconfigured to use NVIDIA’s Build Customizations. All standard capabilities of Visual Studio C++ projects will be available.
To specify a custom CUDA Toolkit location, under CUDA C/C++, select Common, and set the CUDA Toolkit Custom Dir field as desired. Note that the selected toolkit must match the version of the Build Customizations.
4.4. Build Customizations for Existing Projects
While Option 2 will allow your project to automatically use any new CUDA Toolkit version you may install in the future, selecting the toolkit version explicitly as in Option 1 is often better in practice, because if there are new CUDA configuration options added to the build customization rules accompanying the newer toolkit, you would not see those new options using Option 2.
5. Additional Considerations
A number of helpful development tools are included in the CUDA Toolkit or are available for download from the NVIDIA Developer Zone to assist you as you develop your CUDA programs, such as NVIDIA В® Nsightв„ў Visual Studio Edition, NVIDIA Visual Profiler, and cuda-memcheck.
For technical support on programming questions, consult and participate in the developer forums at http://developer.nvidia.com/cuda/.
Notices
Notice
This document is provided for information purposes only and shall not be regarded as a warranty of a certain functionality, condition, or quality of a product. NVIDIA Corporation (“NVIDIA”) makes no representations or warranties, expressed or implied, as to the accuracy or completeness of the information contained in this document and assumes no responsibility for any errors contained herein. NVIDIA shall have no liability for the consequences or use of such information or for any infringement of patents or other rights of third parties that may result from its use. This document is not a commitment to develop, release, or deliver any Material (defined below), code, or functionality.
NVIDIA reserves the right to make corrections, modifications, enhancements, improvements, and any other changes to this document, at any time without notice.
Customer should obtain the latest relevant information before placing orders and should verify that such information is current and complete.
NVIDIA products are sold subject to the NVIDIA standard terms and conditions of sale supplied at the time of order acknowledgement, unless otherwise agreed in an individual sales agreement signed by authorized representatives of NVIDIA and customer (“Terms of Sale”). NVIDIA hereby expressly objects to applying any customer general terms and conditions with regards to the purchase of the NVIDIA product referenced in this document. No contractual obligations are formed either directly or indirectly by this document.
NVIDIA products are not designed, authorized, or warranted to be suitable for use in medical, military, aircraft, space, or life support equipment, nor in applications where failure or malfunction of the NVIDIA product can reasonably be expected to result in personal injury, death, or property or environmental damage. NVIDIA accepts no liability for inclusion and/or use of NVIDIA products in such equipment or applications and therefore such inclusion and/or use is at customer’s own risk.
NVIDIA makes no representation or warranty that products based on this document will be suitable for any specified use. Testing of all parameters of each product is not necessarily performed by NVIDIA. It is customer’s sole responsibility to evaluate and determine the applicability of any information contained in this document, ensure the product is suitable and fit for the application planned by customer, and perform the necessary testing for the application in order to avoid a default of the application or the product. Weaknesses in customer’s product designs may affect the quality and reliability of the NVIDIA product and may result in additional or different conditions and/or requirements beyond those contained in this document. NVIDIA accepts no liability related to any default, damage, costs, or problem which may be based on or attributable to: (i) the use of the NVIDIA product in any manner that is contrary to this document or (ii) customer product designs.
No license, either expressed or implied, is granted under any NVIDIA patent right, copyright, or other NVIDIA intellectual property right under this document. Information published by NVIDIA regarding third-party products or services does not constitute a license from NVIDIA to use such products or services or a warranty or endorsement thereof. Use of such information may require a license from a third party under the patents or other intellectual property rights of the third party, or a license from NVIDIA under the patents or other intellectual property rights of NVIDIA.
Reproduction of information in this document is permissible only if approved in advance by NVIDIA in writing, reproduced without alteration and in full compliance with all applicable export laws and regulations, and accompanied by all associated conditions, limitations, and notices.
THIS DOCUMENT AND ALL NVIDIA DESIGN SPECIFICATIONS, REFERENCE BOARDS, FILES, DRAWINGS, DIAGNOSTICS, LISTS, AND OTHER DOCUMENTS (TOGETHER AND SEPARATELY, “MATERIALS”) ARE BEING PROVIDED “AS IS.” NVIDIA MAKES NO WARRANTIES, EXPRESSED, IMPLIED, STATUTORY, OR OTHERWISE WITH RESPECT TO THE MATERIALS, AND EXPRESSLY DISCLAIMS ALL IMPLIED WARRANTIES OF NONINFRINGEMENT, MERCHANTABILITY, AND FITNESS FOR A PARTICULAR PURPOSE. TO THE EXTENT NOT PROHIBITED BY LAW, IN NO EVENT WILL NVIDIA BE LIABLE FOR ANY DAMAGES, INCLUDING WITHOUT LIMITATION ANY DIRECT, INDIRECT, SPECIAL, INCIDENTAL, PUNITIVE, OR CONSEQUENTIAL DAMAGES, HOWEVER CAUSED AND REGARDLESS OF THE THEORY OF LIABILITY, ARISING OUT OF ANY USE OF THIS DOCUMENT, EVEN IF NVIDIA HAS BEEN ADVISED OF THE POSSIBILITY OF SUCH DAMAGES. Notwithstanding any damages that customer might incur for any reason whatsoever, NVIDIA’s aggregate and cumulative liability towards customer for the products described herein shall be limited in accordance with the Terms of Sale for the product.
Источник
Этап 1: Установка ПО
Перед тем как активировать вычислительные мощности ядер CUDA, необходимо установить специальное программное обеспечение от компании-производителя.
Перейти на ресурс NVIDIA
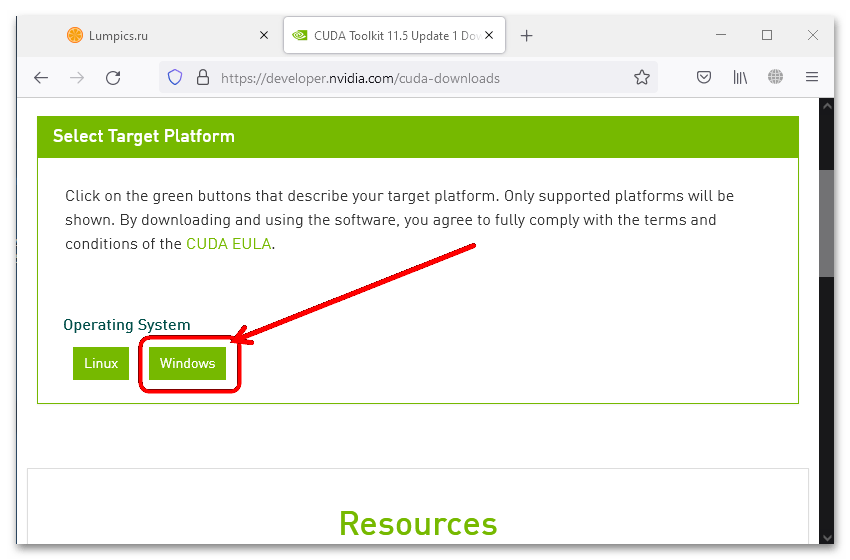
- Перейдя по предложенной выше ссылке, выберите операционную систему – «Windows» (наш пример) или «Linux».
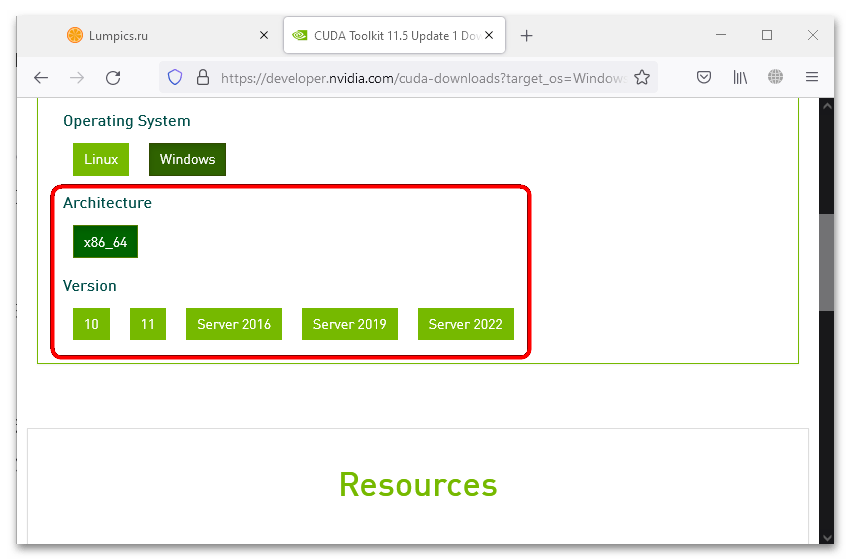
- Архитектура доступна только одна – «x86_64», она устанавливается автоматически. Дополнительно требуется указать конкретную версию Виндовс – поддерживаются как серверные, так и 10, и 11.
- Теперь укажите вариант инсталлятора. «exe(local)» подразумевает скачивание оффлайн-установщиа, который на момент написания настоящей статьи представляет собой файл размером 2,5 Гб. «exe(network)» является онлайновым, необходимые данные загружаются после запуска. Кликните по тому из них, который вам подойдёт.
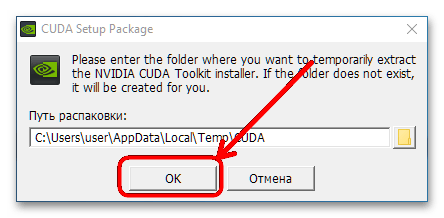
- Независимо от выбранного типа запустите файл после скачивания. Сначала выберите папку, куда будут распакованы временные файлы.
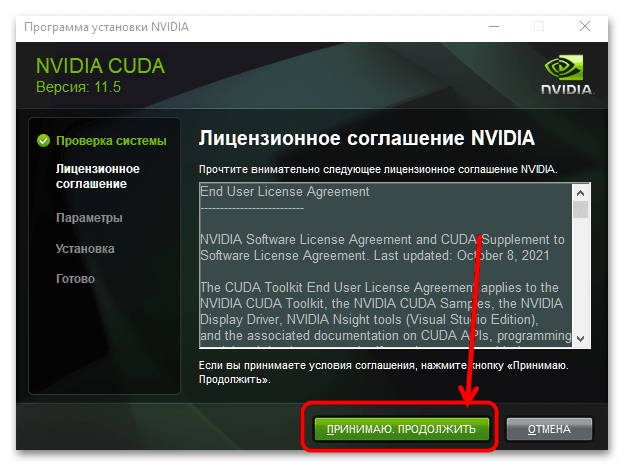
- Подождите, пока данные распакуются, а после появления непосредственно инсталлятора примите лицензионное соглашение.
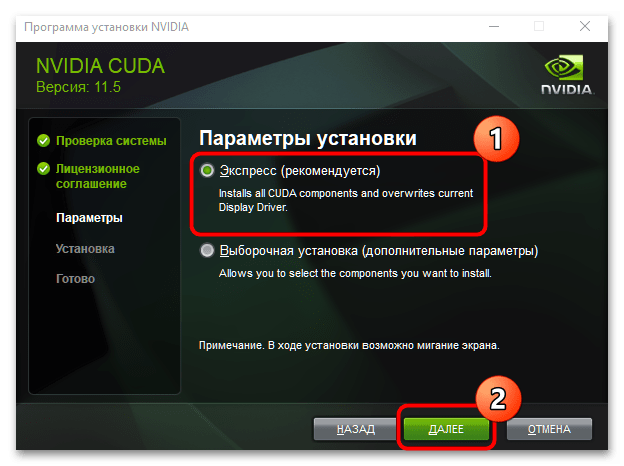
- Для малоопытных пользователей рекомендуется выбирать вариант установки «Экспресс».
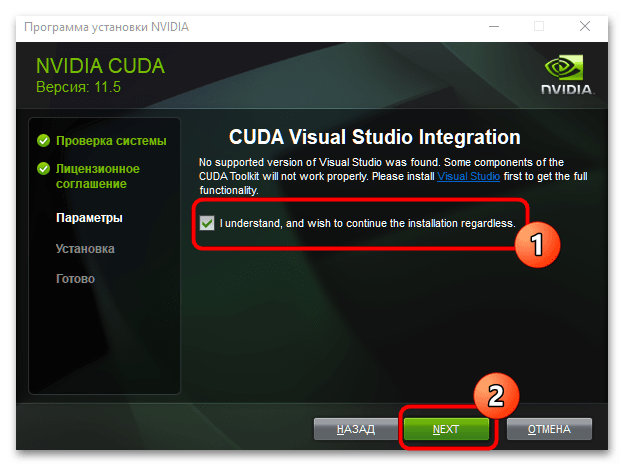
- На данном этапе система предлагает установить Visual Studio. Нам это не требуется, поэтому отметьте опцию, обозначенную на скриншоте, и нажмите «Next».
- Дождитесь установки компонента, снимите галочки, затем кликните «Закрыть».

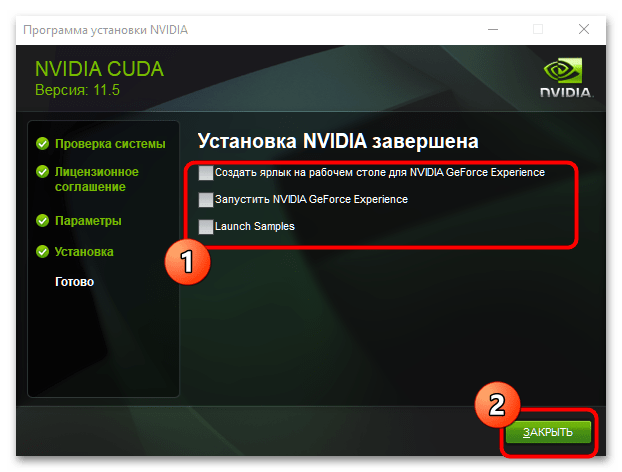
На этом инсталляция средств работы с CUDA закончена.
Включить рассматриваемую технологию разом для всех программ не получится – необходимо её выбирать либо перед началом работы, либо в процессе, либо перед непосредственно вычислением. Использование данного средства покажем на примере программы Adobe After Effects последней версии.
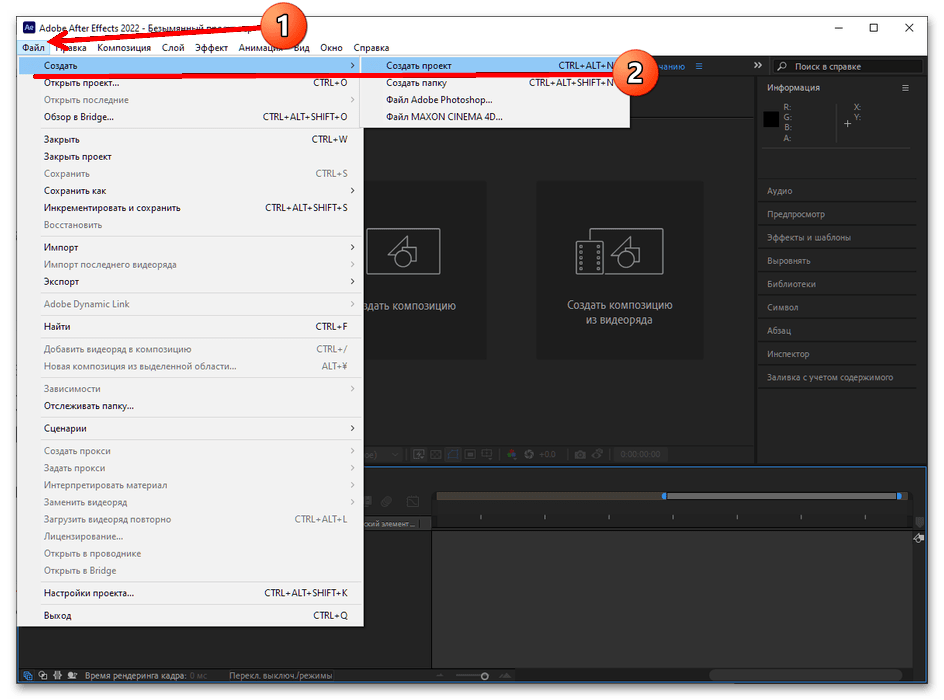
- Запустите Афтер Эффектс и выберите пункты «Файл» – «Создать» – «Создать проект».
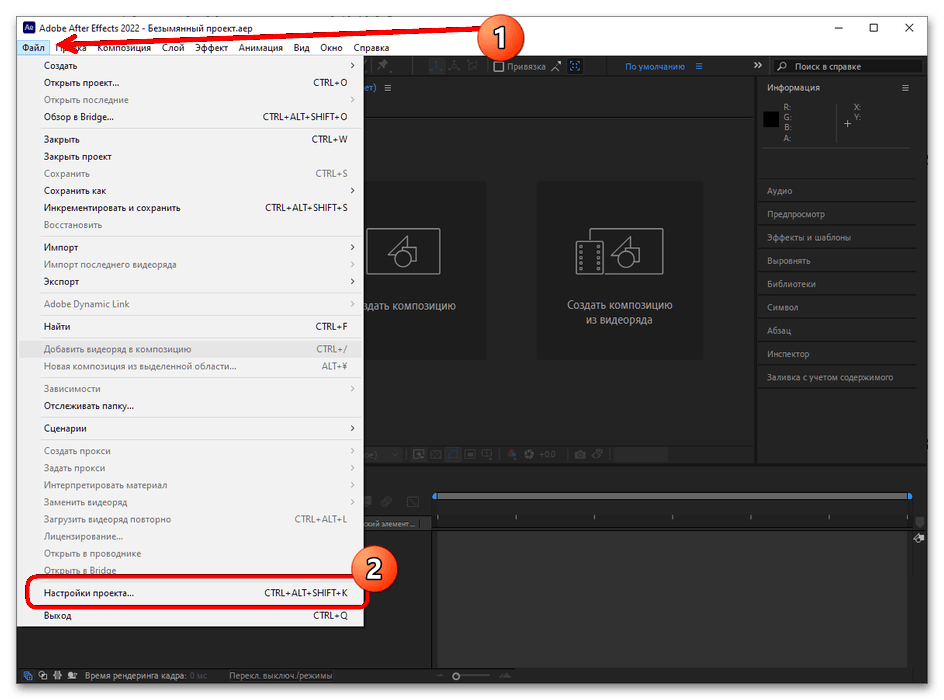
- После создания проекта снова воспользуйтесь элементом «Файл», только на этот раз укажите «Настройки проекта».
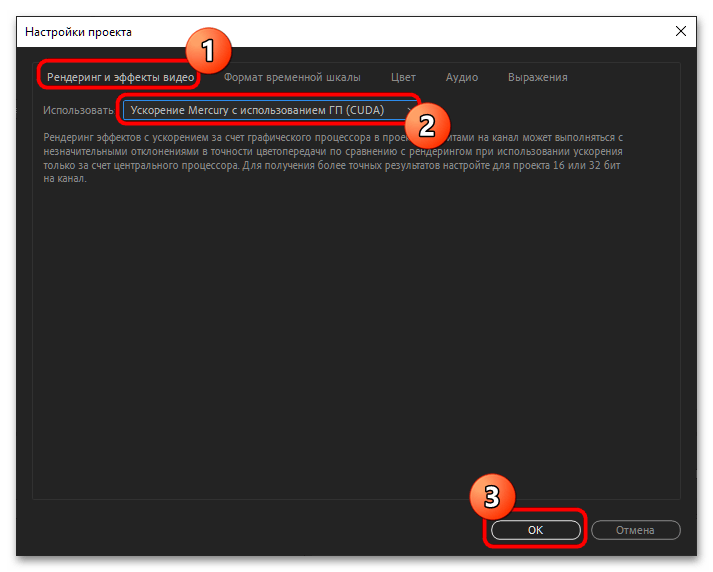
- На вкладке «Рендеринг и эффекты видео» в меню «Использовать» должен быть пункт «Ускорение Mercury с использованием ГП (CUDA)» – выберите его и нажмите «ОК».

В других приложениях данная технология активируется подобным образом.
Еще статьи по данной теме: