На первый взгляд задача «включение SNMP на Windows» не должна быть сложной.
Как включить SNMP на Windows и как ее настроить будем разбираться по пунктам.
Способ №1 Включение SNMP в Windows.
Стандартным, идеальным для пользователя считается следующий способ, он работает в Windows 7 и некоторых сборках Windows 10:
1. Заходим в Панель Управления.
2. Находим меню «Установка и удаление программ» или «Программы и компоненты».
3. В открывшемся окне слева в списке переходим по ссылке «Включение или отключение компонентов Windows».
4. В списке «Компоненты Windows» ищем строчку «Компонент SNMP» и отмечаем галочкой — Нажимаем «ОК».
5. Осталось перейти в Службы (Панель управления — Администрирование — Службы) где выбираем среди всех служб «Служба SNMP» и запускаем.
Способ №2 Включение и настройка SNMP в Windows 10.
Если первый способ не увенчался успехом, то второй нам поможет:
1. Для начала нам нужно будет в меню Пуск найти и запустить WindowsPowerShell «ЗАПУСК ОТ ИМЕНИ АДМИНИСТРАТОРА»!!!.
2. Вводим команду для проверки доступности SNMP — службы :
Get-WindowsCapability -Online -Name "SNMP*"
Вывод команды будет следующим:
Name: SNMP.Client~~~~0.0.1.0
State: NotPresent
DisplayName: SNMP-протокол.
Как видим в строке состояния указано, что SNMP-протокол не представлен.
P.S. Бывали случае, когда в строке состояния указано Installed, но все равно службы SNMP нет. В этом случае все равно переходим к следующему 3 пункту.
3. Устанавливаем службу SNMP командой:
Add-WindowsCapability -Online -Name "SNMP.Client~~~~0.0.1.0"
Видим процесс установки и получаем ответ:
Path:
Online: True
RestartNeeded: False
4. Снова проверим состояние службы SNMP командой из пункта 2:
Get-WindowsCapability -Online -Name "SNMP*"
Вывод команды:
Name: SNMP.Client~~~~0.0.1.0
State: Installed
DisplayName: SNMP-протокол.
5. Обязательно перезагружаем компьютер.
После запуска переходим в Службы и находим «Служба SNMP».
Заходим в свойства службы SNMP. Если состояние службы остановлена, нужно запустить ее кнопкой «Запустить» и в меню «Тип запуска» выбираем «Автоматически».
Способ 3. Как установить SNMP на Windows Server.
1. Включить SNMP можно в «Параметры» — раздел «Приложения и возможности»- ссылка «Дополнительные возможности».
2. В окне «Дополнительные возможности» нажимаем «Добавить компонент» и выбираем в списке «SNMP-протокол» — Установить.
3. Перезагружаем систему.
Как настроить SNMP в Windows.
Необходимо найти службу «Служба SNMP» и открыть свойства службы.
— На вкладке «Безопасность» установим флажок «Посылать ловушку проверки подлинности».
— Нажмем кнопку «Добавить» для настройки «SNMP Community».
— Выбираем уровень доступа (None, Notify, READ ONLY, READ WRITE, READ CREATE). Для мониторинга состояния сервера достаточно выбрать Read Only.
— По-умолчанию community чаще всего указывается public для уровня READ ONLY или private для Read Write.
— Ниже есть пункт «Принимать пакеты SNMP от любого узла» и «Принимать пакеты SNMP от следующих узлов». Здесь вы можете указать конкретный адрес вашего сервера мониторинга, который будет собирать данные или оставить 1 вариант, если вы хотите, что бы не было ограничений по ip-адресу.
— Сохраняем изменения и перезапускаем службу SNMP.
Settings up Microsoft SNMP Service on Windows 7 locally and remotely is something that many admins need to do in their network environments in order to monitor all desktops in their network properly using SNMP.
In order to do this, Windows 7 SNMP Service needs to be installed and configured in order to allow Network monitoring and management software to poll them in order to get information about them.
Automatic Installing and Enabling SNMP Service (Local and on Remote PC/Servers)
Below we’ve highlighted the manual way of installing and enabling SNMP service on your Windows 7, 2008 Server and 2012 R2 Server installations – its a little hands-on as you can see from the tutorial, so we’ve added this cool tool/utility we found from Solarwinds to enable snmp on your local machine and on your Whole network from one place.
- Download and Install the SNMP Enabler for Windows utility from Solarwinds
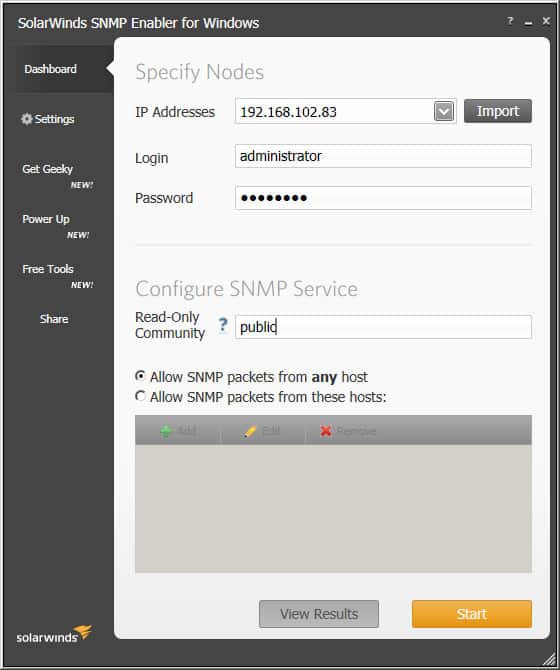
- Run the Utility and specify which IP Address you like to remotely Install and Enable SNMP service on.The Utility also allows you to Bulk Enable the Service on multiple Windows 7, Windows 8.1, Windows 10, Windows Server 2008 and Windows Server 2012 R2 by Importing a File with all the IP Addresses listed in there via the “Import” button.(You can export a list of all IP Addresses used from within DHCP server and import into this utility)

- Click the Start button and the utility will go to each IP Address specified and check whether the SNMP Service has been installed already (if it has not, It will Install SNMP Service on that remote server/desktop) and then configure the Community String for you.When it has completed, you will see a screen like the once below:
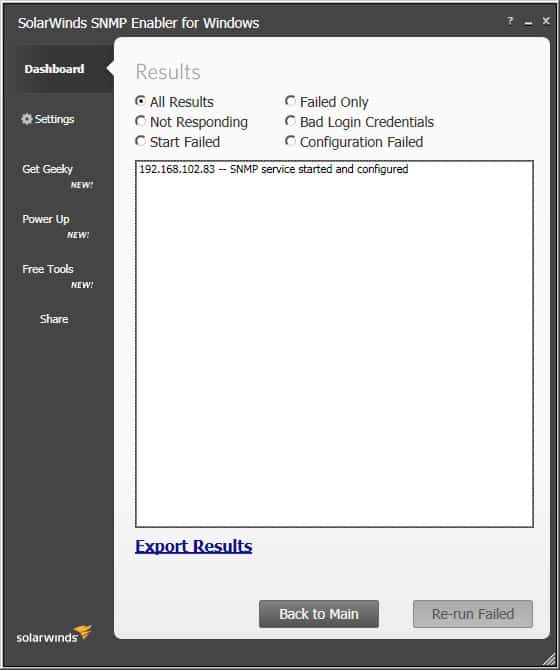
At this point, SNMP Service will be installed along with the Community String enabled and ready to send data out.
Manual Install on Windows 7/2008 Server and 2012 R2 Server
Note: Make sure your using an account that is a member of the “Local Administrators” group or else you’ll have issues with the process below.
-
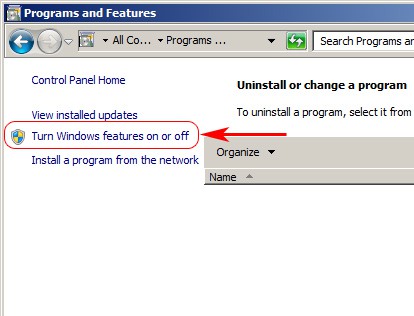
Start > Control Panel > Programs and Features
-
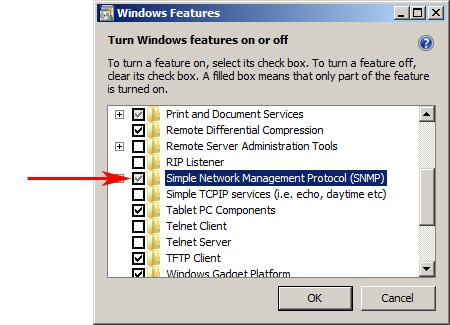
On the Left Sidebar Menu, click on Turn Windows features on or off in the left-hand side of the page.

-
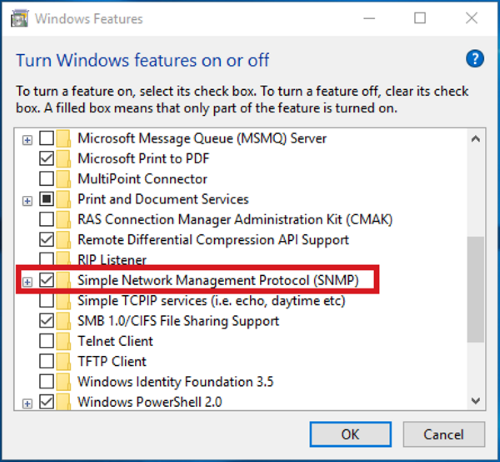
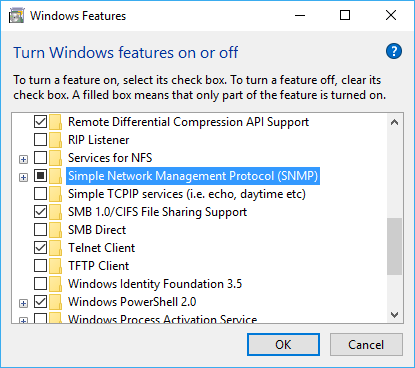
When the “Windows Features” dialog box opens, scroll down and check the “Simple Network Management Protocol” box (see image below), and then click OK.

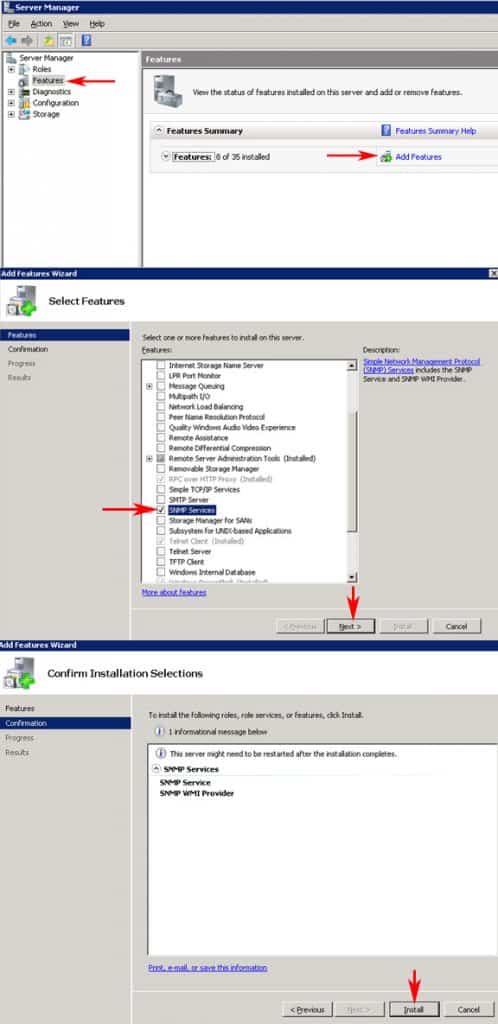
- For Microsoft Windows 2008 Server, the Server Manager dialog box will open. Click on Features on the left menu, and in the Features dialog box on the right side, click on Add Features and then scroll down and check the “SNMP Services” dialog box and click Next and then click Install. See screenshot below:

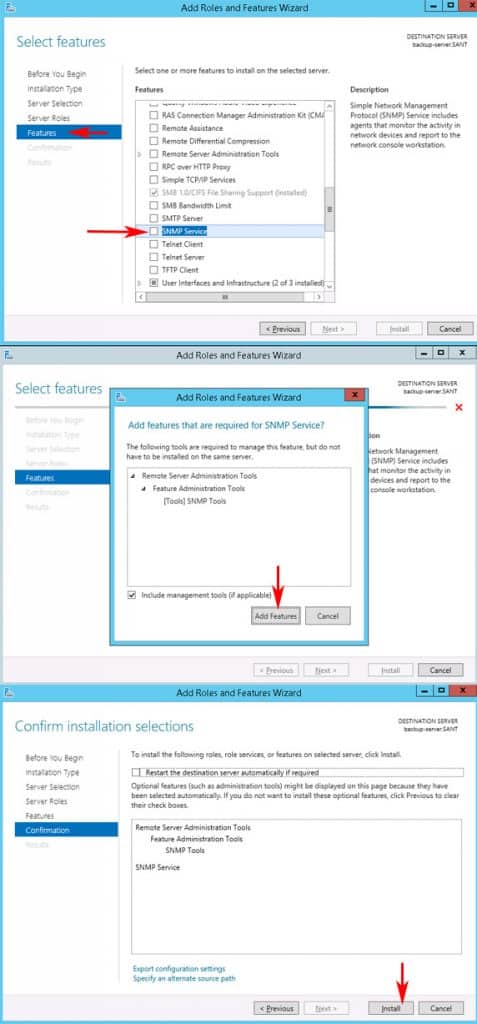
- For Microsoft Windows 2012 R2 Server, the Add Roles and Features wizard will open, click Next for “Role-based or feature-based installation” and then click on Features >
scroll down to SNMP Service and check box > Click Add Features when pop-up box asks you to confirm SNMP Tools installation > Click Next > Click Install. See the screenshots below for step-by-step tutorial:

- For Microsoft Windows 2008 Server, the Server Manager dialog box will open. Click on Features on the left menu, and in the Features dialog box on the right side, click on Add Features and then scroll down and check the “SNMP Services” dialog box and click Next and then click Install. See screenshot below:
-
At this point, you may be Prompted to Insert a Windows 7 Installation disc or may not, depending how you installed your Operating System.
-
The SNMP Service is now set to automatically start with your PC.
You will also need to manually specify a community string within the SNMP service window, as they automatically specify on when you install the service itself. To do so, follow the instructions below:
- Start > type in services.msc and press Enter Key to open up the Services Dialog box
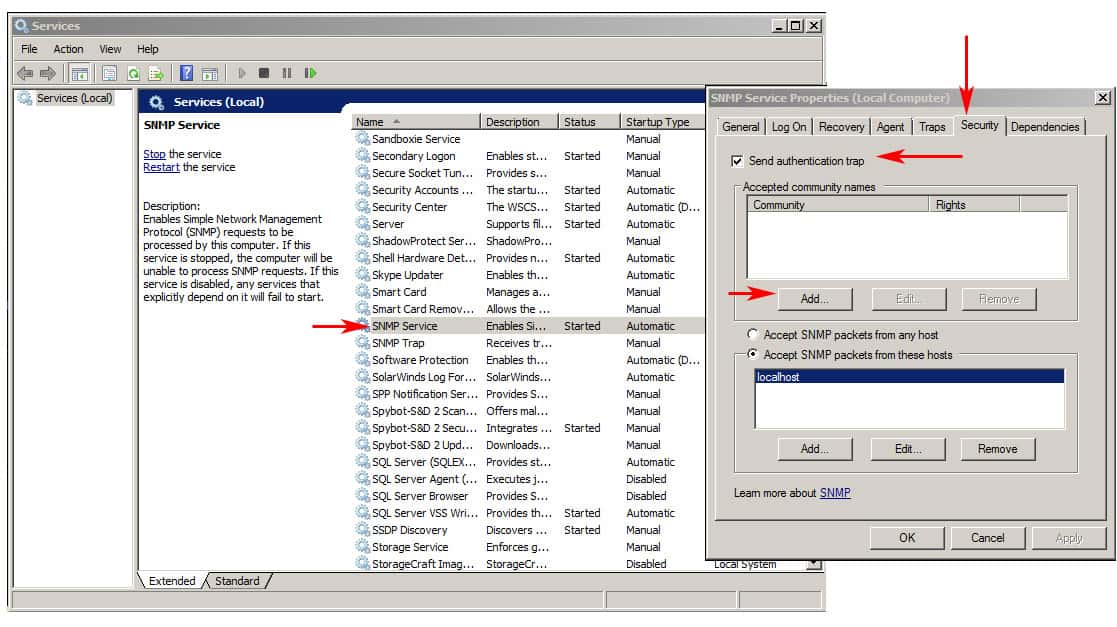
- Scroll down to SNMP Service and double-click on it to open up the dialog box for that service
- Click on the Security tab
- Make sure the “Send authentication trap” check box is Checked

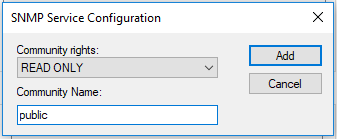
- Click “Add” under the “Accepted community names” and add your Community name into the given text field and make sure “READ ONLY” is selected in the Community rights field, then click the ADD button.

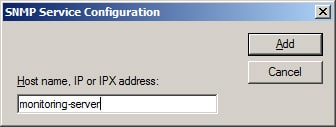
- In the field right below the Community string names, you’ll have the option to specify which hosts can poll the device for SNMP information by adding either an IP Address or Host Name – we suggest you add your Host name of your monitoring server to ensure that is the only machine allowed to poll for data.
You should now be able to monitor the given machine using SNMP services, whether its a Windows 7, Window 8, Windows 10 or Windows 2008 Server or Windows 2012 R2 server.
If you want a quick and easy way to Enable this service without going through the hassle of manually doing it, definitely consider grabbing the FREE Tool from Solarwinds to do it from the Link below.
Протокол Simple Network Management Protocol (SNMP) используется для получения данных как из самой операционной системы так и из Программного обеспечения если оно поддерживает передачу по SNMP. Так же данные можно не только читать — запрашивать в режиме READ чтение, но так же и изменять их если предоставлен доступ WRITER запись.
Так же у нас есть SNMP TRAP — отличие просто от SNMP в том что trap он сам передает данные, а просто в snmp мы их сами запрашиваем и устройство нам их отдает.
Например на устройстве настроено при определенном значении/отметке отправить данные такого то трапа.
Более подробно о работе SNMP можно посмотреть тут Пример работы SNMP запрос данных и SNMP Traps пример работы, что такое MIB их зависимости как правильно дать имя MIB файлу где их брать и тд.
Так же стоит отметить SNMP может быть реализован по обоим протоколам через локальную сеть. Хотя SNMP через порт TCP возможен, пакеты SNMP обычно отправляются через UDP.
SNMP — 161, SNMP Trap — 162, при использовании TLS или DTLS запросы получаются по порту 10161, а ловушки отправляются на порт 10162.
Переходим к установке службы SNMP
Для Windows 7 , 8 , 8.1 , 10
Панель управленияВсе элементы панели управленияПрограммы и компоненты
Включение или отключение компонентов Windows
Находим и Выбираем (ставим галочки)
SNMP-протокол
Поставщик WMI для SNMP
И жмем OK ждем завершения установки.
 491 просмотр")
- Установка SNMP на Windiws 7 8 10
 491 просмотр")
Так же можно проверить и установить при помощи PowerShell
Проверка
или
Установка
Код: Выделить всё
Enable-WindowsOptionalFeature -online -FeatureName SNMPили
Код: Выделить всё
Install-WindowsFeature SNMP-Service,SNMP-WMI-Provider -IncludeManagementToolsЕсли в Windows 10 нет такого пункта
- Установка SNMP на Windiws10 нет такого пункта
 491 просмотр")
Добавление Службы SNMP на Windows Server
После заходим в Диспетчер сервера > Компоненты > Добавления компонентов. Выбираем Службы SNMP и SNMP WMI Providers
C помощью Server Manager -> Выберите Add roles and features -> Features. Выберите SNMP Service и SNMP WMI Providers
- Windows Server 2008 Диспетчер сервера добавление компонентов SNMP
 489 просмотров")
SNMP WMI Providers — Поставщик WMI для SNMP (обеспечивает доступ к информации SNMP через интерфейсы Windows Management Instrumentation) Можно запрашивать данные из самой операционной системы Windows.
Установка службы SNMP в Windows 10/11
вынесена в отдельный компонент Feature On Demand (как RSAT и OpenSSH).
Параметры -> Приложения -> Приложения и возможности -> Дополнительные компоненты -> Добавить компонент -> Пишем SNMP ставим галки и жмем -> Установить
Apps -> Optional features -> Add an optional feature -> View features
- Установка SNMP на Windiws10 Параметры приложения
 491 просмотр")
- Установка SNMP на Windiws10 Приложения и возможности Дополнительные компоненты
 491 просмотр")
- Установка SNMP на Windiws10 Дополнительные компоненты Добавить компонент
 491 просмотр")
После установки Переходим в Службы / Services ( Win + R и services.msc)
Через диспетчер задач, панель управления , Параметры или поиск кому как удобнее
- Службы в Диспетчере задач
 491 просмотр")
В списке службы должны появится две новые службы:
SNMP Service – это основная служба SNMP агента, которая отслеживают активность и отправляет информацию;
SNMP Trap — получает сообщения ловушки (trap messages) от локальных или удаленных агентов SNMP, и пересылает сообщения в управляющие программы SNMP, которые работают на этом компьютере.
Откройте свойства службы SNMP. Если она остановлена, запустите ее, нажав кнопку Start и измените тип запуска (Startup type) на автоматический.
Переходим к настройке служб SNMP
Вкладки:
Agent / Агент SNMP — указывается базовая информация об устройстве (контакты администратора, местоположение). Здесь же можно указать тип информации, который может отправлять данное устройство при SNMP опросе.
Доступны следующие типы сервисов:
Physical Физическая
Applications Приложения
Internet Интернет
End-to-end Узел-узел
Datalink and subnetwork Канал данных и подсети
- Агент SNMP
 488 просмотров")
Traps / Ловушки — указываются адрес серверов, на который SNMP агент должен отправлять SNMP-ловушка (SNMP trap).
SNMP Trap это широковещательный USP пакет, используемый для асинхронного уведомления менеджера (например, сообщение о критическом событии).
- SNMP Ловушки
 488 просмотров")
Не забудьте открыть в Windows Defender Firewall правила, разрешающие входящий и исходящий трафик для SNMP запросов и ловушек (TRAP). Нужные правила фаейрвола можно включить с помощью PowerShell.
В Windows Firewall есть несколько готовых правил для SNMP трафика:
Код: Выделить всё
Get-NetFirewallrule -DisplayName *snmp* |ftSNMPTRAP-In-UDP
SNMPTRAP-In-UDP-NoScope
SNMP-Out-UDP
SNMP-In-UDP-NoScope
SNMP-Out-UDP-NoScope
SNMP-In-UDP
Можно включить все правила, или только определенное:
Код: Выделить всё
Get-NetFirewallrule -DisplayName *snmp* | Enable-NetFirewallRuleКод: Выделить всё
Get-NetFirewallrule SNMP-Out-UDP | Disable-NetFirewallRuleSecurity / Безопасность — можно создать несколько строк подключения, так же настроить различные параметры безопасности для различных серверов SNMP.
- SNMP Безопасность
 488 просмотров")
Можно выбрать один из пяти уровней доступа для сообщества:
READ ONLY — позволяет получать данные с устройства;
READ WRITE — позволяет получать данные и изменять конфигурацию устройства;
NOTIFY — позволяет получать SNMP ловушки;
READ CREATE – позволяет читать данные, изменять и создавать объекты;
NONE
Вы можете создать несколько community string. Для этого нужно задать имя и выбрать права/ Для мониторинга состояние сервера достаточно выбрать READ ONLY.
В списке Accept SNMP packets from these hosts можно указать имена/IP адреса серверов, которым разрешено опрашивать данное устройство. Если вы не хотите ограничивать список разрешенных устройств, оставьте здесь Accept SNMP packets from any hosts.
В списке Accepted community names перечислены имена сообществ, чьи SNMP узлы проходят аутентификацию для отправки SNMP-запросов на этот компьютер.
Community — это имя, которое обладает такими же функциями, как логин и пароль.
Нажмите кнопку Добавить и укажите имя Community и один из пяти уровней доступа (None, Notify, READ ONLY, READ WRITE, READ CREATE). READ WRITE – это максимальный уровень доступа, при которых сервер управления SNMP может вносить изменения в систему. В системах мониторинга обычно достаточно выбрать READ ONLY, при этом сервер мониторинга может только опрашивать систему, но не вносить изменения.
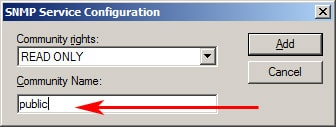
В нашем примере мы добавили комьюнити public с разрешениями READ ONLY.
Далее добавьте список серверов системы мониторинга (по DNS имени или по IP адресам), от которых вы хотите разрешить получать SNMP пакеты.
Можно выбрать опцию ‘Принимать пакеты SNMP от любого узла’/Accept SNMP packages from these hosts, но это не безопасно.
Сохраните изменения и перезапустите службу SNMP.
В списке служб Windows есть еще одна служба SNMP Trap.
Она используется для получения сообщений от других SNMP агентов и пересылки на SNMP сервера (обычно это система мониторинга, опрашивающая устройства по SNMP, Zabbix).
Примеры:
ПО для передачи по SNMP через стандартную службу SNMP Windows
Dell-OpenManage snmpv2 RUS Состояние серверов Dell на основе ПО OPEN MANAGE SERVER ADMINISTRATOR
Kraftway PMC-Sierra Adaptec 5805 raid массива при помощи ПО Adaptec Storage Manager
ПО не использует стандартную службу SNMP Windows так как указывается другой порт для snmp
Для ИБП марки APC
APC Smart UPS 2200 через ПО PowerChute Business Edition
Далее переходим Мониторинг Windows OS при помощи SNMP
Шаблон ОС Windows SNMPv2
| Информация о файле | Описание |
|---|---|
| Размер файла: | 32 kB |
| Дата и время изменения файла: | 2008:04:14 12:00:00+00:00 |
| Дата и время изменения индексного дескриптора файлов: | 2017:11:05 07:07:15+00:00 |
| Тип файла: | Win32 EXE |
| Тип MIME: | application/octet-stream |
| Тип компьютера: | Intel 386 or later, and compatibles |
| Метка времени: | 2008:04:13 18:58:29+00:00 |
| Тип PE: | PE32 |
| Версия компоновщика: | 7.10 |
| Размер кода: | 28160 |
| Размер инициализированных данных: | 5120 |
| Размер неинициализированных данных: | 0 |
| Точка входа: | 0x7060 |
| Версия ОС: | 5.1 |
| Версия образа: | 5.1 |
| Версия подсистемы: | 4.0 |
| Подсистема: | Windows command line |
| Номер версии файла: | 5.1.2600.5512 |
| Номер версии продукта: | 5.1.2600.5512 |
| Маска флагов файлов: | 0x003f |
| Флаги файлов: | (none) |
| Файловая ОС: | Windows NT 32-bit |
| Тип объектного файла: | Executable application |
| Подтип файла: | 0 |
| Код языка: | English (U.S.) |
| Набор символов: | Unicode |
| Наименование компании: | Microsoft Corporation |
| Описание файла: | SNMP Service |
| Версия файла: | 5.1.2600.5512 (xpsp.080413-0852) |
| Внутреннее имя: | snmp.exe |
| Авторское право: | © Microsoft Corporation. All rights reserved. |
| Оригинальное имя файла: | snmp.exe |
| Название продукта: | Microsoft® Windows® Operating System |
| Версия продукта: | 5.1.2600.5512 |
✻ Фрагменты данных файлов предоставлены участником Exiftool (Phil Harvey) и распространяются под лицензией Perl Artistic.
Вернуться к началу
Переключение боковой панели оглавления
Перейдите в нужный подраздел, если требуется включить SNMP на:
- Windows Server 2008
- Windows Vista или Seven
- Windows XP, 2000 или 2003
- Windows NT
- Windows 98
 |
У Вас должны быть привилегии администратора, чтобы включить SNMP на системе Windows. |
Установить SNMP на Windows Server 2008
Вы можете установить сервис SNMP на Windows Server 2008, используя один из следующих вариантов:
- использовать встраиваемый модуль Менеджера Сервера для добавления свойства сервиса SNMP
- или использовать следующую команду:
start /w ocsetup SNMP-SC
Этапы установки SNMP на Windows Vista и Windows 7
Этапы установки SNMP на Windows XP, 2000 или 2003
Процесс установки теперь завершен. Помимо этого автоматически устанавливается БД управления ресурсами хост-системы. Для настройки агентов SNMP для ответа на запросы SNMP, обратитесь к разделу Настройка агентов SNMP.
Этапы установки SNMP на Windows NT
Процесс установки завершен. Помимо этого автоматически устанавливается БД управления ресурсами хост-системы. Чтобы настроить SNMP-агенты так, чтобы они отвечали на запросы SNMP, изучите раздел Настройка агентов SNMP.
Этапы настройки SNMP на Windows 98
toolsreskitnetadminsnmp на Вашем СD в диалоговом окне Установить с диска, а затем кликните OKПроцесс установки завершен. Помимо этого автоматически устанавливается БД управления ресурсами хост-системы. Чтобы настроить SNMP-агенты так, чтобы они отвечали на запросы SNMP, изучите раздел Настройка агентов SNMP.
Related searches
- what is microsoft snmp service
- microsoft snmp service download
- install microsoft snmp service
- microsoft snmp service descargar
- microsoft snmp service
- microsoft snmp service win 7
Microsoft Snmp Service Windows 7
at Software Informer
![]()
Internet Security and Acceleration (ISA) Server 2004 SP3.
functionality. This service pack also … for publishing Microsoft Exchange Server
![]()
1
Microsoft
Freeware
Activates computers running Windows Vista and Windows Server 2008.
![]()
34
Microsoft
291
Freeware
It provides customers with the latest updates to the 2007 Office suite.
![]()
Microsoft
Freeware
It provides customers with the latest updates to Office SharePoint Designer 2007.
More Microsoft Snmp Service Windows 7
Microsoft Snmp Service Windows 7 in introduction
![]()
10
Microsoft
3,588
Freeware
The WSE allows to securу Web services easier and better.
![]()
Microsoft Corporation
9
Freeware
This software provides the ability to synchronize data from disparate sources.
![]()
2
Microsoft Corporation
110
Freeware
Self-extracting archive of the Windows Services for UNIX product.
![]()
Microsoft Corporation
Freeware
The Exchange 2010 SP2 Web Services SDK assists developers.
![]()
Microsoft Corporation
12
Freeware
Forward copies of your Exchange Server mail to your Exchange Online mailboxes.
![]()
11
Microsoft Corporation
4,671
Freeware
ACT helps customers lower their costs for application compatibility testing.
Additional titles, containing microsoft snmp service windows 7
![]()
FireDaemon Technologies Limited
1
Freeware
PanelDaemon is a free web based Microsoft Windows Service Applications manager.
![]()
2
SkyCop
7
Open source
SkyNet is a C# client for the Microsoft SkyDrive service.
![]()
RAD data communications
Commercial
RADview-SC/Vmux service center is a powerful SNMP-based management tool.
![]()
3
Microsoft Corporation
4
Freeware
Microsoft Windows Server 2003 Service Pack 2 (SP2) is a cumulative service pack.
![]()
3
Microsof Corporation
1
Freeware
Microsoft has released a service pack for Microsoft Office Visio Viewer 2007.
![]()
1
Microsoft Corporation
153
Freeware
A tool allowing to build a file for Microsoft’s customer service.
![]()
77
Vamsoft Ltd.
2
Shareware
ORF is a spam filter for Microsoft® Exchange servers and the IIS SMTP Service.
![]()
Maric Igor
6
Freeware
Slipstream latest service pack and hotfixes into your Microsoft Office.
![]()
10
Microsof Corporation
7
Freeware
Service Pack 1 provides the latest updates to the 2007 Microsoft Office suite.
![]()
Weird Solutions, Inc. (Sweden)
2
Shareware
Delivers an easy-to-use BOOTP and static DHCP service to Microsoft Windows 95. The program is fully….
![]()
FrontIT
58
![]()
1
Microsoft Services Austria
32
![]()
Kaseya

In this article, we are going to discuss what is SNMP and how to install or enable and configure SNMP service in Windows 10. SNMP which stands for Simple Network Management Protocol is a standard internet protocol that is used to govern and manage communication amongst multiple networking devices connected over an IP. It enables organizations to monitor different networking devices including routers, workstations, modems, switches, servers, printers, etc. SNMP is already configured on most of the networking devices. And, once the protocol is enabled, device performance statistics are stored.

Let us now discuss the main component of SNMP.
Main Components of SNMP
Here are the key components of an SNMP-managed environment:
SNMP manager: It is the central system that manages and monitors the SNMP network. It is also known as Network Management Station (NMS) and runs on a host on the network. The SNMP manager basically queries the SNMP agent, obtains requests,
SNMP agent: It is a software process that gives the status and statistics of a network node when it receives an SNMP query. It is an important component in SNMP management that collects, stores, and transmits monitoring data to SNMP managers.
Managed Devices: These devices include all SNMP-enabled networking devices that you want to monitor, such as printers, routers, wireless devices, etc.
SNMP MIB: SNMP uses an extensible design with hierarchies defined as Management Information Base (MIB) that uses object identifiers (OIDs) network entity management. It is mainly defined as the format of information exchange in an SNMP management model. Each of the network servers has MIB files that are queried to collect monitoring data.
SNMP OID: OID aka Object Identifiers are organized in the MIB database in a tree structure where manageable features of all products are present.
SNMP Versions
There are basically three versions of SNMP that are:
- SNMPv1: The first version of SNMP protocol that is defined in RFC 1155 and 1157.
- SNMPv2c: This is the enhanced version and is defined in RFC 1901, RFC 1905, and RFC 1906.
- SNMPv3: The last version of SNMP as of now that also promotes remote configuration of SNMP entities. It is the most secure version as of yet and is defined in RFC 1905, RFC 1906, RFC 2571, RFC 2572, RFC 2574, and RFC 2575.
Basic SNMP Commands
Here are the main SNMP commands used in the network management model”
- GET: The SNMP manager sends GET requests to the managed devices to receive one or more values.
- GET NEXT: This command is used to retrieve the next OID value in the MIB tree
- GET BULK: This command is used to query and retrieve bulk data from a large MIB table.
- SET: To edit or add values of managed devices, this command is used by SNMP managers.
- TRAPS: Such command is started by an SNMP agent to send a signal to the SNMP manager when events occur.
- INFORM: Another command initiated by SNMP agent including a confirmation when SNMP manager receives the message.
- RESPONSE: This command carries back the values or signal of actions directed by the SNMP manager.
IT organizations can use dedicated SNMP monitoring software like PRTG Network Monitor or Spiceworks Network Monitor to manage and monitor networking devices and performance statistics. Here are some common uses of an SNMP monitoring tool:
- It is used to discover, manage, organize, and monitor network devices in an organization.
- It enables complete visibility of the performance of network devices.
- Analyze various statistics and information of connected network devices like connectivity, availability, performance, bandwidth, traffic, network usage graphs, and more.
- It allows to set up threshold limits for network usage.
- It lets you trigger alerts in case of exceptions or inconsistencies.
Now, let us check out how you can install and enable SNMP service and then configure it on Windows 10.
SNMP used to be a preinstalled feature in earlier versions of Windows. However, SNMP is now considered deprecated and is made an Optional Feature/ Feature on Demand (FOD) in Windows 10 version 1809 and later. Windows now recommend using Common Information Model (CIM) that is supported by Windows Remote Management.
In the latest Windows 10 builds, SNMP can be installed and enabled via the Settings app using the optional features option.
Here are the steps to enable and configure SNMP in Windows 10 using Settings:
- Click Windows + I hotkey to open the Settings App.
- Go to the Apps category and move to Apps & features tab.
- Tap on the Optional features button.
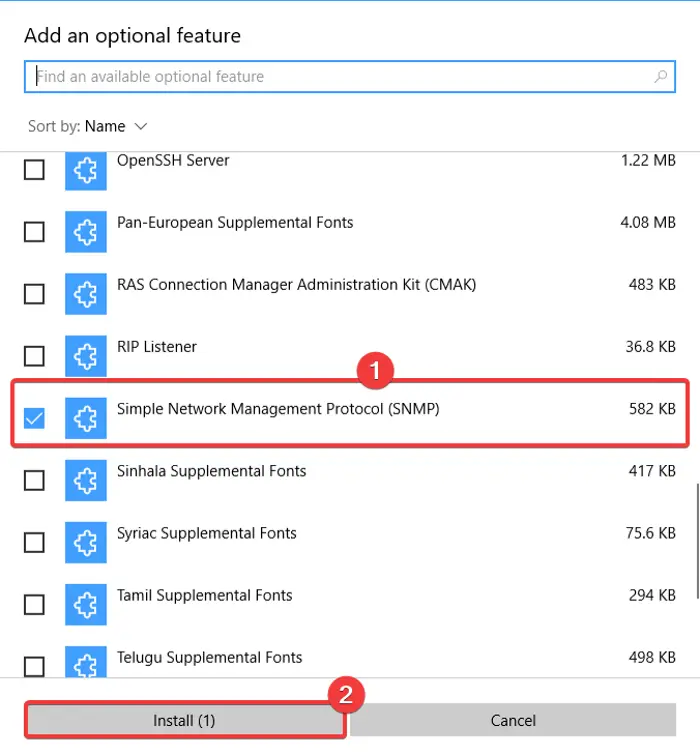
- On the new page, click on the Add a feature button.
- Scroll down to Simple Network Management Protocol (SNMP) and select it.
- Press the Install button to enable SNMP on your PC.
You can also use Control Panel to enable SNMP on your computer if you use an older Windows 10 build or even Windows 8.
Simply use the following steps for that:
- Open Run using Windows + R and enter “control panel” in it and press Enter.
- Go to the Programs and Features and then click on the Turn Windows features on or off option.
- In the Windows Features list, select Simple Network Management Protocol (SNMP) and press OK to install it.
How to configure SNMP service in Windows 10
After installing, you need to configure the SNMP service in Windows 10. There are two main SNMP services that include:
- SNMP Service – main service to monitor and send information
- SNMP Trap – to receive trap messages from SNMP agents and forward them to SNMP management software.
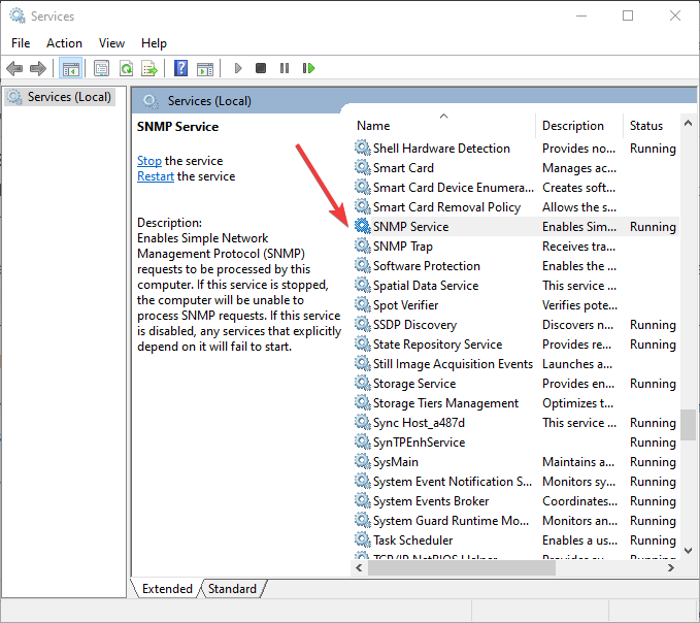
These services must be started automatically after SNMP installation. You can check and configure these from the Services Manager. Simply open the Services app by pressing Windows + R hotkey to evoke Run dialog and entering “services.msc” in it. In the Servies window, scroll down to the SNMP service in the list and see if it is running or not. If it is not running, simply click the Start button to start the SNMP service. Also, set its startup type to Automatic.
You can further set up various SNMP service properties including Agent, Security, etc. Just right-click on the SNMP service and select the Properties option.
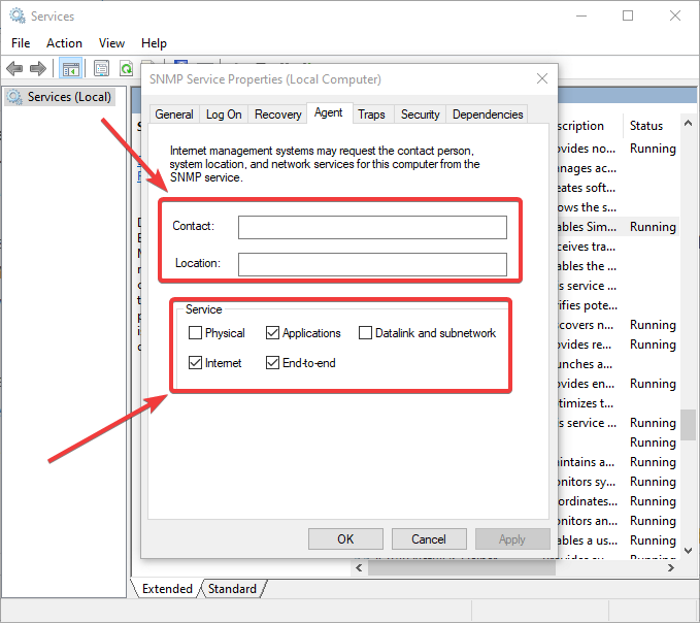
In the Properties window, go to the Agent tab where you can configure the SNMP agent information. You can add contact and location details to specify the user or administrator’s contact name and physical location of the computer. Furthermore, you can enable or disable five services from the list from which you receive monitoring data and send it to the monitoring device. These services include Physical, Applications, Datalink and subnetwork, Internet, and End-to-end.
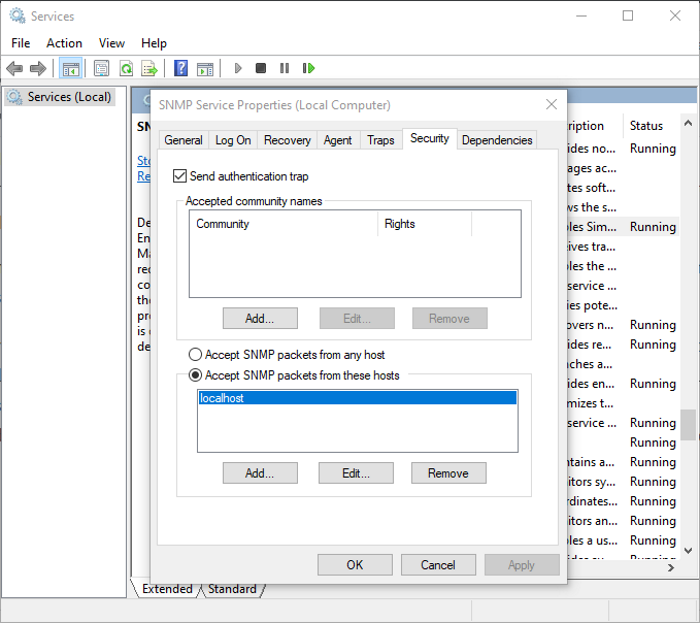
To configure some security-related settings for different SNMP servers, you can go to the Security tab in the Properties window. In the Accepted community names list, you can view and add SNMP hosts that are authenticated for sending SNMP requests. To add a community, click on the Add button and type the community name. You can provide None, Notify, READ ONLY, READ WRITE, or READ CREATE access to a particular community.
You can add a list of SNMP monitoring servers with IP addresses in the list of Accept SNMP packets from these hosts. This is to specify the servers from which SNMP packets are accepted. In case you enable Accept SNMP packets from any host option, no IP restrictions will be enforced on the SNMP agent to receive SNMP packets. This option is not safe and hence is not recommended on public computers.
IT admins can further configure some other settings related to SNMP and monitor all connected networking devices using SNMP management software and tools.
Hopefully, this article helped you learn about SNMP protocol and how you can enable and configure SNMP service in Windows 10.
Now read: Free Network and Internet Traffic Monitor Tools for Windows 11/10.
In this article, we are going to discuss what is SNMP and how to install or enable and configure SNMP service in Windows 10. SNMP which stands for Simple Network Management Protocol is a standard internet protocol that is used to govern and manage communication amongst multiple networking devices connected over an IP. It enables organizations to monitor different networking devices including routers, workstations, modems, switches, servers, printers, etc. SNMP is already configured on most of the networking devices. And, once the protocol is enabled, device performance statistics are stored.
Let us now discuss the main component of SNMP.
Main Components of SNMP
Here are the key components of an SNMP-managed environment:
SNMP manager: It is the central system that manages and monitors the SNMP network. It is also known as Network Management Station (NMS) and runs on a host on the network. The SNMP manager basically queries the SNMP agent, obtains requests,
SNMP agent: It is a software process that gives the status and statistics of a network node when it receives an SNMP query. It is an important component in SNMP management that collects, stores, and transmits monitoring data to SNMP managers.
Managed Devices: These devices include all SNMP-enabled networking devices that you want to monitor, such as printers, routers, wireless devices, etc.
SNMP MIB: SNMP uses an extensible design with hierarchies defined as Management Information Base (MIB) that uses object identifiers (OIDs) network entity management. It is mainly defined as the format of information exchange in an SNMP management model. Each of the network servers has MIB files that are queried to collect monitoring data.
SNMP OID: OID aka Object Identifiers are organized in the MIB database in a tree structure where manageable features of all products are present.
SNMP Versions
There are basically three versions of SNMP that are:
- SNMPv1: The first version of SNMP protocol that is defined in RFC 1155 and 1157.
- SNMPv2c: This is the enhanced version and is defined in RFC 1901, RFC 1905, and RFC 1906.
- SNMPv3: The last version of SNMP as of now that also promotes remote configuration of SNMP entities. It is the most secure version as of yet and is defined in RFC 1905, RFC 1906, RFC 2571, RFC 2572, RFC 2574, and RFC 2575.
Basic SNMP Commands
Here are the main SNMP commands used in the network management model”
- GET: The SNMP manager sends GET requests to the managed devices to receive one or more values.
- GET NEXT: This command is used to retrieve the next OID value in the MIB tree
- GET BULK: This command is used to query and retrieve bulk data from a large MIB table.
- SET: To edit or add values of managed devices, this command is used by SNMP managers.
- TRAPS: Such command is started by an SNMP agent to send a signal to the SNMP manager when events occur.
- INFORM: Another command initiated by SNMP agent including a confirmation when SNMP manager receives the message.
- RESPONSE: This command carries back the values or signal of actions directed by the SNMP manager.
IT organizations can use dedicated SNMP monitoring software like PRTG Network Monitor or Spiceworks Network Monitor to manage and monitor networking devices and performance statistics. Here are some common uses of an SNMP monitoring tool:
- It is used to discover, manage, organize, and monitor network devices in an organization.
- It enables complete visibility of the performance of network devices.
- Analyze various statistics and information of connected network devices like connectivity, availability, performance, bandwidth, traffic, network usage graphs, and more.
- It allows to set up threshold limits for network usage.
- It lets you trigger alerts in case of exceptions or inconsistencies.
Now, let us check out how you can install and enable SNMP service and then configure it on Windows 10.
SNMP used to be a preinstalled feature in earlier versions of Windows. However, SNMP is now considered deprecated and is made an Optional Feature/ Feature on Demand (FOD) in Windows 10 version 1809 and later. Windows now recommend using Common Information Model (CIM) that is supported by Windows Remote Management.
In the latest Windows 10 builds, SNMP can be installed and enabled via the Settings app using the optional features option.
Here are the steps to enable and configure SNMP in Windows 10 using Settings:
- Click Windows + I hotkey to open the Settings App.
- Go to the Apps category and move to Apps & features tab.
- Tap on the Optional features button.
- On the new page, click on the Add a feature button.
- Scroll down to Simple Network Management Protocol (SNMP) and select it.
- Press the Install button to enable SNMP on your PC.
You can also use Control Panel to enable SNMP on your computer if you use an older Windows 10 build or even Windows 8.
Simply use the following steps for that:
- Open Run using Windows + R and enter “control panel” in it and press Enter.
- Go to the Programs and Features and then click on the Turn Windows features on or off option.
- In the Windows Features list, select Simple Network Management Protocol (SNMP) and press OK to install it.
How to configure SNMP service in Windows 10
After installing, you need to configure the SNMP service in Windows 10. There are two main SNMP services that include:
- SNMP Service – main service to monitor and send information
- SNMP Trap – to receive trap messages from SNMP agents and forward them to SNMP management software.
These services must be started automatically after SNMP installation. You can check and configure these from the Services Manager. Simply open the Services app by pressing Windows + R hotkey to evoke Run dialog and entering “services.msc” in it. In the Servies window, scroll down to the SNMP service in the list and see if it is running or not. If it is not running, simply click the Start button to start the SNMP service. Also, set its startup type to Automatic.
You can further set up various SNMP service properties including Agent, Security, etc. Just right-click on the SNMP service and select the Properties option.
In the Properties window, go to the Agent tab where you can configure the SNMP agent information. You can add contact and location details to specify the user or administrator’s contact name and physical location of the computer. Furthermore, you can enable or disable five services from the list from which you receive monitoring data and send it to the monitoring device. These services include Physical, Applications, Datalink and subnetwork, Internet, and End-to-end.
To configure some security-related settings for different SNMP servers, you can go to the Security tab in the Properties window. In the Accepted community names list, you can view and add SNMP hosts that are authenticated for sending SNMP requests. To add a community, click on the Add button and type the community name. You can provide None, Notify, READ ONLY, READ WRITE, or READ CREATE access to a particular community.
You can add a list of SNMP monitoring servers with IP addresses in the list of Accept SNMP packets from these hosts. This is to specify the servers from which SNMP packets are accepted. In case you enable Accept SNMP packets from any host option, no IP restrictions will be enforced on the SNMP agent to receive SNMP packets. This option is not safe and hence is not recommended on public computers.
IT admins can further configure some other settings related to SNMP and monitor all connected networking devices using SNMP management software and tools.
Hopefully, this article helped you learn about SNMP protocol and how you can enable and configure SNMP service in Windows 10.
Now read: Free Network and Internet Traffic Monitor Tools for Windows 11/10.
Install and Enable SNMP Service in Windows 10 / 8 / 7 & Windows Server 2016 / 2012 (R2)
SNMP (Simple Network Management Protocol) is an internet protocol used in network management systems to monitor network-attached devices such as computers, servers, routers, switches, gateways, wireless access points, VoIP phones, and etc. for conditions that warrant administrative attention.
SNMP provides management data in the form of variables on the managed systems, which describe the system configuration parameter or current status value. These variables can then be read and queried (or sometimes set or write) by managing applications.
Windows system, including Windows XP, Windows Vista, Windows 7, Windows Server 2003, Windows Server 2008 (R2), Windows 8, Windows 8.1, Windows Server 2012 (R2), Windows 10, Windows Server 2016, either does not have SNMP service installed by default, or does not turn on SNMP service by default, or does not configure SNMP service by default, thus users need to manually install, enable or configure SNMP service before they can monitor the system via SNMP.
Note that you must be logged on as an administrator or a member of the Administrators group in order to complete this procedure. If your computer is connected to a network, network policy settings may also prevent you from completing this procedure.
How to Install and Enable the SNMP Service
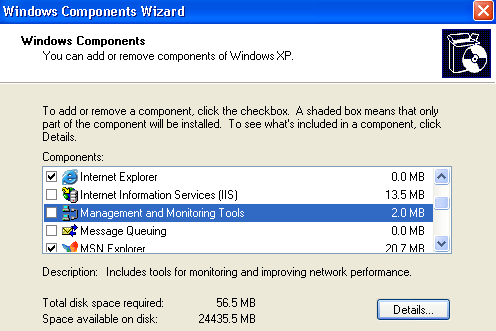
- In Windows XP and Windows Server 2003, click Start button, then go to Control Panel and run Add or Remove Programs applet. On Add or Remove Programs dialog, click Add/Remove Windows Components to open “Windows Components” wizard.
In Windows Vista, Windows 7, Windows Server 2008 and Windows Server 2008 R2, click Start button, then go to Control Panel. Click on Programs -> Programs and Features link and then click on Turn Windows features on or off. If you’re prompted with User Account Control dialog, click “Continue”.
In Windows 8, Windows 8.1, Windows 10, Windows Server 2012, Windows Server 2012 R2, Windows Server 2016 or later, open the Control Panel, then click or tap on Programs -> Programs and Features link, followed by Turn Windows features on or off. If you’re prompted with User Account Control dialog, click “Continue” or “Yes”.
- In Components of Windows XP or Windows Server 2003, click on the Management and Monitoring Tools (make sure that you do not select or clear, tick or untick its check box to change the existing selection), and then click Details.

- Select and tick the check box of Simple Network Management Protocol (SNMP), Simple Network Management Protocol or SNMP feature.

- Click OK. In Windows XP or Windows Server 2003, you need to click additional Next button.
SNMP service will be installed on the system. You may require to insert the Windows setup CD/DVD disc into optical drive.
- SNMP will start automatically after installation. But it’s recommended to verify the service status from Services in Control Panel or Task Manager, and if it’s stopped, you can start the SNMP service from there.
Two new services will be created:
- SNMP Service which is the main engine with agents that monitor the activity in the network devices and report the information to the monitoring console workstation.
- SNMP Trap Service which receives trap messages generated by local or remote SNMP agents and forwards the messages to SNMP management programs running on this computer.
Windows doesn’t assign any community string to the SNMP service by default, and also only allow access from localhost (this computer only) or local devices. Further configuration is needed to add in desired community string, which act as the password to grant reply to any SNMP request from remote system.
How to Configure Security Community String for SNMP Service
Note: The following guide public community string as example.
- Open Control Panel.
- In Windows XP, go to Performance and Maintenance, while the other versions of Windows, System and Maintenance link.
- Open Administrative Tools.
- Run Services applet.
- Locate and right click on SNMP Service, then select Properties.
- In SNMP Service Properties window, click on Services tab.
- Under “Accepted community names” section, click Add button.
- Select the appropriate permission level for the community string in the “Community Rights” drop down list to specify the authentication that the host used to process and grant SNMP requests from the selected community. Normally READ ONLY is recommended.

- In the “Community Name” box, type public or any case-sensitive community name that you want.
- Click on Add button.
- In order for the SNMP service to accept and receive SNMP request packets from any host on the network, including external remote host regardless of identity, click Accept SNMP packets from any host.
To limit the acceptance of SNMP packets, click Accept SNMP packets from these hosts, and then click Add, and then type the appropriate host name, IP or IPX address in the Host name, IP or IPX address box. You can restrict the access to local host or limited servers only by using this setting. Finish off by clicking Add button again.
- Click OK when done. Note that you may need to reboot for the settings to take effect.
Optionally, if you requires to send SNMP traps to remote trap destination, you can configure it at the “Traps” tab.
How to Configure SNMP Traps
- Open Control Panel.
- In Windows XP, go to Performance and Maintenance, while the other versions of Windows, System and Maintenance link.
- Open Administrative Tools.
- Run Services applet.
- Locate and right click on SNMP Service, then select Properties.
- Go to Traps tab.
- In SNMP Service Properties window, click on Traps tab.
- In the “Community name” text box, enter public or any other case-sensitive SNMP community name to which this computer will send trap messages.
- Click on Add to list button.
- Then, click or tap on the Add button below “Trap destinations” to enter IP addresses, host names or IPX addresses of the remove server that will receive SNMP traps.
About the Author: LK

Page load link