NTP Download
Basic information on NTP can be found on our
NTP info page as well as in our
knowledge base articles.
The Meinberg NTP package provides a GUI setup program for Windows which installs the NTP service and associated executable programs that have been compiled from the original public NTP source code available at the
NTP download page at ntp.org.
The GUI installer also contains the corresponding HTML based NTP documentation, as well as the
libcrypto DLL from the
OpenSSL project,
which is required to create or check signatures of the NTP network packets, if the symmetric or public key authentication feature is used.
Unattended installation is also supported. Please see the
NTP Installer README
for help on how to use the installer.
Actually there a different stable NTP versions provided, plus some additional information:
- NTP package for current Windows versions (XP and later), with IPv6 support
- Outdated NTP package for Windows NT, Windows 2000, and newer, IPv4 only
- External Web Links
- NTP Cheat Sheet / Short Reference
- Linux driver for Meinberg plug-in radio clocks
For the Windows operating system there’s also an
NTP Time Server Monitor program
available which allows configuration of the local NTP service and graphical monitoring
of the local and remote NTP servers.
If you have any questions or feedback, please contact
ntp-support@meinberg.de.
NTP for current Windows versions (Windows XP and later), with IPv6 support
The current stable NTP version can be used with current 32 and 64 bit Windows versions (Windows XP and newer).
Beside the standard IPv4 network protocol it also supports IPv6.
Alternatively, there’s an older version available which can also be used on Windows 2000
or even Windows NT.
Note: Der current setup program ntp-4.2.8p15-v2 is based on the same source code from the NTP project as
the previous version ntp-4.2.8p15, so the executable programs are basically the same as provided by the previous
version. However, there are some changes in the setup program:
- When installing the service, the path to the executable program entered in the registry is placed
in quotation marks, since a path that contains spaces represents a potential security hole.
For more details see the article
Securing the NTP Service Installation on Windows
in our knowledge base. - The supplied libcrypt DLL from the openSSL project has been updated to the latest version v1.1.1j.
- All executable programs are now signed with a SHA-256 certificate instead of a SHA-1 certificate
that was used for earlier versions.
Also the previous version ntp-4.2.8p15 of the setup program provided some minor security patches
and some enhancements. See the
NTP changelog
for details.
It is explicitly recommended to upgrade earlier installations to this version.
ntp-4.2.8p15-v2-win32-setup.exe
(4.29 MB)
24 February 2021
NTP package with IPv6 support for Windows XP and newer
SHA256 Checksum:
ntp-4.2.8p15-v2-win32-setup.exe.sha256sum
How to verify integrity of the downloaded file
Note:
If the NTP service fails to start after installation on Windows XP or Windows 7, the
Visual Studio Redistributable package my be missing,
althogh it should be available by default on all current Windows installations.
The 32 bit (x86) version of the redistributable is required even on 64 bit Windows systems.
The package is available from the Microsoft download page:
Go to Windows Download Center
Installation of the Redistributable Package (Screenshots)
NTP for Windows NT, Windows 2000, and newer, IPv4 only, without current security patches
This version of the NTP package is outdated but is still provided since it can also be used on Windows 2000 or even Windows NT.
It supports IPv4 only, but not IPv6. For current Windows installations the
current stable NTP version should be used which also contains current security patches.
Screenshots NTP Installer (Windows)
Here are some screenshot of the NTP installation (click to enlarge):
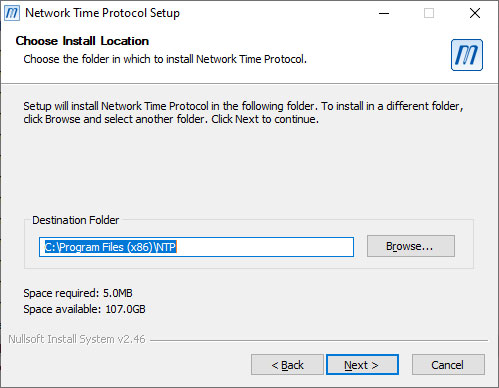
Step 1:
Step 1: Select the local program folder.
Schritt 2:
Step 2: Select the components to be installed.
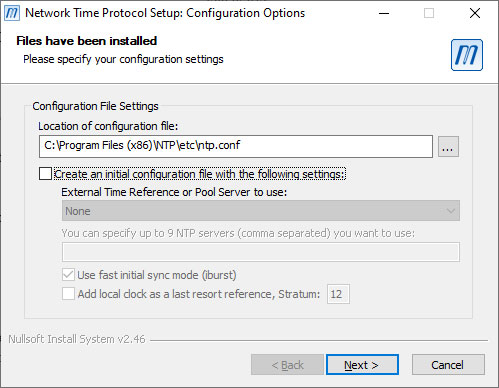
Step 3a (without initial configuration file):
for experienced users — the configuration file must be setup manually.
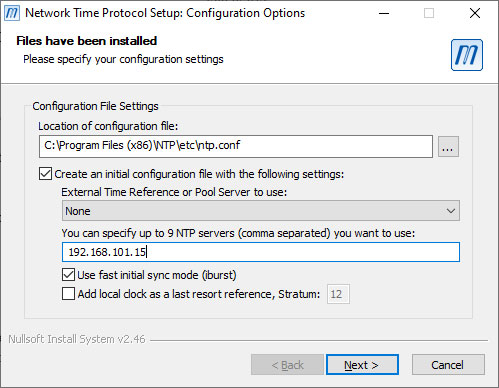
Step 3b: (initial configuration with external time server):
specification of up to 9 external NTP servers.
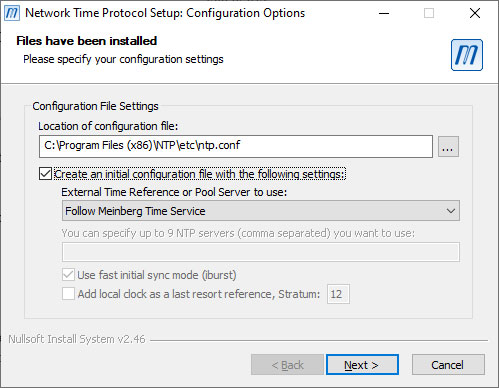
Step 3c (initial configuration with Meinberg Time Service):
Set up your own NTP server with built-in Meinberg reference clock (e.g. GPS180PEX).
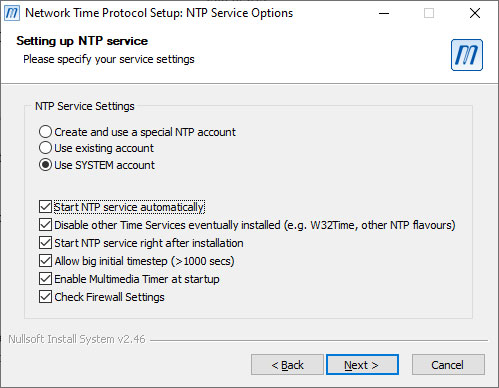
Step 4:
Select the service settings (recommended «Use System Account»).
External Web Links:
- David Taylor created a detailed step-by-step walkthrough of the installation
on his website. - The official documentation of the NTP Reference Implementation is included
in the setup program and will (optionally) be installed together with the binaries.
It is also available of the NTP documentation website.
Please make sure you select the NTP version that is included in the installer.
NTP Cheat Sheet
NTP Cheat Sheet v1.0
(308 kB)
NTP Short Reference (A4, 2 pages), English language. Contains short lists of the most important NTP
configuration parameters, command line options and file formats used by NTP, e.g. for the keyfile
or the statistic files that can be generated by ntpd (loopstats, peerstats, clockstats, sysstats).
Linux driver for Meinberg plug-in radio clocks
A Linux driver for Meinberg PC plug-in cards is available on our
driver download page.
That driver is only required for plug-in radio clocks. Radio clocks
which are connected via a serial interface are directly supported by
NTP.
Настройка
Чтобы начать использовать любой из наших NTP-серверов, сначала необходимо получить его адрес. Далее следует произвести настройку вашей системы на работу с протоколом NTP.
Убедитесь, что ваш компьютер, либо другое устройство, поддерживает протокол NTP версии 3 или 4. Для базовой настройки синхронизации времени, обычно, достаточно просто задать адрес NTP-сервера.
Ниже представлены краткие руководства по настройке синхронизации времени с NTP для различных операционных систем.
- Настройка для Windows 10/11
- Настройка для Windows Vista/7/8/8.1
- Настройка для Windows XP
- Настройка для Windows 2000/2003
- Настройка для Linux
- Настройка для FreeBSD
Для быстрой настройки синхронизации в ОС Windows, можно также воспользоваться сценарием, который позволяет задать адрес сервера и периодичность обновления времени по NTP.
- Скачать сценарий
Примечание: Перед осуществлением настройки операционной системы, пожалуйста, ознакомьтесь с информацией о переходе на зимнее время.
Время с NTP-сервера (UTC)
—:—:—
Время на компьютере (UTC)
—:—:—
Сменить часовой пояс для показа времени с NTP-сервера можно на главной странице сайта.
Протокол NTP (Network Time Protocol) используется для синхронизации времени. Реализован поверх UDP на 123 порту, RFC 5905. В сетях, где windows 7 имеет выход в интернет, а другие компьютеры такой возможности не имеют, настройка NTP сервера будет очень полезна.
- Останавливаем “Cлужбу времени windows” Кстати запуск службы нужно установить в “Автоматический (отложенный запуск)”.
- В редакторе реестра сделать правки в ветке HKEY_LOCAL_MACHINESYSTEMCurrentControlSetservicesW32TimeConfig ключ “AnnounceFlags” (REG_DWORD) = 5 (по умолчанию 10, KB314054).
- В ветке HKEY_LOCAL_MACHINESYSTEMCurrentControlSetservicesW32TimeTimeProvidersNtpServer ключ “Enabled” (REG_DWORD) = 1.
- Запустить “Cлужбу времени windows”
- На сервере проверить настройки синхронизации времени с интернетом (кнопкой обновить).
- На других компьютерах установить IP-адрес (или хост) уже настроенного сервера как сервер обновления времени.
Запустите под админом команду:
w32tm /monitor /computers:time.nist.gov,localhost,debian
Результат её работы:
time.nist.gov[192.43.244.18:123]:
ICMP: 257ms задержка
NTP: —1.1403957s смещение относительно локального времени
RefID: ‘ACTS’ [0x53544341]
Страта: 1
localhost[[::1]:123]:
ICMP: 0ms задержка
NTP: +0.0000000s смещение относительно локального времени
RefID: ‘LOCL’ [0x4C434F4C]
Страта: 1
debian[192.168.2.240:123]:
ICMP: 0ms задержка
NTP: +0.0641177s смещение относительно локального времени
RefID: Server [192.168.1.2]
Страта: 2
(debian – хост на линукс, синхронизируется с сервера Server).

