The OpenVPN community project team is proud to release OpenVPN 2.6.0. This is a new stable release with some major new features.
For details see: Changes.rst
The Changes document also contains a section with workarounds for common problems encountered when using OpenVPN with OpenSSL 3.
New features and improvements in 2.6.0 compared to 2.5.8:
- Data Channel Offload (DCO) kernel acceleration support for Windows, Linux, and FreeBSD.
- OpenSSL 3 support.
- Improved handling of tunnel MTU, including support for pushable MTU.
- Outdated cryptographic algorithms disabled by default, but there are options to override if necessary.
- Reworked TLS handshake, making OpenVPN immune to replay-packet state exhaustion attacks.
- Added —peer-fingerprint mode for a more simplistic certificate setup and verification.
- Added Pre-Logon Access Provider support to OpenVPN GUI for Windows.
- Improved protocol negotiation, leading to faster connection setup.
- Included openvpn-gui updated to 11.36.0.0. See CHANGES.rst.
- Updated easy-rsa3 bundled with the installer on Windows.
- Various bug fixes.
Windows 64-bit MSI installer |
GnuPG Signature | OpenVPN-2.6.0-I004-amd64.msi |
Windows ARM64 MSI installer |
GnuPG Signature | OpenVPN-2.6.0-I004-arm64.msi |
Windows 32-bit MSI installer |
GnuPG Signature | OpenVPN-2.6.0-I004-x86.msi |
Source archive file |
GnuPG Signature | openvpn-2.6.0.tar.gz |
The OpenVPN community project team is proud to release OpenVPN 2.5.4. This release include a number of fixes and small improvements. One of the fixes is to password prompting on windows console when stderr redirection is in use — this breaks 2.5.x on Win11/ARM, and might also break on Win11/amd64. Windows executable and libraries are now built natively on Windows using MSVC, not cross-compiled on Linux as with earlier 2.5 releases. Windows installers include updated OpenSSL and new OpenVPN GUI. The latter includes several improvements, the most important of which is the ability to import profiles from URLs where available. Installer version I602 fixes loading of pkcs11 files on Windows. Installer version I603 fixes a bug in the version number as seen by Windows (was 2.5..4, not 2.5.4). Installer I604 fixes some small Windows issues.
Source tarball (gzip) |
GnuPG Signature | openvpn-2.5.4.tar.gz |
Source tarball (xz) |
GnuPG Signature | openvpn-2.5.4.tar.xz |
Source zip |
GnuPG Signature | openvpn-2.5.4.zip |
Windows 32-bit MSI installer |
GnuPG Signature | OpenVPN-2.5.4-I604-x86.msi |
Windows 64-bit MSI installer |
GnuPG Signature | OpenVPN-2.5.4-I604-amd64.msi |
Windows ARM64 MSI installer |
GnuPG Signature | OpenVPN-2.5.4-I604-arm64.msi |
Overview of changes since OpenVPN 2.4
Faster connections
Crypto specific changes
- ChaCha20-Poly1305 cipher in the OpenVPN data channel (Requires OpenSSL 1.1.0 or newer)
- Improved TLS 1.3 support when using OpenSSL 1.1.1 or newer
- Client-specific tls-crypt keys (—tls-crypt-v2)
- Improved Data channel cipher negotiation
- Removal of BF-CBC support in default configuration (see below for possible incompatibilities)
Server-side improvements
- HMAC based auth-token support for seamless reconnects to standalone servers or a group of servers.
- Asynchronous (deferred) authentication support for auth-pam plugin
- Asynchronous (deferred) support for client-connect scripts and plugins
Network-related changes
- Support IPv4 configs with /31 netmasks now
- 802.1q VLAN support on TAP servers
- IPv6-only tunnels
- New option —block-ipv6 to reject all IPv6 packets (ICMPv6)
Linux-specific features
- VRF support
- Netlink integration (OpenVPN no longer needs to execute ifconfig/route or ip commands)
Windows-specific features
- Wintun driver support, a faster alternative to tap-windows6
- Setting tun/tap interface MTU
- Setting DHCP search domain
- Allow unicode search string in —cryptoapicert option
- EasyRSA3, a modern take on OpenVPN CA management
- MSI installer
Important notices
BF-CBC cipher is no longer the default
Cipher handling for the data channel cipher has been significantly changed between OpenVPN 2.3/2.4 and v2.5, most notably there are no «default cipher BF-CBC» anymore because it is no longer considered a reasonable default. BF-CBC is still available, but it needs to be explicitly configured now.
For connections between OpenVPN 2.4 and v2.5 clients and servers, both ends will be able to negotiate a better cipher than BF-CBC. By default they will select one of the AES-GCM ciphers, but this can be influenced using the —data-ciphers setting.
Connections between OpenVPN 2.3 and v2.5 that have no —cipher setting in the config (= defaulting to BF-CBC and not being negotiation-capable) must be updated. Unless BF-CBC is included in —data-ciphers or there is a «—cipher BF-CBC» in the OpenVPN 2.5 config, a v2.5 client or server will refuse to talk to a v2.3 server or client, because it has no common data channel cipher and negotiating a cipher is not possible. Generally, we recommend upgrading such setups to OpenVPN 2.4 or v2.5. If upgrading is not possible we recommend adding data-ciphers AES-256-GCM:AES-128-GCM:AES-128-CBC (for v2.5+) or cipher AES-128-CBC (v2.4.x and older) to the configuration of all clients and servers.
If you really need to use an unsupported OpenVPN 2.3 (or even older) release and need to stay on BF-CBC (not recommended), the OpenVPN 2.5 based client will need a config file change to re-enable BF-CBC. But be warned that BF-CBC and other related weak ciphers will be removed in coming OpenVPN major releases.
Connectivity to some VPN service provider may break
Connecting with an OpenVPN 2.5 client to at least one commercial VPN service that
implemented their own cipher negotiation method that always reports back that it is using BF-CBC to the client is broken in v2.5. This has always caused warning about mismatch ciphers. We have been in contact with some service providers and they are looking into it. This is not something the OpenVPN community can fix. If your commercial VPN does not work with a v2.5 client, complain to the VPN service provider.
More details on these new features as well as a list of deprecated features and user-visible changes are available in Changes.rst.
The OpenVPN community project team is proud to release OpenVPN 2.5.3. Besides a number of small improvements and bug fixes, this release fixes a possible security issue with OpenSSL config autoloading on Windows (CVE-2021-3606). Updated OpenVPN GUI is also included in Windows installers.
Source tarball (gzip) |
GnuPG Signature | openvpn-2.5.3.tar.gz |
Source tarball (xz) |
GnuPG Signature | openvpn-2.5.3.tar.xz |
Source zip |
GnuPG Signature | openvpn-2.5.3.zip |
Windows 32-bit MSI installer |
GnuPG Signature | OpenVPN-2.5.3-I601-x86.msi |
Windows 64-bit MSI installer |
GnuPG Signature | OpenVPN-2.5.3-I601-amd64.msi |
Windows ARM64 MSI installer |
GnuPG Signature | OpenVPN-2.5.3-I601-arm64.msi |
Overview of changes since OpenVPN 2.4
Faster connections
- Connections setup is now much faster
Crypto specific changes
- ChaCha20-Poly1305 cipher in the OpenVPN data channel (Requires OpenSSL 1.1.0 or newer)
- Improved TLS 1.3 support when using OpenSSL 1.1.1 or newer
- Client-specific tls-crypt keys (—tls-crypt-v2)
- Improved Data channel cipher negotiation
- Removal of BF-CBC support in default configuration (see below for possible incompatibilities)
Server-side improvements
- HMAC based auth-token support for seamless reconnects to standalone servers or a group of servers.
- Asynchronous (deferred) authentication support for auth-pam plugin
- Asynchronous (deferred) support for client-connect scripts and plugins
Network-related changes
- Support IPv4 configs with /31 netmasks now
- 802.1q VLAN support on TAP servers
- IPv6-only tunnels
- New option —block-ipv6 to reject all IPv6 packets (ICMPv6)
Linux-specific features
- VRF support
- Netlink integration (OpenVPN no longer needs to execute ifconfig/route or ip commands)
Windows-specific features
- Wintun driver support, a faster alternative to tap-windows6
- Setting tun/tap interface MTU
- Setting DHCP search domain
- Allow unicode search string in —cryptoapicert option
- EasyRSA3, a modern take on OpenVPN CA management
- MSI installer
Important notices
BF-CBC cipher is no longer the default
Cipher handling for the data channel cipher has been significantly changed between OpenVPN 2.3/2.4 and v2.5, most notably there are no «default cipher BF-CBC» anymore because it is no longer considered a reasonable default. BF-CBC is still available, but it needs to be explicitly configured now.
For connections between OpenVPN 2.4 and v2.5 clients and servers, both ends will be able to negotiate a better cipher than BF-CBC. By default they will select one of the AES-GCM ciphers, but this can be influenced using the —data-ciphers setting.
Connections between OpenVPN 2.3 and v2.5 that have no —cipher setting in the config (= defaulting to BF-CBC and not being negotiation-capable) must be updated. Unless BF-CBC is included in —data-ciphers or there is a «—cipher BF-CBC» in the OpenVPN 2.5 config, a v2.5 client or server will refuse to talk to a v2.3 server or client, because it has no common data channel cipher and negotiating a cipher is not possible. Generally, we recommend upgrading such setups to OpenVPN 2.4 or v2.5. If upgrading is not possible we recommend adding data-ciphers AES-256-GCM:AES-128-GCM:AES-128-CBC (for v2.5+) or cipher AES-128-CBC (v2.4.x and older) to the configuration of all clients and servers.
If you really need to use an unsupported OpenVPN 2.3 (or even older) release and need to stay on BF-CBC (not recommended), the OpenVPN 2.5 based client will need a config file change to re-enable BF-CBC. But be warned that BF-CBC and other related weak ciphers will be removed in coming OpenVPN major releases.
Connectivity to some VPN service provider may break
Connecting with an OpenVPN 2.5 client to at least one commercial VPN service that
implemented their own cipher negotiation method that always reports back that it is using BF-CBC to the client is broken in v2.5. This has always caused warning about mismatch ciphers. We have been in contact with some service providers and they are looking into it. This is not something the OpenVPN community can fix. If your commercial VPN does not work with a v2.5 client, complain to the VPN service provider.
More details on these new features as well as a list of deprecated features and user-visible changes are available in Changes.rst.
The OpenVPN community project team is proud to release OpenVPN 2.5.2. It fixes two related security vulnerabilities (CVE-2020-15078) which under very specific circumstances allow tricking a server using delayed authentication (plugin or management) into returning a PUSH_REPLY before the AUTH_FAILED message, which can possibly be used to gather information about a VPN setup. In combination with «—auth-gen-token» or a user-specific token auth solution it can be possible to get access to a VPN with an otherwise-invalid account. OpenVPN 2.5.2 also includes other bug fixes and improvements. Updated OpenSSL and OpenVPN GUI are included in Windows installers.
Source tarball (gzip) |
GnuPG Signature | openvpn-2.5.2.tar.gz |
Source tarball (xz) |
GnuPG Signature | openvpn-2.5.2.tar.xz |
Source zip |
GnuPG Signature | openvpn-2.5.2.zip |
Windows 32-bit MSI installer |
GnuPG Signature | OpenVPN-2.5.2-I601-x86.msi |
Windows 64-bit MSI installer |
GnuPG Signature | OpenVPN-2.5.2-I601-amd64.msi |
Overview of changes since OpenVPN 2.4
Faster connections
- Connections setup is now much faster
Crypto specific changes
- ChaCha20-Poly1305 cipher in the OpenVPN data channel (Requires OpenSSL 1.1.0 or newer)
- Improved TLS 1.3 support when using OpenSSL 1.1.1 or newer
- Client-specific tls-crypt keys (—tls-crypt-v2)
- Improved Data channel cipher negotiation
- Removal of BF-CBC support in default configuration (see below for possible incompatibilities)
Server-side improvements
- HMAC based auth-token support for seamless reconnects to standalone servers or a group of servers.
- Asynchronous (deferred) authentication support for auth-pam plugin
- Asynchronous (deferred) support for client-connect scripts and plugins
Network-related changes
- Support IPv4 configs with /31 netmasks now
- 802.1q VLAN support on TAP servers
- IPv6-only tunnels
- New option —block-ipv6 to reject all IPv6 packets (ICMPv6)
Linux-specific features
- VRF support
- Netlink integration (OpenVPN no longer needs to execute ifconfig/route or ip commands)
Windows-specific features
- Wintun driver support, a faster alternative to tap-windows6
- Setting tun/tap interface MTU
- Setting DHCP search domain
- Allow unicode search string in —cryptoapicert option
- EasyRSA3, a modern take on OpenVPN CA management
- MSI installer
Important notices
BF-CBC cipher is no longer the default
Cipher handling for the data channel cipher has been significantly changed between OpenVPN 2.3/2.4 and v2.5, most notably there are no «default cipher BF-CBC» anymore because it is no longer considered a reasonable default. BF-CBC is still available, but it needs to be explicitly configured now.
For connections between OpenVPN 2.4 and v2.5 clients and servers, both ends will be able to negotiate a better cipher than BF-CBC. By default they will select one of the AES-GCM ciphers, but this can be influenced using the —data-ciphers setting.
Connections between OpenVPN 2.3 and v2.5 that have no —cipher setting in the config (= defaulting to BF-CBC and not being negotiation-capable) must be updated. Unless BF-CBC is included in —data-ciphers or there is a «—cipher BF-CBC» in the OpenVPN 2.5 config, a v2.5 client or server will refuse to talk to a v2.3 server or client, because it has no common data channel cipher and negotiating a cipher is not possible. Generally, we recommend upgrading such setups to OpenVPN 2.4 or v2.5. If upgrading is not possible we recommend adding data-ciphers AES-256-GCM:AES-128-GCM:AES-128-CBC (for v2.5+) or cipher AES-128-CBC (v2.4.x and older) to the configuration of all clients and servers.
If you really need to use an unsupported OpenVPN 2.3 (or even older) release and need to stay on BF-CBC (not recommended), the OpenVPN 2.5 based client will need a config file change to re-enable BF-CBC. But be warned that BF-CBC and other related weak ciphers will be removed in coming OpenVPN major releases.
Connectivity to some VPN service provider may break
Connecting with an OpenVPN 2.5 client to at least one commercial VPN service that
implemented their own cipher negotiation method that always reports back that it is using BF-CBC to the client is broken in v2.5. This has always caused warning about mismatch ciphers. We have been in contact with some service providers and they are looking into it. This is not something the OpenVPN community can fix. If your commercial VPN does not work with a v2.5 client, complain to the VPN service provider.
More details on these new features as well as a list of deprecated features and user-visible changes are available in Changes.rst.
The OpenVPN community project team is proud to release OpenVPN 2.5.1. It includes several bug fixes and improvements as well as updated OpenSSL and OpenVPN GUI for Windows.
Source tarball (gzip) |
GnuPG Signature | openvpn-2.5.1.tar.gz |
Source tarball (xz) |
GnuPG Signature | openvpn-2.5.1.tar.xz |
Source zip |
GnuPG Signature | openvpn-2.5.1.zip |
Windows 32-bit MSI installer |
GnuPG Signature | OpenVPN-2.5.1-I601-x86.msi |
Windows 64-bit MSI installer |
GnuPG Signature | OpenVPN-2.5.1-I601-amd64.msi |
Overview of changes since OpenVPN 2.4
Faster connections
- Connections setup is now much faster
Crypto specific changes
- ChaCha20-Poly1305 cipher in the OpenVPN data channel (Requires OpenSSL 1.1.0 or newer)
- Improved TLS 1.3 support when using OpenSSL 1.1.1 or newer
- Client-specific tls-crypt keys (—tls-crypt-v2)
- Improved Data channel cipher negotiation
- Removal of BF-CBC support in default configuration (see below for possible incompatibilities)
Server-side improvements
- HMAC based auth-token support for seamless reconnects to standalone servers or a group of servers.
- Asynchronous (deferred) authentication support for auth-pam plugin
- Asynchronous (deferred) support for client-connect scripts and plugins
Network-related changes
- Support IPv4 configs with /31 netmasks now
- 802.1q VLAN support on TAP servers
- IPv6-only tunnels
- New option —block-ipv6 to reject all IPv6 packets (ICMPv6)
Linux-specific features
- VRF support
- Netlink integration (OpenVPN no longer needs to execute ifconfig/route or ip commands)
Windows-specific features
- Wintun driver support, a faster alternative to tap-windows6
- Setting tun/tap interface MTU
- Setting DHCP search domain
- Allow unicode search string in —cryptoapicert option
- EasyRSA3, a modern take on OpenVPN CA management
- MSI installer
Important notices
BF-CBC cipher is no longer the default
Cipher handling for the data channel cipher has been significantly changed between OpenVPN 2.3/2.4 and v2.5, most notably there are no «default cipher BF-CBC» anymore because it is no longer considered a reasonable default. BF-CBC is still available, but it needs to be explicitly configured now.
For connections between OpenVPN 2.4 and v2.5 clients and servers, both ends will be able to negotiate a better cipher than BF-CBC. By default they will select one of the AES-GCM ciphers, but this can be influenced using the —data-ciphers setting.
Connections between OpenVPN 2.3 and v2.5 that have no —cipher setting in the config (= defaulting to BF-CBC and not being negotiation-capable) must be updated. Unless BF-CBC is included in —data-ciphers or there is a «—cipher BF-CBC» in the OpenVPN 2.5 config, a v2.5 client or server will refuse to talk to a v2.3 server or client, because it has no common data channel cipher and negotiating a cipher is not possible. Generally, we recommend upgrading such setups to OpenVPN 2.4 or v2.5. If upgrading is not possible we recommend adding data-ciphers AES-256-GCM:AES-128-GCM:AES-128-CBC (for v2.5+) or cipher AES-128-CBC (v2.4.x and older) to the configuration of all clients and servers.
If you really need to use an unsupported OpenVPN 2.3 (or even older) release and need to stay on BF-CBC (not recommended), the OpenVPN 2.5 based client will need a config file change to re-enable BF-CBC. But be warned that BF-CBC and other related weak ciphers will be removed in coming OpenVPN major releases.
Connectivity to some VPN service provider may break
Connecting with an OpenVPN 2.5 client to at least one commercial VPN service that
implemented their own cipher negotiation method that always reports back that it is using BF-CBC to the client is broken in v2.5. This has always caused warning about mismatch ciphers. We have been in contact with some service providers and they are looking into it. This is not something the OpenVPN community can fix. If your commercial VPN does not work with a v2.5 client, complain to the VPN service provider.
More details on these new features as well as a list of deprecated features and user-visible changes are available in Changes.rst.
The OpenVPN community project team is proud to release OpenVPN 2.5.0 which is a new major release with many new features.
Source tarball (gzip) |
GnuPG Signature | openvpn-2.5.0.tar.gz |
Source tarball (xz) |
GnuPG Signature | openvpn-2.5.0.tar.xz |
Source zip |
GnuPG Signature | openvpn-2.5.0.zip |
Windows 32-bit MSI installer |
GnuPG Signature | OpenVPN-2.5.0-I601-x86.msi |
Windows 64-bit MSI installer |
GnuPG Signature | OpenVPN-2.5.0-I601-amd64.msi |
Overview of changes since OpenVPN 2.4
Faster connections
- Connections setup is now much faster
Crypto specific changes
- ChaCha20-Poly1305 cipher in the OpenVPN data channel (Requires OpenSSL 1.1.0 or newer)
- Improved TLS 1.3 support when using OpenSSL 1.1.1 or newer
- Client-specific tls-crypt keys (—tls-crypt-v2)
- Improved Data channel cipher negotiation
- Removal of BF-CBC support in default configuration (see below for possible incompatibilities)
Server-side improvements
- HMAC based auth-token support for seamless reconnects to standalone servers or a group of servers.
- Asynchronous (deferred) authentication support for auth-pam plugin
- Asynchronous (deferred) support for client-connect scripts and plugins
Network-related changes
- Support IPv4 configs with /31 netmasks now
- 802.1q VLAN support on TAP servers
- IPv6-only tunnels
- New option —block-ipv6 to reject all IPv6 packets (ICMPv6)
Linux-specific features
- VRF support
- Netlink integration (OpenVPN no longer needs to execute ifconfig/route or ip commands)
Windows-specific features
- Wintun driver support, a faster alternative to tap-windows6
- Setting tun/tap interface MTU
- Setting DHCP search domain
- Allow unicode search string in —cryptoapicert option
- EasyRSA3, a modern take on OpenVPN CA management
- MSI installer
Important notices
BF-CBC cipher is no longer the default
Cipher handling for the data channel cipher has been significantly changed between OpenVPN 2.3/2.4 and v2.5, most notably there are no «default cipher BF-CBC» anymore because it is no longer considered a reasonable default. BF-CBC is still available, but it needs to be explicitly configured now.
For connections between OpenVPN 2.4 and v2.5 clients and servers, both ends will be able to negotiate a better cipher than BF-CBC. By default they will select one of the AES-GCM ciphers, but this can be influenced using the —data-ciphers setting.
Connections between OpenVPN 2.3 and v2.5 that have no —cipher setting in the config (= defaulting to BF-CBC and not being negotiation-capable) must be updated. Unless BF-CBC is included in —data-ciphers or there is a «—cipher BF-CBC» in the OpenVPN 2.5 config, a v2.5 client or server will refuse to talk to a v2.3 server or client, because it has no common data channel cipher and negotiating a cipher is not possible. Generally, we recommend upgrading such setups to OpenVPN 2.4 or v2.5. If upgrading is not possible we recommend adding data-ciphers AES-256-GCM:AES-128-GCM:AES-128-CBC (for v2.5+) or cipher AES-128-CBC (v2.4.x and older) to the configuration of all clients and servers.
If you really need to use an unsupported OpenVPN 2.3 (or even older) release and need to stay on BF-CBC (not recommended), the OpenVPN 2.5 based client will need a config file change to re-enable BF-CBC. But be warned that BF-CBC and other related weak ciphers will be removed in coming OpenVPN major releases.
Connectivity to some VPN service provider may break
Connecting with an OpenVPN 2.5 client to at least one commercial VPN service that
implemented their own cipher negotiation method that always reports back that it is using BF-CBC to the client is broken in v2.5. This has always caused warning about mismatch ciphers. We have been in contact with some service providers and they are looking into it. This is not something the OpenVPN community can fix. If your commercial VPN does not work with a v2.5 client, complain to the VPN service provider.
More details on these new features as well as a list of deprecated features and user-visible changes are available in Changes.rst.
The OpenVPN community project team is proud to release OpenVPN 2.4.11. It fixes two related security vulnerabilities (CVE-2020-15078) which under very specific circumstances allow tricking a server using delayed authentication (plugin or management) into returning a PUSH_REPLY before the AUTH_FAILED message, which can possibly be used to gather information about a VPN setup. This release also includes other bug fixes and improvements. The I602 Windows installers fix a possible security issue with OpenSSL config autoloading on Windows (CVE-2021-3606). Updated OpenSSL and OpenVPN GUI are included in Windows installers.
Source Tarball (gzip) |
GnuPG Signature | openvpn-2.4.11.tar.gz |
Source Tarball (xz) |
GnuPG Signature | openvpn-2.4.11.tar.xz |
Source Zip |
GnuPG Signature | openvpn-2.4.11.zip |
Windows 7/8/8.1/Server 2012r2 installer (NSIS) |
GnuPG Signature | openvpn-install-2.4.11-I602-Win7.exe |
Windows 10/Server 2016/Server 2019 installer (NSIS) |
GnuPG Signature | openvpn-install-2.4.11-I602-Win10.exe |
A summary of the changes is available in Changes.rst, and a full list of changes is available here.
Please note that LibreSSL is not a supported crypto backend. We accept patches and we do test on OpenBSD 6.0 which comes with LibreSSL, but if newer versions of LibreSSL break API compatibility we do not take responsibility to fix that.
Also note that Windows installers have been built with NSIS version that has been patched against several NSIS installer code execution and privilege escalation problems. Based on our testing, though, older Windows versions such as Windows 7 might not benefit from these fixes. We thus strongly encourage you to always move NSIS installers to a non-user-writeable location before running them.
Please note that OpenVPN 2.4 installers will not work on Windows XP. The last OpenVPN version that supports Windows XP is 2.3.18, which is downloadable as 32-bit and 64-bit versions.
If you find a bug in this release, please file a bug report to our Trac bug tracker. In uncertain cases please contact our developers first, either using the openvpn-devel mailinglist or the developer IRC channel (#openvpn-devel at irc.libera.chat). For generic help take a look at our official documentation, wiki, forums, openvpn-users mailing list and user IRC channel (#openvpn at irc.libera.chat).
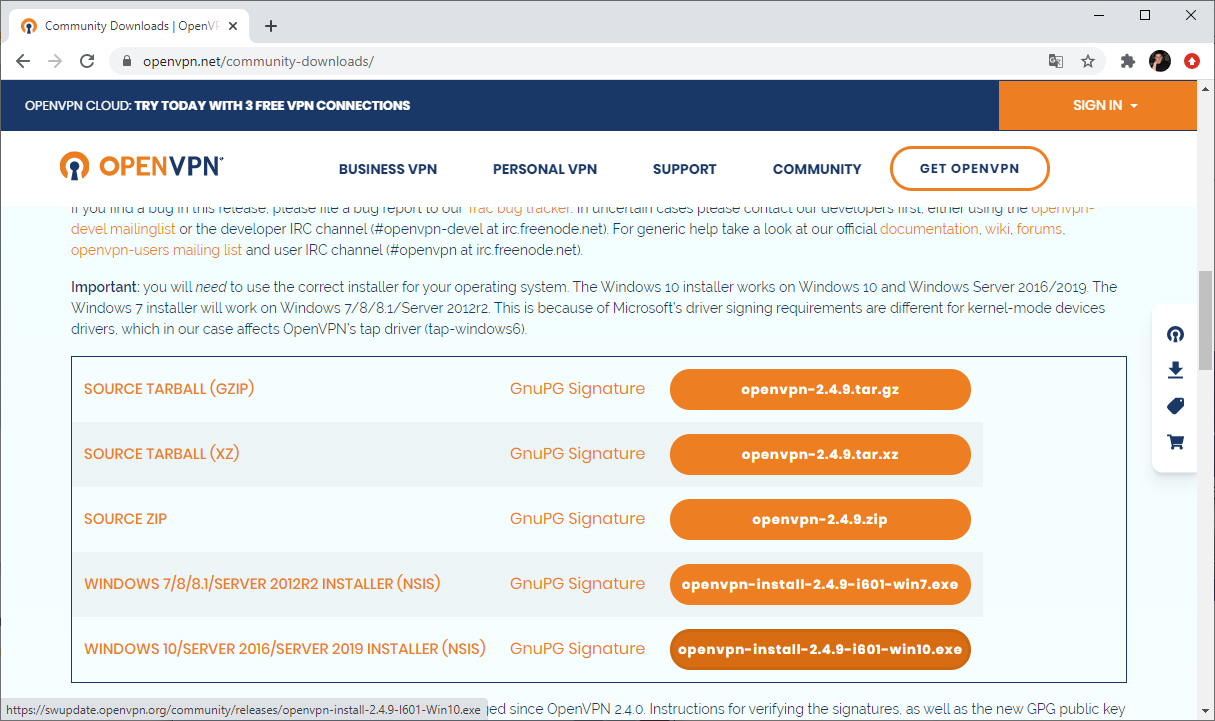
Important: you will need to use the correct installer for your operating system. The Windows 10 installer works on Windows 10 and Windows Server 2016/2019. The Windows 7 installer will work on Windows 7/8/8.1/Server 2012r2. This is because of Microsoft’s driver signing requirements are different for kernel-mode devices drivers, which in our case affects OpenVPN’s tap driver (tap-windows6).
This is primarily a maintenance release with bugfixes and small improvements. Windows installers include the latest OpenSSL version (1.1.1i) which includes security fixes.
A summary of the changes is available in Changes.rst, and a full list of changes is available here.
Please note that LibreSSL is not a supported crypto backend. We accept patches and we do test on OpenBSD 6.0 which comes with LibreSSL, but if newer versions of LibreSSL break API compatibility we do not take responsibility to fix that.
Also note that Windows installers have been built with NSIS version that has been patched against several NSIS installer code execution and privilege escalation problems. Based on our testing, though, older Windows versions such as Windows 7 might not benefit from these fixes. We thus strongly encourage you to always move NSIS installers to a non-user-writeable location before running them.
Please note that OpenVPN 2.4 installers will not work on Windows XP. The last OpenVPN version that supports Windows XP is 2.3.18, which is downloadable as 32-bit and 64-bit versions.
If you find a bug in this release, please file a bug report to our Trac bug tracker. In uncertain cases please contact our developers first, either using the openvpn-devel mailinglist or the developer IRC channel (#openvpn-devel at irc.libera.chat). For generic help take a look at our official documentation, wiki, forums, openvpn-users mailing list and user IRC channel (#openvpn at irc.libera.chat).
Important: you will need to use the correct installer for your operating system. The Windows 10 installer works on Windows 10 and Windows Server 2016/2019. The Windows 7 installer will work on Windows 7/8/8.1/Server 2012r2. This is because of Microsoft’s driver signing requirements are different for kernel-mode devices drivers, which in our case affects OpenVPN’s tap driver (tap-windows6).
Source Tarball (gzip) |
GnuPG Signature | openvpn-2.4.10.tar.gz |
Source Tarball (xz) |
GnuPG Signature | openvpn-2.4.10.tar.xz |
Source Zip |
GnuPG Signature | openvpn-2.4.10.zip |
Windows 7/8/8.1/Server 2012r2 installer (NSIS) |
GnuPG Signature | openvpn-install-2.4.10-I601-Win7.exe |
Windows 10/Server 2016/Server 2019 installer (NSIS) |
GnuPG Signature | openvpn-install-2.4.10-I601-Win10.exe |
Instructions for verifying the signatures are available here.
This release is also available in our own software repositories for Debian and Ubuntu, Supported architectures are i386 and amd64. For details. look here.
The Windows installers are bundled with OpenVPN-GUI — its source code is available on its project page and as tarballs on our alternative download server.
This is primarily a maintenance release with bugfixes and improvements. This release also fixes a security issue (CVE-2020-11810, trac #1272) which allows disrupting service of a freshly connected client that has not yet not negotiated session keys. The vulnerability cannot be used to inject or steal VPN traffic.
A summary of the changes is available in Changes.rst, and a full list of changes is available here.
Please note that LibreSSL is not a supported crypto backend. We accept patches and we do test on OpenBSD 6.0 which comes with LibreSSL, but if newer versions of LibreSSL break API compatibility we do not take responsibility to fix that.
Also note that Windows installers have been built with NSIS version that has been patched against several NSIS installer code execution and privilege escalation problems. Based on our testing, though, older Windows versions such as Windows 7 might not benefit from these fixes. We thus strongly encourage you to always move NSIS installers to a non-user-writeable location before running them. We are moving to MSI installers in OpenVPN 2.5, but OpenVPN 2.4.x will remain NSIS-only.
Compared to OpenVPN 2.3 this is a major update with a large number of new features, improvements and fixes. Some of the major features are AEAD (GCM) cipher and Elliptic Curve DH key exchange support, improved IPv4/IPv6 dual stack support and more seamless connection migration when client’s IP address changes (Peer-ID). Also, the new —tls-crypt feature can be used to increase users’ connection privacy.
OpenVPN GUI bundled with the Windows installer has a large number of new features compared to the one bundled with OpenVPN 2.3. One of major features is the ability to run OpenVPN GUI without administrator privileges. For full details, see the changelog. The new OpenVPN GUI features are documented here.
Please note that OpenVPN 2.4 installers will not work on Windows XP. The last OpenVPN version that supports Windows XP is 2.3.18, which is downloadable as 32-bit and 64-bit versions.
If you find a bug in this release, please file a bug report to our Trac bug tracker. In uncertain cases please contact our developers first, either using the openvpn-devel mailinglist or the developer IRC channel (#openvpn-devel at irc.libera.chat). For generic help take a look at our official documentation, wiki, forums, openvpn-users mailing list and user IRC channel (#openvpn at irc.libera.chat).
Important: you will need to use the correct installer for your operating system. The Windows 10 installer works on Windows 10 and Windows Server 2016/2019. The Windows 7 installer will work on Windows 7/8/8.1/Server 2012r2. This is because of Microsoft’s driver signing requirements are different for kernel-mode devices drivers, which in our case affects OpenVPN’s tap driver (tap-windows6).
Source Tarball (gzip) |
GnuPG Signature | openvpn-2.4.9.tar.gz |
Source Tarball (xz) |
GnuPG Signature | openvpn-2.4.9.tar.xz |
Source Zip |
GnuPG Signature | openvpn-2.4.9.zip |
Windows 7/8/8.1/Server 2012r2 installer (NSIS) |
GnuPG Signature | openvpn-install-2.4.9-I601-Win7.exe |
Windows 10/Server 2016/Server 2019 installer (NSIS) |
GnuPG Signature | openvpn-install-2.4.9-I601-Win10.exe |
NOTE: the GPG key used to sign the release files has been changed since OpenVPN 2.4.0. Instructions for verifying the signatures, as well as the new GPG public key are available here.
We also provide static URLs pointing to latest releases to ease automation. For a list of files look here.
This release is also available in our own software repositories for Debian and Ubuntu, Supported architectures are i386 and amd64. For details. look here.
You can use EasyRSA 2 or EasyRSA 3 for generating your own certificate authority. The former is bundled with Windows installers. The latter is a more modern alternative for UNIX-like operating systems.
The Windows installers are bundled with OpenVPN-GUI — its source code is available on its project page and as tarballs on our alternative download server.
This is primarily a maintenance release with bugfixes and improvements. The Windows installers (I601) have several improvements compared to the previous release:
- New tap-windows6 driver (9.24.2) which fixes some suspend and resume issues
- Latest OpenVPN-GUI
- Considerable performance boost due to new compiler optimization flags
A summary of the changes is available in Changes.rst, and a full list of changes is available here.
Please note that LibreSSL is not a supported crypto backend. We accept patches and we do test on OpenBSD 6.0 which comes with LibreSSL, but if newer versions of LibreSSL break API compatibility we do not take responsibility to fix that.
Also note that Windows installers have been built with NSIS version that has been patched against several NSIS installer code execution and privilege escalation problems. Based on our testing, though, older Windows versions such as Windows 7 might not benefit from these fixes. We thus strongly encourage you to always move NSIS installers to a non-user-writeable location before running them. We are moving to MSI installers in OpenVPN 2.5, but OpenVPN 2.4.x will remain NSIS-only.
Compared to OpenVPN 2.3 this is a major update with a large number of new features, improvements and fixes. Some of the major features are AEAD (GCM) cipher and Elliptic Curve DH key exchange support, improved IPv4/IPv6 dual stack support and more seamless connection migration when client’s IP address changes (Peer-ID). Also, the new —tls-crypt feature can be used to increase users’ connection privacy.
OpenVPN GUI bundled with the Windows installer has a large number of new features compared to the one bundled with OpenVPN 2.3. One of major features is the ability to run OpenVPN GUI without administrator privileges. For full details, see the changelog. The new OpenVPN GUI features are documented here.
Please note that OpenVPN 2.4 installers will not work on Windows XP. The last OpenVPN version that supports Windows XP is 2.3.18, which is downloadable as 32-bit and 64-bit versions.
If you find a bug in this release, please file a bug report to our Trac bug tracker. In uncertain cases please contact our developers first, either using the openvpn-devel mailinglist or the developer IRC channel (#openvpn-devel at irc.libera.chat). For generic help take a look at our official documentation, wiki, forums, openvpn-users mailing list and user IRC channel (#openvpn at irc.libera.chat).
Important: you will need to use the correct installer for your operating system. The Windows 10 installer works on Windows 10 and Windows Server 2016/2019. The Windows 7 installer will work on Windows 7/8/8.1/Server 2012r2. This is because of Microsoft’s driver signing requirements are different for kernel-mode devices drivers, which in our case affects OpenVPN’s tap driver (tap-windows6).
Source Tarball (gzip) |
GnuPG Signature | openvpn-2.4.8.tar.gz |
Source Tarball (xz) |
GnuPG Signature | openvpn-2.4.8.tar.xz |
Source Zip |
GnuPG Signature | openvpn-2.4.8.zip |
Windows 7/8/8.1/Server 2012r2 installer (NSIS) |
GnuPG Signature | openvpn-install-2.4.8-I602-Win7.exe |
Windows 10/Server 2016/Server 2019 installer (NSIS) |
GnuPG Signature | openvpn-install-2.4.8-I602-Win10.exe |
NOTE: the GPG key used to sign the release files has been changed since OpenVPN 2.4.0. Instructions for verifying the signatures, as well as the new GPG public key are available here.
We also provide static URLs pointing to latest releases to ease automation. For a list of files look here.
This release is also available in our own software repositories for Debian and Ubuntu, Supported architectures are i386 and amd64. For details. look here.
You can use EasyRSA 2 or EasyRSA 3 for generating your own certificate authority. The former is bundled with Windows installers. The latter is a more modern alternative for UNIX-like operating systems.
The Windows installers are bundled with OpenVPN-GUI — its source code is available on its project page and as tarballs on our alternative download server.
This is primarily a maintenance release with bugfixes and improvements. One of the big things is enhanced TLS 1.3 support. A summary of the changes is available in Changes.rst, and a full list of changes is available here.
Please note that LibreSSL is not a supported crypto backend. We accept patches and we do test on OpenBSD 6.0 which comes with LibreSSL, but if newer versions of LibreSSL break API compatibility we do not take responsibility to fix that.
Also note that Windows installers have been built with NSIS version that has been patched against several NSIS installer code execution and privilege escalation problems. Based on our testing, though, older Windows versions such as Windows 7 might not benefit from these fixes. We thus strongly encourage you to always move NSIS installers to a non-user-writeable location before running them. We are moving to MSI installers in OpenVPN 2.5, but OpenVPN 2.4.x will remain NSIS-only.
Compared to OpenVPN 2.3 this is a major update with a large number of new features, improvements and fixes. Some of the major features are AEAD (GCM) cipher and Elliptic Curve DH key exchange support, improved IPv4/IPv6 dual stack support and more seamless connection migration when client’s IP address changes (Peer-ID). Also, the new —tls-crypt feature can be used to increase users’ connection privacy.
OpenVPN GUI bundled with the Windows installer has a large number of new features compared to the one bundled with OpenVPN 2.3. One of major features is the ability to run OpenVPN GUI without administrator privileges. For full details, see the changelog. The new OpenVPN GUI features are documented here.
Please note that OpenVPN 2.4 installers will not work on Windows XP. The last OpenVPN version that supports Windows XP is 2.3.18, which is downloadable as 32-bit and 64-bit versions.
If you find a bug in this release, please file a bug report to our Trac bug tracker. In uncertain cases please contact our developers first, either using the openvpn-devel mailinglist or the developer IRC channel (#openvpn-devel at irc.libera.chat). For generic help take a look at our official documentation, wiki, forums, openvpn-users mailing list and user IRC channel (#openvpn at irc.libera.chat).
Important: you will need to use the correct installer for your operating system. The Windows 10 installer will not work on Windows 7/8/8.1/Server 2012r2. This is because Microsoft’s driver signing requirements and tap-windows6. For the same reason you need to use an older installer with Windows Server 2016. This older installer has a local privilege escalation vulnerability issue which we cannot resolve for Windows Server 2016 until tap-windows6 passes the HLK test suite on that platform. In the meanwhile we recommend Windows Server 2016 users to avoid installing OpenVPN/tap-windows6 driver on hosts where all users can’t be trusted. Users of Windows 7-10 and Server 2012r2 are recommended to update to latest installers as soon as possible.
Source Tarball (gzip) |
GnuPG Signature | openvpn-2.4.7.tar.gz |
Source Tarball (xz) |
GnuPG Signature | openvpn-2.4.7.tar.xz |
Source Zip |
GnuPG Signature | openvpn-2.4.7.zip |
Windows 7/8/8.1/Server 2012r2 installer (NSIS) |
GnuPG Signature | openvpn-install-2.4.7-I607-Win7.exe |
Windows 10 installer (NSIS) |
GnuPG Signature | openvpn-install-2.4.7-I607-Win10.exe |
Windows Server 2016 installer (NSIS) |
GnuPG Signature | openvpn-install-2.4.7-I603.exe |
NOTE: the GPG key used to sign the release files has been changed since OpenVPN 2.4.0. Instructions for verifying the signatures, as well as the new GPG public key are available here.
We also provide static URLs pointing to latest releases to ease automation. For a list of files look here.
This release is also available in our own software repositories for Debian and Ubuntu, Supported architectures are i386 and amd64. For details. look here.
You can use EasyRSA 2 or EasyRSA 3 for generating your own certificate authority. The former is bundled with Windows installers. The latter is a more modern alternative for UNIX-like operating systems.
The Windows installers are bundled with OpenVPN-GUI — its source code is available on its project page and as tarballs on our alternative download server.
This is primarily a maintenance release with minor bugfixes and improvements, and one security relevant fix for the Windows Interactive Service. Windows installer includes updated OpenVPN GUI and OpenSSL. Installer I601 included tap-windows6 driver 9.22.1 which had one security fix and dropped Windows Vista support. However, in installer I602 we had to revert back to tap-windows 9.21.2 due to driver getting reject on freshly installed Windows 10 rev 1607 and later when Secure Boot was enabled. The failure was due to the new, more strict driver signing requirements. The 9.22.1 version of the driver is in the process of getting approved and signed by Microsoft and will be bundled in an upcoming Windows installer.
Please note that LibreSSL is not a supported crypto backend. We accept patches and we do test on OpenBSD 6.0 which comes with LibreSSL, but if newer versions of LibreSSL break API compatibility we do not take responsibility to fix that.
Also note that Windows installers have been built with NSIS version that has been patched against several NSIS installer code execution and privilege escalation problems. Based on our testing, though, older Windows versions such as Windows 7 might not benefit from these fixes. We thus strongly encourage you to always move NSIS installers to a non-user-writeable location before running them. Our long-term plan is to migrate to using MSI installers instead.
Compared to OpenVPN 2.3 this is a major update with a large number of new features, improvements and fixes. Some of the major features are AEAD (GCM) cipher and Elliptic Curve DH key exchange support, improved IPv4/IPv6 dual stack support and more seamless connection migration when client’s IP address changes (Peer-ID). Also, the new —tls-crypt feature can be used to increase users’ connection privacy.
A summary of the changes is available in Changes.rst, and a full list of changes is available here.
OpenVPN GUI bundled with the Windows installer has a large number of new features compared to the one bundled with OpenVPN 2.3. One of major features is the ability to run OpenVPN GUI without administrator privileges. For full details, see the changelog. The new OpenVPN GUI features are documented here.
Please note that OpenVPN 2.4 installers will not work on Windows XP.
If you find a bug in this release, please file a bug report to our Trac bug tracker. In uncertain cases please contact our developers first, either using the openvpn-devel mailinglist or the developha er IRC channel (#openvpn-devel at irc.libera.chat). For generic help take a look at our official documentation, wiki, forums, openvpn-users mailing list and user IRC channel (#openvpn at irc.libera.chat).
Source Tarball (gzip) |
GnuPG Signature | openvpn-2.4.6.tar.gz |
Source Tarball (xz) |
GnuPG Signature | openvpn-2.4.6.tar.xz |
Source Zip |
GnuPG Signature | openvpn-2.4.6.zip |
Windows installer (NSIS) |
GnuPG Signature | openvpn-install-2.4.6-I602.exe |
NOTE: the GPG key used to sign the release files has been changed since OpenVPN 2.4.0. Instructions for verifying the signatures, as well as the new GPG public key are available here.
We also provide static URLs pointing to latest releases to ease automation. For a list of files look here.
This release is also available in our own software repositories for Debian and Ubuntu, Supported architectures are i386 and amd64. For details. look here.
You can use EasyRSA 2 or EasyRSA 3 for generating your own certificate authority. The former is bundled with Windows installers. The latter is a more modern alternative for UNIX-like operating systems.
The Windows installers are bundled with OpenVPN-GUI — its source code is available on its project page and as tarballs on our alternative download server.
You can download Windows developments snapshots (MSI installers) from here (Index of /downloads/snapshots/github-actions/openvpn2/ ). Those are automatically built from commits to OpenVPN master branch and include functionality which will be available in the next release. Development snapshots are less stable than releases, so use at your own risk.
Two secure networking solutions.
Both based on the proven OpenVPN protocol.
Unmatched flexibility, scalability, and ease of use.
Use Our Service
OpenVPN Cloud
-
A virtual network is created immediately on signup.
-
Connect your private networks, set access and security policies.
-
Add users or use SSO with SAML and LDAP.
Deploy On Your Servers
Access Server
-
Create your free subscription for 2 concurrent connections.
-
Download Software for:
-
Ubuntu
-
Debian
-
Red Hat
-
CentOS
-
Linux2
-
VMWare ESXi
-
Hyper-V
-
-
Launch on Iaas providers:
-
aws
-
Azure
-
Digital Ocean
-
GCP
-
Oracle
-
Find the right solution for your business
What is OpenVPN Cloud?
With OpenVPN Cloud your business gets a cloud-delivered service that integrates virtual networking and critical security functions in a secure overlay network that’s easy to deploy and manage. Now you can connect your applications, private networks, workforce, and IoT devices — without complex, hard-to-scale hardware.
Benefits
- A single solution for site-to-site connectivity, IoT connectivity.
- Eliminates hardware that’s difficult to scale and manage.
- Provides secure remote access to all private and SaaS apps.
- Enables easy networking, even with overlapping IP addresses.
Learn More
What is Access Server?
Access Server, our self-hosted solution, simplifies the rapid deployment of a secure remote access solution with a web-based graphic user interface and built-in OpenVPN Connect Client installer.
Benefits
- A single solution for site-to-site connectivity, IoT connectivity.
- Distributes clients with bundled connection configuration.
- Horizontal scaling using clustering.
- Subscribed connections can be shared with multiple instances.
Learn More
OpenVPN Cloud Documentation
Have questions? Tap into our Documentation libraries for some of the most common things customers ask.
Read Documentation

Access Server Documentation
Have questions? Tap into our Documentation libraries for some of the most common things customers ask.
Read Documentation

Установим и настроим OpenVPN сервер. На сервере используется операционная система Windows Server 2019.
OpenVPN — бесплатная реализация технологии виртуальной частной сети (VPN) для создания зашифрованных каналов связи между компьютерами типа точка-точка или сервер-клиенты за NAT и Firewall.
Установка OpenVPN Server
Скачиваем дистрибутив для установки OpenVPN:
Прокручиваем вниз, выбираем стабильную версию. Я буду использовать версию 2.4.9.
Для операционной системы Windows доступны два пакета:
- WINDOWS 7/8/8.1/SERVER 2012R2 INSTALLER (NSIS)
- WINDOWS 10/SERVER 2016/SERVER 2019 INSTALLER (NSIS)
Для Windows Server 2019 подходит второй вариант, скачиваю.
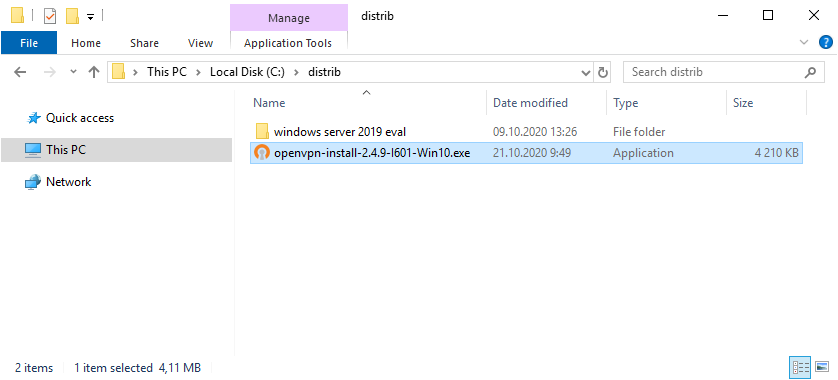
Запускаем инсталлятор OpenVPN.
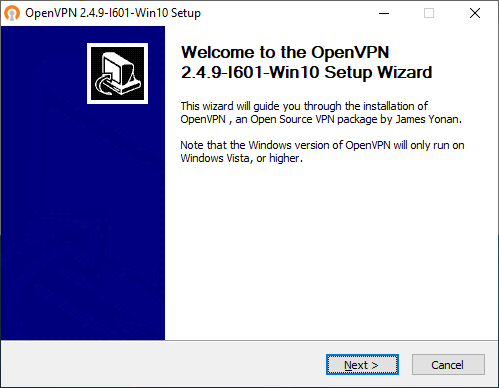
Открывается мастер установки. Next.
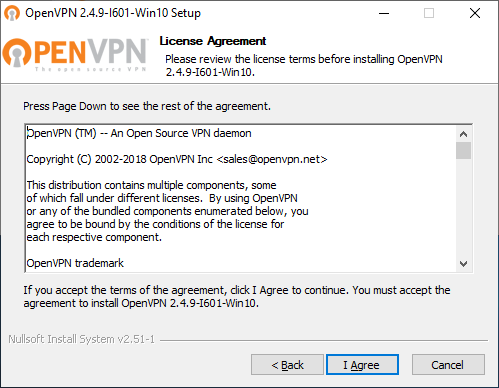
Принимаем лицензионное соглашение. I Agree.
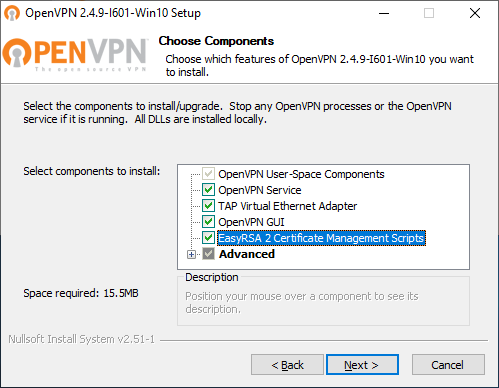
Выбираем компоненты. Выделите EasyRSA 2 Certificate Management Scripts. Для сервера OpenVPN GUI можно не устанавливать, если вы планируете запускать OpenVPN в качестве службы. Next.
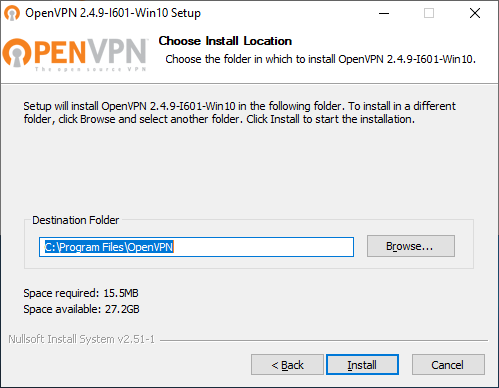
Выбираем путь установки, я оставляю по умолчанию C:Program FilesOpenVPN. Install.
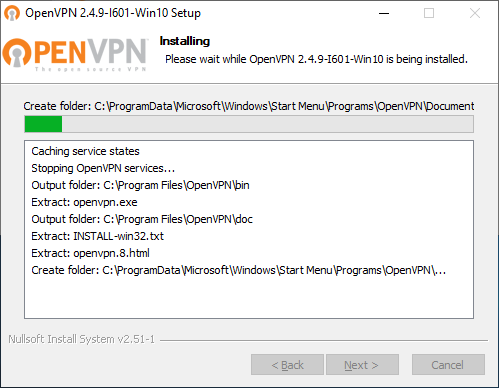
Начинается процесс установки OpenVPN.
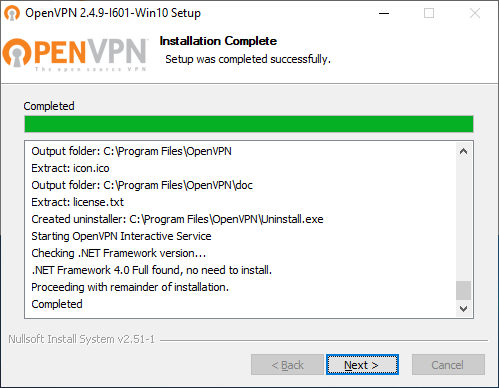
Установка успешно завершена. Next.
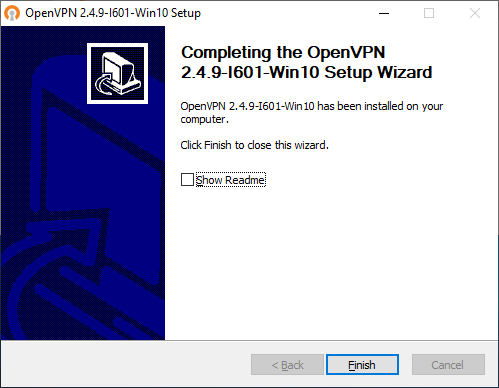
Finish.
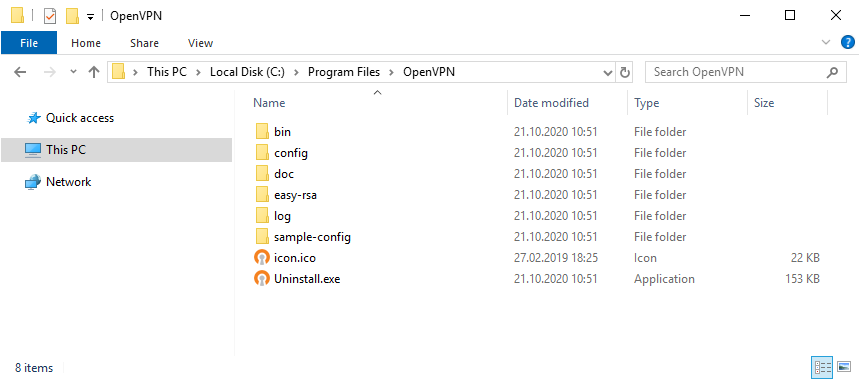
Установка выполнена в директорию C:Program FilesOpenVPN.

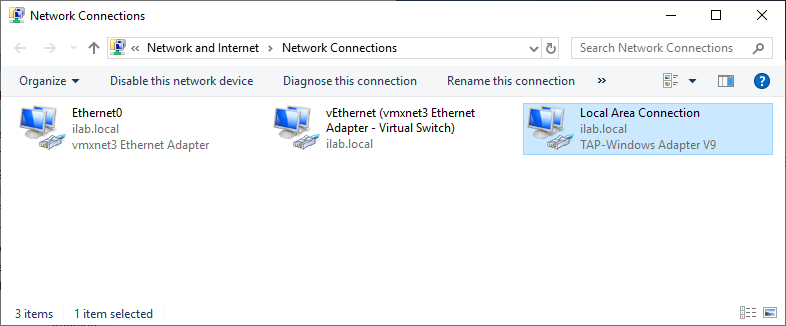
После установки у нас появляется новый сетевой адаптер TAP-Windows Adapter V9.
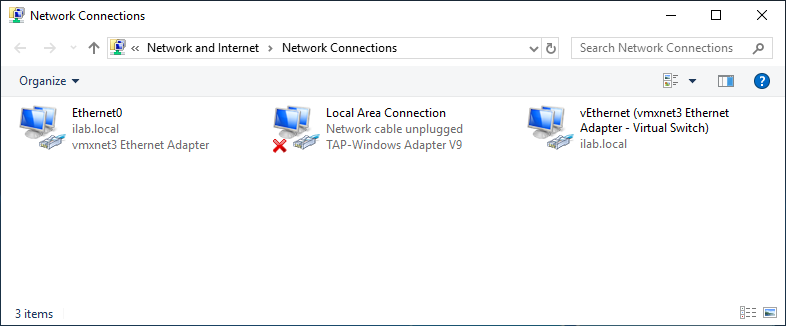
Адаптер отключён. Если по каким-то причинам нужно добавить несколько таких адаптеров, то загляните в папку C:Program FilesTAP-Windowsbin.
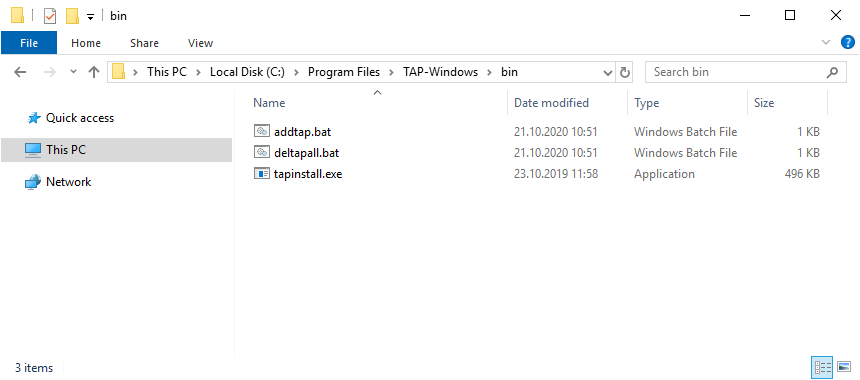
Здесь есть скрипты для установки адаптера, добавления адаптера и удаления всех адаптеров.
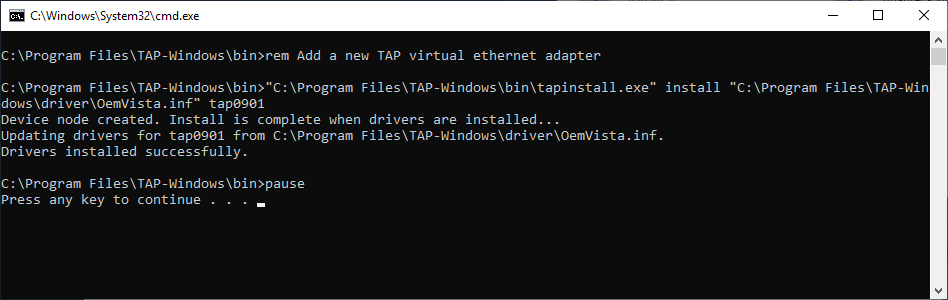
Пример установки адаптера. В командной строке под администратором:
cd "C:Program FilesTAP-Windowsbin"
"C:Program FilesTAP-Windowsbintapinstall.exe" install "C:Program FilesTAP-WindowsdriverOemVista.inf" tap0901
В большинстве случаев дополнительно настраивать сетевой адаптер не требуется.
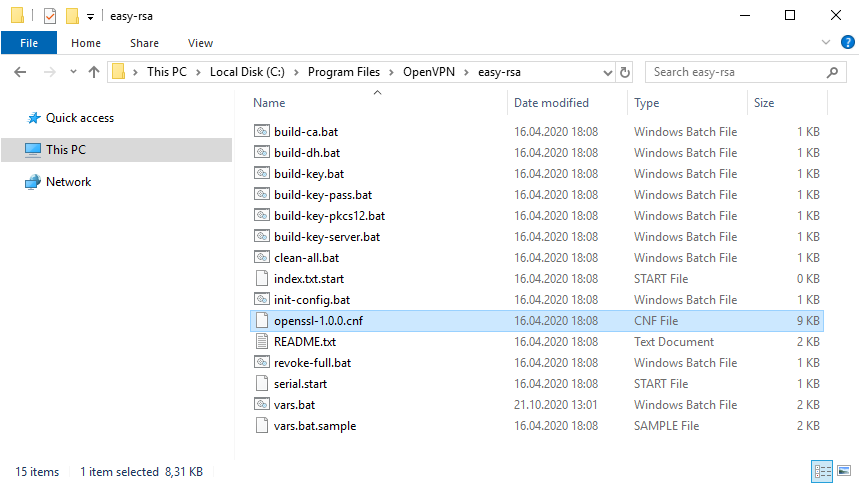
Создание ключей и сертификатов
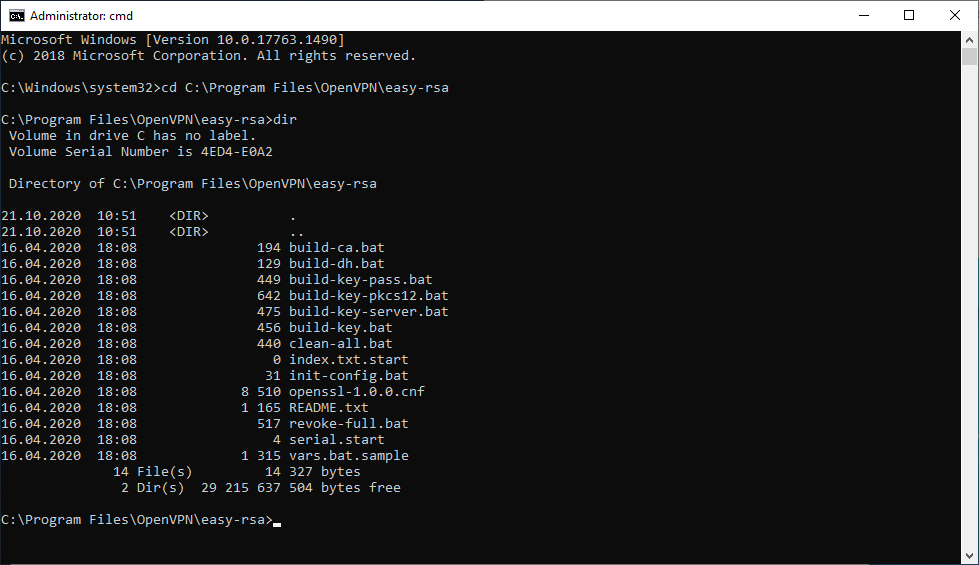
Запускаем командную строку под администратором и переходим в рабочую директорию C:Program FilesOpenVPNeasy-rsa.
cd C:Program FilesOpenVPNeasy-rsaВ этой папке есть всё необходимое для генерации сертификатов.
Выполняем:
init-config.bat
copy vars.bat.sample vars.bat
Создаётся файл vars.bat с настройками и примером готовых параметров для создания CSR запроса сертификатов. Заполним его. Открываем vars.bat блокнотом.
notepad vars.bat
Открывается vars.bat.
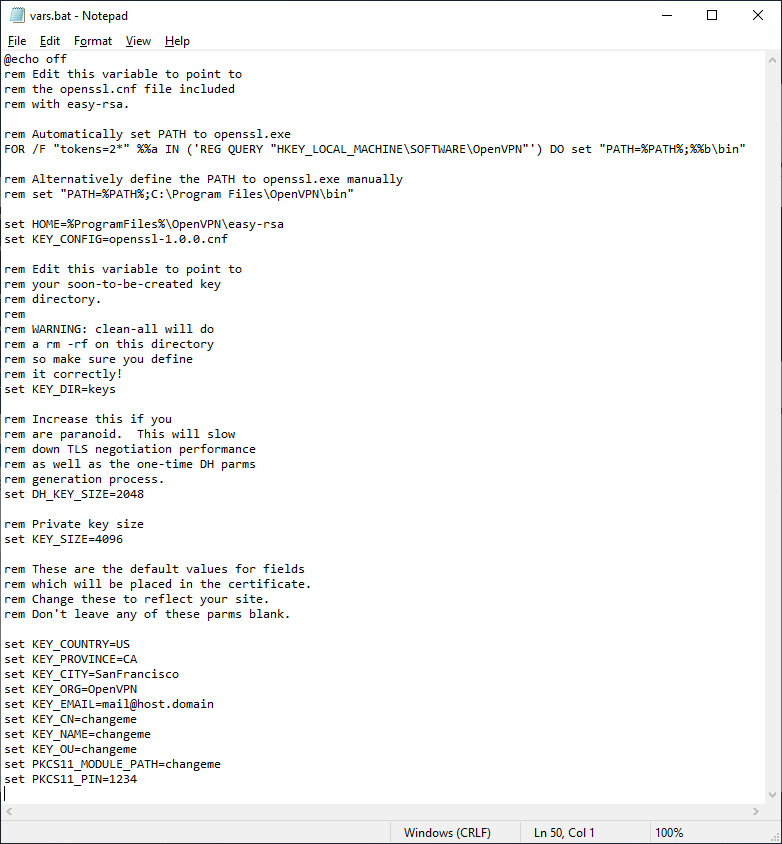
Здесь стоит обратить внимание на пути к рабочим директориям. Например, вы можете указать свой путь к openssl.exe, если установили OpenVPN в другую директорию. Здесь же можно изменить длину ключей шифрования.
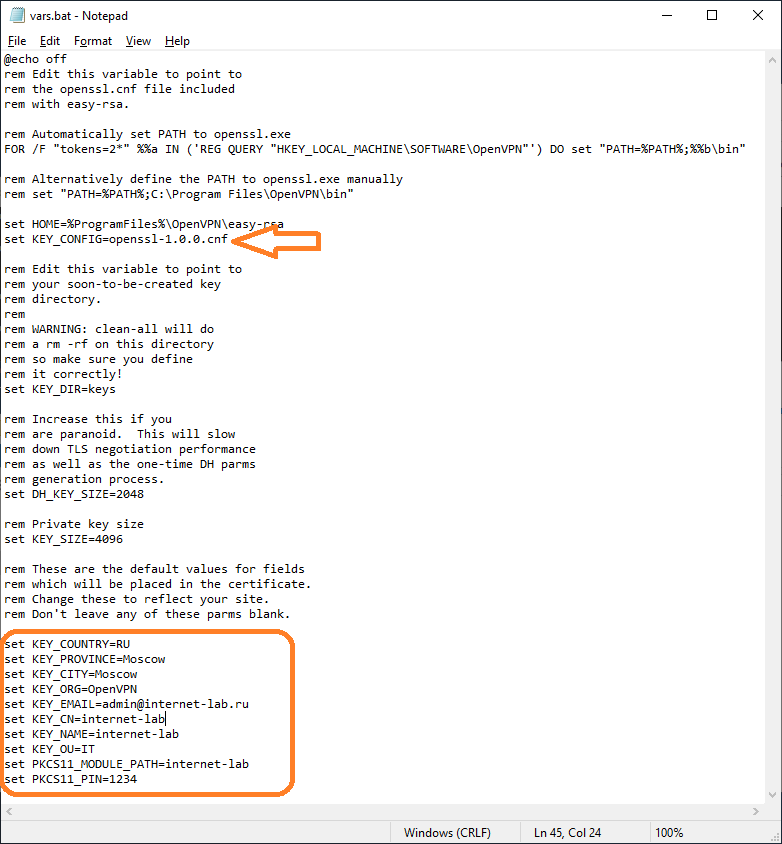
Заполняем переменные в нижней части файла, указываем:
- KEY_COUNTRY — страна
- KEY_PROVINCE — область
- KEY_CITY — город
- KEY_ORG — организация
- KEY_EMAIL — e-mail
- KEY_CN — (Common Name) имя сервера
- KEY_NAME — (Name) имя сервера
- KEY_OU — (Organization Unit) отдел
- PKCS11_MODULE_PATH — для токенов двухфакторной аутентификации, нам не требуется, укажу имя сервера
- PKC11_PIN — ПИН для токенов двухфакторной аутентификации, нам не требуется, укажу 1234
Для каждого сертификата нужно будет указывать свои NAME и COMMON NAME, можно их не указывать в vars.bat, потому как при генерации все параметры будут запрашивать.
Обращаем внимание на строку:
set KEY_KONFIG=openssl-1.0.0.cnf
Это имя конфигурационного файла. Находим его в рабочей директории.
Откроем блокнотом.

Внутри есть параметр default_days, в котором можно указать срок действия будущих сертификатов. По умолчанию у меня стоит 3650 дней, это 10 лет. Меня устраивает. Вероятно, кому-то при генерации клиентских сертификатов может понадобиться уменьшить этот срок.
Сохраняем все изменения и возвращаемся к командной строке. Подгружаем утверждённые нами переменные:
vars.bat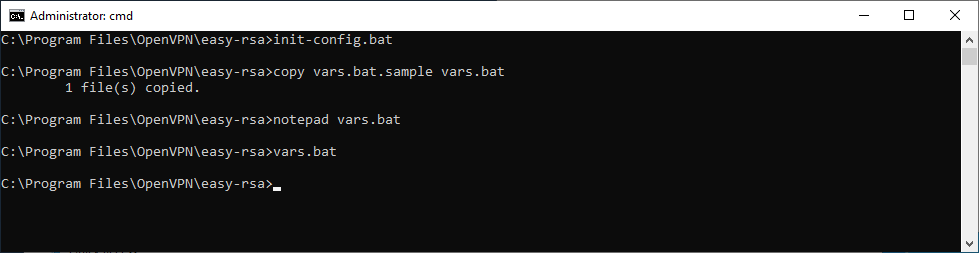
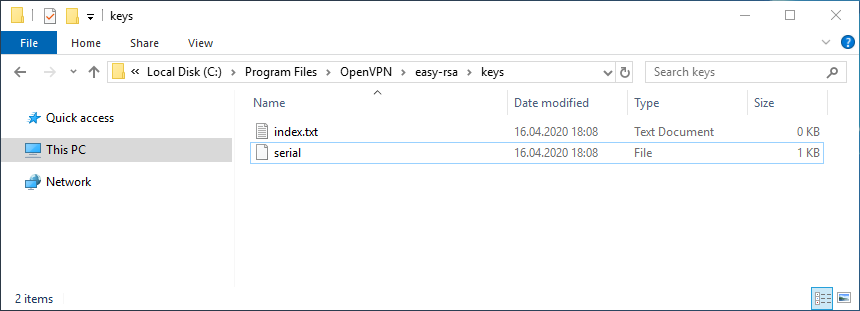
Очищаем директорию с ключами:
clean-all.bat
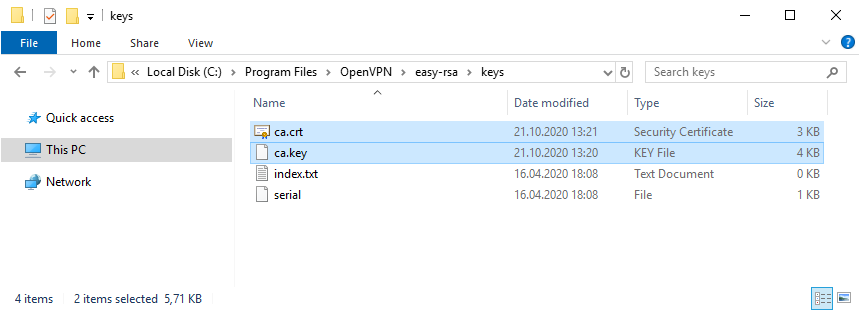
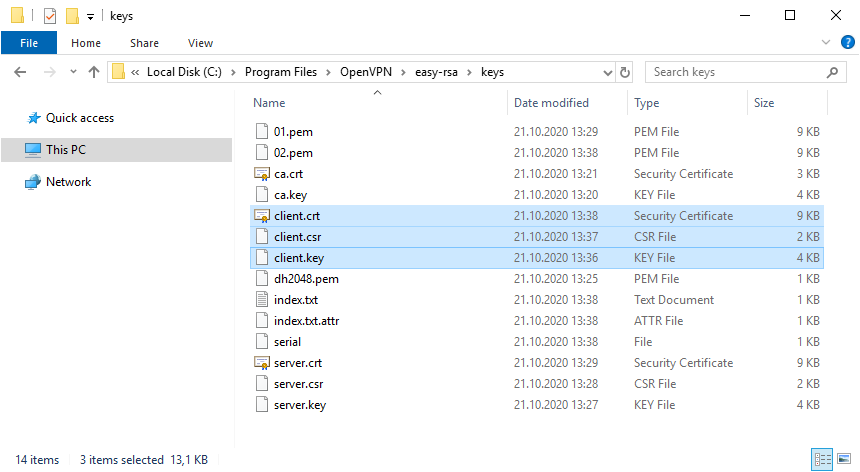
Сертификаты, которые мы будем создавать, появятся в папке C:Program FilesOpenVPNeasy-rsakeys. Сейчас эта папка очистилась, в ней два файла: index.txt и serial.
Генерируем ключ и сертификат центра сертификации:
build-ca.bat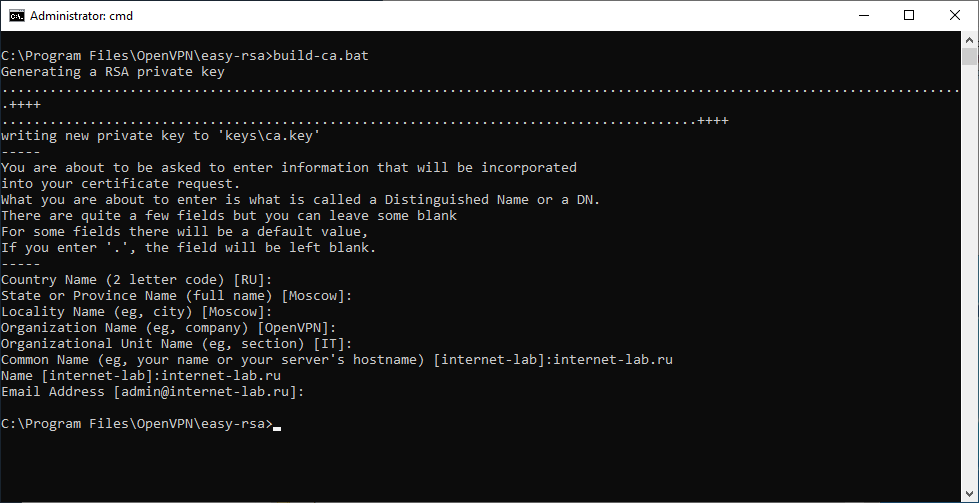
В процессе генерации сертификата нас будут спрашивать все те же параметры, которые мы указали в vars.bat. Если параметр нас устраивает (а он нас устраивает), просто нажимаем ввод и переходим к следующему вопросу. После завершения работы скрипта в папке C:Program FilesOpenVPNeasy-rsakeys появляется два файла:
- ca.crt — сертификат центра сертификации
- ca.key — ключ центра сертификации
Ключ секретный, никому не передавайте, он будет храниться на сервере.
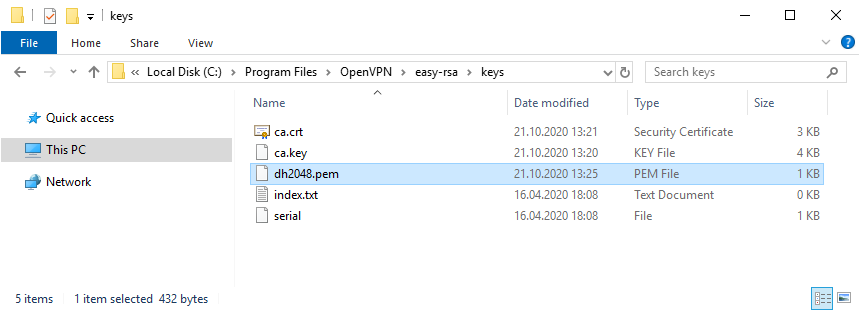
Генерируем ключ Диффи-Хеллмана:
build-dh.bat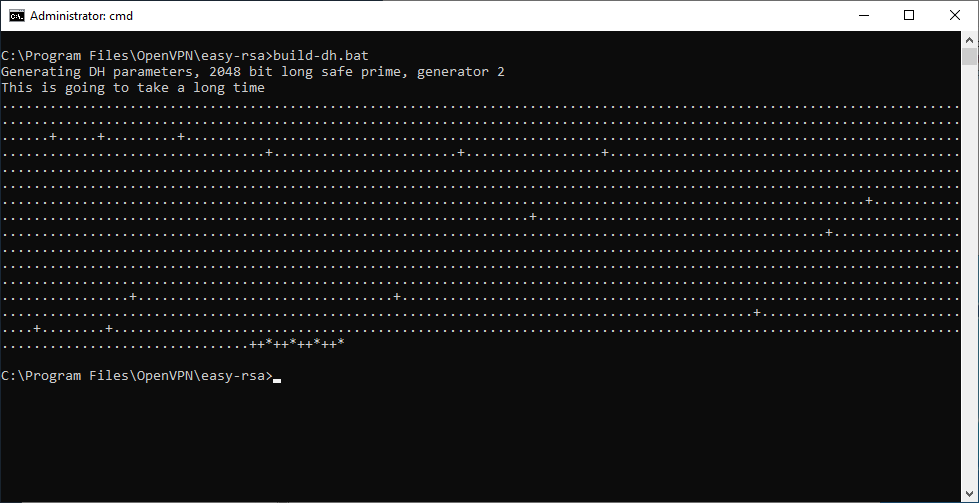
В папке C:Program FilesOpenVPNeasy-rsakeys появляется файл:
- dh2048.pem
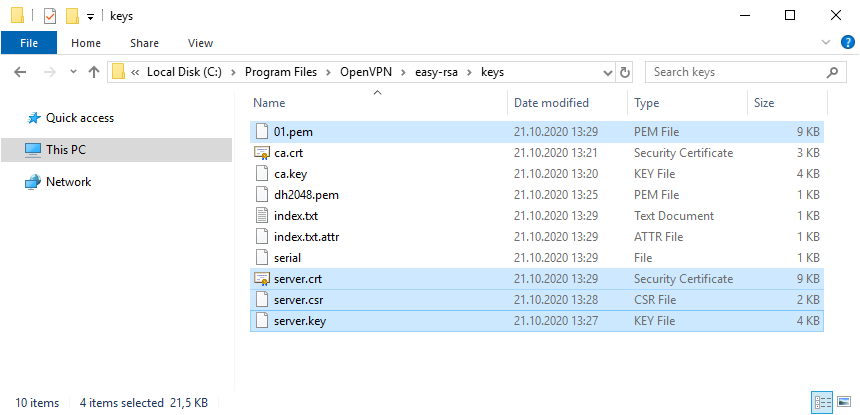
Генерируем ключ и сертификат сервера, назовём сервер именем «server«:
build-key-server.bat server
В процессе генерации серверного сертификата нас будут спрашивать те же параметры, которые мы указали в vars.bat. Если параметр нас устраивает (а он нас снова устраивает), просто нажимаем ввод и переходим к следующему вопросу. На вопрос Sign the certificate отвечаем y. На вопрос 1 out of 1 certificate requests certified, commit отвечаем y.
После завершения работы скрипта в папке C:Program FilesOpenVPNeasy-rsakeys появляется четыре файла:
- 01.pem — не понадобится
- server.crt — сертификат сервера
- server.csr — запрос сертификата сервера, не понадобится
- server.key — ключ сервера
Ключ секретный, никому не передавайте, он будет храниться на сервере.
Генерируем ключ и сертификат первого клиента. Для каждого клиента нужно указывать своё имя файла, Name и Common Name. Назовём первого клиента именем «client«:
build-key.bat client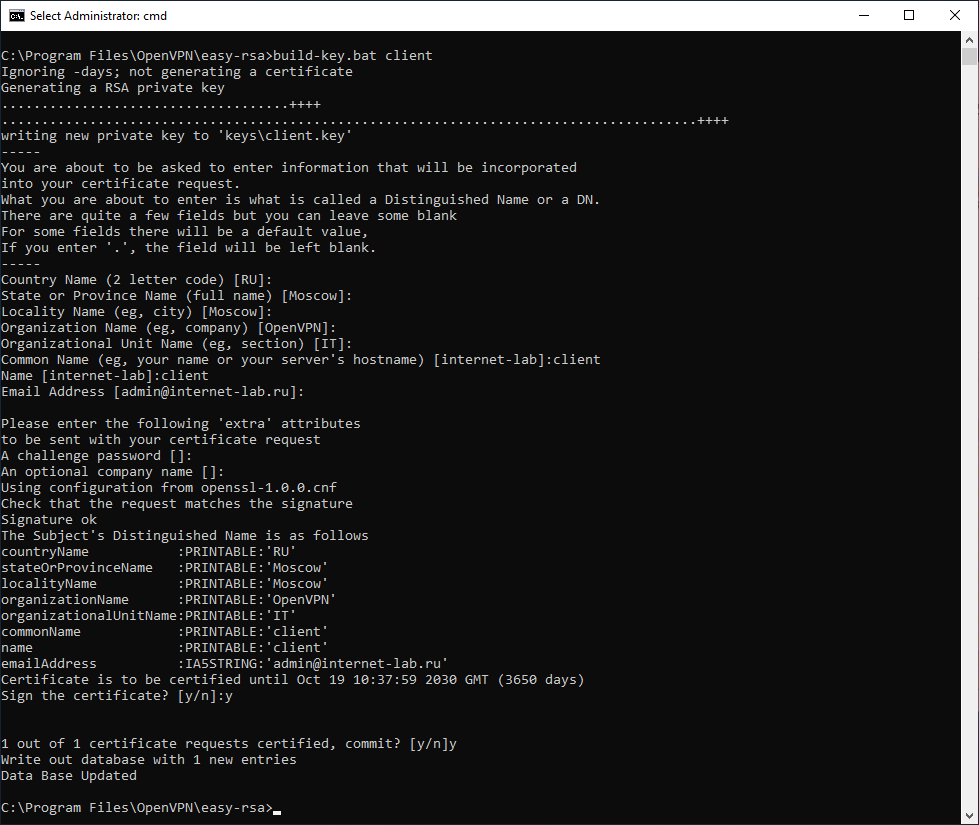
В процессе генерации клиентского сертификата нас будут спрашивать те же параметры, которые мы указали в vars.bat. Нас устраивают все параметры кроме NAME и COMMON NAME, на них отвечаем client. Помним, что для другого клиента имя должно быть другим. На вопрос Sign the certificate отвечаем y. На вопрос 1 out of 1 certificate requests certified, commit отвечаем y.
После завершения работы скрипта в папке C:Program FilesOpenVPNeasy-rsakeys появляется четыре файла:
- 02.pem — не понадобится
- client.crt — сертификат первого клиента
- client.csr — запрос сертификата первого клиента, не понадобится
- client.key — ключ первого клиента
Для каждого нового клиента, который будет подключаться к серверу OpenVPN необходимо сгенерировать свой клиентский сертификат. Но это можно сделать позже, пока добьёмся подключения хотя бы одного клиента.
В настройках сервера можно потом включить настройку duplicate-cn, которая позволяет подключаться всем клиентам по одному общему сертификату, но это небезопасно и не рекомендуется. Используйте только в тестовых целях.
# Uncomment this directive if multiple clients
# might connect with the same certificate/key
# files or common names. This is recommended
# only for testing purposes. For production use,
# each client should have its own certificate/key
# pair.
#
# IF YOU HAVE NOT GENERATED INDIVIDUAL
# CERTIFICATE/KEY PAIRS FOR EACH CLIENT,
# EACH HAVING ITS OWN UNIQUE «COMMON NAME»,
# UNCOMMENT THIS LINE OUT.
;duplicate-cn
Я на сервере собираюсь использовать tls-auth для дополнительной проверки целостности, это обеспечит дополнительный уровень безопасности протокола SSL/TLS при создании соединения:
- Сканирование прослушиваемых VPN-сервером портов
- Инициация SSL/TLS-соединения несанкционированной машиной на раннем этапе
- DoS-атаки и флуд на порты OpenVPN
- Переполнение буфера SSL/TLS
При использовании tls-auth на клиенте не понадобится ключ Диффи-Хеллмана, но пусть будет. Генерируем ключ tls-auth:
openvpn --genkey --secret keys/ta.key
В папке C:Program FilesOpenVPNeasy-rsakeys появляется файл:
- ta.key
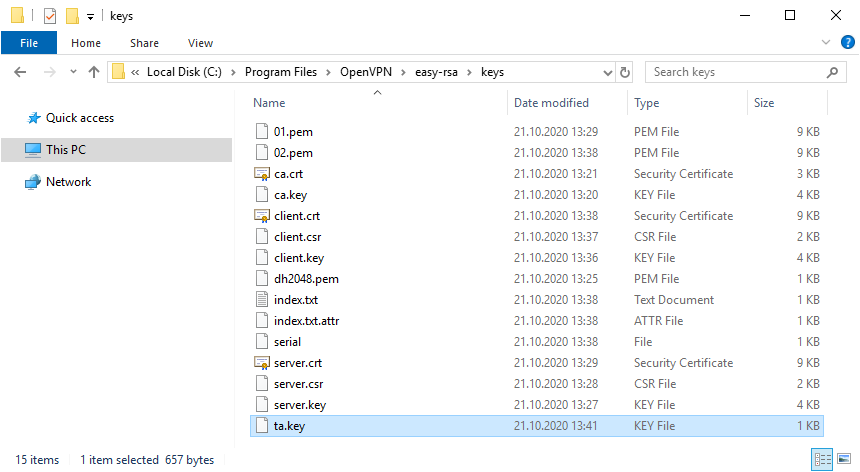
Минимальный набор сертификатов сгенерирован.
Настройка OpenVPN сервера
Чтобы случайно всё не удалить, создадим папку C:Program FilesOpenVPNssl и скопируем в неё сертификаты. Это будет рабочая папка сервера.
mkdir "C:Program FilesOpenVPNssl"
copy "C:Program FilesOpenVPNeasy-rsakeys" "C:Program FilesOpenVPNssl"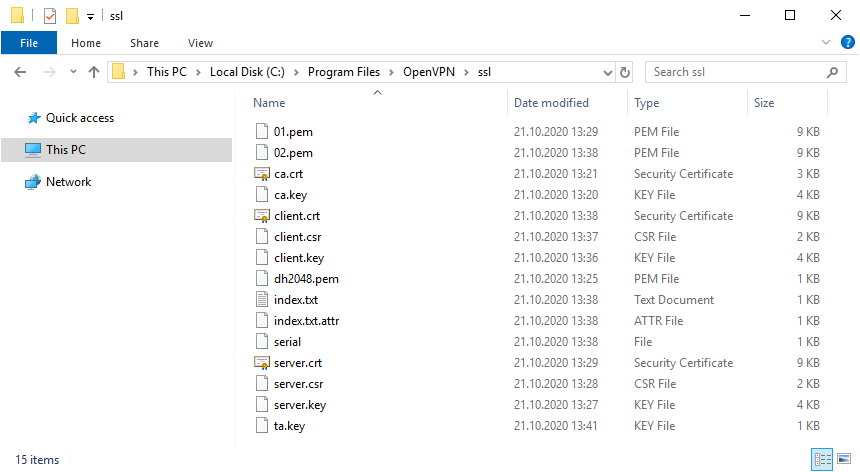
Создадим конфигурационный файл сервера C:Program FilesOpenVPNconfigserver.ovpn:
copy "C:Program FilesOpenVPNsample-configserver.ovpn" "C:Program FilesOpenVPNconfigserver.ovpn"Открываем блокнотом и редактируем:
notepad "C:Program FilesOpenVPNconfigserver.ovpn"Лучше изучить конфигурационный файл, я предлагаю свой вариант конфига:
port 1194
proto udp
dev tun
ca "C:\Program Files\OpenVPN\ssl\ca.crt"
cert "C:\Program Files\OpenVPN\ssl\server.crt"
key "C:\Program Files\OpenVPN\ssl\server.key"  # This file should be kept secret
dh "C:\Program Files\OpenVPN\ssl\dh2048.pem"
server 10.8.0.0 255.255.255.0
tls-auth "C:\Program Files\OpenVPN\ssl\ta.key" 0 # This file is secret
keepalive 10 120
comp-lzo
persist-key
persist-tun
cipher AES-256-CBC
status "C:\Program Files\OpenVPN\log\status.log"
log "C:\Program Files\OpenVPN\log\openvpn.log"
verb 4
mute 20
Указываем параметры сервера, пути к ключам и сертификатам. Здесь же пути к логам. Для тестирования можно использовать tcp протокол:
proto tcpПереходим к службам:
services.msc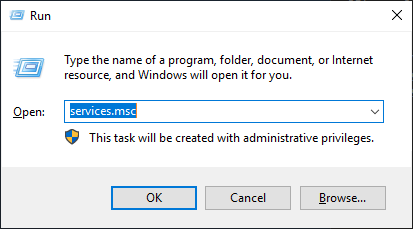
Находим службу OpenVPNService.
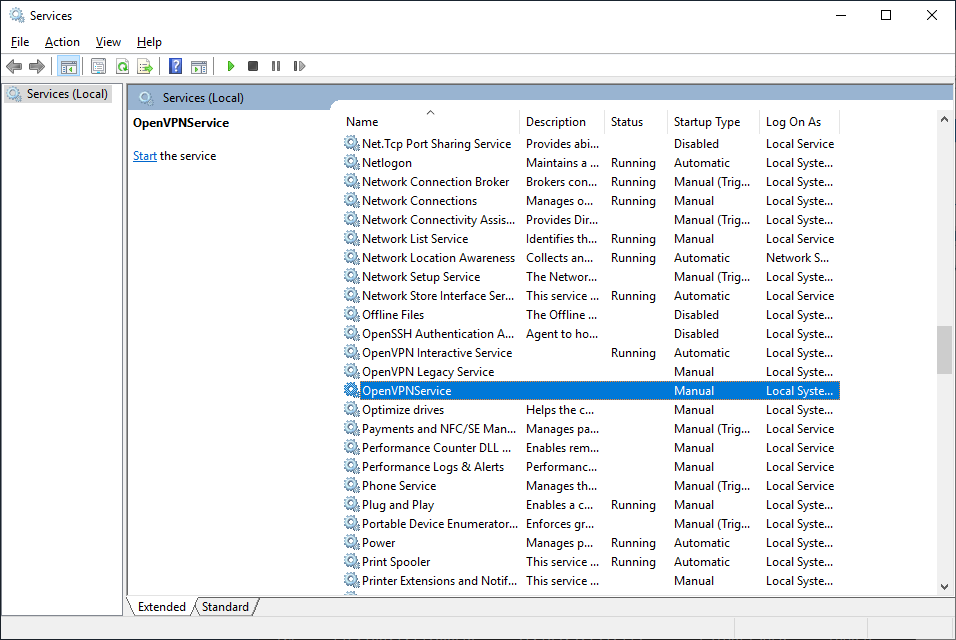
Настраиваем на автоматический запуск при загрузке сервера.
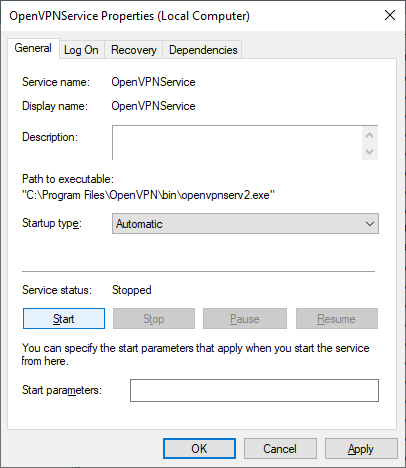
Запускаем службу.

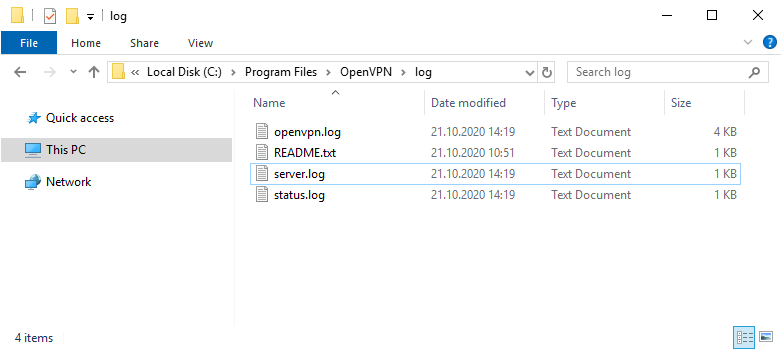
Согласно настройкам сервера в папке C:Program FilesOpenVPNlog должны появиться логи. Это один из инструментов администратора OpenVPN сервера.
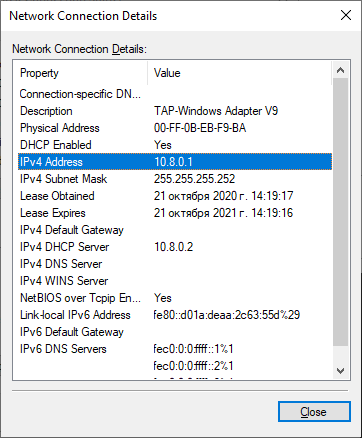
Активировался сетевой адаптер TAP-Windows Adapter V9.
Согласно настройкам сервера IP адрес 10.8.0.1.
Проверяем поднялся ли порт tcp 1194:
netstat -tan | find "1194"Порт должен прослушиваться.

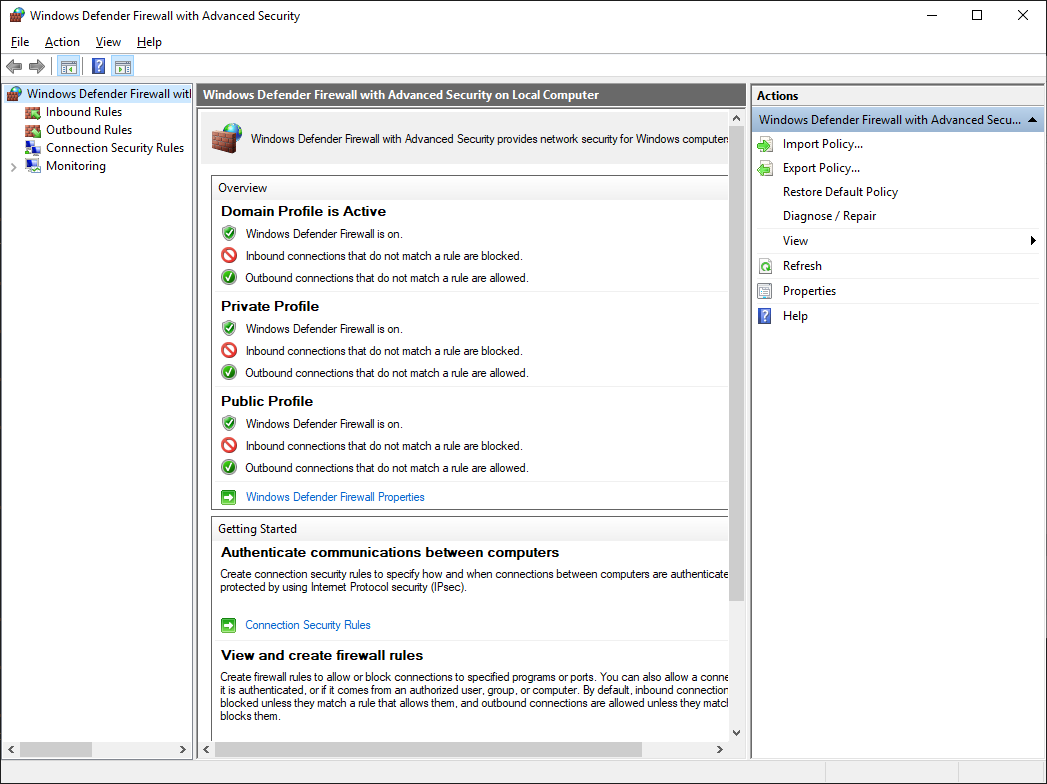
Теперь нужно настроить firewall. Открываем Windows Defender Firewall with Advanced Security.
Переходим в Inbound Rules.
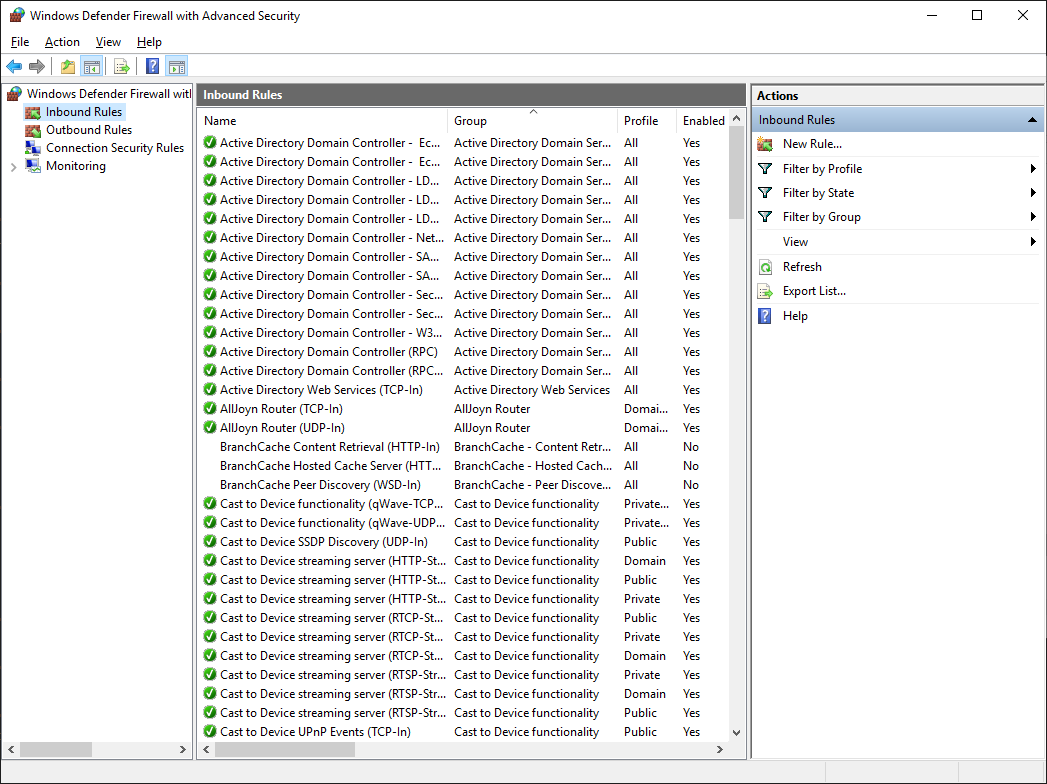
Создаём правило — New Rule…
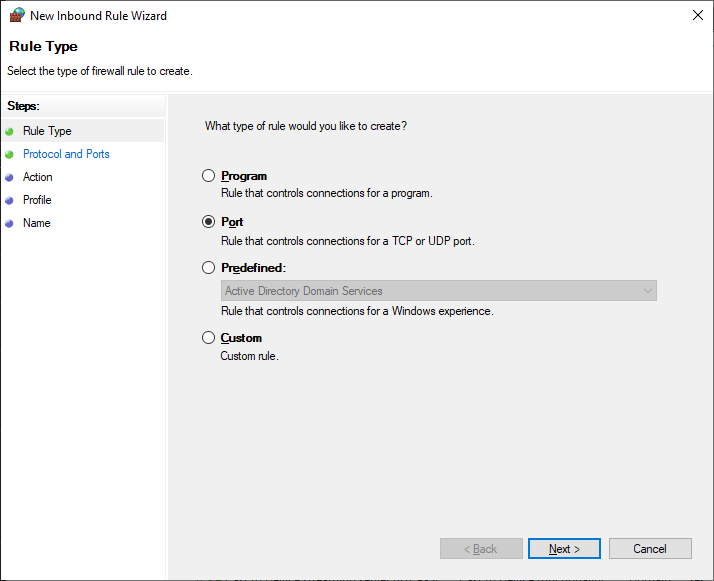
Тип правила — Port. Next.
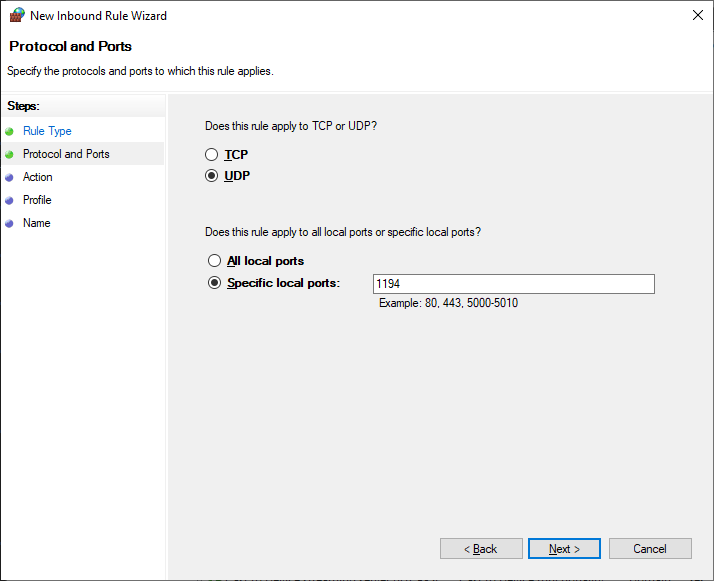
Протоколы и порты — UDP 1194. Как в настройках сервера. Next.
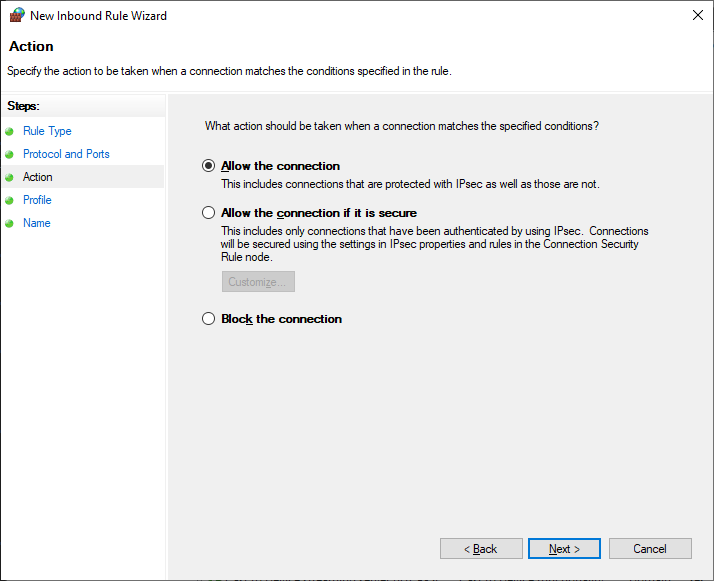
Действия — Allow the connection. Next.
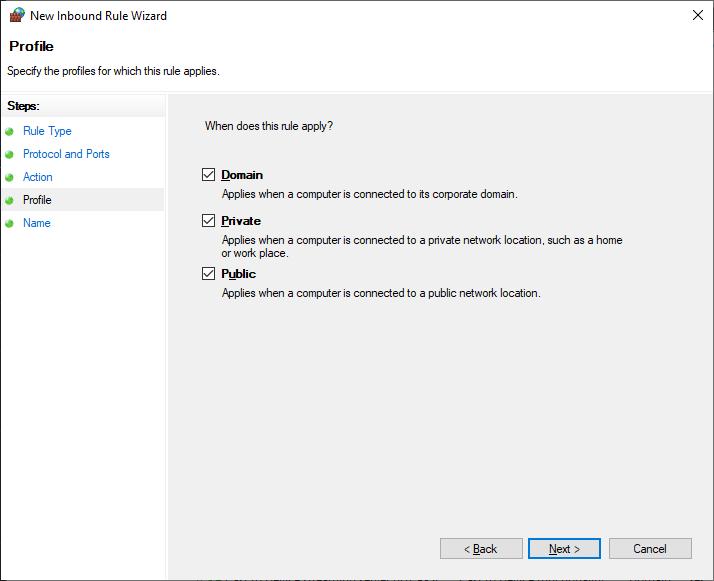
Для всех сетей. Next.
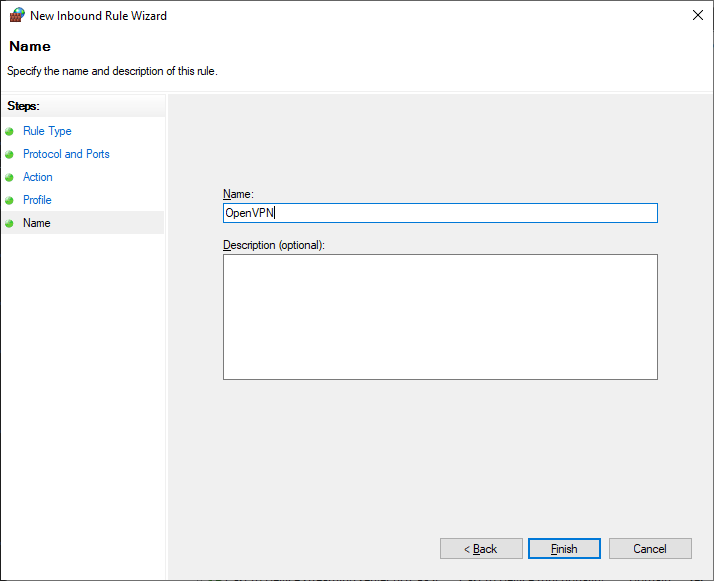
Указываем название правила — OpenVPN. Next.
Правило создано, теперь firewall не блокирует входящие UDP соединения на 1194 порту.
Настройка OpenVPN клиента
На компьютере клиента устанавливаем OpenVPN точно также как на сервер. Галку EasyRSA 2 Certificate Management Scripts не указываем. Галку OpenVPN GUI указываем.
Я устанавливаю OpenVPN на клиенте в папку по умолчанию. C:Program FilesOpenVPN.
Копируем в отдельную папку for_client (её содержимое отправим потом на компьютер клиента) на сервере файлы для клиента:
- ca.crt
- client.crt
- client.key
- dh2048.pem
- ta.key

Туда же из папки C:Program FilesOpenVPNsample-config копируем client.ovpn
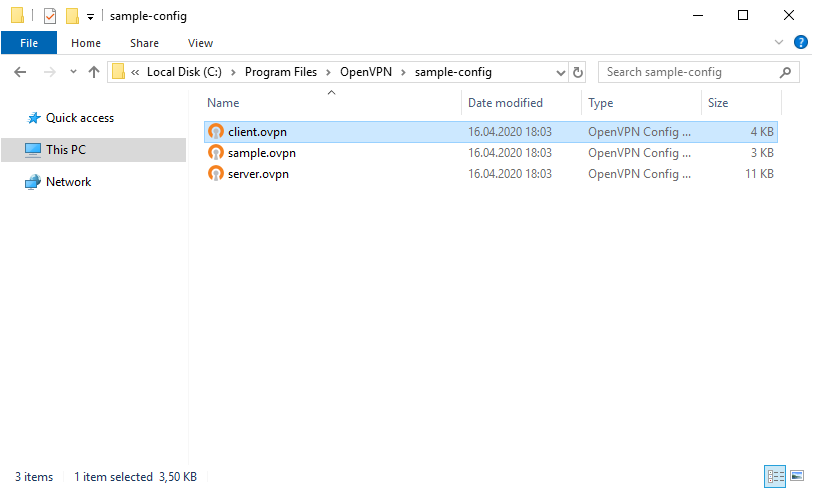
Переименовываю client.ovpn в config.ovpn. Можно использовать любое имя, лучше созвучное с названием организации. Вот такой получился набор.
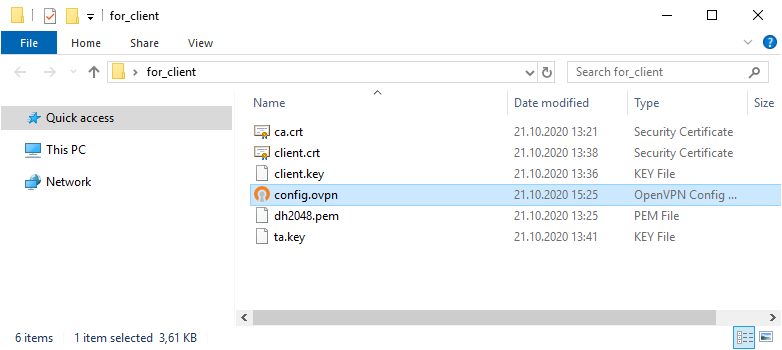
Редактируем файл config.ovpn.
client
dev tun
proto udp
remote internet-lab.ru 1194
resolv-retry infinite
nobind
persist-key
persist-tun
ca "C:\Program Files\OpenVPN\config\ca.crt"
cert "C:\Program Files\OpenVPN\config\client.crt"
key "C:\Program Files\OpenVPN\config\client.key"
tls-auth "C:\Program Files\OpenVPN\config\ta.key" 1
#dh "C:\Program Files\OpenVPN\config\dh2048.pem"
cipher AES-256-CBC
comp-lzo
verb 0
connect-retry-max 25
Здесь указываем пути к ключам и сертификатам клиента. Не забываем про адрес и порт сервера, куда подключаться, для примера я указал internet-lab.ru UDP 1194.
Отправляем подготовленные файлы на компьютер клиента и копируем в C:Program FilesOpenVPNconfig.
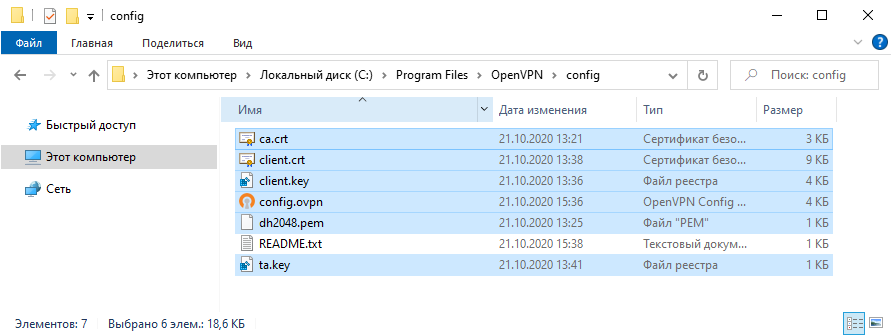
На клиента запускаем OpenVPN GUI.
В трее появляется значок OpenVPN.

Правой кнопкой — подключиться.

Устанавливается соединение.

Значок позеленел, назначен адрес 10.8.0.6.

Можно подключаться к серверу, если есть доступы.

Для второго и последующего клиента генерируем свой набор клиентских сертификатов.

Отзыв сертификата
Иногда нужно отозвать сертификат, выданный клиенту. Кто-то увольняется, кто-то палит сертификаты.
cd "C:Program FilesOpenVPNeasy-rsa"
vars.bat
revoke-full client
Где client — это имя клиента.
В папке C:Program FilesOpenVPNkeys появляется файл:
- crl.pem
Копируем его с заменой в рабочую директорию сервера C:Program FilesOpenVPNssl.
Добавляем строчку в конфигурационный файл сервера:
crl-verify "C:\Program Files\OpenVPN\keys\crl.pem" Перезапускаем службу OpenVPN сервера.
net stop OpenVPNService
net start OpenVPNService
Если в конфигурационном файле уже был ранее указан путь к crl.pem, то службу можно не перезапускать, OpenVPN перечитывает CRL один раз в час. Но в течении этого часа клиенты с отозванными сертификатами смогут продолжать подключаться и работать.
Для клиента с отозванным сертификатом процесс подключения будет «зависать». В логе можно увидеть:
TLS Error: TLS key negotiation failed to occur within 60 seconds (check your network connectivity)
TLS Error: TLS handshake failed
Чтобы клиент не стучался постоянно на сервер, у него в конфиге есть опция:
connect-retry-max 25Передать эту опцию при отзыве сертификата нельзя, поэтому указывайте её всем клиентам заранее.
Ссылки
OpenVPN 2.5.1 сервер на Windows
OpenVPN – это набор open source программ, который заслуженно является одним из самых популярных и легких решений для реализации защищенной VPN сети. OpenVPN позволяет объединить в единую сеть сервер и клиентов (даже находящиеся за NAT или файерволами), или объединить сети удаленных офисов. Серверную часть OpenVPN можно развернуть практически на всех доступных операционных системах (пример настройки OpenVPN на Linux). Вы можете установить OpenVPN сервер даже на обычный компьютер с десктопной редакцией Windows 10.
В этой статье, мы покажем, как установить OpenVPN сервер на компьютер с Windows 10, настроить OpenVPN клиент на другом Windows хосте и установить защищенное VPN подключение.
Содержание:
- Установка службы OpenVPN сервера в Windows
- Создаем ключи шифрования и сертификаты для OpenVPN
- Конфигурационный файл OpenVPN сервера в Windows
- Настройка OpenVPN клиента в Windows
Установка службы OpenVPN сервера в Windows
Скачайте MSI установщик OpenVPN для вашей версии Windows с официального сайта (https://openvpn.net/community-downloads/). В нашем случае это OpenVPN-2.5.5-I602-amd64.msi (https://swupdate.openvpn.org/community/releases/OpenVPN-2.5.5-I602-amd64.msi).
Запустите установку.
Если вы планируете, OpenVPN сервер работал в автоматическом режиме, можно не устанавливать OpenVPN GUI. Обязательно установите OpenVPN Services.
Начиная с версии OpenVPN 2.5, поддерживается драйвер WinTun от разработчиков WireGuard. Считается, что этот драйвер работает быстрее чем классический OpenVPN драйвер TAP. Установите драйвер Wintun, откажитесь от установки TAP-Windows6.
Установите OpenSSL утилиту EasyRSA Certificate Management Scripts.
Запустите установку.
По умолчанию OpenVPN устаналивается в каталог C:Program FilesOpenVPN.
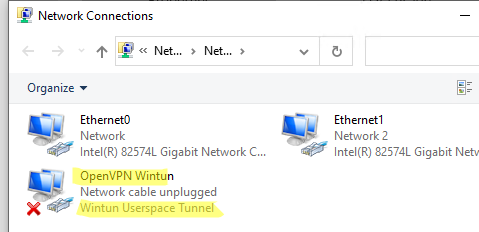
После окончания установки появится новый сетевой адаптер типа Wintun Userspace Tunnel. Этот адаптер отключен, если служба OpenVPN не запущена.
Создаем ключи шифрования и сертификаты для OpenVPN
OpenVPN основан на шифровании OpenSSL. Это означает, что для обмена трафиком между клиентом и серверов VPN нужно сгенерировать ключи и сертификаты с использованием RSA3.
Откройте командную строку и перейдите в каталог easy-rsa:
cd C:Program FilesOpenVPNeasy-rsa
Создайте копию файла:
copy vars.example vars
Откройте файл vars с помощью любого текстового редактора. Проверьте пути к рабочим директориям.
Обязательно поправьте переменную EASYRSA_TEMP_DIR следующим образом:
set_var EASYRSA_TEMP_DIR "$EASYRSA_PKI/temp"

Можете заполнить поля для сертификатов (опционально)
set_var EASYRSA_REQ_COUNTRY "RU"
set_var EASYRSA_REQ_PROVINCE "MSK"
set_var EASYRSA_REQ_CITY "MSK"
set_var EASYRSA_REQ_ORG "IT-Company"
set_var EASYRSA_REQ_EMAIL " [email protected] "
set_var EASYRSA_REQ_OU " IT department "

Срок действия сертификатов задается с помощью:
#set_var EASYRSA_CA_EXPIRE 3650
#set_var EASYRSA_CERT_EXPIRE 825
Сохраните файл и выполните команду:
EasyRSA-Start.bat
Следующие команды выполняются в среде EasyRSA Shell:
Инициализация PKI:
./easyrsa init-pki
Должна появится надпись:
init-pki complete; you may now create a CA or requests.
Your newly created PKI dir is: C:/Program Files/OpenVPN/easy-rsa/pki
Теперь нужно сгенерировать корневой CA:
./easyrsa build-ca
Задайте дважды пароль для CA:
CA creation complete and you may now import and sign cert requests.
Данная команда сформировала:
- Корневой сертификат центра сертификации: «C:Program FilesOpenVPNeasy-rsapkica.crt»
- Ключ центра сертификации «C:Program FilesOpenVPNeasy-rsapkiprivateca.key»
Теперь нужно сгенерировать запрос сертификата и ключ для вашего сервера OpenVPN:
./easyrsa gen-req server nopass
Утилита сгенерирует два файла:
req: C:/Program Files/OpenVPN/easy-rsa/pki/reqs/server.req
key: C:/Program Files/OpenVPN/easy-rsa/pki/private/server.key
Подпишем запрос на выпуск сертификата сервера с помощью нашего CA:
./easyrsa sign-req server server
Подтвердите правильность данных, набрав yes.
Затем введите пароль CA от корневого CA.
В каталоге issued появится сертификат сервера («C:Program FilesOpenVPNeasy-rsapkiissuedserver.crt»)

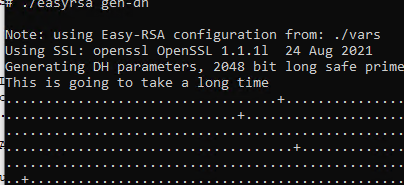
Теперь можно создать ключи Диффи-Хеллмана (займет длительное время):
./easyrsa gen-dh
Для дополнительной защиты VPN сервера желательно включить tls-auth. Данная технология позволяет использовать подписи HMAC к handshake-пакетам SSL/TLS, инициируя дополнительную проверку целостности. Пакеты без такой подписи будут отбрасываться VPN сервером. Это защитит вас от сканирования порта VPN сервера, DoS атак, переполнения буфера SSL/TLS.
Сгенерируйте ключ tls-auth:
cd C:Program FilesOpenVPNbin
openvpn --genkey secret ta.key
Должен появиться файл «C:Program FilesOpenVPNbinta.key». Переместите его в каталог C:Program FilesOpenVPNeasy-rsapki
Теперь можно сформировать ключи для клиентов OpenVPN. Для каждого клиента, который будет подключаться к вашему серверу нужно создать собственные ключи.
Есть несколько способов генерации ключей и передачи их клиентам. В следующем примере, мы создадим на сервере ключ клиента и защитим его паролем:
./easyrsa gen-req kbuldogov
./easyrsa sign-req client kbuldogov

Данный ключ («C:Program FilesOpenVPNeasy-rsapkiprivatekbuldogov.key») нужно передать клиенту и сообщить пароль. Клиент может снять защиту паролем для ключа:
openssl rsa -in "C:Program FilesOpenVPNeasy-rsapkiprivatekbuldogov.key"-out "C:Program FilesOpenVPNeasy-rsapkiprivatekbuldogov_use.key"

Если вы хотите сгенерировать ключ, не защищенный паролем, нужно выполнить команду:
./easyrsa gen-req имяклиента nopass
На сервере с OpenVPN вы можете создать неограниченное количество ключей и сертификатов для пользователей. Аналогичным образом сформируйте ключи и сертфикаты для других клиентов.
Вы можете отохвать скомпрометированные сертификаты клиентов:
cd C:Program FilesOpenVPNeasy-rsa
EasyRSA-Start.bat
./easyrsa revoke kbuldogov
Итак, мы сгенерировали набор ключей и сертификатов для OpenVPN сервера. Теперь можно настроить и запустить службу OpenVPN.
Конфигурационный файл OpenVPN сервера в Windows
Скопируйте типовой конфигурационный файл OpenVPN сервера:
copy "C:Program FilesOpenVPNsample-configserver.ovpn" "C:Program FilesOpenVPNconfig-autoserver.ovpn"
Откройте файл server.ovpn в любом текстовом редакторе и внесите свои настройки. Я использую следующий конфиг для OpenVPN:
# Указываем порт, протокол и устройство
port 1194
proto udp
dev tun
# Указываем пути к сертификатам сервера
ca "C:\Program Files\OpenVPN\easy-rsa\pki\ca.crt"
cert "C:\Program Files\OpenVPN\easy-rsa\pki\issued\server.crt"
key "C:\Program Files\OpenVPN\easy-rsa\pki\private\server.key"
dh "C:\Program Files\OpenVPN\easy-rsa\pki\dh.pem"
# Указываем настройки IP сети, адреса из которой будет будут получать VPN клиенты
server 10.24.1.0 255.255.255.0
#если нужно разрешить клиентам подключаться под одним ключом, нужвно включить опцию duplicate-cn (не рекомендуется)
#duplicate-cn
# TLS защита
tls-auth "C:\Program Files\OpenVPN\easy-rsa\pki\ta.key" 0
cipher AES-256-GCM
# Другая параметры
keepalive 20 60
persist-key
persist-tun
status "C:\Program Files\OpenVPN\log\status.log"
log "C:\Program Files\OpenVPN\log\openvpn.log"
verb 3
mute 20
windows-driver wintun
Сохраните файл.
OpenVPN позволяет использовать как TCP, так и UDP для подключения. В этом примере я запустил OpenVPN на 1194 UDP. Рекомендуется использовать протокол UDP, это оптимально как с точки зрения производительности, так и безопасности.
Не забудьте открыть на файерволе порты для указанного вами порта OpenVPN на клиенте и на сервере. Можно открыть порты в Windows Defender с помощью PowerShell.
Правило для сервера:
New-NetFirewallRule -DisplayName "AllowOpenVPN-In" -Direction Inbound -Protocol UDP –LocalPort 1194 -Action Allow
Правило для клиента:
New-NetFirewallRule -DisplayName "AllowOpenVPN-Out" -Direction Outbound -Protocol UDP –LocalPort 1194 -Action Allow
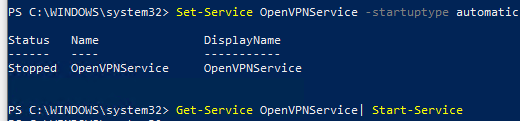
Теперь нужно запустить службу OpenVPN и изменить тип ее запуска на автоматический. Воспользуйтесь таким командами PowerShell, чтобы включить службу:
Set-Service OpenVPNService –startuptype automatic –passthru
Get-Service OpenVPNService| Start-Service
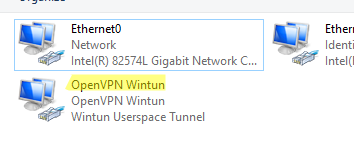
Откройте панель управления, и убедитесь, что виртуальный сетевой адаптер OpenVPN Wintun теперь активен. Если нет, смотрите лог «C:Program FilesOpenVPNlogserver.log»
Если при запуске OpenVPN вы видите в логе ошибку:
Options error: In C:Program FilesOpenVPNconfig-autoserver.ovpn:1: Maximum option line length (256) exceeded, line starts with..
Смените в файле server.ovpn символы переноса строки на Windows CRLF (в notepad++ нужно выбрать Edit -> EOL Conversion -> Windows CR LF). Сохраните файл, перезапустите службу OpevVPNService.
Данный конфиг позволит удаленным клиентам получить доступ только к серверу, но другие компьютеры и сервисы в локальной сети сервера для них недоступны. Чтобы разрешить клиентам OpenVPN получить доступ к внутренней сети нужно:
Включить опцию IPEnableRouter в реестре (включает IP маршрутизацию в Windows, в том числе включает маршрутизацию меду сетями Hyper-V): reg add «HKLMSYSTEMCurrentControlSetServicesTcpipParameters» /v IPEnableRouter /t REG_DWORD /d 1 /f
Добавьте в конфгурационный файл сервера OpenVPN маршруты до внутренней IP сети:
push "route 10.24.1.0 255.255.255.0"
push "route 192.168.100.0 255.255.255.0"
Если нужно, назначьте клиенту адреса DNS серверов:
push "dhcp-option DNS 192.168.100.11"
push "dhcp-option DNS 192.168.100.12"
Если нужно завернуть все запросы клиента (в том числе Интернет трафик) на ваш OpenVPN сервер, добавьте опцию:
push "redirect-gateway def1"
Настройка OpenVPN клиента в Windows
Создайте на сервере шаблонный конфигурационный файла для клиента VPN (на базе iшаблона client.ovpn) со следующими параметрами (имя файла kbuldovov.ovpn)
client
dev tun
proto udp
remote your_vpn_server_address 1194
resolv-retry infinite
nobind
persist-key
persist-tun
ca ca.crt
cert kbuldogov.crt
key kbuldogov.key
remote-cert-tls server
tls-auth ta.key 1
cipher AES-256-GCM
connect-retry-max 25
verb 3
В директиве remote указывается публичный IP адрес или DNS имя вашего сервера OpenVPN.
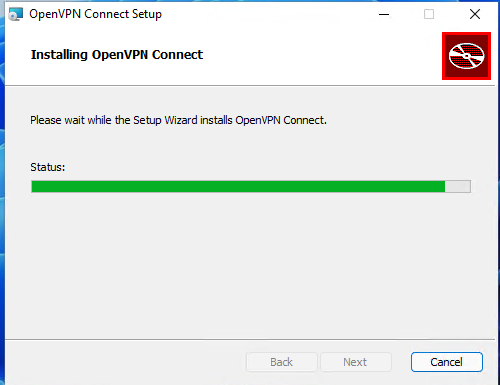
Скачайте и установите клиент OpenVPN Connect для Windows (https://openvpn.net/downloads/openvpn-connect-v3-windows.msi).
Теперь на компьютер с клиентом OpenVPN нужно с сервера скопировать файлы:
- ca.crt
- kbuldogov.crt
- kbuldogov.key
- dh.pem
- ta.key
- kbuldogov.ovpn

Теперь импортируйте файл с профилем *.ovpn и попробуйте подключиться к вашему VPN серверу.
Если все настроено правильно, появится такая картинка. 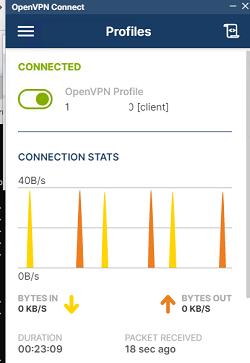
Проверьте теперь лог OpenVPN на клиенте «C:Program FilesOpenVPN Connectagent.log»
Mon Dec 27 08:09:30 2021 proxy_auto_config_url
Mon Dec 27 08:09:31 2021 TUN SETUP
TAP ADAPTERS:
guid='{25EE4A55-BE90-45A0-88A1-8FA8FEF24C42}' index=22 name='Local Area Connection'
Open TAP device "Local Area Connection" PATH="\.Global{25EE4A55-BE90-45A0-88A1-8FA8FEF24C42}.tap" SUCCEEDED
TAP-Windows Driver Version 9.24
ActionDeleteAllRoutesOnInterface iface_index=22
netsh interface ip set interface 22 metric=1
Ok.
netsh interface ip set address 22 static 10.24.1.6 255.255.255.252 gateway=10.24.1.5 store=active
IPHelper: add route 10.24.1.1/32 22 10.24.1.5 metric=-1
Клиент успешно подключится к OpenVPN серверу и получил IP адрес 10.24.1.6.
Проверьте теперь лог на сервере («C:Program FilesOpenVPNlogopenvpn.log»). Здесь также видно, что клиент с сертификатом kbuldogov успешно подключится к вашему серверу.
2021-12-27 08:09:35 192.168.13.202:55648 [kbuldogov] Peer Connection Initiated with [AF_INET6]::ffff:192.168.13.202:55648
2021-12-27 08:09:35 kbuldogov/192.168.13.202:55648 MULTI_sva: pool returned IPv4=10.24.1.6, IPv6=(Not enabled)
2021-12-27 08:09:35 kbuldogov/192.168.13.202:55648 MULTI: Learn: 10.24.1.6 -> kbuldogov/192.168.13.202:55648
2021-12-27 08:09:35 kbuldogov/192.168.13.202:55648 MULTI: primary virtual IP for kbuldogov/192.168.13.202:55648: 10.24.1.6
If you want to protect your online privacy or encrypt your information on the web so that it does not fall into the hands of hackers; you should use a VPN. The main element of any VPN is the VPN protocol used by it. In this article, we will teach you how to install OpenVpn on Windows Server 2019. Most VPNs support several protocols such as IKEv2, L2TP, and SSTP, but the OpenVPN protocol is known as the most popular and best VPN protocol in the world. In this article, we will teach you How to Setup OpenVPN On Windows Server 2019. If you want to purchase your own RDP, you can check out the packages offered on the Eldernode website.
What is OpenVPN?
Openvpn is currently the most popular and widely used protocol as a VPN. Unlike other IPSec-based tunneling protocols (such as L2tp), Openvpn relies on SSL / TLS for authentication and data encryption. This standard security technology is for making secure, remote connections from one place to another or from one point to another. The use of SSL to protect financial transactions, data transfers, emails, and other things is very popular.
OpenVPN is compatible with all major operating systems such as Windows, Android, iOS, Mac, and Linux. It is open source and supports up to 256-bit encryption.
Available OpenVPNs is as follows:
–> OpenVPN Community Edition: It is an open-source and free version and doesn’t have user limitations.
–> OpenVPN Access Server: It is based on the Community Edition but provides additional paid and proprietary features such as Easy Management Admin Portal, LDAP integration and etc.
–> OpenVPN-as-a-Service: It is a solution that eliminates the need for VPN server installation. You can connect to your hosted service with regions around the world simply by purchasing OpenVPN Cloud.
In this step from the Windows training tag, you will learn how to install OpenVPN on Windows Server 2019.
Prerequisites
– Access to port 1194 to connect to the same network
– Windows Server 2019
You can do this by allowing UDP traffic on port 1194 by adding a rule to your Firewall.
How to Install OpenVPN on Windows Server 2019
Go to the official OpenVPN Website to download the latest Windows 64-bit MSI installer for the OpenVPN Community edition:
After the download is completed, go to the downloaded file and double-click on it. Click on the icon next to desired features to choose them. Check the ”EasyRSA 2 Certificate Management Scripts” and click on Next:
Once the installation is completed, you should generate the certificates and keys to access the VPN. To do this, open the terminal by typing cmd on the Start menu and right-click on the Command Prompt icon. Choose ”Run as Administrator”:
Go to the following path:
C:Program FilesOpenVPNeasy-rsaNow you can start configuring OpenVPN:
init-configIn this step, you need to open the vars.bat file in the text editor:
notepad vars.batEdit the subsequent lines by switching The ”US”, ”CA” etc with your business’s data:
set KEY_COUNTRY=US set KEY_PROVINCE=CA set KEY_CITY=SanFrancisco set KEY_ORG=OpenVPN set [email protected]–> KEY_CN and KEY_NAME: They will be unique for each build request and refer to the common name field and the name of the certificate.
–> KEY_OU: They refer to an ”Organizational Unit” and can be set to whatever if there isn’t a requirement for it.
–> PKCS11_values: They refer to settings used for Hardware Security Modules and Smart Cards if you use them.
Save the text editor file and exit it.
To apply the changes, enter the following command:
varsclean allBuilding Certificates and Keys
In order to create the Certificate Authority (CA) certificate and key, we need to run the following command:
build-caThis will prompt you to enter your country, state, and city. These options will also have default values, which appear within brackets:
Certificate Authority "OpenVPN-CA": Country Name (2 letter code) [US]: State or Province Name (full name) [CA]: Locality Name (eg, city) [SanFrancisco]: Organization Name (eg, company) [OpenVPN]: Organizational Unit Name (eg, section) []: Common Name (eg, your name or your server's hostname) []:OpenVPN-CA Email Address [[email protected]]:Using the following command, we initiate the server’s certificate and key:
build-key-server serverWhen prompted to sign the certificate and commit, enter ”y” and enter the ”Common Name” as a server.
Server Certificates and Keys
C:Program FilesOpenVPNeasy-rsa>build-key-server.bat Generating a RSA private key ..............................................................................................................................................................................................................................................++++ ................................++++ writing new private key to 'keys.key' ----- You are about to be asked to enter information that will be incorporated into your certificate request. What you are about to enter is what is called a Distinguished Name or a DN. There are quite a few fields but you can leave some blank For some fields there will be a default value, If you enter '.', the field will be left blank. ----- Country Name (2 letter code) [US]:US State or Province Name (full name) [MI]: Locality Name (eg, city) [Lansing]: Organization Name (eg, company) [OpenVPN]: Organizational Unit Name (eg, section) [changeme]: Common Name (eg, your name or your server's hostname) [changeme]:Server Name [changeme]: Email Address [[email protected]]: Please enter the following 'extra' attributes to be sent with your certificate request A challenge password []:XXXXXXXXXXXXXXXX An optional company name []: Using configuration from openssl-1.0.0.cnf Can't open keys/index.txt.attr for reading, No such file or directory 1832:error:02001002:system library:fopen:No such file or directory:crypto/bio/bss_file.c:74:fopen('keys/index.txt.attr','r') 1832:error:2006D080:BIO routines:BIO_new_file:no such file:crypto/bio/bss_file.c:81: Check that the request matches the signature Signature ok The Subject's Distinguished Name is as follows countryName :PRINTABLE:'US' stateOrProvinceName :PRINTABLE:'MI' localityName :PRINTABLE:'Lansing' organizationName :PRINTABLE:'OpenVPN' organizationalUnitName:PRINTABLE:'changeme' commonName :PRINTABLE:'Server' name :PRINTABLE:'changeme' emailAddress :IA5STRING:'[email protected]' Certificate is to be certified until Dec 24 19:01:08 2029 GMT (3650 days) Sign the certificate? [y/n]:y 1 out of 1 certificate requests certified, commit? [y/n]y Write out database with 1 new entries Data Base Updated C:Program FilesOpenVPNeasy-rsa>Client Certificates and Keys
For each client that will be connecting to the server, you should choose a unique name to identify that user’s computer, such as ”Michael-PC” in the following example.
When prompted, enter the Common Name as the name you have chosen for the client’s cert/key. You will repeat this step for every client computer that is going to connect to the VPN.
C:Program FilesOpenVPNeasy-rsa>build-key Michael-PC Generating a RSA private key .............................................................................................................................................................................++++ ..............................................................................++++ writing new private key to 'keysMichael-PC.key' ----- You are about to be asked to enter information that will be incorporated into your certificate request. What you are about to enter is what is called a Distinguished Name or a DN. There are quite a few fields but you can leave some blank For some fields there will be a default value, If you enter '.', the field will be left blank. ----- Country Name (2 letter code) [US]: State or Province Name (full name) [MI]: Locality Name (eg, city) [Lansing]: Organization Name (eg, company) [OpenVPN]: Organizational Unit Name (eg, section) [changeme]: Common Name (eg, your name or your server's hostname) [changeme]:Michael-PC Name [changeme]: Michael Jordan Email Address [[email protected]]: Please enter the following 'extra' attributes to be sent with your certificate request A challenge password []:XXXXXXXXXXXXXXXX An optional company name []: Using configuration from openssl-1.0.0.cnf Check that the request matches the signature Signature ok The Subject's Distinguished Name is as follows countryName :PRINTABLE:'US' stateOrProvinceName :PRINTABLE:'MI' localityName :PRINTABLE:'Lansing' organizationName :PRINTABLE:'OpenVPN' organizationalUnitName:PRINTABLE:'changeme' commonName :PRINTABLE:'Michael-PC' name :PRINTABLE:'Michael Jordan' emailAddress :IA5STRING:'[email protected]' Certificate is to be certified until Dec 24 19:06:10 2029 GMT (3650 days) Sign the certificate? [y/n]:y 1 out of 1 certificate requests certified, commit? [y/n]y Write out database with 1 new entries Data Base Updated C:Program FilesOpenVPNeasy-rsa>In this part, you need to generate the ”Diffie Hellman” parameters using thebuild-dh command. This step is necessary in order to set up the encryption model.
C:Program FilesOpenVPNeasy-rsa>build-dh.bat Generating DH parameters, 2048 bit long safe prime, generator 2 This is going to take a long time .................................+......................................................................................................+.............................................................................................+..................................................................................+......................................................... .............................................................................+............................+..........+........+............................................+..............................................+....++*++*++*++* C:Program FilesOpenVPNeasy-rsa>Generate a shared secret key (which is required when using tls-auth):
"C:Program FilesOpenVPNbinopenvpn.exe" --genkey --secret "C:Program FilesOpenVPNeasy-rsakeysta.key"Configuration Files
OpenVPN provides sample configuration data which can easily be found using the start menu.
Open the Start menu, and click on All Programs. Then select OpenVPN Sample Configuration Files from the OpenVPN options.
Server Config File
Copy the sample ”server configuration” file over to the easy-rsa folder. This command and its output are as follows:
copy "C:Program FilesOpenVPNsample-configserver.ovpn" "C:Program FilesOpenVPNeasy-rsakeysserver.ovpn" C:Program FilesOpenVPNeasy-rsa>"C:Program FilesOpenVPNbinopenvpn.exe" --genkey --secret "C:Program FilesOpenVPNeasy-rsakeysta.key" C:Program FilesOpenVPNeasy-rsa>copy "C:Program FilesOpenVPNsample-configserver.ovpn" "C:Program FilesOpenVPNeasy-rsakeysserver.ovpn" 1 file(s) copied. C:Program FilesOpenVPNeasy-rsa>Now edit the server.ovpn file:
notepad "C:Program FilesOpenVPNeasy-rsakeysserver.ovpn"Locate the following lines within the file:
ca ca.crt cert server.crt key server.key dh dh2048.pemThen edit them as follows:
ca "C:\Program Files\OpenVPN\config\ca.crt" cert "C:\Program Files\OpenVPN\config\server.crt" key "C:\Program Files\OpenVPN\config\server.key" dh "C:\Program Files\OpenVPN\config\dh2048.pem"Finally, save and close the file.
Client Config Files
The client file modification is very similar to the server configuration changes.
Copy the sample server configuration file to the easy-rsa folder with the client’s Common Name as the file name.
Remember: Each client will need to have a unique filename.
copy "C:Program FilesOpenVPNsample-configclient.ovpn" "C:Program FilesOpenVPNeasy-rsakeysMichael-PC.ovpn" C:Program FilesOpenVPNeasy-rsa>copy "C:Program FilesOpenVPNsample-configclient.ovpn" "C:Program FilesOpenVPNeasy-rsakeysMichael-PC.ovpn" 1 file(s) copied. C:Program FilesOpenVPNeasy-rsa> Edit the client’s config file.
notepad "C:Program FilesOpenVPNeasy-rsakeysMichael-PC.ovpn" Locate the following settings in the file and edit them as follows:
ca ca.crt cert client.crt key client.key to ca "C:\Program Files\OpenVPN\config\ca.crt" cert "C:\Program Files\OpenVPN\config\Michael-PC.crt" key "C:\Program Files\OpenVPN\config\Michael-PC.key" Next, we will edit the line “my-server-1“, replacing it with the server’s public IP Address or Domain Name.
remote my-server-1 1194 # The hostname/IP and port of the server. # You can have multiple remote entries # to load balance between the servers. remote my-server-1 69.16.236.167 ;remote my-server-2 1194 Save and close the file.
Copying the Client and Server Files to Their Pertinent Directories
Now you can copy these files from C:Program FilesOpenVPNeasy-rsakeys to C:Program FilesOpenVPNconfig on the server using the robocopy command:
- ca.crt
- ta.key
- dh2048.pem
- server.crt
- server.key
- server.ovpn
robocopy "C:Program FilesOpenVPNeasy-rsakeys " "C:Program FilesOpenVPNconfig " ca.crt ta.key dh2048.pem server.crt server.key server.ovpn C:Program FilesOpenVPNeasy-rsa>robocopy "C:Program FilesOpenVPNeasy-rsakeys " "C:Program FilesOpenVPNconfig " ca.crt ta.key dh2048.pem server.crt server.key server.ovpn ------------------------------------------------------------------------------- ROBOCOPY :: Robust File Copy for Windows ------------------------------------------------------------------------------- Started : Friday, December 27, 2019 12:16:02 PM Source : C:Program FilesOpenVPNeasy-rsakeys Dest : C:Program FilesOpenVPNconfig Files : ca.crt ta.key dh2048.pem server.crt server.key server.ovpn Options : /DCOPY:DA /COPY:DAT /R:1000000 /W:30 ------------------------------------------------------------------------------ 4 C:Program FilesOpenVPNeasy-rsakeys 100% New File 2482 ca.crt 100% New File 432 dh2048.pem 100% New File 10901 server.ovpn 100% New File 657 ta.key ------------------------------------------------------------------------------ Total Copied Skipped Mismatch FAILED Extras Dirs : 1 0 1 0 0 0 Files : 4 4 0 0 0 0 Bytes : 14.1 k 14.1 k 0 0 0 0 Times : 0:00:00 0:00:00 0:00:00 0:00:00 Speed : 452250 Bytes/sec. Speed : 25.877 MegaBytes/min. Ended : Thursday, July 16, 2020 12:16:02 PM C:Program FilesOpenVPNeasy-rsa> You can copy the following files from C:Program FilesOpenVPNeasy-rsakeys on the server to C:Program FilesOpenVPNconfig for each client that will be using the VPN (e.g., Michael-PC, in this example)
- ca.crt
- ta.key
- Michael-PC.crt
- Michael-PC.key
- Michael-PC.ovpn
Firewall Settings
If you have any connection difficulties, ensure you set up a rule on the server’s firewall allowing incoming UDP traffic on port 1194. (Win+R “wf.msc”)
Conclusion
We hope you would enjoy this tutorial, you can ask questions about this training in the comments section, or to solve other problems in the field of Eldernode training, refer to the Ask page section and raise your problem in it as soon as possible. In this article, we taught you how to install OpenVPN on Windows Server 2019.
OpenVPN GUI

Installation Instructions for OpenVPN GUI for Windows
OpenVPN-GUI has been bundled with OpenVPN installers for a long time, so there
is rarely a need to install it separately. Bleeding-edge
versions of OpenVPN-GUI are available in OpenVPN snapshot
installers based on Git master
branch. OpenVPN-GUI gets installed by default in all OpenVPN installers.
Installation using the official OpenVPN installers
- Download an OpenVPN installer
- If you have a previous version of OpenVPN GUI running, shut it down.
Make sure it’s closed by ALL logged on users. - Run the OpenVPN installer
Manual installation of OpenVPN GUI
- First install OpenVPN using an official installer as described above.
- Build your own version of OpenVPN GUI from source. See BUILD.rst
for build instructions. From the build tree copy openvpn-gui.exe,
libopenvpn_plap.dll, openvpn-plap-install.reg and openvpn-plap-uninstall.reg
to OpenVPN’s bin folder.
Default is C:Program FilesOpenVPNbin. You must put it in this folder
because OpenVPN GUI depends on the OpenSSL DLLs installed in this folder by
OpenVPN.
Configuring OpenVPN GUI to start on Windows logon
OpenVPN GUI can be configured to start automatically on logon to Windows from
its setting menu. This is default behavior for all users if OpenVPN GUI was
installed by an OpenVPN 2.4 installer using default installer options.
Adding an OpenVPN configuration file
To launch a VPN connections using OpenVPN GUI you need to add an OpenVPN
configuration file with .ovpn suffix. Any text editor (e.g. notepad.exe) can be
used to create a OpenVPN configuration files. Note that log and log-append
options are ignored as OpenVPN GUI redirects the normal output to a log file
itself. There are sample config files in the sample-config folder. Please
refer to the OpenVPN How To for more
information regarding creating the configuration file.
Once the configuration file is ready, you need to let OpenVPN GUI know about it.
There are three ways to do this:
- Place the file into the system-wide location, usually
C:Program FilesOpenVPNconfig, or any of its immediate
subdirectories. This VPN connection will be visible for all users of the
system. - Place the file into C:UsersusernameOpenVPNconfig, or any of its
immediate subdirectories. The configuration file is only visible for the
user in question. If the user is not a member of the built-in «Administrators»
group or «OpenVPN Administrators» group and tries to launch such a connection,
OpenVPN GUI pops up a UAC, offering to create the latter group (if missing)
and to add the user to it. This will only work if admin-level credentials are
available. - Use the «Import file» function in OpenVPN GUI itself
- See the section on Persistent or Pre-started connections
for how to use OpenVPN GUI to conftrol configurations in
C:Program FilesOpenVPNconfig-auto that are started by the automatic service.
Using OpenVPN GUI
When OpenVPN GUI is started your OpenVPN config folders
(C:UsersusernameOpenVPNconfig and
C:Program FilesOpenVPNconfig) will be scanned for .ovpn files and the
OpenVPN GUI icon will appear in the system tray. Each OpenVPN configuration
file shows up as a separate menu item in the OpenVPN GUI tray, allowing you to
selectively connect to and disconnect to your VPNs. The config dir will be
re-scanned for new config files every time you open the OpenVPN GUI menu by
right-clicking the icon.
When you choose to connect to a site OpenVPN GUI will launch openvpn with
the specified config file. If you use a passphrase protected key you will be
prompted for the passphrase.
If you want OpenVPN GUI to start a connection automatically when it’s started,
you can use the —connect cmd-line option. The extension of the config file
may be optionally included. Example:
openvpn-gui --connect office.ovpn
OR
openvpn-gui --connect office
Starting version 11.34, any connections active when OpenVPN GUI exits or the user
logs out are automatically reconnected when OpenVPN GUI is restarted.
To get help with OpenVPN GUI please use one of the official OpenVPN support
channels.
Running OpenVPN GUI
Run OpenVPN-GUI as normal user by double clicking on the icon. No
administrative privileges or runas-administrator options are required.
It just works as limited user with the help of Interactive Service which
is enabled by default.
Persistent or Pre-started connections
Starting release 2.5.8 (GUI version 11.30), OpenVPN GUI can
control connections started by the «automatic service»
(OpenVPNService) — also referred to as persistent connections.
OpenVPNService, if running, starts all connection profiles
listed in the config-auto directory in the installation path.
By default, such connections are scanned for, and attempt is
made to attach to their management interfaces if available.
User can then view the status of these connections, and disconnect,
reconnect, detach or re-attach them using the menu items.
It requires that such connections be started with
—management 127.0.0.1 port [pw-file] option in their config file.
pw-file containing a password is optional, but highly recommended.
The password should be a single line of text, preferably shorter than 128
characters of plain ascii.
Further, if —auth-user-pass or any such options requiring
interactive user input are present, the config file must also
contain —management-query-passwords.
This feature may be controlled by changing the Persistent Connections
setting in the General tab of the Settings menu: choose auto
for the default behaviour described above, manual to enumerate
and list such connections but not auto-attach, or disable to not scan
auto-started connection profiles.
Interactively starting connections before logon
Starting release 2.6 (GUI version 11.30), «Start Before Logon»
aka Pre-Logon Access Provider is supported. This feature is not
enabled by default. It may be enabled during installation or
through the General Settings menu of the GUI via the
Start Before Logon check mark.
Only persistent connection profiles described in the previous
section will be listed on the login screen. Ensure that
connections that may be interactively started from login
screen are setup in the config-auto folder, OpenVPNService
is running, and these connections are visible and controllable
from the GUI.
Once those pre-requisites are satisfied, the login screen will
display an icon for Pre-Logon Access Providers, clicking which
will bring up a list of OpenVPN connection profiles available, and
allow connecting or disconnecting them interactively.
Run Connect/Disconnect/Preconnect Scripts
There are three different scripts that OpenVPN GUI can execute to help
with different tasks like mapping network drives.
- Preconnect If a file named «xxx_pre.bat» exist in the config folder
- where xxx is the same as your OpenVPN config file name,
this will be executed BEFORE the OpenVPN tunnel is established. - Connect If a file named «xxx_up.bat» exist in the config folder
- where xxx is the same as your OpenVPN config file name,
this will be executed AFTER the OpenVPN tunnel is established. - Disconnect If a file named «xxx_down.bat» exist in the config folder
- where xxx is the same as your OpenVPN config file name,
this will be executed BEFORE the OpenVPN tunnel is closed.
The outputs of these scripts are redirected to «xxx_pre.log»,
«xxx_up.log» and «xxx_down.log» respectively. These log
files are created in the log_dir and over-written during
each evocation.
Send Commands to a Running Instance of OpenVPN GUI
When an instance of the GUI is running, certain commands may be sent to
it using the command line interface using the following syntax:
openvpn-gui.exe --command *cmd* [*args*]
Currently supported cmds are
- connect
config-name - Connect the configuration named config-name (excluding the
extension .ovpn). If already connected, show the status window. - disconnect
config-name - Disconnect the configuration named config-name if connected.
- reconnect
config-name - Disconnect and then reconnect the configuration named config-name
if connected. - disconnect_all
- Disconnect all active connections.
- silent_connection 0 | 1
- Set the silent connection flag on (1) or off (0)
- exit
- Disconnect all active connections and terminate the GUI process
- rescan
- Rescan the config folders for changes
- import
path - Import the config file pointed to by
path.
If no running instance of the GUI is found, these commands do nothing
except for —command connect config-name which gets interpreted
as —connect config-name
Registry Values affecting the OpenVPN GUI operation
Parameters taken from the global registry values in
HKEY_LOCAL_MACHINESOFTWAREOpenVPN key
- (Default)
- The installation directory of openvpn (e.g., C:Program FilesOpenVPN).
This value must be present. - config_dir
- The global configuration file directory. Defaults to
C:Program FilesOpenVPNconfig - exe_path
- path to openvpn.exe, defaults to C:Program FilesOpenVPNbinopenvpn.exe
- priority
-
the windows priority class for each instantiated OpenVPN process,
can be one of:- IDLE_PRIORITY_CLASS
- BELOW_NORMAL_PRIORITY_CLASS
- NORMAL_PRIORITY_CLASS (default)
- ABOVE_NORMAL_PRIORITY_CLASS
- HIGH_PRIORITY_CLASS
- ovpn_admin_group
- The windows group whose membership allows the user to start any configuration file
in their profile (not just those installed by the administrator in the global
config directory). Default: «OpenVPN Administrators». - disable_save_passwords
- Set to a nonzero value to disable the password save feature.
Default: 0 - auto_config_dir
- If persistent connection support is enabled and the so-called automatic
service (OpenVPNService) is running, any config files in this folder are
scanned and listed in the list of connection profiles.
User Preferences
All other OpenVPN GUI registry values are located below the
HKEY_CURRENT_USERSOFTWAREOpenVPN-GUI key. In a fresh
installation none of these values are present and are not
required for the operation of the program. These keys are only
used for persisting user’s preferences, and the key names
and their values are subject to change.
The user is not expected to edit any of these values directly.
Instead, edit all preferences using the settings menu.
- config_dir
- The user-specific configuration file directory: defaults to
C:UsersusernameOpenVPNconfig.
The GUI parses this directory for configuration files before
parsing the global config_dir. - config_ext
- file extension on configuration files, defaults to ovpn
- connectscript_timeout
- Time in seconds to wait for the connect script to finish. If set to 0
the exitcode of the script is not checked. - disconnectscript_timeout
- Time in seconds to wait for the disconnect script to finish. Must be a
value between 1-99. - preconnectscript_timeout
- Time in seconds to wait for the preconnect script to finish. Must be a
value between 1-99. - log_dir
- log file directory, defaults to C:UsersusernameOpenVPNlog
- log_append
- if set to «0», the log file will be truncated every time you start a
connection. If set to «1», the log will be appended to the log file. - silent_connection
- If set to «1», the status window with the OpenVPN log output will
not be shown while connecting. Warnings such as interactive service
not started or multiple config files with same name are also suppressed. - show_balloon
-
0: Never show any connected balloon
1: Show balloon after initial connection is established
2: Show balloon even after re-connects
- config_menu_view
-
0: Use a hierarchical (nested) display of config menu reflecting the directory sturcture of config files if the number of configs exceed 25, else use a flat display
1: Force flat menu
2: Force nested menu
- disable_popup_messages
- If set to 1 echo messages are ignored
- popup_mute_interval
- Amount of time in hours for which repeated echo messages are not displayed.
Defaults to 24 hours. - management_port_offset
- The management interface port is chosen as this offset plus a connection specific index.
Allowed values: 1 to 61000, defaults to 25340.
All of these registry options are also available as cmd-line options.
Use «openvpn-gui —help» for more info about cmd-line options.
Building OpenVPN GUI from source
See BUILD.rst for build instructions.
Introduction
A VPN (Virtual Private Network) is a virtual private network that allows you to securely connect to the Internet to remotely access your company’s IT network. Through a VPN it is therefore possible to access company services and resources, even from an untrusted network, as if you were physically present on site.
VPNs can be implemented through common operating systems, including Windows, and a service like OpenVPN. It is an open source software that allows you to create an encrypted virtual tunnel based on the TLS / SSL (Transport Layer Security / Secure Sockets Layer) protocols, using certificates to allow traffic to securely pass between the server and one or more clients.
In this tutorial you will learn how to implement a VPN on your Cloud Server by installing and configuring OpenVPN connect client software on Windows Server 2019.
Prerequisites
In order to connect to the same network, the two or more devices (client and server) connected to the VPN must have access to port 1194.
This can be done by allowing UDP traffic on that port by adding a rule to your firewall.
Installing OpenVPN
The first step is to download the OpenVPN installer for Windows Server 2019 directly from the official website .
Once the file is downloaded, open it and start the installation procedure. Make sure you put the check mark under «EasyRSA 2 Certificate Management Scripts» and then click on «Next».
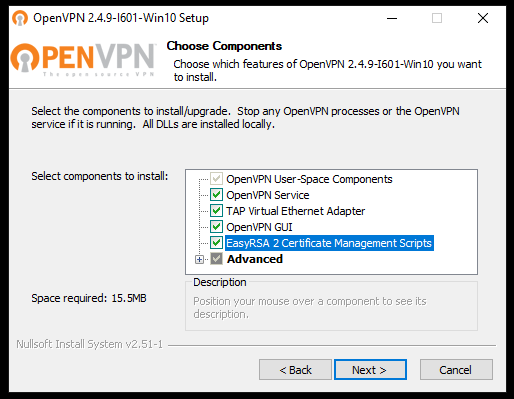
Continue with the installation, by going on every time you are required to do so .
Generating Certificates and Keys for the Server
Once the preliminary installation phase of OpenVPN is completed, generate the certificates and keys for accessing the VPN .
First, open the terminal of your Windows Server. To do so, click on Start, type «cmd» and right-click on the Command Prompt icon, then, select «Run as administrator».
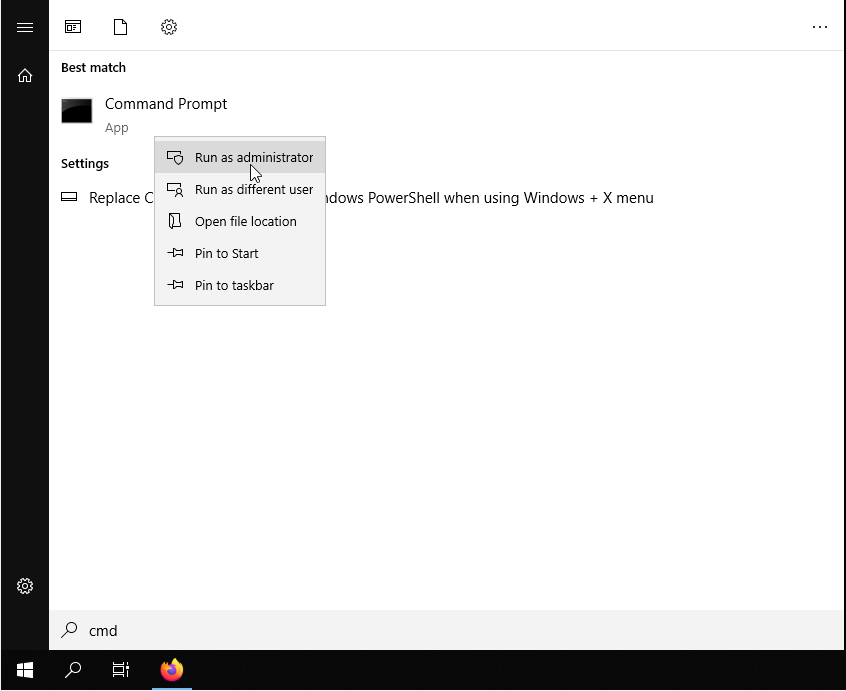
Go to the folder where OpenVPN was installed and start the «init-config» script.
cd "C:Program FilesOpenVPNeasy-rsa"init-configAn output similar to that in the figure below should be shown.
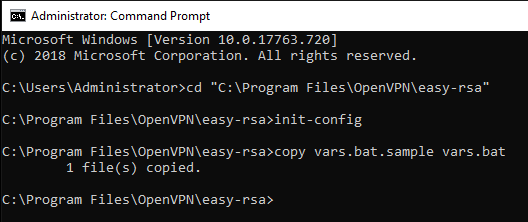
At this point, apply the changes to the «vars.bat» file in the «C: Program Files OpenVPN easy-rsa» folder:
notepad vars.batAlmost at the end of the document there will be a series of items beginning with «set» and used to set some information between the environment variables. Edit these fields with your information to generate the certificate.

This step is not essential as you will be required to enter this information later on as well. However, by setting the values in this file now, these values will be used as default parameters later.
Once this information has been entered, save the file and close the text editor. Then, type the following commands to apply these changes :
varsclean-allThen, start creating the Certificate. From the terminal (started as administrator and always in the «C: Program Files OpenVPN easy-rsa» folder) type:
build-caIf the «vars» file was already edited with your information, this will already be present in the square brackets of each required field. In this case, just press «Enter» to select this value as the default parameter.
On the other hand, the item «Common name» has to be given an easy- to- remember name r: in this case «OpenVPN-CA» will be used.
To verify that the operation of certificate generation was successful, the two files «ca.crt» and «ca.key» will be created in the «easy-rsa keys» folder.
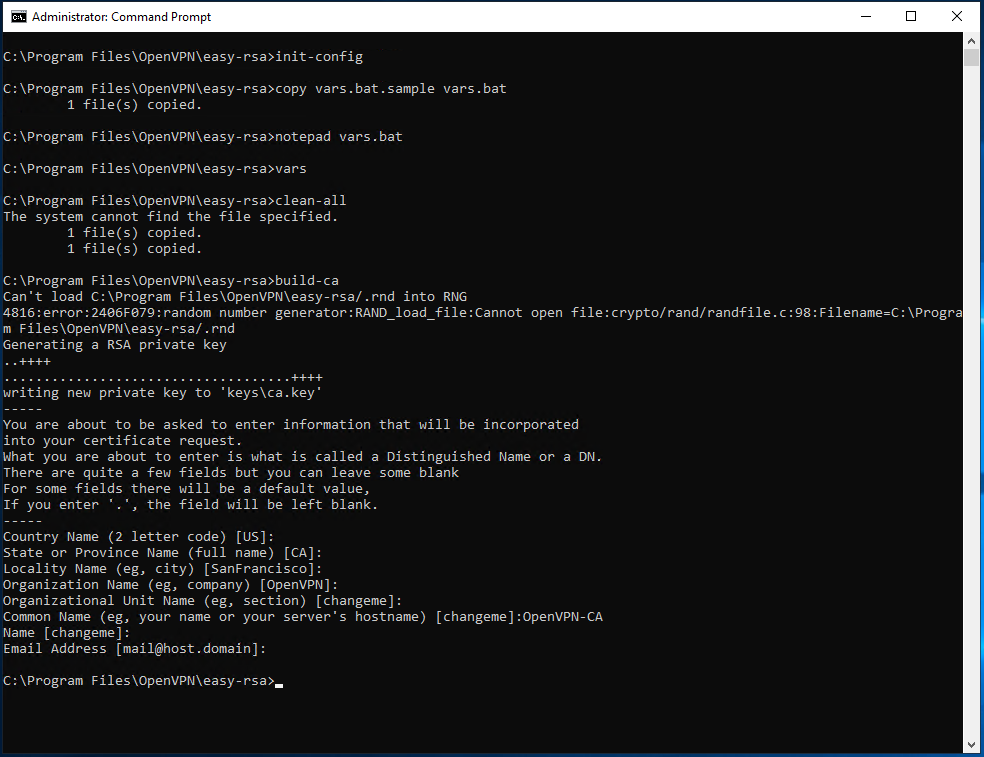
At this point, create the server keys. To start the procedure use the command:
build-key-server server_nameIn this case, assign to the server the generic name by specifying it under «Common Name». As shown in the following image, the name «server» was here used.
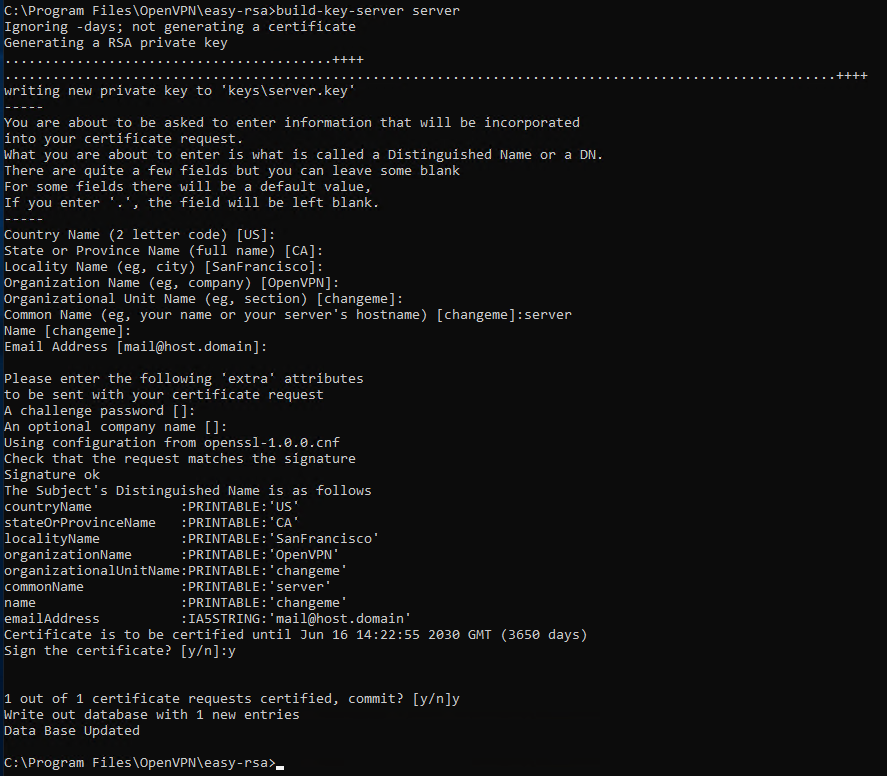
Towards the end of the procedure you will be requested to confirm the saving of the data set twice. In both cases, type y and press «Enter».
Generating Key for the Client
Since in a VPN all connected devices must be recognizable, Clients also need a pair of keys for communicating. Still inside your Server, from the terminal and in the folder «C: Program Files OpenVPN easy-rsa») type:
build-key client_nameIn this case, specify the generic name to assign to the Client (as in the image, in this case «client-desktop» was used) under the «Common Name» item .
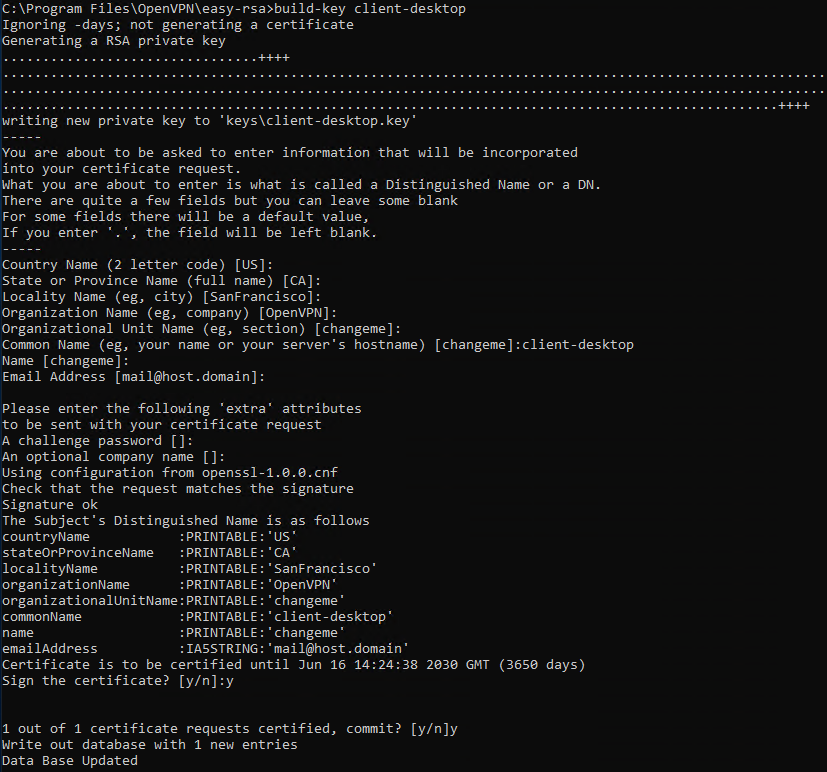
Now it is necessary to start the Diffie-Hellman cryptographic protocol allowing the two interlocutors (Server and Client) to agree on which «common» key they will use as an authentication key to identify each other. Then, type:
build-dhThis operation may take long, depending on the hardware the server has, and requires no user interaction.
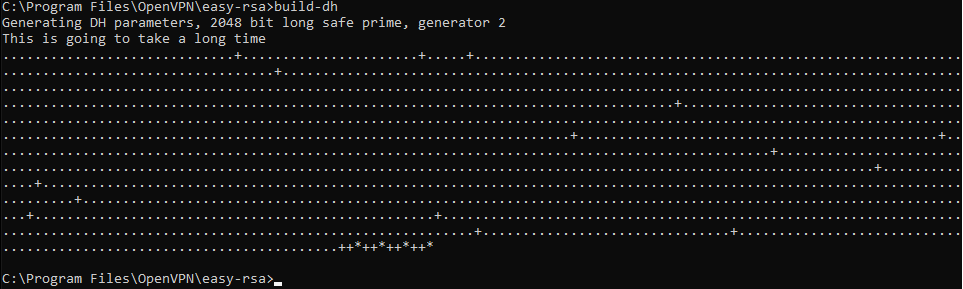
Finally, generate the «ta.key» key, to further increase the VPN security. More precisely, define a TLS authentication that verifies the integrity of the packets moving through the network. Then, type:
"C:Program FilesOpenVPNbinopenvpn.exe" --genkey --secret "C:Program FilesOpenVPNeasy-rsakeysta.key"Server configuration file
OpenVPN already provides sample configuration files that can be used to generate the configuration needed for the correct functioning of the VPN.
Open Start -> All Programs -> OpenVPN -> OpenVPN Sample Configuration Files and copy the file «server.ovpn» to the folder «» C: Program Files OpenVPN easy-rsa keys «. Once copied, open it with the Notepad:
notepad "C:Program FilesOpenVPNeasy-rsakeysserver.ovpn"Then identify the items:
- approx .crt
- cert server.crt
- key server.key
- dh dh2048.pem
and replace them with:
- ca «C: \ Program Files \ OpenVPN \ config \ ca.crt»
- cert «C: \ Program Files \ OpenVPN \ config \ server.crt»
- key «C: \ Program Files \ OpenVPN \ config \ server.key»
- dh «C: \ Program Files \ OpenVPN \ config \ dh2048.pem»
Apply these changes, save and close the file.
Client Configuration File
The changes to be made to the Client configuration file are very similar to those made for the Server.
Open Start -> All Programs -> OpenVPN -> OpenVPN Sample Configuration Files and copy the file «client.ovpn» to the folder «» C: Program Files OpenVPN easy-rsa keys «. Once copied, rename it giving it the same «Common Name» name used in the key generation phase (in this case «client-desktop») and open it with the Notepad.
notepad "C:Program FilesOpenVPNeasy-rsakeysclient-desktop.ovpn"Then identify the items:
- approx .crt
- cert server.crt
- key server.key
and replace them with:
- ca «C: \ Program Files \ OpenVPN \ config \ ca.crt»
- cert «C: \ Program Files \ OpenVPN \ config \ client-desktop.crt»
- key «C: \ Program Files \ OpenVPN \ config \ client-desktop.key»
Also identify the remote entry my-server-1 1194 and replace “my-server-1” with the IP address of your Server. Apply these changes, save and close the file.
At this point, copy the following files:
- ca.crt
- ta.key
- dh2048.pem
- server.crt
- server.key
- server.ovpn
Inside the folder «C: Program Files OpenVPN config», an operation that can be performed directly with the robocopy tool .
robocopy "C:Program FilesOpenVPNeasy-rsakeys " "C:Program FilesOpenVPNconfig " ca.crt ta.key dh2048.pem server.crt server.key server.ovpnJust copy the following files:
- ca.crt
- ta.key
- client-desktop.crt
- client-desktop.key
- client-desktop.ovpn
Within your Client in the folder «C: Program Files OpenVPN config «.
NB the OpenVPN GUI must have already been installed on the Client as well, as explained at the beginning of the tutorial for the Server.
At this point, click on Start -> All Programs -> OpenVPN -> OpenVPN GUI both on the Server and on the Client.
The graphical interface of OpenVPN will open in the tray system, at the bottom right. Right click on the respective OpenVPN icon, then click «Connect».
When the icon turns green, the connection to the virtual private network has been correctly established and, therefore, the two devices, client and server, will be communicating through the newly created VPN.
OpenVPN
для Windows

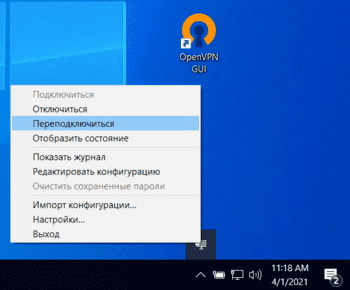
OpenVPN — кроссплатформенный инструмент для безопасного туннелирования IP-сетей через единственный UDP или TCP-порт с поддержкой аутентификации сессий и обмена ключами на основе SSL/TLS, шифрования, аутентификации и сжатия пакетов. Поддерживается широкий спектр конфигураций, динамических IP-адресов и NAT, присутствует возможность настраивать удаленный доступ, VPN-соединения типа «точка-точка» и пр.
Основные возможности OpenVPN:
- Поддержка прокси серверов, включая HTTP, SOCKS, NAT и сетевые фильтры.
- Сетевые операции через TCP или UDP транспорт.
- Туннелирования IP-сетей через единственный UDP или TCP-порт с поддержкой аутентификации сессий.
- Эффективное сжатие трафика.
- Поддержка нескольких протоколов шифрования (MD5-HMAC, RSA) и 2048-битного ключа.
- Возможность настраивать удаленный доступ.
- Поддержка динамических IP-адресов и NAT.
- VPN-соединения типа «точка-точка».
ТОП-сегодня раздела «Анонимайзеры, VPN»
![]() Tor Browser 12.0.2
Tor Browser 12.0.2
Предоставляет надежную защиту персональной информации и конфиденциальности, которая…
![]() Windscribe 2.5.17
Windscribe 2.5.17
Удобное решение, которое представляет собой набор инструментов, которые работают вместе…
![]() AdGuard VPN 2.0.1
AdGuard VPN 2.0.1
Удобный инструмент для интернет-безопасности и защиты конфиденциальности в Сети,…
![]() Planet VPN 1.4.05.01
Planet VPN 1.4.05.01
Бесплатный VPN с возможностями, функционалом и защищенностью на уровне топовых платных…
Отзывы о программе OpenVPN
Сергей про OpenVPN 2.5.7 [12-07-2022]
OpenVPN-2.5.7-I602-arm64 Win10 очень классная программа, бесплатная и работает на все100%
4 | 7 | Ответить
Валерий про OpenVPN 2.5.6 [24-03-2022]
Хрень, полная ни фига эта прога не меняет ваш регион и ип. Зря качал.
4 | 33 | Ответить
Алексей в ответ Валерий про OpenVPN 2.5.7 [18-01-2023]
Ну если не знать для чего существует данная программа, то хаять конечно же проще.
Свою задачу она выполняет на все 100%
| | Ответить
