In this article, we have shared the manual VMware Tools download links for Windows, Linux, or macOS guest operating systems that you have installed on your host computer using one of the VMware Workstation, VMware Fusion, or ESXi virtualization software.
How to Manually Download VMware Tools ISO/EXE for Windows, Linux, and macOS Virtual Machines
To increase the performance of the virtual machines you have installed on your host computer or to transfer files between the host and the VM, you need to install VMware Tools. By installing the drivers for the guest operating systems you have installed with VMware Workstation, VMware Fusion, or vSphere ESXi, you can enable features such as better mouse experience or fitting screen resolution to full screen.
To install the drivers for a Windows, Linux, or macOS guest operating system that you have installed on the virtual machine, simply click VM / Install VMware Tools from the tool menu. In this case, you do not need to download VMware Tools, because it is integrated into Workstation and Fusion programs.
What’s the Benefit of Installing Virtual Machine Tools?
- It fixes the low video resolution issues.
- It improves insufficient color depth.
- It fixes the issue where the network speed is displayed incorrectly.
- It improves restricted mouse movement.
- It enables copy-paste and drag-and-drop for files.
- It fixes the missing sound issue.
- It enables taking snapshots of the guest operating system.
- It synchronizes the clock on the guest operating system with the host.
- It installs the hardware drivers of the virtual machine.
- It allows you to use the virtual machine in full-screen mode.
VMware Tools for Windows Guest Operating Systems
It is possible to manually download VMware Tools to update or install the drivers of all Windows guest machines you have installed on your host computer using one of the virtualization software.
After visiting the web page containing the latest version of VM Tools tools by clicking the button below, you can manually download the 32 Bit or 64 Bit or ISO file to your computer according to the architectural platform of the system you have installed.
Download
VMware Tools for Linux Guest Operating Systems
VMware company had allowed downloading virtual machine drivers for Linux guest machines as tar.gz file extension on its official website. However, the company has changed the decision to download this file for Linux systems, suggesting that it be followed on its GitHub page.
In order to install the drivers for Linux guest operating systems more easily, simply click Install VMware Tools from the tool menu of the virtualization software. However, it can be a bit difficult to install VM Tools on Linux machines as opposed to Windows guest machines. Therefore, you can install the drivers for your Ubuntu virtual machine by visiting this article that will guide you.
You can manually download the tar.gz extension package to your computer after visiting the Open VMware Tools for Linux webpage, which is constantly updated on GitHub, by clicking the button below.
Download
VMware Tools (Darwin.iso) for macOS Guest Operating Systems
What is Darwin.iso?
Due to situations arising from Apple‘s agreements with VMware, it is not officially supported to install macOS systems using Workstation software on Windows platforms. However, installing the macOS operating system using VMware Fusion on a Mac computer is officially supported.
Therefore, the Darwin.iso file from Fusion software is needed to install drivers for macOS guest machines on Windows or other platforms.
After installing your macOS guest machine, you can install the integrated VMware tools in the virtualization software on your guest system. Actually, you don’t need to download VMware tools externally, but it is recommended to install newer versions as the Darwin.iso file is also updated when newer versions of Fusion software are released.
In addition, you can install the drivers of macOS guest machines that you have installed on ESXi server virtualization platforms both with the VMware Tools inside and using the Darwin.iso file.
Download Latest Darwin.iso for macOS
You can download the latest Darwin.iso 13.0.0 file published by Fusion in the folder we shared on Google Drive by clicking the button below.
Download
Related Articles
♦ How to Install VM Tools on macOS
♦ How to Install Windows 10 on Mac
♦ How to Create a Virtual Machine on macOS
♦ How to Create a Virtual Machine on Windows
♦ How to Install Windows 10 in Virtual Machine
As of 12/11/2020, VMware no longer signs Tools for Windows Vista with SHA-1, so you need Windows 7 SP1 or later to use the latest version.
However, you can use an older version of VMware Tools, which is here: https://media.githubusercontent.com/media/thepwrtank18/thepwrtank18/master/VMware%20Tools%20for%20Windows%207%20RTM%20and%20Vista.iso
Link is dead. Instead, here’s a full on guide.
Step 0: Foreword
This is an unsupported operating system, with unsupported drivers. Use this at your own risk.
Step 1: Preparation
You will need:
- Either a:
- x64 Windows Vista ISO
- x64 Windows Vista Disc + Reader
- VMware Workstation (Pro or Player) 15.x, or Pro 16.x.
- An old version of the VMware Tools ISO (10.3.5 to be precise), from here
Step 2: Creation
Note: Do not let VMware scan your ISO or disc, Easy Install may use the wrong version of Windows, whether a wrong edition or architecture.
Make a VM. If you have Pro or Player 15.x, do what you normally do. If you have Pro 16.x, make sure compatibility is set to Workstation 15.x (in Custom settings). After that, customize the settings you want. (Player does not support custom settings, so you either need to get 15.x, which is what you need anyway, or Pro 16.x.)
Step 3: Modification
Make sure you have your ISO or disc selected in the VM options. If there’s a floppy disc or extra DVD drive with «autoinst» or the like on it, remove that drive.
Step 4: Installation
Install as usual. When it tells you do create a user profile, don’t do that. Go to the VM settings, then put in the VMware Tools ISO you got earlier. Don’t install VMware Tools via VM>Install VMware Tools. After that, press Shift+F10 in the VM. Put in D:setup64.exe.
Step 5: Initialization
Do the VMware Tools installation as usual. When it says if it wants to restart the machine, say «Yes», then go to VM>Power>Reset. When it reboots, do the setup as normal. Let it monitor your computer’s performance, as drivers are installed.
Posted by Mohammed Raffic on Last updated Jul 4, 2017 at 1:11PM | Published on Sep 14, 2013 in VM Tricks, VMware tools | 478065 Views | 4 Responses
This post is to share the information about how to manually download VMware tools ISO image for various Operating systems based on VMware vSphere versions including the latest version of vSphere such as vSphere 6.5 . VMware tools varies for each and every operating system. When we try to install or Upgrade VMware tools using vSphere client, It will automatically mount the associated VMware tools ISO into virtual CD ROM drive of your virtual machine based on the Guest Operating system of the virtual machine. If in case you face any problem with mounting VMware tools ISO image to the virtual machine using vSphere client, you can manually download VMware tools ISO image from the VMware website and install it manually on the respective guest operating system.
You can even download the complete list of VMware tools available for various operating systems and place it in your organization repository to be used by administrators. It will make your job easy. VMware tools helps to optimize the performance of your virtual machine using ESX/ESXi hypervisor resource management mechanisms.
Manually Download VMware Tools ISO Image
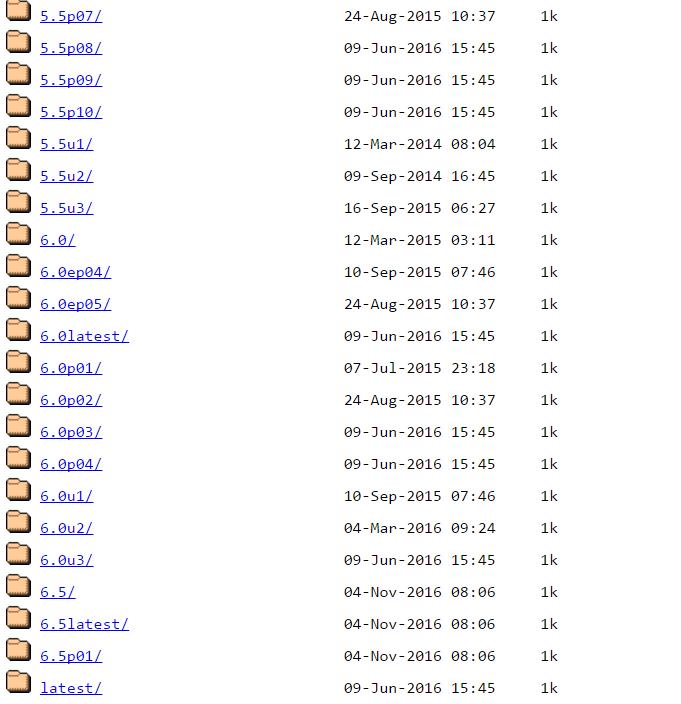
Download VMware Tools from packages.vmware.com. You can select the version of vSphere to download the VMware tools. I have Selected ESXi 6.5p01
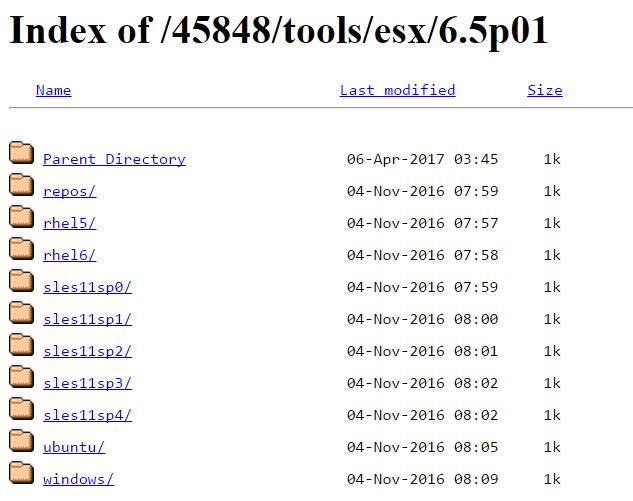
After selecting the ESX/ESXi version, It will allow us to select the Operating system to download VMware tools ISO image version for the respective operating system
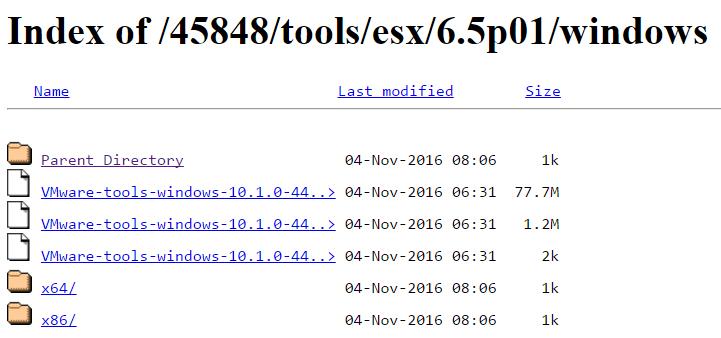
I have selected Windows in the above section and intern it will ask you to select either 32 bit or 64 bit of VMware tools version for the windows operating system.
Choose either X64 or X86 based on your operating system of the Virtual Machine. It will allow you to download VMware tools .exe file and also allow you to download VMware tools ISO image.
That’s it. You are done with the manual download of VMware tools ISO image for your guest operating system. I hope this post is informative for you. Thanks for Reading !!!
vSphere 6.5 Blog posts:
What’s New with VMware vSphere 6.5?
vSphere 6.5 -What’s New with vCenter 6.5?
What’s New with Virtual SAN 6.5? – New Features Overview
vSphere 6.5 -What’s New with vSphere 6.5 HA & DRS
vSphere 6.5 – What’s is in VMware vSphere 6.5 Fault Tolerance?
Download VMware vSphere 6.5 – Get your Copy to Evaluate!!!
vSphere 6.5 – Deploying vCenter appliance 6.5
Deploying vCenter 6.5 External Platform Services Controller
Deploying vCenter Server appliance 6.5 with External PSC
vSphere 6.5 – Configuring vCenter Server 6.5 HA
vSphere 6.5 – vCenter 6.5 Native HA Failover Testing
vSphere 6.5 Configuration Maximums – What’s New?
vSphere 6.5 – How VM’s are Secured using vSphere 6.5 Security Features?
Migrate Windows vCenter Server 6.0 to vCenter Server appliance 6.5
vCenter Server Appliance 6.5 Posts
The Ultimate Revelation Of Reset VCSA 6.5 Root Password in 60 seconds
6 Basic Commands to Interact with VCSA 6.5 Embedded VPostgres Database
6 Tips for Configuring Firewall To Manage VCSA 6.5 Postgres Database Remotely You Can Learn From VMwareArena
How to Connect VCSA 6.5 Embedded Postgres Database using pgAdmin (With GUI) -VMware Unsupported
WinSCP Connection to VCSA failed – “Received too large SFTP packet”
How to Backup vCenter Appliance 6.5 Embedded Postgres Database
How to Monitor vCenter Server Appliance 6.5 performance using vimtop
Become an Expert on vCenter Server appliance Log File Location in 120 seconds
How to Backup And Restore VCSA 6.5 – The Ultimate Cheatsheet
How to Join VCSA 6.5 to Active Directory Domain from Web Client
How to Configure Active Directory Authentication for vCenter Server 6.5
В статье мы подробно расскажем, зачем нужен VMware Tools, а также покажем способы его установки на операционную систему Windows 10. Если вы хотите установить этот пакет программ на ОС Ubuntu, используйте инструкцию Установка VMware Tools в Ubuntu.
Что такое VMware Workstation Tools
Чтобы одновременно запускать на одной физической машине (сервере или компьютере) несколько операционных систем, были придуманы специальные программы. Одной из таких программ является VMware Workstation Player. С её помощью можно создавать на компьютере с одной ОС, ещё один компьютер с совершенно другой ОС — виртуальную машину (ВМ или VM). VMware Workstation можно установить на macOS, Windows, а также на Linux и его дистрибутивы.
Однако, чтобы виртуальная машина работала наравне с физической, желательно установить дополнительные программы и утилиты. Например, VMware Workstation Tools.
VMware Tools — это специальный пакет программ, с помощью которого можно оптимизировать взаимодействие виртуальной машины и физической, ресурсы которой использует для работы виртуальная. Он позволяет улучшить управляемость и производительность операционной системы ВМ.
Tools усиливает интеграцию с гипервизором — элементом, который отвечает за распределение ресурсов основного компьютера между несколькими гостевыми операционными системами и изоляцию их друг от друга.
VMTools позволяет:
- использовать не только опцию Power, но и опции Shutdown и Restart,
- использовать оптимизированные драйверы ОС (например, vmxnet3),
- увеличить скорость работы курсора и видеоадаптера,
- использовать фреймворки API (например, VIX),
- раскрывать информацию (например, IP-адреса),
- настроить автоматический вход в учетную запись VM,
- настроить буфер обмена между двумя ОС,
- настроить отображение виртуальной машины на нескольких физических мониторах,
- использовать динамическую подстройку разрешения экрана гостевой ОС,
- открывать гостевую ОС как приложение через интерфейс основной ОС,
- перезагружать и выключать гостевую ОС без потери данных.
Тулс можно запускать на 32-разрядных и 64-разрядных операционных системах. Инструмент интеграции подойдёт для работы как на Windows, так и Linux и других дистрибутивах.
Пакет устанавливается одним из двух способов: сразу при создании гостевой ОС (через функцию Open-VM-Tools) или после её создания. Чтобы использовать первый способ, в старых версиях достаточно выбрать автоматическую интеграцию (OVT) при установке машины. В новых версиях пакет чаще всего устанавливается по умолчанию.
Во втором случае установка происходит вручную. Нужно смонтировать ISO-файл, который будет содержать двоичные файлы (установочные файлы, скрипты и другое) в виртуальный CD-ROM гостевой машины.
Ниже мы покажем, как установить Windows 10 на Workstation, а также разберём установку Tools вручную.
Как создать виртуальную машину Windows 10
-
1.
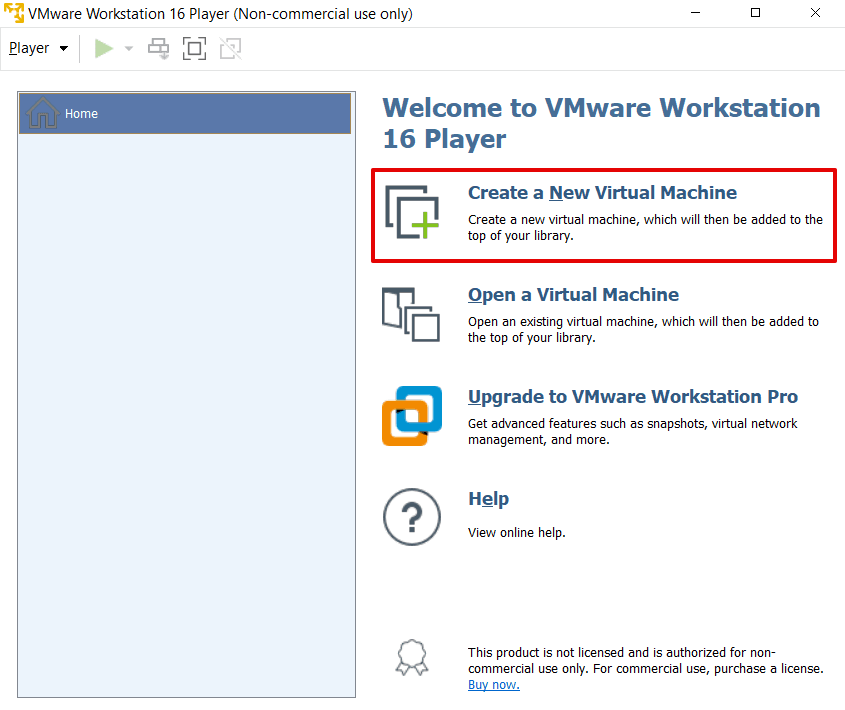
Запустите Workstation Player и нажмите Create a New Virtual Machine:
-
2.
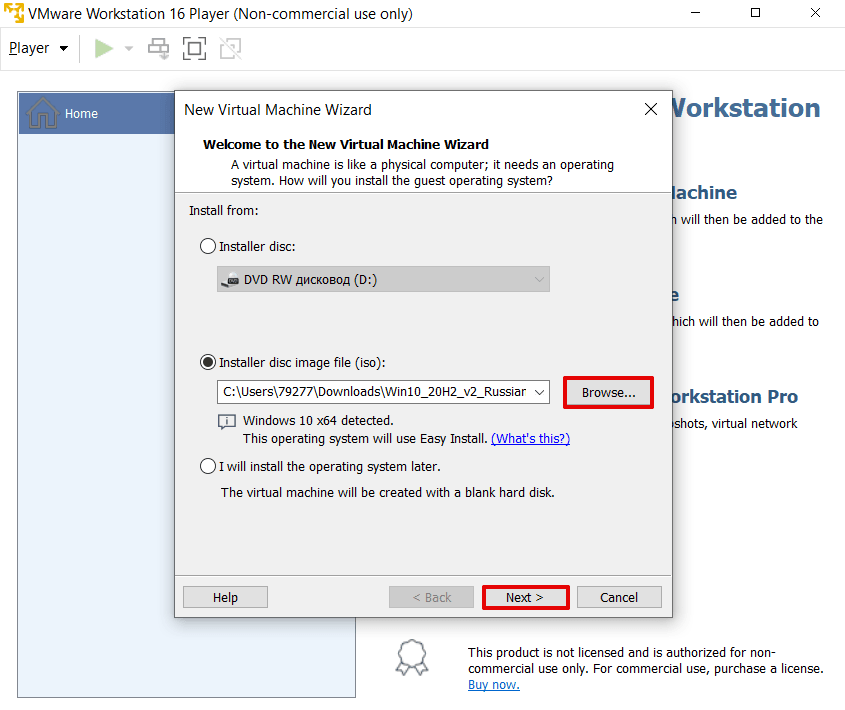
Нажмите Browse и в локальной папке компьютера выберите ISO-образ Windows 10. После этого кликните Next.
-
3.
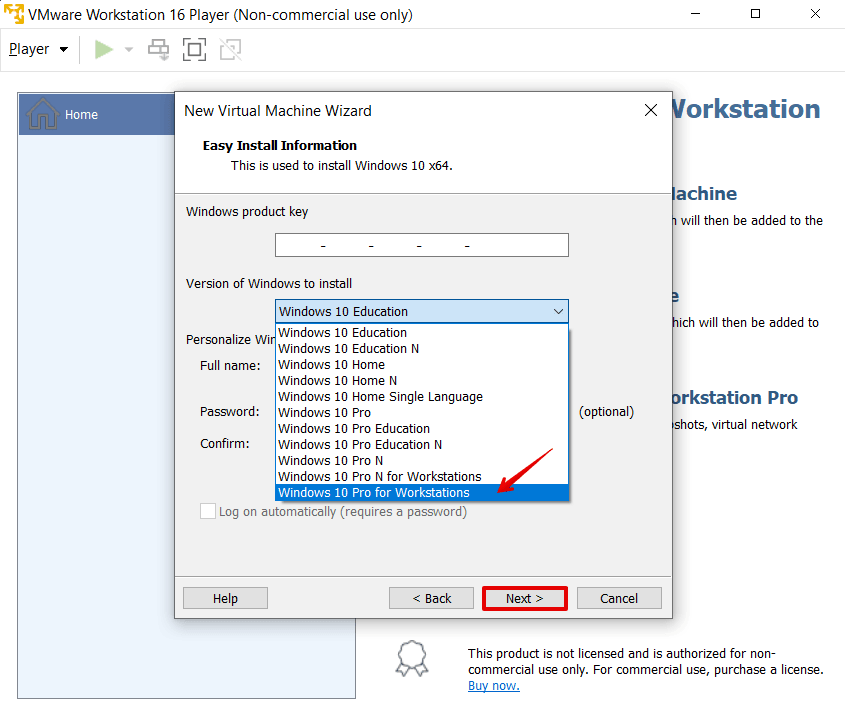
Кликните на строку Version of Windows to install. В выпадающем списке выберите Windows 10 Pro for Workstation и нажмите Next:
-
4.
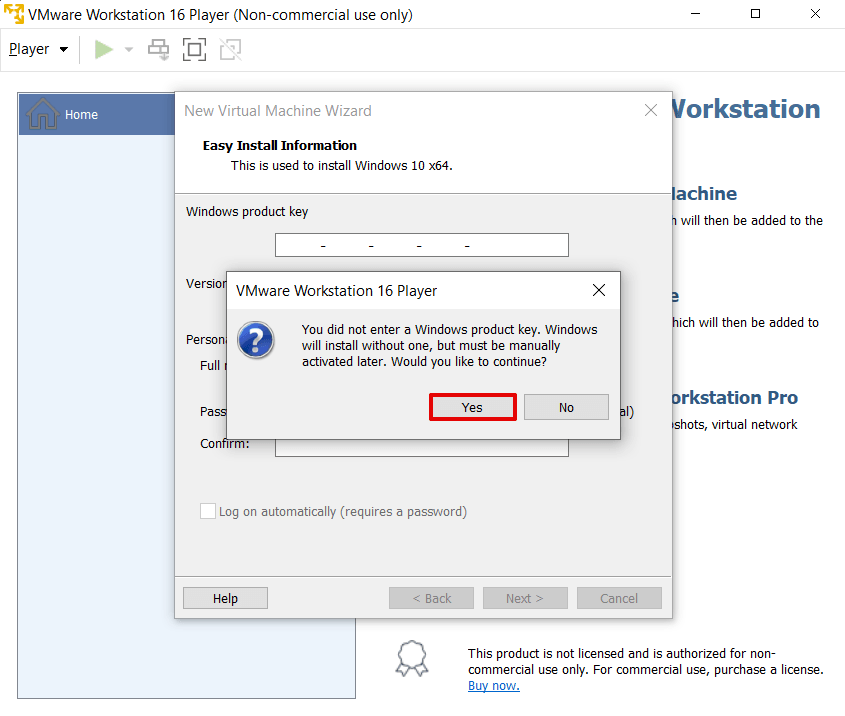
Во всплывающем окне нажмите Yes:
-
5.
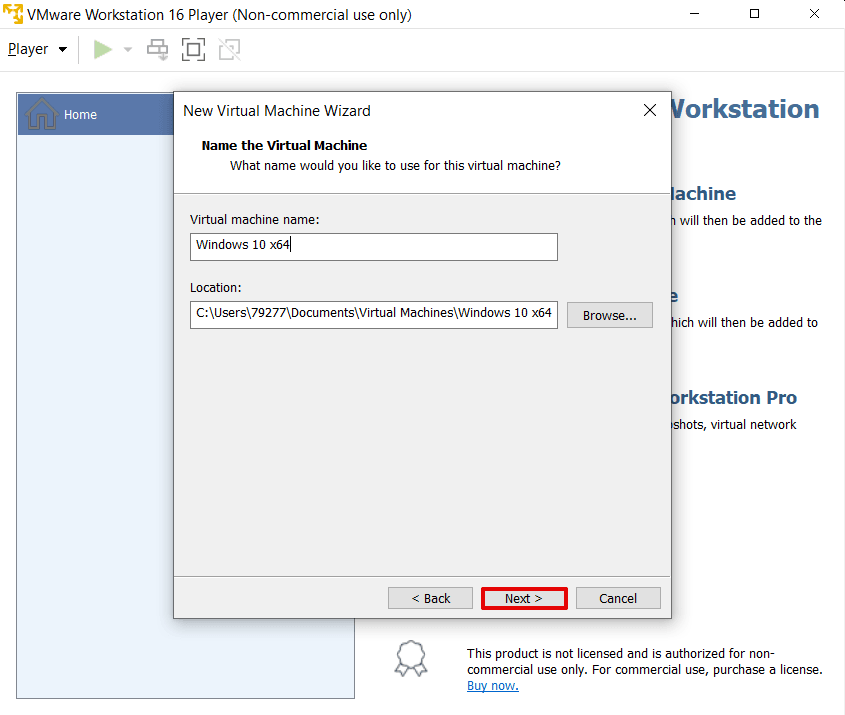
Затем кликните Next:
-
6.
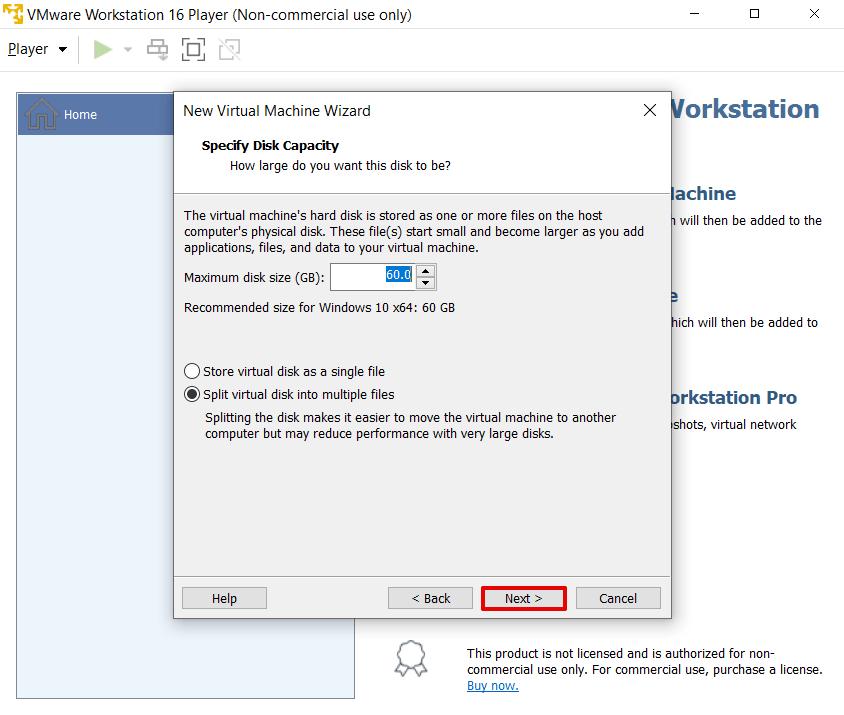
Выберите максимальное количество дисковой памяти, которое сможет использовать BM, и нажмите Next:
-
7.
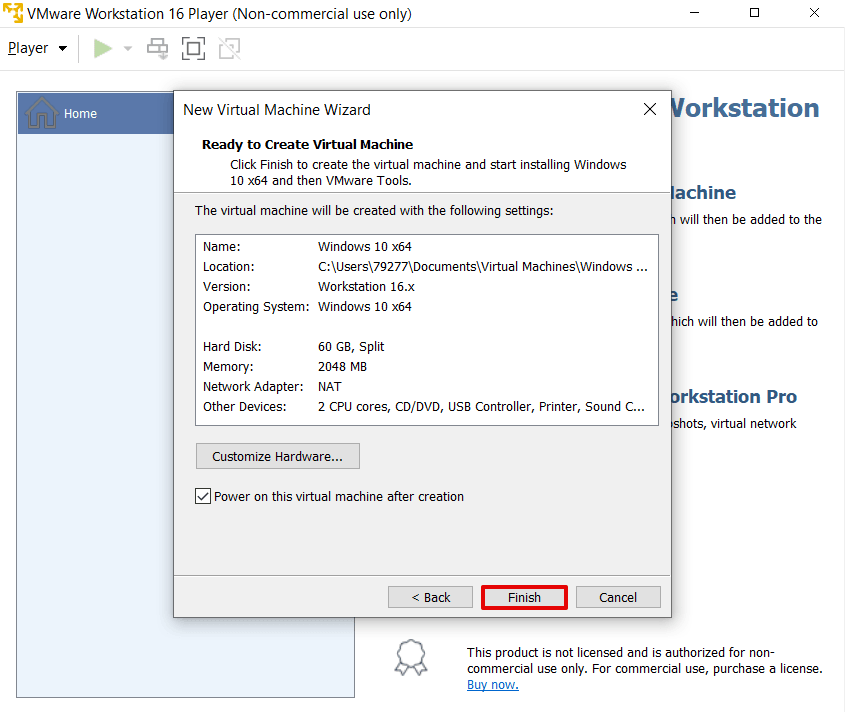
Чтобы завершить настройку, нажмите Finish. Создание машины займёт 5-10 минут.
Готово, установка завершена.
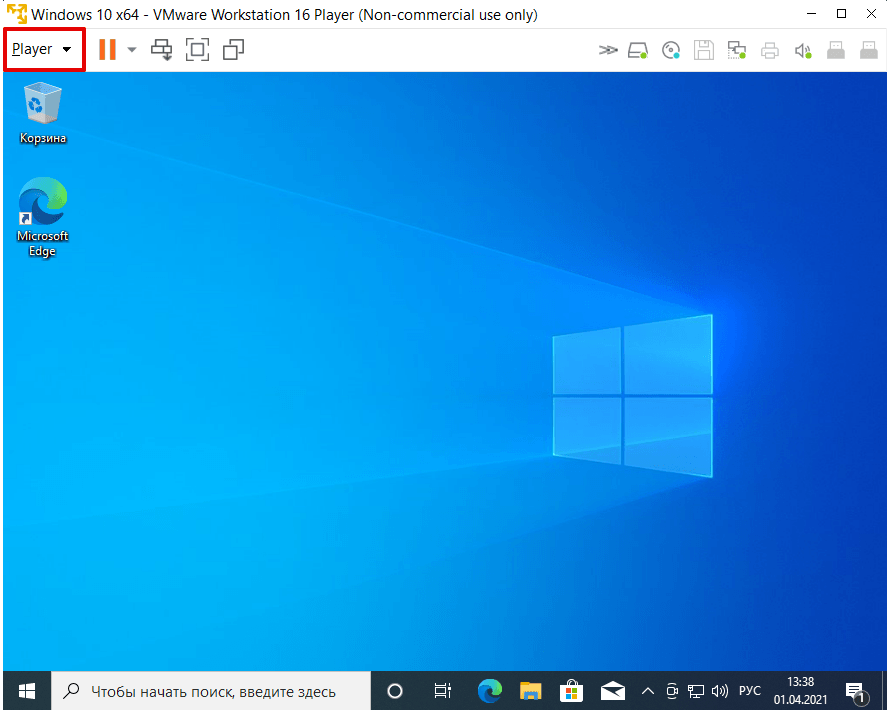
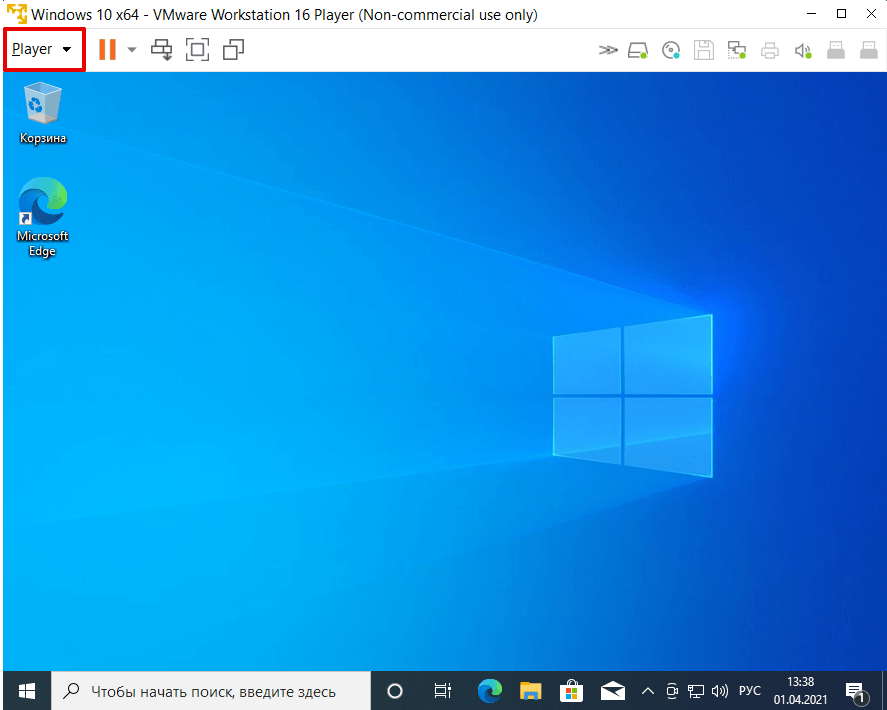
Часто пакет Тулс устанавливается автоматически при создании VM. Чтобы проверить, активирован ли Тулс, в панели управления ВМ нажмите Player:
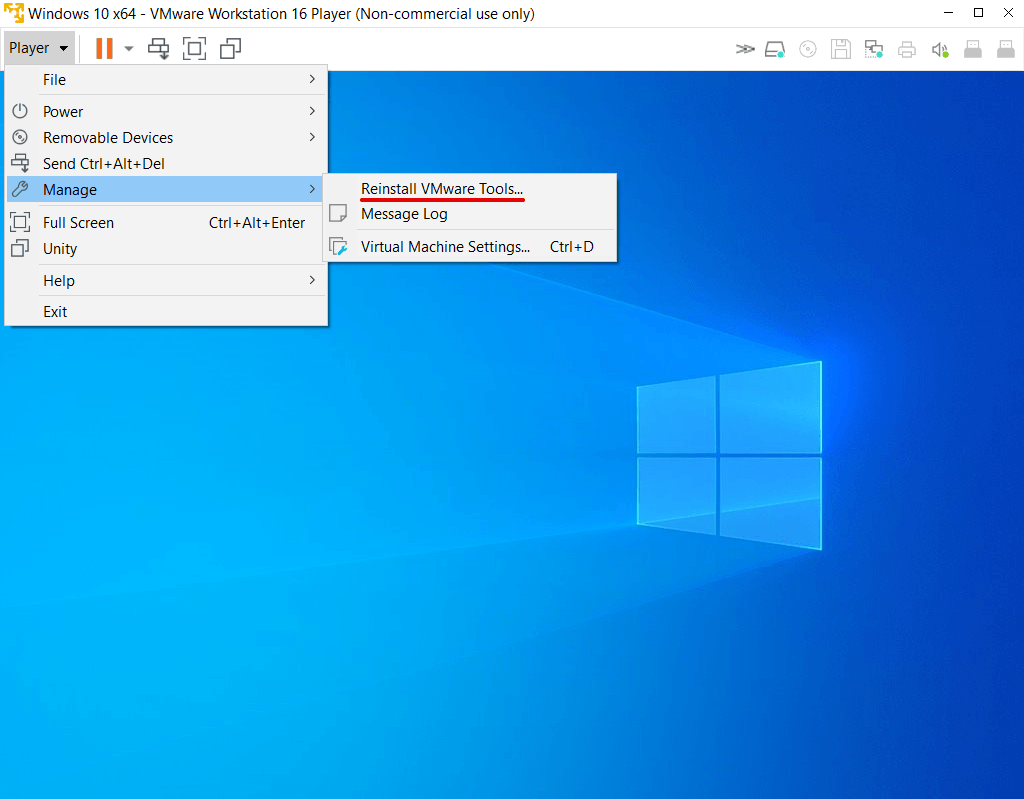
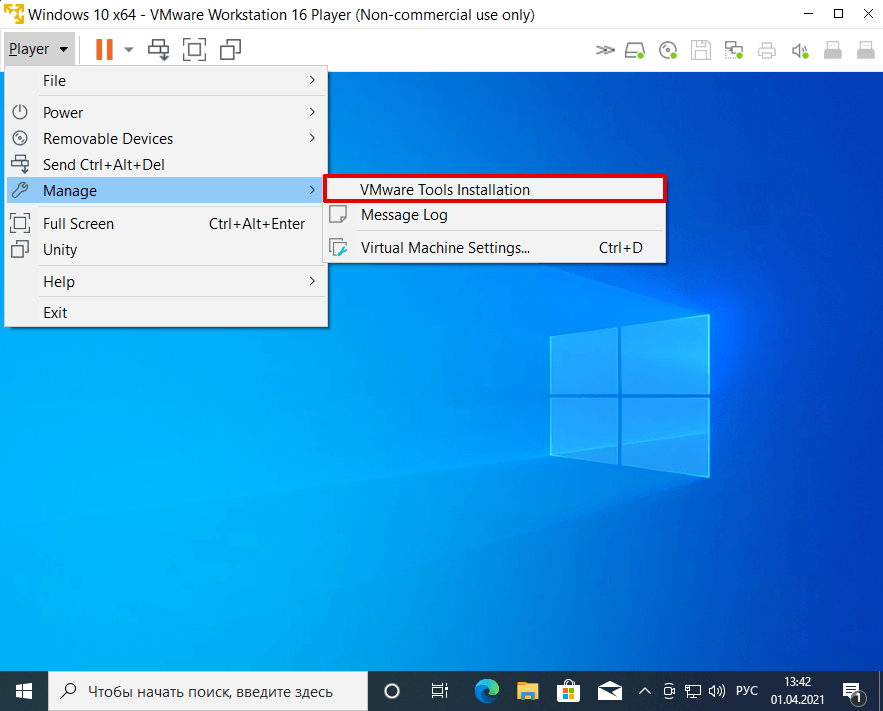
В списке наведите курсор на раздел Manage. Если в первом пункте выпадающего списка вы увидите «Reinstall», значит пакет тулс уже установлен. Если в пункте будет указано «Installation», значит пакет нужно установить вручную по инструкции.
Если кнопка Tools в настройках неактивна
-
1.
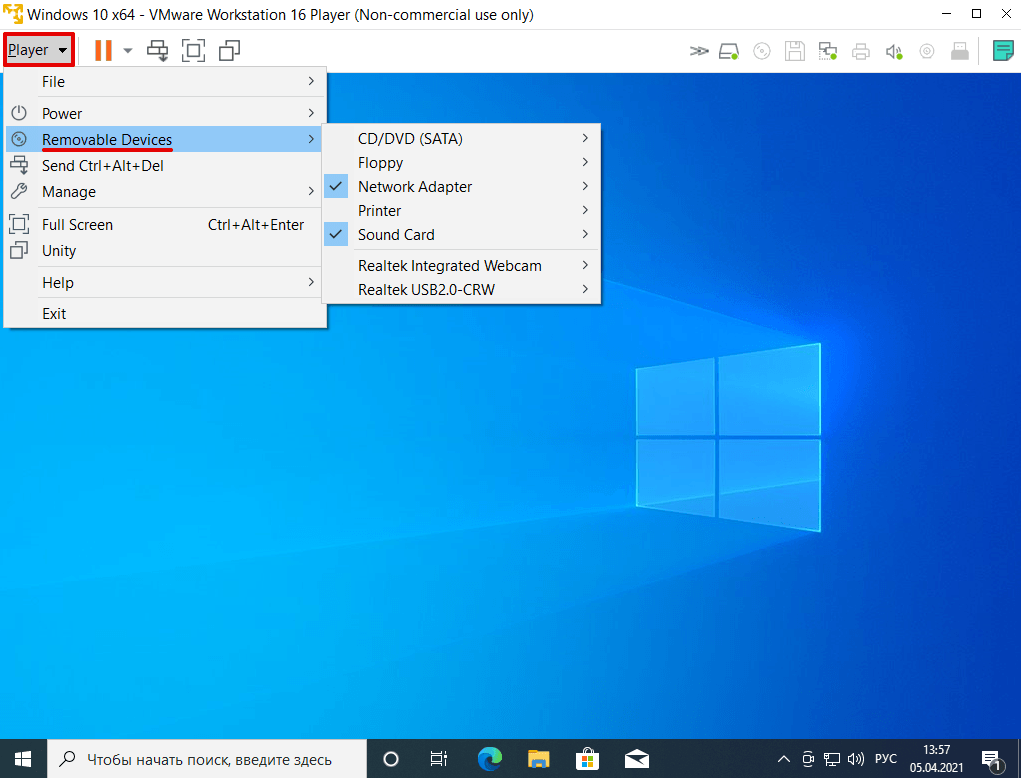
В панели управления нажмите Player и наведите курсор на раздел Removable Devices:
-
2.
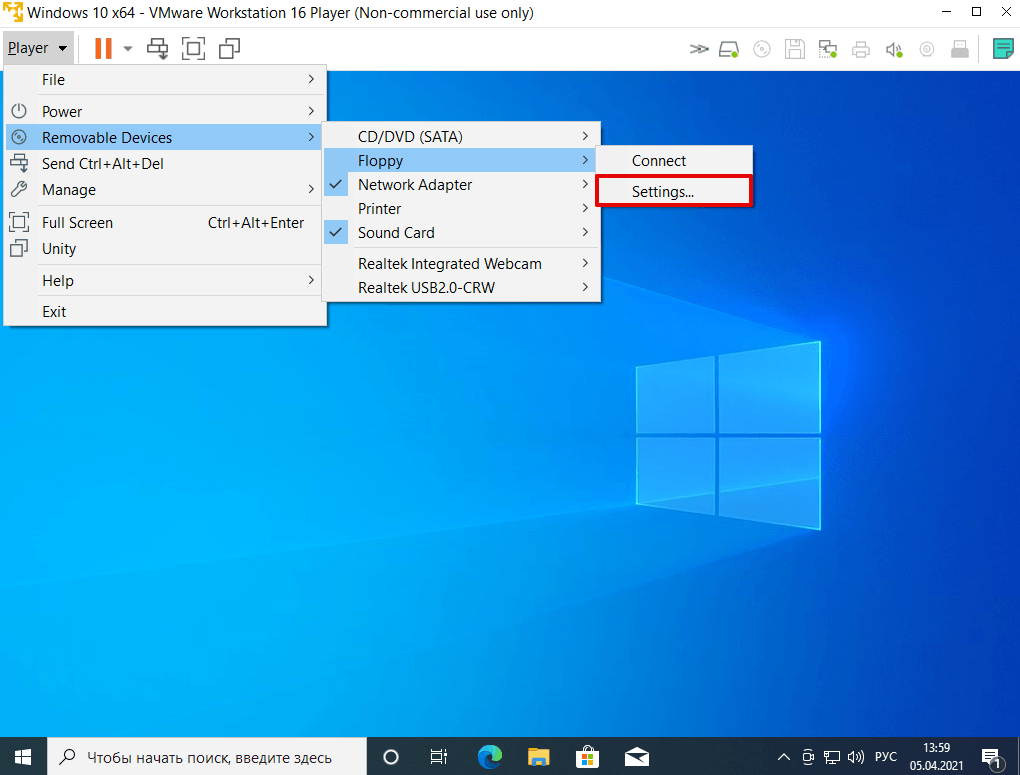
Наведите курсор на пункт Floppy и кликните Settings..:
-
3.
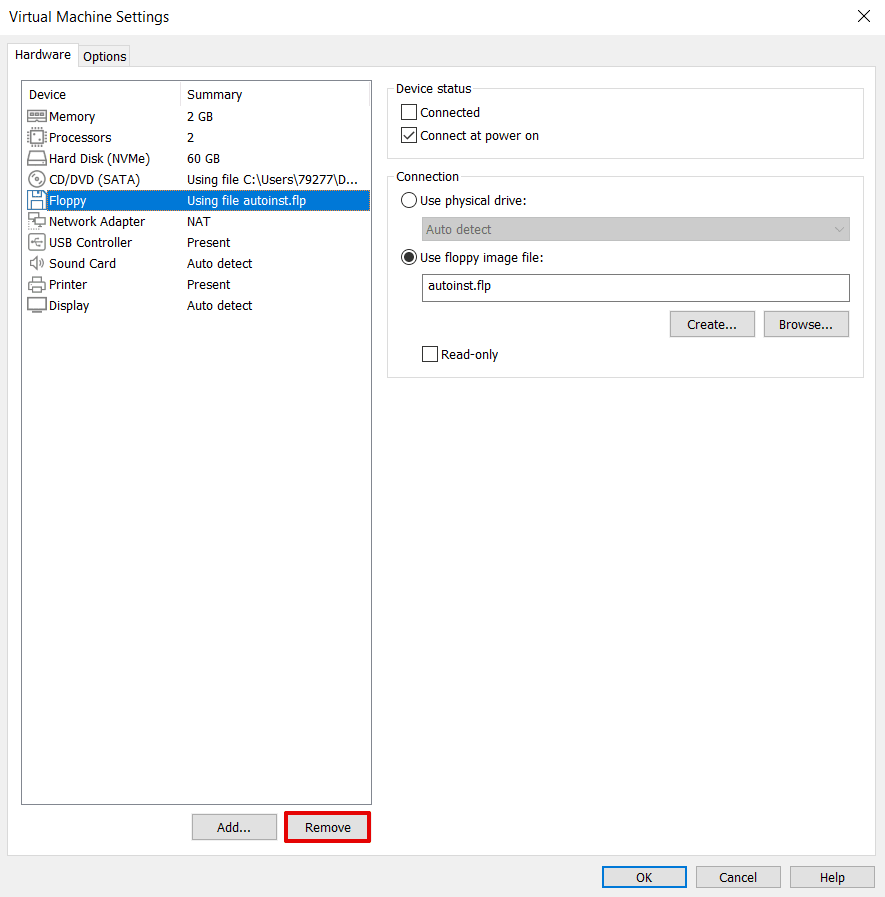
Кликните по строке Floppy и нажмите Remove:
-
4.
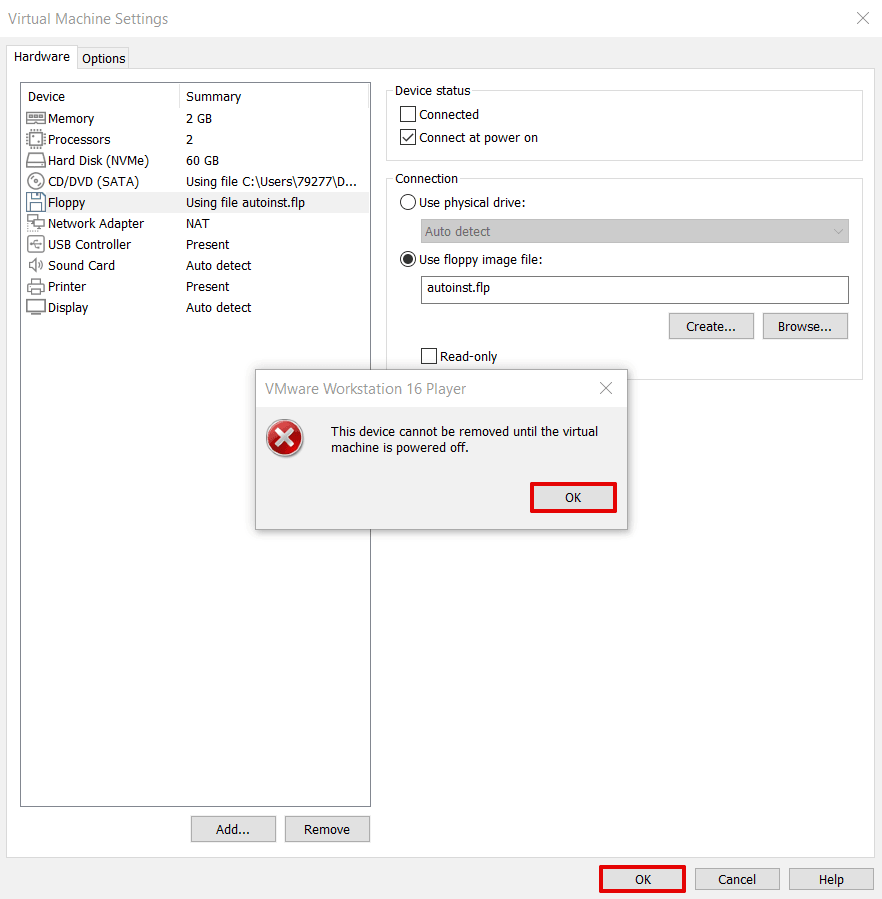
Подтвердите удаление. Для этого кликните Ок во всплывающем окне, а затем Ок внизу страницы:
Готово, вы активировали кнопку.
Как установить VMware Tools на виртуальную машину Windows 10
-
1.
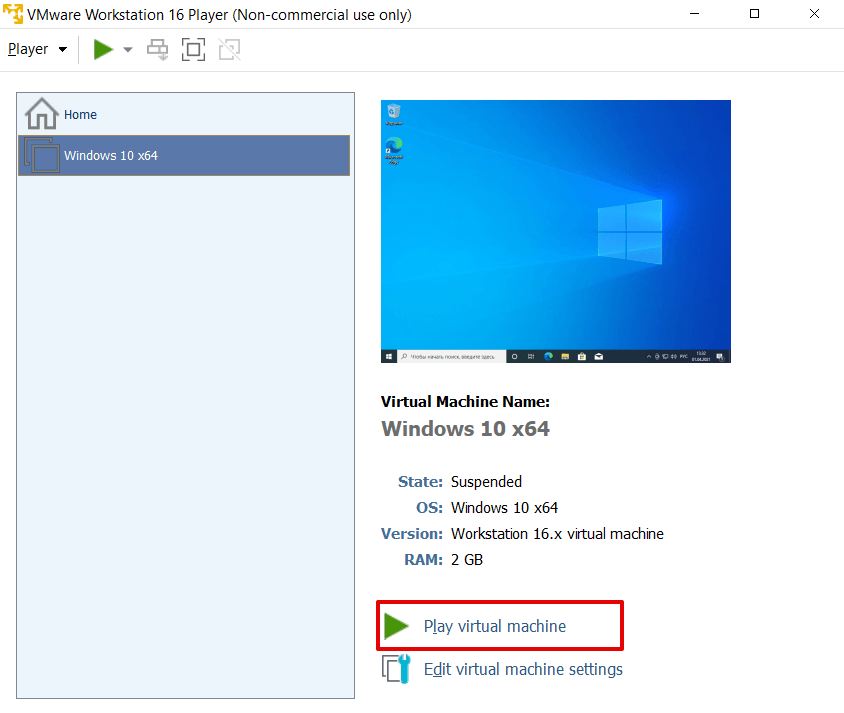
Запустите виртуальную машину Windows 10:
-
2.
В панели управления ВМ нажмите Player:
-
3.
В списке выберите Manage — VMware Tools Installation:
-
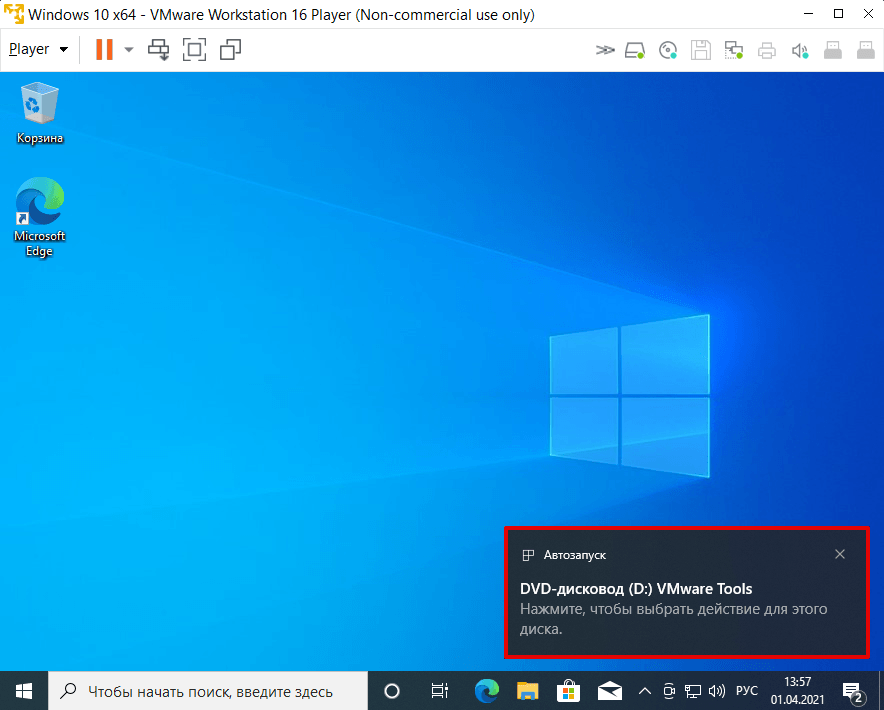
4.
Кликните по всплывающему окошку DVD-дисковод (D:) VMware Tools:
-
5.
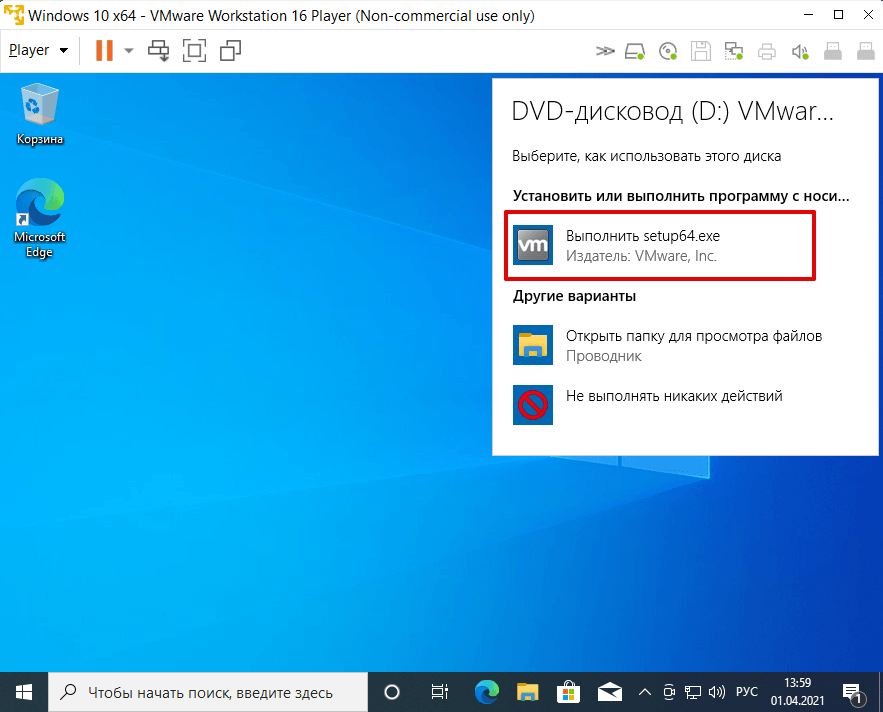
В появившемся окне нажмите Выполнить setup64.exe:
-
6.
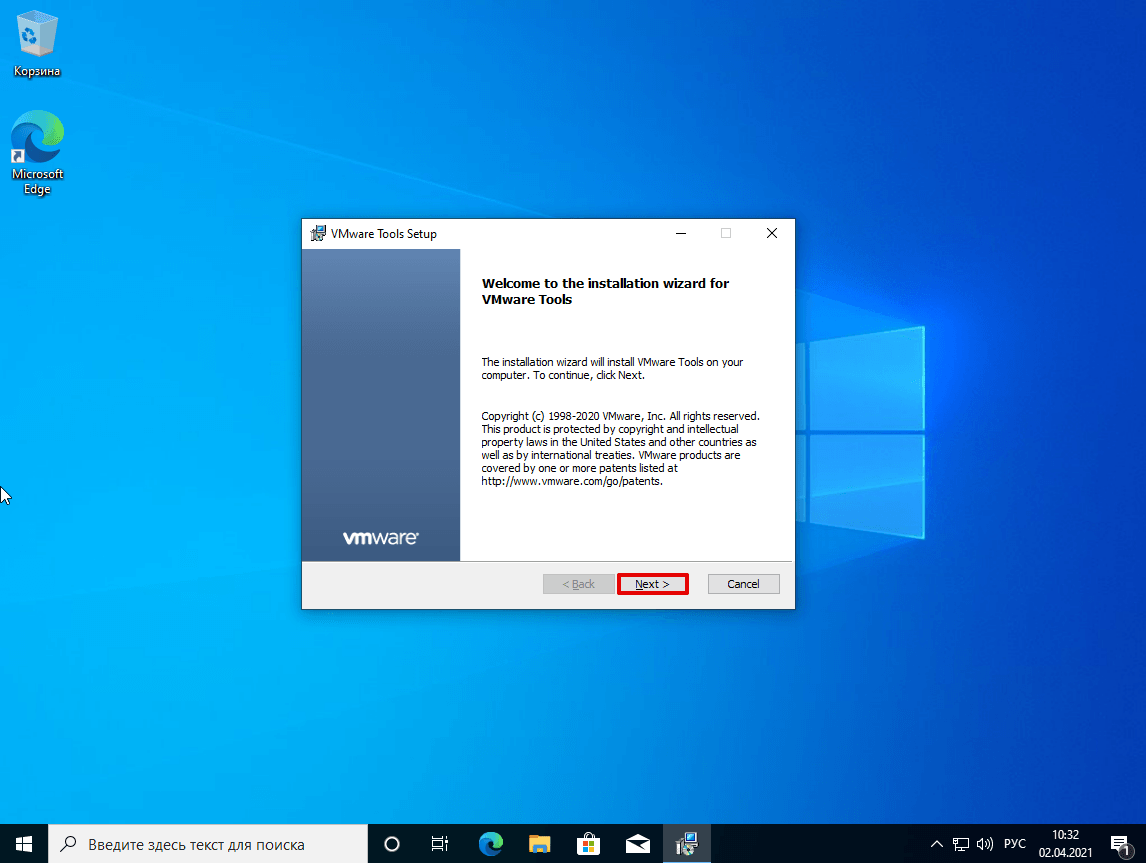
Чтобы запустить установку, нажмите Next:
-
7.
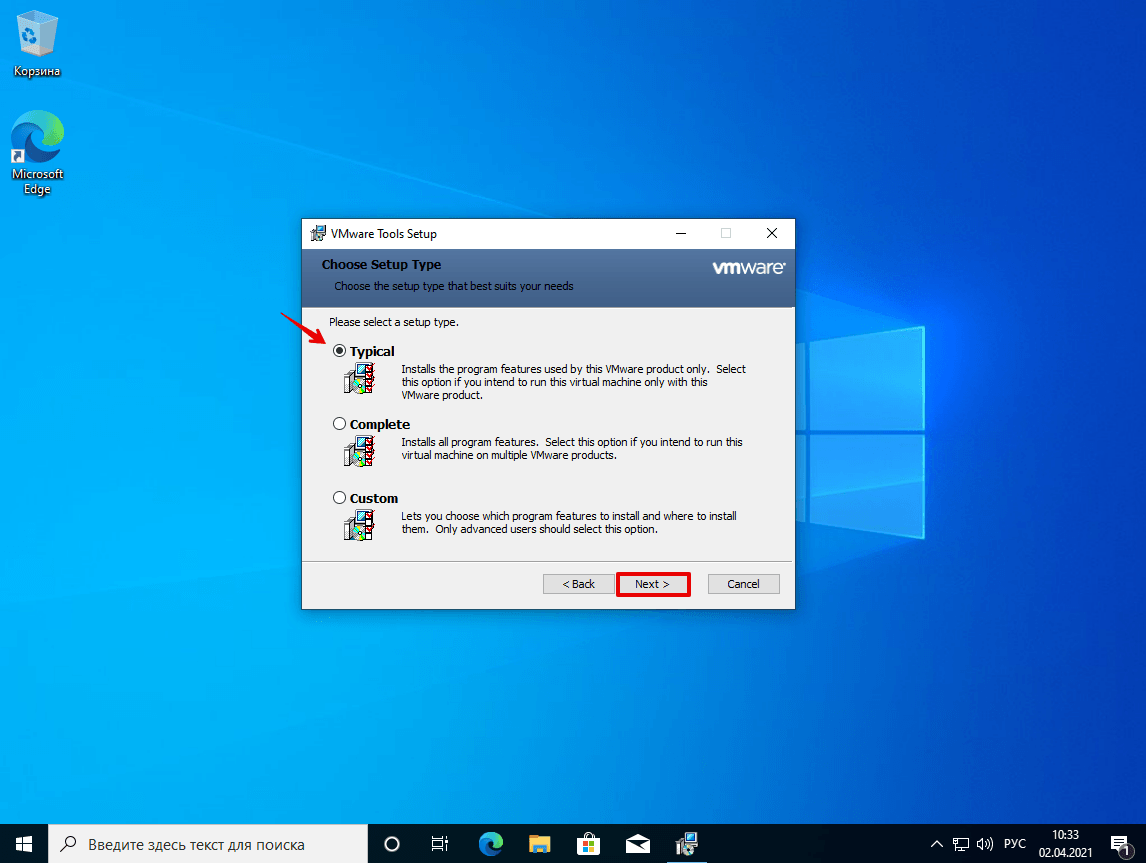
Выберите один из установочных пакетов:
- Typical – пакет, который подходит для интеграции с VMware Workstation,
- Complete – полный пакет, который подойдёт для интеграции с несколькими продуктами VMware,
- Custom – настраиваемый пакет: компоненты можно выбирать самостоятельно.
Если вы используете только Workstation, выберите пакет Typical:
-
8.
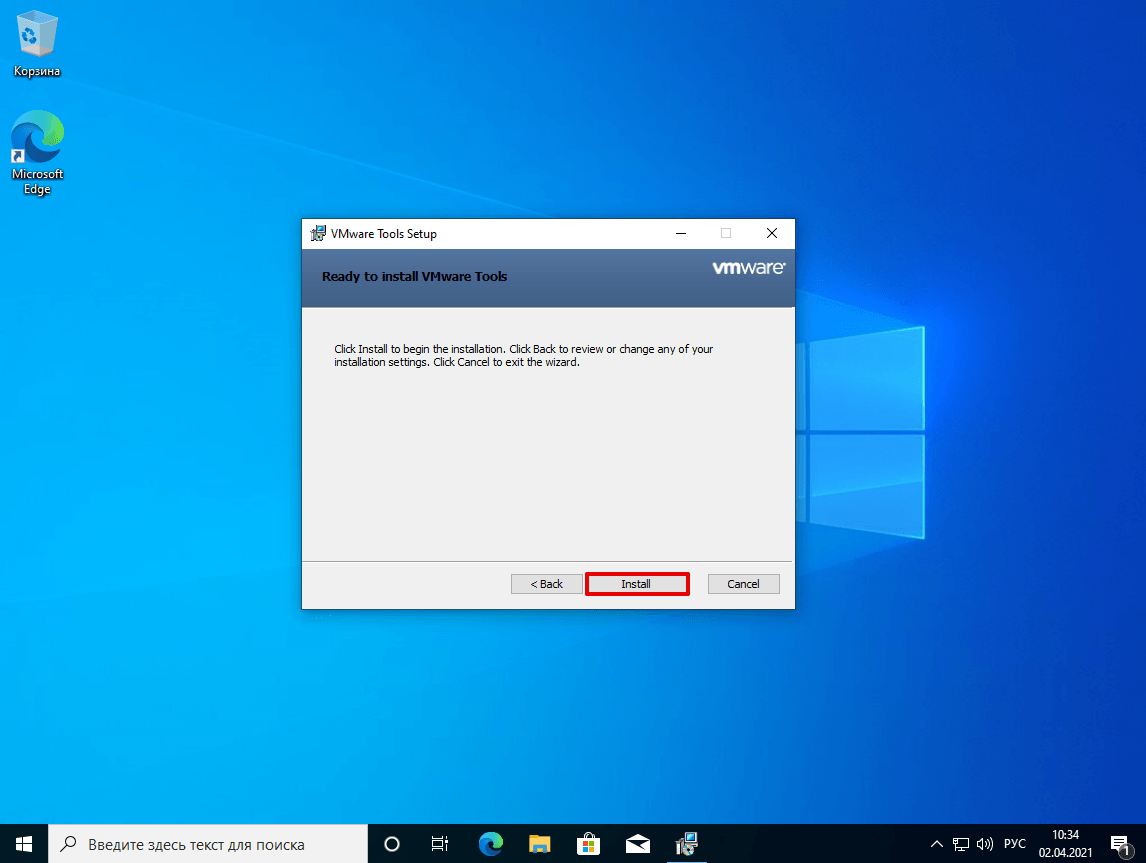
Затем нажмите Install:
Установка на виртуальной машине -
9.
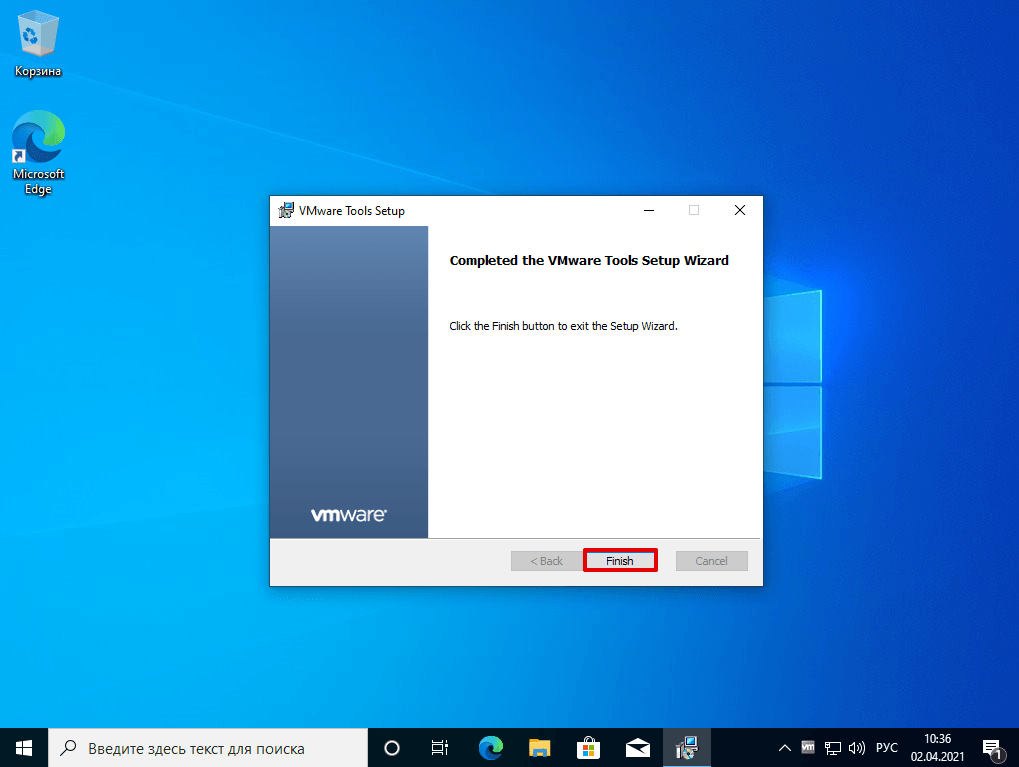
Для завершения установки кликните Finish:
-
10.
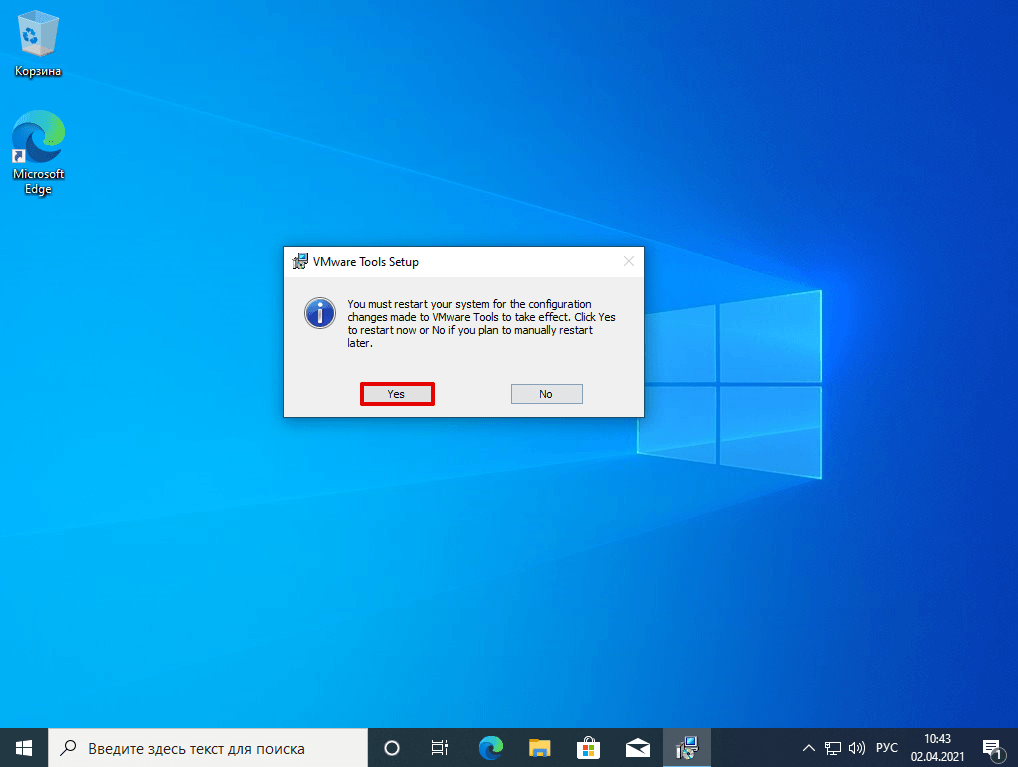
Перезагрузите виртуальную машину. Для этого нажмите Yes. Если вы хотите выполнить перезагрузку позже, нажмите No.
Готово. Аналогичным образом вы можете установить VMware Tools на Windows 7.
Introduction
VMware Tools are critical for the effective use of virtual machines. From the VMware website:
VMware Tools is a set of services and modules that enable several features in VMware products for better management of, and seamless user interactions with, guest operating systems.
In this post I will details how to download, extract, and manually VMware Tools and the drivers contained in it.
Download
The first thing is to download VMware tools. The VMware Tools Operating System Specific Packages is an excellent resource for finding all the Tools package downloads. To see a list of all release back to v10.0.0 you can visit https://packages.vmware.com/tools/releases/.
The latest VMware Tools can always be accessed at https://packages.vmware.com/tools/releases/latest/. At the time of this blog post the latest VMware Tools version is 11.1.5.
Under the version of tools you need, there are download options for the following operating systems:
- rhel5 — Red Hat Linux 5
- rhel6 — Red Hat Linux 6
- sles11sp0 — SUSE Linux 11
- sles11sp1 — SUSE Linux 11 SP1
- sles11sp2 — SUSE Linux 11 SP2
- sles11sp3 — SUSE Linux 11 SP3
- sles11sp4 — SUSE Linux 11 SP4
- ubuntu — Ubuntu Linux variants
- windows — Windows Operating Systems
For Linux VMs it is generally it is best to use open-vm-tools which is built into most major distributions. See the open-vm-tools GitHub page for more details.
Windows is a more manual process. VM Tools is not part of the OS and doesn’t ship as part of it, so it needs to be installed after the operating system is installed.
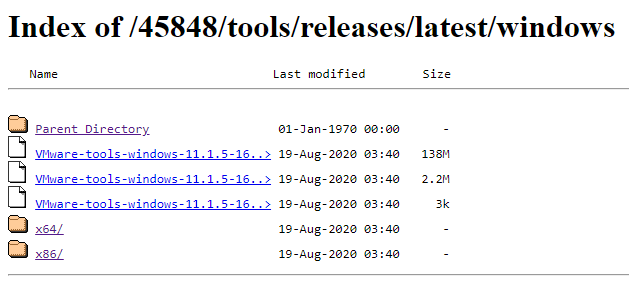
If you browse the package site and browse down in to the latest Windows release you are shown the following (note at the time of this blog post the version of VM Tools is 11.1.5):
You can see three files and two directories. Unfortunately in Chrome the full file path is cut off for the files. Only by hovering over the link can you see the full file name. Once you know what each file as and its corresponding size it’s easy to glance at the list and pick the right file.
- 138M file is an ISO of all the VMware Tools files
- 2.2M file is a SHA file
- 3k file is a SIG file which can be used to verify the digital signature of the download
Unless you are verifying the download just grab the 138MB ISO file.
The two folders x64 and x86 contain standalone .exe files for use in the OS. Just pick your flavour:
- VMware-tools-11.1.5-16724464-i386.exe — 32 bit Windows
- VMware-tools-11.1.5-16724464-x86_64.exe — 64 bit Windows
ISO File
The ISO file is the best option if you want to mount the ISO to the VM and install VMware Tools. Mounting the ISO exposes the following files/folders:
You can see there is an autorun.inf there so the install may launch automatically when the ISO is mounted. If not, launch setup.exe for 32 bit Windows, and setup64.exe for 64 bit Windows.
Standalone .exe Files
The standalone VMware-tools-*.exe files run exactly the same installation as the setup.exe and setup64.exe files packaged in the ISO file. In fact if you look at the file size for the 32 and 64 bit files they match:
I tend to use this package if I do ad-hoc updates to VMware Tools on an existing OS install.
Installation
The traditional way of installing VMware Tools is using Install/Upgrade VMware Tools in the vSphere client. Now that VMware Tools is decoupled from the ESXi build version this may not be applicable for your case. Come back for a future blog post where I will show a couple of ways to deploy this way.
What seems to be coming more common is to use something like SCCM to push out VMware Tools to the OS. This will require using silent install deployment options using command line switches.
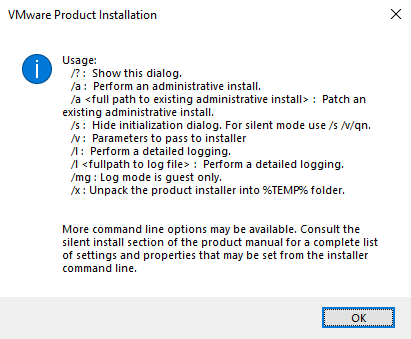
You can get some idea of what is required by calling the installation .exe (setup.exe/setup64.exe for the ISO download or the VMware-tools-*.exe for the standalone download) from a command line with the switch setup64.exe /?
I want to make the install silent, so the /s line has the information we need. The required switches are /s /v /qn and the MSI arguments.
/s— hide installation dialog box/v— pass MSI parameters
Next is the MSI arguments:
/qn— fully silent install- REBOOT=R — do NOT reboot
- ADDLOCAL=ALL — install all components
- REMOVE=* — do not install specific components
It seems kind of strange that if you do not want to install some component you have to first specify to install everything then remove the component. Just one of those things when they designed msi packages I guess.
So how do you know what the individual component names are?
- Audio — Audio driver
- Bootcamp — Mac BootCamp Driver
- MemCtl — Virtual Memory Control Driver
- Mouse — Mouse Driver
- PVSCSI — Paravirtual SCSI driver
- SVGA — SVGA display Driver
- Sync — Filesystem Driver to allow snapshot based backups for older than Windows Server 2003 OSs
- ThinPrint — Allows printers on host OS to be used in VM. Depreciated from vSphere 5.5 onwards
- VMCI — Virtual Machine Communication Interface driver
- Hgfs — Shared Folders driver. For Workstation, Player and Fusion only
- VMXNet — VMXNet network driver
- VMXNet3 — VMXNet3 network driver
- FileIntrospection — NSX File Introspection driver
- NetworkIntrospection — NSX Network Introspection driver
- VSS — VSS based snapshot backups drivers for Windows Server 2003 and newer
- AppDefense — AppDefence component
- Perfmon — WMI performance logging driver
Some of these options obviously depend on the OS version.
An example install at the command line is this:
VMware-tools-11.1.5-16724464-x86_64.exe /S /v"/qn REBOOT=R ADDLOCAL=ALL REMOVE=AppDefense,FileIntrospection,NetworkIntrospection,Hgfs" /l C:TempVMwareToolsInstall.log
Let’s break this down:
- This installs the Windows 64-bit version of VMware Tools
- The installer is silent and hides the dialog box
- Suppress a reboot
- Install all options except AppDefense, NSX File and Network Introspection, and Shared Folders
- Output a log file to C:Temp
You can use this now at the command line or packed up in a third party tool for mass deployment.
Wrap Up
VMware Tools is a critical part of your vSphere environment. This should give you the knowledge to integrate the deployment of VMware tools in an silent fashion using a simple command line script.
How to Install VMware Tools on Linux, Windows, MacOS, FreeBSD, and Solaris
If you have ever deployed a VMware VM on VMware ESXi, VMware Workstation, VMware Player, or VMware Fusion, you’ve probably noticed that after installing a guest operating system (OS), the VMware hypervisor asks you to install VMware Tools. Today’s blog post covers VMWare Tools and the VMware Tools installation process on different operating systems including Linux, Windows, macOS, FreeBSD, and Solaris.
The blog post consists of the following main parts:
- What is VMware Tools?
- Requirements
- How to Install VMware Tools on Linux
- Installing VMware Tools on Linux automatically
- Drag & Drop troubleshooting
- How to enable shared clipboard on ESXi VMs
- How to install VMware Tools on FreeBSD
- How to install VMware Tools on Solaris
- How to install VMware Tools on Windows
- How to install VMware Tools on macOS
What Is VMware Tools?
VMware Tools is a set of drivers and utilities that are installed on a guest operating system (OS) and can improve the performance of the guest OS, synchronize time between a host and guest, and improve the user experience. This is achieved through offering better mouse performance (no lags with a mouse pointer), higher graphics performance, shared clipboard, the ability to drag & drop files, in addition to scripting to automate tasks inside a VM. As you may recall, when you create a VM, you should select the hardware version. Each hardware version uses the appropriate emulated hardware, drivers which are installed with VMware Tools. A VM can work without VMware Tools, but most features and advantages of using VMs are not available without the VMware Tools functionality. It is highly recommended that you install VMware Tools on guest OSs running on VMware virtual machines (VMs).
A set of features available after installing VMware Tools is not the same for different operating systems. For example, some features enabled for Windows guests are not available for Linux guests. The Unity mode is not available for Linux guests in the latest versions of VMware desktop hypervisors. Shared clipboard is limited for VMs running on ESXi hosts. You also need to install VMware Tools after P2V migration (if you convert a physical server to a virtual machine).
Requirements
There are some requirements to install VMware Tools:
- A guest OS must be on the list of supported operating systems.
- A VM must be in the running state to start the VMware Tools installation, and a guest OS must be booted.
In some Linux distributions, you may need to manually install the packages required for VMware Tools installation (such as kernel headers and tools that are needed to compile VMware Tools during installation). In Debian-based distributions, you can install the necessary packages with the command:
apt-get install binutils cpp gcc make psmisc linux-headers-$(uname -r)
In other Linux distributions, use the appropriate package managers such as zypper in SUSE and yum in Red Hat based distributions.
The algorithm for installing VMware Tools is similar for VMs running on VMware ESXi, VMware Workstation, VMware Player and VMware Fusion. Let’s review how to install VMware Tools on a VM running Ubuntu 18; ESXi 6.5 and VMware Workstation 15 are used in our lab for writing today’s blog post.
The legacy method to install VMware Tools
The idea of this method is to insert a virtual ISO disk image that contains the VMware Tools installer to a virtual DVD drive of the VM, run the executable file of the standalone installer, and install VMware Tools. The legacy method can be useful when you need to install VMware Tools on older versions of Linux.
ISO images for different guest operating systems are stored in the following locations:
- /vmimages/tools-isoimages/ on ESXi.
- «C:Program Files (x86)VMwareVMware Workstation» is the default location on Windows. ISO images are stored in the installation directory of VMware Workstation on Windows.
- /usr/lib/vmware/isoimages/ on Linux.
If ISO images with VMware Tools are missing on the machine running a VMware hypervisor, you can download the necessary ISO image with VMware Tools from VMware’s web site.
In order to install VMware Tools on Linux, perform the following actions.
1. Insert the virtual DVD image that contains the VMware Tools installer.
If your VM is running on VMware ESXi managed by vCenter, open VMware HTML5 vSphere Client, and select your VM in Host and Clusters. If VMware Tools are not installed on that VM, you can see a notification and a clickable button Install VMware Tools. You can also start the VMware Tools installation manually by clicking Actions > Guest OS > Install VMware Tools (see the screenshot below).
After that, VMware vSphere Client notifies you that a VM with a guest OS must be running in order to mount the ISO image and install VMware Tools on the guest OS. If a guest OS is not running, you should start a VM first, wait until a guest OS is booted, and then mount the ISO image with VMware Tools installed. Click Mount when ready.
If your VM is running on VMware Workstation or on an ESXi host, but you manage a VM running on ESXi by using VMware Workstation, insert the VMware Tools installation ISO disk image.
a) Select your running VM, on which VMware Tools must be installed.
b) Click VM > Install VMware Tools.
Note: if you have two guest operating systems installed on a VM, you should install VMware Tools on both operating systems.
2. Now the disk image that contains the VMware Tools installer is inserted in the virtual CD/DVD drive. In Ubuntu 18, the virtual DVD disc is mounted automatically and you can see its shortcut on the Desktop. Right click the shortcut and hit Open in Terminal.
Note: If the DVD disc is not mounted automatically on your Linux distribution, you can mount the disc manually.
Go to the /mnt/ directory:
cd /mnt/
Create the /mnt/cdrom/ directory if this directory doesn’t exist:
mkdir cdrom
Mount your CD-ROM to the /mnt/cdrom/ directory:
mount /dev/cdrom /mnt/cdrom
Go to the /tmp/ directory:
cd /tmp/
Extract files from the VMware Tools installation archive (the number of your version may be different):
tar zxvf /mnt/cdrom/VMwareTools-10.1.0-4449150.tar.gz
Unmount the CD-ROM device:
umount /dev/cdrom
3. Make sure that the ifconfig command is available in the console. Otherwise, install net-tools that include the ifconfig tool manually before installing VMware Tools on your Ubuntu guest.
apt-get install net-tools
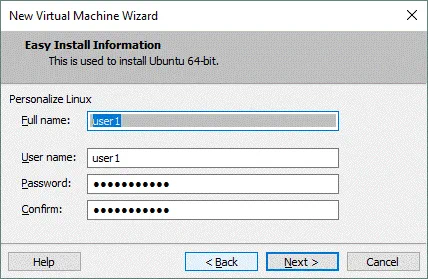
4. After opening a shortcut in Terminal, you can see a directory of the virtual DVD disc image that is the current directory in the console now. In our case, the content of the VMware Tools installation virtual DVD disc is available in /media/user1/VMware Tools/.
Where user1 is the name of our user account in Linux.
You can list the content of this directory and see the archive with the VMware Tools installer for Linux.
ls -al
The archive’s name is VMwareTools-10.1.0-4449150.tar.gz in this case.
Copy the archive to the directory for which you have write permissions, for example, to the ~/Downloads/ directory. As an alternative, you can use the /tmp/ directory.
cp VMwareTools-10.1.0-4449150.tar.gz ~/Downloads
5. Go to the directory to which you have copied the archive with VMware Tools:
cd ~/Downloads
6. Unpack the installer files from the archive:
tar -zxvf VMwareTools-10.1.0-4449150.tar.gz
7. Go to the vmware-tools-distrib directory that contains the executable installer file.
cd vmware-tools-distrib/
8. Run the installer file as root:
sudo ./vmware-install.pl
The installer is written on Perl. After running the VMware Tools installer, you should answer the questions in the console. Press Enter to use the default value that is shown in brackets. You can use the default value for the majority of options. Be attentive when you see the questions about enabling shared folders and drag & drop (see the screenshot below). Enter Y (yes) to enable those features, as the default answer is [no].
If VMware Tools have been installed successfully, you can see a message like the message displayed on the screenshot. You may need to restart your guest Linux to apply all system changes after installing VMware Tools.
9. Once you have installed VMware Tools on Linux, you can check the version of VMware Tools installed with the command:
vmware-toolbox-cmd -v
Note: In OpenSuSE Linux, you can download the fresh VMware Tools (Open VM Tools) installation package in the ymp format (YaST meta package) or directly download the binary packages in the rpm format from the OpenSUSE web site.
Installing VMware Tools using software repositories (recommended)
VMware recommends you to install VMware Tools for Linux from online software repositories by using the Linux package manager. The advantage of this method is that you always get the latest version of VMware Tools and the installation process is faster and easier since you don’t need to copy installation files and perform configuration manually. VMware has made open-source VMware Tools for Linux that are called Open VM Tools (you can find source code here). Let’s review how to install VMware Tools on Linux from online repositories on an example of Ubuntu 18. The clear installation of Ubuntu 18.04 is used to explain the process of installing VMware Tools (Open VM Tools) in each example.
Note: The installation principle for other Linux distributions is the same.
1. Update the list of packages available in software repositories for your package manager.
apt-get update
2. If you use Linux without a graphical user interface (GUI) that has only the command line interface, then install VMware Tools with the command:
apt-get install open-vm-tools
If you use Linux with the GUI, then install VMware Tools that are optimized for desktop experience and provide features such as Shared Folders, Shared Clipboard and Drag & Drop.
apt-get install open-vm-tools-desktop
Note: There are also two alternative packages of Open VM Tools that can be installed from online software repositories.
open-vm-tools-devel is an extended package of open-vm-tools that contains additional user space libraries for applications development.
open-vm-tools-debuginfo is an alternative package with binaries and source code that can be used to debug open-vm-tools.
3. Now you can check the version of VMware Tools installed.
vmware-toolbox-cmd -v
Installing VMware Tools on Linux Automatically
VMware Tools can be installed automatically if you are installing Ubuntu 19. Even if you select Minimal installation in the Ubuntu installation wizard (Updates and other software), VMware Tools (open-vm-tools-desktop) will be downloaded and installed automatically from online software repositories (Internet connection is required). You may need to configure Drag & Drop after that. Thus, you can save time spent on installing VMware Tools and system updates. Ubuntu 19 becomes more user-friendly for VMware virtual environment. If you have already installed Linux on a VM, use one of the methods explained above and install VMware Tools or Open VM Tools.
Note: If you install the latest versions of OpenSUSE Linux with enabled Internet connection and activate online repositories, Open VM Tools are installed automatically.
If you use VMware Easy Install to create a Linux VM, VMware Tools are installed automatically, but manual Linux installation with the “installing updates” option is preferable as you can configure more parameters in this case.
Drag & Drop Troubleshooting
If you run a Linux VM with installed VMware Tools on VMware Workstation/Player, and Drag & Drop doesn’t work, check the following settings when a VM is powered off.
Go to VM > Settings, click the Options tab, then select Guest Isolation. Make sure that these two options are enabled:
- Enable drag and drop
- Enable copy and paste
If these settings don’t help you and Drag & Drop still doesn’t work, try to run the commands in your guest Linux as shown below.
1. Check the process related to VMware Tools (Open VM Tools are used in this example).
ps -ef | grep tools
Remember the process ID of the /usr/bin/vmtoolsd -n vmusr —blockFd 3
In this example, the PID is 1891.
2. List open files related to that process (1891).
lsof -p 1891 | grep -i plugins
3. Enable the VMware vmblock fuse mount service required to use drag and drop.
systemctl enable run-vmblock\x2dfuse.mount
4. Check the status of the service.
systemctl status -l run-vmblock\x2dfuse.mount
Be aware that Drag & Drop is disabled for VMs running on ESXi, but you can try to configure shared clipboard. See how to do this below.
How to Enable Shared Clipboard on ESXi VMs
By default, shared clipboard is disabled on VMs running on ESXi hosts even if VMware Tools are installed. This is for security reasons. You can enable shared clipboard for ESXi VMs manually.
To do this, you should edit the virtual machine configuration. You can do it in the interface of VMware vSphere Client or manually by editing the VMX file of the VM in the datastore. Let’s edit the VMX configuration file manually by using SSH access to the ESXi server on which our VM resides.
1. Power off the VM which configuration you are going to edit.
2. Connect to the ESXi host on which a VM is residing with an SSH client. SSH access must be enabled on your ESXi host. Go to the directory on a datastore where the files of your Linux virtual machine are stored. In this example, we go to the directory:
cd /vmfs/volumes/SSD2/Ubuntu-VMT/
3. In our case, we have to edit the Ubuntu-VMT.vmx that is located in the virtual machine directory. You can make a backup of the VM configuration file before editing. Add the following two strings in the end of the file.
isolation.tools.copy.disable = «FALSE»
isolation.tools.paste.disable = «FALSE»
These settings override the settings made with VMware Tools inside a VM.
There are limitations to using shared clipboard for ESXi VMs: 64 KB of plain text is the limit for the Copy/Paste feature, and you cannot copy and paste images, audio, and other content copied to clipboard, or copy and paste files including text files.
Data Protection with NAKIVO Backup & Replication
NAKIVO Backup & Replication delivers high-end data protection for SMBs and enterprises with multiple backup, replication and recovery features, including VMware Backup, Hyper-V Backup, Office 365 Backup and more. Get the Free Trial now!
How to Install VMware Tools on FreeBSD
Similarly to Linux, the latest versions of VMware Tools are distributed only as Open VM Tools, which is an open source implementation of VMware Tools intended to improve the installation process and make it possible to update VMware Tools when upgrading an operating system.
It is recommended that you install Open VM Tools from online software repositories (not VMware Tools from standalone installers included into the ISO images) on FreeBSD version 10.x and newer. The latest version of VMware Tools for FreeBSD to be distributed as the ISO image is 10.1.15. For this reason, only the modern method of installing VMware Tools (Open VM Tools) from repositories is explained in today’s blog post. If you want to install the latest version of Open VM Tools, but you have installed VMware Tools from the ISO image, you must uninstall that old version of VMware Tools before installing Open VM Tools.
Method 1 – using the package manager
You can install VMware Tools on FreeBSD with the VMware package manager.
1. First, search the packets that are available for your system.
# pkg search open-vm
In our case, these two packets are available:
open-vm-tools-10.3.0_1,2 Open VMware tools for FreeBSD VMware guests
open-vm-tools-nox11-10.3.0_1,2 Open VMware tools for FreeBSD VMware guests
2. As FreeBSD used in the current example doesn’t have the graphical user interface, the “nox” type of VMware Tools is installed.
# pkg install open-vm-tools-nox11-10.3.0_1,2
The system notifies that some additional packages must be installed. Proceed with this action — type Y and press Enter to continue.
There is a message that a fuse kernel module must be installed to use fusefs-libs.
This kernel module can be installed with the commands:
Install the port: cd /usr/ports/sysutils/fusefs-libs3/ && make install clean
Install the package: pkg install fusefs-libs3
3. After installing VMware Tools (Open VM Tools), reboot the VM running FreeBSD.
shutdown -r now
Method 2 – installing VMware Tools from ports
You can also install VMware Tools on FreeBSD from ports.
1. Go to the ports directory:
cd /usr/ports/emulators/open-vm-tools
2. Install Open VM Tools:
make install clean
rehash
3. Reboot the VM running FreeBSD:
shutdown -r now
Note: If you are using FreeBSD without the X Window System (without a GUI), in step 1 go to the directory:
cd /usr/ports/emulators/open-vm-tools-nox11
How to Install VMware Tools on Solaris
Another operating system supported by VMware as a guest operating system is Oracle Solaris (also known as SunOS) and much like the operating systems considered above, it is highly recommended to install VMware Tools on Solaris. The process of installing VMware Tools on Solaris is similar to installing VMware Tools on Linux and FreeBSD from the ISO installation disk image. Let’s review how to install VMware Tools on Solaris 11.4.
1. Mount the ISO image with the installer of VMware Tools to the VM running Solaris similarly as shown for Linux VMs above. If the image cannot be mounted automatically, download and mount the installation ISO image for Solaris to the VM manually.
Wait a moment for the auto-mounting of the image to the CD-ROM in the guest operating system.
2. Once you have mounted the ISO image to the virtual CD/DVD drive of the VM, view the files on that disc.
ls -al /cdrom
Note: If the CD-ROM is not mounted under /cdrom/vmwaretools/, try to restart the volume manager:
/etc/init.d/volmgt stop
/etc/init.d/volmgt start
3. Copy the archive with the VMware Tools installer to the temporary directory, for example, to /tmp/
cp /cdrom/vmwaretools/vmware-solaris-tools.tar.gz /tmp
4. Go to the /tmp/ directory:
cd /tmp
5. Unzip files from the archive
gunzip vmware-solaris-tools.tar.gz
6. Untar files
tar xvf vmware-solaris-tools.tar
7. Check that files are extracted
ls -al
As you can see, the files are extracted to the vmware-tools-distrib subdirectory
8. Go to that subdirectory
cd vmware-tools-distrib/
Now you are in the /tmp/vmware-tools-distrib/ directory.
9. Run the vmware-install.pl file to run the installer and install VMware Tools on Solaris.
./vmware-install.pl
Note: The VMware Tools installer is written on Perl. Perl must be installed in your operating system to run the installer successfully.
Answer the questions provided by the VMware Tools installer. You can use default settings in most cases. Pay close attention to questions about the VMware Host-Guest Filesystem and vmblock to enable shared folders, shared clipboard, and drag & drop features.
10. Reboot your Solaris VM to make changes take effect.
init 6
11. Check the status of VMware Tools after rebooting.
/etc/init.d/vmware-tools status
If everything is OK, the output should look like this:
vmtoolsd is running
How to Install VMware Tools on Windows
Installing VMware Tools on Windows is not a difficult task.
1. Insert a virtual ISO disk image that contains the VMware Tools installer into a virtual DVD drive of a VM. In the current example, Windows Server 2008 R2 (x64) is running on the VM on which VMware Tools will be installed.
If your VM is running on an ESXi host and you use vCenter to manage ESXi hosts, open VMware vSphere Client, select your VM in the Hosts and Clusters menu, then click Actions > Guest OS > Install VMware Tools.
As you recall, ISO images with VMware Tools installers are located on an ESXi host in the /vmimages/tools-isoimages/ directory. If ISO images are missing on your ESXi host, you can download and install VMware Tools Offline VIB Bundle on your ESXi host. This bundle contains a new release of VMware Tools for supported guest operating systems. You can also copy ISO images from your local computer to that directory on the ESXi host by using an SCP client manually.
If you use VMware Workstation for managing a VM running on your local machine or on a remote ESXi host, click VM > Install VMware Tools.
After that, a virtual ISO disk image containing the VMware Tools installer is mounted to a guest operating system. By default, the VMware Tools installation ISO images are located in the directory where VMware Workstation is installed. In our case, this directory on a Windows computer is:
«C:Program Files (x86)VMwareVMware Workstation»
The names of ISO files are:
windows.iso – the image for the latest Windows versions since Vista.
winPre2k.iso – the image for old Windows versions released before Windows 2000.
winPreVista.iso – the image for Windows versions older than Windows Vista (Windows 2000, 2000 Server, XP, XP x64).
If, for some reason, these ISO images are missing, you can download the VMware Tools installer for Windows from the VMware’s web site.
2. If autorun is enabled on a guest Windows system, you will see the AutoPlay window with a suggestion to run setup64.exe (because a 64-bit version of Windows is used as a guest OS).
If autorun is disabled, open the optical disc drive to which the virtual ISO disk image is inserted in your Windows guest, then select the appropriate installer file – setup.exe for 32-bit operating systems or setup64.exe for 64-bit operating systems. Run the installer as Administrator.
3. The VMware Tools Setup Wizard is opened.
1) On the first screen, read the introduction. Click Next to continue.
2) Choose Setup Type. Typical is enough in most cases. You can select this type and continue installation.
3) Ready to Install. If you want to change the installation type, hit Back. If everything is correct, hit Install to start the installation process. Wait for a while until VMware Tools are installed.
4) Completed the VMware Tools Setup Wizard. If VMware Tools have been installed successfully, you should see this screen. Hit Finish to close the window.
5) Once you have installed VMware Tools on your Windows guest, you must restart your system for the configuration changes made to VMware Tools to take effect. In the displayed window click Yes to restart now.
Now you can use features that became available after installing VMware Tools.
Installing VMware Tools on Windows Server Core in PowerShell
If you use Windows Server Core which has only the command line interface and doesn’t have the graphical user interface, the principle of VMware Tools installation is similar. You can run the VMware Tools installer in PowerShell.
1. Insert the virtual ISO disk image that contains the VMware Tools installer into a virtual DVD-ROM of the VM.
VM > Install VMware Tools
2. In PowerShell, run the command to see the letter of the optical drive assigned in your Windows running on the VM.
Get-Psdrive
3. Go to that drive (in this example, D: is the optical drive used by the Windows VM).
d:
4. Run the installer
.setup64.exe
5. Follow the steps of the installation wizard to complete the VMware Tools installation.
6. Restart your Windows VM
shutdown -r -t 0
How to Install VMware Tools on MacOS
MacOS can be installed on VMs running on VMware Workstation/Player, VMware Fusion, and VMware ESXi. Installing macOS on VMware Workstation and ESXi needs some fine-tuning. Read how to install macOS on a VMware VM in the blog post. Installing VMware Tools on macOS is different from installing VMware Tools on other operating systems, but you must have the ISO image with the VMware Tools installer and mount the ISO image to a virtual DVD drive of the VM as a DVD disc. Let’s review how to install VMware Tools on macOS Mojave (Mac OS X 10.14).
1. Download the archive that contains the needed ISO image. Select VMware Tools packages for Solaris and OS X. You can download a zip or tar.gz archive. At the time of writing this blog post, the newest VMware Tools release is VMware Tools 10.3.2.
2. Extract the archive. You need the darwin.iso file. You can copy darwin.iso to the directory where other ISO images with VMware Tools are stored. If you use VMware Workstation, this directory is the VMware Workstation installation directory on Windows and /usr/lib/vmware/isoimages/ on Linux (Ubuntu). The directory to store ISO images with VMware Tools on ESXi is /vmimages/tools-isoimages/
3. Mount the ISO image with VMware Tools to the virtual DVD drive of the VM (if the VMware Tools image is copied to the standard VMware Tools directory and you manage the VM in VMware Workstation, you can click VM > Install VMware Tools when a VM is running). Don’t forget to eject the disc previously used from the virtual DVD drive (for example, the macOS installation medium).
However, you can always mount the ISO image with VMware Tools manually in the VM settings when a VM is powered off.
4. Now you can see the icon of DVD-ROM with the VMware Tools disc inserted in a running macOS. By default, autorun is enabled and you should see two options in the opened window – Install VMware Tools and Uninstall VMware Tools. Hit Install VMware Tools.
5. The VMware Tools Installation wizard for macOS is opened.
Introduction. Read the information and click Next to continue.
Destination select. If there are multiple macOS users in the guest operating system, you can opt to install VMware Tools for all users or only for you (the current user).
Installation Type. At this step, you can change the install location if need be. When all settings are configured, hit the Install button. In the popup notification window, click Continue Installation and enter your login and password to install software.
Installation. Wait for a while until all necessary packages are installed.
After unpacking VMware Tools files, you will see the System Extension Blocked warning in the popup window of macOS Mojave. Click Open Security Preferences and edit settings (do not click OK).
The Security & Privacy window is now opened. In the General tab, you can see a notification: System software from developer “VMware, Inc.” was blocked from loading.
Click the Allow button to unblock VMware Tools in macOS. After that, you can close the window.
If a popup system extension warning message is displayed, click OK.
Summary. In the Install VMware Tools wizard, you can now see that the installation has been successful. Hit the Restart button and restart the virtual machine running macOS.
6. Once macOS has been rebooted, a new pop-up window is opened and a notification is displayed: System Extension Blocked. You should recall seeing the same notification during the process of installing VMware Tools. Click Open Security Preferences as you have done before.
The notification in the Security & Privacy window is also the same: System software from developer “VMware, Inc.” was blocked from loading. Click Allow to unblock VMware extensions.
Click OK if the System Extension Warning message is displayed.
Now you can verify whether features related to VMware Tools are working properly. Try to copy and paste the text, drag and drop files, and enter a full screen mode. (Note that there may be limitations to drag and drop files if your VM with macOS is running on an ESXi host).
7. Once you try to drag and drop files from your host machine on which a VMware Workstation, VMware Player or VMware Fusion is installed, you will see the accessibility access warning: “vmware-tools-daemon” would like to control this computer using accessibility features. Hit the Open System Preferences button to edit settings.
The Security & Privacy window is opened again, but you see the Privacy tab now. You need to tick the checkbox at the vmware-tools-daemon string, but now this string is inactive. In the left bottom corner of the window, click the lock to make changes.
Enter your login and password to confirm. Now the settings are editable. Click the vmware-tools-daemon checkbox.
Now everything should be OK and the features depending on VMware Tools should work on your guest macOS. If the advanced features you require after installing VMware Tools don’t work on your macOS VM, try to reinstall VMware Tools.
Conclusion
Today’s blog post has covered the VMware Tools installation process for Linux, FreeBSD, Solaris, Windows, and macOS guest operating systems. The principle of installing VMware Tools is quite similar on Linux, Free BSD and Solaris. Moreover, you can install Open VM Tools, which is an open-source implementation of VMware Tools on Linux and FreeBSD from online repositories with a package manager available in your operating system. Open VM Tools allow you to always get the latest version from online repositories in addition to updating the current version of Open VM Tools installed on your guest OS when you update the operating system. If you decide to use a standalone installer distributed in an ISO image, be aware that new versions of VMware Tools for Linux have not yet been released at the time of this writing, and Perl must be installed on a guest OS to run the installer script. As for Windows, you should mount the ISO image with VMware Tools compatible with your version of Windows and run the EXE installer. If you want to install VMware Tools on macOS, you also have to mount the ISO image (darwin.iso) to the VM and run the installer; don’t forget to unblock VMware Tools in security settings of the operating system if you use the latest versions of Mac OS X.
VMware Tools should be installed on a VM to take a snapshot of the running VM, quiesce the file system in the VM to make the state of the VM suitable for backups, and keep the VM data consistent. VM snapshots are also used to perform incremental backup and replication of VMs. Now that you know the importance of VMware Tools, don’t forget to protect your data. NAKIVO Backup & Replication is an all-in-one data protection solution that supports incremental backup and replication of VMware vSphere VMs on a host level by using VMware APIs. Download NAKIVO Backup & Replication and try to back up running VMs with VMware Tools installed.


