React Native Windows 0.71.0
We’re excited to release React Native Windows 0.71.0 targeting React Native 0.71.0. There have been many changes to both react-native-windows and react-native itself, and we would love your feedback on anything that doesn’t work as expected.
How to upgrade
You can view the changes made to the default new React Native Windows applications for C++ and C# using React Native Upgrade Helper. See this document for more details.
What’s new from React Native
Debuggability
- Improves messaging within the React Native Windows development dependencies script. Now verbose output is supported, .NET check now looks for the SDK (not the runtime). VS check checks for workloads, and the Choco, Chrome, and MSBuild64LongPath check have been removed.
Reliability
- Modifies CLI scripts to search for a version range of Visual Studio to ensure compatibility between the RNW version and Visual Studio version used in CLI commands.
- Fixes crash when using WinUI3 with keyboard input.
- Ensures a Flyout is only shown if the
XamlRootattached to the Flyout is valid and is the activeXamlRootset inXamlUIService. - .blur() method for TextInput now works in XamlIslands scenarios.
- Horizontal scrolling with zoom in a ScrollView is now working.
- Resolves bug with C# modules using multi-parameter callbacks.
- Fixes crash creating InstanceSettings on Windows 8.1.
- Enables app paths to contains spaces.
- Increased core component props sample coverage from 27.3% to 36.2% in RNW’s snapshot testing.
- Increased core component props test coverage from 3.5% to 26.7% in RNW’s snapshot testing.
- Increased community module test coverage from 0% to 80% in React Native Gallery’s snapshot testing.
Accessibility
- Adds UIA events which trigger when
accessibilityValuehas changed. Ensures that accessibility clients like Narrator can announce these types of changes to the user. - Fixes min/max/now values for
accessibilityValue.
Other
- Upgrades @react-native-cummunity/cli packages to ^10.0.0-alpha.0 version.
- Upgrades Metro to ^0.73.0.
- Upgrades Jest to ^29.0.0.
- Modifies the
CompositionRootViewinterface to take aReactViewHostinstead of separate properties forComponentNameandInitialProperties. Updates to these properties can now be made atomically instead of triggering two rootview reloads to update them both. - Enables users of the codegen project to opt in to generate the C++ JSI specs if desired.
- Add Rendering driver option to NativeAnimated.
- Implements handling of request with enctype
multipart/form-data. - Adds LayoutService interface to allow native layout updates.
- Fast Text optimization is now applied to Text nodes with multiple runs.
- Adds
isPressedfield which indicates ifonKeyDownhas been fired.onKeyUpwill not first ifisPressedis not true. - Adds
GetReactRootViewmethodXamlUIService. - Adds support for ImageSource.
- Allows customers to specify
$(CppWinRTVersion). - Move @react-native/tester to a devDependency instead of a dependency.
- Adds a QuirkSetting to opt-in to the YGExperimentalFeatureWebFlexBasis option in Yoga for apps where re-use of cached flex basis value creates problems.
- Adds codegen-windows command, allowing apps to more easily use the windows codegen for nativemodules/turbomodules.
- Adds
IViewManagerWithOnLayoutinterface for ABI VMs.
Breaking Changes
- React Native Windows is now using Visual Studio 2022. Once you install VS 2022 on your computer, make sure to re-run the development dependencies script on our website to make sure you have all the required dependencies for the new version of Visual Studio. Note this includes upgrading to .NET 6.0.
- Removes dependency on ViewPanel wrapper calls to manage children. Also modifies ViewControl to return a XAML Panel type rather than ViewPanel. This will be a breaking change to the ViewControl ABI.
focusableandaccessibleprops are now synchronized to align with Windows UIA standards. If a control has eitherfocusableoraccessibleset to false, the control will lose keyboard and accessibility focus. There is an exception in functionality in the case of the View control, where setting eitherfocusableoraccessibleto true will allow the component to gain keyboard and accessibility focus.
React Native Windows 0.70.11
React Native Windows 0.70.10
React Native Windows 0.69.17
React Native Windows 0.68.26
React Native Windows 0.71.0-preview.3
React Native Windows 0.70.9
React Native Windows 0.69.16
React Native Windows 0.68.25
React Native Windows 0.71.0-preview.2
Bring your React Native apps to some of the most powerful devices out there. Take your apps across PC, Xbox, Surface Tablets, and dual-screens with our robust Windows extension to React Native. Extend your desktop experience to more than just Windows! Try out our fully supported macOS extension to React Native. React Native for Windows + macOS brings React Native support for the Windows 10 SDK as well as the macOS 10.13 SDK. With this, you can use JavaScript to build native Windows apps for all devices supported by Windows 10 including PCs, tablets, 2-in-1s, Xbox, Mixed reality devices, etc., as well as the macOS desktop and laptop ecosystems. Some build-time tools will send telemetry to Microsoft by default. No telemetry is collected or transmitted in the final app. You can prevent the telemetry from being sent by using the —no-telemetry command line option. See the —help command or README file for more details.
Features
- Use JavaScript to build native Windows apps for all devices supported by Windows 10
- You can run React Native Windows apps only on devices supported by the Windows 10 SDK
- Take your apps across PC, Xbox, Surface Tablets, and dual-screens with our robust Windows extension to React Native
- Some build-time tools will send telemetry to Microsoft by default
- The Debug configuration uses the Web Debugger by default, which means the application’s JavaScript code runs in Chrome
- React Native Components and APIs that are a part of the React Native Lean Core effort are now all supported in React Native for Windows
Project Samples

License
MIT License

Content Optimized For The Modern Marketer
User Reviews
Be the first to post a review of React Native for Windows!
Additional Project Details
Programming Language
C++
React Native is a renowned JavaScript mobile application framework that allows building mobile applications on Android and iOS platforms. It offers superb mobile development capabilities and concentrates on creating applications for multiple stages using a similar codebase. To know more about usereducer in React and React Native Interview Questions, click here.
Originally developed by Facebook for its internal app development, React Native was open-sourced in March 2015 for iOS Mobile apps, and by September of the same year a version for Android dev was also released. Today, Native React has been vastly improved and powers popular worldwide mobile applications like Instagram, Facebook, Skype, and more. For more information on web development, check out Full Stack Bootcamp.
Are you ready to get started with React Native? Let’s understand how to download, install and set up React Native in Windows 10.
1. Prerequisites
Before we get started, here are a few system requirements to download, install, and set up React-Native on your Windows 10.
Hardware requirements
To download and successfully install React-Native in your computer, you need to consider the minimum hardware specifications required to support the app and run it smoothly.
- RAM 8 GB
- CPU: Intel ® Core ™ i7‐4870 HQ CPU @ 2.50 GHz
- 256 GB ROM
Software requirements
To efficiently install and set up React-Native on your Windows device, you will need to install the following:
- Android Studio
- Android SDK
- Install JDK
- Node Js
- NPM 3.5.2
- React native cli
2. Installation procedure
To successfully install and set up React-Native to your device, you need to follow the steps discussed below:
Step-1: Install Chocolatey
The first process that you need to do is to install Chocolatey, a well‐known package manager for Windows. Installation of Chocolatey requires administrator access to the computer’s command prompt to run.
- Go to and choose the option – get started.

- In the Chocolatey install section, choose Individual as shown:

- Now go to Windows CMD Shell, and enter the following command in the cmd.exe shell.

The installation will look like as shown below:

To check whether you have installed it correctly, open the command prompt and type;
choco -version
If you managed a correct installation, this command returns the Chocolatey version you have installed; like shown in the screen below:

Step-2: Install Node Js
Using Chocolatey we will now install Node.js, and JDK8 as follows.
i. Installing Node Js
Installing Node.js is crucial as it is a JavaScript runtime environment and React Native uses it build the JavaScript code. To install Node.js, you need to open the command prompt as the administrator and put in the Chocolatey command prompt below:
Choco install -y nodejs.install

Installation may take some time. Once done, you will see a message stating that Chocolatey is installed as shown below:

To confirm that installation has been successful, we will execute the below command at the command prompt, as administrator:
node --version
If the installation was successful, the version number is displayed.
.png&w=3840&q=75)
After installing Node.js, the Node Package Manager NPM automatically installs. Now check the installation of NPM in your system by entering the following command.
npm --version
The displayed message below verifies that the installation of NPM is successful.

Step:4 Installing JDK8 (Java Development Kit)
JDK8 is crucial in the improvement of android applications by React-Native. To install the JDK8, go to the Windows PowerShell and use the following command:
choco install -y nodejs.install openjdk8

To know whether it installed successfully, open the command prompt again and enter the command:
java -version
The message below is displayed if the JDK8 is successfully installed hence showing the Java version as:
openjdk version “1.8.0_222”
The installed JDK8 also has an installed Java compiler. To confirm whether the Java compiler has been installed, open the command prompt and enter the below command:
javac -version
Step-5: Install Android Studio
To improve mobile applications with React Native, you need to install Android Studio. To download the installation file, go to. By default, android studio automatically installs the latest Android SDK. However, building a React Native app with native code demands Android 11.0 (R) SDK in particular.
Wondering where to begin to career as web developer? Enroll in Full Website Development course.
The installation display message looks like below:

After downloading the file, perform the Android Studio installation process. To continue, click on the Next button to see the Choose Components screen.

Tick the box containing Android Virtual Device and click on the Next button.

You then need to choose the location in your computer where you would like the Android Studio to get installed. You can even leave it to install at the default location to save time, and then click the Next button to go to the next screen:

You will come to the Choose Start Menu Folder. Click the Install button to install the program.


When the bar reaches the end, click on the Next button to complete the process.

On the next screen, check Start Android Studio and click on the Finish button.

Customize Android Studio:
Click the Next button to go to the Install Type screen:

Choose the Custom type of setup and then click the Next button.


On this screen, you can select the theme of your choice and then click on the Next button to go to the SDK Component Setup window.

On the SDK Component Setup display, check on the Performance Intel HAXM option plus Android Virtual Device option and then click on the Next button.

On the Emulator Settings window, do not make changes to anything. Leave it the way it is and click on the Next button.

Verify settings.

The dialogue box below completes the whole process by clicking on the Install button.

Customize Android SDK
When you select Configure, the SDK Manager as shown on the screen above is displayed. This allows you to choose the Android SDK settings. Click on the Show Package Details located at the bottom right of the screen. From the list, tick the following:
- Android SDK Platform 28
- Intel x86 Atom System Image
- Google APIs Intel x86 Atom System Image
- Google APIs Intel x86 Atom_64 System Image
Click the OK button to install them, and you are done setting up the Android SDK.
React Native needs environment variables to be customized to create applications using the native codes. Next, we will customize the Android Studio Environment variable.
3. Setting the path to Environmental Variable
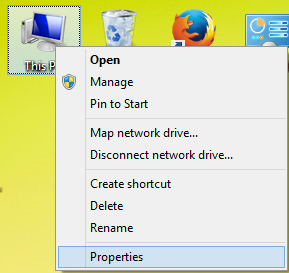
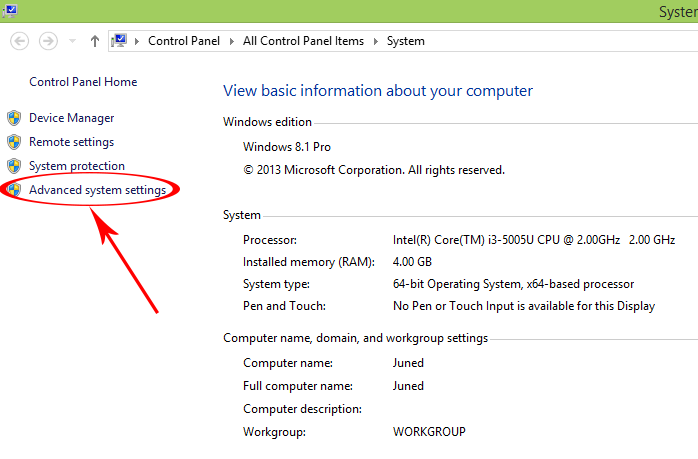
Right‐click on This PC and click Properties, a screen displays as below. Click on the advanced system settings.

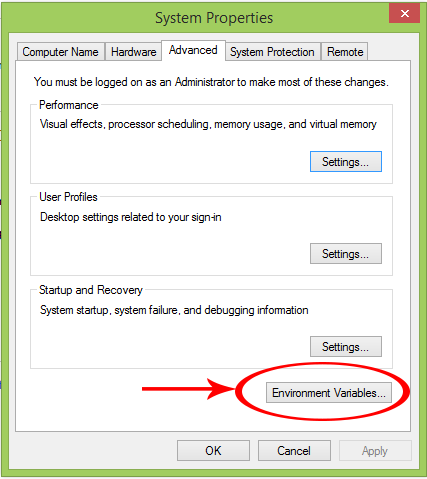
Once you are on the System Properties window, select the Advanced tab, and then the Environment Variables button at the bottom. Then press Enter.

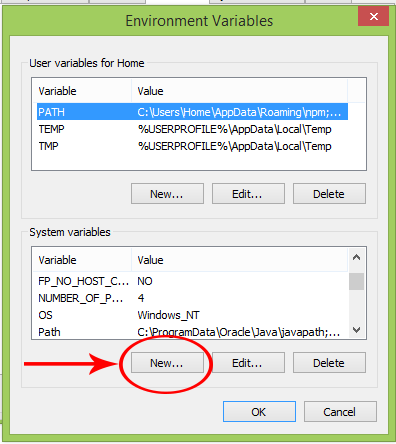
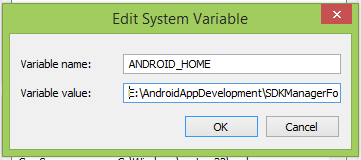
After selecting the environment variable, go to the Variable name, type ANDROID_HOME, and your variable value Android Studio SDK path. After that, customize the Android Studio platform‐tools path by selecting the Path variable on User variables for your name list to move to the edit dialog.
Input platform-tools folder path in the SDK path, like C:Users[user name]AppDataLocalAndroidSdkto the end of the list and press, Enter key. Open the command prompt and input the command below:
adb
When the environmental variable customization is successful, you get the below message:
Android Debug Bridge version 1.0.41
Version 29.0.1-5644136
Installed as /Users/Username/Library/Android/sdk/platform-tools/adb
Install React Native CLI
To install React-Native CLI, open the command prompt as an administrator and enter the following command:
npm install -g react-native-cli

4. Creating a New Application
Let us create a new React Native project using react native CLI. reactapp is the first project we are creating on React Native.
react-native init reactapp

Running the Application
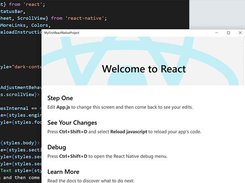
Once you have created your first React application, it’s time to run the application. Open the application in any IDE of your choice. Here we are using Visual Studio Code as shown:
Getting Started with React Native Development on Windows XP, Vista, 7, 8.1, 10 for android application development beginners step by step guide.
As we all know that Mobile application development is recently a very big market and everyone is using their own Android or iOS mobile phones. But for companies who has developing Android and iOS apps together gets very high cost for their customers, because they have to develop individual applications for each platform and that makes their application cost high.
So here we comes with React Native. React Native is a fully responsive mobile application development language which gives us the coding environment to code in JavaScript, HTML and CSS. You can find more about React Native on here.
In this tutorial we would going to install, run and create Android app development’s first project using React Native on windows machine. So just follow the below steps . If you like my tutorial than please share it with others.
Step 1. Install Required Software :
The first step to install React Native is Download and Install below required software packages.
NodeJS : Download and install the latest NodeJS windows machine installer software package from nodejs.org .
Python : Download and install the latest Python windows installer package from Python.org .
Step 2. Install React Native :
After installing NodeJS we can access the nmp packages via Command Line Interface ( DOS ) in windows. So open Command prompt type the below command to install React Native .
|
npm install —g react—native—cli |
Step 3. Install JDK( Java Development Kit ) :
JDK : Download and install JDK from Oracle’s official website oracle.com .
Step 4. Install Android Studio + SDK Manager :
Download the Android Studio latest version from Google Android Developers official Page developer.android.com .
After installing Android Studio Open it Goto Files -> Settings .
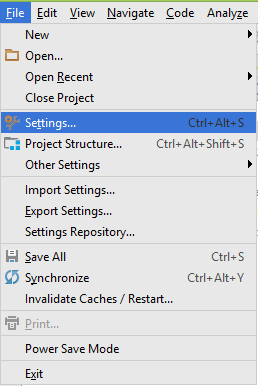
Goto Appearance and Behavior -> System Settings -> Android SDK and install latest android platform.
Step 5. Add Environment Variable ANDROID_HOME in Windows :
React Native required ANDROID_HOME variable to compile and run apps. So define the ANDROID_HOME variable.
- Right Click on My Computer.
- Goto Properties.

- Click on Advanced System Settings.

- Click on Environment Variables.

- Under System Variables click on New .

- Set variable name as ANDROID_HOME and variable value as your SDK Manager’s Path.

- Here you go now your ANDROID_HOME variable has been successfully set.
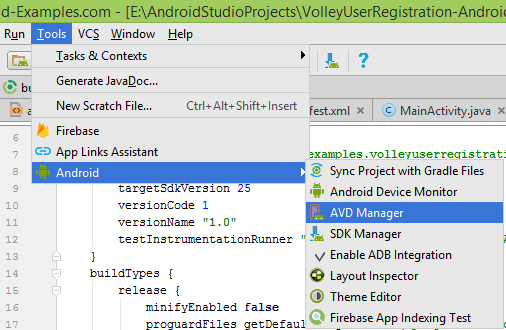
6. Start Android Virtual Device (AVD) :
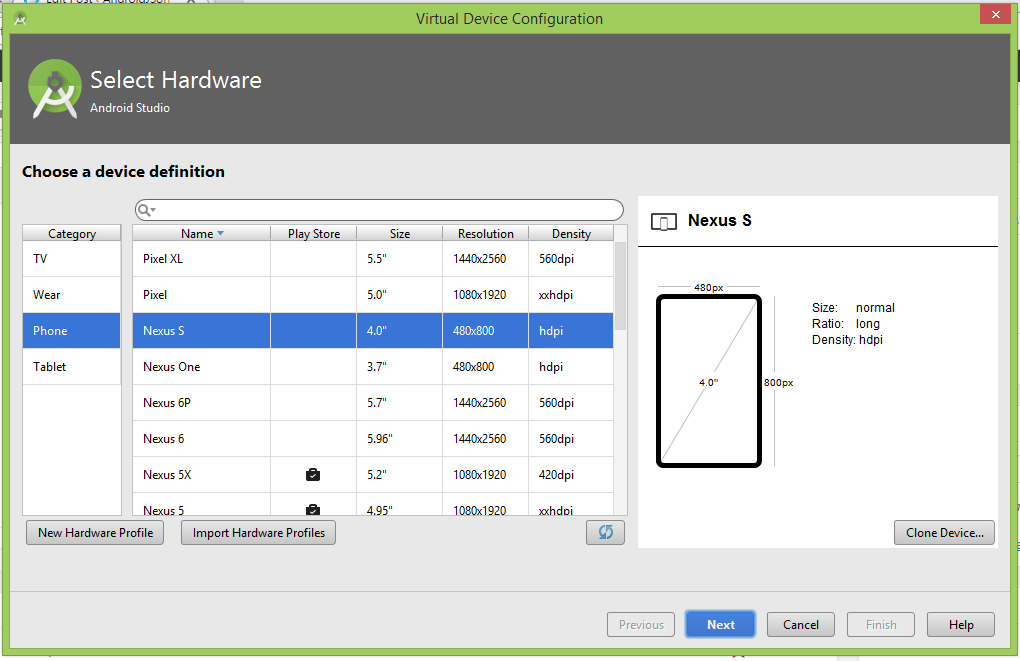
1. Android virtual device is used to see the test result of our coding inside a virtual android machine just like a real android mobile phone. To setup AVD Open Android Studio -> Tools -> Android -> AVD Manager.
2. Click on Create New Virtual Device.
3. Select your device.
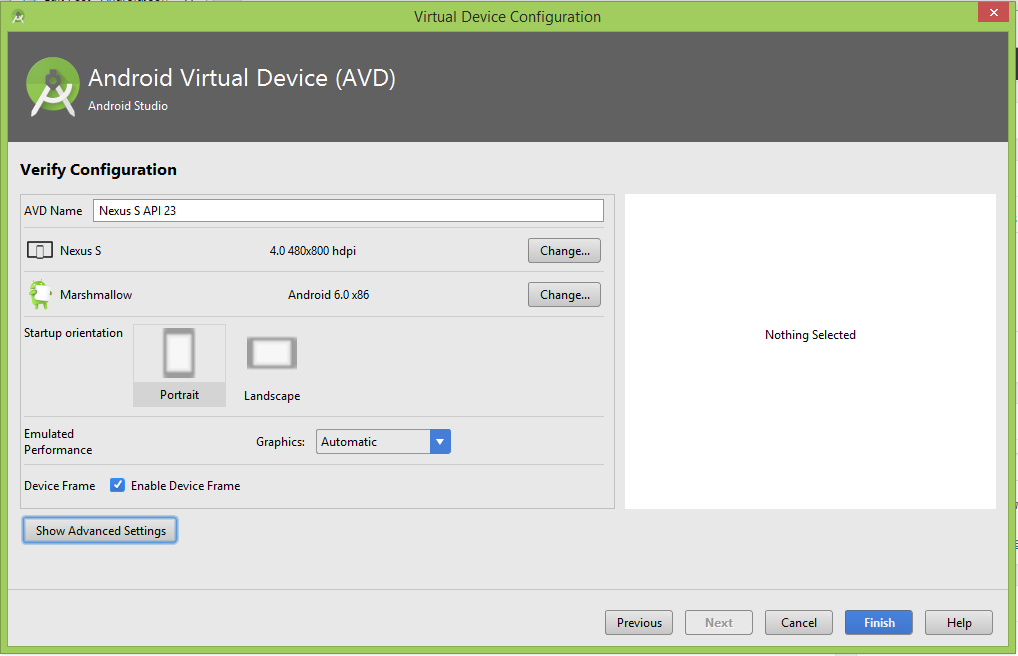
4. Select Android OS version System Image.

5. Name the AVD and hit the Finish button.
6. After done creating AVD just hit the Run button to start the AVD.
Step 7. Create your first React Native project :
1. Once you have finish all the installing than Create a folder in your drive in which you will store your all React Native projects. Than start command prompt and goto that folder inside command prompt. You can use cd.. command to go back individually from folder to folder.
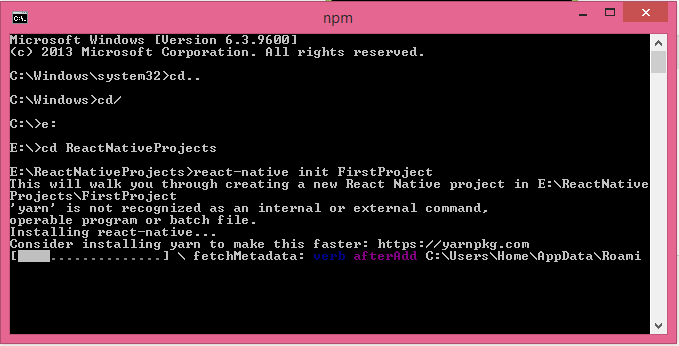
2. Now type react-native init FirstProject and press enter.

3. Now it will start downloading the React Native app support libraries from internet.
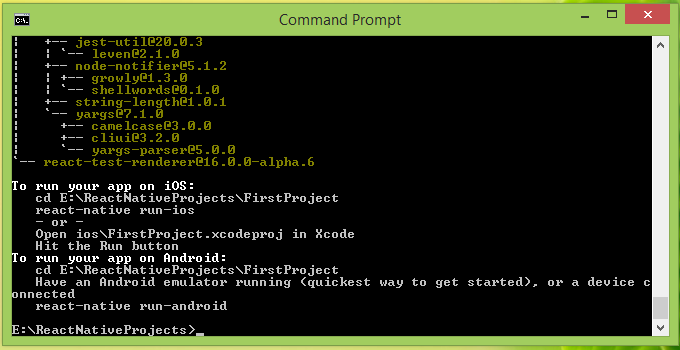
4. The final output will like below screenshot.
5. Now build the created app and run it into Android Emulator using below command.
|
E:>cd reactnativeprojects E:ReactNativeProjects>cd firstproject E:ReactNativeProjectsFirstProject>react—native run—android |
6. If your project build successfully then you can see a message on your command prompt screen BUILD SUCCESSFUL .
|
1 2 3 4 5 6 7 8 9 10 11 12 13 14 15 16 17 18 19 20 21 22 23 24 25 26 27 28 29 30 31 32 33 34 35 36 37 38 39 40 41 42 43 44 45 46 47 48 49 50 51 52 53 54 55 56 57 58 59 60 61 62 63 64 65 66 67 68 |
E:ReactNativeProjectsFirstProject>react—native run—android Scanning 555 folders for symlinks in E:ReactNativeProjectsFirstProjectnode_mo dules (134ms) Starting JS server... Building and installing the app on the device (cd android && gradlew.bat install Debug)... Download https://jcenter.bintray.com/com/facebook/react/react-native/0.42.3-atla ssian—1/react—native—0.42.3—atlassian—1.pom Incremental java compilation is an incubating feature. :app:preBuild UP—TO—DATE :app:preDebugBuild UP—TO—DATE :app:checkDebugManifest :app:preReleaseBuild UP—TO—DATE :app:prepareComAndroidSupportAppcompatV72301Library :app:prepareComAndroidSupportSupportV42301Library :app:prepareComFacebookFbuiTextlayoutbuilderTextlayoutbuilder100Library :app:prepareComFacebookFrescoDrawee101Library :app:prepareComFacebookFrescoFbcore101Library :app:prepareComFacebookFrescoFresco101Library :app:prepareComFacebookFrescoImagepipeline101Library :app:prepareComFacebookFrescoImagepipelineBase101Library :app:prepareComFacebookFrescoImagepipelineOkhttp3101Library :app:prepareComFacebookReactReactNative0442Library :app:prepareComFacebookSoloaderSoloader010Library :app:prepareOrgWebkitAndroidJscR174650Library :app:prepareDebugDependencies :app:compileDebugAidl :app:compileDebugRenderscript :app:generateDebugBuildConfig :app:mergeDebugShaders :app:compileDebugShaders :app:generateDebugAssets :app:mergeDebugAssets :app:generateDebugResValues :app:generateDebugResources :app:mergeDebugResources :app:bundleDebugJsAndAssets SKIPPED :app:processDebugManifest :app:processDebugResources :app:generateDebugSources :app:incrementalDebugJavaCompilationSafeguard :app:compileDebugJavaWithJavac :app:compileDebugJavaWithJavac — is not incremental (e.g. outputs have changed, no previous execution, etc.). :app:compileDebugNdk UP—TO—DATE :app:compileDebugSources :app:transformClassesWithDexForDebug Running dex in—process requires build tools 23.0.2. For faster builds update this project to use the latest build tools. :app:mergeDebugJniLibFolders :app:transformNative_libsWithMergeJniLibsForDebug :app:processDebugJavaRes UP—TO—DATE :app:transformResourcesWithMergeJavaResForDebug :app:validateSigningDebug :app:packageDebug :app:assembleDebug :app:installDebug Installing APK ‘app-debug.apk’ on ‘Marshmallow(AVD) — 6.0’ for app:debug Installed on 1 device. <strong>BUILD SUCCESSFUL</strong> Total time: 4 mins 53.489 secs ‘adb’ is not recognized as an internal or external command, operable program or batch file. Starting the app (E:AndroidAppDevelopmentSDKManagerForAndroidStudio/platform—t ools/adb shell am start —n com.firstproject/.MainActivity... Starting: Intent { cmp=com.firstproject/.MainActivity } |
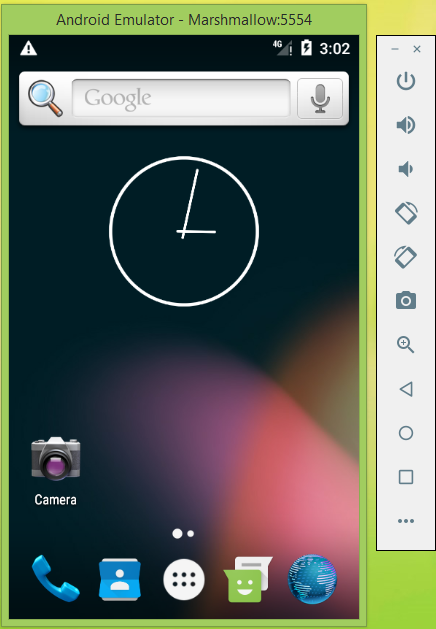
Here you go now you can see Your app is build successfully and run into Android emulator. Your emulator screenshot should look like this :

Related posts:
React Native framework is getting more attention from developers who want to build cross-platform mobile applications (Android/ios). I could see a lot of tutorials in installing and setting up React Native on Mac OS and Linux distributions. But this tutorial is for Windows users. Here we will learn the steps to install React Native on Windows 10.
We can find official installation documentation on the React Native website. But I faced some issues when following it and some of the steps are a little bit confusing. This is the reason behind the making of this tutorial.
We can set up and work with a React Native project on our Windows system in two different ways. Using Expo CLI and using React Native CLI.
- If you are a beginner, Expo CLI will be the best compatible option. Because the environmental setup for both Android and iOS is handled by Expo here.
- In a project built with React Native CLI, we can find two directories android and ios in our project directory to customize our app for both platforms.
Here we will use React Native CLI to install and set up a React Native project on our Windows 10 system.
So let’s start the installation of React Native on Windows 10 using React Native CLI.
Prerequisites
To continue with this article, the reader must know the basics of working with the Command Prompt/ Powershell in a Windows 10 system.
What we will learn?
Here in this article, we will learn the following things:-
- Install Chocolatey package manager on Windows 10
- Install Node.js, Python2 and JDK8 using Chocalatey
- Installing Android Studio
- Setup Android SDK
- Install React Native CLI
- Creating a new React Native application
- Set up an Android device
- Running the React Native app we created
Install Chocolatey
Chocolatey is a popular package manager for Windows. So at first, we need to install it on our system.
To install Chocolaty, Open Command Prompt with administrator privileges and run the command below.
@"%SystemRoot%System32WindowsPowerShellv1.0powershell.exe" -NoProfile -InputFormat None -ExecutionPolicy Bypass -Command "iex ((New-Object System.Net.WebClient).DownloadString('https://chocolatey.org/install.ps1'))" && SET "PATH=%PATH%;%ALLUSERSPROFILE%chocolateybin"
Install Node, Python2, and JDK8
Now we need to install Nodejs, Python2, and JDK using Chocolaty. This can be done using the below command.
choco install -y nodejs.install python2 jdk8
Install Android Studio
Android studio needs to be installed for working with React Native development. We can easily download and install it from the URL below.

https://developer.android.com/studio
Set up Android SDK
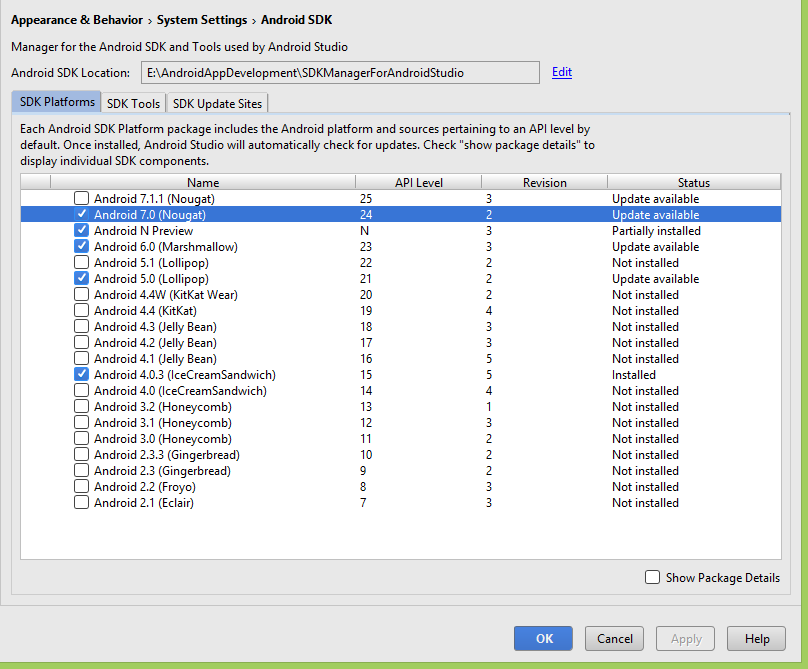
Android Studio installs the latest Android SDK by default. However, building a React Native app with native code requires the Android 11.0 (R) SDK in particular. Additional Android SDKs can be installed through the SDK Manager in Android Studio.
The SDK Manager can be accessed from the Welcome to Android Studio screen.
Click on Configure, then select the SDK Manager.
SDK manager -> SDK platforms
then check the box next to “Show Package Details” in the bottom right corner. Look for and expand the Android 11.0 (R) entry, then make sure the following items are all checked:
- Android SDK Platform 26
- Google APIs Intel x86 Atom_64 System Image


The React Native tools require some environment variables to be set up in order to build apps with native code.
Open the System pane under System and Security in the Windows Control Panel, then click on Change settings. Open the Advanced tab and click on Environment Variables. Click on New to create a new ANDROID_HOME user variable that points to the path to your Android SDK:
c:UsersYOUR_USERNAMEAppDataLocalAndroidSdk

Install React Native CLI
We can easily install React Native CLI using NPM. So, install it with the below command on Command Prompt/ Powershell on our system.
npm install -g react-native-cli
Creating a New Application
Using react native CLI, we can create a new React Native project.
react-native init AwesomeProject
Here AwesomeProject is the project name I have chosen.
Set Up an Android Device
Now we can run the project we have created on our Android phone. For this, we need to set up our mobile device first.
We can also run our application of Android Virtual Device(AVD) which can be created from Android Studio. But I am not explaining it in this tutorial.
We need to enable USB debugging in our Android device to run the React Native app we have created.
- On our Android device, Go to Settings->About
- We can see a Build Version menu there.
- Continually click the Build Version option until it enables the Developer options.
- Now, return to Settings and click the Developer options menu there.
- Enable the USB debugging option in Developer options.

Connect our mobile device with our Windows system using the USB cable. Type the below command to verify whether our mobile device is connected or not.
adb devices

Running the React Native app
Now, execute the below command to run the react native app on our mobile device.
react-native run-android

We recommend using Visual Studio code as the source-code editor for working with React Native projects.
Summary
So here in this article, we learned the steps to install React Native on our Windows 10 using React Native CLI. These installation steps are those who are really serious about React Native mobile app development. Others can work with Expo CLI that makes the installation and setup easier.