
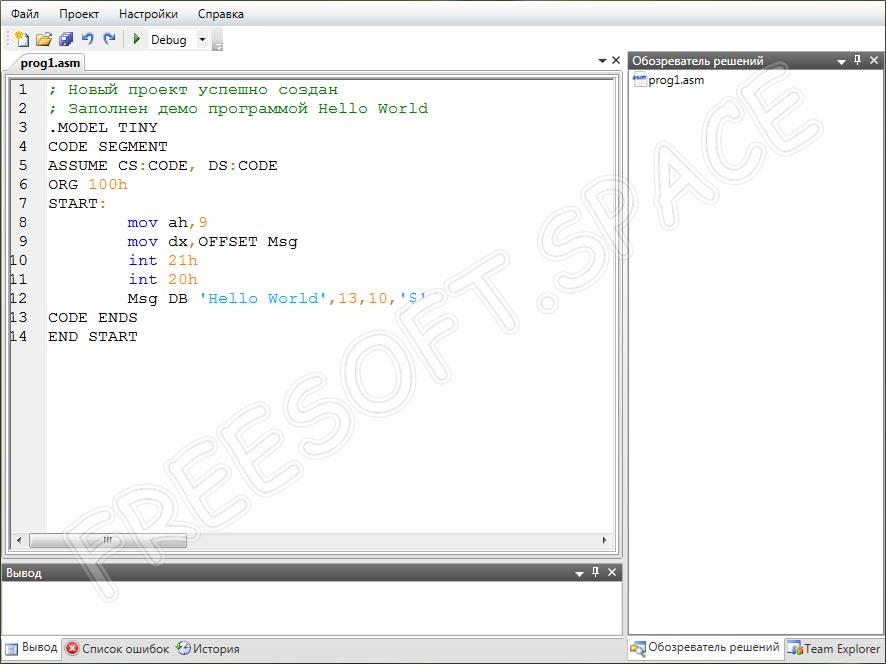
Сегодня многие современные приложения разрабатываются на языке программирования ассемблере. Для облегчения работы с данным софтом используется программный пакет TASM, речь о котором, собственно говоря, и пойдет в сегодняшнем обзоре. На нашем портале можно бесплатно скачать Turbo Assembler v.5.0 (TASM) для Windows 10 x32/x64 Bit. Перед загрузкой инструмента рекомендуем обязательно ознакомиться с его основными функциями и предназначением.
Содержание
- Описание и возможности
- Как установить
- Достоинства и недостатки
- Похожие приложения
- Системные требования
- Скачать
- Вопросы и ответы
Описание и возможности
Программное обеспечение, обозреваемое в сегодняшней статье, может использоваться разработчиками в двух вариациях. Первый способ – ручной ввод различных команд программирования. Во втором случае речь идет об использовании удобного графического интерфейса, наделенного такими функциями:
- Использование стандартных и расширенных сегментарных директив.
- Разработка и тестирование различных программ.
- Создание и сохранение файлов с кодами.
- Работа с различными элементами кода.
- Работа с отдельными элементами и автоматический поиск их замены.
Если вы не обладаете нужными знаниями в сфере разработки, нет никакого смысла загружать пакет на ПК. Инструмент предназначен для программистов.
Как установить
Обозреваемый сегодня софт является сложным и многофункциональным инструментом для разработки различных приложений. Для того чтобы освоить все функции пакета, необходимо пройти специальные курсы или хотя бы просмотреть обучающие видеоролики в сети. Несмотря на всю сложность утилиты, инсталляция ее проходит по стандартному сценарию. Для этого делаем следующие шаги:
- Переходим вниз данной странички и кликаем по ссылке для загрузки архива с файлом установки приложения.
- Руководствуясь подсказками мастера инсталляции, производим установку инструмента на компьютер или ноутбук.
При первом запуске программного обеспечения видим, что интерфейс на английском языке. Изменить его можно в разделе «Option», перейдя в папку «General».
Достоинства и недостатки
Теперь самое время разобраться с сильными и слабыми аспектами пакета для программирования. Сделаем это в виде небольших списков.
Достоинства:
- Пользовательский интерфейс довольно простой, но очень удобный.
- Удобное редактирование кода, отображаемого в главном окне утилиты.
- Возможность применения горячих клавиш.
- Бесплатное распространение.
- Легковесность и низкие требования к ПК.
- Работа с несколькими проектами параллельно.
Недостатки:
- Новичку разобраться с функциями ПО будет довольно тяжело.
Похожие приложения
Назовем еще несколько интересных решений, используемых в сфере разработки:
- Fasm (flat assembler).
- UASM (HJWasm).
- FASMARM.
- Turbo Debugger.
- Turbo Pascal.
Системные требования
Приложение имеет относительно невысокие требования к параметрам электронной машины. Рассмотрим эти рекомендации немного подробнее:
- ЦП: от 1 ГГц и более.
- ОЗУ: от 512 Мб.
- Место на диске: от 1 ГБ и выше.
- Операционная система: Microsoft Windows XP, 7, 8 или 10.
Скачать
Осталось лишь кликнуть по ссылке и начать использование клиента для программирования на ПК.
| Версия: | v.5.0 |
| Разработчик: | Borland |
| Информация обновлена и актуальна на: | 2022 год |
| Название: | Turbo Assembler |
| Операционная система: | Microsoft Windows 32/64 Бит |
| Язык: | Русский |
| Лицензия: | Бесплатно |
Turbo Assembler v.5.0 (TASM)
Вопросы и ответы
Всего несколько простых шагов и удобная утилита для разработки в вашем полном распоряжении. Надеемся, трудностей с использованием софта у вас не возникнет. Если вопросы появятся, задать их можно специалистам портала через форму обратной связи, расположенную внизу.
( 7 оценок, среднее 1.14 из 5 )

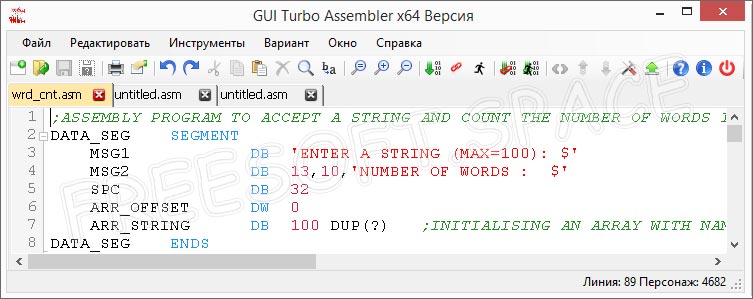
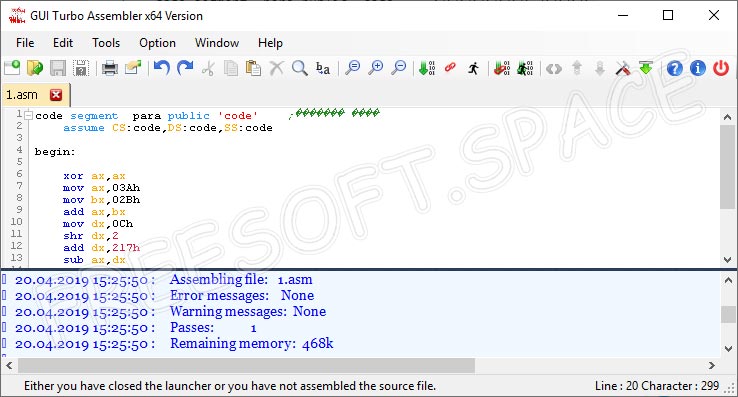
Инструмент, о котором мы расскажем в этом материале, представляет собой программный пакет, используемый для разработки различного софта на языке ассемблера. Предлагаем бесплатно скачать GUI Turbo Assembler 5.0 (TASM) для Windows 10 x32/x64 Bit и познакомиться с данным продуктом ближе. По уже имеющейся на сайте традиции разберемся с возможностями утилиты, сразу после чего поговорим о ее загрузке и инсталляции на компьютер или ноутбук.

Содержание
- Описание и возможности
- Как пользоваться
- Загрузка и установка
- Инструкция по работе
- Достоинства и недостатки
- Похожие приложения
- Системные требования
- Скачать
- Видеообзор
- Вопросы и ответы
Описание и возможности
Программное обеспечение может использоваться как специалистами для полноценной работы, так и новичками для обучения. Приложение включает полноценную справочную систему, где можно найти ответы на все интересующие вас вопросы по теме. Графический интерфейс инструмента для программирования довольно простой и симпатичный. Работать с ним вполне комфортно. К ключевым возможностям можно отнести:
- Удобный поиск и замена отдельных элементов программы в автоматическом режиме.
- Работа с исполняемыми файлами – сбор и запуск.
- Создание и хранение файлов с кодами.
- Отправка файлов с кодами на печатающие устройства.
- Разработка различного софта и его тестирование.
- Работа с расширенными или стандартными сегментарными директивами.

Утилита часто применяется для обучения программированию на языке ассемблере. Для расширения функций программы используются наборы дополнительных макросов.
Как пользоваться
Скачивание и установка приложения проводится довольно быстро и легко. Для этого не понадобится каких-то особых знаний и умений. Читайте инструкцию и выполняйте каждый ее шаг.
Загрузка и установка
Перед загрузкой утилиты важно понимать, что она относится к сложным и многогранным инструментам. Перед началом работы с ней потребуется пройти соответствующее обучение. Но для начала давайте произведем инсталляцию программы на компьютер. Для этого делаем следующее:
- Внизу странички находим ссылку, по которой необходимо перейти для загрузки установочного дистрибутива.
- После распаковки архива запускаем инсталляцию софта, выполним двойной левый клик мышкой по исполняемому компоненту.
- Все дальнейшие действия осуществляются в соответствии с подсказками мастера установки. Изначально приложение будет на английском языке. Изменить его можно в настройках.

TASM в вашем полном распоряжении. Можно смело переходить к изучению и использованию программного обеспечения.
Инструкция по работе
Конечно же, в двух словах описать принципы работы с утилитой не получится. Для полного освоения софта вам потребуется не один день. Единственное, на чем хотелось бы сделать акцент, это то, что ввод, редактирование или копирование кодов здесь осуществляется через удобную панель. На этой же панели расположены основные клавиши для тестирования и запуска готового проекта. Кроме этого, в разделе настроек пользователь может изменить конфигурацию графического интерфейса или воспользоваться некоторыми дополнительными функциями.
При желании изучить все функции программного обеспечения можно почитать обучающую литературу по данной теме или просмотреть видео в сети.
Достоинства и недостатки
Пришло время уделить внимание рассмотрению сильных и слабых сторон приложения, о котором мы говорим сегодня.
Достоинства:
- Бесплатное использование.
- Невысокие системные требования.
- Возможность применения горячих клавиш.
- Можно вести работу с несколькими проектами одновременно.
- Работа с кодами проходит в главном окне.
- Несмотря на простоту, интерфейс весьма удобный.
Недостатки:
- Без знаний основ программирования разобраться с утилитой будет довольно сложно.
Похожие приложения
В качестве среды разработки на ПК или ноутбуке можно также использовать такие решения:
- Free Pascal.
- RadASM.
- Turbo Debugger.
- FASMARM.
- Eonza.
Системные требования
Назовем рекомендуемые параметры электронной машины для стабильной работы софта:
- Центральный процессор: начиная от 1 ГГц.
- Оперативная память: не менее 512 Мб.
- Пространство на жестком диске: от 1 Гб и более.
- Платформа: Microsoft Windows 32/64 Bit.
Скачать
Прямо сейчас у вас есть возможность получить желаемый инструмент на свой ПК по ссылке ниже.
| Версия: | 5.0 |
| Разработчик: | Borland |
| Информация обновлена и актуальна на: | 2022 год |
| Название: | GUI Turbo Assembler |
| Платформа: | Microsoft Windows XP, 7, 8 или 10 |
| Язык: | Русский |
| Лицензия: | Бесплатно |
| Пароль к архиву: | bestsoft.club |
GUI Turbo Assembler 5.0 (TASM)
Видеообзор
Начните изучение программы с этого небольшого ролика. Уверены, он будет полезным для вас.
Вопросы и ответы
Теперь вы можете смело переходить к практике и устанавливать приложение на ПК. Если в процессе этого появятся трудности, мы всегда рады помочь советом. Достаточно лишь описать проблему через форму обратной связи ниже.
( 2 оценки, среднее 3 из 5 )

GUI Turbo Assembler is an essential Multilingual Integrated Development Environment for Assembly language.
GUI Turbo Assembler comes integrated with Borland Turbo Assembler and Turbo Linker for assembling and building assembly codes. It is powered by DOSBox for handling Borland Turbo Assembler and Turbo Linker in 64-bit environment.
The IDE is loaded with powerful feature like syntax highlighting, code folding along with the other regular features to work with any assembly source code.
It supports compiling and building of assembly codes to windows executable with a single click.
Features
- 64-bit Compatible
- 32-bit Compatible
- Multilingual
- Tab Browsing
- Syntex Highlightening
License
Other License
Codility makes great hiring decisions effortless without wasting engineering or recruiter time. Candidates are evaluated equally based on the technical skills that matter, enabling engineering leaders to build high-performing, diverse teams that power growth.
User Ratings
5.0
out of 5 stars
★★★★★
★★★★
★★★
★★
★
ease
1 of 5
2 of 5
3 of 5
4 of 5
5 of 5
4 / 5
features
1 of 5
2 of 5
3 of 5
4 of 5
5 of 5
4 / 5
design
1 of 5
2 of 5
3 of 5
4 of 5
5 of 5
4 / 5
support
1 of 5
2 of 5
3 of 5
4 of 5
5 of 5
4 / 5
User Reviews
- All
- ★★★★★
- ★★★★
- ★★★
- ★★
- ★
-
Best GUI for TASM. Thanks to devs.
-
Fantastic project for coding old demo effects in ASM (not that there’s any reason in the world to do that, but that’s how the post-Amiga asm demos were done. So if you want to do it old school, TASM is a must!) Before this app, TASM in D0sbox was pretty much a pain. Works flawlessly. Many thanks to the author!
-
I believe the Web Master needs to update the link listed for the company’s website. It does not take you there but to another persons homepage. Overall however, the downloaded software was great, I liked it better than MASM that I currently use.
-
One of my favourite app. Very easy to use and helpful app. It saved lots of my time.
Thank you1 user found this review helpful.
Read more reviews >
Additional Project Details
Intended Audience
Advanced End Users, System Administrators, Developers, End Users/Desktop, Quality Engineers, Testers
User Interface
.NET/Mono
Programming Language
C#
Hello Guys,
Tasm,or Turbo Assembler/Turbo Debugger By Borland , is one of the most popular assembler used in the world today. it’s used to study the architecture and working of various Microprocessors such as 8085,8086,8051,Pentium Series etc..
But However it doesn’t work / supports the 64 bits of Windows i.e Windows 7 64 bit / Windows 8 Version, so i have created a separate configured Version of the software for the same purpose.,it will run smoothly,with fullscreen mode and has many features such as
- Full Screen Mode Operation On Windows 7 as well as Windows 8 | 8.1 & Windows 10 for Tasm [Turbo Asssembler,TD,turbo Debugger]
- edit option of Microsoft Dos editor integrated [ You can now write your program directly with the dos editor edit in Windows 7/Windows 8 ]
- Inbuilt MS-Dos Editor 2.026 within DosBox
- Auto Mounted the Tasm Files such as tasm,td,and tlink [so that there is no need to mount them everytime , not even one time !! 😀 you open DosBox]
- Mouse Pointer Support
- One Click Installer,No Need of configuring anything,installs in seconds and the Shortcut placed on your Desktop!
- Useful For Students as well as Teachers and Professionals..
- You can save the program directly within it,and open it next time From the Software itself for editing/Use.
Click here to Download The Installation Package Tasm 1.4 Windows 7|Windows 8|8.1 & Windows 10 64bit Version [2-3 MB]
Installation Guide
First of all You Need To Download The TASM from above link- >
Click here to Download The Installation Package Tasm 1.4 Windows 7|Windows 8|8.1 & Windows 10 64bit Version [2-3 MB]
Then , Its Pretty Simple,Just Keep on Clicking Next,Just Don’t change the Install Directory of the software and make sure its “C:tasm 1.4”
- Tasm 1.4 Installation Directory..
Now Launch The Software by the Tasm 1.4 Shortcut Present on your Desktop..
Here are the Basic Function Commands of Tasm are same as that of normal version like
First make sure the screen is showing : C:Tasm> in Dos Command
Now, To Open MS-Dos Editor Type :
edit “yourfilename.extension” and it will open
check the Below screenshot

To Perform Tasm,Tlink And Execution Debugging
The Same commands are used
For Compiling : tasm “filename.asm” [without quotes]
for Linking : tlink “filename.obj” [without quotes]
For Debugger : simply “td” [without quotes] or you can use td “filename” [without quotes]
For Execution : filename.exe
here are the screenies for the above functions


- turbo debugger/td full screen on Windows 7/windows 8

Click here to Download The Installation Package Tasm 1.4 Windows 7|Windows 8 & Windows 10 64bit Version [2-3 MB]
Support
- If you are not able to get fullscreen window press “alt+enter” simultaneously after opening the swiss replica watches program.
- Comment any other ones if you have 😀
|
0 / 0 / 0 Регистрация: 25.02.2016 Сообщений: 10 |
|
|
1 |
|
|
25.02.2016, 18:29. Показов 10299. Ответов 8
Где скачать TASM или MASM для Win 10 64 разряда ???? Хочу выучить ассемблер не не знаю где скачать tlink, td, tasm… =( Те что есть у меня не работают. По братский дайте верное направление =
__________________
0 |

|
7 / 7 / 4 Регистрация: 30.11.2015 Сообщений: 107 |
|
|
25.02.2016, 18:48 |
2 |
|
ставишь виртуальную машину. в нее пилишь ХР 32 битную и тасм и всё будет работать)
0 |
|
Хитрая блондиночка $) 1470 / 985 / 399 Регистрация: 21.12.2015 Сообщений: 3,785 |
|
|
25.02.2016, 18:53 |
3 |
|
Хочу выучить ассемблер А разве МАСМ на х64 не работает?
0 |

|
44 / 44 / 17 Регистрация: 28.01.2012 Сообщений: 341 |
|
|
25.02.2016, 19:53 |
4 |
|
В Visual Studio можно MASM настроить.
0 |
|
0 / 0 / 0 Регистрация: 25.02.2016 Сообщений: 10 |
|
|
25.02.2016, 23:26 [ТС] |
5 |
|
Ну так то наверно да но как ??? Добавлено через 9 минут Hikari — с сайта микрософт скачал, а он чет не работает не понимаю akk — так то наверно можно опять же скачал пакет с микрософта Visual Studio установил. МАСМ запускаю и опять непонятки какие то- через фар тоже самое
0 |


|
44 / 44 / 17 Регистрация: 28.01.2012 Сообщений: 341 |
|
|
25.02.2016, 23:29 |
6 |
|
prizral_62, отличная статья как настроить MASM. (В свое время помогла
0 |
") )
)|
0 / 0 / 0 Регистрация: 25.02.2016 Сообщений: 10 |
|
|
26.02.2016, 00:31 [ТС] |
7 |
|
akk — Премного благодарен !!! Пошел изучать З.ы вопрос с повестки дня не снимается… Готов выслушать у кого еще есть какие варианты или предложения…. Добавлено через 55 минут
0 |
")
|
Ушел с форума
15703 / 7377 / 980 Регистрация: 11.11.2010 Сообщений: 13,319 |
|
|
26.02.2016, 03:51 |
8 |
|
0 |
|
0 / 0 / 0 Регистрация: 25.02.2016 Сообщений: 10 |
|
|
26.02.2016, 17:03 [ТС] |
9 |
|
Mikl___ Спасибо. Это что то очень сложное для меня пока… Не понимаю
0 |
 Учусь на сисадмина там на компьютерах все как то проще…
  Запускаем фар, создаем фаил, пишем программу, линкуем, смотрим дамп, регистры флаги и т.д…. Как я понял что на 64х так просто не получился =( Вывод будем покупать комп =( Ну и ладно…. Тут работает принцип капитализма нету знаний плати бабки
 В данной статье я хочу рассмотреть вопросы, которые могут возникнуть у человека, приступившего к изучению ассемблера, связанные с установкой различных трансляторов и трансляцией программ под Windows и Linux, а также указать ссылки на ресурсы и книги, посвященные изучению данной темы.
MASM
Используется для создания драйверов под Windows.
По ссылке переходим на сайт и скачиваем пакет (masm32v11r.zip). После инсталляции программы на диске создается папка с нашим пакетом C:masm32. Создадим программу prog11.asm, которая ничего не делает.
.586P
.model flat, stdcall
_data segment
_data ends
_text segment
start:
ret
_text ends
end start
Произведём ассемблирование (трансляцию) файла prog11.asm, используя ассемблер с сайта masm32.
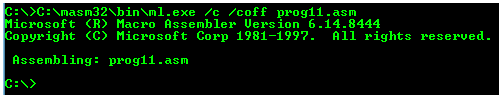
Ключ /coff используется здесь для трансляции 32-битных программ.
Линковка производится командой link /subsystem:windows prog11.obj (link /subsystem:console prog11.obj)
Как сказано в Википедии
MASM — один из немногих инструментов разработки Microsoft, для которых не было отдельных 16- и 32-битных версий.
Также ассемблер версии 6. можно взять на сайте Кипа Ирвина kipirvine.com/asm, автора книги «Язык ассемблера для процессоров Intel».
Кстати, вот ссылка на личный сайт Владислава Пирогова, автора книги “Ассемблер для Windows”.
MASM с сайта Microsoft
Далее скачаем MASM (версия 8.0) с сайта Microsoft по ссылке. Загруженный файл носит название «MASMsetup.exe». При запуске этого файла получаем сообщение -«Microsoft Visual C++ Express Edition 2005 required».
Открываем этот файл архиватором (например 7zip). Внутри видим файл setup.exe, извлекаем его, открываем архиватором. Внутри видим два файла vc_masm.msi,vc_masm1.cab. Извлекаем файл vc_masm1.cab, открываем архиватором. Внутри видим файл FL_ml_exe_____X86.3643236F_FC70_11D3_A536_0090278A1BB8. Переименовываем его в файл fl_ml.exe, далее, произведём ассемблирование файла prog11.asm, используя ассемблер fl_ml.exe.

MASM в Visual Studio
Также MASM можно найти в папке с Visual Studio (у меня VS 10) вот здесь: C:Program FilesMicrosoft Visual Studio 10.0VCbinml.exe.

Для того, чтобы запустить на 32- или 64-разрядной системе и создавать программы, работающие как под 32-, так и под 64-разрядной Windows, подходит MASM32 (ml.exe, fl_ml.exe). Для того, чтобы работать на 32- и 64-разрядных системах и создавать программы, работающие под 64-разрядной Windows, но неработающие под 32-разрядной нужен ассемблер ml64.exe. Лежит в папке C:Program FilesMicrosoft Visual Studio 10.0VCbinamd64 и вот здесь — C:Program FilesMicrosoft Visual Studio 10.0VCbinx86_amd64.
TASM
Программный пакет компании Borland, предназначенный для разработки программ на языке ассемблера для архитектуры x86. В настоящее время Borland прекратила распространение своего ассемблера.
Скачать можно, например, здесь. Инсталлятора нет, просто извлекаем программу. Вот исходник из книги Питера Абеля (рис. 3.2) «Язык Ассемблера для IBM PC и программирования».
stacksg segment para stack 'stack'
    db 12 dup ('stackseg')
stacksg ends
codesg segment para 'code'
begin proc far
 assume ss:stacksg,cs:codesg,ds:nothing
 push ds
 sub ax,ax
 push ax
 mov ax, 0123h
 add ax, 0025h
 mov bx,ax
 add bx,ax
 mov cx,bx
 sub cx,ax
 sub ax,ax
 nop
 ret
begin endp
codesg ends
 end begin
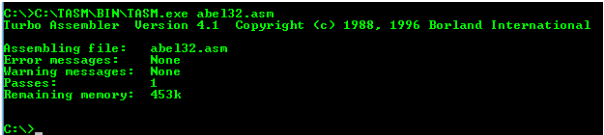
Выполним ассемблирование (трансляцию) файла abel32.asm.
Корректность работы программы можно проверить, произведя линковку (tlink.exe) объектного файла и запустив полученный файл в отладчике.
Как было сказано выше, MASM можно использовать для работы с 16-битными программами. Выполним ассемблирование (трансляцию) программы abel32.asm с помощью ассемблера MASM:

Ключ /coff здесь не используется.
Линковка производится файлом link16.exe
Вот здесь приводится порядок действий, которые необходимо выполнить для запуска TASM в DOSbox. Для линковки понадобится файл DPMI16BI.OVL
FASM
В статье Криса Касперски «Сравнение ассемблерных трансляторов» написано, что «FASM — неординарный и весьма самобытный, но увы, игрушечный ассемблер. Пригоден для мелких задач типа „hello, world“, вирусов, демок и прочих произведений хакерского творчества.»
Скачаем FASM с официального сайта. Инсталлятора нет, просто извлекаем программу. Откроем fasm editor — C:fasmfasmw.exe. В папке C:fasmEXAMPLESHELLO есть файл HELLO.asm.
include 'win32ax.inc'
.code
  start:
 invoke    MessageBox,HWND_DESKTOP,"Hi! I'm the example program!",invoke GetCommandLine,MB_OK
    invoke    ExitProcess,0
.end start
Откроем файл HELLO.asm из fasmw.exe. Изменим строку include ‘win32ax.inc’ на строку include ‘c:fasmINCLUDEWIN32AX.INC’. Запускаем из меню Run → Run.

Вот ссылки на ресурсы, посвященные FASM:
→ FASM на Cyberforum’е
→ FASM на asmworld .com программы под Dos
→ Цикл статей «Ассемблер под Windows для чайников»
→ Сайт на narod’е
FASM в Linux
Для того, использовать FASM в Linux (у меня Ubuntu), скачаем соответствующий дистрибутив (fasm-1.71.60.tgz), распакуем его, в папке у нас будет бинарный файл fasm, копируем этот файл в /usr/local/bin для того, чтобы можно было запускать его из консоли, как любую другую команду.Выполним ассемблирование программы hello.asm из папки fasm/examples/elfexe/hello.asm.

Корректность работы программы можно проверить в отладчике.
Nasm
Nasm успешно конкурирует со стандартным в Linux- и многих других UNIX-системах ассемблером Gas.
Nasm в Linux можно установить с помощью менеджера пакетов или из командной строки: в дистрибутиве Debian (Ubuntu) командой apt-get install nasm, в дистрибутивах Fedora, CentOS, RedHat командой yum install nasm.
Создадим программу, которая 5 раз выводит сообщение “Hello”. Пример взят из книги Андрея Викторовича Столярова “Программирование на языке ассемблера NASM для ОС UNIX”. Учебник, а также библиотека “stud_io.inc” есть на личном сайте автора.
%include "stud_io.inc"
global _start
section .text
_start: mov eax, 0
again:  PRINT "Hello"
PUTCHAR 10
inc eax
cmp eax, 5
jl again
FINISH
Выполним ассемблирование и линковку и запустим файл hello.asm.
$ nasm -f elf hello.asm
$ ld hello.o -o hello
$ ./hello
Для 64bit необходимо использовать команду nasm -f elf64 hello.asm
NASM для Windows
NASM для Windows можно установить, скачав соответствующий дистрибутив с соответствующего сайта.
Ассемблирование:
nasm -f bin имя_файла.asm -o имя_файла.com
Ссылки на ресурсы, посвященные Nasm:
→ Сайт А.В. Столярова
→ Сайт, на котором лежит электронный учебник (в архиве)
→ То же самое
AS
Стандартный ассемблер практически во всех разновидностях UNIX, в том числе Linux и BSD. Свободная версия этого ассемблера называется GAS (GNU assembler). Позволяет транслировать программы с помощью компилятора GCC.
Из учебников удалось найти только книгу на английском «Programming from the ground up». На русском удалось найти только одну главу из книги С. Зубкова «Assembler для DOS, Windows и UNIX».
Возьмем пример программы, которая ничего не делает, с сайта. Создадим программу gas.s
.section .text
   .globl _start
   _start:
      movl  $1, %eax
      movl  $2, %ebx
      int   $0x80
Выполним ассемблирование (трансляцию), линковку и запуск программы:
$ as -o gas.o gas.s
$ ld -o gas gas.o
$ ./gas
Если в данной программе изменить _start на main, то можно выполнить ассемблирование (трансляцию) и линковку компилятором gcc.
.section .text
   .globl main
   main:
      movl  $1, %eax
      movl  $2, %ebx
      int   $0x80
Выполним ассемблирование (трансляцию), линковку и запуск программы:
$ gcc gas.s -o gas
$ ./gas
Выводы: если вы изучаете программирование под Windows, то вы можете остановить свой выбор на Masm; Tasm больше не поддерживается, но для обучения по старым классическим учебникам подойдёт.
Под Linux Gas подойдет тем, кто использует GCC, а тем, кому не нравится синтаксис Gas, подойдёт Nasm.
P.S. Про обработку строк в ассемблере на примере создания транслятора простого «эзотерического» языка можно прочитать здесь.
P.P.S. Упрощенный ограниченный набор ассемблерных инструкций используется в учебной модели компьютера Little Man Computer, которому у меня также посвящено несколько статей ссылка.

Программный пакет Turbo Assembler 5.0 (TASM), который можно бесплатно скачать для Windows 10 по прямой ссылке, представляет собой удобный и функциональный инструмент для разработки различного софта на языке ассемблера. Софт отлично подойдет как для обучения студентов и новичков в сфере программирования, так и для профессиональных пользователей. Ниже можно найти более подробную информацию об утилите.
Описание
Для более четкого формирования у посетителей портала представления о программной разработке, приведем пример возможностей приложения:
- Возможность редактирования отдельных элементов проекта.
- Быстрое и удобное создание кодов.
- Отправка файлов на печать.
- Быстрый и качественный поиск кодов.
- Исправление ошибок.
- Применение дополнительных макросов.
- Тестирование созданного исполняемого компонента.
- Выполнение построения и запуска программы.

Удобный русскоязычный интерфейс и простота в использовании делает утилиту отличным выбором как для новичков, так и для профессиональных программистов.
Похожие приложения
Выделим несколько аналогичных решений для разработки на одноименном языке:
- Netwide Assembler.
- MASM Builder.
- Pass32.
- RadASM.
- SoftICE.

Достоинства и недостатки
Немного разобравшись с функциональными возможностями инструмента, коснемся чуть подробнее его сильных и слабых сторон.
Плюсы:
- Простота в использовании.
- Большой набор инструментов.
- Возможность удобного редактирования кода.
- Работа с отдельными элементами проекта.
- Создание и тестирование исполняемого файла.
- Бесплатное распространение.
- Использование специальной панели для написания кодов.
Минусы:
- Новичку будет тяжело освоить программу.

Системные требования
Среда разработки не требует от ПК слишком высоких характеристик:
- Процессор: от 1 ГГц и более.
- ОЗУ: от 1 Гб и выше.
- Место на диске: от 256 МБ.
- Платформа: Microsoft Windows 32/64 Bit.
Скачать
В данном разделе можно ознакомиться с дополнительной информацией и перейти непосредственно к загрузке приложения на ПК.
| Информация актуальна на: | 2022 год |
| Версия: | 5.0 |
| Платформа: | Windows XP, 7, 8, 10 |
| Лицензия: | Бесплатно |
| Язык: | Английский |
| Разработчик: | Бесплатно |
Turbo Assembler 5.0

Before we get started with TASM installation on a Windows machine, let’s get some knowledge about TASM and learn what it will do for us.
Turbo Assembler (TASM) a small 16-bit computer program which enables us to write 16 bit i.e. x86 programming code on 32-bit machine. It can be used with any high level language compliers like GCC compiler set to build object files. So that programmers can use their daily routine machines to write 16-bit code and execute on x86 devices.
So let get started with installation steps. Before we get started to make sure that you have the following software. If not, you can download it by clicking on it.
Requirements.
1. DosBox software.
2. TASM installation files.
Steps
1. First, install DOSBox software on your system.

2. Just run the downloaded setup file to install as just like other software you install.

3. Then extract the TASM zip file.
4. After that copy that extracted the folder to C drive of your system.

5. Now we have to mount our C drive to DosBox so that we can use our TASM libraries there.
6. To do that go to the following path on your PC
For 32-bit PC
C:Program FilesDOSBOX-0.74
For 64-bit PC
C:Program Files (x86) DOSBOX-0.74
7. Then there you will see a file named “DOSBOX 0.74 Options” click on it to open.

8. It will open a text file in notepad. Then navigate to the last line of that file where it shows “# You can put your MOUNT lines here”.

9. Add the following lines after that.
mount c c://tasm
c://
10. And save that file.

11. And now open DOSBOX. You’re done.
12. To run a TASM program copy your program file into the TASM folder which is under your C: drive.

13. And now open DOSBOX. And navigate to the TASM folder by typing cd TASM and hit enter.

14. Now type tasm <program_name>. Replace <program_name> with your actual program name. in my case, my program name is the timer so I will type tasm timer.asm

15. After you hit enter. You will see an error, warning messages. If there isn’t anything wrong with your program syntactically, you will see none there.

16. And now link your program to that type tlink <program_name> and hit enter. And now execute program by typing <program_name> only.
17. The program will start executing. To stop execution type exit and hit enter.
So in this way you can install TASM on your system and execute x86 code on your machine. This tutorial is applicable to Windows 7/8/8.1/10.
If you face any problem while doing this, make sure that you hit the comment below with your problem.
via
/*************************************************************************/
                           TSM_INST.TXT
                        TURBO ASSEMBLER 5.0

This file contains details on how to install the TASM 5.0 package.

--------------------------------------------------------------------
                        TABLE OF CONTENTS

SECTION 1     System Requirements  -   Full Installation

SECTION 2     Installing TASM 5.0
              A)   Pre-Installation Notes
                   1)   Backup Disks
                   2)   Disk Compressions
                   4)   Network Installation
              B)   Where to install
              C)   Installation Instructions
              D)   After Installation

SECTION 3     Minimum and Selected Installation Options


SECTION 4     Troubleshooting - Install Issues
              A)   Data Integrity or Bad Section Errors
              B)   Disk Full or Insufficient Disk Space
                   Errors
              C)   GP Fault or Unhandled Exception Errors

SECTION 5     Troubleshooting - Run Time Problems
              A)   Out of Memory Errors
              B)   GP Fault or Unhandled Exception Errors
              C)   Turbo Debugger for Windows

SECTION 6     Icons in the TASM Group Window
              A)   Creating a Program Group Window for TASM
              B)   List of Icons and Executable Files

SECTION 7     Using TASM from Windows

SECTION 8     How to Get A Technical Information Document
              A)   From TechFax
              B)   From Bulletin Boards

SECTION 9     Boot Clean
--------------------------------------------------------------------

SEARCH INSTRUCTIONS:  To go directly to a specific
section, use your editor's search utility and search on
"SECTION -#-" replacing the # with the appropriate section
number.


SECTION -1-  SYSTEM REQUIREMENTS
================================
Before installing TASM please review the minimum
system requirements listed below:

System requirements for a generic full installation
(both 16- and 32-bit installation):
   8 MB system memory  (req. to run Win32)
   Intel 386 or higher
   DOS 5.01 or later
   Windows 3.1 or later (to access Turbo Assembler help file)
   Windows '95 or Windows NT (for targeting those environments)
   Approximately 10 MB hard disk space
   3.5" High Density Disk Drive

Generally, you should use a host environment with a capability that is
equal to or greater than capability of the system you plan to target.
For example, if you are building 32-bit applications for Windows 95 or
Windows NT, you should use TD32 in a Win32 environment.

NOTE: On a compressed hard disk the installation process
might need additional hard disk space. If you are using
a disk compression utility, refer to Section 2, part A.


SECTION -2-  INSTALLING TASM 5.0
================================

A) Pre-Installation Notes
-------------------------
1) Backup Disks
   If you wish to make backup copies of your original disks
   use the DOS DISKCOPY command. You must use the same disk
   size and media (density) when you make your backup set of
   disks. Attempting to copy from 3.5" to 5.25" will cause
   the install program to fail. If you have a bad disk
   contact Borland's Disk Replacement line at (800) 621-3132.

2) Disk Compression
   If you are using a disk compression utility (such as
   Stacker[tm], DoubleSpace[tm], XtraDrive[tm],
   SuperStor[tm], etc.) the estimated available hard disk
   space reported might not be sufficient to install the
   product. During installation, TASM 5.0 copies compressed
   files onto your hard disk. Disk compression utilities
   report available hard disk space assuming that the files
   copied onto the disk can be compressed. Since the files
   that are copied by the installation program are already
   compressed, the disk compression utility cannot compress
   them any further. To solve this, you might need to free
   additional hard disk space for the installation.

3) Network Installation
   If you are installing TASM 5.0 on a network, you may wish
   to consult Technical Information Document number 1738. For
   information on how to receive this document, refer to
   Section 10.


B) Where to Install:
--------------------
This product is designed to be used as a standalone product or in
conjunction with Delphi 2.0 or Borland C++ 5.0.  It can also be used
with Borland/Turbo C++ 4.x, Borland Pascal 7 or Delphi 1.0.  If you are
using Turbo Assembler 5.0 in conjunction with any of these Borland
compilers, you can install Turbo Assembler atop the same directory
heirarchy as your other Borland Tools.

If you use Turbo Assembler 5.0 with any other Borland development tools or
versions, then it is best to install Turbo Assembler to a unique
directory, such as c:tasm.  Both tool sets should be referenced in your
dos path with the most recent version being first in the path.  For custom
configuration requirements, please contact Technical Support.


C) Installation Instructions:
-----------------------------
1. Boot Clean
   It is highly recommended that you boot clean before
   installing TASM 5.0. Booting your system with a clean
   configuration will eliminate any potential software
   conflicts that might arise during installation. Refer to
   Section 10 for instructions on how to boot clean.

2. Insert the TASM 5.0 installation disk into drive A or B.

3. From the DOS prompt type A:INSTALL (or B:INSTALL)
   and press <ENTER>. Do not install from a Windows DOS prompt.

4. Select installation options from the install menu. See
   Section 3 for more details on the installation instructions.

5. Choose START INSTALLATION to begin installation. If problems
   occur during installation, note any error messages and refer to
   Section 5.


D) After Installation:
----------------------
1. After the install has completed, the README file appears.
   The README file contains important information about
   configuring and using TASM 5.0, including late changes
   which might have occurred after the manuals were printed.

2. Modify your CONFIG.SYS so that files and buffers are set
   to at least 40. For example:

	FILES=40
	BUFFERS=40

   Also modify your AUTOEXEC.BAT file by adding to your path
   statement the TASM 5.0 bin directory. For example:

	PATH C:TASMBIN;C:;C:DOS;C:WINDOWS

3. If you are installing Delphi 1.0, or Borland C++ 4.x AFTER
   Turbo Assembler 5.0 has been installed, you will have to manually
   change the system settings that allow these products to coexist:

   In your system.ini file, check your [386Enh] section for multiple
   entries for the device TDDEBUG.386.  Remove duplicate entries of
   TDDEBUG.386 so that only the version from this product is loaded.
   On disk, you may also want to rename or remove the BP7 or BC4.x
   versions of TDDEBUG.386 and TDWINTH.DLL to avoid their accidental
   loading.  You must restart Windows after making changes to system.ini.


4. Changes to SYSTEM.INI file:
   Presuming you have installed Turbo Assembler and Tools to "c:tasm",
   The install program makes these changes to the SYSTEM.INI file:

   1) Adds "device=c:tasmbinwindpmi.386" to support our 32-bit tools.
   2) Adds "device=c:tasmbintddebug.386" to support our debugger.


5. Configuring the Windows NT command prompt:
   To run 16-bit protected-mode programs (tlink) under an NT command
   prompt you need to add the following line to CONFIG.NT:

      ntcmdprompt

    Under the default NT command-line prompt, DOS COMMAND.COM is run
    after returning from a TSR (such as RTM.EXE which bcc and tlink load).
    Adding the above line will cause the original NT CMD.EXE to be run.


SECTION -3-  MINIMUM AND SELECTIVE INSTALLATION OPTIONS
=======================================================
This section outlines the minimum and selective install
options available for TASM 5.0.

There are some files that are common to more than one option.
For example, MAKE.EXE will be installed if either the 16-bit or
the 32-bit command line tools are installed. { Common to 16-bit
and 32-bit tools is [2360K] of files ; Common to the TDWIN and
TDWIN32 options is [504K] of files } Those common files are
included in all the following estimates.

16-bit command line tools        [3085K]
    Install the 16-bit tools (TASM, TLINK).
    (Minimum installation option)

32-bit command line tools        [3163K]
    Install the 32-bit tools (TASM32, TLINK32).

Turbo Debugger for DOS           [1041K]
    Install Turbo Debugger for DOS.
    (Minimum installation option)

Turbo Debugger for Windows       [1533K]
    Install Turbo Debugger for Windows and associated Debugger
    tools (TDWINI setup, wremote).

Turbo Debugger for Win32         [1502K]
    Install Turbo Debugger for Win32 programs.

Examples                         [580K]
    Install Borland TASM examples.

Documentation Files              [6K]
    Install documentation files.


SECTION -4-  TROUBLESHOOTING - INSTALL PROBLEMS
===============================================
This section explains a few common errors encountered during
installation. System configuration and software conflicts
might cause the installation process to fail. If the
installation fails, follow the instructions in Section 10
on how to boot clean. This will eliminate any possible
software conflicts. If booting clean doesn't solve the
problem, or you encounter a problem not mentioned here,
contact Borland Technical Support.

With any of the following installation errors there are
several common steps that can be taken to enable the
installation to complete.

   - Make sure your system meets the minimum requirements.
     Refer to Section 1 for a list of the minimum
     installation requirements.

   - Boot your system with a clean configuration. Refer to
     Section 10 for instructions on how to boot clean.

   - Install the product from your local hard drive. Sometimes
     a timing error between the hard drive and a disk drive will
     generate an error from the TASM install. Installing from
     the hard drive can solve this problem. (Especially in
     conjunction with a clean boot)

     1) Copy the contents of all the diskettes to a temporary
        directory on your hard drive. The following is an example
        of the command:

		COPY *.* c:temp

        If you should get an error during the copying process see
        below for information on how to get a replacement disk set.

     2) Change directories to the temp directory and then type
        install. For example:

	CD c:temp
	INSTALL


A) Data Integrity or Bad Sector on Disk Errors
----------------------------------------------
If you receive either one of these error messages, you
need to get a replacement disk set. Contact Borland's
Disk Replacement Line at (800-621-3132).


B) Disk Full or Insufficient Disk Space Errors
----------------------------------------------
You could also get this error if there is insufficient
hard disk space available to install TASM 5.0.

   - If you are using disk compression read Section -2-
     part A) on reported available disk space when using
     disk compression.


C) GP Fault/Unhandled Exception
-------------------------------
GP Fault or Unhandled Exception errors can occur for a
variety of reasons. Possible reasons for these errors are
explained in Technical Information Document number 649.
Refer to Section 9 for instructions on how to obtain
this document.

   - Turn off Disk Caching and Video/Shadow RAM in CMOS.
     Refer to the documentation for your computer.


SECTION -5-  TROUBLESHOOTING - RUN TIME PROBLEMS
================================================
This section describes common errors encountered when
trying to use tools included in TASM 5.0. System configuration
and software conflicts might cause one of the tools to fail.
If a tool fails, you should boot your system clean to eliminate
any possible software conflicts. Refer to Section 10 for
instructions on how to boot clean. If booting clean does not
solve the problem or you encounter a problem not mentioned here,
contact Borland Technical Support.


A) Out of Memory
----------------
If you are using command-line tools and are getting
"Out of Memory" errors you might have exhausted your
extended (or XMS) memory pool. This is especially true if
you only have 2MB available extended RAM and do not have
a memory manager that provides virtual memory. If you are
experiencing this, please consult the TASM readme file that
can be found in the TASM directory, under the section General,
Out of Memory. This information can also be found in the
Technical Information Document number 1737. For information
on how to receive this document, refer to Section 9.


B) GP Fault/Unhandled Exception/System Hang
-------------------------------------------
GP Fault or Unhandled Exception errors can occur for a
variety of reasons including: not enough memory
available, not enough hard disk space available,
conflicts with optimizations set in the CMOS, and
software conflicts. Technical Information Document
numbers 649 and 1328 address these issues. Refer to
Section 9 for information on how to obtain these files.


C) Turbo Debugger for Windows
-----------------------------
If you experience any strange behavior from the Turbo
Debugger, such as a garbled screen or a system hang upon
execution or exit:

   1)  Make sure that you have the latest Windows drivers
       for your video card.

   2)  Run TDWINI and test a different DLL to resolve a
       possible compatibility problem with your specific
       card.

   3)  Check README.TXT for additional information.

   4)  If you are still experiencing difficulties your
       problem might not be related to the video mode. At
       this point contact Borland Technical Support via
       phone or online help. Refer to Section 10 for more
       information about online options and procedures.


SECTION -6-  ICONS IN THE TASM GROUP WINDOW
===========================================

A) Creating a Program Group Window for TASM 5.0.
------------------------------------------------
If the Borland C++ Program Group Window didn't appear
after installation you can create one by choosing one of
the following options:

   - Generate icons by running the groups.exe:
     From within Windows, choose File|Run, and type:

	   c:windowsgroups.exe groups.b$$

     If nothing appears to happen, it is possible that the
     data file (groups.b$$) was not created properly.

   - Manually creating the icons. Load Windows, choose
     File|New|Program Group, and click on OK. Type the
     name you want for the program group window in the
     "Description:" text box, such as Borland TASM 5.0. Leave
     "Group File" line blank. Click OK. A new Window appears.
     Choose File|New|Program Item to create icons for the
     Windows programs and click OK. Select one of the
     Windows executable programs to create an icon for, such
     as TDW.EXE (you can also use the Browse button). Type
     the name of that executable program in the Description
     text box. Type the full path name to the executable in
     the Command Line text box. Typing a path name for the
     working directory is optional. The default is the
     WINDOWS directory. Click OK. The icon appears in
     the active program group window. Repeat these steps
     for executable program you want to use.


B) List of Icons and Executable Files
-------------------------------------
The following table contains a list of executable files that
each icon calls, as well as the name of the icon for that
executable, if there is one:

    TASM.HLP=F:TASMBIN, Tasm Reference, HELP.ICO
    TDW.EXE=F:TASMBIN, Turbo Debugger for Windows, TDW.ICO
    TDWINST.EXE=F:TASMBIN, TDW Configuration, TDWINST.ICO
    WREMOTE.EXE=F:TASMBIN, Remote Debugging
    WRSETUP.EXE=F:TASMBIN, Remote Setup
    TD.PIF=F:TASMBIN, Turbo Debugger for DOS, TDDOS.ICO
    TDINST.EXE=F:TASMBIN, TD Configuration, TDOSINST.ICO
    TD32.EXE=F:TASMBIN, Turbo Debugger for Win32, TD32.ICO
    TD32INST.EXE=F:TASMBIN, TD32 Configuration, TD32INST.ICO
    TDWINI.EXE=F:TASMBIN, TD Video Configuration


SECTION -7-  USING TASM FROM WINDOWS
====================================
The TASM installation creates a TASM 5.0 group in the Windows
Program Manager. However, the installation program does not
create Windows PIF files to run any of the command line tools.

TASM.EXE and all other 16-bit executable tools can be run through
a regular Windows DOS box.

To run TASM32 from a Windows DOS box, you need to use an icon
created with a PIF file. You can use the PIF file B32TOOLS.PIF
(located in the TASMBIN directory) to run the 32-bit tools
from a Windows DOS box. This PIF file references COMMAND.COM.
When you double click the icon, a DOS box activates, and you
can run TASM32.EXE and TLINK32.EXE from it.


SECTION -8-  HOW TO GET A TECHNICAL INFORMATION DOCUMENT
========================================================
Technical Information Documents contain tips, techniques,
and enhanced information on using Borland development tools,
and information on commonly asked programming questions.
Such documents often include programming examples. These
documents can be accessed via modem or fax. Technical
files which contain binary modules, such as patches for
released Borland products, are normally available only from
those services that can be accessed by modem. Documents can
be accessed from the following sources:


A) Fax the document from Borland's TechFax Service
--------------------------------------------------
Call (800) 822-4269 from a touch-tone phone. When
prompted, enter your FAX number, then enter the document
number you want to receive. The document will be faxed to
you shortly.

Here is a list of common Technical Information Documents:

      * 3       General Catalog of All Documents Available
      * 649     General Protection Faults
      * 1171    Problem Report Form
      * 1010    Installing and Configuring BC++
      * 806     Network Installations
      * 738     Memory Corruption
      * 1561    Clean Boot


B) Download the document from
-----------------------------
   -The Borland Download Bulletin Board Service (DLBBS)
    (408) 431-5096, protocol 8N1
   -The Borland Automated Online Service (OAS)
    (408) 431-5250, protocol 8N1
   -The Borland-supported FTP site on Internet
    ftp.cica.indiana.edu, IP address [129.79.20.27]
   -Borland-supported forums on CompuServe, Genie, BIX.
	For CIS type:
	   go BCPPWIN
             or
	   go BCPPDOS
	and choose library 2

	For BIX type: join Borland

	For GENIE type: Borland

   Below are steps to download a Technical Information
   Document from the Borland DLBBS.

   For proper display, your communication software should
   provide ANSI terminal support. Most packages provide
   VT-100 terminal emulation, which is fine for the DLBBS.
   If you're using a Windows based package, select a screen
   font (such as: Terminal) that includes extended ASCII
   characters.

   Once connected, you'll be prompted to enter your first
   and last name and a password. If you haven't used the
   service before, you'll be asked to verify your name and
   then answer a few questions. The menu-driven system
   guides you through the various product and file
   areas. You'll always receive a list of options when you
   are prompted to make any choice.


   MANEUVERING THE MAIN MENU
   - - - - - - - - - - - - -
   First join the C++ Conference. The Main Menu shows the
   product whose files you can access. At the Main menu,
   type "F" to select the Files menu.


   DOWNLOADING FILES
   - - - - - - - - -
   Once you know the name of the file you want to download,
   type "D" for download at the File menu. When prompted,
   type the full name of the file or files. All Technical
   Information Documents have the form "TI#.ZIP". Replace
   the # with the appropriate document number. For example,
   to download Technical Information Document number 649,
   the full name of the file is TI649.ZIP. If you do not
   know the protocol or download keys to press, refer to
   your telecommunications manual.


   WORKING WITH DOWNLOADED FILES
   - - - - - - - - - - - - - - -
   Most of the files on the Download BBS are stored and
   transferred in an archived (compressed) format and need
   to be unarchived before they can be used. If you don't
   have the unarchiving utility PKUNZIP v.204G or newer,
   download PKZ204G.EXE from the DLBBS and execute it.
   You'll receive PKUNZIP and PKZIP utilities. To unarchive
   the file, type the name of an unarchive utility
   (UNPACK, UNZIP or PKUNZIP) and then the name of the
   archived file. For example:

	PKUNZIP TI649.ZIP


SECTION -9-  BOOT CLEAN
========================
This section describes the process of "booting clean" on
IBM PC's and compatible computers with DOS and/or windows.
This document assumes you have MS-DOS version 5.00 or higher.
"Booting Clean" is the process of booting without loading
device drivers and TSRs. Device drivers such as mouse
drivers, network drivers, TSRs, etc. can cause memory
conflicts.

These device drivers and TSRs are usually loaded in two
files (AUTOEXEC.BAT and CONFIG.SYS typically located on
the root directory of your hard disk). The safest
method of booting clean is to create a "bootable" floppy
disk in drive A:. See the "Making a Boot Disk" section
below.

If you are using a program that runs under Microsoft
Windows, then you might need to make changes to some Windows
configuration files in order to ensure a "clean system
configuration" under Windows. The two files you will need
to examine are WIN.INI and SYSTEM.INI. These files are
located in the WINDOWS subdirectory on your hard disk. The
changes that you will need to make to these files (if any)
are outlined below.


Making a Boot Disk
- - - - - - - - - -
In order to make a bootable floppy disk, follow the
instructions below. NOTE: These instructions assume that
your hard disk is C: and your DOS and WINDOWS subdirectories
appear on this disk. (Most cases):

     1) Place a blank disk in drive A:
     2) type  format a: /s (format the disk)

At this point you now have a bootable floppy disk. Using
EDIT, ensure your AUTOEXEC.BAT and CONFIG.SYS look like
one of the configuration choices below.

Your "clean" system configuration should be exactly like
one of the choices below except replace "<Insert REQUIRED
drivers here>" with any required drivers. The ONLY
required drivers are, for example, disk compression and/or
hard disk access drivers. This does not include mouse
drivers and disk caching utilities such as SmartDrive.


Clean Configuration DOS 5.0 and DOS 6.x running Windows
-------------------------------------------------------
   1) Insert your "bootable floppy" in drive A.
   2) Type "EDIT A:CONFIG.SYS"
   3) Type in the following:

          <Insert REQUIRED drivers here>
          DEVICE=C:DOSHIMEM.SYS
          FILES=40
          BUFFERS=40

   4) Exit the editor (Alt-F, then X, then Y).
   5) Type "EDIT A:AUTOEXEC.BAT"
   6) Type in the following:

          <Insert REQUIRED drivers here>
          PATH=C:WINDOWS;C:DOS;C:BC4BIN
          PROMPT $P$G

   7) Exit the editor (Alt-F, then X, then Y).
   8) Type "CD WINDOWS:
   9) Type "COPY WIN.INI WIN.BAK"
  10) Type "COPY SYSTEM.INI SYSTEM.BAK"
  11) Type "EDIT WIN.INI"
  12) Make sure that the "load=" and "run=" lines in your
      WIN.INI file match the following lines:

          [windows]
          spooler=yes
          load=
          run=
          Beep=yes

  13) Exit the editor (Alt-F, then X, then Y).
  14) Type "EDIT system.ini"
  15) Ensure that your "shell=" line in your SYSTEM.INI file
       matches the following:

          [boot]
          shell=progman.exe

  16) Exit the editor (Alt-F, then X, then Y).
  17) Make sure your "Bootable floppy" is in drive A: and
      reboot your computer.

/**************************** END OF FILE ********************************/

�