Linux on Windows is a reality, thanks to the partnership between Canonical (parent company of Ubuntu) and Microsoft.
When Microsoft’s CEO announced that the Bash shell was coming to Windows, several people couldn’t believe it. #BashOnWindows trended on Twitter for days; such was the impact of this news.
But Bash on Windows (or Windows Subsystem for Linux) was not available to everyone immediately. People had to install the Windows 10 technical preview to install Linux on Windows 10.
That’s not the case anymore; it is pretty easy to install and use WSL now!
📋
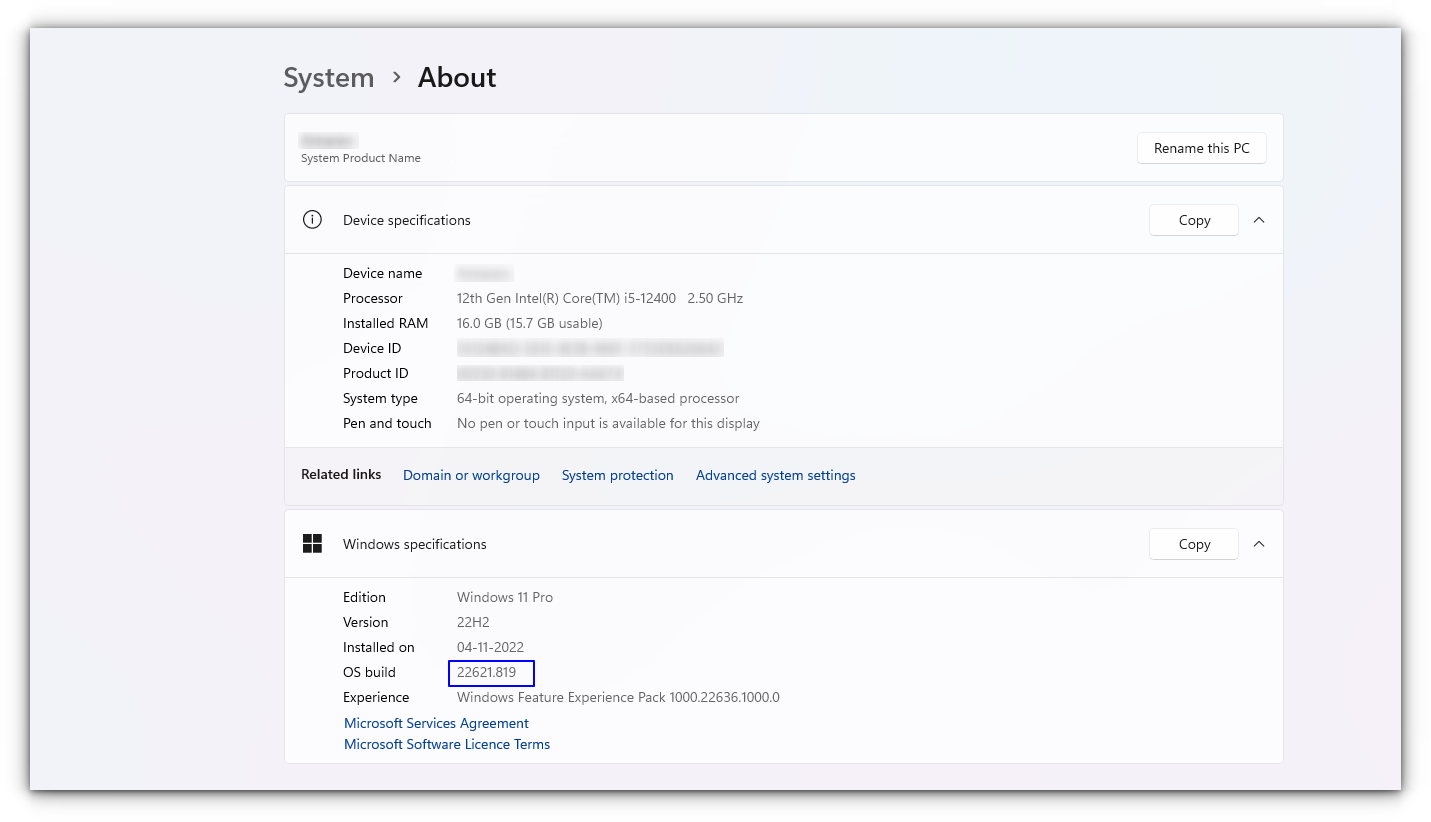
This tutorial was tested with the latest Windows 11 version 22H2, and build 22621.819. You might need to update your Windows installation if you have an older build to follow everything in this tutorial.
What is Bash on Windows?
Bash on Windows provides a Windows subsystem, and Linux runs atop it. It is not a virtual machine or an application like Cygwin. It is a complete Linux system inside Windows 10/11. It allows you to run the same Bash shell you find on Linux. You can run Linux commands inside Windows without installing a virtual machine or dual-boot Linux and Windows.
You install Linux inside Windows like a regular application. This is a good option if your main aim is to learn Linux/UNIX commands.
Check for System Compatibility
You must be running specific versions of Windows for the different features described in this article. Requirements necessary for a particular feature to work are described under its titles. To check your Windows version, search for about in the start menu.
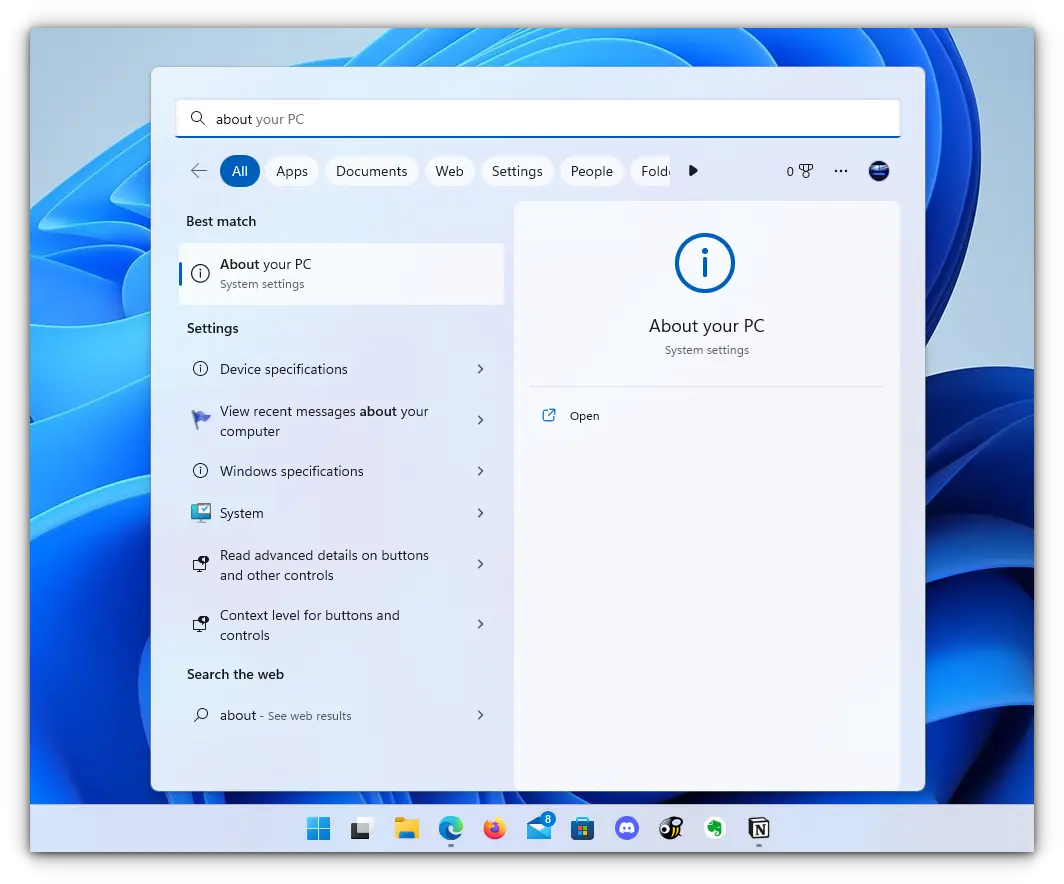
Here, you can see the build of your PC, as shown in the screenshot below. Make sure it is matching with the respective requirements described under various sub-headings here in this article.
- You must be running Windows 10 version 1607 (the Anniversary update) or above.
- WSL only runs on 64-bit versions 32-bit versions are not supported.
Install Bash in Newer Windows 10 and 11
The good thing is that the latest set of upgrades, including the stable release of WSL v1.0 released from Windows, makes it easier to install Bash on Windows.
There are two ways you can go about it:
- You can get it in one click from Windows Store.
- Choose to use the command-line.
1. Install WSL Using the Microsoft Store
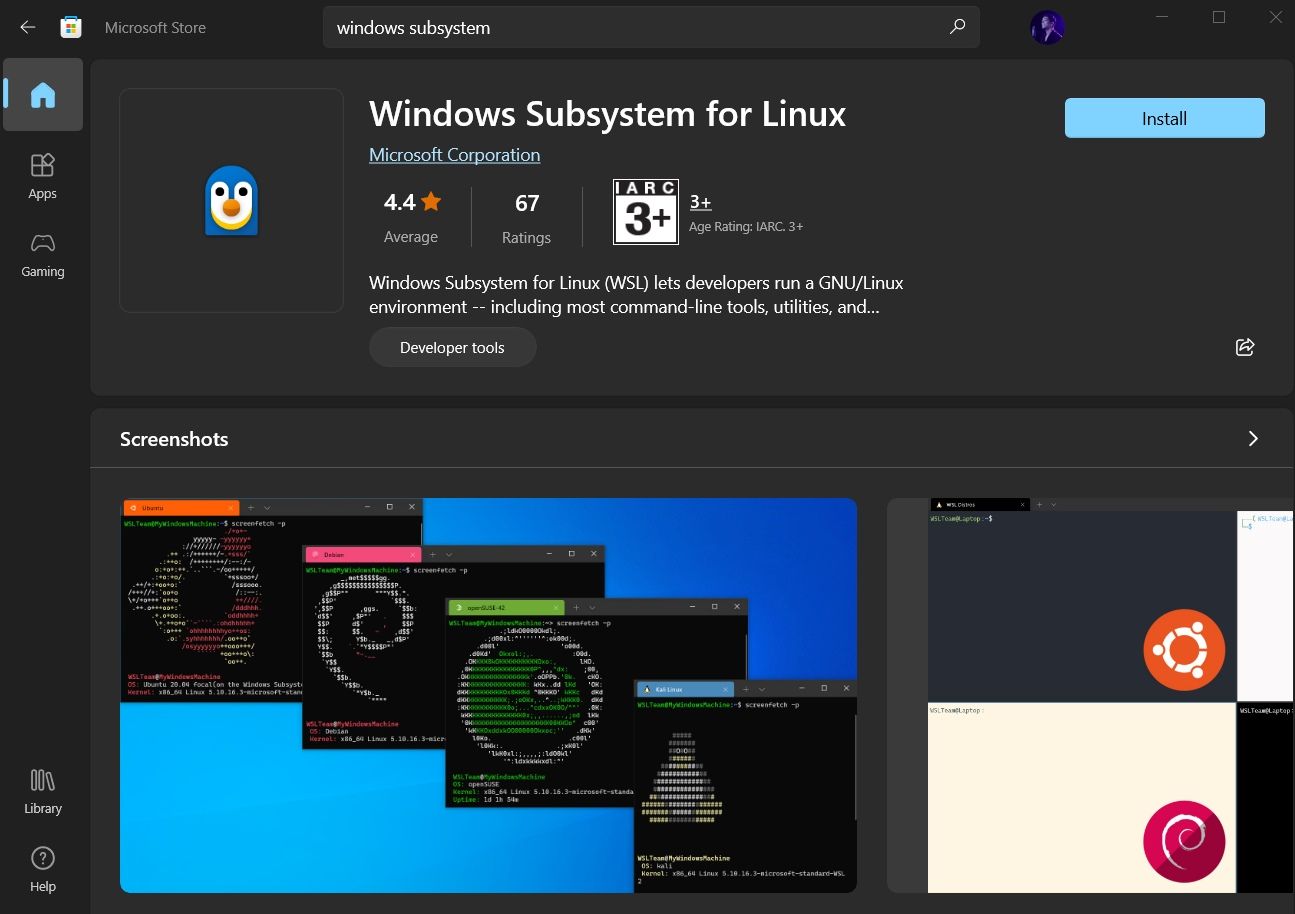
Launch the Microsoft Store and search for «Windows subsystem«.
Install it, and you’re done with the first step. Next, you have to install a Linux distribution.
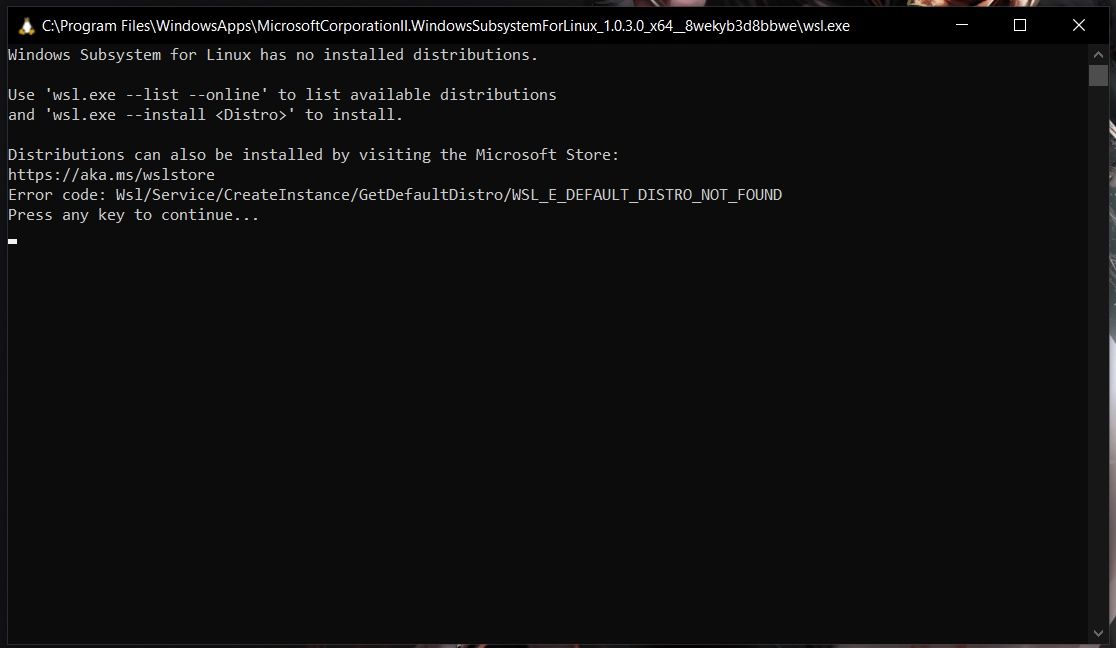
So, if you try to open WSL, you will get to see a window informing you that no distribution is installed.
Similar to WSL, search for the distribution on Microsoft Store, and then install it.
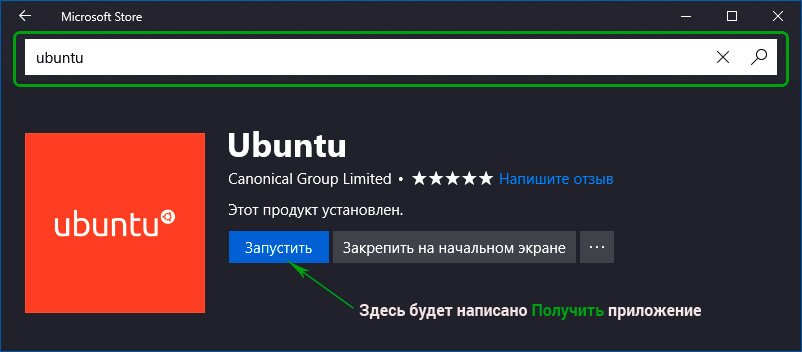
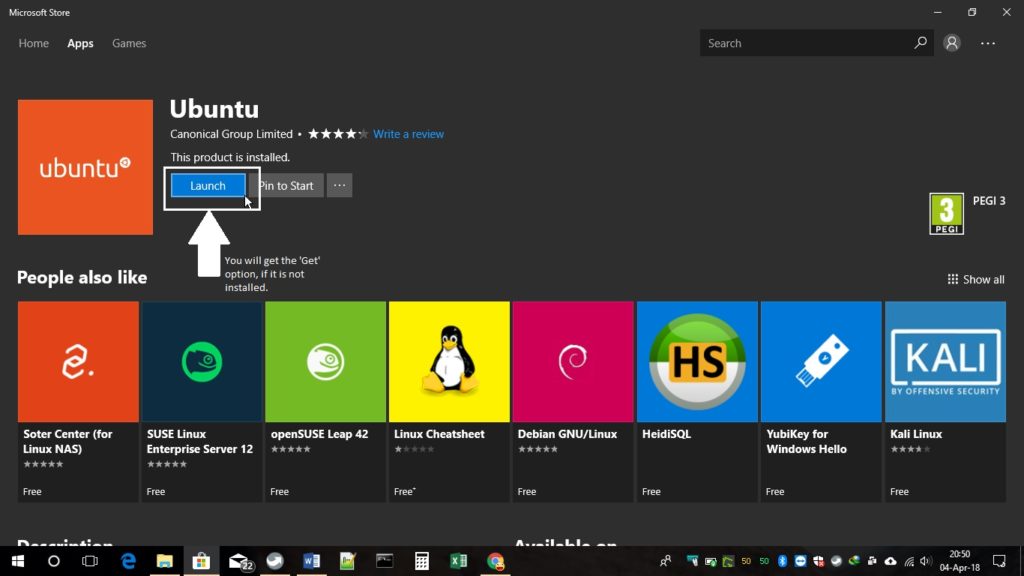
For instance, I installed Ubuntu from the store as shown in the image below:
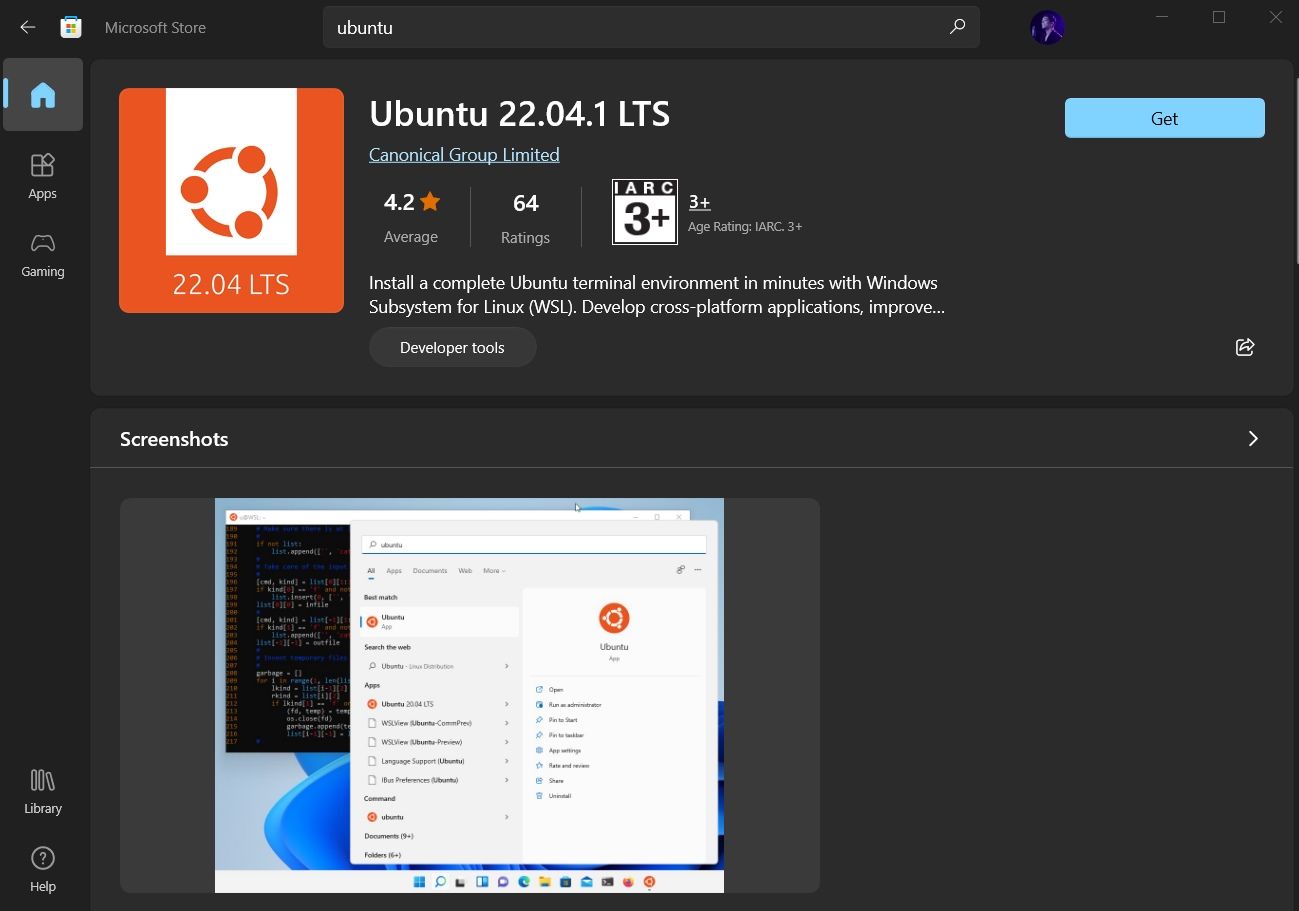
And, then proceed to «Open» it and it will automatically start installing. The procedure is same for any distribution you choose.
We then have to configure it, which is discussed right after installing it through the command line.
2. Install WSL and the default distribution using the command-line
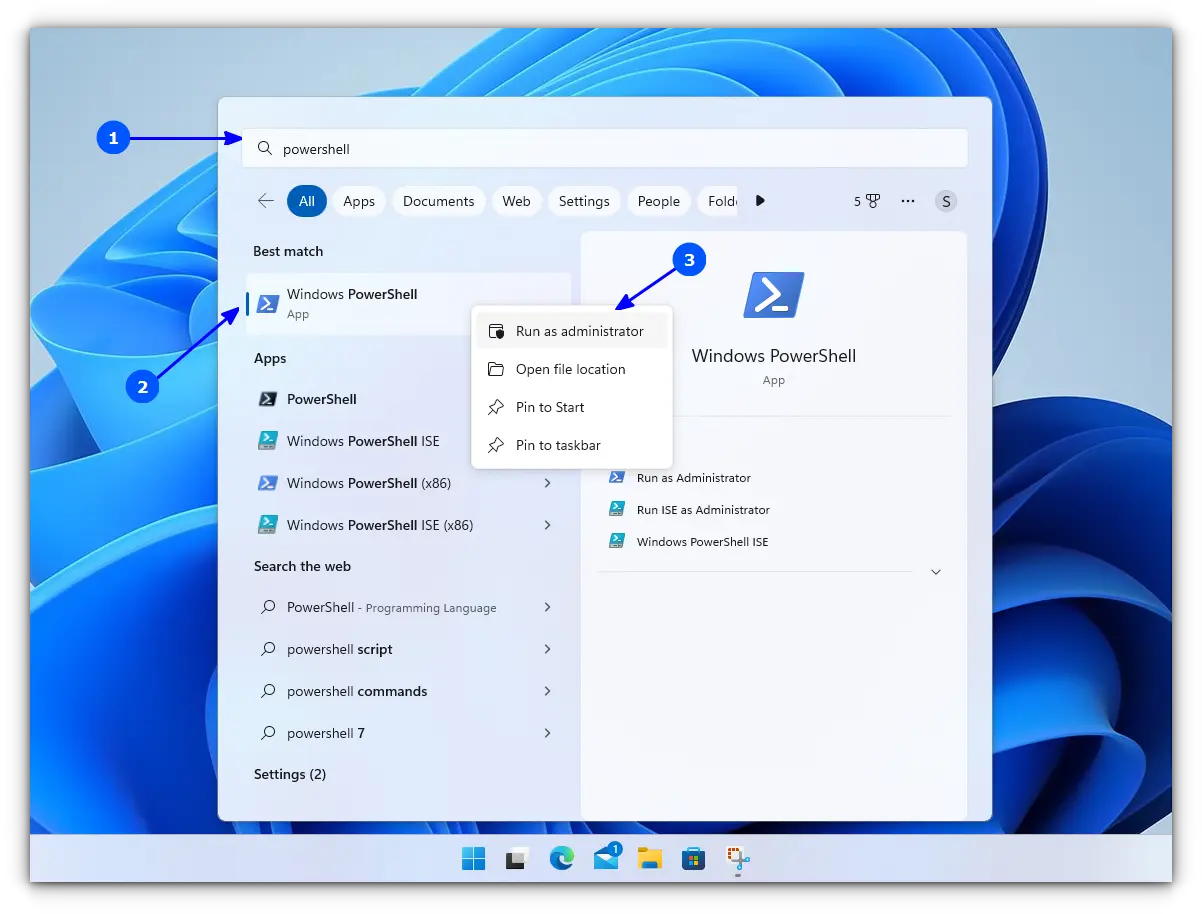
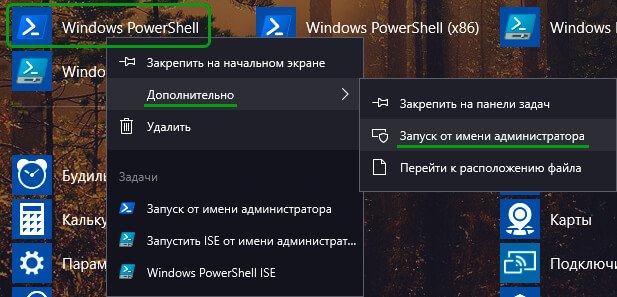
In WSL, the default distribution is Ubuntu (which can be changed). To install, open Powershell as an administrator.
For this, search for Powershell in the start menu, right-click on Powershell and select Run as Administrator.
Inside Powershell, enter the following command to install WSL, along with all necessary features and the default distribution, that is, Ubuntu.
wsl --installOnce finished downloading and installing, you need to reboot to apply the changes.
Whether you installed WSL and Ubuntu using the Microsoft Store or the command line, you need to configure it.
Here’s how it is done:
🛠️ Configure the newly installed Ubuntu
After rebooting, search for Ubuntu in Start Menu and open it.

It will ask you to enter a UNIX Username and Password. Enter these details and press enter key.
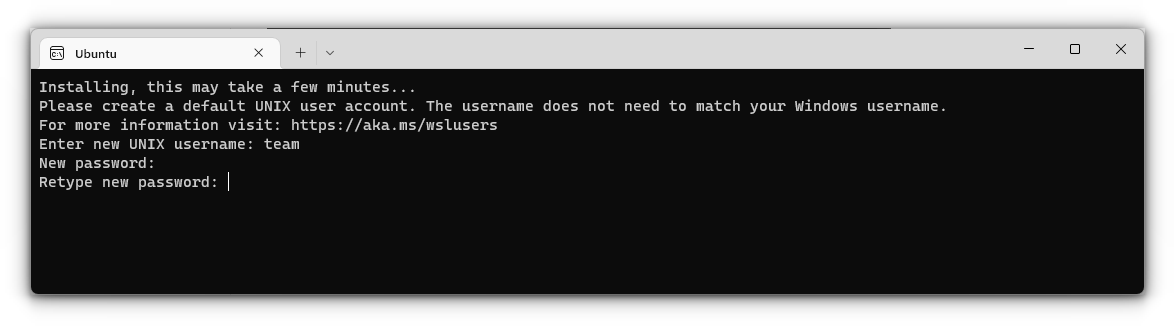
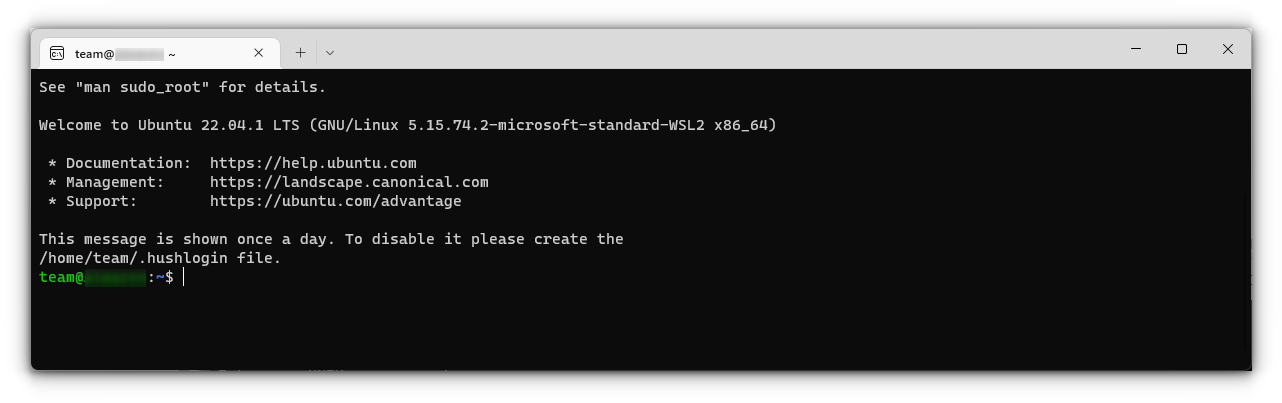
You will now be inside the terminal window of Ubuntu.
Once logged in, you need to update the installed Ubuntu. For this, enter the following commands one by one:
sudo apt update
sudo apt full-upgrade
After completing the update, you are good to go with Ubuntu in WSL.
Install Bash on Older Windows
If you have the minimum requirements mentioned in the beginning but are running an older Windows build, the previous method may not be supported. So there is a manual installation method.
Also, there are both WSL1 and WSL2 available. WSL2 offers some upgraded functionalities but has some minimum requirements to run:
- For x64 systems: Version 1903 or later, with Build 18362 or later.
- For ARM64 systems: Version 2004 or later, with Build 19041 or later.
So this brings us to two possibilities to install:
- Install Ubuntu with WSL1
- Install Ubuntu with WSL2
1. Install Ubuntu with WSL 1
This is a relatively simple procedure for those with a system incompatible with WSL2. First, you need to enable the Windows Subsystem for the Linux feature. This can be done through the command line. Open Powershell as an administrator and enter the following command:
dism.exe /online /enable-feature /featurename:Microsoft-Windows-Subsystem-Linux /all /norestartOr, to do this via GUI, follow the steps below:
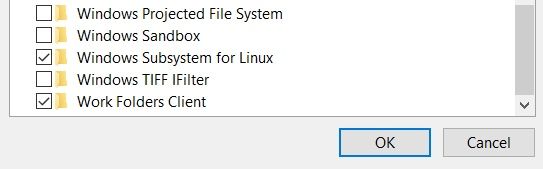
- Search for Windows Features in Start Menu.
- Turn on Windows Subsystem for the Linux feature.
- Reboot your system.
- Open the Windows store and search for the distribution of your choice to install.
Once installation is completed, open the Ubuntu app from the start menu. It will take a couple of seconds to install. You will be prompted to enter a username and password. Provide those credentials, and you are good to go with Ubuntu in WSL1.
2. Install Ubuntu with WSL 2
It is recommended to use WSL2 instead of WSL1 if you have support. To install Ubuntu with WSL2, you need to make sure that the Windows Subsystem for Linux feature is turned on. For this, as in the above case, execute the following command in an elevated Powershell:
dism.exe /online /enable-feature /featurename:Microsoft-Windows-Subsystem-Linux /all /norestartReboot the device once the command is completed.
After this, you need to enable the Virtual Machine Platform feature. Open the Powershell with admin privileges and enter the following command:
dism.exe /online /enable-feature /featurename:VirtualMachinePlatform /all /norestartOnce again, restart the device to complete the WSL install and update to WSL 2.
Now, download the Linux Kernel Update Package for x64 machines from the official website. If you are using ARM64 devices, use this link to download the latest kernel update package.
If you are not sure about the device architecture, enter the command below in Powershell to get the type:
systeminfo | find "System Type"When the file is downloaded, double-click on it and finish the installation of the Kernel update package.
Now, open PowerShell and run this command to set WSL 2 as the default version when installing a new Linux distribution:
wsl --set-default-version 2Once WSL2 is set as the default version, you can now install the Linux distribution of your choice.
Go to Windows Store and install Ubuntu, as described in the earlier steps. and the rest of the procedure is already described above.
Enjoy Linux inside Windows.
🔧 Troubleshooting Tip 1
«The WSL optional component is not enabled. Please enable it and try again.»
You may see an error like this when you try to run Linux inside Windows 10:
The WSL optional component is not enabled. Please enable it and try again.
See https://aka.ms/wslinstall for details.
Error: 0x8007007e
Press any key to continue...
And when you press any key, the application closes immediately.
The reason here is that the Windows Subsystem for Linux is not enabled in your case. You should enable it as explained in this guide. You can do that even after you have installed Linux.
🔧 Troubleshooting Tip 2
Installation failed with error 0x80070003
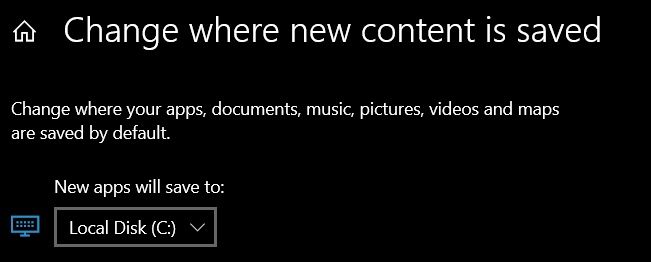
This is because Windows Subsystem for Linux only runs on the system drive i.e. the C drive. You should ensure that when you download Linux from the Windows Store, it is stored and installed in the C Drive.
On Windows 10, go to Settings -> Storage -> More Storage Settings -> Where new content is saved: Change where new content is saved and select C Drive here.
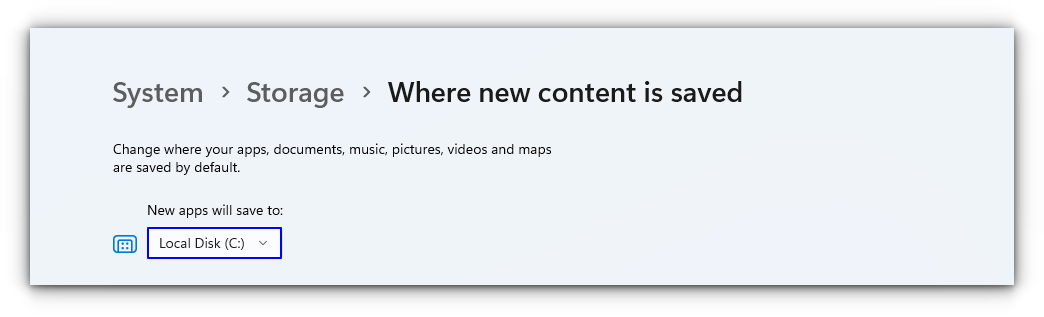
On Windows 11, go to Settings -> System -> Storage -> Advanced storage settings -> Where new content is saved and select C Drive here.
🔧 Troubleshooting Tip 3
«Failed to attach disk Error»
Sometimes, this error will appear when we reinstall the Ubuntu in WSL.
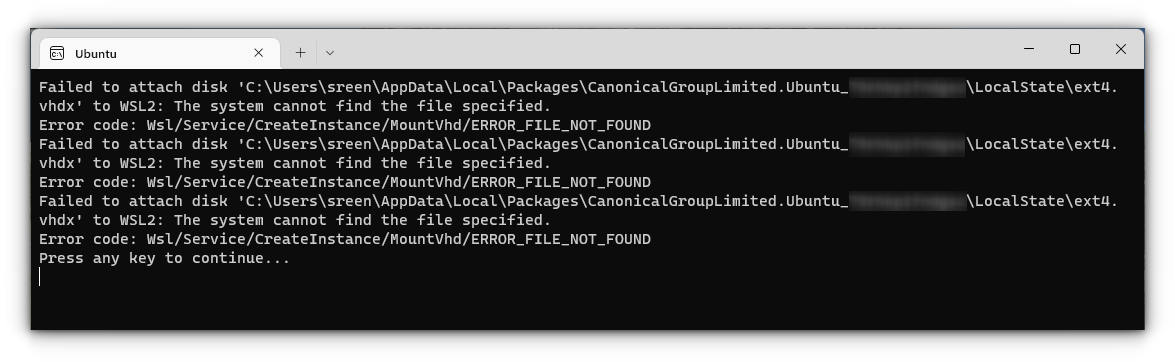
In this case, open Powershell and run the following command:
wsl -l -vThis will list the installed Linux systems. Find the name of the system, that is throwing the error, in my case Ubuntu. Now run the following command:
wsl --unregister UbuntuYou can restart the ubuntu app and it will run without any issues.
You can refer to more common troubleshooting methods from the official website.
Run GUI Apps On Windows Subsystem for Linux
The ability to run GUI apps on Windows Subsystem for Linux was introduced with the WSL 2 release in May 2020.
Windows Subsystem for Linux (WSL) with WSL2 now supports running Linux GUI applications (X11 and Wayland) on Windows in a fully integrated desktop experience. This allows you to install Linux applications and seamlessly integrate them into Windows desktop, including features like “pin to taskbar”.
📋
One crucial point is that you must be on Windows 10 Build 19044+ or Windows 11 to access this feature.
Step 1: Enable/Update WSL 2
This procedure has been explained in the above section and you can refer to it.
Step 2: Download and Install Graphics drivers
To run GUI apps, you need to install appropriate graphics drivers. You can use the following link to download the drivers according to your provider.
- Intel GPU Driver for WSL
- AMD GPU Driver for WSL
- NVIDIA GPU Driver for WSL
Once installed, you are all done.
Step 3: Install some GUI Apps
Now, go to your Ubuntu app and install any GUI app using the APT package manager. You should note that running apps from other sources like flatpak are problematic within WSL.
For this article, I installed the Gedit text editor using the following command:
sudo apt install gedit -yThis will install several MB of packages including required libraries. Once completed, you can run the following command to start the GUI Gedit app in Windows.:
gedit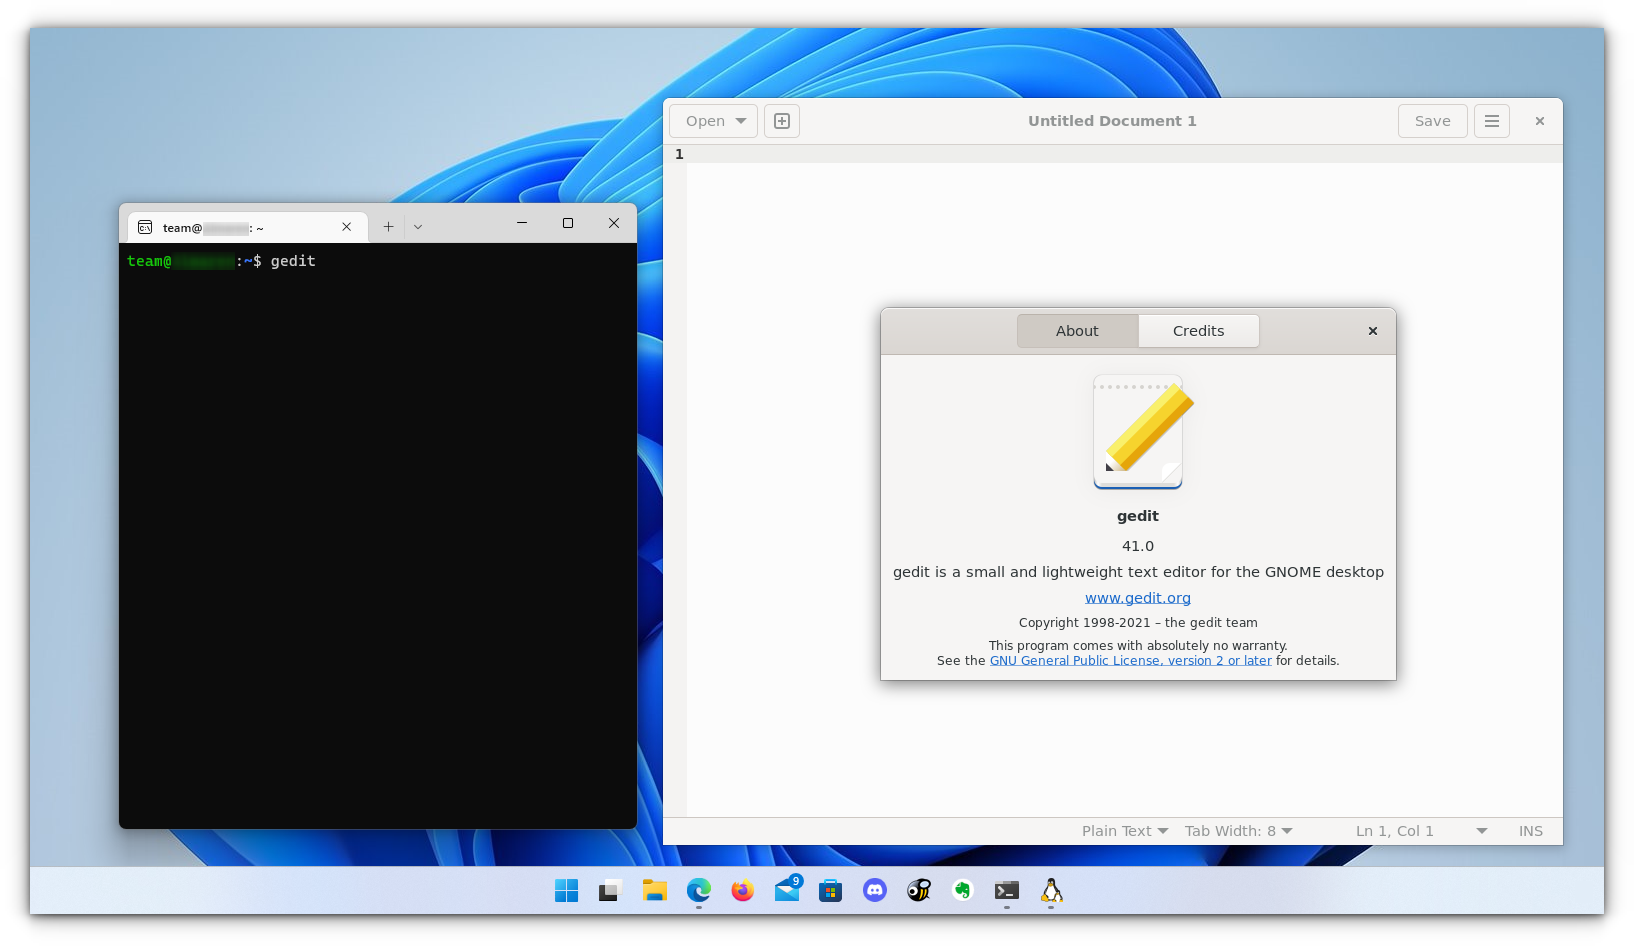
Similarly, you can install all the popular applications available to Linux, including Nautilus file manager, GIMP, etc. For more about running GUI applications in WSL, you can refer to the official documentation.
Install Linux Bash Shell on other older Windows 10
If you cannot get the Fall Creator’s update on Windows 10 for some reason, you can still install it if you have the Anniversary update of Windows 10. But here, you’ll have to enable developer mode. I still recommend upgrading to the Fall Creator’s update or the latest Windows 10 2004 version update though.
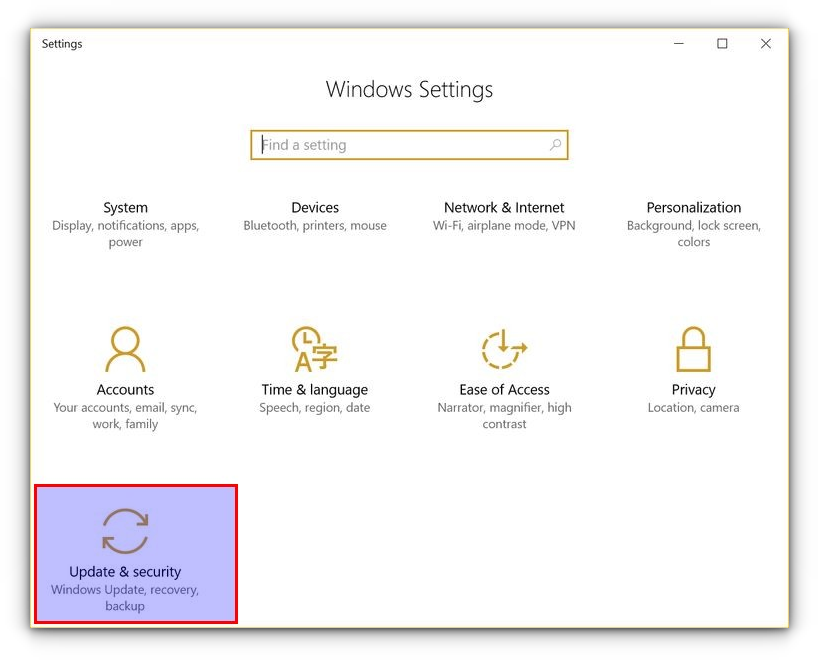
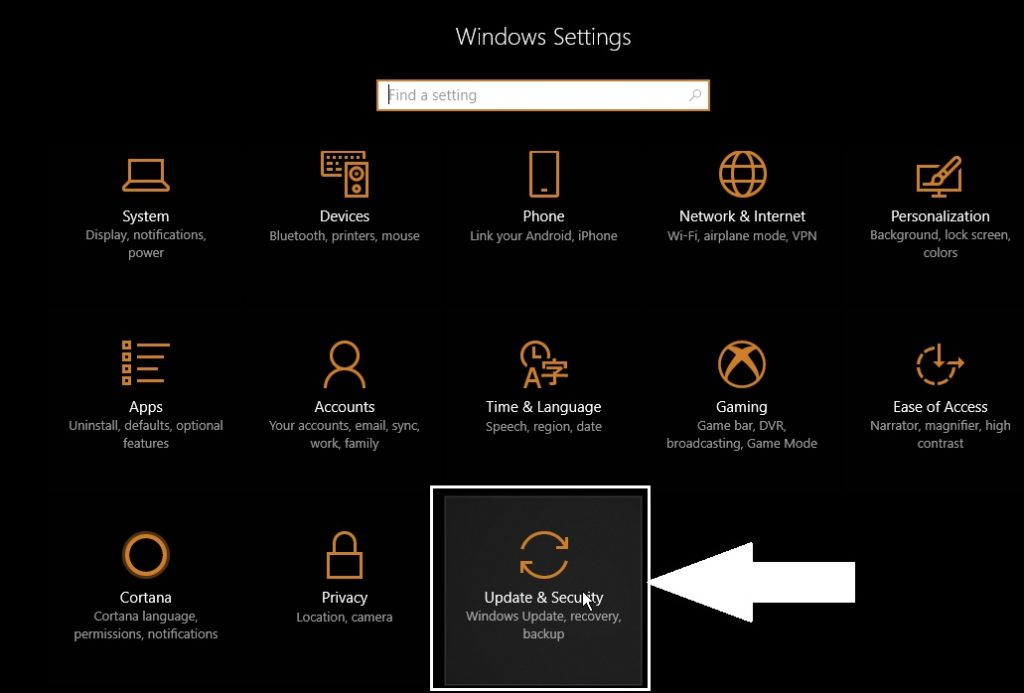
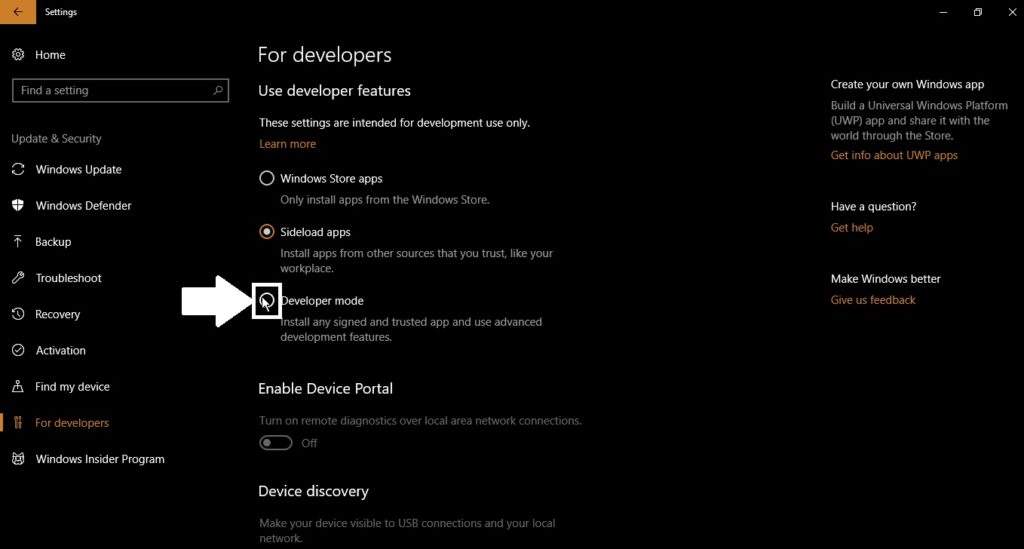
Press Windows Key + I to access Windows system settings. Here, go to Update & Security:
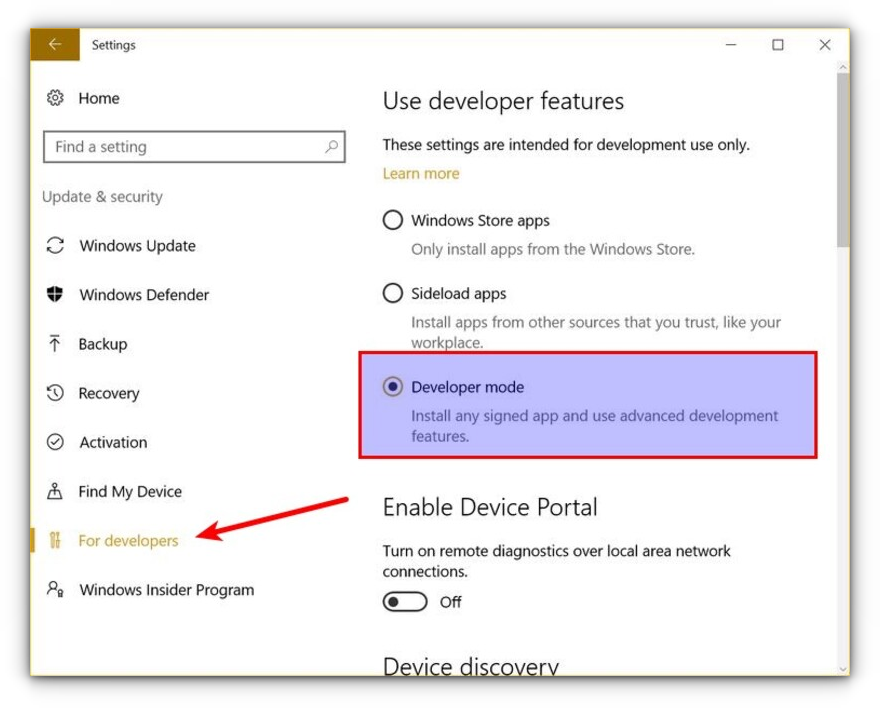
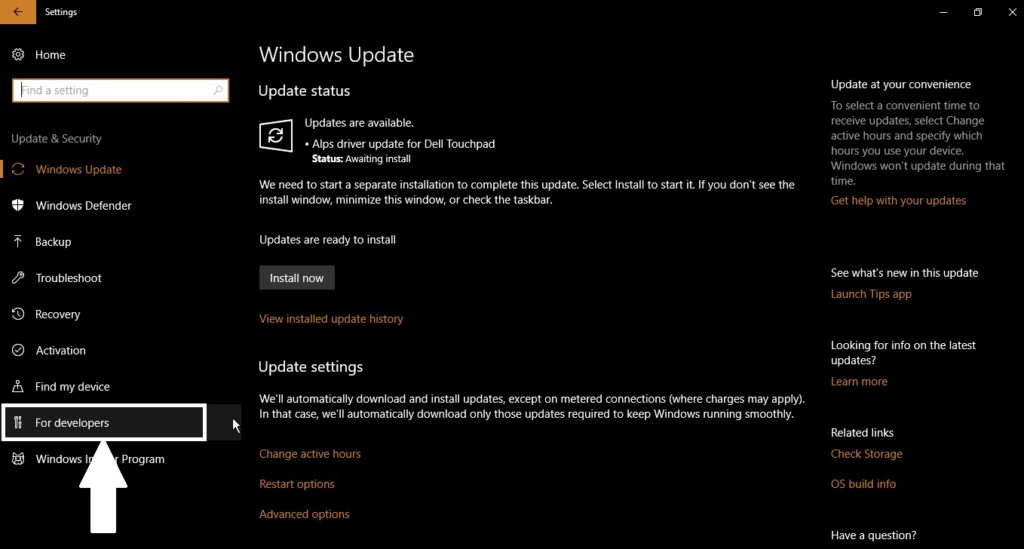
From the left side pane, choose “For developers.” You’ll see an option for “Developer mode.” Enable it.
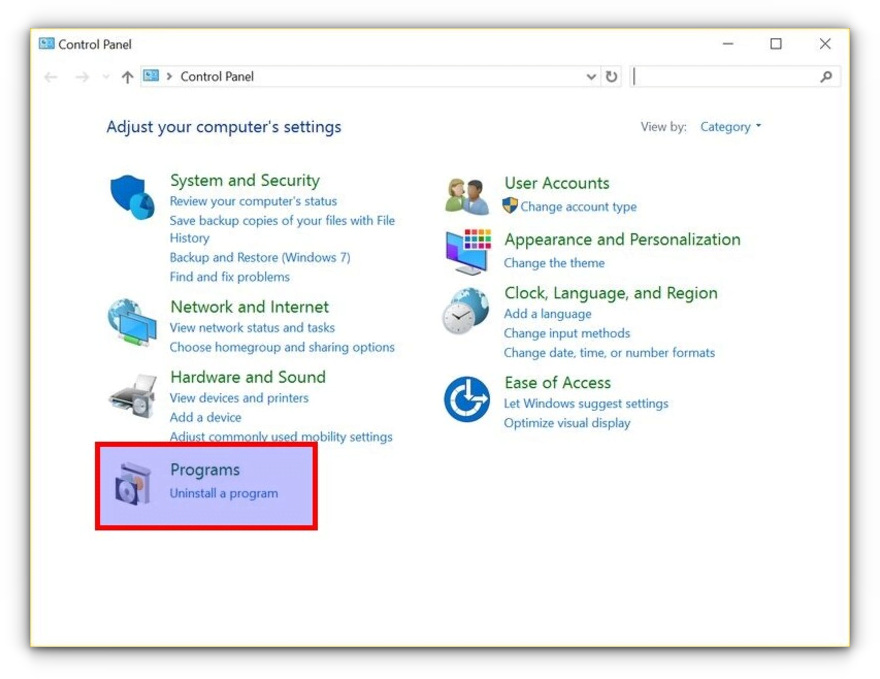
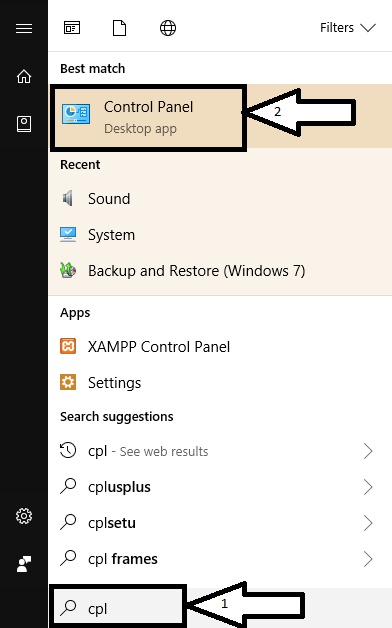
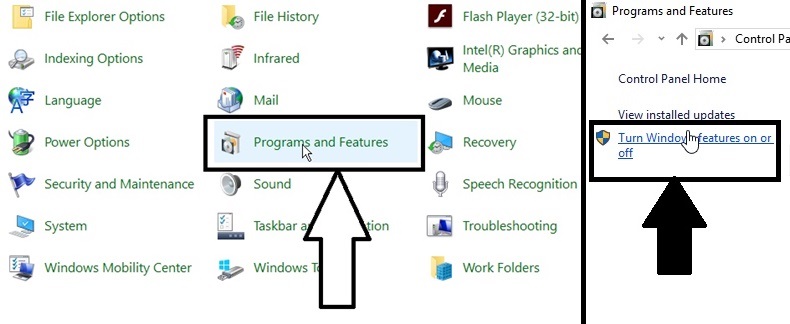
Now search for Control Panel and in Control Panel, click on “Programs”:
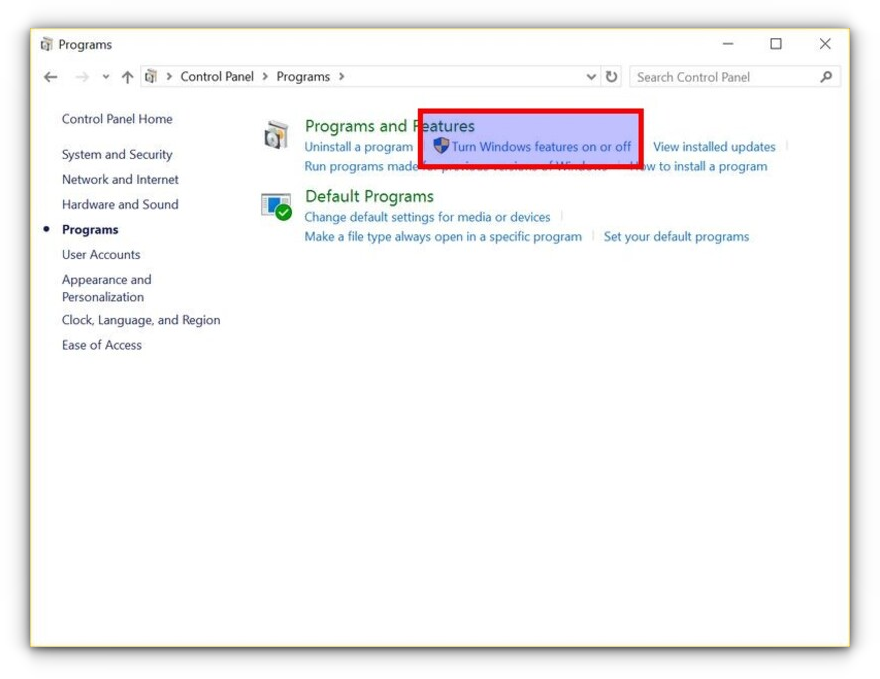
In Programs, click “Turn Windows features on or off”:
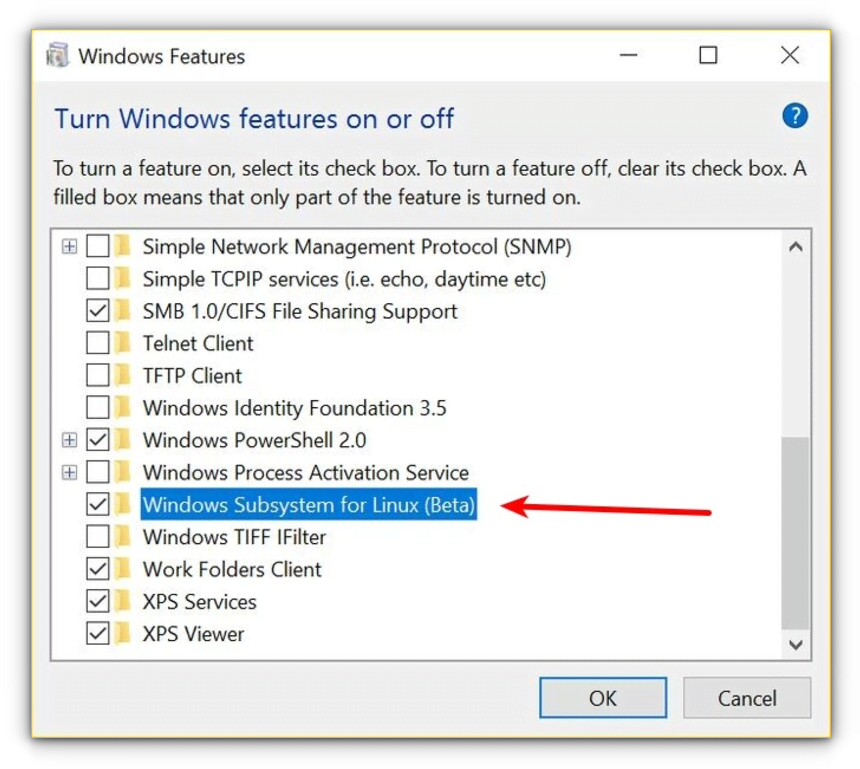
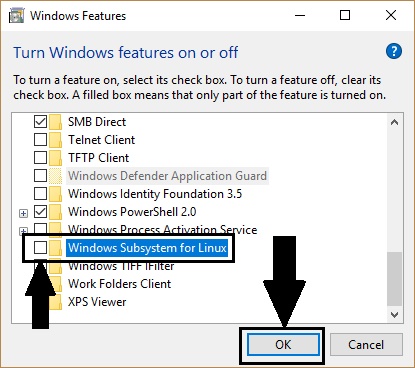
When you do this, you’ll see several Windows features. Look for “Windows Subsystem for Linux” and enable it.
You’ll need to restart the system after doing this.
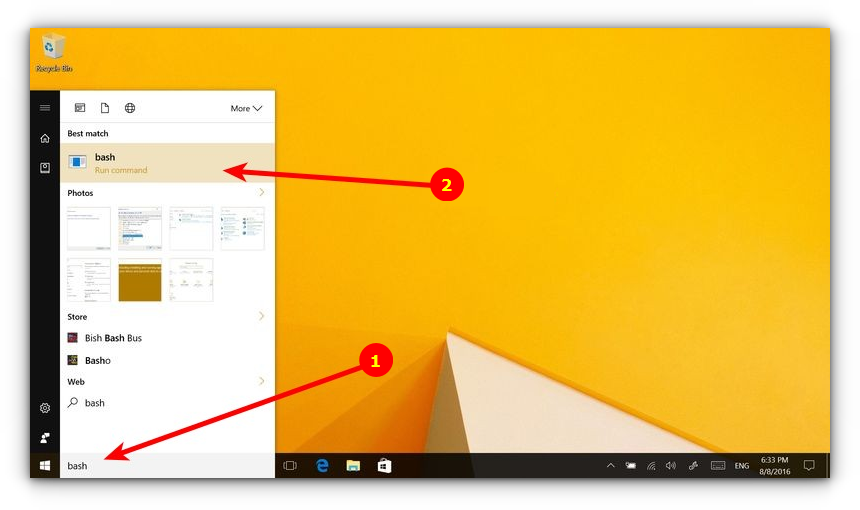
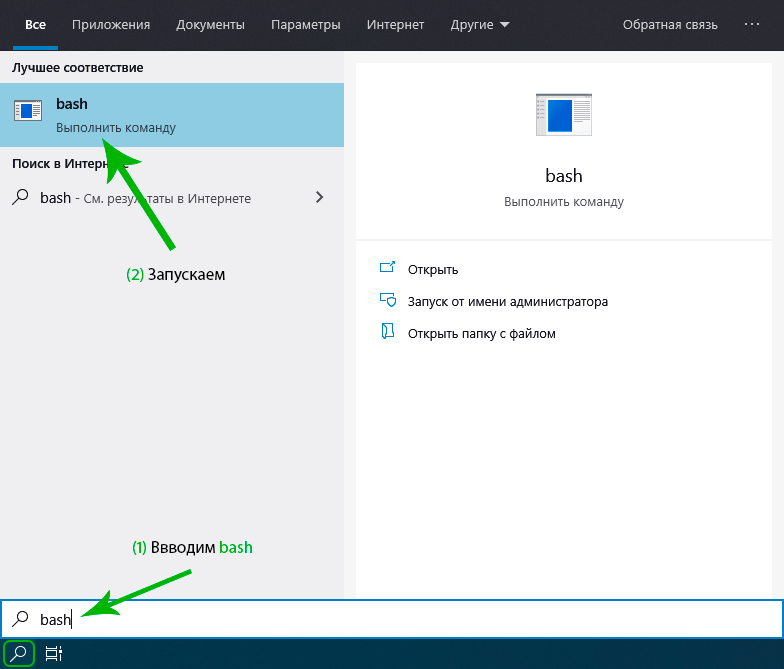
After restarting the computer, click the start button and search for “bash”.
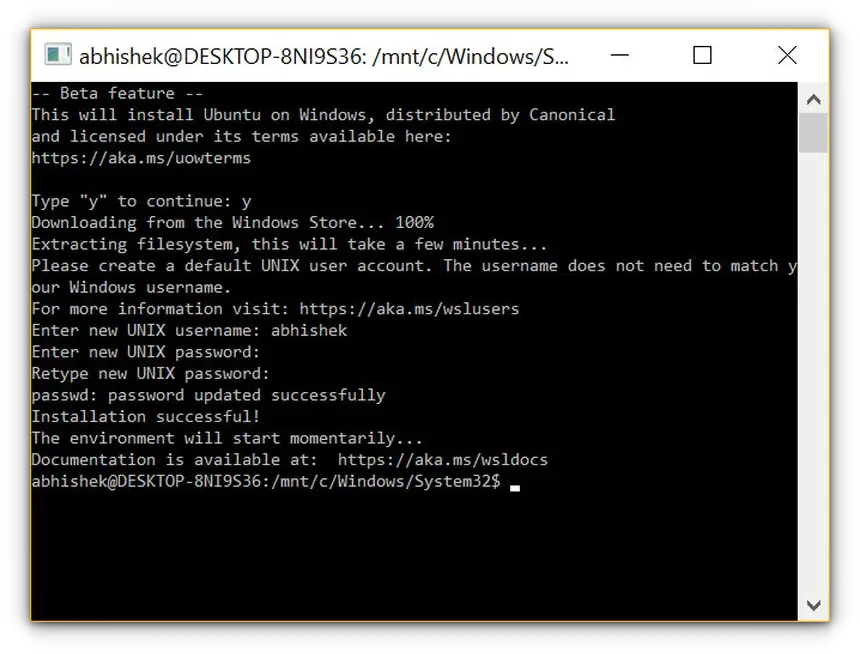
When you run it for the first time, you’ll be given the option to download and install Ubuntu. You’ll be asked to create a username and password during this process. It will install an entire Ubuntu Linux system, so have patience as it will take some time in downloading and installing Linux on Windows.
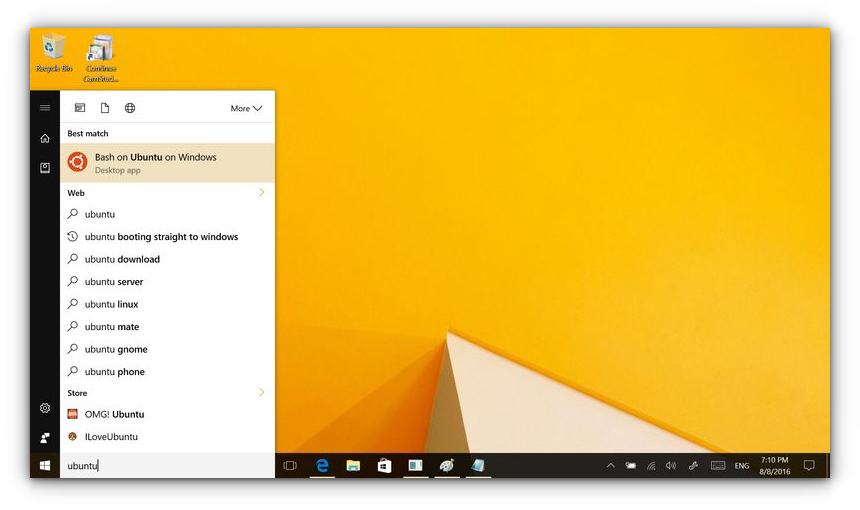
Once this is done, go back to the Start menu and search for Ubuntu or Bash.
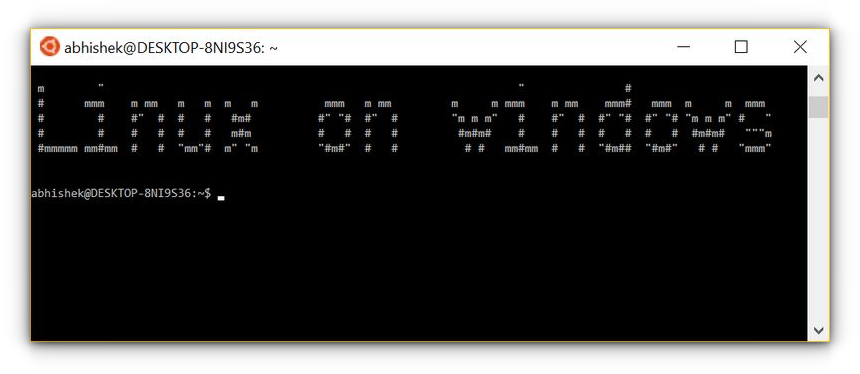
Now you have a command line version of Ubuntu Linux. You can use apt to install various command line tools in it.
💬 I hope you find this tutorial helpful for installing bash on Windows and experimenting with Linux GUI apps on Windows. No wonder WSL lets you play with Linux inside of Windows. If you have questions or suggestions, feel free to ask.
It’s less like Power Rangers clicking rings, more like living among expats in a foreign country
![]()
![]()
![]()
![]()
![]()
![]()
![]()
![]()
![]()
![]()
![]()
Overview
- Architecture
- Got 64-bit?
- Virtualization
- Enable WSL Windows Feature
- Set Linux distro to be backed by WSL 2
- Ubuntu version/release
- Ubuntu Install, Launch, and configure
- Install & Configure Utilities
- Profile to define prompt
- Zsh
- LinuxBrew vs. Homebrew for MacOS
- Linux commands
- pwd file storage mounts
- VSCode Extensions
- FAQ
- Kubespray (Ansible)
- Video Tutorials
- Docker Enterprise Components
- MCR
- Docker Edge (at Tech Preview)
- VHD size adjustment
- Resize your WSL 2 VHD:
- Akash Network
- References
- More on DevOps
NOTE: Content here are my personal opinions, and
not intended to represent any employer (past or present).
“PROTIP:” here highlight information I haven’t seen elsewhere on the internet
because it is hard-won, little-know but significant facts
based on my personal research and experience.
June 2017 was the first “beta” release of Microsoft’s WSL (Windows Subsystem for Linux).
Around May 2019, Microsoft released WSL2 (version 2).
WSL is so much simpler than Cygwin
VIDEO and BLOG: Scott Hanselman explains it all: VS Code with Remote Extension, Docker, and the Windows Terminal.
Architecture
The diagram for WSL1: (TODO: Update for WSL2 needed)
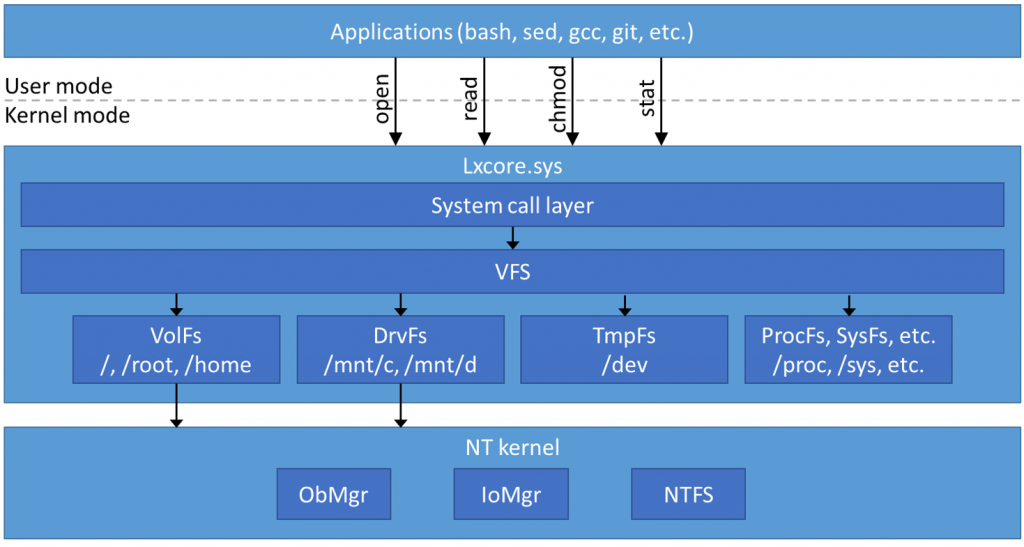
gcc is installed by ???. bash, git can be installed using Choclately.
Lxcore.sys is the driver that recognizes Bash commands and other Linux utilities such as chmod
to change permissions.
VFS is the Virtual File System.
From inside Bash, DrvFS gets to Windows.
From inside Windows, VolFS gets to Linux symbolic files and its case sensitivity.
NTFS (New Technology File System) is the file system controlling hard drives.
CAUTION: WSL provides no GPU support, so it can’t run Linux GUI programs such as Gnome, KDE, etc.
Got 64-bit?
Verify your PC’s CPU architecture and Windows version/build number:
-
Start: Click the Windows icon/keyboard key to open Settings, System, About (at the bottom of the list).
Windows 10:

-
Get a newer computer if you don’t see:
System type 64-bit operating system, x64-based processor.
The technical requirement is that WSL currently runs “ELF64 Linux binaries”.
-
If you have configured PowerShell to run commands,
get your Windows Server build number within PowerShell:systeminfo | Select-String "^OS Name","^OS Version"
Example response:
OS Name: Microsoft Windows 11 Home
OS Version: 10.0.22621 N/A Build 22621
-
Get the installer: NOTE: We’re not using the Register to be in the Windows Insider Build.
wsl --install
- Ubuntu-18.04 — CanonicalGroupLimited.Ubuntu18.04onWindows_1804.2018.817.0_x64__79rhkp1fndgsc
- Ubuntu 18.04 ARM for running on Raspberry Pi?
- Ubuntu-16.04 — Ubuntu_1604.2019.523.0_x64.appx
- Debian GNU/Linux — DebianGNULinux_1-1-3-0_x64__76v4gfsz19hv4
- Kali Linux
- OpenSUSE Leap 42
- SUSE Linux Enterprise Server 12
- Fedora Remix for WSL (licensed)
- Pengwin is paid/licensed. Based on Debian.
- WLinux ???
Virtualization
Virtualization must be enabled in the computer bios, instructions for this vary between manufacturers
but it’s usually a simple on/off listing in the BIOS.Enable WSL Windows Feature
-
Press the Windows Start button and immediately type in the search box that appears:
Turn Windows features on or off
-
Type enough until the option appears in the menu, then click on the option.

Wait a while for all items to appear.
- Scroll down to check “Windows Subsystem for Linux”, then
click OK to exit dialog, then Restart your computer.
(This option was added since the “Anniversary” and “Creators Update” of Windows 10.)
## Windows Terminal
- Click the Windows Start and get in the Microsoft Window Store to install the new Windows Terminal. It is like tmux — it makes it easy to open multiple panes with different prompts for bash, command prompt and PowerShell.
## Download installer
-
Following instructions at https://docs.microsoft.com/en-us/windows/wsl/wsl2-install, in PowerShell, enable the ‘Virtual Machine Platform’ optional component (whatever that means):
dism.exe /online /enable-feature /featurename:Microsoft-Windows-Subsystem-Linux /all /norestart
dism.exe /online /enable-feature /featurename:VirtualMachinePlatform /all /norestart
-
Confirm whether Windows Subsystem for Linux is enabled in PowerShell:
Get-WindowsOptionalFeature -Online -FeatureName Microsoft-Windows-Subsystem-Linux
The response I got:
FeatureName      : Microsoft-Windows-Subsystem-Linux
DisplayName      : Windows Subsystem for Linux
Description      : Provides services and environments for running native user-mode Linux shells and tools on Windows.
RestartRequired  : Possible
State            : Enabled
CustomProperties :
                ServerComponentDescription : Provides services and environments for running native user-mode
                Linux shells and tools on Windows.
                ServerComponentDisplayName : Windows Subsystem for Linux
                ServerComponentId : 1033
                ServerComponentType : Feature
                ServerComponentUniqueName : Microsoft-Windows-Subsystem-Linux
                ServerComponentDeploysUpdateName : Microsoft-Windows-Subsystem-Linux
Set Linux distro to be backed by WSL 2
-
PROTIP:
WSL provides a choice of Linux distributions. For a list:wsl -l
Distributions:
Ubuntu (Default)
docker-desktop
docker-desktop-data
PROTIP: Ubuntu was the first distro tested with WSL, so it’s probably the most well tested.
But it’s not supported by Windows 10 S.
Both Ubuntu and Debian make use of the apt-get (Advanced Packaging Tool) package manager and dpkg command.BTW Ubuntu is a Linux distribution from Canonical, Inc. which also created Virtualenv for Python.
Kali Linux is used by security researchers (not for production use).
Ubuntu version/release
-
In a web browser, know what the latest version of Ubutu is:
https://releases.ubuntu.com
Note there is a name for each release.
WARNING: Time is needed for integration into Windows, so WSL probably does not support the very latest version of Ubuntu.
- From the Start menu, select the Microsoft Windows Store.
-
Search for Ubuntu:
Scroll to see the latest version of Ubuntu for Windows (such as 22.4.5 LTS).
-
Click “Get”:
Once installed, the ‘Install’ button will change to ‘Launch’, click the ‘Launch’ button.
One can, but don’t: alternately, download the “.appx” installer by constructing the curl command for the Ubuntu version listed above, such as:
curl -L -o ubuntu-1604.appx https://aka.ms/wsl-ubuntu-1604
This is instead of the Invoke-WebRequest PowerShell command or
Microsoft Store for Business used within enterprises.
-
Set the distribution code for the Linux distro downloaded (I don’t know why):
wsl --set-version Ubuntu 2
-
Verify what versions of WSL your distros are using:
wsl -l -v
-
Make WSL 2 your default architecture (as if you’ll ever want to go back):
wsl.exe --set-default-version 2

## Where is WSL?

PROTIP: WSL runs within the Vemmem process.
-
Open Task Manager to see it.
Ubuntu Install, Launch, and configure
https://kubernetes.io/blog/2020/05/21/wsl-docker-kubernetes-on-the-windows-desktop/
- In the Windows Start menu section titled “WSL Linux Distros”,
-
Scroll to “Ubuntu on Windows”. Right-click and select “Pin to Start”

- Repeat to select “Pin to taskbar” at the edge of every screen.
-
Repeat to “Run as Administrator” or Launch a new instance.
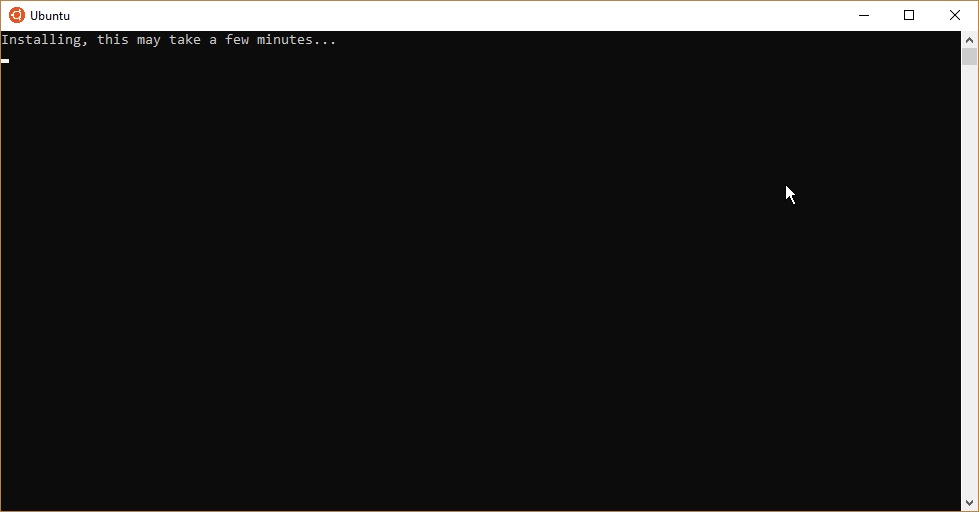
- The first time a newly installed distro runs, a Console window opens, and you’ll see

Installing, this may take a few minutes...
Then…
Installation successful
   Please create a default UNIX user account. The username does not need to match your Windows username.
   For more information visit: https://aka.ms/wslusers
   Enter new UNIX username: _
- Enter a username your make up.
PROTIP: The WSL user is not “root” with admin priviledges.
- PROTIP: Get the password copied into your Clipboard from 1Password or other Password Manager, then paste onto the screen.
A shortcut is added to your start menu named:
Bash on Ubuntu on Windows
-
Click the shortcut.
By default, the prompt is your Linux user name @ your machine name:/mnt/c/Users/%USERNAME%$
You should now see a pop-up window showing Ubuntu, such as this example:
The authenticity of host '192.168.1.16 (192.168.1.16)' can't be established. ED25519 key fingerprint is SHA256:j8f47S7QkzcnJ+hXpwnEQpL4RveqD2MQx79yVhiYXDE. This key is not known by any other names Are you sure you want to continue connecting (yes/no/[fingerprint])? yes Warning: Permanently added '192.168.1.16' (ED25519) to the list of known hosts. kermitv@192.168.1.16's password: Welcome to Ubuntu 22.04.1 LTS (GNU/Linux 5.15.0-57-generic x86_64) * Documentation: https://help.ubuntu.com * Management: https://landscape.canonical.com * Support: https://ubuntu.com/advantage System information as of Sun Jan 8 01:00:39 AM UTC 2023 System load: 1.12841796875 Processes: 235 Usage of /: 43.5% of 9.75GB Users logged in: 0 Memory usage: 22% IPv4 address for docker0: 172.17.0.1 Swap usage: 0% IPv4 address for ens33: 192.168.1.16 60 updates can be applied immediately. To see these additional updates run: apt list --upgradable -
You brave enough:
apt list --upgradable
sudo apt-get upgrade
-
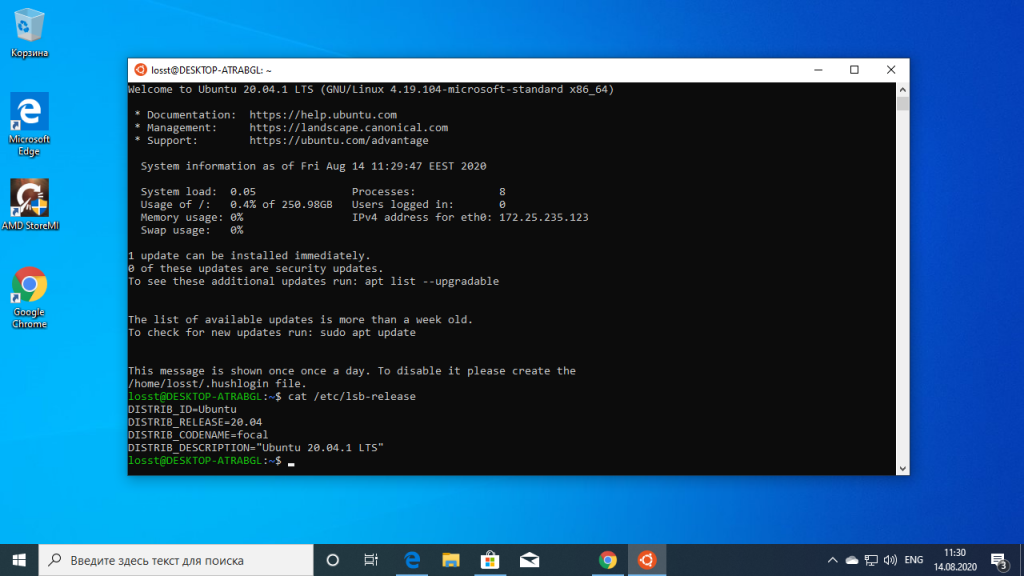
View details of the Linux distro currently running:
lsb_release -a
The version at time of this writing:
No LSB modules are available.
Distributor ID: Ubuntu
Description: Ubuntu 22.04.1 LTS
Release: 22.04
Codename: jammy
### Linux Folders and variables
-
See where Ubuntu is installed using a Windows system variable
referenced using a Windows % wrapper rather than Bash $ prefix:%localappdata%lxss
Note the directory is marked as a hidden system folder.
That’s a clue that you should not modify files in your bash environment using Windows File Explorer, console, or apps.Creating and/or modifying files in this location using Windows tools and apps corrupts the system because it is read-locked. Here is an explanation.
### Within Ubuntu
-
Type your admin password for all subsequent commands:
su -l
### Install kubectl
-
Install latest release of kubectl on Ubuntu:
sudo apt-get update && sudo apt-get install -y apt-transport-https
curl -s https://packages.cloud.google.com/apt/doc/apt-key.gpg | sudo apt-key add -
echo "deb https://apt.kubernetes.io/ kubernetes-xenial main" | sudo tee -a /etc/apt/sources.list.d/kubernetes.list
sudo apt-get update
sudo apt-get install -y kubectl
-
Install latest release of Minikube:
curl -Lo minikube https://storage.googleapis.com/minikube/releases/latest/minikube-linux-amd64 && chmod +x minikube
sudo install minikube /usr/local/bin
-
If you see this error: Exiting due to GUEST_MISSING_CONNTRACK: Sorry, Kubernetes 1.25.3 requires conntrack to be installed in root’s path
sudo apt-get install conntrack
-
In the Ubuntu Linux terminal, verify:
minikube version
minikube version v1.28.0
commit: 986b1ebd987211ed16f8cc10aed7d2c42fc8392f
-
In the Ubuntu Linux terminal, start minikube:
minikube start --vm-driver=none
If you see:
😄  minikube v1.28.0 on Ubuntu 20.04 (amd64)
✨  Using the none driver based on existing profile

🤷  Exiting due to PROVIDER_NONE_NOT_FOUND: The 'none' provider was not found: running the 'none' driver as a regular user requires sudo permissions
Alternately, (from CHATGPT4) run the dockerd server:
sudo dockerd --exec-opt native.cgroupdriver=none
Install & Configure Utilities
-
TODO: Use brew to install additional utilities: git, Python/pip, tree, jq, etc.
https://medium.com/swlh/wsl-2-docker-edge-tech-preview-native-linux-containers-w-o-emulation-b41667e6dbef
-
Use pip to install Virtualenv.
-
Install keyboard aliases to use custom commands:
NOTE: To run Python for Selenium controlling Firefox, install Xming with gekoDriver.
Profile to define prompt
-
Open the Bash command prompt</strong> (click Windows Start and type Bash until you can select it from the list that arises):
NOTE: You can run Linux binaries such as ls from the Windows Command Prompt (CMD or PowerShell) by invoking wsl.exe there. These are called interop features.
-
Open the Visual Studio Code text editor to the file in the $HOME folder, which is what ~ stands for, just like in macOS:
code ~/.profile
By default, WSL reads and executes commands from the file /etc/profile if that file exists. After reading that file, it looks for ~/.bash_profile, ~/.bash_login, and ~/.profile, in that order, and reads and executes commands from the first one that exists and is readable. It skips the other files if one is found.
-
Define keyboard aliases in a .bash_aliases file in the .bashrc file *
code ~/.bashrc
My list is in https://github.com/wilsonmar/git-utilities/master/aliases.sh
Zsh
See https://medium.com/@edwardbaeg9/using-homebrew-on-windows-10-with-windows-subsystem-for-linux-wsl-c7f1792f88b3
LinuxBrew vs. Homebrew for MacOS
-
Install the LinuxBrew fork of Homebrew for macOS*
“I found some apps that didn’t work well from apt-get worked flawlessly when installed with brew, like zplug. Inversely, I couldn’t get ranger to work with brew but got it working with apt-get. This very conveniently gives you multiple options for installing a package, potentially skipping the step of Googling vague errors.
To fix the patchelf error:
sudo apt-get update
sudo apt-get install build-essential
Linux commands
-
Get to know the built-in Linux commands: cat, cd, chmod, chown, curl, df, diff, echo, exit, find, finger, grep, groups, gzip, head, history, kill, less, ls, man, mkdir, mv, passwd, ping, ps, pwd, shutdown, ssh, sudo, tail, tar, top, uname, w, whoami. There’s also cp.
- Ubuntu’s “The Linux command line for beginners”.
- 37 Important Linux Commands You Should Know
Rather than a translation layer built by the WSL 1 team, WSL 2 includes its own open-sourced Linux kernel with full system call compatibility with the LTS Linux kernel. WSL2 does not work under HyperV.
Sean Dearnaley points out that since macOS currently doesn’t have good GPU support, if Windows introduces GPU support for WSL, Windows machines could become a very powerful machine learning development platform when running Nvidia CUDA based apps.
pwd file storage mounts
-
To list drives mounted:
cd /mnt
The response is the drives:
c d f
-
For the purpose of this tutorial, create folder dev/project for use by both Windows and Linux tools:
cd /mnt/c/dev/
mkdir project
You can also make whatever directory name you want.
-
PROTIP: Use $HOME or ~ to reference your home folder:
cd ~
pwd
Unlike/users on macOS, the folder above user accounts is:
/home/me
-
Open Windows Explorer to view files from both Windows and from Bash:
explorer.exe .
-
Access files from both Windows and from Bash as:
/mnt/c/path
-
Run a Linux utility such as disk usage of the current folder (represented by a dot):
du -sh
The response is like 56K .
-
View the manual on the du command:
man du
-
PROTIP: Remember this move whenever you see that “:” in the lower-left corner:
type q to quit out.
VSCode Extensions
-
In VSCode, “Trust and install” extensions Docker (from Microsoft), “Dev Containers”, “Kubernetes”.
VIDEO:
Run and debug your Linux-based applications from within VSCode in Windows. Edit files in WSL or the mounted Windows filesystem (/mnt/c) without worrying about pathing issues, binary compatibility, or other cross-OS challenges. -
Install Visual Studio Code Remote — WSL extension at https://marketplace.visualstudio.com/items?itemName=ms-vscode-remote.remote-wsl
FAQ
-
Read the FAQ for known weirdness.
Bugs with WSL are reported to developers at https://github.com/microsoft/WSL
https://docs.microsoft.com/en-us/windows/wsl/troubleshooting
Kubespray (Ansible)
Video Tutorials
-
16 Nov 2021 “Getting Started with Docker on Windows” 5h41m by Wes Higbee
-
3 Feb 2021 “Managing Docker on Windows Servers” 1h17m by Piotr Gaczkowski referencing his github.com/DoomHammer/pluralsight-managing-docker-on-windows-servers for each tutorial module.
-
Create a new container:
docker run -v ${PWD}:C:app --workdir /app mcr.microsoft.com/dotnet/core/sdk:3.1 dotnet new mvc --auth Individual -
The Dockerignore file contains names of files and folders that should not be in container images (because they are generated every time), such as:
bin
obj
-
The Dockerfile in each tutorial module defines the various base images from the Azure MCR.
Docker Enterprise Components
-
VIDEO: Enterprise licenses:
What was previously “Docker Engine” (and Docker’s 30% pentration into the Fortune 500) was purchased Nov, 2019 by Mirantis (the cloud consulting company with OpenStack roots). So it is now the Mirantis Container Runtime.
Docker’s “Universal Control Plane” is now Mirantis Kubenetes Engine (MKE), which provides RBAC & LDAP for centralized cluster management.
MCR
Docker’s “Trusted Registry” is now the Mirantis Secure Registry running MKE, hosting containers as a Linux server. It performs security scanning of image files.
-
To install MCR on Windows Server 2019, in PowerShell:
[Net.ServicePointManager]::SecrurityProtocol - [Net.SecurityProtocolType]::Tls12
[Install-Module DockerMsftProvider] -Force
https://github.com/Mirantis/cri-dockerd#build-and-install
Docker Edge (at Tech Preview)
-
TODO: Use brew to install Docker Desktop Edge, in Technical Preview as of this writing.

See https://docs.docker.com/docker-for-windows/edge-release-notes/
Sean Dearnaley provides pointers.
It now supports Kubernetes, offers VPN-friendly networking, provides an updated Docker daemon, and many new features.

VHD size adjustment
WSL 2 stores Linux files inside of a VHD (Virtual Hard Disk) using the ext4 file system. VHD has an initial max size of 256GB. If your distro grows beyond that you will see errors stating that you’ve run out of disk space. To expand VHD size:
-
Terminate all WSL instances:
wsl --shutdown
-
Find your distro installation package name ‘PackageFamilyName’.
-
In a powershell prompt (where ‘distro’ is your distribution name) construct:
Get-AppxPackage -Name "*distro*" | Select PackageFamilyName
-
Locate the VHD file fullpath used by your WSL 2 installation, this will be your ‘pathToVHD’:
%LOCALAPPDATA%PackagesPackageFamilyNameLocalStatedisk.vhdx
Resize your WSL 2 VHD:
-
Open a command prompt Window with admin privileges and run the following commands:
diskpart
In the dialog:
Select vdisk file=”pathToVHD”
expand vdisk maximum=”sizeInMegaBytes”
-
Launch your WSL distro.
-
Make WSL is aware that it can expand its file system’s size by running these commands in your WSL distro:
sudo mount -t devtmpfs none /dev
mount | grep ext4
-
Copy the name of this entry, which will look like: /dev/sdXX (with the X representing any other character),
making sure to use the value you copied earlier.sudo resize2fs /dev/sdXX
-
You may need to use:
apt install resize2fs
Akash Network
All of the above is getting ready for preparing your machine to generate revenue as provider clusters used by others on the Akash.cloud network. Leases of Akash resources are deployed via Kubernetes pods.
The
Praetor application from Akash builds an Akash Provider for small and medium sized environments.
On a Windows machine, Praetor runs after Kubespray (using RedHat Ansible) on an Ubuntu server within WSL2.
References:
- https://github.com/kubernetes-sigs/kubespray
-
VIDEO: “Kube 65.1 ] Kubespray — Kubernetes cluster provisioning”
- https://www.techbeatly.com/2020/11/deploying-kubernetes-with-kubespray.html using Vagrant
- https://www.redhat.com/sysadmin/kubespray-deploy-kubernetes
- https://kubernetes.io/docs/setup/production-environment/tools/kubespray/
- https://www.densify.com/kubernetes-tools/kubespray
- https://adamtheautomator.com/kubespray/
- https://schoolofdevops.github.io/ultimate-kubernetes-bootcamp/cluster_setup_kubespray/
- https://slateci.io/docs/cluster/automated/install-kubernetes-with-kubespray.html including metalLB
VIDEO: “Deploying kubernetes using Kubespray” by Remko Deenik illustrating Steps to build the provider’s Kubernetes control plane and worker nodes:
-
Install Ansible on Ubuntu:
sudo apt-get update
sudo apt-get install ansible
-
Install Python: QUESTION: Virtualvenv?
sudo pip3 install --upgrade pip
sudo apt-get install ansible
- Navigate/create a folder the folder where you will be cloning into.
-
Clone the kubespray repository onto your server:
QUESTION: Fork this first?
git clone https://github.com/kubernetes-sigs/kubespray.git
-
Install (download) Python dependency packages:
sudo pip install -r requirements.txt
-
Create an Ansible inventory file in your kubespray directory:
cd kubespray
cp -rfp inventory/sample inventory/mycluster
-
Install the required dependencies:
sudo ansible-galaxy install -r requirements.yml
-
Specify the IP addresses of the servers of your cluster in a hosts.yml file:
declare -a IPS=(10.1.1.101 10.1.1.102 10.1.1.103 10.1.1.104 10.1.1.105 10.1.1.106)
edit inventory/mycluster/hosts.yml
An example of the hosts.yml:
hosts:
  node1:
 ansible_host: 10.1.1.101
 ip: 10.1.1.101
 access_ip: 10.1.1.101
...
-
Define the permissions in hosts.yml:
kube-node: hosts: node1: node2: node3: node4: node5: node6: etcd: hosts: node1: node2: node3: k8s-cluster: children: kube-master: kube-node: calico-rr: hosts: {} -
Specify the IP addresses of the servers of your cluster:
CONFIG_FILE=inventory/mycluster/hosts.yml python3 contrib/inventory_builder/inventory.py ${IPS[@]} -
Review Kubespray configuration settings:
vi inventory/mycluster/group_vars/all/all.yml
-
Review Kubernetes configuration settings:
vi inventory/mycluster/group_vars/k8s-cluster/k8s-cluster.yml
-
Deploy the cluster using the cluster.yml playbook and the mycluster inventory file:
ansible-playbook -i inventory/mycluster/hosts.yml cluster.yml
--become --become-user=root cluster.yml
The above took an hour to spit out a lot.
-
Download latest kubectl:
curl -LO https://storage.googleapis.com/kubernetes-release/release/$(curl -s https://storage.googleapis.com/kubernetes-release/release/stable.txt)/bin/linux/amd64/kubectl
-
Use SSH to get files:
ssh 10.1.1.101 sudo cp /etc/kubernetes/admin.conf "/home/$USERNAME/config"
ssh 10.1.1.101 sudo chmod +4 ~/config
scp 10.1.1.101:~/config .
mkdir .kube
mv config .kube/
ssh 10.1.1.101 sudo rm ~/config
-
Verify access
kubectl version
kubectl get nodes
References
Links and issues for this:
https://github.com/Microsoft/BashOnWindows
https://msdn.microsoft.com/en-us/commandline/wsl/install_guide
https://blogs.msdn.microsoft.com/wsl/2016/06/15/wsl-file-system-support
published 15 June 2016 by Jack Hammons, who writes:
https://blogs.msdn.microsoft.com/wsl, the home page of WSL.
https://medium.com/better-programming/make-bash-on-ubuntu-on-windows-10-look-like-the-ubuntu-terminal-f7566008c5c2
https://medium.com/free-code-camp/how-to-set-up-docker-and-windows-subsystem-for-linux-a-love-story-35c856968991
“Yeah, it seemed to have uninstalled linuxbrew as soon as I closed the Ubuntu shell. Although my path references in .profile seemed to persist”
https://www.windowscentral.com/how-install-wsl2-windows-10
More on DevOps
This is one of a series on DevOps:
- DevOps_2.0
- ci-cd (Continuous Integration and Continuous Delivery)
- User Stories for DevOps
-
Enterprise Software)
- Git and GitHub vs File Archival
- Git Commands and Statuses
- Git Commit, Tag, Push
- Git Utilities
- Data Security GitHub
- GitHub API
-
TFS vs. GitHub
- Choices for DevOps Technologies
- Pulumi Infrastructure as Code (IaC)
- Java DevOps Workflow
-
Okta for SSO & MFA
- AWS DevOps (CodeCommit, CodePipeline, CodeDeploy)
- AWS server deployment options
-
AWS Load Balancers
- Cloud services comparisons (across vendors)
- Cloud regions (across vendors)
-
AWS Virtual Private Cloud
- Azure Cloud Onramp (Subscriptions, Portal GUI, CLI)
- Azure Certifications
-
Azure Cloud
- Azure Cloud Powershell
- Bash Windows using Microsoft’s WSL (Windows Subsystem for Linux)
-
Azure KSQL (Kusto Query Language) for Azure Monitor, etc.
- Azure Networking
- Azure Storage
- Azure Compute
-
Azure Monitoring
- Digital Ocean
-
Cloud Foundry
- Packer automation to build Vagrant images
- Terraform multi-cloud provisioning automation
-
Hashicorp Vault and Consul to generate and hold secrets
- Powershell Ecosystem
- Powershell on MacOS
-
Powershell Desired System Configuration
- Jenkins Server Setup
- Jenkins Plug-ins
- Jenkins Freestyle jobs
-
Jenkins2 Pipeline jobs using Groovy code in Jenkinsfile
- Docker (Glossary, Ecosystem, Certification)
- Make Makefile for Docker
- Docker Setup and run Bash shell script
- Bash coding
- Docker Setup
- Dockerize apps
-
Docker Registry
-
Maven on MacOSX
- Ansible
- Kubernetes Operators
-
OPA (Open Policy Agent) in Rego language
-
MySQL Setup
- Threat Modeling
-
SonarQube & SonarSource static code scan
- API Management Microsoft
-
API Management Amazon
- Scenarios for load
- Chaos Engineering
September 28th, 2016
Summary: Learn about the Windows Subsystem for Linux that runs on top of Windows 10.
Today we have a guest article written by Stefan Roth. Take it away Stefan …
Hi, my name is Stefan Roth, and I am a Cloud and Datacenter MVP. In a couple of posts, I would like to show you how cool it is that Microsoft is touching the Linux world. Myself, I am a 100% Microsoft fan, but, as you can read all over the Internet…Microsoft loves Linux. This is not just a one-night stand. Microsoft is really serious about Linux support in all cloud scenarios (private, public, and hybrid). Therefore, we start with something really cool.
I will start a three-part series that touches a few parts of the Linux direction that Microsoft is taking. My first post gives you an overview of Bash on Windows 10 by using Secure Shell (SSH). We’ll run a script that installs the prerequisites and sets up a desired state configuration (DSC) environment. The second post will show you how to install .NET Core and PowerShell on Linux by using DSC. The last part will use Azure Automation DSC and the Operations Management Suite injection API for some fun.
The anniversary update
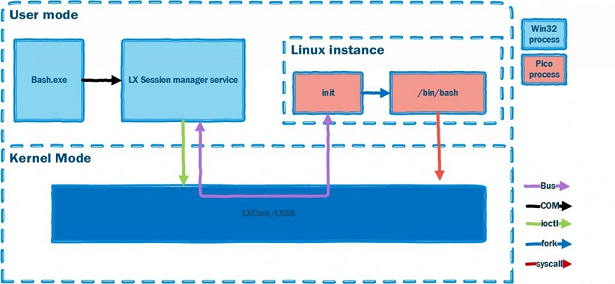
Microsoft released the Windows 10 Anniversary Update on August 2nd. One awesome new feature is the Windows Subsystem for Linux (WSL) that runs on top of Windows 10. What does that mean? This subsystem allows you to run native Linux binaries on Windows. If you remember back to Windows NT, there was already a POSIX subsystem available for Unix-based applications. Because the Windows NT kernel was designed to run such subsystems, Microsoft could use this architecture and build a subsystem for Linux. Exactly how this works is explained in the Windows Subsystem for Linux Overview blog post.
Why should we care at all? Good question. I think there is a short-term goal and a long-term goal. If you watched Technical Fellow Jeffrey Snover announcing PowerShell on Linux and Open Sourced , Jeffrey mentioned a vision to manage any system from any operating system by using Windows PowerShell. One short-term goal is for developers to have a Linux environment available on Windows as also a “native” way to use SSH to connect and manage native Linux systems, which has been requested for years. Scott Hanselmann has released a nice video on his blog, which shows what you can do with Bash and explains some more details.
Install Bash on Windows
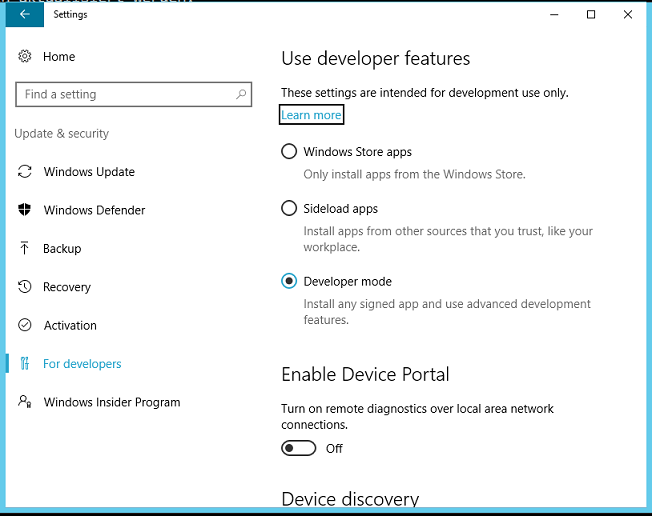
First, let’s install Bash on Windows 10. Make sure that you have the latest Windows 10 Anniversary 64-bit edition and that you have Developer Mode enabled. Open the Settings app and go to Update & security > For developers. Select Developer mode to enable Developer Mode.
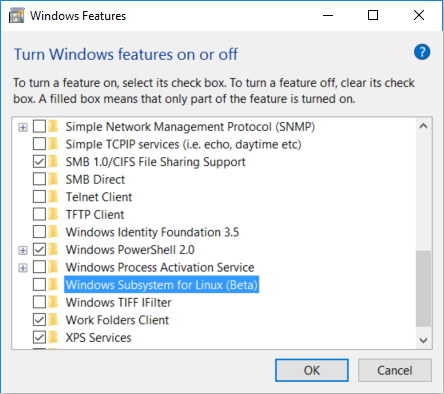
Next, use Turn Windows features on or off to turn on Windows Subsystem for Linux (Beta), reboot, and everything is done.
Type Bash in the Run Window, and follow the instructions to complete the setup. Now you are a proud owner of an Ubuntu Bash on Windows 10 that’s waiting for input.
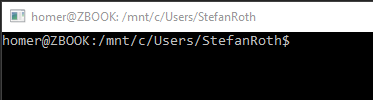
I have a CentOS 7 x64 Linux system called centos installed on my local Hyper-V server. Now let’s connect from your Windows 10 Bash to the CentOS server system by using SSH.
Type within Bash:
ssh [IP OF YOUR SERVER] -l root
Enter your password when prompted.
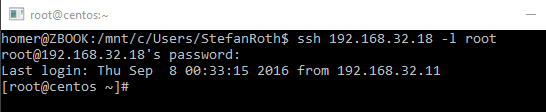
Note: If you receive a response like this, just confirm by typing yes.
The authenticity of host ‘192.168.32.18 (192.168.32.18)’ can’t be established. ECDSA key fingerprint is 26:b6:fb:b1:de:76:b0:2e:47:68:0b:94:32:00:c9:08. Are you sure you want to continue connecting (yes/no)?
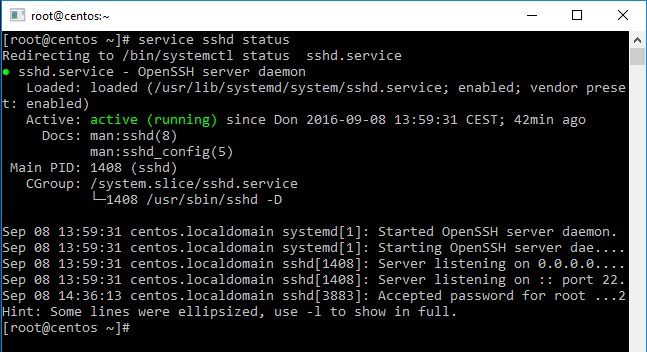
Now you are authenticated as root (root = administrator permission) to the remote system via SSH. If you get an error, check on your Linux server locally to determine if the sshd (SSH daemon) is running by typing:
service sshd status
You should get an output as shown in the following screenshot.
Install the prerequisites
Next, we are going to run a little shell script to download all prerequisites and source for the OMI CIM server and the DSC packages. After successful download, we’ll install the rpm packages (Package Manager for Red Hat).
First, to create the script file, go to /root/Downloads:
- Type
vi install.shto launch an empty file called install.sh. - Type
ito insert text. - Paste the script that follows these steps.
- Type Esc key to change vi editor mode.
- Type
:. - Type
wq!to write and quit.
It should look like this…
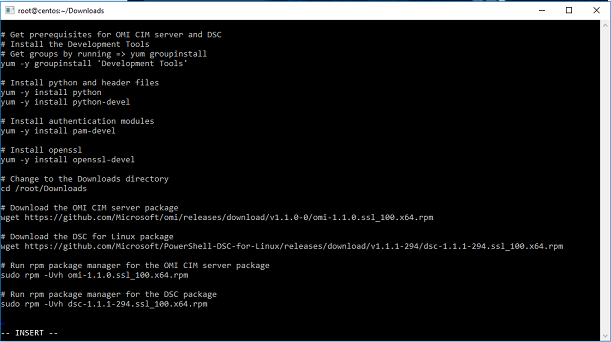
Shell script:
#####################################################################################
#! /bin/sh

# Get prerequisites for OMI CIM server and DSC

# Install the Development Tools

# Get groups by running => yum groupinstall

yum -y groupinstall 'Development Tools'
# Install python and header files

yum -y install python

yum -y install python-devel
# Install authentication modules

yum -y install pam-devel
# Install openssl

yum -y install openssl-devel
# Change to the Downloads directory

cd /root/Downloads
# Download the OMI CIM server package

wget https://github.com/Microsoft/omi/releases/download/v1.1.0-0/omi-1.1.0.ssl_100.x64.rpm
# Download the DSC for Linux package

wget https://github.com/Microsoft/PowerShell-DSC-for-Linux/releases/download/v1.1.1-294/dsc-1.1.1-294.ssl_100.x64.rpm
# Run rpm package manager for the OMI CIM server package

sudo rpm -Uvh omi-1.1.0.ssl_100.x64.rpm
# Run rpm package manager for the DSC package

sudo rpm -Uvh dsc-1.1.1-294.ssl_100.x64.rpm
###############################################################################
Next, to set the permission to the script as executable, type:
chmod +x install.sh
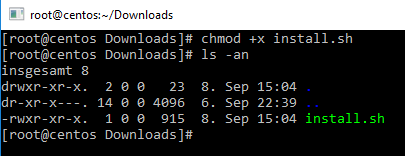
Finally, execute the script. The install process will kick off, and you will see the installation.

Note: If you get an error like “…Another app is currently holding the yum lock”, the yum installer is running in the background. To temporarily prevent the database lock, use the following command to stop the daemon.
Stop yum installer
service packagekit stop
Run the script again ./install.sh. If everything worked, you should have a prompt again and run the next command to see the status of the OMI CIM server.
OMI CIM server status
service omid status
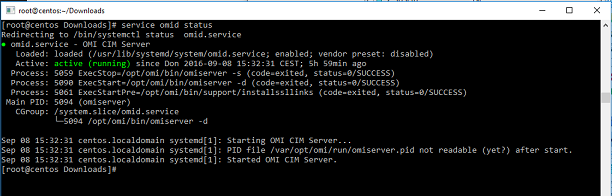
At this point, OMI CIM server and DSC Linux components are installed – up and running.
Testing it
If you want to explore your installation, there are few commands which might help you to troubleshoot OMI CIM server and DSC.
OMI Server
Show OMI server version:
/opt/omi/bin/omiserver -v
Show OMI server help:
/opt/omi/bin/omiserver -h
Shows the OMI server configuration file
vi /etc/opt/omi/conf/omiserver.conf
Shows the OMI server log file
vi /var/opt/omi/log/omiserver.log
DSC
Get DSC configuration
/opt/microsoft/dsc/Scripts/GetDscConfiguration.py
Get LCM configuration
/opt/microsoft/dsc/Scripts/GetDscLocalConfigurationManager.py
Install a DSC custom module
/opt/microsoft/dsc/Scripts/InstallModule.py /tmp/cnx_Resource.zip
Remove a DSC custom module
/opt/microsoft/dsc/Scripts/RemoveModule.py cnx_Resource
Applies a configuration MOF file to the computer
/opt/microsoft/dsc/Scripts/StartDscLocalConfigurationManager.py –configurationmof /tmp/localhost.mof
Applies a Meta Configuration MOF file to the compute
/opt/microsoft/dsc/Scripts/SetDscLocalConfigurationManager.py –configurationmof /tmp/localhost.meta.mof
Shows the DSC log file
vi /var/opt/omi/log/dsc.log
Summary
First, we installed the Windows Subsystem for Linux and used Bash to make a connection to a Linux server by using SSH. From this shell, we ran an installation script to install OMI CIM Server and DSC for Linux.
You might have noticed that we never had to leave the Bash window. We could manage the Linux server from Windows 10 without logging in to the Linux server console. One small but important goodie I like is that we are also able to copy from Windows and paste to the Bash window as we did tocreate the shell script file.
Thank you, Stefan.
I invite you to follow me on Twitter and Facebook. If you have any questions, send email to me at scripter@microsoft.com, or post your questions on the Official Scripting Guys Forum. Also check out my Microsoft Operations Management Suite Blog. Until then, peace.
Ed Wilson, Microsoft Scripting Guy
Под GNU/Linux-дистрибутивы создано огромное количество полезных и удобных инструментов и приложений для обычных пользователей и разработчиков. Далеко не всё из этого доступно на Windows, но, к счастью, для ОС от Microsoft есть решения, исправляющие эту проблему.
WSL — официальная подсистема Linux внутри Windows
В Windows 10 существует крайне полезная вещь под названием Windows Subsystem for Linux (WSL). Она позволяет использовать GNU/Linux-среду прямо в Windows и запускать не только команды, но и, например, Bash-скрипты. Для использования WSL необходимо следовать инструкции ниже.
Шаг 1. Проверьте, подходит ли текущая версия Windows требованиям. Для этого нажмите сочетание клавиш Win+R, затем введите winver. Найдите строку «Сборка ОС» — она должна быть свежее версии 14316.
Шаг 2. Запустите стандартную утилиту PowerShell от имени администратора и введите в ней команду для включения WSL:
dism.exe /online /enable-feature /featurename:Microsoft-Windows-Subsystem-Linux /all /norestart
Шаг 3. Если версия Windows, определённая в первом пункте, свежее 18362, вы можете установить WSL 2, который в разы быстрее первой версии и обладает доработанным ядром. Введите команду ниже, если нужно установить WSL 2:
dism.exe /online /enable-feature /featurename:VirtualMachinePlatform /all /norestart
После этого скачайте и установите пакет обновления с официального сайта.
Шаг 4. Перезагрузите компьютер. Если была произведена установка WSL 2, введите в PowerShell от имени администратора следующую команду:
wsl —set-default-version 2
Шаг 5. После перезагрузки откройте фирменный магазин приложений Microsoft Store и найдите подходящий GNU/Linux-дистрибутив. Самым популярным является Ubuntu — вы можете установить любую версию из представленных в Microsoft Store.
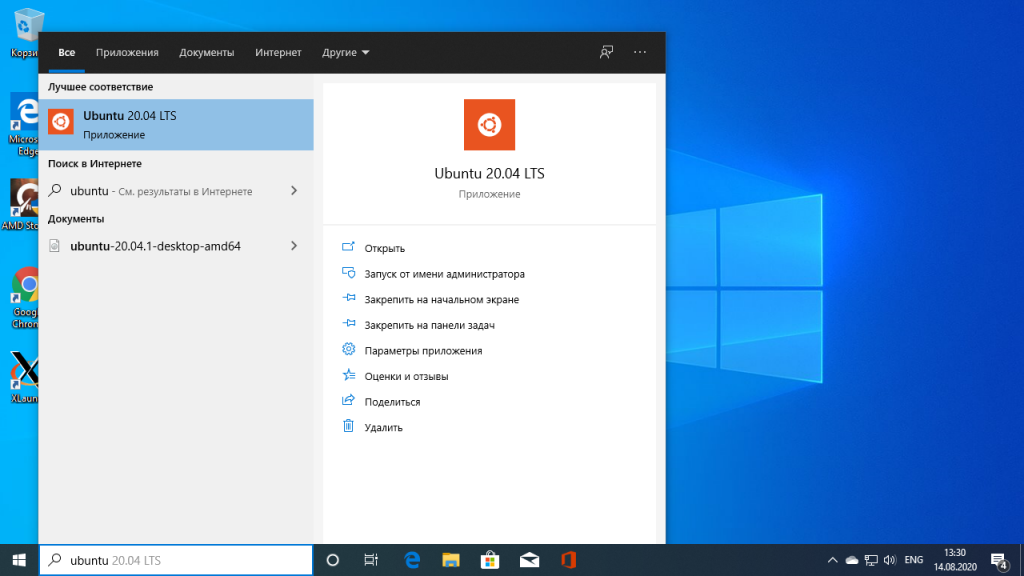
Шаг 6. Как только установка завершится, найдите дистрибутив в меню «Пуск» и запустите его.
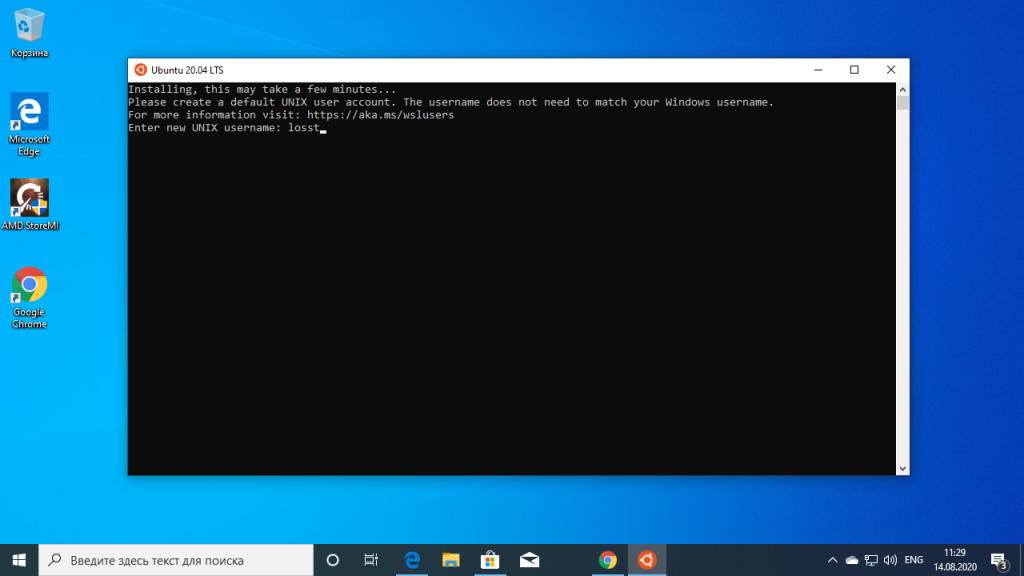
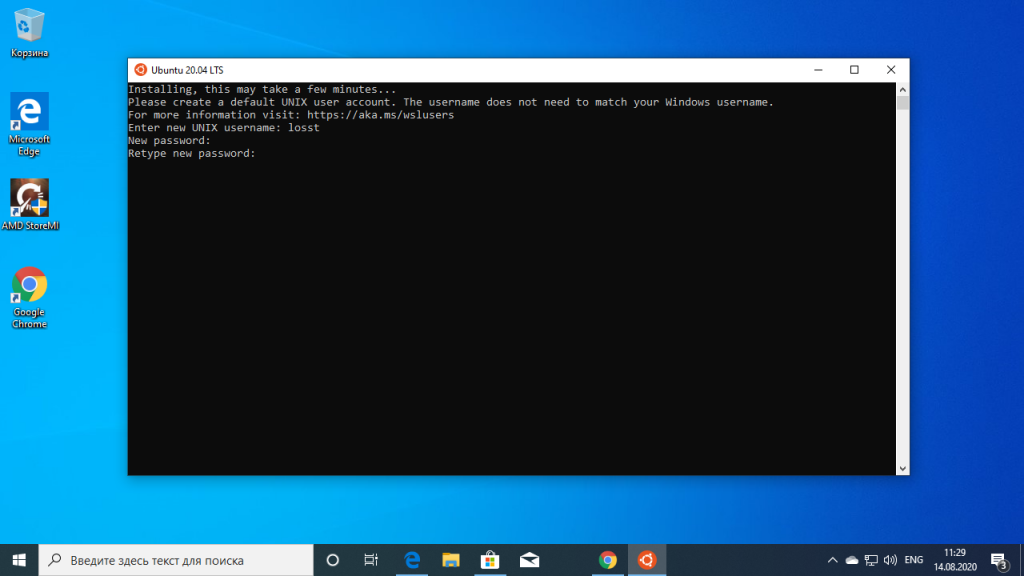
Шаг 7. Пройдите этап первоначальной настройки, введя имя нового пользователя и придумав пароль.
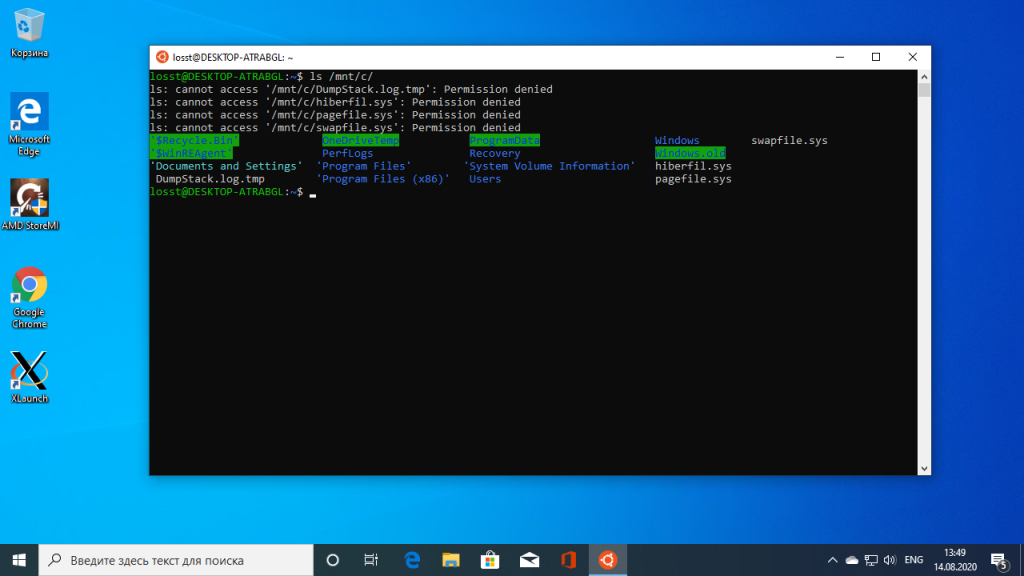
Шаг 8. Теперь различные GNU/Linux-команды можно выполнять, запустив дистрибутив, либо введя в командной строке wsl <команда>. Например, для просмотра всех файлов в текущей директории достаточно в командной строке выполнить wsl ls -a.
Обращу внимание на то, что путь к дискам в WSL отличается от такового в Windows. Вместо привычного C:/ используйте /mnt/c/. Также не забывайте про экранирование пробелов с помощью символа — это также пригодится при вводе путей к файлам.
Помимо выполнения базовых команд, с помощью WSL можно даже запускать приложения с графическим интерфейсом. Правда, рассчитывать на большое количество поддерживаемых подобных программ не стоит.
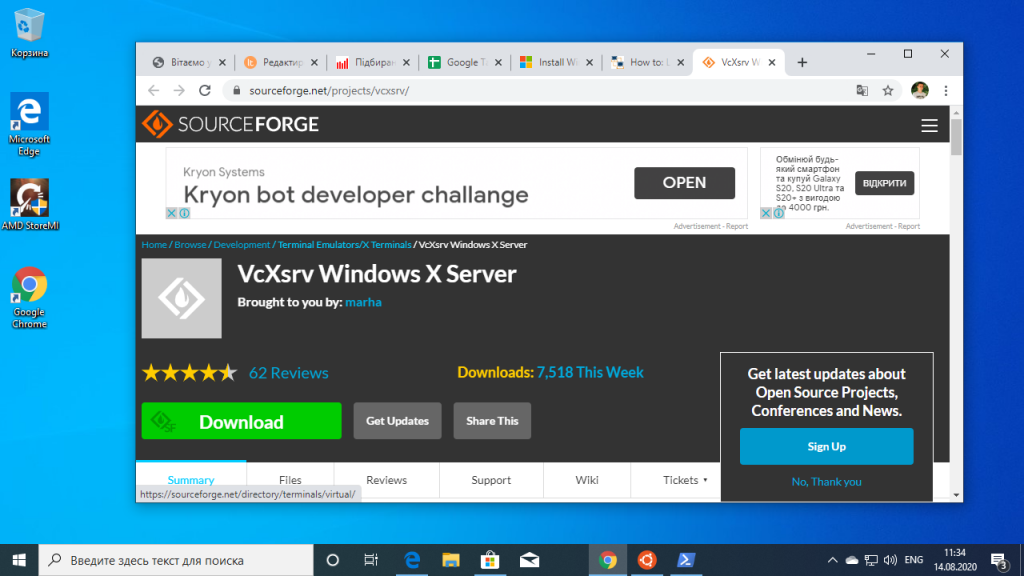
Шаг 1. Загрузите X-сервер и установите его.
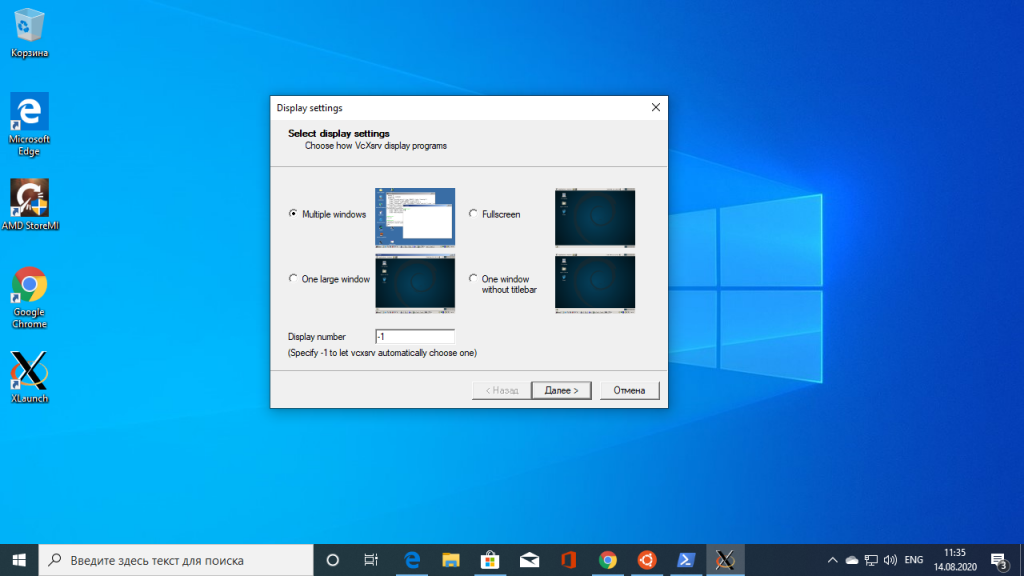
Шаг 2. Запустите его с помощью ярлыка на рабочем столе. В открывшемся окне выберите вариант Multiple windows, затем Start no client. Завершите настройку кнопкой Finish.
Шаг 3. Откройте дистрибутив через меню Пуск и выполните команду export DISPLAY=:0
Шаг 4. Запустив приложение с графическим интерфейсом в WSL, вы увидите новое окно прямо в Windows.
CoreUtils — лёгкий инструмент для запуска базовых команд
Плюс данной утилиты — возможность запуска не только на Windows 10, но и на более старых версиях ОС. Кроме того, она легка и не занимает много места. Не обошлось без недостатков — программа скудна на функционал и не обновлялась очень давно. Она не только не умеет запускать скрипты и приложения с GUI, но и поддерживает лишь самые базовые GNU/Linux-команды. Установка CoreUtils весьма проста.
Шаг 1. Скачайте утилиту с официального сайта.
Шаг 2. Следуйте инструкциям установщика.
Шаг 3. Откройте «Панель управления», в разделе «Система и безопасность» выберите пункт «Система». На панели слева откройте «Дополнительные параметры системы». Нажмите кнопку «Переменные среды» и в открывшемся окне найдите область с заголовком «Системные переменные». В случае, когда там есть переменная Path, выберите её, нажмите «Изменить» и далее создайте новую строку. Содержимым этой строки должен быть путь к папке, который был указан при установке. Если вы ничего не меняли, то введите следующее:
C:Program Files (x86)GnuWin32bin
Переменной Path нет? Тогда для начала создайте её кнопкой «Создать», затем в поле имени введите Path, а в поле значения — строку выше.
Шаг 4. Запустите командную строку и выполняйте команды прямо там.
Cygwin — запуск команд и Bash-скриптов
Ещё одна утилита, схожая с CoreUtils, но обладающая более широким функционалом — в том числе и возможностью запуска скриптов. Из минусов — немалый вес и более сложная установка. Разумеется, не идёт ни в какое сравнение с максимально удобным WSL, но для базовых команд вполне подойдёт.
Шаг 1. Загрузите Cygwin и запустите установку.
Шаг 2. Выберите Install from Internet, укажите директории для установки и загрузки пакетов, а также любой подходящий сайт из списка для скачивания файлов.
Шаг 3. В процессе установки можете выбрать необходимые пакеты, либо сразу нажать «Далее», оставив базовый набор.
Шаг 4. Откройте «Панель управления», в разделе «Система и безопасность» выберите пункт «Система». На панели слева откройте «Дополнительные параметры системы». Нажмите кнопку «Переменные среды» и в открывшемся окне найдите область с заголовком «Системные переменные». В случае, когда там есть переменная Path, выберите её, нажмите «Изменить» и далее создайте новую строку. Содержимым этой строки должен быть путь к папке, который был указан при установке. Если вы ничего не меняли, то введите следующее:
C:cygwin64bin
Переменной Path нет? Тогда для начала создайте её кнопкой «Создать», затем в поле имени введите Path, а в поле значения — строку выше.
Шаг 5. Команды можно выполнять как через командную строку, так и через специальный терминал.
Шаг 6. Для удаления Cygwin достаточно удалить папку, в которую программа была установлена, а также (по желанию) значение из переменной Path по методу, обратному тому, что был описан в 4 шаге (не удаляйте саму переменную).
Недавно мы говорили о том, как выполнять различные Linux утилиты в Windows. Но для Windows 10 это, похоже, уже неактуально. Уже давно в Windows 10 появилась нативная поддержка оболочки Bash, в окружении дистрибутива Ubuntu благодаря подсистеме Linux для Windows 10.
Вы можете запускать различные дистрибутивы Linux в Windows без виртуализации, а с недавних пор, можно даже полноценно заставить работать графический интерфейс, правда для этого уже нужна вторая версия WSL. В этой статье мы рассмотрим как установить Linux в Windows 10.
Что такое WSL?
В начале цикла разработки Windows 10, Microsoft открыла страницу обсуждения и голосования за новые функции. Там зашел разговор о командной строке Windows. Разработчики спросили сообщество, что им не нравится в командной строке Windows и какие функции они хотели бы увидеть в новой версии.
Многие пользователи заявили что им нужны небольшие улучшения командной строки, другие же сказали что неплохо было бы иметь возможность использовать инструменты Linux / Unix и Bash в Windows 10. Много пользователей согласились с тем, что нужно сделать проще использование этих инструментов в Windows.
Прислушиваясь к голосу сообщества, в Microsoft первым делом улучшили CMD, PowerShell и другие инструменты командной строки. А во-вторых, они сделали, то что казалось невероятным несколько лет назад, они добавили реальный, нативный Bash вместе с поддержкой всех необходимых инструментов командной строки, работающих непосредственно на Windows, в среде, которая ведет себя как Linux. Это не какая-нибудь виртуальная машина, это реальный Linux в Windows.
Для реализации этого Microsoft построили новую инфраструктуру в Windows, это Windows Subsystem for Linux или WSL, на основе которой работает образ окружения Ubuntu, поставляемый партнером Canonical. Эта функция позволит разработчикам более эффективно использовать инструменты Linux. Инфраструктура основана на уже заброшенном проекте, Project Astoria, который должен был использоваться для запуска Android-приложений в Windows. Ее можно расценивать как противоположность Wine, только Wine запускает приложения Windows в Linux, подсистема Linux позволяет выполнять приложения Linux в Windows, точнее, только консольные приложения Bash в Windows 10.
С технической точки зрения, это вообще не Линукс. Каждая система GNU Linux должна быть основана на ядре Linux, здесь же просто есть возможность выполнять двоичные файлы, которые работают в Ubuntu.
С каждой новой версией в WSL всё меньше ограничений, вы уже можете использовать сервисы, а также с WSL 2 стали доступны графические приложения. Решение предназначено для разработчиков, которые хотят запускать linux-утилиты из командной строки Windows. Да, эти команды имеют доступ к файловой системе Windows, но вы не можете использовать их для автоматизации своих задач или в стандартной командной строке Windows. Теперь давайте разберемся как установить WSL в Windows 10.
1. Проверка версии системы
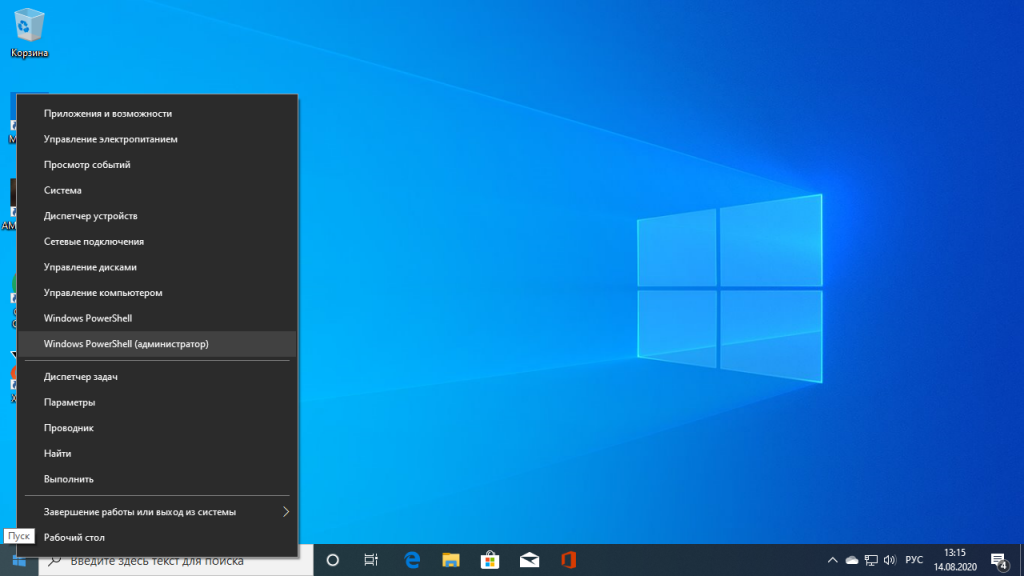
Вы можете установить WSL в Windows 10 начиная с версии Windows 10 Insider Preview 14316, а для WSL версии 2, которая принесла много улучшений нужно обновление Windows 10 19041 или новее. Сначала убедитесь, что у вас правильная версия Windows. Для этого октройте PowerShell кликнув правой кнопкой по иконке пуск:
Затем выполните команду:
[environment]::osversion
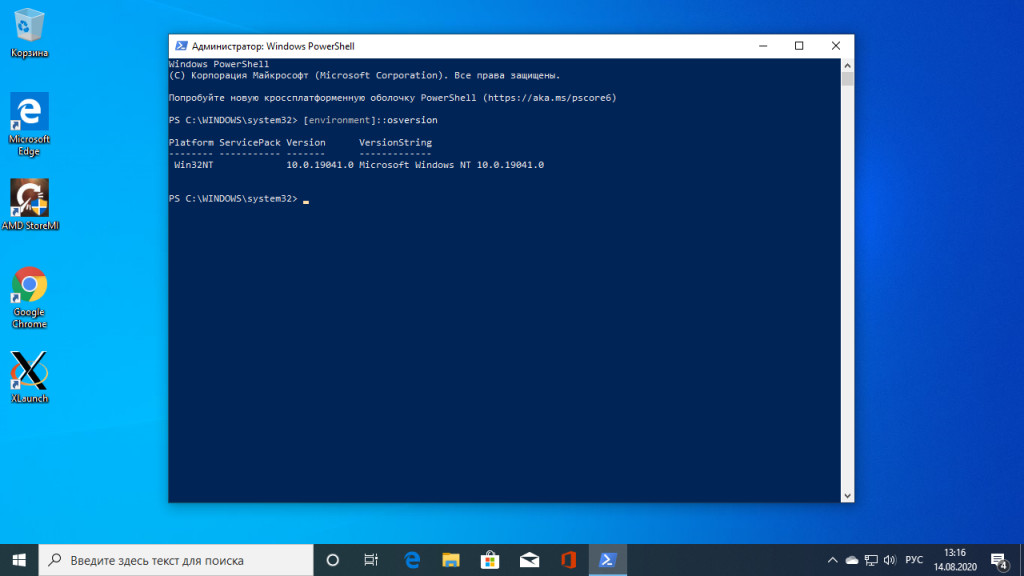
Если отображается версия как на снимке экрана или выше, значит всё хорошо. Иначе идите обновлять систему.
2. Активация WSL и виртуализации
Чтобы активировать компонент Windows Subsystem for Linux можно использовать уже открытую командную строку PowerShell. Для этого выполните:
dism.exe /online /enable-feature /featurename:Microsoft-Windows-Subsystem-Linux /all /norestart
Затем выполните ещё одну команду чтобы включить компонент виртуализации Hyper-V:
dism.exe /online /enable-feature /featurename:VirtualMachinePlatform /all /norestart
Когда эта работа будет выполнена перезапустите компьютер, чтобы все компоненты установились.
3. Активация WSL 2
Чтобы установить WSL 2 необходимо скачать пакет с новым ядром с официального сайта Microsoft. Кликните по ссылке download the latest WSL2 Linux kernel:
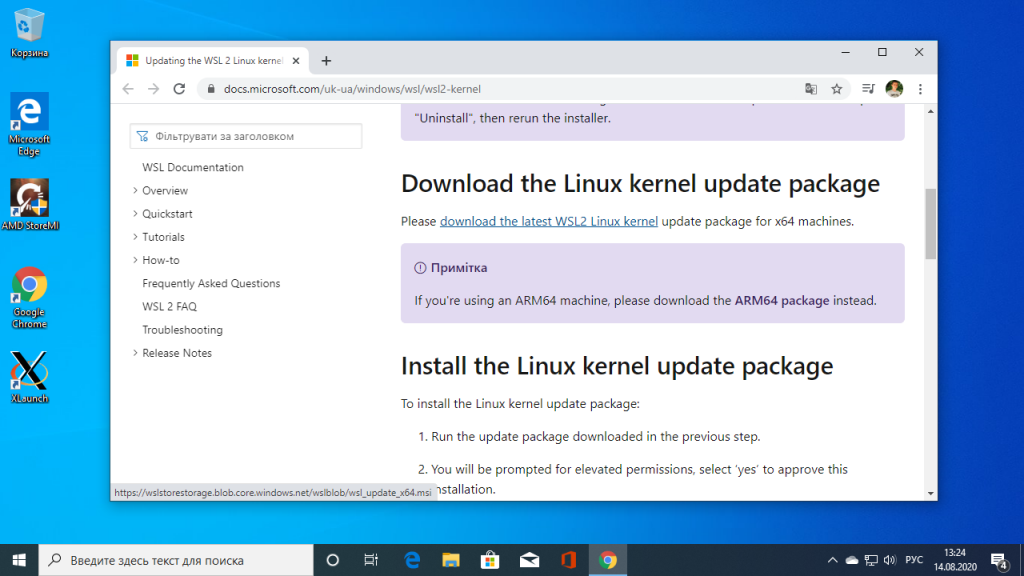
Затем установите загруженный файл:
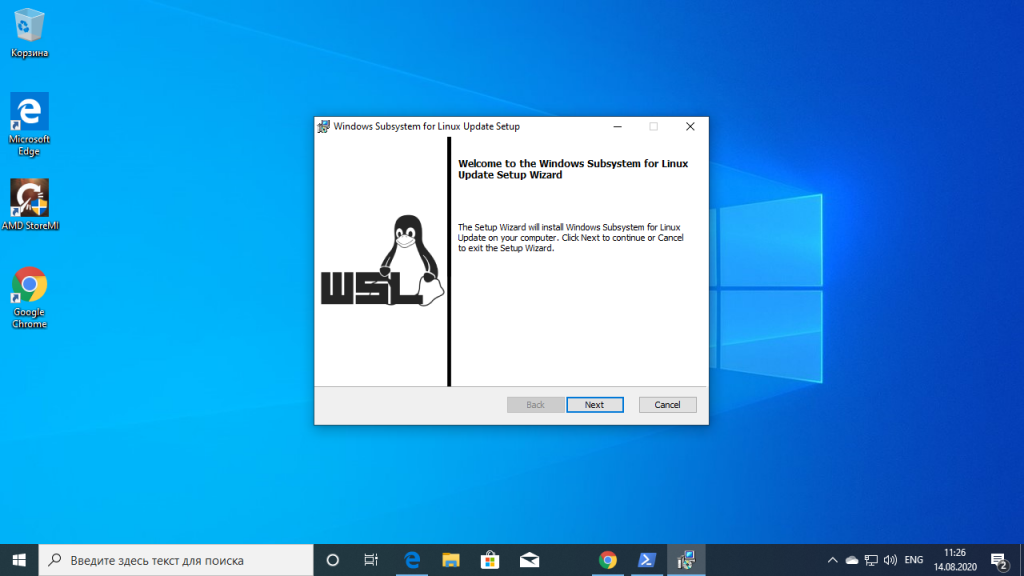
Чтобы всегда по умолчанию использовалась версия WSL 2 необходимо выполнить такую команду:
wsl --set-default-version 2
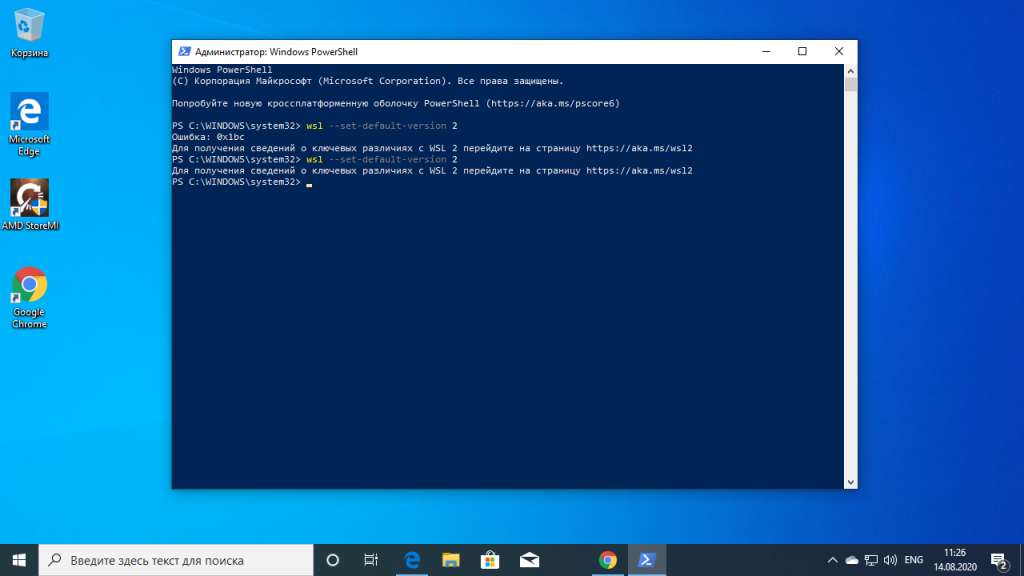
Если вы всё же получаете ошибку, с сообщением о том, что такой опции у этой команды нет, значит у вас старая версия Windows, обновляйте. Если команда не выдала ошибки — значит настройка WSL завершена успешно.
4. Установка Linux
Далее вам надо установить какой-либо дистрибутив Linux из магазина Microsoft. Достаточно просто открыть магазин и набарть в поиске имя дистрибутива, например Ubuntu, затем нажмите кнопку Get:
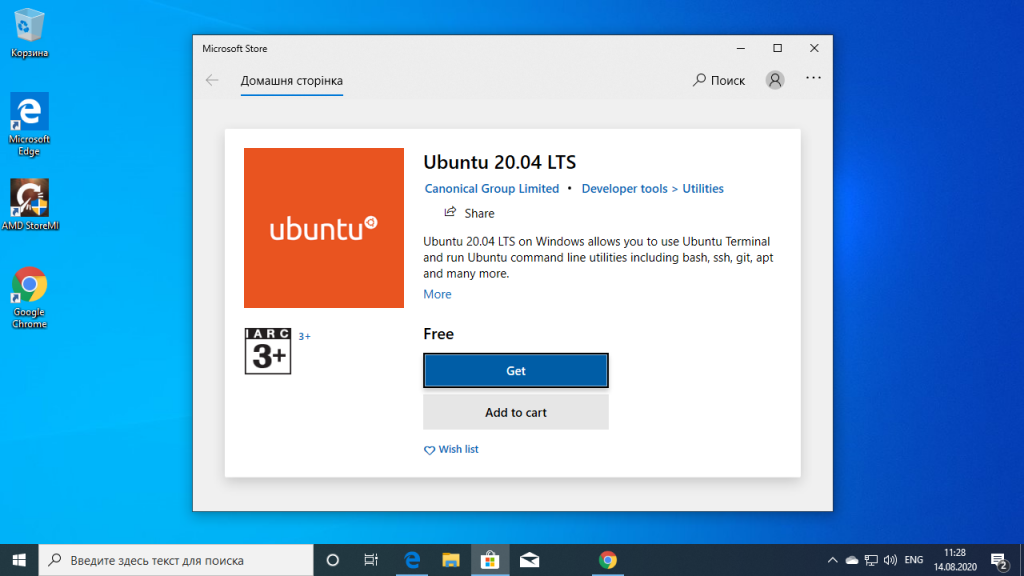
Дождитесь завершения установки и запустите загруженный дистрибутив из главного меню:
5. Настройка дистрибутива
При первом запуске будет выполняться настройка окружения. Вам необходимо указать имя пользователя:
Затем два раза пароль:
После этого вы сможете пользоваться оболочкой Bash в Windows 10:
6. Установка X сервера
Если вы хотите запускать графические приложения из WSL Windows, то вам понадобится установить в систему X сервер. Скачать его можно здесь.
Затем просто установите.
7. Запуск X сервера
После завершения установки на рабочем столе появится ярлык. В первом окне выберите Multipe windows чтобы окна программ, выполняемых на X сервере интегрировались в систему:
Затем выберите, что клиентов запускать не надо — Start no client:
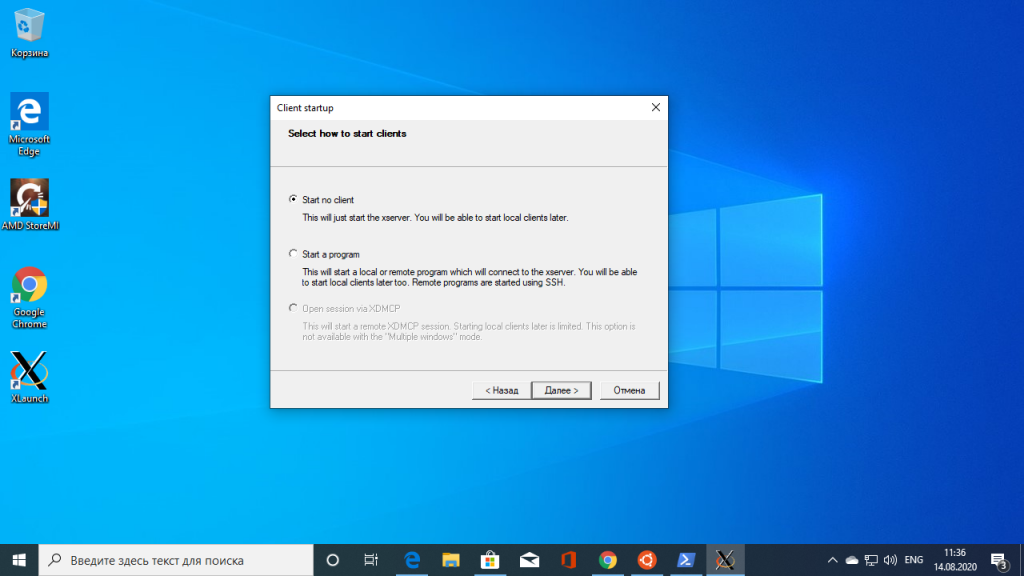
Поставьте все галочки, затем нажмите кнопку Next, а потом Finish для завершения установки.

Брандмауэр Windows тоже попросит разрешить доступ этому приложению в сеть. Надо разрешить.
8. Настройка подключения
Чтобы настроить подключение к X серверу из WSL нужно узнать какой адрес система Windows присвоила WSL окружению, для этого вернитесь к PowerShell и выполните:
ipconfig
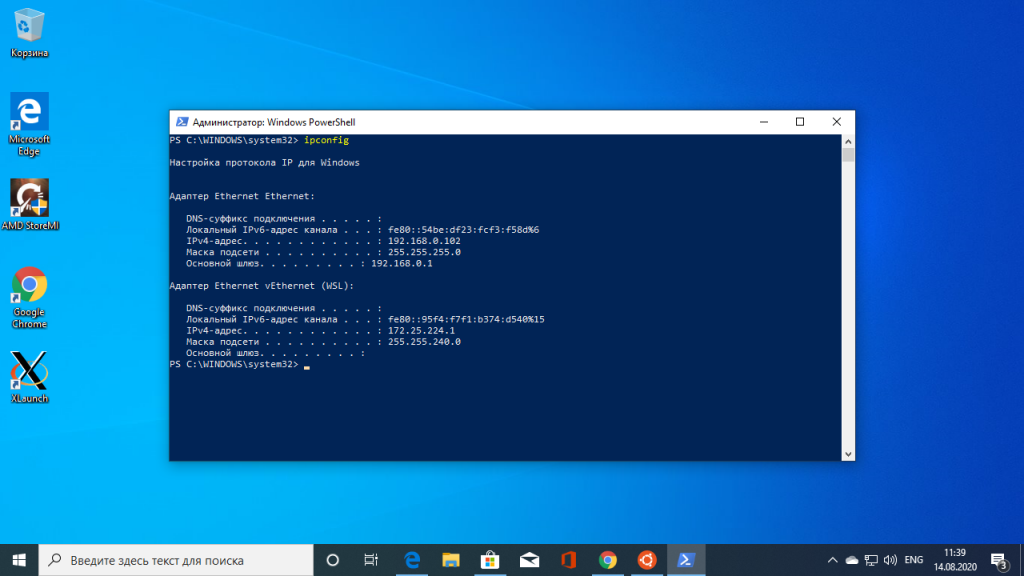
В данном случае это 172.25.224.1. Выполните в окружении дистрибутива такую команду:
export DISPLAY=172.25.224.1:0
Шаг 9. Установка и запуск приложений
Для установки приложений в дистрибутив необходимо сначала обновить списки репозиториев:
sudo apt update
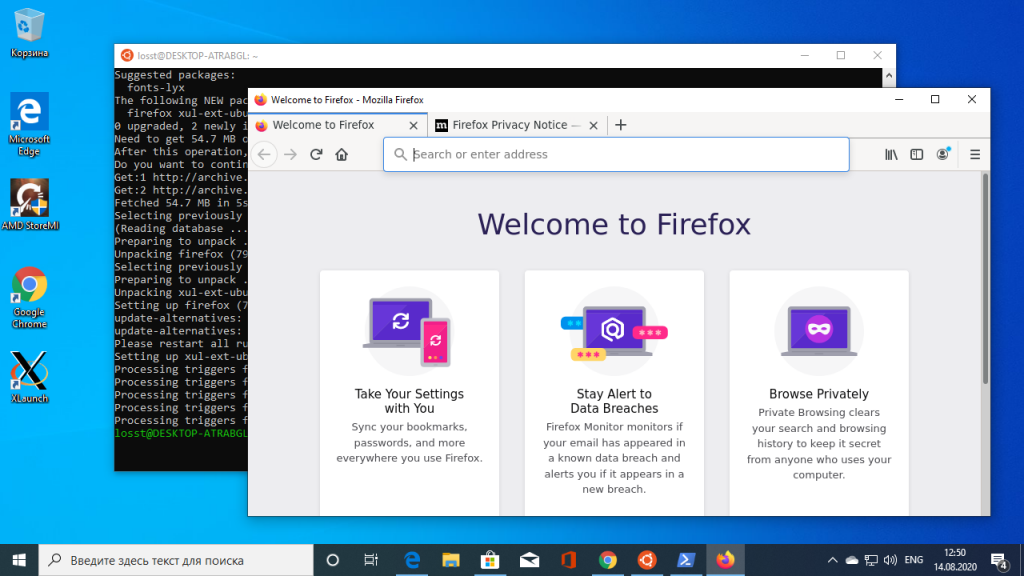
Затем установите графическое приложение, например, Firefox:
sudo apt install firefox
После этого его можно запустить:
firefox
На снимке вы видите графический интерфейс WSL для браузера Firefox, запущенного в Linux:
Использование WSL
Установка WSL Windows 10 завершена. Теперь у вас есть полноценная командная строка Ubuntu в Windows с оболочкой Bash. Поскольку используются одни и те же двоичные файлы, вы можете устанавливать программное обеспечение с помощью apt из репозиториев Ubuntu. Можно установить любое приложение, но не все будут работать.
Если вы раньше уже пользовались Bash в Linux или MacOS, то будете чувствовать себя здесь как дома. Здесь не нужно использовать команду sudo, поскольку у оболочки уже есть права администратора. Ваша файловая система Windows доступна в /mnt/c.
Для управления и перемещения по каталогам используйте те же команды что и в Linux. Если вы привыкли к стандартной оболочке Windows, то вот основные команды, которые вам могут понадобится:
- cd — изменить текущий каталог;
- ls — посмотреть содержимое каталога;
- mv — переместить или переименовать файл;
- cp — скопировать файл;
- rm — удалить файл;
- mkdir — создать папку;
- vi или nano — открыть файл для редактирования.
Важно также понимать, что в отличии от WIndows, оболочка Bash и ее окружение чувствительны к регистру. Другими словами, file.txt и File.txt, это совсем разные файлы.
Для установки и обновления программ необходимо использовать команду apt-get. Вот небольшой список ее параметров:
- apt update — скачать списки программного обеспечения из репозиториев;
- apt install пакет — установить пакет;
- apt search слово — поиск пакета по слову;
- apt upgrade — загрузка и установка последних обновлений дистрибутива.
Не забудьте, что устанавливаемые в этой оболочке программы, ограничиваются по области действия оболочкой. Вы не можете получить доступ к ним из обычной командной строки PowerShell, CMD или в любом другом месте Windows. Также WSL не может напрямую взаимодействовать с исполняемыми файлами Windows, хотя обе среды имеют доступ к одним и тем же файлам на компьютере.
Выводы
Использование Linux в Windows как нельзя лучше подойдёт для разработчиков, но может понадобиться и начинающим пользователям, которые хотят познакомиться с системой. А что вы обо всём этом думаете? Использовали ли когда-нибудь WSL? Напишите в комментариях!

Статья распространяется под лицензией Creative Commons ShareAlike 4.0 при копировании материала ссылка на источник обязательна .
Windows
Установка bash в Windows 10
Дата размещения статьи 27/05/2018 👁1873
Установка bash в Windows 10
В этой статье мы рассмотрим как установить оболочку bash для Windows 10. Для этого нам нужно включить подсистему Linux для Windows и установить Ubuntu из Microsoft Store.
- узнать версию Windows 10;
- как включить подсистему Linux для Windows;
- обновление WSL до 2 версии
- установка Ubuntu из Microsoft Store;
- установка Nodejs в подсистеме Linux для Windows 10;
- установка Gulp в подсистеме Linux для Windows 10;
- npm: command not found.
Как узнать версию Windows 10
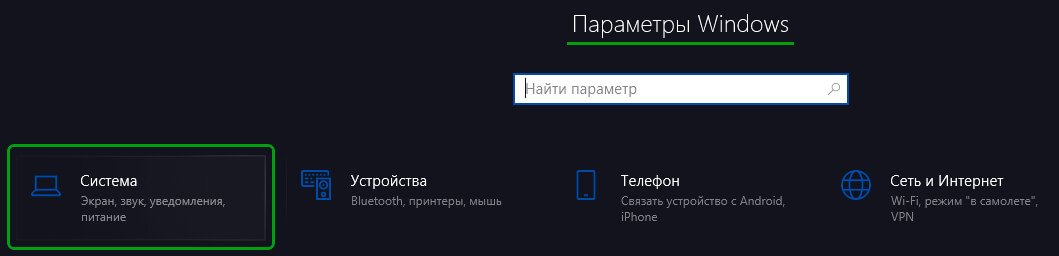
Открываем Параметры Windows нажатием на клавиатуре клавиш Win + I. Выбираем Система.
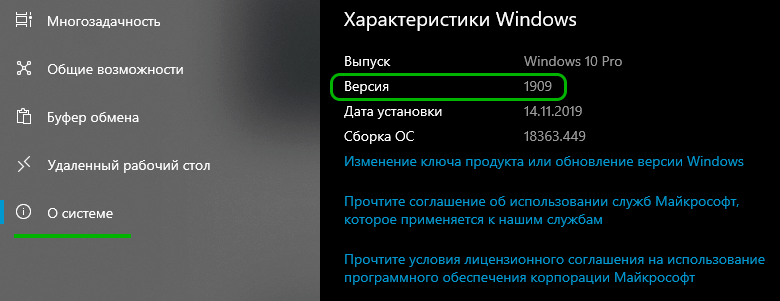
Вкладка О системе. В правой колонке последний заголовок Характеристики Windows.
Как включить подсистему Linux для Windows
Для ОС Windows 10 с обновлениями Fall Creators Update (версия 1709) и новее.
Открыть PowerShell от имени администратора. Для этого нужно нажать правой кнопкой мыши на Windows PowerShell » Дополнительно » Запуск от имени администратора.
Ввести следующую команду:
dism.exe /online /enable-feature /featurename:VirtualMachinePlatform /all /norestartНужно будет нажать Y и на ваш компьютер будут установлены необходимые компоненты.
Перезагрузите компьютер.
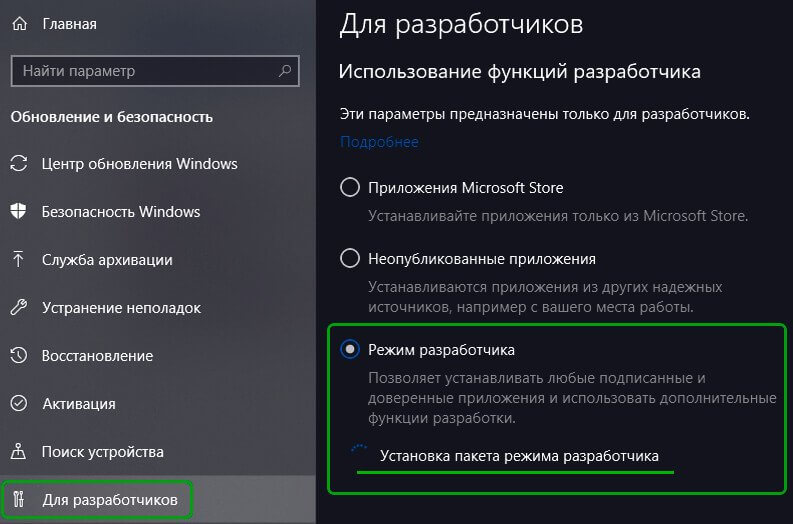
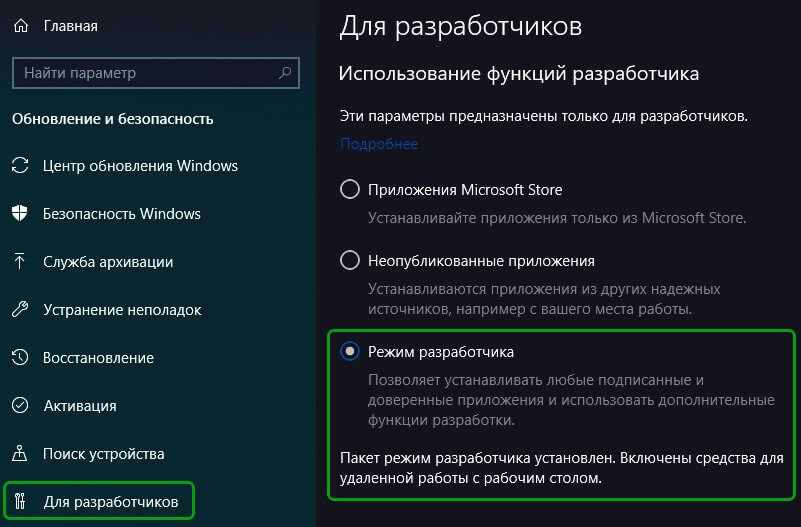
Для десятки версией ниже 1709 открываем Параметры Windows. Для этого нажмём на клавиатуре клавиши Win + I. Выбираем Обновления и безопасность.

Вкладка Для разработчиков. В ней выбираем Режим разработчика.
Установка WSL и обновление до 2 версии
Если у вас Windows 10 версии 2004 и выше (сборка 19041 и выше) или Windows 11, то можете просто использовать команду для установки WSL 2 версии:
Если же версия Windows ниже, то перейдите по ссылке пакет обновления ядра Linux в WSL и скачайте пакет последней версии. Установите его.
Назначим WSL 2 по дефолту, введя следующую команду в PowerShell:
wsl --set-default-version 2Установка Ubuntu
Сначала установим Ubuntu для Windows 10 из Магазина Майкрософт — это позволит интегрировать ОС Ubuntu внутрь нашей Windows. Благодаря этому мы сможем пользоваться bash оболочкой.
Для установки Ubuntu зайдём в Пуск » Все приложения и выберем Microsoft Store. В строке поиска введём Ubuntu. Выберем её и нажмём получить.
После того как скачали Ubuntu запустим его. Ждём несколько минут, пока он установится. Далее, нужно придумать пользователя и пароль для системы Ubuntu. При вводе пароля видно его не будет (как будто мы его не вводим).
Далее, для обновления списка пакетов программного обеспечения до последних версий введём следующую команду:
- sudo — означает с правами администратора
- apt-get — команда для управления пакетами (установка, удаление, обновление пакетов)
- update — обновление списков пакетов ПО
Чтобы открыть bash, в строке поиска Windows введём bash и нажмём на него.
Или откроем необходимую папку и с нажатой клавишей shift. Нажмём правой кнопкой мыши и в контекстном меню выберем Откройте здесь оболочку Linux. Если увидите знак доллара, значит мы теперь используем bash.
Как установить Nodejs в подсистеме Linux для Windows 10
Откроем bash. Перейдём в домашнюю папку.
Далее установим nodejs (на примере 16 версии)
curl -sL https://deb.nodesource.com/setup_16.x | sudo -E bash -sudo apt-get install -y nodejsNodejs в подсистеме Linux системы Windows установлен.
Установка Gulp в подсистеме Linux для Windows 10
Выполните команду:
sudo npm i -g gulp rimrafNpm: command not found
При ошибке npm: command not found выполните следующую команду:
Автоматическое обновление страницы с помощью browser-sync для Gulp Плавный скролл до элемента
Надеюсь, вам понравилась данная информация. Если вам интересна тема web-разработки,
то можете следить за выходом новых статей в Telegram.
- Локальная сеть через WI-FI
- Проверьте действительность вашей лицензии ESET
- Временная шкала Windows 10
- Отключение автоматического обновления Windows 10
- Как удалить шрифты в windows 10
- Как Отключить Рекламу в Торрент
There is no doubt, Linux is one of the most powerful operating systems, which comes with a great comment line or Terminal, and it is more powerful than the GUI itself. But despite the power of Linux, the popularity and market share of Windows is always at the top, at least for personal and office computers. But most enterprise users use Linux, as it is open source. Most of the machines, which are run on Azure Cloud use Linux, and it is enough to make Microsoft understand its position in the enterprise market. To integrate the power of Linux within Windows, Microsoft has brought the native support for Bash on Windows 10, which can help the Windows 10 users execute a number of common line tasks from Windows itself. Yes, it is pretty cool.
But Microsoft was sure, most people will not need the Bash shell, and thus, it is not available to all the users, by default. Yes, you got it right. Most people who do everyday tasks on the computer, or use a computer for the purpose of gaming and entertainment will hardly use Bash shell. Even you can use Bash for Windows 7 with a different piece of software, but on Windows 10, you will not need any third-party software, as a Windows bash commands can easily be executed from the Windows Command Prompt. Without discussing further, let’s find out how to get bash on Windows 10, with some simple steps, which are yet easy to execute.
The steps to install Bash
There is no requirement of Bash download, to run Ubuntu in Windows 10, as it is already present. Though, some downloads will be necessary later on.
Step 1: Go to Start menu, and open ‘Settings’.
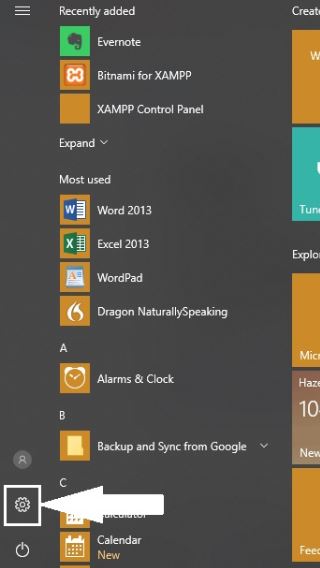
Step 2: Click on ‘Update & Security’.
Step 4: Developers option
On the left side, you can find the option saying ‘For developers’. Click on that.
Step 5: Developer Mode
Check the option saying ‘Developer mode’. You will get a message. Just hit the ‘OK’ button to continue.
Now it the time to close the ‘Settings’ app, and open ‘Control Panel’. On Windows 10, you can hit the ‘Start’ button, type ‘cpl’, and hit the enter key, to open the Control Panel.
Step 6: Programs and Features
Now open ‘Programs and Features’, and on the left panel, you can find an option saying ‘Turn Windows features on or off’.
Step 7: Windows Subsystem for Linux
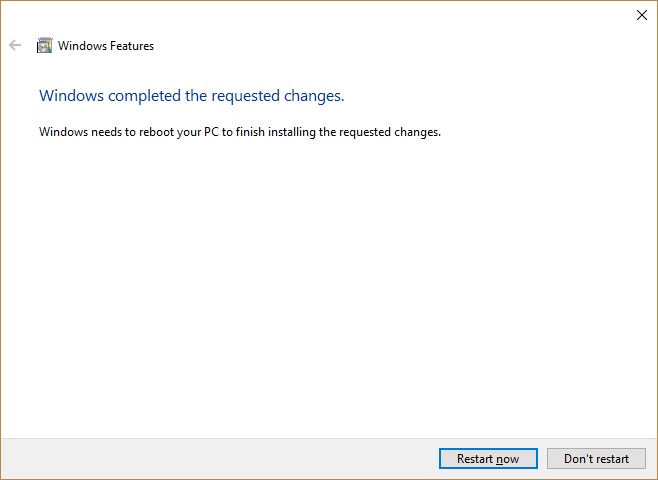
You will have to scroll down a little bit unless you find the option saying ‘Windows Subsystem for Linux’. Just mark it, and hit the OK button. The installation of the components will start and will take some time.
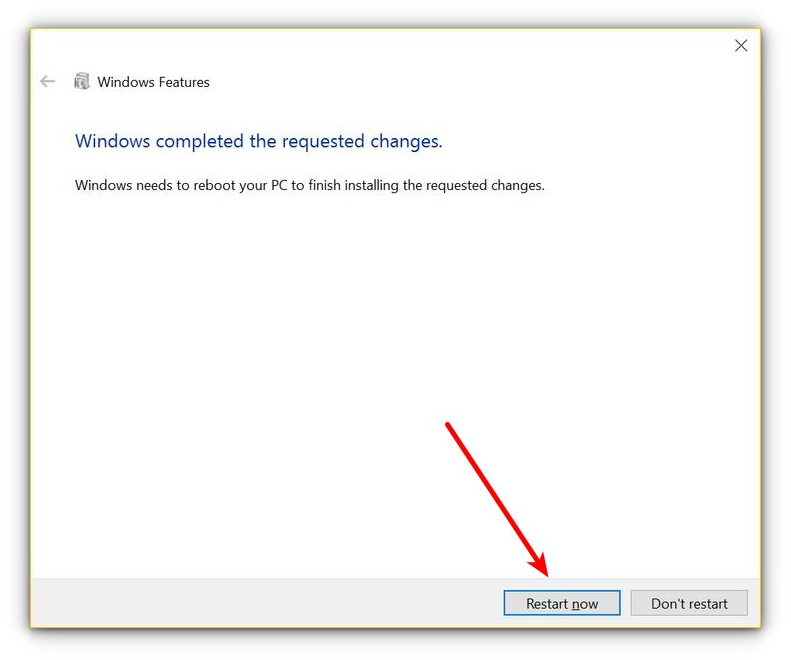
Once the installation is complete, you will be asked to restart your computer. Just hit the ‘Restart now’ to restart the computer right now, or hit ‘Don’t restart’, if you want to restart it later on.
After the computer restarts, which might take some time, as it will install the updates, go to ‘Microsoft Store’, and search for your preferred distribution of Linux. Ubuntu being my favorite, I will use Bash to run Ubuntu on Windows 10. You can even install Linux on Windows 10 with other distributions like OpenSUSE, Debian, Kali Linux, and many others.
I don’t think, I will have to elaborate the process of installing an app from the Windows Store. Thus, once the installation is complete, you will have to launch the Linux app, which will be Ubuntu for me. In the image below, you can even find a number of other Linux distributions, which can be used with the aid of Bash. You can even use other distributions if you need.

Initializing Ubuntu Command Line for Windows 10 using Bash
On starting, you will get the following screen. The installation will take a few seconds, or even minutes, depending on your system.
Now you will have to enter a new username, which is ‘sarbasish’ for my case. After that, hit the enter key, and enter your desired password. After that, you will get the following prompt, and once you get that, the installation is complete. (In the case of entering the username and the password, you do not necessarily need to enter the same username and password, which is associated with your Windows computer).
Linux Terminal commands execution on Windows 10

Now all the Linux Terminal commands can be executed on Windows 10.
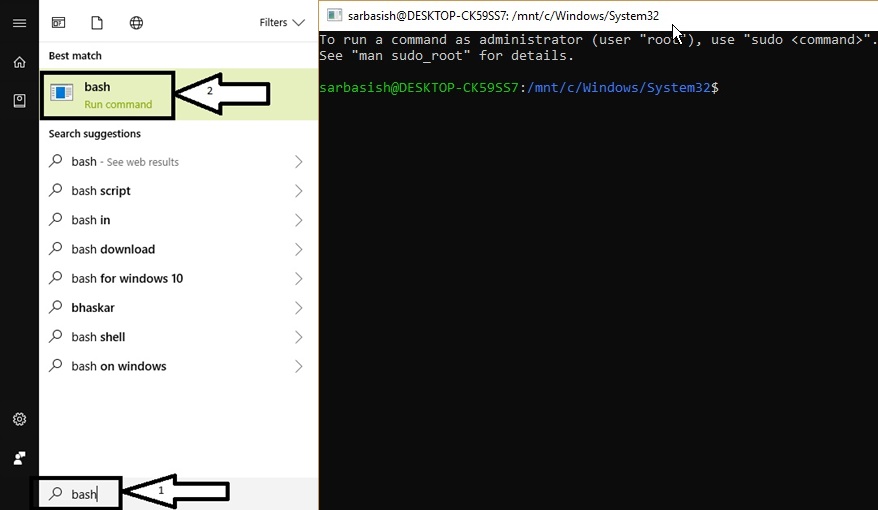
You can even get the same user interface by searching for Bash on ‘Start’.
Some basic tips for Bash on Windows 10
The installation is complete. Now, let’s find out some basic tips, which can be helpful for you at the time of using Windows subsystem for Linux, using Bash.
Once you open Bash, you will be in the default directory, which is ‘/mnt/c/Windows/System32’. Here the directory ‘c’ refers to the C drive, and you can find all the other drives, in the directory ‘/mnt/’.
If some of your commands do not work for you, or some packages can’t be installed, just type ‘sudo apt-get update’, and that will solve the issue in most of the cases. Windows bash packages can be updated with the command, which can be helpful for you.
With the help of Windows 10 Linux subsystem, with the help of Bash, you can get to use all the Linux and Unix commands, and that too on the Windows environment. The Linux subsystems for Windows with Bash is almost the complete Linux, with the absence of the Linux kernel, which is pretty obvious. If you are a developer, the Windows 10 Bash is really going to help you to make your job simpler. The option to install Ubuntu for Windows 10 using virtual machine platforms is always available and always have the option to use that, if the Bash is not working out for you, according to your expectations. If you want to know, how to use Bash on Windows, that is not at all difficult. Just follow the steps above to install Bash, and just use the Linux commands to start using Bash.
Hope, the way to install and use Bash on Windows 10, to use Linux on Windows, was helpful for you. Let me know in the comment section below if you faced any kinds of troubles.
ALSO SEE:
- How to Install Ubuntu on Windows 10 using Virtualbox Virtual Machine
- Tutorial on how to install XAMPP on Windows and Linux to use Marina DB, Perl, and PHP on a localhost
- Install WAMP server for windows 10: Step by Step Tutorial Guide
- Way to Install Java in Ubuntu / Linux mint using Terminal
- Enable Native Windows 10 OpenSSH Client Beta Support