Samsung Android USB Driver for Windows v1.7.59
You need the driver only if you are developing on Windows and want to connect a Samsung Android device to your development environment over USB.
Test Your Apps
Test your Android apps on the latest Samsung Galaxy devices!

Remote Test Lab
Use the Remote Test Lab to remotely access a real device online.

Galaxy Emulator Skin
Check out the new version of Galaxy Emulator Skins.

Foldables & Large Screen
New opportunities for the mobile experience
Boost Your App’s Value with Foldables & Large Screen Optimization
Newsletter
Monthly Newsletter for Samsung Developers
If you don’t currently receive the newsletter, you can subscribe here.
-
Android USB
Производитель:
Google, Inc
Версия:
5.3.24758.042
(22 фев 2022)
Файл *.inf:
android_winusb.inf
Windows Vista, 7, 8, 8.1, 10
-
Android USB
Тип драйвера:
USB
Производитель:
Google Corporation
Версия:
1.0.0020.00000
(11 ноя 2015)
Файл *.inf:
androidusb.inf
Windows Vista, 7, 8, 8.1, 10
В каталоге нет драйверов для Android USB под Windows.
Скачайте DriverHub для автоматического подбора драйвера.
Драйверы для Android USB собраны с официальных сайтов компаний-производителей и других проверенных источников.
Официальные пакеты драйверов помогут исправить ошибки и неполадки в работе Android USB (другие устройства).
Скачать последние версии драйверов на Android USB для компьютеров и ноутбуков на Windows.

Драйвера для Андроид устройств. Драйвера необходимы для того, чтобы ваш Android смог подружиться с компьютером, а также чтобы прошивать его и всячески модифицировать.
>> Инструкция по установке <<
Доступные драйвера Android
Для определенных производителей для некоторых операций необходим Fastboot драйвер. Если в поле Fastboot драйвера нет, значит Fastboot драйвер не нужен!
|
Производитель Android |
Универсальный |
Fastboot |
Alcatel |
официальный сайтскачать |
|
Acer |
скачать |
|
BlackBerry |
скачать |
|
Asus |
скачатьскачать (adb) |
|
Google Nexus/Pixel |
скачать (без установщика)скачать
|
|
Huawei(если не подходит, то MTK) |
скачатьскачать (HiSuite) |
|
HTC |
скачатьскачать (Windows 8-10)скачать (официальный,HTCSynk) |
|
Prestigio |
официальный сайтскачать |
|
LG |
скачать |
|
Samsung |
скачать |
|
Sony |
скачать |
скачать |
ZTE |
скачатьскачать (доп.) |
|
Rockchip |
скачатьскачать |
|
На базе чипов MTK(Mediatek, SP Flash Tool, Китай) |
скачать (официальные)скачать (все, ручная установка)скачать (все, ручная установка)скачать (инсталлятор),скачать (инсталлятор),скачать (zopo) |
|
Lenovo
|
скачать |
|
Spreadtrum |
скачать |
|
На базе чипов Intel |
скачатьскачать |
|
Motorola |
скачать |
|
HighScreen |
скачать |
|
Xiaomi |
скачать |
|
Explay |
скачать |
|
Qualcomm |
скачатьскачать |
|
Keneksi |
скачать |
Универсальные драйверы
Данные драйверы предназначены если возникают проблемы с официальным, компьютер не «видит» устройство, либо если нет в списке вашего производителя.
Универсальный драйвер для многих моделей Android планшетов и смартфонов — Universal_Naked_Driver
Универсальный драйвер для многих моделей Android — Universal_ADB Driver
Универсальный драйвер для многих моделей Android — PdaNet
Универсальный драйвер для многих моделей Android — 15 seconds ADB Installer
Инструкции по прошивки Android различных брендов
Для абсолютно каждого производителя выпускающего Android смартфон и планшет есть собственные программы для прошивки:
Для смартфонов и планшетов SAMSUNG — программа ODIN
Для HTC — Fastboot
Для Sony — Flsahtool (ftf) или Fastboot (img)
Для LG — KDZ Updater
Для устройств на базе RockChip
Для китайских Android смартфонов и планшетов на базе MTK — универсальный прошивальщик
Также существует способ установки прошиваемых архивных-обновлений, так называемых UPDTATE.ZIP
| [Размер файла — 8,42 Mb] | |
| [Размер файла — 14,3 Mb] | |
| [Размер файла — 374 Kb] | |
| [Размер файла — 1,34 Mb] | |
| [Размер файла — 1,31 Mb] | |
| [Размер файла — 14,6 Mb] | |
| [Размер файла — 9,47 Mb] | |
| [Размер файла — 11,1 Kb] | |
| [Размер файла — 10,1 Mb] | |
| [Размер файла — 8,28 Mb] | |
| [Размер файла — 13,1 Mb] | |
| [Размер файла — 8,28 Mb] | |
| [Размер файла — 16,5 Mb] | |
| [Размер файла — 10,5 Mb] | |
| [Размер файла — 9,00 Mb] | |
| [Размер файла — 14,6 Mb] | |
| [Размер файла — 4,41 Mb] | |
| [Размер файла — 8,27 Mb] | |
| [Размер файла — 9,26 Mb] | |
| [Размер файла — 8,39 Mb] | |
| [Размер файла — 17,8 Mb] | |
| [Размер файла — 975 Kb] | |
| [Размер файла — 17,8 Mb] | |
| [Размер файла — 8,65 Mb] | |
| [Размер файла — 428 Kb] | |
| [Размер файла — 10,9 Mb] | |
| [Размер файла — 7,39 Mb] |
Поиск по ID
Android WinUsb ADB Driver v.3.0.0.0 Windows XP / Vista / 7 / 8 32-64 bits

Подробнее о пакете драйверов:Тип: драйвер |
Android WinUsb ADB Driver. Характеристики драйвера
Драйверы USB для подключения к ПК смартфонов на базе ОС Android. Предназначены для автоматической установки на Windows XP, Windows Vista, Windows 7 и Windows 8 32-64 бита.
Версия драйвера:
- android_winusb.inf — v.3.0.0.0 от 10.09.2015
Внимание! Перед установкой драйвера Android WinUsb ADB Driver рекомендутся удалить её старую версию. Удаление драйвера особенно необходимо — при замене оборудования или перед установкой новых версий драйверов для видеокарт. Узнать об этом подробнее можно в разделе FAQ.
Скриншот файлов архива

Файлы для скачивания (информация)
Поддерживаемые устройства (ID оборудований):
| USBVID_12D1&PID_1DF1 | |
| USBVID_12D1&PID_1DF2&MI_01 | |
| USBVID_12D1&PID_1DF3&MI_01 | |
| USBVID_12d1&PID_1DF4&MI_01 | |
| USBVID_18D1&PID_4E12&MI_01 | Google Inc. Nexus One (debug) |
| USBVid_12d1&PID_1DF5&MI_01 | |
| USBVid_12d1&PID_1DF9&MI_02 | |
| USBVID_12D1&PID_2001 | |
| USBVID_12D1&PID_2002&MI_01 | |
| USBVID_12D1&PID_2003&MI_01 | |
| USBVID_12d1&PID_2004&MI_01 | |
| USBVid_12d1&PID_2005&MI_01 | |
| USBVid_12d1&PID_2009&MI_02 | |
| USBVID_12D1&PID_36DD | |
| USBVID_12D1&PID_3A0D | |
| USBVID_12D1&PID_360F&MI_01 | |
| USBVID_12D1&PID_360E&MI_01 | |
| USBVID_12d1&PID_3650&MI_01 | Huawei Incorporated USB COM 1.0 |
| USBVid_12d1&PID_1DF3&MI_01 | |
| USBVID_12D1&PID_3611&MI_02 | |
| USBVID_12D1&PID_3A0B&MI_01 | |
| USBVID_12D1&PID_3A11&MI_02 | |
| USBVID_12D1&PID_3A13&MI_01 | |
| USBVID_18D1&PID_DDDD | |
| USBVID_18D1&PID_D00D | Google, Inc. Android Bootloader Interface |
| USBVID_18D1&PID_D00D&MI_01 | Google, Inc. Android Bootloader Interface |
| USBVID_05c6&PID_9018&MI_01 | Qualcomm, Inc. Qualcomm HSUSB Device |
| USBVID_05c6&PID_9025&MI_01 | Qualcomm, Inc. Qualcomm HSUSB Device |
| USBVID_05c6&PID_9029&MI_01 | |
| USBVID_05c6&PID_9031&MI_02 | |
| USBVID_05c6&PID_9037&MI_02 | |
| USBVID_05c6&PID_9035&MI_02 | |
| USBVID_05c6&PID_9039&MI_01 | |
| USBVID_05c6&PID_902D&MI_03 | |
| USBVID_05c6&PID_901D&MI_01 | ALCATEL Incorporated USB Composite Device 901D |
| USBVID_05c6&PID_903B&MI_02 | |
| USBVID_18D1&PID_0D02 | Google Inc. Celkon A88 |
| USBVID_18D1&PID_0D02&MI_01 | Google Inc. Celkon A88 |
| USBVID_18D1&PID_4E11 | Google Inc. Nexus One |
| USBVID_18D1&PID_4E12&MI_01 | Google Inc. Nexus One (debug) |
| USBVID_18D1&PID_4E21 | Google Inc. Nexus S |
| USBVID_18D1&PID_4E22&MI_01 | Google Inc. Nexus S (debug) |
| USBVID_18D1&PID_4E23 | Google, Inc. Android ADB Interface |
| USBVID_18D1&PID_4E24&MI_01 | Google Inc. Nexus S (tether) |
| USBVID_18D1&PID_4E40 | Google Inc. Nexus 7 (fastboot) |
| USBVID_18D1&PID_4E42&MI_01 | Google Inc. Nexus 7 (debug) |
| USBVID_18D1&PID_4E44&MI_01 | Google Inc. Nexus 7 2012 (PTP) |
| USBVID_18D1&PID_2C10 | |
| USBVID_18D1&PID_2C11 | |
| USBVID_18D1&PID_4EE0 | Google Inc. Nexus 4 (bootloade r) |
| USBVID_18D1&PID_4EE2&MI_01 | Google Inc. Nexus Device (debug) |
| USBVID_18D1&PID_4EE4&MI_02 | Google Inc. Nexus 4/5/7/10 (debug + tether) |
| USBVID_18D1&PID_4EE6&MI_01 | Google Inc. Nexus 4/5 (PTP + debug) |
| USBVID_18D1&PID_4EE7 | |
| USBVID_18D1&PID_9001 | |
| USBVID_18D1&PID_9001&MI_01 | |
| USBVID_18D1&PID_4D00 | |
| USBVID_18D1&PID_4D02&MI_01 | |
| USBVID_18D1&PID_4D04&MI_02 | |
| USBVID_18D1&PID_4D06&MI_01 | |
| USBVID_18D1&PID_4D07 | |
| USBVID_12D1&Subclass_42&Prot_01 |
Другие драйверы от Microsoft
Сайт не содержит материалов, защищенных авторскими правами. Все файлы взяты из открытых источников.
© 2012-2023 DriversLab | Каталог драйверов, новые драйвера для ПК, скачать бесплатно для Windows
kamtizis@mail.ru
Страница сгенерирована за 0.062929 секунд
![]()
![]() Driver Booster Free 10.2.0.110
Driver Booster Free 10.2.0.110
IObit Driver Booster — полезная программа, автоматически сканирующая и определяющая драйвера на ПК….
![]() DriverPack Solution 17.11.106 (Online)
DriverPack Solution 17.11.106 (Online)
DriverPack Solution — пакет, состоящий из наиболее актуальных драйверов для всевозможных конфигураций ПК, а также для разнообразных моделей ноутбуков…
![]() Snappy Driver Installer 1.22.1 (R2201)
Snappy Driver Installer 1.22.1 (R2201)
Snappy Driver Installer — программа для поиска и установки драйверов. Предлагает пользователю…
![]() Display Driver Uninstaller 18.0.6.0
Display Driver Uninstaller 18.0.6.0
Display Driver Uninstaller — бесплатная программа для удаления из системы драйверов видеокарт NVIDIA и AMD….
![]() Microsoft .NET Framework 3.5 SP1 (Full Package)
Microsoft .NET Framework 3.5 SP1 (Full Package)
Microsoft .NET Framework — набор библиотек и системных компонентов, которые необходимы для работы приложений, основанных на архитектуре .NET Framework…
![]() Microsoft .NET Framework 4.7.1 / 4.7.2
Microsoft .NET Framework 4.7.1 / 4.7.2
Microsoft .NET Framework — набор библиотек и системных компонентов, наличие которых является…
Google USB Drivers are required to connect Google Pixel or Nexus devices to Windows PC using a USB cable. You will need these drivers to transfer files or sync data on your Pixel/Nexus device, and especially when working with the Android ADB and Fastboot tools.
You can download the latest Google USB Drivers from here and follow the instructions on how to manually install them on your Windows PC. Furthermore, we have also provided instructions on how to modify the ‘android_winusb.inf‘ file included in the drivers to support other Android devices.
Normally, the said USB drivers come bundled with SDK Manager in the Android Studio IDE, which is constantly updated with the latest available drivers. But if you’re an average Android user, chances are that you might not have the IDE set up on your PC. That’s because it is used mostly by experienced developers and enthusiasts. In that case, you can use the standalone USB drivers, which as provided directly by Google for users who might face issues of Windows not recognizing their phone over a USB connection.
Google USB drivers also act as ‘Android ADB and Fastboot Drivers‘ that allow your computer to communicate with your Android device over the Android Bootloader Interface (Fastboot Mode) as well as Android Composite ADB Interface. So you can install them on your PC to use ADB (Android Debug Bridge) for debugging apps and ROMs, boot your device into Bootloader/Recovery modes, or use Fastboot to unlock the bootloader and flash factory images on your Pixel/Nexus device.
To sum up, the drivers are useful in various situations. With that in mind, go ahead to download the latest version of the USB Drivers from below and follow the instructions on how to install them on your Windows PC.
Table of Contents
- Download Google USB Drivers
- Direct Download
- Download via Android Studio
- How to Install Google USB Drivers
- On Windows 11 and Windows 10
- On Windows 7 and Windows 8/8.1
- How to Modify Google USB Drivers to Support Other Android Devices
- Step 1: Get the VID and PID of your Android Device
- Step 2: Modify ‘android_winusb.inf’ file
- Step 3: Install the Modified USB Drivers
Download Google USB Drivers
Now, there are two different ways/methods to download the USB driver on Windows. You can either download the Google USB Driver ZIP file manually. Or, you can use the SDK Manager in the Android Studio to download it.
The latter gives an added benefit, that is the SDK Manager will automatically notify you when a newer version is available. The former method, on the contrary, will require you to manually check if a newer driver version is available and download it again.
In our personal experience, downloading the ZIP package directly is easier than using the Android Studio. But the choice is solely up to you. We have covered both the methods below.
Note: If you’re using macOS or Linux, you would not need these drivers.
Direct Download
Just click on the link below to download the Google USB Driver ZIP file to your PC.
- Latest version: usb_driver_r13-windows.zip
- Previous versions:
- usb_driver_r12-windows.zip
- usb_driver_r11-windows.zip
- usb_driver_r10-windows.zip
Once downloaded, extract the ZIP file to a suitable location on your computer. The extracted ‘usb_drivers’ folder should contain the required ‘android_winusb.inf’ driver file.
Download via Android Studio
First of all, make sure that you have downloaded and installed the latest version of Android Studio on your Windows PC. Once you have it installed, follow the instructions below:
Android Studio will now download the Google USB drivers to ‘android_sdkextrasgoogleusb_driver‘ on your PC. Here ‘android_sdk‘ is the folder where the Android SDK is installed on your PC.
How to Install Google USB Drivers
The Google USB Drivers come in the form of an ‘android_winusb.inf‘ setup information file, rather than a Windows executable. So, you will need to manually install it on your Windows PC. The same steps can also be used to upgrade the existing drivers installed on your PC to the latest version available.
Now follow the installation guide below according to the Windows OS version you’re using. It’s quite easy and wouldn’t take more than a minute to install them.
On Windows 11 and Windows 10
To install Google Android USB Drivers on Windows 10, follow the instructions below.
- First, connect your Android device to the PC’s USB port.
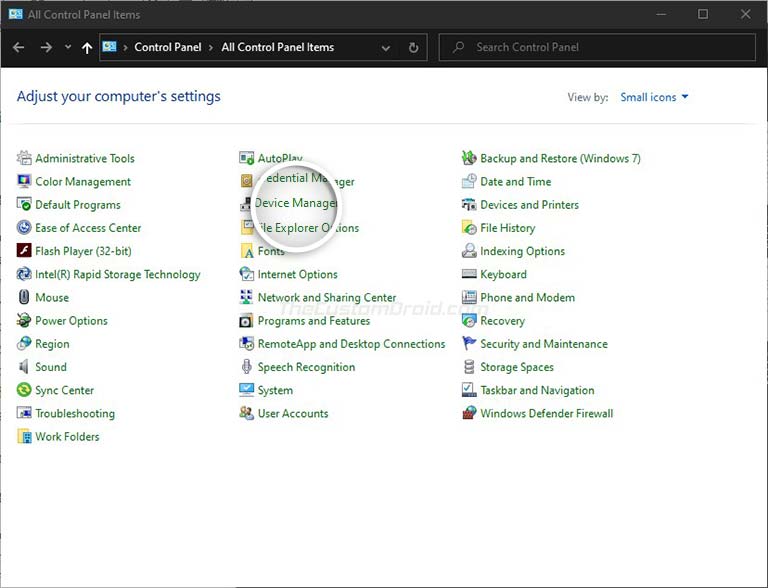
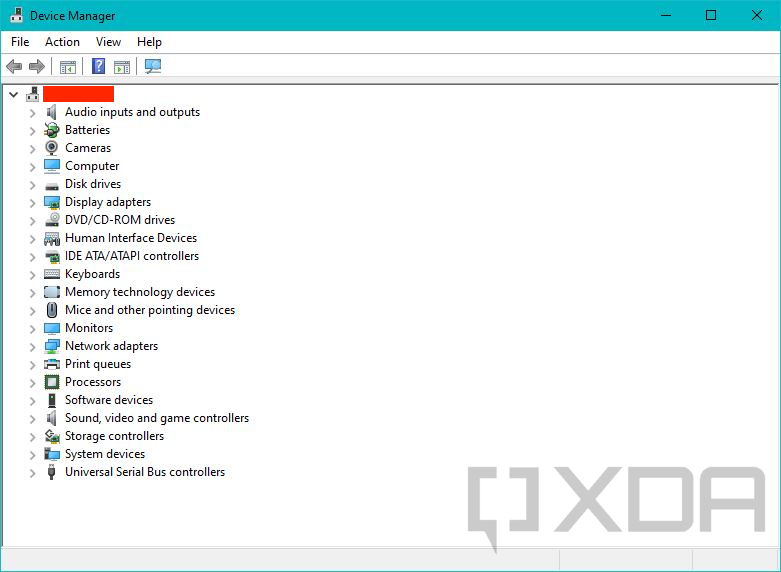
- Go to the ‘Control Panel‘ and click on ‘Device Manager‘.

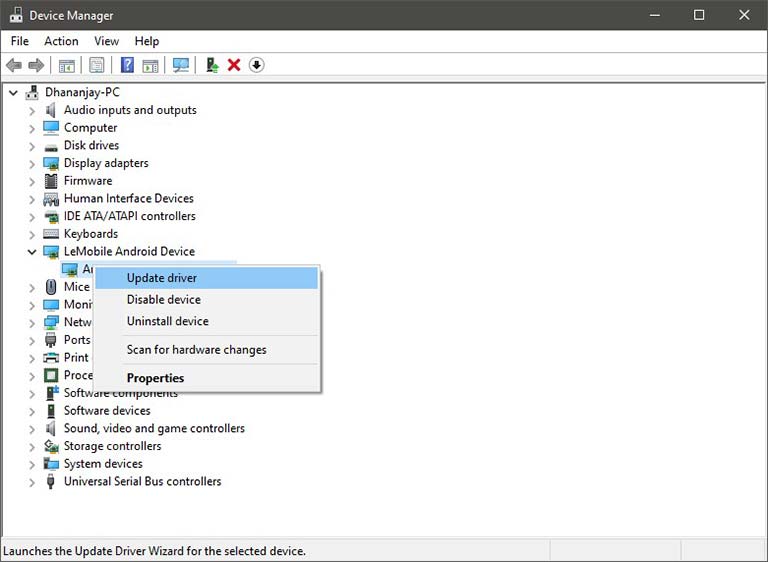
- Double-click on your device category to expand the list of connected devices.
- Right-click on your Android device’s name and click on ‘Update driver‘.

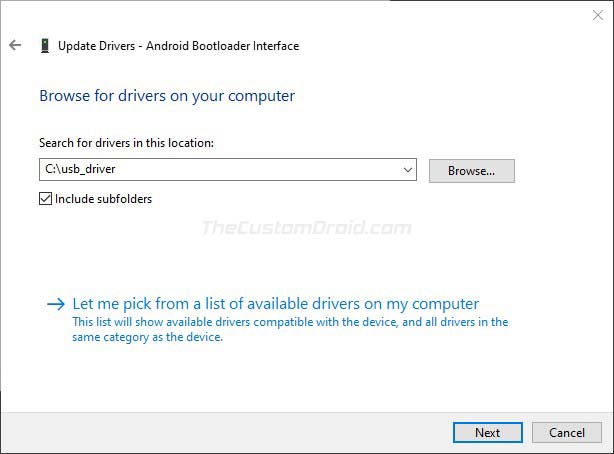
- Click on ‘Browse my computer for driver software‘ in the Hardware Update wizard.
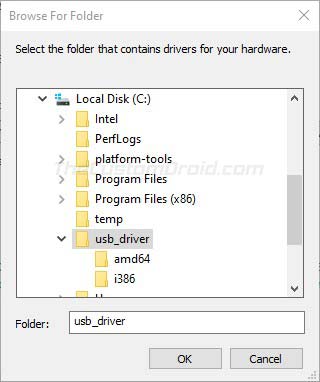
- Click ‘Browse‘ and select the ‘usb_driver‘ folder.
- For example: If you downloaded the drivers using Android Studio, the folder should be located in ‘android_sdkextrasgoogle’ on the PC. Or, if you downloaded the ZIP file, then just locate the extracted ‘usb_driver’ folder.

- For example: If you downloaded the drivers using Android Studio, the folder should be located in ‘android_sdkextrasgoogle’ on the PC. Or, if you downloaded the ZIP file, then just locate the extracted ‘usb_driver’ folder.
- Finally, click ‘Next‘ to install the drivers.

On Windows 7 and Windows 8/8.1
To install Google Android USB drivers on Windows 7, Windows 8, and Windows 8.1 PC, follow the instructions below.
- First, connect your Android device to the Windows PC’s USB port.
- Then right-click on ‘Computer‘ and select ‘Manage‘.
- Select Devices in the left pane.
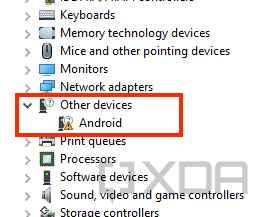
- Double-click on ‘Other device‘ in the right pane to expand it.
- Right-click on the device name (e.g. Google Pixel) and select the ‘Update Driver‘ option.
- Click on ‘Browse my computer for driver software‘ in the Hardware Update wizard.
- Click ‘Browse‘ and locate the ‘usb_driver’ folder.
- Finally, click on ‘Next‘ to install the USB drivers.
You should now have the Google USB Drivers installed. Your Windows PC should now detect and recognize your Android device over the USB connection.
Important Note
If the drivers fail to install even after following the steps, OR the ADB/Fastboot commands do no work even if the drivers are installed, then it could be because you’re using a USB 3.0/3.1/3.2 port or an AMD based PC. This is an issue faced by a lot of users recently.
To fix it, simply try using a USB 2.0 port (If it’s not available, you can also use a USB 2.0 hub) on your PC. Also, try using an Intel-based PC for especially when using ADB/Fastboot tools.
How to Modify Google USB Drivers to Support Other Android Devices
Like we mentioned above, Google USB Drivers also work as ‘ADB Drivers’. But by default, they only support the Google Pixel and Nexus devices.
While Android OEMs do provide their own drivers, but it’s more often than they miss to include the required ADB USB drivers in them. In such cases, you can easily modify the ‘android_winusb.inf’ file in Google USB Drivers to support any other Android device to use the ADB and Fastboot tools.
In order for the drivers to support your non-Pixel/Nexus device, you will first need to acquire the Vendor ID (VID) and Product ID (PID) of your device. Once you have them, the second step is to edit the ‘android_winusb.inf’ file and add a new device section with the VID and PID of your own device. And finally, the third and last step is to install the modified drivers.
Sounds confusing? It’s quite simple actually. Just follow the step-by-step instructions below.
Step 1: Get the VID and PID of your Android Device
- First, connect your Android device to the PC using the USB cable.
- Go to ‘Control Panel‘ > ‘Device Manager‘ on the PC.
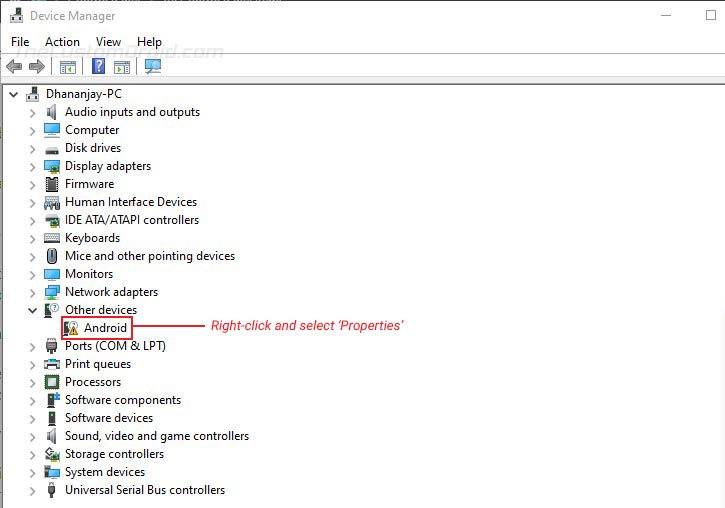
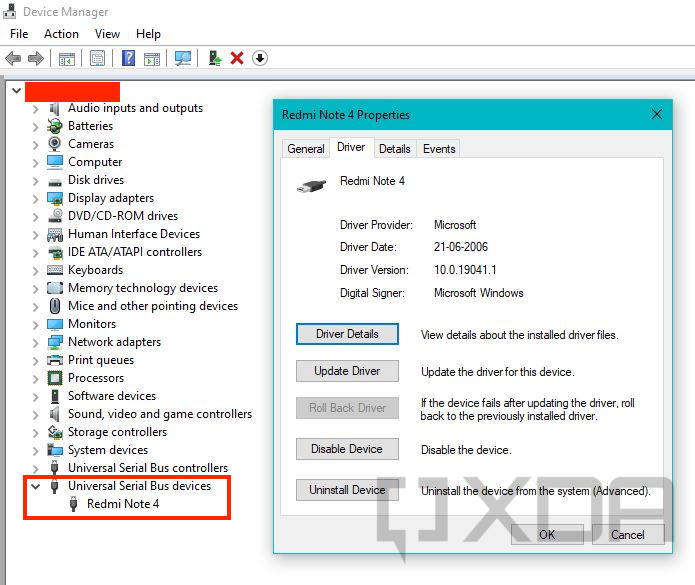
- Locate your unrecognized Android device. An unrecognized device can normally be located under the ‘Universal Serial Bus controllers‘ OR ‘Other devices‘ sections in Device Manager. You would see a yellow-colored triangle warning icon beside the connected device.

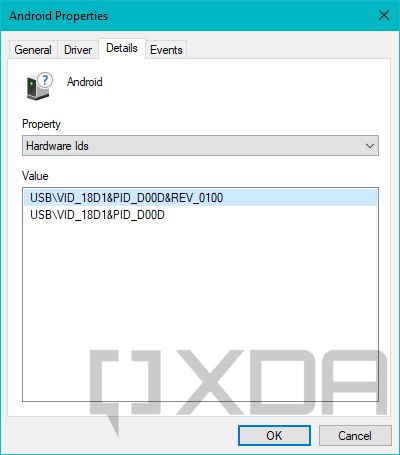
- Right-click on the device name and click on ‘Properties‘.
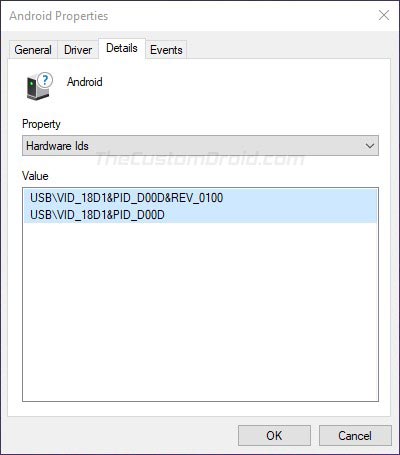
- Go to the ‘Details‘ tab and select ‘Hardware Ids‘ from the dropdown menu.

- You should now see the Vendor and Product IDs of your Android device.
Step 2: Modify ‘android_winusb.inf’ file
Now that you have the required IDs, you can modify/edit the ‘android_winusb.inf’ file to add your device to the supported list.
- First, locate the ‘usb_driver‘ folder on your PC. Inside the folder, you should have the ‘android_winusb.inf‘ file.
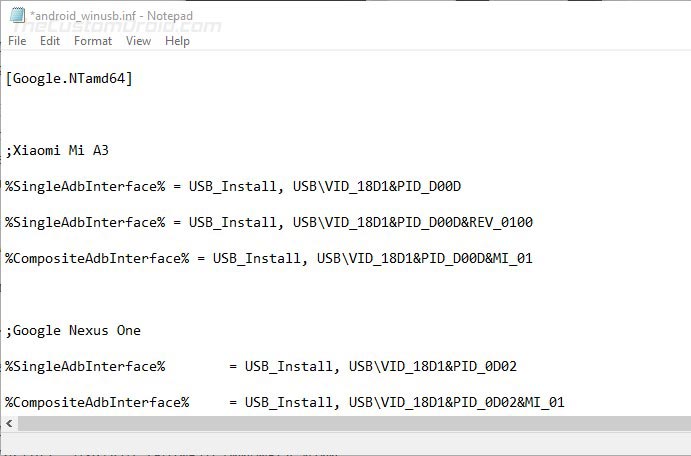
- Open the file using a text editor and locate the ‘[Google.NTx86]‘ section if your Windows PC is 32-bit (x86) or the ‘[Google.NTamd64]‘ section if your Windows PC is 64-bit (x64).
- In the said section, you will see a number of items with the following format:
;[device name]
%SingleAdbInterface% = USB_Install, USBVID_xxxx&PID_xxxx
%CompositeAdbInterface% = USB_Install, USBVID_xxxx&PID_xxxx&MI_xx
- You can copy the above lines into the respective section and edit it accordingly.
- The first thing to do is to replace the ‘[device name]‘ item with your actual device name (Nothing specific, it could be anything).
- Next, you have to add your device’s VID and PID values to the %SingleAdbInterface% and %CompositeAdbInterface% items.
- In case your device also has a REV_xxxx ID, you will need to add two lines for the %SingleAdbInterface% item. One without and another with the REV ID. The line with the REV ID should look like:
USBVID_xxxx&PID_xxxx&REV_xxxx
- For the %CompositeAdbInterface% item, you will further need to add ‘MI_01‘ ID towards the end. With the MI_01 ID, the line should look like:
USBVID_xxxx&PID_xxxx&MI_01
- In case your device also has a REV_xxxx ID, you will need to add two lines for the %SingleAdbInterface% item. One without and another with the REV ID. The line with the REV ID should look like:
- For example, my Xiaomi Mi A3 has a VID and PID as ‘USBVID_18D1&PID_D00D’ & ‘USBVID_18D1&PID_D00D&REV_0100’. In that case, the lines should look like the following:
;Xiaomi Mi A3
%SingleAdbInterface% = USB_Install, USBVID_18D1&PID_D00D
%SingleAdbInterface% = USB_Install, USBVID_18D1&PID_D00D&REV_0100
%CompositeAdbInterface% = USB_Install, USBVID_18D1&PID_D00D&MI_01

Once you have added the lines under the proper section (depending on your PC’s architecture), save the file and exit.
Step 3: Install the Modified USB Drivers
You have now successfully modified the Google USB Drivers to support your Android device. The last step is to install these modified drivers for your device.
Important information:
The android_winusb.inf file is signed by Google and making changes to it (although intentional, such as we did here) will directly affects its digital signature. Once the file has been modified, the “Driver Signature Enforcement” feature of Windows (11/10/8.1/8) will prevent you from installing the modified USB driver.
To bypass this, you will need to temporarily disable Driver Signature Verification by enabling Test Mode. How-to-Geek has a pretty good explanatory piece on how to do it using two different methods.
Thanks Hamid for pointing it out!
Now, to install the modified Google USB drivers: go to ‘Control Panel’ > ‘Device Manager’ and right-click on your device’s name. Then select ‘Update drivers’ to launch the Hardware Update wizard. Click on ‘Browse my computer for driver software’ and select ‘Browse’. Now locate the ‘usb_driver’ folder that contains the modified android_winusb.inf file and select it.
Finally, click ‘Next’ to install the modified drivers for your device. That’s it! Reboot your Windows computer and it should now recognize your Android device over ADB or Fastboot.
Installing the Google USB Drivers is the easiest solution to make your Windows PC successfully recognize your Android device. And while it should work for most other Android devices too, it’s not a hundred percent guaranteed. And if this happens, you may want to install your device’s OEM specific drivers from this page or by clicking your device manufacturer link below.
- Huawei
- Realme
- Samsung
- OnePlus
- LG
- Xiaomi
For low-level firmware flashing, you could also use MediaTek or Qualcomm USB drivers.
If you face any issues installing the drivers on your PC, feel free to ask us through the comments.
Drivers source: Google
Not sure which driver to install for your Android device? We can help. In this guide, we’ll explain how to install the correct USB driver.
Quick Links
- Purpose of Android USB drivers
- Download Android USB drivers for popular OEMs
- How to install Android USB drivers
So you’ve got an Android device and want to dive deep into the world of modding? Be it rooting or installing a custom ROM like LineageOS, most of the aftermarket modding requires you to connect your Android smartphone to a computer using a USB cable so you can use tools like the Android Debug Bridge (ADB) and Fastboot to interact with the device. For an Android power user, you may also want to reinstall the factory firmware on your phone, which means you have to deal with the OEM-specific flashing utilities.
However, none of these tinkering jobs are possible if your PC can’t see the target device in the first place. As in the case of Windows, the operating system may require an additional piece of software known as the «driver» in order to properly recognize all the different connection modes exposed by the Android device. Below you can find a list of official OEM-provided Android USB driver packages and a generic driver installation guide. If you don’t see the maker of your device listed or you see a misplaced link, send a message to Skanda Hazarika (SkandaH on the forums) with the device details.

Purpose of Android USB drivers
The USB interface of an Android device is a pretty complex object. Depending on the configuration, it may expose the standard Android USB debugging interface, the fastboot interface, and various other SoC-specific diagnostic interfaces to the computer. Simultaneously maintaining more than one interface is supported as well, e.g. you can interact with your device with ADB while configuring the internal modem parameters.
Keep in mind the aforementioned scenarios are a bit different from connecting the device through the plain old Media Transfer Protocol (MTP) or Picture Transfer Protocol (PTP) mode. MTP enables the end-user to browse the internal memory on the device from a PC as if it’s an external storage drive. Microsoft ships a generic MTP/PTP driver with every edition of Windows since Windows XP, so you don’t need an external driver for that.
Download Android USB drivers for popular OEMs
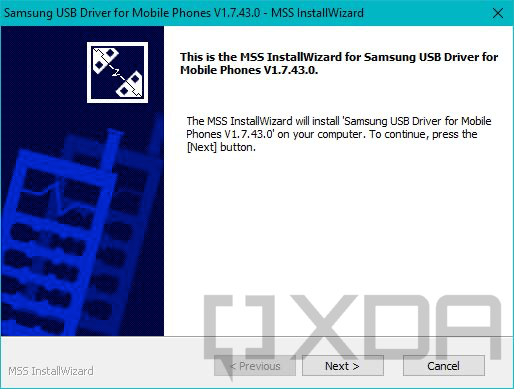
Most Android OEMs offer official driver packages for their devices. Besides the ADB and Fastboot interfaces, these drivers also support proprietary flashing protocols designed by the corresponding device maker. For example, if you want to flash a Samsung Galaxy device, you must install the Samsung USB driver package beforehand.
Note that Microsoft has been shipping a generic ADB driver with Windows for a while, so installing the OEM driver just for the sake of USB debugging might not sound worthwhile anymore. Windows can also check and install the missing drivers on the fly through Windows Update. However, Microsoft-recommended drivers are not always the best choice for complex USB interfaces, so do check out the official driver pack whenever possible.
Get the appropriate driver for your device from the index below:
How to install Android USB drivers
Now that you’ve downloaded the suitable driver package for your device, it’s time for you to install it. Some OEMs offer standard installer executables, which means you can easily install the whole driver suite by double-clicking on the setup file and following the wizard.
However, Google and a few other vendors prefer to stick with the bare INF and associated binary files which are packed inside a ZIP or RAR archive. Such packages need to be installed using Device Manager, but you have to extract the contents of the archive beforehand.
- Right-click on the Start button and select the Device Manager entry. You can also call the Microsoft Management Console snap-in named
devmgmt.mscdirectly from Run to open Device Manager.
- Connect the Android device to your PC. Depending on the selected configuration, you may see one or more unknown devices popping up.
- (Optional) Right-click on the unknown device entry, select Properties, move to the Details tab, and finally select Hardware Ids from the dropdown menu. Now open your favorite search engine, paste the hardware identifier in the search box, and go through the search results. This is a crude way to determine the probable interface your device is currently exposing.
- Right-click on the unknown device entry and select Update drivers. Now select Browse my computer for drivers/driver software and point the wizard to the folder where you extracted the driver package.
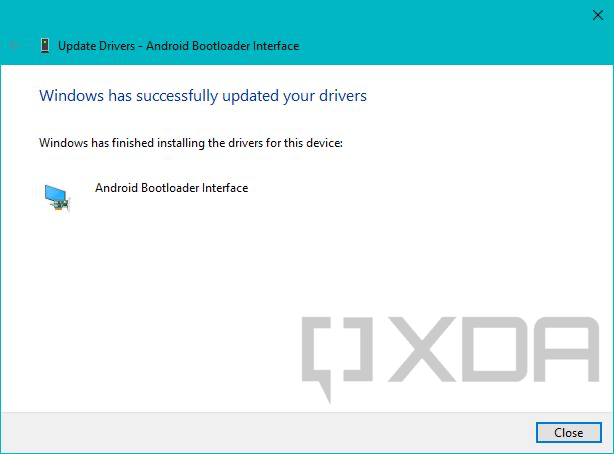
- If everything goes right, you should see a confirmation page like the following.
Manually install the driver for an unsupported device
On some occasions, the OEM drivers aren’t enough. Perhaps you’ve stumbled upon a no-name generic tablet, or the flash mode interface of your shiny new phone has yet to get an official driver from its maker. In that case, you can forcibly install an existing driver package for a similar USB interface through Device Manager.
- Open Device Manager and locate the unknown device entry.
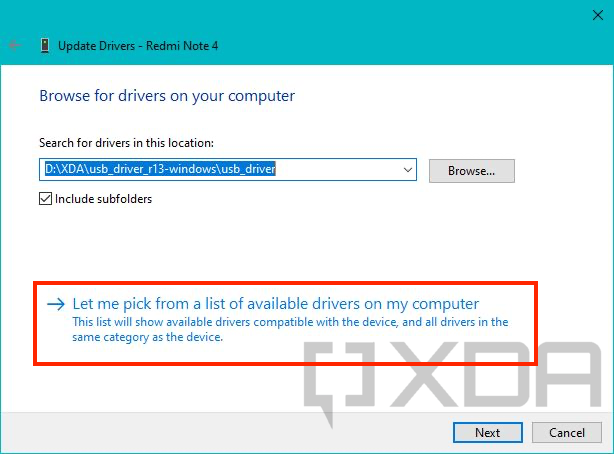
- Right-click on it and select Update drivers. Select Browse my computer for driver software and then choose the option named Let me pick from a list of available drivers on my computer.
- Now select Show All Devices and click Next. On the next screen, click on the Have Disk… button.
- At this point, you need to browse to the location where the extracted driver for a similar device is located. Pick the INF file from the list of files and select Open.

- Now carefully choose the driver model. For example, if you’re trying to install the Fastboot mode driver for a device, select the Android Bootloader Interface from Google’s driver set. Windows might show a warning related to compatibility, but you can ignore it and continue the installation process anyway.
- That’s it!
This method lets you force-install a signed driver without breaking its digital signature, so you don’t need to turn off driver signature enforcement on a 64-bit Windows instance.
You’ve now got the correct USB driver installed on your computer and your Android device is ready to receive instructions. Now it’s time to put it all together and run your first ADB command!