Before you proceed to download the software below, see our official installation guide.
Chances are that you’re coming from an outdated tutorial, so it’s recommended to follow the guide above to prevent any issues with the installation.
Windows on Raspberry imager
Download version 2.3.1
See the changelog
Customization options
Requirements:
- a computer with Windows 10 version 1703 or later. (Wine is not supported — see the PE-based installer for other OSes)
- a Raspberry Pi 2 rev 1.2, 3, 4 or 400. (minimum RAM requirement is 1 GB, but it will generally result in poor performance, especially on boards older than Raspberry Pi 4)
-
a good/reliable drive that has at least 8 GB of available space. It can be:
- an SD card (A1 rating is highly recommended; non-A1 rated cards may be too slow)
- an USB device (preferably SSD, or any drive that has decent random I/O speeds).
A slow drive can also cause other issues, besides being a bottleneck.
- a Windows 10 ARM64 build 19041 or newer image (up to Windows 11 version 2022 / build 22621): WIM/ESD, ISO or FFU
Windows on Raspberry PE-based installer
This is not a straightforward wizard tool like the Windows-only imager, so please follow the appropriate guide for it: How to install from other OSes.
Download package version 1.1.0
See the changelog
Customization options
Requirements:
Same as for the Windows-only version, with some exceptions:
- no specific OS required, as long as the tools needed to create the PE-based installer are available or can be compiled for it.
- the Windows ARM64 image can only have the ISO format. The reason for this is that some required files from the ISO cannot be found in the WIM/ESD.
- storage-wise, you need either:
- a drive that has at least 32 GB, for self-installation
- a drive that has at least 8 GB for the installation media, and another destination drive that has at least 16 GB for the OS (e.g.: an USB drive and an SD card)
Boot partition mount utility
Easily mount the boot partition of your Windows on Raspberry installation. Works directly on the Raspberry Pi or another computer.
Download version 1.1.0
PiMon
A simple hardware monitor for your Raspberry Pi running Windows. (https://github.com/driver1998/PiMon)
Download the latest version
See the changelog
Windows images
See the Getting Windows Images guide.
What about FFU images?
FFU images can speed up the deployment process significantly, especially on slow devices. They are not available for download due to legal reasons, but you can safely generate them yourself: How to generate FFU images?
В связи с бурным развитием в последнее время технологий интернета вещей (IoT-технологий) многие компании стали разрабатывать операционные системы (ОС), специально «заточенные» для применения в IoT-технологиях. Одной из таких компаний является Microsoft, которая специально для этих целей выпустила операционную систему Windows 10 IoT core, которая уже успела полюбиться многим энтузиастам в мире электроники. В данной статье мы рассмотрим как установить Windows 10 IoT Core на плату Raspberry Pi и запустить на ней тестовое приложение.

Windows 10 IoT core – это самая маленькая версия операционной системы Windows, разработанная для применения в приложениях интернета вещей (IoT).
Для установки Windows 10 IoT core необходима специальная плата прототипирования, в нашем случае ее роль будет выполнять плата Raspberry Pi с установленной в нее SD картой. Для работы с Windows 10 IoT core понадобится всего лишь подать питание на плату Raspberry Pi, внешних монитора и клавиатуры не понадобятся. Windows 10 IoT core можно скачать и установить на ваш компьютер (мы это рассмотрим далее в статье). После установки Windows 10 IoT core необходимо просто подать питание на плату Raspberry Pi и она автоматически соединится к вашей сети и к вашему компьютеру на Windows. Вы можете писать код программы на Visual Studio и после этого перебрасывать код этой программы удаленно на плату, также вы можете удаленно производить отладку этой программы.
Операционная система Windows 10 IoT имеет сформировавшееся «живое» сообщество пользователей, которое разработало уже достаточно много кодов и проектов в рамках данной системы, среди которых вы легко можете найти прототип для проектируемого вами устройства. Windows 10 IoT core отличается хорошей устойчивостью и стабильностью работы, безопасностью и хорошей масштабируемостью. Для работы с Windows 10 IoT core доступно достаточно большое количество разнообразных электронных плат.
Необходимые компоненты
- Плата Raspberry Pi 2 или выше (купить на AliExpress).
- SD карта объемом не менее 8 Гб.
- Модуль чтения SD карт (или компьютер с таким ридером).
- HDMI кабель.
- Источник питания 5V 2A с разъемом microUSB.
- Монитор с HDMI.
- Мышка и USB клавиатура (опционально).
Установка Windows 10 IoT Core на Raspberry Pi
1. Вначале вам необходимо скачать панель инструментов Windows 10 IoT core на свой компьютер или ноутбук. Мы будем устанавливать эту операционную систему на SD карту с помощью данной панели инструментов. Скачать эту панель инструментов вы можете по следующей ссылке. После скачивания установите ее на свой компьютер.
2. Теперь нам необходимо установить наше устройство в этой панели. Для этого откройте панель инструментов (Dashboard) и нажмите в левой ее части на ссылку Set up a new device (установить новое устройство). Если у вас есть аккаунт Microsoft, то войдите в него, если нет – то нажмите Skip this step (пропустить данный шаг).

3. Вставьте SD карту в модуль чтения SD карт и вставьте его в ваш компьютер. В следующем окне панели инструментов выберите тип устройства (Device type) – Broadcomm, сборку ОС (OS build) – Windows 10 Iot core. Затем выберите свою SD карту, введите имя устройства (device name) и пароль (на свое усмотрение) как показано на приведенном ниже рисунке.
После этого нажмите кнопку Download and install (скачать и установить). Установка займет некоторое время, зависящее от скорости вашего интернет соединения.

После нажатия кнопки Download and install вы увидите прогресс скачивания дистрибутива Windows 10 Iot core и запись его на вашу SD карту.

4. После того как запись Windows 10 Iot core на SD карту будет закончена, выньте SD карту из вашего компьютера и вставьте ее в вашу плату Raspberry Pi. Подключите плату Raspberry Pi к монитору с помощью HDMI кабеля и подайте питание на плату. Установка Windows 10 Iot займет несколько минут. Следуйте инструкциям, которые будут появляться на экране монитора.
5. После этого вы увидите на экране домашнюю страницу Windows 10 IoT Core. На этой странице вы найдете некоторую полезную информацию: IP адрес вашей платы Raspberry Pi, подключенные устройства и т.д.

В левой панели главной страницы Windows 10 IoT Core будет 4 вкладки: Device info (информация об устройствах), Command line (командная строка), Browser (браузер) и Tutorials (обучающие материалы). Также в левом нижнем углу будет кнопка для открытия меню настроек (Settings menu).
На этом установка Windows 10 IoT Core на вашу плату Raspberry Pi будет закончена. Теперь вы сможете управлять работой вашей платы Raspberry Pi из панели настроек Windows 10 IoT на вашем компьютере.
Подключение к Raspberry Pi из панели инструментов Windows 10 IoT на компьютере
1. Откройте панель инструментов Windows 10 IoT на вашем компьютере и выберите в ней вкладку My devices (мои устройства). После этого вы увидите свою плату Raspberry Pi в списке устройств. Убедитесь в том, что плата Raspberry Pi и ваш компьютер подключены к одной и той же Wi-Fi.

Если вы не видите свою плату Raspberry Pi в списке устройств, перезагрузите плату и обновите список устройств в панели настроек Windows 10 IoT.
2. В списке устройств сделайте двойной клик мышкой и откройте окно с устройствами (Open windows device portal) в вашем браузере.

3. Вкладка, которая откроется в вашем браузере, попросит у вас сертификат (credentials) вашей платы Raspberry Pi. Введите в качестве имени пользователя (Username) слово Administrator и пароль, который вы ввели ранее (в процессе установки ОС).
После этого вы увидите окно, показанное на следующем рисунке, на котором будет представлен весь функционал (возможности) по управлению Raspberry Pi с помощью Windows 10 IoT.

4. Вы можете запустить на выполнение демо приложение с помощью встроенного примера кода. Для этого нажмите на Quick-run samples в пункте Apps как показано на рисунке ниже. Вы увидите 4 проекта с доступными для них фрагментами кода.

5. В данной статье мы рассмотрим пример «Hello world». Кликните на иконку этого проекта и затем на кнопку Deploy and run. После этого на экране монитора у вас появится следующая картинка:

Вы можете протестировать работу и других представленных примеров. Для более подробной информации по созданию приложений с помощью Windows 10 IoT core вы можете обратиться к официальной документации компании Microsoft по следующей ссылке.
Видео, демонстрирующее работу проекта
![]() Загрузка…
Загрузка…
1 200 просмотров
Разработчики наконец установили оптимизированную для ARM версию Windows 10 на Raspberry Pi 4 после того, как некоторым людям удалось запустить ее на Raspberry Pi 3 в первой половине 2019 года.
Raspberry Pi 4 и Pi 3 официально поддерживают версию Windows 10 для IoT Core, которая не совпадает с версией Windows 10, которая работает на настольном компьютере, но является упрощенной версией для маломощных компьютерных плат.
Например, Windows 10 IoT Core не позволяет запускать традиционные приложения Win32 или даже загружаться на рабочий стол. IoT позволяет вам запускать одновременно одно приложение UWP, и реальная цель ОС на Pi – запускать небольшие приложения, предназначенные для миниатюрных компьютерных плат.
К счастью, есть новое руководство, чтобы заставить Windows 10 на ARM работать на Pi 3 B + и Pi 4B, используя неподдерживаемую техническую предварительную сборку. В отличие от IoT, Windows 10 on ARM представляет собой ARM-ориентированную версию ОС, которая поставляется с традиционным десктопом и поддержкой приложений Win32 посредством эмуляции.
Разработчику Marcin удалось установить Windows 10 on ARM на Raspberry Pi 4 Model B, и он также опубликовал подробное руководство.
Как установить Windows 10 на Raspberry Pi 4
– Загрузите прошивку UEFI
отсюда
и распакуйте ее на карту MicroSD в формате FAT32.
– Загрузите сборку Windows 10 ARM64
отсюда
. Только сборка 17134 была протестирована, но любая более новая сборка, которая проходит OOBE, также должна быть совместимой.
– Загрузите ISO-компилятор
отсюда
. В соответствии с разработкой, это создаст файл ISO, но вам все равно понадобится файл «install.wim» из «sources».
– Загрузите «Windows на Raspberry»
отсюда
. Оно установит Build 17134 или новее на USB-накопитель, но необходимо выбрать разметку GPT.
После загрузки этих файлов вы должны запустить командную строку и выполнить действия, описанные
здесь
.
Стоит отметить, что некоторые функции Raspberry Pi 4 могут не работать с Windows 10 на ARM. Например, вы можете использовать только USB-порт Type-C для зарядки и OTG. Windows 10 on ARM также ограничивает использование ОЗУ только в 1 ГБ, а драйвер контроллера Broadcom auxspi не работает.
Разработчики также портируют Windows 10 on ARM на телефоны Android, такие как Galaxy S8, OnePlus 6 и Xiaomi Mi Mix.
-
NBHD0720
- Posts: 1
- Joined: Fri Dec 13, 2019 5:09 am
How to Install Microsoft windows 10 IOT on Raspberry PI 4 ?
Hello All,
How to Install Microsoft windows 10 IOT on Raspberry PI 4 ? and It’s possible?
Thanks
-
GlowInTheDark
- Posts: 2331
- Joined: Sat Nov 09, 2019 12:14 pm
Re: How to Install Microsoft windows 10 IOT on Raspberry PI 4 ?
Fri Dec 13, 2019 9:48 pm
I think (emphasis on «think») that the current answer is that it isn’t available for the Pi4 yet.
Poster of inconvenient truths.
Back from a short, unplanned vacation. Did you miss me?
-
trejan
- Posts: 5363
- Joined: Tue Jul 02, 2019 2:28 pm
Re: How to Install Microsoft windows 10 IOT on Raspberry PI 4 ?
Fri Dec 13, 2019 10:21 pm
Don’t hold your breath for Pi 4 support as it looks like Microsoft has abandoned development of Windows 10 IoT Core for Raspberry Pi. They only made a single release for the 3B+ a couple years ago and it was a technical preview.
-
hippy
- Posts: 12951
- Joined: Fri Sep 09, 2011 10:34 pm
- Location: UK
Re: How to Install Microsoft windows 10 IOT on Raspberry PI 4 ?
Sat Dec 14, 2019 1:07 pm
The only supported official Windows 10 IoT releases are for the Pi 2B rev 1.1 and Pi 3B (non-plus).
There was a non-supported technical preview for the Pi 3B+ as noted, which might work on the 2B rev 1.2
There are only ‘less than useless’ responses coming from Microsoft whenever anyone asks about Windows 10 IoT on the 4B so I would guess it isn’t likely to happen.
-
Heater
- Posts: 19295
- Joined: Tue Jul 17, 2012 3:02 pm
Re: How to Install Microsoft windows 10 IOT on Raspberry PI 4 ?
Sun Dec 15, 2019 6:02 pm
Given that Win 10 IOT is not supported by it’s creator I would advise against spending any significant time on developing anything with/for it.
Slava Ukrayini.
-
Redkey
- Posts: 5
- Joined: Fri Jan 10, 2020 4:08 pm
Re: How to Install Microsoft windows 10 IOT on Raspberry PI 4 ?
Fri Jan 10, 2020 4:44 pm
I’ve been investigating installing Windows 10 IOT core on the newest RP4. I have it working well with a RP3 b and I can develop remotely with VS2019 (community edition). I’m able to Program in C# which is what I’m interested in at the moment. Obviously I wish I could update to the latest RP4. I’ve been researching and it seems like Microsoft gave the community a working version of IOT core for the earlier version of the RP and gave us the ability to migrate with a Board Support Package (BSP) https://docs.microsoft.com/en-us/window … -a-new-bsp. I’m guessing that for some of the updates it would be about looking at what has changed in the Raspian files and somehow reflecting those changes in a BSP. The onboard Memory(RAM) might be a new kettle of fish.
Also I noticed that for the last version that Microsoft had working well(RS3B), there was a complete data sheet For the Broadcom part. Maybe getting microsoft to provide an update might be as simple as providing Microsoft with updated documentation, however there may be some NDA issues with Broadcom/raspberrypi.org.
My programming skills are not super strong. Most of my career I did assembly programming for Microchips products, More recently Some C, C++ and C #, the latter in VS2019.
Anyway I’m willing to donate some time to the project, if others are interested in doing the same. Thoughts?
Thanks
Ken
-
Heater
- Posts: 19295
- Joined: Tue Jul 17, 2012 3:02 pm
Re: How to Install Microsoft windows 10 IOT on Raspberry PI 4 ?
Sat Jan 11, 2020 2:33 pm
Redkey,
Anyway I’m willing to donate some time to the project, if others are interested in doing the same. Thoughts?
My thought is to ask why one would want to spend ones time supporting a closed source operating system from one of the worlds richest companies for free?
Slava Ukrayini.
-
fruitoftheloom
- Posts: 27225
- Joined: Tue Mar 25, 2014 12:40 pm
Re: How to Install Microsoft windows 10 IOT on Raspberry PI 4 ?
Sat Jan 11, 2020 2:41 pm
Redkey wrote: ↑
Fri Jan 10, 2020 4:44 pm
I’ve been investigating installing Windows 10 IOT core on the newest RP4. I have it working well with a RP3 b and I can develop remotely with VS2019 (community edition). I’m able to Program in C# which is what I’m interested in at the moment. Obviously I wish I could update to the latest RP4. I’ve been researching and it seems like Microsoft gave the community a working version of IOT core for the earlier version of the RP and gave us the ability to migrate with a Board Support Package (BSP) https://docs.microsoft.com/en-us/window … -a-new-bsp. I’m guessing that for some of the updates it would be about looking at what has changed in the Raspian files and somehow reflecting those changes in a BSP. The onboard Memory(RAM) might be a new kettle of fish.
Also I noticed that for the last version that Microsoft had working well(RS3B), there was a complete data sheet For the Broadcom part. Maybe getting microsoft to provide an update might be as simple as providing Microsoft with updated documentation, however there may be some NDA issues with Broadcom/raspberrypi.org.
My programming skills are not super strong. Most of my career I did assembly programming for Microchips products, More recently Some C, C++ and C #, the latter in VS2019.
Anyway I’m willing to donate some time to the project, if others are interested in doing the same. Thoughts?Thanks
Ken
Microsoft ARM products run Qualcomm SoCs and that is the best way forward at this time in my opinion.
Take what I advise as advice not the utopian holy grail, and it is gratis !!
-
Redkey
- Posts: 5
- Joined: Fri Jan 10, 2020 4:08 pm
Re: How to Install Microsoft windows 10 IOT on Raspberry PI 4 ?
Sat Jan 11, 2020 2:46 pm
I did give this some thought. Microsoft doesn’t charge for commercial use of IOT Core( there is some requirement to allow for updating) or VS2019(Community) and it recently announced 10 years of support for the IOT Core. Raspberry PI is supposed to be open source and , in my opinion should be, OS agnostic. In fact with a bit more documentation one could develop a quick and agile RTOS for very specific use, although it is a bit like reinventing the wheel in most cases. But mostly to leverage the VS2019, it cross compiles all kinds of languages and offers single step debugging to remote target. This makes it easy to build PC apps, android apps and RP4 apps, all at the same time.
-
fruitoftheloom
- Posts: 27225
- Joined: Tue Mar 25, 2014 12:40 pm
Re: How to Install Microsoft windows 10 IOT on Raspberry PI 4 ?
Sat Jan 11, 2020 2:50 pm
Redkey wrote: ↑
Sat Jan 11, 2020 2:46 pm
I did give this some thought. Microsoft doesn’t charge for commercial use of IOT Core( there is some requirement to allow for updating) or VS2019(Community) and it recently announced 10 years of support for the IOT Core. Raspberry PI is supposed to be open source and , in my opinion should be, OS agnostic. In fact with a bit more documentation one could develop a quick and agile RTOS for very specific use, although it is a bit like reinventing the wheel in most cases. But mostly to leverage the VS2019, it cross compiles all kinds of languages and offers single step debugging to remote target. This makes it easy to build PC apps, android apps and RP4 apps, all at the same time.
The Raspberry Pi SBC is not open hardware.
Look at 96Boards if open hardware is a requirement.
https://www.96boards.org/
Microsoft MSDN Forum is a good place to preach your ideals and requirements:
https://social.msdn.microsoft.com/forum … WindowsIoT
Take what I advise as advice not the utopian holy grail, and it is gratis !!
-
Redkey
- Posts: 5
- Joined: Fri Jan 10, 2020 4:08 pm
Re: How to Install Microsoft windows 10 IOT on Raspberry PI 4 ?
Sat Jan 11, 2020 3:07 pm
«The Raspberry Pi SBC is not open hardware.»
I didn’t realize that. I had seen some schematics and some older Data sheets and I assumed that it was. Thanks for the qualcomm suggestion. They do offer some hardware boards that would probably work, but not priced like the RP4. But maybe I have that wrong also. When I was at Microcenter recently, the pricing went up with quantity. (?)
So if I decide not to swim upstream and go with Raspian, what Tool chain and language will I find the most support in?
Thanks
Ken
PS. I have no real love for Microsoft, but they did seem to be making an effort to get a piece of the Pi!
-
fruitoftheloom
- Posts: 27225
- Joined: Tue Mar 25, 2014 12:40 pm
Re: How to Install Microsoft windows 10 IOT on Raspberry PI 4 ?
Sat Jan 11, 2020 3:23 pm
Redkey wrote: ↑
Sat Jan 11, 2020 3:07 pm
«The Raspberry Pi SBC is not open hardware.»
I didn’t realize that. I had seen some schematics and some older Data sheets and I assumed that it was. Thanks for the qualcomm suggestion. They do offer some hardware boards that would probably work, but not priced like the RP4. But maybe I have that wrong also. When I was at Microcenter recently, the pricing went up with quantity. (?)So if I decide not to swim upstream and go with Raspian, what Tool chain and language will I find the most support in?
Thanks
KenPS. I have no real love for Microsoft, but they did seem to be making an effort to get a piece of the Pi!
The Dragonboard 410C is supported by MS:
https://www.arrow.com/en/products/drago … ment-tools
There is no requirement for the Raspberry Pi SBC to be open hardware, Microsoft ( or any other Operating System developer ) have enough information to create an Operating System if they so choose to do so…….
Take what I advise as advice not the utopian holy grail, and it is gratis !!
-
Daniel Gessel
- Posts: 439
- Joined: Sun Dec 03, 2017 1:47 am
- Location: Boston area, MA, US
Re: How to Install Microsoft windows 10 IOT on Raspberry PI 4 ?
Sat Jan 11, 2020 3:51 pm
Redkey wrote: ↑
Sat Jan 11, 2020 3:07 pm
So if I decide not to swim upstream and go with Raspian, what Tool chain and language will I find the most support in?
Based on the board activity here, the fact that ”Pi” intentionally evokes Py(thon) and my own observations, Python is both the best supported and most popular language. I don’t use IDE’s (unless Emacs counts as one) but a few are preinstalled on Raspian so are presumably a good place to start.
I like C, which is pretty well supported but sometimes harder to find code samples to ease development (some of the Python code is fairly sophisticated and takes me a while to understand well enough to translate). But C is the language of the Linux kernel, so support is quite good and the board here is quite active. C++, which I’m not using right now, is also quite popular. Again, I just use Emacs and then gcc to build and link. I have a little Python build script which I find easier to manage than Makefiles for my project tree, but IDE’s can manage C/C++ build processes.
-
Heater
- Posts: 19295
- Joined: Tue Jul 17, 2012 3:02 pm
Re: How to Install Microsoft windows 10 IOT on Raspberry PI 4 ?
Sun Jan 12, 2020 12:45 am
Redkey,
Microsoft doesn’t charge for commercial use of IOT Core( there is some requirement to allow for updating) or VS2019(Community) and it recently announced 10 years of support for the IOT Core.
It charges by virtue of the fact that you need a Windows operating system to develop for it.
Clearly it is the intention of MS that people will us it with their Azure Cloud services, IoT and all that, thus bringing money to them rather than sombody else.
Money aside, I don’t think it’s healthy to have ones computing infrastructure, now including IoT, dependent on one company, which for most is out of their control in a foriegn country.
Raspberry PI is supposed to be open source…
No. The Rasperry Pi is hardware. As such it is no more open source than pretty much all other harware out there. It is dependent on closed source firmware.
It is though operating system agnostic. As evidenced by the fact that ther are about 100 operating systems running on it, including MS IoT and some that asre not Linux based.
In fact with a bit more documentation one could develop a quick and agile RTOS for very specific use, although it is a bit like reinventing the wheel in most cases.
It has been done. More than once. Even without the best documentation.
But mostly to leverage the VS2019,…
Fine idea. If you happy being dependent on MS.
Slava Ukrayini.
-
Redkey
- Posts: 5
- Joined: Fri Jan 10, 2020 4:08 pm
Re: How to Install Microsoft windows 10 IOT on Raspberry PI 4 ?
Mon Jan 13, 2020 6:42 pm
Thanks to everyone who responded and thanks for the great solutions. Here’s a recent headline «NXP releases i.MX 6/7/8 BSPs for Windows 10 IoT Core» . and you’ll find details of the agreement here. https://developer.microsoft.com/en-us/windows/iot. So the Idea of a hardware manufacturer providing a BSP to microsoft isn’t completely outrageous. My only remaining question is if Raspberrypi.org has a reason/desire/principle that makes it not want to provide this development path. Reading the current mission statement, such a release seems in line with the founders , however as was pointed out even though MS tools are free, It does require running a PC with windows which is not free. Having said that, it’s a cost that most of the Pi developers have paid for one reason or another. If the foundation doesn’t want a BSP, I would respect that, but I think they should just come out and say it outright.
Thanks Again
Ken
-
Heater
- Posts: 19295
- Joined: Tue Jul 17, 2012 3:02 pm
Re: How to Install Microsoft windows 10 IOT on Raspberry PI 4 ?
Mon Jan 13, 2020 9:23 pm
Redkey,
So the Idea of a hardware manufacturer providing a BSP to microsoft isn’t completely outrageous.
Quite so.
Manufacturers like NXP are for profit corporations whose mission is to maximize profit. As such we can imagine why they might do such a thing.
The Raspberry Pi Foundation is a a charitable organization with an educational mission. As such I would be disgusted to find they use any of their resources to support a huge and profitable company, in a foreign country.
…it’s a cost that most of the Pi developers have paid for one reason or another.
I you sure about that? There is a lot of Mac users out there. We should not be exclusory.
If the foundation doesn’t want a BSP, I would respect that, but I think they should just come out and say it outright.
Why?
The BSP they supply is Rapbian. All is good.
Slava Ukrayini.
-
Daniel Gessel
- Posts: 439
- Joined: Sun Dec 03, 2017 1:47 am
- Location: Boston area, MA, US
Re: How to Install Microsoft windows 10 IOT on Raspberry PI 4 ?
Mon Jan 13, 2020 9:57 pm
Redkey wrote: ↑
Mon Jan 13, 2020 6:42 pm
My only remaining question is if Raspberrypi.org has a reason/desire/principle that makes it not want to provide this development path.
…
If the foundation doesn’t want a BSP, I would respect that, but I think they should just come out and say it outright.
Providing a “BSP” costs resources which can be better spent on Raspian.
I doubt they would want to stop MS from providing a BSP — they seem pretty open to letting everybody in.
-

Imperf3kt
- Posts: 4675
- Joined: Tue Jun 20, 2017 12:16 am
- Location: Australia

Re: How to Install Microsoft windows 10 IOT on Raspberry PI 4 ?
Mon Jan 13, 2020 10:00 pm
Heater wrote: ↑
Sat Jan 11, 2020 2:33 pm
Redkey,Anyway I’m willing to donate some time to the project, if others are interested in doing the same. Thoughts?
My thought is to ask why one would want to spend ones time supporting a closed source operating system from one of the worlds richest companies for free?
It isn’t rocket science, there is a desire, Microsoft isn’t providing, so «I’ll do it myself» suddenly becomes a viable method to get what one wants.
I’m pretty sure that’s how this thing called «Linux» came to be, there was a desire and the current operating systems weren’t providing, so somebody went and did the work themselves.
55:55:44:44:4C
52:4C:52:42:41
Rose tinted glasses are difficult to see through.
-
GlowInTheDark
- Posts: 2331
- Joined: Sat Nov 09, 2019 12:14 pm
Re: How to Install Microsoft windows 10 IOT on Raspberry PI 4 ?
Tue Jan 14, 2020 12:04 am
I’m pretty sure that’s how this thing called «Linux» came to be, there was a desire and the current operating systems weren’t providing, so somebody went and did the work themselves.
I thought it was just that some guy was casting about for an idea for a master’s thesis, and heard about this thing called Minix.
The rest, they say, is history.
Poster of inconvenient truths.
Back from a short, unplanned vacation. Did you miss me?
-
Imperf3kt
- Posts: 4675
- Joined: Tue Jun 20, 2017 12:16 am
- Location: Australia
Re: How to Install Microsoft windows 10 IOT on Raspberry PI 4 ?
Tue Jan 14, 2020 12:37 am
Not according to Wikipedia.
MINIX’s 16-bit design was not well adapted to the 32-bit features of the increasingly cheap and popular Intel 386 architecture for personal computers. In the early nineties a commercial UNIX operating system for Intel 386 PCs was too expensive for private users.
These factors and the lack of a widely adopted, free kernel provided the impetus for Torvalds’ starting his project. He has stated that if either the GNU Hurd or 386BSD kernels had been available at the time, he likely would not have written his own.
55:55:44:44:4C
52:4C:52:42:41
Rose tinted glasses are difficult to see through.
-
hippy
- Posts: 12951
- Joined: Fri Sep 09, 2011 10:34 pm
- Location: UK
Re: How to Install Microsoft windows 10 IOT on Raspberry PI 4 ?
Tue Jan 14, 2020 1:39 pm
Heater wrote: ↑
Mon Jan 13, 2020 9:23 pm
Manufacturers like NXP are for profit corporations whose mission is to maximize profit. As such we can imagine why they might do such a thing.The Raspberry Pi Foundation is a a charitable organization with an educational mission. As such I would be disgusted to find they use any of their resources to support a huge and profitable company, in a foreign country.
Raspberry Pi Trading is a for-profit commercial business whose mission is to generate profit which pays its staff, funds further developments, and generates gift-aided income for the Foundation to further their goals.
There’s nothing I can see wrong with supporting huge and profitable companies, even those in foreign countries, when it benefits the Foundation or the Pi community. It’s merely a business matter, though you seem to think it should be more ideological, and particularly when it comes to Microsoft.
-
Heater
- Posts: 19295
- Joined: Tue Jul 17, 2012 3:02 pm
Re: How to Install Microsoft windows 10 IOT on Raspberry PI 4 ?
Tue Jan 14, 2020 8:27 pm
hippy,
…particularly when it comes to Microsoft.
What do you mean? I love Microsoft, I use an MS Surface Pro 4 everyday. I use Github and VSCode everyday.
I happen to think it’s bad idea for the worlds computing infrastructure to be dependent on a single corporation. Which traditionally has been MS but need not be.
I happen to think the education of a children should not be dependent on such a corporation. Be it MS or Apple or whoever.
I happen to notice the Pi and the Foundation has been doing very well with out that lock in.
I hope that continues.
Slava Ukrayini.
-
hippy
- Posts: 12951
- Joined: Fri Sep 09, 2011 10:34 pm
- Location: UK
Re: How to Install Microsoft windows 10 IOT on Raspberry PI 4 ?
Wed Jan 15, 2020 6:06 pm
Heater wrote: ↑
Tue Jan 14, 2020 8:27 pm
I happen to think the education of a children should not be dependent on such a corporation. Be it MS or Apple or whoever.
I don’t see anyone arguing that it should be nor see how it ever would be. Getting Windows 10 IOT to work on a Pi 4B is hardly going to deliver that outcome.
-
jamesh
- Raspberry Pi Engineer & Forum Moderator

- Posts: 32166
- Joined: Sat Jul 30, 2011 7:41 pm

Re: How to Install Microsoft windows 10 IOT on Raspberry PI 4 ?
Wed Jan 15, 2020 6:38 pm
Redkey wrote: ↑
Mon Jan 13, 2020 6:42 pm
Thanks to everyone who responded and thanks for the great solutions. Here’s a recent headline «NXP releases i.MX 6/7/8 BSPs for Windows 10 IoT Core» . and you’ll find details of the agreement here. https://developer.microsoft.com/en-us/windows/iot. So the Idea of a hardware manufacturer providing a BSP to microsoft isn’t completely outrageous. My only remaining question is if Raspberrypi.org has a reason/desire/principle that makes it not want to provide this development path. Reading the current mission statement, such a release seems in line with the founders , however as was pointed out even though MS tools are free, It does require running a PC with windows which is not free. Having said that, it’s a cost that most of the Pi developers have paid for one reason or another. If the foundation doesn’t want a BSP, I would respect that, but I think they should just come out and say it outright.Thanks Again
Ken
I’m Trading rather than Foundation, but as far as I know, we do not intend to do a BSP for Win10 for the Pi4. Apart from a lack of any real profit motive, we have limited staff available and none with Win10IoT experience, and what staff we do have are pretty busy on more important stuff. We would probably be happy supporting MS with advice if they wanted to do it, but that would be the limit of our involvement.
I suspect that a BSP could be written by a third party experienced in it, using any existing one from earlier versions, and with help from the forums and the Linux source code.
Principal Software Engineer at Raspberry Pi Ltd.
Working in the Applications Team.
Return to “Windows 10 for IoT”
We are announcing the transfer of custodianship of the Raspberry Pi BSP for Windows 10 IoT Core to the Raspberry Pi Foundation. By moving this repository to community administration, we hope to foster the continued interest and innovation in Raspberry Pi with Windows.
The new home for Raspberry Pi BSP for Windows 10 IoT Core will be at
https://github.com/raspberrypi/windows-drivers
Raspberry Pi Board Support Package for Windows 10 IoT Core
Welcome to the Raspberry Pi Board Support Package (BSP) for Windows 10 IoT Core
This repository contains BSP components for the Raspberry Pi 2, 3, and Compute Module. This BSP repository is under community support; it is functional with the Fall 2018 release of Windows 10 IoT Core but is not actively maintained by Microsoft. BSP elements included in this repository may contain features that are not available with Windows 10 IoT Core releases.
For more information about Windows 10 IoT Core, see online documentation here
This project has adopted the Microsoft Open Source Code of Conduct. For more information see the Code of Conduct FAQ or contact opencode@microsoft.com with any additional questions or comments.
Firmware binaries
Sample binaries of the firmware is included in RPi.BootFirmware to enable quick prototyping. The sources for these binaries are listed below.
- Firmware binaries : RaspberryPi/Firmware
- UEFI Sources : RPi/UEFI
UEFI Customisations
SMBIOS requirements of Windows 10 IoT Core OEM Licensing requires a custom version of kernel.img file with the proper SMBIOS values.
See PlatformSmbiosDxe.c to update the SMBIOS data. Steps to build the kernel.img is provided in the RPi/UEFI Github.
Build the drivers
- Clone https://github.com/ms-iot/rpi-iotcore
- Open Visual Studio with Administrator privileges
- In Visual Studio: File -> Open -> Project/Solution -> Select
rpi-iotcorebuildbcm2836buildbcm2836.sln - Set your build configuration (Release or Debug)
- Build -> Build Solution
The resulting driver binaries will be located in the rpi-iotcorebuildbcm2836ARM folder.
Export the bsp
We provide a binexport.ps1 script to scrape the BSP components together into a zip file for easy use with the IoT ADK AddonKit.
- Open Powershell
- Navigate to rpi-iotcoretools
- Run
binexport.ps1with the appropriate arguments..binexport.ps1 C:Release (or) .binexport.ps1 C:Release -IsDebug # for debug binaries
- The script will generate a zip file RPi_BSP_xx.zip that can be imported into the IoT-ADK-Addonkit shell using Import-IoTBSP.
Import-IoTBSP RPi C:TempRPi_BSP_xx.zip
Гаджеты, Компьютерное железо, Разработка на Raspberry Pi
Рекомендация: подборка платных и бесплатных курсов таргетированной рекламе — https://katalog-kursov.ru/

В середине июля 2020 года эксперты портала Tom’s Hardware опубликовали инструкцию по установке Windows 10 на Raspberry Pi 4. Вдобавок они проверили, как работают некоторые сторонние программы (GIMP Photo Editor, Arduino IDE и Python 3.8) в этой связке микрокомпьютера на ARM и последней версии Windows.
Вопрос «зачем» тут не особо уместен, так как экспериментаторам был важен сам факт того, что это можно сделать и все будет работать. Да, медленно и с тормозами и проблемами, но будет.
Официально, единственная операционная система Microsoft для Raspberry Pi — это устаревшая на текущий момент версия Windows 10 IoT Core, которая, например, позволяет выполнять код Visual Studio на микрокомпьютере, но там даже нет графического интерфейса. Тем не менее, разработчики (например, проект «Windows on Raspberry Pi» в Discord) своими силами сделали необходимы программы и нашли способ по установке и запуску полноценной версии Windows 10 на Raspberry Pi 4.
Эксперты портала Tom’s Hardware дополнительно уведомили, что они не могут ручаться за безопасность или законность любых пользовательских файлов, созданных сообществом «Windows on Raspberry Pi», поэтому все действия далее они делали на свой страх и риск.
В 2019 году эксперты портала Tom’s Hardware уже попытались установить Windows 10 на Raspberry Pi 3, но тогда этот трудный процесс у них закончился по большей части проблемами, ошибками и тормозами после установки.
В настоящее время даже после всех стараний команды проекта «Windows on Raspberry», после установки Windows 10 на Raspberry Pi 4 не работают встроенные в микрокомпьютер порт Ethernet, модули Wi-Fi, Bluetooth и GPIO, аудио через HDMI также недоступно. Для сетевого подключения нужно использовать Wi-Fi USB-адаптер, а для вывода звука Bluetooth через USB-адаптер.
Для установки Windows 10 на Raspberry Pi 4 понадобятся:
- последняя версия Raspberry Pi 4 с 4GB или 8GB ОЗУ;
- карта памяти microSD на 16 GB или больше;
- ПК с Windows 10 и доступом в сеть интернет для создания нужной загрузочной сборки;
- адаптер USB to Ethernet или WiFi dongle;
- Bluetooth dongle (если нужен Bluetooth).
Инструкция по установке Windows 10 на Raspberry Pi 4:
- нужно скачать и распаковать на ПК последнюю версию инструмента WoR 2.0.0 alpha 3, там будет архив на 4.7G;
- зайти на Windows on Raspberry Pi Discord server в разделе Downloads channel скачать последнюю стабильную версию Windows on ARM (0.2.1), ссылка на этот файл PublicFlukeByte.iso;
- запустить WoR Alpha tool и выбрать язык установки;
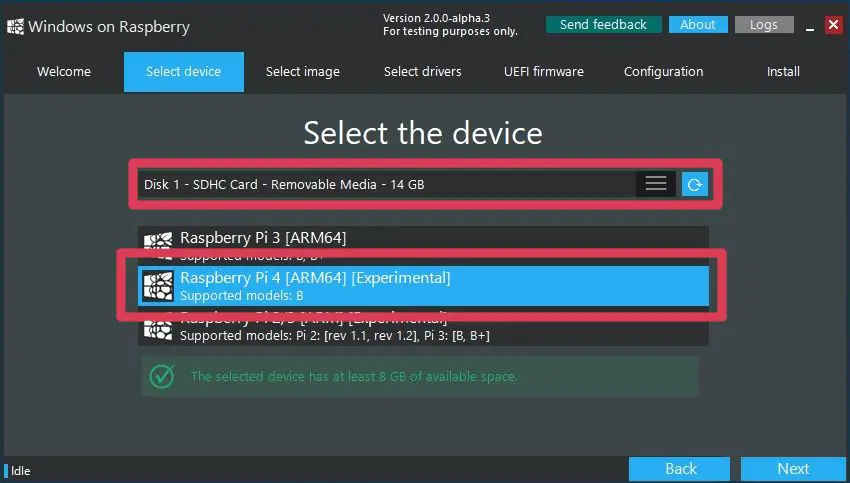
- вставить в ПК карту памяти и выбрать ее в WoR Alpha tool в разделе «Select device», там же выбрать режим «Raspberry Pi 4 experimental mode»;
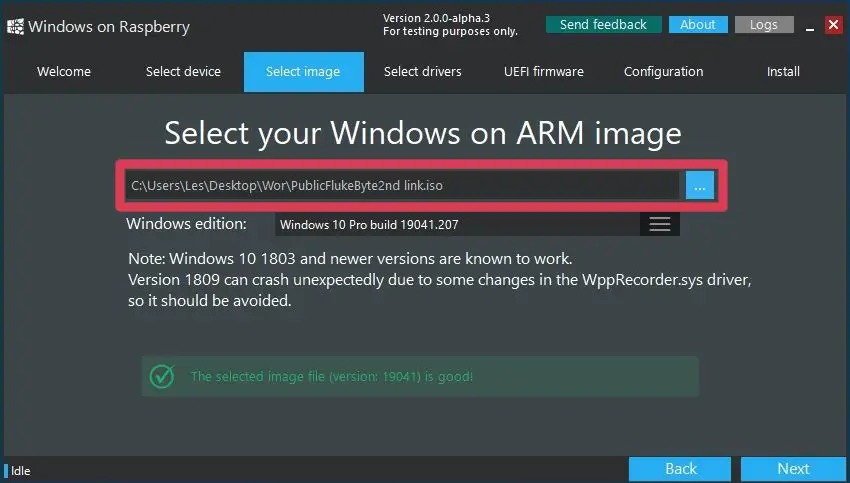
- далее в разделе «Select image» указать место расположения на ПК ранее скаченного файла PublicFlukeByte.iso;
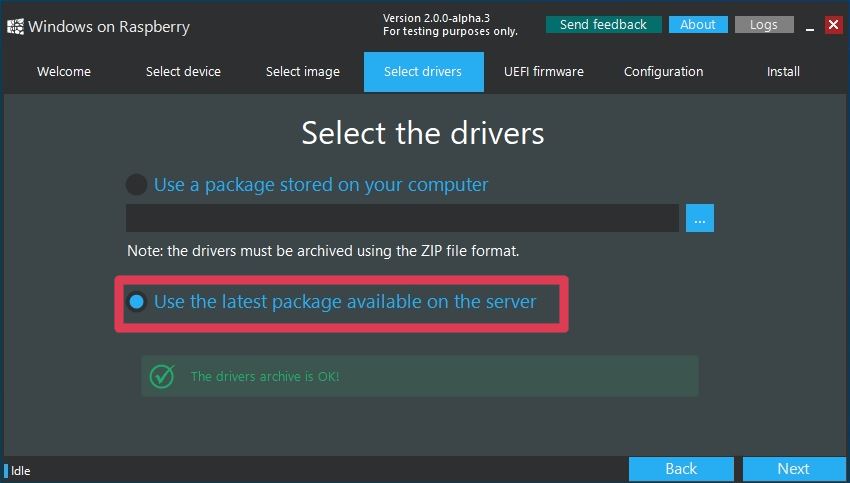
- далее в разделе «Select drivers» выбрать опцию «Use the latest package available on the server.»;
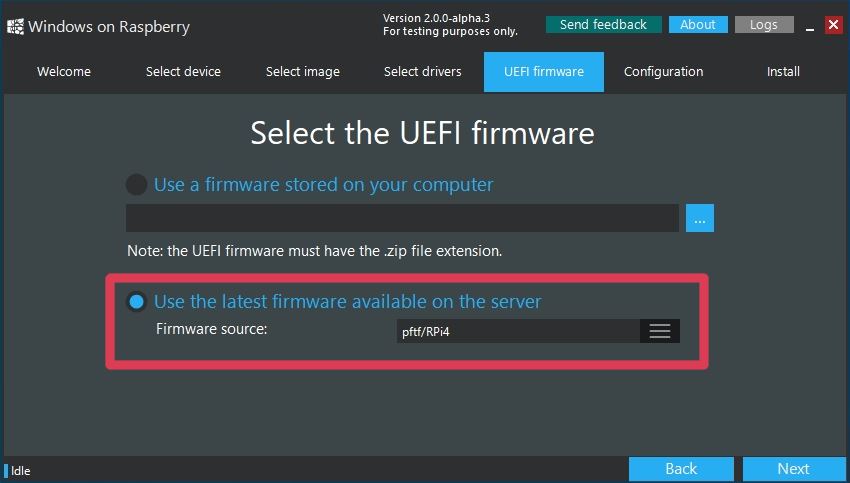
- далее в разделе «UEFI firmware» выбрать опцию «Use the latest firmware available on the server.»;
- потом нужно проверить конфигурацию загрузочной сборки и начат ее записать на карту памяти, причем запись может продолжаться более двух часов, в зависимости от параметров карты памяти;
- скачать и распаковать на ПК патч для Raspberry Pi 4 по активации USB-портов и 3 ГБ ОЗУ в Windows 10, скопировать файл winpatch.exe в корень диска C: на ПК;
- пропатчить сборку на карте памяти: в командной строке на ПК выполнить
«winpatch X:WindowsSystem32driversUSBXHCI.SYS 910063E8370000EA 910063E8360000EA 3700010AD5033F9F 3600010AD5033F9F», где Х — буква диска с картой памяти; - рекомендуется также «разогнать» в настройках Raspberry Pi, но тогда лучше заранее обеспокоиться установкой на микрокомпьютер системы охлаждения, для этого необходимо в файле config.txt на загрузочном карте памяти выставить параметры: «over_voltage=6» и «arm_freq=2000»;
- теперь можно извлечь загрузочную карту памяти из ПК, вставить ее в Raspberry Pi 4 и начать стандартную установку ОС Windows 10;
- после окончания процесса установки Windows 10 на Raspberry Pi 4 необходимо активировать в ОС возможность полноценно использовать 3 ГБ ОЗУ, для этого нужно под администратором в командной строке запустить: «bcdedit /deletevalue {default} truncatememory», далее необходимо перезагрузить микрокомпьютер;
- далее можно подключить сетевые USB-адаптеры, настроить их и скачивать и устанавливать из интернета необходимые для работы приложения, включая браузеры и другое ПО.
Эксперты портала Tom’s Hardware установили на Raspberry Pi 4 с Windows 10 браузер Microsoft Edge, программы GIMP Photo Editor, Arduino IDE и Python 3.8 с оболочкой Python REPL. Все программы запускались и работали нормально. По скорости работы с этой ОС микрокомпьютер оказался на уровне Intel Celeron или Atom начального уровня. Время загрузки ОС Windows 10 составило 2 минуты 12 секунд. Просмотр видео в YouTube возможен, но со средними настройками разрешения роликов. Из проблем — на эту сборку не удалось установить редактор кода Visual Studio Code. Также не работал модуль Python под названием GPIO Zero, который используется для взаимодействия с GPIO Raspberry Pi. Возможно, что в будущем эти моменты будут доработаны разработчиками проекта «Windows on Raspberry Pi».
Ранее в феврале 2020 года Raspberry Pi Foundation выпустил обновленную версию (v1.2) Raspberry Pi 4, в которой было исправлено несколько проблем, включая совместимость с различными USB-C кабелями. Тогда микрокомпьютер не распознавал некоторые кабели как источник питания из-за проблем со схемой питания.
В конце мая 2020 года в продажу поступила 8-гигабайтная модель Raspberry Pi 4. Она доступна по цене в $75. Вдобавок создатели портативного ПК сняли с продажи версию с 1 ГБ оперативной памяти, теперь за $35 можно приобрести Raspberry Pi 4 с 2 ГБ ОЗУ.
Introduction
Since Microsoft first released Windows 10 IoT core for Raspberry Pi, it is already more than 3 years. I want to show you how this system works today.
Background
To see how to setup your raspberry pi and how you can build your first app, please see my other articles.
- Introduction to Windows IoT
- Installing Windows IoT core on Raspberry Pi
- Setting up Windows IoT Core on Raspberry Pi
- Building Your First App for Windows IoT
Surely, since the first release of Windows 10 IoT Core, there are many changes, and many of them improved the overall user experience with this system. Let’s have a quick look at them.
Installation
To install Windows 10 IoT on your Raspberry Pi, you have to download IoT dashboard.
You can download it here.
Then, you must have a Microsoft account, but this account is free, and you will be prompted to create one.
The process of creating SD card is very simple. First, you will have to insert SD card to your card reader and then, you can choose what version of OS you would like to install.

In this step, you will also choose device name, and you have to set device password. Here, it is good to notice that when you try to login to your device, username is administrator also now it is possible to set up WiFi connection directly to your SD card so when you boot your device for the first time, it will connect automatically.
After you set up everything, the program will start downloading selected Windows version. Currently in 4.2019, you can choose from 3 versions of Windows 10 IoT core:
- 17763 (latest)
- 17744 (insider)
- 17744 (insider)
- Custom (here, you can choose your own *.ffu file, but I do not know how to get one)
After download, the command line window will appear and it will check your SD card.
When this is ready, another command line window will appear and system will be written to your SD card.
When it is all ready, you will be prompted to insert SD card to your device.
This entire process took about 10 — 15 minutes, depends on size of SD card you use. 8GB SD card is more than enough for Windows 10 IoT core.
You can see how the first boot of device looks like in this video.
As you can see, it took about 4 minutes to boot the first time. When you set up WiFi Connection, it connects automatically and you do not have to set it up on Raspberry. Normal boot up took about 2 minutes, and there is no user interaction needed. System goes directly to your default app (currently IOTCoreDefaultApplication).
You can see the normal Boot sequence in this video.
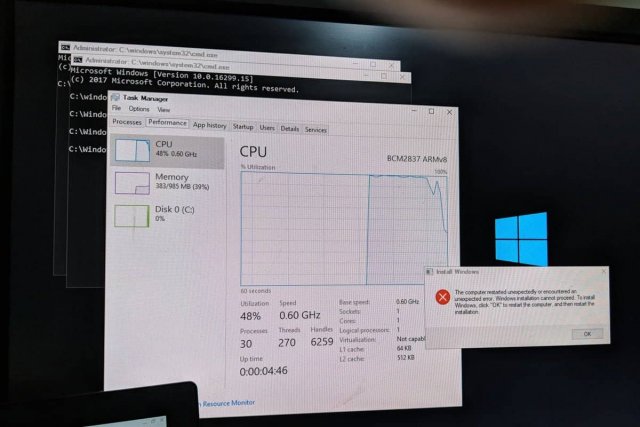
Sometimes, it can happen that system is unable to read your SD card. Then, you can get this screen.
Just try few more times, and if it is not helping try to flash your SD card again. If even this will not work, try another SD card, maybe the SD card is broken.
Features Overview
Same as before 3 years, Windows 10 IoT is not using full potential from Raspberry Pi 2 or 3. User experience in most of the app is rather bad, even the default app which is pre-installed on image is sometimes laggy on Raspberry Pi 3, on Raspberry Pi 2 it is even worse. But there are still some bright sides, so let’s have a look at it.
- WiFi (Raspberry pi 3) — Working
- Bluetooth — Working
- HDMI output — Working
- Audio output — Working
- LAN — Working
- USB — Working
- Graphics — Not Working
- Remote client — Not Working
What was an unpleasant surprise to me was that even after 3 years, Microsoft did not add Graphic Chip support. Raspberry board has that chip on board, and all linux distributions are fully capable of playing video. But on Windows 10 IoT, you are not able to play any video, or display some more complex graphic content because all rendering goes only through CPU and it just cannot handle it. Another thing to mention about video is that you will get no sound over HDMI. At least in default setting, maybe it is possible to set it somehow to send sound over HDMI, but in default setting, you get sound only from 3.5 mm jack.
For example, see how video playback looks like on my video.
So if you are thinking about Windows IoT and Raspberry Pi to be a great solution to some digital signage project, think again, without GPU support, you can display only slideshows, or some very simple web pages. This will be very limiting to you in time. It is good to know limitations of platform before you invest into building something on it. I personally did one project where we created digital signage solution running on Windows IoT on Raspberry Pi. But in the end, it was a huge failure because of missing GPU support and limitations depending on this. We ended up displaying every single web page, and even that was not reliable enough, because after some time (6 — 7 months), our Raspberries started to break down because of high CPU usage and overheating. Some did not start at all, and some others did display green lines over screens or similar artifacts.
Another new thing in Windows Iot Core is remote desktop client. It is a very nice feature, and you can work with your device even if you do not have a display attached, but on Raspberry Pi, it will not work. It is a known bug since 2017 and still, it is not fixed. See MSDN thread here. I personally think it will never be fixed, same as Graphics support.
Device Portal
This is a very nice option to manage your Raspberry Pi running Windows 10 IoT. Since 2016, it has been completely redesigned, and I see many improvements in it. So, let’s have a look at it.
The easiest way to access device portal is to open your IoT core dashboard and right click on your device in section «My devices«.
After that, it will open your browser and you will be prompted to sign in. Username is «administrator» password you have set when creating SD card.

After login, you will see really rich user interface.
In device settings section, you can change your timezone, password and even get a screenshot from device and save it on your computer.
In Apps section, you can upload your UWP app, set is as default to run after device boot, Also, you can uninstall or stop existing apps. You can manage files on your device, or quickly get some samples running on your device. This is very nice and you can quickly see some real projects running on your Raspberry Pi.
Very nice is Processes section where you can see sort of Task manager, in real time, you see your CPU, network Disk and memory usage. You can also run command on device, or see all active processes and possibly kill some.
In debug section, you can download kernel dumps, and most importantly, you can start Visual Studio remote debugger. This will allow you to debug your code directly on Raspberry Pi when you develop it.
This is a kind of device manager of your Raspberry Pi.
Connectivity is a very interesting section. Here, you can manage Bluetooth connections, WiFi connections and even set up Internet connection sharing. So probably, you can receive WiFi and share it over the ethernet or vice versa. I did not test this feature but it looks promising. Also, in OnBoarding menu, you can set up WiFi Access point. As you see on Raspberry Pi 3, both onboard modules WiFi and Bluetooth are supported.
In Windows update section, you can check for Windows updates, or install CAB files. Unfortunately, there is no option to turn updates off.
This section is to turn on remote desktop connections, unfortunately, it is not working on Raspberry Pi. You will get only white screen, but your mouse movements will be transferred to client. In the end, it is still useless and I do not think it will be working on Raspberry some day.
This last section is empty and you can add almost any from controls which you have seen on previous pages. So you can build some kind of your own home page.
So, in the end, I think it is moving in a good direction, but sadly Raspberry Pi is not in focus of Microsoft, maybe all features are functioning on other supported boards. I hope this overview gave you some overall picture about Windows 10 IoT core and Raspberry Pi. If you will have any questions, feel free to write them in the comments below and I will respond.
History
- 9th April, 2019: Initial version
After study on University of Zilina, I started to work as software developer in this town in Slovakia, I have worked with various technologies, a bit of mobile apps, for android and iOS In latest time I specialize in ASP .NET and .NET C# applications. I like to learn and explore new technologies. Also I like photography and traveling.
I hope with my articles here I could help another developers solve similar problems that I was facing.

The Raspberry Pi is usually associated with Linux operating systems like Raspberry Pi OS (formerly known as Raspbian), Ubuntu, etc. But what about running Windows 10 on your Raspberry Pi? Well, it would be great for sure. However, Windows 10 is still not officially supported for Raspberry Pi. Microsoft’s only OS for Pi is the old Windows 10 IoT Core that just lets you execute Visual Studio codes but cannot work as a standalone OS with its GUI.
Though it is so, it didn’t stop some passionate developers to find a way to run a full desktop version of Windows 10 on Raspberry Pi. They have made it possible with the WoR project. With that, they developed a tool to flash an ARM image of Windows 10 on an SD Card (or an SDD), that can boot on a Raspberry Pi.
In this guide, I’ll walk you through the exact steps to install Raspberry Pi Windows 10.
Contents
- Requirements
- Steps to Install Windows 10 on Raspberry Pi 4/3/2
- Step 1: Download the Required Files
- Step 2: Update Raspberry Pi Firmware
- Step 3: Build Windows 10 ISO File on your PC
- Step 4: Flash the ISO File with WoR Tool
- The First Boot
- Overclock the Raspberry Pi
- How Does Raspberry Pi Windows 10 Perform?
- Now it’s your turn..
Requirements
- Raspberry Pi 4/3/2
- MicroSD Card (Faster is better, so a class A2 card is recommended)
- Ethernet Cable or Wi-Fi dongle
- Keyboard, Mouse, and Monitor
Step 1: Download the Required Files
In order to get started with the installation, you have 2 things to download.
1. The WoR Tool [https://www.worproject.ml/downloads]
When you download this you will get a zip file with everything inside it. Keep it for now. We’ll use it later.
2. UUP file for Windows 10 ARM
For downloading a UUP file you can use any one of the following websites. Each of them works a bit differently. On these websites, you only have to choose a Windows version, build number, language, and edition like Pro, Home, Ultimate, etc.
- https://uupdump.net/ (for Linux or Mac PC)
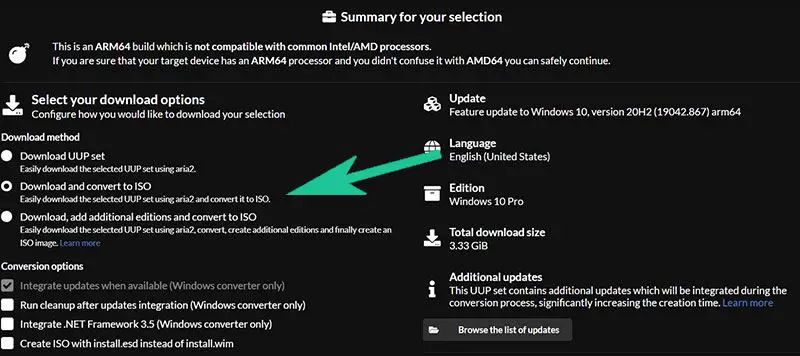
Download the file from this website only if your computer is not running on Windows OS. While on the website, I recommend selecting only one edition to keep the file size smaller and make the installation faster. Only check the required edition and leave others unchecked. Now choose the Download and convert to ISO option.
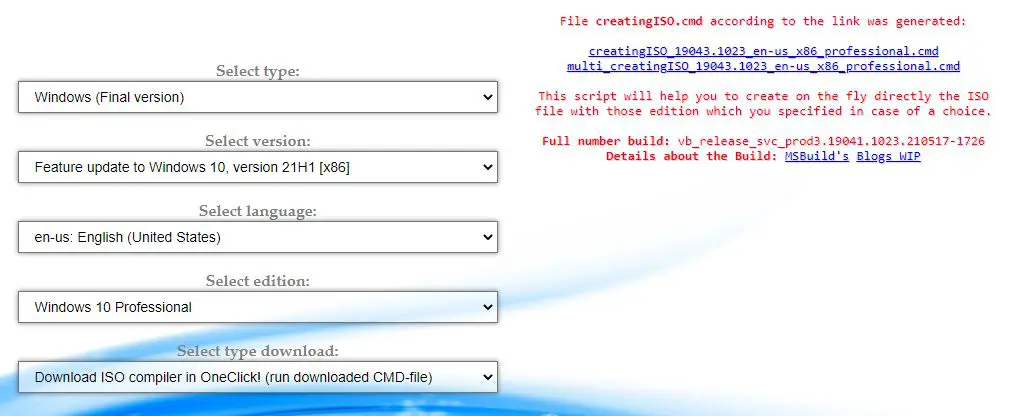
- https://uup.rg-adguard.net/ (for Windows PC only)
This site has got a much more intuitive interface where you can easily download the file. Use the drop-down arrows to choose the required version number, edition, build number, etc. Then click on the Download ISO compiler in One click! option in the download type. Download the cmd file by clicking on the link appearing on the right side. This will look something like this:
Step 2: Update Raspberry Pi Firmware
As usual, before doing something big, we have to update the firmware of our Raspberry Pi. To do the same, open a terminal and type the following command.
sudo apt update
sudo apt full-upgrade
Once done with that, stop your device and you don’t need the Raspberry Pi OS (Raspbian) anymore.
Step 3: Build Windows 10 ISO File on your PC
The next step is to build the Windows 10 ISO image file using the cmd file that we’ve download in step 1. If you downloaded the file from the second website you will get the direct cmd file whereas if you have downloaded it from the first website (uupdump.net) then you need to extract the zip file to see a file named “uudp_download_windows.cmd“.
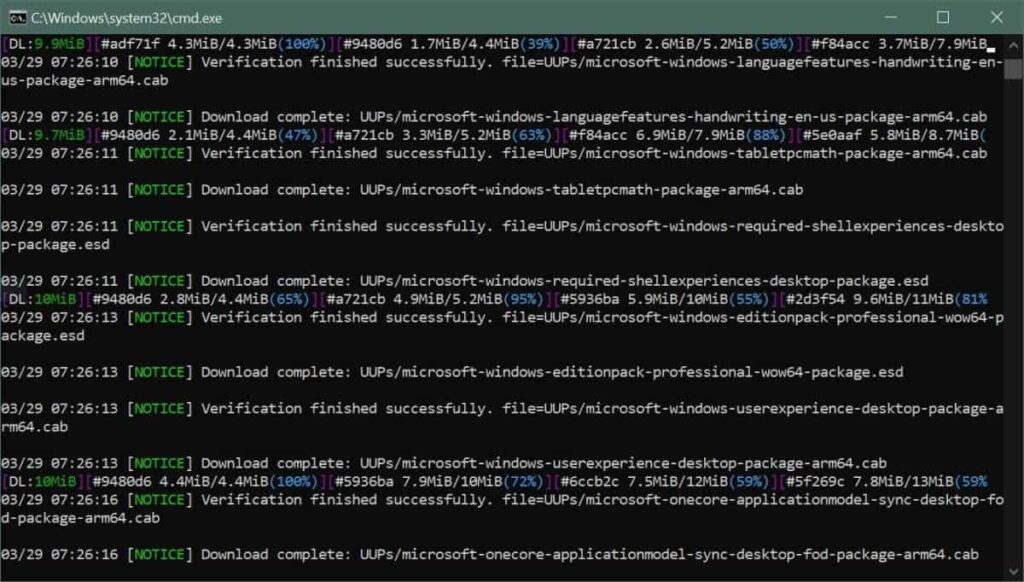
- Double click on the cmd file and you will see a terminal window. Press 0 when asked. It will immediately start to download some files for the process. This will be of a few gigabytes and take a lot of time if your internet connection is slow.

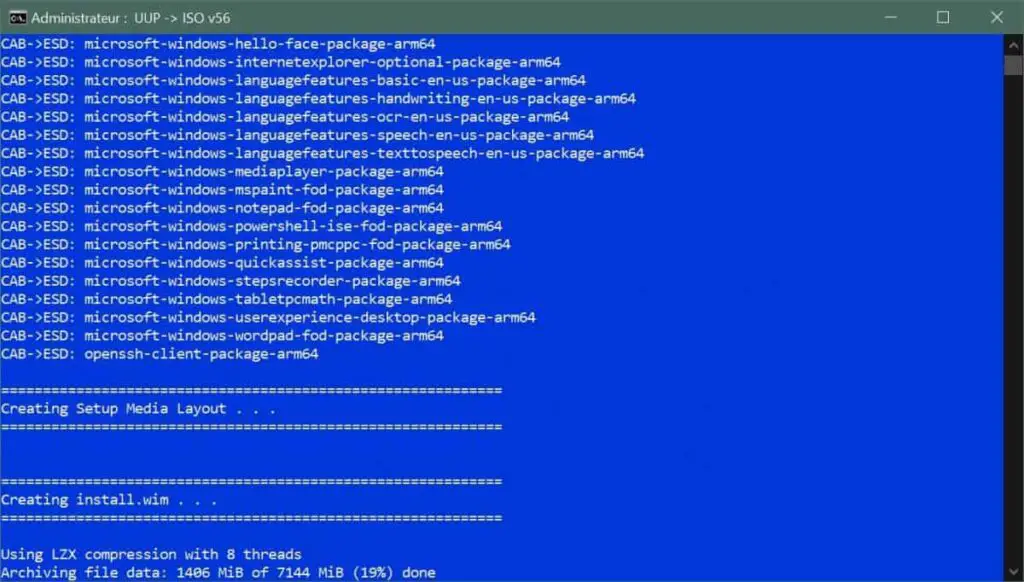
- Once the downloads are complete it will automatically start to build the ISO image file.
- This also will take some time. If you encounter any stuck somewhere in the process just press the Enter.


Step 4: Flash the ISO File with WoR Tool
Now it’s time to flash the ISO file that we build just now. Here comes the use of the WoR tool. It is a simple and easy-to-use flashing tool. To flash the ISO, follow the below steps.
- Firstly, extract the WoR_Release_….zip archive to a new folder on your computer.
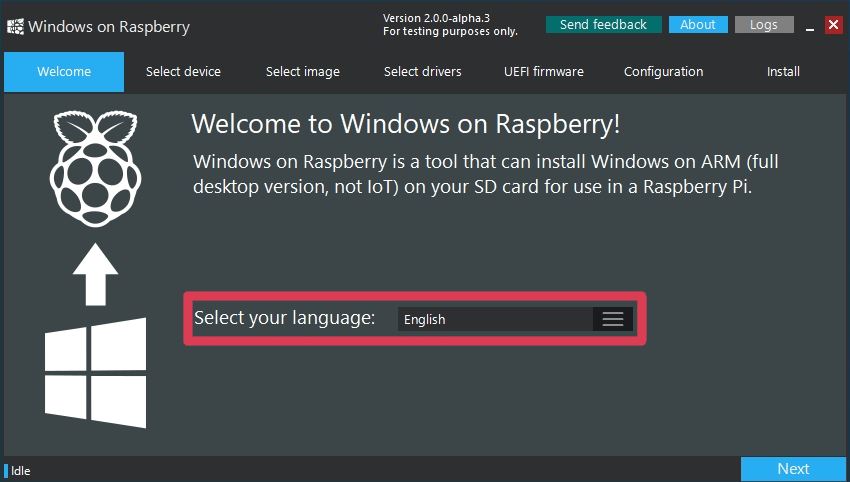
- Find the wor.exe file and double-click on it.
- Select your preferred language from the drop-down list.
- Choose the target drive (your SD Card or SSD drive) and the model of your Raspberry Pi board.
- Once all those selected, now navigate and choose the ISO file that we’ve built.
- The next step is to select the driver package from the server. Simply select the latest package.
- Then select the UEFI firmware to flash. Here also select the latest version available.
- Check the configuration and click Next.
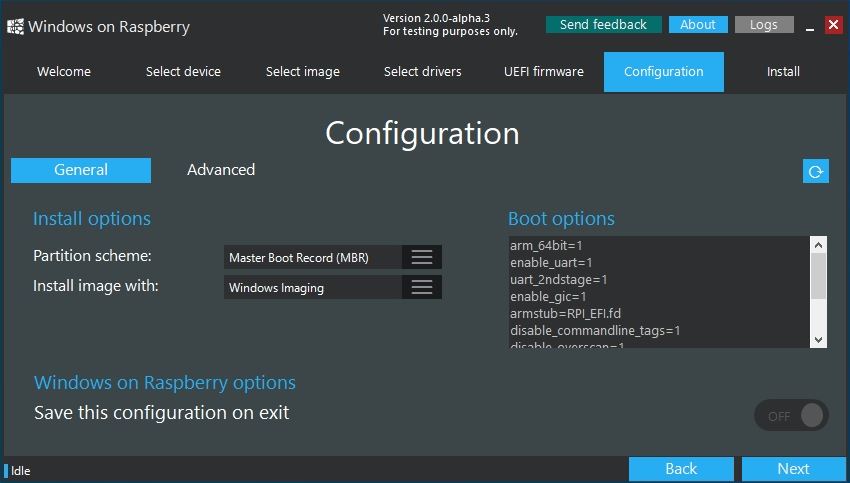
- So you have selected all the things to get started with the install. Just double-check everything and click Install.
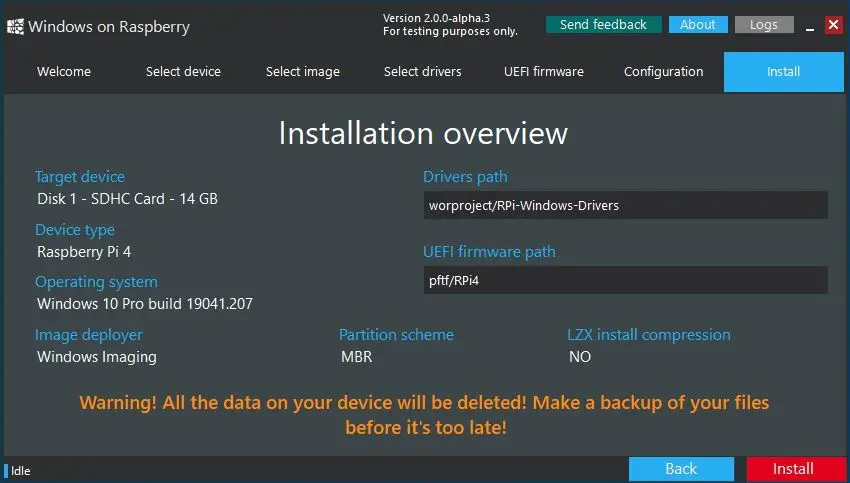
The installation may take as long as 1.5 to 2 hours, depending on the write speed of your SD Card. This is why I recommend getting an A1 or A2 class SD Card or else an SSD drive to get the job done much faster. On an SSD drive, it may take only about 15 minutes or so.
The First Boot
And now once the Raspberry Pi Windows 10 installation is completed and your device is ready, you can directly plug it (if you have an SSD) into the Pi or insert it if you have an SD card. Then boot it up.
Since it is the first boot, it will take some time to completely initialize and configure things according to your device and boot up. However, from the second boot onwards everything will be fine and will work as normal. If you are a beginner and don’t know how to set up a remote desktop on your Raspberry Pi, just relax – I’ve got that covered for you. Head over to this link: How to Setup Raspberry Pi Remote Desktop on Windows/ Linux/ Mac (5 Methods)
As usual with a typical Windows installation, you will need to configure some things manually: for example Cortana and the privacy policies that Windows normally tries to disable for you.
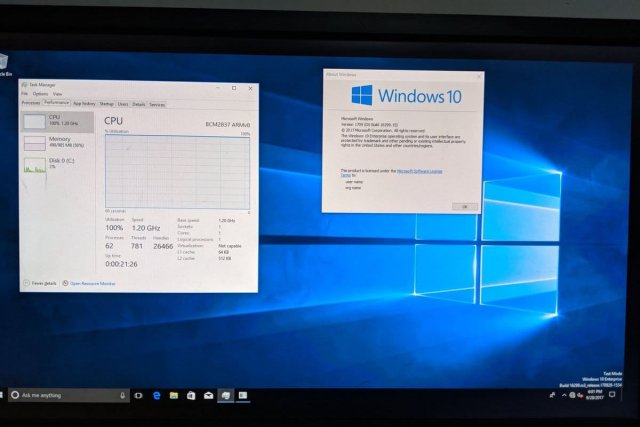
Once done with that, you will enter into a full-fledged Windows 10 on your cute little Raspberry Pi.
Overclock the Raspberry Pi
Now that you have successfully completed the Raspberry Pi Windows 10 installation, and thinking to boost the performance?
Well. That’s indeed a right thought. Overclocking a Raspberry Pi will help you get the most out of your SBC and take your projects to the next level. For this purpose, I have written a comprehensive article on how to overclock Raspberry Pi board. You can click on the link and refer to the article.
How Does Raspberry Pi Windows 10 Perform?
In my testing, the overall performance is pretty much decent and it’s smoothly usable. However, it has the following limitations.
- Resource limits will be reached quickly with some usage.
- CPU usage is almost 100% while streaming YouTube in Google Chrome.
- Bluetooth support is also limited as the RTS/CTS lines are not exposed.
- Problems with HDMI audio out.
Though it is having some limitations, you will get a nice Windows 10 experience on your tiny computer. You can get partially get rid of the resource exhausting problem by providing an A2 class 32/64 GB SD card or a super-fast SSD drive.
Now it’s your turn..
It’s now your turn to try the Raspberry Pi Windows 10 installation and share your experience. I’ve tried to make this tutorial as simple as possible and still if you have any queries just drop them in the comment section below.
Found an issue with this article? Report it here, so that I can resolve it.