Сетевой протокол SMB (Server Message Block) используется для предоставления совместного удаленного доступа к файлам, принтерам и другим устройствам через порт TCP 445. В этой статье мы рассмотрим: какие версии (диалекты) протокола SMB доступны в различных версиях Windows (и как они соотносятся с версиями samba в Linux); как определить версию SMB на вашем компьютере; и как включить/отключить клиент и сервер SMBv1, SMBv2 и SMBv3.
Содержание:
- Версии протокола SMB в Windows
- Как проверить поддерживаемые версии SMB в Windows?
- Вывести используемые версии SMB с помощью Get-SMBConnection
- Об опасности использования SMBv1
- Включение и отключение SMBv1, SMBv2 и SMBv3 в Windows
Версии протокола SMB в Windows
Есть несколько версии протокола SMB (диалектов), которые последовательно появлялись в новых версиях Windows:
Для реализации протокола SMB в Linux/Unix системах используется samba. В скобках мы указали в каких версиях samba поддерживается каждый диалект SMB.
- CIFS — Windows NT 4.0;
- SMB 1.0 — Windows 2000;
- SMB 2.0 — Windows Server 2008 и Windows Vista SP1 (поддерживается в Samba 3.6);
- SMB 2.1 — Windows Server 2008 R2 и Windows 7 (поддерживается в Samba 4.0);
- SMB 3.0 — Windows Server 2012 и Windows 8 (поддерживается в Samba 4.2);
- SMB 3.02 — Windows Server 2012 R2 и Windows 8. 1 (не поддерживается в Samba);
- SMB 3.1.1 – Windows Server 2016 и Windows 10 (не поддерживается в Samba).
Начиная с версии Samba 4.14, по умолчанию используется SMB2.1.
При сетевом взаимодействии по протоколу SMB между клиентом и сервером используется максимальная версия протокола, поддерживаемая одновременно и клиентом, и сервером.
Ниже представлена сводная таблица, по которой можно определить версию протокола SMB, которая выбирается при взаимодействии разных версий Windows:
| Операционная система | Win 10, Server 2016 | Windows 8.1, Server 2012 R2 |
Windows 8, Server 2012 |
Windows 7, Server 2008 R2 |
Windows Vista, Server 2008 |
Windows XP, Server 2003 и ниже |
| Windows 10 , Windows Server 2016 |
SMB 3.1.1 | SMB 3.02 | SMB 3.0 | SMB 2.1 | SMB 2.0 | SMB 1.0 |
| Windows 8.1 , Server 2012 R2 |
SMB 3.02 | SMB 3.02 | SMB 3.0 | SMB 2.1 | SMB 2.0 | SMB 1.0 |
| Windows 8 , Server 2012 |
SMB 3.0 | SMB 3.0 | SMB 3.0 | SMB 2.1 | SMB 2.0 | SMB 1.0 |
| Windows 7, Server 2008 R2 |
SMB 2.1 | SMB 2.1 | SMB 2.1 | SMB 2.1 | SMB 2.0 | SMB 1.0 |
| Windows Vista, Server 2008 |
SMB 2.0 | SMB 2.0 | SMB 2.0 | SMB 2.0 | SMB 2.0 | SMB 1.0 |
| Windows XP, 2003 и ниже | SMB 1.0 | SMB 1.0 | SMB 1.0 | SMB 1.0 | SMB 1.0 | SMB 1.0 |
К примеру, при подключении клиентского компьютера с Windows 8.1 к файловому серверу с Windows Server 2016 будет использоваться протокол SMB 3.0.2.
Согласно таблице Windows XP, Windows Server 2003 для доступа к общим файлам и папкам на сервере могут использовать только SMB 1.0, который в новых версиях Windows Server (2012 R2 / 2016) может быть отключен. Таким образом, если в вашей инфраструктуре одновременно используются компьютеры с Windows XP (снятой с поддержки), Windows Server 2003/R2 и сервера с Windows Server 2012 R2/2016/2019, устаревшие клиенты не смогут получить доступ к файлам и папкам на файловом сервере с новой ОС.
Если Windows Server 2016/2012 R2 с отключенным SMB v1.0 используется в качестве контроллера домена, значить клиенты на Windows XP/Server 2003 не смогут получить доступ к каталогам SYSVOL и NETLOGON на контроллерах домена и авторизоваться в AD.
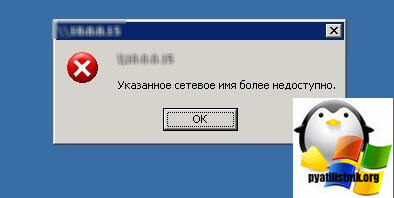
На старых клиентах при попытке подключиться к ресурсу на файловом сервере с отключенным SMB v1 появляется ошибка:
The specified network name is no longer available
Как проверить поддерживаемые версии SMB в Windows?
Рассмотрим, как определить, какие версии протокола SMB поддерживаются на вашем компьютере Windows.
В Windows 10, 8.1 и Windows Server 2019/2016/2012R2 вы можете проверить состояние различных диалектов SMB протокола с помощью PowerShell:
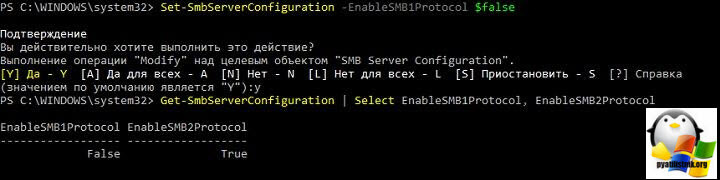
Get-SmbServerConfiguration | select EnableSMB1Protocol,EnableSMB2Protocol

Данная команда вернула, что протокол SMB1 отключен (
EnableSMB1Protocol=False
), а протоколы SMB2 и SMB3 включены (
EnableSMB1Protocol=True
).
Обратите внимание, что протоколы SMBv3 и SMBv2 тесно связаны между собой. Нельзя отключить или включить отдельно SMBv3 или SMBv2. Они всегда включаются/отключаются только совместно, т.к. используют один стек.
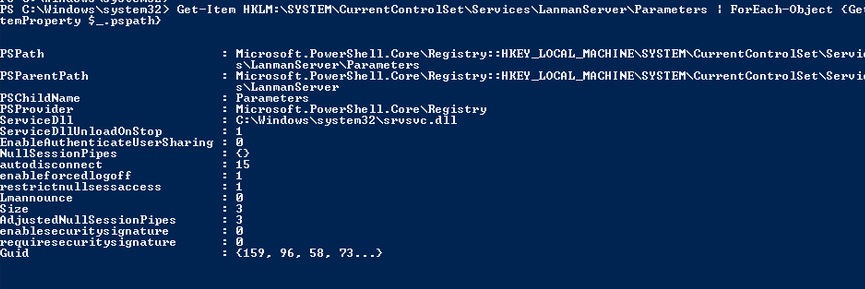
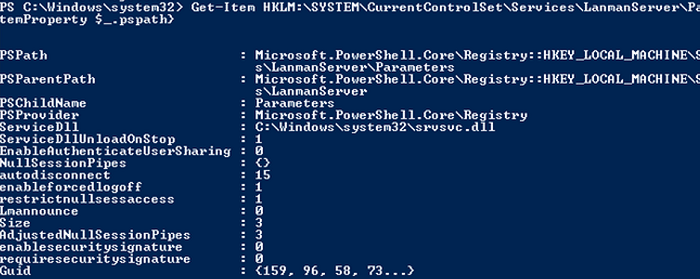
В Windows 7, Vista, Windows Server 2008 R2/2008:
Get-Item HKLM:SYSTEMCurrentControlSetServicesLanmanServerParameters | ForEach-Object {Get-ItemProperty $_.pspath}
Если в данной ветке реестра нет параметров с именами SMB1 или SMB2, значить протоколы SMB1 и SMB2 по умолчанию включены.
Также в этих версиях Windows вы можете проверить, какие диалекты SMB разрешено использовать в качестве клиентов с помощью команд:
sc.exe query mrxsmb10
SERVICE_NAME: mrxsmb10
TYPE : 2 FILE_SYSTEM_DRIVER
STATE : 4 RUNNING
(STOPPABLE, NOT_PAUSABLE, IGNORES_SHUTDOWN)
WIN32_EXIT_CODE : 0 (0x0)
SERVICE_EXIT_CODE : 0 (0x0)
CHECKPOINT : 0x0
WAIT_HINT : 0x0
sc.exe query mrxsmb20
SERVICE_NAME: mrxsmb20
TYPE : 2 FILE_SYSTEM_DRIVER
STATE : 4 RUNNING
(STOPPABLE, NOT_PAUSABLE, IGNORES_SHUTDOWN)
WIN32_EXIT_CODE : 0 (0x0)
SERVICE_EXIT_CODE : 0 (0x0)
CHECKPOINT : 0x0
WAIT_HINT : 0x0
В обоих случаях службы запущены (
STATE=4 Running
). Значит Windows может подключаться как к SMBv1, так и к SMBv2 серверам.
Вывести используемые версии SMB с помощью Get-SMBConnection
Как мы говорили раньше, компьютеры при взаимодействии по протоколу SMB используют максимальную версию, поддерживаемую как клиентом, так и сервером. Для определения версии SMB, используемой для доступа к удаленному компьютеру можно использовать командлет PowerShell
Get-SMBConnection
:
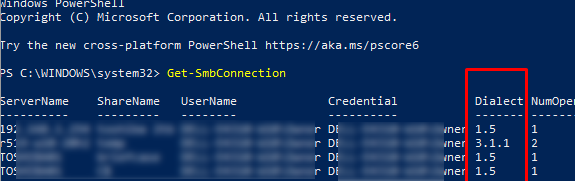
Версия SMB, используемая для подключения к удаленному серверу (ServerName) указана в столбце Dialect.
Можно вывести информацию о версиях SMB, используемых для доступа к конкретному серверу:
Get-SmbConnection -ServerName servername
Если нужно отобразить, используется ли SMB шифрование (появилось в SMB 3.0), выполните:
Get-SmbConnection | ft ServerName,ShareName,Dialect,Encrypted,UserName
В Linux вывести список SMB подключения и используемые диалекты в samba можно командой:
$ sudo smbstatus
Чтобы на стороне сервера вывести список используемых клиентами версий протокола SMB и количество клиентов, используемых ту или иную версию протокола SMB, выполните команду:
Get-SmbSession | Select-Object -ExpandProperty Dialect | Sort-Object -Unique

В нашем примере имеется 825 клиентов, подключенных к серверу с помощью SMB 2.1 (Windows 7/Windows Server 2008 R2) и 12 клиентов SMB 3.02.
С помощью PowerShell можно включить аудит версий SMB, используемых для подключения:
Set-SmbServerConfiguration –AuditSmb1Access $true
События подключения затем можно извлечь из журналов Event Viewer с помощью PowerShell:
Get-WinEvent -LogName Microsoft-Windows-SMBServer/Audit
Об опасности использования SMBv1
Последние несколько лет Microsoft из соображений безопасности планомерно отключает устаревший протокол SMB 1.0. Связано это с большим количеством критических уязвимостей в этом протоколе (вспомните историю с эпидемиями вирусов-шифровальщиков wannacrypt и petya, которые использовали уязвимость именно в протоколе SMBv1). Microsoft и другие IT компании настоятельно рекомендуют отказаться от его использования.
Однако отключение SMBv1 может вызвать проблемы с доступом к общий файлам и папкам на новых версиях Windows 10 (Windows Server 2016/2019) с устаревших версий клиентов (Windows XP, Server 2003), сторонних ОС (Mac OSX 10.8 Mountain Lion, Snow Leopard, Mavericks, старые версии Linux), различных старых NAS устройствах.
Если в вашей сети не осталось legacy устройств с поддержкой только SMBv1, обязательно отключайте эту версию диалекта в Windows.
В том случае, если в вашей сети остались клиенты с Windows XP, Windows Server 2003 или другие устройства, которые поддерживают только SMBv1, их нужно как можно скорее обновить или тщательно изолировать.
Включение и отключение SMBv1, SMBv2 и SMBv3 в Windows
Рассмотрим способы включения, отключения различных версий SMB в Windows. Мы рассматриваем отдельно включение клиента и сервера SMB (это разные компоненты).
Windows 10, 8.1, Windows Server 2019/2016/2012R2:
Отключить клиент и сервер SMBv1:
Disable-WindowsOptionalFeature -Online -FeatureName smb1protocol
Отключить только SMBv1 сервер:
Set-SmbServerConfiguration -EnableSMB1Protocol $false
Включить клиент и сервер SMBv1:
Enable-WindowsOptionalFeature -Online -FeatureName smb1protocol
Включить только SMBv1 сервер:
Set-SmbServerConfiguration -EnableSMB1Protocol $true
Отключить сервер SMBv2 и SMBv3:
Set-SmbServerConfiguration -EnableSMB2Protocol $false
Включить сервер SMBv2 и SMBv3:
Set-SmbServerConfiguration -EnableSMB2Protocol $true

Windows 7, Vista, Windows Server 2008 R2/2008:
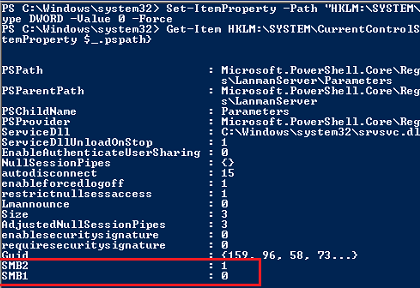
Отключить SMBv1 сервер:
Set-ItemProperty -Path "HKLM:SYSTEMCurrentControlSetServicesLanmanServerParameters" SMB1 -Type DWORD -Value 0 –Force

Включить SMBv1 сервер:
Set-ItemProperty -Path "HKLM:SYSTEMCurrentControlSetServicesLanmanServerParameters" SMB1 -Type DWORD -Value 1 –Force
Отключить SMBv1 клиент:
sc.exe config lanmanworkstation depend= bowser/mrxsmb20/nsi
sc.exe config mrxsmb10 start= disabled
Включить SMBv1 клиент:
sc.exe config lanmanworkstation depend= bowser/mrxsmb10/mrxsmb20/nsi
sc.exe config mrxsmb10 start= auto
Отключить SMBv2 сервер:
Set-ItemProperty -Path "HKLM:SYSTEMCurrentControlSetServicesLanmanServerParameters" SMB2 -Type DWORD -Value 0 -Force
Включить SMBv2 сервер
Set-ItemProperty -Path "HKLM:SYSTEMCurrentControlSetServicesLanmanServerParameters" SMB2 -Type DWORD -Value 1 –Force
Отключить SMBv2 клиент:
sc.exe config lanmanworkstation depend= bowser/mrxsmb10/nsi
sc.exe config mrxsmb20 start= disabled
Включить SMBv2 клиент:
sc.exe config lanmanworkstation depend= bowser/mrxsmb10/mrxsmb20/nsi
sc.exe config mrxsmb20 start= auto
Для отключения сервера SMBv1 на всех компьютерах независимо от версии Windows можно распространить параметр реестра типа REG_DWORD с именем SMB1 и значением 0 (HKEY_LOCAL_MACHINESYSTEMCurrentControlSetServicesLanmanServerParameters)на через GPO.
Для отключения SMBv2 нужно в этой же ветке установить параметр SMB2=0.
Для отключения SMBv1 клиента нужно распространить такой параметр реестра:
- Key: HKEY_LOCAL_MACHINESYSTEMCurrentControlSetservicesmrxsmb10
- Name: Start
- Type: REG_DWORD
- Value: 4
При отключении SMB 1.0/CIFS File Sharing Support в Windows вы можете столкнуться с ошибкой “0x80070035, не найден сетевой путь”, ошибкой при доступе к общим папкам, и проблемами обнаружения компьютеров в сетевом окружении. В этом случае вместо служба обозревателя компьютеров (Computer Browser) нужно использовать службы обнаружения (линк).

В связи с недавной эпидемией шифровальщика WannaCry, эксплуатирующим уязвимость SMB v1, в сети снова появились советы по отключению этого протокола. Более того, Microsoft настоятельно рекомендовала отключить первую версию SMB еще в сентябре 2016 года. Но такое отключение может привести к неожиданным последствиям, вплоть до курьезов: лично сталкивался с компанией, где после борьбы с SMB перестали играть беспроводные колонки Sonos.
Специально для минимизации вероятности «выстрела в ногу» я хочу напомнить об особенностях SMB и подробно рассмотреть, чем грозит непродуманное отключение его старых версий.
SMB (Server Message Block) – сетевой протокол для удаленного доступа к файлам и принтерам. Именно он используется при подключении ресурсов через servernamesharename. Протокол изначально работал поверх NetBIOS, используя порты UDP 137, 138 и TCP 137, 139. С выходом Windows 2000 стал работать напрямую, используя порт TCP 445. SMB используется также для входа в домен Active Directory и работы в нем.
Помимо удаленного доступа к ресурсам протокол используется еще и для межпроцессорного взаимодействия через «именованные потоки» – named pipes. Обращение к процессу производится по пути .pipename.
Первая версия протокола, также известная как CIFS (Common Internet File System), была создана еще в 1980-х годах, а вот вторая версия появилась только с Windows Vista, в 2006. Третья версия протокола вышла с Windows 8. Параллельно с Microsoft протокол создавался и обновлялся в его открытой имплементации Samba.
В каждой новой версии протокола добавлялись разного рода улучшения, направленные на увеличение быстродействия, безопасности и поддержки новых функций. Но при этом оставалась поддержка старых протоколов для совместимости. Разумеется, в старых версиях было и есть достаточно уязвимостей, одной из которых и пользуется WannaCry.
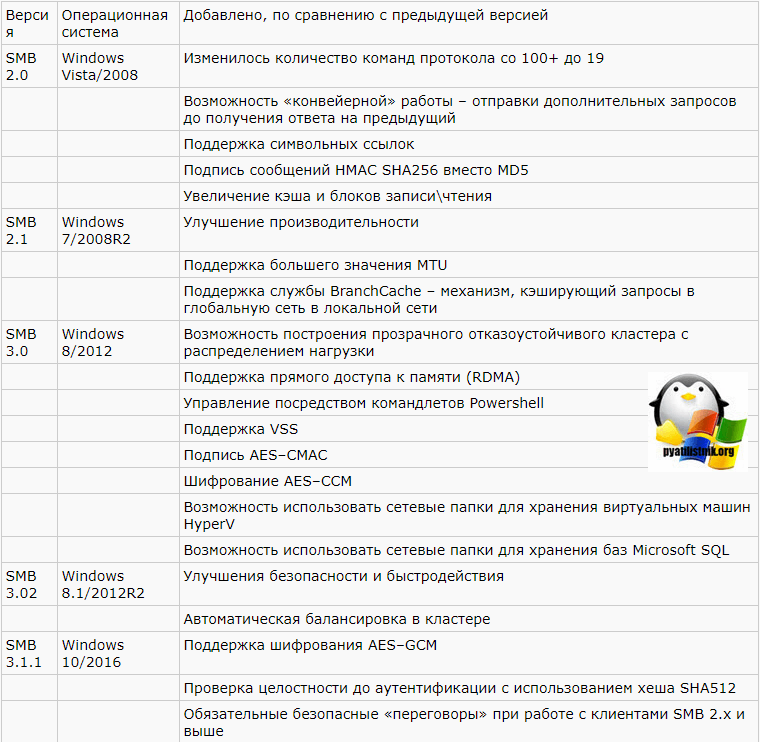
Под спойлером вы найдете сводную таблицу изменений в версиях SMB.
| Версия | Операционная система | Добавлено, по сравнению с предыдущей версией |
| SMB 2.0 | Windows Vista/2008 | Изменилось количество команд протокола со 100+ до 19 |
| Возможность «конвейерной» работы – отправки дополнительных запросов до получения ответа на предыдущий | ||
| Поддержка символьных ссылок | ||
| Подпись сообщений HMAC SHA256 вместо MD5 | ||
| Увеличение кэша и блоков записичтения | ||
| SMB 2.1 | Windows 7/2008R2 | Улучшение производительности |
| Поддержка большего значения MTU | ||
| Поддержка службы BranchCache – механизм, кэширующий запросы в глобальную сеть в локальной сети | ||
| SMB 3.0 | Windows 8/2012 | Возможность построения прозрачного отказоустойчивого кластера с распределением нагрузки |
| Поддержка прямого доступа к памяти (RDMA) | ||
| Управление посредством командлетов Powershell | ||
| Поддержка VSS | ||
| Подпись AES–CMAC | ||
| Шифрование AES–CCM | ||
| Возможность использовать сетевые папки для хранения виртуальных машин HyperV | ||
| Возможность использовать сетевые папки для хранения баз Microsoft SQL | ||
| SMB 3.02 | Windows 8.1/2012R2 | Улучшения безопасности и быстродействия |
| Автоматическая балансировка в кластере | ||
| SMB 3.1.1 | Windows 10/2016 | Поддержка шифрования AES–GCM |
| Проверка целостности до аутентификации с использованием хеша SHA512 | ||
| Обязательные безопасные «переговоры» при работе с клиентами SMB 2.x и выше |
Считаем условно пострадавших
Посмотреть используемую в текущий момент версию протокола довольно просто, используем для этого командлет Get–SmbConnection:

Вывод командлета при открытых сетевых ресурсах на серверах с разной версией Windows.
Из вывода видно, что клиент, поддерживающий все версии протокола, использует для подключения максимально возможную версию из поддерживаемых сервером. Разумеется, если клиент поддерживает только старую версию протокола, а на сервере она будет отключена – соединение установлено не будет. Включить или выключить поддержку старых версий в современных системах Windows можно при помощи командлета Set–SmbServerConfiguration, а посмотреть состояние так:
Get–SmbServerConfiguration | Select EnableSMB1Protocol, EnableSMB2Protocol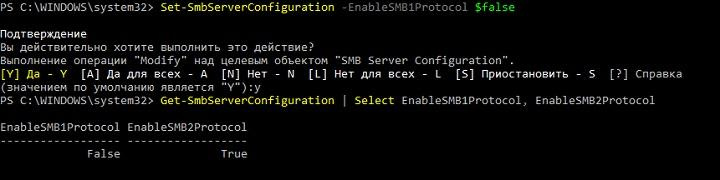
Выключаем SMBv1 на сервере с Windows 2012 R2.

Результат при подключении с Windows 2003.
Таким образом, при отключении старого, уязвимого протокола можно лишиться работоспособности сети со старыми клиентами. При этом помимо Windows XP и 2003 SMB v1 используется и в ряде программных и аппаратных решений (например NAS на GNULinux, использующий старую версию samba).
Под спойлером приведу список производителей и продуктов, которые полностью или частично перестанут работать при отключении SMB v1.
| Производитель | Продукт | Комментарий |
| Barracuda | SSL VPN | |
| Web Security Gateway backups | ||
| Canon | Сканирование на сетевой ресурс | |
| Cisco | WSA/WSAv | |
| WAAS | Версии 5.0 и старше | |
| F5 | RDP client gateway | |
| Microsoft Exchange Proxy | ||
| Forcepoint (Raytheon) | «Некоторые продукты» | |
| HPE | ArcSight Legacy Unified Connector | Старые версии |
| IBM | NetServer | Версия V7R2 и старше |
| QRadar Vulnerability Manager | Версии 7.2.x и старше | |
| Lexmark | МФУ, сканирование на сетевой ресурс | Прошивки Firmware eSF 2.x и eSF 3.x |
| Linux Kernel | Клиент CIFS | С 2.5.42 до 3.5.x |
| McAfee | Web Gateway | |
| Microsoft | Windows | XP/2003 и старше |
| MYOB | Accountants | |
| NetApp | ONTAP | Версии до 9.1 |
| NetGear | ReadyNAS | |
| Oracle | Solaris | 11.3 и старше |
| Pulse Secure | PCS | 8.1R9/8.2R4 и старше |
| PPS | 5.1R9/5.3R4 и старше | |
| QNAP | Все устройства хранения | Прошивка старше 4.1 |
| RedHat | RHEL | Версии до 7.2 |
| Ricoh | МФУ, сканирование на сетевой ресурс | Кроме ряда моделей |
| RSA | Authentication Manager Server | |
| Samba | Samba | Старше 3.5 |
| Sonos | Беспроводные колонки | |
| Sophos | Sophos UTM | |
| Sophos XG firewall | ||
| Sophos Web Appliance | ||
| SUSE | SLES | 11 и старше |
| Synology | Diskstation Manager | Только управление |
| Thomson Reuters | CS Professional Suite | |
| Tintri | Tintri OS, Tintri Global Center | |
| VMware | Vcenter | |
| ESXi | Старше 6.0 | |
| Worldox | GX3 DMS | |
| Xerox | МФУ, сканирование на сетевой ресурс | Прошивки без ConnectKey Firmware |
Список взят с сайта Microsoft, где он регулярно пополняется.
Перечень продуктов, использующих старую версию протокола, достаточно велик – перед отключением SMB v1 обязательно нужно подумать о последствиях.
Все-таки отключаем
Если программ и устройств, использующих SMB v1 в сети нет, то, конечно, старый протокол лучше отключить. При этом если выключение на SMB сервере Windows 8/2012 производится при помощи командлета Powershell, то для Windows 7/2008 понадобится правка реестра. Это можно сделать тоже при помощи Powershell:
Set–ItemProperty –Path "HKLM:SYSTEMCurrentControlSetServicesLanmanServerParameters" SMB1 –Type DWORD –Value 0 –Force
Или любым другим удобным способом. При этом для применения изменений понадобится перезагрузка.
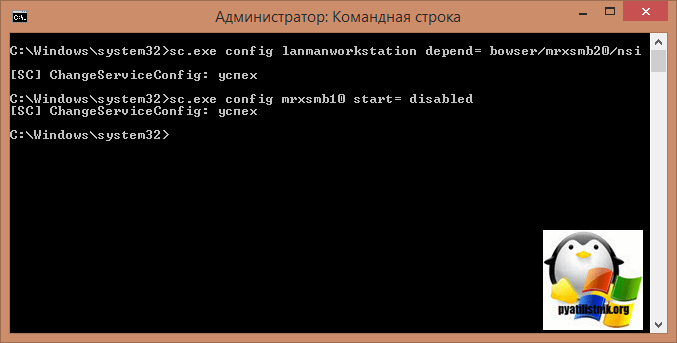
Для отключения поддержки SMB v1 на клиенте достаточно остановить отвечающую за его работу службу и поправить зависимости службы lanmanworkstation. Это можно сделать следующими командами:
sc.exe config lanmanworkstation depend=bowser/mrxsmb20/nsi

sc.exe config mrxsmb10 start=disabled
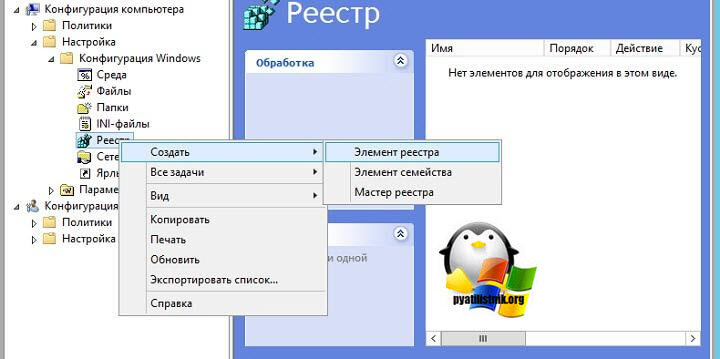
Для удобства отключения протокола по всей сети удобно использовать групповые политики, в частности Group Policy Preferences. С помощью них можно удобно работать с реестром.
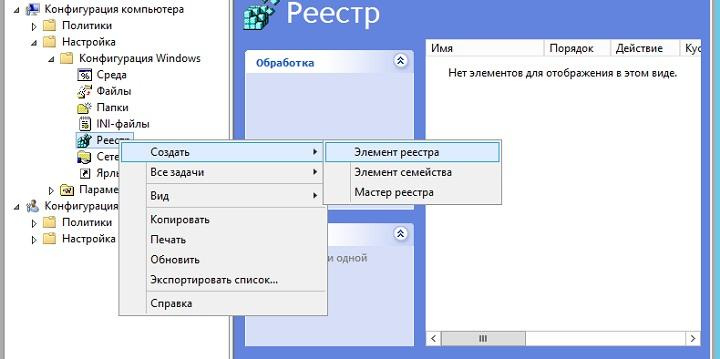
Создание элемента реестра через групповые политики.
Чтобы отключить протокол на сервере, достаточно создать следующий параметр:
-
путь: HKLM:SYSTEMCurrentControlSetServicesLanmanServerParameters;
-
новый параметр: REG_DWORD c именем SMB1;
- значение: 0.

Создание параметра реестра для отключения SMB v1 на сервере через групповые политики.
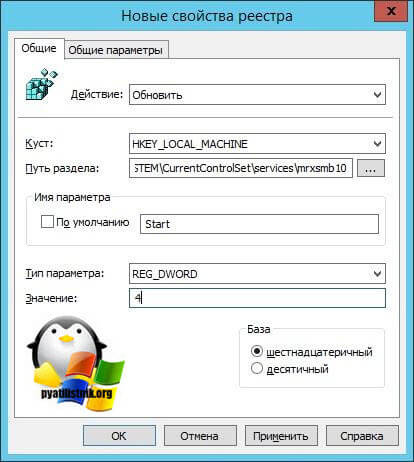
Для отключения поддержки SMB v1 на клиентах понадобится изменить значение двух параметров.
Сначала отключим службу протокола SMB v1:
-
путь: HKLM:SYSTEMCurrentControlSetservicesmrxsmb10;
-
параметр: REG_DWORD c именем Start;
- значение: 4.

Обновляем один из параметров.
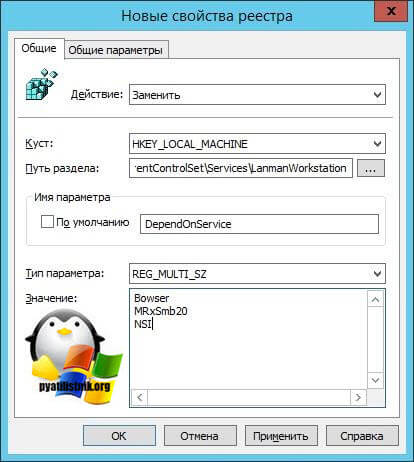
Потом поправим зависимость службы LanmanWorkstation, чтоб она не зависела от SMB v1:
-
путь: HKLM:SYSTEMCurrentControlSetServicesLanmanWorkstation;
-
параметр: REG_MULTI_SZ с именем DependOnService;
- значение: три строки – Bowser, MRxSmb20 и NSI.

И заменяем другой.
После применения групповой политики необходимо перезагрузить компьютеры организации. После перезагрузки SMB v1 перестанет использоваться.
Работает – не трогай
Как ни странно, эта старая заповедь не всегда полезна – в редко обновляемой инфраструктуре могут завестись шифровальщики и трояны. Тем не менее, неаккуратное отключение и обновление служб могут парализовать работу организации не хуже вирусов.
Расскажите, а вы уже отключили у себя SMB первой версии? Много было жертв?
Для Windows 8 и Windows Server 2012
В Windows 8 и Windows Server 2012 появился новый командлет Windows PowerShell Set-SMBServerConfiguration. Он позволяет включать или отключать протоколы SMB версии 1, 2 и 3 на сервере.
Примечания. При включении или отключении протокола SMB версии 2 в Windows 8 или Windows Server 2012 также происходит включение или отключение протокола SMB версии 3. Это связано с использованием общего стека для этих протоколов.
После выполнения командлета Set-SMBServerConfiguration перезагрузка компьютера не требуется.
SMB версии 1 на SMB-сервере
| Обнаружение: | Get-SmbServerConfiguration | Select EnableSMB1Protocol |
| Отключение: | Set-SmbServerConfiguration -EnableSMB1Protocol $false |
| Включение: | Set-SmbServerConfiguration -EnableSMB1Protocol $true |
SMB версий 2 и 3 на SMB-сервере
| Обнаружение: | Get-SmbServerConfiguration | Select EnableSMB2Protocol |
| Отключение: | Set-SmbServerConfiguration -EnableSMB2Protocol $false |
| Включение: | Set-SmbServerConfiguration -EnableSMB2Protocol $true |
Для Windows 7, Windows Server 2008 R2, Windows Vista и Windows Server 2008
Чтобы включить или отключить протоколы SMB на SMB-сервере с Windows 7, Windows Server 2008 R2, Windows Vista или Windows Server 2008, воспользуйтесь Windows PowerShell или редактором реестра.
Способы с использованием PowerShell
SMB версии 1 на SMB-сервере
Обнаружение:
Get-Item HKLM:SYSTEMCurrentControlSetServicesLanmanServerParameters | ForEach-Object {Get-ItemProperty $_.pspath}
Конфигурация по умолчанию = Enabled (раздел реестра не создается), значение SMB1 не возвращается
Отключение:
Set-ItemProperty -Path "HKLM:SYSTEMCurrentControlSetServicesLanmanServerParameters" SMB1 -Type DWORD -Value 0 –Force
Включение:
Set-ItemProperty -Path "HKLM:SYSTEMCurrentControlSetServicesLanmanServerParameters" SMB1 -Type DWORD -Value 1 –Force
Примечание. После внесения этих изменений компьютер необходимо перезагрузить.
SMB версий 2 и 3 на SMB-сервере
Обнаружение:
Get-ItemProperty HKLM:SYSTEMCurrentControlSetServicesLanmanServerParameters | ForEach-Object {Get-ItemProperty $_.pspath}
Отключение:
Set-ItemProperty -Path "HKLM:SYSTEMCurrentControlSetServicesLanmanServerParameters" SMB2 -Type DWORD -Value 0 –Force
Включение:
Set-ItemProperty -Path "HKLM:SYSTEMCurrentControlSetServicesLanmanServerParameters" SMB2 -Type DWORD -Value 1 –Force
Примечание. После внесения этих изменений компьютер необходимо перезагрузить.
Редактор реестра
Внимание! В статье содержатся сведения об изменении реестра. Перед внесением изменений рекомендуется создать резервную копию реестра. и изучить процедуру его восстановления на случай возникновения проблемы. Дополнительные сведения о создании резервной копии, восстановлении и изменении реестра см. в указанной ниже статье базы знаний Майкрософт.
322756 Как создать резервную копию и восстановить реестр в Windows
Чтобы включить или отключить протокол SMB версии 1 на SMB-сервере, настройте следующий раздел реестра:
Подраздел реестра: HKEY_LOCAL_MACHINESYSTEMCurrentControlSetServicesLanmanServerParameters
Запись реестра: SMB1
REG_DWORD: 0 = отключено
REG_DWORD: 1 = включено
По умолчанию: 1 = включен (не создан раздел реестра)
Чтобы включить или отключить протокол SMB версии 2 на SMB-сервере, настройте следующий раздел реестра:
Подраздел реестра:HKEY_LOCAL_MACHINESYSTEMCurrentControlSetServicesLanmanServerParameters
Запись реестра: SMB2
REG_DWORD: 0 = отключено
REG_DWORD: 1 = включено
По умолчанию: 1 = включен (не создан раздел реестра)
Примечание. После внесения этих изменений компьютер необходимо перезагрузить.
| title | description | author | manager | ms.topic | ms.author | ms.date | ms.custom |
|---|---|---|---|---|---|---|---|
|
How to detect, enable and disable SMBv1, SMBv2, and SMBv3 in Windows |
Describes how to enable and disable the Server Message Block protocol (SMBv1, SMBv2, and SMBv3) in Windows client and server environments. |
Deland-Han |
dcscontentpm |
how-to |
delhan |
12/12/2022 |
contperf-fy21q2 |
How to detect, enable and disable SMBv1, SMBv2, and SMBv3 in Windows
Applies to: Windows Server 2022, Windows Server 2019, Windows Server 2016, Windows Server 2012 R2, Windows Server 2012, Windows 11, Windows 10, Windows 8.1, Windows 8
This article describes how to enable and disable Server Message Block (SMB) version 1 (SMBv1), SMB version 2 (SMBv2), and SMB version 3 (SMBv3) on the SMB client and server components.
While disabling or removing SMBv1 might cause some compatibility issues with old computers or software, SMBv1 has significant security vulnerabilities, and we strongly encourage you not to use it.
Disabling SMBv2 or SMBv3 for troubleshooting
We recommend keeping SMBv2 and SMBv3 enabled, but you might find it useful to disable one temporarily for troubleshooting. For more information, see How to detect status, enable, and disable SMB protocols on the SMB Server.
In Windows 10, Windows 8.1, Windows Server 2019, Windows Server 2016, Windows Server 2012 R2, and Windows Server 2012, disabling SMBv3 deactivates the following functionality:
- Transparent Failover — clients reconnect without interruption to cluster nodes during maintenance or failover
- Scale Out — concurrent access to shared data on all file cluster nodes
- Multichannel — aggregation of network bandwidth and fault tolerance if multiple paths are available between client and server
- SMB Direct — adds RDMA networking support for high performance, with low latency and low CPU use
- Encryption — Provides end-to-end encryption and protects from eavesdropping on untrustworthy networks
- Directory Leasing — Improves application response times in branch offices through caching
- Performance Optimizations — optimizations for small random read/write I/O
In Windows 7 and Windows Server 2008 R2, disabling SMBv2 deactivates the following functionality:
- Request compounding — allows for sending multiple SMBv2 requests as a single network request
- Larger reads and writes — better use of faster networks
- Caching of folder and file properties — clients keep local copies of folders and files
- Durable handles — allow for connection to transparently reconnect to the server if there’s a temporary disconnection
- Improved message signing — HMAC SHA-256 replaces MD5 as hashing algorithm
- Improved scalability for file sharing — number of users, shares, and open files per server greatly increased
- Support for symbolic links
- Client oplock leasing model — limits the data transferred between the client and server, improving performance on high-latency networks and increasing SMB server scalability
- Large MTU support — for full use of 10 Gigabit Ethernet (GbE)
- Improved energy efficiency — clients that have open files to a server can sleep
The SMBv2 protocol was introduced in Windows Vista and Windows Server 2008, while the SMBv3 protocol was introduced in Windows 8 and Windows Server 2012. For more information about SMBv2 and SMBv3 capabilities, see the following articles:
- Server Message Block overview
- What’s New in SMB
How to remove SMBv1 via PowerShell
Here are the steps to detect, disable and enable SMBv1 client and server by using PowerShell commands with elevation.
[!NOTE]
The computer will restart after you run the PowerShell commands to disable or enable SMBv1.
-
Detect:
Get-WindowsOptionalFeature -Online -FeatureName SMB1Protocol
-
Disable:
Disable-WindowsOptionalFeature -Online -FeatureName SMB1Protocol
-
Enable:
Enable-WindowsOptionalFeature -Online -FeatureName SMB1Protocol
[!TIP]
You can detect SMBv1 status, without elevation, by running:Get-SmbServerConfiguration | Format-List EnableSMB1Protocol.
Windows Server 2012 Windows Server 2012 R2, Windows Server 2016, Windows Server 2019: Server Manager method

To remove SMBv1 from Windows Server:
- On the Server Manager Dashboard of the server where you want to remove SMBv1, under Configure this local server, select Add roles and features.
- On the Before you begin page, select Start the Remove Roles and Features Wizard, and then on the following page, select Next.
- On the Select destination server page under Server Pool, ensure that the server you want to remove the feature from is selected, and then select Next.
- On the Remove server roles page, select Next.
- On the Remove features page, clear the check box for SMB 1.0/CIFS File Sharing Support and select Next.
- On the Confirm removal selections page, confirm that the feature is listed, and then select Remove.
Windows 8.1, Windows 10, and Windows 11: Add or Remove Programs method

To disable SMBv1 for the mentioned operating systems:
- In Control Panel, select Programs and Features.
- Under Control Panel Home, select Turn Windows features on or off to open the Windows Features box.
- In the Windows Features box, scroll down the list, clear the check box for SMB 1.0/CIFS File Sharing Support and select OK.
- After Windows applies the change, on the confirmation page, select Restart now.
How to detect status, enable, and disable SMB protocols
[!NOTE]
When you enable or disable SMBv2 in Windows 8 or Windows Server 2012, SMBv3 is also enabled or disabled. This behavior occurs because these protocols share the same stack.
Server
Windows 8 and Windows Server 2012 introduced the new Set-SMBServerConfiguration Windows PowerShell cmdlet. The cmdlet enables you to enable or disable the SMBv1, SMBv2, and SMBv3 protocols on the server component.
You don’t have to restart the computer after you run the Set-SMBServerConfiguration cmdlet.
SMBv1
-
Detect:
Get-SmbServerConfiguration | Select EnableSMB1Protocol
-
Disable:
Set-SmbServerConfiguration -EnableSMB1Protocol $false
-
Enable:
Set-SmbServerConfiguration -EnableSMB1Protocol $true
For more information, see Server storage at Microsoft.
SMB v2/v3
-
Detect:
Get-SmbServerConfiguration | Select EnableSMB2Protocol
-
Disable:
Set-SmbServerConfiguration -EnableSMB2Protocol $false
-
Enable:
Set-SmbServerConfiguration -EnableSMB2Protocol $true
For Windows 7, Windows Server 2008 R2, Windows Vista, and Windows Server 2008
To enable or disable SMB protocols on an SMB Server that is running Windows 7, Windows Server 2008 R2, Windows Vista, or Windows Server 2008, use Windows PowerShell or Registry Editor.
Additional PowerShell methods
[!NOTE]
This method requires PowerShell 2.0 or later.
SMBv1 on SMB Server
Detect:
Get-Item HKLM:SYSTEMCurrentControlSetServicesLanmanServerParameters | ForEach-Object {Get-ItemProperty $_.pspath}
Default configuration = Enabled (No registry named value is created), so no SMB1 value will be returned
Disable:
Set-ItemProperty -Path "HKLM:SYSTEMCurrentControlSetServicesLanmanServerParameters" SMB1 -Type DWORD -Value 0 -Force
Enable:
Set-ItemProperty -Path "HKLM:SYSTEMCurrentControlSetServicesLanmanServerParameters" SMB1 -Type DWORD -Value 1 -Force
Note You must restart the computer after you make these changes.
For more information, see Server storage at Microsoft.
SMBv2/v3 on SMB Server
Detect:
Get-ItemProperty HKLM:SYSTEMCurrentControlSetServicesLanmanServerParameters | ForEach-Object {Get-ItemProperty $_.pspath}
Disable:
Set-ItemProperty -Path "HKLM:SYSTEMCurrentControlSetServicesLanmanServerParameters" SMB2 -Type DWORD -Value 0 -Force
Enable:
Set-ItemProperty -Path "HKLM:SYSTEMCurrentControlSetServicesLanmanServerParameters" SMB2 -Type DWORD -Value 1 -Force
[!NOTE]
You must restart the computer after you make these changes.
Registry Editor
[!IMPORTANT]
Follow the steps in this section carefully. Serious problems might occur if you modify the registry incorrectly. Before you modify it, back up the registry for restoration in case problems occur.
To enable or disable SMBv1 on the SMB server, configure the following registry key:
HKEY_LOCAL_MACHINESYSTEMCurrentControlSetServicesLanmanServerParameters
Registry entry: SMB1
REG_DWORD: 0 = Disabled
REG_DWORD: 1 = Enabled
Default: 1 = Enabled (No registry key is created)
To enable or disable SMBv2 on the SMB server, configure the following registry key:
HKEY_LOCAL_MACHINESYSTEMCurrentControlSetServicesLanmanServerParameters
Registry entry: SMB2
REG_DWORD: 0 = Disabled
REG_DWORD: 1 = Enabled
Default: 1 = Enabled (No registry key is created)
[!NOTE]
You must restart the computer after you make these changes.
Client
Here is how to detect status, enable, and disable SMB protocols on the SMB Client that is running Windows 10, Windows Server 2019, Windows 8.1, Windows Server 2016, Windows Server 2012 R2, and Windows Server 2012.
SMBv1 on SMB Client
-
Detect
sc.exe qc lanmanworkstation
-
Disable:
sc.exe config lanmanworkstation depend= bowser/mrxsmb20/nsi
sc.exe config mrxsmb10 start= disabled
-
Enable:
sc.exe config lanmanworkstation depend= bowser/mrxsmb10/mrxsmb20/nsi
sc.exe config mrxsmb10 start= auto
For more information, see Server storage at Microsoft
SMB v2/v3 on SMB Client
-
Detect:
sc.exe qc lanmanworkstation
-
Disable:
sc.exe config lanmanworkstation depend= bowser/mrxsmb10/nsi
sc.exe config mrxsmb20 start= disabled
-
Enable:
sc.exe config lanmanworkstation depend= bowser/mrxsmb10/mrxsmb20/nsi
sc.exe config mrxsmb20 start= auto
[!NOTE]
- You must run these commands at an elevated command prompt.
- You must restart the computer after you make these changes.
Disable SMBv1 by using Group Policy
This section introduces how to use Group Policy to disable SMBv1. You can use this method on different versions of Windows.
Server
SMBv1
This procedure configures the following new item in the registry:
HKEY_LOCAL_MACHINESYSTEMCurrentControlSetServicesLanmanServerParameters
- Registry entry: SMB1
- REG_DWORD: 0 = Disabled
To use Group Policy to configure this, follow these steps:
-
Open the Group Policy Management Console. Right-click the Group Policy object (GPO) that should contain the new preference item, and then click Edit.
-
In the console tree under Computer Configuration, expand the Preferences folder, and then expand the Windows Settings folder.
-
Right-click the Registry node, point to New, and select Registry Item.


In the New Registry Properties dialog box, select the following:
- Action: Create
- Hive: HKEY_LOCAL_MACHINE
- Key Path: SYSTEMCurrentControlSetServicesLanmanServerParameters
- Value name: SMB1
- Value type: REG_DWORD
- Value data: 0

This procedure disables the SMBv1 Server components. This Group Policy must be applied to all necessary workstations, servers, and domain controllers in the domain.
[!NOTE]
WMI filters can also be set to exclude unsupported operating systems or selected exclusions, such as Windows XP.
[!IMPORTANT]
Be careful when you make these changes on domain controllers on which legacy Windows XP or older Linux and third-party systems (that don’t support SMBv2 or SMBv3) require access to SYSVOL or other file shares where SMB v1 is being disabled.
Client
SMB v1
To disable the SMBv1 client, the services registry key needs to be updated to disable the start of MRxSMB10, and then the dependency on MRxSMB10 needs to be removed from the entry for LanmanWorkstation so that it can start normally without requiring MRxSMB10 to first start.
This guidance updates and replaces the default values in the following two items in the registry:
HKEY_LOCAL_MACHINESYSTEMCurrentControlSetservicesmrxsmb10
Registry entry: Start REG_DWORD: 4= Disabled
HKEY_LOCAL_MACHINESYSTEMCurrentControlSetServicesLanmanWorkstation
Registry entry: DependOnService REG_MULTI_SZ: «Bowser»,»MRxSmb20″,»NSI»
[!NOTE]
The default included MRxSMB10 which is now removed as dependency.
To configure this by using Group Policy, follow these steps:
-
Open the Group Policy Management Console. Right-click the GPO that should contain the new preference item, and then click Edit.
-
In the console tree under Computer Configuration, expand the Preferences folder, and then expand the Windows Settings folder.
-
Right-click the Registry node, point to New, and select Registry Item.
-
In the New Registry Properties dialog box, select the following:
- Action: Update
- Hive: HKEY_LOCAL_MACHINE
- Key Path: SYSTEMCurrentControlSetservicesmrxsmb10
- Value name: Start
- Value type: REG_DWORD
- Value data: 4
-
Then remove the dependency on the MRxSMB10 that was disabled.
In the New Registry Properties dialog box, select the following:
- Action: Replace
- Hive: HKEY_LOCAL_MACHINE
- Key Path: SYSTEMCurrentControlSetServicesLanmanWorkstation
- Value name: DependOnService
- Value type: REG_MULTI_SZ
- Value data:
- Bowser
- MRxSmb20
- NSI
[!NOTE]
These three strings will not have bullets (see the following screen shot).The default value includes MRxSMB10 in many versions of Windows, so by replacing them with this multi-value string, it is in effect removing MRxSMB10 as a dependency for LanmanWorkstation and going from four default values down to just these three values above.
[!NOTE]
When you use Group Policy Management Console, you don’t have to use quotation marks or commas. Just type each entry on individual lines. -
Restart the targeted systems to finish disabling SMB v1.


Auditing SMBv1 usage
To determine which clients are attempting to connect to an SMB server with SMBv1, you can enable auditing on Windows Server 2016, Windows 10, and Windows Server 2019. You can also audit on Windows 7 and Windows Server 2008 R2 if the May 2018 monthly update is installed, and on Windows 8.1 and Windows Server 2012 R2 if the July 2017 monthly update is installed.
-
Enable:
Set-SmbServerConfiguration -AuditSmb1Access $true
-
Disable:
Set-SmbServerConfiguration -AuditSmb1Access $false
-
Detect:
Get-SmbServerConfiguration | Select AuditSmb1Access
When SMBv1 auditing is enabled, event 3000 appears in the «Microsoft-Windows-SMBServerAudit» event log, identifying each client that attempts to connect with SMBv1.
Summary
If all the settings are in the same GPO, Group Policy Management displays the following settings.

Testing and validation
After completing the configuration steps in this article, allow the policy to replicate and update. As necessary for testing, run gpupdate /force at a command prompt, and then review the target computers to make sure that the registry settings are applied correctly. Make sure SMBv2 and SMBv3 are functioning for all other systems in the environment.
[!NOTE]
Don’t forget to restart the target systems.
The Server Message Block (SMB) network protocol is used to share and access folders, files, printers, and other devices over network (TCP port 445). In this article, we will look at which versions (dialects) of SMB are available in different versions of Windows (and how they relate to samba versions on Linux); how to check the SMB version in use on your computer; and how to enable or disable the SMBv1, SMBv2, and SMBv3 dialects.
Contents:
- SMB Protocol Versions in Windows
- How to Check SMB Version on Windows?
- Checking Used SMB Dialects with Get-SMBConnection
- Stop Using the Insecure SMBv1 Protocol
- How to Enable and Disable SMBv1, SMBv2, and SMBv3 on Windows?
SMB Protocol Versions in Windows
There are several versions of the SMB protocol (dialects) that have consistently appeared in new Windows versions (and samba) :
- CIFS – Windows NT 4.0
- SMB 1.0 – Windows 2000
- SMB 2.0 – Windows Server 2008 and Windows Vista SP1 (supported in Samba 3.6)
- SMB 2.1 – Windows Server 2008 R2 and Windows 7 (Samba 4.0)
- SMB 3.0 – Windows Server 2012 and Windows 8 (Samba 4.2)
- SMB 3.02 – Windows Server 2012 R2 and Windows 8.1 (not supported in Samba)
- SMB 3.1.1 – Windows Server 2016 and Windows 10 (not supported in Samba)
Samba is used to implement the SMB protocol in Linux/Unix . Samba 4.14 and newer uses SMB 2.1 by default.
In SMB network communication, the client and server use the maximum SMB protocol version supported by both the client and the server.
The summary table of SMB version compatibility looks like this. Using this table, you can determine the version of the SMB protocol that is selected when different versions of Windows interact:
| Operating System | Windows 10, Win Server 2016 | Windows 8.1, Win Server 2012 R2 | Windows 8,Server 2012 | Windows 7,Server 2008 R2 | Windows Vista,Server 2008 | Windows XP, Server 2003 and earlier |
| Windows 10, Windows Server 2016 | SMB 3.1.1 | SMB 3.02 | SMB 3.0 | SMB 2.1 | SMB 2.0 | SMB 1.0 |
| Windows 8.1, Server 2012 R2 | SMB 3.02 | SMB 3.02 | SMB 3.0 | SMB 2.1 | SMB 2.0 | SMB 1.0 |
| Windows 8, Server 2012 | SMB 3.0 | SMB 3.0 | SMB 3.0 | SMB 2.1 | SMB 2.0 | SMB 1.0 |
| Windows 7, Server 2008 R2 | SMB 2.1 | SMB 2.1 | SMB 2.1 | SMB 2.1 | SMB 2.0 | SMB 1.0 |
| Windows Vista, Server 2008 | SMB 2.0 | SMB 2.0 | SMB 2.0 | SMB 2.0 | SMB 2.0 | SMB 1.0 |
| Windows XP, 2003 and earlier | SMB 1.0 | SMB 1.0 | SMB 1.0 | SMB 1.0 | SMB 1.0 | SMB 1.0 |
For example, if a client computer running Windows 8.1 connects to a file server with Windows Server 2016, the SMB 3.0.2 protocol will be used.
According to the table, Windows XP and Windows Server 2003 can use only SMB 1.0 to access shared folders and files. The SMBv1 is disabled in newer versions of Windows Server (2012 R2/2016). So, if you are still using Windows XP and Windows Server 2003 devices on your network, they won’t be able to access shared folders on the file server running Windows Server 2016.
If Windows Server 2019/2016 with disabled SMB v1.0 is used as a domain controller, then Windows XP/Server 2003 clients won’t be able to access the SYSVOL and NETLOGON folders on domain controllers and authenticate with AD.
You may receive the following error when trying to connect to a shared folder on a file server with SMBv1 disabled:
The specified network name is no longer available
How to Check SMB Version on Windows?
Let’s look on how to find out which versions of the SMB are enabled on your Windows device.
On Windows 10/8.1 and Windows Server 2019/2016/2012R2, you can check the status of various dialects of the SMB protocol using PowerShell:
Get-SmbServerConfiguration | select EnableSMB1Protocol,EnableSMB2Protocol

This command returned that the SMB1 protocol is disabled (EnableSMB1Protocol = True), and the SMB2 and SMB3 protocols are enabled (EnableSMB1Protocol = False).
Note that the SMBv3 and SMBv2 protocols are closely related. You cannot disable or enable SMBv3 or SMBv2 separately. They are always enabled/disabled only together because they share the same stack.
On Windows 7, Vista, and Windows Server 2008 R2/2008:
Get-Item HKLM:SYSTEMCurrentControlSetServicesLanmanServerParameters | ForEach-Object {Get-ItemProperty $_.pspath}
If there are no parameters named SMB1 or SMB2 in this registry key, then the SMBv1 and SMBv2 protocols are enabled by default.
Also on these Windows versions, you can check which SMB client dialects are allowed to connect to remote hosts:
sc.exe query mrxsmb10
SERVICE_NAME: mrxsmb10
TYPE : 2 FILE_SYSTEM_DRIVER
STATE : 4 RUNNING
(STOPPABLE, NOT_PAUSABLE, IGNORES_SHUTDOWN)
WIN32_EXIT_CODE : 0 (0x0)
SERVICE_EXIT_CODE : 0 (0x0)
CHECKPOINT : 0x0
WAIT_HINT : 0x0
sc.exe query mrxsmb20
SERVICE_NAME: mrxsmb20
TYPE : 2 FILE_SYSTEM_DRIVER
STATE : 4 RUNNING
(STOPPABLE, NOT_PAUSABLE, IGNORES_SHUTDOWN)
WIN32_EXIT_CODE : 0 (0x0)
SERVICE_EXIT_CODE : 0 (0x0)
CHECKPOINT : 0x0
WAIT_HINT : 0x0
In both cases, the services are running (STATE = 4 Running). This means that the current Windows device can connect to both SMBv1 and SMBv2 hosts.
Checking Used SMB Dialects with Get-SMBConnection
When communicating over SMB, computers use the maximum SMB version supported by both the client and the server. The Get-SMBConnection PowerShell cmdlet can be used to check the SMB version used to access a remote computer:

The SMB version used to connect to the remote server (ServerName) is listed in the Dialect column.
You can display information about the SMB versions used to access a specific server:
Get-SmbConnection -ServerName srvfs01
If you want to display if SMB encryption is in use (introduced in SMB 3.0):
Get-SmbConnection | ft ServerName,ShareName,Dialect,Encrypted,UserName
On Linux, you can display a list of SMB connections and used dialects in samba using the command:
$ sudo smbstatus
On the Windows SMB server side, you can display a list of the versions of the SMB protocols that the clients are currently using. Run the command:
Get-SmbSession | Select-Object -ExpandProperty Dialect | Sort-Object -Unique
 In this example, there are 898 clients connected to the server using SMB 2.1 (Windows 7/ Windows 2008 R2) and 8 SMB 3.02 clients.
You can use PowerShell to enable auditing of the SMB versions used for the connection:
Set-SmbServerConfiguration –AuditSmb1Access $true
SMB connection events can then be exported from Event Viewer logs:
Get-WinEvent -LogName Microsoft-Windows-SMBServer/Audit
Stop Using the Insecure SMBv1 Protocol
Over the past few years, Microsoft has systematically disabled the legacy SMB 1.0 protocol in all products for security reasons. This is due to the large number of critical vulnerabilities in this protocol (remember the incidents with wannacrypt and petya ransomware, which exploited a vulnerability in the SMBv1 protocol). Microsoft and other IT companies strongly recommend that you stop using SMBv1 in your network.
However, disabling SMBv1 can cause problems with accessing shared files and folders on newer versions of Windows 10 (Windows Server 2016/2019) from legacy clients (Windows XP, Windows Server 2003), third-party OS (Mac OSX 10.8 Mountain Lion, Snow Leopard, Mavericks, old Linux distros), old NAS devices.
If there are no legacy devices left on your network that support only SMBv1, be sure to disable this SMB dialect in Windows.
If you have clients running Windows XP, Windows Server 2003, or other devices that only support SMBv1, they should be updated or isolated.
How to Enable and Disable SMBv1, SMBv2, and SMBv3 on Windows?
Let’s look at ways to enable and disable different SMB versions on Windows. We’ll cover SMB client and server management (they are different Windows components).
Windows 10, 8.1, and Windows Server 2019/2016/2012R2:
Disable SMBv1 client and server:
Disable-WindowsOptionalFeature -Online -FeatureName smb1protocol
Disable SMBv1 server only:
Set-SmbServerConfiguration -EnableSMB1Protocol $false
Enable SMBv1 client and server:
Enable-WindowsOptionalFeature -Online -FeatureName smb1protocol
Enable only SMBv1 server:
Set-SmbServerConfiguration -EnableSMB1Protocol $true
Disable SMBv2 and SMBv3 server:
Set-SmbServerConfiguration -EnableSMB2Protocol $false
Enable SMBv2 and SMBv3 server:
Set-SmbServerConfiguration -EnableSMB2Protocol $true

Windows 7, Vista, and Windows Server 2008 R2/2008:
Disable SMBv1 server:
Set-ItemProperty -Path "HKLM:SYSTEMCurrentControlSetServicesLanmanServerParameters" SMB1 -Type DWORD -Value 0 –Force
Enable SMBv1 server:
Set-ItemProperty -Path "HKLM:SYSTEMCurrentControlSetServicesLanmanServerParameters" SMB1 -Type DWORD -Value 1 –Force
Disable SMBv1 client:
sc.exe config lanmanworkstation depend= bowser/mrxsmb20/nsi

sc.exe config mrxsmb10 start= disabled
Enable SMBv1 client:
sc.exe config lanmanworkstation depend= bowser/mrxsmb10/mrxsmb20/nsi

sc.exe config mrxsmb10 start= auto
Disable SMBv2 server:
Set-ItemProperty -Path "HKLM:SYSTEMCurrentControlSetServicesLanmanServerParameters" SMB2 -Type DWORD -Value 0 -Force
Enable SMBv2 server:
Set-ItemProperty -Path "HKLM:SYSTEMCurrentControlSetServicesLanmanServerParameters" SMB2 -Type DWORD -Value 1 –Force
Disable SMBv2 client:
sc.exe config lanmanworkstation depend= bowser/mrxsmb10/nsi

sc.exe config mrxsmb20 start= disabled
Enable SMBv2 client:
sc.exe config lanmanworkstation depend= bowser/mrxsmb10/mrxsmb20/nsi

sc.exe config mrxsmb20 start= auto
You can disable SMBv1 server on domain joined computers by deploying the following registry parameter through the GPO:
- Key: HKEY_LOCAL_MACHINESYSTEMCurrentControlSetServicesLanmanServerParameters
- Name: SMB1
- Type: REG_DWORD
- Value: 0
Set the registry parameter SMB2=0 in order to disable the SMBv2 server.
To disable the SMBv1 client, you need to propagate the following registry setting:
- Key: HKEY_LOCAL_MACHINESYSTEMCurrentControlSetservicesmrxsmb10
- Name: Start
- Type: REG_DWORD
- Value: 4
Permanent link:
https://auditsquare.com/advisory/windows/how-to-disable-smb1
What is “SMB1”?
SMB or CIFS is usually used to refer to Microsoft Windows networking protocol, used for sharing files and printers and for IPC in Windows networks.
SMB1 is the particular version of this protocol; there are also newer versions, namely SMB2 and SMB3, supported
on Windows Vista/Windows Server 2008 and Windows 8/Windows Server 2012, respectively.
SMB1 is today generally considered insecure, and over the years quite a few very serious bugs and errors were reported for it. For this reason, it is advised to disable support for this SMB version whenever it is possible. Note however, that Microsoft Windows XP and Windows Server 2003 and older systems do not support newer SMB versions.
How to disable it?
Disabling server-side SMB1 via registry (Windows Vista, Windows Server 2008 and later)
- Start
regedit(as administrator) - Go to:
HKEY_LOCAL_MACHINESystemCurrentControlSetServicesLanmanServerParameters - Create a new
DWORDvalue namedSMB1and set it to0 - Reboot for the change to take effect.
- Note: changing value of
SMB1to1would re-enable the SMB1 support.
Disabling server-side SMB1 using powershell (Windows 8, Windows Server 2012 and later)
- Run the command
Set-SmbServerConfiguration -EnableSMB1Protocol $falsein powershell prompt. - You do not have to restart the computer after you run the Set-SMBServerConfiguration cmdlet.
Completely removing SMB1 support (incl. client-side) via GUI (Windows 8.1, Windows Server 2012R2 and later)
- On server: in Server Manager, go to
Remove featuresand in the list, uncheckSMB 1.0/CIFS File Sharing Support. - On client: go to Control Panel, Add or Remove Programs, Turn Windows features on or off, and uncheck
SMB 1.0/CIFS File Sharing Supportin the list - Note: this method disables also client support for SMB1; though it is highly advisable from the security point of view, it may lead to operational problems when client access to legacy systems is required.
Windows XP / 2000 / 2003
- Unfortunately the only option here is to completely disable
LanmanServerservice (which disables sharing of files and printers).
Обновлено 25.11.2022

Добрый день уважаемые читатели, в прошлый раз я вам подробно рассказал, как защититься от шифровальщика, если он уже попал к вам на компьютер, сегодня же я хочу рассмотреть вопрос, как не дать ему к вам попасть из вне, мы разберем отключение smb v1 или как защититься от wannacrypt и вируса petya. Уверен, что описанный тут материал окажется для вас весьма полезным и актуальным, так как разновидностей данной заразы, будет еще очень много в будущем.
Что такое протокол SMB v1
Прежде, чем начать перекрывать кислород для вирусов шифровальщиков, я хочу вас познакомить с источником, через который они лезут и называется он протокол Server Message Block (SMB).
Server Message Block — это сетевой протокол, работающий на прикладном уровне модели OSI, для доступа к сетевым ресурсам, принтерам, папкам, для взаимодействия процессов. Наверняка многие из вас знают, такое понятие как UNC пути, вида \servershare, когда вы обращаетесь к сетевой папке или принтеру, так например, сервер печати Windows, расшаривает их.
Ранее SMB протокол работал и NetBIOS прослойкой, где использовал порты UDP 137-138 и TCP 137, 139, но это было до появления 2000-го Windows, где порт поменяли на 445, он так же применяется и для входа компьютеров в домен Active Directory. Самая первая версию данного протокола, имела название «Common Internet File System» (CIFS ), ее придумали еще в далеких 90-х, я тогда еще пешком под стол ходил. Протокол долго не развивался и приобрел вторую версию, лишь в 2006 году с выходом провальной Windows Vista. Windows 8 уже принесла нам SMB 3.0.
Каждая новая версия реализации протокола, привносила новые возможности, и это логично, необходимо было увеличивать скорость передачи данных, так как локальные сети, уже превращались в гигабитные и очень часто стали появляться твердотельные накопители. Новые версии по старинке, поддерживали предыдущие, для обратной совместимости операционных систем и устройств, это и является Ахиллесовой пятой у него, через который лезут wannacrypt и petya.
Ниже вы можете посмотреть, эволюцию протокола SMB v1 с выходом новых операционных систем.
Для чего отключать smb v1
Расскажу небольшую предысторию о появлении вирусов wannacrypt и petya. В начале 2017 года, одна хакерская команда, смогла взломать службу АНБ и похитить у нее данные, о всевозможных лазейках в компьютерных системах, благодаря которым можно получать удаленный доступ к нужному компьютеру и следить за жертвой, получая о ней все данные. Среди этих дыр безопасности, были лазейки для:
- Vmware ESXI 5 и выше
- Microsoft Windows XP и выше
- Linux системы
- Сетевое оборудование
Хакеры попытались продать все сворованное, но в итоге покупателей не нашли, не долго думая они выложили все это в сеть, тут и понеслось, другие хакеры и группы, быстро все это дело понахватали и создали свои вирусы, их очень много, но вот за май и июнь 2017 года, мир выучил названия двух, petya и wannacry (wannacrypt). Оба они используют старую уязвимость в протоколе smb v1, являющийся частью операционных систем Windos XP, вплоть до Windows 10, но у десятки все лучше, там по умолчанию работает версия SMB 3.1.1, поэтому она пока спит спокойно.
Вот посмотрите как выглядит экран блокировки после вируса petya. У пострадавшего компьютера просят 300 долларов в биткоинах, ни в коем случае не отправляйте деньги, вы ничего не получите, так как изначально данная зараза не включала в себя разблокировку.

А вот как выглядит экран после заражения wannacrypt. Как и в случае с Петей, все данные зашифрованы и уже являются цифровым мусором.

Что нужно чтобы не стать жертвой шифровальщиков
Давайте я приведу небольшой чек лист, который вам поможет сделать вашу систему более защищенной:
- Своевременно устанавливайте обновления в системе, так как это основная проблема большинства пораженных компьютеров
- Не устанавливайте не проверенный софт
- Посещайте только проверенные веб ресурсы
- Закройте лишние порты на фаэрволе
- Не открывайте электронные письма от неизвестных людей.
Как проверить можно ли заразить ваш компьютер
Как я и писал выше, жертвами становятся те компьютеры у кого работает протокол smb v1, который требует отключения. Ниже я вам предоставлю утилиту, с помощью которой вы сможете проверить удовлетворяет ли ваш или другой компьютер в сети, требованиям по безопасности.
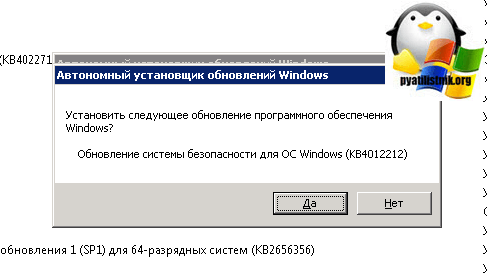
KB обновления защищающие от wannacrypt и Petya
Вот подробный список KB для разных операционных систем Windows:
Windows XP
- https://blogs.technet.microsoft.com/msrc/2017/05/12/customer-guidance-for-wannacrypt-attacks/
Windows Vista и Windows Server 2008
- KB4012598 — 32 бита — http://catalog.update.microsoft.com/v7/site/Search.aspx?q=KB4012598
- KB4012598 — 64 бита — http://catalog.update.microsoft.com/v7/site/Search.aspx?q=KB4012598
Windows 7
- KB4012212 — 32 бита — http://catalog.update.microsoft.com/v7/site/Search.aspx?q=KB4012212
- KB4012215 — 32 бита — http://catalog.update.microsoft.com/v7/site/Search.aspx?q=KB4012215
- KB4012212 — 64 бита — http://catalog.update.microsoft.com/v7/site/Search.aspx?q=KB4012212
- KB4012215 — 64 бита — http://catalog.update.microsoft.com/v7/site/Search.aspx?q=KB4012215
Windows Server 2008 R2
- KB4012212 — http://catalog.update.microsoft.com/v7/site/Search.aspx?q=KB4012212
- KB4012215 — http://catalog.update.microsoft.com/v7/site/Search.aspx?q=KB4012215
Windows 8.1
- KB4012213 — 32 бита — http://catalog.update.microsoft.com/v7/site/Search.aspx?q=KB4012213
- KB4012216 — 32 бита — http://catalog.update.microsoft.com/v7/site/Search.aspx?q=KB4012216
- KB4012213 — 64 бита — http://catalog.update.microsoft.com/v7/site/Search.aspx?q=KB4012213
- KB4012216 — 64 бита — http://catalog.update.microsoft.com/v7/site/Search.aspx?q=KB4012216
Windows Server 2012 R2
- KB4012214 — http://catalog.update.microsoft.com/v7/site/Search.aspx?q=KB4012214
- KB4012217 — http://catalog.update.microsoft.com/v7/site/Search.aspx?q=KB4012217
- KB4012213 — http://catalog.update.microsoft.com/v7/site/Search.aspx?q=KB4012213
- KB4012216 — http://catalog.update.microsoft.com/v7/site/Search.aspx?q=KB4012216
Windows 10
- KB4012606 -32 бита — http://catalog.update.microsoft.com/v7/site/Search.aspx?q=KB4012606
- KB4012606 -64 бита — http://catalog.update.microsoft.com/v7/site/Search.aspx?q=KB4012606
- Windows 10 1511 — KB4013198 — 32 бита — http://catalog.update.microsoft.com/v7/site/Search.aspx?q=KB4013198
- Windows 10 1511 — KB4013198 — 64 бита — http://catalog.update.microsoft.com/v7/site/Search.aspx?q=KB4013198
- Windows 10 1607 — KB4013429 — 32 бита — http://catalog.update.microsoft.com/v7/site/Search.aspx?q=KB4013429
- Windows 10 1607 — KB4013429 — 64 бита — http://catalog.update.microsoft.com/v7/site/Search.aspx?q=KB4013429
Windows Server 2016
- KB4013429 — http://catalog.update.microsoft.com/v7/site/Search.aspx?q=KB4013429
Теперь зная нужные KB мы легко можем проверить, где не хватает обновлений и включен протокол smb v1. Ниже я вам предоставлю два метода поиска бреши.
- Утилита SecurityChecker.v2
- Power shell
Утилита SecurityChecker.v2
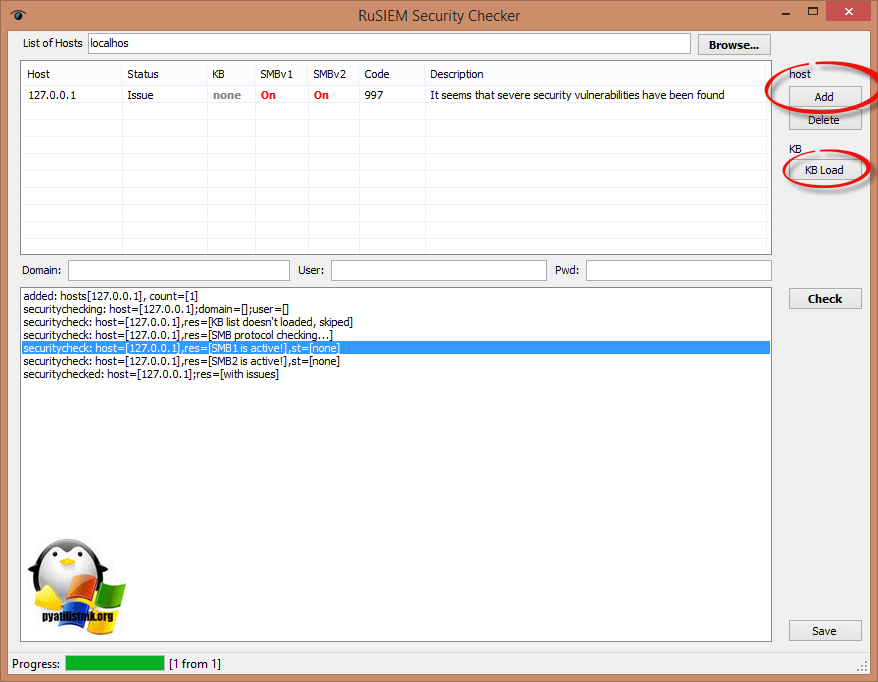
Данная утилита может показать, где включен smb v1 и 2.0, а так же проверить компьютер или компьютеры локальной сети на наличие нужного обновления.
В открывшейся программе, вам необходимо нажать кнопку «Add» и добавить компьютер или компьютеры, требующие проверки. Через кнопку KB вы можете подгрузить файл находящийся в корне утилиты с нужными KB для проверки, после чего нажимаете «Check». По результату проверки, вы увидите, стоит ли вам выполнить отключение smb v1 или же нет. На моем примере, вы видите, что и первая и вторая версии включены.
Проверить протокол smb v1 можно и через powershell. Открываем его от имени администратора и вводим такую команду:
get-hotfix -ComputerName имя вашего компьютера -Id нужная kb
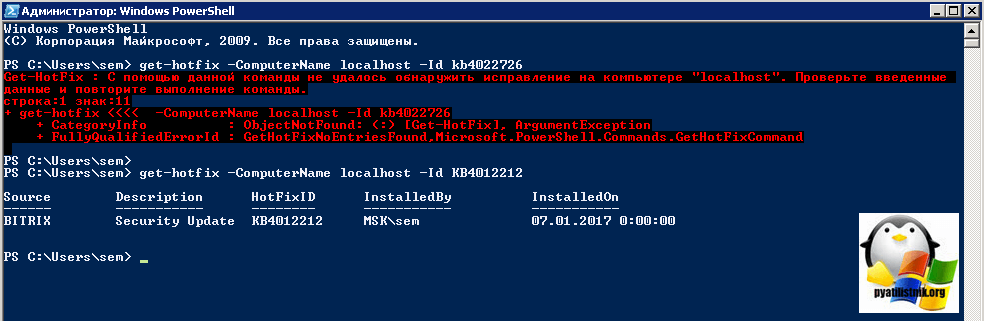
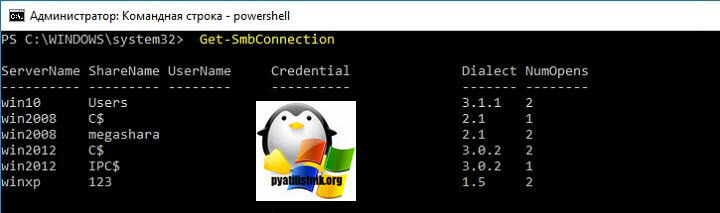
Если у вас есть UNC соединения к вашему компьютеру, то вы можете посмотреть их версии командой
Как отключить smb v1
Я вам хочу рассказать о методах деактивирующих протокол SMB старой версии:
- Через компоненты Windows
- Через PowerShell
- Через реестр Windows
- Через групповую политику
- Оставить и установить обновления
- Через команду sc.exe config
Отключаем smb v1 через компоненты системы
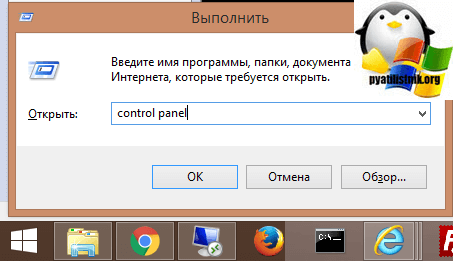
Данный метод подойдет для любой не серверной версии Windows, начиная с Wista и заканчивая Windows 10.Вам необходимо открыть панель управления Windows. Нажимаете одновременно Win+R и в открывшемся окне вводите control panel, это такой универсальный метод, отработает в любой винде.
Находим пункт «Программы и компоненты»
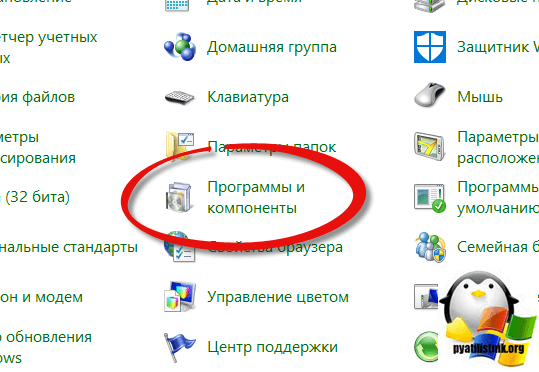
Нажимаем «Включение и отключение компонентов Windows» именно тут, мы уберем доступ для wannacrypt и petya
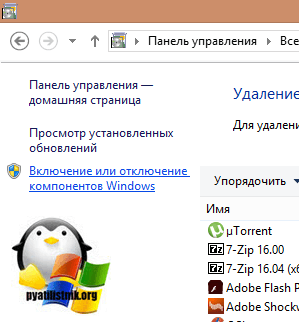
Снимаем галку «Поддержка общего доступа к файлам SMB 1.0/CIFS»
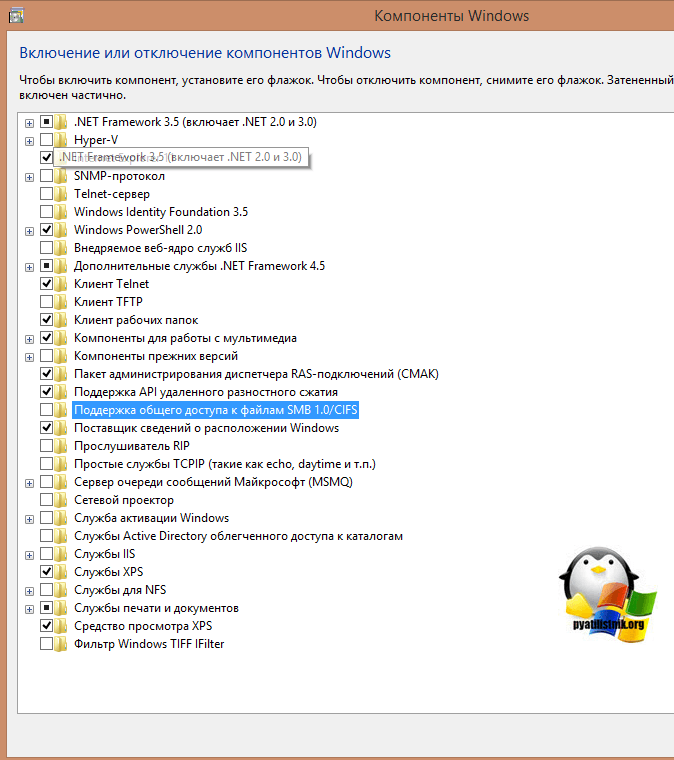
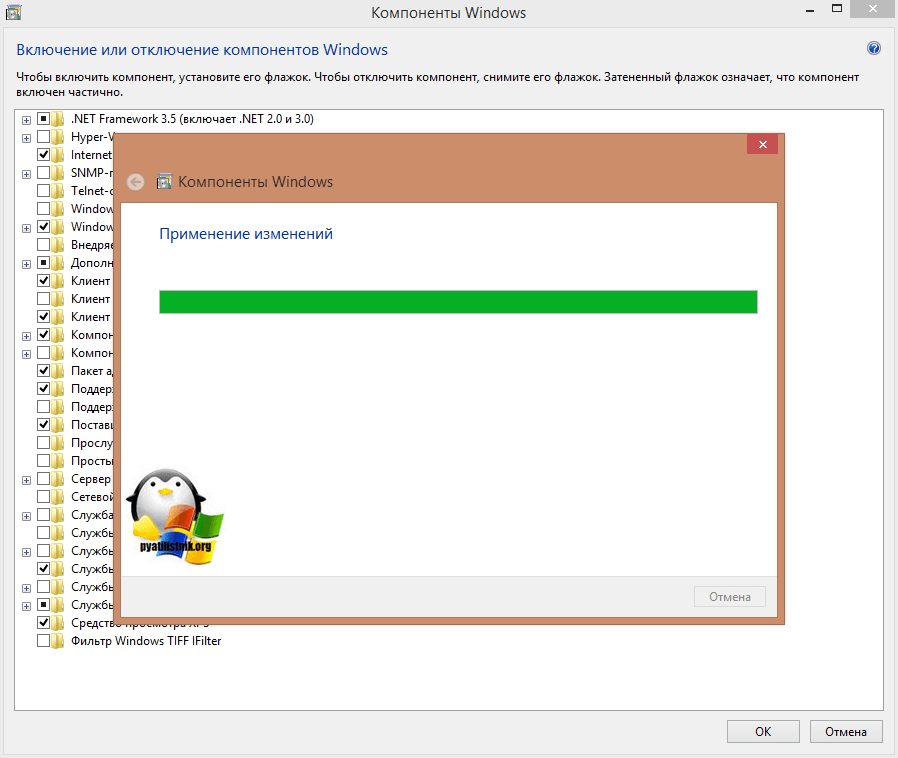
Начнется удаление компонента.
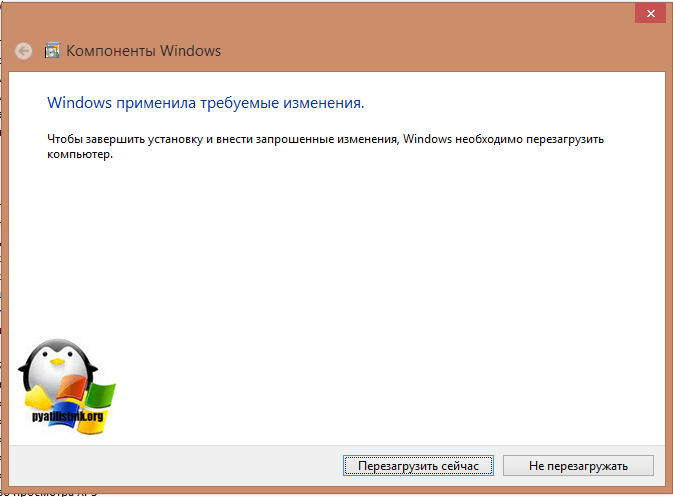
Все, теперь потребуется перезагрузка.
Теперь если со старого компьютера, по типу Windpws XP вы попытаетесь попасть на UNC шару, вы увидите ошибку
Если же вам необходимо сохранить его функциональность и быть защищенным, то устанавливаем нужные KB.
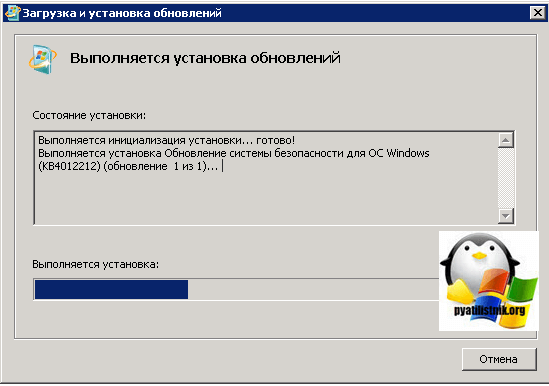
Установка KB против wannacrypt и petya
Выше вы найдете список исправлений для протокола smb v1, скачиваете их из центра обновлений.Это будут файлы формата msu.

Производите установку KB.
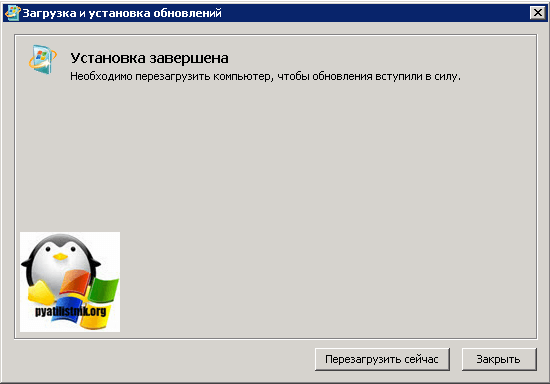
Вот так выглядит процесс установки KB.
Вам потребуется произвести перезагрузку системы. теперь, когда все обновления у вас установлены вам не страшны вирусы wannacrypt и petya.
Отключаем smb v1 через powershell
Данный метод подойдет для серверной операционной системы Windows Server 2012 R2 и Windos 8.1, выполните вот такую команду:
Set-SmbServerConfiguration -EnableSMB1Protocol $false
После ее выполнения smb v1 будет выключен.
Для отключения SMB версии 2 и 3 выполните:
Set-SmbServerConfiguration -EnableSMB2Protocol $false
Если захотите включить, то поменяйте $false на $true.
Теперь для Windows 7 и Windows 2008 R2, выполните следующее:
- Чтобы отключить протокол SMB версии 1 на SMB-сервере, выполните следующий командлет:
Set-ItemProperty -Path «HKLM:SYSTEMCurrentControlSetServicesLanmanServerParameters» SMB1 -Type DWORD -Value 0 -Force
- Чтобы отключить протоколы SMB версии 2 и 3 на SMB-сервере, выполните следующий командлет:
Set-ItemProperty -Path «HKLM:SYSTEMCurrentControlSetServicesLanmanServerParameters» SMB2 -Type DWORD -Value 0 -Force
- Чтобы включить протокол SMB версии 1 на SMB-сервере, выполните следующий командлет:
Set-ItemProperty -Path «HKLM:SYSTEMCurrentControlSetServicesLanmanServerParameters» SMB1 -Type DWORD -Value 1 -Force
- Чтобы включить протоколы SMB версии 2 и 3 на SMB-сервере, выполните следующий командлет:
Set-ItemProperty -Path «HKLM:SYSTEMCurrentControlSetServicesLanmanServerParameters» SMB2 -Type DWORD -Value 1 -Force
Отключаем smb v1 через реестр
Перед тем как править реестр Windows я советую вам сделать резервную копию, так на всякий случай. Открываем реестр, делается это через нажатие кнопок Win+R и ввода команды regedit.
Находим ветку:
HKEY_LOCAL_MACHINESYSTEMCurrentControlSet ServicesLanmanServerParameters
Тут будет параметр SMB1 , по умолчанию там стоит 1, значит включено, меняем его на 0 и закрываем, после перезагрузки все будет выключено. Wannacrypt вас теперь не побеспокоит.
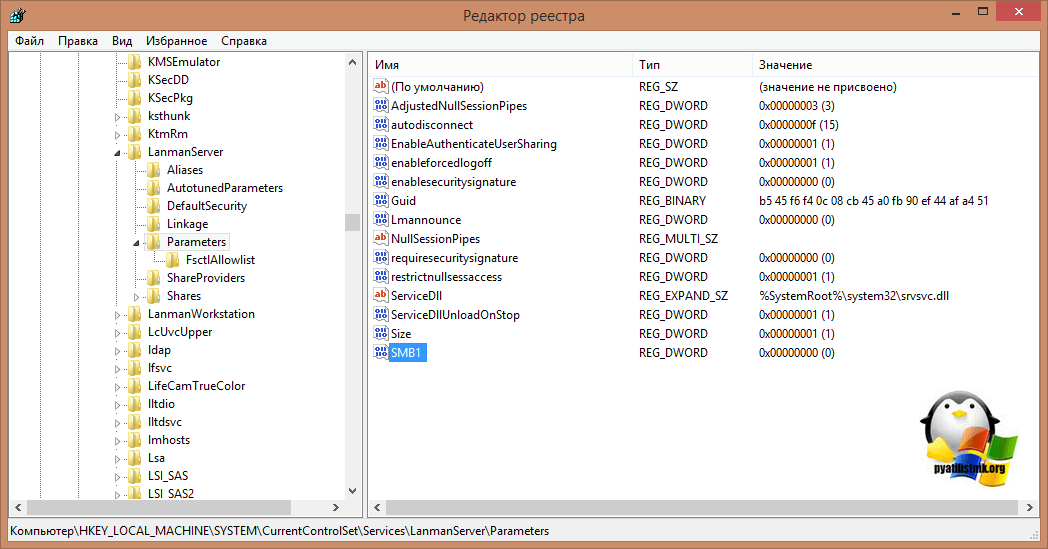
Если нужно отключить SMB2, то находим ветку и меняем там параметр SMB2, так же на ноль.
HKEY_LOCAL_MACHINESYSTEMCurrentControlSet ServicesLanmanServerParameters
Отключить через DISM
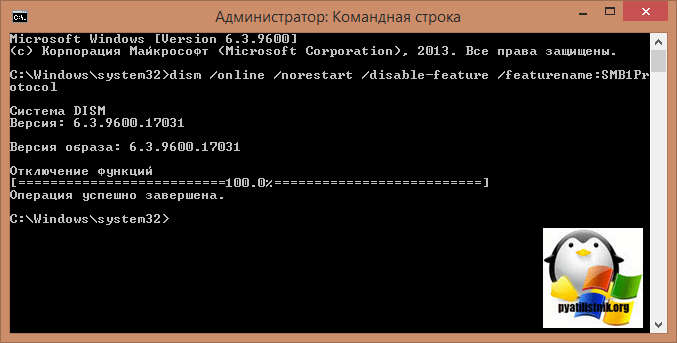
Откройте командную стоку от имени администратора и введите команду:
dism /online /norestart /disable-feature /featurename:SMB1Protocol
Как видите еще один метод защититься от wannacrypt.
Отключение через sc.exe config
Начиная с Windows 7 вы можете выполнить внутри системы вот такие команды через cmd запущенного от имени администратора:
- Чтобы отключить протокол SMB версии 1 на SMB-клиенте, выполните следующие команды:
sc.exe config lanmanworkstation depend= bowser/mrxsmb20/nsi
sc.exe config mrxsmb10 start= disabled
- Чтобы включить протокол SMB версии 1 на SMB-клиенте, выполните следующие команды:
sc.exe config lanmanworkstation depend= bowser/mrxsmb10/mrxsmb20/nsi
sc.exe config mrxsmb10 start= auto
- Чтобы отключить протоколы SMB версии 2 и 3 на SMB-клиенте, выполните следующие команды:
sc.exe config lanmanworkstation depend= bowser/mrxsmb10/nsi
sc.exe config mrxsmb20 start= disabled
- Чтобы включить протоколы SMB версии 2 и 3 на SMB-клиенте, выполните следующие команды:
sc.exe config lanmanworkstation depend= bowser/mrxsmb10/mrxsmb20/nsi
sc.exe config mrxsmb20 start= auto
Как защититься от wannacrypt в Active Directory
Когда речь идет о домене Active Directory, то у системного администратора сразу это ассоциируется с групповыми политиками. Давайте посмотрим как GPO поможет нам в массовом отключении smb v1. По сути групповая политика это изменение ключей реестра на клиентах. Открываем редактор и создаем новую политику, прилинковываем ее к нужному организационному подразделению и изменяем.
Политика для серверных ОС
Нас будет интересовать объект «Конфигурация компьютера — Настройка — Конфигурация Windows — Реестр», создаем элемент реестра.
- Действие: Создать
- Куст: HKEY_LOCAL_MACHINE
- Путь к разделу: SYSTEMCurrentControlSetServicesLanmanServerParameters
- Имя параметра: SMB1
- Тип значения: REG_DWORD.
- Значение: 0

Политика для клиентских ОС
Для отключения поддержки SMB v1 на клиентах понадобится изменить значение двух параметров. Сначала отключим службу протокола SMB v1:
- путь: HKLM:SYSTEMCurrentControlSetservicesmrxsmb10;
- параметр: REG_DWORD c именем Start;
- значение: 4.
Потом поправим зависимость службы LanmanWorkstation, чтоб она не зависела от SMB v1:
- путь: HKLM:SYSTEMCurrentControlSetServicesLanmanWorkstation;
- параметр: REG_MULTI_SZ с именем DependOnService;
- значение: три строки – Bowser, MRxSmb20 и NSI.
Клиентским компьютерам осталось только перезагрузиться и все будет отключено
Учтите, что выключив smb v1, вы защититесь конечно от wannacrypt и petya, но будьте осторожны, если у вас в локальной сети остались старые компьютеры, они не смогут связаться с контроллерами домена и не смогут пройти аутентификацию, так как не умеют работать по SMB 2
Introduction:
In this blog I will not cover why we have to remove SMB v1 from production network, this have been already covered, probably one of the best articles covering this is https://blogs.technet.microsoft.com/filecab/2016/09/16/stop-using-smb1/
I will cover how you can audit the usage of SMB v1 in your network, so you can disable it safely without breaking anything on your production. To do, we will proceed with the three steps listed below:
· Enable Auditing on SMB Servers.
· Configure Event Forwarding.
· Retrieve Events on an Excel sheet and analyzing SMBv1 traffic.
Enable Auditing on SMB Servers:
First Question, on which servers we need to enable auditing?
the answer is simple, all SMB servers. Domain controllers are a good example, client computers and member servers use SMB to access SYSVOL and NETLOGON shares to apply group policy, so domain controllers are servers to audit. File and print servers also need to be audited.
In my scenario I have three concerned servers: DC01 and DC02 are domain controllers, MEM01 is a file server. All of them are running Windows Server 2012 R2.
To enable SMB v1 auditing on Windows Server 2012 R2 run the PowerShell command:
Set-SmbServerConfiguration -AuditSmb1Access $true

After enabling the audit, an event will be logged each time a client computer access server using SMB v1.
I can see the events by navigating Application and Services Logs à Microsoft à Windows à SMB Server à Audit


As you can see on the screenshot above, the event indicates SMB1 access and give you the client IP address.
Note: The command Set-SmbServerConfiguration -AuditSmb1Access $true will not work on a non-updated Windows Server 2012 R2, please install the latest monthly rollup to be sure everything will work just fine, till writing of these lines the latest monthly rollup is October 2018. https://support.microsoft.com/en-us/help/4462926/windows-8-update-kb4462926.
Configure Event Forwarding
Imagine you have a huge environment, let’s say more than 50 domain controllers or maybe more than 100, how you will analyze SMBv1 events on all these servers, here where windows event forwarding will be very useful to centralize logs for better analyzing. Below the steps to centralize SMBv1 events on the server MEM01.
1. Add the network service account as member of the group Event Log Readers on all audited servers.
On Domain Controllers use Active Directory Users and Computers.

On Member servers use Computer Management console as shown on screenshots below.


2. Give the Event Log Readers group permissions to access SMB Server audit Logs.
By default, Event Log Readers members have permissions to access Security and System logs…etc. But they don’t have permissions to access SMB Server Log.
Open command prompt as administrator and run the following command on audited servers.
wevtutil set-log Microsoft-Windows-SMBServer/Audit /ca:O:BAG:SYD:(A;;0x5;;;BA)(A;;0x1;;;S-1-5-32-573)

3. Create a subscription on the Windows Event forwarding Server. (MEM01)
Open Event Viewer
Click on Subscription and then Click Yes.

Right click on Subscription and select Create Subscription…

Enter a friendly name.
Select Source computer initiated.
Click on Select Computer Groups.

Click on Add Domain Computers…

Include the group Domain Controllers and MEM01.
Click OK.

Click on Select Events…

Choose the SMBServer Audit log.

Type 3000 to forward only Events with Event ID 3000.
Click OK.

Click on Advanced…

Select Minimize Latency.

Click OK twice.
Subscription SMBv1 is created.

4. Configure the group policy
Create a GPO and configure the policy setting: Configure target Subscription Manager

Enable the policy and click on Show…

Enter the URI of the event forwarder server. In my example MEM01.

My GPO is named: Event Forwarding.
The GPO is linked to domain controllers OU and BROMServers OU.

you might need to restart the servers before beginning viewing events on the Event forwarding server (MEM01).

Retrieve Events on an Excel sheet and analyzing SMBv1 traffic.
Use the PowerShell script below to export the events on a nice Excel Sheet. Run the PowerShell code below on the event forwarder server (MEM01).

Add-Content -Value “clientName,server,TimeCreated” -Path c:SMBv1.csv
$Events = Get-WinEvent -LogName ForwardedEvents
# Parse out the event message data
ForEach ($Event in $Events) {
# Convert the event to XML
$eventXML = $Event.ToXml()
$clientName = $eventXML.Event.EventData.Data.’#text’
$server = $Event.MachineName
$TimeCreated = $Event.TimeCreated
Add-Content -Value “$clientName,$server,$TimeCreated” -Path c:SMBv1.csv
}
Run the script.

You will find the SMBv1.csv on the C: drive

Screenshot of the csv file opened on Excel.

With Excel you can see the devices and computers using SMBv1. After treatment of all the devices you can disable SMBv1 safely .
Conclusion
The most important thing when disabling SMB v1 from production is auditing, following steps on this article you will have all the devices talking SMBv1 with your SMB Servers, you need to understand why these clients are talking SMBv1 and how to remediate, after treatment of these devices you can safely disable SMBv1 using the steps on the article below.
https://support.microsoft.com/en-us/help/2696547/how-to-detect-enable-and-disable-smbv1-smbv2-and-smbv3-in-windows-and