В конце 1980-х, SNMP или Простой протокол управления сетью впервые возник как решение для управления узлами в сети. С тех пор данные SNMP использовались для измерения производительности устройств среди бесчисленных поставщиков, чтобы обеспечить работоспособность сетей. Сегодня SNMP является одним из самых популярных сетевых протоколов в мире и snmpwalk стал методом сканирования для сканирования нескольких узлов одновременно.
Contents
- 1 Как работает SNMP?
- 2 Что такое snmpwalk?
- 3 Установка snmpwalk в Windows
- 4 Установка snmpwalk в Linux
- 5 Параметры и параметры Snmpwalk в Windows и Linux
- 6 Как минимизировать информацию, которую вы видите с помощью snmpwalk
- 7 Примеры Snmpwalk
- 8 Экономьте время с snmpwalk
- 9 Использование MIB с агентом SNMP
- 9.1 Мониторинг SNMP, MIB и OID Paessler с помощью PRTG (БЕСПЛАТНАЯ ПРОБНАЯ ВЕРСИЯ)
Как работает SNMP?
Однако, прежде чем мы рассмотрим команду snmpwalk, нам сначала нужно посмотреть, как работает SNMP. На устройствах с поддержкой SNMP Агент SNMP собирает информацию с устройства и хранит его в База управленческой информации (MIB) где хранятся эти данные, чтобы к ним можно было обращаться каждый раз, когда менеджер SNMP опрашивает агента SNMP.
Когда SNMP Manager запрашивает SNMP-агент, данные берутся из MIB и отправляются в SNMP Manager, где их можно просматривать с помощью инструмента сетевого мониторинга. Существует много разных команд, которые вы можете использовать для запроса агента SNMP. Наиболее распространенными способами являются использование ПОЛУЧИТЬ или GET-Next команда. Команда GET используется для Идентификатор объекта (OID) Из MIB. Команда GET-Next немного более продвинута и проходит через дерево MIB от OID до OID, получая информацию. Здесь приходит snmpwalk.
snmpwalk это имя, данное приложение SNMP, которое автоматически выполняет несколько запросов GETNEXT. Запрос SNMP GETNEXT используется для запроса устройства и получения данных SNMP с устройства. Команда snmpwalk используется потому, что она позволяет пользователю объединять запросы GETNEXT вместе, не вводя уникальные команды для каждого OID или узла в поддереве..
snmpwalk выдается корневому узлу поддерева так что информация собирается из каждого подключенного узла. Это предоставляет вам эффективный способ сбора информации с различных устройств, таких как маршрутизаторы и коммутаторы. Собираемая вами информация поступает в форме OID. OID — это объект, который является частью MIB в устройстве с поддержкой SNMP.
Установка snmpwalk в Windows
Для пользователей Windows процесс установки snmpwalk в Windows невероятно прост.
- Сначала вам нужно скачать и извлечь следующий файл из zip-файла:
https://sourceforge.net/projects/net-snmp/files/net-snmp/ - Когда у вас есть файл snmpwalk.exe на вашем компьютере, нажмите Начало > поиск CMD и нажмите Войти. Это покажет окно командной строки.
- Перетащите snmpwalk.exe файл в черное окно.
Если вы не хотите запускать файл из командной строки, вы можете скачать установщик .exe по этой ссылке здесь (обратите внимание, что вы хотите выбрать самую последнюю версию, которую можете): http://sourceforge.net/projects/net-snmp/files/net-snmp/
Установка snmpwalk в Linux
На устройствах Linux snmpwalk доступен в виде пакета для установки. Процесс этого зависит от вашего дистрибутива Linux. Однако вы можете установить Linux, введя следующие команды:
- Redhat / Fedora / CentOs: yum install net-snmp-utils
- Ubuntu: apt-get установить snmp
Параметры и параметры Snmpwalk в Windows и Linux
Snmpwalk имеет ряд различных параметров, которые вы можете использовать. К ним относятся следующие:
- имя хоста — Имя агента SNMP.
- сообщество -Тип читаемого сообщества.
- object_id — Укажите идентификатор объекта для возврата всех объектов SNMP под ним. Если NULL, то корень объектов SNMP принимается как object_id.
- Тайм-аут — количество микросекунд до первого таймаута.
- повторы — Сколько раз повторить попытку подключения в случае тайм-аута.
- -Операционные системы — Показывает последний символический элемент OID.
- -с -Устанавливает строку сообщества.
- -v — указывает версию SNMP, которую вы хотите использовать.
Как минимизировать информацию, которую вы видите с помощью snmpwalk
Первое, что вы заметите при запуске snmpwalk, — это слишком много результатов, чтобы вы могли их прочитать. Вы можете легко получить тысячи разных результатов. Чтобы обойти это, поставщики помогут вам, предоставив вам MIB файл. Файл MIB используется для указания того, какие OID доступны на устройстве.. Многие поставщики предоставляют вам MIB-файл для каждого вашего устройства. Наличие файла MIB позволяет вам выполнить запрос, специфичный для этого файла, а не проходить через все.
Смотрите также: Инструменты SMNP
Примеры Snmpwalk
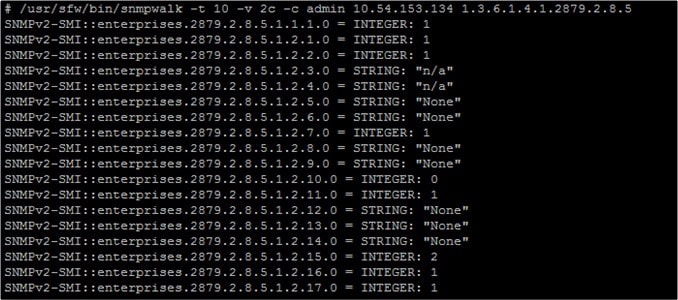
При использовании snmpwalk на устройстве агент SNMP предоставит вам диапазон значений. Вы будете проходить через OID от вашего начального OID и далее. Если вы введете команду snmpwalk на устройстве, отобразится результат, подобный следующему:
$ snmpwalk -v1 -c public 10.10.1.224
SNMPv2-MIB :: sysDescr.0 = STRING: APC Web / Карта управления SNMP
SNMPv2-MIB :: sysObjectID.0 = OID: SNMPv2-SMI :: enterprises.318.1.3.7
SNMPv2-MIB :: sysUpTime.0 = Timeticks: (47372422) 5 дней, 11: 35: 24.22
SNMPv2-MIB :: sysContact.0 = STRING: Comparitech
SNMPv2-MIB :: sysName.0 = STRING: APC-3425
SNMPv2-MIB :: sysLocation.0 = sTRING: 3425EDISON
SNMPv2-MIB :: sysServices.0 = INTEGER: 72
IF-MIB :: ifNumber.0 = INTEGER: 1
IF-MIB :: ifIndex.1 = INTEGER: 1
IF-MIB :: ifDescr.1 = STRING: veya
………
SNMPv2-MIB :: snmpOutGetResponses.0 = Counter32: 338
SNMPv2-MIB: snmpOutTraps.0 = Counter32: 0
SNMPv2-MIB :: snmpEnableAuthenTraps.0 = INTEGER: 0
$
Как видите, много информации генерируется одной командой. Большинство строк состоит из информации, полученной из MIB.
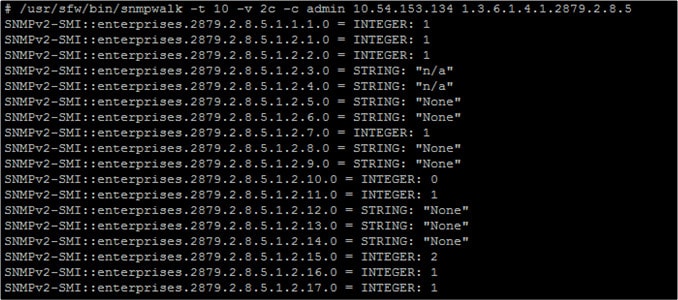
В приведенном ниже примере вы можете увидеть пример snmpwalk без MIB. Второе число в первой строке или .1.3.6.1.4.1.318 — это OID, с которого мы начали.
$ snmpwalk -v1 -c public 10.10.1.224 .1.3.6.1.4.1.318
SNMPv2-SMI :: enterprises.318.1.1.1.1.1.1.0 = STRING: «Silcon DP340E»
SNMPv2-SMI :: enterprises.318.1.1.1.1.1.2.0 = STRING: «UPS_IDEN»
SNMPv2-SMI :: enterprises.318.1.1.1.1.2.1.0 = STRING: «314.10.D
……
Однако, если у вас есть определенный MIB, вы можете получить более подробную информацию, возвращенную вам из объектов, которые вы хотите просмотреть. В приведенном ниже примере команда -m обозначает MIB, который будет запрашиваться.
$ snmpwalk -v1 -c public -m «./APC-POWERNET.txt» 10.10.1.224 apc
PowerNet-MIB :: upsBasicIdentModel.0 = STRING: «Silcon DP340E»
PowerNet-MIB :: upsBasicIdentName.0 = STRING: «UPS_IDEN»
PowerNet-MIB :: upsAdvIdentFirmwareRevision.0 = STRING: «314.10.D»
…..
Ниже приведен пример команды snmpwalk для Linux. Как вы можете видеть, эта функция работает примерно так же, проходя через OID для извлечения соответствующей информации из подключенных устройств:
#% snmpwalk-v 1 локальная публичная система # system.sysDescr.o = «SunOS name sun4c»
# system.sysObjectID.o = OID: enterprises.ucdavis.ucdSnmpAgent.sunos4
# system.sys.UpTime.o = Timeticks (595637548) 68 дней, 22:32:55
# system.sysContact.o = «[email protected]>»
# system.sysName.o = «Ridyadh_o8_WS»
# system.sysLocation.o = «Ридьяд, КСА»
# system.sysServices.o = 72
Экономьте время с snmpwalk
snmpwalk кажется сложной концепцией, но на самом деле это не так. Команда snmpwalk просто сокращенный способ использовать несколько запросов GETNEXT без необходимости вводить множество различных команд. С помощью одной команды snmpwalk вы можете запустить множество различных GETNEXT и просмотреть состояние своей инфраструктуры..
Если вы используете команду snmpwalk, важно помнить, чтобы максимально сократить объем получаемой информации. Указание MIB позволит вам видеть конкретную информацию, а не данные, собранные из всей базы данных идентификаторов объектов!
Таким образом, получая данные SNMP с устройств по всей вашей сети, вы можете быть уверены, что не пропустите ничего важного в вашей сети. В конце концов, есть команда snmpwalk, которая поможет вам максимально эффективно извлекать данные SNMP с устройств в вашей сети..
Использование MIB с агентом SNMP
Агенты SNMP собирают информацию о сетевых устройствах и сохраняют ее в базе управляющей информации (MIB) и становятся доступными для мощных инструментов SNMP.
Мониторинг SNMP, MIB и OID Paessler с помощью PRTG (БЕСПЛАТНАЯ ПРОБНАЯ ВЕРСИЯ)
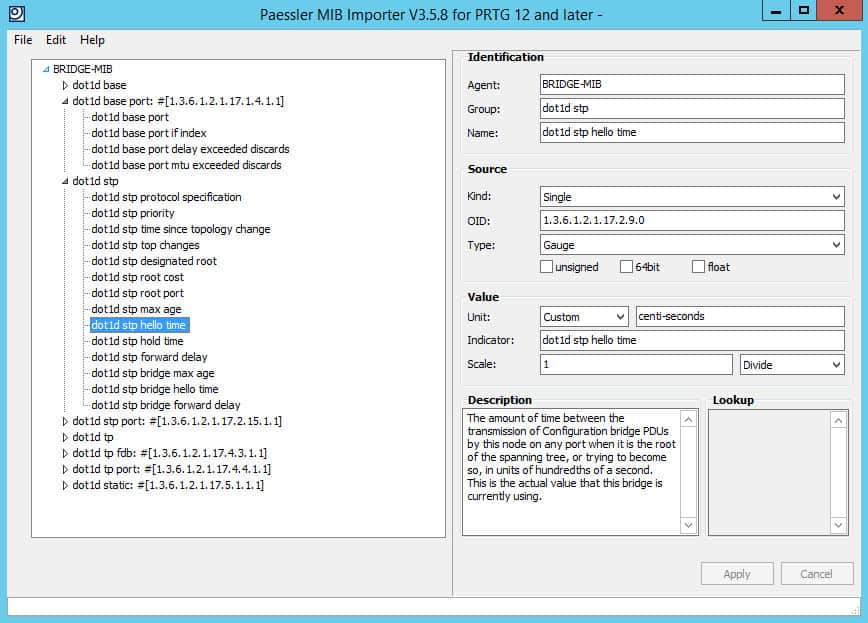
С Paessler’s PRTG Сетевой монитор, Вы можете развернуть SNMP, MIBS и OID с одной интуитивно понятной панели. PRTG использует SNMP для мониторинга вашей сети и для обработки ваших MIB и OID. После настройки PRTG может начать сбор всех соответствующих данных на каждом из устройств в вашей сети и на программном обеспечении, с которым они работают. Информация хранится в древовидной и ветвистой структуре, при этом каждый поставщик составляет ветвь дерева, помогая вам идентифицировать и устранять неполадки на каждом из устройств в вашей сети..
Сетевой монитор PRTG доступен на 30-дневной бесплатной пробной версии..
Мониторинг SNMP, MIB и OID Paessler с помощью PRTG Загрузить 30-дневную бесплатную пробную версию
Смотрите также: Лучшие инструменты мониторинга SNMP
The snmpwalk command is one of the most used tools on Linux and Windows for testing SNMP on the network devices. In this tutorial, I will show you how to use that command using various snmpwalk examples (v3 and v2c), and also examples of other commands from the Net-SNMP toolkit: SnmpGet, SnmpSet, and SnmpTrap.
Are you familiar with the SNMP protocol? No? Don’t worry, I got you covered with my post – What is SNMP protocol? How does it work? Learn with examples. However, if you have a basic understanding of SNMP then continue with reading.
On Ubuntu/Debian/Rasbian you can install Net-SNMP tools with one simple command: “apt-get install snmp“, or if you have CentOS/RHEL/Oracle Linux/Fedora you can use “yum install net-snmp net-snmp-utils“.
On Windows, download and install net-snmp-5.5.0-2.x64.exe, leave default directory “C:usr“, then run the CMD tool and when calling snmpwalk tool use a full path like this “C:usrbinsnmpwalk.exe -v2c -c public localhost 1.3.6.1.2.1.1“
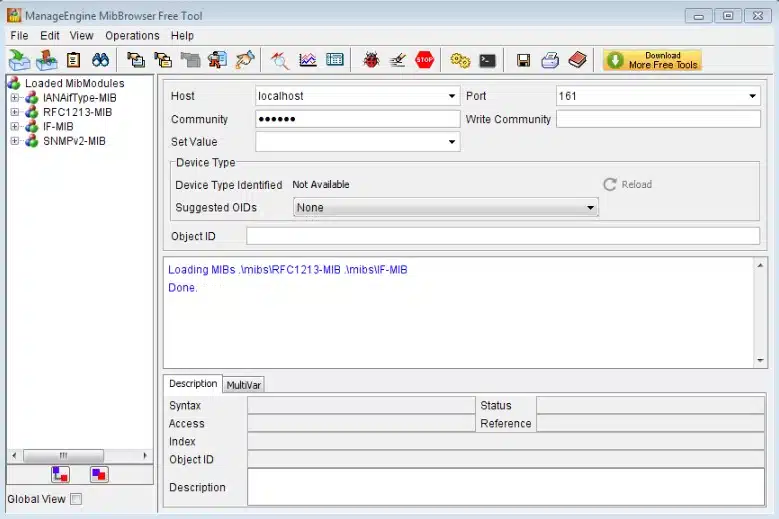
If you prefer the GUI version of SNMPwalk on Windows please check out SnmpB MIB browser instead to test SNMP and manage MIB files on Windows.
Before you continue, make sure that the host or network firewall is not blocking UDP port 161.
SNMPWALK command
Snmpwalk uses the “SNMP GETNEXT” message type to collect multiple information from a network device in a single SNMP query.
snmpwalk v3 example
Examples
# snmpwalk v3 example with authentication and encryption
snmpwalk -v3 -l authPriv -u UserMe -a SHA -A AuthPass1 -x AES -X PrivPass2 192.168.1.1 1.3.6.1.2.1.1

# snmpwalk v3 example with authentication, but no encryption
snmpwalk -v3 -l authnoPriv -u UserMe -a SHA -A AuthPass1 192.168.1.1:161 1.3.6.1.2.1.1

# snmpwalk v3 example with no authentication and no encryption but you still needs a username
snmpwalk -v3 -l noAuthNoPriv -u UserMe 192.168.1.1:161 1.3.6.1.2.1.1

# Using OID dot1dTpFdbAddress and SNMPv3 context name to get mac addresses in VLAN 32
snmpwalk -v3 -l authNoPriv -u UserMe -a MD5 -A AuthPass1 -n vlan-32 192.168.1.1 dot1dTpFdbAddress
Syntax
snmpwalk -v3 -l <noAuthNoPriv|authNoPriv|authPriv> -u <username> [-a <MD5|SHA>] [-A <authphrase>]
    [-x <DES|AES>] [-X <privaphrase>] <ipaddress>[:<dest_port>] [oid]
snmpwalk v2c example
Examples
#  snmpwalk v2 example with OID System to get basic system information about the host
snmpwalk -v2c -c public 192.168.1.1 1.3.6.1.2.1.1

# snmpwalk v2 example with OID ifDescr to get the description of all interfaces on the host
snmpwalk -v2c -c public 192.168.1.1:161 1.3.6.1.2.1.2.2.1.2
Syntax
snmpwalk -v2c -c <community> <ipaddress>[:<dest_port>] [oid]
SNMPGET command
A snmpget command for v3 and v2 is similar to the snmpwalk, just replace “snmpwalk” with “snmpget” when you run the command like this:
# Using OID sysDescr (1.3.6.1.2.1.1.1) to get system description
snmpget -v3 -l authPriv -u UserMe -a SHA -A AuthPass1 -x AES -X PrivPass2 10.1.1.1 1.3.6.1.2.1.1.0
Just remember that “snmpget” is for getting only one value, while snmpwalk can “walk” down the MIB hierarchy and get all the values at once. Also, snmpget needs full OID to get data from the device.
SNMPSET command
Snmpset uses the “SNMP SET” message type to remotely configure a network device over SNMP protocol.
snmpset v3 example
Examples
# Using OID ifAdminStatus (1.3.6.1.2.1.2.2.1.7) to administratively shutdown interface with index 10105
snmpset -v3 -l authPriv -u UserMe -a SHA -A AuthPass1 -x AES -X PrivPass2 192.168.1.1 1.3.6.1.2.1.2.2.1.7.10105 i 2
Syntax
snmpset -v3 -l <noAuthNoPriv|authNoPriv|authPriv> -u <username> [-a <MD5|SHA>] [-A <authphrase>]
    [-x <DES|AES>] [-X <privaphrase>] <ipaddress>[:<dest_port>] [oid] [type] [value]

[type] can be one of i, u, t, a, o, s, x, d, b
     i: INTEGER, u: unsigned INTEGER, t: TIMETICKS, a: IPADDRESS
     o: OBJID, s: STRING, x: HEX STRING, d: DECIMAL STRING, b: BITS
     U: unsigned int64, I: signed int64, F: float, D: double
Need more examples? You can find more detailed examples in my step by step tutorial about SNMP under section SNMP testing tools.
snmpset v2c example
Examples
# Using OID ifAdminStatus (1.3.6.1.2.1.2.2.1.7) to administratively shutdown interface with index 10105
snmpset -v2c -c private 192.168.1.1 1.3.6.1.2.1.2.2.1.7.10105 i 2
Syntax
snmpset -v2c -c <community> <ipaddress>[:<dest_port>] [oid] [type] [value]

[type] can be one of i, u, t, a, o, s, x, d, b
     i: INTEGER, u: unsigned INTEGER, t: TIMETICKS, a: IPADDRESS
     o: OBJID, s: STRING, x: HEX STRING, d: DECIMAL STRING, b: BITS
     U: unsigned int64, I: signed int64, F: float, D: double
SNMPTRAP command
Snmptrap uses SNMP TRAP operation to send information to a network manager (NMS) via UDP port 162, so make sure that the host or the network firewall is not blocking that port.
snmptrap v3 example
Examples
# Using OID netSnmpExampleHeartbeatRate (1.3.6.1.4.1.8072.2.3.2.1) to send a trap using numeric OID
snmptrap -v3 -e 0x090807060504030201 -l authPriv -u UserMe -a SHA -A AuthPass1 -x AES -X PrivPass2 127.0.0.1:161 ''  1.3.6.1.4.1.8072.2.3.0.1 1.3.6.1.4.1.8072.2.3.2.1 i 60

# Using OID netSnmpExampleHeartbeatRate (1.3.6.1.4.1.8072.2.3.2.1) to send a trap using MIB
snmptrap -v3 -e 0x090807060504030201 -l authPriv -u UserMe -a SHA -A AuthPass1 -x AES -X PrivPass2 127.0.0.1:161 '' NET-SNMP-EXAMPLES-MIB::netSnmpExampleHeartbeatNotification netSnmpExampleHeartbeatRate i 60
Syntax
snmptrap -v3 -e <engine_id> -l <noAuthNoPriv|authNoPriv|authPriv> -u <username> [-a <MD5|SHA>] [-A <authphrase>]
[-x <DES|AES>] [-X <privaphrase>] <ipaddress>[:<dest_port>] <uptime> <OID|MIB> [<oid> <type> <value>...]<uptime> must be in unix timestamp format or empty string if you need to set current time on trap
<type> can be one of i, u, t, a, o, s, x, d, b
i: INTEGER, u: unsigned INTEGER, t: TIMETICKS, a: IPADDRESS
o: OBJID, s: STRING, x: HEX STRING, d: DECIMAL STRING, b: BITS
U: unsigned int64, I: signed int64, F: float, D: double
snmptrap v2c example
Examples
# Using OID netSnmpExampleHeartbeatRate (1.3.6.1.4.1.8072.2.3.2.1) to send a trap using MIB
snmptrap -v2c -c public 127.0.0.1 '' NET-SNMP-EXAMPLES-MIB::netSnmpExampleHeartbeatNotification netSnmpExampleHeartbeatRate i 6

# Using OID linkUp (1.3.6.1.6.3.1.1.5.4) to send a trap that notifies that eth0 is in UP state
snmptrap -v2c -c public 127.0.0.1 '' '.1.3.6.1.6.3.1.1.5.4' .1.3.6.1.6.3.1.1.5.4 s "eth0"
Syntax
snmptrap -v2c -c <community> <destination_host> <uptime> <OID|MIB> [<oid> <type> <value>...]


<uptime> must be in unix timestamp format or empty string if you need to set current time on trap

<type> can be one of i, u, t, a, o, s, x, d, b
     i: INTEGER, u: unsigned INTEGER, t: TIMETICKS, a: IPADDRESS
     o: OBJID, s: STRING, x: HEX STRING, d: DECIMAL STRING, b: BITS
     U: unsigned int64, I: signed int64, F: float, D: double
snmptrap v1 example
It is important to note that snmptrap v1 have different syntax, and because of that you can’t use snmptrap v2 or v3 examples.
Examples
snmptrap -v 1 -c public 10.1.1.160 .1.3.6.1.4.1.28116.20 10.0.1.250 6 "" "" 1.3.6.1.4.1.28116.20.1 s "Test Trap"
Syntax
snmptrap -v1 -c <community> <destination_host> <OID|MIB> <sender_ip_address> <trap-type> <trap-id> <uptime> [<oid> <type> <value>...]

<trap-type> can be 0=coldStart, 1=warmStart, 2=linkDown, 3=linkUp, 4=authentication Failure, 5=egpNeighborLoss, Generic=6

<trap-id> can be anything, even blank

<uptime> must be in unix timestamp format or a empty string if you need to set current time on trap

<type> can be one of i, u, t, a, o, s, x, d, b
     i: INTEGER, u: unsigned INTEGER, t: TIMETICKS, a: IPADDRESS
     o: OBJID, s: STRING, x: HEX STRING, d: DECIMAL STRING, b: BITS
     U: unsigned int64, I: signed int64, F: float, D: double
Configuring and testing traps can be a slow process, as sometimes you depend on another department/customer to confirm the trap arrivals. To resolve that problem, I recommend using SnmpB (100% free MIB browser) that can be installed on your computer and configured to receive SNMP traps – check out my step-by-step guide for SnmpB MIB browser.
What is SNMP?
SNMP also known as “Simple Network Management Protocol” is an application-layer protocol used to measure and monitor the performance of the devices within a network. It helps the system administrator to ensure that networks stay up and running. Today, SNMP is one of the most popular networking protocols in the world. All modern manufacturers create SNMP-enabled devices that enterprises can use to obtain performance data from the devices.
How SNMP Works?
SNMP uses the device’s Management Information Database (MIB) to collect the performance data. The MIB is a database that records information about the hardware and contains MIB files. The MIB resides within the SNMP manager designed to collect information and organize it into a hierarchical format. SNMP uses this information from the MIB to interpret messages before sending them onwards to the end-user.
There are different types of queries managers used to poll the information from the SNMP agent including, GET or GET-NEXT commands. The GET command uses the agent’s hostname and Object Identifiers (OID) to obtain the information from the MIB. The GET-NEXT command obtains the data from the next OID.
What is SNMPWALK?
SNMPWALK is a command-line utility used to collect the information from remote SNMP-enabled devices including, routers and switches. It allows you to see all the OID variables available on remote devices. It sends multiple GET-NEXT commands to OIDs then the manager collects the data from all OIDs. SNMPWALK is a command-line utility that can be installed on Linux and Windows operating systems.
In this guide, we will show you how to install SNMPWALK on Windows and Linux. We will also explain how to use it to get the information from the remote devices.
Install SNMP and SNMPWALK on Linux
In this section, we will show you how to install SNMP and SNMPWALK on Debian and RPM-based Linux operating systems.
For RPM-based operating system including, RHEL/CentOS/Fedora, install the SNMP and SNMPWALK using the following command:
yum install net-snmp net-snmp-libs net-snmp-utils -y
For Debian based operating system including, Debian/Ubuntu, install the SNMP and SNMPWALK using the following command:
apt-get install snmpd snmp libsnmp-dev -y
Once the installation has been finished, start the SNMP service and enable it to start at system reboot with the following command:
systemctl start snmpd

systemctl enable snmpd
You can check the status of the SNMP with the following command:
systemctl status snmpd
You should get the following output:
● snmpd.service - Simple Network Management Protocol (SNMP) Daemon.
Loaded: loaded (/lib/systemd/system/snmpd.service; enabled; vendor preset: enabled)
Active: active (running) since Fri 2021-05-14 06:36:48 UTC; 3min 22s ago
Main PID: 36724 (snmpd)
Tasks: 1 (limit: 4691)
Memory: 8.7M
CGroup: /system.slice/snmpd.service
└─36724 /usr/sbin/snmpd -LOw -u Debian-snmp -g Debian-snmp -I -smux mteTrigger mteTriggerConf -f -p /run/snmpd.pid
May 14 06:36:48 ubuntu2004 systemd[1]: Starting Simple Network Management Protocol (SNMP) Daemon....
May 14 06:36:48 ubuntu2004 systemd[1]: Started Simple Network Management Protocol (SNMP) Daemon..
By default, SNMP does not allow retrieving all available SNMP information. So you will need to edit the SNMP default configuration file and make some changes so we can retrieve all information using the SNMPWALK command.
nano /etc/snmp/snmpd.conf
Find the following lines:
rocommunity  public default -V systemonly

rocommunity6 public default -V systemonly
And, replace them with the following lines:
rocommunity  public default

rocommunity6 public default
Save and close the file then restart the SNMP service to apply the changes:
systemctl restart snmpd
Now, open your command-line interface and print help information of SNMPWALK command as shown below:
snmpwalk -h
You should get the following output:
USAGE: snmpwalk [OPTIONS] AGENT [OID]
Version:  5.8

Web:      http://www.net-snmp.org/

Email:    net-snmp-coders@lists.sourceforge.net
OPTIONS:

-h, --help		display this help message

-H			display configuration file directives understood

-v 1|2c|3		specifies SNMP version to use

-V, --version		display package version number

SNMP Version 1 or 2c specific

-c COMMUNITY		set the community string

SNMP Version 3 specific

-a PROTOCOL		set authentication protocol (MD5|SHA|SHA-224|SHA-256|SHA-384|SHA-512)

-A PASSPHRASE		set authentication protocol pass phrase

-e ENGINE-ID		set security engine ID (e.g. 800000020109840301)

-E ENGINE-ID		set context engine ID (e.g. 800000020109840301)

-l LEVEL		set security level (noAuthNoPriv|authNoPriv|authPriv)

-n CONTEXT		set context name (e.g. bridge1)

-u USER-NAME		set security name (e.g. bert)

-x PROTOCOL		set privacy protocol (DES|AES)

-X PASSPHRASE		set privacy protocol pass phrase

-Z BOOTS,TIME		set destination engine boots/time

General communication options

-r RETRIES		set the number of retries

-t TIMEOUT		set the request timeout (in seconds)

Debugging

-d			dump input/output packets in hexadecimal

-D[TOKEN[,...]]	turn on debugging output for the specified TOKENs

(ALL gives extremely verbose debugging output)
Install SNMP and SNMPWALK on Windows 10 Windows Server 2016 and Windows Server 2019
In this section, we will show you how to install SNMP and SNMPWALK on the Windows operating system.
Follow the below steps to install SNMP on Windows:
Step 1 – Open the Control Panel as shown below:
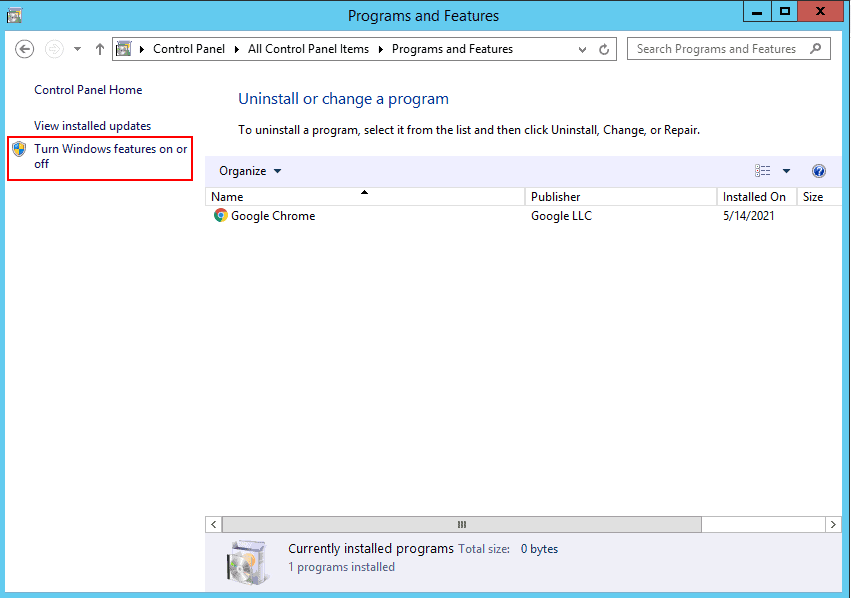
Step 2 – Click on the Programs and Features you should see in the page below:
Step 3 – Click on the Turn Windows features on or off.
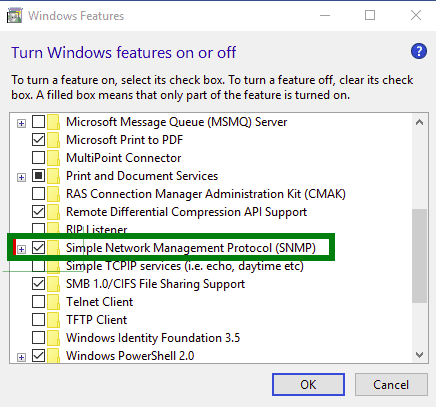
Step 4 – On Windows 10, select Simple Network Management Protocol (SNMP) and install it.
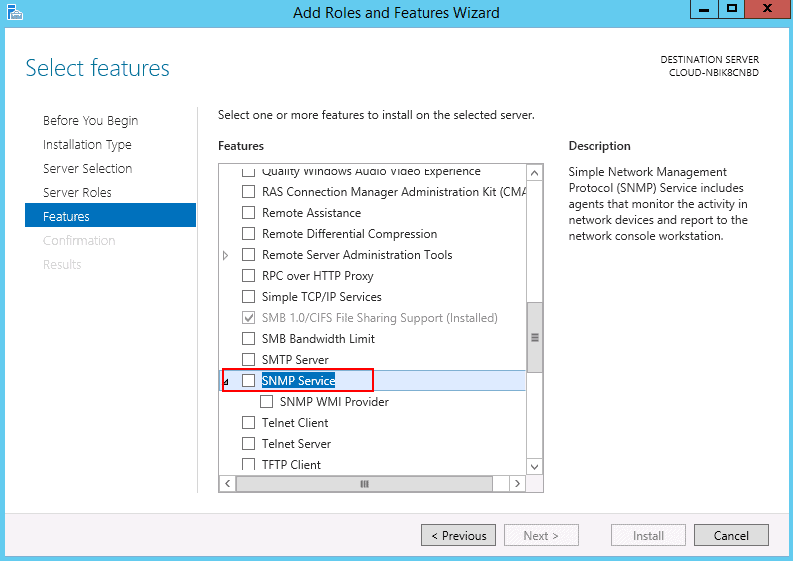
Step 5 – On Windows Server 2016 and 2019, click on the Add Roles and Features Wizard until you reach the Features section then select SNMP service.
Step 6 – Install SNMP Service.
This will automatically install the SNMP service on your Windows system.
After installing SNMP, you will need to configure it.
Follow the below steps to configure the SNMP service:
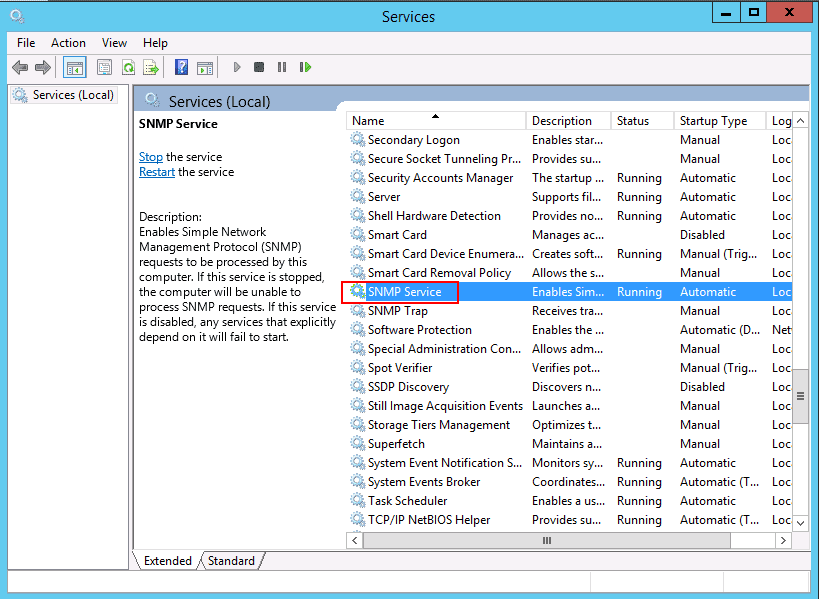
Step 1 – Press Windows + R and type services.msc as shown below:
Step 2 – Press OK to open the Windows service configuration wizard.
Step 3 – Select the SNMP service, right-click and click on the properties as shown below:
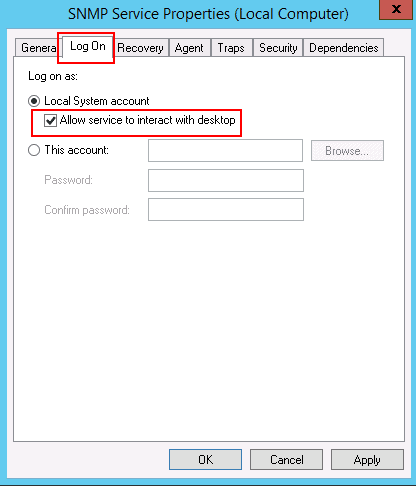
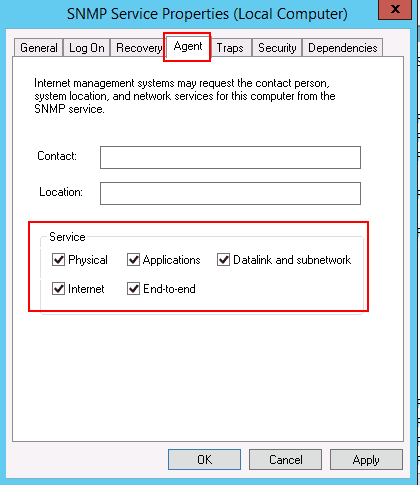
Step 4 – In the Log On tab, select “Allow service to interact with desktop”. Then click on the Agent tab as shown below:
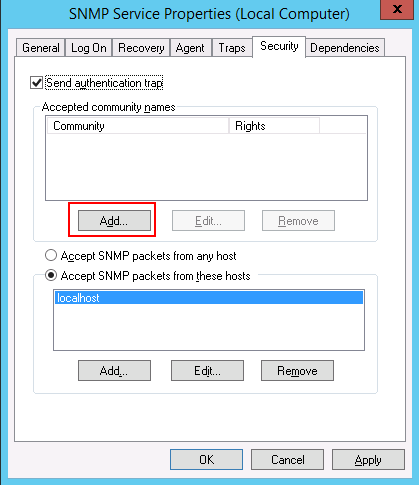
Step 5 – Select all services and click on the Security tab as shown below:
Step 6 – Click on the Add button. You should see the following screen:
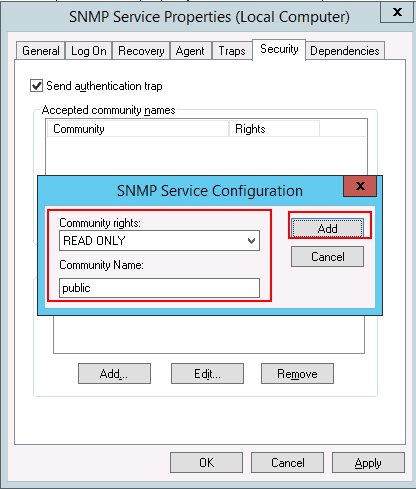
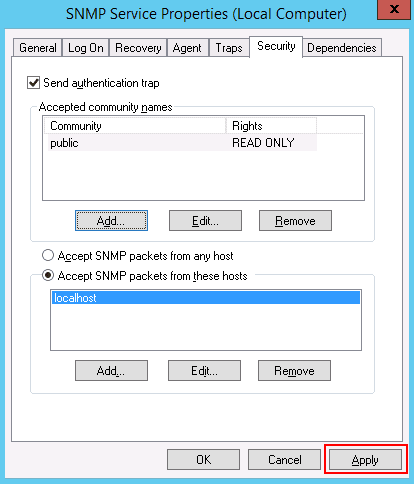
Step 7 – Provide community rights and community name then click on the Add button. You should see the following page:
Step 8 – Click on the Apply button to apply the changes.
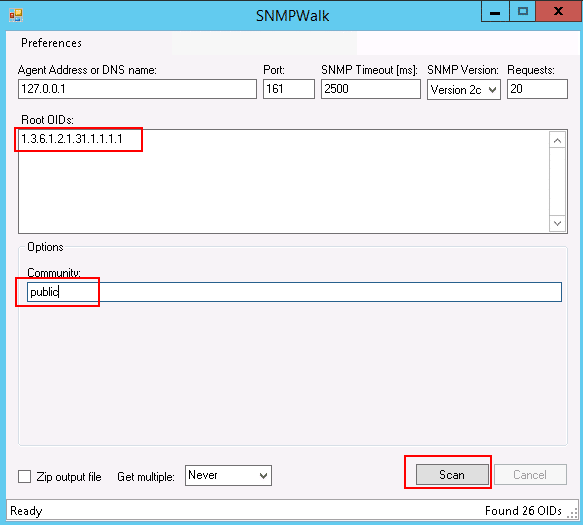
For full SNMP functionality, you will need to download the SolarWinds MIB Walk module from their Engineer’s Toolset to your windows system. However, you can download the free snmpwalk files from the SourceForge website and follow along with this post.
Once SNMPWALK is downloaded, extract it to the download folder. You can now use snmpwalk.exe to launch and use the SNMPWALK.
Provide your agent address, OID, community, and click the Scan button. This will generate a complete system information report based on the OID.
How to Use SNMPWALK to Retrieve the System Information
In this section, we will show you how to use the SNMPWALK command in Linux to retrieve the system information.
You can use the following options with the SNMPWALK command to retrieve the system information:
- -v: Specify the SNMP version.
- -c: Specify the community string which you have configured on the SNMP.
- hostname: Specify the hostname or IP address of the system where the SNMP agent is installed.
- OID: Specify the OID to return all SNMP objects.
Now, open your command-line interface and run the following command to list all existing OIDs on the network..
snmpwalk -v 2c -c public localhost
You should get the following output:
iso.3.6.1.2.1.1.1.0 = STRING: "Linux ubuntu2004 5.4.0-29-generic #33-Ubuntu SMP Wed Apr 29 14:32:27 UTC 2020 x86_64"

iso.3.6.1.2.1.1.2.0 = OID: iso.3.6.1.4.1.8072.3.2.10

iso.3.6.1.2.1.1.3.0 = Timeticks: (19907) 0:03:19.07

iso.3.6.1.2.1.1.4.0 = STRING: "Me <me@example.org>"

iso.3.6.1.2.1.1.5.0 = STRING: "ubuntu2004"

iso.3.6.1.2.1.1.6.0 = STRING: "Sitting on the Dock of the Bay"

iso.3.6.1.2.1.1.7.0 = INTEGER: 72

iso.3.6.1.2.1.1.8.0 = Timeticks: (3) 0:00:00.03

iso.3.6.1.2.1.1.9.1.2.1 = OID: iso.3.6.1.6.3.10.3.1.1

iso.3.6.1.2.1.1.9.1.2.2 = OID: iso.3.6.1.6.3.11.3.1.1

iso.3.6.1.2.1.1.9.1.2.3 = OID: iso.3.6.1.6.3.15.2.1.1

iso.3.6.1.2.1.1.9.1.2.4 = OID: iso.3.6.1.6.3.1

iso.3.6.1.2.1.1.9.1.2.5 = OID: iso.3.6.1.6.3.16.2.2.1

iso.3.6.1.2.1.1.9.1.2.6 = OID: iso.3.6.1.2.1.49

iso.3.6.1.2.1.1.9.1.2.7 = OID: iso.3.6.1.2.1.4

iso.3.6.1.2.1.1.9.1.2.8 = OID: iso.3.6.1.2.1.50

iso.3.6.1.2.1.1.9.1.2.9 = OID: iso.3.6.1.6.3.13.3.1.3

iso.3.6.1.2.1.1.9.1.2.10 = OID: iso.3.6.1.2.1.92

iso.3.6.1.2.1.1.9.1.3.1 = STRING: "The SNMP Management Architecture MIB."

iso.3.6.1.2.1.1.9.1.3.2 = STRING: "The MIB for Message Processing and Dispatching."

iso.3.6.1.2.1.1.9.1.3.3 = STRING: "The management information definitions for the SNMP User-based Security Model."

iso.3.6.1.2.1.1.9.1.3.4 = STRING: "The MIB module for SNMPv2 entities"

iso.3.6.1.2.1.1.9.1.3.5 = STRING: "View-based Access Control Model for SNMP."

iso.3.6.1.2.1.1.9.1.3.6 = STRING: "The MIB module for managing TCP implementations"

iso.3.6.1.2.1.1.9.1.3.7 = STRING: "The MIB module for managing IP and ICMP implementations"

iso.3.6.1.2.1.1.9.1.3.8 = STRING: "The MIB module for managing UDP implementations"

iso.3.6.1.2.1.1.9.1.3.9 = STRING: "The MIB modules for managing SNMP Notification, plus filtering."

iso.3.6.1.2.1.1.9.1.3.10 = STRING: "The MIB module for logging SNMP Notifications."
You can see the different OIDs in the above output. The typical format of an OID is shown below:
1.3.6.1.4.1.2021.10.1
A brief explanation of the most commonly used OIDs are shown below:
- 1 – ISO – International Organization for Standardization (ISO)
- 3 – org – Organizations according to ISO/IEC 6523-2
- 6 – dod – US Department of Defense (DOD)
- 1 – Internet protocol
- 4 – Private – Device manufactured by a private company
- 2021 – It is the particular device manufacturer number.
To get the hostname of the system, run the following command:
snmpwalk -v 2c -c public 127.0.0.1 .1.3.6.1.2.1.1.5
You should get the following output:
iso.3.6.1.2.1.1.5.0 = STRING: "ubuntu2004"
To get the hostname and kernel information, run the following command:
snmpwalk -v 2c -c public 127.0.0.1 .1.3.6.1.2.1.1.1
You should get the following output:
iso.3.6.1.2.1.1.1.0 = STRING: "Linux ubuntu2004 5.4.0-29-generic #33-Ubuntu SMP Wed Apr 29 14:32:27 UTC 2020 x86_64"
To get the network interface information, run the following command:
snmpwalk -v 2c 127.0.0.1 -c public .1.3.6.1.2.1.2.2.1.1
You should get the following output:
iso.3.6.1.2.1.2.2.1.1.1 = INTEGER: 1

iso.3.6.1.2.1.2.2.1.1.2 = INTEGER: 2

iso.3.6.1.2.1.2.2.1.1.3 = INTEGER: 3
To get the MAC address information, run the following command:
snmpwalk -v 2c 127.0.0.1 -c public .1.3.6.1.2.1.2.2.1.6
You should get the following output:
iso.3.6.1.2.1.2.2.1.6.1 = ""

iso.3.6.1.2.1.2.2.1.6.2 = Hex-STRING: 00 00 2D 3A 26 A4

iso.3.6.1.2.1.2.2.1.6.3 = Hex-STRING: 00 00 0A 3A 26 A4
To get a list of all network interface, run the following command:
snmpwalk -v 2c -c public 127.0.0.1 .1.3.6.1.2.1.31.1.1.1.1
You should get the following output:
iso.3.6.1.2.1.31.1.1.1.1.1 = STRING: "lo"

iso.3.6.1.2.1.31.1.1.1.1.2 = STRING: "eth0"

iso.3.6.1.2.1.31.1.1.1.1.3 = STRING: "eth1"
To get an IP address of the system, run the following command:
snmpwalk -v 2c -c public 127.0.0.1 .1.3.6.1.2.1.4.20.1.1
You should get the following output:
iso.3.6.1.2.1.4.20.1.1.45.58.38.164 = IpAddress: 45.58.38.164

iso.3.6.1.2.1.4.20.1.1.127.0.0.1 = IpAddress: 127.0.0.1
To get the Subnet Mask of the system, run the following command:
snmpwalk -v 2c -c public 127.0.0.1 .1.3.6.1.2.1.4.20.1.3
You should get the following output:
iso.3.6.1.2.1.4.20.1.3.45.58.38.164 = IpAddress: 255.255.255.0

iso.3.6.1.2.1.4.20.1.3.127.0.0.1 = IpAddress: 255.0.0.0
To get the CPU information, run the following command:
snmpwalk -v 2c -c public 127.0.0.1 .1.3.6.1.2.1.25.3.2.1.3 |grep -i cpu
You should get the following output:
iso.3.6.1.2.1.25.3.2.1.3.196608 = STRING: "GenuineIntel: QEMU Virtual CPU version 2.5+"

iso.3.6.1.2.1.25.3.2.1.3.196609 = STRING: "GenuineIntel: QEMU Virtual CPU version 2.5+"
To get the system load information, run the following command:
snmpwalk -v 2c -c public 127.0.0.1 .1.3.6.1.4.1.2021.10.1
You should get the following output:
iso.3.6.1.4.1.2021.10.1.1.1 = INTEGER: 1

iso.3.6.1.4.1.2021.10.1.1.2 = INTEGER: 2

iso.3.6.1.4.1.2021.10.1.1.3 = INTEGER: 3

iso.3.6.1.4.1.2021.10.1.2.1 = STRING: "Load-1"

iso.3.6.1.4.1.2021.10.1.2.2 = STRING: "Load-5"

iso.3.6.1.4.1.2021.10.1.2.3 = STRING: "Load-15"

iso.3.6.1.4.1.2021.10.1.3.1 = STRING: "0.00"

iso.3.6.1.4.1.2021.10.1.3.2 = STRING: "0.01"

iso.3.6.1.4.1.2021.10.1.3.3 = STRING: "0.00"

iso.3.6.1.4.1.2021.10.1.4.1 = STRING: "12.00"

iso.3.6.1.4.1.2021.10.1.4.2 = STRING: "12.00"

iso.3.6.1.4.1.2021.10.1.4.3 = STRING: "12.00"

iso.3.6.1.4.1.2021.10.1.5.1 = INTEGER: 0

iso.3.6.1.4.1.2021.10.1.5.2 = INTEGER: 1

iso.3.6.1.4.1.2021.10.1.5.3 = INTEGER: 0

iso.3.6.1.4.1.2021.10.1.6.1 = Opaque: Float: 0.000000

iso.3.6.1.4.1.2021.10.1.6.2 = Opaque: Float: 0.010000

iso.3.6.1.4.1.2021.10.1.6.3 = Opaque: Float: 0.000000

iso.3.6.1.4.1.2021.10.1.100.1 = INTEGER: 0

iso.3.6.1.4.1.2021.10.1.100.2 = INTEGER: 0

iso.3.6.1.4.1.2021.10.1.100.3 = INTEGER: 0

iso.3.6.1.4.1.2021.10.1.101.1 = ""

iso.3.6.1.4.1.2021.10.1.101.2 = ""

iso.3.6.1.4.1.2021.10.1.101.3 = ""
To get the system uptime information, run the following command:
snmpwalk -v 2c -c public 127.0.0.1 .1.3.6.1.2.1.1.3.0
You should get the following output:
iso.3.6.1.2.1.1.3.0 = Timeticks: (66282) 0:11:02.82
Conclusion
In the above post, you learned how to install and use SNMP and SNMPWALK on Windows and Linux to get the system information across the connected devices. I hope this will help you to monitor the network devices.
SNMPWALK FAQs
What is a snmpwalk tool?
SNMPWALK is a process of exploring the Management Information Base (MIB) structure of an SNMP report. The MIB has a tree structure that is denoted by a dot-notation number and the “walk” crawls through these numbers, recreating the tree. An SNMPWALK tool can construct a MIB tree by mapping the relationship between the values in a MIB. Each number that identifies a node on the MIB tree will have a label and a value. The OID (Object ID) is a reference code for the label.
Is SNMP v3 TCP or UDP?
All versions of SNMP use the same ports – there are two and they are both UDP. Regular SNMP transactions involve the SNMP Manager sending out a broadcasted request, to which the SNMP device agents reply with a MIB. This communication occurs on UDP port 161. The SNMP agent can send out a warning message without waiting for a request. This is called a Trap and it goes to UDP port 162.
What is OID in Linux?
OID is short for Object ID. It is the level code that identifies a node in a tree structure that is used for reporting in SNMP. An SNMP report is called a Management Information Base (MIB). It has a set number of fields that are identified by OIDs. The OID uses a dot-notation format to indicate the inheritance of a node on the tree.
SNMP (
Simple Network Management Protocol
) — это классический протокол для мониторинга и сбора информации о сетевых устройствах (сервера, сетевое оборудование, рабочие станции, принтеры и т.д.). Протокол SNMP довольно легкий, быстрый, для передачи данных использует UDP порты 161 и 162. В этой статье мы рассмотрим, как установить и настроить службу SNMP в Windows Server 2022/2019 и Windows 10/11.
Содержание:
- Установка службы SNMP в Windows Server 2022/2019
- Установка SNMP агента в Windows Server Core
- Установка службы SNMP в Windows 10/11
- Настройка службы SNMP в Windows Server и Windows 10/11
Установка службы SNMP в Windows Server 2022/2019
В Windows Server службу SNMP можно установить с помощью Server Manager.
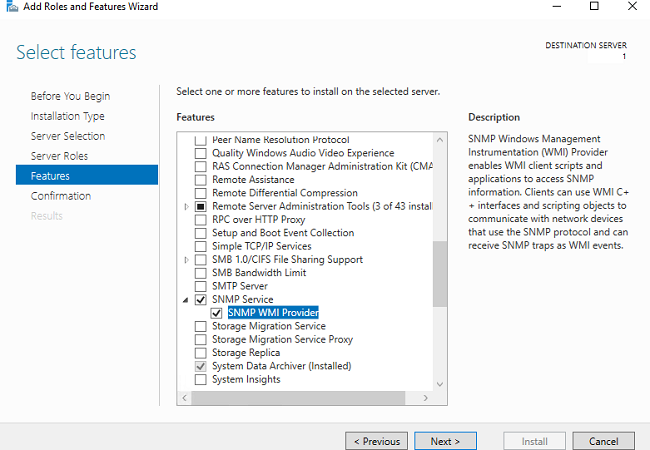
Выберите Add roles and features -> Features. Выберите SNMP Service (если нужно отметьте также SNMP WMI Providers).
Служба SNMP WMI Provider позволяет опрашивать SNMP устройство через WMI.
Нажмите Next -> Install и дождитесь окончания установки.
Установка SNMP агента в Windows Server Core
В Windows Server Core можно установить SNMP с помощью веб-интерфеса Windows Admin Center и PowerShell.
Если вы используете Windows Admin Center, подключитесь к хосту Windows Server, выберите Roles and Features -> SNMP Service.
Т.к. в Windows Server Core отсутствует графический интерфейс, а для его управления используется командная строка, вы можете установить службу SNMP из командной строки PowerShell.
Для установки ролей в Windows Server из PowerShell используется командлет Install-WindowsFeature.
Проверьте, что служба SNMP не установлена:
Get-WindowsFeature SNMP*
Установите роль SNMP и WMI провайдер:
Install-WindowsFeature SNMP-Service,SNMP-WMI-Provider -IncludeManagementTools
Проверьте, что службы SNMP запущены:
Get-Service SNMP*
В нашем примере SNMP служба запущена, а SNMPTRAP остановлена.
Установка службы SNMP в Windows 10/11
Вы можете использовать службу SNMP не только в Windows Server, но и в десктопных редакциях Windows 10 и 11.
В Windows 10/11 служба SNMP, вынесена в отдельный компонент Feature On Demand (как RSAT и OpenSSH).
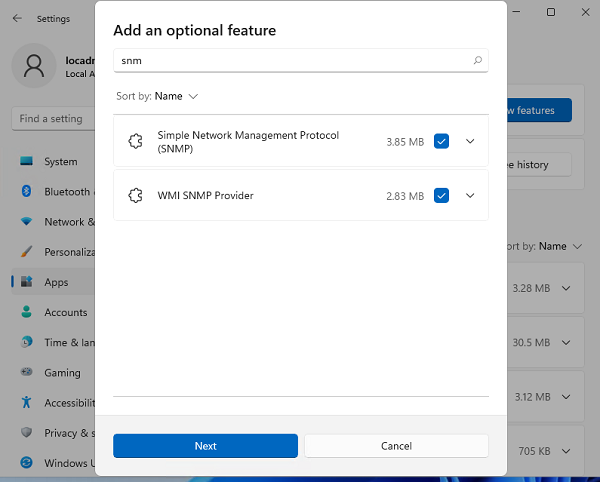
Вы можете установить SNMP через панель Settings. Перейдите в Apps -> Optional features -> Add an optional feature -> View features.
В списке доступных компонентов выберите Simple Network Management Protocol (SNMP) и WMI SNMP Provider. Для начала установки нажмите Next (понадобится интернет подключение к серверам Microsoft).
Для установки службы SNMP через PowerShell, используйте команду:
Add-WindowsCapability -Online -Name SNMP.Client~~~~0.0.1.0
Для установки службы SNMP без подключения к интернету, вам понадобится скачать ISO образ Windows 10/11 Features on Demand из личного кабинета на сайте лицензирования Volume Licensing Service Center (VLSC).
Для офлайн установки службы SNMP с такого ISO образа используется команда:
Add-WindowsCapability -Online -Name SNMP.Client~~~~0.0.1.0 -LimitAccess -Source \msk-fs01DistrWindows-FODWin11
Настройка службы SNMP в Windows Server и Windows 10/11
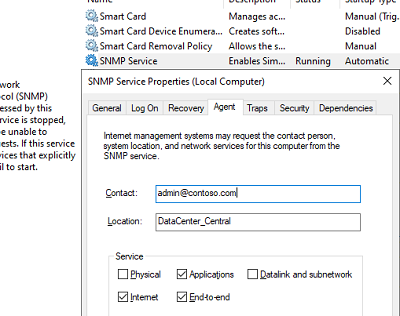
Вы можете настроить параметры службы SNMP в консоли services.msc. Найдите службу SNMP Services в списке и откройте ее свойства.
Обратите внимание, что у службы SNMP есть несколько дополнительных вкладок:
- Agent
- Traps
- Security
На вкладке Agent указывается базовая информация об устройстве (контакты администратора, местоположение). Здесь же можно указать тип информации, который может отправлять данное устройство при SNMP опросе.
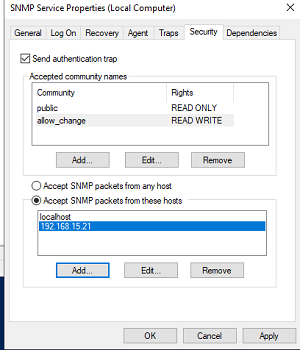
В старых версиях протокола SNMP (SNMP v.1 и SNMP v.2) для авторизации пользователя используется строка сообщества (community string). На вкладке Security можно создать несколько строк подключения.
Можно выбрать один из пяти уровней доступа для сообщества:
- READ ONLY — позволяет получать данные с устройства;
- READ WRITE — позволяет получать данные и изменять конфигурацию устройства;
- NOTIFY — позволяет получать SNMP ловушки;
- READ CREATE – позволяет читать данные, изменять и создавать объекты;
- NONE
Вы можете создать несколько community string. Для этого нужно задать имя и выбрать права/ Для мониторинга состояние сервера достаточно выбрать READ ONLY.
В списке Accept SNMP packets from these hosts можно указать имена/IP адреса серверов, которым разрешено опрашивать данное устройство. Если вы не хотите ограничивать список разрешенных устройств, оставьте здесь Accept SNMP packets from any hosts.
На вкладке Traps указываются адрес серверов, на который SNMP агент должен отправлять SNMP-ловушка (SNMP trap). SNMP Trap это широковещательный USP пакет, используемый для асинхронного уведомления менеджера (например, сообщение о критическом событии).
Не забудьте открыть в Windows Defender Firewall правила, разрешающие входящий и исходящий трафик для SNMP запросов и ловушек (TRAP). Нужные правила фаейрвола можно включить с помощью PowerShell.
В Windows Firewall есть несколько готовых правил для SNMP трафика:
Get-NetFirewallrule -DisplayName *snmp* |ft
- SNMPTRAP-In-UDP
- SNMPTRAP-In-UDP-NoScope
- SNMP-Out-UDP
- SNMP-In-UDP-NoScope
- SNMP-Out-UDP-NoScope
- SNMP-In-UDP
Можно включить все правила, или только определенное:
Get-NetFirewallrule -DisplayName *snmp* | Enable-NetFirewallRule
Get-NetFirewallrule SNMP-Out-UDP | Disable-NetFirewallRule
В списке служб Windows есть еще одна служба SNMP Trap. Она используется для получения сообщений от других SNMP агентов и пересылки на SNMP сервера (обычно это система мониторинга, опрашивающая устройства по SNMP, например PRTG или Zabbix).
Если вы настраиваете SNMP на Windows Server Core, вы не сможете использовать графический интерфейс службы SNMP для настройки ее параметров. Вместо этого придется вносить изменения в реестр с помощью PowerShell. Настройки службы SNMP хранятся в ветке реестра HKEY_LOCAL_MACHINESYSTEMCurrentControlSetServicesSNMPParameters.
Следующие команды зададут описание агента:
New-ItemProperty -Path "HKLM:SYSTEMCurrentControlSetservicesSNMPParametersRFC1156Agent" -Name "sysContact" -Value "[email protected]" -PropertyType REG_SZ
New-ItemProperty -Path "HKLM:SYSTEMCurrentControlSetservicesSNMPParametersRFC1156Agent" -Name "sysLocation" -Value "MSK_Datacenter1" -PropertyType REG_SZ
Для каждой ловушки SNMP придется создать отдельный ключ в HKLMSYSTEMCurrentControlSetservicesSNMPParametersTrapConfiguration с именем community.
New-Item -Path "HKLM:SYSTEMCurrentControlSetservicesSNMPParametersTrapConfigurationpublic1"
Укажите разрешения для community:
New-ItemProperty -Path "HKLM:SYSTEMCurrentControlSetServicesSNMPParametersValidCommunities" -Name "public1" -Value 4 -PropertyType DWord
Возможные значения:
- 1 — NONE
- 2 — NOTIFY
- 4 — READ ONLY
- 8 — READ WRITE
- 16 — READ CREATE
Для каждого community можно указать список серверов, с которых разрешено принимать запросы:
New-ItemProperty -Path "HKLM:SYSTEMCurrentControlSetServicesSNMPParametersPermittedManagers" -Name "1" -Value "server1.winitpro.ru" -PropertyType REG_SZ
Перезапустите службу SNMP для применения новых настроек из реестра:
Get-Service SNMP|Restart Service
Если нужно распространить эти SNMP настройки на множество компьютеров/серверов Windows в домене, используйте возможности внесения изменений в реестр через GPO.
Проверить работу службы SNMP можно с помощью утилиты snmpwalk (доступна в любом Linux дистрибутиве):
# snmpwalk -v 2c -c public1 -O e 192.168.13.122
В этом примере мы опросили наш Windows хост через версию протокола SNMPv2.
Утилита вернула базовыую информацию о хосте (syscontact, sysname, syslocation) и довольно большое количество информации о состоянии сервера Windows.
Mark Silinio <silinio(at)mail.ru>
��������� ���������� 21/04/05
��������: silinio.webhost.ru
������ �������� ������������ ����� ������� Net-SNMP Tutorial — Commands ��������� Net-SNMP �������������� ��� ������ � ���������� SNMP �� ������ UNIX ��������, ������� Linux � *BSD.
� ����� �������� ���������� ��������� ������ � �������� ������.
���������� �� ��������:
��������� ������� ������������ � ������ ��� ��������:
-
OID — Object IDentificator — ������������� ������� -
MIB — Management Information Base — �������������� ���� ���������� -
TRAP — Trap — ����������� (����. «�������») -
INFORM — Inform — ����������� � �������������� � �������� -
SMI — Structure of Management Information — ��������� ���������� ���������� -
PDU — protocol data units — ������������ ������� ������ -
community — Community name — ��� ����������
����������:
- snmptranslate: ������ OID’�� � MIB ��������
- snmpget: ��������� ���������� � ���̣����� �����
- snmpgetnext: ��������� ���������� ���������� OID’�
- snmpwalk: ����� snmpnext ������� �� ���
- snmptable: ����������� SNMP-�������
- snmpset: ��������� OID’��
-
snmptrap: ������� � �������� trap-��������, ������������ �� ���
- �������� � ��ɣ� SNMPv3 TRAP’�� � INFORM’��
- ����� ������
- ������������� ��������� MIB-������
- �����, ����������� ��� SNMPv3
- �����, �������� �� ������ ������
- ������
- ������
snmptranslate: ������ OID’�� � MIB ��������
������� snmptranslate ��������� � ��������� ������ ������� MIB-�������.
� ����� ������� ������, ��� ��������� � �������� ��������� OID � ������� ��� �������� ��������:
�������� ����� �������� ��������������, ��� ����� ���������� ������ �������� ����� -On
��������, ��� ��������, ������������ ���������, ����� ��������� OID � ����� ����, � ����� -On ������ ������ �� ����� (-O, �� ����� Output):
������ ������ ������ �������� OID? ����������� ����� -Of:
�������� � �������������� �������� � ���, ��� ��� ���������� ������� ���� OID, ������� �� ������ ������������ � ���������.
������ ���������, ����������� ����� -IR (-I, �� ����� Input) ��� ������ �� ����� MIB-������:
� ������� ����� -Ib �������� ����� �� MIB-������ � �������������� ���������� ���������:
����� �������� ���� ������ ��������� �� ����������� ��������� ��������, ����������� ����� -TB:
�������� �������������� ���������� � MIB-����� ����� � -Td(description) ������:
� �������, ���� �� ������ �������� ���������� ��������� ������ MIB-������, ����������� -Tp �����:
�������� snmptranslate -Tp ��� �����-���� ����������, ����� �������� �ӣ MIB-������ �������.
snmpget: ��������� ���������� � ���̣����� �����
������� snmpget ������������ ��� ������ ���������� � ����������, ��������� �� ��� �����(host name), ������������������ ���������� � OID. ������:
� �����ģ���� ������� test.net-snmp.org — ��� ��� ����� � �������� �� �������� ������, ��������� SNMP ��������(community string) demopublic � ����������� �������� OID’� system.sysUpTime.0.
������ ������ ������ ucd-snmp ������������ �� ��������� SNMPv1 � community name ��������� �� ������ �����. ������� ������ net-snmp ���������� ��-��������� SNMPv3 � ������� ��� ����� ������, ��� � community string � ������ ���������� ������. SNMPv2, �� ���� ������� SNMPv1, �� � ���������� �������������, � ��� �� ���������� �������� community names � �������� ������� � ���� ��������� ������. ��������� �������, ������������ SNMPv2c, ����� �����������:
��� �������(����� snmptranslate) ��������� ������������ ���������� OID’�� � ���������� ����� �� ����� MIB ������, ��� ��� �� ������ ������� ������ ����� OID’�:
������ ������� �������� �������� ������� snmpget OID’� ��� �������. � �����ģ���� ������� �������� ������������� �� OID’� �������� ��������, � ������ ������� ������ ����� ‘0’(����). ���������� ���������� ‘.0’ � ����� OID’�, � ��������� ������ �������ģ� ������. ��������, ��� ��������� �� ������ ��������� �������� ��� SNMPv1 � SNMPv2c:
�������� ��������� �������� ���������� OID’�� ����� ��������:
snmpgetnext: ��������� ���������� ���������� OID’�
������� snmpgetnext ������ �� snmpget, � ��� ���� ���������, ��� ���������� OID � ��� ��������, ��������� � MIB-������ �� ���, ��� ������� � �������� ���������:
���, snmpgetnext ����� �������������� ��� ����������������� ��������� OID’�� ������ ��ԣ� �������� � ��������� ���������� ����������� OID’�:
���������� ������� snmpwalk, ��������������� ����, ������ �� �� ����� �� ���� ���!
� ������� �� snmpget, snmpgetnext ���������� �������� ��� OID’�, ����������� ��� �������(��. ��� snmpget ����). � ����� ������ � snmpgetnext �� ����� ��������� ������, �.�. �� ��������� �������� ��������� ���������� ���������� �� ����, ������ �� ������ ��� ���������� � ��������� �������:
snmpwalk: ����� snmpnext ������� �� ���
������� snmpwalk ������������� ��������� ����� snmpnext ������ ������ ��������� OID’�� ���������. � �������, ���� �� ������ �������� ��� ����������, ���������� � MIB ������ system, ����������� ��������� �������:
snmptable: ����������� SNMP-�������
������� snmptable ���������� SNMP ������� � �������� �� ������� ����. ���������� ������ sysORTable. � ������� �� ������� snmpwalk, ������������ ������ � ���� �������� ������, snmptable ����������� ����� � ������� ��� ������ ���� (������, ��� � ������� ����, ����� ����� ���� ������ �����):
�� �� ������ ������ ������ ��������� �������:
snmpset: ��������� OID’��
������� snmpset ������������ ��� ��������� ������ �� ���̣���� �����/����������. ��� ������ ����������, ��� ��� ���������� ��������, ���������� ������� OID, ��� ������ � ���� ��������.
�� ������ ������� �������������� ���� ������ � ����� ������ ������� snmpset, ���������� � ������ -h:
��� ������� ��������, � ����� ������� �������� OID’�, ��������� snmpget � snmpset:
��� �� ����� ������, �� ������� �������� �������� OID’� ucdDemoPublicString.0.
��������, ��� � ������, ����� �� �� ������ ����� �� ���������(������) �������, ��������� �� ������ �������� ��� SNMPv1 � SNMPv2c:
� SNMPv1 ����������� �������� ������, �� ��� ���������� � SNMPv2c. ������ ������������� ������������ SNMPv2c ������ SNMPv1, �� �ݣ ����� ������ ��������� ����� SNMPv3 ��� � ����� ������������, ��� � � ����� ��������� �� �������,- SNMPv3 ����� ���������� ���� �����.
snmptrap: ������� � �������� TRAP’��, ������������ �� ���
TRAP’�(�������) ����� �������������� ��� ����������� ������� ���������� � �����-���� ����������.
����� �� ���������� ����������� TRAP’�� � MIB-������, �������� �� � ������� ������� snmptrap, � ��ɣ� �������� snmptrapd.
����������: ��� ��� ���� ��������, ������ OID’� ���������� ������� ���� ������::�������������, ��� ������������ � ���������ģ���� ��������, � ����� ������� snmptrapd ������������� ������������� ����� -OS.
����������� TRAP’��.
TRAP’� SNMPv1 � SNMPv2(INFORM’�) ���������� ��� ���������� ������ ���� �����������.
TRAP’� SNMPv1 ������������ � MIB ����� ��������� ���������������� TRAP-TYPE, ��� � ��������� �������:
TRAP-TEST-MIB DEFINITIONS ::= BEGIN
	IMPORTS ucdExperimental FROM UCD-SNMP-MIB;

	demotraps OBJECT IDENTIFIER ::= { ucdExperimental 990 }

	demo-trap TRAP-TYPE
		STATUS current
		ENTERPRISE demotraps
		VARIABLES { sysLocation }
		DESCRIPTION "This is just a demo"
		::= 17

	END
��� �� ���������� ���� enterprice-����������� TRAP, ������� ����� ���� ������� ��������� �������:
��� ţ ��������� snmptrapd ������� ����� ����� �� �����:
1999-11-12 23:26:07 localhost [127.0.0.1] TRAP-TEST-MIB::demotraps:
        Enterprise Specific Trap (demo-trap) Uptime: 1 day, 5:34:06
	SNMPv2-MIB::sysLocation.0 = "Just here"
������ INFORM’�� SNMPv2 ������� �� ������� TRAP’�� SNMPv1 � �������� �������� �������:
NOTIFICATION-TEST-MIB DEFINITIONS ::= BEGIN
        IMPORTS ucdavis FROM UCD-SNMP-MIB;

demonotifs OBJECT IDENTIFIER ::= { ucdavis 991 }

demo-notif NOTIFICATION-TYPE
STATUS current
        OBJECTS { sysLocation }
	DESCRIPTION "Just a test notification"
        ::= { demonotifs 17 }

END
��� ����������� ���������� TRAP’� SNMPv1 ��� ������������� ����. ��� �������� ����� INFORM’� SNMPv2:
� ��� — ����� snmptrapd ��� ��������� INFORM’�:
1999-11-13 08:31:33 localhost [127.0.0.1]:
        SNMPv2-MIB::sysUpTime.0 = Timeticks: (13917129) 1 day, 14:39:31.29
        SNMPv2-MIB::snmpTrapOID.0 = OID: NOTIFICATION-TEST-MIB::demo-notif
        SNMPv2-MIB::sysLocation.0 = "just here"
����������� �������� ��� ��ɣ�� TRAP’�� � INFORM’��.
������� snmptrapd ����� ����������� ��������� ������ ��������� � ������ ��������� �������-�����������. ���� ��������� ��������� traphandle, ������� ��������� ���������:
traphandle OID �������
��������, ��� � �������� ���������� � ���, ����� TRAP(��� INFORM) ����� ��������, ������������ OID. ��� ������������� ��� ����� ������������� ������������� ������� SNMPv1 � ������� SNMPv2, ��� ������� � RFC 2089. ������ OID ��� ��������� ���� TRAP ��������� ��ԣ� ������ ENTERPRICE ��������� � ���������� � ���� ���-��������������� 0 � 17. �������� OID’� ��� SNMPv1 TRAP’�� ������������ ���������� SNMPv2.
������� ��������� �������� ���������, ����������� ��� ��������� TRAP ������� snmptrapd. ��������� �������� ������ TRAP �� ����������� ����. ������ ������ — ��� ��� �����, ������ — IP-����� ����������� TRAP, � ����������� ����� �������� ���� �������� OID �������� � ������� �� ���������� TRAP.
������ shell-�������, ����������� snmptrapd:
#!/bin/sh

read host
read ip
vars=

while read oid val
do
  if [ "$vars" = "" ]
  then
    vars="$oid = $val"
  else
    vars="$vars, $oid = $val"
  fi
done

echo trap: $1 $host $ip $vars
����� ���������� ��������� snmptrapd.conf ����:
# the generic traps
traphandle SNMPv2-MIB::coldStart    /home/nba/bin/traps cold
traphandle SNMPv2-MIB::warmStart    /home/nba/bin/traps warm
traphandle IF-MIB::linkDown         /home/nba/bin/traps down
traphandle IF-MIB::linkUp           /home/nba/bin/traps up
traphandle SNMPv2-MIB::authenticationFailure /home/nba/bin/traps auth
# this one is deprecated
traphandle .1.3.6.1.6.3.1.1.5.6     /home/nba/bin/traps egp-neighbor-loss

# enterprise specific traps
traphandle TRAP-TEST-MIB::demo-trap /home/nba/bin/traps demo-trap
traphandle NOTIFICATION-TEST-MIB::demo-notif /home/nba/bin/traps demo-notif
� ��������� ���������� �������� ���������� � ������� snmptrap:
�������� ����� ����� �� snmptrapd:
1999-11-13 12:46:49 localhost [127.0.0.1]  TRAP-TEST-MIB::traps:
        Link Down Trap (0) Uptime: 1 day, 18:54:46.27
	IF-MIB::ifIndex.0 = 1
� ����� ����� ����� handler-���������:
����� ����� enterprice specific TRAP’� ���� ����� ����� handler-���������:
� ���������� — ��� enterprice specific INFORM:
��������� TRAP’�� �������
����� ����� �������� �������� TRAP’�. ��� ������� ������������ TRAP SNMPv2-MIB::coldStart, � ��� ���������� UCD-SNMP-MIB::ucdShutDown
��� TRAP’� ������������ ������, ������̣���� � snmpd.conf ����� � ������� �������� trapsink � trap2sink (��� SNMPv1 � SNMPv2 ��������������)
# send v1 traps
trapsink	nms.system.com	public
# also send v2 traps
trap2sink	nms.system.com	secret
# send traps on authentication failures
authtrapenable	1
������������� ����� ����� �������� TRAP’� � ������ ����������� �������������� ������, ��������� ���������� authtrapenable ����� snmpd.conf, ��� ��ԣ� ��������� ���������� SNMPv2-MIB::snmpEnableAuthenTraps:
�������� � ��ɣ� TRAP’�� � INFORM’�� ��� SNMPv3
�������� ������� ����� TRAP’��� � INFORM’���: TRAP — ��� SNMP ���������, ������������ ����� ����������� ������� ����������(������ ��� ���̣���� ����). �� �������� ������ ������� � ����������� � �����������. ����������� TRAP’�� �������� ����������� ����������� ��������� ������������� � ���, ��� TRAP ��� ������ ���̣���� ������. SNMPv2 PDU ���������� ��� ��������, ����� ������� INFORM, ������� ������������ ����� ��� �� ����� TRAP, �� � ��������������. ����� �������, ���� ���������� �� ���̣���� ����� �������� INFORM, �� ��� ���������� � ����� ������������� � ���������. ������������� ����� ���� ��������� ��������� � ���, ��� ����������� ����������� ����������. � ������� ������� snmptrap �������� �������� ��� TRAP’��, ��� � INFROM’��, � ��������� ������ ����� �������� ����� -Ci(���� ������������ ������� snmpinform). �������� ��������, ��� ��� ������� INFORM’�� ����� ������������ SNMPv2c ��� SNMPv3. ��������� snmptrapd �������� ��������� ��� INFORM’�, ��� � TRAP’�.
����������: ��� ����, ����� ��������� snmptrapd ������� ��������� TRAP’� � INFORM’� SNMPv3, ������������ ������̣���� �������������, ��� ������ ���� ��������� ��������, ��������� ��������� createUser, ��������������� ����. ���� ��������� snmptrapd � ������ -Dusm, �� � ����� ������� ����� �������� ��������� «no such user».
SNMPv3, ������������ � engineID’�
TRAP’� � INFORM’� ����� ����� ��� ������������� SNMPv3 ��������� �������� ���������� ���� �������������. ��������� SNMPv1 � SNMPv2c, ������������ community-������, ������ ���������� ������ ������������. SNMPv3 ��������� ������, ���� ������������ ������������ � ���� ������������� SNMPv3. �ӣ ������, �� ��� ��? �� ����������� ����� ��������� ��������: ���� ������������� ���������� SNMPv3 ��������� ������������� ����� �������� � ���� ����� ������������(����������� «securityName») � �������������� ������� SNMP ����������, � ������� ��������������� �����(��ף��� «engineID»). ������ ����� �� ����������� ���������� Net-SNMP(snmpget, snmpwalk � ��.), ��� ���� ������� engineID � ���������� ��� ������������, engineID � ������ � ���� ������������� �� ������ engineID ���̣����� ����������. ����� ����� �����
SNMPv3 INFORM’�
INFORM’� �������� �� ������� ��������. ��� ������� INFORM’a ����������� ���̣���� engineID, ������� ������ ���������� � ���̣���� ���� ������������� ������ � securityName. ��������� snmptrap(� �� ������) ���������� ���̣���� engineID � �������� ������������ � ������ ������ ������������(securityName). ����, �ӣ, ��� ��� ���������� �������, ��� ������� � ���� ������������� ��������� snmptrapd(���������������, ��� �� ������������ ��������� TRAP’�� � INFORM’��) ����������� �ޣ���� ������:
- ���������� ����ݣ����
snmptrapd - �������� �
/var/net-snmp/snmptrapd.conf��������� ������:createUser myuser MD5 mypassword DES myotherpassword
- ��� myuser ��� securityName, mypassword — ��� ������ ��� ��������������, � myotherpassword — ��� ������ ��� ����������(�������� ��� ������, ���� �� ������ ������ ��� �� ������ ������������ ����������)
- ������������� ���������
snmptrapd
������ �� ������ ������������ snmpinform ��� ������� snmptrapd INFORM’� coldStart:
���� �� ������� �ӣ ���������, �� ������ ������� �������� �� snmptrapd:
2001-10-31 11:21:05 localhost.localdomain [127.0.0.1]:
        sysUpTimeInstance = Timeticks: (42) 0:00:00.42  snmpTrapOID.0 = OID: coldStart.0
TRAP’� SNMPv3
������������� TRAP’�� SNMPv3 ����� ����� ��������� ��������, �� ���� ������� ��������� ������ ���������, ���� �� ������� ������������ �� ����. ������� TRAP’�� SNMPv3 � ������������� engineID ���������� ����������, ����������� TRAP ������ engineID ���̣����� ����������. ��� ������, ��� �� ������ ������� ����������� ������������� � ����� ���̣���� ����,- �� ������ ��� ������� engineID, � �������� �� ������ �������� TRAP’�. ���� � ��� 100 SNMP ������� �������� TRAP’� SNMPv3 �� ��� TRAP-��ɣ����, �� �� ������ ������ ������� 100 ������� createUser � ���������������� ����� /var/net-snmp/snmptrapd.conf.
����, ��������� ���������:
- ����������
snmptrapd - �������� � ����
/var/net-snmp/snmptrapd.conf��������� ������:createUser -e 0x0102030405 myuser MD5 mypassword DES myotherpassword
- ��������, ��� �������� engineID ������������ ���� ������ ��� 0x0102030405(��� �� �������������, �� � ���������������� �� ����� ��������)
- (����)���������
snmptrapd.
������ �� ������ ����������� ��������� � ������� snmptrap coldStart v3 TRAP ��������� TRAP-������:
����� ����� ���������� ����������� �������.
����� ������ ���� ������ ���������� ��� v3 engineID, INFORM’�, TRAP’�, ����������� engineID, ��������� �����, ������, ��������� ����� � ��. �ӣ ��� ���������� �������� 18223 ����� ������ � RFC 2570-2575, ������ �� ����� ����������� �����…
������������� ��������� MIB-������
������� Net-SNMP ����� ����������� �������������� �������� OID’�� � ��������� ��������� �����-�������� MIB’��. � ��������� ��� �ģ� ����� �� ���������� ����������� MIB’��, �� �� ������ ������� ����� �������������.
������� Net-SNMP ��������� MIB’� ��-��������� �� ��������� ���� ����������:
-
$HOME/.snmp/mibs -
/usr/local/share/snmp/mibs
� �������, � ��� ���� MIB, ������� �� ������ ������������ � ������� ���������� CISCO-RHINO-MIB (����� ������������� ����). ��������� ��� MIB � ���� �� ����������������� ����������. ���� �� ����� MIB �� ������-���� �����(��� RFC ��������), ���������, ��� ������ ������ ��� ������, �� ����������� � MIB(��������� �����, ����������� �������). ������ ������ ����� ������ ���������� � ������ ���� «CISCO-RHINO-MIB DEFINITIONS ::= BEGIN»
��������� ������������� � �������� ��� ��� ���� �� CISCO-RHINO-MIB, ����� ��� ����� cicsoLS1010ChassisFanLed.
��������, ��� snmptranslate ������ �� ������ ��� � ����� ����:
���, ��� �� �����. ������ �� ������ ������� ���� CISCO-RHINO-MIB.mib � ��������� ��� � ����������, ��� �� ����� ������ ��������� Net-SNMP. ��������� ��� � $HOME/.snmp/mibs.
������������� ������ -m ������� snmptranslate ��� �������� MIB’�. ������������� ����� «-m +CISCO-RHINO-MIB ��������� �� �������� �� ������ MIB’��, �������������� ��-���������, �� ����� � �� �������� CISCO-RHINO-MIB(���� ‘+’ �������� «��������»).
���… �� ������ ������ ����� �������, ��� ��� ����� ��������� CISCO-SMI MIB. ��������� ��� � �������� � $HOME/.snmp/mibs. ��������� ������� ��������:
��������!
�ݣ ���� ������: �� ������ ������� ��� ������� ������ ��������(����� ����� �������� �������������� � ������������� �������� �������������� Net-SNMP):
��� ��������� ����������, ��� �������, ����� ������ MIB’� ������������� ������������ ��������� Net-SNMP ��� �� ������ �������� � ��������� ������.
���� ��������� ����� ������� ���.
���������� ������������� ��������� Ethereal: ���� �� ���� ������� ������� � ��� Ethereal, �.�. ��� �� ����� ����������� ���������� ������ MIB’� ��������� ����� -m � -M, ��� �� ������������� ����.
� ������ ������� �� ������ ��������� ��������� ������ � ���� snmp.conf. ���� ���� ����� ���� ����ݣ� ��� � ��������� ���������������� ���� Net-SNMP(����. /usr/local/share/snmp.conf), ��� � � ������������($HOME/.snmp/snmp.conf):
mibs +CISCO-RHINO-MIB
mibs +SOME-OTHER-SPIFFY-MIB
��� �������� ������ MIB’�� ����� ����� ������������ ���������� ��������� � ��������� MIBS(����� ������ ��� �������� /bin/sh):
����� ����������� ��� SNMPv3
3-� ������ ��������� SNMP ����� ������������ ��������� �� ����� ������������ � ��������� � ����������� ��������. ���, SNMPv1 � SNMPv2c ���������� ��� �������������� community-������ ���������� �������� �������. ����� ��� �������������� ������ �����������, �.�. ����� ���� ����� ���������� ���������.
SNMPv3 ����������� �������� �� ����� ������������ � ��������� �������������� � ����������� �� ��������� ��� �����:
- USM — User-based Security Module, ������� ������ ������������� � �� ���������. USM ������ � RFC 2574.
- VACM — Version-based Access Control Module, ������������� ������ �������������(��� � SNMPv1/v2c communities), � �.�. ������ � ������̣���� ������� MIB-������. VACM ������ � RFC 2575.
���������� ������ ������������� Net-SNMP ��� ���������(set) ������ �� ���̣���� �����.
������� ������������ �������� ��������� ������:
���������� ��������� ����� ��������� �������.
— ������ ������������ ����� ���(securityName), ��� ��������������(authProtocol), ��� privacy(privProtocol), � ����� ����� ��������������(authKey) � privacy(privKey).
— �������������� ���������� ��ԣ� ������������ ������������� ��������� � ������� authKey. authProtocol �� ����������� ���� ����� ���� MD5 ��� SHA, ����� ��� authKeys � privKeys ������������ �� ��������� ����� ������ �� ����� 8-�� ��������
— �������������� ���������� � ����������� ����������������� privKey ��� ���������� ������ ����������� ���������. privProtocol ����� ���� AES ��� DES.
��������� ����� ���� �������� ����������������������, ��������������������, ��� �������������������� � �������������� � ����������� �� �������� securityLevel.
������� ���� ���������, ��� ��� ��� �������� ����� ���� ������� � ��������� ������. �� ����� ������ ��������� �������� �� ��������� � ���� ~/.snmp/snmp.conf, ��������� ������ ������� �������.
| �������� | ����� ���������� ������ | ����������� � snmp.conf
|
|---|---|---|
| securityName | -u NAME | defSecurityName NAME |
| authProtocol | -a (MD5|SHA) | defAuthType (MD5|SHA) |
| privProtocol | -x (AES|DES) | defPrivType DES |
| authKey | -A PASSPHRASE | defAuthPassphrase PASSPHRASE |
| privKey | -X PASSPHRASE | defPrivPassphrase PASSPHRASE |
| securityLevel | -l (noAuthNoPriv|authNoPriv|authPriv) | defSecurityLevel (noAuthNoPriv|authNoPriv|authPriv) |
| context | -n CONTEXTNAME | defContext CONTEXTNAME |
�������
������ ������� ��� �������������� (��� �������, ��������� ������� ��� ������������):
������ � ���������������:
� �������, ������ � ��������������� � �����������:
������� �� ��� ��� �������� ������ �.�. �������� �������� �������. �� ���� � �������� ���� �������� ������������ ����� ������� ��������������. �����, ��� �� ������ �����������, ������ ����� ����� ֣����� ������� ������������ � ����� ���� �� authNoPriv ������� ��� ��������� VACM �������� �������.
� � ����������, �������� snmp.conf �������� �������:
defContext none
defSecurityName MD5User
defAuthPassphrase The Net-SNMP Demo Password
defVersion 3
defAuthType MD5
defSecurityLevel authNoPriv
����� ������� ��� ���������, ������������ ���� ����� � ��������� ������, ����� ������������� ������� �� ����� �����:
� �ݣ ��������:
�����:
����� �������� �� ������ ������
��� ������� ������ Net-SNMP, �� ����������� snmptrapd � snmpd, ����� ������������ ����� ������� �� ���������� ����.
��� ��������� ������ ���� ����� ��������� ��������� � ������ «-h«.
� ������� ����� -O, ������������� � �������� ����� �������� Net-SNMP, ����� �������� ������ ������:
��������� �������� ������������� ���� �����������:
-On
������ ���� ��������� �������� OID’� � �������� ������� ������ ����������:
-Oe
���� ���� ����������, ����� �� ���������� ���������(����� ������ � �������) ����������� ��������� ��������:
-Ob
������ SNMP ������� ���������� � �������� ������� ������. ����� ������ ������������� � OID �������� ��� ���������� SNMP �������. ������� ��������� ����������� � ���� �� ��������� �������. ��������� OID usmUserEntry:
��� ������, usmUserEntry ���������� � �������� �������� ��� ��������� ��������: usmUserEngineID � usmUserName. �� ��������� ������� Net-SNMP ���������� �����, �������� �������� ��� ��������:
����� ��� OID’�: �������� ������ — «………», ������� — «MD5User». ������ ��������� �������� ������������ ����� engineID, ������� ������� �� ���������� ��������(������ � ����������), ������ �� — ������������ ����� ��� ��� ������, ������� �� ���� ������ ������� ����� ��������. ������� �������, ������� ����������� ������� � �������� ����:
��� ������, OID’� — ��� �� ������ ��������� ��������, ����� �ӣ ��������� �������.
��� ������������� ��������� �������� � �������� Net-SNMP ����� ��������� �������� �������� �����, ��� ���� ������� ����������� ��������:
-OX
������������� ���� ����� �������� ���� ����� ������ ������� ����������� �������� ��������. �������� ��������, ��� ����� ������ ������������ ������ ��� ������.
��������, ������������ MIB’��� IPv6, ������ �������� ������ ��������, ������ ������ ������� �� ��������� � ���� ����������, ��� �� ����� ������.
���������� IPV6-MIB:ipv6RouteTable:
�����: � �������� ������� ������������ IPv6 ����� � ��� �������(integer) ��������. ��������� �� ���:
��, �� ��� �� ����� �����������. ����� ��������� ���:
�������� ��������. ����� ������ �������� ����������� �������� ������ ������, � ���������� ���������� DISPLAY-HINT � �������������� ����� ��� �� ����������� �����������.
-Os, -OS, � -Of
��������� ����� ������� ������� OID’�� ����� � ������� ����� -Os � -OS (-OS ��������� �������� MIB’� ����� OID’��):
������� ������, ��� ������ ������������ ������ ��������� ���� OID’�.
����� �� -Of, ��������, ������� ������ OID:
-Ov
���� -Ov ������� ������ ��������, �� �� �������� ����������:
-Oq
���� -Oq ������������ �������� �������(q — quick) �����, ��� ����� ���� ������� � ������ ������������� ������ Net-SNMP � ��������� ��������:
��������, ��� � ����� ������� ����������� ���� ��������� � ������� «OID:» �������.
����������, �� ������ ������������� ������ �����:
��� shell-�������� ����� ������� ����� -Oqv. ������� ���� ������ �������� ��������, ��� ������ ������ ������������ � ��������:
������
.
Q: ��� ������������� ������ snmpget, snmpgetnext ��� snmpwalk, ����������� ������ «stack smashing attack in function netsnmp_udp_transport()«. |
A: ���������������� ����� Net-SNMP ��� ������������� StackProtector. � Gentoo Linux ��� ����� ����� ������������� �� GCC-������� �������������� �� hardenednossp, �������� ���: # gcc-config i686-pc-linux-gnu-3.4.5-hardenednossp � ����������������� Net-SNMP �������� # emerge net-snmp. |
| Q: �������� �� ������� ���, ����� ���������� TRAP’� ��������� �� Jabber’�? |
| A: ������ ����� �� ���������� ����� ��. � ������ �������� ����������� � ������� sendxmpp ������� «����������» |
������
- RFC
- Structure of Management Information (SMI)
- Simple Network Management Protocol (SNMP)
- Concise MIB definitions
- Management Information Base (MIB-II)
- ������
- SNMP �������� — ��������, ������������, ����������
- SNMP traps � � ��� �� ����
- ������������� � �������������� � ���������� ��������� ����� SNMP
- ����������� ������������ SNMP
- MIB’�
- 3Com
- Alcatel
- APC
- Ascend
- Cabletron
- Cisco
- Enterasys
- Fore
- HP
- IBM
- Juniper
- Riverstone
- Shiva
- WellFleet
- Zyxel
The snmpwalk command is designed to perform a sequence of chained GETNEXT requests automatically, rather than having to issue the necessary snmpgetnext requests by hand.
Contents
- 1 Basic Example
- 2 Walking tables
- 3 Walking an empty tree
- 4 Multiple Values
- 5 Tutorial Sections
- 5.1 About the SNMP Protocol
- 5.2 Net-SNMP Command Line Applications
- 5.3 Application Configuration
- 5.4 Net-SNMP Daemons
- 5.5 Coding Tutorials
- 5.6 Debugging SNMP Applications and Agents
- 5.7 Operating System Specific Tutorials
Basic Example
The command takes a single OID, and will display a list of all the results which lie within the subtree rooted on this OID:
 % snmpwalk -v 2c -c demopublic test.net-snmp.org system
 SNMPv2-MIB::sysDescr.0 = HP-UX net-snmp B.10.20 A 9000/715
 SNMPv2-MIB::sysObjectID.0 = OID: enterprises.ucdavis.ucdSnmpAgent.hpux10
 SNMPv2-MIB::sysUpTime.0 = Timeticks: (586998396) 67 days, 22:33:03.96
 SNMPv2-MIB::sysContact.0 = Wes Hardaker wjhardaker@ucdavis.edu
 SNMPv2-MIB::sysName.0 = net-snmp
 SNMPv2-MIB::sysLocation.0 = UCDavis
 SNMPv2-MIB::sysORLastChange.0 = Timeticks: (0) 0:00:00.00
 SNMPv2-MIB::sysORID.1 = OID: SNMPv2-MIB::snmpMIB
 SNMPv2-MIB::sysORID.2 = OID: IF-MIB::ifMIB
 SNMPv2-MIB::sysORID.4 = OID: IP-MIB::ip
 SNMPv2-MIB::sysORID.5 = OID: UDP-MIB::udpMIB
 SNMPv2-MIB::sysORDescr.1 = The Mib module for SNMPv2 entities.
 SNMPv2-MIB::sysORDescr.2 = The MIB module to describe generic objects for network interface sub-layers
 SNMPv2-MIB::sysORDescr.4 = The MIB module for managing IP and ICMP implementations
 SNMPv2-MIB::sysORDescr.5 = The MIB module for managing UDP implementations
 SNMPv2-MIB::sysORUpTime.1 = Timeticks: (82) 0:00:00.82
 SNMPv2-MIB::sysORUpTime.2 = Timeticks: (81) 0:00:00.81
 SNMPv2-MIB::sysORUpTime.4 = Timeticks: (83) 0:00:00.83
 SNMPv2-MIB::sysORUpTime.5 = Timeticks: (82) 0:00:00.82
It can also be used with a single MIB (scalar) object, or even an exact
instance OID — returning the corresponding value:
 % snmpwalk -v 2c -c demopublic test.net-snmp.org sysDescr
 SNMPv2-MIB::sysDescr.0 = HP-UX net-snmp B.10.20 A 9000/715

 % snmpwalk -v 2c -c demopublic test.net-snmp.org sysDescr.0
 SNMPv2-MIB::sysDescr.0 = HP-UX net-snmp B.10.20 A 9000/715
Conversely, it’s also possible to start the walk at a higher level,
retrieving more than one group of information.
% snmpwalk -v 2c -c demopublic test.net-snmp.org .iso
would typically retrieve all the information known to an agent.
(Output omitted here, for obvious reasons!)
Walking tables
The first example above contains both scalar and table instances.
Snmpwalk can also be used for retrieving a single column of a table,
by specifying the column object as the starting point.
 % snmpwalk -v 2c -c demopublic test.net-snmp.org sysORID
 SNMPv2-MIB::sysORID.1 = OID: SNMPv2-MIB::snmpMIB
 SNMPv2-MIB::sysORID.2 = OID: IF-MIB::ifMIB
 SNMPv2-MIB::sysORID.4 = OID: IP-MIB::ip
 SNMPv2-MIB::sysORID.5 = OID: UDP-MIB::udpMIB
Note that when retrieving a full table (either alone, or as part of a wider walk),
all the values for one column are displayed before moving on to the next.
This can be seen in the output of walking the system group above.
This is precisely the behaviour described in the
snmpgetnext tutorial for a chain of GETNEXT requests.
However it sometimes comes as a surprise to those new to SNMP, who expect
such tables to be displayed one row at a time.
The snmptable command may provide a more familiar view of such tables.
Walking an empty tree
If the agent does not implement any MIB objects underneath the specified
OID, then the snmpwalk command may return without displaying anything
at all, or it may display a vaguely informative message, depending on
the SNMP version being used:
 % snmpwalk -v 1 -c demopublic test.net-snmp.org ifXTable
 (nothing displayed)

 % snmpwalk -v 2c -c demopublic test.net-snmp.org ifXTable
 IF-MIB::ifXTable = No Such Object available on this agent at this OID
Alternatively, if the requested tree is later than the last MIB instance
that the agent implements, a slightly different message will be displayed:
 % snmpwalk -v 1 -c demopublic test.net-snmp.org .2.0
 End of MIB

 % snmpwalk -v 2c -c demopublic test.net-snmp.org .2.0
 joint-iso-ccitt.0 = No more variables left in this MIB View (It is past the end of the MIB tree)
But in each case, the meaning is the same — the agent had nothing relevant
to display.
Exactly the same behaviour holds if the agent does implement MIB objects within
the requested subtree, but the access control settings are configured to deny
access to them. That is effectively the same as not implementing these objects
at all. (At least for the given administrative information settings)
Multiple Values
The snmpwalk is designed to retrieve multiple OIDs and values from
the remote agent.
But unlike most of the other command-line tools, it can only
work with a single starting OID. It is not possible to supply multiple
OIDs as part of the same command.
Or more accurately — it is possible to specify several OIDs, but
everything other than the first one will be ignored!
Tutorial Sections
About the SNMP Protocol
These tutorial links talk about SNMP generically and how the protocol itself works. They are good introductory reading material and the concepts are important to understand before diving into the later tutorials about Net-SNMP itself.
- How SNMP Works: About the protocol itself (GETs, GETNEXTs, etc)
- What data is in SNMP: All about SNMP Management Information Bases (MIBs)
- Securing SNMP: How to use the SNMP protocol securely
Net-SNMP Command Line Applications
These tutorial pages discuss the command line tools provided in the Net-SNMP suite of tools. Nearly all the example commands in these tutorials works if you try it yourself, as they’re all examples that talk to our online Net-SNMP test agent. Given them a shot!
- snmptranslate: learning about the MIB tree.
- snmpget: retrieving data from a host.
- snmpgetnext: retrieving unknown indexed data.
- snmpwalk: retrieving lots of data at once!
- snmptable: displaying a table.
- snmpset: peforming write operations.
- snmpbulkget: communicates with a network entity using SNMP GETBULK request
- snmpbulkwalk: retrieve a sub-tree of management values using SNMP GETBULK requests.
- snmptrap: Sending and receiving traps, and acting upon them.
- Traps/informs with SNMPv3/USM: Sending and receiving SNMPv3/USM TRAPs and INFORMs
- Sending Traps/Informs via AgentX: Sending notifications from the command line through snmpd
- Common command line options:
- Using and loading MIBS
- SNMPv3/USM Options
- Using SNMPv3 over TLS and DTLS
- Customized Output Formats
- Writing mib2c config files
Application Configuration
All of our applications support configuration to allow you to customize how they behave.
- Configuration files for Net-SNMP applications
Net-SNMP Daemons
Net-SNMP comes with two long-running daemons: a SNMP agent (snmpd) for responding to management requests and a notification receiver (snmptrapd) for receiving SNMP notifications.
- SNMP Agent (snmpd) Configuration
- Configuration Basics
- Access Control (VACM)
- snmpconf
- SNMP Notification Receiver (snmptrapd)
- Configuring snmptrapd
- Configuring SNMPv3 notifications
- Configuring snmptrapd to understand vendor-specific MIBS (Cisco)
- Agent Monitoring
- DisMan Monitoring
- Monitoring with MRTG
Coding Tutorials
Net-SNMP comes with a highly flexible and extensible API. The API allows you to create your own commands, add extensions to the agent to support your own MIBs and perform specialized processing of notifications.
- Client / Manager Coding Tutorials
- Writing a simple application
- Writing a simple asynchronous application
- Agent Coding Tutorials
- The Agent Architecture page might be worth reading before or after the agent coding tutorials, and describes how the Agent Helpers work under the hood.
- Writing a mib module to serve information described by an SNMP MIB, and how to compile it into the net-snmp snmpd agent.
- Writing a Dynamically Loadable Object that can be loaded into the SNMP agent.
- Writing a Subagent that can be run to attach to the snmpd master agent.
- Writing a perl plugin to extend the agent using the NetSNMP::agent module.
- Writing shell scripts to extend the agent
- Using mib2c to help write an agent code template for you
- General mib2c Overview
- Using the mib2c-update script to recode your code
- mib2c.mfd.conf tutorial
- Header files and autoconf
Debugging SNMP Applications and Agents
All our tools and applications have extensive debugging output. These tutorials talk about how the debugging system works and how you can add your own debugging statements to you code:
- Debugging output printed using the -D command line option
- Putting DEBUGMSG tokens in your code
- Using -Ddump to display packet breakdowns
- Debugging using GDB
Operating System Specific Tutorials
- Building With Visual Studio 2005 Express
- Using the command line and nmake
- Building Net-SNMP 64-bit with Visual C++ 2010 Express
- Using the command line and nmake (VC++ 2010 Express)
- Net-Snmp on Ubuntu
- Net-SNMP and lm-sensors on Ubuntu 10.04
- Net-SNMP for windows:
- How to install: [1]
- How to configure: [2]
The snmpwalk command is a shorthand way to use multiple GETNEXT requests without having to type lots of different commands, fire off lots of different GETNEXT and view your infrastructure health. We look at some snmpwalk examples on Windows and Linux.
UPDATED: November 8, 2022
In the late 1980’s, SNMP or the Simple Network Management Protocol first emerged as a solution for managing nodes within a network. Since then SNMP data has been used to measure the system performance of devices across countless vendors to help ensure that networks stay up and running.
Today SNMP is one of the most popular networking protocols in the world and snmpwalk has become a go-to method for scanning multiple nodes at once.
How Does SNMP Work?
However, before we look at the snmpwalk command, we first need to look at how SNMP works. On SNMP-enabled devices, an SNMP agent collects information from the device and stores it within a Management Information Base (MIB) where this data is stored so that it can be accessed whenever the SNMP manager polls the SNMP agent.
When the SNMP Manager queries the SNMP agent, data is taken from the MIB and sent to the SNMP Manager where it can be viewed with a network monitoring tool. There are many different commands that you can use to query an SNMP agent. The most common ways are through the use of the GET or the GET-Next command. The GET command is used to take an Object Identifier (OID) from the MIB. The GET-Next command is a little more advanced and goes through a MIB tree from OID to OID pulling information. This is where snmpwalk comes in.
What is snmpwalk?
snmpwalk is the name given to an SNMP application that runs multiple GETNEXT requests automatically. The SNMP GETNEXT request is used to query an enabled device and take SNMP data from a device. The snmpwalk command is used because it allows the user to chain GETNEXT requests together without having to enter unique commands for each and every OID or node within a sub-tree.
The snmpwalk is issued to the root node of the sub-tree so that system information is gathered from every connected node. This provides you with an efficient way to collect information from a range of devices like routers and switches. The information you collect arrives in the form of OIDs. An OID is an object which is part of the MIB within an SNMP-enabled device.
Installing snmpwalk on Windows
For Microsoft Windows users, the process of installing snmpwalk on Windows is incredibly simple.
- You first need to download the following:
https://sourceforge.net/projects/net-snmp/files/net-snmp/ - Once you have the snmpwalk.exe file on your computer, click Start > search cmd and press Enter. This will open the command line prompt window.
Installing snmpwalk on Linux
On Linux devices, snmpwalk is available as a package for you to install. The process of doing this depends on your Linux distribution. However, you can install Linux by entering the following commands:
- Redhat/Fedora/CentOs:
yum install net-snmp-utils - Ubuntu:
apt-get install snmp
snmpwalk Parameters and Options in Windows and Linux
snmpwalk has a range of different parameters that you can use. These include the following:
| hostname |
The SNMP agent name
|
| community |
The type of read community
|
| object_id |
Specify an object ID to return all SNMP objects below it. If NULL then the root of the SNMP object is taken as the object_id
|
| timeout |
Number of microseconds before the first timeout
|
| retries |
How many times to retry the connection in the event of a timeout
|
| -Os |
Shows the last symbolic element of an OID
|
| -c |
Sets a community string
|
| -v |
Specifies the SNMP version you want to use
|
How to Minimize the Information You See With snmpwalk
One of the first things you’ll notice when running snmpwalk is that there are too many results for you to read. You can easily end up with thousands of different results. To get around this vendors help you by providing you with a MIB file. The MIB file is used to specify which OIDs are available on a device. Many vendors provide you with a MIB file for each device you have. Having a MIB file allows you to run a query that is specific to that file, rather than walking through everything.
See also: SMNP tools
snmpwalk Examples
When using snmpwalk on a device you will be provided with a range of values by the SNMP agent. You will be walking through the OID from your starting OID onwards. If you enter the snmpwalk command on a device then a similar result to the following will display:
$ snmpwalk -v1 -c public 10.10.1.224
SNMPv2-MIB::sysDescr.0 = STRING: APC Web/SNMP Management Card
SNMPv2-MIB::sysObjectID.0 = OID: SNMPv2-SMI::enterprises.318.1.3.7
SNMPv2-MIB::sysUpTime.0 = Timeticks: (47372422) 5 days, 11:35:24.22
SNMPv2-MIB::sysContact.0 = STRING: Comparitech
SNMPv2-MIB::sysName.0 = STRING: APC-3425
SNMPv2-MIB::sysLocation.0 = sTRING: 3425EDISON
SNMPv2-MIB::sysServices.0 = INTEGER: 72
IF-MIB:: ifNumber.0 = INTEGER: 1
IF-MIB:: ifIndex.1 = INTEGER: 1
IF-MIB:: ifDescr.1 =STRING: veya
………
SNMPv2-MIB:: snmpOutGetResponses.0 =Counter32: 338
SNMPv2-MIB: snmpOutTraps.0 = Counter32: 0
SNMPv2-MIB:: snmpEnableAuthenTraps.0 = INTEGER: 0
$
As you can see that is a lot of system information generated by a single command. Most of the lines are comprised of information pulled from the MIB.
snmpwalk example with no MIB
In the example below, you can see a snmpwalk example with no MIB. The second number on the first line, or the .1.3.6.1.4.1.318, is the OID that we started from.
$ snmpwalk -v1 -c public 10.10.1.224 .1.3.6.1.4.1.318
SNMPv2-SMI::enterprises.318.1.1.1.1.1.1.0 = STRING: “Silcon DP340E”
SNMPv2-SMI::enterprises.318.1.1.1.1.1.2.0 = STRING: “UPS_IDEN”
SNMPv2-SMI::enterprises.318.1.1.1.1.2.1.0 = STRING: “314.10.D
……
snmpwalk example with MIB denoted
However, if you have a specific MIB then you can get more detailed information returned back to you from the objects that you want to view. In the example below the -m command denotes the MIB that is going to be queried.
$ snmpwalk -v1 -c public -m “./APC-POWERNET.txt” 10.10.1.224 apc
PowerNet-MIB::upsBasicIdentModel.0 = STRING: “Silcon DP340E”
PowerNet-MIB::upsBasicIdentName.0 = STRING: “UPS_IDEN”
PowerNet-MIB::upsAdvIdentFirmwareRevision.0 = STRING: “314.10.D”
…..
snmpwalk example command on Linux
Below is a snmpwalk example command on Linux. As you can see this functions in much the same way walking through the OIDs to pull the relevant system information from the connected devices:
# % snmpwalk-v 1 localhost public system # system.sysDescr.o = “SunOS name sun4c”
# system.sysObjectID.o = OID: enterprises.ucdavis.ucdSnmpAgent.sunos4
# system.sys.UpTime.o = Timeticks (595637548) 68 days, 22:32:55
# system.sysContact.o = “sys_admin@stc.org>”
# system.sysName.o = “Ridyadh_o8_WS”
# system.sysLocation.o = “Ridyadh, KSA”
# system.sysServices.o = 72
Save Time with snmpwalk
snmpwalk seems like a complicated concept but it isn’t in reality. The snmpwalk command is simply a shorthand way to use multiple GETNEXT requests without having to type lots of different commands. With one snmpwalk command, you can fire off lots of different GETNEXT and view your infrastructure health.
If you’re using the snmpwalk command then it’s important to remember to cut down the amount of information you receive as much as possible. Specifying a MIB will allow you to see specific information rather than data collected from an entire database of object IDs!
By drawing SNMP data from devices throughout your network this way, you can make sure that you don’t miss anything important happening on your network. After all the snmpwalk command is there to help you pull SNMP data from devices in your network as efficiently as possible.
Using MIB with an SNMP agent
Our methodology for selecting MIB analyzers like snmpwalk
We reviewed the market for MIB analyzers like snmpwalk and assessed the options based on the following criteria:
- An interpreter for the OID structure of SNMP
- A tool that includes a visual layout of the OID tree
- A view that shows the OID value plus a description for each active node
- A display of whether an OID node has a value or not
- A graphical user interface that is easy to use
- A free trial for a no-risk assessment
- Value for money represented by useful functionality at a good price
SNMP agents collect network device information and store it in a Management Information Base (MIB) and become accessible to powerful SNMP tools.
ManageEngine SNMP MIB Browser
The SNMP MIB Browser from ManageEngine is a visual SNMP Walk tool that will run on Windows and Linux. This is a great free alternative to the big network monitoring systems like PRTG if you just want to see the details in the MIB returned by a specific device. The MIB Browser can also query a series of devices and summarize their MIBs.
Pros:
- Lets you query a specific device or a range of devices
- Will run on Linux and Windows
- Supports SNMP v1, v2, and v3
- Can be set up to query and read MIBs continuously
- Has an alert system that can be set up to trigger if a fail status is in a MIB
- Will send alerts by email
- Can parse MIBs
Cons:
- Not a full network monitor
Download the free SNMP MIB Browser from ManageEngine.
snmpwalk FAQs
What is a MIB walk?
A MIB is the SNMP Management Information Base. This is created through a reference code structure with each item having sub-nodes that are identified by the parent ID plus an extension. So, the MIB has a tree structure. A MIB walk is the process of working through a received MIB report and checking every code defined in the SNMP standard to see if it has an associated value.
Are there any alternatives to SNMP?
SNMP is the only reporting standard that is universally implemented by network device manufacturers. There are some other reporting standards that some of the major device producers install as well. These include Netconf, which is available on Cisco devices – some other manufacturers install this as well. WMI is another option, but this is only available on devices that run Windows.
What is snmpwalk OID?
OID stands for “object identifier.” This is the code that identifies each node on the MIB tree. Therefore, a snmpwalk on OIDs is the same as a MIB walk.
How do you use SNMP GET command in Linux?
The snmpget command in Linux has a number of switches that modify the behavior of the utility. You can see these options by entering snmpget -h Here are the results that you will see:
-H display configuration file directives understood
-v 1|2c|3 specifies SNMP version to use
-V, —version display package version number
For example, you would type in snmpget -V to see the version number of your SNMP implementation
How can I tell if SNMP is running on Linux?
Issue any standard SNMP command at the command line to see if the SNMP service is running. For example, use the snmpget -v command.
How can I tell if SNMP is working on Windows?
To see if SNMP is running on a Windows computer:
- Go to the Start Menu, expand Windows Administrative Tools, and click on Services.
- Scroll down the displayed list of services to find the SNMP entry. Its Status should be Running if it is working.
See also: Best SNMP Monitoring Tools
SNMP в Windows Часть 3. Snmpwalk и все все все OID.
Всем привет! Если Вы прочитали две мои предыдущие статьи, посвященные протоколу SNMP, то вы наверное уже задались вопросом, а где же искать коды OID для того чтобы мониторить (или изменять) требуемые Вам параметры устройств. Конечно я уже несколько раз упоминал что необходимо искать MIBы и знакомиться с их содержимым, но есть более простой способ позволяющий быстро получить все значения OID поддерживаемые устройством — это применение утилиты snmpwalk.
Утилита snmpwalk входит в состав набора программного обеспечения Net—SNMP и позволяет получить все поддерживаемые устройством OID при помощью SNMP GetNext запросов. Скачаем данную утилиту и поместим её в корне диска C. Далее откроем командную строку с правами администратора и выполним в ней следующие команды:
cd c:
snmpwalk.exe -r:192.168.1.12 -c:Test > 2.txt
Вторая из этих команд запускает утилиту snmpwalk.exe с параметрами. Параметр —r: отвечает за указание IP адреса агента SNMP, а параметр —c: отвечает за указание используемого для опроса community. Конструкция > 2.txt позволяет вывести результат выполнения команд не в консоль а в текстовый файл 2.txt.
Теперь, если мы перейдем в корень диска С и откроем файл 2.txt, то увидим в нем полный перечень OID поддерживаемых устройством, их тип и значения которые они имеют в данный момент. К сожалению, описания того за что какой OID отвечает нет. Для того чтобы в этом разобраться вам придется гуглить или все же просматривать mibы. Хотя о назначение некоторых OID нетрудно догадаться по их значениям.
Удачи и не бойтесь эксперементировать.

