Simple Network Management Protocol or SNMP is used for monitoring, event notification, and network device management on corporate networks. The protocol consists of a set of network management standards, including the Application Layer protocol, database schemas, and a set of data objects. SNMP can receive various types of information (uptime, performance counters, device parameters, etc.) from any network device. SNMP can receive information from switches, servers, routers, or computers on which the SNMP agent is installed. In Windows 10 and Windows 11, the SNMP service is available as a separate Windows feature and it’s not installed by default.
Installing SNMP Service on Windows 11
In previous versions of Windows (Win 8.1, 7, or 10 RTM), it was possible to install the Windows SNMP service via Control Panel > Add Program and Features applet or using the DISM command:
dism /online /enable-feature /featureName:WMISnmpProvider
However, on Windows 11, when you run this command, you get an error:
Error: 0x800f080c
Feature name WMISnmpProvider is unknown.
A Windows feature name was not recognized.
Use the /Get-Features option to find the name of the feature in the image and try the command again. A Windows feature name was not recognized.

Also, Microsoft deprecated SNMP from Control Panel > Add Program and Features applet.
On Windows 11, you can still install the SNMP client and WMI SNMP Provider services, however, Microsoft has changed the install ways.
The SNMP service in Windows 11 can be installed via the Settings app:
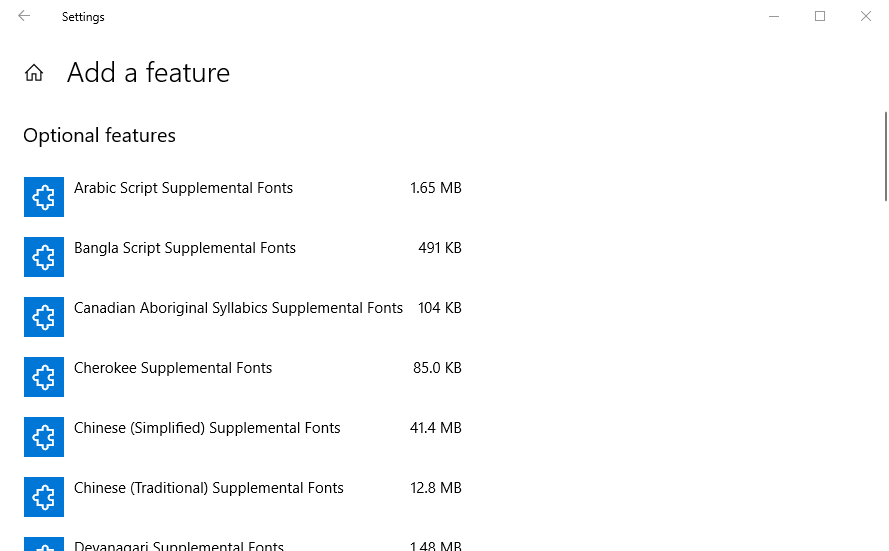
- Right-click Start > Settings > Apps > Optional Features > Add an optional feature > View features;

- Type SNMP in the search field and select Simple Network Management Protocol (SNMP) and WMI SNMP Provider (optional) to install;

- Click Next > Install;
- To install the components, your computer must be connected to the network with Internet access. If the computer is offline, an error will appear when installing the SNMP feature.


You can also install the SNMP service on Windows 11 using PowerShell:
- Open Windows Terminal as an administrator;
- Check if the SNMP service is not installed (State=NotPresent):
Get-WindowsCapability -Online -Name "*SNMP*"|select name,DisplayName,State

- To install the SNMP service, run the command:
Add-WindowsCapability -Online -Name “SNMP.Client~~~~0.0.1.0“
- In order to install WMI SNMP Provider, run the command:
Add-WindowsCapability -Online -Name "WMI-SNMP-Provider.Client~~~~0.0.1.0"
- Wait for the installation to finish and check the installation state again using the Get-WindowsCapability cmdlet. The state is Installed if these Windows features are installed correctly.

These PowerShell commands also require an Internet connection to download the SNMP service components from Microsoft servers.
If the error Add-WindowsCapability failed error. Error code = 0x800f0954 appears when you try to install Windows Optional features, most likely, your computer is configured to receive Windows updates from an internal WSUS server (Windows Server Update Services). The computer is trying to get SNMP binaries from the WSUS server instead of the Microsoft Update servers.
You can temporarily bypass WSUS and download Windows feature files directly from Microsoft Update servers using the following commands:
Set-ItemProperty -Path HKLM:SOFTWAREPoliciesMicrosoftWindowsWindowsUpdateAU -Name UseWUServer 0
Restart Windows Update service:
netsh winhttp reset policy
Restart-Service wuaserv
Install SNMP on Windows 11 using the PowerShell Add-WindowsCapability cmdlet or using the Settings app. Then target your Windows Update client back to the WSUS Server:
Set-ItemProperty -Path HKLM:SOFTWAREPoliciesMicrosoftWindowsWindowsUpdateAU -Name UseWUServer 1

Restart-Service wuaserv
You can check if the SNMP service is installed on your Windows 10 by using the PowerShell Get-Service cmdlet:
Get-Service -Name snmp*
Most likely, the service has not been installed yet.
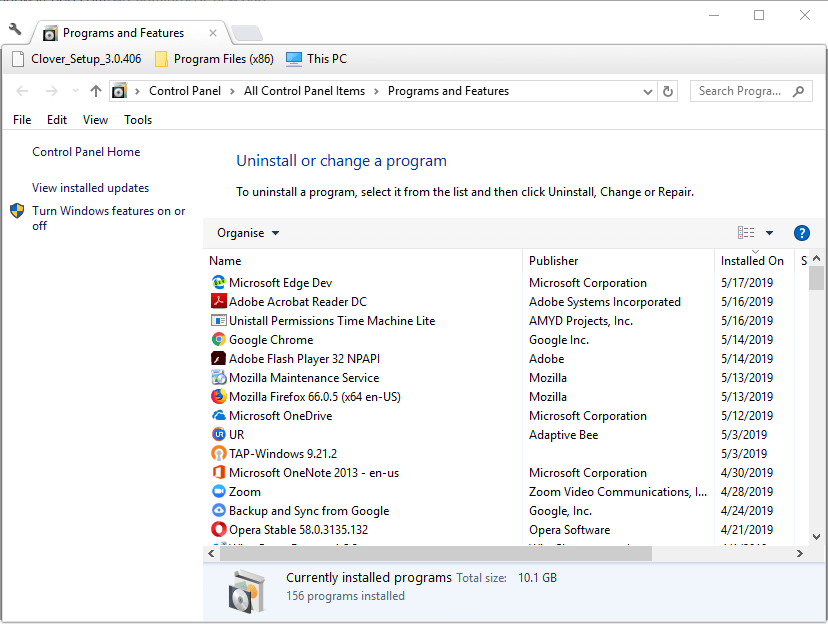
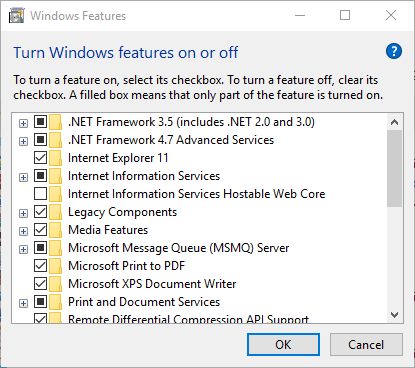
You can install the SNMP service via the Control Panel. Go to the Control Panel > Programs and Features > Turn Windows features on or off. In the list of Windows features, select Simple Network Management Protocol (SNMP) and the WMI SNMP Provider (provides access to the SNMP information via the Windows Management Instrumentation interfaces), and click OK.

You can also install the SNMP service using PowerShell:
Enable-WindowsOptionalFeature -online -FeatureName SNMP
This command can help you to install the SNMP service on Windows 10 in 1803 builds or earlier. Starting from Windows 10 1809 Microsoft changed the way to deploy SNMP service on desktop OSs.
How to Enable SNMP Service in Windows 10 1803 and Newer?
In Windows 10 1803 and later (1809, 1903,1909, 2004), the SNMP service is considered deprecated and is not listed in the Windows features in the Control Panel list.

Microsoft plans to completely remove the SNMP service in the next Windows builds because of the security risks associated with this protocol. Instead of SNMP, it is recommended to use the Common Information Model (CIM), which is supported by Windows Remote Management. On the current builds of Windows 10, the SNMP service is hidden.
The SNMP service is now missing from the Windows 10 image and can only be installed as Feature On Demand (FoD).
Tip. You can install the SNMP service on a disconnected environment (without Internet access) using the FoD ISO image. You can download the FOD media from your Volume License Servicing Center (VLSC).
If your computer has a direct Internet connection, you can install the SNMP service components online from Microsoft servers. To do this, open the elevated PowerShell console and run the command:
Add-WindowsCapability -Online -Name "SNMP.Client~~~~0.0.1.0"

You can also use DISM to install the SNMP service:
DISM /online /add-capability /capabilityname:SNMP.Client~~~~0.0.1.0
After that, you can verify if the SNMP service is installed:
Get-WindowsCapability -Online -Name "SNMP*"

Name : SNMP.Client~~~~0.0.1.0
State : Installed
DisplayName : Simple Network Management Protocol (SNMP)
Description : This feature includes Simple Network Management Protocol agents that monitor the activity in network devices and reports it to the network console workstation
DownloadSize : 595304
InstallSize : 1128133
To disable the SNMP service, use the PowerShell command:
Remove-WindowsCapability -Online -Name "SNMP.Client~~~~0.0.1.0"
You can also install the SNMP service through the Optional Features graphical interface.
Go to the Settings > Apps > Apps & Features > Manage optional feature > Add Feature. Select the following features in the list: Simple Network Management Protocol (SNMP) and WMI SNMP Provider (to get all SNMP service configuration tabs).

After that, the SNMP service will appear in the services.msc console.
If when performing the Add-WindowsCapability command you received the “Add-WindowsCapability failed error. Error code = 0x800f0954”, most likely your computer receives Windows updates not from Microsoft Update servers but the internal WSUS server. To make the SNMP service receive installation files from Microsoft servers, you need to temporarily bypass the WSUS.
To do this, run the command:
reg add "HKEY_LOCAL_MACHINESoftwarePoliciesMicrosoftWindowsWindowsUpdateAU" /v UseWUServer /t REG_DWORD /d 0 /f
After that, restart the Windows Update service:
netshh winhttp reset proxy

net stop wuauserv

net start wuauserv
Now try to install the SNMP service with the Add-WindowsCapability command. If all goes well, return the initial wusuaserv service registry parameter pointing to the WSUS server. Run the command:
reg add "HKEY_LOCAL_MACHINESoftwarePoliciesMicrosoftWindowsWindowsUpdateAU" /v UseWUServer /t REG_DWORD /d 1 /f
And restart the Windows Update Service.
Configure SNMP on Windows 10 Computer
After the installation, SNMP services should start automatically. Open the Services management console (services.msc). Two new services should appear in the service list:
- SNMP Service — this is the primary SNMP agent service, that tracks activity and sends information;
- SNMP Trap — receives trap messages from local or remote SNMP agents, and forwards messages to the SNMP management software that is being run on that computer.
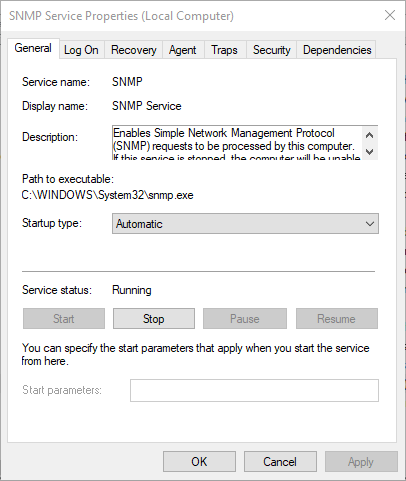
Open the properties of the SNMP Service. If it is stopped, restart it by pressing the Start button and then changing the startup type to Automatic.

Click the Agent tab. Fill in the Contact and Location fields (you can specify the user’s contact name and computer location). Then select the list of services from which you want to collect data and send it to the monitoring device. There are five service-based options:
- Physical;
- Applications;
- Internet;
- End-to-end;
- Datalink and subnetwork.

Click the Security tab. Here you can configure various security settings for different SNMP servers.
The list of Accepted community names contains the names of the communities whose SNMP hosts are authenticated to send SNMP requests to this computer. The community name has the same functions like login and password.
Click the Add button and specify the Community Name and one of the five access levels (None, Notify, READ ONLY, READ WRITE, READ CREATE). READ WRITE is the maximum access level at which the SNMP management server can make changes on the system. For monitoring systems, it is usually enough to select READ ONLY (the monitoring server can only poll the system, but not make changes). In our example, we added a community name public with READ ONLY permissions.
Add a list of monitoring servers (hostnames or IP addresses) to the Accept SNMP packets from these hosts from which you want to accept SNMP packets. This could be your monitoring system, for example, Zabbix, Nagios, Icinga, OpenNMS, PRTG, and Microsoft System Center Operations Manager (SCOM).

Tip. You can select the Accept SNMP packets from any host option. In this mode, the SNMP agent accepts packets from any host without IP restrictions. This option is not recommended for use on public computers. This is not safe.
Save the changes and restart the SNMP service.
Hint. To make your Windows host receive and send SNMP queries and traps, you need to open SNMP ports in Windows Defender Firewall with Advanced Security. SNMP uses UDP as a transport protocol. Two ports are used: UDP 161 (SNMP) and UDP 162 (SNMPTRAP). You can open inbound and outbound SNMP ports in Windows Firewall using the following commands:
netsh advfirewall firewall add rule name="SNMP UDP Port 161 In" dir=in action=allow protocol=UDP localport=161

netsh advfirewall firewall add rule name="SNMP UDP Port 161 Out" dir=out action=allow protocol=UDP localport=161

netsh advfirewall firewall add rule name="SNMPTRAP UDP Port 162 In" dir=in action=allow protocol=UDP localport=162

netsh advfirewall firewall add rule name=" SNMPTRAP UDP Port 162 Out" dir=out action=allow protocol=UDP localport=162
Configuring SNMP Settings via Group Policy
Several GPO parameters will help you configure SNMP parameters centrally. These parameters are located in the GPO editor (gpedit.msc or gpmc.msc) under Computer Configuration > Policies > Administrative Templates definitions > Network > SNMP.
Three SNMP policy parameters are available:
- Specify communities — allows you to set a list of communities for the SNMP service;
- Specify permitted managers — allows you to specify a list of permitted hosts that can send SNMP queries to the agent on this computer;
- Specify traps for public community — allows you to set up trap configuration for the Simple Network Management Protocol.

Another way to configure SNMP parameters is through the registry. These parameters are set in the following section of the Registry Editor (regedit.exe) HKEY_LOCAL_MACHINESYSTEMCurrentControlSetservicesSNMPParameters.
You can configure SNMP parameters as needed on a reference computer, upload them to a reg file, and deploy them to servers/computers via GPO (Computer Configuration > Preferences > Windows Settings > Registry).

You can use SNMP and SNMP Traps to monitor different metrics of your Windows device (uptime, CPU usage, RAM, storage, network traffic). Currently, only SNMP v1 and SNMP v2c are supported in the Windows SNMP service. These protocols are not encrypted. It means that an attacker can intercept all your SNMP data and view it in plain text. Windows 10 and 11 do not support SNMP v3 which is an encrypted and more secure protocol.
This completes the SNMP service configuration in Windows. If you need to enable SNMP on multiple computers or servers, you can remotely install and configure SNMP service using PowerShell or Group Policy.
- About
- Latest Posts

I enjoy technology and developing websites. Since 2012 I’m running a few of my own websites, and share useful content on gadgets, PC administration and website promotion.
by Matthew Adams
Matthew is a freelancer who has produced a variety of articles on various topics related to technology. His main focus is the Windows OS and all the things… read more
Updated on January 27, 2022
- Various network problems can occur, and many reported that SNMP is missing on Windows 10.
- The best way to diagnose and fix SNMP problems is to use reliable network monitor software.
- Sometimes the SNMP is missing, but you can install it from the command line in a matter of moments.
- You can also install SNMP from the Settings app in Windows 10.

XINSTALL BY CLICKING THE DOWNLOAD FILE
This software will keep your drivers up and running, thus keeping you safe from common computer errors and hardware failure. Check all your drivers now in 3 easy steps:
- Download DriverFix (verified download file).
- Click Start Scan to find all problematic drivers.
- Click Update Drivers to get new versions and avoid system malfunctionings.
- DriverFix has been downloaded by 0 readers this month.
The SNMP (System Network Management Protocol) Service processes SNMP protocol requests. However, some users who have updated Windows 10 to version 1809 have said that SNMP is missing in the latest build version. That is not entirely surprising as SNMP is an optional feature in Windows 10 1809. Users can’t utilize SNMP in Windows 10 when that service is missing.
How do I enable System Network Management Protocol (SNMP) in Windows 10? Firstly, install SNMP with PowerShell. That should restore the missing Windows Feature. Alternatively, add SNMP via Settings or via Control Panel.
Read the instructions below.
Table of contents:
- Install SNMP with PowerShell
- Use third-party tools
- Add SNMP via Settings
- How to turn On SNMP in Windows 10 1803
How can I restore missing SNMP in Windows 10?
1. Install SNMP with PowerShell
- Users have confirmed that they’ve restored SNMP in Windows 10 1809 by installing it via PowerShell. To do that, open Cortana by pressing the Type here to search button on the taskbar.
- Enter PowerShell as the keyword in the search box.
- Right-click Windows PowerShell and select Run as administrator.
- First, enter Get-WindowsCapability -Online -Name “SNMP*” in PowerShell, as in the shot directly below, and press Return.

- Input Add-WindowsCapability -Online -Name “SNMP.Client~~~~0.0.1.0” and press Enter.
- Then enter Get-WindowsCapability -Online -Name “SNMP*” in PowerShell, and press the Return key.
- Thereafter, press the Windows key + R keyboard shortcut.
- Input services.msc in Run, and click the OK button.
- Then users can check if the Services window includes the SNMP Service. If so, the above fix did the trick.
- Double-click SNMP Service to open the window directly below.

- Then check the service’s Startup type is configured to Automatic.
- Click Start if the service is currently stopped.
- Select the Apply and OK options.


2. Use third-party tools

One of the easiest ways to fix missing SNMP on your Windows 10 PC is to use specialized tools, such as PRTG Network Monitor. The software works as a network monitor and it can monitor all devices in your network.
Using this software you can easily monitor both bandwidth or databases. Cloud, server, LAN, and SNMP monitoring are also available.
PRTG Network Monitor is a powerful software for network monitoring and if you’re a network administrator or you just want to fix SNMP problems, be sure to try it out.
Other great features:
- SNMP monitoring
- Packet sniffing
- Bandwidth monitoring
- Cloud monitoring
- LAN monitoring
⇒ Get PRTG Network Monitor
3. Add SNMP via Settings
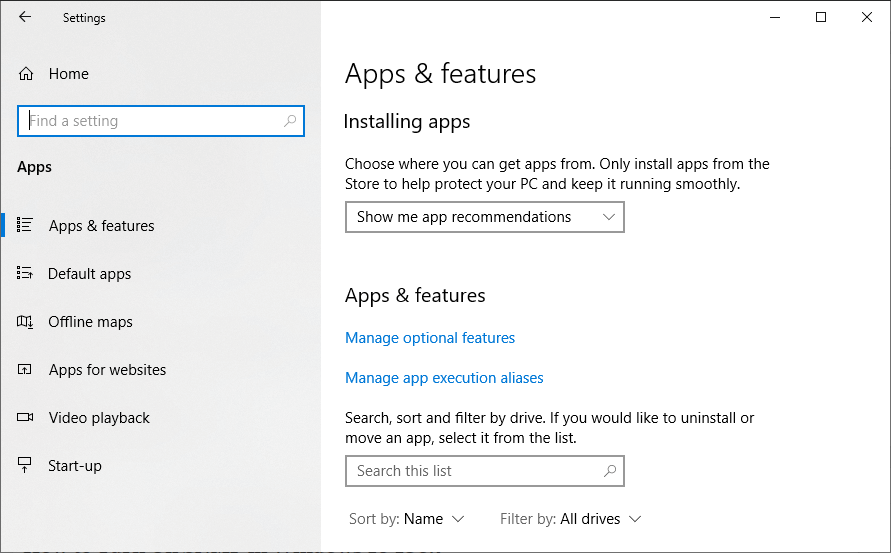
- Alternatively, users can enable SNMP in Windows 10 1903 via the Settings app. First, click the Start button; and then press the Settings button.
- Select Apps to open options shown below.

- Then click Manage optional features to open the Settings page in the snapshot below.

- Press the Add features button.
- Then select the Simple Network Management Protocol (SNMP), and press the Install button.

4. How to turn on SNMP in Windows 10 1803
- Users who need to enable missing SNMP in Windows 10 1803, or earlier build versions, can do so via Windows Features. To do that, open the Run accessory.
- Open Programs and Features by entering ‘appwiz.cpl’ in Run and clicking OK.

- Click Turn Windows features on or off to open the window in the image directly below.

- Then check the Simple Network Management Protocol (SNMP) option, and click the OK button.
So, that’s how users can restore a missing SNMP Service in Windows 10 1903 and earlier build versions. Then users can utilize SNMP in Windows 10.
![]()
Newsletter
Skip to content
На чтение 3 мин. Просмотров 3.9k. Опубликовано 03.09.2019
Служба SNMP (протокол сетевого управления системой) обрабатывает запросы протокола SNMP. Однако некоторые пользователи, которые обновили Windows 10 до версии 1809, сказали, что SNMP отсутствует в последней версии сборки. Это неудивительно, поскольку SNMP является дополнительной функцией в Windows 10 1809. Пользователи не могут использовать SNMP в Windows 10, когда эта служба отсутствует.
Как включить протокол системного сетевого управления (SNMP) в Windows 10? Во-первых, установите SNMP с PowerShell. Это должно восстановить недостающую функцию Windows. Или добавьте SNMP через Настройки или через Панель управления.
Прочитайте инструкции ниже.
Содержание
- Вот как пользователи могут восстановить отсутствующий SNMP в Windows 10
- 1. Установите SNMP с помощью PowerShell
- 2. Добавьте SNMP через Настройки
- 3. Как включить SNMP в Windows 10 1803
Вот как пользователи могут восстановить отсутствующий SNMP в Windows 10
- Установите SNMP с помощью PowerShell
- Добавить SNMP через настройки
- Как включить SNMP в Windows 10 1803
1. Установите SNMP с помощью PowerShell
- Пользователи подтвердили, что восстановили SNMP в Windows 10 1809, установив его через PowerShell. Для этого откройте Cortana, нажав кнопку «Введите здесь для поиска» на панели задач.
- Введите «PowerShell» в качестве ключевого слова в поле поиска.
- Нажмите правой кнопкой мыши Windows PowerShell и выберите Запуск от имени администратора .
-
Сначала введите Get-WindowsCapability -Online -Name «SNMP *» в PowerShell, как показано на приведенном ниже снимке, и нажмите Return.

-
Введите Add-WindowsCapability -Online -Name «SNMP.Client ~~~~ 0.0.1.0» и нажмите Enter.
-
Затем введите Get-WindowsCapability -Online -Name «SNMP *» в PowerShell и нажмите клавишу возврата.
- После этого нажмите сочетание клавиш Windows + R.
- Введите “services.msc” в поле “Выполнить” и нажмите кнопку ОК .
- Затем пользователи могут проверить, включает ли окно «Службы» службу SNMP. Если так, то вышеприведенное исправление помогло.
-
Дважды щелкните SNMP Service, чтобы открыть окно, расположенное ниже.
- Затем убедитесь, что тип запуска службы настроен как Автоматический .
- Нажмите Пуск , если служба в данный момент остановлена.
- Выберите параметры Применить и ОК .


2. Добавьте SNMP через Настройки
- Кроме того, пользователи могут включить SNMP в Windows 10 1903 через приложение «Настройки». Сначала нажмите кнопку «Пуск»; а затем нажмите кнопку Настройки .
-
Выберите Приложения , чтобы открыть параметры, показанные ниже.
-
Затем нажмите Управление дополнительными функциями , чтобы открыть страницу настроек в снимке экрана ниже.
-
Нажмите кнопку Добавить функции .
- Затем выберите простой протокол управления сетью (SNMP) и нажмите кнопку Установить .


3. Как включить SNMP в Windows 10 1803
- Пользователи, которым необходимо включить отсутствующий SNMP в Windows 10 1803 или более ранних версиях сборки, могут сделать это с помощью функций Windows. Для этого откройте аксессуар Run.
-
Чтобы открыть программы и компоненты, введите «appwiz.cpl» в разделе «Выполнить» и нажмите ОК .
-
Нажмите Включить или выключить функции Windows , чтобы открыть окно на изображении ниже.
- Затем выберите параметр Простой протокол сетевого управления (SNMP) и нажмите кнопку ОК .


Таким образом, пользователи могут восстановить отсутствующую службу SNMP в Windows 10 1903 и более ранних версиях сборки. Затем пользователи могут использовать SNMP в Windows 10.
Adding the SMTP service to a Windows OS seems quite straightforward in almost all cases: open the Windows Features interface, then check the «Simple Network Management Protocol» option. After rebooting, a new local service should be available called «SNMP Service».
I’ve followed those steps in Windows 10 Pro 64-bit, but I find that there is no «SNMP Service» to be found. There is an «SNMP Trap» service, but that’s apparently not what I’m looking for. It seems the SNMP agent settings (eg. community name) can only be modified within the properties of «SNMP Service».
In my searching, I found a Powershell command purported to install the SNMP service:
Install-WindowsFeature RSAT-SNMP
However, the result is an error message (even when run as Administrator):
Install-WindowsFeature : The target of the specified cmdlet cannot be a Windows client-based operating system.
The words «client-based operating system» suggests the SNMP service is only available for Windows Server OSes, but that wasn’t true for Windows 7/8. So I’m curious whether this has changed with Windows 10.
- Remove From My Forums
-
Question
-
Good afternoon,
We’re starting to push out Windows 10 v1809 for our new workstations and we’ve hit a bump — I can’t get snmp to work on those workstations. If I go to Control Panel > Windows Features there’s no snmp option. Using the following command:
Add-WindowsCapability -Online -Name "SNMP.Client~~~~0.0.1.0"
under PowerShell as administrator gives the following error message:
Access is denied.
+ CategoryInfo : NotSpecified: (:) [Add-WindowsCapability], COMException
+ FullyQualifiedErrorId : Microsoft.Dism.Commands.AddWindowsCapabilityCommand
I tried changing to the domain admin account but I get the same «Access is denied» error.
I found this command:
dism.exe /online /enable-feature /featurename:"SNMP" /featurename:"WMISnmpProvider"
but that gives me this error:
PS C:WINDOWSsystem32> dism.exe /online /enable-feature /featurename:"SNMP" /featurename:"WMISnmpProvider"

Deployment Image Servicing and Management tool
Version: 10.0.17763.1

Image Version: 10.0.17763.134

Error: 0x800f080c

Feature name SNMP is unknown.
Feature name WMISnmpProvider is unknown.
A Windows feature name was not recognized.
Use the /Get-Features option to find the name of the feature in the image and try the command again.

The DISM log file can be found at C:WINDOWSLogsDISMdism.log
PS C:WINDOWSsystem32>
I looked up Error: 0x800f080c and found several posts regarding .Net. These computers have 3.5 and 4.7 installed.
Any ideas, suggestions, or recommendations on how we can get snmp working on our v1809 computers?
Thanks,
Joe B
Answers
-
i also have something that can help you.
In my company we do not have access to microsoft servers (firewall rules, no windows update, no catalog…)
In my case, to install SNMP on 1809 i have to :
1) Have an internet access without restriction (my cellphone)
2) set to 0 the following registry key : HKEY_LOCAL_MACHINESOFTWAREPoliciesMicrosoftWindowsWindowsUpdateAUusewuserver en 0
launch the following commands :
netshh winhttp reset proxy
net stop wuauserv
net start wuauservedit : those commands and the registry key are about specific configuration in professionnal environment (proxy server, wsus etc…) that can mess installation from microsoft servers
3) launch the following powershell command : add-windowscapability -online -name «SNMP.Client~~~~0.0.1.0»
and it works in my case !
sorry english is not my mother tongue
-
Edited by
Thursday, February 14, 2019 9:17 AM
adding a comment -
Marked as answer by
JBruyet
Thursday, February 14, 2019 3:57 PM
-
Edited by
На первый взгляд задача «включение SNMP на Windows» не должна быть сложной.
Как включить SNMP на Windows и как ее настроить будем разбираться по пунктам.
Способ №1 Включение SNMP в Windows.
Стандартным, идеальным для пользователя считается следующий способ, он работает в Windows 7 и некоторых сборках Windows 10:
1. Заходим в Панель Управления.
2. Находим меню «Установка и удаление программ» или «Программы и компоненты».
3. В открывшемся окне слева в списке переходим по ссылке «Включение или отключение компонентов Windows».
4. В списке «Компоненты Windows» ищем строчку «Компонент SNMP» и отмечаем галочкой — Нажимаем «ОК».
5. Осталось перейти в Службы (Панель управления — Администрирование — Службы) где выбираем среди всех служб «Служба SNMP» и запускаем.
Способ №2 Включение и настройка SNMP в Windows 10.
Если первый способ не увенчался успехом, то второй нам поможет:
1. Для начала нам нужно будет в меню Пуск найти и запустить WindowsPowerShell «ЗАПУСК ОТ ИМЕНИ АДМИНИСТРАТОРА»!!!.
2. Вводим команду для проверки доступности SNMP — службы :
Get-WindowsCapability -Online -Name "SNMP*"
Вывод команды будет следующим:
Name: SNMP.Client~~~~0.0.1.0
State: NotPresent
DisplayName: SNMP-протокол.
Как видим в строке состояния указано, что SNMP-протокол не представлен.
P.S. Бывали случае, когда в строке состояния указано Installed, но все равно службы SNMP нет. В этом случае все равно переходим к следующему 3 пункту.
3. Устанавливаем службу SNMP командой:
Add-WindowsCapability -Online -Name "SNMP.Client~~~~0.0.1.0"
Видим процесс установки и получаем ответ:
Path:
Online: True
RestartNeeded: False
4. Снова проверим состояние службы SNMP командой из пункта 2:
Get-WindowsCapability -Online -Name "SNMP*"
Вывод команды:
Name: SNMP.Client~~~~0.0.1.0
State: Installed
DisplayName: SNMP-протокол.
5. Обязательно перезагружаем компьютер.
После запуска переходим в Службы и находим «Служба SNMP».
Заходим в свойства службы SNMP. Если состояние службы остановлена, нужно запустить ее кнопкой «Запустить» и в меню «Тип запуска» выбираем «Автоматически».
Способ 3. Как установить SNMP на Windows Server.
1. Включить SNMP можно в «Параметры» — раздел «Приложения и возможности»- ссылка «Дополнительные возможности».
2. В окне «Дополнительные возможности» нажимаем «Добавить компонент» и выбираем в списке «SNMP-протокол» — Установить.
3. Перезагружаем систему.
Как настроить SNMP в Windows.
Необходимо найти службу «Служба SNMP» и открыть свойства службы.
— На вкладке «Безопасность» установим флажок «Посылать ловушку проверки подлинности».
— Нажмем кнопку «Добавить» для настройки «SNMP Community».
— Выбираем уровень доступа (None, Notify, READ ONLY, READ WRITE, READ CREATE). Для мониторинга состояния сервера достаточно выбрать Read Only.
— По-умолчанию community чаще всего указывается public для уровня READ ONLY или private для Read Write.
— Ниже есть пункт «Принимать пакеты SNMP от любого узла» и «Принимать пакеты SNMP от следующих узлов». Здесь вы можете указать конкретный адрес вашего сервера мониторинга, который будет собирать данные или оставить 1 вариант, если вы хотите, что бы не было ограничений по ip-адресу.
— Сохраняем изменения и перезапускаем службу SNMP.
SNMP (Simple Network Management Protocol) is a classic protocol for monitoring and collecting information about network devices (servers, network hardware, workstations, printers, etc.). SNMP is quite a lightweight and fast protocol, it uses UDP ports 161 and 162 to transfer data. In this article, we’ll show how to install and configure SNMP service on Windows Server 2022/2019 and Windows 10/11.
Contents:
- How to Install SNMP Service on Windows Server 2022/2019?
- Installing SNMP Agent on Windows Server Core
- Enabling SNMP Service in Windows 10/11
- How to Configure SNMP Service on Windows?
How to Install SNMP Service on Windows Server 2022/2019?
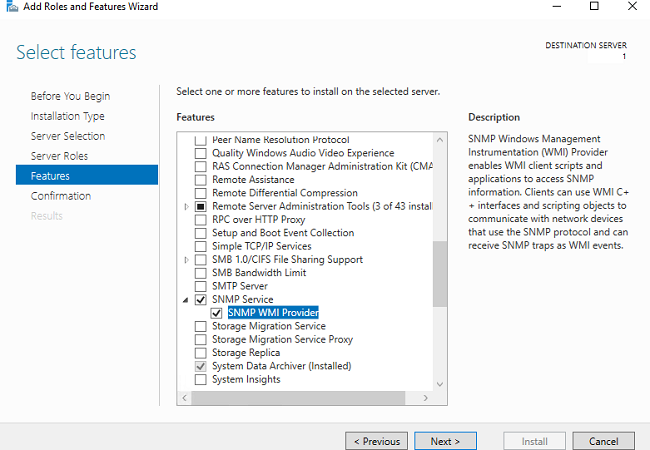
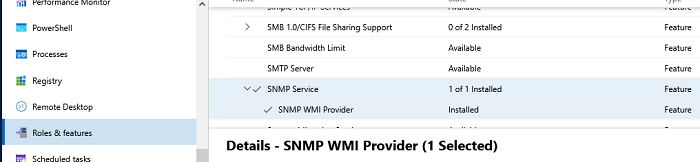
In Windows Server, you can install the SNMP service using Server Manager. Select Add roles and features -> Features. Click SNMP Service (if needed, also check SNMP WMI Providers).
The SNMP WMI Provider allows you to query an SNMP device via WMI.
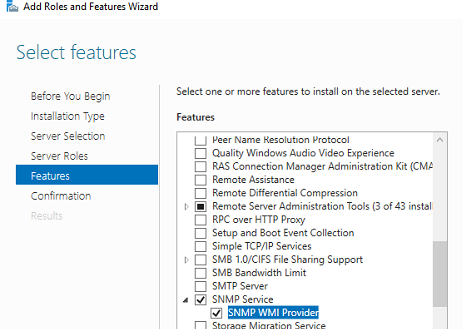
Click Next -> Install and wait till the installation is over.
Installing SNMP Agent on Windows Server Core
In Windows Server Core, you can install SNMP using the Windows Admin Center web interface or PowerShell.
If you are using the Windows Admin Center, connect to your Windows Server host, and select Roles and Features -> SNMP Service.

Since there is no graphical interface on Windows Server Core and the Server Core host can be managed from the command prompt, you can install the SNMP service using PowerShell.
You can use the Install-WindowsFeature PowerShell cmdlet to install roles and features on Windows Server.
Check that the SNMP service is not installed:
Get-WindowsFeature SNMP*
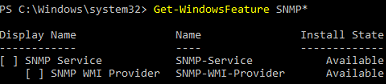
Install the SNMP role and WMI provider:
Install-WindowsFeature SNMP-Service,SNMP-WMI-Provider -IncludeManagementTools
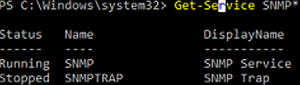
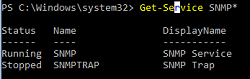
Make sure that SNMP services are running:
Get-Service SNMP*
In our example, the SNMP service is running, and SNMPTRAP is stopped.
Enabling SNMP Service in Windows 10/11
You can use the SNMP service not only on Windows Server but also on Windows 10 and 11 desktops. In Windows 10/11, the SNMP service is a part of the Features on Demand (like RSAT or OpenSSH).
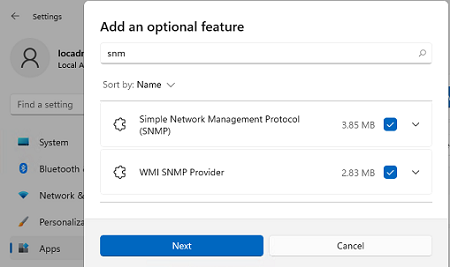
You can install SNMP via the Settings panel. Go to Apps -> Optional features -> Add an optional feature -> View features.
Select Simple Network Management Protocol (SNMP) and WMI SNMP Provider in the list of available components. To start the installation, click Next (you will need an Internet connection to Microsoft servers).
To install the SNMP service using PowerShell, run the command below:
Add-WindowsCapability -Online -Name SNMP.Client~~~~0.0.1.0
To install the SNMP service offline (without an internet connection), download the Windows 10/11 Features on Demand ISO image from your account on the Volume Licensing Service Center (VLSC) website.
To install SNMP from the ISO image offline, use this command:
Add-WindowsCapability -Online -Name SNMP.Client~~~~0.0.1.0 -LimitAccess -Source \munfs01DistrWin11FoD
How to Configure SNMP Service on Windows?
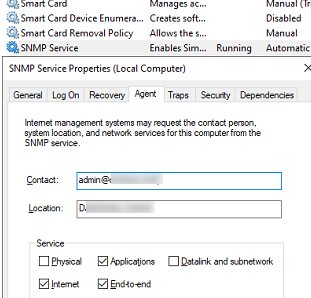
You can configure the SNMP service options with the services.msc console. Find the SNMP Service in the list and open its properties.
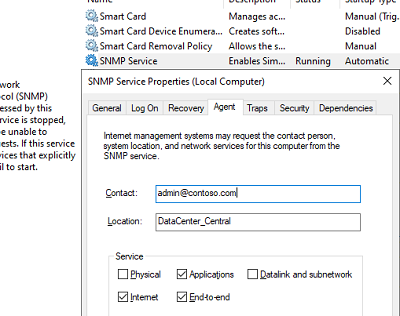
Note that the SNMP service has some additional tabs:
- Agent
- Traps
- Security
The Agent tab contains basic information about the device (administrator contact information, location). Here you can also select the type of information that the device can send when polling via SNMP.
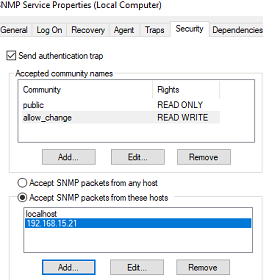
In earlier SNMP protocol versions (SNMP 1 and SNMP 2), a community string is used for authentication. In the Security tab, you can create multiple connection strings.
You can select one of five available access levels for the community:
- READ ONLY — allows getting information from a device
- READ WRITE —get information and edit a device configuration
- NOTIFY — allows receiving SNMP traps
- READ CREATE – to read data, change, and create objects
- NONE
You can create multiple community strings. To do it, enter a name and select the permissions. To monitor the server state, the READ ONLY privilege is enough.
In the Accept SNMP packets from these hosts list, you can enter the names or IP addresses of the hosts allowed to query the device. If you don’t want to use the allowed device list, leave Accept SNMP packets from any hosts here.
The Traps tab allows setting the list of the hosts to which the SNMP agent should send SNMP traps. An SNMP Trap is a broadcast UDP packet used for asynchronous notification of the manager (for example, a notification about a critical event).
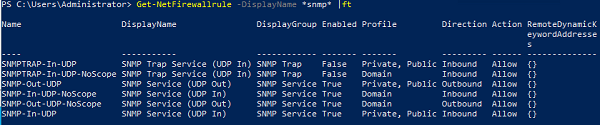
Remember to create rules allowing inbound and outbound traffic for SNMP queries and traps in your Windows Defender Firewall. You can enable firewall rules with PowerShell.
There are several predefined rules for SNMP traffic in Microsoft Defender Firewall:
Get-NetFirewallrule -DisplayName *snmp* |ft
- SNMPTRAP-In-UDP
- SNMPTRAP-In-UDP-NoScope
- SNMP-Out-UDP
- SNMP-In-UDP-NoScope
- SNMP-Out-UDP-NoScope
- SNMP-In-UDP
You can enable all rules or just a specific one:
Get-NetFirewallrule -DisplayName *snmp* | Enable-NetFirewallRule

Get-NetFirewallrule SNMP-Out-UDP | Disable-NetFirewallRule

There is the SNMP Trap in the list of Windows services. It is used to receive messages from other SNMP agents and forward them to SNMP servers (usually it is a monitoring system querying devices using via, for example, PRTG or Zabbix).
If you configure SNMP on Windows Server Core, you won’t be able to use the SNMP service GUI to set its settings. You will have to make changes to the registry using PowerShell instead. SNMP service settings are located under the registry key HKEY_LOCAL_MACHINESYSTEMCurrentControlSetServicesSNMPParameters.
The following commands will set the agent description:
New-ItemProperty -Path "HKLM:SYSTEMCurrentControlSetservicesSNMPParametersRFC1156Agent" -Name "sysContact" -Value "admin@woshub.com" -PropertyType REG_SZ

New-ItemProperty -Path "HKLM:SYSTEMCurrentControlSetservicesSNMPParametersRFC1156Agent" -Name "sysLocation" -Value "MUN_DCn2" -PropertyType REG_SZ
You will have to create a separate key with the community name under HKLMSYSTEMCurrentControlSetservicesSNMPParametersTrapConfiguration for each SNMP trap.
New-Item -Path "HKLM:SYSTEMCurrentControlSetservicesSNMPParametersTrapConfigurationpublic1"
Set the community permissions:
New-ItemProperty -Path "HKLM:SYSTEMCurrentControlSetServicesSNMPParametersValidCommunities" -Name "public1" -Value 4 -PropertyType DWord
Possible values:
- 1 — NONE
- 2 — NOTIFY
- 4 — READ ONLY
- 8 — READ WRITE
- 16 — READ CREATE
For each community, you can set a list of hosts they are allowed to accept queries from:
New-ItemProperty -Path "HKLM:SYSTEMCurrentControlSetServicesSNMPParametersPermittedManagers" -Name "1" -Value "mun-mon1.woshub.com" -PropertyType REG_SZ
Restart your SNMP service to apply new settings from the registry:
Get-Service SNMP|Restart Service
If you want to deploy the SNMP service settings to multiple Windows computers/servers in your domain, use Group Policy Preferences to modify the registry.
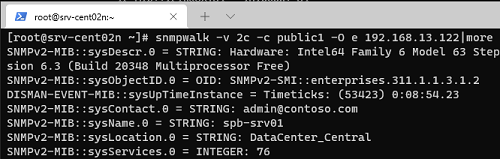
To make sure if SNMP is working, use the snmpwalk tool (available in any Linux distro):
# snmpwalk -v 2c -c public1 -O e 192.168.12.200
In this example, we have polled our Windows host using SNMPv2.
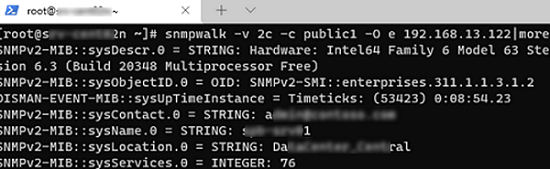
The tool has returned basic host information (syscontact, sysname, syslocation) and a lot of data on the Windows server state.
SNMP is a common and most used network protocol for monitoring SNMP-enabled network hosts; including Windows and Windows Servers. You can use it for monitoring different metrics, such as CPU load, RAM, Disk, system uptime, and much more.
It acts as a Windows service and it is prone to different problems. If it doesn’t work, you will not be able to use it for monitoring the performance of your Windows machines. The problem can occur on any Windows and Windows Server version or edition. Why does the problem occur?
For writing this article, I run my workloads on powerful mini PC - Intel NUC powered with the CPU i7 the latest generation, 64 GB RAM DDR4, 256 M.2 SSD. Intel® NUC Mini PCs are fully complete and ready to work out of the box. You can learn more here Intel® NUC Products.There are different reasons for that. In this article, I’ll cover common issues you might see and potential solutions to fix them.
And Yes…I’d love to hear your feedback. Please let me know if any, and what solution helped you to solve SNMP problems on your Windows. You can do it by adding your comment at the end of this article.
#1 Test SNMP connectivity
SNMP doesn’t work! Well, we know that, but it sounds generic. Firstly, we need to identify where is the root cause of the problem. Is there a problem with the destination Windows machine, network monitoring solution (NMS), or communication between Windows and NMS?
You can verify if the SNMP service is running using free SNMP Tester tools. The SNMP Tester tool can be run on the source (NMS) or destination machine (Windows). I’ll do it on the destination Windows machine which doesn’t respond to SNMP queries. You can do it on your NMS machine, as well. Based on the results we get, we can make some conclusions.
What tool should you use? I advocate for Paessler SNMP Tester.
- Download Paessler SNMP Tester from this LINK.
- Extract it, run Setup.exe to install it.
- Run the Paessler SNMP Tester.
- Under 1. Set SNMP Tester add the IP/Port, choose SNMP Version and Community. Under 2. Select Request Type select Read Device Uptime.
- Under 3. Run Test click Start. In the case below, you can see there is no response from Windows. Considering I use the correct paraments, my SNMP doesn’t work.
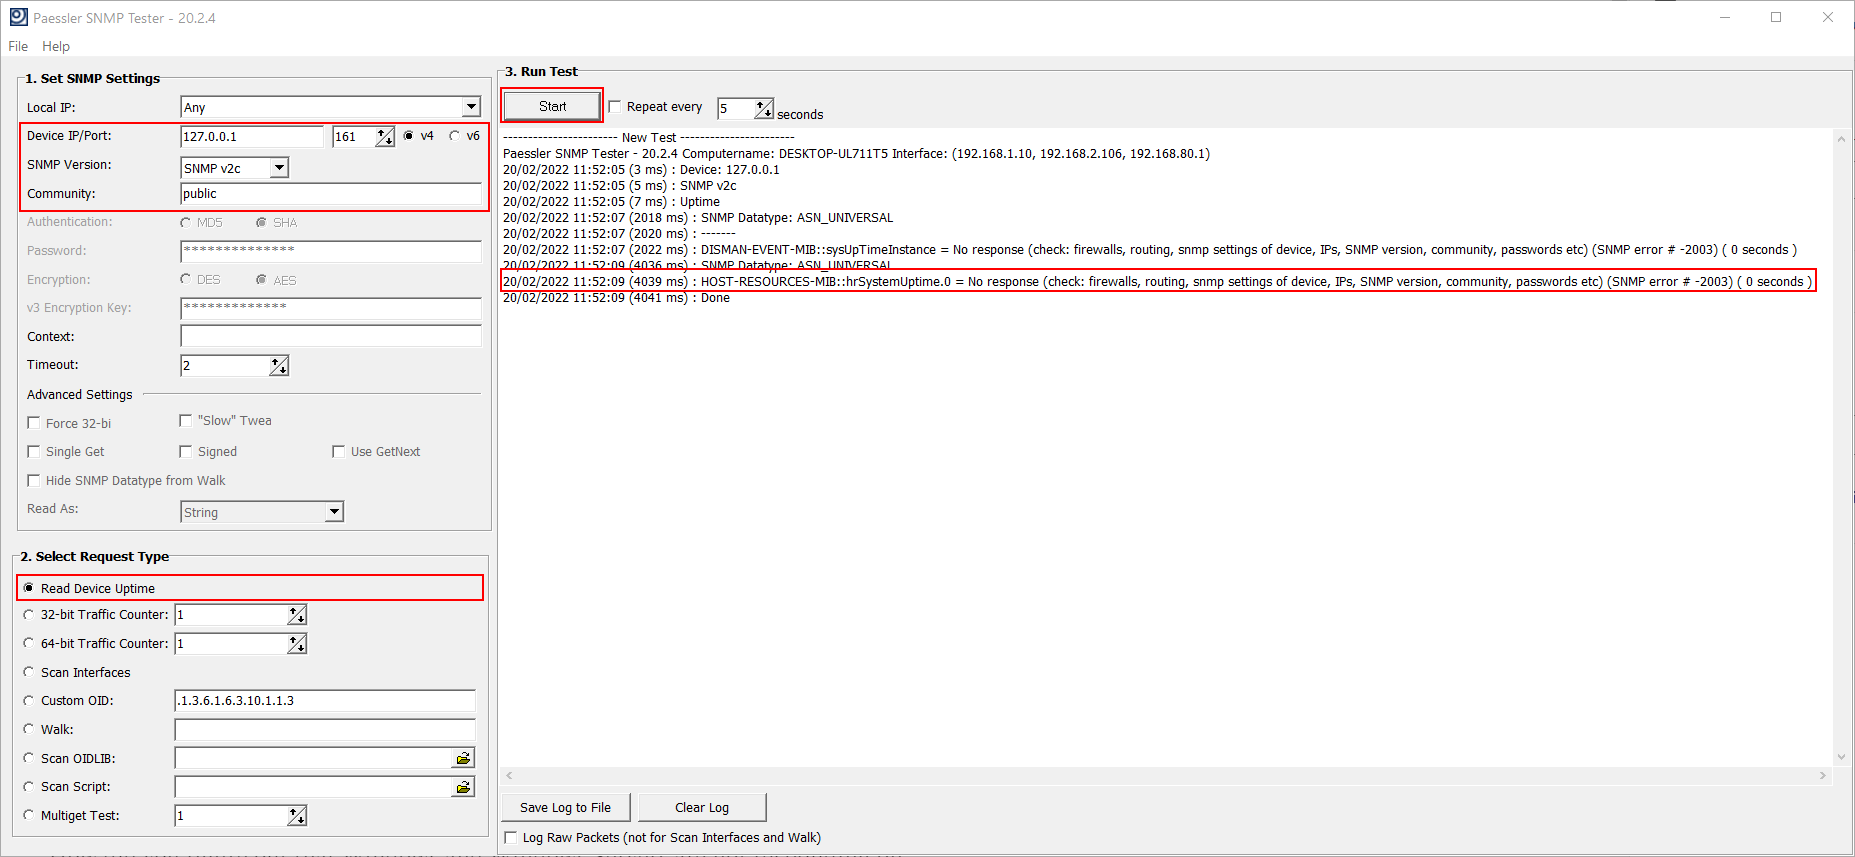
If you run SNMP Tester on the destination Windows machine, and it doesn’t respond to SNMP: SNMP is not enabled. Please check #2.
If you run SNMP Tester on the destination Windows machine, and it responds to SNMP but doesn’t respond to SNMP from NMS: you need to check if SNMP settings are matched with your NMS. Please check #3 and #4.
#2 Check SNMP service
SNMP service is not enabled by default. Regardless you are running Windows or Windows Server, you need to enable it. If you are unsure, you need to check the SNMP services status using the Services tool or PowerShell.
In Windows and Windows Server with Desktop Experience (GUI), you can check the SNMP status using Services.msc. Services is a tool in the Windows operating system to get a list of all the services on the computer. msc stands for the management console.
In order to do it, you need to open the Services tool and navigate to SNMP Service.
1. Hold Windows logo + R
2. Type services.msc and press Enter
Navigate to SNMP Service and check if it is running. If SNMP service is available, but not running, change the startup type and run it by clicking on Properties > General > Startup type > Start.

You don’t see SNMP service? That means it is disabled, and you need to enable it. You can check the details on how to do it on different operating systems in the following articles:
- How to install deprecated SNMP in Windows 10 1803 and onwards
- Can you still monitor your Windows 11 with SNMP
- Install and Configure SNMP in Windows Server 2019
- Can you still monitor your Windows Server 2022 with SNMP
What if you are running Windows Server Core or Hyper-V Server Core? In that case, you can check the status using PowerShell by executing the following command:
Get-WindowsFeature SNMP*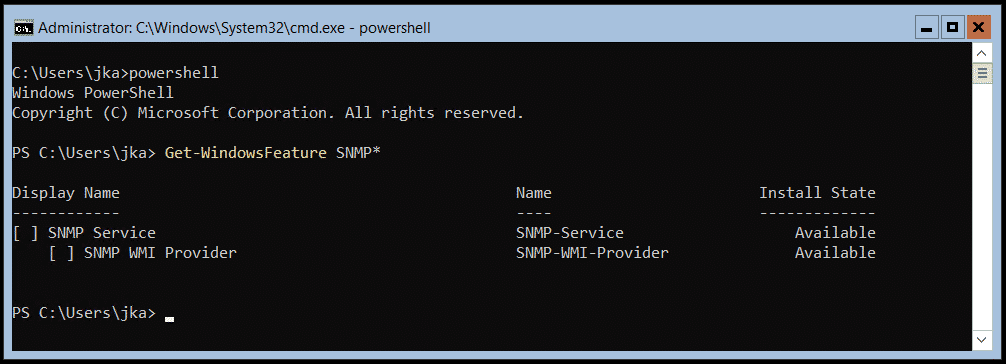
I’ve got you covered with the complete procedure in these two articles:
- Install and configure SNMP on Windows Server Core
- Install and configure SNMP on Hyper-V Server Core
SNMP service is enabled, but I still can’t monitor target Windows machines using SNMP. Well, check the next step(s).
#3 Check SNMP settings
It is not only enough to enable SNMP on your Windows, you also need to configure it. It could happen that settings are not matched, and Windows and NMS can’t exchange SNMP messages. It could also happen that someone intentionally and accidentally made some changes. So, it always makes sense to check if the settings are matched or not.
There are four important parameters you need to match. It is an SNMP version, community string, port (explained in #4), and SNMP access list.
What SNMP versions are available? Windows only supports v1 and v2c. You need to check if v1 or v2c are configured within your NMS. If in any case, you use v3 in your NMS; Windows will not be able to respond to it.
What is the community string? A community string is some kind of key that is shared between NMS and Windows machines. The default one is public. You can keep the default one or change it (recommended).
What is the default port? SNMP uses UDP ports 161 and 162. For more information please refer to #4.
What is an SNMP access list? It is a list of IP addresses that are allowed to send SNMP queries to target Windows machines. This setting can be only configured on Windows machines.
Both, the community string and SNMP access list can be configured within the SNMP service itself. In order to do it, you need to open the Services tool and navigate to SNMP Service.
1. Hold Windows logo + R
2. Type services.msc and press Enter
3. Right click on SNMP Service and click Properties
4. Click on Security tab
Check the community string and match it with the NMS. You can add, edit or remove it.
The second option you need to configure is the SNMP access list. There are two options available, Accept SNMP packets from any hosts or Accept SNMP Packets from these hosts. If you select Accept SNMP packets from any hosts or Accept SNMP Packets from these hosts, you also need to add the IP address of your NMS. In my case below, the community string is prtgnetworkmonitor and my Windows machines only accept SNMP queries from 192.168.88.21 which is PRTG Network Monitor.
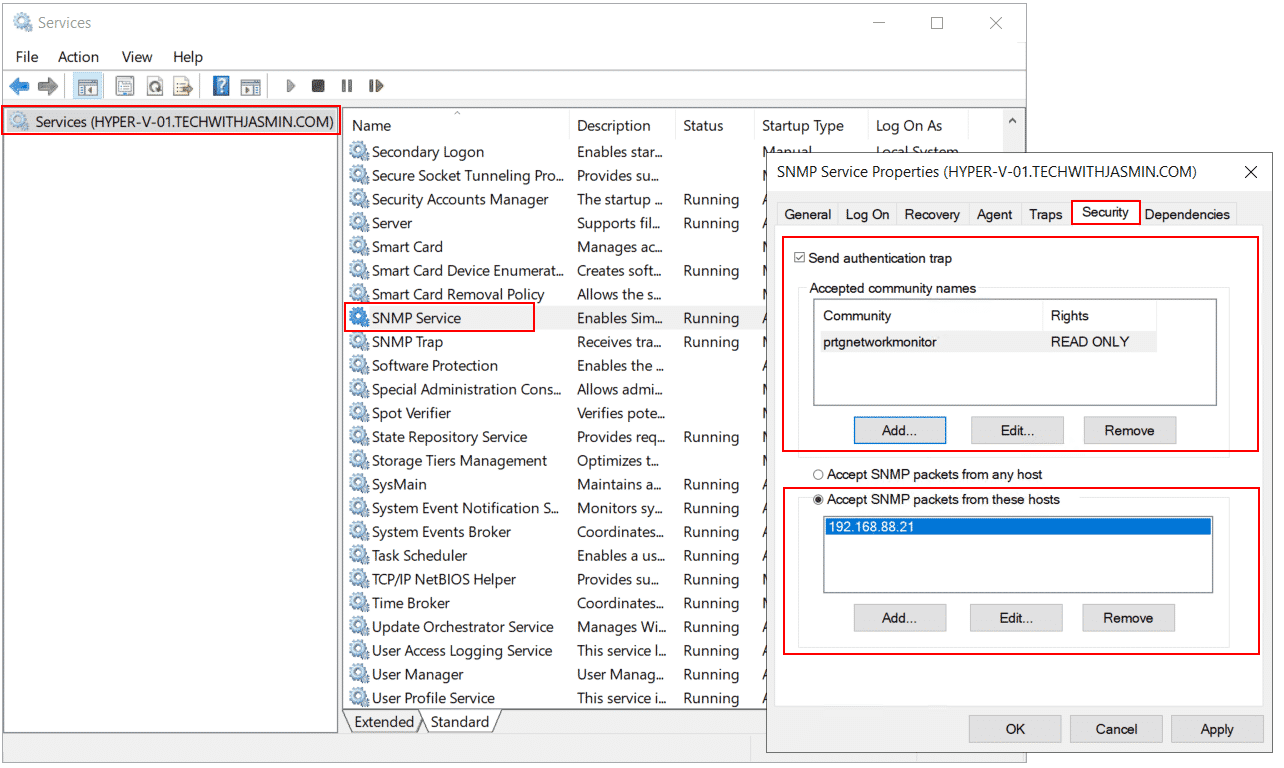
Navigate to your NMS, in my case PRTG Network Monitor and verify if the SNMP version and community string are matched. In my case, they are.

I know there is one thing missing, a port. Please refer to the next step.
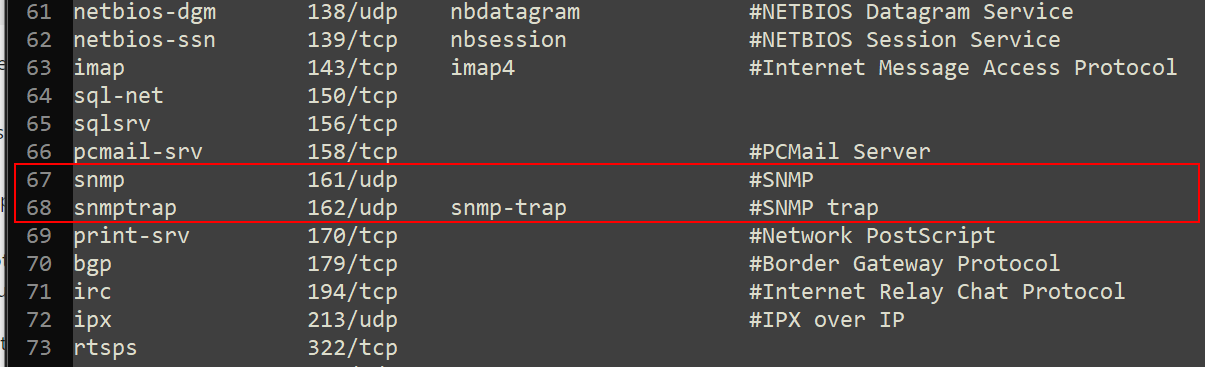
#4 Check SNMP port(s)
SNMP uses the UDP port 161 for general SNMP messages. It uses UDP port 162 for SNMP Traps. These ports (if not changed on the Windows), must be matched with the port on your NMS.
If you are unsure what SNMP post is used, you can check it by navigating to your Windows machine and opening %systemroot%System32DriversEtc. Open file services with a text editor (e.g. Notepad++) and navigate to SNMP.
#5 Check firewall rules
This is not really a common situation, but it might be the case in certain situations. No harm to look at it. Windows provides you with a native firewall that can control inbound and outbound traffic. You can open Windows Firewall Advanced Settings and check if there are any rules blocking SNMP. The newest version of Windows and Windows Server, it is called Windows Defender Firewall with Advanced Security.
Once you open it, on the left side of the device tree, you can find Inbound and Outbound rules. Go through them and see if there are any rules that are blocking SNMP.
In my case, Windows 10 has the rule to block SNMP. What can I do in that case? I can disable the rule, modify it or delete it.

What can you do in your case? Please advise your IT department if you are allowed to modify it. In centralized environments dependent on the Active Directory, you can perform this change on hundreds or thousands of Windows machines by running a single group policy.
#6 SNMP stopped working after Windows Update
Well, this might happen with any Windows features. Windows Update is a must to do, but sometimes it just breaks things. We as IT professionals need to have a mechanism for how to mitigate or minimize potential problems.
If you noticed that SNMP stopped working after Windows Update, you can try to revert the update to the previous version (if possible). If you can’t do it, search for potential fixes on the Internet.
#7 Repair your Windows
Malware infected your Windows and SNMP files. You tried all of the potential solutions, but they didn’t work.
You can try to repair system files by running the sfc /scannow. The sfc /scannow command will scan all protected system files, and replace corrupted files with a cached copy that is located in a compressed folder at %WinDir%System32dllcache.
Open PowerShell or Command Prompt as Administrator and run the following command.
sfc /scannow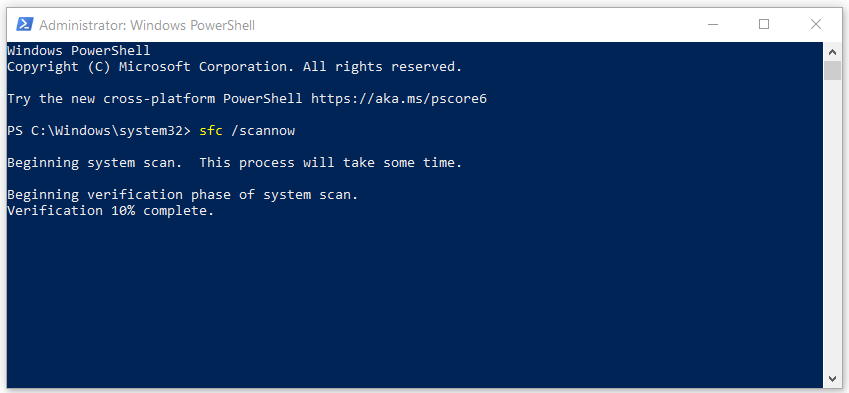
#8 Check your NMS
If SNMP works fine on your Windows machine, but NMS has some difficulties sending SNMP queries, you should check with the vendors if there are any known problems with SNMP. Open a ticket and read the release notes.
#9 Wireshark knows where the packet goes
Considering your Windows and NMS are working properly and your SNMP packets are somewhere lost; try to analyze your network traffic using Wireshark. Wireshark is a super powerful tool for that kind of job.
And Yes…I’d love to hear your feedback. Please let me know if any, and what solution helped you to solve SNMP problems on your Windows. You can do it by adding your comment at the end of this article.
If you find this article helpful, you can share it with your network by using the social media buttons below.
SNMP (
Simple Network Management Protocol
) — это классический протокол для мониторинга и сбора информации о сетевых устройствах (сервера, сетевое оборудование, рабочие станции, принтеры и т.д.). Протокол SNMP довольно легкий, быстрый, для передачи данных использует UDP порты 161 и 162. В этой статье мы рассмотрим, как установить и настроить службу SNMP в Windows Server 2022/2019 и Windows 10/11.
Содержание:
- Установка службы SNMP в Windows Server 2022/2019
- Установка SNMP агента в Windows Server Core
- Установка службы SNMP в Windows 10/11
- Настройка службы SNMP в Windows Server и Windows 10/11
Установка службы SNMP в Windows Server 2022/2019
В Windows Server службу SNMP можно установить с помощью Server Manager.
Выберите Add roles and features -> Features. Выберите SNMP Service (если нужно отметьте также SNMP WMI Providers).
Служба SNMP WMI Provider позволяет опрашивать SNMP устройство через WMI.
Нажмите Next -> Install и дождитесь окончания установки.
Установка SNMP агента в Windows Server Core
В Windows Server Core можно установить SNMP с помощью веб-интерфеса Windows Admin Center и PowerShell.
Если вы используете Windows Admin Center, подключитесь к хосту Windows Server, выберите Roles and Features -> SNMP Service.
Т.к. в Windows Server Core отсутствует графический интерфейс, а для его управления используется командная строка, вы можете установить службу SNMP из командной строки PowerShell.
Для установки ролей в Windows Server из PowerShell используется командлет Install-WindowsFeature.
Проверьте, что служба SNMP не установлена:
Get-WindowsFeature SNMP*

Установите роль SNMP и WMI провайдер:
Install-WindowsFeature SNMP-Service,SNMP-WMI-Provider -IncludeManagementTools
Проверьте, что службы SNMP запущены:
Get-Service SNMP*
В нашем примере SNMP служба запущена, а SNMPTRAP остановлена.
Установка службы SNMP в Windows 10/11
Вы можете использовать службу SNMP не только в Windows Server, но и в десктопных редакциях Windows 10 и 11.
В Windows 10/11 служба SNMP, вынесена в отдельный компонент Feature On Demand (как RSAT и OpenSSH).
Вы можете установить SNMP через панель Settings. Перейдите в Apps -> Optional features -> Add an optional feature -> View features.
В списке доступных компонентов выберите Simple Network Management Protocol (SNMP) и WMI SNMP Provider. Для начала установки нажмите Next (понадобится интернет подключение к серверам Microsoft).

Для установки службы SNMP через PowerShell, используйте команду:
Add-WindowsCapability -Online -Name SNMP.Client~~~~0.0.1.0
Для установки службы SNMP без подключения к интернету, вам понадобится скачать ISO образ Windows 10/11 Features on Demand из личного кабинета на сайте лицензирования Volume Licensing Service Center (VLSC).
Для офлайн установки службы SNMP с такого ISO образа используется команда:
Add-WindowsCapability -Online -Name SNMP.Client~~~~0.0.1.0 -LimitAccess -Source \msk-fs01DistrWindows-FODWin11
Настройка службы SNMP в Windows Server и Windows 10/11
Вы можете настроить параметры службы SNMP в консоли services.msc. Найдите службу SNMP Services в списке и откройте ее свойства.
Обратите внимание, что у службы SNMP есть несколько дополнительных вкладок:
- Agent
- Traps
- Security
На вкладке Agent указывается базовая информация об устройстве (контакты администратора, местоположение). Здесь же можно указать тип информации, который может отправлять данное устройство при SNMP опросе.
В старых версиях протокола SNMP (SNMP v.1 и SNMP v.2) для авторизации пользователя используется строка сообщества (community string). На вкладке Security можно создать несколько строк подключения.
Можно выбрать один из пяти уровней доступа для сообщества:
- READ ONLY — позволяет получать данные с устройства;
- READ WRITE — позволяет получать данные и изменять конфигурацию устройства;
- NOTIFY — позволяет получать SNMP ловушки;
- READ CREATE – позволяет читать данные, изменять и создавать объекты;
- NONE
Вы можете создать несколько community string. Для этого нужно задать имя и выбрать права/ Для мониторинга состояние сервера достаточно выбрать READ ONLY.
В списке Accept SNMP packets from these hosts можно указать имена/IP адреса серверов, которым разрешено опрашивать данное устройство. Если вы не хотите ограничивать список разрешенных устройств, оставьте здесь Accept SNMP packets from any hosts.

На вкладке Traps указываются адрес серверов, на который SNMP агент должен отправлять SNMP-ловушка (SNMP trap). SNMP Trap это широковещательный USP пакет, используемый для асинхронного уведомления менеджера (например, сообщение о критическом событии).
Не забудьте открыть в Windows Defender Firewall правила, разрешающие входящий и исходящий трафик для SNMP запросов и ловушек (TRAP). Нужные правила фаейрвола можно включить с помощью PowerShell.
В Windows Firewall есть несколько готовых правил для SNMP трафика:
Get-NetFirewallrule -DisplayName *snmp* |ft
- SNMPTRAP-In-UDP
- SNMPTRAP-In-UDP-NoScope
- SNMP-Out-UDP
- SNMP-In-UDP-NoScope
- SNMP-Out-UDP-NoScope
- SNMP-In-UDP
Можно включить все правила, или только определенное:
Get-NetFirewallrule -DisplayName *snmp* | Enable-NetFirewallRule
Get-NetFirewallrule SNMP-Out-UDP | Disable-NetFirewallRule
В списке служб Windows есть еще одна служба SNMP Trap. Она используется для получения сообщений от других SNMP агентов и пересылки на SNMP сервера (обычно это система мониторинга, опрашивающая устройства по SNMP, например PRTG или Zabbix).
Если вы настраиваете SNMP на Windows Server Core, вы не сможете использовать графический интерфейс службы SNMP для настройки ее параметров. Вместо этого придется вносить изменения в реестр с помощью PowerShell. Настройки службы SNMP хранятся в ветке реестра HKEY_LOCAL_MACHINESYSTEMCurrentControlSetServicesSNMPParameters.
Следующие команды зададут описание агента:
New-ItemProperty -Path "HKLM:SYSTEMCurrentControlSetservicesSNMPParametersRFC1156Agent" -Name "sysContact" -Value "[email protected]" -PropertyType REG_SZ
New-ItemProperty -Path "HKLM:SYSTEMCurrentControlSetservicesSNMPParametersRFC1156Agent" -Name "sysLocation" -Value "MSK_Datacenter1" -PropertyType REG_SZ
Для каждой ловушки SNMP придется создать отдельный ключ в HKLMSYSTEMCurrentControlSetservicesSNMPParametersTrapConfiguration с именем community.
New-Item -Path "HKLM:SYSTEMCurrentControlSetservicesSNMPParametersTrapConfigurationpublic1"
Укажите разрешения для community:
New-ItemProperty -Path "HKLM:SYSTEMCurrentControlSetServicesSNMPParametersValidCommunities" -Name "public1" -Value 4 -PropertyType DWord
Возможные значения:
- 1 — NONE
- 2 — NOTIFY
- 4 — READ ONLY
- 8 — READ WRITE
- 16 — READ CREATE
Для каждого community можно указать список серверов, с которых разрешено принимать запросы:
New-ItemProperty -Path "HKLM:SYSTEMCurrentControlSetServicesSNMPParametersPermittedManagers" -Name "1" -Value "server1.winitpro.ru" -PropertyType REG_SZ
Перезапустите службу SNMP для применения новых настроек из реестра:
Get-Service SNMP|Restart Service
Если нужно распространить эти SNMP настройки на множество компьютеров/серверов Windows в домене, используйте возможности внесения изменений в реестр через GPO.
Проверить работу службы SNMP можно с помощью утилиты snmpwalk (доступна в любом Linux дистрибутиве):
# snmpwalk -v 2c -c public1 -O e 192.168.13.122
В этом примере мы опросили наш Windows хост через версию протокола SNMPv2.
Утилита вернула базовыую информацию о хосте (syscontact, sysname, syslocation) и довольно большое количество информации о состоянии сервера Windows.