- Remove From My Forums
-
Question
-
I am set policy Allow only per user or approved shell extensions (GPedit: User Configuration >> Administrative Templates >> Windows Components >> Windows Explorer)
Delete entry at:
HKEY_LOCAL_MACHINESOFTWAREMicrosoftWindowsCurrentVersionShell ExtensionsApproved
Extensions was disabled in Windows XP. However in Windows 7 extensions was still enabled.
Is this policy functional in Windows 7?
Answers
-
Based on the information you have provided, it should have worked as expected.
A paid support incident would be required to full determine where your scenario is failing.
David J. This posting is provided «AS IS» with no warranties, and confers no rights. Please remember to click “Mark as Answer” on the post that helps you, and to click “Unmark as Answer” if a marked post does not actually answer your
question. This can be beneficial to other community members reading the thread.-
Marked as answer by
Thursday, December 30, 2010 2:04 AM
-
Marked as answer by
Новый вид проводника может понравиться не каждому пользователю. Кому-то новый вид Проводника может быть неудобным. Поэтому Microsoft оставила возможность вернуть классический вариант.
Как возвратить классический вид Проводника в Windows 11
Нажмите Windows + R, чтобы запустить приложение Выполнить. Или нажмите на кнопку Пуск и начните писать Выполнить, после чего нажмите на приложение.
В появившемся окне напишите regedit и нажмите кнопку ОК.
Перейдите по следующему пути в редакторе реестра: HKEY_LOCAL_MACHINESOFTWAREMicrosoftWindowsCurrentVersionShell Extensions
Щелкните правой кнопкой мыши по папке Shell Extensions, затем выберите Создать и выберите Раздел.
Назовите раздел Blocked и нажмите на него левой кнопкой мышки.
Щелкните правой кнопкой мышки в пустое место, выберите Создать и выберите Строковый параметр.
Введите это значение: {e2bf9676-5f8f-435c-97eb-11607a5bedf7} и нажмите Enter.
Перезагрузите компьютер
После перезагрузки изменения вступят в силу.
Проводник в Windows 11 до и после изменения
Если вы передумали
Если вы передумали и хотите вернуть проводник Windows 11, то вам нужно вернуться в редактор реестра и удалить созданный параметр {e2bf9676-5f8f-435c-97eb-11607a5bedf7}.
О том, что такое расширение Windowsshell, я не буду здесь рассказывать. Если вы не понимаете, погуглите.
Один. Программирование оболочки
Используемая здесь среда разработки — WindowsXP + sp3, VS 2005 + sp1 (должна поддерживаться версия VS выше VS 2005, предполагается, что VC 6.0 не поддерживается).
1. Создайте новый проект ATL, введите имя проекта: ImportShell, как показано ниже:

2. Выберите тип сервера в настройках приложения: библиотека динамической компоновки (DLL), остальные параметры принимают настройки по умолчанию, как показано на рисунке ниже:

Таким образом, после нажатия кнопки «Готово» создается новый проект ATL.
3. Создайте новый простой объект ATL (английская версия VS — это ATLSimple Object), как показано ниже:

4. Введите аббревиатуру: ImportShellExt, другая VS заполнит ее автоматически, как показано на рисунке ниже:

НовыйCImportShellExtКласс должен унаследовать два новых базовых класса: IShellExtInitИ IContextMenu. В основном добавлены четыре новые интерфейсные функции:
Когда наше расширение оболочки загружено, Explorer вызовет функцию QueryInterface () реализованного нами COM-объекта, чтобы получить указатель интерфейса IShellExtInit.
Этот интерфейс имеет только один метод Initialize (), а его прототип функции:
HRESULTIShellExtInit::Initialize ( LPCITEMIDLIST pidlFolder, LPDATAOBJECT pDataObj,HKEY hProgID );
Explorer использует этот метод для передачи нам различной информации.
PidlFolder — это переменная PIDL папки, в которой расположен файл, выбранный пользователем. (PIDL [указатель на список идентификаторов] — это структура данных, которая однозначно идентифицирует любой объект в пространстве имен Shell, имя в пространстве имен Shell Объект может быть или не быть объектом в реальной файловой системе.)
pDataObj — это указатель интерфейса IDataObject, с помощью которого мы можем получить имя файла операции, выбранной пользователем.
hProgID — это переменная ключа реестра HKEY, которую можно использовать для получения регистрационных данных нашей DLL.
Как только Explorer инициализирует расширение, он вызоветIContextMenu Этот метод позволяет нам добавлять пункты меню, предоставлять подсказки в строке состояния и отвечать на выбор пользователя.
Добавьте прототип функции метода IContextMenu: public:
- // IContextMenu
- STDMETHOD(GetCommandString)(UINT, UINT, UINT*, LPSTR, UINT);
- STDMETHOD(InvokeCommand)(LPCMINVOKECOMMANDINFO);
- STDMETHOD(QueryContextMenu)(HMENU, UINT, UINT, UINT, UINT);
// IContextMenu
STDMETHOD(GetCommandString)(UINT, UINT, UINT*, LPSTR, UINT);
STDMETHOD(InvokeCommand)(LPCMINVOKECOMMANDINFO);
STDMETHOD(QueryContextMenu)(HMENU, UINT, UINT, UINT, UINT);
Есть три способа изменить контекстное меню IContextMenu.
Первый — это QueryContextMenu (), который позволяет нам изменять контекстное меню. Его прототип:
- HRESULT IContextMenu::QueryContextMenu ( HMENU hmenu, UINT uMenuIndex, UINT uidFirstCmd, UINT uidLastCmd, UINT uFlags );
HRESULT IContextMenu::QueryContextMenu ( HMENU hmenu, UINT uMenuIndex, UINT uidFirstCmd, UINT uidLastCmd, UINT uFlags ); дескриптор контекстного меню hmenu.
uMenuIndex — это начальная позиция, в которую мы должны добавить пункт меню.
uidFirstCmd и uidLastCmd — это диапазон значений идентификаторов команд меню, которые мы можем использовать.
uFlags определяет причину, по которой Explorer вызывает QueryContextMenu ().
Возвращаемое значение зависит от документа, который вы ищете.
В книге Дино Эспозито говорится, что возвращаемое значение — это количество добавленных вами пунктов меню.
В MSDN VC6.0 указано, что это идентификатор команды последнего добавленного нами пункта меню плюс 1.
И последний MSDN говорит:
Установите возвращаемое значение на максимальную разницу между идентификаторами команд, назначенных каждому пункту меню, плюс 1.
Например, предположим idCmdFirst Установите значение 5, и вы добавили три пункта меню, идентификаторы команд — 5, 7 и 8.
Возвращаемое значение должно быть: MAKE_HRESULT (SEVERITY_SUCCESS, 0, 8-5 + 1).
Я всегда следовал объяснениям Дино, и они работали очень хорошо.
Фактически, его метод согласуется с последним MSDN, если вы строго используете uidFirstCmd в качестве идентификатора первого пункта меню, а затем добавляете 1 к идентификатору следующего пункта меню.
Наше временное расширение добавляет только один пункт меню, поэтому
QueryContextMenu() очень простой:
- HRESULT CImportShellExt::QueryContextMenu( HMENU hmenu,UINT uMenuIndex, UINT uidFirstCmd, UINT uidLastCmd, UINT uFlags )
- {
- // Если логотип содержит CMF_DEFAULTONLY, мы ничего делать не будем.
- if ( uFlags & CMF_DEFAULTONLY )
- {
- return MAKE_HRESULT ( SEVERITY_SUCCESS, FACILITY_NULL, 0 );
- }
- InsertMenu ( hmenu, uMenuIndex, MF_BYPOSITION, uidFirstCmd, _T(«Хранилище проекта») );
- return MAKE_HRESULT ( SEVERITY_SUCCESS, FACILITY_NULL, 1 );
- }
HRESULT CImportShellExt::QueryContextMenu( HMENU hmenu,UINT uMenuIndex, UINT uidFirstCmd, UINT uidLastCmd, UINT uFlags )
{
	// Если флаг содержит CMF_DEFAULTONLY, мы ничего делать не будем.
	if ( uFlags & CMF_DEFAULTONLY )
	{
		return MAKE_HRESULT ( SEVERITY_SUCCESS, FACILITY_NULL, 0 );
	}

	 InsertMenu (hmenu, uMenuIndex, MF_BYPOSITION, uidFirstCmd, _T («Хранилище проекта»));
	return MAKE_HRESULT ( SEVERITY_SUCCESS, FACILITY_NULL, 1 );
}
Сначала мы проверяемuFlags.
Вы можете найти объяснения всех флагов в MSDN, но для расширения контекстного меню важно только одно значение:CMF_DEFAULTONLY.
Этот флаг указывает расширению пространства имен Shell сохранять элементы меню по умолчанию.В настоящее время наше расширение Shell не должно добавлять какие-либо настраиваемые элементы меню, поэтому мы хотим вернуть 0 в это время.
Если флаг не установлен, мы можем изменить меню (используяhmenu Handle) и верните 1, чтобы сообщить Shell, что мы добавили пункт меню.
Следующий назовутIContextMenu путьGetCommandString().Если пользователь щелкает правой кнопкой мыши текстовый файл в окне браузера или выбирает текстовый файл и щелкает меню файла, в строке состояния отображается подсказка.
нашGetCommandString() Функция вернет строку справки для отображения в браузере.GetCommandString() Прототип:
- HRESULT IContextMenu::GetCommandString ( UINT idCmd, UINT uFlags, UINT *pwReserved, LPSTR pszName, UINT cchMax );
HRESULT IContextMenu::GetCommandString ( UINT idCmd, UINT uFlags, UINT *pwReserved, LPSTR pszName, UINT cchMax );idCmd Это счетчик, основанный на 0, который определяет, какой пункт меню выбран.
Поскольку у нас есть только один пункт меню, поэтомуidCmd Всегда 0. Но если мы добавим 3 пункта меню,idCmd Это может быть 0, 1 или 2.
uFlags Это еще один набор знаков (о нем я расскажу позже).
PwReservedМожно проигнорировать.
pszName Укажите на буфер, принадлежащий оболочке, и мы скопируем строку справки в буфер.
cchMax Размер буфера.
Возвращаемое значение —S_OK ИлиE_FAIL.
GetCommandString() Его также можно вызвать для получения действия («глагола») пункта меню.
verb — это независимая от языка символьная строка, которая определяет операцию, которая может быть добавлена к файловому объекту.
ShellExecute()В документе есть подробное объяснение, и содержания глагола достаточно, чтобы написать еще одну статью. Простое объяснение: глагол может быть указан непосредственно в реестре (например, строки «открыть» и «напечатать») или Расширение контекстного меню создано. Это можно сделать, позвонивShellExecute()Выполните код, реализованный в расширении Shell.
Во всяком случае, я сказал это, чтобы ясно объяснить
GetCommandString() Роль.
Если Explorer запрашивает строку справки, мы ее предоставляем. Если Explorer запрашивает глагол, мы игнорируем его. ЭтоuFlags Роль параметров.
в случае uFlags уже настроенGCS_HELPTEXT Bit, Explorer запрашивает строку справки. И еслиGCS_UNICODE Установлен, мы должны вернуть строку Unicode.
наш
GetCommandString() следующее:
- #include <atlconv.h>
- // Заголовочные файлы включены для использования макросов преобразования строк ATL
- HRESULT CImportShellExt::GetCommandString( UINT idCmd, UINT uFlags,UINT* pwReserved, LPSTR pszName, UINT cchMax )
- {
- USES_CONVERSION;
- // Проверяем idCmd, это должно быть потому, что у нас добавлен только один пункт меню.
- if ( 0 != idCmd )
- return E_INVALIDARG;
- // Если Explorer запрашивает строку справки, скопируйте ее в предоставленный буфер.
- if ( uFlags & GCS_HELPTEXT )
- {
- LPCTSTR szText = _T(«Подсчитайте количество файлов в папке»);
- if ( uFlags & GCS_UNICODE )
- {
- // Нам нужно преобразовать pszName в строку Unicode, а затем использовать API копирования строки Unicode.
- lstrcpynW ( (LPWSTR) pszName, T2CW(szText), cchMax );
- }
- else
- {
- // Используйте ANSI String Copy API для возврата строки справки.
- lstrcpynA ( pszName, T2CA(szText), cchMax );
- }
- return S_OK;
- }
- return E_INVALIDARG;
- }
#include <atlconv.h>
 // Заголовочный файл включен для использования макросов преобразования строк ATL

HRESULT CImportShellExt::GetCommandString( UINT idCmd, UINT uFlags,UINT* pwReserved, LPSTR pszName, UINT cchMax )
{
	USES_CONVERSION;
	 // Проверяем idCmd, это должно быть потому, что у нас добавлен только один пункт меню.
	if ( 0 != idCmd )
	   return E_INVALIDARG;

	 // Если Explorer запрашивает строку справки, скопируйте ее в предоставленный буфер.
	if ( uFlags & GCS_HELPTEXT )
	{
		 LPCTSTR szText = _T («Подсчитать количество файлов в папке»);
		if ( uFlags & GCS_UNICODE )
		{
			 // Нам нужно преобразовать pszName в строку Unicode, а затем использовать API копирования строки Unicode.
			lstrcpynW ( (LPWSTR) pszName, T2CW(szText), cchMax );
		}
		else
		{
			 // Используйте API копирования строк ANSI для возврата строки справки.
			lstrcpynA ( pszName, T2CA(szText), cchMax );
		}
		return S_OK;
	}
	return E_INVALIDARG;
}
Здесь нет специального кода; я использовал жестко закодированную строку и преобразовал ее в соответствующий набор символов.
Если вы никогда не использовали макрос преобразования строки ATL, вы должны изучить его, потому что при передаче строк Unicode в функции COM и OLE использование макроса преобразования будет очень полезным.
Я использовал T2CW и T2CA в приведенном выше коде для преобразования строк TCHAR в строки Unicode и ANSI соответственно.
В начале функцииUSES_CONVERSION Макрос фактически объявляет локальную переменную, которая будет использоваться макросом преобразования.
Следует отметить одну проблему:
lstrcpyn() Гарантируется, что целевая строка закончится нулевым значением.
Это то же самое, что и функция среды выполнения C (CRT)strncpy()Другой. Когда длина исходной строки, которую нужно скопировать, больше или равна cchMax.strncpy()Не будет добавлять нулевой терминатор.
Я рекомендую всегда использоватьlstrcpyn(), Так что вам не нужноstrncpy()Затем добавьте код для проверки, чтобы убедиться, что строка заканчивается нулем.
IContextMenu Последний метод интерфейсаInvokeCommand(). Этот метод будет вызываться, когда пользователь щелкает по добавленному нами пункту меню. Прототип функции:
- HRESULT IContextMenu::InvokeCommand ( LPCMINVOKECOMMANDINFO pCmdInfo );
HRESULT IContextMenu::InvokeCommand ( LPCMINVOKECOMMANDINFO pCmdInfo );CMINVOKECOMMANDINFO Структура несет много информации, но нас волнует толькоlpVerb с hwnd Эти два участника.
lpVerbУ параметра есть две функции — это либо имя глагола (действия), которое может быть запущено, либо индекс пункта меню, по которому был выполнен щелчок.
hwnd Это дескриптор окна браузера, в котором пользователь активировал наше расширение меню.
Поскольку у нас есть только один пункт расширенного меню, нам просто нужно проверить
lpVerb Параметр, если его значение равно 0, мы можем определить, что наш пункт меню был нажат. Самый простой код, который я могу придумать, — это всплывающее информационное окно, и этот код делает так много. Информационное окно отображает имя выбранной папки. Конкретный код выглядит следующим образом:
- HRESULT CImportShellExt::InvokeCommand( LPCMINVOKECOMMANDINFO pCmdInfo )
- {
- // If lpVerb really points to a string, ignore this function call and bail out.
- if ( 0 != HIWORD( pCmdInfo->lpVerb ) )
- return E_INVALIDARG;
- // Get the command index — the only valid one is 0.
- switch ( LOWORD( pCmdInfo->lpVerb) )
- {
- case 0:
- {
- TCHAR szMsg [MAX_PATH + 32];
- wsprintf ( szMsg, _T(«Выбранная папка% s»),m_szFile);
- MessageBox ( pCmdInfo->hwnd, szMsg, _T(«Информация»),
- MB_ICONINFORMATION );
- return S_OK;
- }
- break;
- default:
- return E_INVALIDARG;
- break;
- }
- }
HRESULT CImportShellExt::InvokeCommand( LPCMINVOKECOMMANDINFO pCmdInfo )
{
	// If lpVerb really points to a string, ignore this function call and bail out.
	if ( 0 != HIWORD( pCmdInfo->lpVerb ) )
		return E_INVALIDARG;

	// Get the command index - the only valid one is 0.
	switch ( LOWORD( pCmdInfo->lpVerb) )
	{
	case 0:
		{
			TCHAR szMsg [MAX_PATH + 32];
			 wsprintf (szMsg, _T ("Выбранная папка% s"), m_szFile);
			 MessageBox (pCmdInfo-> hwnd, szMsg, _T ("информация"),
				MB_ICONINFORMATION );
			return S_OK;
		}
		break;
	default:
		return E_INVALIDARG;
		break;
	}
}
На этот раз вы можете спросить: как операционная система узнает, что мы хотим вставить это меню? Это включает в себя регистрацию COM-компонента. Так называемая регистрация компонентов COM заключается в простой записи соответствующей информации о компоненте COM в реестр, а затем операционная система загружает компонент COM, считывая соответствующую информацию из реестра. Регистрация программы Shell делится на два этапа:
Первый шаг — убедиться, что ваше расширение Shell может быть вызвано пользователями без прав администратора в Win NT / Win 2000. Вам необходимо добавить информацию о нашей программе в реестр HKEY_LOCAL_MACHINE Software Microsoft Windows CurrentVersion ShellExtensions Approved. Это должно быть в проектеDllRegisterServerФункция (функция регистрации) и DllUnregisterServerФункция (функция отмены регистрации). код показан ниже:
- // DllRegisterServer-Добавляем элемент в системный реестр
- STDAPI DllRegisterServer(void)
- {
- // Регистрируем объекты, библиотеки типов и все интерфейсы в библиотеках типов
- if ( 0 == (GetVersion() & 0x80000000UL) )
- {
- CRegKey reg;
- LONG lRet;
- lRet = reg.Open ( HKEY_LOCAL_MACHINE,
- _T(«Software\Microsoft\Windows\CurrentVersion\Shell Extensions\Approved»),
- KEY_SET_VALUE );
- if ( ERROR_SUCCESS != lRet )
- return E_ACCESSDENIED;
- lRet = reg.SetValue ( _T(«ImportShell extension»),
- _T(«{06001B8E-8858-4CEE-8E91-60E12A6C81A7}») );
- if ( ERROR_SUCCESS != lRet )
- return E_ACCESSDENIED;
- }
- HRESULT hr = _AtlModule.DllRegisterServer();
- return hr;
- }
- // DllUnregisterServer — удаляем элемент из системного реестра
- STDAPI DllUnregisterServer(void)
- {
- if ( 0 == (GetVersion() & 0x80000000UL) )
- {
- CRegKey reg;
- LONG lRet;
- lRet = reg.Open ( HKEY_LOCAL_MACHINE,
- _T(«Software\Microsoft\Windows\CurrentVersion\Shell Extensions\Approved»),
- KEY_SET_VALUE );
- if ( ERROR_SUCCESS == lRet )
- {
- lRet = reg.DeleteValue ( _T(«{06001B8E-8858-4CEE-8E91-60E12A6C81A7}») );
- }
- }
- HRESULT hr = _AtlModule.DllUnregisterServer();
- return hr;
- }
// DllRegisterServer-Добавить ключ в системный реестр
STDAPI DllRegisterServer(void)
{
         // Регистрируем объекты, библиотеки типов и все интерфейсы в библиотеках типов
	if ( 0 == (GetVersion() & 0x80000000UL) )
	{
		CRegKey reg;
		LONG    lRet;

		lRet = reg.Open ( HKEY_LOCAL_MACHINE,
			_T("Software\Microsoft\Windows\CurrentVersion\Shell Extensions\Approved"),
			KEY_SET_VALUE );

		if ( ERROR_SUCCESS != lRet )
			return E_ACCESSDENIED;

		lRet = reg.SetValue ( _T("ImportShell extension"),
			_T("{06001B8E-8858-4CEE-8E91-60E12A6C81A7}") );

		if ( ERROR_SUCCESS != lRet )
			return E_ACCESSDENIED;
	}

    HRESULT hr = _AtlModule.DllRegisterServer();
	return hr;
}


 // DllUnregisterServer - удаляем ключ из системного реестра
STDAPI DllUnregisterServer(void)
{
	if ( 0 == (GetVersion() & 0x80000000UL) )
	{
		CRegKey reg;
		LONG    lRet;

		lRet = reg.Open ( HKEY_LOCAL_MACHINE,
			_T("Software\Microsoft\Windows\CurrentVersion\Shell Extensions\Approved"),
			KEY_SET_VALUE );

		if ( ERROR_SUCCESS == lRet )
		{
			lRet = reg.DeleteValue ( _T("{06001B8E-8858-4CEE-8E91-60E12A6C81A7}") );
		}
	}

	HRESULT hr = _AtlModule.DllUnregisterServer();
	return hr;
}
Одна проблема здесьreg.SetValue ( _T(«ImportShell extension»),
_T(«{06001B8E-8858-4CEE-8E91-60E12A6C81A7}») );
Как соотносятся имена ключей и значения ключей в ?? Фактически, когда вы создаете новый простой объект COM, он автоматически сгенерирует файл ImportShellExt.rgs, откройте файл ImportShellExt.rgs, там будут следующие файлы:
ImportShell.ImportShellExt.1 = s ‘ImportShellExt Class’
{
CLSID = s ‘{06001B8E-8858-4CEE-8E91-60E12A6C81A7}’
}
ImportShell.ImportShellExt = s ‘ImportShellExt Class’
{
CLSID = s ‘{06001B8E-8858-4CEE-8E91-60E12A6C81A7}’
CurVer = s ‘ImportShell.ImportShellExt.1’
}
Это имя ключа обычно берется из имени программы + расширения, такого как расширение ImportShell, а значение ключа берется из его строковой формы guid: {06001B8E-8858-4CEE-8E91-60E12A6C81A7}.
Второй шаг касается типа файла, управляемого программой Shell. Например, мы требуем, чтобы при выборе папки открывалось контекстное меню. В это время вам нужно добавить некоторую информацию в файл ImportShellExt.rgs:
NoRemove Folder
{
NoRemove ShellEx
{
NoRemove ContextMenuHandlers
{
ForceRemove ImportShellExt = s'{06001B8E-8858-4CEE-8E91-60E12A6C81A7}’
}
}
}
Вышесказанное на самом деле очень хорошо понятно: каждая строка представляет ключ реестра, «HKCR» — это сокращение HKEY_CLASSES_ROOT.
Ключевое слово NoRemove означает, что ключ не нужно удалять, когда COM-сервер выходит из системы.
Последняя строка немного сложна. Ключевое слово ForceRemove указывает, что, если ключ уже существует, ключ должен быть удален перед добавлением нового ключа. Остальная часть этой строки сценария определяет строку, которая будет сохранена в качестве значения по умолчанию для ключа ImportShell.
Если вы хотите манипулировать txt-файлами, вы можете добавить такую информацию:
NoRemove .txt
{
NoRemove ShellEx
{
NoRemove ContextMenuHandlers
{
ForceRemove ImportShellExt = s'{06001B8E-8858-4CEE-8E91-60E12A6C81A7}’
}
}
}
Если вы хотите работать с любым типом файла, это:
NoRemove *
{
NoRemove ShellEx
{
NoRemove ContextMenuHandlers
{
ForceRemove ImportShellExt = s'{06001B8E-8858-4CEE-8E91-60E12A6C81A7}’
}
}
}
Два, два. Отладка оболочки
В Win NT / 2000 вы можете найти следующие ключи:
HKCUSoftwareMicrosoftWindowsCurrentVersionExplorer
И создайте значение DWORD с именем DesktopProcess 1. Это заставит рабочий стол и панель задач работать в одном процессе, а все остальные окна проводника будут запускаться в каждом из собственных процессов. То есть вы можете запускать в одном Выполните отладку в окне проводника, а затем, пока вы закроете окно, ваша DLL будет немедленно удалена, что позволяет избежать использования DLL в Windows и не может быть заменено или обновлено. Если это произойдет, к сожалению, вам придется Выйдите из системы и снова войдите в Windows, чтобы принудительно выгрузить используемую DLL расширения Shell. ,
Нажмите F5, чтобы начать, и появится диалоговое окно. В это время введите путь к explorer.exe, как показано ниже:

В это время обычно появляется окно с предупреждением, и я проигнорирую его, как показано ниже:

Далее нужно открыть окно моего документа, как показано ниже:

В это время вы можете установить точки останова в коде для отладки.
три. Развертывание оболочки
Развертывание программы Shell очень простое, то есть создать два пакетных файла в каталоге сгенерированной dll:
install.bat —— Сценарий установки программы оболочки, содержимое:
regsvr32.exe ImportShell.dll
uninstall.bat — сценарий удаления оболочки программы, содержимое:
regsvr32.exe /u ImportShell.dll
Вы можете установить или удалить программу оболочки, запустив эти два командных файла.
Четыре, четыре. Обнаруженные проблемы и решения
Ошибка средства компоновщика ССЫЛКА: фатальная ошибка LNK1168: не удается открыть .. outdir Debug ImportShell.dll для записи.
Эта проблема возникает при изменении guid зарегистрированного объекта com. Решение — открыть диспетчер задач, убить все explorer.exe и затем создать новый процесс проводника.
About what is a Windowsshell extension, I won’t introduce it here. If you don’t understand, please Google it.
One. Shell programming
The development environment used here is WindowsXP+sp3, VS 2005 + sp1 (VS version above VS 2005 should be supported, VC 6.0 is estimated not to support).
1. Create a new ATL project, enter the project name: ImportShell, as shown below:

2. Select the server type in the application settings: dynamic link library (DLL), other options adopt the default settings, as shown in the figure below:

In this way, after clicking Finish, a new ATL project is created.
3. Create a new ATL simple object (the English version of the VS is ATLSimple Object), as shown below:

4. Enter an abbreviation: ImportShellExt, other VS will fill it out automatically for you, as shown in the figure below:

NewCImportShellExtThe class needs to inherit two new base classes: IShellExtInitAnd IContextMenu. There are mainly four newly added interface functions:
When our shell extension is loaded, Explorer will call the QueryInterface() function of the COM object we implemented to get an IShellExtInit interface pointer.
This interface has only one method Initialize(), and its function prototype is:
HRESULTIShellExtInit::Initialize ( LPCITEMIDLIST pidlFolder, LPDATAOBJECT pDataObj,HKEY hProgID );
Explorer uses this method to pass a variety of information to us.
PidlFolder is the PIDL variable of the folder where the file selected by the user is located. (a PIDL [pointer to ID list] is a data structure that uniquely identifies any object in the Shell namespace, a name in the Shell namespace The object may or may not be an object in the real file system.)
pDataObj is an IDataObject interface pointer, through which we can get the file name of the operation selected by the user.
hProgID is a HKEY registry key variable, which can be used to obtain the registration data of our DLL.
Once Explorer initializes the extension, it will then callIContextMenu The method lets us add menu items, provide prompts on the status bar, and respond to the user’s selection.
Add the function prototype of the IContextMenu method: public:
- // IContextMenu
- STDMETHOD(GetCommandString)(UINT, UINT, UINT*, LPSTR, UINT);
- STDMETHOD(InvokeCommand)(LPCMINVOKECOMMANDINFO);
- STDMETHOD(QueryContextMenu)(HMENU, UINT, UINT, UINT, UINT);
// IContextMenu
STDMETHOD(GetCommandString)(UINT, UINT, UINT*, LPSTR, UINT);
STDMETHOD(InvokeCommand)(LPCMINVOKECOMMANDINFO);
STDMETHOD(QueryContextMenu)(HMENU, UINT, UINT, UINT, UINT);
There are three ways to modify the context menu IContextMenu.
The first is QueryContextMenu(), which allows us to modify the context menu. Its prototype is:
- HRESULT IContextMenu::QueryContextMenu ( HMENU hmenu, UINT uMenuIndex, UINT uidFirstCmd, UINT uidLastCmd, UINT uFlags );
HRESULT IContextMenu::QueryContextMenu ( HMENU hmenu, UINT uMenuIndex, UINT uidFirstCmd, UINT uidLastCmd, UINT uFlags ); hmenu context menu handle.
uMenuIndex is the starting position where we should add the menu item.
uidFirstCmd and uidLastCmd are the range of menu command ID values we can use.
uFlags identifies the reason why Explorer calls QueryContextMenu().
The return value varies depending on the document you are consulting.
Dino Esposito’s book says that the return value is the number of menu items you add.
And the MSDN of VC6.0 said that it is the command ID of the last menu item we added plus 1.
And the latest MSDN says:
Set the return value to the maximum difference between the command IDs assigned to each menu item, plus 1.
For example, suppose idCmdFirst Set to 5, and you have added three menu items, the command IDs are 5, 7, and 8.
The return value at this time should be: MAKE_HRESULT(SEVERITY_SUCCESS, 0, 8-5 + 1).
I have always followed Dino’s explanation and it worked very well.
In fact, his method is consistent with the latest MSDN, as long as you strictly use uidFirstCmd as the ID of the first menu item, and then add 1 to the ID of the subsequent menu item.
Our temporary extension only adds one menu item, so
QueryContextMenu() very simple:
- HRESULT CImportShellExt::QueryContextMenu( HMENU hmenu,UINT uMenuIndex, UINT uidFirstCmd, UINT uidLastCmd, UINT uFlags )
- {
- // If the logo contains CMF_DEFAULTONLY, we will not do anything.
- if ( uFlags & CMF_DEFAULTONLY )
- {
- return MAKE_HRESULT ( SEVERITY_SUCCESS, FACILITY_NULL, 0 );
- }
- InsertMenu ( hmenu, uMenuIndex, MF_BYPOSITION, uidFirstCmd, _T(«Project Storage») );
- return MAKE_HRESULT ( SEVERITY_SUCCESS, FACILITY_NULL, 1 );
- }
HRESULT CImportShellExt::QueryContextMenu( HMENU hmenu,UINT uMenuIndex, UINT uidFirstCmd, UINT uidLastCmd, UINT uFlags )
{
	 // If the flag contains CMF_DEFAULTONLY, we will not do anything.
	if ( uFlags & CMF_DEFAULTONLY )
	{
		return MAKE_HRESULT ( SEVERITY_SUCCESS, FACILITY_NULL, 0 );
	}

	 InsertMenu (hmenu, uMenuIndex, MF_BYPOSITION, uidFirstCmd, _T("Project storage") );
	return MAKE_HRESULT ( SEVERITY_SUCCESS, FACILITY_NULL, 1 );
}
First we checkuFlags.
You can find explanations of all the flags in MSDN, but for context menu extension, only one value is important:CMF_DEFAULTONLY.
This flag tells the Shell namespace extension to keep the default menu items. At this time, our Shell extension should not add any customized menu items, which is why we want to return 0 at this time.
If the flag is not set, we can modify the menu (usinghmenu Handle), and return 1 to tell Shell that we have added a menu item.
The next one to be calledIContextMenu the way is GetCommandString().If the user right-clicks a text file in the browser window, or selects a text file and clicks the file menu, the status bar will display prompt help.
our GetCommandString() The function will return a help string for the browser to display.GetCommandString() The prototype is:
- HRESULT IContextMenu::GetCommandString ( UINT idCmd, UINT uFlags, UINT *pwReserved, LPSTR pszName, UINT cchMax );
HRESULT IContextMenu::GetCommandString ( UINT idCmd, UINT uFlags, UINT *pwReserved, LPSTR pszName, UINT cchMax );idCmd It is a counter based on 0, which identifies which menu item is selected.
Because we only have one menu item, soidCmd Always 0. But if we add 3 menu items,idCmd It can be 0, 1, or 2.
uFlags It is another set of signs (I will discuss it later).
PwReservedCan be ignored.
pszName Point to a buffer owned by the Shell, and we will copy the help string into the buffer.
cchMax Is the size of the buffer.
The return value isS_OK OrE_FAIL.
GetCommandString() It can also be called to get the action («verb») of the menu item.
verb is a language-independent character string, which identifies an operation that can be added to a file object.
ShellExecute()There is a detailed explanation in the document, and the content of the verb is enough to write another article. The simple explanation is: verb can be listed directly in the registry (such as «open» and «print» strings), or by The context menu extension is created. This can be done by callingShellExecute()Execute the code implemented in the Shell extension.
Anyway, I said this much just to explain clearly
GetCommandString() The role of.
If Explorer asks for a help string, we provide it. If Explorer asks for a verb, we ignore it. This isuFlags The role of parameters.
in case uFlags already setupGCS_HELPTEXT Bit, Explorer is asking for a help string. And ifGCS_UNICODE Is set, we must return a Unicode string.
our
GetCommandString() as follows:
- #include <atlconv.h>
- // Header file included for using ATL string conversion macro
- HRESULT CImportShellExt::GetCommandString( UINT idCmd, UINT uFlags,UINT* pwReserved, LPSTR pszName, UINT cchMax )
- {
- USES_CONVERSION;
- //Check idCmd, it must be because we only have one menu item added.
- if ( 0 != idCmd )
- return E_INVALIDARG;
- // If Explorer asks for the help string, copy it to the buffer provided.
- if ( uFlags & GCS_HELPTEXT )
- {
- LPCTSTR szText = _T(«Count the number of files in the folder»);
- if ( uFlags & GCS_UNICODE )
- {
- // We need to convert pszName into a Unicode string, and then use the Unicode string copy API.
- lstrcpynW ( (LPWSTR) pszName, T2CW(szText), cchMax );
- }
- else
- {
- // Use ANSI String Copy API to return the help string.
- lstrcpynA ( pszName, T2CA(szText), cchMax );
- }
- return S_OK;
- }
- return E_INVALIDARG;
- }
#include <atlconv.h>
 // Header file included to use ATL string conversion macros

HRESULT CImportShellExt::GetCommandString( UINT idCmd, UINT uFlags,UINT* pwReserved, LPSTR pszName, UINT cchMax )
{
	USES_CONVERSION;
	 //Check idCmd, it must be because we only have one menu item added.
	if ( 0 != idCmd )
	   return E_INVALIDARG;

	 // If Explorer asks for the help string, copy it to the buffer provided.
	if ( uFlags & GCS_HELPTEXT )
	{
		 LPCTSTR szText = _T("Count the number of files in the folder");
		if ( uFlags & GCS_UNICODE )
		{
			 // We need to convert pszName into a Unicode string, and then use the Unicode string copy API.
			lstrcpynW ( (LPWSTR) pszName, T2CW(szText), cchMax );
		}
		else
		{
			 // Use ANSI string copy API to return the help string.
			lstrcpynA ( pszName, T2CA(szText), cchMax );
		}
		return S_OK;
	}
	return E_INVALIDARG;
}
There is no special code here; I used a hard-coded string and converted it to the corresponding character set.
If you have never used ATL string conversion macros, you must learn it, because when you pass Unicode strings to COM and OLE functions, using the conversion macros will be very helpful.
I used T2CW and T2CA in the above code to convert TCHAR strings into Unicode and ANSI strings respectively.
At the beginning of the functionUSES_CONVERSION The macro actually declares a local variable that will be used by the conversion macro.
One issue to note is:
lstrcpyn() It is guaranteed that the target string will end with null.
This is the same as the C runtime (CRT) functionstrncpy()Different. When the length of the source string to be copied is greater than or equal to cchMaxstrncpy()Will not add a null terminator.
I recommend always usinglstrcpyn(), So that you don’t have tostrncpy()Then add the code to check to ensure that the character string ends with null.
IContextMenu The last method of the interface isInvokeCommand(). This method will be called when the user clicks on the menu item we added. The function prototype is:
- HRESULT IContextMenu::InvokeCommand ( LPCMINVOKECOMMANDINFO pCmdInfo );
HRESULT IContextMenu::InvokeCommand ( LPCMINVOKECOMMANDINFO pCmdInfo );CMINVOKECOMMANDINFO The structure carries a lot of information, but we only care aboutlpVerb with hwnd These two members.
lpVerbThe parameter has two functions-it is either the name of the verb (action) that can be triggered, or the index of the menu item that was clicked.
hwnd It is the handle of the browser window where the user activated our menu extension.
Because we only have one extended menu item, we just need to check
lpVerb The parameter, if its value is 0, we can determine that our menu item was clicked. The simplest code I can think of is to pop up an information box, and the code here does so much. The information box displays the name of the selected folder. The specific code is as follows:
- HRESULT CImportShellExt::InvokeCommand( LPCMINVOKECOMMANDINFO pCmdInfo )
- {
- // If lpVerb really points to a string, ignore this function call and bail out.
- if ( 0 != HIWORD( pCmdInfo->lpVerb ) )
- return E_INVALIDARG;
- // Get the command index — the only valid one is 0.
- switch ( LOWORD( pCmdInfo->lpVerb) )
- {
- case 0:
- {
- TCHAR szMsg [MAX_PATH + 32];
- wsprintf ( szMsg, _T(«The selected folder is %s»),m_szFile);
- MessageBox ( pCmdInfo->hwnd, szMsg, _T(«information»),
- MB_ICONINFORMATION );
- return S_OK;
- }
- break;
- default:
- return E_INVALIDARG;
- break;
- }
- }
HRESULT CImportShellExt::InvokeCommand( LPCMINVOKECOMMANDINFO pCmdInfo )
{
	// If lpVerb really points to a string, ignore this function call and bail out.
	if ( 0 != HIWORD( pCmdInfo->lpVerb ) )
		return E_INVALIDARG;

	// Get the command index - the only valid one is 0.
	switch ( LOWORD( pCmdInfo->lpVerb) )
	{
	case 0:
		{
			TCHAR szMsg [MAX_PATH + 32];
			wsprintf (szMsg, _T("The selected folder is %s"),m_szFile);
			 MessageBox (pCmdInfo->hwnd, szMsg, _T("information"),
				MB_ICONINFORMATION );
			return S_OK;
		}
		break;
	default:
		return E_INVALIDARG;
		break;
	}
}
At this time, you may ask: How does the operating system know that we want to insert this menu? This involves the registration of a COM component. The so-called registration of the COM component is simply to write the relevant information of the COM component into the registry, and then the operating system loads the COM component by reading the relevant information of the registry. The registration of the Shell program is divided into two steps:
The first step is to ensure that your Shell extension can be invoked by users without administrator rights on Win NT/Win 2000. You need to add our program information to the registry HKEY_LOCAL_MACHINESoftwareMicrosoftWindowsCurrentVersionShellExtensionsApproved. This needs to be in the projectDllRegisterServerFunction (register function) and DllUnregisterServerFunction (de-registration function). code show as below:
- // DllRegisterServer-Add the item to the system registry
- STDAPI DllRegisterServer(void)
- {
- // Register objects, type libraries, and all interfaces in the type library
- if ( 0 == (GetVersion() & 0x80000000UL) )
- {
- CRegKey reg;
- LONG lRet;
- lRet = reg.Open ( HKEY_LOCAL_MACHINE,
- _T(«Software\Microsoft\Windows\CurrentVersion\Shell Extensions\Approved»),
- KEY_SET_VALUE );
- if ( ERROR_SUCCESS != lRet )
- return E_ACCESSDENIED;
- lRet = reg.SetValue ( _T(«ImportShell extension»),
- _T(«{06001B8E-8858-4CEE-8E91-60E12A6C81A7}») );
- if ( ERROR_SUCCESS != lRet )
- return E_ACCESSDENIED;
- }
- HRESULT hr = _AtlModule.DllRegisterServer();
- return hr;
- }
- // DllUnregisterServer- Remove the item from the system registry
- STDAPI DllUnregisterServer(void)
- {
- if ( 0 == (GetVersion() & 0x80000000UL) )
- {
- CRegKey reg;
- LONG lRet;
- lRet = reg.Open ( HKEY_LOCAL_MACHINE,
- _T(«Software\Microsoft\Windows\CurrentVersion\Shell Extensions\Approved»),
- KEY_SET_VALUE );
- if ( ERROR_SUCCESS == lRet )
- {
- lRet = reg.DeleteValue ( _T(«{06001B8E-8858-4CEE-8E91-60E12A6C81A7}») );
- }
- }
- HRESULT hr = _AtlModule.DllUnregisterServer();
- return hr;
- }
// DllRegisterServer-add the key to the system registry
STDAPI DllRegisterServer(void)
{
         // Register objects, type libraries and all interfaces in type libraries
	if ( 0 == (GetVersion() & 0x80000000UL) )
	{
		CRegKey reg;
		LONG    lRet;

		lRet = reg.Open ( HKEY_LOCAL_MACHINE,
			_T("Software\Microsoft\Windows\CurrentVersion\Shell Extensions\Approved"),
			KEY_SET_VALUE );

		if ( ERROR_SUCCESS != lRet )
			return E_ACCESSDENIED;

		lRet = reg.SetValue ( _T("ImportShell extension"),
			_T("{06001B8E-8858-4CEE-8E91-60E12A6C81A7}") );

		if ( ERROR_SUCCESS != lRet )
			return E_ACCESSDENIED;
	}

    HRESULT hr = _AtlModule.DllRegisterServer();
	return hr;
}


 // DllUnregisterServer-remove the key from the system registry
STDAPI DllUnregisterServer(void)
{
	if ( 0 == (GetVersion() & 0x80000000UL) )
	{
		CRegKey reg;
		LONG    lRet;

		lRet = reg.Open ( HKEY_LOCAL_MACHINE,
			_T("Software\Microsoft\Windows\CurrentVersion\Shell Extensions\Approved"),
			KEY_SET_VALUE );

		if ( ERROR_SUCCESS == lRet )
		{
			lRet = reg.DeleteValue ( _T("{06001B8E-8858-4CEE-8E91-60E12A6C81A7}") );
		}
	}

	HRESULT hr = _AtlModule.DllUnregisterServer();
	return hr;
}
One problem here isreg.SetValue ( _T(«ImportShell extension»),
_T(«{06001B8E-8858-4CEE-8E91-60E12A6C81A7}») );
How do the key names and key values in In fact, when you create a new COM simple object, it will automatically generate an ImportShellExt.rgs file, open the ImportShellExt.rgs file, there will be the following files:
ImportShell.ImportShellExt.1 = s ‘ImportShellExt Class’
{
CLSID = s ‘{06001B8E-8858-4CEE-8E91-60E12A6C81A7}’
}
ImportShell.ImportShellExt = s ‘ImportShellExt Class’
{
CLSID = s ‘{06001B8E-8858-4CEE-8E91-60E12A6C81A7}’
CurVer = s ‘ImportShell.ImportShellExt.1’
}
This key name is generally taken from the program name + extension, such as ImportShell extension, and the key value comes from its guid string form: {06001B8E-8858-4CEE-8E91-60E12A6C81A7}.
The second step involves the file type operated by the Shell program. For example, we require it to pop up our right-click menu when the folder is selected. At this time, you need to add some information to the ImportShellExt.rgs file:
NoRemove Folder
{
NoRemove ShellEx
{
NoRemove ContextMenuHandlers
{
ForceRemove ImportShellExt = s'{06001B8E-8858-4CEE-8E91-60E12A6C81A7}’
}
}
}
The above is actually well understood: each row represents a registry key, «HKCR» is the abbreviation of HKEY_CLASSES_ROOT.
The NoRemove keyword means that the key does not need to be deleted when the COM server is logged out.
The last line is a bit complicated. The ForceRemove keyword indicates that if the key already exists, the key should be deleted before the new key is added. The rest of this line of script specifies a string that will be stored as the default value of the ImportShell key.
If you want to manipulate txt files, you can add information like this:
NoRemove .txt
{
NoRemove ShellEx
{
NoRemove ContextMenuHandlers
{
ForceRemove ImportShellExt = s'{06001B8E-8858-4CEE-8E91-60E12A6C81A7}’
}
}
}
If you want to operate any type of file, it is:
NoRemove *
{
NoRemove ShellEx
{
NoRemove ContextMenuHandlers
{
ForceRemove ImportShellExt = s'{06001B8E-8858-4CEE-8E91-60E12A6C81A7}’
}
}
}
Two. Two. Shell debugging
On Win NT/2000, you can find the following keys:
HKCUSoftwareMicrosoftWindowsCurrentVersionExplorer
And create a DWORD value called DesktopProcess 1. This will make the desktop and taskbar run in the same process, and every other Explorer window runs in each of its own processes. That is, you can run in a single process Debug in the Explorer window, and then as long as you close the window, your DLL will be unloaded immediately, which avoids that the DLL cannot be replaced and updated because the DLL is being used by Windows. If this happens unfortunately, you have to Log out and log in to Windows again to force the unloading of the Shell extension DLL in use. ,
Press F5 to start, then a dialog box will pop up, please enter the path of explorer.exe, as shown below:

At this time, a warning box will generally appear, and I will ignore it as shown below:

Next is to open a window of my document, as shown below:

At this time, you can set breakpoints in the code for debugging.
three. Shell deployment
The deployment of the Shell program is very simple, which is to create two batch files in the directory of the generated dll:
install.bat——The installation script of the shell program, the content is:
regsvr32.exe ImportShell.dll
uninstall.bat —— uninstall script of the shell program, the content is:
regsvr32.exe /u ImportShell.dll
You can install or uninstall the shell program by running these two batch files.
Four. Four. Encountered problems and solutions
Linker tool error LINK: fatal error LNK1168: cannot open..outdirDebugImportShell.dll for writing.
This problem will occur when the guid of the registered com object is changed. The solution is to open the task manager, kill all explorer.exe, and then create a new explorer process.
Shell extensions are a powerful and flexible way to extend Windows Shell capabilities. However, when working with Shell extension handlers you can encounter hidden difficulties.
In this article, we describe the general approach to creating Windows Shell extensions based on the example of shortcut menu and icon overlay handlers. We also explain a number of pitfalls you may face when developing these types of extensions and offer several best practices to avoid them.
Contents:
What are Shell extensions?
Creating Shell extension handlers
Registering Shell extensions
Installing Shell extensions
Removing Shell extensions
Common problems and their solutions
Conclusion
What are Shell extensions?
What is a Shell extension? To define Shell extensions, let’s look at the Windows Shell extension handler that allows you to extend the usual set of actions while working with Windows Explorer. Shell extensions can be represented as individual plug-ins to Windows Explorer. They can be used to add a new tab to the Properties window, change a file preview, and do other things.
Before taking any action, the Shell calls registered extension handlers to customize this action. A typical example of such adjustment is a Shell extension handler for the shortcut menu.
Depending on the file type, Shell extension handlers can be added either to all types of objects within Windows Explorer or only to certain types of objects.
Shell extension handlers used with specific file types:
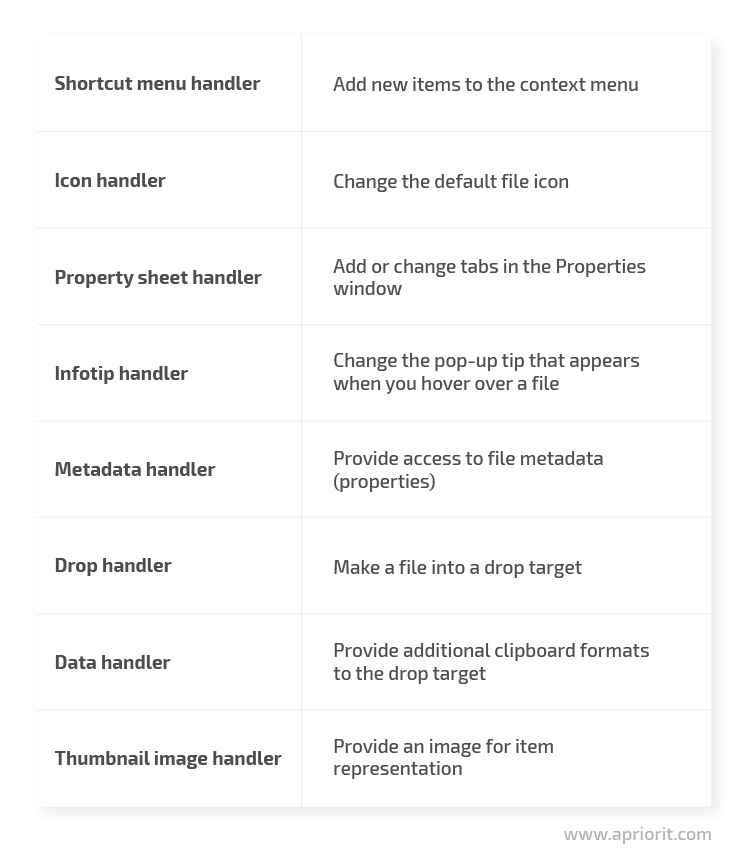
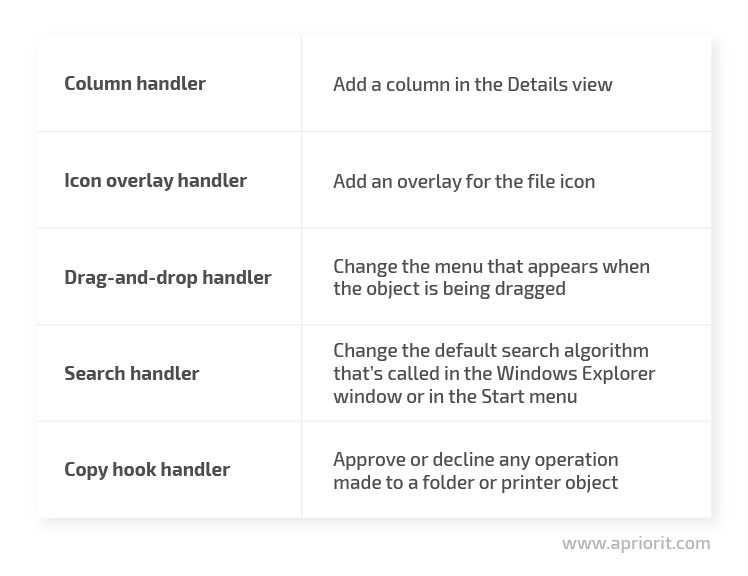
Shell extension handlers that don’t depend on the file type:
However, no matter what file type you apply a handler to, using Shell extensions can slow down Windows Explorer. In addition to Windows Explorer, other programs including Dropbox, TortoiseSVN, WinRAR, and SkyDrive establish their own sets of Shell extensions.
Creating Shell extension handlers
In this section, we’ll discuss the process of creating Windows Shell extension handlers based on the example of overlay and context menu extensions. Other types of Shell extensions can be implemented in a similar way.
Each Shell extension handler is a Component Object Model (COM) object. Handlers must have their own globally unique identifier (GUID) and be registered before the Shell can use them. The registry path is determined by the type of extension handler. Now let’s go through all the stages of creating a Shell extension handler.
Implementing the required functions and interfaces
Since a Shell extension handler is a COM object, it’s implemented as a dynamic link library (DLL). At the same time, just as any COM object, a DLL must export the following standard functions:
- DllMain – Creates an entry point to a DLL
- DllGetClassObject – Gets an object using the Class factory
- DllCanUnloadNow – Calls a DLL before unloading to check whether it’s currently being used
- DllRegisterServer – Registers a COM object in the registry
- DllUnregisterServer – Removes the COM object entry from the registry
The ClassFactory is used to create the component object and must implement the IClassFactory interface. Here’s how the ClassFactory looks:
{code}class ClassFactory : public IClassFactory
    {
    public:
        // IUnknown
        IFACEMETHODIMP QueryInterface(REFIID riid, void **ppv);
        IFACEMETHODIMP_(ULONG) AddRef();
        IFACEMETHODIMP_(ULONG) Release();
        // IClassFactory
        IFACEMETHODIMP CreateInstance(IUnknown *pUnkOuter, REFIID riid, void **ppv);
        IFACEMETHODIMP LockServer(BOOL fLock);
        explicit ClassFactory();
        ~ClassFactory();
    private:
        long m_cRef;
    };
{/code}
In addition, the class that encapsulates the logic of the extension handler must implement the IUnknown interface, like all COM objects. Interfaces that are specific to different types of Shell extensions inherit from this interface. The IUnknown interface looks as follows:
{code}class IUnknown
{
public:
   virtual HRESULT QueryInterface(REFID riid, void** ppv)=0;
   virtual ULONG AddRef () = 0;
   virtual ULONG Release() = 0;
};
{/code}
Note that several extension handlers can be implemented in a single DLL. At the same time, you should specify GUID, perform registering in the registry, and set up a ClassFactory for each handler (although you can use a common ClassFactory for several extension handlers).
Definition of interfaces specific to Shell extensions
In addition to the required IUnknown COM interface, extension classes must implement an interface that’s specific to Shell extensions. For different types of extensions, there are different sets of required interfaces.
Most extension handlers must also implement either an IPersistFile or IShellExtInit interface in Windows XP or earlier. These were replaced by IInitializeWithStream, IInitializeWithItem, and IInitializeWithFile in Windows Vista. The Shell uses these interfaces to initialize the handler.
For a shortcut menu handler, the interfaces used are IShellExtInit and IContextMenu, and for the overlay icon handler, it’s the IShellIconOverlayIdentifier interface. Let’s look closer at each of them.
IShellExtInit
The IShellExtInit interface provides only an extension handler initialization function:
{code}class IShellExtInit : public IUnknown
{
public:
   virtual HRESULT Initialize(LPCITEMIDLIST pidlFolder, LPDATAOBJECT pDataObj, HKEY hKeyPro-gID) = 0;
};
{/code}
The Initialize method is called by Windows Explorer before you perform an action that this handler extends. For example, in the case of extending the context menu, this method will be called after clicking on selected files and before the context menu opens.
In the Initialize method, you can implement logic that filters extension work depending on the type of selected files or any other conditions. Furthermore, the list of objects, which the user chooses, can be obtained in the Initialize method.
Note that you can use the IShellExtInit interface only when you’re writing a handler based on the IContextMenu or IShellPropSheetExt interface, as other Shell extensions based on different interfaces use different initialization methods.
IContextMenu
The IContextMenu interface contains methods for working with the context menu:
{code}class IContextMenu : public IUnknown
{
public:
   virtual HRESULT QueryContextMenu(HMENU hMenu, UINT indexMenu, UINT idCmdFirst, UINT idCmdLast, UINT uFlags) = 0;
   virtual HRESULT InvokeCommand(LPCMINVOKECOMMANDINFO pici) = 0;
   virtual HRESULT GetCommandString(UINT_PTR idCommand, UINT uFlags, UINT *pwReserved, LPSTR pszName, UINT cchMax) = 0;
};
{/code}
The QueryContextMenu method is responsible for adding new menu items to the context menu. This is where you can add logic for creating new menu items. A menu item can be created by the WinApi InsertMenuItem function.
Each menu item is linked to its ID. The idCmdFirst parameter is the minimum ID value that can be assigned to a menu item. Accordingly, idCmdLast is the maximum ID value. It’s important that if a menu item contains a submenu, the submenu items are assigned to IDs created after the ID of the menu item.
The QueryContextMenu method returns the difference between the first and last assigned ID plus 1.
QueryContextMenu is called by Windows Explorer only if the extension is registered for separate file types.
The InvokeCommand method processes clicks on added menu items. Each menu button is identified by the verb value, which is specified while creating the item in QueryContextMenu. Verb is a string with the command name that is executed by the menu item. Verb is given in two versions: with and without the use of Unicode. Therefore, the verb format should be checked before executing a command.
The GetCommandString method is used to obtain a canonical verb name assigned to the menu item. This method is optional and set for Windows XP and earlier versions of Windows. It’s used to display the hint text for the selected menu item in the status bar.
IShellIconOverlayIdentifier
This interface must be implemented by the overlay icon handler:
{code}class IShellIconOverlayIdentifier: public IUnknown
{
public:
   STDMETHOD(GetOverlayInfo)(LPWSTR pwszIconFile, int cchMax, int *pIndex, DWORD* pdw-Flags) = 0;
   STDMETHOD(GetPriority)(int* pPriority) = 0;
   STDMETHOD(IsMemberOf)(LPCWSTR pwszPath, DWORD dwAttrib) = 0;
};
{/code}
The GetOverlayInfo method is used for the first call to the overlay handler in order to add an icon to the system’s list of images. After that, the icon can’t be changed and subsequent calls to GetOverlayInfo must return the path of the file containing the icon and the icon index. The icon index is the serial number of an icon (starting with 0) in the DLL resource list.
If the method returns an error for the first run, the icon will not be loaded, even if subsequent calls to GetOverlayInfo are successful. This can lead to a situation when the handler is working and the icon is not displayed.
The GetPriority method is used to specify the overlay icon’s priority over other icons. Depending on it, the handler can either be a top priority or not. The highest priority is 0.
The IsMemberOf method must contain logic that indicates whether to apply the icon to the given object in Windows Explorer. This method is called in turn for all objects in the current Windows Explorer window when the window is opened and after it’s updated. If you don’t specify any filters here and just return S_OK, the icon will be displayed on all objects in Windows Explorer.
Registering Shell extensions
The logic for registering Windows Shell extensions must be implemented in the DllRegisterServer function. This function is called when installing a Shell extension and is responsible for COM object registration. Accordingly, the DllUnregisterServer function must contain code for deleting records from the registry.
Note that you may receive an 0x80070005 error when you try to register a DLL on Windows XP or Windows Server 2003. This happens because their strict security schemes allow only admins to initiate DLL registration.
The registry hive, which contains information about extensions, differs depending on the type of extension handler. For example, for the shortcut menu handler, the path is as follows:
{code}HKEY_CLASSES_ROOT<file_type>shellexContextMenuHandlersExtensionName
{/code}
The <file_type> parameter may be defined:
- For a specific file type: BMP, DOCX, PNG
- For all file types: *
- For a group of objects: Drive, Directory, Folder, LibraryLocation
The shortcut menu handler must be registered separately for each object type.
The icon overlay handler is registered once using the path:
{code}HKEY_LOCAL_MACHINESoftwareMicrosoftWindowsCurrentVersionExplorerShellIconOverlayIdentifiersExtensionName{/code}
In addition, you need to register the COM component itself:
{code}HKEY_CLASSES_ROOTCLSID<COM_object_GUID>InprocServer32ThreadingModel
{/code}
For example, the DllRegisterServer function, which registers overlay icon handlers and shortcut menu handlers for all file types (“*”), might look like this:
{code}// GUIDs for COM objects
const CLSID kMenuExtCLSID = { 0xa1239638, 0xb2ba, 0xa2c8, { 0xa4, 0x3b, 0xf6, 0xe2, 0x10, 0x81, 0xf, 0x77 } };
const CLSID kOverlayExtCLSID = { 0xa4569638, 0xc2ba, 0x42c8, { 0xb4, 0xfb, 0xc6, 0xe6, 0x10, 0x91, 0xf, 0x23 } };
STDAPI DllRegisterServer(void)
{
    HRESULT hr;
    wchar_t szModule[MAX_PATH];
    if (GetModuleFileName(g_Dll->DllInst(), szModule, ARRAYSIZE(szModule)) == 0)
    {
        hr = HRESULT_FROM_WIN32(GetLastError());
        return hr;
    }
    // register COM object for shortcut menu handler
    hr = RegisterInprocServer(szModule, kMenuExtCLSID, L"AppCustomExtensions", L"Apartment");
    if (SUCCEEDED(hr))
    {
        // register shortcut menu handler
        hr = RegisterShellExtContextMenuHandler(L"*", kMenuExtCLSID, L"ContextMenuExt");
    }
    // register COM object for overlay icon handler
    hr = RegisterInprocServer(szModule, kOverlayExtCLSID, L"AppCustomExtensions", L"Apartment");
    if (SUCCEEDED(hr))
    {
        // register overlay icon handler
        hr = RegisterShellExtOverlayIconHandler(kOverlayExtCLSID, L"OverlayIconExt");
    }
    return hr;
}
{/code}
The RegisterInprocServer, RegisterShellExtContextMenuHandler, and RegisterShellExtOverlayIconHandler functions contain the code for adding new hives and keys to the registry.
Preparing resources for icon overlay handlers
Icons must be prepared to be correctly displayed by Shell extension handlers.
For the context menu, we need a BMP image. Overlay handlers are a bit more complicated: the icon must be in ICO format and support the following dimensions:
- 10×10 (for 16×16)
- 16×16 (for 32×32)
- 24×24 (for 48×48)
- 128×128 (for 256×256)
Overlay handler icons will be displayed in the lower left corner of the main icon and should take up no more than 25% of the file icon (except for 10×10 for 16×16).
When scaling objects in Windows Explorer, the right size will be determined authomatically.
Installing Shell extensions
Shell extensions are installed using the standard Regsvr32 utility. For example:
{code}> regsvr32 C:ExampleShellExtensions.dll
{/code}
When you run this command, the DllRegisterServer function is called, and this function provides extension registration in the registry. All the logic for adding and removing entries from the registry must be implemented by the developer.
After this, the shortcut menu handler immediately begins its work, which can be verified by opening a menu. As for the overlay handler, the icons are not going to appear immediately after registration. In order to download the required resources, you must relaunch Windows Explorer.
Removing Shell extensions
For removing a Shell extension, you can use the same approach used for its installation — namely, Regsvr32:
{code}> regsvr32 /u C:ExampeShellExtensions.dll
{/code}
Meanwhile, when we call the DllUnregisterServer function, the system deletes records from the registry.
After removing the overlay handler, you’ll also need to relaunch Windows Explorer.
Common problems and their solutions
You may face some Windows Shell extension problems when writing Shell extension handlers. Some of these problems are listed below together with ways to overcome them:
1. Overlay icons are not displayed
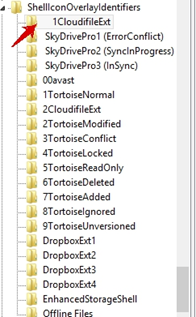
The problem: As described above, this problem may be in the logic of the GetOverlayInfo function. Also, as Windows uses only a limited number of registered overlay icon handlers, all other handlers are simply ignored.
A list of the handlers that won’t be ignored is determined by the name in the registry branch: HKEY_LOCAL_MACHINE Software Microsoft Windows CurrentVersion Explorer ShellIconOverlayIdentifiers. The system takes the first 15 overlay icon handlers in alphabetical order. Therefore, if Dropbox or TortoiseSVN, which record a number of extensions, are installed in the system, they can become a reason for not displaying icons.
How to solve this: Add any character before the overlay handler name during registration. This will make the extension appear at the top of the list of extensions. For example, you can add spaces before the handler name.
2. Issues with displaying icons with transparent backgrounds in the context menu
The problem is in using a BMP image that does not support transparency while you add a new menu item. If you use ICO or PNG files, then the icon will be displayed on a black background after its conversion.
How to solve this: Redraw the ICO to BMP format in the code while the extension is running. For example, the following implementation can be used (with UX-THEME.DLL):
{code}m_beginPainFunc = (BeginPaintFunction)::GetProcAddress(m_hUxTheme,
"BeginBufferedPaint");
m_endPaintFunc = (EndPaintFunction)::GetProcAddress(m_hUxTheme,
"EndBufferedPaint");
  ...
 SIZE iconSize;
        RECT iconRect;
        HBITMAP hBmp = NULL;
        HDC hdcDest = CreateCompatibleDC(NULL);
        // set the icon size
        iconSize.cx = GetSystemMetrics(SM_CXSMICON);
        iconSize.cy = GetSystemMetrics(SM_CYSMICON);
        SetRect(&iconRect, 0, 0, iconSize.cx, iconSize.cy);
        if (hdcDest)
        {
            if (SUCCEEDED(CreateHbitmap(hdcDest, &iconSize, NULL, &hBmp)))
            {
                HBITMAP oldBitmap = (HBITMAP)SelectObject(hdcDest, hBmp);
                if (oldBitmap)
                {
// set the necessary parameters
                    BLENDFUNCTION bfAlpha = { AC_SRC_OVER, 0, 255, AC_SRC_ALPHA };
                    BP_PAINTPARAMS paintParams = {0};
                    paintParams.cbSize = sizeof(paintParams);
                    paintParams.dwFlags = BPPF_ERASE;
                    paintParams.pBlendFunction = &bfAlpha;
// repaint the icon
                    HDC hdcBuffer;
                    HPAINTBUFFER hPaintBuffer = m_beginPainFunc(hdcDest, &iconRect, BPBF_DIB, &paintParams, &hdcBuffer);
                    if (hPaintBuffer)
                    {
                        if (DrawIconEx(hdcBuffer, 0, 0, hIcon, iconSize.cx, iconSize.cy, 0, NULL, DI_NORMAL))
                        {
                            ConvertBufferToPARGB32(hPaintBuffer, hdcDest, hIcon, iconSize);
                        }
                        m_endPaintFunc(hPaintBuffer, TRUE);
                    }
                    SelectObject(hdcDest, oldBitmap);
                }
            }
            DeleteDC(hdcDest);
        }
{/code}
3. Issues with displaying the context menu
There can be several problems associated with the context menu.
The problem: After registering a shell extension for LibraryLocation, the context menu extension is not displayed.
The problem may be in the implementation of the Initialize method in the IShellExtInit interface, which is called to initialize the Shell extension. IdataObject, which is used for receiving objects for which the extension will be displayed, is passed to the Initialize method as a parameter. So when you click on the library folders (Documents, Music, etc.), any attempts to receive the CF_HDROP format objects from it don’t lead to the expected result.
How to solve this: Use the CFSTR_SHELLIDLIST format, which is similar to CF_HDROP but contains PIDL (a pointer to the object ID in the ITEMIDLIST Shell structure) instead of the file path. It allows CFSTR_SHELLIDLIST to process system and virtual file system objects.
{code}Int m_shellIdList = RegisterClipboardFormat(CFSTR_SHELLIDLIST);

IFACEMETHODIMP ContextMenuExt::Initialize(
LPCITEMIDLIST pidlFolder, LPDATAOBJECT pDataObj, HKEY hKeyProgID)
{
    if (pDataObj == NULL)
    {
      return E_INVALIDARG;
    }

    HRESULT hr = E_FAIL;

    // instead of
    // FORMATETC etc = { CF_HDROP, NULL, DVASPECT_CONTENT, -1, TYMED_HGLOBAL };
    FORMATETC fe = { (CLIPFORMAT) m_shellIdList, NULL, DVASPECT_CONTENT, -1, TYMED_HGLOBAL };
    . . .
}
{/code}
The problem: When registering a Shell extension for AllFileSystemObjects, clicking .lnk files adds this Windows Shell extension to the context menu twice.
The problem is that the extension works both for the object and for the link that points to it.
How to solve this: In the QueryContextMenu method of the IContextMenu interface, not only must the CMF_DEFAULTONLY flag be checked but also the context menu extensions should ignore objects with the CMF_NOVERBS and CMF_VERBSONLY flags.
The problem: The context menu extension is not displayed for some types of files, although it can be registered for all types.
The problem may be in the implementation of the QueryContextMenu method of the IcontextMenu interface. In case of successful implementation, it should return HRESULT with a code value equal to the maximum offset of the command identifier that was assigned plus one.
For example, if idCmdFirst equals 5 and 3 more menu items with 5, 7, and 8 command identifiers were added, then the return value should be: MAKE_HRESULT(SEVERITY_SUCCESS, 0, 8 – 5 + 1).
If you forget to add one, the context menu extension will still work but not in all cases.
How to solve it: Make sure the QueryContextMenu method of the IcontextMenu interface is successfully implemented.
4. The problem with starting a thread from DllMain
The problem: When you start a thread in DllMain (for example, to initialize something), there may be problems with DLL unloading using FreeLibrary.
For example, a DLL with Shell extensions loads dynamically in order to unregister extensions manually. At the same time, you start a thread in DllMain to initialize logging. In this case, the DllUnregisterServer is called and successfully unloads the DLL. Then, as you might expect, the system calls FreeLibrary.
In this example, it may happen that a thread called from DllMain either has not completed execution or has not started yet, while a DLL has already been unloaded from the process context. As a result, memory areas are damaged and access violations may occur at any time when there’s a reference to these areas.
How to solve it: Wait for the end of the initialization thread in the exported DLL functions.
Conclusion
In this article, we discussed all types of Windows Shell extensions as well as a general approach to their implementation. In addition, we described the basic steps for creating a shortcut menu and overlay icon handlers. We also examined several pitfalls of implementing these extensions and provided tips on how to overcome them. To get the sample project sources, you can initiate the Windows Shell extension download here.
Apriorit has a team of qualified Windows system developers who can assist you with a Windows project of any complexity. Get in contact with us using the form below!
This time is about shell extensions. Because I am tired to open a console every time when I want to register the Debug dll as shell extension, I was thinking that’s a good idea to right-click the dll to register/unregister.
So here we are! (as stupid Dexters’s sister, DeeDee, said once). You will find here few things you cannot find in MSDN or in other articles.
1. GUID. You can obtain this sinister number running one of the uuidgen or guidgen tools. This is CLSID_DLLRegisterer.
2. The main file, where the DLL’s entry point DllMain resides, is dllregshex.cpp. I prefer to load resources at start and free them at end, especially when are in little number. So, the routines _LoadResources and _UnloadResources do this. The other two interesting routines are DllRegisterServer and DllUnregisterServer. If you use one, be polite to the user and use the twin (I have seen may Reg, but few Unreg). That’s when you did not choose another way (as a .reg file, for example, or separate install/uninstall programs).
So, what’s happening registering a dll as shell context extension? You have to create the entry in CLSID key and to create under this the ‘samename’ key and the thread model key (I read somewhere that only ‘Apartment’ is accepted for context extensions — is really true?).
STDAPI
DllRegisterServer(void)
{
  HINSTANCE hInst = g_hmodThisDll;

  int      i;
  HKEY     hKey;
  LRESULT  lResult;
  DWORD    dwDisp;
  TCHAR    szSubKey[MAX_PATH];
  TCHAR    szCLSID[MAX_PATH];
  TCHAR    szModule[MAX_PATH];
  LPWSTR   pwszShellExt;

  StringFromIID(CLSID_DLLRegisterer, &pwszShellExt);

  if (pwszShellExt)
  {
    WideCharToLocal(szCLSID, pwszShellExt, ARRAYSIZE(szCLSID));

    LPMALLOC pMalloc;
    CoGetMalloc(1, &pMalloc);
    if(pMalloc)
    {
      pMalloc->Free(pwszShellExt);
      pMalloc->Release();
    }
  }

  GetModuleFileName(hInst, szModule, ARRAYSIZE(szModule));
  REGSTRUCT ShExClsidEntries[] =
  {
    HKEY_CLASSES_ROOT, TEXT("CLSID\%s"), NULL, TEXT(DLLREGUNREGNAME),
    HKEY_CLASSES_ROOT, TEXT("CLSID\%s\InProcServer32"), NULL, TEXT("%s"),
    HKEY_CLASSES_ROOT, TEXT("CLSID\%s\InProcServer32"),
	  TEXT("ThreadingModel"), TEXT("Apartment"), NULL, NULL, NULL, NULL
  };

  for(i = 0; ShExClsidEntries[i].hRootKey; i++)
  {
    wsprintf(szSubKey, ShExClsidEntries[i].lpszSubKey, szCLSID);
    lResult = RegCreateKeyEx(ShExClsidEntries[i].hRootKey, szSubKey, 0, NULL,
      REG_OPTION_NON_VOLATILE,  KEY_WRITE, NULL,
      &hKey, &dwDisp);

    if(NOERROR == lResult)
    {
      TCHAR szData[MAX_PATH];
      wsprintf(szData, ShExClsidEntries[i].lpszData, szModule);
      lResult = RegSetValueEx(hKey, ShExClsidEntries[i].lpszValueName, 0,
        REG_SZ,
        (LPBYTE)szData, lstrlen(szData) + 1);
      RegCloseKey(hKey);
    }
    else
      return SELFREG_E_CLASS;
    }
The other entries bind the desired extension (in our case, the DLLs) to our CLSID:
REGSTRUCT OtherShExEntries[] =
{
  HKEY_LOCAL_MACHINE, TEXT("software\classes\clsid\"DLLREGUNREGNAME),
  NULL,   TEXT("%s"),
  HKEY_CLASSES_ROOT,
  TEXT("dllfile\shellex\ContextMenuHandlers\"DLLREGUNREGNAME),
  NULL, TEXT("%s"), NULL, NULL, NULL, NULL
};

for (i = 0; OtherShExEntries[i].hRootKey; i++)
{
  wsprintf(szSubKey, OtherShExEntries[i].lpszSubKey, szCLSID);
  lResult = RegCreateKeyEx(OtherShExEntries[i].hRootKey, szSubKey, 0, NULL,
    REG_OPTION_NON_VOLATILE, KEY_WRITE, NULL, &hKey, &dwDisp);

  if(NOERROR == lResult)
  {
    TCHAR szData[MAX_PATH];
    wsprintf(szData, OtherShExEntries[i].lpszData, szCLSID);
    lResult = RegSetValueEx(hKey, OtherShExEntries[i].lpszValueName, 0,
    REG_SZ,
      (LPBYTE)szData, lstrlen(szData) + 1);
    RegCloseKey(hKey);
  }
  else
    return SELFREG_E_CLASS;
}
A special mention when Windows is NT: register the extension as ‘Approved’:
  OSVERSIONINFO  osvi;
  osvi.dwOSVersionInfoSize = sizeof(osvi);
  GetVersionEx(&osvi);
  if (VER_PLATFORM_WIN32_NT == osvi.dwPlatformId)
  {
    lstrcpy( szSubKey,
    TEXT(
      "Software\Microsoft\Windows\CurrentVersion\Shell Extensions\Approved"
	));
    lResult = RegCreateKeyEx(HKEY_LOCAL_MACHINE, szSubKey, 0, NULL,
      REG_OPTION_NON_VOLATILE, KEY_WRITE,
      NULL, &hKey, &dwDisp);
    if(NOERROR == lResult)
    {
      TCHAR szData[MAX_PATH];
      lstrcpy(szData, DLLREGUNREGNAME);
      lResult = RegSetValueEx(hKey, szCLSID, 0, REG_SZ, (LPBYTE)szData,
	  lstrlen(szData) + 1);
      RegCloseKey(hKey);
    }
    else
      return SELFREG_E_CLASS;
  }

  return S_OK;
}
The unregister routine performs the inverse way. The rest is history: AddRef, Release, QueryInterface.
3. The utils file (dllreg_util.cpp) contains conversion routines. This UNICODE job really kills me, I simply copied one of the 1000 other ways to deal with it.
4. The menu file (dllreg_ctxm.cpp) contains 3 standard routines: QueryContextMenu, which builds the added popup menu and his options, InvokeCommand and GetCommandString — this will show you a simple text on Explorer’ status bar. Nothing unusual.
#include "dllreg_xhdr.h"
#include "dllregshex.h"
#include "dllreg_util.h"
#include "resource.h"

extern UINT      g_cRefThisDll;
extern HINSTANCE   g_hmodThisDll;

extern HBITMAP      hBmp_Install;
extern HBITMAP      hBmp_Uninstall;
extern HBITMAP      hBmp_About;
extern HMENU      hSubMenu;


STDMETHODIMP
CShellExt::QueryContextMenu(HMENU hMenu, UINT indexMenu, UINT idCmdFirst,
  UINT idCmdLast, UINT uFlags)
{
  _UNUSED_PARAMETER(idCmdLast);
  UINT idCmd = idCmdFirst;

  char *szMenuText_Popup   = "Shell e&xtension";
  char *szMenuText_Install   = "&Install";
  char *szMenuText_Uninstall   = "&Uninstall";
  char *szMenuText_About   = "&About...";

  BOOL bAppendItems = TRUE;

  if((uFlags & 0x000F) == CMF_NORMAL)
    bAppendItems = TRUE;
  else if (uFlags & CMF_VERBSONLY)
    bAppendItems = TRUE;
  else if (uFlags & CMF_EXPLORE)
    bAppendItems = TRUE;
  else
    bAppendItems = FALSE;

  if(bAppendItems)
  {
    InsertMenu(hMenu, indexMenu++, MF_SEPARATOR | MF_BYPOSITION, 0, NULL);

    HMENU hSubMenu = CreateMenu();
    if(hSubMenu)
    {
      InsertMenu(hSubMenu, 0, MF_STRING    | MF_BYPOSITION, idCmd++,
	    szMenuText_Install);
      SetMenuItemBitmaps(hSubMenu, 0, MF_BYPOSITION, hBmp_Install,
	    hBmp_Install);
      InsertMenu(hSubMenu, 1, MF_STRING | MF_BYPOSITION, idCmd++,
	    szMenuText_Uninstall);
      SetMenuItemBitmaps(hSubMenu, 1, MF_BYPOSITION, hBmp_Uninstall,
	    hBmp_Uninstall);

      InsertMenu(hSubMenu, 2, MF_SEPARATOR | MF_BYPOSITION, 0, NULL);

      InsertMenu(hSubMenu, 3, MF_STRING    | MF_BYPOSITION, idCmd++,
	    szMenuText_About);
      SetMenuItemBitmaps(hSubMenu, 3, MF_BYPOSITION, hBmp_About, hBmp_About);
    }

    InsertMenu(hMenu, indexMenu++, MF_STRING | MF_POPUP | MF_BYPOSITION,
      (UINT_PTR)hSubMenu, szMenuText_Popup);
    InsertMenu(hMenu, indexMenu++, MF_SEPARATOR | MF_BYPOSITION, 0, NULL);

    return ResultFromShort(idCmd - idCmdFirst);
  }

  return NOERROR;
}

STDMETHODIMP
CShellExt::InvokeCommand(LPCMINVOKECOMMANDINFO lpcmi)
{
  HRESULT hr = E_INVALIDARG;
  if (!HIWORD(lpcmi->lpVerb))
  {
    UINT idCmd = LOWORD(lpcmi->lpVerb);
    switch (idCmd)
    {
      case 0:
        hr = DoInstall(lpcmi->hwnd, lpcmi->lpDirectory,
		  lpcmi->lpVerb, lpcmi->lpParameters, lpcmi->nShow);
        break;
      case 1:
        hr = DoUninstall(lpcmi->hwnd, lpcmi->lpDirectory,
		  lpcmi->lpVerb, lpcmi->lpParameters, lpcmi->nShow);
        break;
      case 2:
        hr = DoAbout(lpcmi->hwnd, lpcmi->lpDirectory,
		  lpcmi->lpVerb, lpcmi->lpParameters, lpcmi->nShow);
        break;
      default:
        break;
    }
  }
  return hr;
}

STDMETHODIMP
CShellExt::GetCommandString(UINT idCmd, UINT uFlags, UINT FAR *reserved,
  LPSTR pszName, UINT cchMax)
{
  _UNUSED_PARAMETER(reserved);
  _UNUSED_PARAMETER(uFlags);

  *pszName = 0;
  cchMax   = 40;
  char psz[40];

  switch (idCmd)
  {
    case 0:
      LoadString(g_hmodThisDll, IDCMD_INSTALL, psz, cchMax);
      break;
    case 1:
      LoadString(g_hmodThisDll, IDCMD_UNINSTALL, psz, cchMax);
      break;
    case 2:
      LoadString(g_hmodThisDll, IDCMD_ABOUT, psz, cchMax);
      break;
    default:
      break;
  }
  wcscpy((unsigned short *)pszName, _WCSTR(psz));
  return NOERROR;
}
5. The most interesting stuff is contained in file dllreg_job.cpp, and this is the _GetFullFileName function. The others are handled in one routine, which simply format a command line using the regsvr32.exe tool (_DoRegisterJob)
STDMETHODIMP
CShellExt::_GetFullFileName()
{
  HRESULT hr = S_FALSE;


  IEnumFORMATETC *pefEtc = 0;
  hr = m_pDataObj->EnumFormatEtc(DATADIR_GET, &pefEtc);
  if(SUCCEEDED(hr))
  {
    hr = pefEtc->Reset();

    if(SUCCEEDED(hr))
    {


      FORMATETC fEtc;
      ULONG ulFetched = 0L;

      while(TRUE)
      {
        hr = pefEtc->Next(1, &fEtc, &ulFetched);
        if(FAILED(hr) || (ulFetched <= 0))
          break;


        fEtc.cfFormat   = CF_HDROP;
        fEtc.dwAspect   = DVASPECT_CONTENT;
        fEtc.lindex      = -1;
        fEtc.ptd      = NULL;
        fEtc.tymed      = TYMED_HGLOBAL;


        STGMEDIUM stgM;
        hr = m_pDataObj->GetData(&fEtc, &stgM);
        if(SUCCEEDED(hr))
        {
          if(stgM.tymed == TYMED_HGLOBAL)
          {
            m_ppszFileUserClickedOn[0] = '';

            UINT nFileCount = DragQueryFile((HDROP)stgM.hGlobal,
              (UINT)INVALID_HANDLE_VALUE, NULL, 0);
            if(nFileCount >= 1)
            {
              if(m_ppszFileUserClickedOn)
              {
                DeleteFileData();
              }

              m_ppszFileUserClickedOn = new LPTSTR[nFileCount];

              for(register UINT x = 0; x < nFileCount; x++)
              {
                m_ppszFileUserClickedOn[x] = new TCHAR[_MAX_PATH + 1];


                DragQueryFile((HDROP)stgM.hGlobal, x,
                  m_ppszFileUserClickedOn[x], _MAX_PATH + 1);
              }

              m_xFileCount = nFileCount;
            }
          }
        }
      }
    }
  }

  if(pefEtc)
    pefEtc->Release();
  return hr;
}
-

Bobs
New Member
- Публикаций:
-
0
- Регистрация:
- 10 июл 2005
- Сообщения:
- 13
Собственно, сабж. Интересует программная реализация сего действа. Наверняка кто-то делал, подскажите, плиз.
-
Bobs
New Member
- Публикаций:
-
0
- Регистрация:
- 10 июл 2005
- Сообщения:
- 13
Свои ключи ExeCryptor в разделе HKEY_CURRENT_USERSoftwareMicrosoftWindowsCurrentVersionShell ExtensionsApproved. Проблема в том, что они «скрытые» и обычниыми API их не удалить — RegDeleteKey и SHDeleteKey…
-
Bobs
«Скрытые» это значит что юникодовские строки ?
Тогда натив можно заюзать. -
Bobs
New Member
- Публикаций:
-
0
- Регистрация:
- 10 июл 2005
- Сообщения:
- 13
Нет, «скрытые» здесь означает, что ключ нельзя ни открыть, ни удалить стандартным regedit.
-
Bobs
Возможно нет прав. Попробуйте стать владельцем ключа — right click -> permissions.
Или они невидимые? -
Bobs
Сказал ведь, используй натив. Винапи не может работать с такими строками, например если в конце два нуля, поэтому регэдит и не отображает. -
Bobs
New Member
- Публикаций:
-
0
- Регистрация:
- 10 июл 2005
- Сообщения:
- 13
Извиняюсь за тупой вопрос, но что значит натив? Какой-нибудь пример можно.
-
NtOpenKey, NtDeleteKey etc.
-
Bobs
New Member
- Публикаций:
-
0
- Регистрация:
- 10 июл 2005
- Сообщения:
- 13
Clerk
То есть, я так понимаю, удаление такого ключа возможно только посредством драйвера? -
_tmp17628
New Member
- Публикаций:
-
0
- Регистрация:
- 7 фев 2009
- Сообщения:
- 144
Bobs
ZwOpenKey, ZwDeleteKey etc -
netuser
Юрий
- Публикаций:
-
0
- Регистрация:
- 21 янв 2008
- Сообщения:
- 166
Bobs
Я так понял, адрес ключа известен, вот только удалить его даже с правами админа не удаётся. Попробуй воспользоваться стандартным планировщиком с правами system, который позволяет просматривать и модифицировать все ветви реестра без исключения, защищенные в том числе. -
Bobs
New Member
- Публикаций:
-
0
- Регистрация:
- 10 июл 2005
- Сообщения:
- 13
netuser
Ключ этот можно удалить и посредством программы Registry Trash Keys Finder, она находит ключи этого протектора, и даже позволяет просматривать содержимое ключей и удалять такие ключи. У меня же появилась необходимость реализовать это в своей программе, и я не знаю как это сделать, если только не писать драйвер. -
Это многих вводит в заблуждение, думою следует обьяснить.
Это сервисы, не правильно говорить о них как об экспортах, правильно говорить как об идентификаторах.
NtOpenKey подразумевает под собой ID сервиса, а это число посредством которого он и будет вызван(индекс в таблице дескрипторов), например для вызова тогоже NtOpenKey мы можем использовать код:Сдесь 0x77 это и есть идентификатор сервиса NtOpenKey.
Также подразумевать под NtOpenKey функцию будет не совсем верно, так как функция имеет некоторую модель вызова, поэтому её конвенция вызова относительна. Относительно экспорта она будет одной, относительно шлюза совсем другой. В юзермоде экспортируются переходники(заглушки, стубы) для вызова сервиса Zw* и Nt*, они имеют общую точку входа. Ядерные хэндлеры сервисов имеют сответственно имена Nt*. Также неверно говорить про соответствие имени хэндлера сервиса в ядре и экспортируемого стуба в юзермоде. Некоторые считают что для для хэндлера сервиса в ядре(Nt*) соответствующий стуб в ntdll будет иметь имя Zw*, это не верно, например в некоторых версиях сервис NtSuspendProcess не имеет соответствующего стуба ZwSuspendProcess, но имется экспортируемый стуб с именем NtSuspendProcess. Обычно если говорят про сервис, то говорят имя его ядерного обработчика Nt* и для юзермода подразумевают его индекс.
Думою понятно обьяснил. -
seeQ
New Member
- Публикаций:
-
0
- Регистрация:
- 3 сен 2003
- Сообщения:
- 71
все верно, execryptor использует строки с «00».
-
Coderess
New Member
- Публикаций:
-
0
- Регистрация:
- 28 окт 2008
- Сообщения:
- 41
-
.text:7C929C87 public RtlpNtOpenKey
-
.text:7C929C87 RtlpNtOpenKey proc near
-
.text:7C929C87 arg_0 = dword ptr 8
-
.text:7C929C87 arg_4 = dword ptr 0Ch
-
.text:7C929C87 arg_8 = dword ptr 10h
-
.text:7C929C87 mov edi, edi
-
.text:7C929C8A mov ebp, esp
-
.text:7C929C8C mov eax, [ebp+arg_8]
-
.text:7C929C8F test eax, eax
-
.text:7C929C91 jz short loc_7C929C97
-
.text:7C929C93 and dword ptr [eax+0Ch], 0FFFFFFCFh
-
.text:7C929C97 loc_7C929C97: ; CODE XREF: RtlpNtOpenKey+Aj
-
.text:7C929C98 push [ebp+arg_4]
-
.text:7C929C9B push [ebp+arg_0]
-
.text:7C929C9E call ZwOpenKey
-
.text:7C929CA4 RtlpNtOpenKey endp
-
.text:7C90DD3C public ZwOpenKey
-
.text:7C90DD3C ZwOpenKey proc near ; CODE XREF: RtlOpenCurrentUser+43p
-
.text:7C90DD3C ; sub_7C91D18E+F1p …
-
.text:7C90DD3C mov eax, 77h ; NtOpenKey
-
.text:7C90DD41 mov edx, 7FFE0300h
-
.text:7C90DD46 call dword ptr [edx]
-
.text:7C90DD48 ZwOpenKey endp
Clerk почему такой вызов? и не sysenter
-
Coderess
Этот универсальнее, впрочем какая разница.
По адресу 0x7FFE0300 указатель на KiFastSystemCall, а она загружает в Edx указатель на стек и юзоет сервис посредством Sysenter, если процессор её не поддерживает то будет вызов через прерывание.

Способы Автозапуска
Ключи реестра и места на диске, с помощью которых могут запускаться автоматически программы или зловреды, при каждой загрузке системы
Logon
Начало сеанса. Все что требуется чтобы загрузилась система
%SystemDrive%Documents and SettingsAll UsersStart MenuProgramsStartup
%SystemDrive%Documents and Settings<username>Start MenuProgramsStartup
HKLMSOFTWAREMicrosoftWindowsCurrentVersionExplorerShell Folders, Common Startup
HKLMSOFTWAREMicrosoftWindowsCurrentVersionExplorerShell Folders, Common AltStartup
HKLMSOFTWAREMicrosoftWindowsCurrentVersionExplorerUser Shell Folders, Common Startup
HKLMSOFTWAREMicrosoftWindowsCurrentVersionExplorerUser Shell Folders, Common AltStartup
HKCUSoftwareMicrosoftWindowsCurrentVersionExplorerShell Folders, Startup
HKCUSoftwareMicrosoftWindowsCurrentVersionExplorerShell Folders, AltStartup
HKCUSoftwareMicrosoftWindowsCurrentVersionExplorerUser Shell Folders, Startup
HKCUSoftwareMicrosoftWindowsCurrentVersionExplorerUser Shell Folders, AltStartup
—
HKLMSOFTWAREMicrosoftWindowsCurrentVersionRun
HKCUSoftwareMicrosoftWindowsCurrentVersionRun
HKLMSOFTWAREMicrosoftWindowsCurrentVersionRunOnce
HKLMSOFTWAREMicrosoftWindowsCurrentVersionRunOnceEx
HKCUSoftwareMicrosoftWindowsCurrentVersionRunOnce
HKLMSOFTWAREMicrosoftWindowsCurrentVersionRunServices
HKLMSOFTWAREMicrosoftWindowsCurrentVersionRunServicesOnce
HKCUSoftwareMicrosoftWindowsCurrentVersionRunServices
—
HKCUSoftwareMicrosoftWindows NTCurrentVersionWindows, load
HKCUSoftwareMicrosoftWindows NTCurrentVersionWindows, run
—
HKLMSOFTWAREMicrosoftWindowsCurrentVersionPoliciesExplorer, run
HKCUSoftwareMicrosoftWindowsCurrentVersionPoliciesExplorer, run
HKLMSOFTWAREMicrosoftWindowsCurrentVersionPoliciesSystem, shell
HKCUSoftwareMicrosoftWindowsCurrentVersionPoliciesSystem, shell
—
HKLMSOFTWAREPoliciesMicrosoftWindowsSystemScriptsStartup
HKLMSOFTWAREPoliciesMicrosoftWindowsSystemScriptsShutdown
HKCUSoftwarePoliciesMicrosoftWindowsSystemScriptsLogon
HKCUSoftwarePoliciesMicrosoftWindowsSystemScriptsLogoff
—
HKLMSYSTEMCurrentControlSetControlTerminal ServerWdsrdpwd, StartupPrograms
—
HKLMSOFTWAREMicrosoftWindows NTCurrentVersionTerminal ServerInstallSoftwareMicrosoftWindowsCurrentVersionRunonce
HKLMSOFTWAREMicrosoftWindows NTCurrentVersionTerminal ServerInstallSoftwareMicrosoftWindowsCurrentVersionRunonceEx
HKLMSOFTWAREMicrosoftWindows NTCurrentVersionTerminal ServerInstallSoftwareMicrosoftWindowsCurrentVersionRun
HKCUSoftwareMicrosoftWindows NTCurrentVersionTerminal ServerInstallSoftwareMicrosoftWindowsCurrentVersionRunonce
HKCUSoftwareMicrosoftWindows NTCurrentVersionTerminal ServerInstallSoftwareMicrosoftWindowsCurrentVersionRunonceEx
HKCUSoftwareMicrosoftWindows NTCurrentVersionTerminal ServerInstallSoftwareMicrosoftWindowsCurrentVersionRun
—
%WinDir%system.ini
%WinDir%win.ini
HKLMSOFTWAREMicrosoftWindows NTCurrentVersionIniFileMappingsystem.ini
HKLMSOFTWAREMicrosoftWindows NTCurrentVersionIniFileMappingwin.ini
Winlogon
WINLOGON.EXE — процесс, ответственный за начало ( logon) сеанса и завершение сеанса ( logoff) пользователя. Процесс активируется только после пользователем кнопок CTRL+ALT+DEL и демонстрирует диалоговое окно для ввода пароля.
Файл WINLOGON.EXE всегда расположен в C:WindowsSystem32. В случае обнаружения этого файла в любом другом каталоге он должен быть незамедлительно удален. В настоящее время известно более сотни вирусов (например W32.Neveg.A@mm, Spyware.CMKeyLogger, W32/Netsky-D и множество других), использующих имя WINLOGON.EXE для сокрытия своего присутствия в системе.
HKLMSOFTWAREMicrosoftWindows NTCurrentVersionWinlogonNotify
—
HKLMSOFTWAREMicrosoftWindows NTCurrentVersionWinlogonGPExtensions
—
HKLMSOFTWAREMicrosoftWindows NTCurrentVersionWinlogon, AppSetup
HKLMSOFTWAREMicrosoftWindows NTCurrentVersionWinlogon, GinaDLL
HKLMSOFTWAREMicrosoftWindows NTCurrentVersionWinlogon, System
HKLMSOFTWAREMicrosoftWindows NTCurrentVersionWinlogon, Taskman
HKLMSOFTWAREMicrosoftWindows NTCurrentVersionWinlogon, UIHost
HKLMSOFTWAREMicrosoftWindows NTCurrentVersionWinlogon, VmApplet
HKLMSOFTWAREMicrosoftWindows NTCurrentVersionWinlogon, Userinit
HKLMSOFTWAREMicrosoftWindows NTCurrentVersionWinlogon, shell
HKCUSoftwareMicrosoftWindows NTCurrentVersionWinlogon, shell
—
HKCUControl PanelDesktop, SCRNSAVE.EXE
—
HKLMSYSTEMCurrentControlSetControlBootVerificationProgram, ImageName
AppInit DLLs
Файлы (.dll), которые прописываются в этот ключ, загружаются в каждое Windows-приложение, использующее библиотеку user32.dll.
С опаской нужно относиться к тому, что здесь прописывается. Но при этом учитывать, что здесь могут быть прописаны программы, связанные с безопасностью компьютера: например, Outpost (wl_hook.dll), BitDefender (sockspy.dll) или Kaspersky (adialhk.dll)
HKLMSOFTWAREMicrosoftWindows NTCurrentVersionWindows, Appinit_Dlls
Explorer
Explorer.exe. Данный процесс является пользовательской оболочкой, которая отвечает за такие компоненты как Панель задач, Рабочий стол и так далее. Этот процесс не столь важен для работы Windows и может быть остановлен (и перезапущен) с помощью Диспетчера задач, как правило, без отрицательных побочных эффектов.
HKLMSOFTWAREClassesProtocolsFilter
HKLMSOFTWAREClassesProtocolsHandler
—
HKCUSoftwareMicrosoftInternet ExplorerDesktopComponents
—
HKLMSOFTWAREMicrosoftActive SetupInstalled Components
HKCUSoftwareMicrosoftActive SetupInstalled Components
—
HKLMSOFTWAREMicrosoftWindowsCurrentVersionExplorerSharedTaskScheduler
—
HKLMSOFTWAREMicrosoftWindowsCurrentVersionExplorerShellExecuteHooks
—
HKLMSOFTWAREMicrosoftWindowsCurrentVersionShellServiceObjectDelayLoad
HKCUSoftwareMicrosoftWindowsCurrentVersionShellServiceObjectDelayLoad
—
HKLMSOFTWAREMicrosoftWindowsCurrentVersionShell ExtensionsApproved
HKCUSoftwareMicrosoftWindowsCurrentVersionShell ExtensionsApproved
—
HKLMSOFTWAREClassesFoldershellexColumnHandlers
HKCUSoftwareClassesFoldershellexColumnHandlers
—
HKLMSOFTWAREMicrosoftCtfLangBarAddin
HKCUSoftwareMicrosoftCtfLangBarAddin
Internet Explorer
Все что запускает и может применить Вам в помощь браузер Internet Explorer
HKLMSOFTWAREMicrosoftWindowsCurrentVersionExplorerBrowser Helper Objects
—
HKCUSoftwareMicrosoftInternet ExplorerUrlSearchHooks
—
HKLMSOFTWAREMicrosoftInternet ExplorerToolbar
—
HKLMSOFTWAREMicrosoftInternet ExplorerExplorer Bars
HKCUSoftwareMicrosoftInternet ExplorerExplorer Bars
—
HKLMSOFTWAREMicrosoftInternet ExplorerExtensions
HKCUSoftwareMicrosoftInternet ExplorerExtensions
—
HKCUSOFTWAREMicrosoftInternet ExplorerMenuExt
—
HKLMSOFTWAREMicrosoftInternet ExplorerPlugins
—
HKLMSOFTWAREMicrosoftCode Store DatabaseDistribution Units
%WinDir%Downloaded Program Files
—
HKLMSOFTWAREMicrosoftWindowsCurrentVersionURLPrefix
HKLMSOFTWAREMicrosoftWindowsCurrentVersionURLDefaultPrefix
Services
HKLMSYSTEMCurrentControlSetServices
HKLMSYSTEMControlSet001Services
HKLMSYSTEMControlSet002Services
HKLMSYSTEMControlSet003Services
Drivers
HKLMSYSTEMCurrentControlSetServices
HKLMSYSTEMControlSet001Services
HKLMSYSTEMControlSet002Services
HKLMSYSTEMControlSet003Services
Boot Execute
Параметр BootExecute реестра содержит одну или несколько команд, которые Диспетчер сеансов выполняет перед загрузкой сервисов. Значением по умолчанию для этого элемента является Autochk.exe
HKLMSYSTEMCurrentControlSetControlSession Manager, BootExecute +
HKLMSYSTEMCurrentControlSetControlSession Manager, Execute
HKLMSYSTEMCurrentControlSetControlSession Manager, SetupExecute
Print Monitors
HKLMSYSTEMCurrentControlSetControlPrintMonitors
Known Dlls
Эти библиотеки загружаются во все процессы, запускаемые системой
HKLMSYSTEMCurrentControlSetControlSession ManagerKnownDlls
Lsa Providers
HKLMSYSTEMCurrentControlSetControlLsa, Authentication Packages
HKLMSYSTEMCurrentControlSetControlLsa, Notification Packages
HKLMSYSTEMCurrentControlSetControlLsa, Security Packages
—
HKLMSYSTEMCurrentControlSetControlSecurityProviders, SecurityProviders
Network Providers
Поставщики Network. Поставщик сетевых услуг
HKLMSYSTEMCurrentControlSetControlNetworkProviderOrder
WinSock Providers
HKLMSYSTEMCurrentControlSetServicesWinSock2ParametersProtocol_Catalog9
HKLMSYSTEMCurrentControlSetServicesWinSock2ParametersNameSpace_Catalog5
Image File Execution Options(Debugger)
HKLMSOFTWAREMicrosoftWindows NTCurrentVersionImage File Execution Options
Command Processor
HKLMSOFTWAREMicrosoftCommand Processor, AutoRun
HKCUSoftwareMicrosoftCommand Processor, AutoRun
Associations
HKLMSOFTWAREClasses*shellopencommand
HKCUSoftwareClasses*shellopencommand
Апплеты панели управления (Control Panel Libraries)
%WinDir%system32
HKLMSOFTWAREMicrosoftWindowsCurrentVersionControl PanelCpls
MVB
HKCUControl PanelIOProcs, MVB
Applications
HKLMSOFTWAREMicrosoftWindows NTCurrentVersionAccessibilityUtility Manager
HKLMSOFTWAREMicrosoftWindowsCurrentVersionExplorerMyComputerBackupPath
HKLMSOFTWAREMicrosoftWindowsCurrentVersionExplorerMyComputerCleanuppath
HKLMSOFTWAREMicrosoftWindowsCurrentVersionExplorerMyComputerDefragPath
HKLMSOFTWAREMicrosoftWindows NTCurrentVersionAeDebug, Debugger
HKLMSOFTWAREMicrosoftWindows Script Host
—
Task Scheduler: %WinDir%Tasks
ICQ Agent Autostart Apps
HKCUSoftwareMirabilisICQAgentApps
источник