Spatial Media Metadata Injector v2.1
August 27, 2018
Simplified UI for easier injecting.
Release notes
Additions
- Added support for an additional non-diegetic (head-locked) stereo track in the Spatial Audio stream
- Added support for VR180 video format
Bug fixes
- Improved pose description and new stereo metadata
- Other bug fixes and improvements
OS X release notes
The OS X release requires a Mac with an Intel Core 2 processor or newer, running OS X 10.13 High Sierra or newer.
Windows release notes
The Windows release requires a 64-bit version of Windows. If you’re using a 32-bit version of Windows, you can still run the metadata injector from the Python source code as follows:
- Install Python.
- Download and extract the metadata injector source code.
- From the «spatialmedia» directory in Windows Explorer, double click on «gui». Alternatively, from the command prompt, change to the «spatialmedia» directory, and run «python gui.py».
Spatial Media Metadata Injector
June 28, 2016
Simplified UI for easier injecting.
OS X release notes
The OS X release requires a Mac with an Intel Core 2 processor or newer, running OS X 10.8 Mountain Lion or newer.
Windows release notes
The Windows release requires a 64-bit version of Windows. If you’re using a 32-bit version of Windows, you can still run the metadata injector from the Python source code as follows:
- Install Python 2.
- Download and extract the metadata injector source code.
- From the «spatialmedia» directory in Windows Explorer, double click on «gui». Alternatively, from the command prompt, change to the spatialmedia directory, and run «python gui.py».
Содержание
- 1 Пара слов о виртуальной реальности
- 2 Конвертируем фотопанораму в виртуальную реальность
- 2.1 Подготавливаем сферическую панораму
- 2.2 Конвертируем в видеофайл MPEG-4
- 2.3 Прописываем метатеги 360° видео
- 2.4 Загрузка VR-контента на Youtube или FaceBook
Сферические панорамы (виртуальные 3D туры) стали чуть ли не обязательным атрибутом сайтов: все хотят показать своим посетителям свои витрины, свои офисы и кабинеты, свой товар, территорию и т.д.
Сферические панорамы создаются, как правило, продвинутыми фотографами обработкой серии исходных снимков и их соединением в единое изображение – эквидистантную проекцию панорамы. Иногда специальной камерой, которая смотрит во все стороны и фотографирует панораму за один раз!
Если панорам много, из них делают тур — серию последовательных панорам, в каждую сферическую панораму добавляются возможности перехода из одной панорамы в другую, можно наложить музыку, текст и другое рекламное оформление.
Такие 3D туры вы наверняка много раз встречали на сайтах в интернете. В одно время они были диковинкой, теперь же удивить 3D панорамой сложно. Учитывая, что технология их создания сильно эволюционировала и созданием 3D панорам (на заказ) стали промышлять даже школьники.
Но технологии не стоят на месте! Что делать с вашей 3D панорамой на сайте (кроме как добавления на сайт и в Google maps)? Давайте «оживим» такие панорамы и перенесем их в виртуальную реальность! Саму панораму при этом переснимать нет необходимости.
Пара слов о виртуальной реальности
Виртуальная реальность (virtual reality, VR) уже стала реальностью: при использовании специальных гарнитур (например Google Cardboard) можно смотреть панорамный контент и играть в игры. В такой виртуальной реальности вы находитесь в центре события, можете смотреть вокруг себя, вверх, вниз.
О том, что данная область сильно развивается, свидетельствует ряд очевидных фактов: появление на рынке специальных устройств для съемок и воспроизведения VR-контента, сильный рост специализированного ПО (можно проследить лишь для линейки Android), поддержка VR-контента на Youtube (боюсь ошибиться, но вроде с марта 2015 года) и даже FaceBook.
Таким образом, если 360° видео поддерживается на Youtube и FaceBook почему не воспользоваться этой возможностью и не вдохнуть новую жизнь в свою 3D панораму?
Конвертируем фотопанораму в виртуальную реальность
Для конвертации 3D панорамы в VR-контент для Youtube и FaceBook, нам потребуется:
- сферическая панорама (фотография вашей панорамы, обычно в jpg);
- видеоредактор (Pinnacle Studio или любой бесплатный аналог);
- приложение «360 Video Metadata» (программа для записи метаданных в видеофайл, без них VR панорама работать не будет) — ссылка на программу будет ниже;
Подготавливаем сферическую панораму
Достаем свою сферическую панораму. Это одна цельная фотографию из вашего 3D тура (как правило в формате jpg). Если у вас нет цельного файла панорамы (в зависимости от используемого ПО, ваш 3D тур может состоять из отдельных фрагментов фотографии), вам придется «сшить» панораму из этих лоскутков (можно программой Image Composite Editor от Microsoft). У вас должна получится одна фотография, где края сшиваются (являются продолжением один другого). Пример:

Конвертируем в видеофайл MPEG-4
Запускаем видеоредактор, создаем новый фильм, на шкалу времени перетягиваем фотографию нашей панорамы, накладываем музыку, регулируем время воспроизведения видео.

Особо хочу обратить внимание на черные зоны (красными стрелками на скрине), которых у вас не должно быть! Они могут появится в зависимости от разрешения фотографии и настроек окна видеоредактора. Вы должны устранить (используя тонкие настройки видеоэффектов в настройках видеоредактора) эти черные зоны (растянуть изображение на полный экран) иначе эти зоны появятся на вашей конечной VR-панораме как грубые черные пятна вверху и внизу.
Сохраняем фильм в формате MPEG-4, разрешение ставим максимальное поддерживаемое редактором (очень часто это 4K — 3656 × 2664 или 4096 × 3072 (полнокадровый 4K). На выходе получаем какой-нибудь moy_film.mp4 (названием фильма сохраняем именно английскими буквами, так как на следующем этапе возникнут ошибки).
Прописываем метатеги 360° видео
Перед тем как загрузить видеофайл на Youtube или FaceBook, мы должны сообщить им, что это необычное видео, а сферическое (содержит VR-контент). Это делается специальными метатегами, которые нужно вставить в видеофайл. Сделать это можно программой «360 Video Metadata» (качаем для Mac или Windows).
Скачиваем программу, разархивируем, запускаем Spatial Media Metadata Injector.exe

Нажмите Open — выберите свой видеофайл (в нашем примере: moy_film.mp4)
Поставьте флажок только на первом пункте (My video is spherical 360)
Нажмите «Inject metadata«, вам предложит сохранить файл в той же папке как moy_film_injected.mp4.
Сохраните файл. moy_film_injected.mp4 — это и есть ваш видеофайл, который можно грузить на Youtube или FaceBook.
Загрузка VR-контента на Youtube или FaceBook
Видео, подготовленное подобным образом, можно грузить на Youtube или FaceBook как обычный видеоролик. Внимание: никаких дополнительных опций при загрузке или редактировании видео указывать не надо. Вы уже все прописали программой «360 Video Metadata«. Дождитесь полной загрузки видеоролика и его обработки (потребуется некоторое время). Результатом вашей успешной работы будут стрелки навигации на видеоролике в верхнем левом углу, а само видео сможете вращать как и обычную панораму (если смотреть с обычного браузера). Пример VR-панорамы (сделан для стоматологической клиники ЮлиСТОМ в Санкт-Петербурге):
Собственно и все! Мы только что сделали из обычной фотопанорамы VR-панораму для виртуальной реальности (подойдет для загрузки на Youtube или FaceBook) . Те пользователи интернета, у которых есть возможность погрузиться в этот виртуальный мир смогут по настоящему очутиться в центре этой панорамы и осмотреться вокруг!
Old test results
The test results for this version are very old, and as such they may not represent the current state of Wine. Please consider submitting a new test report.
Selected Test Results
What works
The app opened in Linux through this Wine configuration as if using Windows OS; it wouldn’t even open otherwise.
What does not
In order to be able to run the .exe file, there is need to create a 64-bit virtual drive which simulates Windows 10, using a default Wine Version: System
Workarounds
Install a non-listed program,
select the .exe file (unzip from the downloaded),
create a new virtual drive and make it run in 64-bit.
Go to Configure button and find and select the newly created drive,
at General label, make sure Wine Version: System
at Wine label, click Wine Configure button, at Applications label, Windows Version: Windows 10.
Again in Configure, find and select the newly created drive,
at General label, Make a shortcut from this virtual drive and browse for the file:
Spatial Media Metadata Injector.exe
What was not tested
Didn’t test out the app functions («metadata injections»), but it opened properly.
Hardware tested
Graphics:
- GPU: Nvidia
- Driver: unknown
Additional Comments
selected in Test Results table below
| Operating system | Test date | Wine version | Installs? | Runs? | Used Workaround? |
Rating | Submitter | ||
| Current | Ubuntu 18.04 «Bionic» amd64 (+variants like Kubuntu) | Oct 25 2018 | 3.0.3 | Yes | Yes | Yes | Gold | Glak |
In this article, I will show you how to create a 360 VR video in Unity with the help of two tools:
- Unity Recorder
- Google Spatial Media Metadata Injector
This technique can be used to create 360 VR videos for any scene inside Unity. For demonstration purposes, I will be using the free Apartment Kit asset available in the Unity Asset Store, and this is what you will get after following the steps in this article.
Play the YouTube video and swipe across the video player to get a 360 view of the apartment.👇
Let’s get started:
- Project setup
- Record a 360 VR Video of any scene in Unity
- Add 360 capability to a video using Google’s Spatial Media Meta Data Injector
Additionally, here’s the full video tutorial:
Project setup
If you haven’t done so already, create a new Unity 3D project and name it “VR 360 Apartment.”
You can do so by launching Unity Hub on your computer and clicking New Project.
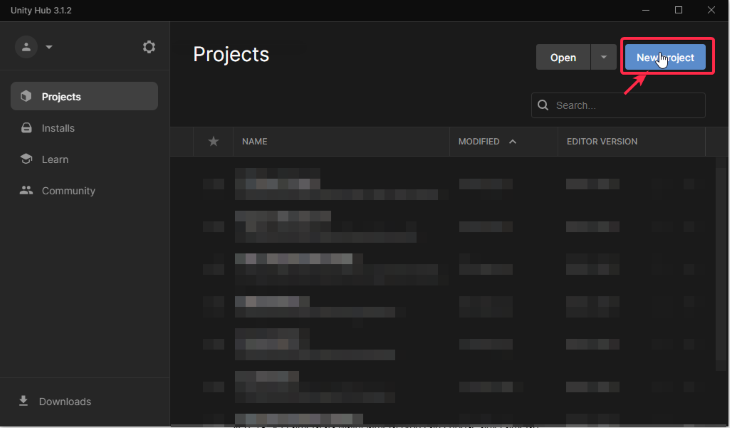
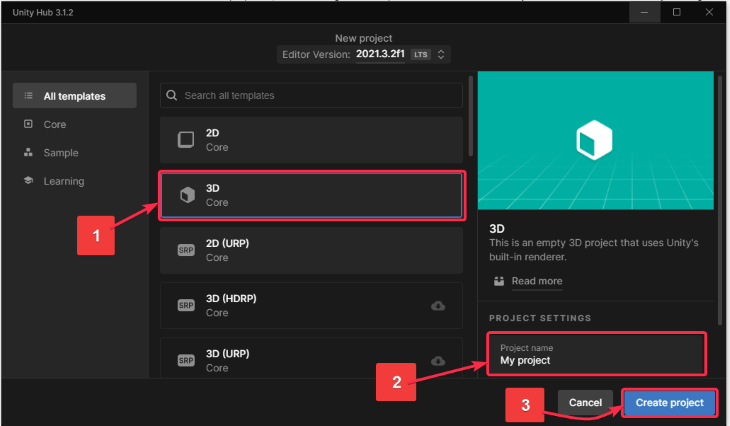
After clicking on New Project, the below window pops up. To ensure that we are creating a 3D project, do the following steps:
- Select 3D from the templates
- Update the Project Name from My Project to VR 360 Apartment
- Click the Create Project button
The project will take a few minutes to open up in Unity.
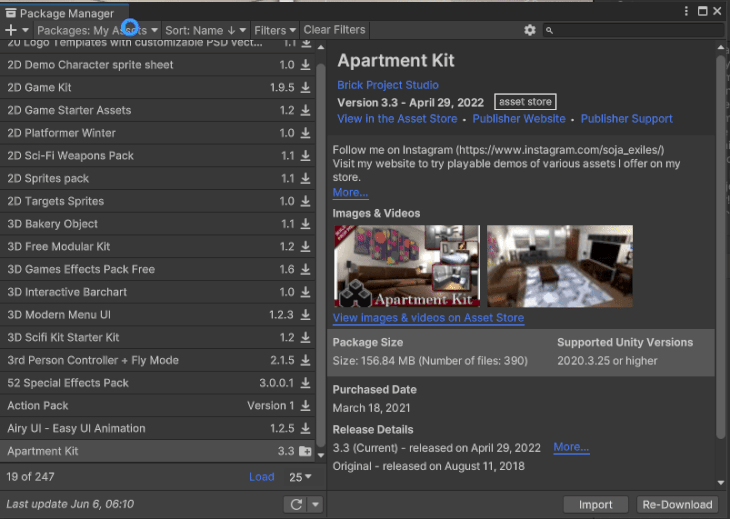
Once the project is open, go to the Unity Asset Store and get the Apartment Kit asset. Instead of the Open in Unity button (in the image below), you will see the Add to my Assets button. After clicking the Add to my Assets button, you will also see the Open in Unity button.
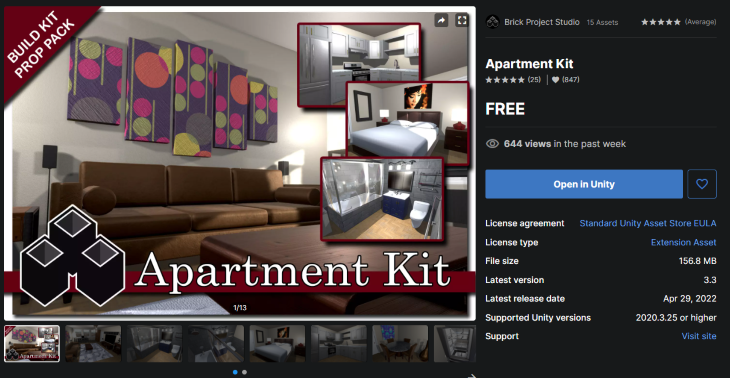
When the Open in Unity button appears, click on it.
This is what you will see👇:
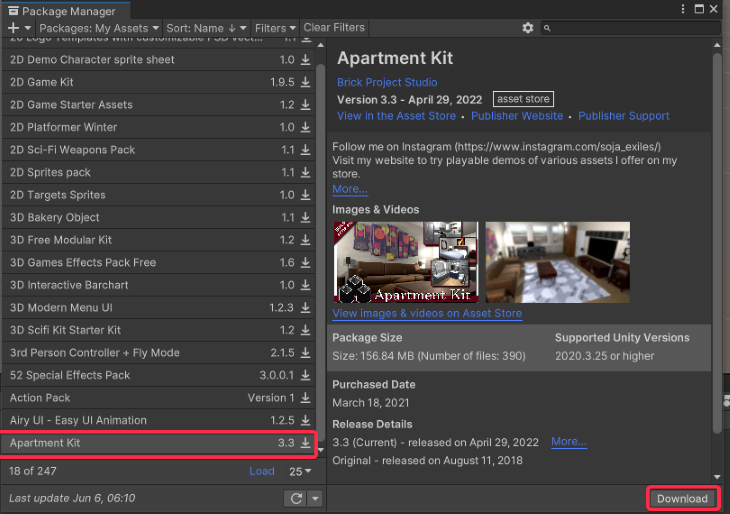
This window is called the Package Manager. On the left-hand side, you will see all the assets that you have purchased from the Unity Asset Store. On the right-hand side, you get the description of that asset. Convenient, isn’t it?
Click Download. Once the asset gets downloaded, click Import.

After clicking on Import, simply click on the Install/Upgrade button if you get a warning. After that, you will see this pop-up:
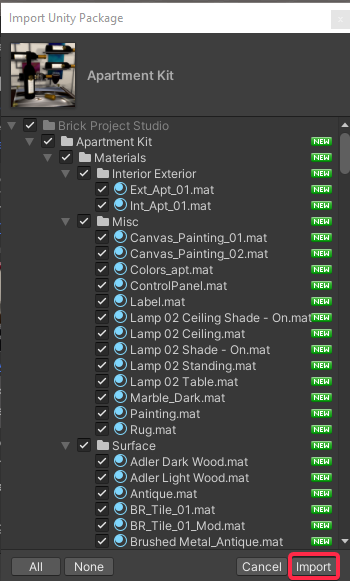
N.B., many times when you import a third-party asset like the one above, you need not import all the files of that asset in your project. This is why Unity gives you the option of selecting specific files for your project so that you don’t bloat your project with unnecessary things.
For the purpose of this tutorial, ensure that all the files are checked and then hit Import.
After the asset is imported, you will see a new folder called Brick Project Studio under Assets in the Project Panel on the bottom left-hand side. This means that you have successfully downloaded the Apartment Kit asset. 🎉
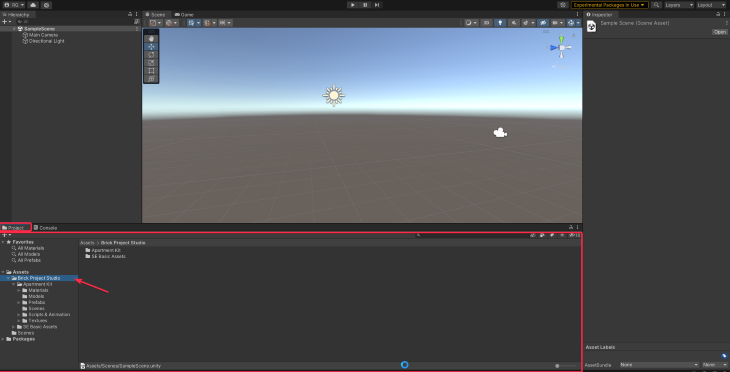
💡 If the assets panel looks a bit different for you, you can change the view by dragging the little switch left and right (as demonstrated below). The switch is located on the bottom right-hand side.
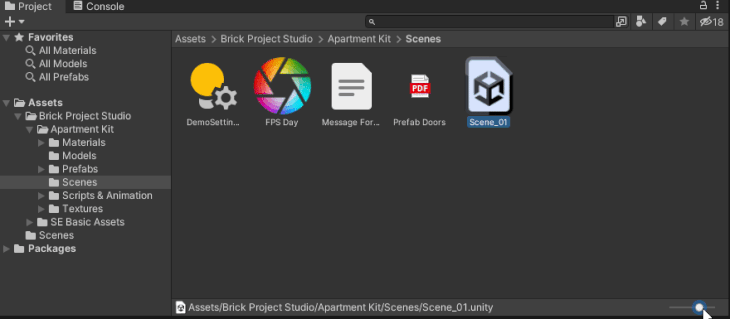
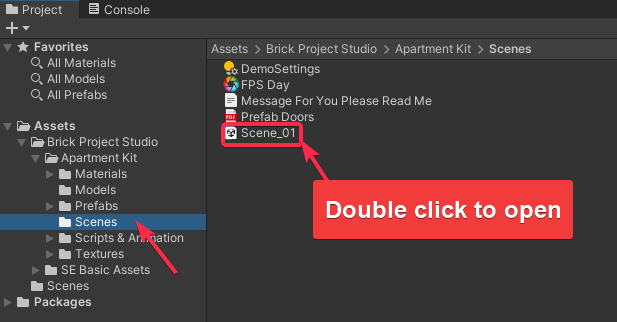
Now click on the Scenes folder located under Assets > Brick Project Studio > Apartment Kit. And now double click to open the Scene_01.unity file.
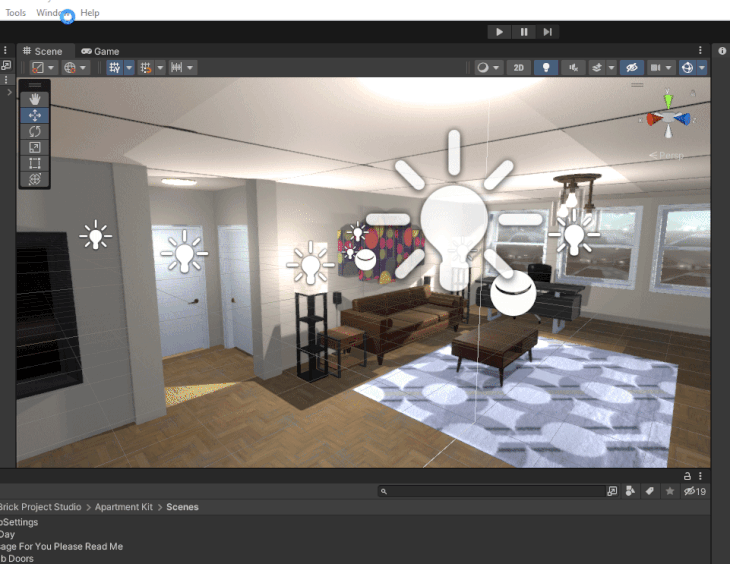
This is what you will see in the Scene panel:
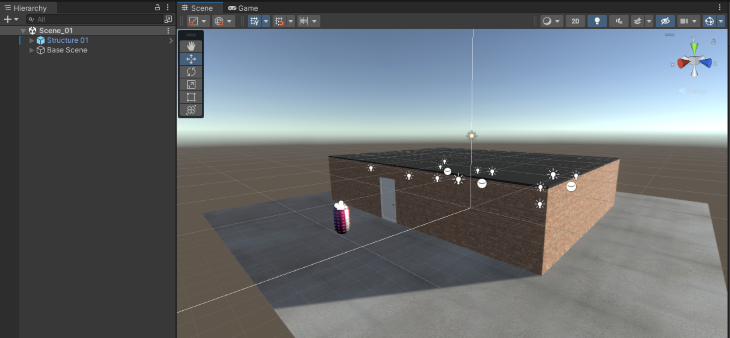
Try zooming in to get a good view of your apartment:

In the Scene Hierarchy window, expand the Base Scene Game Object.
Select First Person Player. Reposition this game object so that it is inside the apartment. Here is a quick demo:

We position the First Person Player inside the apartment so that the Camera object (child of the First Person Player game object) is also positioned inside the apartment. We will use this Camera in a later step in this article.
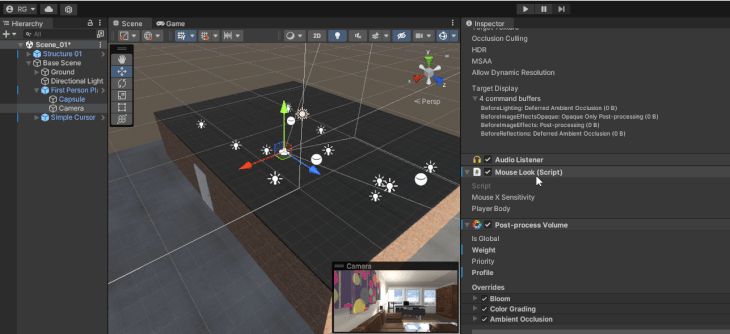
Please make sure that this Camera object is tagged as Main Camera. Here is how you can do so from the Inspector Panel:
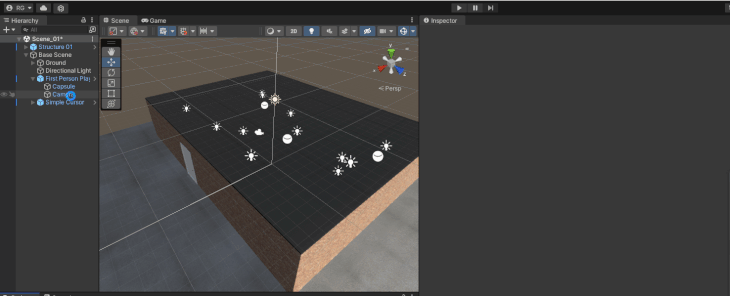
Also, uncheck the Mouse Look Script Component for the Camera game object from the Inspector Panel.
Phew! Now the apartment is set up.
All we have to do now is record a 360 VR video of the apartment.
Let’s go.
Record a 360 VR Video of any scene in Unity
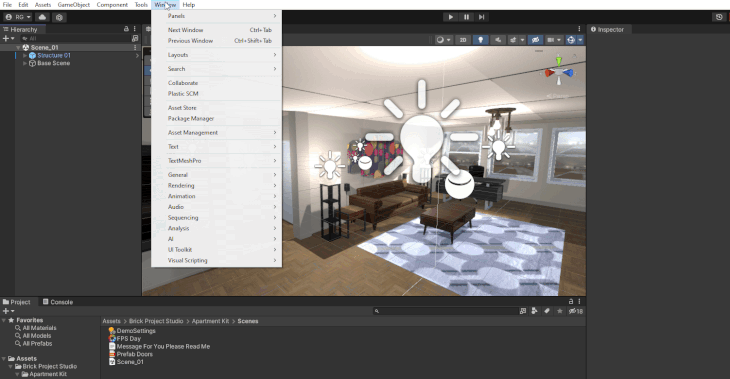
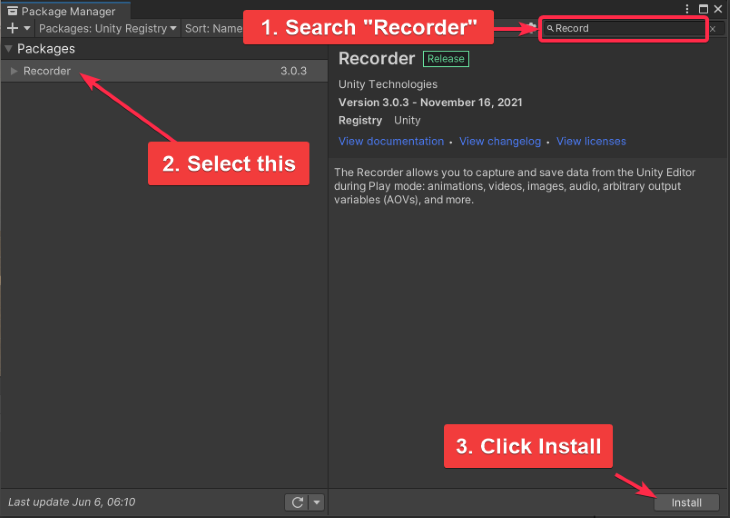
Step 1: Go to Window > Package Manager
Step 2: Switch to Unity Registry instead of My Assets
Step 3: Install Recorder by Unity Technologies
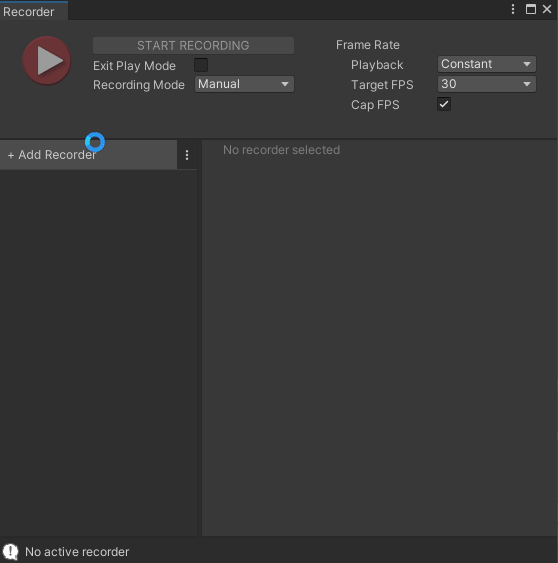
Step 4: Go to Window > General > Recorder > Recorder Window
Step 5: Add Recorder > Movie
Step 6: In the Movie Settings, keep the following settings (annotated in the image below).
- Set Source as 360 View
- Set Camera as MainCamera
- Set Output Dimensions Width = 4096 & Height = 2048
- Set Cube Map Size Width = 2048
- Deselect Record In Stereo
- Include or exclude audio (personal preference. I am excluding it as we don’t have any sound effects in this project)
- Set Output File > File Name to “Apartment 360 Video”
- Select Output File > Path. The default path will create a folder called Recordings inside the project itself. If you want, you can set it to a custom destination on your computer by clicking the three dots icon on the right-hand side
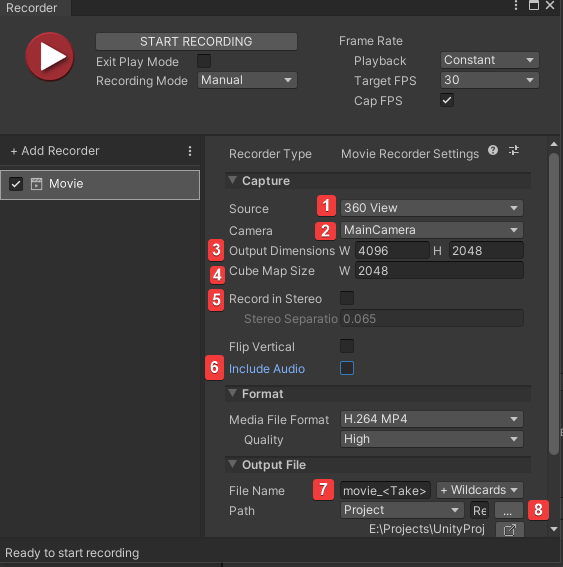
Keep this Recorder window open. We will need it in the next two steps.
Step 7: Click the play button in the Unity Editor.
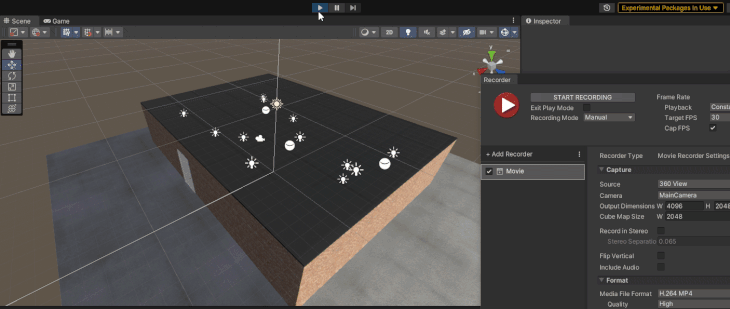
Step 8: While in Play Mode, click Start Recording in the Recorder Panel.
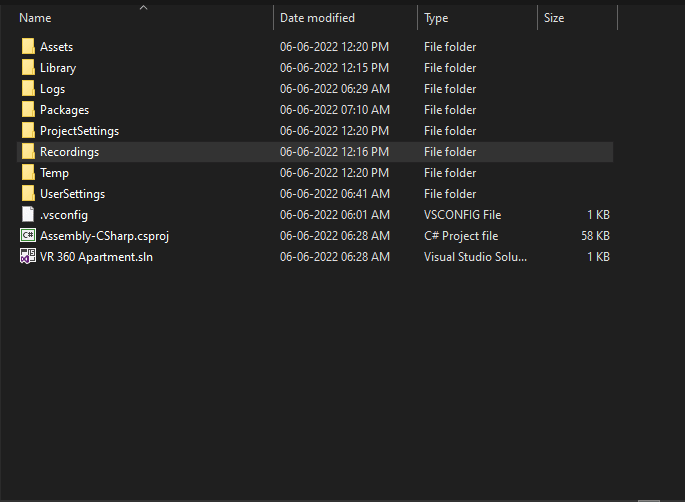
Step 9: After 30 seconds (roughly) stop recording. You can record a longer video based on your requirement. Then go to your Project folder > Recordings. You will find a file called “Apartment 360 Video.mp4.”
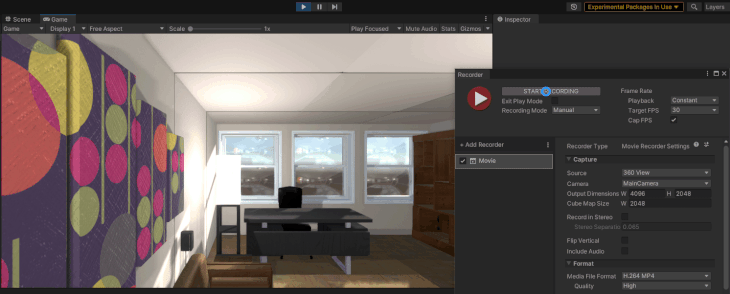
Try playing the above video in any video player such as VLC Media Player. It will appear a bit distorted. It is expected behavior. This happens because the video doesn’t include any data about the 360 support capability. To add this 360 support, you have to inject data, or rather “metadata,” using a tool by Google.
Let’s see how to install Google’s Spatial Media tool and then inject 360 metadata into Apartment 360 Video.mp4.
Step 1: Download the Spatial Media Meta Data from their official repository. Scroll down a bit till you see this Assets section in their releases page. Get the “360.Video.Metadata.Tool.win.zip” file.

Step 2: Extract the zipped folder anywhere on your computer and then run the Spatial Media Metadata Injector.exe file. You will get this pop-up.
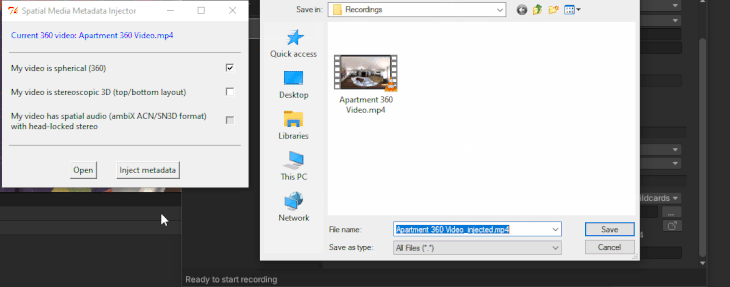
Step 3: Click Open. Select your Apartment 360 Video.mp4 file and then click Open.
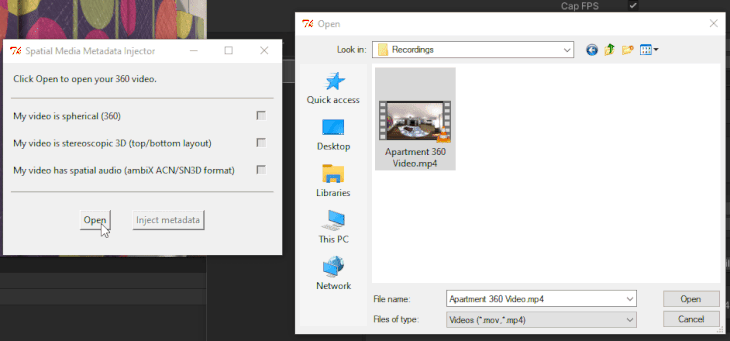
Step 4: Finally, click on Inject Metadata. This will create a file called Apartment 360 Video_injected.mp4. That’s it.
Now, this video can be easily uploaded to YouTube or you can even try playing it on VLC Media Player. You will be able to pan around the 360 video by holding the left click on your mouse and moving around.
Try it out in the YouTube video player:
Conclusion
You can get the final project here.
Feel free to use other assets from the Unity Asset Store and create your own 360 videos in Unity. You can even create your own environments using different assets, arrange them as you wish, and then record a 360 video of it. Isn’t that amazing?🙂
If you’re exploring AR and VR, get my 100+ AR/VR Resources Pack and save thousands of hours on AR/VR research. Or check out some of my other work here.
LogRocket: Full visibility into your web and mobile apps

LogRocket is a frontend application monitoring solution that lets you replay problems as if they happened in your own browser. Instead of guessing why errors happen, or asking users for screenshots and log dumps, LogRocket lets you replay the session to quickly understand what went wrong. It works perfectly with any app, regardless of framework, and has plugins to log additional context from Redux, Vuex, and @ngrx/store.
In addition to logging Redux actions and state, LogRocket records console logs, JavaScript errors, stacktraces, network requests/responses with headers + bodies, browser metadata, and custom logs. It also instruments the DOM to record the HTML and CSS on the page, recreating pixel-perfect videos of even the most complex single-page and mobile apps.
Try it for free.
Changing the Movie Metadata
Now that we have the video our goal is to get it uploaded to a private YouTube channel and watch it with the cardboard on our smartphone. However, we first have to use yet another tool to adapt some of the metadata in the movie file so that YouTube will correctly recognize it as a 360° movie. We will follow Google’s Upload 360-degree videos instructions.
- Download the 360 Video Metadata app by clicking on the «360.Video.Metadata.Tool.win.zip».
- The downloaded .zip file contains a single .exe program called «Spatial Media Metadata Injector.exe». Start this program.
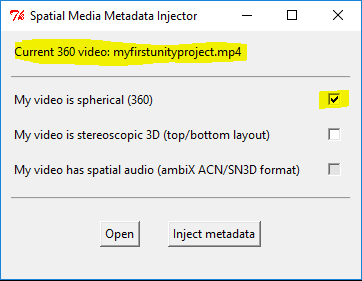
- In the dialog window that opens up, click the “Open” button and then navigate to our video file. After this, the name of the file should either appear in blue at the top of the dialog window.

Credit: Google
- Finally, select the «My video is spherical (360)» option at the top and then use the «Inject metadata» button to save the modified file under a new name. Let’s use “myfirstunityproject360.mp4” as the name. The resulting file is the one that we want to now upload to YouTube.
1. Создание сферической 360 градусов панорамы
Файл панорамы должен быть в равноугольной проекции, с пропорциями 2:1. Создание сферической 360 градусов панорамы
2. проект в Vegas Pro c пропорциями 2:1
На YouTube можно загружать панорамное видео (в формате равнопромежуточной горизонтальной проекции 2:1) с частотой 24, 25, 30, 48, 50 и 60 кадров в секунду и разрешением в диапазоне от 7168 x 3584 до 8192 x 4096.
Т.к. это статика — выбираем 24p.
Создаем проект в Vegas Pro c пропорциями 2:1 — 3840х1920px:

Фото: Проект в Vegas Pro для видео 360
Файл панорамы соответствует пропорциям проекта и займет 100% предпросмотра без черных полей:

Фото: Предпросмотр 360 градусов панорамы в Vegas Pro 14
В Vegas Pro 17 появился шаблон для 360 градусного видео, настройки такие:
В окне предпросмотра панораму можно вращать мышью.
3. Монтаж 360 градусов видео
Монтируем как обычное слайдшоу — можно добавлять переходы и титры. Для рендера создаем шаблон с разрешением как у проекта (3840х1920px):

Фото: Рендер в Vegas Pro видео 360
Битрейд лучше поставить максимальный. Контейнер нужен именно MP4. С нестандартным разрешением не каждый кодек будет рендерить!
4. Добавление метаданных в видео 360 градусов
Перед загрузкой 360 градусного файла на YouTube в него необходимо добавить метаданные, по которым Ютуб поймет, что видео необходимо отображать как 360 градусное.
Для добавления метаданых в видео о 360 градусах есть утилита Spatial Media Metadata Injector, которая работает без установки в систему. Скачать — Внешняя ссылка

Фото: Добавление Metadata
Файл с метаданными в видео 360 Spatial Media Metadata Injector сохранит как новый файл. Перекодировки видео 360 не будет, а будет простое копирование и к имени файла по умолчанию будет добавлено _injected. (но можно добавить и vodkomotornik)
Этот файл и загружаем на YouTube.
После обработки будут доступны все разрешения и в плеере YouTube отмечается в левом верхнем углу круглой кнопкой режима панорамы. Если загруженное видео имеет эти функции — значит, что файл сохранен по технологии 360° и его можно вращать как душе угодно.
Т.к. это статичное видео, то удобнее нажать паузу после Play в плеере и спокойно его вращать для того, чтобы рассмотреть детали.
Просмотр результата шаманства 360 градусов на YouTube
#панорама360 #panorama360 #pano #видео360 #панорама #панорамакалининград #панорамы #панорамнаяфотосъемка #панорамнаясъемка #панорама39 #интерьернаясъемка #интерьер
По суше: велосипед, Соболь 4х4 самый западный и LR Defender 110.
Отдохнул – отчитайся, лучшее слово – дело.