Введение
Для корректной работы 3CX Phone System рекомендуется настроить и использовать так называемую разделенную DNS (Split DNS). Split DNS единообразно представляет сетевые имена узлов (FQDN) во внутренней и внешней сети. Иными словами, сервер 3CX Phone System будет доступен в частной и публичной сети по единому FQDN имени. Такой подход предоставляет ряд преимуществ:
- обеспечивает единообразную настройку внутренних и внешних подключений к серверу
- ускоряет перерегистрацию пользователя при переходе из внутренней во внешнюю сеть и наоборот
- позволяет создать одинаковую конфигурацию для внутренних и внешних пользователей 3CXPhone
- позволяет администрировать систему, просматривать отчеты и слушать записи разговоров, независимо от расположения пользователя
- позволяет указывать в IP телефонах единый URL автонастройки, независимо от их расположения
Для успешной настройки Split DNS необходимо соблюдение ряда условий:
- создание самоподписанного SSL сертификата, либо приобретение доверенного сертификата у аккредитованной компании
- наличие зарегистрированного доменного имени у доменного регистратора
- наличие статического IP адреса
- в вашей внутренней сети должен работать DNS сервер. Это может быть DNS на базе Windows Server или DNS сервер, реализованный в сетевом экране.
Рекомендуется создавать Split DNS до установки сервера 3CX Phone System.
Split DNS создается в два этапа:
- Настраивается DNS зона на публичном DNS сервере у регистратора вашего доменного имени – публичное FQDN имя сервера 3CX Phone System
- Создается аналогичная зона на внутреннем DNS севере – частное FQDN имя сервера 3CX Phone System
Публичное FQDN имя сервера
Покажем настройку публичного имени сервера на примере регистратора EuroDNS. Для других регистраторов процедура принципиально не отличается.
- Зайдите в свою учетную запись
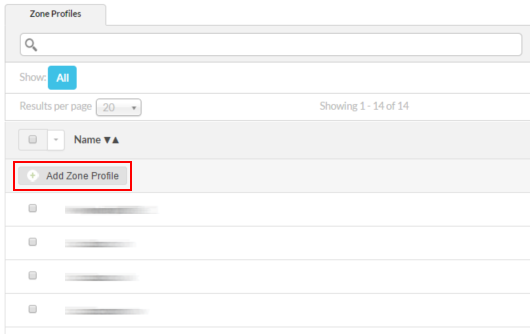
- Перейдите в Control Panel > Zone Profiles

- Нажмите Add Zone Profile
- Нажмите Rename Zone Profile и присвойте профилю имя. В этом примере мы использовали example.com. Нажмите Rename, чтобы сохранить имя профиля
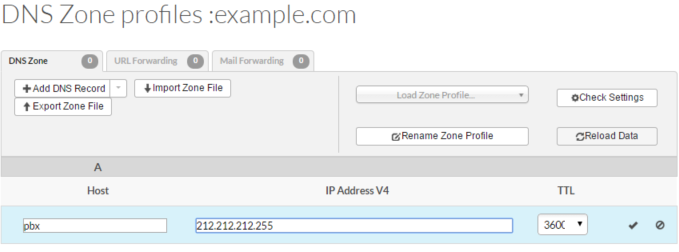
- Нажмите Add DNS Record и в меню выберите A (IPv4 Address)
- В поле Host укажите желаемое имя сервера. В нашем примере это pbx
- В поле IP Address V4 укажите публичный IP адрес вашего сервера 3CX Phone System
- Поле TTL оставьте по умолчанию 3600
- Для сохранения настроек нажмите ✓. A-запись (ваше FQDN имя сервера) pbx.example.com будет создана. Через некоторое время, которое может занять до 24 часов, ваше публичное FQDN имя сервера будет преобразовываться в публичный IP адрес.
Чтобы протестировать корректность настройки публичного FQDN имени, в командной строке введите nslookup pbx.example.com. Команду нужно выполнять на компьютере, находящемся во внешней сети. В ответ вы должны получить внешний IP адрес сервера 3CX.
Частное FQDN имя сервера
Покажем, как настроить частное FQDN имя на DNS сервере, расположенном во внутренней сети вашей компании. Пример основан на DNS сервере Windows 2012 R2 и предполагает, что сервер настраивается с нуля.
Включение роли DNS

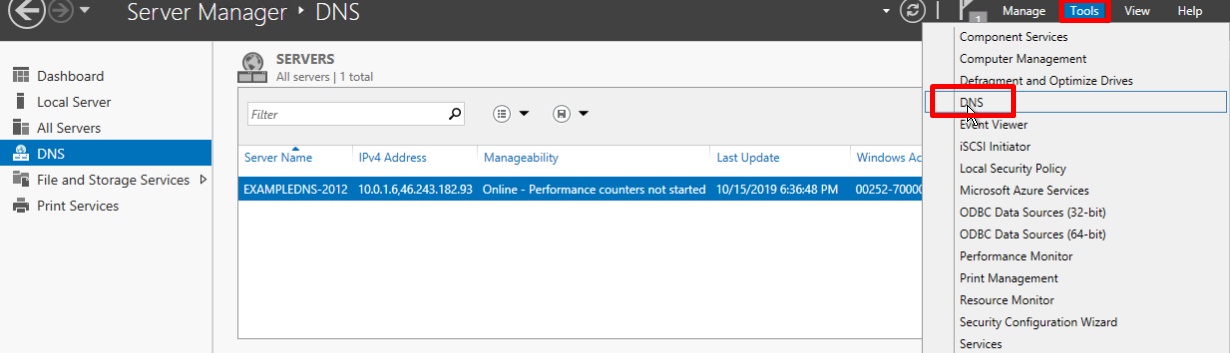
- Запустите Server Manager
- В правом верхнем углу окна Server Manager нажмите Manage и из выпадающего меню выберите Add Roles and Features
- В окне мастера Add Roles and Features Wizard нажмите Next
- Оставьте опцию по умолчанию Role-based or feature-based installation и нажмите Next
- Выберите сервер, которому нужно назначить новую роль и нажмите Next
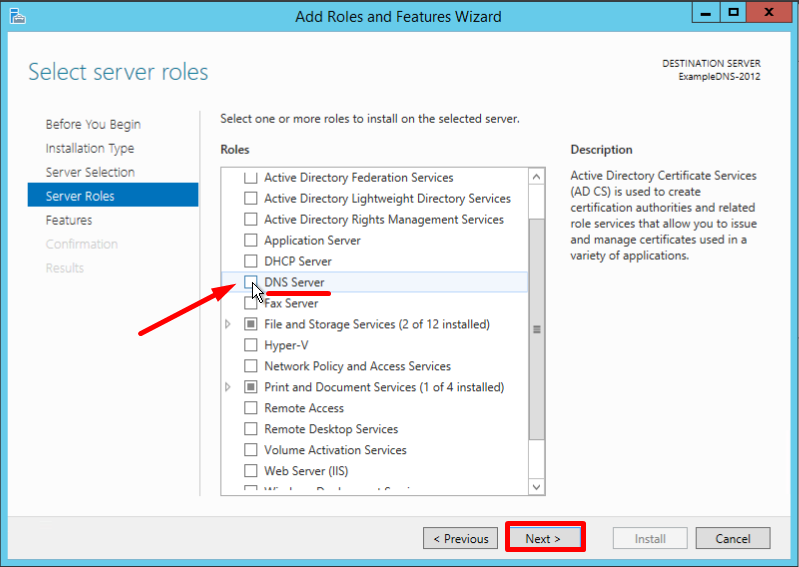
- В списке выберите DNS Server. В появившемся диалоговом окне оставьте значения по умолчанию, нажмите Add Features и Next
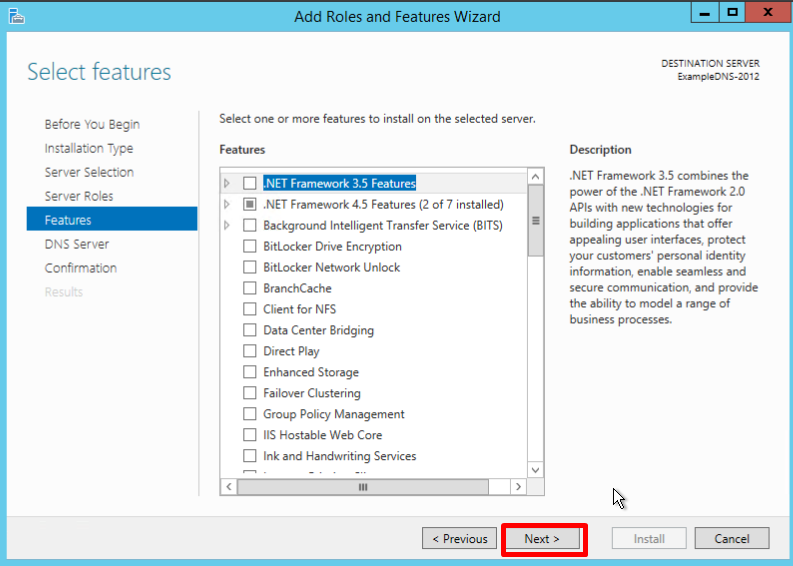
- На странице Features нажмите Next
- На странице DNS Server нажмите Next
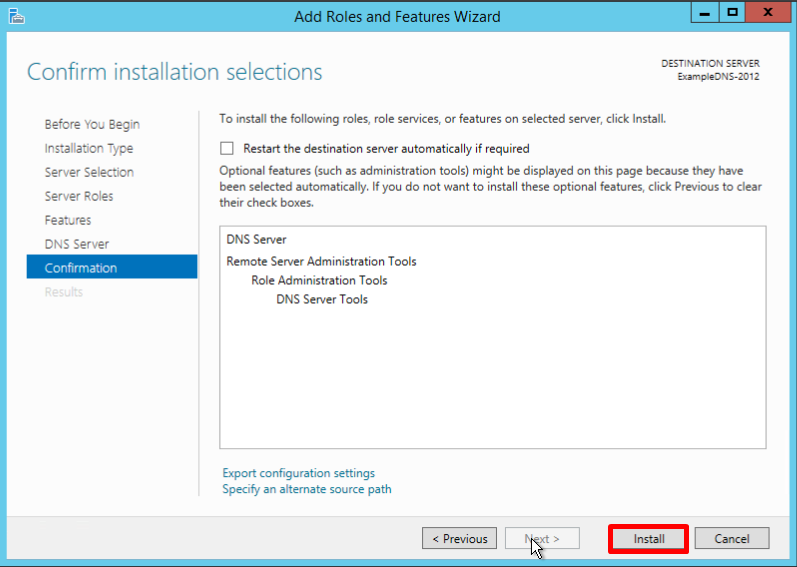
- Нажмите Install
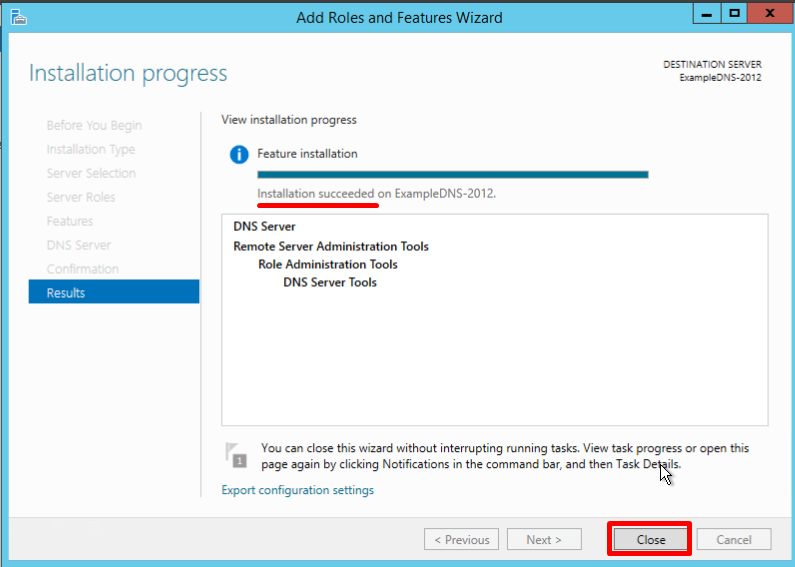
- По окончании установки нажмите Close
После добавления роли DNS сервера создайте Split DNS зону и записи в ней.
Добавление новой зоны

Новая зона создается в оснастке Server Manager:
- В правом верхнем углу оснастки выберите Tools и в выпадающем меню DNS
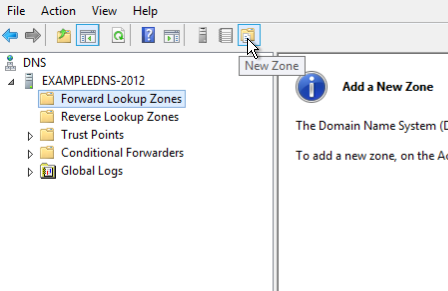
- Откроется DNS manager. Кликните правой кнопкой мыши по имени сервера и выберите New Zone…
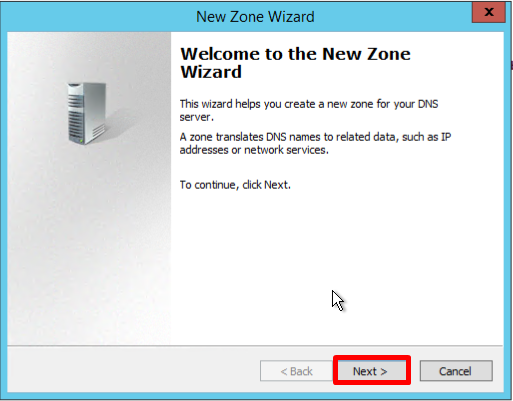
- В мастере New Zone Wizard нажмите Next
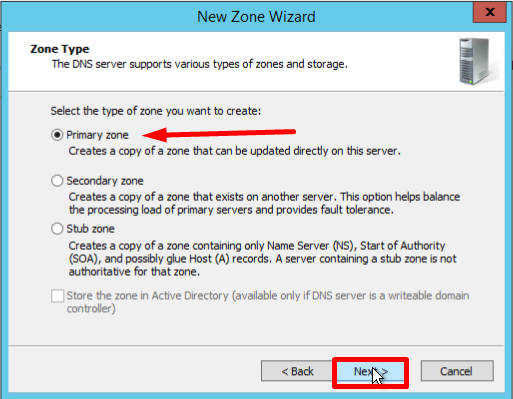
- Оставьте Primary zone по умолчанию и нажмите Next
- Выберите Forward lookup zone и нажмите Next
- Укажите имя зоны, в нашем примере, example.com, и нажмите Next
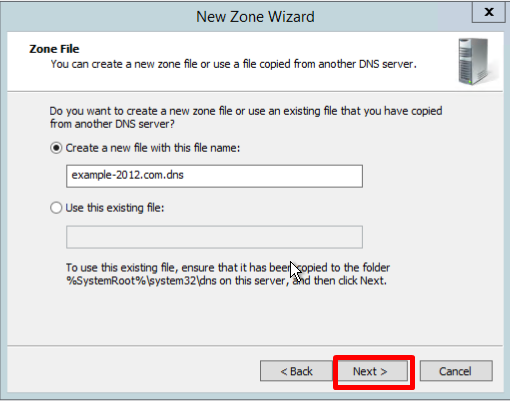
- На странице Zone File оставьте параметры по умолчанию и нажмите Next
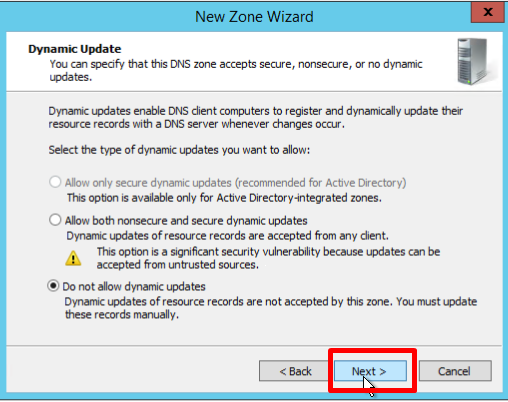
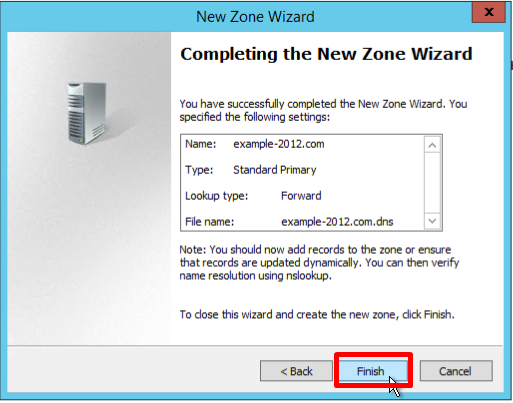
- На странице Dynamic Update оставьте параметры по умолчанию, нажмите Next и Finish

Добавление нового хоста

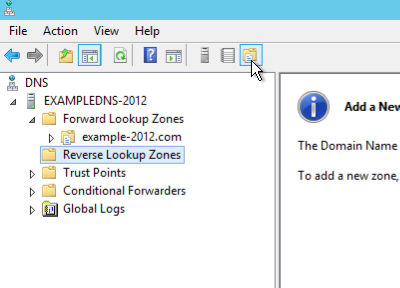
Вновь созданная зона появится в разделе Forward Lookup Zones:

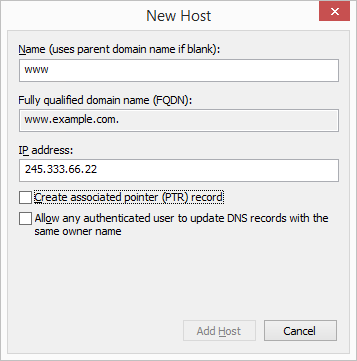
- Кликните правой кнопкой мыши по созданной зоне и выберите New Host (A or AAAA)…
- Укажите имя хоста, в нашем примере, pbx
- Укажите частный (локальный) IP адрес сервера 3CX Phone System
- Нажмите Add Host. Появится сообщение о том, что запись pbx.example.com создана. Нажмите OK и Done
Именно это FQDN имя вы указываете во время инсталляции сервера 3CX Phone System в разделе FQDN.
Чтобы протестировать корректность настройки частного FQDN имени, в командной строке введите nslookup pbx.example.com. Команду нужно выполнять на компьютере, находящемся во внутренней сети. В ответ вы должны получить внутренний IP адрес сервера.
Split DNS создана. С этого момента 3CX Phone System будет использовать единое FQDN имя в публичной и частной сети.
Возможные проблемы
В зависимости от используемого типа DNS сервера, вы можете столкнуться с тем, что другие ваши хосты, например, веб сервер www.example.com, станут недоступны из внутренней сети. Это связано с тем, что ваш локальный DNS сервер начнет использовать внутреннюю DNS зону, а не перенаправлять запросы локальных клиентов на внешний DNS сервер. В этом случае необходимо продублировать во внутренней DNS зоне A записи всех хостов, находящихся во внешней DNS зоне. A запись должна содержать доменное имя хоста и его публичный IP адрес.
Дополнительная информация
- Split-Brain Domain Name Services
- Windows — Setting Up Split DNS
- Split DNS: заставим BIND работать на два фронта
- Установка 3CX Phone System
- Настройка межсетевых экранов (firewall) и маршрутизаторов
- Настройка клиентов: 3CXPhone
- Настройка и управление IP-телефонами и оконечными устройствами
DNS (Domain Name System) is a system that lets you translate domain names into IP addresses and vice versa.
A DNS server is a network service that provides and maintains the operation of DNS. The DNS server is an easy and light service that can run on most machines. If you don’t intend to configure other roles and services on the target machine, the minimum configuration is enough.
How to set up a DNS server:
- Configuring the network adapter for the DNS server
- Installing the DNS Server Role
- Create a forward lookup zone
- Creating a reverse lookup zone
- Create an A record
- Describes the Domain Name System (DNS) features that are new or changed in Windows Server 2016.
Configuring the network adapter on the DNS server
Installing a DNS server requires a domain zone. You need to create a private network in your personal account and connect virtual machines to it.
After the machine is connected to both of the networks, it is important to remember which connection needs to be configured. Usually, a network adapter is setup by default from the very beginning with an access to the Internet. At the same time other additional network adapters have no Internet access until the configuration is performed manually:
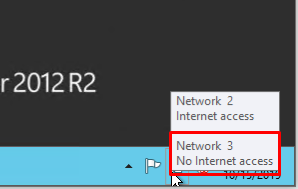
By hovering the cursor over the network icon in the system tray, you can find a tooltip with brief information about networks. Following the example above, you can see that the joined network is Network 3.
Perform a series of actions:
- Right-click Start and select Network Connections from the drop-down menu;
- Right-click on the required network adapter and select Properties from the menu;
- Select IPv4 In the Properties window, and click on the Properties button;
- Fill in the appropriate fields with the necessary data:
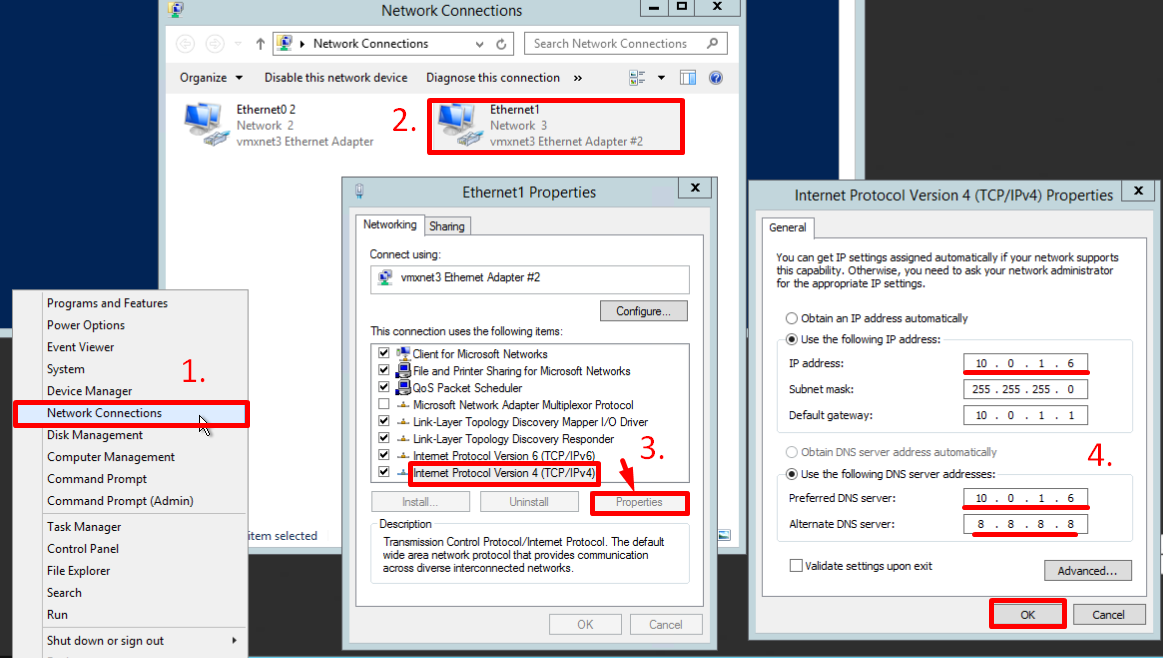
Here, the machine is assigned as the preferred DNS server, and the alternate is assigned as dns.google [8.8.8.8].
Installing the DNS server role
To add new roles to Windows Server, you use Add Roles and Features Wizard in Server Manager.
On the upper navigation bar of the Server Manager click the Manage menu, and then select Add Roles and Features:
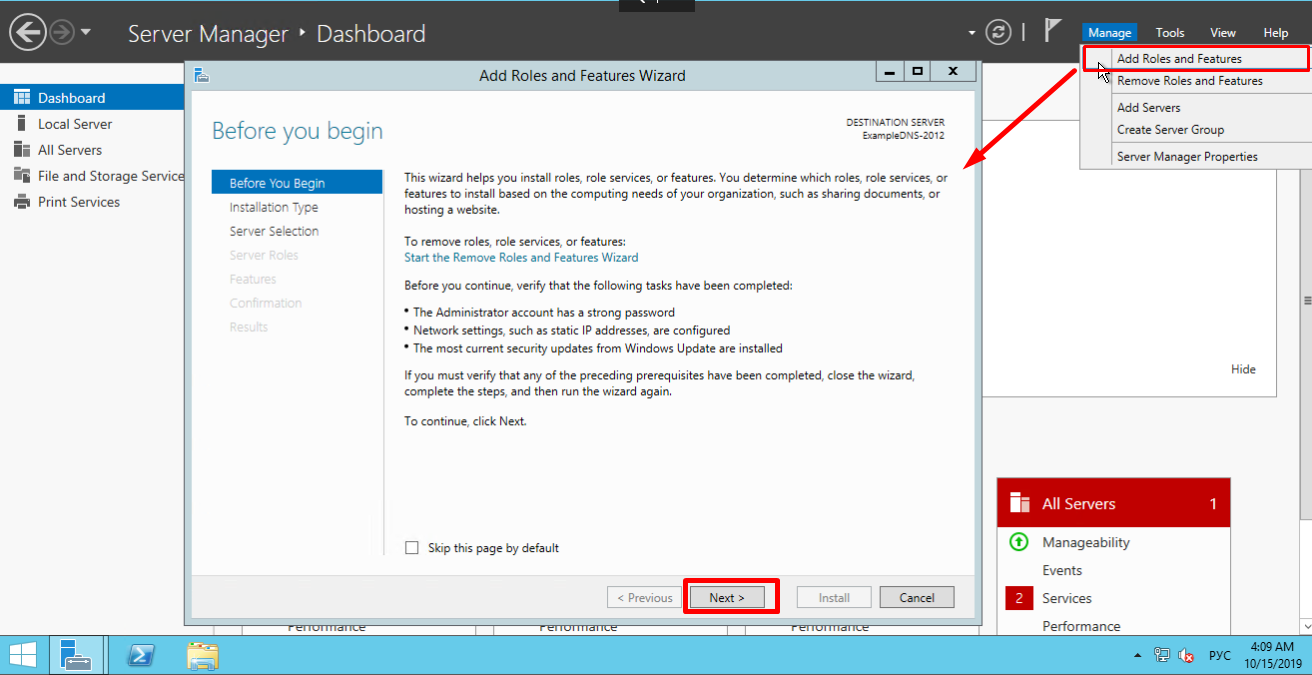
Here, the Wizard recommends you to verify if the following tasks have been completed:
1. The Administrator account has a strong password.
2. Network settings, such as static IP addresses, are configured.
3. The most current security updates from Windows Update are installed.
If you are sure that all the conditions are met, click Next;
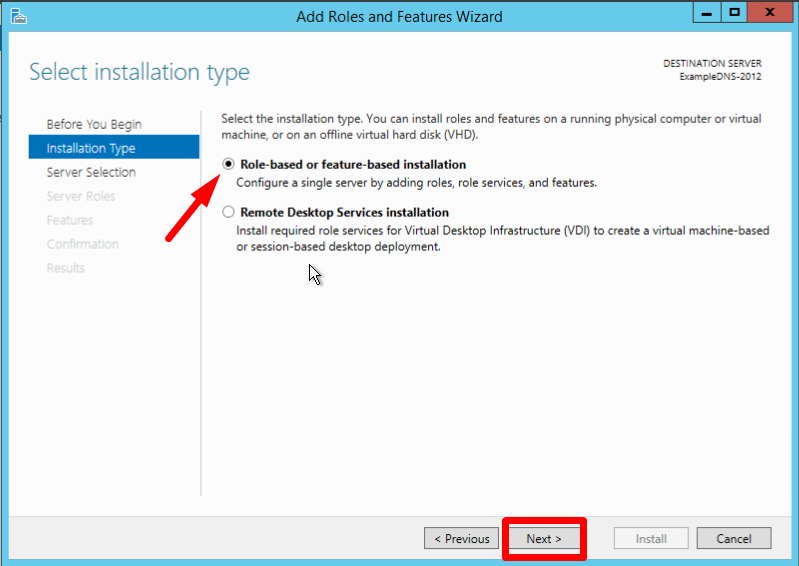
Select the Role-based or feature-based installation and click Next:
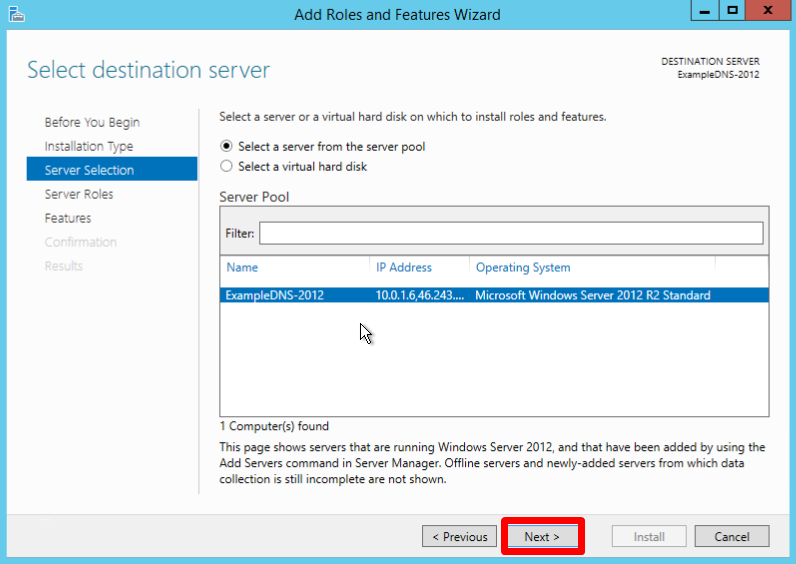
Select a server you want from the server pool and click Next:
Check off the DNS server role and click Next:
Check the list of features to install and confirm by clicking Add Features:

Keep the list of features as is and click Next:
Read the information and click Next:

Check the installation configuration once again and confirm your decision by clicking Install:
The final confirmation screen lets you know that the installation has been successfully completed, and you can close the installation Wizard:
Creating forward and reverse lookup zones
A domain zone — a set of domain names within a specific domain.
Forward lookup zones resolve names to IP addresses.
Reverse lookup zones resolve IP addresses to names.
You have to use the DNS Manager to create and manage the zones.
On the upper navigation bar of the Server Manager click the Tools menu and select DNS in the drop-down list:
Creating a forward lookup zone
- Right-click on the Forward Lookup Zones folder, select New Zone. This will open the New Zone Wizard:
- On the Welcome screen of the Wizard, click Next:
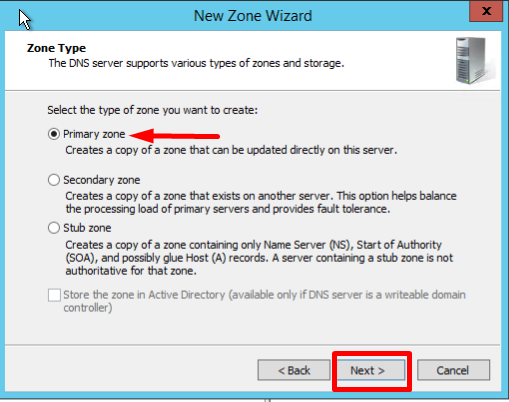
- On the Zone Type screen, Select Primary Zone, and click Next:
- Enter the name, and click Next:

- If necessary, change the name of the future zone file and click Next:
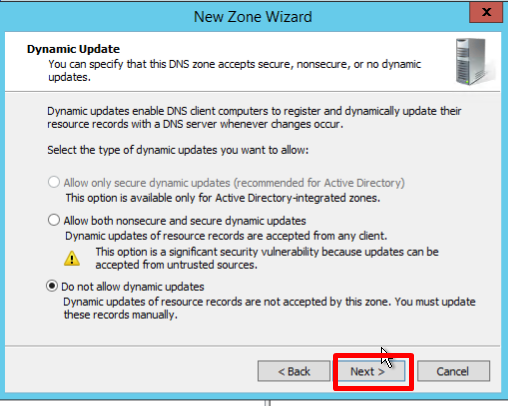
- You must choose whether you want to allow dynamic updates or not. It is not recommended to allow this because of a significant vulnerability. Click Next:
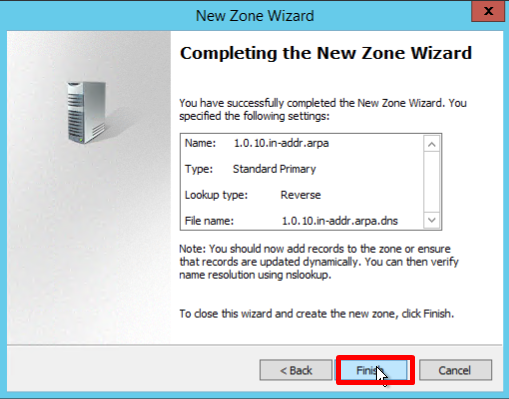
- Verify that the selected settings are correct, click Finish:
Creating a reverse lookup zone
- Open the DNS Manager and right-click on the Reverse Lookup Zones folder, select New Zone. This will open the New Zone Wizard:
- On the Zone Type screen, Select Primary Zone, and click Next:
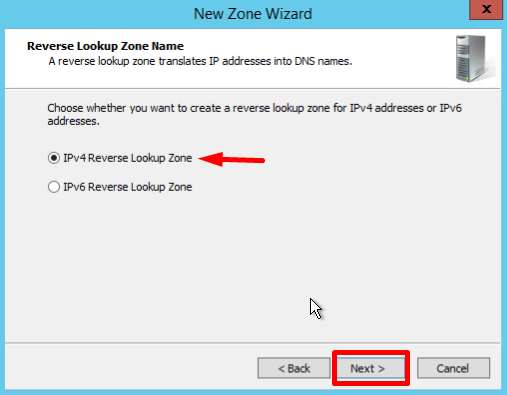
- In the first Reverse Lookup Zone Name page, select IPv4, click Next:
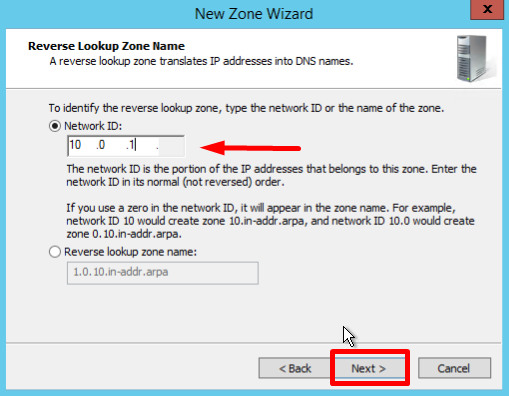
- Type the network ID (the first three octets of the IP address) and click Next:
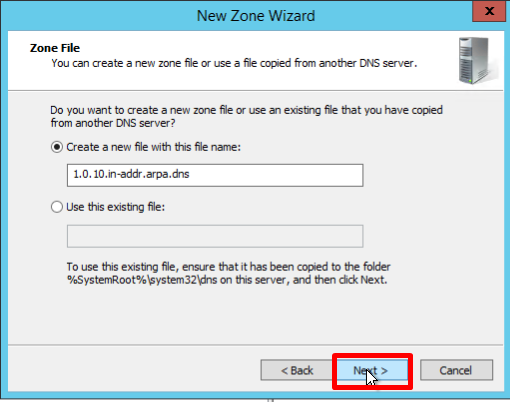
- If necessary, change the name of the future zone file and click Next:
- You must choose whether you want to allow dynamic updates or not. It is not recommended to allow this because of a significant vulnerability. Click Next:
- Verify that the selected settings are correct, click Finish:
Creating a host (A) record
This section of the guideline is here to mostly check all the steps you performed earlier.
A Resource Record is the unit of information storage and transmission in DNS. RRs are the basic building blocks of host-name and IP information and are used to resolve all DNS queries.
Record A — a record that lets you map hostnames to an IP address of the host.
Record PTR — is the reverse version of an A Record.
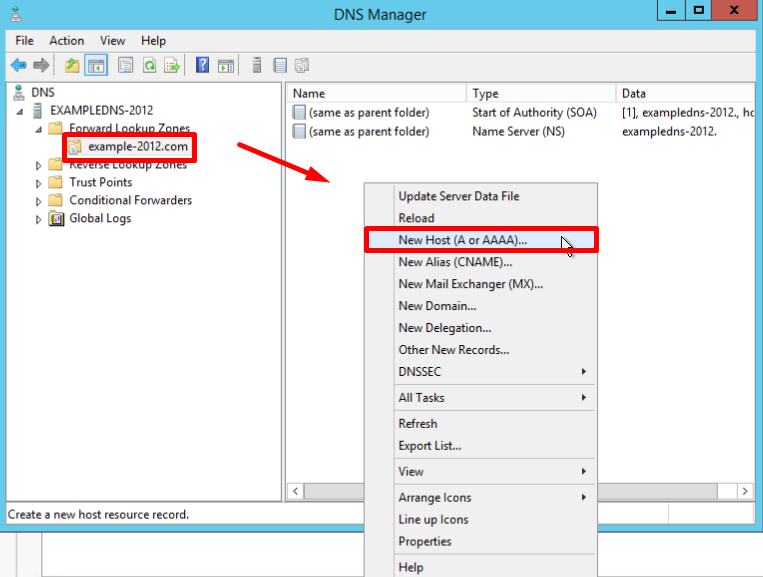
- Open the Forward Lookup Zones folder in the DNS Manager and find the zone folder. Right-click on the right part of the DNS Manager and select New Host (a or AAA):
- New Host page opens. In Name, type a name of the host (with no domain, it will use the name of the Zone as a domain) and your IP address. Check off the section «Create associated pointer (PTR) record», to verify if both Forward and Reverse Lookup Zones are operating properly:
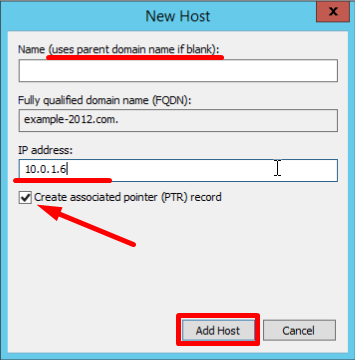
If the Name field is blank it uses parent domain name.
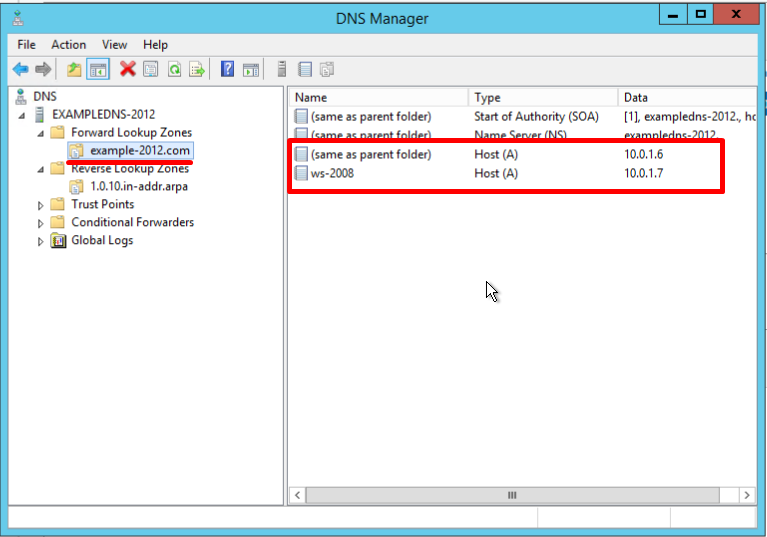
- You can also add records for other servers:
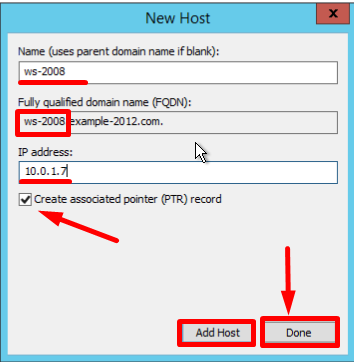
- Once you are finished, click Done.
Making sure everything is correct
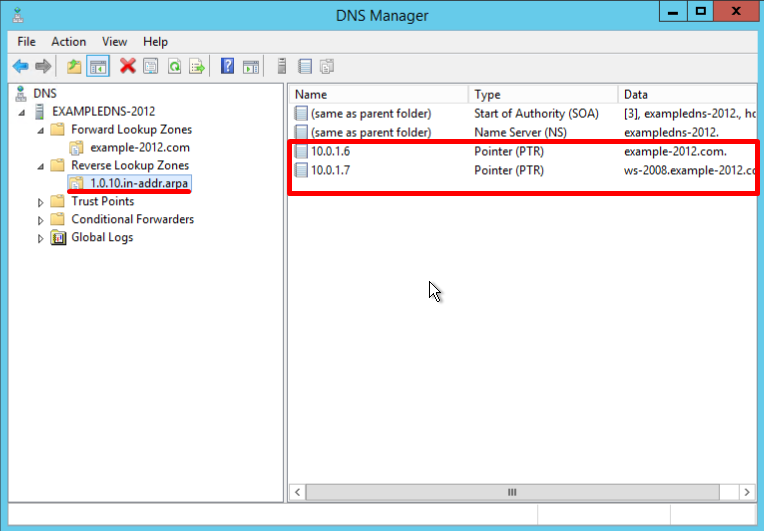
- Check the changes in the folders of the zones (in the example below you can see 2 records appeared in each of them):
- Open the command line (cmd) or PowerShell and run the nslookup command:
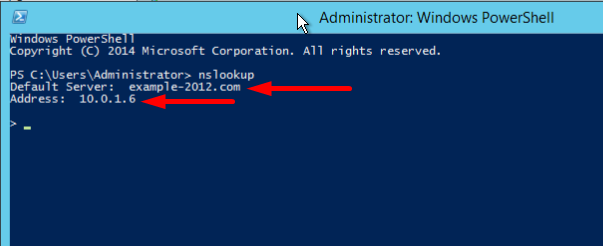
It shows that the default DNS server is example-2012.com with the address 10.0.1.6.
To make sure that the Forward and Reverse Zones are operating properly, you can send two queries:
- To query the domain;
- To query the IP address:
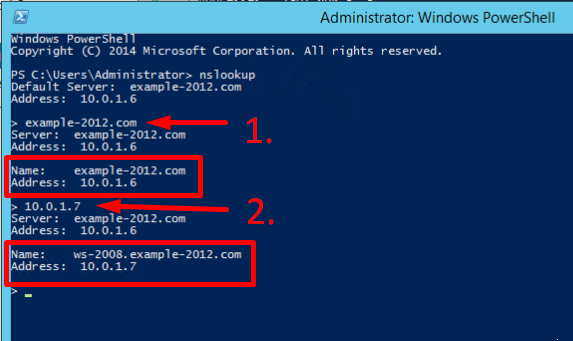
In the example, we have got appropriate responses for both queries.
- There is an option to send a query to an external resource:
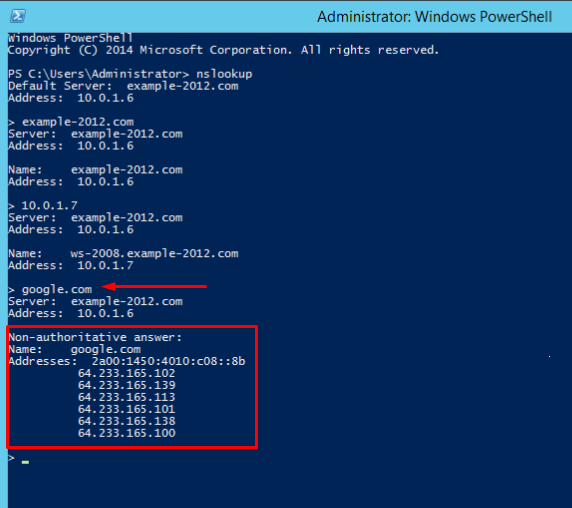
We see a new line here «Non-authoritative answer». This means that our DNS server does not contain domain’s original zone files. Although the information displayed below, received from an authoritative server, it is not itself authoritative in this case.
To compare, all the same queries were made on the server where the forward and reverse zones were not configured:
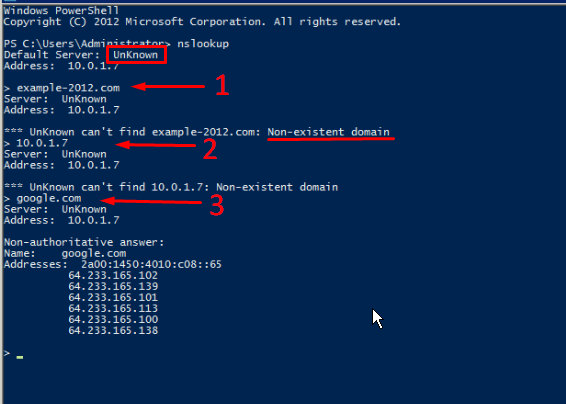
Here, the machine assigned itself as a default DNS server. The DNS server domain name is displayed as unknown because there are no resource records for the IP address (10.0.1.7). For the same reason, the 2nd query returns an error (Non-existent domain).
Describtion of the Domain Name System (DNS) features which are new or changed in Windows Server 2016.
In Windows Server 2016, DNS Server offers updates in the following areas:
- DNS Server Policies
- Response Rate Limit (RRL)
- DNS Based Named Entity Authentication (DANE)
- Unknown record support
- IPv6 root hints
- Windows PowerShell Support
DNS Server Policies
Now you can use these features:
- DNS Policy for Geo-Location based traffic management
- Intelligent DNS responses based on the time of day, to manage a single DNS server configured for split-brain deployment
- Apply filters on DNS queries, and more.
Specific description of these features:
Application Load Balancing
When you have deployed multiple instances of an application at different locations, you can use DNS policy to balance the traffic load between the different application instances, dynamically allocating the traffic load for the application.
Geo-Location Based Traffic Management.
You can use DNS Policy to allow primary and secondary DNS servers to respond to DNS client queries based on the geographical location of both the client and the resource to which the client is attempting to connect, providing the client with the IP address of the closest resource.
Split Brain DNS
With split-brain DNS, DNS records are split into different Zone Scopes on the same DNS server, and DNS clients receive a response based on whether the clients are internal or external clients. You can configure split-brain DNS for Active Directory integrated zones or for zones on standalone DNS servers.
Filtering
You can configure DNS policy to create query filters that are based on criteria that you supply. Query filters in DNS policy allow you to configure the DNS server to respond in a custom manner based on the DNS query and DNS client that sends the DNS query.
Forensics
You can use DNS policy to redirect malicious DNS clients to a non-existent IP address instead of directing them to the computer they are trying to reach.
Time of day based redirection
You can use DNS policy to distribute application traffic across different geographically distributed instances of an application by using DNS policies that are based on the time of day.
You can also use DNS policies for Active Directory integrated DNS zones.
Response Rate Limiting (RRL)
ТYou can configure RRL settings to control how to respond to requests to a DNS client when your server receives several requests targeting the same client.
By doing this, you can prevent someone from sending a Denial of Service (Dos) attack using your DNS servers.
For instance, a bot net can send requests to your DNS server using the IP address of a third computer as the requestor. Without RRL, your DNS servers might respond to all the requests, flooding the third computer.
When you use RRL, you can configure the following settings:
Responses per second This is the maximum number of times the same response is given to a client within one second.
Errors per second This is the maximum number of times an error response is sent to the same client within one second.
Window This is the number of seconds for which responses to a client are suspended if too many requests are made.
Leak rate This is how frequently the DNS server responds to a query during the time responses are suspended. For instance, if the server suspends responses to a client for 10 seconds, and the leak rate is 5, the server still responds to one query for every 5 queries sent. This allows the legitimate clients to get responses even when the DNS server is applying response rate limiting on their subnet or FQDN.
TC rate This is used to tell the client to try connecting with TCP when responses to the client are suspended. For instance, if the TC rate is 3, and the server suspends responses to a given client, the server issues a request for TCP connection for every 3 queries received. Make sure the value for TC rate is lower than the leak rate, to give the client the option to connect via TCP before leaking responses.
Maximum responses This is the maximum number of responses the server issues to a client while responses are suspended.
Allowlist domains This is a list of domains to be excluded from RRL settings.
Allowlist subnets This is a list of subnets to be excluded from RRL settings.
Allowlist server interfaces This is a list of DNS server interfaces to be excluded from RRL settings.
DNS Based Named Entity Authentication (DANE)
You can use DANE support (RFC 6394 and 6698) to specify to your DNS clients what CA they should expect certificates to be issued from for domains names hosted in your DNS server. This prevents a form of man-in-the-middle attack where someone is able to corrupt a DNS cache and point a DNS name to their own IP address.
Unknown record support
An «Unknown Record» is an RR whose RDATA format is not known to the DNS server. The newly added support for unknown record (RFC 3597) types means that you can add the unsupported record types into the Windows DNS server zones in the binary on-wire format. The Windows caching resolver already has the ability to process unknown record types. Windows DNS server does not do any record specific processing for the unknown records, but sends it back in responses if queries are received for it.
IPv6 root hints
The IPV6 root hints, as published by IANA, have been added to the Windows DNS server. The internet name queries can now use IPv6 root servers for performing name resolutions.
Windows PowerShell support
The following new Windows PowerShell cmdlets and parameters are introduced in Windows Server 2016:
Add-DnsServerRecursionScope — This cmdlet creates a new recursion scope on the DNS server. Recursion scopes are used by DNS policies to specify a list of forwarders to be used in a DNS query.
Remove-DnsServerRecursionScope — This cmdlet removes existing recursion scopes.
Set-DnsServerRecursionScope — This cmdlet changes the settings of an existing recursion scope.
Get-DnsServerRecursionScope — This cmdlet retrieves information about existing recursion scopes.
Add-DnsServerClientSubnet — This cmdlet creates a new DNS client subnet. Subnets are used by DNS policies to identify where a DNS client is located.
Remove-DnsServerClientSubnet — This cmdlet removes existing DNS client subnets.
Set-DnsServerClientSubnet — This cmdlet changes the settings of an existing DNS client subnet.
Get-DnsServerClientSubnet — This cmdlet retrieves information about existing DNS client subnets.
Add-DnsServerQueryResolutionPolicy — This cmdlet creates a new DNS query resolution policy. DNS query resolution policies are used to specify how, or if, a query is responded to, based on different criteria.
Remove-DnsServerQueryResolutionPolicy — This cmdlet removes existing DNS policies.
Set-DnsServerQueryResolutionPolicy — This cmdlet changes the settings of an existing DNS policy.
Get-DnsServerQueryResolutionPolicy — This cmdlet retrieves information about existing DNS policies.
Enable-DnsServerPolicy — This cmdlet enables existing DNS policies.
Disable-DnsServerPolicy — This cmdlet disables existing DNS policies.
Add-DnsServerZoneTransferPolicy — This cmdlet creates a new DNS server zone transfer policy. DNS zone transfer policies specify whether to deny or ignore a zone transfer based on different criteria.
Remove-DnsServerZoneTransferPolicy — This cmdlet removes existing DNS server zone transfer policies.
Set-DnsServerZoneTransferPolicy — This cmdlet changes settings of an existing DNS server zone transfer policy.
Get-DnsServerResponseRateLimiting< — This cmdlet retrieves RRL settings.
Set-DnsServerResponseRateLimiting — This cmdlet changes RRL settigns.
Add-DnsServerResponseRateLimitingExceptionlist — This cmdlet creates an RRL exception list on the DNS server.
Get-DnsServerResponseRateLimitingExceptionlist— This cmdlet retrieves RRL excception lists.
Remove-DnsServerResponseRateLimitingExceptionlist — This cmdlet removes an existing RRL exception list.
Set-DnsServerResponseRateLimitingExceptionlist — This cmdlet changes RRL exception lists.
Add-DnsServerResourceRecord — This cmdlet was updated to support unknown record type.
Get-DnsServerResourceRecord — This cmdlet was updated to support unknown record type.
Remove-DnsServerResourceRecord — This cmdlet was updated to support unknown record type.
Set-DnsServerResourceRecord— This cmdlet was updated to support unknown record type
For more information, see the following Windows Server 2016 Windows PowerShell command reference topics.
Powershell DNS Server
Powershell DNS Client
This posting is ~7 years years old. You should keep this in mind. IT is a short living business. This information might be outdated.
Sometimes it’s necessary to have two DNS servers that are authoritative for the same DNS namespace. This is the case if you use the same namespace for your web site and your internal Active Directory domain, e.g. terlisten-consulting.de. Or that you have created the zone terlisten-consulting.de in your Windows DNS to point specific hosts to internal IP addresses. The DNS servers at your ISP would be authoritative, and the domain controllers of your Active Directory would also be authoritative for the same domain. The response to a query depends on which DNS server you ask. So what would happen if you try to resolve www.terlisten-consulting.de, and the internal DNS has no record for it?
C:UsersAdministrator.LAB>nslookup www.terlisten-consulting.de
Server:  adc1.lab.local
Address:  fdda:28ad:487:3::1

*** adc1.lab.local can't find www.terlisten-consulting.de: Non-existent domain
In this case, the domain controller in my lab is authoritative for terlisten-consulting.de. But he doesn’t has a A record for www.terlisten-consulting.de. If I remove the zone from my domain controller, or if I use an external DNS server, I get a non-authoritative answer.
C:UsersAdministrator.LAB>nslookup www.terlisten-consulting.de
Server:  adc1.lab.local
Address:  fdda:28ad:487:3::1

Non-authoritative answer:
Name:    waws-prod-am2-015.cloudapp.net
Address:  23.100.1.29
Aliases:  www.terlisten-consulting.de
          azr-terlistenconsulting.azurewebsites.net
          waws-prod-am2-015.vip.azurewebsites.windows.net
This, the same DNS namespace on different DNS server, is called “split DNS” (sometimes also called split-horizon DNS, split-view DNS or split-brain DNS).
Do it right
Split DNS is pretty handy, and sometimes it’s necessary. When it comes to Microsoft Exchange, it a common practice to use the same external DNS namespace for the internal and external URLs. This requires, that I create a zone for the externally used DNS namespace on my internal DNS (in most cases: Microsoft Windows Activice Directory domain controllers). The downside: I must create all DNS entries on my internal DNS, and I must point them to their external IP addresses, except the ones that should point to an internal IP.
| FQDN | Internal/ External IP address |
| www.terlisten-consulting.de | external IP address |
| exchange.terlisten-consulting.de | internal IP address |
| shop.terlisten-consulting.de | external IP address |
Otherwise, users that use the domain controllers as DNS server, wouldn’t be able to resolve www or shop. This is challenging. But there’s a solution.
Create split DNS for single hosts
The Domain Name System is hierarchy organized. Because of this, I can tell my DNS server to be authoritative only for a sub-tree of a domain, e.g. exchange.terlisten-consulting.de. If I try to resolve www.terlisten-consulting.de, the DNS server would go down the hierarchy starting at the DNS root servers (or it would ask a forwarder). Instead of creating a zone for the whole namespace, create a zone for the host. Simply add
- a new primary zone
- don’t allow dynamic updates to the zone, and
- create a new A or AAAA record for the host
Make sure
- to leave the name field empty
- don’t create a PTR record
- point it to the internal IP of the host

Patrick Terlisten/ www.vcloudnine.de/ Creative Commons CC0
A simple nslookup will show if split DNS works as expected.
C:UsersAdministrator.LAB>nslookup www.terlisten-consulting.de
Server:  adc1.lab.local
Address:  fdda:28ad:487:3::1

Non-authoritative answer:
Name:    waws-prod-am2-015.cloudapp.net
Address:  23.100.1.29
Aliases:  www.terlisten-consulting.de
          azr-terlistenconsulting.azurewebsites.net
          waws-prod-am2-015.vip.azurewebsites.windows.net


C:UsersAdministrator.LAB>nslookup exchange.terlisten-consulting.de
Server:  adc1.lab.local
Address:  fdda:28ad:487:3::1

Name:    exchange.terlisten-consulting.de
Address:  192.168.200.84
Works as expected. Make sure to clear the DNS server cache after you have added the zones.
Windows DNS Server Policies
Windows Server 2016 will introduce Windows DNS Server Policies. DNS Policies will allow you to control how a DNS Server handles answers to queries based on parameters like source IP address, IP address of the network interface that has received the query etc. In future, DNS Server Policies can be used to configure split DNS.
- Author
- Recent Posts

vcloudnine.de is the personal blog of Patrick Terlisten. Patrick has a strong focus on virtualization & cloud solutions, but also storage, networking, and IT infrastructure in general. He is a fan of Lean Management and agile methods, and practices continuous improvement whereever it is possible.
Feel free to follow him on Twitter and/ or leave a comment.
- Remove From My Forums
-
Question
-
Hi
I have a single-domain forest in Active Directory, in my LAN. Servers are 2012 R2. I have just built a DMZ envronment on a different network and now want to implement a split-DNS system with the DMZ (where I have a DNS server implemented with a zone for
the domain name).My LAN network is global.domain.com (AD)
DMZ is domain.comIs this the config reequired?
Thanks!
-
Edited by
Monday, December 7, 2015 10:07 PM
-
Edited by
Answers
-
Hi Gurdip Sira,
Split DNS is used when the internal name and external name for one domain is the same. If server in internal domain with FQDN: server.domain.com, it has private IP address
192.168.2.50, has public IP address 1.1.1.1.We hope internal users query for server.domain.com, the DNS server will answer with private address 192.168.2.50, while external users query for
server.domain.com, the DNS server will answer with public address 1.1.1.1.Then we may use split DNS. Create zone domain.com on the different DNS servers. The internal DNS server only holds private IP address, and the external DNS server holds public IP address. External users use external DNS server, internal
users use internal DNS server.Best Regards,
Anne
Please remember to mark the replies as answers if they help and unmark them if they provide no help. If you have feedback for TechNet Support, contact tnmff@microsoft.com.
-
Proposed as answer by
Anne HeMicrosoft contingent staff
Friday, December 25, 2015 2:43 AM -
Marked as answer by
Anne HeMicrosoft contingent staff
Tuesday, December 29, 2015 8:25 AM
-
Proposed as answer by
I’m having an issue with determining if split-horizon is being used on our domain controller.
(I’ll use baggadonuts.com as the example domain here…)
We are using a Windows Server2012R2 domain controller for DNS. I have been asked to set it up so that esdm.baggadonuts.com resolves to an internal IP 192.168.2.62 while on the network. There is an external resolution already out there for esdm.baggadonuts.com which is working ok and should stay in place.
I figure I need to use split-horizon (a.k.a. split-brain. etc.).
I was given an example of another address on our network that already works correctly. If I am in network and I do an nslookup for git.baggadonuts.com, it resolves to an internal IP 192.168.2.153. If I am outside, it resolves to a public IP.
Our internal domain is main.baggadonuts.com
The part I am struggling with, is that I don’t see ‘baggadonuts.com’ in my Foward Lookup Zone section within DNS on my DC. If the previous admin set-up a split-horizon address, would it show up there? For example, wouldn’t I see in the forward lookup zone:
baggadonuts.com
main.baggadonuts.com
How can I determine if split-horizon was set-up for git.baggadonuts.com? Is that a possibility?
Если вы собираетесь внедрить или уже внедрили Split DNS в своей ИТ-инфраструктуре, то перед вами стоит задача следить за непротиворечивостью DNS-записей на внутренних и внешних DNS серверах.
Для наглядности возьмем схему:

На схеме выделены три вида DNS записей одного домена domain.ru:
Область A – записи относятся только к внутренним объектам (сервисы, компьютеры, принт-серверы и т.п.) и находятся только на внутренних DNS серверах; из внешней сети они недоступны как видно на следующей схеме:

B – эти записи находятся и на внутренних, и на внешних DNS серверах, ссылаясь на один и тот же сервис, например, почтовый сервер, но внутренние клиенты получают внутренний адрес сервиса, а внешние – внешний адрес как показано на следующей схеме:

C – это записи только внешних объектов – сервисов, серверов во внешней сети; внешние адреса прописаны также и на внутренних DNS; внутренние клиенты могут обращаться к внешним сервисам через фаэрвол или/и NAT-устройство (либо через прокси-сервер, но в этом случае DNS уже не используется внутренними клиентами и это не тема этой статьи). Ситуация отражена на следующей схеме:

Проблема Split DNS
В чем заключается проблема при использовании Split DNS и когда она возникает? Проблема возникает, когда внутренний клиент обращается к внешнему сервису и не получает от внутреннего DNS ссылку на этот сервис или получает от внутреннего DNS ссылку на сервис иной, чем сервис с тем же именем, но который был бы доступен ему в случае обращения из внешней сети. Ситуация отражена на следующей схеме:

Проблемы в конфигурации со Split DNS.
Ситуация 1. На внутреннем DNS сервере нет записи Service1. Ни один внутренний пользователь не получит адрес внешнего сервиса. Следовательно, для всех внешних сервисов нужно обязательно создавать записи на внутреннем DNS сервере (в простейшем случае с тем же внешним адресом).
Ситуация 2. Запись Service1 есть на внутреннем и внешнем DNS серверах (область B). Secure DNS выключен. Любой пользователь корпоративной сети называет свой компьютер Service1, включает его в домен, компьютер регистрирует себя во внутреннем DNS. В результате внутренние пользователи будут получать адрес этого компьютера, а не внешнего сервиса.
Ситуация 3. Запись Service1 есть на внутреннем и внешнем DNS серверах (область B). Secure DNS выключен. К корпоративной сети подключается некое устройство с именем Service1 (например, принт-сервер), которое получает от DHCP сервера адрес и отправляет DHCP серверу запрос на регистрацию своего адреса в DNS. DHCP сервер от своего имени регистрирует устройство во внутреннем DNS сервере. Возникает проблема как в предыдущем случае.
Ситуация 4. Запись Service1 есть на внутреннем и внешнем DNS серверах (область B). Secure DNS включен и защищает DNS записи от перезаписи невладельцем. В домене нет учетной записи Service1 (но может быть DNS имя для нужд SPN). Пользователь с административными правами видит, что такой учётной записи нет и включает сервер с именем Service1 в домен. После этого он обнаруживает, что его сервер пингуется неправильно и удаляет «мусор» из внутреннего DNS сервера. Всё – проблема создана.
Что можно сделать для защиты от проблем со Split DNS?
1. Всегда используйте Secure DNS для защиты записей от неавторизованного изменения.
2. Для защиты особо важных DNS записей используйте технику pin-point: вместо создания записи типа A создавайте одноименную запись типа NS — поддомен. В этом случае, ограничив административные права на управление DNS сервисом, можно исключить несанкционированное изменение важных записей практически полностью.
3. Всегда создавайте фиктивные учетные записи компьютеров в Active Directory для сервисов из областей B и C выше приведенной схемы. Защищайте такие учетные записи компьютеров от удаления и перезаписи с помощью выставления прав ACL, оставив пользователям, включая доменных администраторов, права только на чтение (полные права, например, только у Enterprise Admins).
4. Настройте мониторинг изменений важных DNS записей либо с помощью системы мониторинга (SCOM), либо, в простейшем случае, скриптом, который будет проверять как наличие записей, так и правильность ответа (адрес).
5. Регламентируйте внутренние процессы управления DNS серверами.
6. Автоматизируйте перенос изменений из внешнего DNS во внутренний.
Заключение
Как и любая технология Split DNS решает одни проблемы и создает другие. Постарайтесь хорошо вникнуть в работу Split DNS, и это поможет вам построить вашу ИТ инфраструктуру правильно и надежно.
Filed under: Active Directory | Tagged: Active Directory, Split DNS |
To learn more about DNSSEC, consult the following TechNet article at http://technet.microsoft.com/en-us/library/jj200221.aspx.
Lesson summary
![]() A and AAAA records map FQDNs to IP addresses.
A and AAAA records map FQDNs to IP addresses.
![]() PTR records map IP addresses to FQDNs.
PTR records map IP addresses to FQDNs.
![]() CNAME records enable you to create aliases for FQDNs.
CNAME records enable you to create aliases for FQDNs.
![]() MX records are used to provide information about the location of mail servers.
MX records are used to provide information about the location of mail servers.
![]() Scavenging and aging enable you to minimize the amount of stale resource records in a DNS zone.
Scavenging and aging enable you to minimize the amount of stale resource records in a DNS zone.
![]() Scavenging and aging can only scavenge dynamically generated resource records.
Scavenging and aging can only scavenge dynamically generated resource records.
![]() DNSSEC uses public key cryptography to sign DNS zones and resource records.
DNSSEC uses public key cryptography to sign DNS zones and resource records.
![]() When a query occurs against a DNSSEC signed zone, both the requested record and a key to validate the records are provided.
When a query occurs against a DNSSEC signed zone, both the requested record and a key to validate the records are provided.
Lesson review
Answer the following questions to test your knowledge of the information in this lesson. You can find the answers to these questions and explanations of why each answer choice is correct or incorrect in the “Answers” section at the end of this chapter.
1. What type of resource record do you create if you want to have a different name associated with an existing FQDN?
A. A record
B. MX record
C. PTR record
D. CNAME record
2. You have just deployed a server that will function as an SMTP gateway on your organization’s perimeter network. This server has been assigned an FQDN, and an entry exists pointing to the server in the reverse lookup zone associated with the server’s public IP address. Which type of resource record should you create if you want to ensure that the mail servers of external organizations can recognize this server as your organization’s external mail gateway?
A. CNAME record
B. PTR record
C. MX record
D. A record
3. Which of the following Windows PowerShell cmdlets should you use to create a host record that maps an FQDN with an IPv6 address?
A. Add-DnsServerResourceRecordCName
B. Add-DnsServerResourceRecordAAAA
C. Add-DnsServerResourceRecordMX
D. Add-DnsServerResourceRecordPtr
4. Which of the following can you enable to reduce the number of stale resource records in a zone?
A. Secure dynamic updates
B. Aging and scavenging
C. DNSSEC
D. Zone transfers
5. You want to ensure that clients can validate the authenticity of DNS records in several primary zones that are hosted on DNS servers in your organization. Which of the following should you enable to accomplish this goal? (Choose all that apply.)
A. DNSSEC
B. Zone transfers
C. Aging and scavenging
D. Secure dynamic updates
Practice exercises
The goal of this section is to provide you with hands-on practice with the following:
![]() Managing DNS zones
Managing DNS zones
![]() Single-label name resolution
Single-label name resolution
![]() Configuring and managing DNSSEC
Configuring and managing DNSSEC
To perform the exercises in this section, you need access to an evaluation version of Windows Server 2012 R2. You should also have access to virtual machines SYD-DC, MEL-DC, CBR-DC, and ADL-DC, the setup instructions for which are described in the Introduction. You should ensure that you have a checkpoint of these virtual machines that you can revert to at the end of the practice exercises. You should revert the virtual machines to this initial state prior to beginning these exercises.
Exercise 1: Manage DNS zones
In this exercise, you create a new Active Directory integrated zone, configure this zone to replicate to all domain controllers in the forest, and configure the zone to accept only secure dynamic updates. To complete this exercise, perform the following steps:
1. Sign on to SYD-DC as Contosodon_funk.
2. In Server Manager, click the Tools menu, and click DNS.
3. In the DNS Manager Console, expand SYD-DC, and click Forward Lookup Zones, as shown in Figure 3-27.
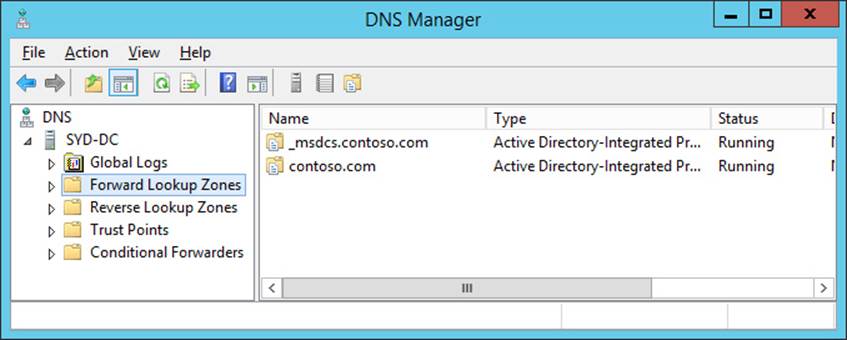
FIGURE 3-27 Forward Lookup Zones
4. In the Action menu, click New Zone.
5. On the first page of the New Zone Wizard, click Next.
6. On the Zone Type page, click Primary Zone and ensure that Store The Zone In Active Directory is selected, as shown in Figure 3-28, and click Next.
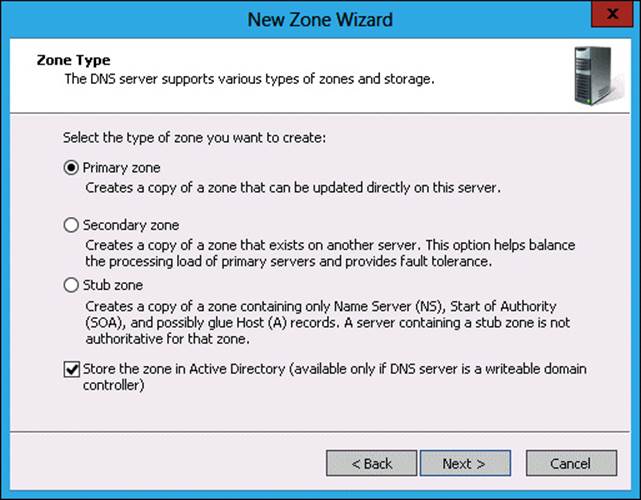
FIGURE 3-28 Active Directory integrated primary zone
7. In the Active Directory Zone Replication Scope page, click To All DNS Servers Running On Domain Controllers In This Forest: Contoso.com, as shown in Figure 3-29, and click Next.
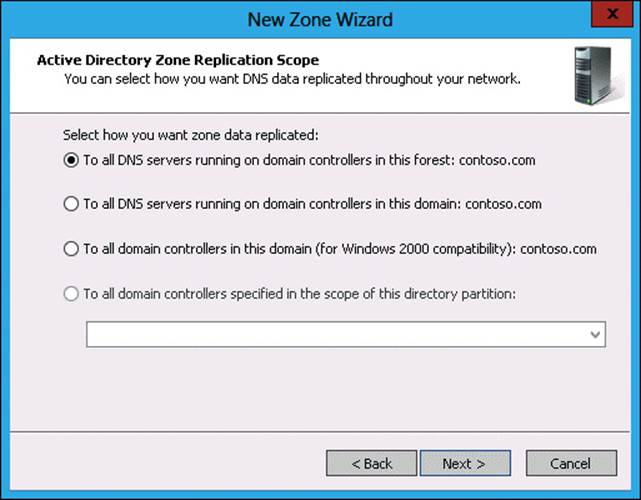
FIGURE 3-29 Zone replication scope
8. On the Zone Name page, type fabrikam.com and click Next.
9. On the Dynamic Update page, click Allow Only Secure Dynamic Updates, as shown in Figure 3-30, and click Next.
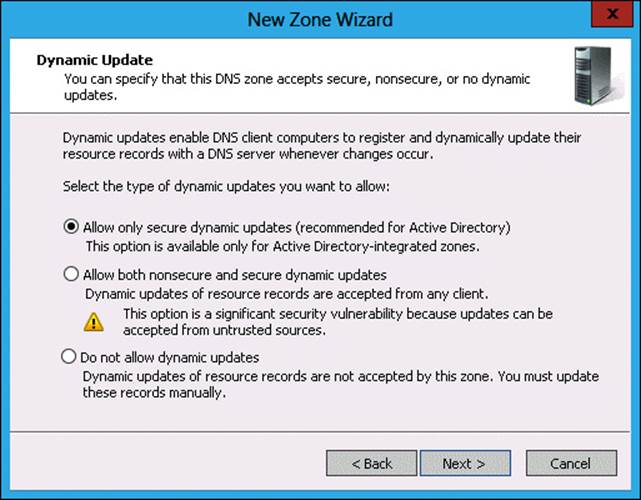
FIGURE 3-30 Configuring secure dynamic updates
10. Click Finish to complete the New Zone Wizard.
Exercise 2: Configure partition-based replication
In this exercise, you create a new Active Directory DNS partition and then create a new Active Directory integrated zone that replicates to DNS servers enrolled in this partition. To complete this exercise, perform the following steps:
1. On SYD-DC, right-click the Windows PowerShell prompt, and click Run As Administrator.
2. Execute the following command to create a new Active Directory DNS partition named Tasmania:
Add-DNSServerDirectoryPartition –Name Tasmania
3. Close the Windows PowerShell window.
4. In the DNS Manager console, click Forward Lookup Zones.
5. In the Action menu, click New Zone.
6. On the Welcome page of the New Zone Wizard, click Next.
7. In the Zone Type page, click Primary Zone, verify that Store The Zone In Active Directory is selected, and click Next.
8. In the Active Directory Zone Replication Scope page, click To All Domain Controllers Specified In The Scope Of This Directory Partition and click Tasmania, as shown in Figure 3-31, and click Next.
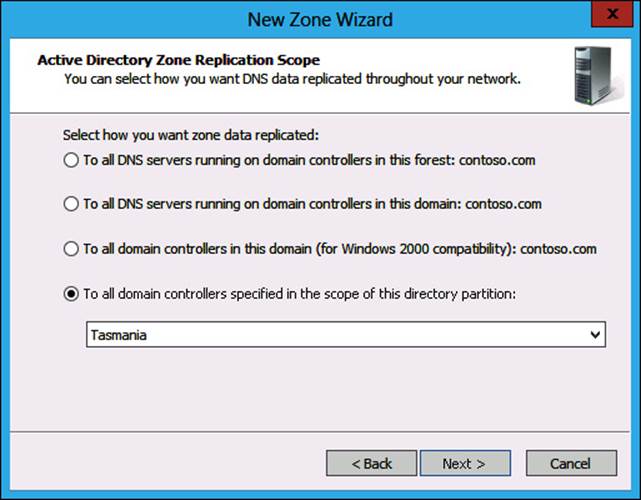
FIGURE 3-31 Replicating to a specific directory partition
9. In the Zone Name Wizard page, type margiestravel.com, as shown in Figure 3-32, and click Next.

FIGURE 3-32 Providing a zone name
10. In the Dynamic Update page, click Do Not Allow Dynamic Updates, as shown in Figure 3-33, and click Next.
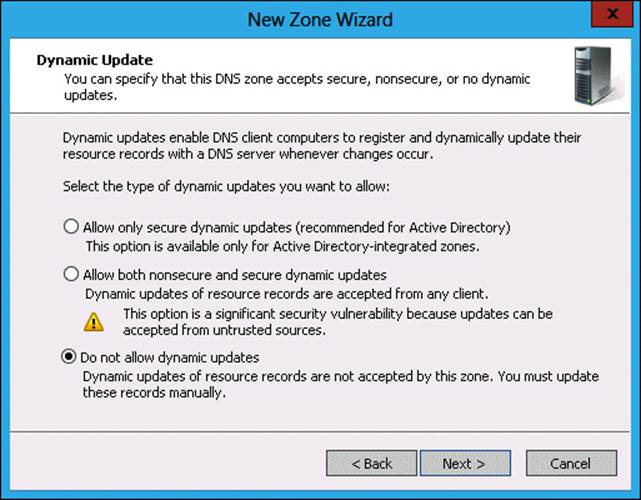
FIGURE 3-33 Do Not Allow Dynamic Updates
11. Click Finish to complete the New Zone Wizard.
Exercise 3: DNS delegation and secondary zones
In this exercise, you install the DNS role and perform a zone delegation. To complete this exercise, perform the following steps:
1. Start MEL-DC, and sign in using the Administrator account with the password Pa$$w0rd.
2. Open the Windows PowerShell prompt and type the following commands.
Add-Computer -DomainName contoso.com
3. In the Windows PowerShell Credentials dialog box type don_funk@contoso.com and Pa$$w0rd, and click OK.
4. Type the following command in the Windows PowerShell prompt to restart the computer.
Restart-Computer
5. Ensure that you are signed on to SYD-DC as Contosodon_funk.
6. In Server Manager on SYD-DC, click All Servers.
7. In the Manage menu, click Add Servers.
8. In the Name box, type MEL-DC and click Find Now.
9. In the Add Servers dialog box, click MEL-DC, and click the arrow button, as shown in Figure 3-34, and click OK.
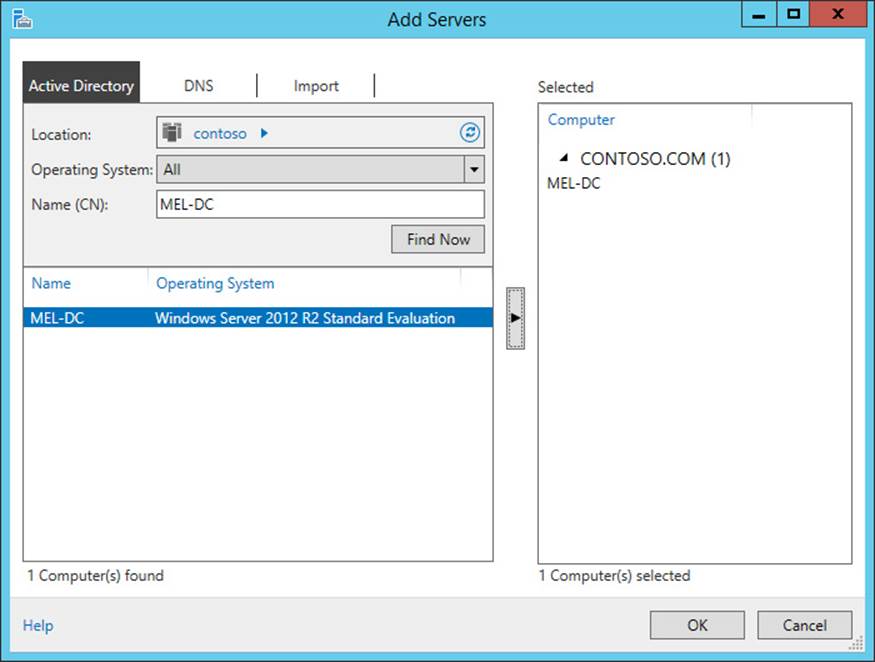
FIGURE 3-34 Adding servers to a group
10. In the All Servers area of Server Manager on SYD-DC, click MEL-DC. From the Manage menu, click Add Roles And Features.
11. In the Before You Begin page of the Add Roles And Features Wizard, click Next.
12. In the Installation Type page, click Role-Based Or Feature-Based Installation, and click Next.
13. In the Select Destination Server page, click MEL-DC.contoso.com, and click Next.
14. In the Select Server Roles page, click DNS Server. In the Add Roles And Features Wizard pop-up list, click Add Features.
15. Verify that the Add Roles And Features Wizard appears the same as shown in Figure 3-35 and click Next.
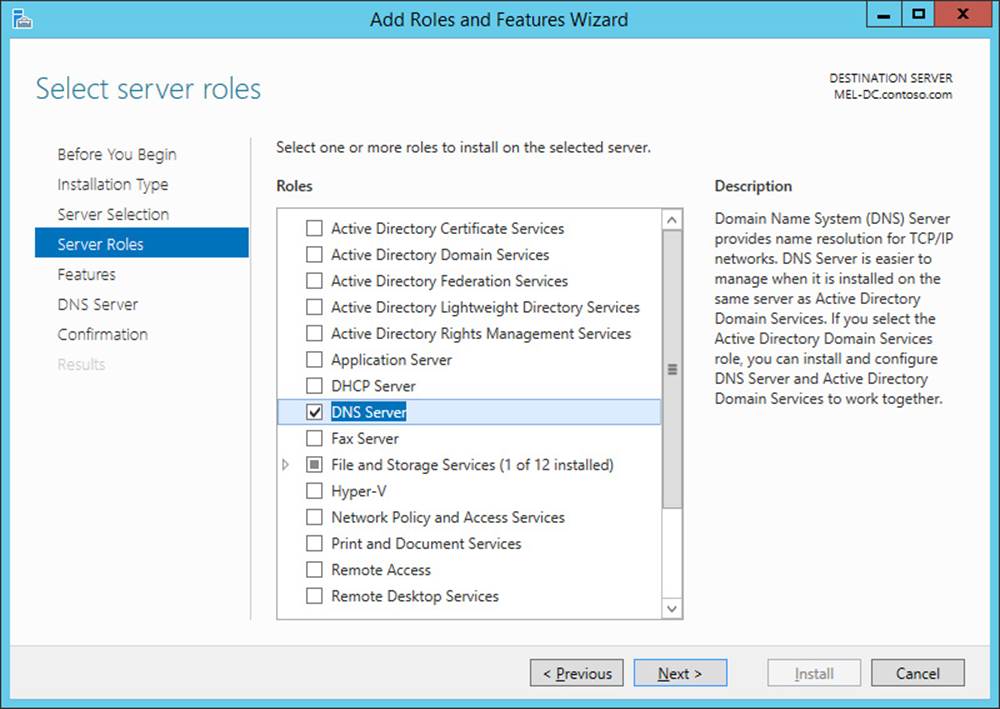
FIGURE 3-35 Installing DNS Server role
16. In the Select Features page, click Next.
17. In the DNS Server page, click Next.
18. In the Confirm Installation Selections page, click Install, and then click Close.
19. In DNS Manager console, click DNS. In the Action menu, click Connect To DNS Server.
20. In the Connect To DNS Server dialog box, click The Following Computer: and type MEL-DC.contoso.com, as shown in Figure 3-36. Click OK.

FIGURE 3-36 Connecting to a DNS server
21. In the DNS Manager Console, click Forward Lookup Zones under MEL-DC.contoso.com, as shown in Figure 3-37.
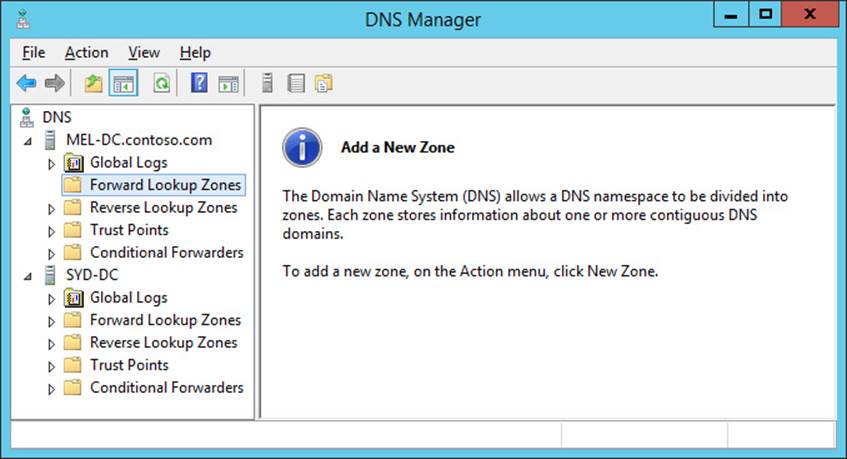
FIGURE 3-37 Connecting to two DNS servers
22. Click Action, and click New Zone.
23. In the Welcome page of the New Zone Wizard, click Next.
24. In the Zone Type page of the New Zone Wizard, click Primary Zone. Note (as shown in Figure 3-38) that the option to store the zone in Active Directory is not present because MEL-DC is not an Active Directory domain controller. Click Next.

FIGURE 3-38 Configuring a primary zone
25. In the Zone Name page, type australia.fabrikam.com, and click Next.
26. In the Zone File page, click Create A New File With This File Name, as shown in Figure 3-39, and click Next.
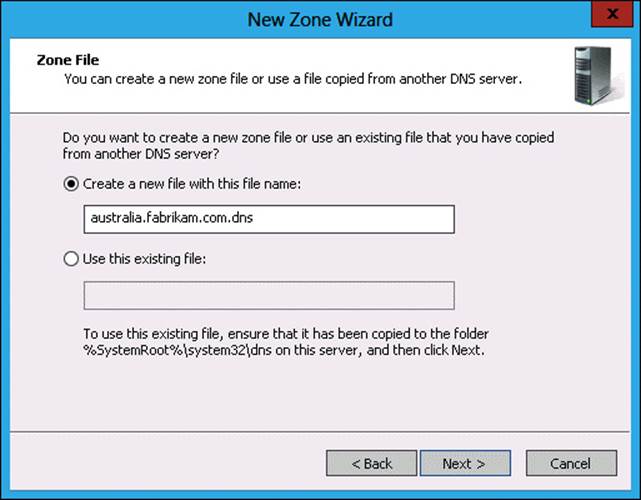
FIGURE 3-39 Creating a zone file
27. In the Dynamic Update page, click Do Not Allow Dynamic Updates, and click Next.
28. In the Completion page, click Finish.
29. In the DNS Manager Console, expand SYD-DCForward Lookup Zones and click Fabrikam.com.
30. In the Action menu, click New Delegation.
31. In the Welcome page of the New Delegation Wizard, click Next.
32. In the Delegated Domain Name page, type australia, as shown in Figure 3-40, and click Next.
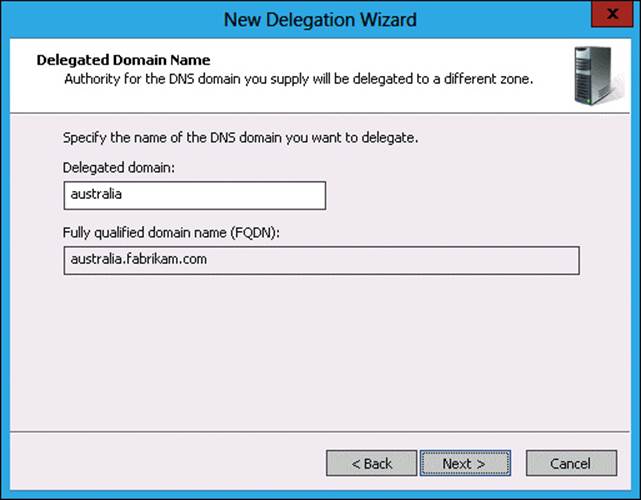
FIGURE 3-40 Configuring a delegated domain
33. In the Name Servers page, click Add.
34. In the New Name Server Record dialog box, type MEL-DC.contoso.com and click Resolve. Click OK.
35. Verify that the Name Servers page of the New Delegation Wizard matches Figure 3-41 and then click Next.
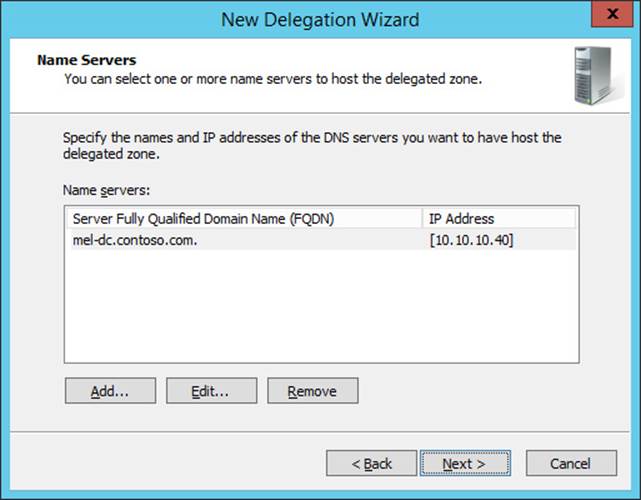
FIGURE 3-41 Delegated name server
36. Click Finish to close the New Delegation Wizard.
Exercise 4: Configure a secondary zone
In this exercise, you configure a DNS server to host the secondary zone copy of a DNS zone. To complete this exercise, perform the following steps:
1. On SYD-DC, in DNS Manager, click Margiestravel.com.
2. In the Action menu, click Properties.
3. On the Zone Transfers tab, click Allow Zone Transfers, and click Only To The Following Servers.
4. Click Edit. In the Allow Zone Transfers dialog box, click the text <Click Here To Add An IP Address Or DNS Name>, type MEL-DC.contoso.com, and press Enter.
5. Click No Such Host Is Known, and click Delete. Even though an error symbol is present, click OK.
6. Verify that the Zone Transfers tab matches Figure 3-42, and click OK.
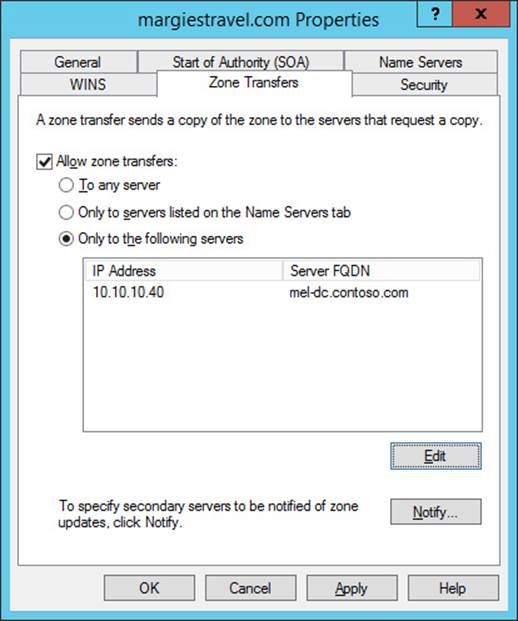
FIGURE 3-42 Configuring zone transfers
7. In the DNS Manager Console, click Forward Lookup Zones under MEL-DC.contoso.com, as shown in Figure 3-43.
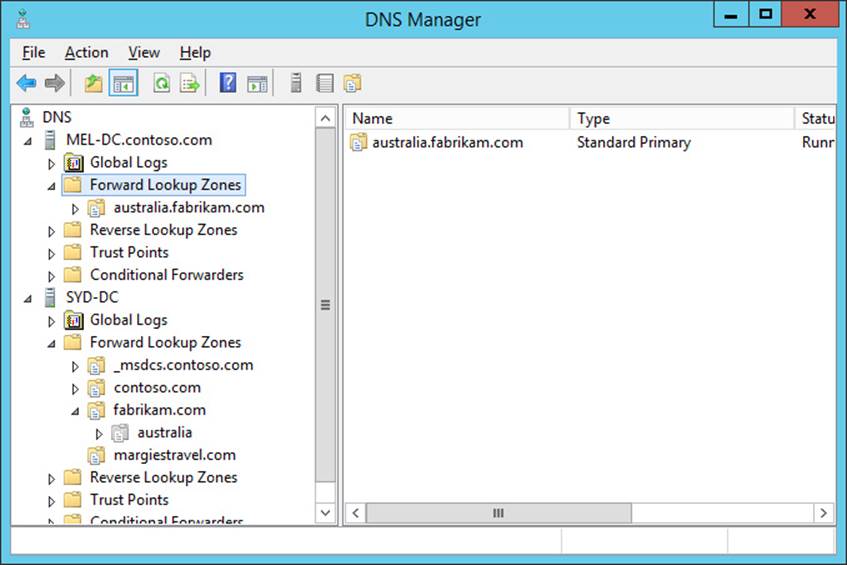
FIGURE 3-43 Forward Lookup Zones
8. In the Action menu, click New Zone.
9. In the Welcome page of the New Zone Wizard, click Next.
10. In the Zone Type page, click Secondary Zone, as shown in Figure 3-44, and click Next.

FIGURE 3-44 Secondary zone
11. In the Zone Name page, type margiestravel.com and click Next.
12. In the Master DNS Servers page, type SYD-DC.contoso.com, press Enter, and click Next (as shown in Figure 3-45).

FIGURE 3-45 Master DNS Servers
13. Click Finish and verify that margiestravel.com is listed as a secondary zone on MEL-DC.contoso.com, as shown in Figure 3-46.
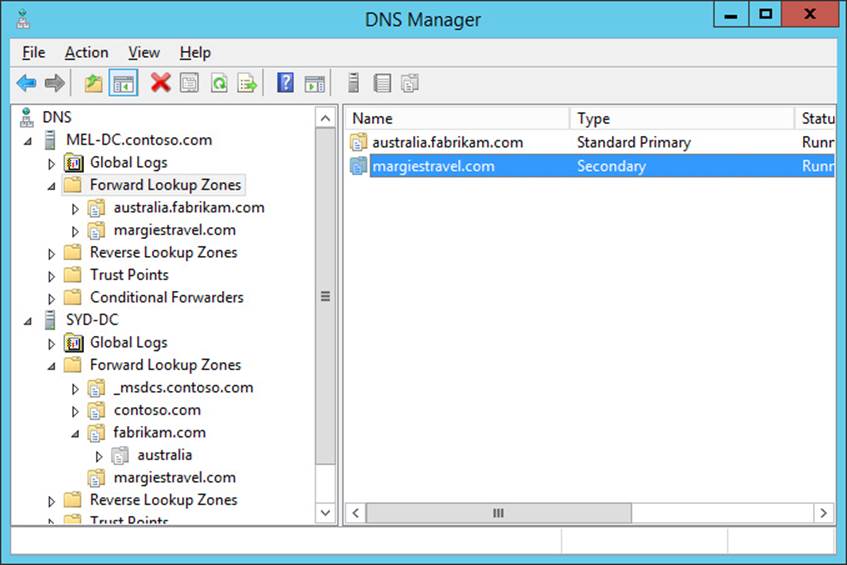
FIGURE 3-46 Secondary zone configured
Exercise 5: Single-label name resolution
In this exercise, you configure single-label name resolution. To complete this exercise, perform the following steps:
1. In the DNS Manager, click Forward Lookup Zones under SYD-DC.
2. Click the Action Menu, and click New Zone.
3. In the Welcome page of the New Zone Wizard, click Next.
4. In the Zone Type page, click Primary Zone, ensure that Store The Zone In Active Directory is selected, and click Next.
5. In the Active Directory Zone Replication Scope page, click To All DNS Servers Running On Domain Controllers In This Forest: Contoso.com and click Next.
6. In the Zone Name page, type GlobalNames, as shown in Figure 3-47, and click Next.
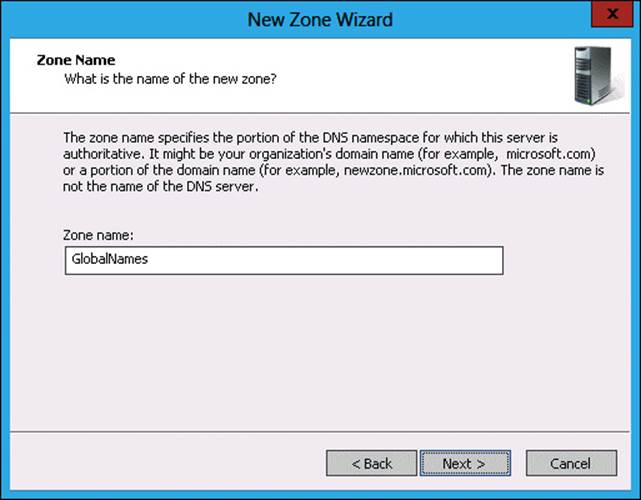
FIGURE 3-47 Secondary zone configured
7. In the Dynamic Update page, click Do Not Allow Dynamic Updates, and click Next.
8. In the Completing The New Zone Wizard page, click Finish.
9. Right-click the Windows PowerShell icon on the taskbar, and click Run As Administrator.
10. Issue the following command to enable the GlobalNames zone on SYD-DC.
Set-DnsServerGlobalNameZone –ComputerName SYD-DC –Enable $True
11. Switch to DNS Manager.
12. Click the GlobalNames zone. In the Action menu, click New Alias (CNAME).
13. In the New Resource Record dialog box, configure the following information, as shown in Figure 3-48, and click OK.
![]() Alias Name (Uses Parent Domain If Left Blank): Wollongong
Alias Name (Uses Parent Domain If Left Blank): Wollongong
![]() Fully Qualified Domain Name (FQDN) For Target Host: MEL-DC.contoso.com
Fully Qualified Domain Name (FQDN) For Target Host: MEL-DC.contoso.com

FIGURE 3-48 Record in GlobalNames zone
14. In the Windows PowerShell prompt, type the following to verify single name resolution.
nslookup Wollongong
Exercise 6: Configure and manage DNSSEC
In this exercise, you configure and manage DNSSEC. To complete this exercise, perform the following steps:
1. In DNS Manager, click Forward Lookup Zones under SYD-DC.
2. In the Action menu, click New Zone.
3. In the Welcome page of the New Zone Wizard, click Next.
4. In the Zone Type page, click Primary Zone, enable the Store The Zone In Active Directory option, and click Next.
5. In the Active Directory Zone Replication Scope page, click To All DNS Servers Running On Domain Controllers In This Forest: Contoso.com.
6. In the Zone Name page, type the zone name as secure.contoso.com, as shown in Figure 3-49, and click Next.

FIGURE 3-49 Creating a new zone
7. In the Dynamic Update page, click Allow Only Secure Dynamic Updates, and click Next.
8. In the Completing The New Zone Wizard page, click Finish.
9. In the DNS Manager, click Secure.contoso.com under Forward Lookup Zones.
10. In the Action menu, click New Host (A Or AAAA).
11. In the New Host dialog box, configure the following details, as shown in Figure 3-50, and then click Add Host.
![]() Name: Host-1
Name: Host-1
![]() IP Address: 10.10.10.150
IP Address: 10.10.10.150
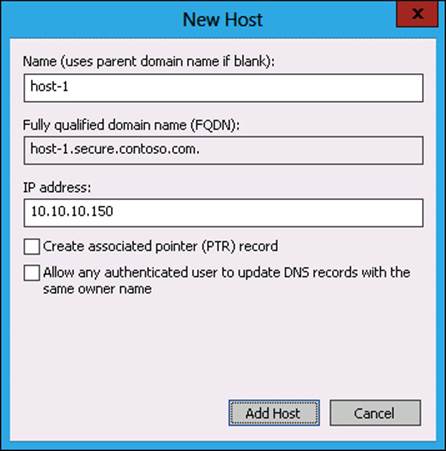
FIGURE 3-50 Creating a new host
12. In the New Host dialog box, configure the following details, click Add Host, and click Done:
![]() Name: Host-2
Name: Host-2
![]() IP Address: 10.10.10.151
IP Address: 10.10.10.151
13. Run the following Windows PowerShell command to verify that no RRSIG record is present.
Resolve-DNSname host-1.secure.contoso.com –server SYD-DC –dnssecok
14. In DNS Manager, click Secure.contoso.com.
15. From the Action menu, click DNSSEC and click Sign The Zone.
16. In the DNS Security Extensions (DNSSEC) page of the Zone Signing Wizard, click Next.
17. In the Signing Options page, click Use Default Settings To Sign The Zone, as shown in Figure 3-51, and click Next.
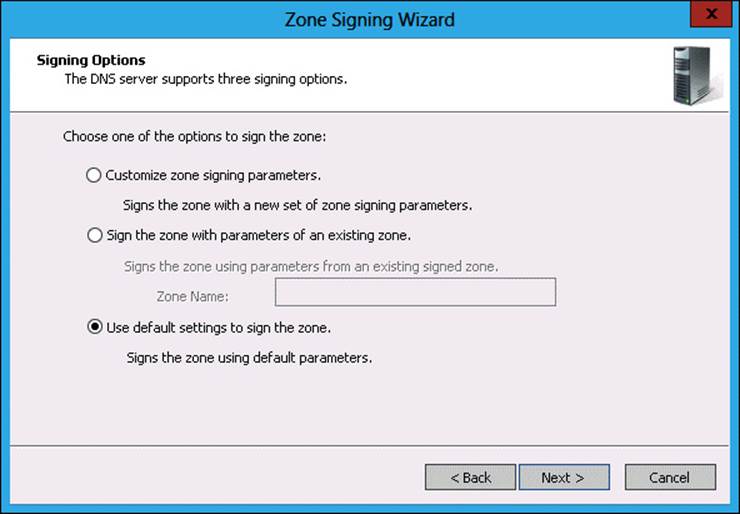
FIGURE 3-51 Sign DNS Zone
18. In the DNS Security Extensions page, click Next.
19. In the Signing The Zone page, click Finish.
20. Click Secure.contoso.com and from the Action menu, click Refresh.
21. View the contents of the Secure.contoso.com zone in DNS Manager to verify the presence of the new DNSKEY, RRSIG, and NSEC3 records.
22. Rerun the Windows PowerShell command from step 13 and note the presence of the RRSIG record.
Suggested practice exercises
The following additional practice exercises are designed to give you more opportunities to practice what you’ve learned and to help you successfully master the lessons presented in this chapter.
![]() Exercise 1 Configure a primary zone on MEL-DC. Configure a secondary zone of the primary zone on SYD-DC. Create host records in the primary zone on MEL-DC and verify that they replicate to the secondary zone on SYD-DC.
Exercise 1 Configure a primary zone on MEL-DC. Configure a secondary zone of the primary zone on SYD-DC. Create host records in the primary zone on MEL-DC and verify that they replicate to the secondary zone on SYD-DC.
![]() Exercise 2 Install Peer Name Resolution Protocol on SYD-DC, MEL-DC, and ADL-DC. Use PNRP to resolve the IPv6 address of each server.
Exercise 2 Install Peer Name Resolution Protocol on SYD-DC, MEL-DC, and ADL-DC. Use PNRP to resolve the IPv6 address of each server.
![]() Exercise 3 Use Windows PowerShell to create A, CNAME, PTR, and MX records in the secure.contoso.com zone created in Exercise 3.
Exercise 3 Use Windows PowerShell to create A, CNAME, PTR, and MX records in the secure.contoso.com zone created in Exercise 3.
Answers
This section contains the answers to the lesson review questions in this chapter.
Lesson 1
1. Correct answers: A and C
A. Correct. Configuring the zone as Active Directory integrated primary enables you to configure the zone to accept only secure dynamic updates.
B. Incorrect. You cannot configure a standard primary zone so that it will accept only secure dynamic updates. A standard primary zone can be configured to accept both secure and insecure dynamic updates.
C. Correct. Configuring this setting ensures that only computers that are members of the domain can update the zone.
D. Incorrect. If you do not configure the zone to allow dynamic updates, you have to perform zone updates manually.
2. Correct answer: C
A. Incorrect. This network ID would be associated with the 168.192.in-addr.arpa zone.
B. Incorrect. This network ID would be associated with the 192.186.15.in-addr.arpa zone.
C. Correct. Zone names use octets in reverse. The zero is dropped from the zone name.
D. Incorrect. This network ID would be associated with the 15.168.192.0.in-addr.apra zone.
3. Correct answer: B
A. Incorrect. You should not create the target zone on the computer on which you are going to perform the delegation, unless that computer will host that zone. In this situation, the target zone will be hosted on the computer with IP address 10.100.10.10.
B. Correct. You must create the target zone on the server that will host that zone prior to performing the delegation.
C. Incorrect. You must create the target zone before you perform a delegation.
D. Incorrect. You must create the target zone before you perform a delegation.
4. Correct answer: D
A. Incorrect. Although configuring a secondary zone will provide a local copy of the partner organization’s zone, a better approach is to use a stub zone because the zone updates frequently. This way, clients on your organizational network can quickly locate the authoritative name servers in the partner zone and resolve addresses in that zone accurately.
B. Incorrect. Conditional forwarders use static entries for authoritative servers in the target zone. Because the authoritative servers in the target zone often change, a conditional forwarder is quickly out of date.
C. Incorrect. Forwarders are used to forward all queries, rather than queries to a specific zone.
D. Correct. The best approach is to use a stub zone. This way, clients on your organizational network can quickly locate the authoritative name servers in the partner zone and resolve addresses in that zone accurately.
5. Correct answers: B and C
A. Incorrect. A stub zone replicates authoritative name server information from a target zone. In this situation, you simply want to forward traffic for hosts in a specific zone to a specific DNS server.
B. Correct. You need to configure a forwarder that will forward traffic to your ISP’s DNS server.
C. Correct. A conditional forwarder will forward all traffic to the margiestravel.com DNS zone, to a DNS server at a specific address.
D. Incorrect. You want to forward client request traffic either to your ISP’s DNS server or to the margiestravel.com DNS server. Hosting a secondary zone of the margiestravel.com DNS zone does not accomplish this goal.
Lesson 2
1. Correct answer: B and D
A. Incorrect. DHCP provides network address information to clients, but can’t be used to provide IPv6 single-label name resolution.
B. Correct. GlobalNames zones can be used to provide single-label name resolution for IPv6.
C. Incorrect. WINS does not support IPv6.
D. Correct. PNRP provides single-label name resolution for IPv6.
2. Correct answer: B
A. Incorrect. DNS option 005 is used to provide clients with the address of DNS servers.
B. Correct. DNS option 044 is used to provide clients with the address of WINS servers.
C. Incorrect. Option 004 is used to provide clients with the address of time servers.
D. Incorrect. Option 015 is used to provide clients with their DNS domain name.
3. Correct answer: D
A. Incorrect. Reverse lookup zones are used to translate IP addresses into FQDNs. They can’t be used for single-label name resolution.
B. Incorrect. Stub zones are used to store the addresses of authoritative name servers. They can’t be used for single-label name resolution.
C. Incorrect. Secondary zones are read-only replicas of primary zones, although it is possible to create a secondary zone of a GlobalNames zone.
D. Correct. GlobalNames zones allow you to provide single-label name resolution without deploying WINS. You can manually update a GlobalNames zone.
4. Correct answer: C
A. Incorrect. DNS requires the deployment of a centralized server to respond to DNS lookup requests.
B. Incorrect. WINS requires the deployment of a centralized server to respond to WINS lookup requests.
C. Correct. PNRP provides IPv6 name resolution without requiring the deployment of a centralized server.
D. Incorrect. DHCP provides IP address information. It can’t be used to resolve name resolution queries.
5. Correct answer: C
A. Incorrect. Although Set-DnsServer can be used to configure the properties of a DNS server, it can’t be used to enable GlobalNames zone.
B. Incorrect. You use this cmdlet to configure DNS conditional forwarders.
C. Correct. You use the Set-DnsServerGlobalNameZone cmdlet to enable GlobalNames zones once they are created.
D. Incorrect. You use this cmdlet to configure a DNS server forwarder.
Lesson 3
1. Correct answer: D
A. Incorrect. A records are associated with IP addresses. In this case, you want to associate a new name with an existing FQDN.
B. Incorrect. MX records are used to provide MX information.
C. Incorrect. PTR records are used to associate IP addresses with FQDNs.
D. Correct. A CNAME record, also known as an alias record, allows you to provide an alternate name that points to an existing A record.
2. Correct answer: C
A. Incorrect. You don’t need to create an alias record; you need to create an MX record to allow the mail servers of external organizations to locate your organization’s mail gateway.
B. Incorrect. A PTR record already exists in this scenario.
C. Correct. MX records are used by mail gateways to determine the address of remote mail gateways during message delivery.
D. Incorrect. An A record already exists for this host.
3. Correct answer: B
A. Incorrect. You use the Add-DnsServerResourceRecordCName cmdlet to add an alias rather than an AAAA record.
B. Correct. You use the Add-DnsServerResourceRecordAAAA cmdlet to create an AAAA record. AAAA records map FQDNs to IPv6 addresses.
C. Incorrect. You use the Add-DnsServerResourceRecordMX cmdlet to add MX records to a DNS zone.
D. Incorrect. You use the Add-DNSSErverResourceRecordPtr cmdlet to add a pointer record. A pointer record has already been configured for this host.
4. Correct answer: B
A. Incorrect. Secure dynamic updates ensure that only authorized hosts can update records in a DNS zone. They do not reduce the number of stale resource records.
B. Correct. By time stamping records, aging and scavenging ensures that stale resource records are removed from a zone in a timely manner.
C. Incorrect. You use DNSSEC to validate the authenticity of DNS records.
D. Incorrect. You configure zone transfers to authorize which servers can perform zone transfers of a DNS zone.
5. Correct answer: A
A. Correct. You can use DNSSEC to validate the authenticity of DNS records.
B. Incorrect. You configure zone transfers to authorize which servers can perform zone transfers of a DNS zone.
C. Incorrect. Aging and scavenging ensures that stale resource records are removed from a zone in a timely manner. You can’t use aging and scavenging to validate the authenticity of records.
D. Incorrect. Secure dynamic updates ensure that only authorized hosts can update records in a DNS zone. This technology does not allow a client to determine the authenticity of the results of a DNS query.