I am working with Management studio and I want to log in to databases located on another server in another domain. The only login I have for such is with Windows credentials.
I want to be able to log in via Management Studio on my local PC. I have found the only way to do so is using a command similar to:
runas /netonly /user:domainusername "C:Progr...IDESsms.exe"
While this works, it isn’t the easiest or nicest way. Is there a better way? Any way I can do it within Management Studio?
![]()
asked Jul 21, 2013 at 20:01
![]()
2
The only elegant ways to connect to a SQL Server in another domain but still use Windows Authentication are:
- What you’re already doing:
runas /netonly - Connecting via remote desktop and opening SSMS locally on the remote server
answered Jul 21, 2013 at 20:40
![]()
Aaron BertrandAaron Bertrand
268k36 gold badges458 silver badges485 bronze badges
In addition to the other answers you’ve received, you can also shift-right click on an executable or a shortcut to one and in the resulting context menu, there should be an option to run as a different user. I tried this on my Win 7 machine. I seem to recall that in XP, I had to install ShellRunAs for these options to show up.
answered Jul 21, 2013 at 22:55
![]()
Ben ThulBen Thul
30.4k4 gold badges45 silver badges66 bronze badges
You can get a graphical password prompt by downloading ShellRunAs or better yet, the entire Sysinternals Suite.
-
Store the executable(s) for ShellRunAs or the Sysinternals Suite in a location of your choice. I recommend:
C:Program FilesSysinternals -
You can then enable a «Run as different user…» context menu option for all applications/shortcuts by running
shellrunas /reg
-
If you want to only enable this for SQL Server Management Studio, you can create a shortcut to it and pass the path the management studio like so:
"C:Program FilesSysinternalsShellRunas.exe" "C:Program Files (x86)Microsoft SQL Server100ToolsBinnVSShellCommon7IDESsms.exe"

If you download the entire Sysinternal Suite, I would recommend you add the directory to your PATH environment variable.
Please note that you will need to adjust the paths above based on your SQL Server Management Studio version and whether you’re running 64 bit or 32 bit Windows.
answered Oct 24, 2014 at 2:09
![]()
Drew ChapinDrew Chapin
7,6595 gold badges57 silver badges82 bronze badges
Поддерживаемые методы авторизации
Имеется два различных метода авторизации для подключения к SQL Server: Windows и SQL Server.
Для авторизации Windows требуется, чтобы пользователь сначала авторизовался в Windows со своим логином и паролем. После этого он может подключиться к SQL Server, используя авторизацию Windows. То есть при условии, что их учетной записи Windows был предоставлен доступ к SQL Server через логин (подробнее о логинах ниже). Авторизация Windows тесно связана с безопасностью Windows и называется интегрированной безопасностью (Integrated Security). Авторизация Windows прекрасно работает, когда лицо является частью домена Windows.
Но бывают случаи, когда люди не могут подключиться к Windows; это имеет место при авторизации SQL. Авторизация SQL является менее безопасной, чем авторизация Windows. Для подключения к SQL Server с помощью авторизации SQL, пользователь должен указать логин и пароль при подключении. Пароль логина при авторизации SQL хранится в базе данных master. Т.к. пароль хранится в базе данных, его легче взломать. Поскольку можно сделать бэкап базы с последующим восстановлением, этот способ авторизации менее безопасен, чем при использовании авторизации Windows.
Поскольку авторизация SQL менее безопасна, чем авторизация Windows, рекомендуется при установке экземпляра SQL Server выбирать смешанный режим, если вам требуется поддержка пользователей или приложений, которые не могут подключаться к Windows. Несмотря на то, что авторизация Windows более безопасна и является рекомендуемой практикой для подключения к SQL Server, многие поставщики нестандартного прикладного программного обеспечения до сих пор не поддерживают подключение посредством авторизации Windows.
Установка SQL Server с поддержкой различных режимов авторизации
При установке SQL Server вы можете выбрать поддержку только авторизации Windows или обоих методов авторизации, которая называется смешанным режимом. В процессе установки при определении конфигурации ядра базы данных вы решаете использовать ли смешанный режим, что показано на рис.1.
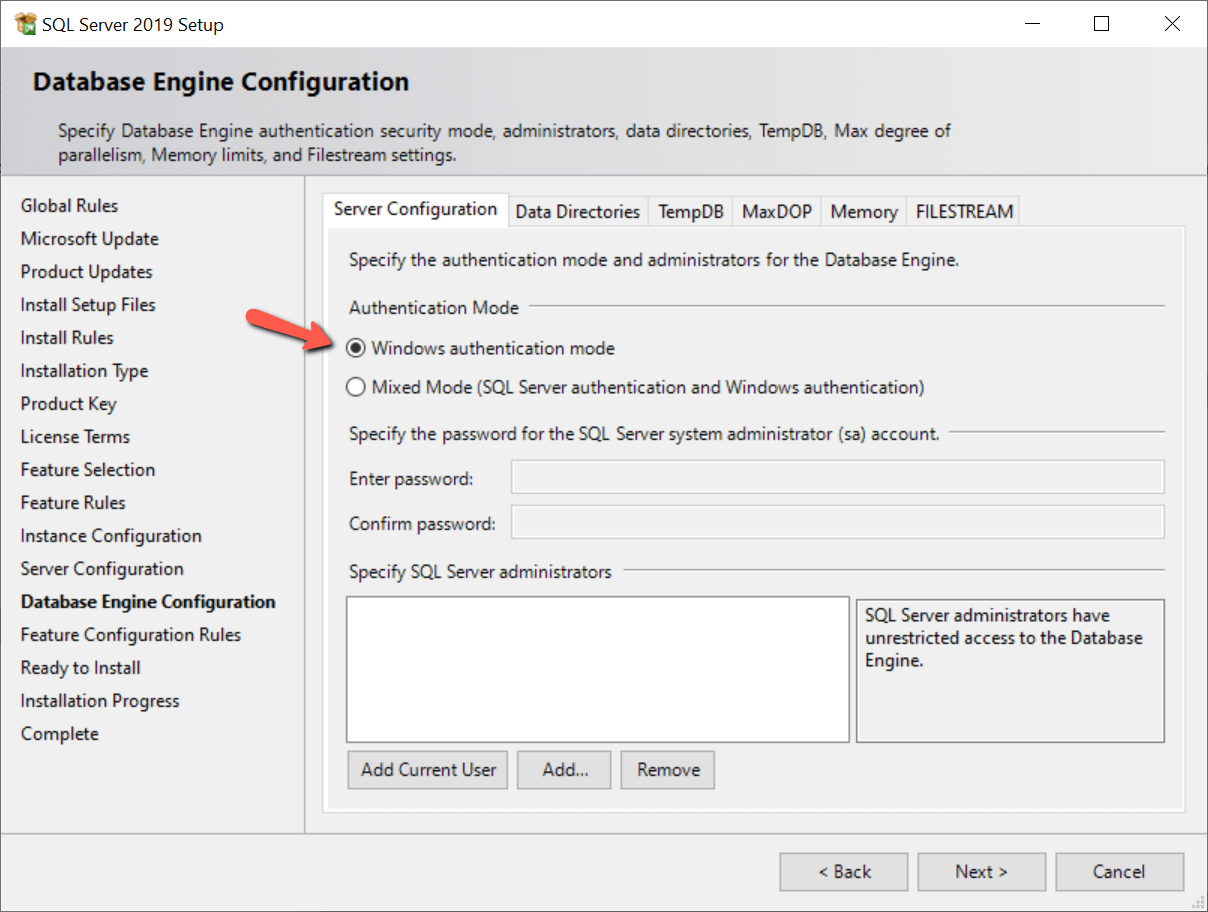
Рис.1 Выбор режима авторизации
Авторизация Windows выбирается по умолчанию (красная стрелка на рис.1). Если вам требуется поддержка авторизации как Windows, так и SQL Server, вам следует выбрать вариант “Mixed Mode”. При этом становится доступным установка пароля аккаунта SA, и вам потребуется задать пароль SA. При выборе только авторизации Windows, аккаунт SA недоступен. Чтобы защитить учетную запись SA при использовании смешанного режима, вы можете отключить ее после включения.
Как определить, какие методы авторизации поддерживаются
Вы можете проверить установленный метод авторизации несколькими способами. Один из способов — использовать SQL Server Management Studio (SSMS). Для этого выполните щелчок правой кнопкой на имени экземпляра и выберите команду Properties (свойства). В моем случае окно свойств показано на рис.2.
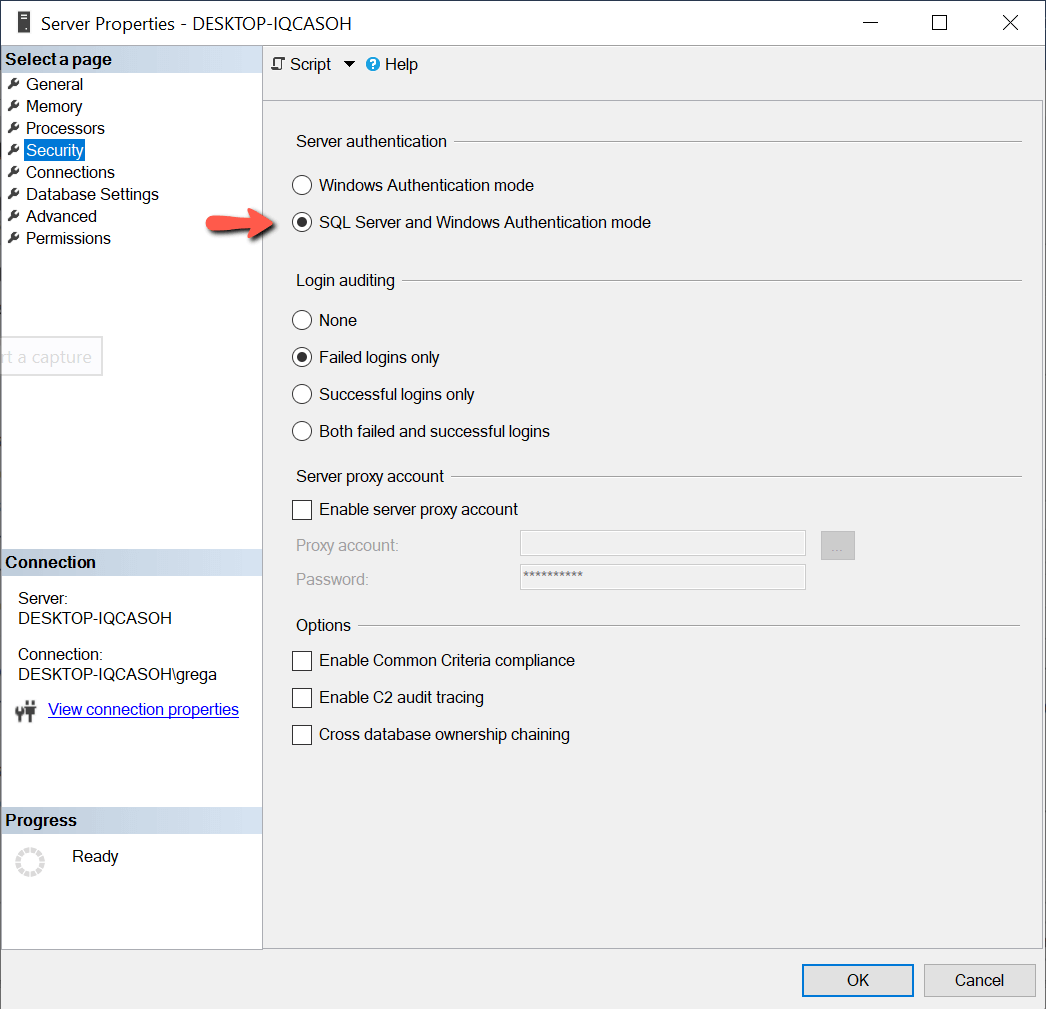
Рис.2 Определение режима авторизации
На рис.2 показывается, что мой экземпляр поддерживает смешанный режим авторизации (красная стрелка).
Другой способ — это использовать код T-SQL. На листинге ниже представлен код для вывода режима авторизации.
SELECT CASE SERVERPROPERTY('IsIntegratedSecurityOnly')

          WHEN 1 THEN 'Windows Authentication Only'

          WHEN 0 THEN 'Windows and SQL Server Authentication'

       END as [Authentication Mode];
Листинг 1: отображение режима авторизации
Изменение методов авторизации после установки SQL Server
Вы можете захотеть изменить установки авторизации для экземпляра SQL Server. Вы могли использовать настройки по умолчанию при установке для поддержки авторизации Windows, а затем приобрели программу, которая может подключаться к серверу только при использовании авторизации SQL Server. Или вы захотели сделать ваш экземпляр более безопасным, удалив поддержку авторизации SQL Server. Опции авторизации можно легко изменить, используя страницу свойств в SSMS, показанную на рис.2.
Если бы я захотел изменить поддержку авторизации только на Windows, все, что мне потребовалось бы сделать, это щелкнуть на кнопке “Windows authentication mode”, а затем на кнопке ОК для сохранения изменений. После изменения этого свойства, необходимо перезапустить экземпляр, чтобы изменения вступили в силу.
Логины SQL Server
Для подключения к SQL Server вы должны иметь доступ к серверу. Доступ гарантируется посредством логина. Логин также называют участником безопасности (security principal), он хранится в базе данных master. Есть одно исключение — это доступ к автономной базе данных. Пользователи автономных баз данных напрямую подключаются к базе данных без необходимости иметь логин в базе данных master. Автономные базы данных — это тема для последующих статей.
Имеется три типа логинов, которые хранятся в базе данных master: пользователь Windows, группа Windows и SQL. Давайте рассмотрим каждый из этих трех типов логинов.
Логин пользователя Windows предоставляет доступ отдельному пользователю Windows. При создании логина этого типа не требуется задавать пароль. Этот тип логина требует, чтобы пользователь сначала прошел валидацию, подключившись к домену Windows. Пароль хранится в домене Windows.
Логин SQL Server подобен логину Windows в том, что он предоставляет доступ к SQL Server для отдельного пользователя, но отличается тем, что пароль логина SQL хранится в базе данных master. Следовательно, при создании логина SQL Server требуется указывать пароль, а также некоторые другие опции, как показано на рис.3.
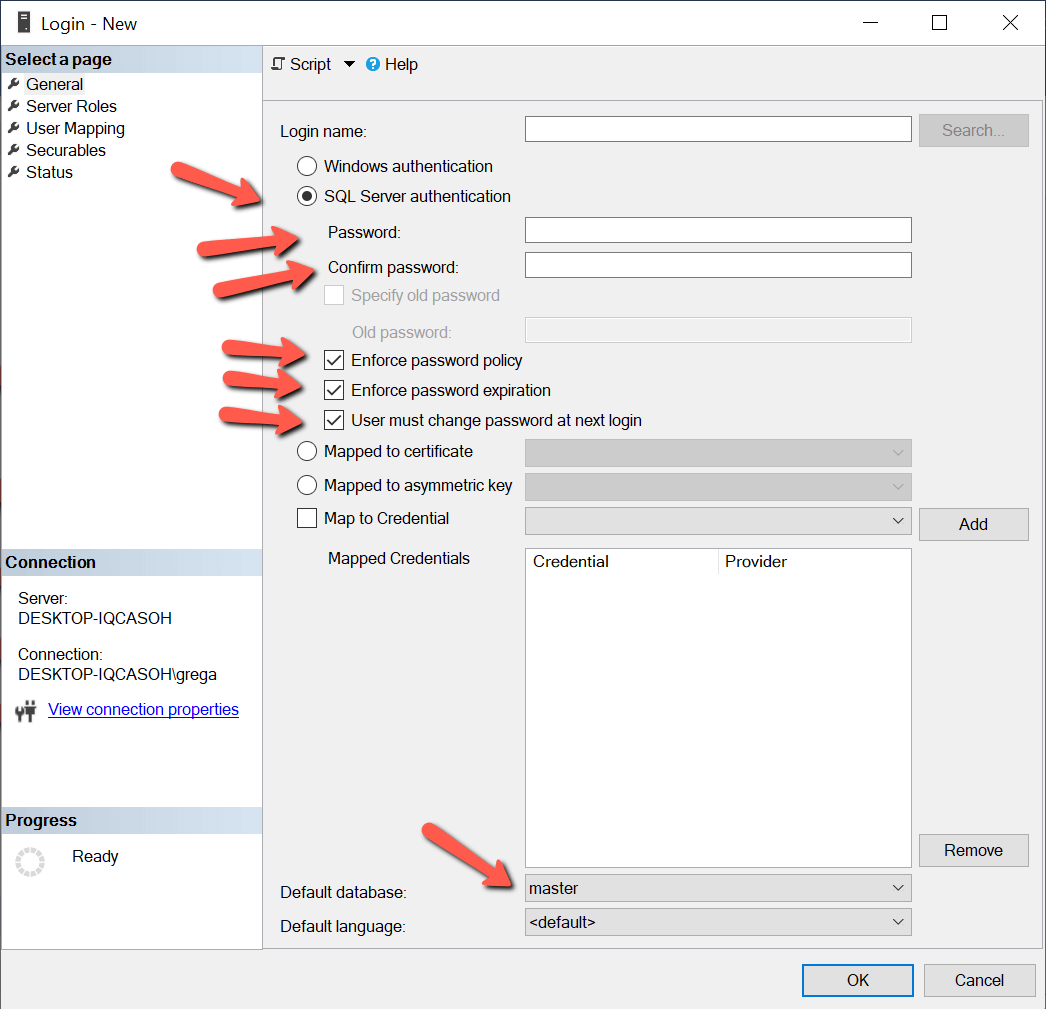
Рис.3 Настройка логина при авторизации SQL Server
На рис.3 показано, что для входа в SQL Server может быть применена политика паролей Windows и истечения срока действия, а также может потребовать от пользователя изменить пароль при первом входе в систему. Microsoft добавила эти новые возможности в SQL Server 2005. Для поддержки этих новых возможностей в приложениях может использоваться API NetValidatePasswordPolicy.
Последний тип логина, логин группы Windows, подобен логину Windows с незначительными отличиями. Логин группы Windows обеспечивает доступ к экземпляру SQL Server каждому логину Windows, который является членом группы. Группы Windows являются хорошим способом предоставить доступ множеству логинов Windows при наличии только одного логина SQL Server. Используя группу Windows, доступ к экземпляру SQL Server может регулироваться добавлением или удалением членов группы. Использование групп Windows помогает минимизировать усилия по обеспечению безопасности и решению проблем безопасности, связанных с логинами.
Внизу скриншота на рис.3 вы видите настройку для логина “Default Database” (база данных по умолчанию). При создании логина базой данных по умолчанию является база данных master. Вы можете поменять эту настройку на любую базу данных на сервере. Лучший вариант — установить по умолчанию базу данных, которую пользователь будет использовать при подключении к SQL Server.
Логины Windows считаются более безопасными из-за способа, каким сохраняется пароль для логина. Пароль для логина Windows сохраняется при использовании настоящего шифрования. В то время как пароль для логина SQL не шифруется, а хэшируется. Поэтому пароль SQL легче взломать. Для установки логинов и паролей Windows требуется администратор доменов, а для логинов SQL администраторы базы данных заводят логины и пароли. Использование админов доменов для управления паролями логинов обеспечивает еще один слой безопасности, обычно называемый разделением обязанностей. Разделение обязанностей по созданию и управлению логинами Windows от управления базами данных и доступа к ним обеспечивает дополнительный контроль безопасности по предоставлению доступа к данным, хранящимся на SQL Server.
Создание логина для SQL Server позволяет пользователям подключаться к серверу. Но один лишь логин не предоставляет пользователю доступ к каким-либо данным в различных базах данных на сервере. Чтобы логин мог читать и записывать данные в базу, он должен иметь доступ к тем или иным базам данных. Если требуется, для логина может быть установлен доступ к нескольким базам данных экземпляра.
Пользователи базы данных
Пользователь базы данных — это не то же самое, что и логин. Логин предоставляет пользователю или приложению возможность подключаться к экземпляру SQL Server, в то время как пользователь базы данных дает пользователю права на доступ к базе данных. В каждой базе данных, к которой логину требуется доступ, требуется определить пользователя; исключение составляет логин с правами системного администратора. Если логин имеет права сисадмина, он имеет доступ ко всем базам данных без необходимости связывать его с пользователем базы данных. Эта связь между логином и пользователем базы данных называется мэппингом пользователей. Мэппинг пользователя для логина может быть создан во время создания логина или позже для уже установленных логинов.
Создание пользователя базы данных при создании нового логина
Чтобы показать обеспечение мэппинга пользователя при создании нового логина, я создам новый логин SQL Server с именем “Red-Gate”. На скриншоте (рис.4) показано окно “Login – new”, где я определяю новый логин. Чтобы вывести это окно, я разворачиваю вкладку “Security” в дереве объектов моего экземпляра, а затем выполняю щелчок правой кнопкой на строке «Logins» и выбираю пункт “New Login…” из выпадающего списка.
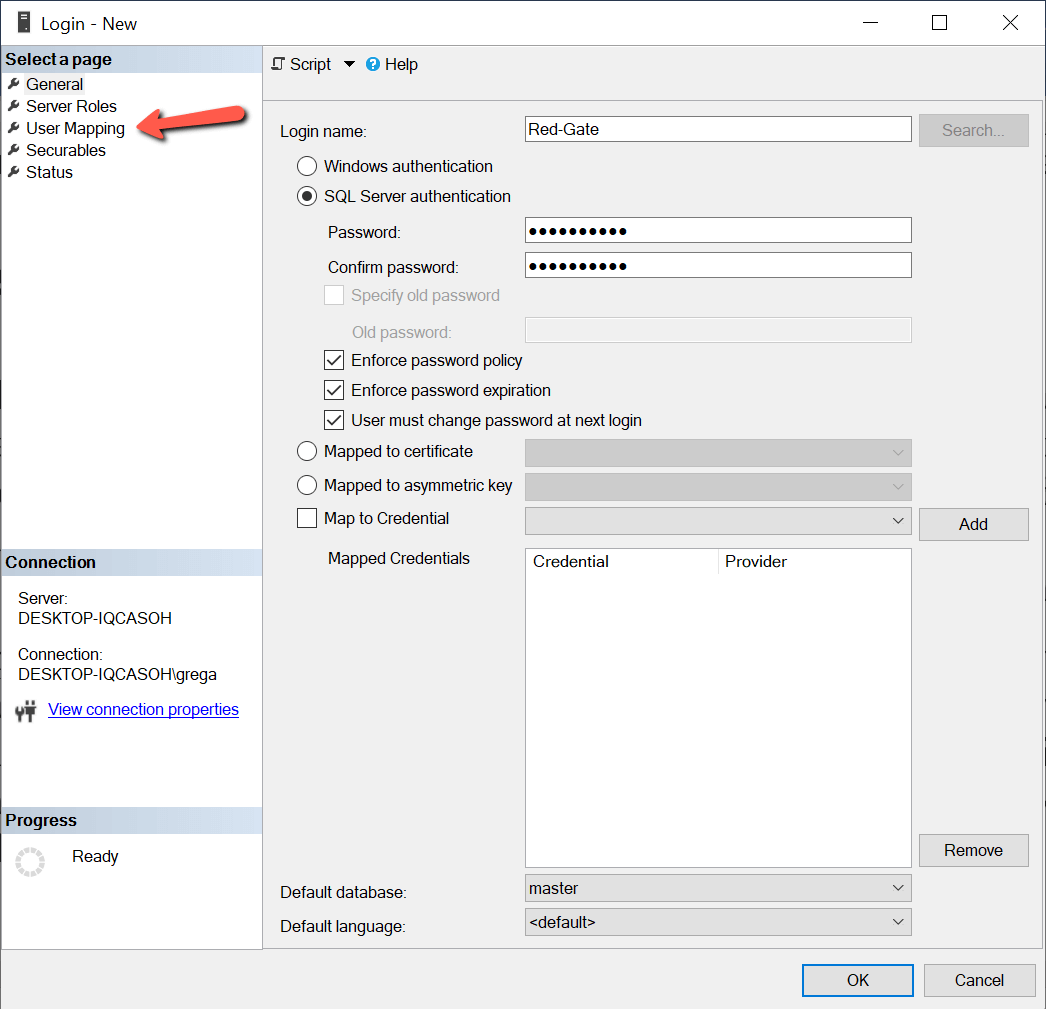
Рис.4 Создание логина Red-Gate
На рис.4 я ввожу «Red-Gate» в качестве имени логина и пароль этого логина SQL в соответствующих полях диалога. Для предоставления доступа этому новому логину я выполняю щелчок на пункте “User Mapping” в левой панели. После этого откроется окно, показанное на рис.5.
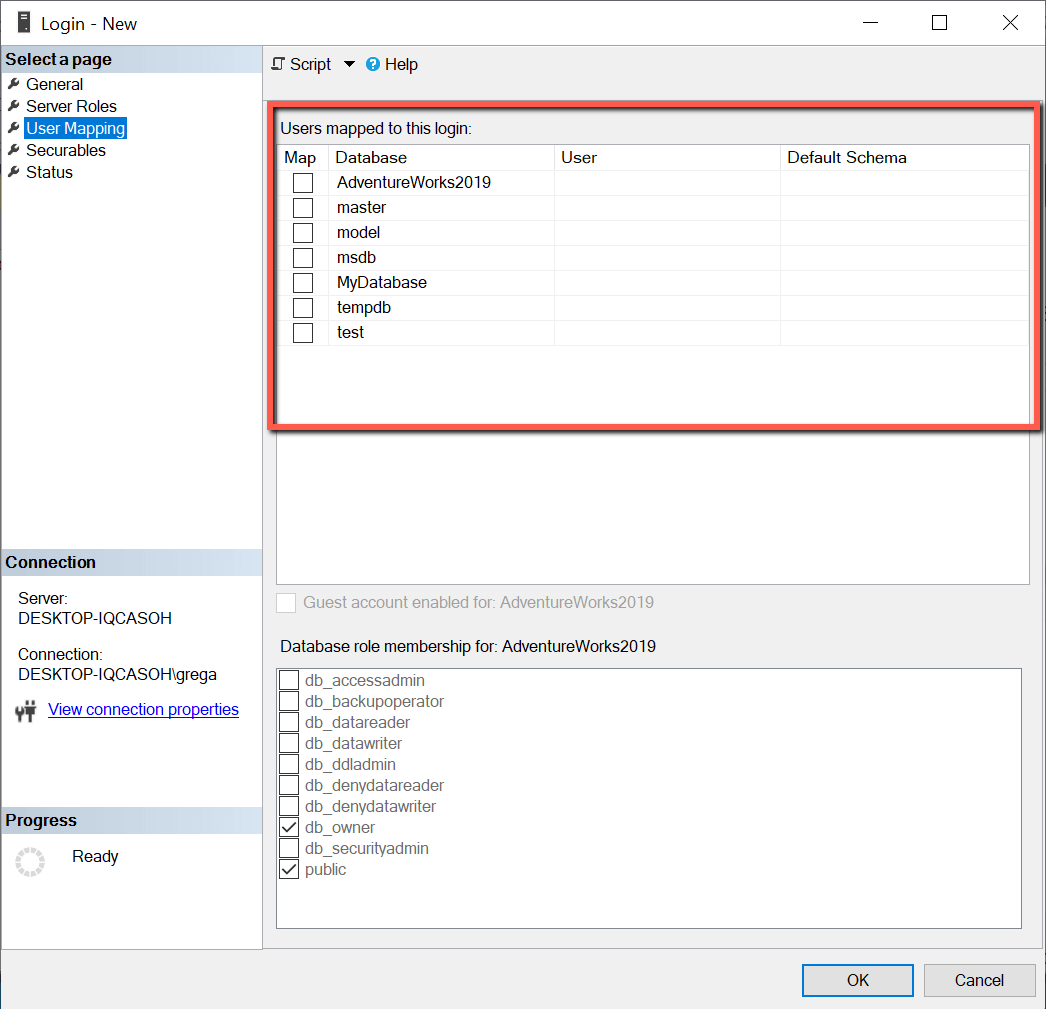
Рис.5 Окно мэппинга пользователя
В красном прямоугольнике выводится список баз данных, с которыми можно связать мой новый логин. Для мэппинга логина “Red-Gate” с базой данных “AdventureWorks2019” мне нужно просто щелкнуть на флажке «Map» рядом с базой данных AdventureWorks2019. Теперь я получу то, что показано на скриншоте (рис.6).
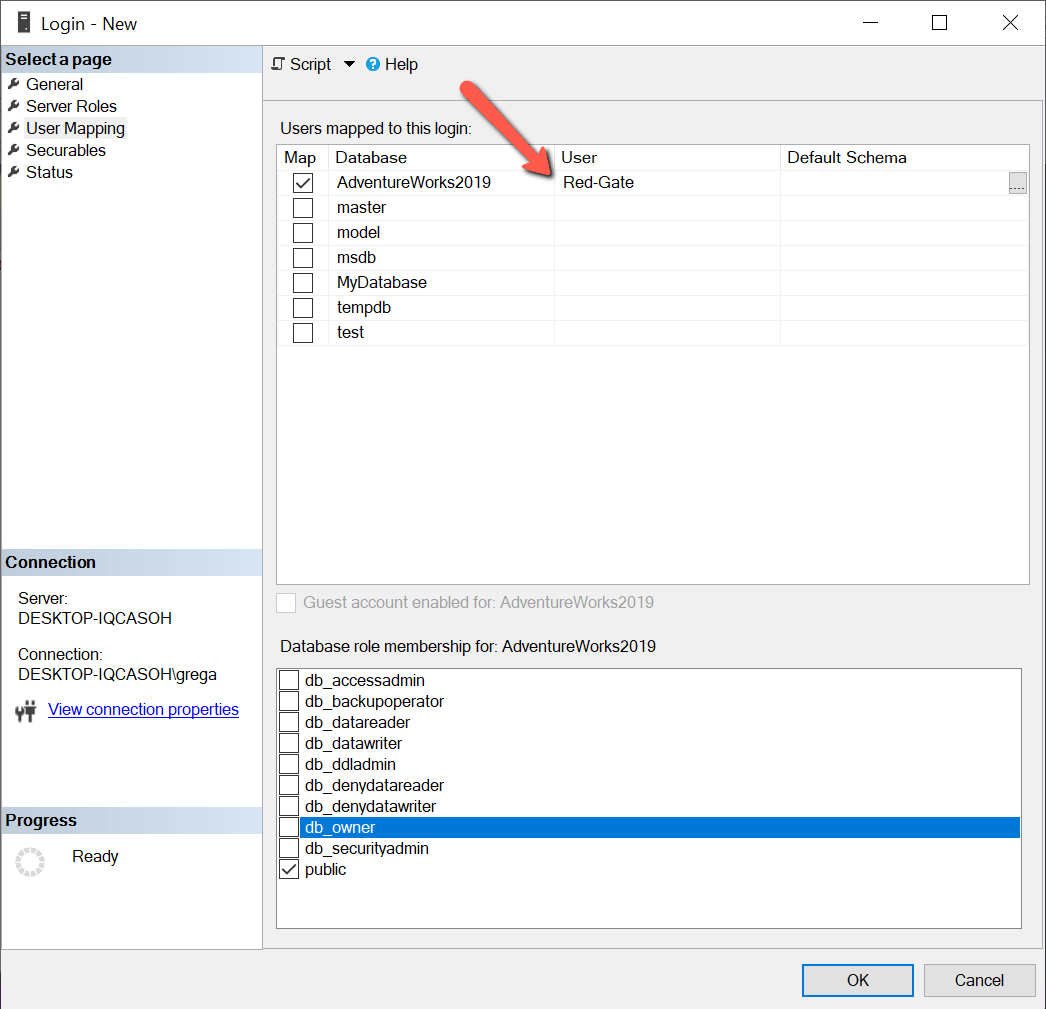
Рис.6 Мэппинг логина с базой данных
После установки флажка Map имя “Red-Gate” автоматически заносится в столбец «User» для базы данных AdventureWorks2019. В интерфейсе автоматически генерируется имя пользователя базы данных, совпадающее с логином. Имена пользователей базы данных не обязательно должны совпадать с логинами. Если вы хотите использовать другое имя, просто наберите желаемое имя вместо предложенного (в моем случае “Red-Gate”). Мэппинг логина с пользователями базы данных обеспечивает только доступ к базе данных, но не предоставляет прав на чтение или обновление данных в базе. В следующих статьях я буду обсуждать предоставление доступа к объектам базы данных на чтение/запись.
Предположим я хочу связать мой новый логин “Red-Gate” и с другими пользовательскими базами данных. В этом случае мне нужно просто проставить флажки рядом с требуемыми базами данных. В данном примере я осуществляю мэппинг логина “Red-Gate” только с базой данных AdventureWorks2019. Для завершения процедуры мэппинга моего логина “Red-Gate” с пользователем базы данных “Red-Gate” нужно щелкнуть кнопку «ОК».
Создание нового пользователя базы данных и связывание его с существующим логином
Иногда, когда логин уже существует, требуется предоставить ему доступ к тем или иным базам данных. Предположим, что теперь я хочу установить доступ моему логину Red-Gate к базе данных с именем MyDatabase. Чтобы предоставить логину Red-Gate доступ к еще одной базе данных, у меня есть несколько вариантов. Одним из них может быть просто модификация мэппинга пользователя путем изменения свойств логина. Это подобно тому, как я только что показал, добавляя мэппинг пользователя при создании логина Red-Gate.
Другой вариант — это добавление нового пользователя в базу данных MyDatabase, а затем связывание этого нового пользователя базы данных с логином Red-Gate. Чтобы создать нового пользователя в базе данных MyDatabase, нужно сначала развернуть базу данных, щелкнуть правой кнопкой на пункте “Security”, переместить указатель на пункт «New», а затем щелкнуть на пункте «User…», как показано на рис.7.
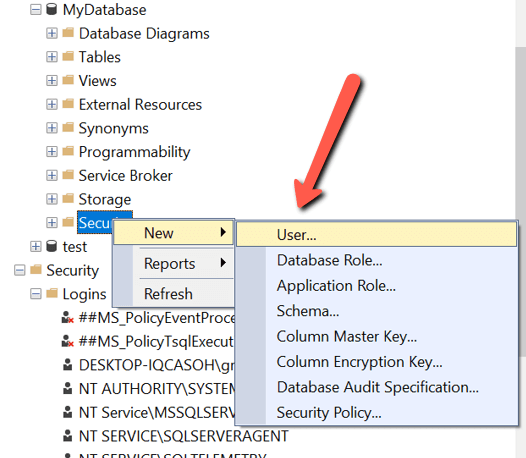
Рис.7 Диалог ввода нового пользователя базы данных
При щелчке на пункте меню «User…» откроется окно, показанное на рис.8.
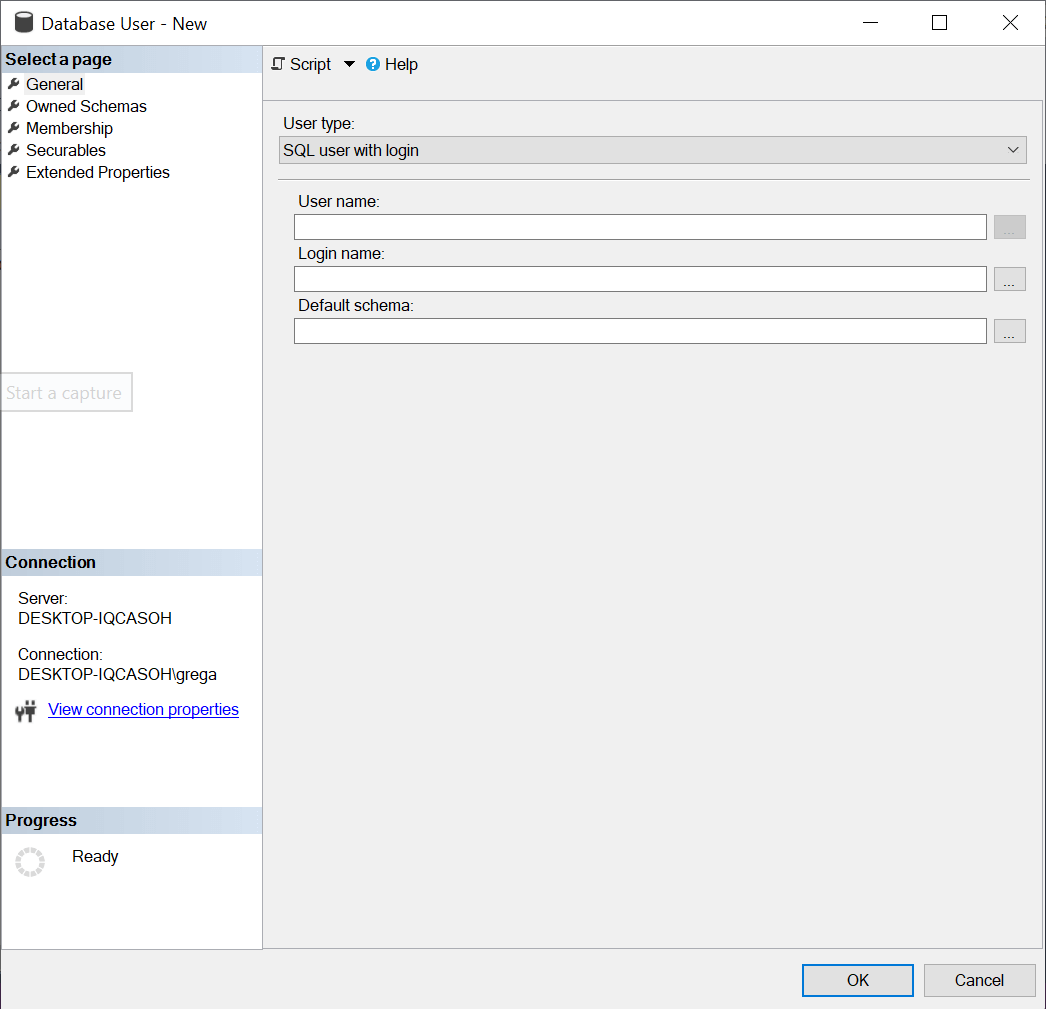
Рис.8 Добавление нового пользователя базы данных
Чтобы предоставить логину Red-Gate доступ к MyDatabase, нужно заполнить форму на рис.8. Сначала рассмотрим пункт “User Type” (тип пользователя). Значением по умолчанию для этого поля является “SQL User with Login” (пользователь SQL с логином). Имеется четыре других типа: SQL user without login (пользователь SQL без логина), User mapped to a certificate (пользователь, связанный с сертификатом), User mapped to an asymmetric key (пользователь, связанный с асимметричным ключом) и пользователи Window. Поскольку я создаю пользователя, который будет связан с логином SQL, я использую значение по умолчанию. Затем я ввожу имя создаваемого пользователя базы данных. Это может быть любое имя, но я предпочитаю использовать имена, совпадающие с соответствующими логинами. Поэтому я введу «Red Gate» в поле «User name». Затем я свяжу нового пользователя с логином. Для этого я могу либо набрать «Red Gate» для логина, либо использовать кнопку «…» для навигации по списку существующих логинов и выбрать нужный.
Последнее, что требуется, это определить схему по умолчанию для этого логина. Имя схемы ассоциируется с коллекцией объектов базы данных, владельцем которых является пользователь базы данных. По умолчанию каждая база данных имеет схему с именем «dbo», владельцем которой является учетная запись пользователя «dbo». При задании нового пользователя базы данных не обязательно указывать схему. Если схема не задана, будет использоваться схема по умолчанию «dbo». Я оставлю обсуждение различных аспектов схем для другой статьи. Когда я создаю нового пользователя базы данных Red-Gate, я оставляю пустым поле схемы по умолчанию и позволяю процессу создания нового пользователя автоматически установить схему по умолчанию в «dbo».
После создания нового пользователя я могу проверить его существование в базе данных, развернув ветку «User» в папке «Security» браузера объектов. Вы также можете создать нового пользователя базы данных и связать его с логином с помощью скрипта. В листинге 2 приводится пример использования T-SQL для создания того же пользователя, которого я только что создал визуальными средствами.
USE [MyDatabase]

GO

CREATE USER [Red-Gate] FOR LOGIN [Red-Gate]

GO
Листинг 2: Создание пользователя базы данных Red-Gate с помощью T-SQL
Методы авторизации SQL Server, логины и пользователи базы данных
Для подключения к SQL Server человеку или процессу необходимо авторизоваться. Имеется два различных метода авторизации на SQL Server: Windows и SQL Server. Метод Windows более безопасен и рекомендуется для подключении к SQL Server. Каждое авторизованное подключение к SQL Server получает доступ к экземпляру посредством логина. Логины определяются на уровне сервера. Сами по себе логины не обеспечивают доступ к данным на SQL Server. Для этого необходимо связать логин с пользователем базы данных. Методы авторизации, логины и пользователи базы данных обеспечивают основы безопасности SQL Server.
- Remove From My Forums
-
Вопрос
-
I am using SQL server 2014 management studio.
I want to know about authentication mode in SQL server in details. I have following questions in my mind :
1.What is windows authentication and SQL server authentication.
2. How windows authentication and SQL server authentication works.
3. Difference between windows authentication and SQL server authentication.
I have searched lot on google but things mixed up. That’s why i posted on forums.
Ответы
-
SQL Server authentication: you enter a username and password, which is validated against data stored in SQL Server. More precisely what is stored is the username and a hash of the password.
Windows Authentication: SQL Server gets the user information from Windows and verifies that your login is permitted to access the instance. You do not specify a password. Note that if you logged into to Windows as DOMAINUSER, you will always be logging
into SQL Server as DOMAINUSER. You cannot log on to SQL Server as DOMAINUSER2.-
Предложено в качестве ответа
31 декабря 2017 г. 12:16
-
Помечено в качестве ответа
AJret
2 января 2018 г. 6:17
-
Предложено в качестве ответа
-
Hi
windows authentication
Using this authentication mode it means you can access your db instance using your windows credentials (the ones that you use to access your computer with)
SQL server authentication
Using this authentication you can create users and assign them a username and password to be able to access the db instance using the details.
For a user to be able to access the database you will need to create a login for the database. This can be achieved easily from management studio by going to security and then mapping the new user to the db that you want to grant access tothanks-
Помечено в качестве ответа
AJret
2 января 2018 г. 6:17
-
Помечено в качестве ответа
-
Hi Ajret,
SQL Server Authentication has much difference from Windows Authentication. Please refer to the following description.
What is the difference between them? On the surface, you will need press user name and password when using SQL Server authentication, while using Windows authentication, you will need not to use them if the Windows account mapped to some login in SQL Server.
We can manage and use them easily when using Windows Authentication and it is more safe (especially using Kerberos) than SQL Server Authentication.By using Windows Authentication, Windows groups can be created at the domain level, and a login can be created on SQL Server for the entire group. Managing access from at the domain level can simplify account administration.
When we go deeper, for Windows authentication,
SQL Server validates the account name and password using the Windows principal token in the operating system. While for SQL Server authentication,
Both the user name and the password are created by using SQL Server and stored in SQL Server. This is the main difference.How them works? It is a complex problem, I will describe them briefly. For SQL Server authentication, it is not complex, after you giving the
credentials (login and password), SQL Server will check it and trust it. For Windows authentication, it is more complex. Windows authentication is a trusted connection, it will tell SQL Server that the user
is trusted and SQL Server will map this user to related login. Windows authentication can be divided into NTLM and Kerberos. Please refer to this blog:
https://blogs.msdn.microsoft.com/sql_protocols/2006/12/02/understanding-kerberos-and-ntlm-authentication-in-sql-server-connections/Best Regards,
Teige
MSDN Community Support
Please remember to click «Mark as Answer» the responses that resolved your issue, and to click «Unmark as Answer» if not. This can be beneficial to other community members reading this thread. If you have any compliments or complaints to
MSDN Support, feel free to contact MSDNFSF@microsoft.com.-
Помечено в качестве ответа
AJret
2 января 2018 г. 6:17
-
Помечено в качестве ответа
Here you will learn how to use your Windows user account to authenticate with the SQL Server.
SQL Server supports the two layers of authentication: login and database user.
Login is the first layer of security to access and connect to the SQL Server.
A login has nothing to do with the databases. Instead, login is mapped to a user in a database to read or write to a particular database.
There are two authentication modes in SQL Server using which you can login and connect with the SQL Server.
- Windows Authentication
- SQL Server Authentication
Windows Authentication
Windows authentication mode enables local Windows authentication with SQL Server, where you can login with your local Windows credentials.
For example, the following uses a Windows credential to connect to SQL Server where user in MYDBSERVERuser is the local user account on Windows and MYDBSERVER is the name of the database server. Click OK to login with this credentials and connect to the MYDBSERVER database server.
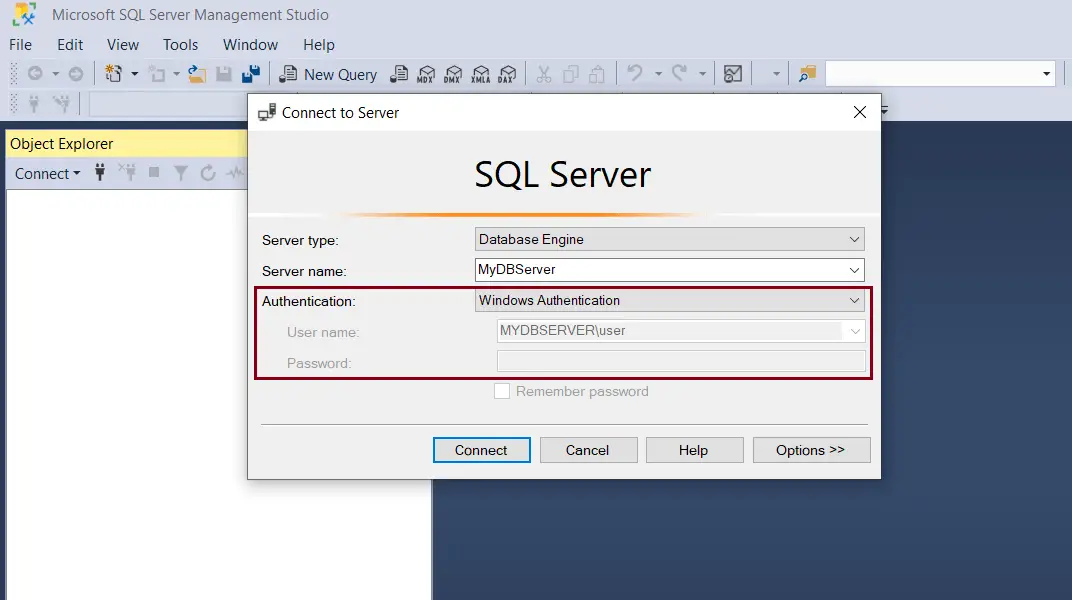
Windows authentication is the default authentication mode and is more secure than SQL Server authentication. It is also referred to as integrated security which is tightly integrated with Windows. Users who are already authenticated with Windows and need not provide any additional credentials while connecting to SQL Server. It is also called a trusted connection. The user account is confirmed by Windows.
In Windows authentication, login can be created in SQL Server for an entire Windows group which simplifies managing account administration.
Windows authentication uses Kerberos security protocol, provides password policy enforcement, and supports password expiration.
Let’s see how to create a new login that uses local Window’s user account to connect with the SQL Server.
Create a New Login with Windows Authentication
To create a new login, open SQL Server Management Studio.
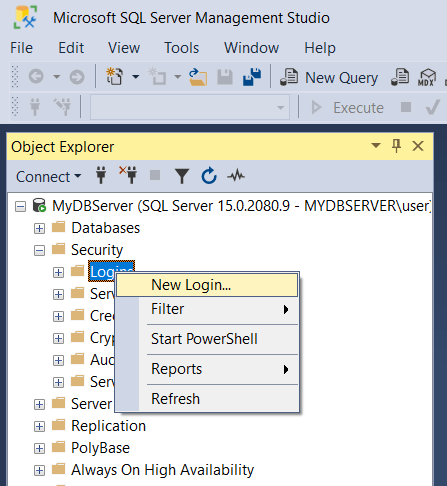
In the object explorer, expand the Security folder and right-click on the Logins folder and click New Login.., as shown below.
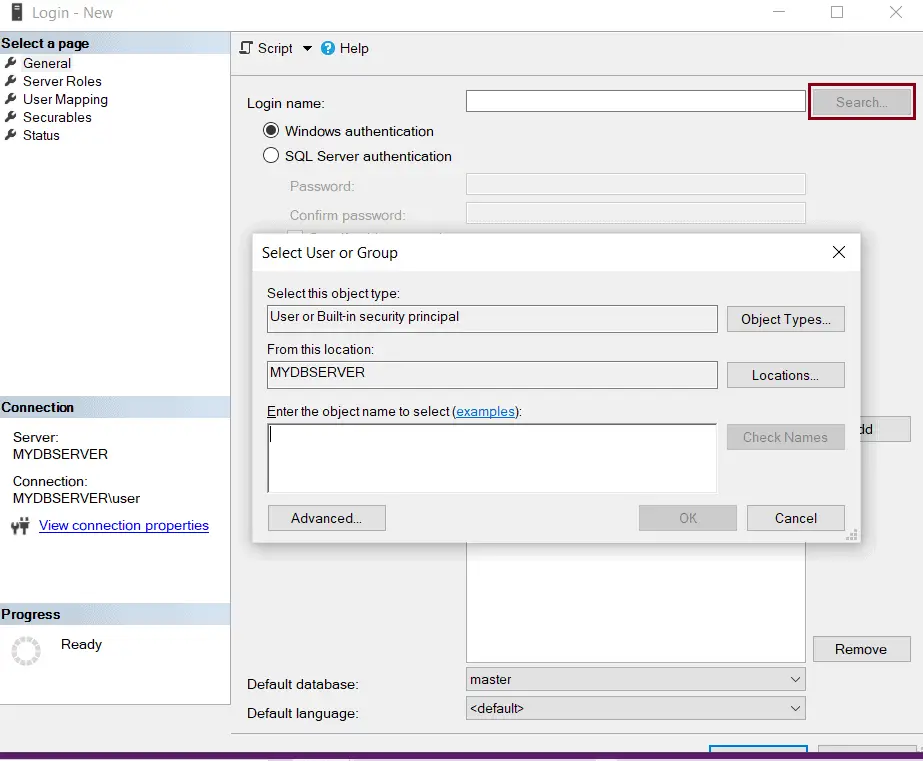
In the Login –New window, shown below, enter a Windows user name. If a user name is not a Windows user then it will raise an error. You may click on the Search button to search a Windows user, as shown below.
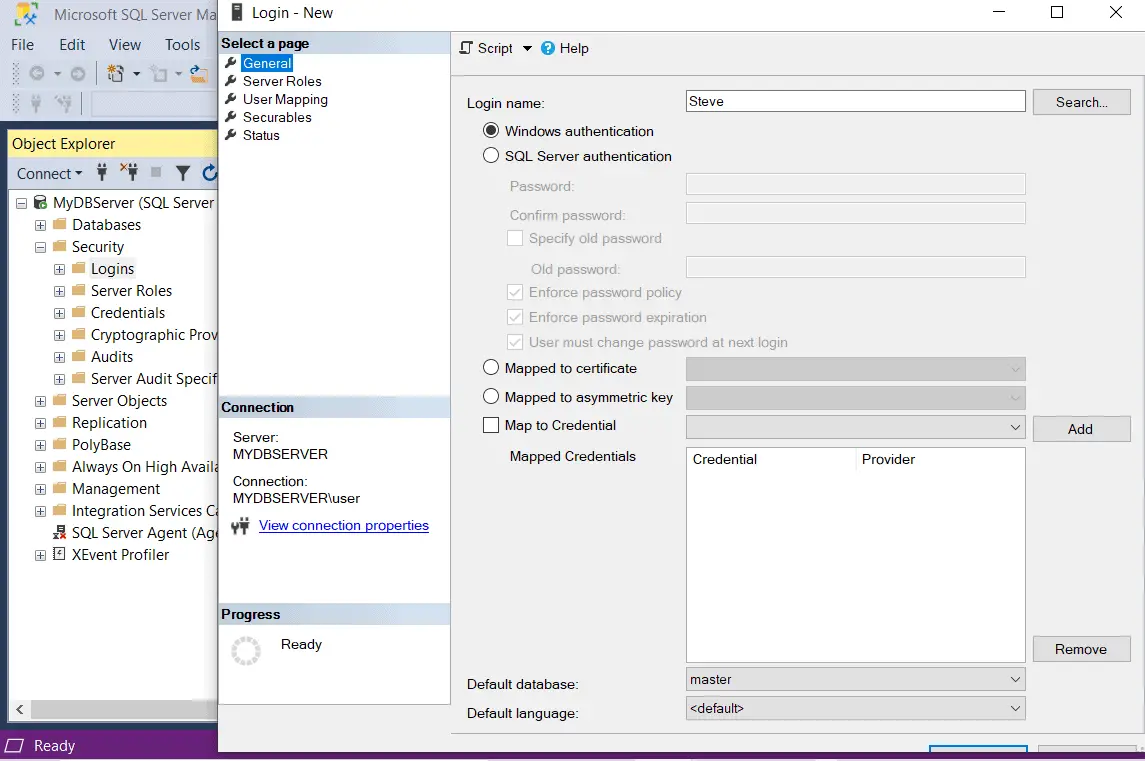
After entering a login name, you will have to choose either Windows authentication or SQL Server authentication. Select Windows authentication. Notice that the password field and password policy radio buttons will be disabled for Windows authentication because we will use the Windows credentials here.
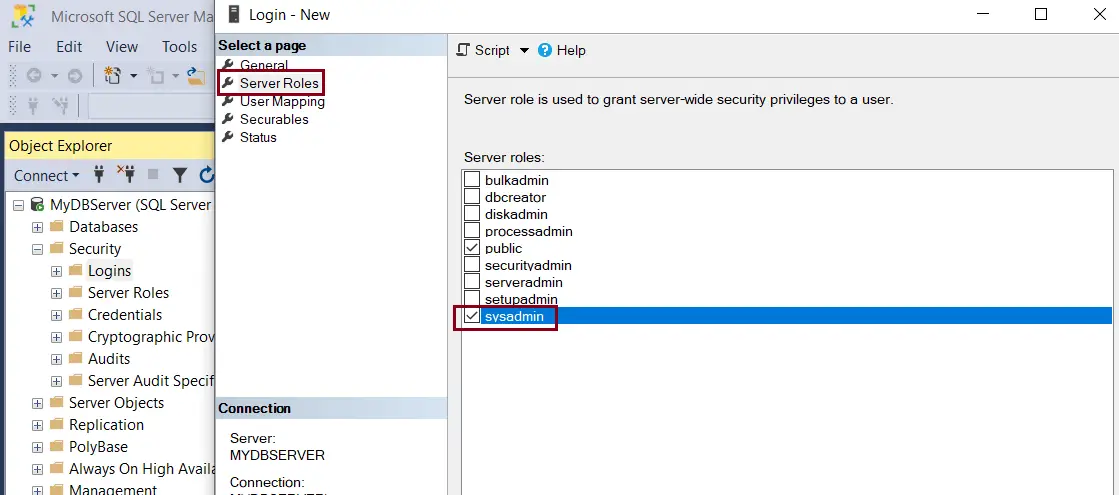
Now, to assign roles & permission to the new login, go to the Server Roles tab. On the Server Roles page, you can assign the server-level role to the new login by clicking the checkbox next to the role. By default, the public role is assigned to a new login. Additionally, let us assign the sysadmin role by clicking on the checkbox next to sysadmin. With sysadmin server role, user can perform any activity on the server and has full control.
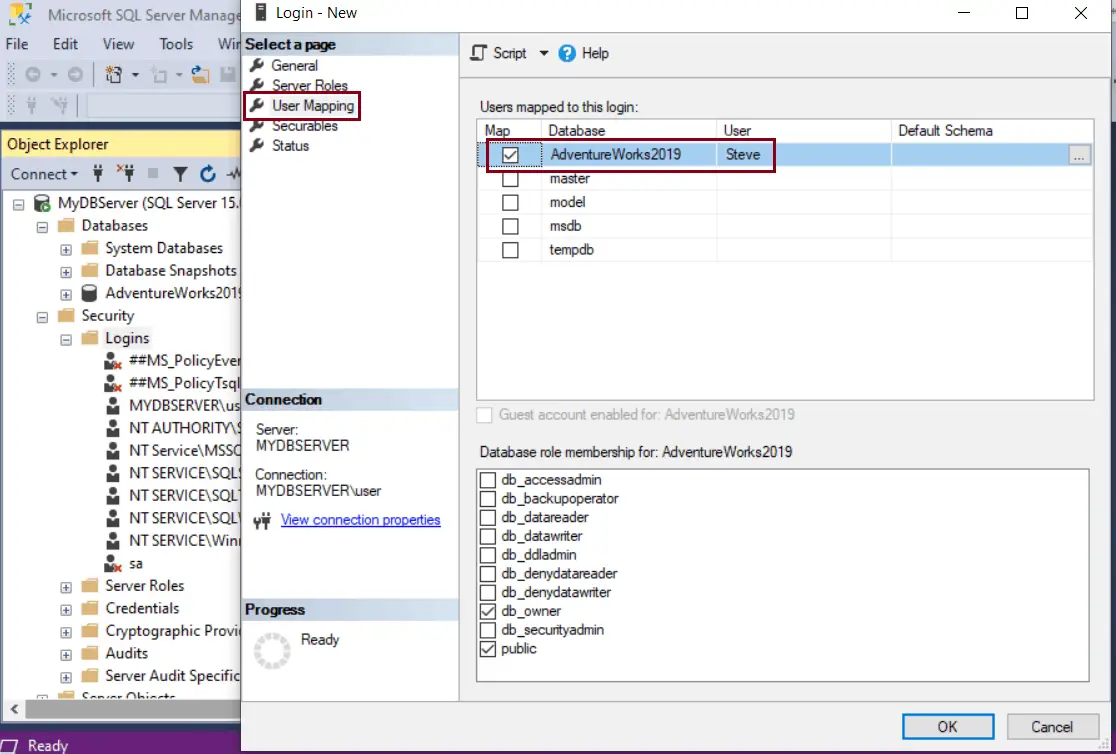
Click the User mapping tab. Here, we will map our Windows login to a database user.
It lists all the databases on the server. To map your new login, just select checkboxes next to databases for which you want map this login to access a database.
In the below figure AdventureWorks2019 database is selected. The new login is now listed under the User column for AdventureWorks2019. You can change the user name if you want it to give a different name than your login name. Just click on the name and re-type whichever name you want for the user. If you want more databases associated with your login, then just click the checkbox next to the database, and it will be mapped with the login.
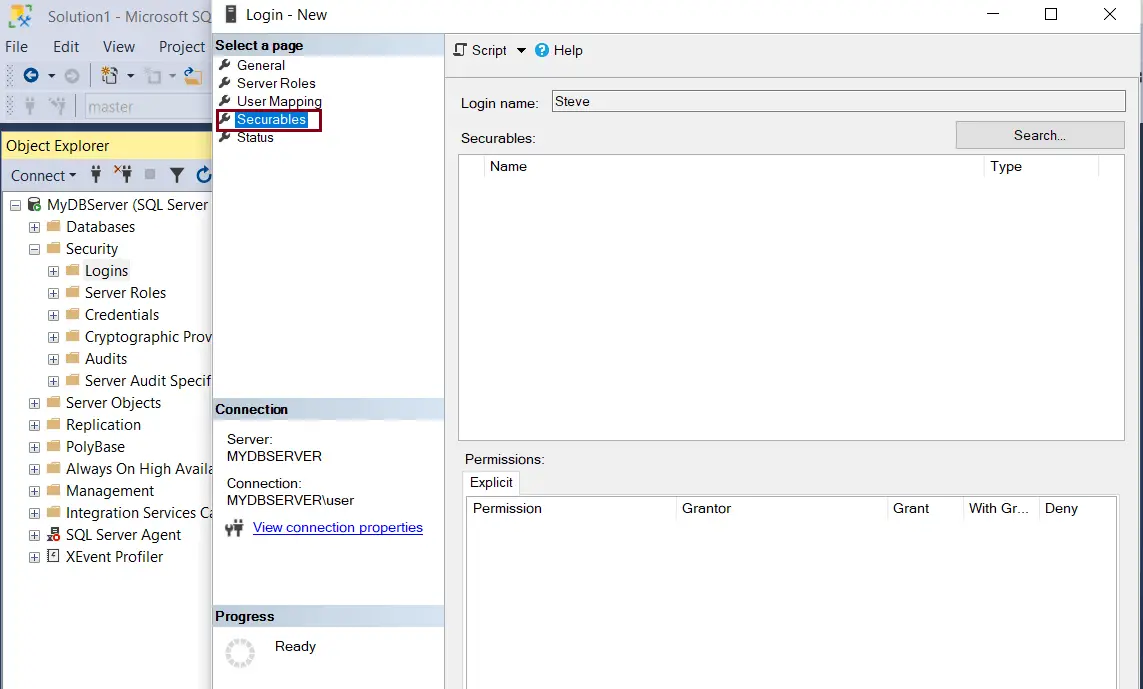
Now, click on the Securables tab. Securables are SQL server resources that can be accessed by a login you are creating. On the Securables tab, click on the Search button. This will open a pop-up, as shown below. Select The server ‘<Your Server name>’ and click OK. This will list all the explicit permissions for a server. Select Grant, With Grant, or Deny as per your requirement.
This is an optional step. You may skip Securables settings while creating the login, and set it later.
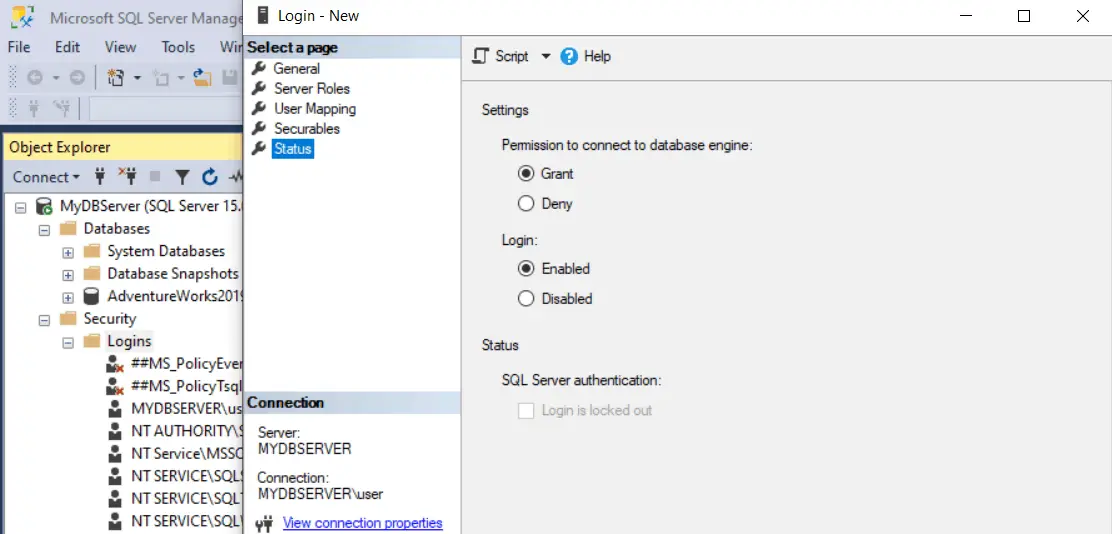
Finally, click on the Status tab and select “Grant” radio button for Permission to connect to the database engine, and Enabled radio button for Login, as shown below.
Click Ok to create the new login. This will add a new login under the Logins node.
Thus, you can add your local Windows user account to login with your database server using Windows authentication.
1. Overview
SQL Server authentication is recommended for connecting Dundas BI to its application and warehouse databases for security reasons. This article explains how to enable SQL Server authentication, and how to use it with your Dundas BI instance.
This applies when installing or upgrading Dundas BI when it uses Microsoft SQL Server to store its own data. Within Dundas BI, users can then connect, analyze, and visualize data from a variety of other data sources or use other authentication methods.
Important
Before reading this article, you should have a basic understanding of using SQL Server Management Studio.
2. Enabling SQL Server Authentication through SQL Management Studio
To enable SQL Server Authentication for your instance:
- Open SQL Server Management Studio.
-
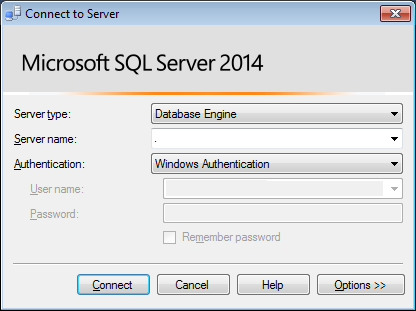
Connect to the SQL Server instance you would like to use for Dundas BI.
Connecting to a database server (e.g., localhost) -
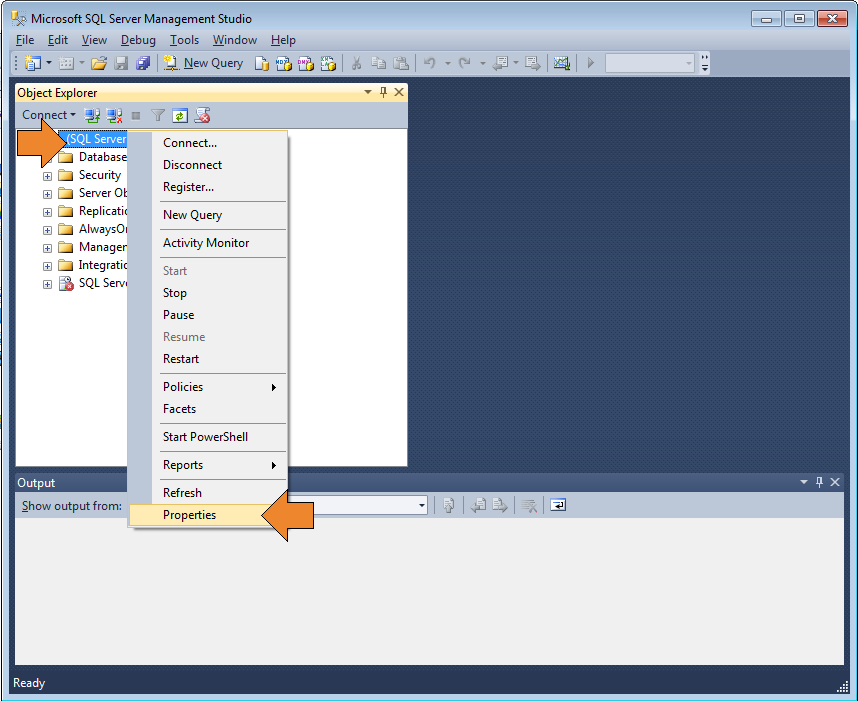
In the Object Explorer, right-click the server and click Properties.
Server properties -
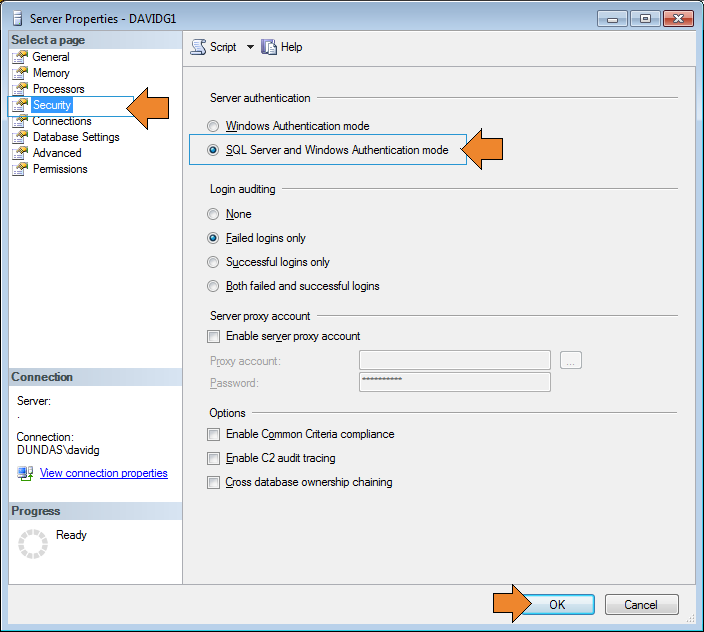
On the Security page under Server authentication, select SQL Server and Windows Authentication mode and then click OK.
Turn on SQL Server authentication mode -
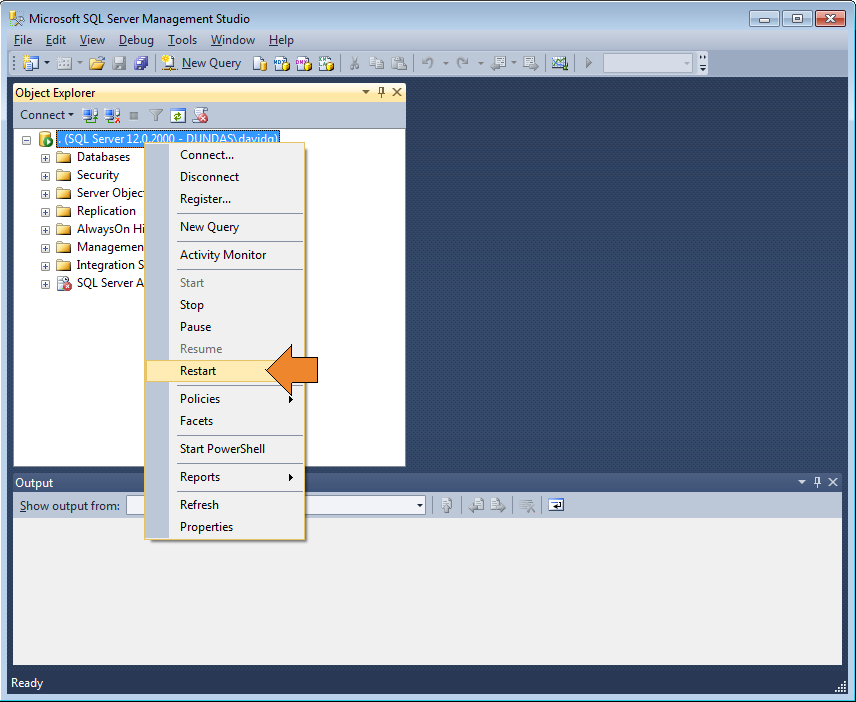
In the Object Explorer, right-click your server and click Restart. If the SQL Server Agent is running, it must also be restarted.
Restart SQL Server
3. Using SQL Server Authentication in Dundas BI
Certain database permissions are needed for the user Dundas BI connects as while deploying a Dundas BI instance, which can be reduced when deploying is finished.
3.1. Before deploying an instance
3.1.1. Creating a SQL Server authentication user
During the deployment of an instance with new databases, the user must have the SysAdmin role, or else all of the following: DbCreator, DiskAdmin, ProcessAdmin, and SecurityAdmin.
Create a user like this in SQL Management Studio:
- Open SQL Server Management Studio.
- Connect to the SQL Server instance you would like to use for Dundas BI.
-
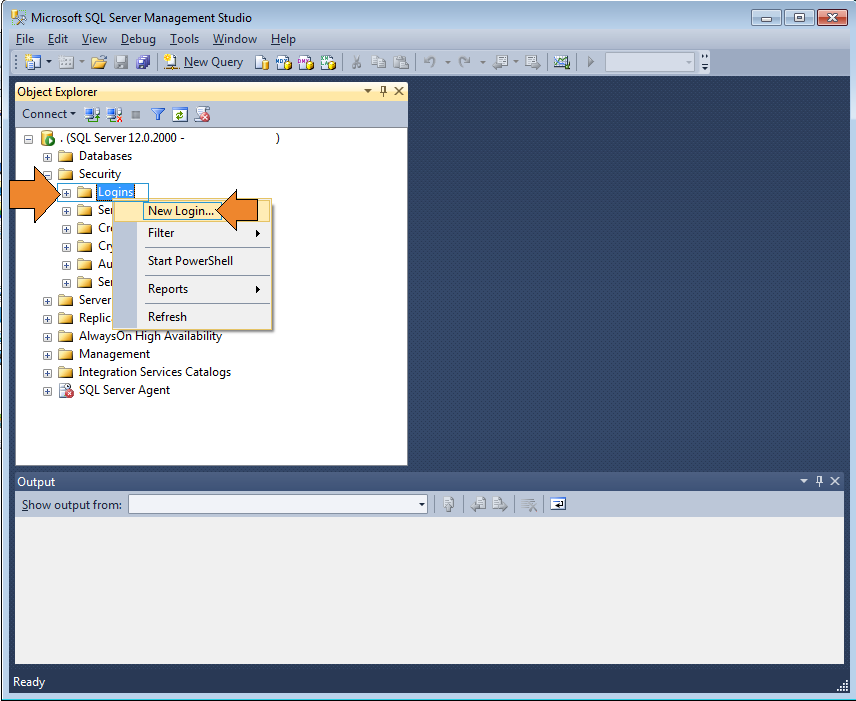
Expand the Security folder, right-click on the Logins folder and choose New Login….
Create SQL Server authentication login from context menu -
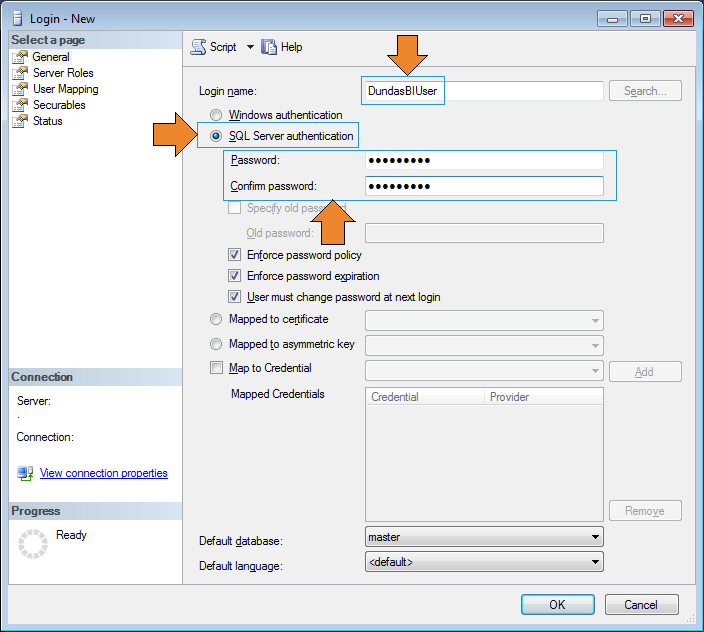
Enter the login name as DundasBIUser, select SQL Server authentication, and enter the Password.
Create SQL Server authentication login -
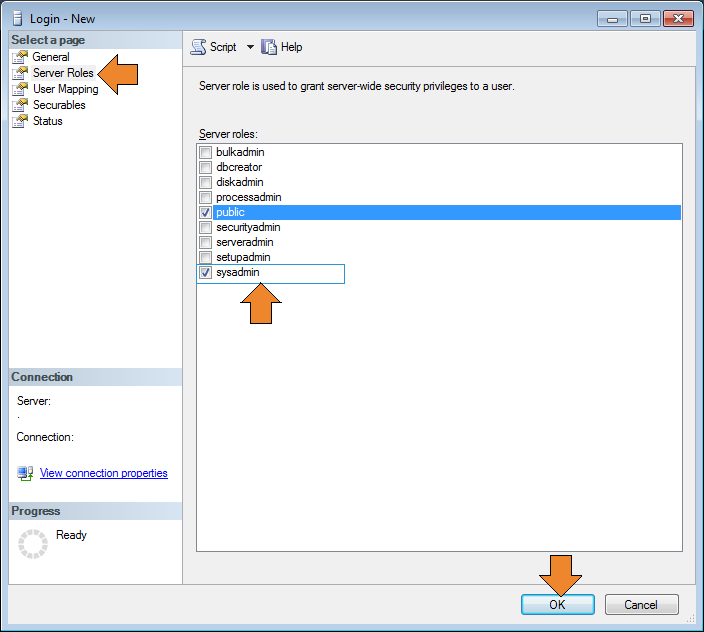
Click the Server Roles page and enable the SysAdmin role, or a combination of DbCreator, DiskAdmin, ProcessAdmin, and SecurityAdmin roles.
Add SysAdmin role to login
3.1.2. Specifying the SQL Server authentication user
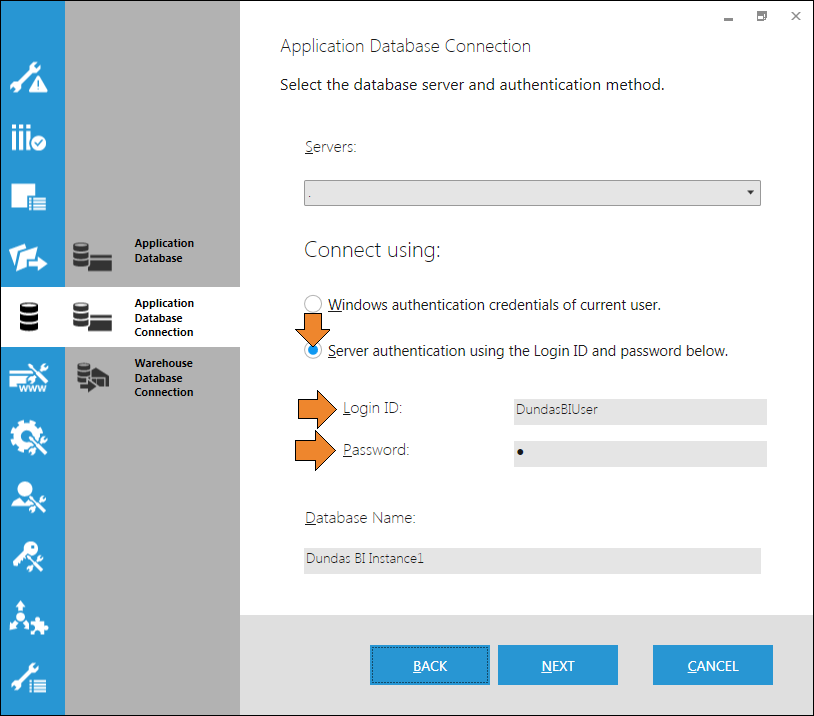
Now that the SQL Server authentication user has been created, use these credentials when you deploy Dundas BI and set up the application database connection.
3.2. After deploying an instance
After deploying, it is possible to remove the SysAdmin role from this user. For regular operation, the user will only require the dbo default schema and the db_owner role membership.
The SysAdmin role will be required again when attempting to upgrade an instance.
4. Changing an existing instance to use SQL Server authentication
Follow the steps below to change an existing instance to use SQL Server authentication for its application and warehouse databases.
4.1. Application database
Open a text editor such as Notepad as an administrator, by right-clicking its shortcut and choosing Run as administrator.
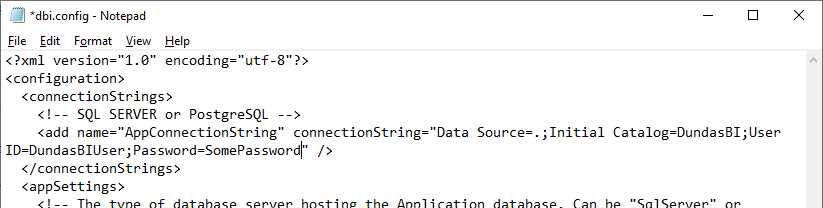
Open the Dundas BI configuration file, located at [InstanceRoot]wwwBIWebsiteApp_Datadbi.config.
Edit the connection string to use SQL Server authentication by specifying the User ID and Password. After saving, recycle the application pool in IIS or restart the Linux service for Dundas BI’s website.
Note
To change the credentials when the connection string is encrypted, first decrypt the connection string using the dt command line tool, then update the credentials. To resume the secure state, encrypt the connection string when you have updated the credentials.
4.2. Warehouse database
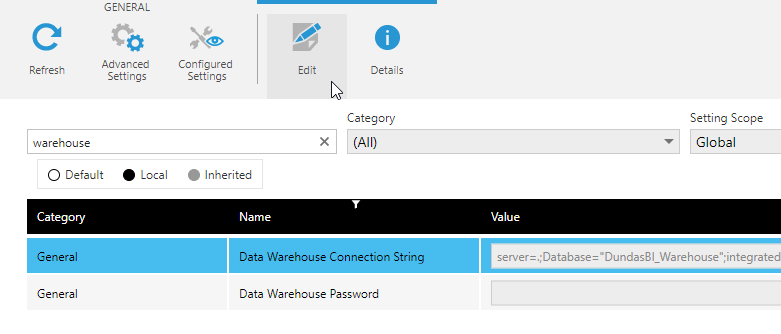
The warehouse database connection is defined in Dundas BI’s configuration settings:
Log into Dundas BI as an administrator, and click the Admin icon in the main menu on the left.
Click to expand Setup and then click Config.
Find or search for the Data Warehouse Connection String setting, located in the General category, and edit it to also use SQL Server authentication.
5. See also
- Microsoft Docs: SQL Server Management Studio
- Microsoft Docs: Choose an Authentication Mode
- Installing Dundas BI
- Dundas BI config file
- Configuration settings
- Dundas BI — System Requirements
| title | description | author | ms.author | ms.date | ms.service | ms.subservice | ms.topic | ms.custom | helpviewer_keywords | ||||
|---|---|---|---|---|---|---|---|---|---|---|---|---|---|
|
Change Server Authentication Mode |
Learn how to change the server authentication mode in SQL Server. You can use either SQL Server Management Studio or Transact-SQL for this task. |
rwestMSFT |
randolphwest |
11/17/2021 |
sql |
configuration |
conceptual |
FY22Q2Fresh |
|
[!INCLUDE SQL Server]
This topic describes how to change the server authentication mode in [!INCLUDEssnoversion] by using [!INCLUDEssManStudioFull] or [!INCLUDEtsql]. During installation, [!INCLUDEssDEnoversion] is set to either Windows Authentication mode or SQL Server and Windows Authentication mode. After installation, you can change the authentication mode at any time.
If Windows Authentication mode is selected during installation, the sa login is disabled and a password is assigned by setup. If you later change authentication mode to SQL Server and Windows Authentication mode, the sa login remains disabled. To use the sa login, use the ALTER LOGIN statement to enable the sa login and assign a new password. The sa login can only connect to the server by using [!INCLUDEssNoVersion] Authentication.
Before you begin
The sa account is a well known [!INCLUDEssNoVersion] account and it is often targeted by malicious users. Do not enable the sa account unless your application requires it. It is important that you use a strong password for the sa login.
Change authentication mode with SSMS
-
In [!INCLUDEssManStudioFull] Object Explorer, right-click the server, and then click Properties.
-
On the Security page, under Server authentication, select the new server authentication mode, and then click OK.
-
In the [!INCLUDEssManStudioFull] dialog box, click OK to acknowledge the requirement to restart [!INCLUDEssNoVersion].
-
In Object Explorer, right-click your server, and then click Restart. If [!INCLUDEssNoVersion] Agent is running, it must also be restarted.
Enable sa login
You can enable the sa login with SSMS or T-SQL.
Use SSMS
-
In Object Explorer, expand Security, expand Logins, right-click sa, and then click Properties.
-
On the General page, you might have to create and confirm a password for the sa login.
-
On the Status page, in the Login section, click Enabled, and then click OK.
Using Transact-SQL
The following example enables the sa login and sets a new password. Replace <enterStrongPasswordHere> with a strong password before you run it.
ALTER LOGIN sa ENABLE ;
GO
ALTER LOGIN sa WITH PASSWORD = '<enterStrongPasswordHere>' ;
GO
Change authentication mode (T-SQL)
The following example changes Server Authentication from mixed mode (Windows + SQL) to Windows only.
[!CAUTION]
The following example uses an extended stored procedure to modify the server registry. Serious problems might occur if you modify the registry incorrectly. These problems might require you to reinstall the operating system. Microsoft cannot guarantee that these problems can be resolved. Modify the registry at your own risk.
USE [master]
GO
EXEC xp_instance_regwrite N'HKEY_LOCAL_MACHINE',
     N'SoftwareMicrosoftMSSQLServerMSSQLServer',
     N'LoginMode', REG_DWORD, 1
GO
[!Note]
The permissions required to change the authentication mode are sysadmin or Control Server
See also
- Strong Passwords
- Security Considerations for a SQL Server Installation
- ALTER LOGIN (Transact-SQL)
- Connect to SQL Server When System Administrators Are Locked Out