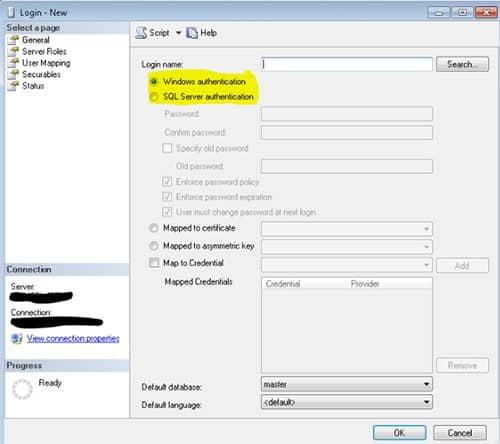
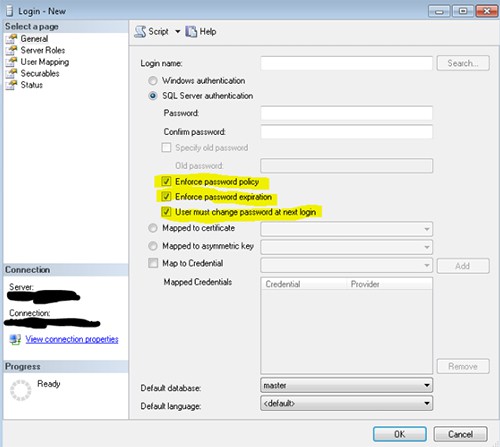
When granting a user access to a database there are a few considerations to be made with advantages and disadvantages in terms of usability and security. Here we have two options for authenticating and granting permission to users. The first is by giving everyone the sa (systems admin) account access and then restricting the permissions manually by retaining a list of the users in which you can grant or deny permissions as needed. This is also known as the SQL authentication method. There are major security flaws in this method, as listed below. The second and better option is to have the Active Directory (AD) handle all the necessary authentication and authorization, also known as Windows authentication. Once the user logs in to their computer the application will connect to the database using those Windows login credentials on the operating system.
The major security issue with using the SQL option is that it violates the principle of least privilege (POLP) which is to only give the user the absolutely necessary permissions they need and no more. By using the sa account you present serious security flaws. The POLP is violated because when the application uses the sa account they have access to the entire database server. Windows authentication on the other hand follows the POLP by only granting access to one database on the server.
The second issue is that there is no need for every instance of the application to have the admin password. This means any application is a potential attack point for the entire server. Windows only uses the Windows credentials to login to the SQL Server. The Windows passwords are stored in a repository as opposed to the SQL database instance itself and the authentication takes place internally within Windows without having to store sa passwords on the application.
A third security issue arises by using the SQL method involves passwords. As presented on the Microsoft website and various security forums, the SQL method doesn’t’ enforce password changing or encryption, rather they are sent as clear text over the network. And the SQL method doesn’t lockout after failing attempts thus allowing a prolonged attempt to break in. Active Directory however, uses Kerberos protocol to encrypt passwords while employing as well a password change system and lockout after failing attempts.
There are efficiency disadvantages as well. Since you will be requiring the user to enter the credentials every time they want to access the database users may forget their credentials.
If a user being removed you would have to remove his credentials from every instance of the application. If you have to update the sa admin password you would have to update every instance of the SQL server. This is time consuming and unsafe, it leaves open the possibility of a dismissed user retaining access to the SQL Server. With the Windows method none of these concerns arise. Everything is centralized and handled by the AD.
The only advantages of using the SQL method lie in its flexibility. You are able to access it from any operating system and network, even remotely. Some older legacy systems as well as some web-based applications may only support sa access.
The AD method also provides time-saving tools such as groups to make it easier to add and remove users, and user tracking ability.
Even if you manage to correct these security flaws in the SQL method, you would be reinventing the wheel. When considering the security advantages provided by Windows authentication, including password policies and following the POLP, it is a much better choice over the SQL authentication. Therefore it is highly recommended to use the Windows authentication option.
Understanding SQL Server security is a critical skill. Greg Larsen explains SQL Server authentication methods, logins, and database users in this article.
Setting up and managing SQL Server security is an important part of building and maintaining your SQL Server environment. SQL Server security is a vast topic that cannot be covered in a single article. This article starts with a few foundation topics of SQL Server security: SQL Server Authentication methods, logins and database users.
Authentication methods supported
There are two different authentication methods for connecting to SQL Server: Windows and SQL Server.
Windows authentication requires a user to first authenticate to Windows with their login and password. Once a user has been authenticated to Windows, they can then connect to SQL Server using Windows authentication. That is, provided their Windows account has been granted access to SQL Server via a login (more on logins later). Windows authentication is tightly coupled with Windows Security and is also known as Integrated Security. Windows authentication works great when a person is part of a Windows domain.
But there are times when people can’t connect to Windows; this is where SQL authentication comes in. SQL Authentication is less secure than Windows Authentication. In order to connect to SQL Server using SQL authentication, a person needs to provide a login and password when they connect. The password for a SQL Authenticated login is stored in the master database. Because the password is stored in a SQL database, it is more easily hacked. It can also be backed up and restored with a database backup which is why it is less secure than using Windows authentication.
Windows Authentication is the default authentication mode when installing a SQL Server instance. In order to support SQL authentication, you need to configure SQL Server to support mixed mode authentication. When mixed mode is used, both Windows and SQL authentication can be used to connect to SQL Server. If SQL Server is not set up to support mixed mode, then only Windows accounts can connect to SQL Server.
Because SQL authentication is less secure than Windows Authentication, it is recommended that you only set up your SQL Server instance to support mixed mode if you have a requirement to support users or applications that can’t connect to Windows. Even though Windows Authentication is more secure and the recommended practice for connecting to SQL Server, many custom application software vendors still don’t support connecting via Windows authentication.
Setting up SQL Server to support different authentication modes
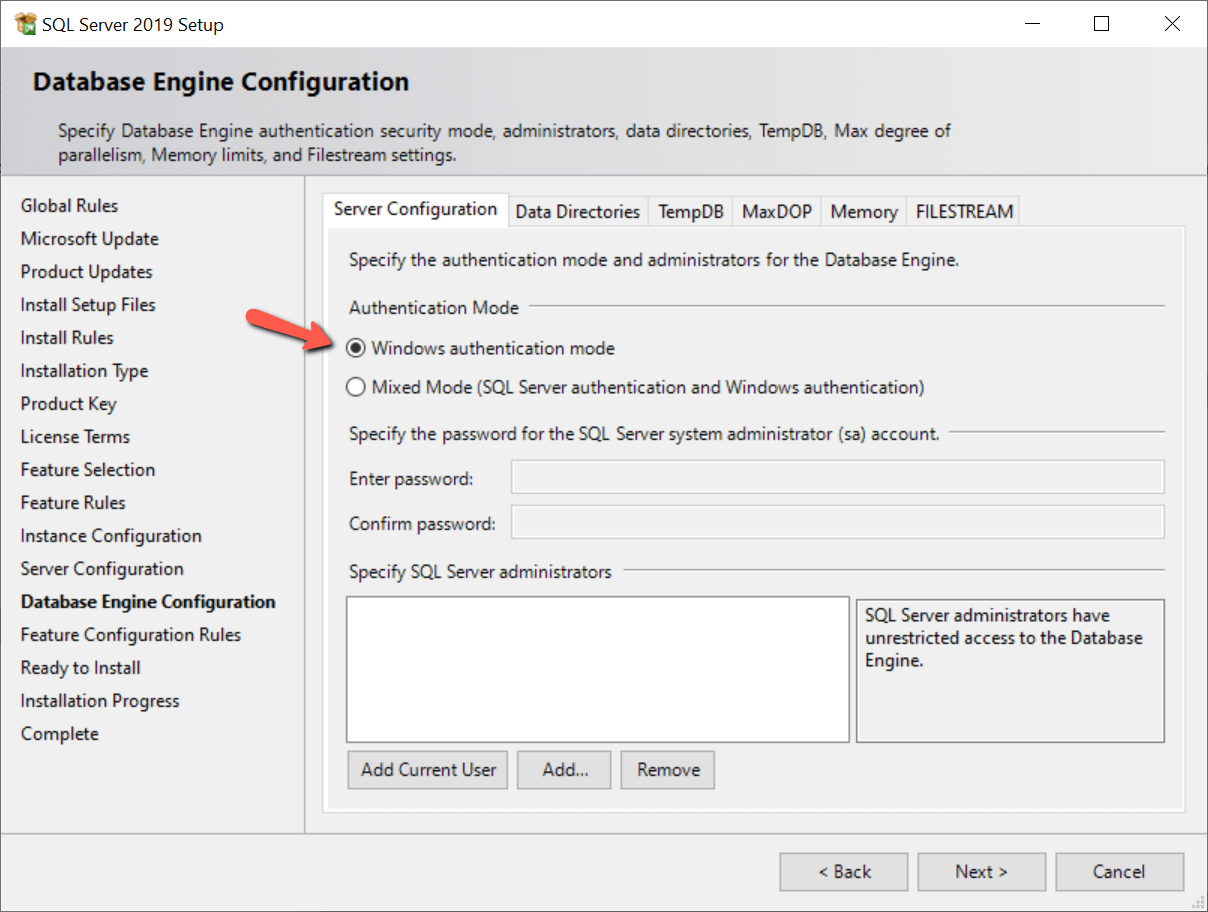
When installing SQL Server, you have the choice to support only Windows authentication or both authentication methods, which is known as mixed mode. During the installation process, you decide whether or not to use mixed mode when defining the database engine configuration, as shown in Figure 1.
Figure 1: Selecting Authentication Methods
Windows Authentication is selected as the default shown with the red arrow in Figure 1. If you need to support both Windows and SQL Server authentication, then you would select the “Mixed Mode” radio button. Upon clicking this button, the SA account password boxes would become enabled, and you would need to specify a password for the SA account. When only Windows authentication is selected, the SA account is disabled. To secure the SA account when you are using mixed mode you can disable the SA account after it is enabled.
How to determine which authentication methods are supported
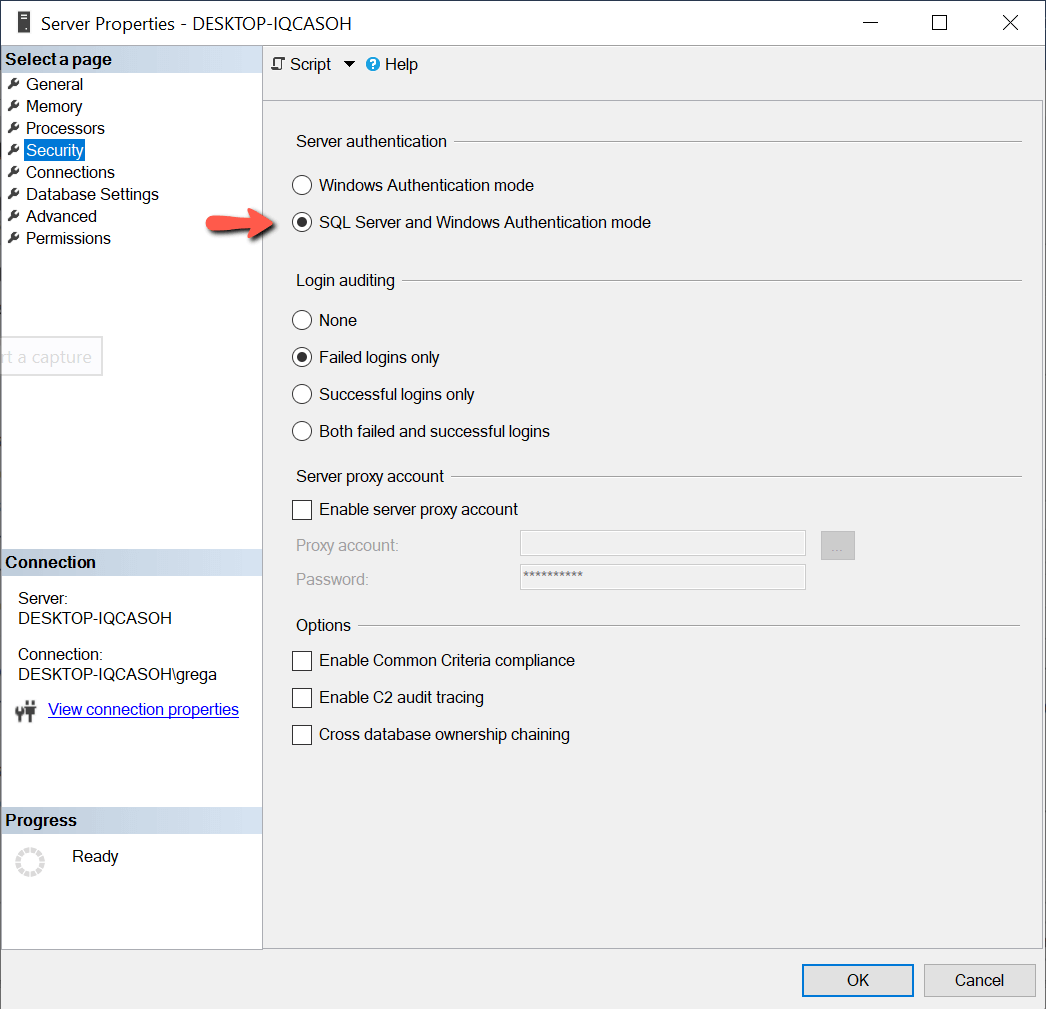
You can check to see which authentication method is configured in several ways. One of those ways is to use SQL Server Management Studio (SSMS). To use SSMS, first right click on the Instance name and select the Properties option. When I do that on my instance, the properties page in Figure 2 is displayed.
Figure 2: Determining Authentication Mode
Figure 2 shows that my instance supports mixed mode authentication because the radio button next to the red arrow is enabled.
Another method to check which authentication modes are set up is to use TSQL code. The code in Listing 1 displays the Authentication mode setup.
|
SELECT CASE SERVERPROPERTY(‘IsIntegratedSecurityOnly’) WHEN 1 THEN ‘Windows Authentication Only’ WHEN 0 THEN ‘Windows and SQL Server Authentication’ END as [Authentication Mode]; |
Listing 1: Displaying Authentication mode
Changing authentication methods After SQL Server is installed
There are times when you might want to change the authentication settings for a SQL Server instance. This might occur if you used the default settings during installation to support Windows authentication only and later acquired some software that can only connect using SQL Server authentication. Or possibly you want to make your instance more secure by removing support for SQL Server authentication. The authentication options can be easily changed using the properties page in SSMS shown in Figure 2.
If I wanted to change my instances to support only Windows authentication, all I would need to do is click on the “Windows authentication mode” button in Figure 2, and then click on the “OK” button to apply that change. After making this property change, I would need to restart my instance for this change to take effect.
SQL Server logins
In order to connect to SQL Server, one must have access to SQL Server. Access is granted via a login. A login is also known as a security principal, and is stored in the master database. There is one exception, and that is accessing a contained database. With contained databases users connect directly to database without the need for a login in the master database. More on contained databases in future articles.
There are three types of logins that are stored in the master database: Windows user, Windows group, and SQL. Let’s review each of these different types of logins.
A Windows user login provides access for a single Windows user. When creating this type of login, no password is needed when defining the login in SQL Server. This type of login requires the user to first validate their login by logging into the Windows domain. The Windows domain stores the password.
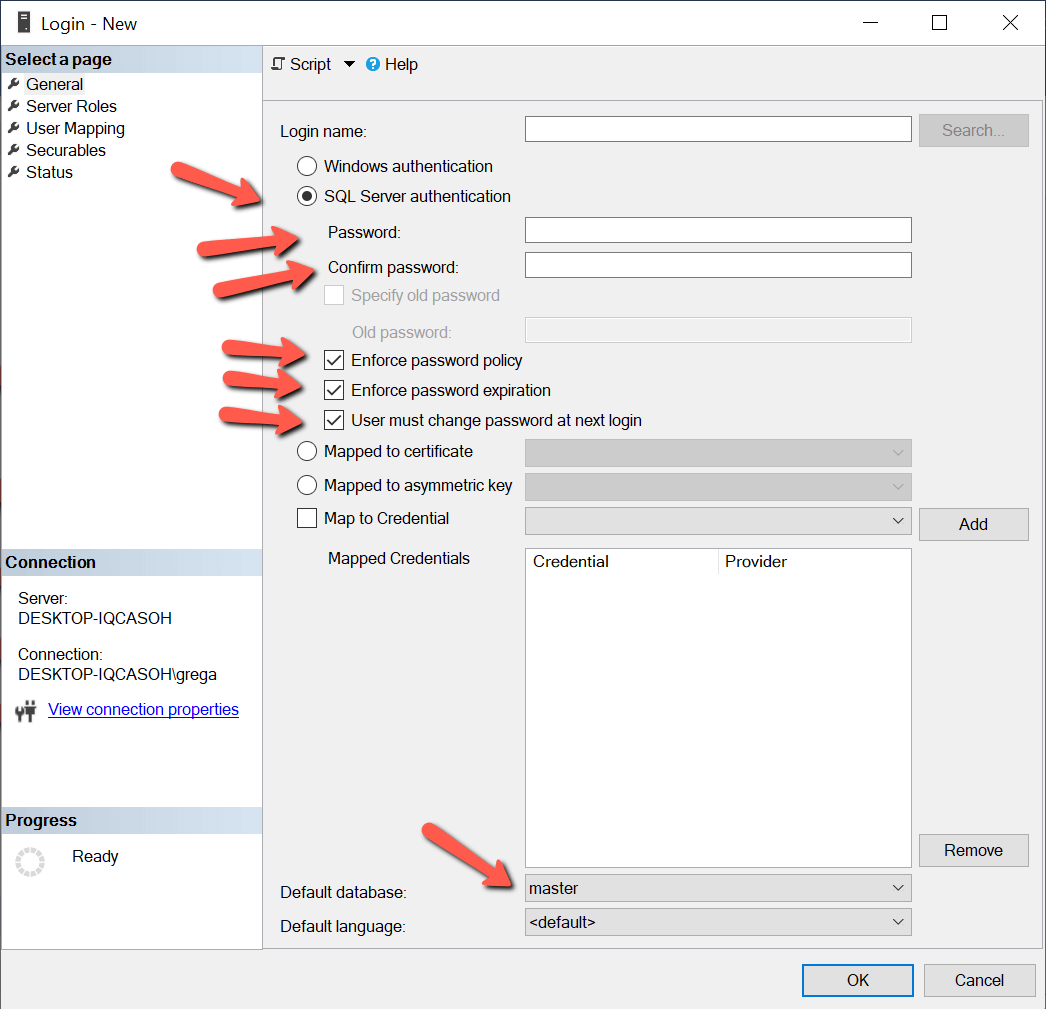
A SQL Server login is similar to a Windows login in that it provides access to SQL Server for a single user, but it is different than a Windows login because the password for a SQL login is stored in the master database. Therefore, when setting up a SQL Server login, a password needs to be provided for the login along with a few other password options, as shown in Figure 3.
Figure 3: Setting up a SQL Server Authenticated Login
Figure 3 shows that a SQL Server Login can be enabled to enforce Windows password policies and expiration and can require a user to change the password upon their first login. Microsoft added these new password features when SQL Server 2005 was released. For applications to support these new password features, they can use the NetValidatePasswordPolicy API.
The last type of login, a Windows group login, is similar to a Windows login but slightly different. A Windows group login provides access to a SQL Server instance for every Windows login that is a member of the group. Windows groups are a great way to provide access to many Windows logins with only having to define a single login in SQL Server. Using a Windows group, access to the SQL Server instance can be maintained by adding or removing group members. Using Windows groups helps minimize security management efforts and troubleshooting login related security issues.
If you look at the bottom of the screenshot in Figure 3, you will notice a “Default Database” setting for a login. The default database setting when creating a login is the “master” database. When setting up a login, the default database can be changed to any database on the server. Best practice is to set the default database to a database that the user will use when connecting to SQL Server.
Windows logins are considered more secure because of the way the password for the login is stored. The password for a Windows login is stored using true encryption. Where as the password for a SQL Login is not encrypted, instead it is hashed. Because a SQL login is hashed makes it easier to crack the password. Windows logins also require domain admin’s to set up the login and password, where as SQL logins the database administrators set up the login and password. By having the domain admin’s managing login passwords provides another layer of security, commonly called separation of duties. By separating the duties of creating and managing Windows logins from managing databases and access to databases, provides an additional security controls to gain access to data stored in SQL Server.
Creating a login to SQL Server allows users to connect to SQL Server. But a login alone doesn’t provide users access to any data in the different databases on the server. For a login to read and/or write data to a database, the login will need access to one or more databases. A login can be set up to have access to many databases on an instance if required.
Database users
A database user is not the same as a login. A login provides to a user or application the ability to connect to a SQL Server instance, whereas a database user provides the login rights to access a database. Each database a login needs access to will require a database user to be defined, except when a login has been given sysadmin rights. When a login has sysadmin rights, they have access to all database, without being mapped to a database user. This association between a login and a database user is known as a user mapping. User mappings for a login can be created during login creation or later for logins that have already been set up.
Creating a database user while creating a new login
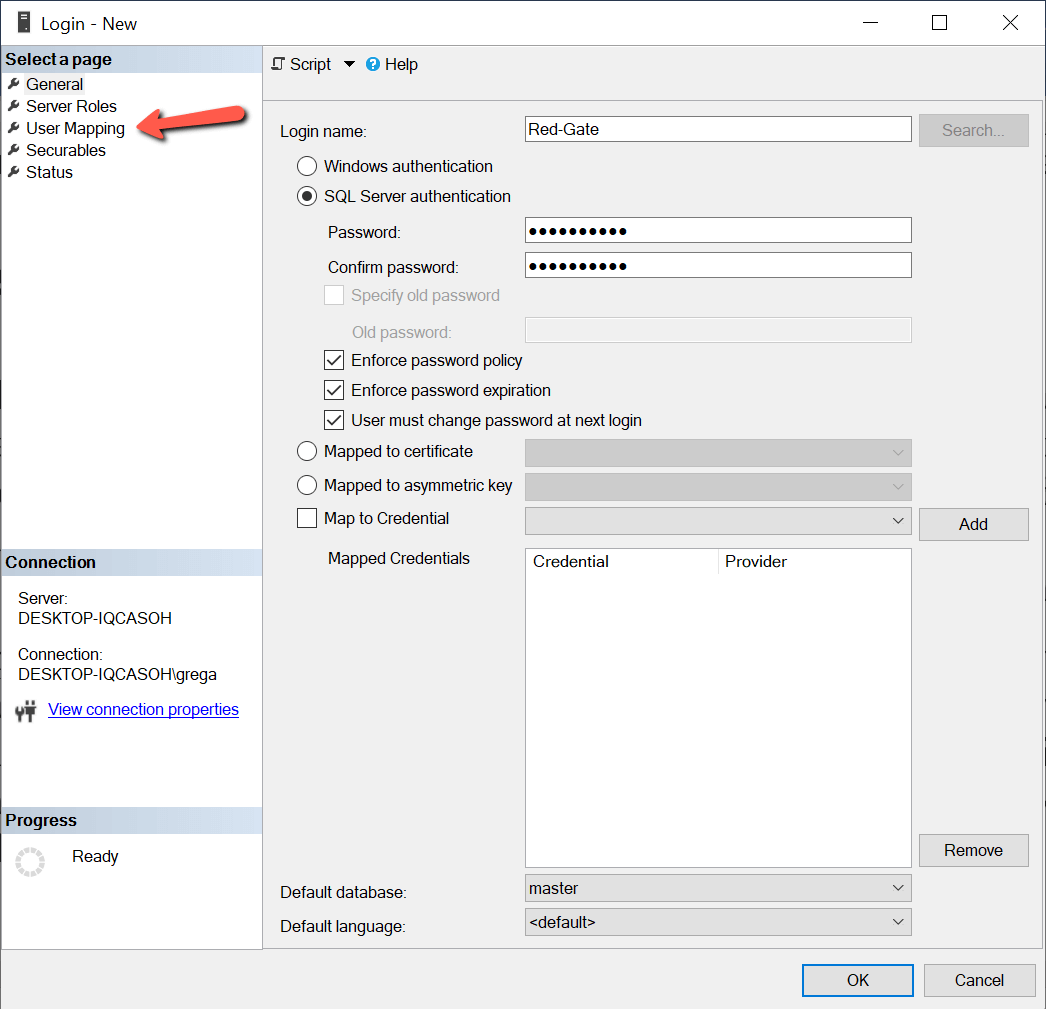
To show how to provide user mapping when a new login is created, I will create a new SQL Server login named “Red-Gate”. The screenshot shown in Figure 4 shows the “Login – new” window where I will define this new login. To bring up this window, I expand the “Security” tab under my instance, and then right-click on the “Logins” option and then select the “New Login…” item from the drop-down.
Figure 4: Creating Red-Gate Login
In figure 4, I enter “Red-Gate” for the login name and entered the password for this SQL login in the dialog boxes provided. To provide database access for this new login, I click on the “User Mapping” option in the left pane. When I do this, the window in Figure 5 is displayed.
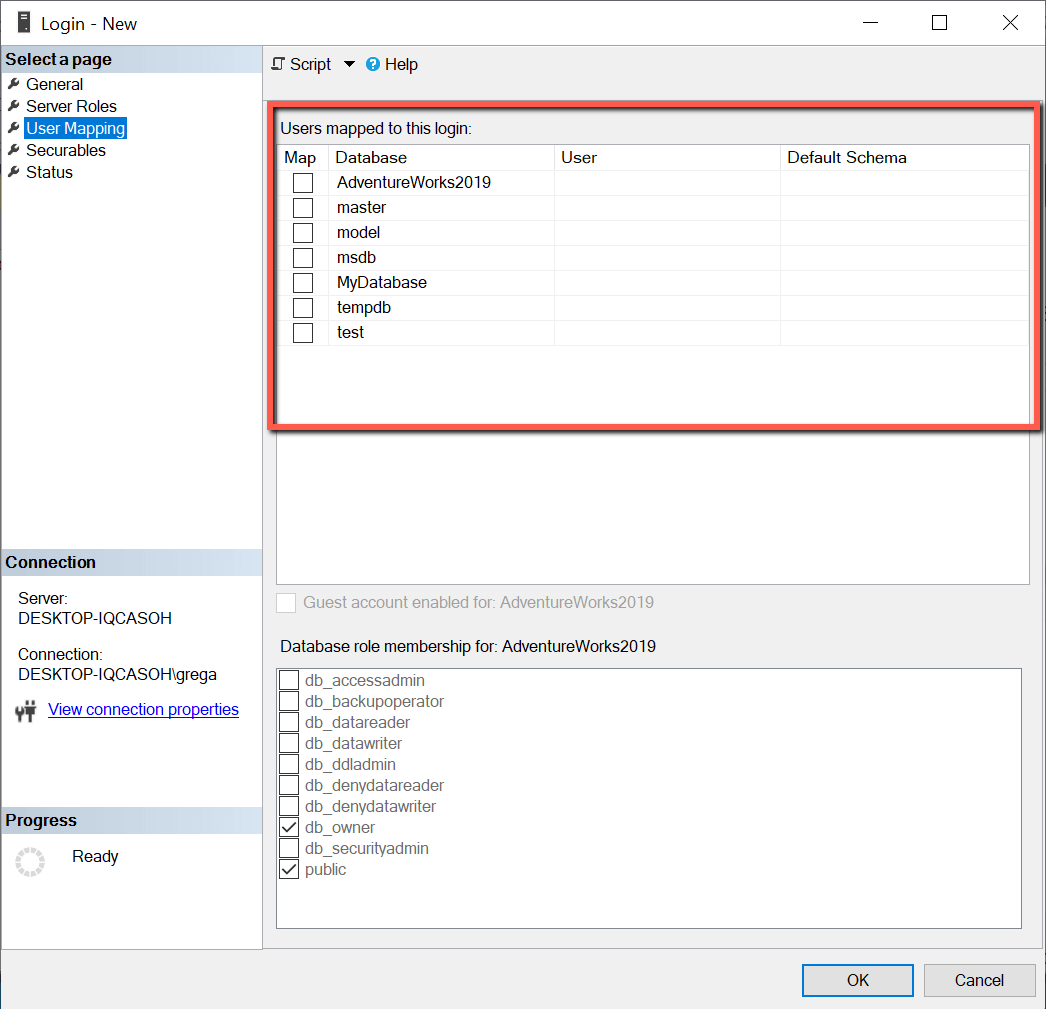
Figure 5: User Mapping Window
A red box shows the list of databases in Figure 5, where my new login can be mapped. In order to map my “Red-Gate” login to the “AdventureWorks2019” database, I would just need to click on the “Map” checkbox next to the AdventureWorks2019 database. When I do that, the screenshot in Figure 6 is displayed.
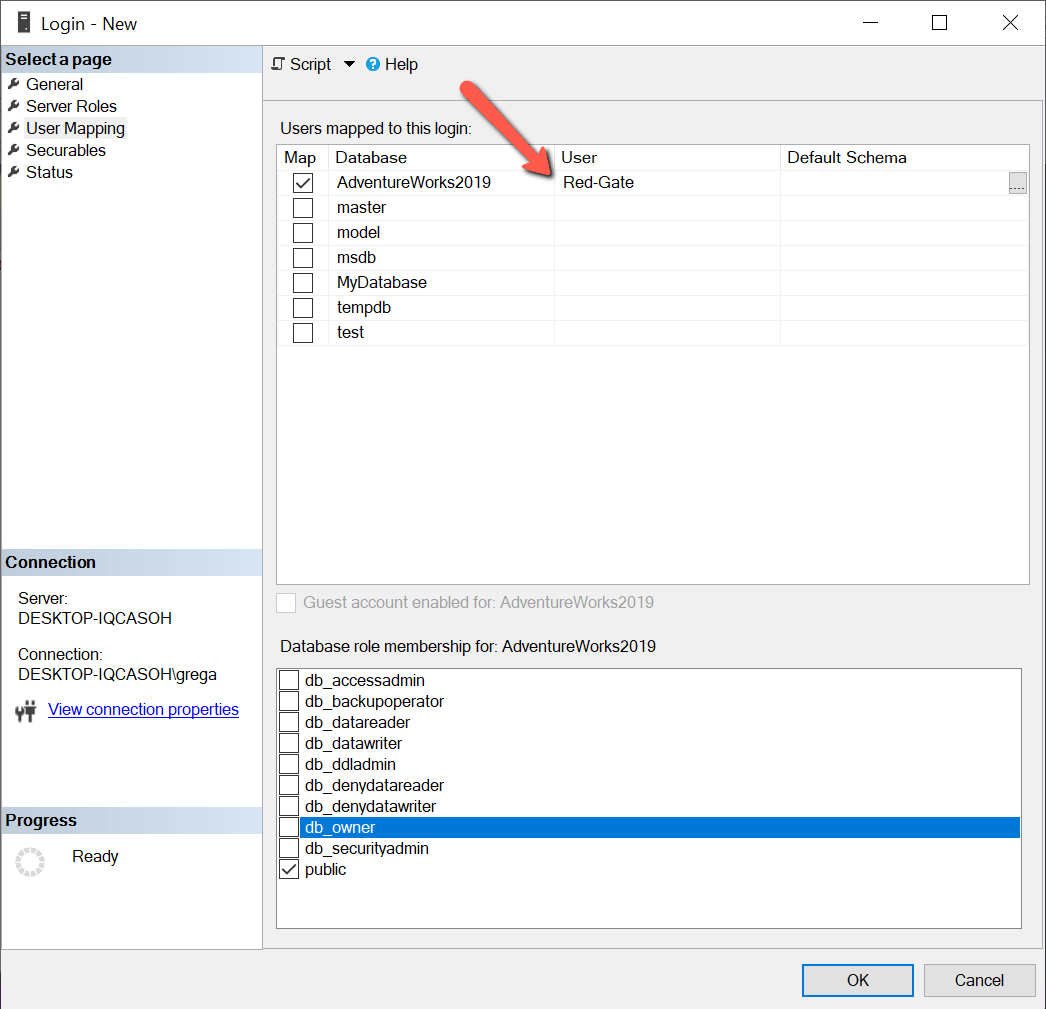
Figure 6: Mapping Login to database
After checking the Map box, the name “Red-Gate” is automatically populated in the “User” column for the AdventureWorks2019 database. This interface automatically generates a database user name the same as the login to which it is mapped. Database user names don’t need to be the same as the login. If I wanted my database user name to be different, I could just type over the “Red-Gate” name and specify whatever database user name I wanted. Mapping a login to a database users only provides that login access to the database, but it doesn’t give the login access to read or update data in the database. In future articles I will be discussing how to provide read/write access to database objects.
Suppose I wanted to map my new “Red-Gate” login to additional user databases. In that case, I could do that by just checking on another “Map” checkbox next to the additional databases. For this example, I only want to map my new “Red-Gate” login to the “AdventureWorks2019” database. To finish up mapping my “Red-Gate” login to the “Red-Gate” database user I just need to click on the “OK” button.
Creating a new database user and mapping it to an existing login
There are times when a login has already been created, and it just needs access to one more database. For example, suppose I now wanted my established Red-Gate SQL Server login to access the database named “MyDatabase”. To give the Red-Gate login additional database access, I have a number of options. One option would be to just modify the user mappings by changing the properties on the login. This would be similar to how I just added the user mapping when I created the Red-Gate login.
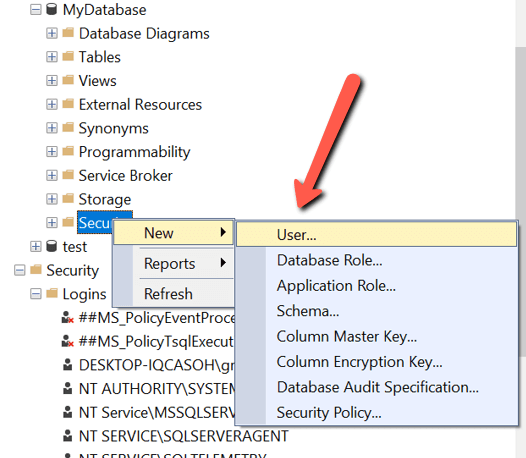
Another option is to add a new database user to the “MyDatabase” and then mapping that new database user to the Red-Gate login. To create a new user in the database “MyDatabases” I would first expand the database, right-click on the “Security” item, hover over the “New” item, and then click on the “User…” item, as shown in Figure 7.
Figure 7: Bring up the new database user dialog
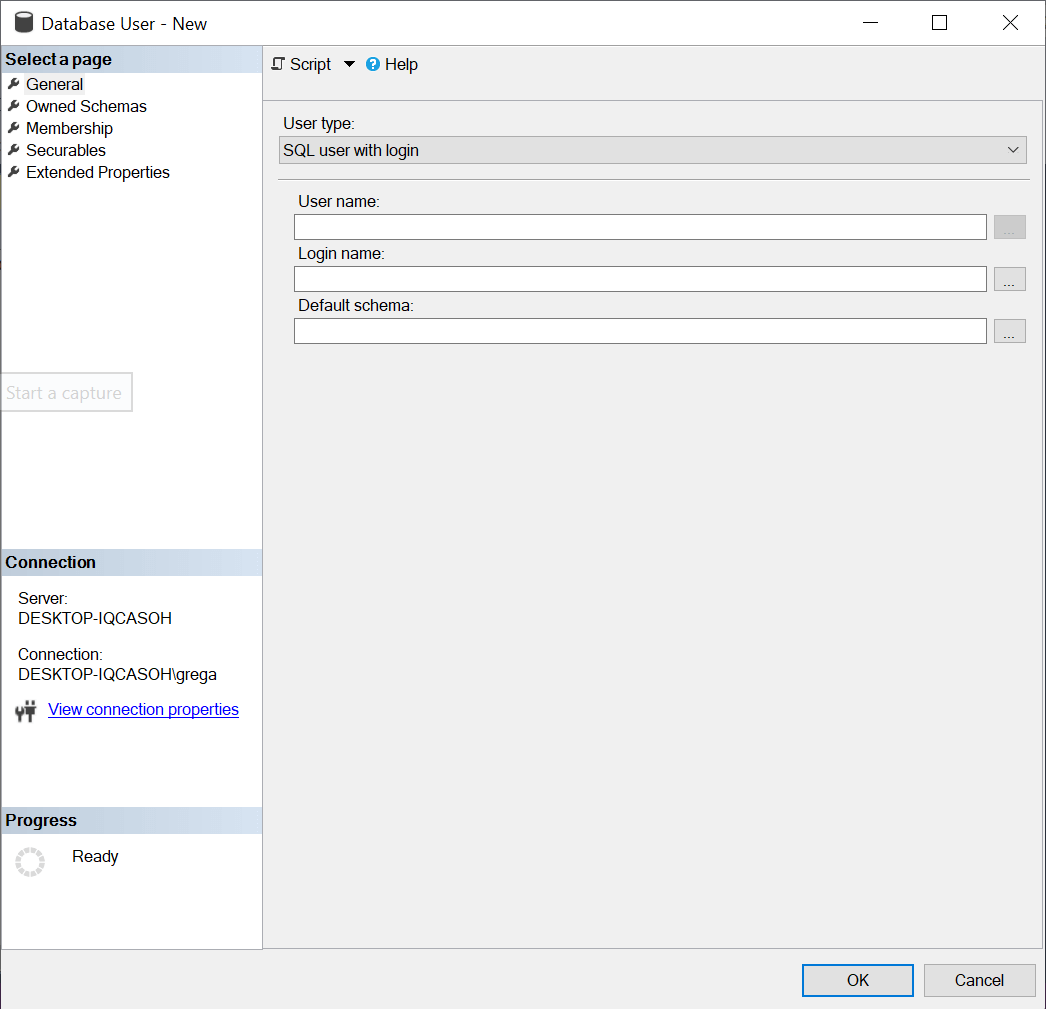
When I click on the new “User…” menu item, the window in Figure 8 is displayed.
Figure 8: Adding a new database user
To give the Red-Gate login access to MyDatabase, I need to fill out the form in Figure 8. The first item in Figure 8 to consider is the “User Type”. This field defaulted to “SQL User with Login”. There are four other types: SQL user without login, User mapped to a certificate, User mapped to an asymmetric key, and Window users. Since I am creating a database user that will be mapped to a SQL login, I use the default. Next, I enter the database user name for the user I am creating. It could be any name, but I prefer to make the database user name match the same name as the login it is associated with. Therefore I enter “Red-Gate” in the “User Name” field. I next map my new users to a login. To do the mapping, I can either type in “Red-Gate” for the login or use the ellipsis button (…) to browse through the list of logins already created and select one.
The last item needed is to define a default schema for this login. A schema name is associated with a database object collection owned by a database user. By default, each database has a schema named “dbo” owned by the “dbo” user account. You don’t need to specify a schema when you define a new database user. If one is not specified when defining the database user, the “dbo” schema will be the default schema. Since this article is just a primer, I will discuss the different aspects of schemas. I’ll leave that for another article. When I create my new Red-Gate database user, I’ll leave the default schema item empty and let the create new users process set the default schema automatically to “dbo”.
Once I’ve created my new user, I can verify it exists in the database by expanding the “User” item under the “Security” folder in Object Explorer. You can also create a new database user and map it to a login using a script. Listing 2 is an example of using TSQL to create the same login I just created using the point and click method.
|
USE [MyDatabase] GO CREATE USER [Red—Gate] FOR LOGIN [Red—Gate] GO |
Listing 2: Create a Red-Gate database user using a TSQL script
SQL Server authentication methods, logins, and database users
To connect to SQL Server, a person or process needs to authenticate. There are two different methods to authenticate to SQL Server: Windows and SQL Server. Windows is the more secure and recommended method for connecting to SQL Server. Each connection that authentications to SQL Server gains access to the instance via a login. Logins are defined at the server level. Logins by themselves don’t provide access to data within SQL Server. To gain access to data in a database, a login needs to be mapped to a database user. The authentication methods, logins, and databases users provide the basic security foundations for SQL Server security.
If you liked this article, you might also like Understanding SQL Server Recovery Models.
Поддерживаемые методы авторизации
Имеется два различных метода авторизации для подключения к SQL Server: Windows и SQL Server.
Для авторизации Windows требуется, чтобы пользователь сначала авторизовался в Windows со своим логином и паролем. После этого он может подключиться к SQL Server, используя авторизацию Windows. То есть при условии, что их учетной записи Windows был предоставлен доступ к SQL Server через логин (подробнее о логинах ниже). Авторизация Windows тесно связана с безопасностью Windows и называется интегрированной безопасностью (Integrated Security). Авторизация Windows прекрасно работает, когда лицо является частью домена Windows.
Но бывают случаи, когда люди не могут подключиться к Windows; это имеет место при авторизации SQL. Авторизация SQL является менее безопасной, чем авторизация Windows. Для подключения к SQL Server с помощью авторизации SQL, пользователь должен указать логин и пароль при подключении. Пароль логина при авторизации SQL хранится в базе данных master. Т.к. пароль хранится в базе данных, его легче взломать. Поскольку можно сделать бэкап базы с последующим восстановлением, этот способ авторизации менее безопасен, чем при использовании авторизации Windows.
Поскольку авторизация SQL менее безопасна, чем авторизация Windows, рекомендуется при установке экземпляра SQL Server выбирать смешанный режим, если вам требуется поддержка пользователей или приложений, которые не могут подключаться к Windows. Несмотря на то, что авторизация Windows более безопасна и является рекомендуемой практикой для подключения к SQL Server, многие поставщики нестандартного прикладного программного обеспечения до сих пор не поддерживают подключение посредством авторизации Windows.
Установка SQL Server с поддержкой различных режимов авторизации
При установке SQL Server вы можете выбрать поддержку только авторизации Windows или обоих методов авторизации, которая называется смешанным режимом. В процессе установки при определении конфигурации ядра базы данных вы решаете использовать ли смешанный режим, что показано на рис.1.
Рис.1 Выбор режима авторизации
Авторизация Windows выбирается по умолчанию (красная стрелка на рис.1). Если вам требуется поддержка авторизации как Windows, так и SQL Server, вам следует выбрать вариант “Mixed Mode”. При этом становится доступным установка пароля аккаунта SA, и вам потребуется задать пароль SA. При выборе только авторизации Windows, аккаунт SA недоступен. Чтобы защитить учетную запись SA при использовании смешанного режима, вы можете отключить ее после включения.
Как определить, какие методы авторизации поддерживаются
Вы можете проверить установленный метод авторизации несколькими способами. Один из способов — использовать SQL Server Management Studio (SSMS). Для этого выполните щелчок правой кнопкой на имени экземпляра и выберите команду Properties (свойства). В моем случае окно свойств показано на рис.2.
Рис.2 Определение режима авторизации
На рис.2 показывается, что мой экземпляр поддерживает смешанный режим авторизации (красная стрелка).
Другой способ — это использовать код T-SQL. На листинге ниже представлен код для вывода режима авторизации.
SELECT CASE SERVERPROPERTY('IsIntegratedSecurityOnly')

          WHEN 1 THEN 'Windows Authentication Only'

          WHEN 0 THEN 'Windows and SQL Server Authentication'

       END as [Authentication Mode];
Листинг 1: отображение режима авторизации
Изменение методов авторизации после установки SQL Server
Вы можете захотеть изменить установки авторизации для экземпляра SQL Server. Вы могли использовать настройки по умолчанию при установке для поддержки авторизации Windows, а затем приобрели программу, которая может подключаться к серверу только при использовании авторизации SQL Server. Или вы захотели сделать ваш экземпляр более безопасным, удалив поддержку авторизации SQL Server. Опции авторизации можно легко изменить, используя страницу свойств в SSMS, показанную на рис.2.
Если бы я захотел изменить поддержку авторизации только на Windows, все, что мне потребовалось бы сделать, это щелкнуть на кнопке “Windows authentication mode”, а затем на кнопке ОК для сохранения изменений. После изменения этого свойства, необходимо перезапустить экземпляр, чтобы изменения вступили в силу.
Логины SQL Server
Для подключения к SQL Server вы должны иметь доступ к серверу. Доступ гарантируется посредством логина. Логин также называют участником безопасности (security principal), он хранится в базе данных master. Есть одно исключение — это доступ к автономной базе данных. Пользователи автономных баз данных напрямую подключаются к базе данных без необходимости иметь логин в базе данных master. Автономные базы данных — это тема для последующих статей.
Имеется три типа логинов, которые хранятся в базе данных master: пользователь Windows, группа Windows и SQL. Давайте рассмотрим каждый из этих трех типов логинов.
Логин пользователя Windows предоставляет доступ отдельному пользователю Windows. При создании логина этого типа не требуется задавать пароль. Этот тип логина требует, чтобы пользователь сначала прошел валидацию, подключившись к домену Windows. Пароль хранится в домене Windows.
Логин SQL Server подобен логину Windows в том, что он предоставляет доступ к SQL Server для отдельного пользователя, но отличается тем, что пароль логина SQL хранится в базе данных master. Следовательно, при создании логина SQL Server требуется указывать пароль, а также некоторые другие опции, как показано на рис.3.
Рис.3 Настройка логина при авторизации SQL Server
На рис.3 показано, что для входа в SQL Server может быть применена политика паролей Windows и истечения срока действия, а также может потребовать от пользователя изменить пароль при первом входе в систему. Microsoft добавила эти новые возможности в SQL Server 2005. Для поддержки этих новых возможностей в приложениях может использоваться API NetValidatePasswordPolicy.
Последний тип логина, логин группы Windows, подобен логину Windows с незначительными отличиями. Логин группы Windows обеспечивает доступ к экземпляру SQL Server каждому логину Windows, который является членом группы. Группы Windows являются хорошим способом предоставить доступ множеству логинов Windows при наличии только одного логина SQL Server. Используя группу Windows, доступ к экземпляру SQL Server может регулироваться добавлением или удалением членов группы. Использование групп Windows помогает минимизировать усилия по обеспечению безопасности и решению проблем безопасности, связанных с логинами.
Внизу скриншота на рис.3 вы видите настройку для логина “Default Database” (база данных по умолчанию). При создании логина базой данных по умолчанию является база данных master. Вы можете поменять эту настройку на любую базу данных на сервере. Лучший вариант — установить по умолчанию базу данных, которую пользователь будет использовать при подключении к SQL Server.
Логины Windows считаются более безопасными из-за способа, каким сохраняется пароль для логина. Пароль для логина Windows сохраняется при использовании настоящего шифрования. В то время как пароль для логина SQL не шифруется, а хэшируется. Поэтому пароль SQL легче взломать. Для установки логинов и паролей Windows требуется администратор доменов, а для логинов SQL администраторы базы данных заводят логины и пароли. Использование админов доменов для управления паролями логинов обеспечивает еще один слой безопасности, обычно называемый разделением обязанностей. Разделение обязанностей по созданию и управлению логинами Windows от управления базами данных и доступа к ним обеспечивает дополнительный контроль безопасности по предоставлению доступа к данным, хранящимся на SQL Server.
Создание логина для SQL Server позволяет пользователям подключаться к серверу. Но один лишь логин не предоставляет пользователю доступ к каким-либо данным в различных базах данных на сервере. Чтобы логин мог читать и записывать данные в базу, он должен иметь доступ к тем или иным базам данных. Если требуется, для логина может быть установлен доступ к нескольким базам данных экземпляра.
Пользователи базы данных
Пользователь базы данных — это не то же самое, что и логин. Логин предоставляет пользователю или приложению возможность подключаться к экземпляру SQL Server, в то время как пользователь базы данных дает пользователю права на доступ к базе данных. В каждой базе данных, к которой логину требуется доступ, требуется определить пользователя; исключение составляет логин с правами системного администратора. Если логин имеет права сисадмина, он имеет доступ ко всем базам данных без необходимости связывать его с пользователем базы данных. Эта связь между логином и пользователем базы данных называется мэппингом пользователей. Мэппинг пользователя для логина может быть создан во время создания логина или позже для уже установленных логинов.
Создание пользователя базы данных при создании нового логина
Чтобы показать обеспечение мэппинга пользователя при создании нового логина, я создам новый логин SQL Server с именем “Red-Gate”. На скриншоте (рис.4) показано окно “Login – new”, где я определяю новый логин. Чтобы вывести это окно, я разворачиваю вкладку “Security” в дереве объектов моего экземпляра, а затем выполняю щелчок правой кнопкой на строке «Logins» и выбираю пункт “New Login…” из выпадающего списка.
Рис.4 Создание логина Red-Gate
На рис.4 я ввожу «Red-Gate» в качестве имени логина и пароль этого логина SQL в соответствующих полях диалога. Для предоставления доступа этому новому логину я выполняю щелчок на пункте “User Mapping” в левой панели. После этого откроется окно, показанное на рис.5.
Рис.5 Окно мэппинга пользователя
В красном прямоугольнике выводится список баз данных, с которыми можно связать мой новый логин. Для мэппинга логина “Red-Gate” с базой данных “AdventureWorks2019” мне нужно просто щелкнуть на флажке «Map» рядом с базой данных AdventureWorks2019. Теперь я получу то, что показано на скриншоте (рис.6).
Рис.6 Мэппинг логина с базой данных
После установки флажка Map имя “Red-Gate” автоматически заносится в столбец «User» для базы данных AdventureWorks2019. В интерфейсе автоматически генерируется имя пользователя базы данных, совпадающее с логином. Имена пользователей базы данных не обязательно должны совпадать с логинами. Если вы хотите использовать другое имя, просто наберите желаемое имя вместо предложенного (в моем случае “Red-Gate”). Мэппинг логина с пользователями базы данных обеспечивает только доступ к базе данных, но не предоставляет прав на чтение или обновление данных в базе. В следующих статьях я буду обсуждать предоставление доступа к объектам базы данных на чтение/запись.
Предположим я хочу связать мой новый логин “Red-Gate” и с другими пользовательскими базами данных. В этом случае мне нужно просто проставить флажки рядом с требуемыми базами данных. В данном примере я осуществляю мэппинг логина “Red-Gate” только с базой данных AdventureWorks2019. Для завершения процедуры мэппинга моего логина “Red-Gate” с пользователем базы данных “Red-Gate” нужно щелкнуть кнопку «ОК».
Создание нового пользователя базы данных и связывание его с существующим логином
Иногда, когда логин уже существует, требуется предоставить ему доступ к тем или иным базам данных. Предположим, что теперь я хочу установить доступ моему логину Red-Gate к базе данных с именем MyDatabase. Чтобы предоставить логину Red-Gate доступ к еще одной базе данных, у меня есть несколько вариантов. Одним из них может быть просто модификация мэппинга пользователя путем изменения свойств логина. Это подобно тому, как я только что показал, добавляя мэппинг пользователя при создании логина Red-Gate.
Другой вариант — это добавление нового пользователя в базу данных MyDatabase, а затем связывание этого нового пользователя базы данных с логином Red-Gate. Чтобы создать нового пользователя в базе данных MyDatabase, нужно сначала развернуть базу данных, щелкнуть правой кнопкой на пункте “Security”, переместить указатель на пункт «New», а затем щелкнуть на пункте «User…», как показано на рис.7.
Рис.7 Диалог ввода нового пользователя базы данных
При щелчке на пункте меню «User…» откроется окно, показанное на рис.8.
Рис.8 Добавление нового пользователя базы данных
Чтобы предоставить логину Red-Gate доступ к MyDatabase, нужно заполнить форму на рис.8. Сначала рассмотрим пункт “User Type” (тип пользователя). Значением по умолчанию для этого поля является “SQL User with Login” (пользователь SQL с логином). Имеется четыре других типа: SQL user without login (пользователь SQL без логина), User mapped to a certificate (пользователь, связанный с сертификатом), User mapped to an asymmetric key (пользователь, связанный с асимметричным ключом) и пользователи Window. Поскольку я создаю пользователя, который будет связан с логином SQL, я использую значение по умолчанию. Затем я ввожу имя создаваемого пользователя базы данных. Это может быть любое имя, но я предпочитаю использовать имена, совпадающие с соответствующими логинами. Поэтому я введу «Red Gate» в поле «User name». Затем я свяжу нового пользователя с логином. Для этого я могу либо набрать «Red Gate» для логина, либо использовать кнопку «…» для навигации по списку существующих логинов и выбрать нужный.
Последнее, что требуется, это определить схему по умолчанию для этого логина. Имя схемы ассоциируется с коллекцией объектов базы данных, владельцем которых является пользователь базы данных. По умолчанию каждая база данных имеет схему с именем «dbo», владельцем которой является учетная запись пользователя «dbo». При задании нового пользователя базы данных не обязательно указывать схему. Если схема не задана, будет использоваться схема по умолчанию «dbo». Я оставлю обсуждение различных аспектов схем для другой статьи. Когда я создаю нового пользователя базы данных Red-Gate, я оставляю пустым поле схемы по умолчанию и позволяю процессу создания нового пользователя автоматически установить схему по умолчанию в «dbo».
После создания нового пользователя я могу проверить его существование в базе данных, развернув ветку «User» в папке «Security» браузера объектов. Вы также можете создать нового пользователя базы данных и связать его с логином с помощью скрипта. В листинге 2 приводится пример использования T-SQL для создания того же пользователя, которого я только что создал визуальными средствами.
USE [MyDatabase]

GO

CREATE USER [Red-Gate] FOR LOGIN [Red-Gate]

GO
Листинг 2: Создание пользователя базы данных Red-Gate с помощью T-SQL
Методы авторизации SQL Server, логины и пользователи базы данных
Для подключения к SQL Server человеку или процессу необходимо авторизоваться. Имеется два различных метода авторизации на SQL Server: Windows и SQL Server. Метод Windows более безопасен и рекомендуется для подключении к SQL Server. Каждое авторизованное подключение к SQL Server получает доступ к экземпляру посредством логина. Логины определяются на уровне сервера. Сами по себе логины не обеспечивают доступ к данным на SQL Server. Для этого необходимо связать логин с пользователем базы данных. Методы авторизации, логины и пользователи базы данных обеспечивают основы безопасности SQL Server.
Note: All
screenshots applied for SQL Server 2012 Enterprise Evaluation version
Introduction
Although this is very basic article regarding authentication modes but it is very helpful to fresher DBAs. I always have a thought in mind when I wrote an
article and thought is «an article can be easily grasp by all whether they are experienced DBAs or fresher DBAs». So with this thought let’s move ahead and start the topic.
What is an Authentication?
Authentication is a process in which we need credentials, in other words username and password required, to access the SQL Server.
Figure 1: The very first screen that appears when we open SQL Server Management Studio (SSMS).
When you open SQL Server Management Studio (SSMS) for very first time you will get the following three things:
- Server Type
- Server Name
- Authentication
1. Server Type
There are the following four types of servers:
- Database Engine: Used for storing, processing and securing data.
- Analysis Services: Used for Online Analytical Processing and data mining functionality.
- Reporting Services: Used for creating interactive, tabular, graphical, or free-form reports from relational, multidimensional, or XML-based data sources.
-
Integration Services: Used to do a broad range of data migration tasks. It is a platform for data integration and workflow applications.
Figure 2: Illustrating server type in SQL Server
2. Server Name
It can be any name of server by which a server can be identified.
3. Authentication
As we already discussed, it is a process in which we need credentials, in other words username and password required, to access the SQL Server which is clearly visible in Figure 3.
Figure 3: Illustrating Authentication
Types of Authentication in SQL Server
There are basically the following two types of authentication in SQL Server:
- Windows authentication
- Mixed mode Authentication/SQL Server Authentication
a. Windows Authentication
Requires a valid Windows username and password to access the SQL Server.
b. Mixed mode Authentication
A user can login either via SQL Server authentication or Windows authentication mode to connect to SQL Server.
Example of Windows Authentication Mode:
Figure 4: Illustrating Windows Authentication in SQL Server
The following describes how to check that we are logged in with Windows Authentication Mode or Mixed Mode.
For this simply execute the following query in SSMS:
Use Master
GO
SELECT
CASE SERVERPROPERTY('IsIntegratedSecurityOnly')
WHEN 0 THEN 'Mixed Mode - Allows Both SQL Server or Windows Authentication Mode'
WHEN 1 THEN 'Allows Only Windows Authentication Mode'
END AS [Current Authentication Mode]
GO

Figure 5: Current Authentication Mode Output
Figure 6: Current Authentication Mode Output
Remember:
Remember that when only Windows Authentication is enabled, you can’t login with SQL Server Authentication or Mixed Mode.
Let’s make it clear with an example.
I have created a new login “yashrox” with SQL Authentication/Mixed Mode Authentication.
Figure 7: Creating a new login from security tab (Step 1)
Figure 8: Choosing SQL Server Authentication/Mixed Mode Authentication for new login “yashrox” (Step 2)
Figure 9: New login “yashrox” created with Mixed mode authentication (Step 3)
Now to check Mixed Mode / SQL Server Authentication we will log into SQL Server with the login «yashrox» that was created with SQL Server / Mixed Mode Authentication.
Figure 10: Trying to login with SQL Server Authentication (Mixed Mode)
Figure 11: Getting error when trying to login with SQL Server Authentication
An error occurred when we tried to login with SQL Server Authentication / Mixed Mode Authentication. Why this happened? It is happened because Mixed Mode / SQL Server Authentication is not enabled by
default as we saw in Figure 5 and Figure 6 also.
Resolution
The resolution for this problem is to enable the Mixed Mode / SQL Server Authentication, so let’s move ahead to enable the Mixed Mode/SQL Server Authentication.
Enabling Mixed Mode/SQL Server Authentication
There are two ways to enable Mixed Mode/SQL Server Authentication mode.
First Way
Step 1
Log into SQL Server with Windows authentication mode with the login name “XYZyashwant.kumar» (refer to Figure 4).
Step 2
Right-click on the Server and then click on properties as in the following:
Figure 12: Configuring SQL Server Properties for Mixed Mode Authentication
Step 3
Click on security in the left pane and select SQL Server and Windows Authentication Mode and click OK to save.
Figure 13: Enabling Mixed Mode Authentication
Step 4Restart SQL Server and try to login with SQL Server Authentication.
Figure 14: Restarting SQL Server after Enabling Mixed Mode Authentication
Step 5
Check authentication mode with below query:
Use Master
GO
SELECT
CASE SERVERPROPERTY('IsIntegratedSecurityOnly')
WHEN 0 THEN 'Mixed Mode - Allows Both SQL Server or Windows Authentication Mode'
WHEN 1 THEN 'Allows Only Windows Authentication Mode'
END AS [Current Authentication Mode]
GO
Figure 15: Checking Authentication mode with query
Step 6
Another way of checking authentication mode using xp_loginconfig
Figure 16: Checking Authentication mode
with other query
Wow! Now this time we are able to login with SQL Server Authentication / Mixed Mode and with both queries we are getting the login mode as Mixed Mode / SQL Server Authentication.
Second Way
Enabling Mixed from Regedit/Registry.
Step 1Open run box using Windows+R key. Type regedit and press Enter.
Step 2Navigate to the registry location HKEY_LOCAL_MACHINESOFTWAREMicrosoftMicrosoft SQL ServerMSSQL11.MSSQLSERVERMSSQLServer.
In the right panel, change the LoginMode from 1 to 2.
1 for Windows authentication.
2 for Mixed mode/SQL Server authentication.
Step 3
Restart your SQL Server instance and you can then connect to the server using SQL Server Authentication.
Figure 17: Enabling Mixed Mode Authentication with Registry
Conclusion
This is all about SQL Server Authentication Modes, I hope every newbie will enjoy and take benefit from this. Your feedback and comments are welcome so that I can improve myself in future and serve you more better articles.
A common question asked from super users of applications is, “What is the difference between Windows Authentication and SQL Server Authentication?” While there are many details under the covers of SQL Server and Windows Authentication, the differences can be summed up as follows.
Windows Authentication
Windows authentication means the account resides in Active Directory for the Domain. SQL Server knows to check AD to see if the account is active, password works, and then checks what level of permissions are granted to the single SQL server instance when using this account. This helps with account management since the account and password only need to be defined once. Plus, you can enforce your company’s security policies on the account (Password complexity, password expiration, etc.).
Another handy feature is you can grant access to an instance of SQL Server using a group defined in AD. Take, for example, you have a team of DBAs. Instead of having to create individual accounts and grant permissions to the individual account, you can grant access to the AD Group in SQL Server and as long as the AD account resides in the AD group, the permission to the SQL Server will be allowed. If someone leaves that company, that ID can be removed from the AD Group and that user no longer has access to the server. No extra steps to remove those individually granted accounts.
SQL Server Authentication
SQL Server Authentication means the account resides in the SQL server master database but nowhere on the Domain. The username and password are stored in the master database. If this account needs to access more than 1 SQL Server instance, then it has to be created on each instance. If the password needs to be changed, it needs to be changed on each instance individually to keep them all in sync. Using SQL Server Authentication gives you the ability to override the Domain Security policies when it comes to password complexity and password expiration. But this can lead to less secure accounts with elevated privileges in your database.
Can an account use both SQL and Windows Authentication?
No. An account cannot use both types of authentication. It has to be decided at the time of creation which authentication method will be used. Once decided then the account is created in AD or in SQL Server.
You can create a SQL Server account with the same name as the Windows account but this is not recommended. It adds to the confusion of which account is being used at which time and can make account management complex.
How can you change from using Windows Authentication to SQL Authentication for a given account?
You cannot change the authentication method of an account. The process is a bit more in depth. If you wish to use SQL Authentication instead of Windows, before making any changes, it is recommended to complete an audit to insure no windows processes are using the account. This would include any connections strings in the application. When you define connection strings to the database, you also define the authentication method to use.
Once it has been determined nothing is using the account, the windows account would need to be delete from the SQL Server instance. Note: Make sure to document all permissions settings to be sure the new account has the privileges needed. (Also, it is recommended to remove the account from AD to keep AD from cluttered with accounts that are no longer needed or wanted.) The creation of the new SQL Server Authentication account can be completed.
Summary
Windows Authentication uses AD to manage user account and passwords. The account can be part of an AD group. SQL Server uses AD to validate the account is active and then checks what permissions that account has in the SQL Server.
SQL Server Authentication manages the created account and password. This information is stored in the Master Database.
For further reading, learn about this SQL Server tip!
Authentication is the process of verifying that a principal—a user or process that needs access to SQL Server databases—is who or what it claims to be. A principal needs unique identification so that SQL Server can determine which permissions the principal has, if any. Correct authentication is a necessary first step in providing secure access to database objects.
SQL Server supports two paths to authentication: Windows Integrated Authentication and SQL Server authentication. The path you use depends on the network environment, types of applications that will access the database, and the types of users of those applications.
- Windows Authentication: This form of authentication relies on Windows to do the heavy lifting—validating identity when the user logs in to Windows. Permissions to access SQL Server objects are then assigned to Windows logins. This type of authentication is available only when SQL Server runs on a version of Windows that supports Windows NT or Kerberos authentication, which has pretty much been standard since Windows 2000.
- SQL Server Authentication: SQL Server can take care of authentication entirely on its own. In this case, you can create unique user names—called logins in SQL Server—and passwords. A user or application connects to SQL Server and supplies those credentials for access. Permissions are then assigned to that login either directly or through membership in a role.
Configuring authentication in SQL Server isn’t a simple either/or choice between these two types. You can configure authentication in either of two ways:
- Mixed Mode Authentication: The server supports both SQL Server and Windows authentication.
- Windows Only Mode: The server supports only Windows authentication.
Microsoft strongly recommends using Windows authentication whenever possible. Windows has robust authentication options, including password policies, but Windows authentication isn’t always practical in real applications. SQL Server authentication can hook into some of those Windows authentication features, but it just isn’t as secure.
Windows Authentication
If you configure your SQL Server to operate in Windows authentication mode, SQL Server assumes a trust relationship with Windows Server. It assumes that Windows authenticated the user when they logged in to Windows. SQL Server then checks the user account, any Windows groups, and any SQL Server roles the user may be a member of to determine whether that user is allowed to work with various SQL Server objects.
Windows authentication has several advantages over SQL Server authentication, including:
- A single login by the user, so she doesn’t have to log into SQL Server separately
- Auditing features
- Simplified login management
- Password policies (on Windows Server 2003 and later)
Another big advantage of Windows authentication is that any changes you make to Windows users and groups are automatically reflected in SQL Server, so you don’t have to administer them separately. However, if you make changes to a Windows user while they are connected to SQL Server, those changes won’t become effective until the next time the user connects to SQL Server.
Configuring SQL Server Security Settings
When you install SQL Server, you can select the authentication mode that the server instance will allow. Later you can change the setting in the Server Properties dialog box available in SQL Server Management Studio. These settings apply to all databases and other objects in the SQL Server instance. So if you need to use SQL Server authentication for any database, you have to set mixed mode for the server.
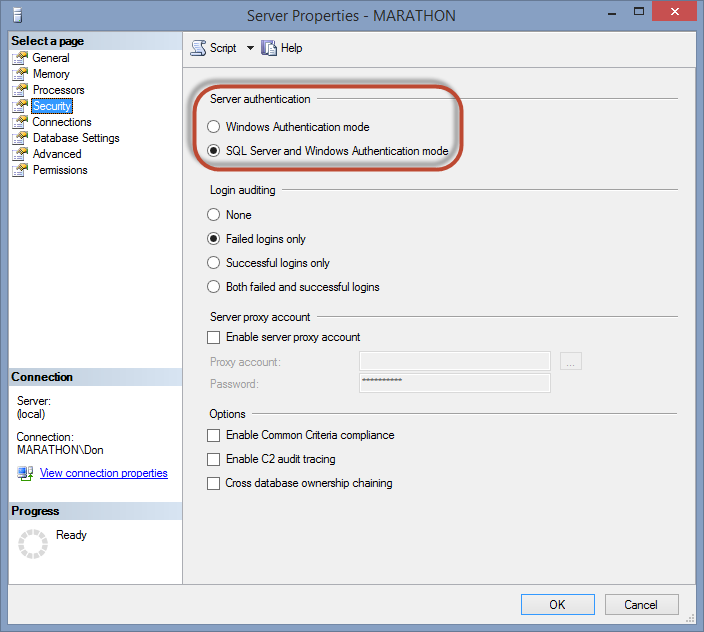
Figure 2.1 shows the Server Properties dialog box in Management Studio with the Security page selected. To open this dialog box, right-click the server instance name in the Object Explorer, and select Properties from the pop-up menu, and go to the Security page. You change the authentication mode simply by clicking the appropriate radio button and clicking OK to commit the change.
Figure 2.1. Configuring the authentication mode for the SQL Server instance.
Adding a Windows Login
To use Windows authentication, your users will need a valid Windows login account before they can access SQL Server. You can then grant permissions to a Windows group to connect to SQL Server, or you can grant permissions to individual Windows users if you don’t want to grant collective permissions.
One of the nice things about using Management Studio to manage security is that you can set up logins and provide database access at the same time. To enable a Windows login to access SQL Server and the AdventureWorks2012 database, use the following steps, which assume that the local machine already has a JoeStairway login defined.
- Open SQL Server Management Studio and make sure that the Object Explorer window is visible and that you are connected to a SQL Server instance.
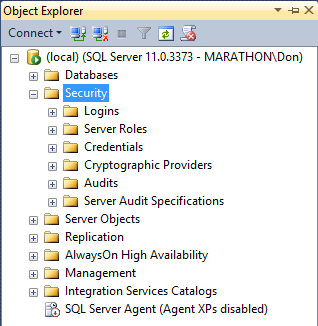
- Expand the tree view of the server’s objects, then expand the Security section. You’ll see several child nodes, as shown in Figure 2.2.
Figure 2.2. The security section of a server’s Object Explorer, where you can define logins.
- Right-click the Logins node and select New Login from the pop-up menu to open the Login – New dialog box.
- Make sure that the Windows authentication radio button is selected.
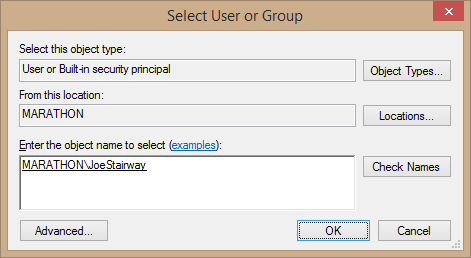
- You can select the Windows login in either of two ways. The first way is to directly type in the domain or machine name, then a backslash and the Windows login name for the user.The second, and generally easier, way is to click the Search button to open the Select User or Group dialog box. Type the user name and click the Check Names button to find the exact name. If the user is found, the full name will appear in the box, as shown in Figure 2.3. Click OK to select that user.
Figure 2.3. Finding a Windows login to add to SQL Server.
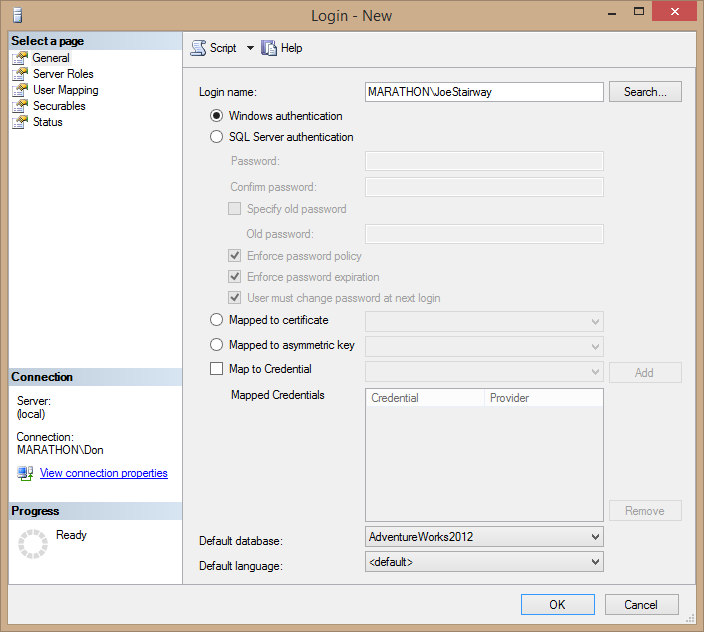
- Back in the Login – New dialog box, set the AdventureWorks2012 database as the login’s Default Database. This is the database that is used when the user connects to the server and doesn’t specify a database. It doesn’t limit the user to accessing only that database.Figure 2.4 shows the resulting login for the Windows JoeStairway user on a machine named Marathon, with a default database set to the sample AdventureWorks2012 database.
Figure 2.4. The Login – New dialog box enables a Windows login to access a SQL Server instance.
TIP:
Never leave the default database set to the master database. I speak from painful experience: It is far too easy to connect to a server and forget to change the database. If you then run a script that creates hundreds of database objects in the master database, you’ll have a very tedious job deleting those objects manually to clean up the master database.
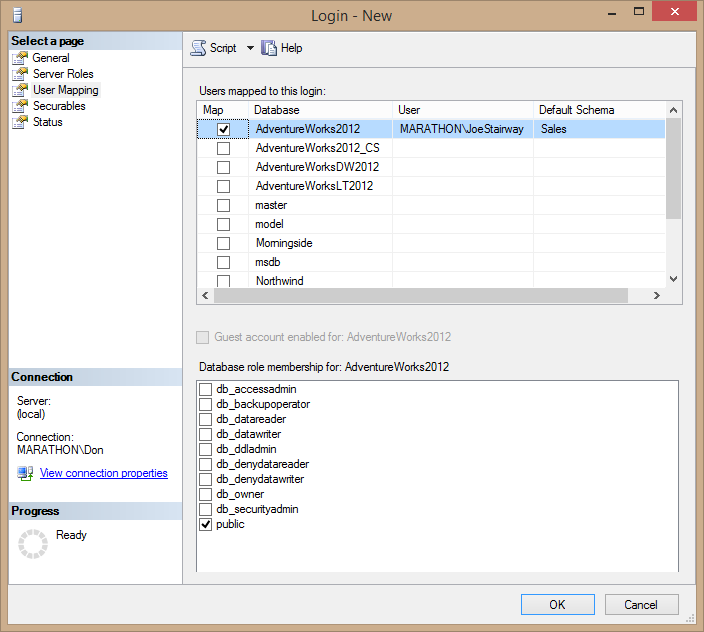
- Next, give the user access to a database. Select the User Mapping page from the list on the left side of the dialog box. Grant the user access to the AdventureWorks2012 database by checking the box next to the database name. SQL Server automatically maps the user to a user with the same name in the database, as you can see in the third column in the table, although you can change the user name if you want. Assign Sales as the user’s default schema in the database, either by typing it in the Default Schema column or clicking the ellipsis (…) button to select it from a list. The dialog box should look like Figure 2.5.
Figure 2.5. Granting a Windows login access to the AdventureWorks2012 database.
Tip:
There is a difference between setting a default database for a login and granting access to the database. A default database simply means that SQL Server attempts to change the context to that database when the user logs in without specifying a database. But this doesn’t grant any kind of permissions to do anything in the database, or even allow access to the database. This means that it is possible to assign a default database that the user can’t access at all. For the user to do anything useful once a database is accessed, you’ll need to explicitly grant the user permissions.
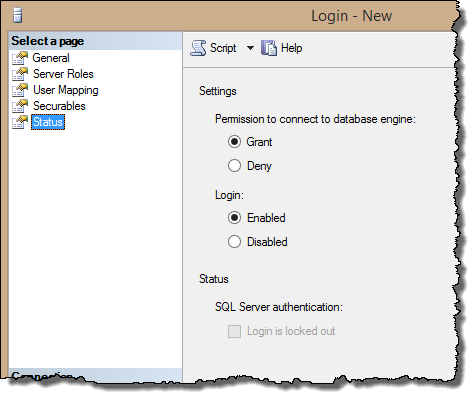
- By default, new Windows logins have access to the server. But if you want to explicitly deny a login access to the server, select Status from the list of pages on the left side of the Login – New dialog box and select the Deny radio button. You can also temporarily disable the login by selecting the Disabled button. Figure 2.6 shows these options.
Figure 2.6. Options to grant or deny access to the server and to temporarily disable a login account.
- Click OK to create the user.
You can also add a Windows group to SQL Server in the same way. In that case, any member of the group will have access to the database server, with whatever access you give the group to objects in a database.
SQL Server Authentication
When you use SQL Server logins for authentication, client applications have to provide a valid user name and password in order to connect to a database. These SQL Server logins are saved in SQL Server, without reference to Windows. When logging in, if no account matches the user name and password, SQL Server raises an error and the user cannot access SQL Server.
Even though Windows authentication is more secure, you may elect to use SQL Server logins instead in some situations. SQL Server authentication is easier to administer for simple applications that don’t have extensive security needs, and it allows you to avoid getting tangled up with Windows security. And if the client is running on older versions of Windows (basically, anything older than Windows 2000) or a non-Windows operating system, you’ll have to use SQL Server logins.
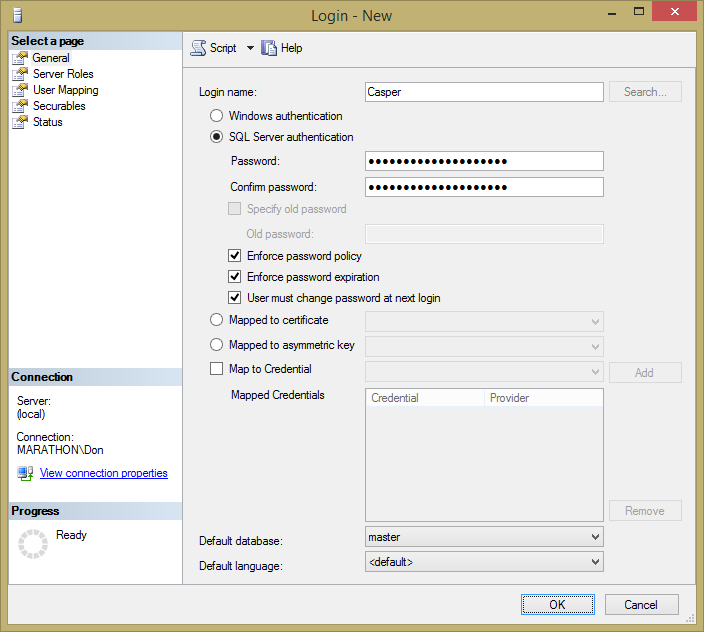
To create a SQL Server login, use the same Login – New dialog box as for Windows logins. But instead of selecting a Windows login, type a unique login name without a domain or machine name, and supply a password. For example, Figure 2.7 shows how to create a new SQL Server login Casper and make AdventureWorks2012 his default database.
Figure 2.7. Creating a SQL Server login.
All of the other options for user mapping and status are the same SQL Server logins as they are for Windows logins.
SQL Server Logins via Transact-SQL
You can also perform the same actions with Transact-SQL code. The CREATE LOGIN code in Listing 2.1 creates a SQL Server login Topaz with a fairly strong password:
CREATE LOGIN Topaz WITH PASSWORD = 'yBqyZIPT8}b]b[{5al0v';
GO
Listing 2.1. Code for creating a new SQL Server login with T-SQL.
Then, to grant Topaz access to the AdventureWorks2012 database, use the CREATE USER statement and assign a default schema, as shown in Listing 2.2.
USE AdventureWorks2012;
GO
CREATE USER Topaz FOR LOGIN Topaz
    WITH DEFAULT_SCHEMA = HumanResources;
GO
Listing 2.2. Code to create a database users associated with a SQL Server login.
Tip:
As with the Level 1 Stairway, you’ll probably need to make some changes to the code samples if you want to run them in your local instance of SQL Server. The code in Listing 2.2 assumes that you have the AdventureWorks2012 database installed. Later code samples assume that you are running the code on a machine named Marathon and have a JoeStairway user in Windows. Feel free either to name your machine Marathon or create a user with that name, or change the code as appropriate.
Like Windows logins, you can map the server login Topaz to some other name in a database. The code in Listing 2.3 maps Topaz to the TopazD user in the AdventureWorks2012 database:
DROP USER Topaz;
GO
CREATE USER TopazD FOR LOGIN Topaz WITH DEFAULT_SCHEMA = HumanResources;
GO
Listing 2.3. Code to drop an existing user then add a database user with a name different from login name.
Beware of the sa Login
If you configure your SQL Server to support SQL Server logins, there is one built-in SQL Server login that you need to watch out for—the sa login—which you may have noticed hanging around in the Logins node in Object Explorer. The sa, or system administrator, login is included mainly for backward compatibility with older versions of SQL Server. The sa login is mapped to the sysadmin fixed server role, and anyone who logs in to SQL Server as sa is a full system administrator, with irrevocable rights over the entire SQL Server instance and all the databases in it. This is a powerful login, indeed.
You can’t modify or delete the sa login. If you select Mixed Mode authentication when you install SQL Server, you’re prompted for a password for the sa user. Without a password, anyone can log in as sa with no password, and play “let’s administer the server.” Needless to say, this is the last thing you want your users doing. Log in using the sa login only as a backdoor if other system administrators are unavailable or have forgotten their Windows passwords. If that happens, you probably need new admins!
Never, EVER, use the sa login for access to a database in an application. Doing so could give a hacker admin-level control over your database server if the hacker is able to get control of the application. In the distant past, this has been an easy way to attack servers and is a horrible practice. Instead, either set up a custom Windows or SQL Server login for the application to use, and give that login the absolute minimum permissions necessary to run the application (which implements the principle of least privilege).
Tip:
In fact, you should consider disabling the sa login entirely, using the Status page of the Login Properties dialog box that you saw earlier. That way an attacker can’t use this all-powerful login to gain control of your server instance, whether you have a strong sa password or not.
Password Policy and Enforcement
In versions of SQL Server before 2005, there was no easy way for a system administrator to enforce password policies that could help make a system more secure. For example, SQL Server had no way to force users to create strong passwords of a minimum length and a mix of alphanumeric and other characters. If someone wanted to create a login with a single letter for a password, you couldn’t configure SQL Server to prevent it. Likewise, there was no way to cause passwords to expire on a regular basis, such as every three months. Some people rightly saw this as a major reason not to use SQL Server logins.
More recent versions of SQL Server can hook into the password policies of Windows Server 2003, Windows Vista, or later versions. The passwords are still stored in SQL Server, but SQL Server makes a call into the NetValidatePasswordPolicy() Windows API method, which was first introduced in Windows Server 2003. This API function applies the Windows password policy to SQL Server logins and returns a value that indicates whether the password is valid. SQL Server calls this function when a user creates, sets, or resets a password.
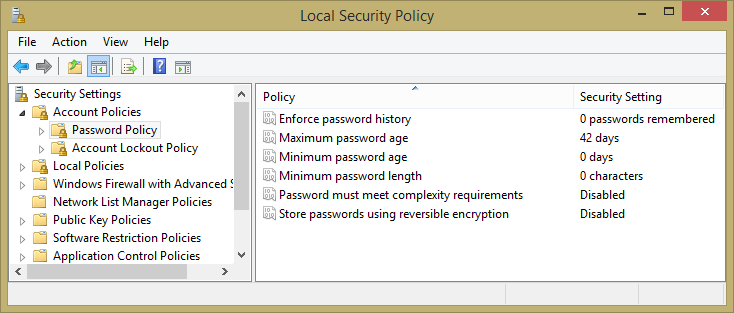
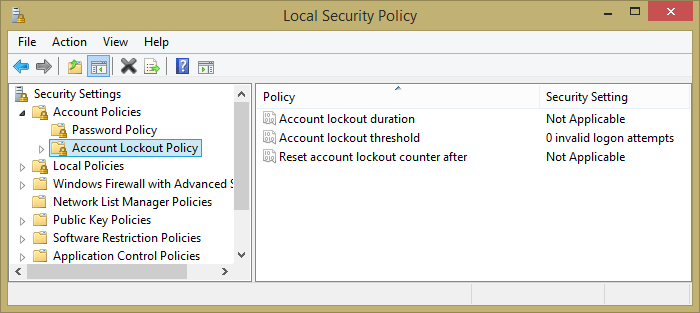
You can define the Windows password policies via the Local Security Settings applet among the Windows Control Panel’s Administrative Tools. The Password Policy section is shown in Figure 2.8 with the default settings. The applet has a separate Account Lockout Policy section, shown in Figure 2.9, which goes into effect when a user makes too many unsuccessful login attempts. By default, the lockout policy is disabled in a fresh Windows install.
Figure 2.8. The Windows Local Security Policy applet, showing the default password policies.
Figure 2.9. The Windows Local Security Policy applet, showing the default account lockout policies.
Table 2.1 lists the password policies along with the default values and some notes about how they work.
| Category | Policy Name | Default | Notes |
| Password Policy | Enforce password history | 0 passwords remembered | Prevents users from reusing old passwords, such as alternating between two passwords. |
| Minimum password length | 0 characters | Use this to require longer passwords to make them harder to break. | |
| Password must meet complexity requirements | Disabled | Minimum mix of alphanumeric and other characters, and does not contain the user name. | |
| Password Expiration | Maximum password age | 42 days | Number of days before a user is prompted to change their password. |
| Minimum password age | 0 Days | Number of days before a user is allowed to change a password. | |
| Account Lockout Policy | Account lockout duration | Not applicable | Time in minutes that the account is locked out if the lockout threshold is enabled. |
| Account lockout threshold | 0 invalid login attempts | Maximum number of unsuccessful login attempts before the account is locked out. | |
| Reset account lockout counter after | Not applicable | Time in minutes after which the counter of unsuccessful attempts is reset; enabled when the lockout threshold is enabled. |
Table 2.1. Windows password policy settings.
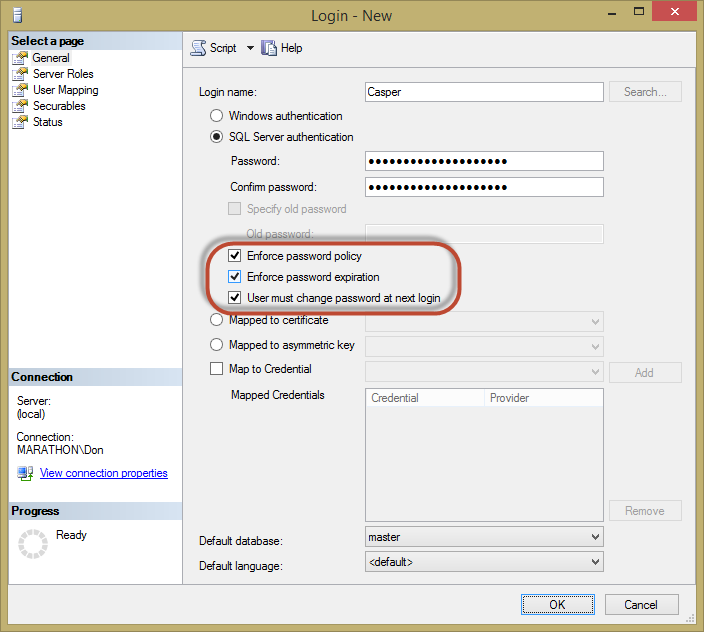
You can enable or disable password policy enforcement when you create a login. The Login – New dialog box has a section under the login name that is enabled when you create a SQL Server login, shown in Figure 2-10.
Figure 2-10. Enforcing password policies for a new login.
Password policies apply when you use Transact-SQL to create logins as well. For example, if you are running SQL Server on Windows 2003 Server or later and have password policies enabled, the code in Listing 2.4 will fail.
USE master;
GO
CREATE LOGIN SIMPLEPWD WITH PASSWORD = 'SIMPLEPWD';
GO
Listing 2.4. Attempting to create a login with a password that violates password policy.
The reason this code fails is that the password can’t be the same as the user name.
You can control the policies when you create or alter logins. The code in Listing 2.5 turns off the options to check expiration and policy.
ALTER LOGIN Topaz WITH PASSWORD = 'yBqyZIPT8}b]b[{5al0v',
    CHECK_EXPIRATION = OFF, CHECK_POLICY = OFF;
Listing 2.5. Code that changes a login to disable password policy for this login only.
The CHECK_EXPIRATION option controls whether SQL Server checks the age of the password against policy and CHECK_POLICY applies to the other policies. A MUST_CHANGE option is available that forces the user to change the password at the next login.
If a user makes too many unsuccessful attempts to log in, exceeding the number set in the account lockout policy, an administrator can reset the account using the UNLOCK option, as demonstrated in Listing 2.6.
ALTER LOGIN Topaz WITH PASSWORD = 'yBqyZIPT8}b]b[{5al0v' UNLOCK
Listing 2.6. Code to unlock a login that was locked because of too many failed login attempts.
You can enable the Enforce Password Policy when running SQL Server on versions of Windows before Windows Server 2003. But SQL Server uses default settings of a minimum length of six characters, checks that the password doesn’t match all or any part of the login name, and is a mix of uppercase letters, lowercase letters, numbers, and other characters. You cannot change these defaults. But hopefully you aren’t running SQL Server on such an old version of Windows, if only because of the vast security improvements since then!
Summary
In this level of the Stairway to SQL Server Security, you’ve learned about a number of the authentication options available in SQL Server. Windows Integrated authentication is the most secure but is not always feasible, and Microsoft has made SQL Server authentication better and more secure over the years. But if you used mixed mode authentication, don’t forget to give the sa login a very strong password or, even better, disable it! Like most security objects, you can create and change them using either the nice GUI interface in Management Studio or T-SQL code. And if you’re running SQL Server on a modern version of Windows, you can hook into the password policies of the local security policy.


