Поддерживаемые методы авторизации
Имеется два различных метода авторизации для подключения к SQL Server: Windows и SQL Server.
Для авторизации Windows требуется, чтобы пользователь сначала авторизовался в Windows со своим логином и паролем. После этого он может подключиться к SQL Server, используя авторизацию Windows. То есть при условии, что их учетной записи Windows был предоставлен доступ к SQL Server через логин (подробнее о логинах ниже). Авторизация Windows тесно связана с безопасностью Windows и называется интегрированной безопасностью (Integrated Security). Авторизация Windows прекрасно работает, когда лицо является частью домена Windows.
Но бывают случаи, когда люди не могут подключиться к Windows; это имеет место при авторизации SQL. Авторизация SQL является менее безопасной, чем авторизация Windows. Для подключения к SQL Server с помощью авторизации SQL, пользователь должен указать логин и пароль при подключении. Пароль логина при авторизации SQL хранится в базе данных master. Т.к. пароль хранится в базе данных, его легче взломать. Поскольку можно сделать бэкап базы с последующим восстановлением, этот способ авторизации менее безопасен, чем при использовании авторизации Windows.
Поскольку авторизация SQL менее безопасна, чем авторизация Windows, рекомендуется при установке экземпляра SQL Server выбирать смешанный режим, если вам требуется поддержка пользователей или приложений, которые не могут подключаться к Windows. Несмотря на то, что авторизация Windows более безопасна и является рекомендуемой практикой для подключения к SQL Server, многие поставщики нестандартного прикладного программного обеспечения до сих пор не поддерживают подключение посредством авторизации Windows.
Установка SQL Server с поддержкой различных режимов авторизации
При установке SQL Server вы можете выбрать поддержку только авторизации Windows или обоих методов авторизации, которая называется смешанным режимом. В процессе установки при определении конфигурации ядра базы данных вы решаете использовать ли смешанный режим, что показано на рис.1.
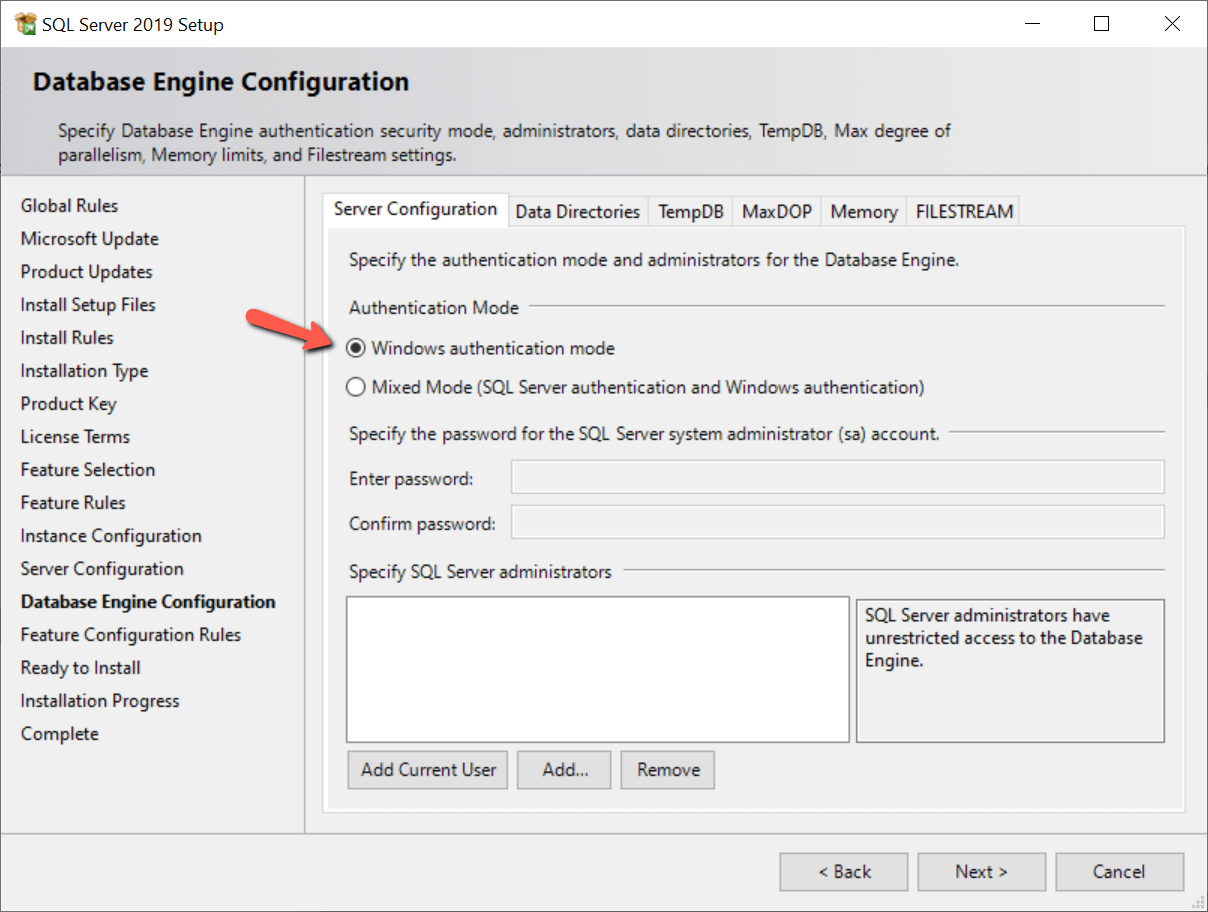
Рис.1 Выбор режима авторизации
Авторизация Windows выбирается по умолчанию (красная стрелка на рис.1). Если вам требуется поддержка авторизации как Windows, так и SQL Server, вам следует выбрать вариант “Mixed Mode”. При этом становится доступным установка пароля аккаунта SA, и вам потребуется задать пароль SA. При выборе только авторизации Windows, аккаунт SA недоступен. Чтобы защитить учетную запись SA при использовании смешанного режима, вы можете отключить ее после включения.
Как определить, какие методы авторизации поддерживаются
Вы можете проверить установленный метод авторизации несколькими способами. Один из способов — использовать SQL Server Management Studio (SSMS). Для этого выполните щелчок правой кнопкой на имени экземпляра и выберите команду Properties (свойства). В моем случае окно свойств показано на рис.2.
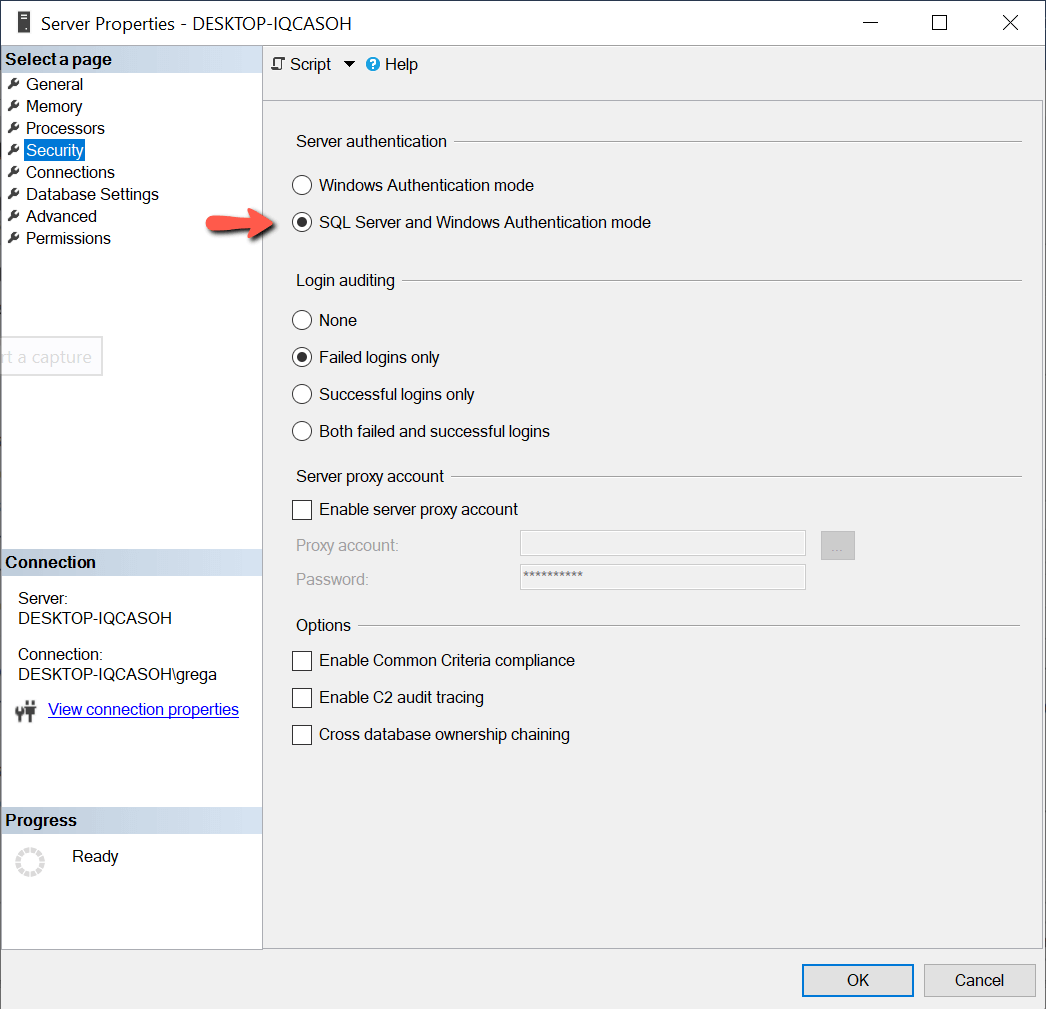
Рис.2 Определение режима авторизации
На рис.2 показывается, что мой экземпляр поддерживает смешанный режим авторизации (красная стрелка).
Другой способ — это использовать код T-SQL. На листинге ниже представлен код для вывода режима авторизации.
SELECT CASE SERVERPROPERTY('IsIntegratedSecurityOnly')

          WHEN 1 THEN 'Windows Authentication Only'

          WHEN 0 THEN 'Windows and SQL Server Authentication'

       END as [Authentication Mode];
Листинг 1: отображение режима авторизации
Изменение методов авторизации после установки SQL Server
Вы можете захотеть изменить установки авторизации для экземпляра SQL Server. Вы могли использовать настройки по умолчанию при установке для поддержки авторизации Windows, а затем приобрели программу, которая может подключаться к серверу только при использовании авторизации SQL Server. Или вы захотели сделать ваш экземпляр более безопасным, удалив поддержку авторизации SQL Server. Опции авторизации можно легко изменить, используя страницу свойств в SSMS, показанную на рис.2.
Если бы я захотел изменить поддержку авторизации только на Windows, все, что мне потребовалось бы сделать, это щелкнуть на кнопке “Windows authentication mode”, а затем на кнопке ОК для сохранения изменений. После изменения этого свойства, необходимо перезапустить экземпляр, чтобы изменения вступили в силу.
Логины SQL Server
Для подключения к SQL Server вы должны иметь доступ к серверу. Доступ гарантируется посредством логина. Логин также называют участником безопасности (security principal), он хранится в базе данных master. Есть одно исключение — это доступ к автономной базе данных. Пользователи автономных баз данных напрямую подключаются к базе данных без необходимости иметь логин в базе данных master. Автономные базы данных — это тема для последующих статей.
Имеется три типа логинов, которые хранятся в базе данных master: пользователь Windows, группа Windows и SQL. Давайте рассмотрим каждый из этих трех типов логинов.
Логин пользователя Windows предоставляет доступ отдельному пользователю Windows. При создании логина этого типа не требуется задавать пароль. Этот тип логина требует, чтобы пользователь сначала прошел валидацию, подключившись к домену Windows. Пароль хранится в домене Windows.
Логин SQL Server подобен логину Windows в том, что он предоставляет доступ к SQL Server для отдельного пользователя, но отличается тем, что пароль логина SQL хранится в базе данных master. Следовательно, при создании логина SQL Server требуется указывать пароль, а также некоторые другие опции, как показано на рис.3.
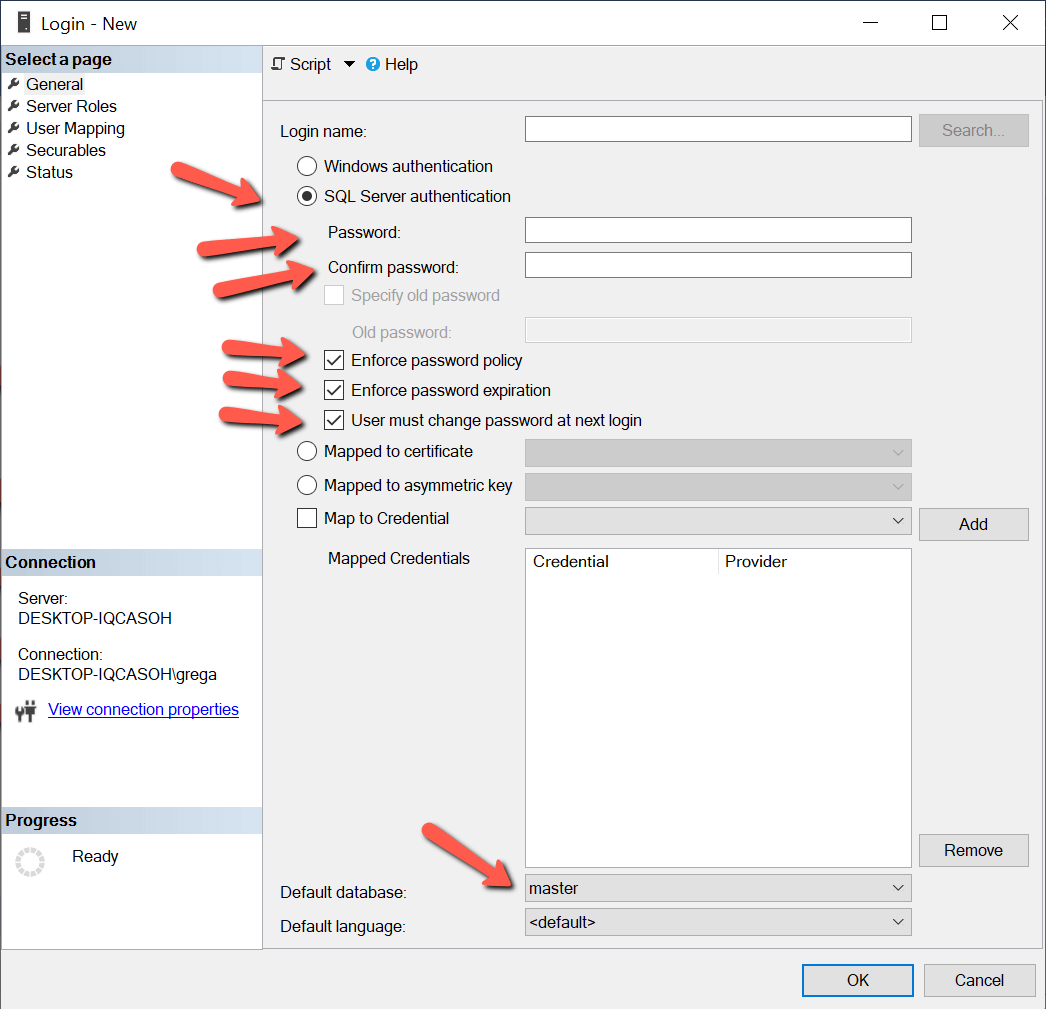
Рис.3 Настройка логина при авторизации SQL Server
На рис.3 показано, что для входа в SQL Server может быть применена политика паролей Windows и истечения срока действия, а также может потребовать от пользователя изменить пароль при первом входе в систему. Microsoft добавила эти новые возможности в SQL Server 2005. Для поддержки этих новых возможностей в приложениях может использоваться API NetValidatePasswordPolicy.
Последний тип логина, логин группы Windows, подобен логину Windows с незначительными отличиями. Логин группы Windows обеспечивает доступ к экземпляру SQL Server каждому логину Windows, который является членом группы. Группы Windows являются хорошим способом предоставить доступ множеству логинов Windows при наличии только одного логина SQL Server. Используя группу Windows, доступ к экземпляру SQL Server может регулироваться добавлением или удалением членов группы. Использование групп Windows помогает минимизировать усилия по обеспечению безопасности и решению проблем безопасности, связанных с логинами.
Внизу скриншота на рис.3 вы видите настройку для логина “Default Database” (база данных по умолчанию). При создании логина базой данных по умолчанию является база данных master. Вы можете поменять эту настройку на любую базу данных на сервере. Лучший вариант — установить по умолчанию базу данных, которую пользователь будет использовать при подключении к SQL Server.
Логины Windows считаются более безопасными из-за способа, каким сохраняется пароль для логина. Пароль для логина Windows сохраняется при использовании настоящего шифрования. В то время как пароль для логина SQL не шифруется, а хэшируется. Поэтому пароль SQL легче взломать. Для установки логинов и паролей Windows требуется администратор доменов, а для логинов SQL администраторы базы данных заводят логины и пароли. Использование админов доменов для управления паролями логинов обеспечивает еще один слой безопасности, обычно называемый разделением обязанностей. Разделение обязанностей по созданию и управлению логинами Windows от управления базами данных и доступа к ним обеспечивает дополнительный контроль безопасности по предоставлению доступа к данным, хранящимся на SQL Server.
Создание логина для SQL Server позволяет пользователям подключаться к серверу. Но один лишь логин не предоставляет пользователю доступ к каким-либо данным в различных базах данных на сервере. Чтобы логин мог читать и записывать данные в базу, он должен иметь доступ к тем или иным базам данных. Если требуется, для логина может быть установлен доступ к нескольким базам данных экземпляра.
Пользователи базы данных
Пользователь базы данных — это не то же самое, что и логин. Логин предоставляет пользователю или приложению возможность подключаться к экземпляру SQL Server, в то время как пользователь базы данных дает пользователю права на доступ к базе данных. В каждой базе данных, к которой логину требуется доступ, требуется определить пользователя; исключение составляет логин с правами системного администратора. Если логин имеет права сисадмина, он имеет доступ ко всем базам данных без необходимости связывать его с пользователем базы данных. Эта связь между логином и пользователем базы данных называется мэппингом пользователей. Мэппинг пользователя для логина может быть создан во время создания логина или позже для уже установленных логинов.
Создание пользователя базы данных при создании нового логина
Чтобы показать обеспечение мэппинга пользователя при создании нового логина, я создам новый логин SQL Server с именем “Red-Gate”. На скриншоте (рис.4) показано окно “Login – new”, где я определяю новый логин. Чтобы вывести это окно, я разворачиваю вкладку “Security” в дереве объектов моего экземпляра, а затем выполняю щелчок правой кнопкой на строке «Logins» и выбираю пункт “New Login…” из выпадающего списка.
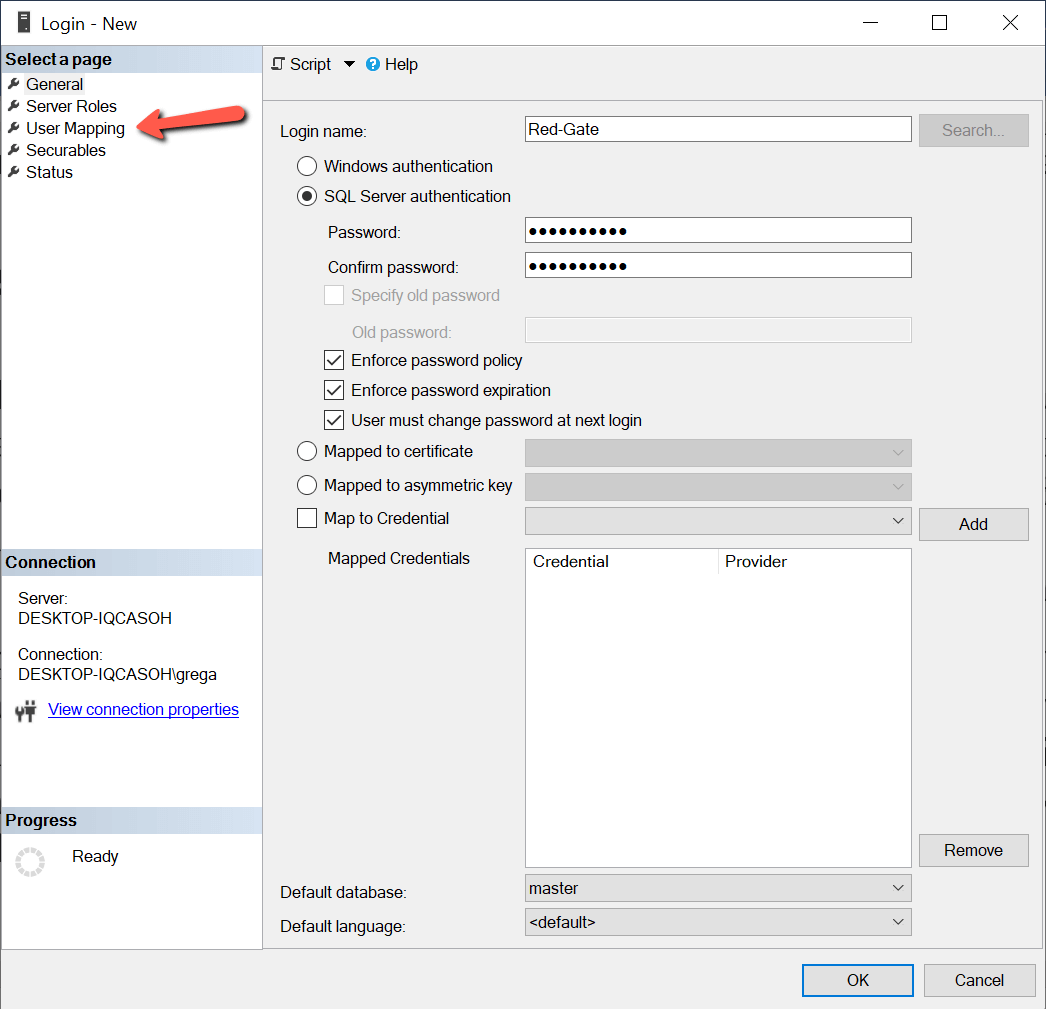
Рис.4 Создание логина Red-Gate
На рис.4 я ввожу «Red-Gate» в качестве имени логина и пароль этого логина SQL в соответствующих полях диалога. Для предоставления доступа этому новому логину я выполняю щелчок на пункте “User Mapping” в левой панели. После этого откроется окно, показанное на рис.5.
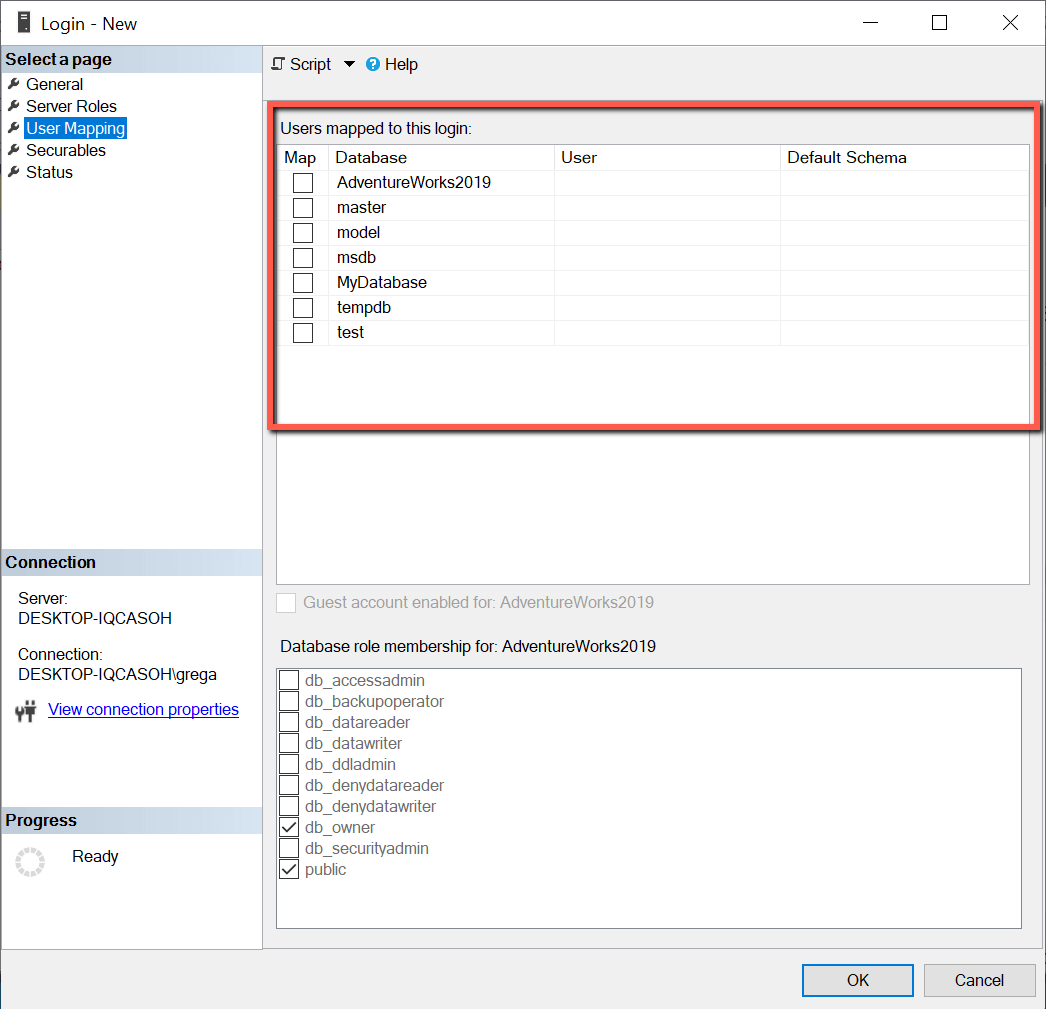
Рис.5 Окно мэппинга пользователя
В красном прямоугольнике выводится список баз данных, с которыми можно связать мой новый логин. Для мэппинга логина “Red-Gate” с базой данных “AdventureWorks2019” мне нужно просто щелкнуть на флажке «Map» рядом с базой данных AdventureWorks2019. Теперь я получу то, что показано на скриншоте (рис.6).
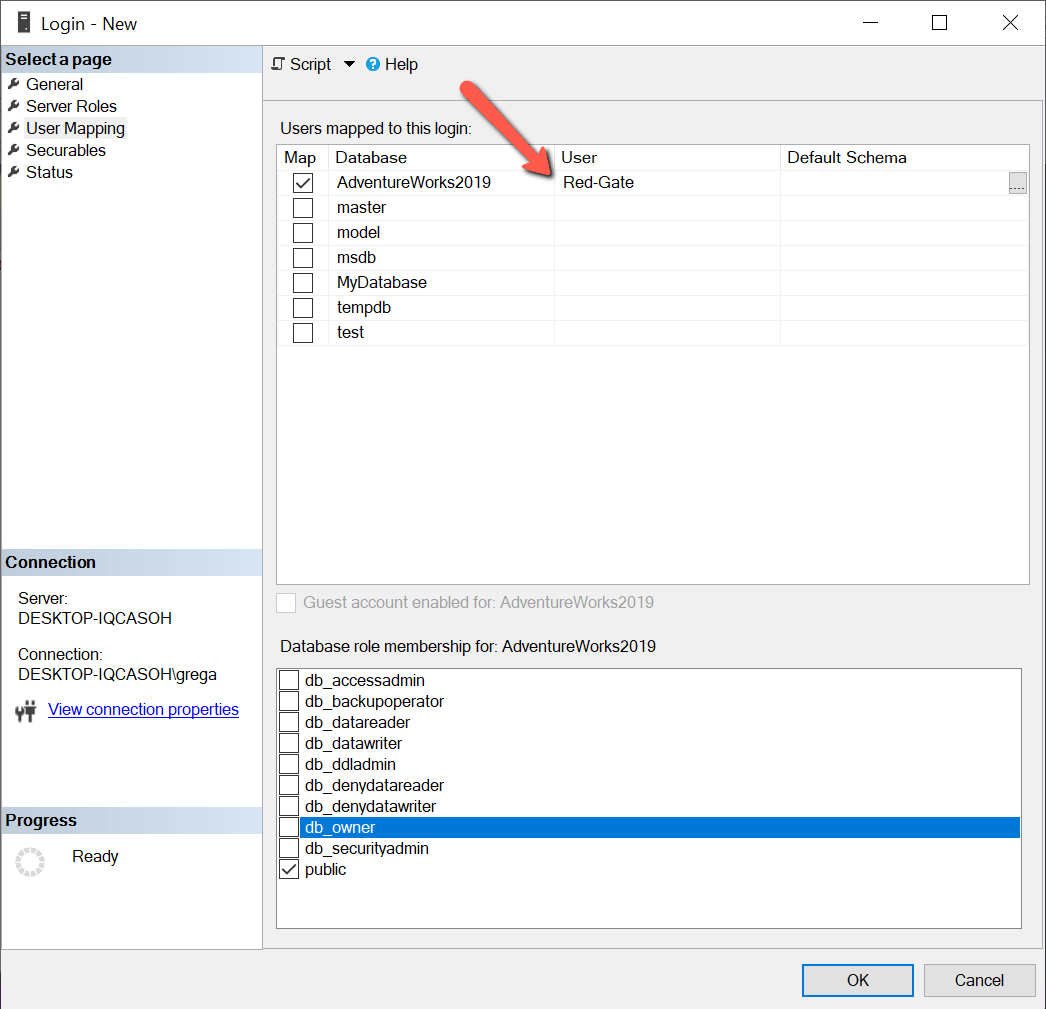
Рис.6 Мэппинг логина с базой данных
После установки флажка Map имя “Red-Gate” автоматически заносится в столбец «User» для базы данных AdventureWorks2019. В интерфейсе автоматически генерируется имя пользователя базы данных, совпадающее с логином. Имена пользователей базы данных не обязательно должны совпадать с логинами. Если вы хотите использовать другое имя, просто наберите желаемое имя вместо предложенного (в моем случае “Red-Gate”). Мэппинг логина с пользователями базы данных обеспечивает только доступ к базе данных, но не предоставляет прав на чтение или обновление данных в базе. В следующих статьях я буду обсуждать предоставление доступа к объектам базы данных на чтение/запись.
Предположим я хочу связать мой новый логин “Red-Gate” и с другими пользовательскими базами данных. В этом случае мне нужно просто проставить флажки рядом с требуемыми базами данных. В данном примере я осуществляю мэппинг логина “Red-Gate” только с базой данных AdventureWorks2019. Для завершения процедуры мэппинга моего логина “Red-Gate” с пользователем базы данных “Red-Gate” нужно щелкнуть кнопку «ОК».
Создание нового пользователя базы данных и связывание его с существующим логином
Иногда, когда логин уже существует, требуется предоставить ему доступ к тем или иным базам данных. Предположим, что теперь я хочу установить доступ моему логину Red-Gate к базе данных с именем MyDatabase. Чтобы предоставить логину Red-Gate доступ к еще одной базе данных, у меня есть несколько вариантов. Одним из них может быть просто модификация мэппинга пользователя путем изменения свойств логина. Это подобно тому, как я только что показал, добавляя мэппинг пользователя при создании логина Red-Gate.
Другой вариант — это добавление нового пользователя в базу данных MyDatabase, а затем связывание этого нового пользователя базы данных с логином Red-Gate. Чтобы создать нового пользователя в базе данных MyDatabase, нужно сначала развернуть базу данных, щелкнуть правой кнопкой на пункте “Security”, переместить указатель на пункт «New», а затем щелкнуть на пункте «User…», как показано на рис.7.
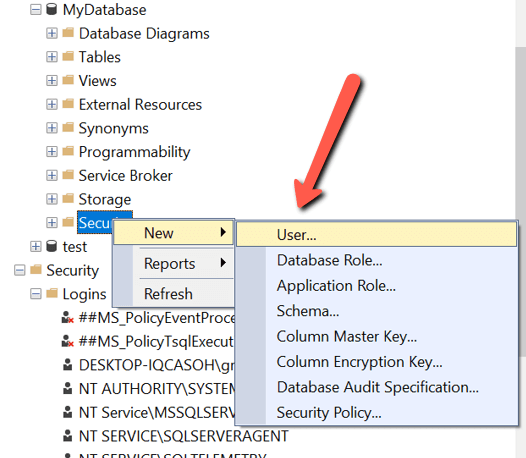
Рис.7 Диалог ввода нового пользователя базы данных
При щелчке на пункте меню «User…» откроется окно, показанное на рис.8.
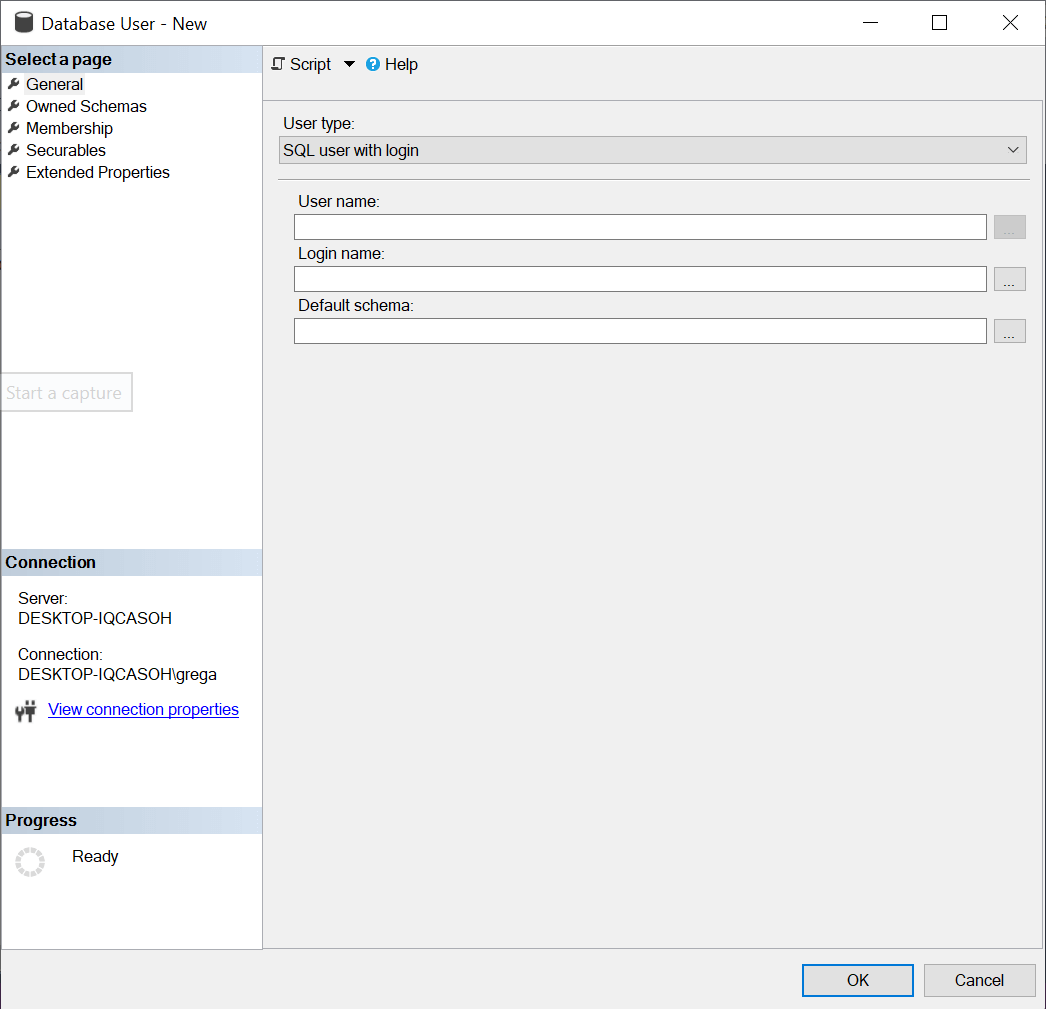
Рис.8 Добавление нового пользователя базы данных
Чтобы предоставить логину Red-Gate доступ к MyDatabase, нужно заполнить форму на рис.8. Сначала рассмотрим пункт “User Type” (тип пользователя). Значением по умолчанию для этого поля является “SQL User with Login” (пользователь SQL с логином). Имеется четыре других типа: SQL user without login (пользователь SQL без логина), User mapped to a certificate (пользователь, связанный с сертификатом), User mapped to an asymmetric key (пользователь, связанный с асимметричным ключом) и пользователи Window. Поскольку я создаю пользователя, который будет связан с логином SQL, я использую значение по умолчанию. Затем я ввожу имя создаваемого пользователя базы данных. Это может быть любое имя, но я предпочитаю использовать имена, совпадающие с соответствующими логинами. Поэтому я введу «Red Gate» в поле «User name». Затем я свяжу нового пользователя с логином. Для этого я могу либо набрать «Red Gate» для логина, либо использовать кнопку «…» для навигации по списку существующих логинов и выбрать нужный.
Последнее, что требуется, это определить схему по умолчанию для этого логина. Имя схемы ассоциируется с коллекцией объектов базы данных, владельцем которых является пользователь базы данных. По умолчанию каждая база данных имеет схему с именем «dbo», владельцем которой является учетная запись пользователя «dbo». При задании нового пользователя базы данных не обязательно указывать схему. Если схема не задана, будет использоваться схема по умолчанию «dbo». Я оставлю обсуждение различных аспектов схем для другой статьи. Когда я создаю нового пользователя базы данных Red-Gate, я оставляю пустым поле схемы по умолчанию и позволяю процессу создания нового пользователя автоматически установить схему по умолчанию в «dbo».
После создания нового пользователя я могу проверить его существование в базе данных, развернув ветку «User» в папке «Security» браузера объектов. Вы также можете создать нового пользователя базы данных и связать его с логином с помощью скрипта. В листинге 2 приводится пример использования T-SQL для создания того же пользователя, которого я только что создал визуальными средствами.
USE [MyDatabase]

GO

CREATE USER [Red-Gate] FOR LOGIN [Red-Gate]

GO
Листинг 2: Создание пользователя базы данных Red-Gate с помощью T-SQL
Методы авторизации SQL Server, логины и пользователи базы данных
Для подключения к SQL Server человеку или процессу необходимо авторизоваться. Имеется два различных метода авторизации на SQL Server: Windows и SQL Server. Метод Windows более безопасен и рекомендуется для подключении к SQL Server. Каждое авторизованное подключение к SQL Server получает доступ к экземпляру посредством логина. Логины определяются на уровне сервера. Сами по себе логины не обеспечивают доступ к данным на SQL Server. Для этого необходимо связать логин с пользователем базы данных. Методы авторизации, логины и пользователи базы данных обеспечивают основы безопасности SQL Server.
Добавляем имя входа для компьютера в SQL Server
Имя входа или логин в SQL Server — это набор учетных данных, который используется для подключения к экземпляру SQL. Для проверки подлинности может использоваться аутентификация SQL Server либо аутентификация Windows.
При использовании Windows-аутентификации можно создать логин для любого объекта в домене, например для доменного пользователя, компьютера или группы безопасности. Однако с учетными записями компьютеров есть некоторые тонкости. Для примера попробуем создать логин для доменного компьютера SRV2.
Для этого открываем SQL Server Management Studio, выбираем пункт Security — Logins, кликаем на нем правой клавишей мыши и в контекстном меню выбираем пункт New Login.

Для выбора учетной записи отмечаем Windows authentication и в поле Login name жмем кнопку Search.

Для того, чтобы найти компьютер, необходимо нажать на кнопку Object types и отметить в списке нужный пункт. Но вот незадача, пункта Computers в списке нет, поэтому выбрать для логина учетную запись компьютера никак не получится. Что интересно, раньше этот пункт был, но потом его почему то убрали.

Поэтому, для создания логина надо указать имя пользователя в формате <доменное имя><имя компьютера>$. Знак доллара $ в конце необходим, потому что в противном случае имя входа будет рассматриваться как учетная запись пользователя, а не компьютера.

В качестве запасного варианта можно создать логин с помощью SQL запроса. Для этого вовсе не обязательно уметь писать запросы, можно в окне создания логина просто нажать кнопку Script и выбрать Script Action to New Query Window

Откроется окно с уже готовым запросом,

в который остается только подставить имя компьютера. Имя пишется в том же формате <доменное имя><имя компьютера>$.

Не важно, каким способом пользоваться, в результате получаем нужный нам логин.

Вот и все.
I have always thought that in order to connect to SQL server using windows authentication with explicitly specified credentials, you must LogonUser, Impersonate, then connect.
It seems to me that this link suggests that it’s possible to connect to SQL server without all this hassle, simply by specifying «uid=…;pwd=…» in connection string. I tested this method just to be sure it doesn’t work, and — lo and behold — it didn’t. If that blog post wasn’t on msdn.com, I would have just dismissed it as noob talk, but it is.
Does anyone have an idea what am I missing?
EDIT1: Many respondents misunderstood what I was referring to. Here’s a copy/paste of what I was talking about. It’s not integrated SQL, nor it’s an ASP.NET impersonation made by IIS:
string sql4 = String.Format(
   @"Data Source={0};Integrated Security=SSPI;uid=<uid>;pwd=<pid>", server);
// Database + Windows Authentication + Username/Password
![]()
John Saunders
160k26 gold badges240 silver badges393 bronze badges
asked May 6, 2009 at 18:11
![]()
3
There are two distinct kinds of security with SQL Server. «Windows Authentication», and «SQL Server Authentication». When you see uid and pwd you’re seeing the latter. The uid in this case is not a Windows principal — the OS knows nothing about it.
So the answer to your question is, no, you can’t pass Windows user name and password in the connection string to log in to SQL Server.
answered May 6, 2009 at 22:35
![]()
John SaundersJohn Saunders
160k26 gold badges240 silver badges393 bronze badges
3
It depends — if you connect from a command-line or Winforms app DIRECTLY to your SQL Server, you EITHER specify «Integrated Security=SSPI;» and then use your Windows credentials as logon credentials, OR you specify «user id=….;pwd=…..» — but that’s then a SQL logon — NOT your Windows logon.
You mention «impersonate and then connect» — that seems to indicate ASP.NET — that’s a totally different story again. If you impersonate, then you’re basically using your Windows credentials, e.g. the web server will «impersonate» you and log on as you (using your Windows credentials). In that case, again, no «uid=….;pwd=…..» needs to be specified (if it is, it will be ignored).
As that link you mentioned clearly shows — if you can connect directly, and you specify «Integrated Security=SSPI;», then this takes precedence over any uid=…;pwd=…. which you might also specified and logs you in using your Windows credentials; those extra uid=…;pwd=…. pieces are ignored.
Marc
answered May 6, 2009 at 18:16
![]()
marc_smarc_s
721k173 gold badges1320 silver badges1442 bronze badges
The article and point in question relates to SQL security, not integrated security. You can pass the credentials for a SQL user and log in in this manner if SQL authentication (mixed mode) is enabled. If the SQL server is set up to use integrated security only then this will not work. It will also not work to allow logging in using Windows logon credentials.
answered May 6, 2009 at 19:18
![]()
BlackWaspBlackWasp
4,9232 gold badges30 silver badges42 bronze badges
In our shop, we routinely use connection strings like you describe. No problemo. But your sql server database must be set up to use sql security, not windows authentication.
A sample connection string (from web.config) in our app looks like:
<connectionStrings>
<add name="ConfigurationData" connectionString="server=DevServer;
database=travel_expense_management_dv;uid=userid;pwd=password!;"
providerName="System.Data.SqlClient" />
</connectionStrings>
On the other hand, the DBA guru for our shop set me up a personal database on the main server that had integrated security with my Windows logon. I didn’t need uid and pwd because it took my authentication info from context.
answered May 6, 2009 at 22:49
![]()
CyberherbalistCyberherbalist
11.9k17 gold badges81 silver badges121 bronze badges
Yes, as you say, the article mentions this:
string sql4 = String.Format(@"Data Source={0};Integrated Security=SSPI;uid=<uid>;pwd=<pid>", server); // Database + Windows Authentication + Username/Password
But if you carefully read few lines later, it says this:
string sql4 -> Logs in with Windows login, ie. takes precedence over the username/password.

answered Nov 14, 2014 at 14:42
![]()
JaganJagan
4275 silver badges12 bronze badges
This is very old but maybe someone has the same issue.
You can connect using WindowsAuthentication and specifying user id and password on your connection string, but not on every device. You can achieve this for example on WinCE devices (https://technet.microsoft.com/en-us/library/aa275613(v=sql.80).aspx).
I don’t know if you can do the same thing on other OS just with the connection string (without doing the impersonation thing).
Hope it helps.
answered Jul 6, 2015 at 21:03
![]()
just a contribution also for some who was still encountering problem like this. Based on my experience if you don’t specify any user/password in you connectivity it will automatically connect to db using windows authentication. Meaning it will get the userid and it’s credential of the user who logged on to the machine. The system will allow you to connect to database if it identifies that your userid exist/created in the database. But once you specify your userid and password in your connectivity it bypass the windows authentication and use sql server authentication instead.
answered Mar 30, 2016 at 5:54
![]()
- Remove From My Forums
-
Question
-
how to create login and password for sql authentication mode?
I forget or did not created login and password at the time of installation.
I am the administrator.
DBMS:SQL SERVER 2005SQLEXPRESS
thanks,
bharathi
Answers
-
How to: Create a SQL Server Login
Most Windows users need a SQL Server login to connect to SQL Server. This topic shows how to create a SQL Server login.
 To create a SQL Server login that uses Windows Authentication (SQL Server Management Studio)
 -
In SQL Server Management Studio, open Object Explorer and expand the folder of the server instance in which to create the new login.
-
Right-click the Security folder, point to New, and then click Login.
-
On the General page, enter the name of a Windows user in the Login name box.
-
Select Windows Authentication.
-
Click OK.
To create a SQL Server login that uses SQL Server Authentication (SQL Server Management Studio) -
In SQL Server Management Studio, open Object Explorer and expand the folder of the server instance in which to create the new login.
-
Right-click the Security folder, point to New, and then click Login.
-
On the General page, enter a name for the new login in the Login name box.
-
Select SQL Server Authentication. Windows Authentication is the more secure option.
-
Enter a password for the login.
-
Select the password policy options that should be applied to the new login. In general, enforcing password policy is the more secure option.
-
Click OK.
To create a SQL Server login that uses Windows Authentication using Transact-SQL -
In Query Editor, enter the following Transact-SQL command:
CREATE LOGIN <name of Windows User> FROM WINDOWS; GO
To create a SQL Server login that uses SQL Server Authentication (Transact-SQL)
Mark as Answer if it helps. This posting is provided «AS IS» with no warranties, confers no rights.
-
Proposed as answer by
Monday, February 2, 2009 1:51 PM
-
Marked as answer by
bharathi_m
Monday, February 2, 2009 3:02 PM
-
-
Hi bhrathi,
«SQL authentication» is also «windows authentication». SQL Server has two authentication options — Windows and Mixed Mode (Windows/SQL).
If you don’t yet have SQL Server Management Studio Express (SSMS), you can download it from here.
Log into your server via SSMS (using Windows Authentication). In the Object Explorer (left pane), right-click on the server, and select Properties. On the security page, ensure that «SQL Server and Windows Authentication Mode» is checked. Expand security, then Logins. Right-click on «sa», and select «properties». You can set or reset the password for the sa account on the properties screen.
You can create additional logins by right-clicking on Logins, and selecting New Login.
Does this help?
Aaron Alton | thehobt.blogspot.com
-
Marked as answer by
bharathi_m
Monday, February 2, 2009 3:03 PM
-
Marked as answer by
-
Try this,
CREATE LOGIN [TestForums] WITH PASSWORD=N‘MicroSOFT77’, DEFAULT_DATABASE=[master], DEFAULT_LANGUAGE=[us_english], CHECK_EXPIRATION=OFF, CHECK_POLICY=ON
GO
EXEC sys.sp_addsrvrolemember @loginame = N‘TestForums’, @rolename = N‘sysadmin’
Rajesh Jonnalagadda http://www.ggktech.com
-
Edited by
Rajesh Jonnalagadda
Monday, February 2, 2009 8:15 AM -
Marked as answer by
bharathi_m
Monday, February 2, 2009 3:03 PM
-
Edited by
-
Try this,
CREATE LOGIN [sa] WITH PASSWORD=N‘Test’, DEFAULT_DATABASE=[master], DEFAULT_LANGUAGE=[us_english], CHECK_EXPIRATION=OFF, CHECK_POLICY=ON
GO
EXEC sys.sp_addsrvrolemember @loginame = N‘sa’, @rolename = N‘sysadmin’
Rajesh Jonnalagadda http://www.ggktech.com
Rajesh,
The sa login is created automatically — you don’t need to create it manually.
Aaron Alton | thehobt.blogspot.com
-
Marked as answer by
bharathi_m
Monday, February 2, 2009 3:03 PM
-
Marked as answer by
- Remove From My Forums
-
Question
-
how to create login and password for sql authentication mode?
I forget or did not created login and password at the time of installation.
I am the administrator.
DBMS:SQL SERVER 2005SQLEXPRESS
thanks,
bharathi
Answers
-
How to: Create a SQL Server Login
Most Windows users need a SQL Server login to connect to SQL Server. This topic shows how to create a SQL Server login.
To create a SQL Server login that uses Windows Authentication (SQL Server Management Studio) -
In SQL Server Management Studio, open Object Explorer and expand the folder of the server instance in which to create the new login.
-
Right-click the Security folder, point to New, and then click Login.
-
On the General page, enter the name of a Windows user in the Login name box.
-
Select Windows Authentication.
-
Click OK.
To create a SQL Server login that uses SQL Server Authentication (SQL Server Management Studio) -
In SQL Server Management Studio, open Object Explorer and expand the folder of the server instance in which to create the new login.
-
Right-click the Security folder, point to New, and then click Login.
-
On the General page, enter a name for the new login in the Login name box.
-
Select SQL Server Authentication. Windows Authentication is the more secure option.
-
Enter a password for the login.
-
Select the password policy options that should be applied to the new login. In general, enforcing password policy is the more secure option.
-
Click OK.
To create a SQL Server login that uses Windows Authentication using Transact-SQL -
In Query Editor, enter the following Transact-SQL command:
CREATE LOGIN <name of Windows User> FROM WINDOWS; GO
To create a SQL Server login that uses SQL Server Authentication (Transact-SQL)
Mark as Answer if it helps. This posting is provided «AS IS» with no warranties, confers no rights.
-
Proposed as answer by
Monday, February 2, 2009 1:51 PM
-
Marked as answer by
bharathi_m
Monday, February 2, 2009 3:02 PM
-
-
Hi bhrathi,
«SQL authentication» is also «windows authentication». SQL Server has two authentication options — Windows and Mixed Mode (Windows/SQL).
If you don’t yet have SQL Server Management Studio Express (SSMS), you can download it from here.
Log into your server via SSMS (using Windows Authentication). In the Object Explorer (left pane), right-click on the server, and select Properties. On the security page, ensure that «SQL Server and Windows Authentication Mode» is checked. Expand security, then Logins. Right-click on «sa», and select «properties». You can set or reset the password for the sa account on the properties screen.
You can create additional logins by right-clicking on Logins, and selecting New Login.
Does this help?
Aaron Alton | thehobt.blogspot.com
-
Marked as answer by
bharathi_m
Monday, February 2, 2009 3:03 PM
-
Marked as answer by
-
Try this,
CREATE LOGIN [TestForums] WITH PASSWORD=N‘MicroSOFT77’, DEFAULT_DATABASE=[master], DEFAULT_LANGUAGE=[us_english], CHECK_EXPIRATION=OFF, CHECK_POLICY=ON
GO
EXEC sys.sp_addsrvrolemember @loginame = N‘TestForums’, @rolename = N‘sysadmin’
Rajesh Jonnalagadda http://www.ggktech.com
-
Edited by
Rajesh Jonnalagadda
Monday, February 2, 2009 8:15 AM -
Marked as answer by
bharathi_m
Monday, February 2, 2009 3:03 PM
-
Edited by
-
Try this,
CREATE LOGIN [sa] WITH PASSWORD=N‘Test’, DEFAULT_DATABASE=[master], DEFAULT_LANGUAGE=[us_english], CHECK_EXPIRATION=OFF, CHECK_POLICY=ON
GO
EXEC sys.sp_addsrvrolemember @loginame = N‘sa’, @rolename = N‘sysadmin’
Rajesh Jonnalagadda http://www.ggktech.com
Rajesh,
The sa login is created automatically — you don’t need to create it manually.
Aaron Alton | thehobt.blogspot.com
-
Marked as answer by
bharathi_m
Monday, February 2, 2009 3:03 PM
-
Marked as answer by
Note: All
screenshots are applied to SQL Server 2012 Enterprise Evaluation Edition.
In this part we will try understand each & everything related to logins so let’s move ahead to explore SQL Server logins
What is Login:
A login is simply a set of credentials that is used to gain access to SQL Server & requires proper authentication.
User needs a login to connect to SQL Server or we can say logins are associated to user and the association is done by SID ( security Identifier ). We can create a login based
on a Windows authentication (like a domain user or a Windows domain group) or we can create a login with SQL Server authentication.

Figure1. Illustration of SQL Server Login
Properties of login:
1) It is a server level entity.

Figure2: Demonstrating that login is a server level entity
2) It is a set of credentials .i.e. username and password requires. Refer figure 1.
3) Login information stored in sys.syslogins/sys.server_principals table in master database.

Figure3:
Showing sys.server_principals output [ output in my case is of 27 rows , I have taken only those rows which covered all type of logins e.g. windows, SQL, certificate mapped and server role, so don’t get confused here ]
Note1: Here I want to emphasize what is the difference between sys.syslogins & sys.server_principals and it is very important to know that:-
sys.syslogins:-
It is a compatibility view to support SQL Server 2000 databases and hence not recommended for use from SQL Server 2005 onwards.
This includes logins which are windows, certificate mapped, or SQL authentication based.
sys.server_principals:-
It is recommended to use this view from SQL Server 2005 onwards.
Apart from windows, certificate mapped or SQL authentication based logins it also includes server role information.
Note2: SQL Server logins enclosed in double hash signs (##) represent internal logins created from certificates. The installation process will create users like ‘##MS_PolicyEventProcessingLogin##’,
so do not be surprised when you see them on SQL Sserver. From figure3 it is very clear.
4) Logins are associated to users by security identifier (SID) in other words we can say if a database user exists but there is no login associated, then in this case user will not able to log into SQL Server.
We can check it by stored procedure
sp_helplogins or sp_msloginmappings

Figure4: Showing ‘XYZyashwant.kumar’ associated to user ‘yashwant’ by SID ‘0x01050000000000051500000094F29E736A3CA94F37C329CD7B540000’ through sp_helplogins in query window & in object explorer also.
OR

Figure5: Showing output of sp_msloginmappings which also shows that ‘XYZyashwant.kumar’ login is associated to user ‘yashwant’.
Exploring More about Logins:

Figure6: Login Properties Page
Login Properties page divided into five sections:
1) General
2) Server Roles
3) User Mapping
4) Securables
5) Status
1) General:
When we open General tab of login properties page we can see below information:
a)
Login Name: information about the name of login including with authentication types information.
b)
Password: it is a password for the login name
c)
Specify Old Password: If we want to change the password. Steps to change the password:
1.
right click on login test1 >>click on properties
2.
delete the old password and enter new password in password box
3.
again enter new password in confirm password box
4.
enable the check box specify old password and input old password
5.
click ok. Its done know. Login with new password and check its done.

Figure7: Demonstration of changing password of login
d)
Enforce password policy: enable this checkbox, if you want to enforce password policy.
e) Enforce Password Expiration: enable this checkbox if you want password expiration time for the login.
f)
Mapped to Certificate: Certificates are the way of encryption which are digitally signed object.
Certificate provides database level security control. We can execute sys.certificates views to see the certificates e.g.
select
name,certificate_id,principal_id,
pvt_key_encryption_type_desc
from sys.certificates;

Figure8: Querying sys.certificates
g) Mapped to Asymmetric Key: These are the keys in SQL Server for encrypting and decrypting data that is being transmitted from one place to another.
We can see the asymmetric keys by querying view sys.asymmetric_keys, e.g.
select
name,principal_id,pvt_key_encryption_type_desc,algorithm_desc
from sys.asymmetric_keys

Figure9: Querying sys.asymmetric_keys
Note: SQL Server knows three algorithms for asymmetric key encryption: RSA_512, RSA_1024 & RSA_2048.
Ø
RSA is made of the initial letters of the surnames of Ron
Rivest, Adi
Shamir, and Leonard
Adleman, who first publicly described the algorithm in 1977.
Ø
All three RSA_512, RSA_1024 & RSA_2048 algorithms are all based on the RSA cryptosystem.
The difference in these RSA is the key length: 512, 1024 or 2048 bits. The longer the key (the more bits it has) resulting in the more secure the encrypted data is & more bits also means that more CPU resources will be used.
h) Map to Credential: A credential is a record that contains the authentication information required to connect to a resource outside SQL Server. [
Source: msdn.microsoft.com ]
Note:
A single credential can be mapped to multiple SQL Server logins. However, a SQL Server login can be mapped to only one credential.
We can see the credential by using sys.credentials view, e.g.
select
* from sys.credentials

Figure10: Querying sys.credentials view
2) Server Roles:
used to grant server wide security privileges to user. Below are the different server roles available for different tasks. These are 9 :

Figure11: Illustration of Server roles in login properties dialogue

Figure12: Types of server roles & their description

Figure13: Difference between Server Roles in SQL Server 2012 & SQL Server 2008/2008 R2
Ø In SQL Server 2012 there is a new feature
introduced in which we can create server role but in SQL Server 2008/2008 R2 it was not possible this is the difference also which is clearly visible and to make this difference clear Microsoft put a Red-Pin with fixed server role. These server roles can’t
be modified while user defined server role “MyServerRole” can be modified.
Ø When we create a user-defined server role we
can add only server level permissions to that user-defined server role. We can list server-level permissions by executing the following statement:
Ø SELECT * FROM sys.fn_builtin_permissions(‘SERVER’) ORDER BY permission_name;
3) User Mapping:
there are two further options available:
a) users mapped to this login
b) database role membership for ‘DatabaseXYZ’
a) Users mapped to this login: In this we can specify that the specific login can access which database.

Figure14: Illustration of user mapped to this login
In this example it is clear that login ‘ianrox’ will be able to access Adventureworks2008R2 database. Now here question arises that ‘ianrox’ can perform which tasks on AdventureWorks2008R2 database.
For this database roles come into picture:
b) Database role membership for ‘DatabaseXYZ’: in this section we can specify that what activities a login can perform. In below screenshot we provided database role ‘db_backupoperator’ means ‘ianrox’ can perform
backup activity for Advetureworks2008R2 database.
There are 10 database roles in SQL Server.

Figure15: Showing database roles
Database roles & their description:
Below table describe the database role:-

Figure16: Showing database roles & their description
Note: Public database role cannot be dropped
4) Securable: securables are the resources which we can assign permissions either at server level which includes resources like
Endpoints, Logins, Server Roles and Databases or at database-level which includes resourcess like Users, Database Roles, Certificates and Schemas.
SQL Server has securable at Schema level also which are called as schema scope securable. Tables, Views, Procedures etc. are the example of schema scope securable.

Figure17: Showing Securables from login properties page
5. Status:
In this page we can set permission to connect to database engine for a login or we can enable/disable login but what is the difference between grant/deny and enable/disable login?
To check the differences I created FOUR below cases:
i)
select DENY and ENABLED login
ii)
select GRANT and DISABLED login
iii)
select DENY and DISABLED login
iv)
select GRANT and ENABLED login [ It is by default selected when we create new login ]

Figure18: Working on Status page of Login Properties
i) select DENY and ENABLED login:
when we select this combination we will get the error message “Login failed for user ‘yashrox’. (Microsoft SQL Server, Error: 18456)
ii) select GRANT and DISABLED login: when we select this combination we will get the error message “ Login failed for user ‘yashrox’. Reason: The account is disabled. (Microsoft SQL Server, Error: 18470)
iii) select DENY and DISABLED login: when we select this combination we will get the same error message as in second combination “ Login failed for user ‘yashrox’. Reason: The account is disabled. (Microsoft SQL Server,
Error: 18470)
iv) select GRANT and ENABLED login: it’s a by default method when any login created, from this combination we will successfully connect to database provided right login name & password.
From all these cases I concluded below things:
Ø DENY
CONNECT SQL will NOT block members of the
sysadmin fixed server role from logging in because deny do NOT apply to
sysadmins. You can check it provide
sysadmin role to that login and try with first case i.e.
DENY and ENABLED. You will be able to login in this case.
Ø Connecting to SQL
server is a two step process:
First, the login must prove its identity with correct login name & password
Second, after verifying identity effective permission ( GRANT/DENY ) will check. If login have CONNECT SQL permission i.e. Grant then they will be able
to connect to SQL Server.
You can check it with third case where we take DENY & DISABLE but we got error “ Login failed for user ‘yashrox’. Reason: The account is disabled. (Microsoft
SQL Server, Error: 18470). It clearly shows that first login is authenticated then CONNECT SQL permission.
Conclusion:
This is all about the SQL Server Logins which I tried to elaborate & touch each aspect of logins. After knowing these things about SQL Server Logins we can dig more & get more information because
when you will go to depth you will find some more new things. I tried a lot to make this more interesting, hope you will like it.
Keep smiling & shining & spread the knowledge.
Stay blessed !!!
SQL Server Authentication is a default mechanism to connect to MS SQL Server, but there are times that you need to use SQL Server Authentication to connect to the server, like when you have to connect to a MS SQL Server Database on a different network or when you have a SSPI problem. In order to use SQL Server Authentication, you need to create a SQL Server Authentication Login ID first.
First of all, we will create a new SQL Server account.
1. Run Microsoft SQL Server Management Studio.
2. Expand the Security item in Object Explorer and right-click Logins and choose New Login….

3. Enter an account name in the Login name field and choose SQL Server authentication. Then, enter a password for the account.
4. Uncheck the following options to set the password as you want:
-
Enforce password policy
-
Enforce password expiration
-
User must change password at next login
If the options are checked, you should the password according to security policy in Windows.
5. Choose BioStar from the Default database drop-down list.

6. Go to the Server Roles page and select sysadmin.

7. Go to the User Mapping page and choose BioStar and db_owner.

8. Go to the Status page and set Permission to connect to database engine to Grant and Login to Enabled.

9. Right-click the database server in Object Explorer and choose Properties.

10. Go to the Security page and choose SQL Server and Windows Authentication mode.

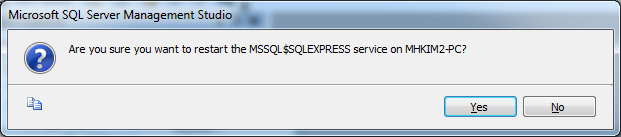
11. Right-click the database server and restart it. When a message box shows up, click YES.

12. Disconnect the database server in Object Explorer and reconnect to it using the ID you’ve just created.

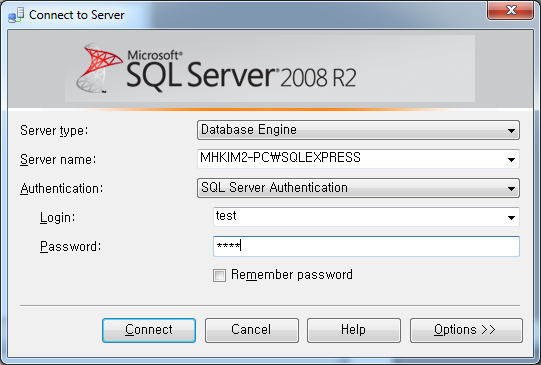
13. Choose SQL Server Authentication from the Authentication drop-down list and enter the ID and password. Then, click Connect.
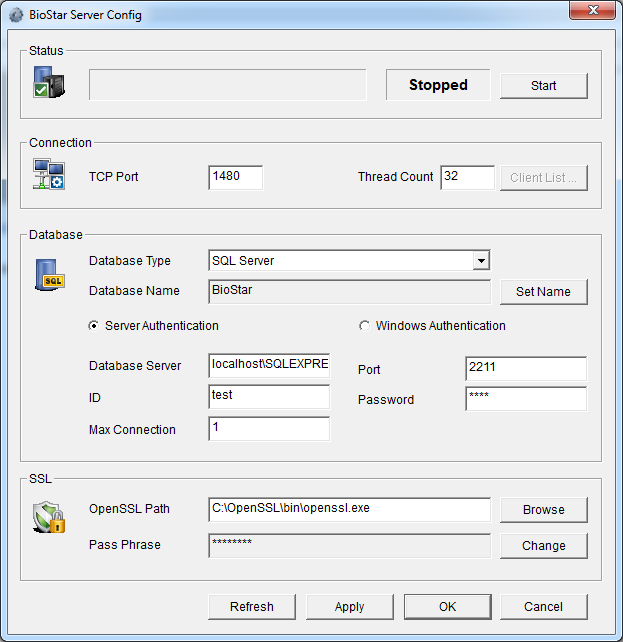
14. If you succeed to connect to the database server, the account is successfully created. Run BioStar Server Config.
15. Choose Server Authentication and enter the ID and password. Before clicking Start, we should check if the port specified here matches the port of MS SQL Database Server.
16. Run SQL Server configuration manager.
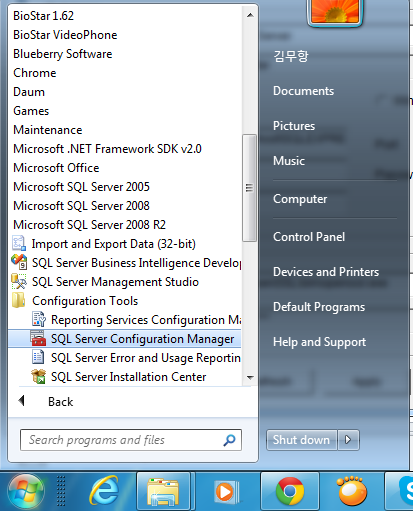
17. Choose SQL Server Network Configuration and then Protocols for SQLEXPRESS. Then, double-click TCP/IP. You can see what number is set to TCP Dynamic Ports and type the number in the Port field in BioStar Server Config.

18. Before clicking Start in BioStar Server Config, make sure that the BSServer.exe process is not running (you can check this on Task Manager). If it’s running, please kill the process or stop the service.