
![]()
Welcome to my first official guide on Dev.to. Today I want to explain how you can setup SSH and Git on your Windows 10 computer.
Note: This is not about 100% securing your keys but about how to generate keys for use with GitHub.
Thanks to garethdd for his constructive feedback.
What is SSH?
SSH stands for Secure Shell and is an awesome way to authenticate yourself on remote servers (for example the Github server) without typing in a password everytime.
SSH works via two keys, the Private Key and the Public Key. While the private key should always stay private and safe, the public key can be shared around the internet without any problems.
The private key allows you to get access to servers that have your public key registered, so your access can only be stolen if the attacker somehow gets your Secret Key so keep it safe!
SSH should be preinstalled on new Windows 10 machines.
What is Git?
Git is a free version management tool that helps you to versionize your code and potentially save it on a remote server (for example Github, Gitlab or Bitbucket).
You can install Git from here:
https://git-scm.com/download/win
You can also install Git via chocolatey:
Create a SSH Key
The first step is to generate a new SSH key. Use cmd or Powershell and run the following command:
ssh-keygen -t rsa -b 4096 -C "your_email@example.com"
You can but don’t need to give it a passphrase since you should never share your secret key around but using one will secure your keys. Keep in mind that everybody can have as many private keys as they want.
This generates a new private SSH key with rsa encryption and 4096 bits. It also generates a public key from the secret key which you can share around.
There will be a new folder and files in your Windows user folder.
In general you can create as many keys as you want. The id_rsa key is the default key generated by ssh and will be automatically be used by your ssh-agent if you don’t tell it to use another key.
What is an ssh-agent?
An ssh-agent is the agent process used to actually authenticate yourself with ssh. There are a few out there (PuTTY with Pageant for example) but for this example we’ll use the ssh-agent provided by the native and default Windows 10 ssh-agent.
If you want to you can use PuTTY and Pageant to make your keys even more secure. Read this post on Digital Ocean for more information.
If you want to change the key used by your ssh-agent, you must first start the service. The service will be disabled on Windows 10 by default. Search for Services and open the Services settings and look for the «OpenSSH Authentication Agent» and Activate it:

Now you will be able to access the ssh-agent from your console via ssh-agent.
For this example we’re going to try to load another key called example into our agent and use it instead of the id_rsa key. To do this you can run the following command:
Now you will have both keys available for this session.
Register your SSH Key on Github
The next step is to register your generated SSH key on Github. For that, run the following command:
type C:Usersyour_user_name.sshid_rsa.pub
and copy the output string into your clipboard. Now go to your Github keys settings and add a new SSH key with your public key and save it.
Congratulations! You now are able to get and push code to Github without any password!
Note: There should also be a C:Usersyour_user_name.sshid_rsa file. This is your private key, don’t share this around!
Setup Github in your Shell
Now it’s time to setup Git on your machine. After installing it from the link above, open a new cmd or Powershell window. Now we need to set your public Git name and Git email address. This will always be public when pushing code.
Luckily Github gives you a privatized email address for use. Go to https://github.com/settings/emails and you will find a @users.noreply.github.com email address for your account. Copy this email address.
Next register your name and email in Git:
git config --global user.name "Your Name"
git config --global user.email your_email@users.noreply.github.com
Congratulations! Now all your Commits will be registered as being commited from your Github user.
Signing your GitHub commits (Optional Step)
To sign your commits you first must install the GPG command line tools. After you installed the GPG toolkit, you can run the following command to generate a new gpg key:
This will ask you what kind of key you want. Go for RSA and RSA.
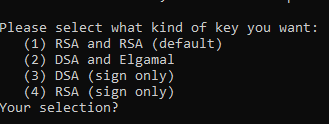
Now you need to enter a bit length. The recommendation is 4096 bits.
After that you can specify a expiration length or if the key should never expire. Pick as you want. Expiring keys are more secure in general because you have to renew them every now and then.
Now enter your personal informations to verifying your identity with your gpg key.
When you’re done you will be asked for a passphrase. Give it a secure passphrase and you will be done with your gpg-key generation.
After that you will be able to find your key in your users .gnupg folder as specified in the success message.
If you want to list your gpg keys, simply run
// short version
gpg --list-secret-keys

// long version
gpg --list-secret-keys --keyid-format LONG
Your GPG key you can share with Github is the key coming after sec rsa4096/ so for example in
/Users/hubot/.gnupg/secring.gpg
------------------------------------
sec   4096R/3AA5C34371567BD2 2016-03-10 [expires: 2017-03-10]
uid                          Hubot
ssb   4096R/42B317FD4BA89E7A 2016-03-10
the gpg key would be 3AA5C34371567BD2
To get your public key block, simply run
gpg --armor --export YOUR_GPG_KEY
which will output your public GPG Key Block. Copy it and paste it to your GitHub Account here.
From now on your commits will be signed when commited.
Use Git
Now you’re ready to actually use Git. From now you can clone repositories via git clone or push new code to Github. Here is a quick reference:
# Clone a repository to the current directory
git clone [REPOSITORY_CLONE_URL]

# Create a new commit with a message
git commit -m "Your commit message"

# Add files to the commit
git add .
git add ./filename.ext

# Push your commits to Github
git push origin master
git push origin [YOUR_BRANCH_NAME]

# Reset your repo to the last version
git reset --hard

# Create a new branch
git checkout -b [YOUR_BRANCH_NAME]

# Switch branches
git checkout [YOUR_BRANCH_NAME]
git checkout master

# Reset a single file
git checkout ./filename.ext
Conclusion
Thanks for reading this post. I hope it helped you with the setup. If you need help or have questions let me know!

SSH-Agent and OpenSSH are tools in Windows that can be used to authenticate to remote Git repositories, such as GitLab, GitHub, Azure DevOps, etc. Once set up as a service that stores your various SSH keys, this can facilitate authentication without entering a password each time, removing the irritation of entering a password every time you wish to push/pull/etc. from a Git repository.
Prerequisites
- The OpenSSH Client optional service must be enabled on your machine, and OpenSSH must be added to your PATH environment variable. You can read how to do that here.
- A remote Git repository that you wish to access. We will use a GitLab repository for this article; however, the process will be similar for other Git management providers.
- Git must be installed on your machine.
How to Install the SSH-Agent Service in Windows
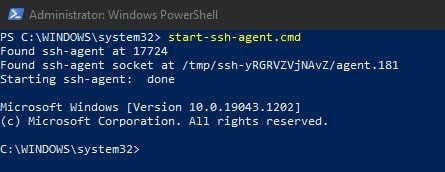
Using an elevated PowerShell window (run as admin), execute the following command to install the SSH-Agent service and configure it to start automatically when you log into your machine:
Get-Service ssh-agent | Set-Service -StartupType Automatic -PassThru | Start-Service

To avoid needing to restart your system to get the service running for the first time, execute this command:
start-ssh-agent.cmd
Setting up an SSH Key Pair to Access a Git Remote Provider
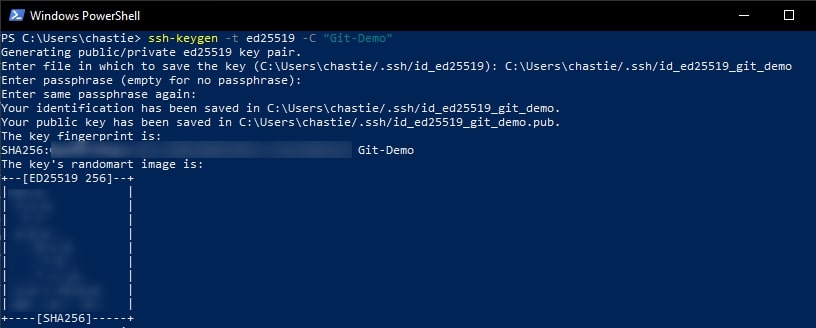
Using a command line tool such as Bash or PowerShell, you should be able to follow these steps to create a local SSH key pair. For our example, we will create an ED25519 key, but you can create other keys such as an RSA.
Create a new SSH ED25519 key, giving it a useful comment:
ssh-keygen -t ed25519 -C "Git-Demo"
By default, the file will be stored in your local user’s SSH repository in Windows. You can choose another storage location if you wish or rename the file by entering a new file path to save the key. Leave it blank to stick with the default.
In our example, we rename the file from the default id_ed25519 to id_ed25519_git_demo:

You can also add a password if you like or leave this blank:

You will then be shown the key’s randomart image to confirm creation:
Copy the contents of the public key to your clipboard. You can read this key with the following command:
cat pathtosshkey.pub
For example, our code is likely:
cat C:Userschastie/.sshid_ed25519_git_demo.pub
Note: We access the public key with the .pub suffix.
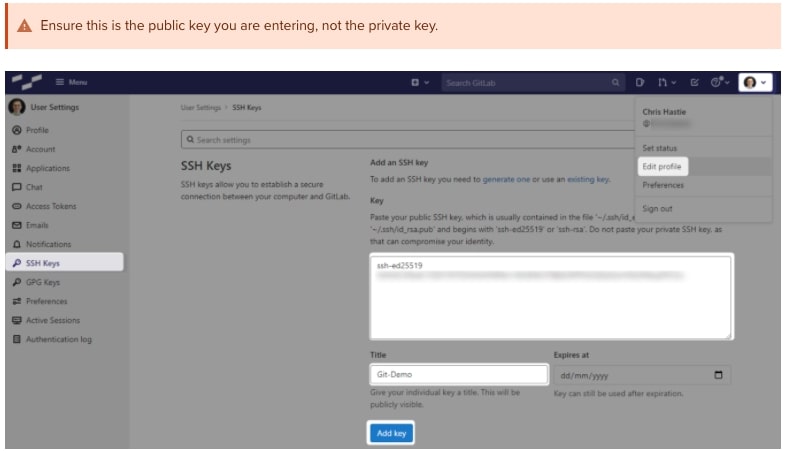
A sample is shown here. You can then select this and copy it with a right-click of your mouse:

In GitLab (or the appropriate location of your Git remote repository), you can now add this public key to your user profile. In GitLab, you can do this by adding it under the SSH Keys section of your user settings:
Test that you can connect to the repository when using the SSH private key directly with this command:
ssh -i path/to/ssh/private/key -T git@host
For example, our command could be:
ssh -i C:Userschastie/.sshid_ed25519_git_demo -T git@gitlab.mycompany.com

or

ssh -i C:Userschastie/.sshid_ed25519_git_demo -T git@github.com

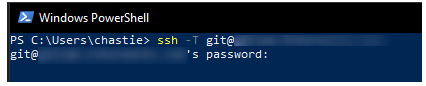
We have now established an SSH key pair that can authenticate to our Git remote provider. It remains to set this up in the SSH-Agent service to automatically provide access. We can demonstrate the issue by attempting the same connection, but without specifically naming the SSH key, with the command below:
ssh -T git@host
As we can see, if we execute this command without specifying an SSH key, we are prompted for a password:
Adding the SSH Key to the SSH-Agent Service
Our goal is to be able to connect to a Git repository without entering a password. At this stage, we have a working SSH key pair and the SSH-Agent service installed and running.
Execute the following command to add your SSH key to your SSH-Agent service:
ssh-add path/to/ssh/private/key
For our example, our command could be:
ssh-add C:Userschastie/.sshid_ed25519_git_demo

We can now test our connection to our Git remote provider without specifying a key and connect successfully:
ssh -T git@host

Configuring Git to Leverage the Windows SSH-Agent

In an elevated console (run as admin), execute the following command to modify your existing Git configuration to leverage the windows OpenSSH service as the core SSH command:
git config --global core.sshCommand C:/Windows/System32/OpenSSH/ssh.exe

Congratulations! You have now set up your environment to automatically authenticate to your Git remote provider through an SSH key pair, without using passwords. If you wish to facilitate access to any other Git remote providers, simply follow the same steps to generate a key pair ( as outlined above) and add it to your existing SSH-Agent service.
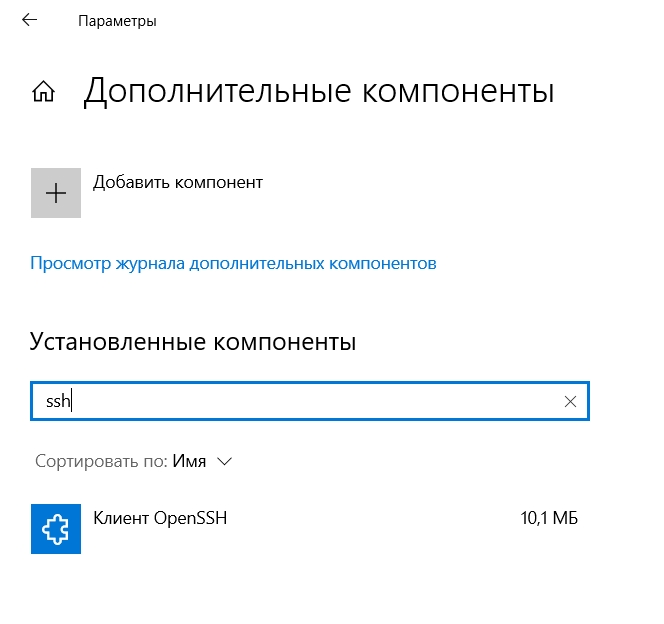
Почти на всем протяжении жизни Windows-систем главной утилитой для работы с SSH (secure shell или безопасная оболочка) была программа PuTTY. В октября 2018 года разработчики Windows выпустили сборку 1809 (Редстоун 5 или просто RS5) с компонентом OpenSSH и сторонние утилиты стали не нужны.
SSH-клиент в Windows 10 доступен в виде компонента «Клиент OpenSSH». Проверить его наличие можно в настройках системы — «Параметры» > «Приложения» > «Дополнительные компоненты» > список ниже. Если «Клиент OpenSSH» отсутствует в списке, то добавьте его.
Настройка сервиса SSH-AGENT
SSH-AGENT — это менеджер ssh-ключей. Для его активации достаточно ввести в PowerShell его наименование ssh-agent.
Есть возможность настроить автозапуск при входе в систему:
Get-Service -Name ssh-agent | Set-Service -StartupType Automatic
Или же запуск вручную по необходимости:
Get-Service -Name ssh-agent | Set-Service -StartupType Manual
Определить текущее состояние настройки запуска:
Get-Service ssh-agent | Select StartType
Проверка текущего состояния:
Генерация ключей
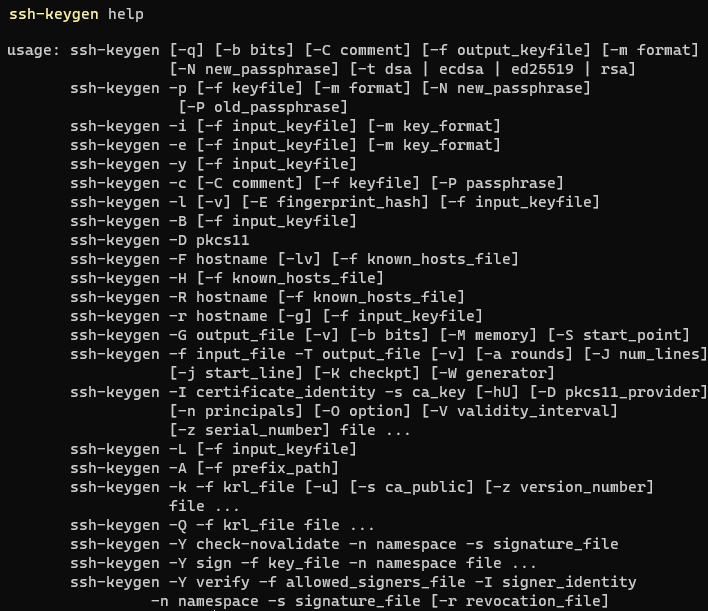
Ключи создаются одной командой:
Пример создания ключа с указанным алгоритмом и своим комментарием:
ssh-keygen -t ed25519 -C "MyGitHubProfile"
Утилита ssh-keygen спросит у вас где сохранить ключи и нужно ли задавать пароль для доступа к ним. Если вы используете ключи для тренировки, то пароль будет отнимать время просто так и задавать его не стоит, но если вы занимаетесь коммерческой разработкой, то пароли крайне желательны. Так надежнее.
После успешной генерации ключей добавьте приватный ключ в ssh-agent:
ssh-add ~.sshid_ed25519
Просмотреть список ключей в SSH-AGENT:
Удалить все ключи из SSH-AGENT:
Если путь до приватного ключа введен правильно, то появится сообщение «Identity added». Ваша система теперь полностью готова для работы с удаленными серверами по SSH.
Что удаленный сервер мог вас опознать, необходимо отправить ему публичный ключ. Ваш публичный ключ должен быть сохранен в файле authorized_keys на удаленном сервере (по умолчанию он располагается в директории пользователя — ~/.ssh/authorized_keys). Ваш публичный ключ обычно расположен около приватного, вот тут: «~.sshid_ed25519.pub». Только не перепутайте, приватный ключ остается у вас, а публичный вы отдаете в сторонние сервисы.
Символ ~ означает директорию текущего пользователя. При желании вы можете указывать полные пути, т.е. вместо «~.sshid_ed25519.pub» вполне подойдет «C:Usersusername.sshid_ed25519.pub».
Что еще стоит знать о SSH?
Схема работы
Если вы ранее не имели дело с SSH, то все это работает примерно так. Вы генерируете два ключа, первый — секретный (он остается только у вас, например, id_ed25519), второй — открытый (например, id_ed25519.pub), его можно передавать кому угодно. Чтобы подключаться по SSH к удаленным серверам, необходимо свой публичный ключ записать на SSH сервер в файл authorized_keys, по нему сервер опознает вас по ключу при попытке соединения. Публичный и приватный (секретный) ключи связаны между собой. Подключиться к публичному ключу лежащему на сервере сможет только владелец связанного с ним приватного (секретного) ключа.
Доступные алгоритмы шифрования
Для создания ключей можно использовать различные алгоритмы шифрования. Вкратце рассмотрим самые популярные варианты и примеры их использования.
dsa — устарел и использовать его не стоит.
ecdsa — надежный алгоритм с возможностью указывать размер ключа в битах (256, 384 и 521), неплохой выбор. Пример:
ssh-keygen -t ecdsa -b 256
ssh-keygen -t ecdsa -b 384
ssh-keygen -t ecdsa -b 521
rsa — один из самых популярных алгоритмов шифрования, хороший выбор. Желательно указывать длинные ключи шифрования от 2048 бит.
ssh-keygen -t rsa -b 256
ssh-keygen -t rsa -b 512
ssh-keygen -t rsa -b 1024
ssh-keygen -t rsa -b 2048
ssh-keygen -t rsa -b 4096
ed25519 — новый, надежный и быстрый алгоритм шифрования. Если ваша система его поддерживает, то это лучший выбор.
Справка
Полезные ссылки
- Работа с SSH в Windows 10 и Linux. Генерация ключей — YouTube;
- Установка OpenSSH;
- Управление ключами OpenSSH — docs.microsoft.com/ru-ru/windows-server/administration/openssh/openssh_keymanagement;
- Ошибка: «Запуск ssh-агента на Windows 10 завершается неудачно…»;
- Настройка SSH аутентификации по ключам в Windows 10 / 2019;
- Пример тестового сервера (Docker);
- Generating a new SSH key and adding it to the ssh-agent.
The built-in SSH client appeared in Windows 10 and Windows Server 2019. Ssh.exe can be used to securely connect to Linux/UNIX servers, VMWare ESXi hosts and other devices instead of Putty, MTPuTTY and other third-party SSH clients. The native Windows SSH client is based on the OpenSSH port and is preinstalled in Windows starting from Windows 10 build 1809.
Contents:
- How to Enable (Install) the OpenSSH Client on Windows 10?
- Using a Native SSH Client on Windows 10
- Using SCP.exe to Transfer Files to/from Windows Host Using SSH
How to Enable (Install) the OpenSSH Client on Windows 10?
The OpenSSH client is included in Windows 10 Features on Demand (like RSAT). The SSH client is installed by default on Windows Server 2019, Windows 10 1809 and newer builds.
Check that the SSH client is installed:
Get-WindowsCapability -Online | ? Name -like 'OpenSSH.Client*'

In our example, the OpenSSH client is installed (State: Installed).
If not (State: Not Present), you can install it using:
- The PowerShell command:
Add-WindowsCapability -Online -Name OpenSSH.Client* - With DISM:
dism /Online /Add-Capability /CapabilityName:OpenSSH.Server~~~~0.0.1.0 - Via Settings -> Apps -> Optional features -> Add a feature. Find OpenSSH client in the list and click Install.

OpenSSH binary files are located in c:WindowsSystem32OpenSSH.
ssh.exe– the SSH client executable;scp.exe– tool for copying files in an SSH session;ssh-keygen.exe– tool to generate RSA SSH authentication keys;ssh-agent.exe– used to manage RSA keys;ssh-add.exe– adds a key to the SSH agent database.

You can install OpenSSH on previous Windows versions as well: just download and install the Win32-OpenSSH from GitHub (you can find an example in the article: Configuring SSH FTP on Windows).
Using a Native SSH Client on Windows 10
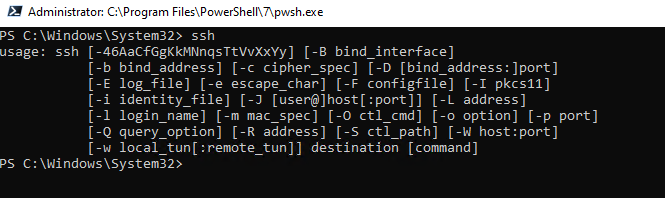
To start the SSH client, run the PowerShell or cmd.exe prompt. You can list the available options and syntax for ssh.exe:
ssh
usage: ssh [-46AaCfGgKkMNnqsTtVvXxYy] [-b bind_address] [-c cipher_spec]
[-D [bind_address:]port] [-E log_file] [-e escape_char]
[-F configfile] [-I pkcs11] [-i identity_file]
[-J [user@]host[:port]] [-L address] [-l login_name] [-m mac_spec]
[-O ctl_cmd] [-o option] [-p port] [-Q query_option] [-R address]
[-S ctl_path] [-W host:port] [-w local_tun[:remote_tun]]
destination [command]
In order to connect to a remote server using SSH, use the following command:
ssh username@host
If your SSH server is running on a port different from the standard TCP/22, specify the port number:
ssh username@host -p port
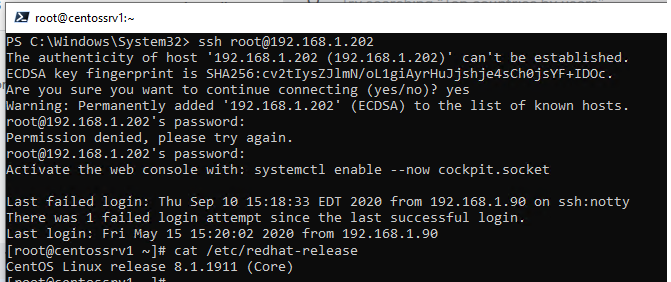
For example, to connect to a Linux host with the IP address 192.168.1.102 as root, run this command:
ssh root@192.168.1.102
At the first connection, you will see a request to add the host key to the trusted list. Type yes and press ENTER. Then the host key fingerprint is added to the C:Usersusername.sshknown_hosts file.
You will be prompted for a password. Specify your root password, and your remote Linux server’s console should open (in my example, CentOS is installed on the remote server).
Using SSH, you can connect both to *Nix OSs and Windows. In one of the previous articles, we showed how to configure an OpenSSH server in Windows 10 and connect to it from a Windows host using an SSH client.
If you use the SSH authentication with RSA keys (see an example on how to configure SSH authentication using keys in Windows), you can specify a path to the private key file in your SSH client as follows:
ssh root@192.168.1.102 -i "C:Usersusername.sshid_rsa"
You can also add a private key to SSH-Agent. First, enable the ssh-agent service and configure automatic startup for it.
set-service ssh-agent StartupType 'Automatic'

Start-Service ssh-agent
Add your private key to the ssh-agent database:
ssh-add "C:Usersusername.sshid_rsa"
Then you will be able to connect to your server over SSH without specifying the path to the RSA key. It will be used automatically. Now you can securely connect to your server without a password (if you have not protected your RSA key with a different password):
ssh root@192.168.1.102
Here are some more useful SSH arguments:
-C– used to compress traffic between client and server (it is useful in case of slow or unstable connections)-v– displays detailed information about all SSH client actions-R/-L– can be used to forward ports using an SSH tunnel
Using SCP.exe to Transfer Files to/from Windows Host Using SSH
Using the scp.exe tool (is a part of Windows 10 SSH client package), you can copy a file from your computer to the SSH server:
scp.exe "E:ISOCentOS-8.1.x86_64.iso" root@192.168.1.202:/home

You can copy all directory contents recursively:
scp -r E:ISO root@192.168.1.202:/home
And vice versa, you can transfer a file from a remote server to your computer:
scp.exe root@192.168.1.202:/home/CentOS-8.1.x86_64.iso c:iso
If you configure authentication using RSA keys, you won’t be prompted to enter your password to transfer files. This is useful if you want to configure automatic scheduled file copying.
Thus, you can connect to SSH servers directly from your Windows 10, copy files using scp without any other third-party apps or tools.
Secure Shell (SSH) is a protocol allowing secure remote login to a computer on a network using public-key cryptography. SSH client programs (such as ssh from OpenSSH) typically run for the duration of a remote login session and are configured to look for the user’s private key in a file in the user’s home directory (e.g., .ssh/id_rsa). For added security (for instance, against an attacker that can read any file on the local filesystem), it is common to store the private key in an encrypted form, where the encryption key is computed from a passphrase that the user has memorized. Because typing the passphrase can be tedious, many users would prefer to enter it just once per local login session. The most secure place to store the unencrypted key is in program memory, and in Unix-like operating systems, memory is normally associated with a process. A normal SSH client process cannot be used to store the unencrypted key because SSH client processes only last the duration of a remote login session. Therefore, users run a program called ssh-agent that runs beyond the duration of a local login session, stores unencrypted keys in memory, and communicates with SSH clients using a Unix domain socket.
| Developer(s) | The OpenBSD Project |
|---|---|
| Repository | github.com/openssh/openssh-portable/ |
| Written in | C |
| Operating system | Unix, Unix-like, Microsoft Windows |
| Type | Command |
| License | BSD, ISC, public domain |
| Website | www.openssh.com |
Security issuesEdit
ssh-agent creates a socket and then checks the connections from ssh. Everyone who is able to connect to this socket also has access to the ssh-agent. The permissions are set as in a usual Linux or Unix system. When the agent starts, it creates a new directory in /tmp with restrictive permissions. The socket is located in this directory.
There is a procedure that may prevent malware from using the ssh-agent socket. If the ssh-add -c option is set when the keys are imported into the ssh-agent, then the agent requests a confirmation from the user using the program specified by the SSH_ASKPASS environment variable, whenever ssh tries to connect.
Ssh-agents can be «forwarded» onto a server you connect to, making their keys available there as well, for other connections. On the local system, it is important that the root user is trustworthy, because the root user can, amongst other things, just read the key file directly. On the remote system, if the ssh-agent connection is forwarded, it is also important that the root user on the other end is trustworthy, because it can access the agent socket on the remote (though not the key, which stays local).
ImplementationsEdit
There are many different programs that perform the same functionality as the OpenSSH ssh-agent, some with very different user interfaces. PuTTY, for example, uses a graphical user interface in its bundled Pageant ssh-agent.
There are tools designed to provide key-agent functionality for both symmetric and asymmetric keys; these usually provide ssh-agent functionality as one of their application interfaces. Examples include GNOME Keyring and KWallet.
Some monolithic SSH clients include the ability to remember SSH passphrases across sessions. Examples include: SecureCRT.
Apple macOSEdit
On the macOS operating system, ssh-agent has been integrated since Leopard, version 10.5 in 2007. Third-party open-source implementations of ssh-agent were available previously.[1]
Microsoft WindowsEdit
OpenSSH-based client and server programs have been included in Windows 10 since version 1803. The SSH client and key agent are enabled and available by default and the SSH server is an optional Feature-on-Demand.[2][3]
ReferencesEdit
- ^ Dribin, Dave (21 August 2007). «SSHKeychain Warning». Dave Dribin’s Blog.
- ^ «What’s new for the Command Line in Windows 10 version 1803». 8 March 2018.
- ^ «Using the OpenSSH Beta in Windows 10 Fall Creators Update and Windows Server 1709». 15 December 2017.
External linksEdit
- ssh-agent man page from OpenSSH release (part of the OpenBSD project).
- third-party alternative ssh-agent front-end for Mac OS X
- «Using ssh-agent with SSH»
- An Illustrated Guide to SSH Agent Forwarding
- security aspects