This tutorial is going to show you 3 ways to log into Linux server on Windows via SSH.
What’s SSH?
SSH stands for Secure Shell, which was invented in 1995 to replace the insecure Telnet (Telecommunication Network). It’s now the primary way for system administrators to securely log into remote Linux servers over the public Internet. Although it looks and acts the same as Telnet, all communications over the SSH protocol is encrypted to prevent packet sniffing.
If you are running a Linux or Mac computer, SSH client is installed by default. You can open up a terminal window and run the ssh command like below to connect to a remote Linux server.
ssh [email protected]
Now let’s discuss how to use SSH on Windows.
Method 1: Windows 10’s Built-in SSH Client
The Microsoft PowerShell team decided to port OpenSSH (both the client and the server) to Windows in 2015. It finally arrived in Windows 10’s Fall Creator Update in 2017 and is enabled by default in the April 2018 Update.
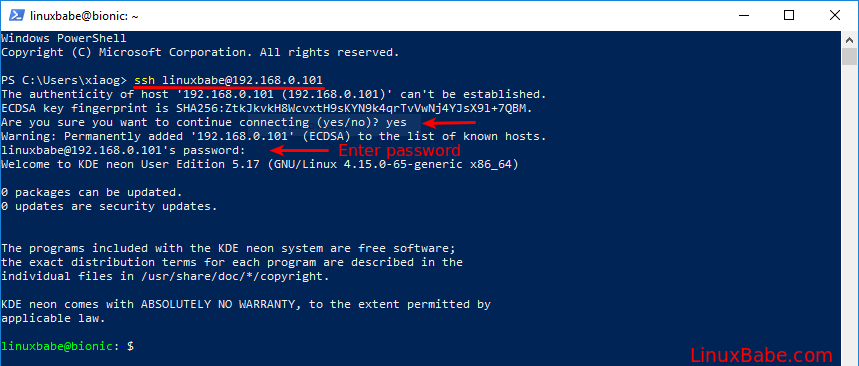
To use the OpenSSH client on Windows 10, simply open a PowerShell window or a command prompt window and run the ssh command. For example, if I want to connect to my Ubuntu desktop in the LAN, I would run
ssh [email protected]
linuxbabe is the username on my Ubuntu desktop and 192.168.0.101 is the private IP address for my Ubuntu desktop. The first time you connect to a Linux computer, you will be prompted to accept the host key. Then enter your password to login. After login, you can run Linux commands to do administrative tasks.
Note that if you want to paste a password into the PowerShell window, you need to right-click the mouse and press Enter.
To log out from the Linux box, run the exit command or press Ctrl+D.
The default font size in PowerShell Window is very small. To change it, right-click the titlebar and select properties, then you can change the font size, and the background color.

Method 2: Use SSH in Windows Subsystem for Linux
Windows Subsystem for Linux (WSL) enables you to run native Linux command-line tools directly on Windows 10. If you are a system administrator, WSL is probably an overkill for just using SSH because it would install and run a Linux distro (without graphical user interface) on your Windows 10 desktop. WSL is created for web developers or those who need to work on open-source projects. You can use not only SSH but also other Linux command line tools (Bash, sed, awk, etc).
Open the Microsoft Store and enter WSL in the search box. Select Run Linux on Windows and install a Linux distro of your choice.
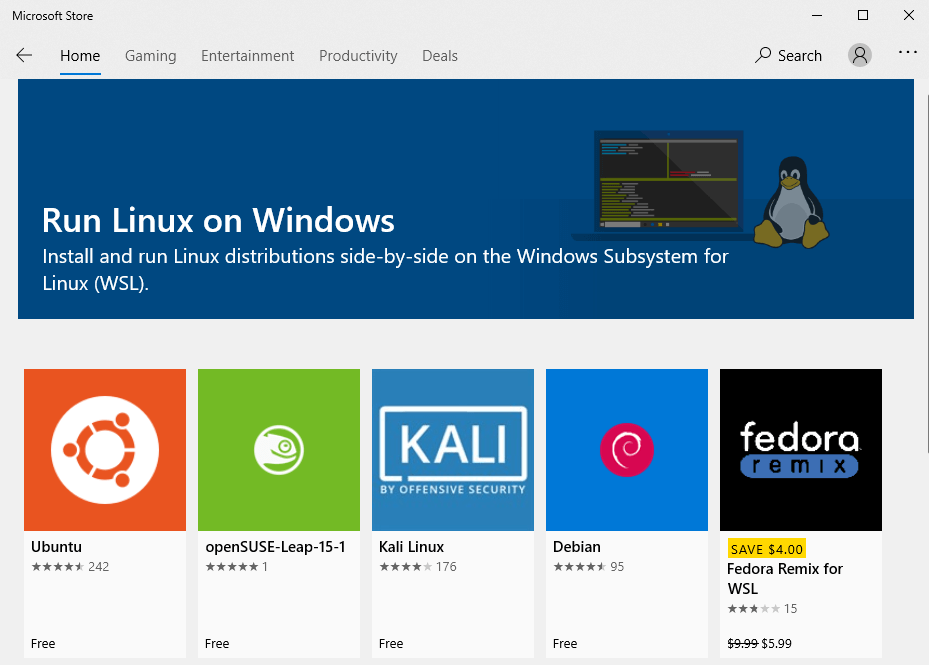
For example, I choose Ubuntu and click the Get button to install it.

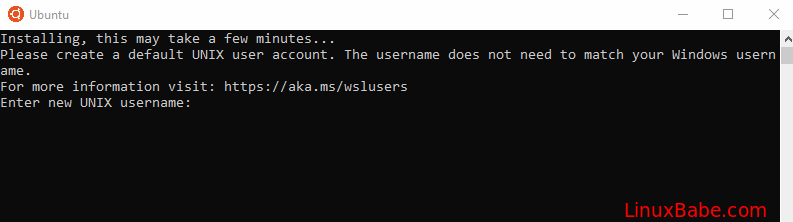
Once your Linux distro is installed, open the Control Panel and select Programs -> Turn Windows features on or off. Tick on the checkbox of Windows Subsystem for Linux to enable this feature. (You may need to reboot your Windows PC for this change to take effect.)
Next, you can launch the Linux distro from the start menu by search the distro’s name. The first time you launch it, you need to create a user and set a password.
After that, you can use the ssh command like below to connect to a Linux server or PC that runs a SSH server.
ssh [email protected]
Method 3: Use Putty
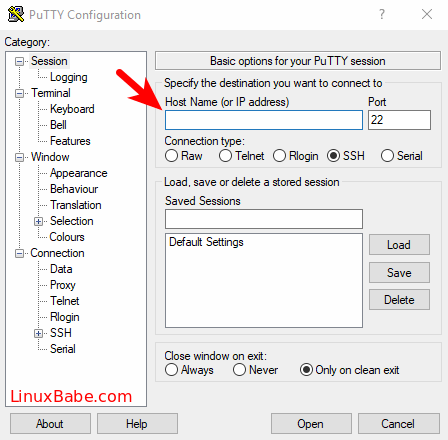
Putty is a well-known and the most popular SSH client on Windows before the arrival of Windows OpenSSH client and Windows Subsystem for Linux. To use SSH with Putty, you need to download the Putty program from the official website and install it.
Launch Putty from the Start menu. Then enter the IP address or hostname of the Linux box and click the Open button to connect to it.
Accept the host key and you will be prompted to enter the username and password.
Please note that when you type in your password, the cursor doesn’t move, but it’s actually accepting your password. To paste text into Putty, first press Ctrl+C to copy the text, then go to Putty window and press the right button of your mouse.
How to Set Up SSH Key on Windows 10 (Optional)
There’re mainly two ways of authenticating user login with OpenSSH server:
- password authentication
- public-key authentication: also known as passwordless SSH login because you don’t need to enter your password.
To set up public-key authentication on Windows 10, follow the instructions below.
Open Windows Powershell, and run the following command to generate SSH keypair.
ssh-keygen -t rsa -b 4096
Where:
-tstands fortype. The above command generates an RSA type keypair. RSA is the default type.-bstands forbits. By default, the key is 3072 bits long. We use a 4096 bits key for stronger security.
When asked which file to save the key, you can simply press Enter to use the default file. Next, you can enter a passphrase to encrypt the private key, but you will need to enter this passphrase every time when you log into the Linux server. If you don’t want it, you can press Enter, so it will have no passphrase.

- The private key (your identification) will be saved in the .ssh/id_rsa file under your user directory.
- The public key will be saved in the .ssh/id_rsa.pub file.
Now we need to upload the public key to remote Linux server. You can display the public key in the Powershell with the following command.
cat .ssh/id_rsa.pub
Then log in to your server via password authentication, and run the following command to create a .ssh directory under your home directory.
sudo mkdir ~/.ssh
Create the authorized_hosts file
sudo nano ~/.ssh/authorized_keys
Copy your SSH public key and paste it to this file. Save and close the file. To save a file in Nano text editor, press Ctrl+O, then press Enter to confirm. To close a file, press Ctrl+X.
Next, change the permission of this file.
sudo chmod 600 ~/.ssh/authorized_keys
Log out of your Linux server.
exit
Now you can SSH into your server without entering a password.
Next Step
I hope this article helped you use SSH on Windows. You might also want to protect SSH service from hacking, I recommend setting up public-key authentication or two-factor authentication.
- 2 Simple Steps to Set up Passwordless SSH Login on Ubuntu
- Set Up SSH Two-Factor Authentication (2FA) on Ubuntu Server
Also, you can enable automatic security updates on your Linux server to patch vulnerabilities.
- Set Up Automatic Security Update (Unattended Upgrades) on Ubuntu
If you want FTP access to the Ubuntu server, you can set up pure-FTPd server.
- How to Set Up a Secure FTP Server with Pure-FTPd on Ubuntu
As always, if you found this post useful, then subscribe to our free newsletter to get more tips and tricks. Take care 🙂
The secure shell protocol (SSH) is the most common method for controlling remote machines over the command line in the Linux world. SSH is a true Linux original, and it is also gaining popularity in the Windows world. There is even official Windows documentation for SSH, which covers controlling Windows machines using OpenSSH.
This article describes how to establish an SSH connection from a Windows machine to a Fedora 33 Linux system using the popular open source tool PuTTY.
Ways to use SSH
SSH uses a client-server architecture, where an SSH client establishes a connection to an SSH server. The SSH server is usually running as a system daemon, so it is often called SSHD. You can hardly find a Linux distribution that does not come with the SSH daemon. In Fedora 33, the SSH daemon is installed but not activated.
You can use SSH to control almost any Linux machine, whether it’s running as a virtual machine or as a physical device on your network. A common use case is the headless configuration of embedded devices, including the Raspberry Pi. SSH can also be used to tunnel other network services. Because SSH traffic is encrypted, you can use SSH as a transport layer for any protocol that does not provide encryption by default.
In this article, I’ll explain four ways to use SSH: 1. how to configure the SSH daemon on the Linux side, 2. how to set up a remote console connection, 3. how to copy files over the network, and 4. how to tunnel a certain protocol over SSH.
1. Configure SSHD
The Linux system (Fedora 33 in my case) acts as the SSH server that allows the PuTTY SSH client to connect. First, check the daemon’s SSH configuration. The configuration file is located at /etc/ssh/sshd_config and contains a lot of switches that can be activated by commenting out related lines:
#	$OpenBSD: sshd_config,v 1.100 2016/08/15 12:32:04 naddy Exp $

# This is the sshd server system-wide configuration file.  See
# sshd_config(5) for more information.

# This sshd was compiled with PATH=/usr/local/sbin:/usr/sbin:/sbin:/usr/local/bin:/usr/bin:/bin

# The strategy used for options in the default sshd_config shipped with
# OpenSSH is to specify options with their default value where
# possible, but leave them commented.  Uncommented options override the
# default value.

Include /etc/ssh/sshd_config.d/*.conf

#Port 22
#AddressFamily any
#ListenAddress 0.0.0.0
#ListenAddress ::
The default configuration, where no line is uncommented, should work for this example. Check whether the SSH daemon is already running by typing systemctl status sshd:
$ systemctl status sshd
● sshd.service - OpenSSH server daemon
   Loaded: loaded (/usr/lib/systemd/system/sshd.service; enabled; vendor preset: enabled)
   Active: active (running) since Fri 2018-06-22 11:12:05 UTC; 2 years 11 months ago
     Docs: man:sshd(8)
           man:sshd_config(5)
 Main PID: 577 (sshd)
    Tasks: 1 (limit: 26213)
   CGroup: /system.slice/sshd.service
           └─577 /usr/sbin/sshd -D -oCiphers=aes256-gcm@openssh.com,chacha20-[...]
If it’s inactive, start it with the systemctl start sshd command.
2. Set up a remote console
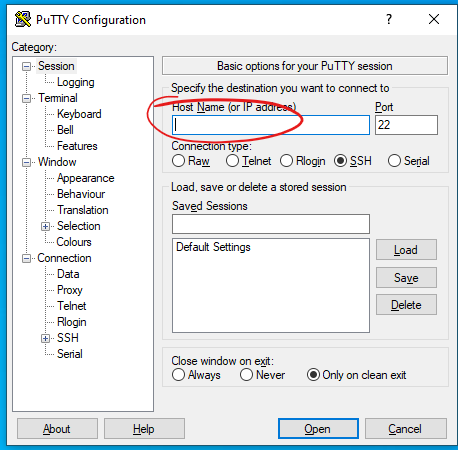
On Windows, download the PuTTY installer, then install and open it. You should see a window like this:

In the Host Name (or IP address) input field, enter the connection information for your Linux system. In this example, I set up a Fedora 33 virtual machine with a bridged network adapter that I can use to contact the system at the IP address 192.168.1.60. Click Open, and a window like this should open:

This is an SSH security mechanism to prevent a man-in-the-middle attack. The fingerprint in the message should match the key on the Linux system at /etc/ssh/ssh_host_ed25519_key.pub.. PuTTY prints the key as an MD5 hash. To check its authenticity, switch to the Linux system, open a command shell, and enter:
ssh-keygen -l -E md5 -f /etc/ssh/ssh_host_ed25519_key.pubThe output should match the fingerprint shown by PuTTY:
$ ssh-keygen -l -E md5 -f /etc/ssh/ssh_host_ed25519_key.pub
256 MD5:E4:5F:01:05:D0:F7:DC:A6:32 no comment (ED25519)
Confirm the PuTTY Security Alert by clicking Yes. The host system’s fingerprint is now in PuTTYs trust list, which is located in the Windows registry under:
HKEY_CURRENT_USERSOFTWARESimonTathamPuTTYSshHostKeysEnter your correct login credentials, and you should be on the console in your home directory:

3. Copy files over the network
In addition to the remote console, you can use PuTTY to transfer files via SSH. Look in the installation folder under C:\Program Files (x86)\PuTTY and find pscp.exe. You can use this to copy files to and from a Linux system.
Open a command prompt with Windows + R and enter cmd. Copy the file MyFile.txt from your Linux user home directory to your Windows home directory by entering:
C:"Program Files (x86)"PuTTYpscp.exe stephan@192.168.1.60:/home/stephan/MyFile.txt .To copy a file from the Windows home directory to the Linux user home directory, enter:
C:"Program Files (x86)"PuTTYpscp.exe MyFile.txt stephan@192.168.1.60:/home/stephan/As you may have already figured out, the copy command’s general structure is:
pscp.exe <source> <target>4. Tunnel a protocol
Imagine you have a Linux machine that is running an HTTP-based service for some arbitrary application. You want to access this HTTP service from your Windows machine over the internet. Of course, you cannot expose the related TCP port to the public because:
- The server is running HTTP, not HTTPS
- There is no user management nor login at all
At first glance, it looks like an impossible task to set up this architecture without producing a horrible security flaw. But SSH makes it relatively easy to set up a safe solution for this scenario.
I will demonstrate this procedure with my software project Pythonic. Running as a container, Pythonic exposes two TCP ports: TCP port 7000 (main editor) and TCP port 8000 (the code-server source-code editor).
To install Pythonic on a Linux machine, run:
podman pull pythonicautomation/pythonic
podman run -d -p 7000:7000 -p 8000:8000 pythonic
Switch to your Windows machine, open PuTTY, and navigate to Connection -> SSH -> Tunnels. Add the two TCP ports you want to forward:
- Source:
7000/ Destination:localhost:7000 - Source:
8000/ Destination:localhost:8000

Then go back to the Session section, and establish an SSH connection as you did before. Open a browser and navigate to http://localhost:7000; you should see a screen like this:

You have successfully configured port forwarding!
Warning: If you expose TCP Port 22 to the public, don’t use easy-to-guess login credentials. You will receive login attempts from all over the world trying to access your Linux machine with common, standard credentials. Instead, permit only known clients to log in. This login restriction can be achieved using public-key cryptography, which uses a key pair in which the public key is stored on the SSH host machine, and the private key remains at the client.
Debugging
If you are struggling to connect to your Linux machine, you can follow the processes in your SSH daemon with:
journalctl -f -u sshdThis is how an ordinary log-in process looks like with LogLevel DEBUG :

Learn more
This article barely scratched the surface about ways to use SSH. If you are looking for information about a specific use case, you can probably find it among the tons of SSH tutorials on the internet. I use PuTTY heavily at work because its easy configuration and good interoperability between operating systems make it a Swiss Army knife tool for connectivity solutions.
 This work is licensed under a Creative Commons Attribution-Share Alike 4.0 International License.
NOTE: I do a LOT of handholding in this article. I wanted to be sure someone who is less-than-familiar with the Linux Command Line Interface and/or SSH would have no trouble understanding what is going on. Here are some navigation links to more readily find what you need:
- Install OpenSSH on your Linux Machine
- Install PuTTY on Your Windows Machine
- Create Public/Private Key pairs with PuTTYGen
- Configure PuTTY for Initial Login to Your Linux Machine
- Your First Login Using Password-based Authentication
- Add Your Public Key to the Linux Authorized Keys List
- Configure PuTTY for Key-Based Authentication
- Connect to Your Linux Machine using Key-Based Authentication
- Set Key File Permissions
- Increase Security by Editing the SSH Configuration File to allow Key-Based Authorization ONLY
Getting to Know Linux
I have recently undertaken to learn how to develop on the Linux platform. I grew up in the Windows world, and decided it was time to expand my horizons. After all, the vast bulk of the web runs on some variant of Linux, and some of today’s most in-demand web application development occurs in Ruby on Rails, which is most at home on a Linux machine.
What I have found so far is that there is a whole lot to like about this strange new OS, and the underlying philosophies and tools which form the core of the Linux experience.
One of the very first things I wanted to do was learn how to access a Linux box remotely from my Windows desktop. The first step in this process was understanding how to set up a Secure Shell (SSH) connection. At first, it might seem this is a little redundant, since my Linux machine sits about 9 feet away from my Windows development box. However, this is a necessary first step in order to eventually be able to:
- Spin up a Linux VM instance on a IAAS/cloud service such as Amazon EC2 and/or Windows Azure, and control/access/utilize it from my windows desktop.
- Set up and manage a hosted Linux server for deployment of web applications/sites
- Understand remote access in a Linux environment
Of course, on top of those items in the list above, this was also a good exercise to get me started doing useful things with my new Linux machine!
Minor Linux Familiarity Required
We will need to perform some Linux commands via the Bash Command Line Interface (CLI), both on our Linux machine, and through our remote connection once we get it set up. If, like myself, you are new to Linux, you may want to review some Bash basics. While the posts linked to below are parts of a series on using Git version control, each of the following focus on basic Bash commands used to navigate and manipulate files in a Linux system.
Review Basic Bash Navigation:
- Getting Started with Git for the Windows Developer (Part II) — Get Acquainted with Bash
- Getting Started with Git for the Windows Developer (Part III) — Working with Files Using Bash
Setting Up the Linux Machine
I am using Linux Mint for my first forays into the Linux world. Mint is built atop Ubuntu, and features a friendly GUI for those of us just getting started. However, for me, the GUI is mainly for those “oh sh*t, I don’t know what to do” moments. One of my main purposes in setting up this machine was to utilize the Bash terminal as much as possible, and master this aspect of this new platform. In fact, we are going to perform this entire exercise using the Bash terminal when interacting with the Linux box.
For this post, I am dealing with a local Linux machine, on my home network behind a router. In another post, I will discuss exposing the machine to the outside world via the internet.
Installing OpenSSH on your Linux Machine
Having recently installed a fresh Mint OS, the first thing we have to do is install an SSH server. Your Linux Distro may or may not come pre-configured with OpenSSH, which I understand is the SSH server of choice in Linux-land.
Linux distro’s based on Debian-flavored Linux use the apt-get install newSotwareTitle to find and download software packages, and/or confirm and update existing installations if they are already present on your machine. So, let’s use apt-get to download OpenSSH on our Linux machine (note — this post assumes you have super-user/administrative permissions on your Linux machine):
Install OpenSSH
Open the Bash terminal on your Linux machine, and type the following command and hit enter. Since you are using sudo to perform this action, be ready to enter your password prior to execution:
Install OpenSSH Server
$ sudo apt-get install openssh-server
In my case, OpenSSH was already present on the system, so my terminal output looks like this:

If your machine did not have OpenSSH Server installed, the terminal will ask that you confirm installation/update of any number of packages. Type “Y” and hit enter. You will then see the terminal window populate with the actions taken and packages added.
Now, we could do some of the SSH server configuration right now at our Bash terminal. However, instead, I am going to move over to the Windows side, and do the rest of the configuring from there, by way of an SSH connection.
The Most Common SSH Client for Windows — PuTTY (no, that is not a typo)
Use of the SSH protocol is less common in the Windows universe then in Linux. However, the most popular SSH client for use on a windows machine is PuTTY, an open source terminal emulator which can act as a client for SSH, Telnet, and other protocols. To get started setting up your SSH client on Windows, visit the PuTTY download page, download and install putty on your machine. The easiest way to go is to download the putty-0.62-installer.exe package, which includes everything required for our purposes:
- Link to the PuTTY download site
- Directly download the PuTTY installer
Once the download completes, run the installer.
Use PuTTYGen to Create a Public/Private Key Pair for Your Windows Client Machine
SSH utilizes Key-based authorization to ensure the security of a connection. A simple description of how this works (From Wikipedia):
SSH uses public-key cryptography to authenticate the remote computer and allow it to authenticate the user, if necessary.[1] Anyone can produce a matching pair of different keys (public and private). The public key is placed on all computers that must allow access to the owner of the matching private key (the owner keeps the private key secret). While authentication is based on the private key, the key itself is never transferred through the network during authentication.
[Read More]
For our purposes, we will use the Handy PuTTYGen utility installed with our PuTTY package to create our keys. Open PuTTYGen (Start Menu —> PuTTY (Folder) —> PuTTYGen (application)) and you should see the following:
PuTTYGen, Ready to Create a Public/Private Key Pair:

Leave the settings at their defaults, and click the “Generate” button. PuTTYGen will request that you move your cursor about in the large empty area in order to ad some “randomness” to the process (and in fact will pause generation until you DO):

When key generation is complete, you will be presented with some additional settings to complete before saving your keys:
![PuTTY-Key-Generator-Comment--Passwor[2]](https://typecastexception.com/image.axd?picture=PuTTY-Key-Generator-Comment--Passwor%5B2%5D_thumb.png "PuTTY-Key-Generator-Comment--Passwor[2]")
Complete the following Items in the Generator Form as follows:
- Key Comment can technically be anything you like, but convention is to use your email address
- The Key Passphrase is not required, but is strongly recommended as an additional level of security, just in case anyone were to get hold of your private key. Use a reasonably strong (but easy to remember) pass word here.
Once you have completed these items, it is time to save your keys. First, I would create a directory (folder) in your Windows User Folder named “SSH Keys” in which to store your private keys. Then, click the “save private key” button and save the key there.
NOTE: Don’t use the “Save Public Key” feature. OpenSSH expects the public key in a slightly different format than PuTTYGen provides, so instead, we are going to copy the key as presented in the PuTTYGen window straight into our authorized_keys file once we log into our Linux machine.
ALSO NOTE: It is not necessary to save the public key which corresponds to the private key we just made, because we can use the PuTTYGen “Load” button to load our private key, which will then also load the proper public key data back into the Public Key Window for copying once again.
Leave the PuTTYGen Window open, and let’s configure PuTTY for our first login.
Configure PuTTY for the Initial Login
The first time we log in to our Linux machine, we will use plain old password authentication, so that we can pass our public SSH key directly over the (relatively) secure connection, and avoid exposing it in a way which might result in someone else getting ahold of it. This is also good practice in a number of different ways.
Open the PuTTY application (Start Menu —> PuTTY (folder) —> PuTTY (application))
Enter the IP Address of your Linux Machine:

As you can see in the picture above, enter the IP Address of the Server machine (your Linux box). If you don’t know what the IP address of your Linux machine is, follow this link:
- Find The IP Address of Your Computer on the Home or Local Area Network (LAN) -Linux (Debian-Based Systems)
Leave the port specification as the default value of 22 (this is the standard port used for SSH logins). While there are potential security reasons to change this later, for now it will do.
Next, in the tree menu to the left, select the Connection/Data node and enter your user name you use to log in to the Linux machine (REMINDER — we are assuming your user profile includes super-user permissions):
Enter your User Name in the Connection/Data node form:

Leave the rest of the settings at their default values (as shown above). Now, go back to the Session node, and enter a name for this configuration in the “Saved Sessions” space, then click “Save. In my case, I saved this session configuration using the IP address, and a brief description of the configuration:

First Remote Login to your Linux computer with Password Authentication
Ok, with those details tended to, click on the “open” button. This first time we log in, you will likely be presented with a warning dialog telling you that there are no keys cached for the server you are attempting to connect to, and do you wish to cache them now:

Since we know this machine is on your LAN, go ahead and click “Yes.” You should be presented with a terminal window that looks like this:

Next, enter the password you use to log in to your Linux machine and hit enter (note that in the terminal here, the cursor does not move, nor are standard obfuscated password placeholders used — in other words, as you type your password, it will appear as if nothing is happening). Your terminal should now resemble this:
![PuTTY-First-Login-Terminal-Logged-In[2]](https://typecastexception.com/image.axd?picture=PuTTY-First-Login-Terminal-Logged-In%5B2%5D_thumb.png "PuTTY-First-Login-Terminal-Logged-In[2]")
Congratulations — you have now logged into your Linux terminal from your Windows computer. However, we are not yet using SSH, and in fact, this method is not a very secure way to remotely access another machine. Next, we need to set up our key-based authentication. Once we have confirmed all is well with that, we will disable the Username/Password-based authentication we are using now in favor of the much stronger key-based security.
Add Your Public Key to the Linux Machine
Your Linux system stores public SSH keys for client machines in a directory within your Linux home user folder (the .ssh directory), in the authorized_keys file. Your next step depends upon whether there is already an .ssh directory on your machine, and whether or not there is already an authorized_keys file present. We can find this out quickly enough by attempting to navigate into a directory named .ssh from within our home folder (our terminal should have opened within our home folder.
If you are not familiar with navigation and basic file manipulation in Bash (the Linux terminal), have a quick look at these two articles I wrote. The articles are part of a series on using Git, but these two focus on basic Bash shell commands useful for file and directory navigation:
- Getting Started with Git for the Windows Developer (Part II) — Get Acquainted with Bash
- Getting Started with Git for the Windows Developer (Part III) — Working with Files Using Bash
First, let’s attempt to navigate into the .ssh directory on our remote Linux box. Type the following into the terminal window (note — the “$‘” symbol is not typed — this is the command “prompt” and indicates that the terminal is ready for command input):
$ cd .ssh
If there is not already a directory named .ssh in your user folder, your terminal window should look like this:
![Navigate-to-ssh-directory-not-exists[2]](https://typecastexception.com/image.axd?picture=Navigate-to-ssh-directory-not-exists%5B2%5D_thumb.png "Navigate-to-ssh-directory-not-exists[2]")
If this is the case, we need to create a new .ssh directory. Type the following:
$ mkdir .ssh
Now your terminal should look like this:

Now let’s try navigating into the new directory:

That’s more like it! Next, since there was no .ssh directory to begin with, we also need to create our authorized keys file. We are going to create a new file, and add our new public key all in one fell swoop. Go to the PuTTYGen window (still open on your Windows desktop), and select and copy the entire public key visible in the space labeled “Public key for pasting into OpenSSH authorized_keys file”:

Now we will use the echo command to create the new authorized_keys file, and insert the Public key for our Windows machine. The syntax of our echo command is as follows:
echo YourPublicKey >> authorized_keys
This command will append YourPublicKey to the file authorized_keys. If the file does not exist, it will be created (ours doesn’t exist yet. If yours DOES, don’t do this this way).
First, type the echo command into the Linux remote terminal like this:

Then, if you right click your mouse pointer at the terminal cursor, the contents of your clipboard (containing your newly created public key for your Windows machine) will automatically paste into the current line.
Then add the >> authorized_keys to the end, and hit the Enter key:

Now that we have added our public key to the Linux machine, let’s end our PuTTY session, and see if we can log back in using Public/Private key authentication. If this works, we will then modify our OpenSSH server configuration on the Linux box to ONLY allow this type of authorization. Go back to the Putty window, and close it. This will end the session.
Configure PuTTY for Public/Private Key Authorization
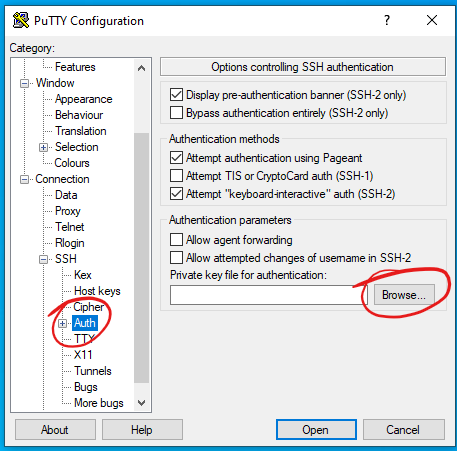
Now, open PuTTY again, and in the tree control to the left, load your previously saved session configuration, select the Connection/SSH/Auth node. Browse to find your private key you created using PuTTYGen, and select it for use. Leave the rest of the settings at their default values for now:
![PuTTY-Configuration-Load-Private-Key[2]](https://typecastexception.com/image.axd?picture=PuTTY-Configuration-Load-Private-Key%5B2%5D_thumb.png "PuTTY-Configuration-Load-Private-Key[2]")
Next, return to the Session configuration node, and type a new name for this modified configuration. As previously, I used the IP address, in conjunction with brief configuration details. Then click “Save”:

Connect to Linux/OpenSSH Server using Public/Private Key Authorization
Ok, let’s try connecting now, using our new configuration. Click on the Open button on the PuTTY interface. You should see something like this:

Notice that this time, PuTTY tells us it is attempting to log in using public key authentication, and prompts us for the password we associated with our key when we created it. Enter the password you used when creating the key (again, the cursor will remain still while you do this), and hit Enter:

Congratulations! You have now logged in to your Linux machine using Public/Private key authentication. While we are connected remotely, let’s tidy up a few loose ends.
Set Permissions on Keys File to Owner/Read-Only
Now that we know our keys are working properly, let’s protect the authorized_keys file on our Linux machine so that we don’t accidentally modify or delete it. Navigate into the .ssh directory, and type the following command into the Bash terminal:
chmod 400 authorized_keys
This sets the permissions on our authorized_keys file so that the current user, and only the current user has read-only permissions, and no one else can even access the file (that specific user can make the file writeable for themselves again by using chmod 700).

Edit the OpenSSH Configuration File to Disable Password Authentication
Now that we have a working key-based authentication scheme, we have no more need for the less-then-secure password-only security we used previously. In fact, our next step will be to edit the OpenSSH configuration file on our Linux machine to NOT allow that, and to ONLY accept key-based authentication.
First, let’s make a backup copy of the configuration file. Type cd to navigate back to your home directory (entering cd with no options or destination path returns you to the home directory by default), then create a folder in your home directory to store backups like this:
$ mkdir ssh_config_backup
Then, use the following command to make a copy of the configuration file in the new directory we just created (note: Since we are using sudo, we will be prompted for the user password we use on the Linux machine):
$ sudo cp /etc/ssh/sshd_config ~/ssh_config_backup
Next, we will open the sshd_config file using vi in terminal mode. Type the following:
$ sudo vi /etc/ssh/sshd_config
Again, you will be promoted for your password on the Linux machine. You should see something like this after hitting the Enter key:

A few things to note:
- I recognize it is difficult to see the dark blue text here. It will be easier to read on your actual screen
- Notice that we are no longer in the Bash terminal per se, but instead looking at the text of the sshd_config file within the terminal.
- At the moment, you cannot edit anything —
viis in command mode.
We will use a few (very few) basic vi commands to get this done. The Commands we need to edit this document are:
- Use the up/down/left/right arrow keys to navigate within the document, and to position your cursor within a line of text.
- If
viis in Command Mode, typei(lowercasei) to enter Insert mode. - If
viis in Insert mode, press the Esc key to return to Command Mode. - When you are finished editing, type :wq (colon then lowercase w the lowercase q) to save and exit the document, returning to the Bash Terminal proper.
Now, using your down arrow key, move down the document a ways until you find this line:
#PasswordAuthentication yes
We want to change it to:
PasswordAuthentication no
The hash symbol at the beginning of this line means that it has been “commented out” (meaning it is ignored when the OpenSSH server refers to this file during configuration). In addition, note its value is set to yes:

First, type lowercase i to enter Insert mode, and delete the hash symbol. Then, use your right arrow key to move to the end of the line, and change the yes to no. Now press the Esc key to return to Command mode.
You would think this would be the end of it. However, at least in my current Linux Mint system, we also have to disable the Password Authentication Modules (PAM) portion of the config file (this is usually the last line in the file). To do this, use your down arrow key to navigate through the document until you find the following line:
UsePAM yes
We want to change it to:
UsePAM no
Your screen should look like this:
Use your Right-Arrow key to move to the end of that line, and type I to enter Insert Mode. Change the yes to no, then press the Esc key to return to Command Mode:

Now, once safely back in Command mode, type the following:
:wq
As you type, this command will appear at the bottom of the vi screen.

Once you hit enter, the modified file will be saved, and you will be returned to the Bash terminal:

Restart the SSH Server
As a final step, we need to re-start the SSH Server on the Linux machine in order that the configuration changes we just made a reflected in the service. Type the following command into the terminal and hit enter:
$ sudo service ssh restart
Ok, now exit the current PuTTY session by closing the PuTTY window. Let’s see if we have succeeded in denying access for those seeking to login using simple password authentication. Re-open PuTTY, and load your original session configuration, which we set up without the key-based authentication using only our user name, and attempt to log in. If we have done everything correctly, you should be greeted with THIS unpleasant artifact:

Hopefully, this has helped some of you get started using OpenSSH and PuTTY to connect to your Linux machine from a Windows box remotely. Of course, this is of limited usefulness when like me, your two machines are in the same room. In a future post, I will discuss using SSH to connect to your Linux machine from the internet at large, and in conjunction with VNC to create a very secure Remote Desktop Connection.
Additionally, I began exploring this because my next goal is to utilize cloud services such as Amazon EC2 and Windows Azure. In that context, I want to be able to spin up a cloud-hosted Virtual Machine (VM) and perform this type of administrative stuff.
Please feel free to leave constructive feedback, and especially, to bust me where I have made a mistake or am propagating bad information. Comments are greatly appreciated!
CodeProject
My name is John Atten, and my username on many of my online accounts is xivSolutions. I am Fascinated by all things technology and software development. I work mostly with C#, Javascript/Node.js, Various flavors of databases, and anything else I find interesting. I am always looking for new information, and value your feedback (especially where I got something wrong!)
Содержание
- Что такое SSH?
- Способ 1. Встроенный SSH-клиент в Windows 10
- Способ 2: использование SSH в подсистеме Windows для Linux
- Способ 3: использовать Putty
- Завершение
Что такое SSH?
SSH означает Secure Shell – протокол, который был изобретен в 1995 году для замены небезопасного Telnet (телекоммуникационная сеть).
Теперь системный администратор является основным способом безопасного входа на удаленные серверы Linux через общедоступный Интернет.
Хотя он выглядит и действует так же, как Telnet, все коммуникации по протоколу SSH зашифрованы для предотвращения перехвата пакетов.
Если вы используете компьютер с Linux или Mac, SSH-клиент установлен по умолчанию.
Вы можете открыть окно терминала и запустить команду ssh, как показано ниже, для подключения к удаленному серверу Linux.
ssh username@itsecforu.local
Теперь давайте обсудим, как использовать SSH в Windows.
Способ 1. Встроенный SSH-клиент в Windows 10
Группа разработчиков Microsoft PowerShell решила перенести OpenSSH (и клиент, и сервер) на Windows в 2015 году.
Наконец, он появился в Windows 10 Fall Creator Update в 2017 году и по умолчанию включена в обновлении от апреля 2018 года.
Чтобы использовать клиент OpenSSH в Windows 10, просто откройте окно PowerShell или окно командной строки и выполните команду ssh.
Например, если я хочу подключиться к своему рабочему столу Ubuntu в локальной сети, я бы запустил.
ssh cryptoparty@192.168.0.101
cryptoparty – это имя пользователя на моем рабочем столе Ubuntu, а 192.168.0.101 – это частный IP-адрес моего рабочего стола Ubuntu.
При первом подключении к компьютеру с Linux вам будет предложено принять ключ хоста.
Затем введите свой пароль для входа.
После входа в систему вы можете запускать команды Linux для выполнения административных задач.
Чтобы выйти из окна Linux, выполните команду выхода или нажмите Ctrl + D.

Чтобы выйти из окна Linux, выполните команду exit или нажмите Ctrl + D.
Способ 2: использование SSH в подсистеме Windows для Linux
Подсистема Windows для Linux (WSL) позволяет запускать встроенные средства командной строки Linux непосредственно в Windows 10.
Если вы являетесь системным администратором, WSL, вероятно, является излишним просто для использования SSH, поскольку он установит и запустит дистрибутив Linux (без графического интерфейса) на рабочем столе Windows 10.
Kali Linux в подсистеме Windows для Linux
WSL создан для веб-разработчиков или тех, кому нужно работать над проектами с открытым исходным кодом.
Вы можете использовать не только SSH, но и другие инструменты командной строки Linux (Bash, sed, awk и т. д.).
Откройте Microsoft Store и введите WSL в поле поиска. Выберите «Запустить Linux на Windows» и установите дистрибутив Linux по вашему выбору.

Например, я выбрал Ubuntu и нажимаю кнопку Get, чтобы установить ее.

После установки дистрибутива Linux откройте панель управления и выберите «Программы» -> «Включить или отключить функции Windows».
Установите флажок Подсистема Windows для Linux, чтобы включить эту функцию.
(Вам может потребоваться перезагрузить компьютер с Windows, чтобы изменения вступили в силу.)
После этого вы можете использовать команду ssh, как показано ниже, для подключения к серверу Linux или ПК, на котором работает SSH-сервер.
ssh itsecforu@192.168.0.101
Способ 3: использовать Putty
Putty – известный и самый популярный SSH-клиент в Windows до появления клиента Windows OpenSSH и подсистемы Windows для Linux.
Чтобы использовать SSH с Putty, вам необходимо скачать программу Putty с официального сайта и установить ее.
Запустите Putty из меню «Пуск». Затем введите IP-адрес или имя хоста окна Linux и нажмите кнопку «Open», чтобы подключиться к этом серверу.

Примите ключ хоста, и вам будет предложено ввести имя пользователя и пароль.
См. также:
- Как использовать команды SSH в командной строке Windows 10
- 6 команд для очистки терминала Linux
Завершение
Я надеюсь, что эта статья помогла вам использовать SSH в Windows.
Как всегда, если вы нашли эту статью полезной, поделитесь ей, чтобы получить больше советов и рекомендаций. Берегите себя 🙂
Last updated on: 2019-01-10
Authored by: Rackspace Support
After you have created a new Cloud Server
with the Cloud Control Panel, you need to make a secure remote
connection from your local computer to your Cloud Server. This article
describes how to use a client called PuTTY to form a Secure Shell (SSH)
connection from a computer running a Microsoft® Windows® operating
system (OS) to a Linux® server.
Note: This procedure requires you to install PuTTY or another SSH client,
which you do at your own risk. PuTTY is not affiliated with
Rackspace in any way, but the software is simple to use, freely
available, and reputable.
If you are a MacOS® X user, you can
connect to a Linux server by using Terminal,
a console program included with the operating system.
For an OnMetal server, see
Create OnMetal Cloud Servers
for applicable OnMetal steps.
Windows version
The procedure and examples in this article use Windows XP, Service Pack 2.
Different versions of Windows might have slightly different interfaces.
Download PuTTY
Use the following steps to download and open PuTTY:
-
Download PuTTY from the
PuTTY website.Ensure that you comply with the license requirements.
-
Launch the client.
Configure your connection
Use the following steps to configure your connection:
-
In the PuTTY Configuration window, enter the following values:
- In the Host Name field, enter the Internet Protocol (IP) address of
your Cloud Server. - Ensure that the connection type is set to SSH.
- (Optional) In the Saved Sessions field, assign a name for
this connection. Assigning a name saves time the next time that you use
Putty. You can assign a different name for each of your Cloud Servers.
- In the Host Name field, enter the Internet Protocol (IP) address of
-
Click Open.
Accept the key
If this is the first time that you have used PuTTY to log in to your
server with SSH, a warning similar to the following one displays:
The server’s host key is not cached in the registry. You have no guarantee
that the server is the computer you think it is. The server’s rsa2 key
fingerprint is: <string>. If you trust this host, hit **Yes** to add the key to
PuTTY’s cache and carry on connecting. If you want to carry on connecting just
once, without adding the key to the cache, hit No. If you do not trust this
host, hit Cancel to abandon the connection.
If you are sure that you have entered the correct information, click Yes.
Subsequent connections do not show this warning because the host key
is now cached in the registry of your local computer. You can expect to
see that warning, however, if you connect to your server from a
different computer.
Enter your username and password
After you accept the warning, the terminal prompts you for your username
and password.
If this is the first time that you are logging in to the server, you
must log in as the root user.
When you are prompted for the password for the root user, enter the
current root password for this server. The password at is not echoed to the
screen. Then, press Enter.
If you have entered the correct root password, the prompt responds with
a shell prompt:
[root@yourservername ~]#
Now you can work on your server with all permissions.
Change your root passwords
We recommend that you change the root password to something personal.
You can easily do this by using the passwd command and the following steps:
- From the shell prompt, enter the
passwdcommand. - Enter the new password that you want to set for your server. The
password does not echo to the screen. - Reenter the new password and press Enter.
When you connect to your server, use this password with the root user.
Connecting to a remote server using SSH from Windows or Linux machine is a sort of necessity nowadays for developers. In fact, a normal user who has to manage multiple machines also needs to access another machine remotely. Therefore, learning ways to connect to the remote server is not optional anymore.
In this tutorial we will see different ways and software to connect to remote server.
First of all there are 2 protocols to connect to remote server.
- SSH for Linux Based Machines
- RDP for Windows-Based Machines
We will be restricting our discussion in this article to SSH only.
Read: What is Docker?
What is SSH?
SSH which stands for Secure Socket Shell, is a protocol that allows your computer to connect securely to a remote computer/server. After establishing connection you will be able to control remote server, execute commands, install packages and many more.
This is the most preferred and secure way to connect to a remote server for system admin.
Connecting from Windows to Linux Remote Server using SSH
As we discussed above SSH protocol is the only way to connect to Linux based machines. However, Windows doesn’t support any SSH connection. Fortunately, we have many open source software which can establish connection over SSH, once installed in your PC.
Putty SSH Client
Putty is a very popular and lightweight SSH client. It comes as both installer and portable. Therefore, you don’t have to really install it before using. It also supports an SSH key which is very handy. However, Putty doesn’t support .pem format generated by most of the machines. It only support .ppk format. But we do have a solution for that. You will find puttygen on putty download page itself. You can use this tool to convert SSH key from one format to another.
Using Putty to Connect from Windows to Linux
After you have downloaded the putty, it will look like something like this. Now enter the IP address in the box.
If you have SSH key then browse the SSH key location and then click open as follows. If you don’t have SSH key, just click open.
On this screen enter username which could be root, ubuntu, centos, opc and then for password-based login it will ask password as follows. Type it and Voila! You are connected to a remote Linux server.
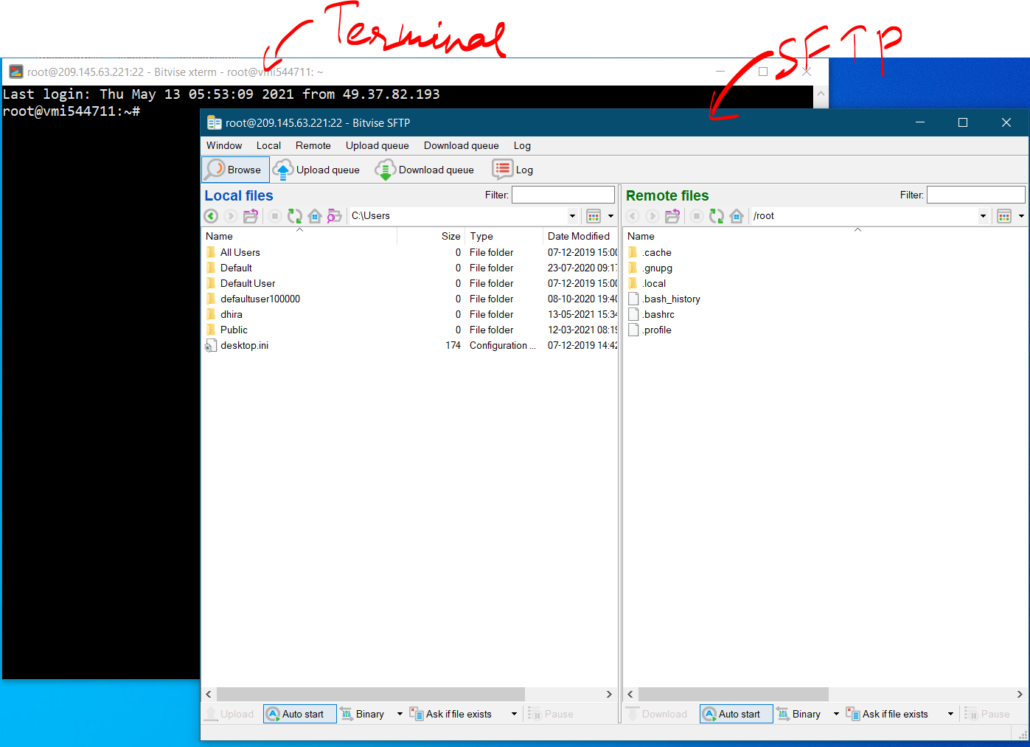
BitVise SSH Client
Another very useful client to access remote Linux server from PC is BitVise. Bitvise also comes with SFTP which allows secure file transfer from your PC to server. This feature was missing in Putty, therefore you would have required FTP client like WinSCP or FileZilla.
Using BitVise to Connect from Windows to Linux
First of all download BitVise and then open it. You will see window something like as follows.
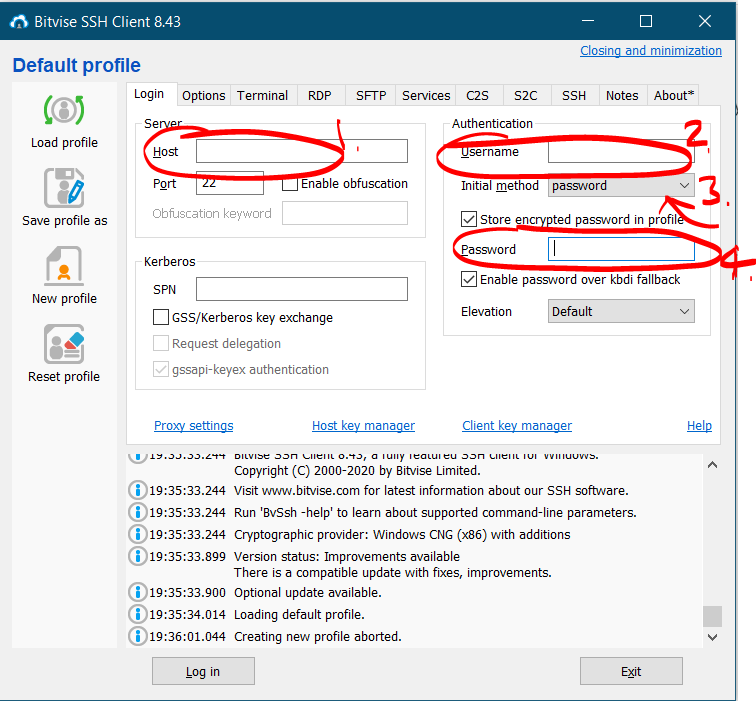
Here you have enter IP address, username and password. Or, if you have SSH key, make selection and it will tell you to browse SSH key.
Once you hit Open you will see 2 additional windows popping out, one is terminal and other is SFTP window.
Connecting from Linux to Linux over SSH
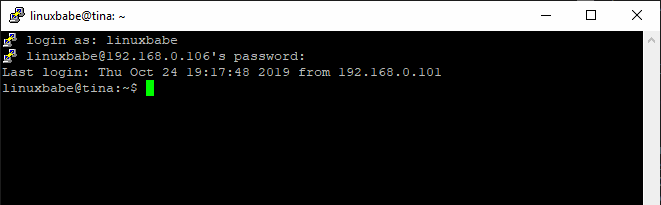
Connecting from Linux to Linux is super easy. All you need is to open terminal on your Linux machine and execute the following command. Answer yes when asked for confirmation. After that you will be asked for password. Type and hit return.
[david@localhost ~]$ ssh root@209.145.63.221

The authenticity of host '209.145.63.221 (209.145.63.221)' can't be established.
RSA key fingerprint is dc:13:95:72:42:31:14:6d:2d:53:31:6e:ae:d1:10:b3.
Are you sure you want to continue connecting (yes/no)? yes
Warning: Permanently added '209.145.63.221' (RSA) to the list of known hosts.
root@209.145.63.221's password:
Welcome to Ubuntu 18.04.5 LTS (GNU/Linux 4.15.0-143-generic x86_64)

 * Documentation:  https://help.ubuntu.com
 * Management:     https://landscape.canonical.com
 * Support:        https://ubuntu.com/advantage

 * Canonical Livepatch is available for installation.
   - Reduce system reboots and improve kernel security. Activate at:
     https://ubuntu.com/livepatch
New release '20.04.2 LTS' available.
Run 'do-release-upgrade' to upgrade to it.

Welcome!

This server is hosted by Contabo. If you have any questions or need help,
please don't hesitate to contact us at support@contabo.com.

Last login: Thu May 13 09:27:03 2021 from 49.37.82.193
root@vmi544711:~#
or if you have SSH key then execute following command. Note that /ssh/newkey.pem is location of your SSH key.
[david@localhost ~]$ ssh -i /ssh/newkey.pem root@209.145.63.221
Conclusion
Connecting to remote server using SSH from Windows or Linux is easy. There’s number of open source SSH client for Windows which make easier to connect to remote Linux server. For Linux to Linux connection we already have terminal on every Linux machine.
Introduction
Accessing machines remotely became a necessity a long time ago and we can barely imagine how it would be if we couldn’t control computers from remote locations. There are many ways to establish a connection with a remote machine depending on the operating system you are running, but the two most used protocols are:
- Secure Shell (SSH) for Linux-based machines
- Remote Desktop Protocol (RDP) for Windows-based machines
The two protocols use the client and server applications to establish a remote connection. These tools allow you to gain access and remotely manage other computers, transfer files, and do virtually anything you can do while physically sitting in front of the machine.
Prerequisites
Before you can establish a secure remote desktop protocol with a remote machine, there are a few basic requirements to meet:
- The remote computer must be turned on at all times and have a network connection.
- The client and server applications need to be installed and enabled.
- You need the IP address or the name of the remote machine you want to connect to.
- You need to have the necessary permissions to access the remote computer.
- Firewall settings need to allow the remote connection.
What is SSH?
Secure Shell, sometimes referred to as Secure Socket Shell, is a protocol which allows you to connect securely to a remote computer or a server by using a text-based interface.
When a secure SSH connection is established, a shell session will be started, and you will be able to manipulate the server by typing commands within the client on your local computer.
System and network administrators use this protocol the most, as well as anyone who needs to manage a computer remotely in a highly secure manner.
How Does SSH Work?
In order to establish an SSH connection, you need two components: a client and the corresponding server-side component. An SSH client is an application you install on the computer which you will use to connect to another computer or a server. The client uses the provided remote host information to initiate the connection and if the credentials are verified, establishes the encrypted connection.
On the server’s side, there is a component called an SSH daemon that is constantly listening to a specific TCP/IP port for possible client connection requests. Once a client initiates a connection, the SSH daemon will respond with the software and the protocol versions it supports and the two will exchange their identification data. If the provided credentials are correct, SSH creates a new session for the appropriate environment.
The default SSH protocol version for SSH server and SSH client communication is version 2.
How to Enable an SSH Connection
Since creating an SSH connection requires both a client and a server component, you need to make sure they are installed on the local and the remote machine, respectively. An open source SSH tool—widely used for Linux distributions— is OpenSSH. Installing OpenSSH is relatively easy. It requires access to the terminal on the server and the computer that you use for connecting. Note that Ubuntu does not have SSH server installed by default.
How to Install an OpenSSH Client
Before you proceed with installing an SSH client, make sure it is not already installed. Many Linux distributions already have an SSH client. For Windows machines, you can install PuTTY or any other client of your choice to gain access to a server.
To check if the client is available on your Linux-based system, you will need to:
- Load an SSH terminal. You can either search for “terminal” or press CTRL + ALT + T on your keyboard.
- Type in
sshand press Enter in the terminal. - If the client is installed, you will receive a response that looks like this:
[email protected]:~$ ssh

usage: ssh [-1246AaCfGgKkMNnqsTtVvXxYy] [-b bind_address] [-c cipher_spec]
[-D [bind_address:]port] [-E log_file] [-e escape_char]
[-F configfile] [-I pkcs11] [-i identity_file]
[-J [[email protected]]host[:port]] [-L address] [-l login_name] [-m mac_spec] [-O ctl_cmd] [-o option] [-p port] [-Q query_option] [-R address] [-S ctl_path] [-W host:port] [-w local_tun[:remote_tun]]
[[email protected]]hostname [command]

[email protected]:~$
This means that you are ready to remotely connect to a physical or virtual machine. Otherwise, you will have to install the OpenSSH client:
- Run the following command to install the OpenSSH client on your computer:
sudo apt-get install openssh-client - Type in your superuser password when asked.
- Hit Enter to complete the installation.
You are now able to SSH into any machine with the server-side application on it, provided that you have the necessary privileges to gain access, as well as the hostname or IP address.
How to Install an OpenSSH Server
In order to accept SSH connections, a machine needs to have the server-side part of the SSH software toolkit.
If you first want to check if OpenSSH server is available on the Ubuntu system of the remote computer that needs to accept SSH connections, you can try to connect to the local host:
- Open the terminal on the server machine. You can either search for “terminal” or press CTRL + ALT + T on your keyboard.
- Type in
ssh localhostand hit enter. - For the systems without the SSH server installed the response will look similar to this:
[email protected]:~$ ssh localhost
ssh: connect to host localhost port 22: Connection refused [email protected]:~$
If the above is the case, you will need to install the OpenSSH server. Leave the terminal open and:
- Run the following command to install the SSH server:
sudo apt-get install openssh-server ii.- Type in your superuser password when asked.
- Enter and Y to allow the installation to continue after the disk space prompt.
The required support files will be installed, and then you can check if the SSH server is running on the machine by typing this command:
sudo service ssh statusThe response in the terminal should look similar to this if the SSH service is now running properly:
[email protected]:-$ sudo service ssh status
• ssh.service - OpenBSD Secure Shell server
Loaded: loaded (/lib/systemd/system/ssh.service; enabled; vendor preset: enab
Active: active (running) since Fr 2018-03-12 10:53:44 CET; 1min 22s ago Process: 1174 ExecReload=/bin/kill -HUP $MAINPID (code=exited, status=0/SUCCES

Main PID: 3165 (sshd)
Another way to test if the OpenSSH server is installed properly and will accept connections is to try running the ssh localhost command again in your terminal prompt. The response will look similar to this screen when you run the command for the first time:
[email protected]:~$ ssh localhost

The authenticity of host 'localhost (127.0.0.1)' can't be established. ECDSA key fingerprint is SHA256:9jqmhko9Yo1EQAS1QeNy9xKceHFG5F8W6kp7EX9U3Rs. Are you sure you want to continue connecting (yes/no)? yes
Warning: Permanently added 'localhost' (ECDSA) to the list of known hosts.

[email protected]:~$
Enter yes or y to continue.
Congratulations! You have set up your server to accept SSH connection requests from a different
computer using an SSH client.
TIP
You can now edit the SSH daemon configuration file, for example, you can change the default port for SSH connections. In the terminal prompt, run this command:
sudo nano /etc/ssh/sshd_configThe configuration file will open in the editor of your choice. In this case, we used Nano.
If you need to install Nano, run this command:
sudo apt-get install nanoPlease note that you need to restart SSH service every time you make any changes to the sshd_config file by running this command:
sudo service ssh restartNow that you have the OpenSSH client and server installed on every machine you need, you can establish a secure remote connection with your servers. To do so:
- Open the SSH terminal on your machine and run the following command:
ssh [email protected]_ip_addressIf the username on your local machine matches the one on the server you are trying to connect to, you can just type:
ssh host_ip_addressAnd hit Enter. - Type in your password and hit Enter. Note that you will not get any feedback on the screen while typing. If you are pasting your password, make sure it is stored safely and not in a text file.
- When you are connecting to a server for the very first time, it will ask you if you want to continue connecting. Just type yes and hit Enter. This message appears only this time since the remote server is not identified on your local machine.
- An ECDSA key fingerprint is now added and you are connected to the remote server.
If the computer you are trying to remotely connect to is on the same network, then it is best to use the private IP address instead of the public IP address. Otherwise, you will have to use the public IP address only. Additionally, make sure that you know the correct TCP port OpenSSH is listening to for connection requests and that the port forwarding settings are correct. The default port is 22 if nobody changed configuration in the sshd_config file. You may also just append the port number after the host IP address.
Here is the example of a connection request using the OpenSSH client. We will specify the port number as well:
[email protected]:~$ ssh [email protected] –p7654 [email protected]’s password:

The authenticity of host '185.52.53.222 (185.52.53.222)' can't be established. ECDSA key fingerprint is SHA256:9lyrpzo5Yo1EQAS2QeHy9xKceHFH8F8W6kp7EX2O3Ps. Are you sure you want to continue connecting (yes/no)? yes
Warning: Permanently added ' 185.52.53.222' (ECDSA) to the list of known hosts.

[email protected]:~$
You are now able to manage and control a remote machine using your terminal. If you have trouble connecting to a remote server, make sure that:
- The IP address of the remote machine is correct.
- The port SSH daemon is listening to is not blocked by a firewall or forwarded incorrectly.
- Your username and password are correct.
- The SSH software is installed properly.
SSH Further Steps
Now that you are able to establish a connection to your server using SSH, we highly recommend a few further steps to improve SSH security. When you leave the setup with the default values, it is more likely to be hacked and your server can easily become a target of scripted attacks.
Some of the suggestions for hardening SSH by editing the sshd configuration file include:
- Change the default TCP port where SSH daemon is listening. Change it from 22 to something much higher, for example 24596. Make sure you do not use a port number that is easy to guess, such as 222, 2222 or 22222.
- Use SSH key pairs for authentication for passwordless SSH login. They are both safer and also allow logging in without the need to use your password (which is faster and more convenient).
- Disable password-based logins on your server. If your password gets cracked, this will eliminate the possibility of using it to log into your servers. Before you disable the option to log in using passwords, it is important to make sure that authentication using key pairs is working properly.
- Disable root access to your server and use a regular account with the su – command to switch to a root user.
You can also use TCP wrappers to restrict access to certain IP addresses or hostnames. Configure which host can connect using TCP wrappers by editing the /etc/hosts.allow and etc/hosts.deny files.
Note that allowed hosts supersede the denied hosts. For example, to allow SSH access to a single host you will first deny all hosts by adding these two lines in the etc/hosts.deny:
sshd : ALLALL : ALL
Then, in the etc/hosts.allow add a line with the allowed hosts for the SSH service. That can be a single IP address, an IP range, or a hostname: sshd : 10.10.0.5, LOCAL.
Make sure to keep your log in information secure at all times and to apply security at multiple layers. Use different methods to limit SSH access to your servers, or use services that will block anyone who tries to use brute force to gain access to your servers. Fail2ban is one example of such service.
VNC Over SSH
For users who are used to working in a graphical desktop environment with Virtual Network Computing (VNC), it is possible to completely encrypt connections using SSH tunneling. In order to tunnel VNC connections over SSH, you will need to run this command in the terminal on your Linux or UNIX machine:
$ ssh -L 5901:localhost:5901 -N -f -l username hostname_or_IPHere is the breakdown of the command above:
- ssh : this starts the SSH client program on your local machine and enables secure connection to the SSH server on a remote computer.
- -L 5901:localhost:5901 : states that the local port for the client on the local machine is to be forwarded to the specified host and port of the remote machine. In this case, local port 5901 on the local client is being forwarded to the same port of the given remote server.
- -N : instructs to only forward ports, and not to execute a remote command.
- -f : sends SSH to background after the password is provided, just before the command is executed. Then, you can freely use the terminal to type commands on the local machine.
- -l username : the username you insert here will be used for logging in to the remote server you specified.
- hostname_or_IP : this is the remote system with a VNC server. An example of an IP address would be 172.16.0.5 and the example of a hostname would be myserver.somedomain.com.
You can also connect to a remote server via SSH tunnel from a Windows machine by using PuTTY. In the PuTTY configuration window:
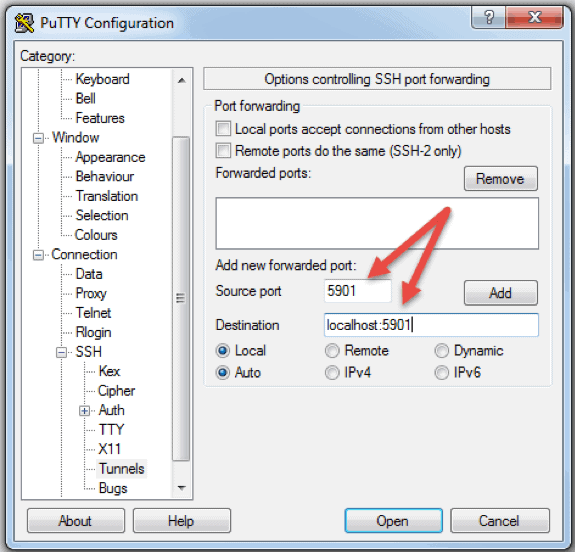
- Go to Connection -> SSH -> Tunnels
- In the Source port field type in 5901
- In the Destination field type in localhost:5901
- Start the SSH session as you normally would.
- Connect to your server with a VNC client of your choice.
What is RDP?
Remote Desktop Protocol (RDP) is a protocol developed by Microsoft. It is used to control and manage machines with a Windows operating system remotely.
Unlike Secure Shell, connections established using an RDP client provide a user with a graphical interface through which they can gain access to a remote computer and control it in the same manner as their local computer.
Using Remote Desktop services, formerly known as terminal services, allows network and system engineers to easily manipulate remote computers connected to a local network or the Internet.
This comes with a price. If you do not use a virtual private network (VPN), connecting via RDP is far less secure than SSH because you are directly exposed to the internet. There are many automated scripts constantly looking for weaknesses in your connection, especially for open ports that Windows Remote Desktop connections use. In that case, it is highly recommended to have strong, secure passwords and change them regularly. This does not make RDP connections safe, but less vulnerable.
How Does Remote Desktop Protocol Work?
Windows Remote Desktop connection is based on a rather simple client-server model using Remote Desktop Protocol (RDP). After you enable it, the Windows Remote Desktop server-side service starts listening for connection requests on port 3389. Whenever you try to connect to a Windows server, you will need to provide a valid username for the account you are using to gain access remotely. Once you gain access to the server, you will be able to manage applications, transfer files between the two computers, and virtually perform any task you can perform locally with the account in question.
No matter what version of the Windows operating system you have, you will be able to establish a secure remote connection to another computer since the Remote Desktop client is available by default. On the other hand, a computer can be remotely accessible only if it runs on a Pro, Enterprise, or Server edition of a Windows operating system. So, we can conclude that RDP connections are possible only between computers with a Windows OS on them.
How to Enable an RDP Connection
Establishing a Remote Desktop connection to another computer over network requires you to enable the Windows Remote Desktop server service. The Remote Desktop client is integrated into Windows systems, ready out of the box, and does not need any special setup before you can connect to another Windows-based machine. However, accepting Remote Desktop connections from another machines is disabled by default on all version of Windows OS.
If you want to remotely connect to a server over the Internet and not through the local network, you need to take a few things into consideration before you enable this service:
- Port forwarding. If you are not using a VPN you need to make sure the ports are forwarded properly to the remote host’s IP address. Check the router settings to see if the traffic on the default TCP port for Remote Desktop Protocol (port 3389) is going to the IP of the server with which you want to establish a Remote Desktop connection. Note that your Windows server is in this case directly exposed to the Internet and vulnerable.
- Using a VPN. This is a much safer option for Remote Desktop connection. When you create a virtual private network on a client computer, you will be able to access all services that are available only when you use local connection.
- Firewall settings. Make sure that the firewall you are using for the remote machine is not blocking Remote Desktop connection. You need to open the local port for RDP, whether it is the default or custom port number.
Enabling Remote Access in Windows 7, 8, 10 and Windows Server Versions
The procedure to configure remote desktop and allow secure remote connections to a server or a PC from a different computer is similar for all versions of Windows operating systems. I will list the basic steps to enable remote access to a desired machine. Before you begin, please make sure that you have taken into consideration the notes listed above concerning port forwarding, VPN, and firewall settings.
Step 1: Allow Remote Connections
Go to the computer information on the machine where you want to allow remote connections:
- Right Click on Computer or This PC depending on the Windows OS version.
- Click on Properties.
- Click on Remote settings on the left side of the window.
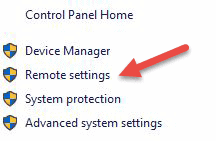
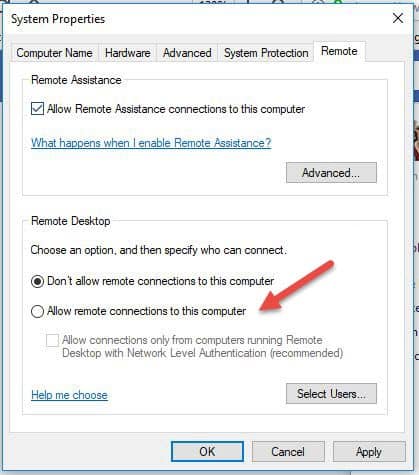
- Click on Allow remote connections to this computer. This should automatically add Remote Desktop Firewall exception. Additionally, you can check off the box that says “Allow connections only from computers running Remote Desktop with Network Level Authentication (recommended)” for additional security of your RDP sessions.
- Click Apply if you want to stay in the tab or OK to close it.
Step 2: Add Users to the List of Remote Users
You need to perform this step only if you want to allow users other than administrators to access the machine in question. If you are an administrator, your account is automatically included in the list of allowed users but you will not see it. To select more users:
- On the Remote settings screen shown above, click Select Users…
- Click on Add in the Remote Desktop Users box.
- The Select Users box will appear. You can select the location you want to search by clicking on Locations.
- In the Enter the Object Names to Select field, type a name of a user and click on Check Names.
- When you find a match, select the user account and click OK.
- Close the System Properties window by clicking OK again.
There are not many other options to change in order to configure Remote Desktop. Provided that other settings do not interfere with your Remote Desktop connection, you are now able to remotely connect and control this computer.
How to Use the Remove Desktop Connection Client
Using the Remote Desktop client is straightforward and you do not need to specifically configure Remote Desktop on the local computer. The steps below will work for all versions of Windows starting from Windows 7.
Step 1: Launch the Destkop Connection Unit
On your local Windows computer, locate the Remote Desktop Connection application. You can find it in a couple of different ways:
- For Windows 7, click on Start -> All Programs, go to the ‘Accessories’ folder and click on Remote Desktop Connection. For Windows 10, Click on Start and locate the ‘Windows Accessories’ folder where you can also find the Remote Desktop Connection app.
- Click on Start and type in Remote Desktop Connection in the search bar. You will receive search results as soon as you start typing. Click on the application when it shows up on the list.

- Press Windows + R keys on your keyboard to get the “Run” box. Type in mstsc and hit Enter in the ‘Open:’ field to run the Remote Desktop client.

Step 2: Enter the Remote Hosts IP Address or Name
Once you launch the Remote Desktop Connection application, you will get a window where you can enter the name or the IP address of a remote machine you want to access.
In the Computer field, type in the corresponding name or IP address and click Connect.
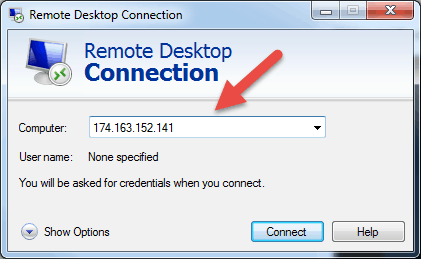
Note: If the default listening port for Remote Desktop connection (port 3389) has been changed on the remote host to a different value, you will have to specify it after the IP address.
Example: 174.163.152.141:6200
Depending on your circumstances, you will either need to enter the private or public IP address of the remote host. Here are the possible scenarios:
- If the client computer and the remote host connect to the same Local Area Network, you will use the host’s private IP address for Remote Desktop Connection.
- If you are using a virtual private network (VPN) on the client computer to access the remote host, you will use the host’s private IP address for Remote Desktop Connection.
- If the client computer is connecting to the remote host from another network over the Internet without a VPN, you will use the public IP address.
How to Find the IP Address and Host Name
There are many ways to locate the name, public or private IP address of a computer where you want to configure Remote Desktop service. Here are the quickest and easiest methods:
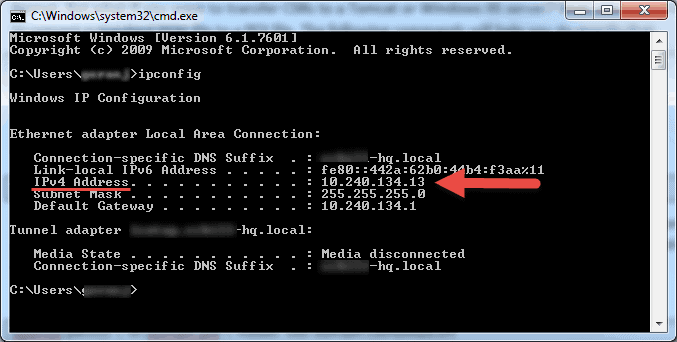
To determine a computer’s private IP address:
- Search for CMD from the start menu or press Windows + R on your keyboard, type in CMD and hit Enter to run the command prompt.
- Type ipconfig in the command prompt and hit Enter.
- Your will see your computer’s private IP address under the IPv4 Address line.
To determine which public IP address a computer is using:
- From your web browser, go to com or use its search bar.
- Type in “what is my IP” or simply “my IP” and hit Enter.
- At the top of the page, Google will show you the public IP address your computer is using. If this is not working for your region, you can visit the first webpage in the search results and it will show you the IP address. Some websites such as www.whatismyip.com will even show you your private (local) IP address.
To find a computer’s name:
- Right Click on Computer, or This PC, depending on the Windows OS version you are using.
- Click on
- You will find your full computer name under the “Computer name, domain, and workgroup settings” section.
Step 3: Entering the RDP Credentials and Finalizing the Connection
After you hit connect, the loading bar will appear. When it finishes initiating and configuring the remote session you will get a pop-up window that will look similar to this:
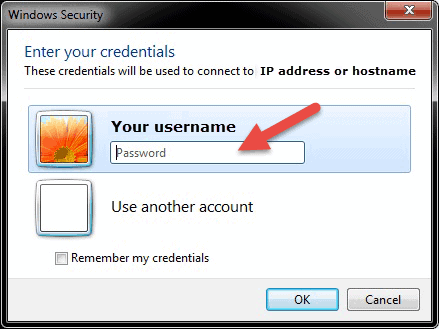
- Enter the password for the selected username. You can use another account, if needed, and provide a different username and password.
- Click OK when ready and you will get the security certificate warning.
- Click Yes to continue.
Note: Only one user can be logged in at the same time on a Windows computer. If someone else is using the machine you are trying to remotely access, that user has to disconnect. The warning logon message will appear in such cases.
You will not see the desktop of the remote machine. Depending on the user account permission settings, you can now perform any operation that you can while working directly in front of it.
Remote Desktop Protocol Further Steps
When setting up your remote server or machine to accept remote desktop connections, it is important to take precautions concerning securing RDP. Your server is especially vulnerable if you are accessing it over the Internet.
Here are a few pieces of advice to keep in mind if you are using remote desktop protocol to remotely connect to your machines:
- Use the built in VPN server on your Windows machine to additionally secure your traffic. This will provide more secure access to your Windows server and services.
- Set client connection encryption level. This option is set to “Not configured” by default. You can enable it and force high encryption level settings for all communications between clients and Remote Desktop Session Host servers. We do not recommended using the “Client Compatible” encryption level setting. Leaving the default “High” encryption level setting will force strong 128-bit encryption for data sent from the client to server and vice versa. You can edit this configuration using the Local Group Policy editor.
- Employ two-factor authentication using a third-party tool, such as Duo Security. By installing Duo Authentication for Windows Logon, you can add two-factor authentication to all Windows login attempts, or only for RDP sessions.
- Enforce firewall rules to limit exposure of open RDP ports to the Internet, especially if you are using the default RDP TCP port 3389. Windows has a built-in firewall which you can access from Control Panel and further configure it to restrict traffic to specific ports and IP addresses
These best practices for additionally securing RDP will help you tighten down remote desktop access. You will avoid most of the unauthorized login attempts without spending too much time making configuration changes to your machines.
Note: Learn how to use SSHFS to mount remote file systems over SSH.
Conclusion
The steps and processes listed in this guide will work for most users and most versions of Linux and Windows operating systems.
You should now be able to Connect to a Remote Server with Linux or Windows.
There are of course many other methods to establish a connection between two remote computers, but the ones covered here are most common.

В прошлой статье я обещал рассмотреть механизм удаленного подключения с Windows на серверы под управлением *nix, и наоборот при помощи PowerShell. Обещанного обычно ждут три года, но я успел чуть раньше. Что ж, если хочется с верного макбука управлять гетерогенной инфраструктурой, или наоборот ― с Surface Pro рулить Linux-серверами без всяких putty, ― прошу под кат.
Microsoft Loves Linux
Еще в 2015 году Microsoft торжественно объявила о запуске программы «Microsoft Linux». Сюда вошла как банальная поддержка гостевых *nix-like OS на Hyper-V, так и встроенная в Windows 10 Ubuntu и возможность запуска в Docker продуктов Microsoft, таких как SQL Server.
Компания также опубликовала исходный код PowerShell, что позволило запускать «Ракушку Мощи» не только на Windows. Из-под одноименного аккаунта на Github, помимо исходного кода, выложены и бинарники под большинство современных систем (лицензия MIT).
Это позволяет настроить удаленное управление с помощью единого инструмента ― PowerShell. Помимо подключения к консоли компьютера, можно запускать отдельные команды, в том числе и на нескольких серверах одновременно. Довольно удобно для автоматизации задач администрирования, таких как массовое изменение настроек, инвентаризация, сбор логов.
Порой удобно совмещать традиционные консольные команды со вставками PowerShell:
cat /etc/passwd | ConvertFrom-Csv -Delimiter ':' -Header Name,Passwd,UID,GID,Description,Home,Shell | Sort-Object Name | Format-TableДля подключения к Windows-машинам при помощи PowerShell используется протокол WS-Man. Для GNULinux привычен SSH. Так как сегодня становятся универсальными оба протокола, разберем их подробнее.
PowerShell 6.0 под Windows и *nix, пока еще находится в бете. Поэтому не рекомендую без хорошего тестирования применять на боевых серверах описанное ниже.
Магомед не идет к горе
Когда технология удаленного доступа при помощи PowerShell только набирала обороты, единственным универсальным способом подключения к разным системам был протокол WS-Man. Для тестового стенда я взял Windows Server 2016 и Centos 7, для которых и буду настраивать возможность удаленного подключения и выполнения команд при помощи этого протокола.
Для начала установим на Centos свежий PowerShell:
curl https://packages.microsoft.com/config/rhel/7/prod.repo > /etc/yum.repos.d/microsoft.repo

yum install -y powershell

pwsh
После установки появилась возможность запускать привычные Windows-администратору командлеты. Например, посмотрим версию PS и получим список запущенных процессов командлетами $PSVersionTable и Get-Process:

Работаем в консоли PowerShell на CentOS.
Чтобы подключаться к Linux-машине с консоли Windows, нам понадобится установить и настроить:
- OMI (Open Management Infrastructure) ― адаптация WMI, которую также можно использовать для управления компьютерами с ОС, отличными от Windows;
- PSRP (PowerShell Remoting Protocol) ― библиотека, необходимая для удаленного подключения PowerShell.
Подробно с работой и эволюцией OMI и PSRP можно ознакомиться в отличном материале от Matt Wrock, я же просто установлю OMI командой:
yum install omiДалее нужно настроить порты и аутентификацию в конфигурационном файле /etc/opt/omi/conf/omiserver.conf, после чего перезапустить сервер командой:
/opt/omi/bin/service_control restartДля упрощения эксперимента я не буду настраивать ни NTLM-аутентификацию, ни Kerberos. Еще и шифрование отключу ― разумеется, в боевой среде делать этого не стоит. Для включения текстовой аутентификации и шифрования на стороне Windows в работе winrm достаточно выполнить следующие команды:
winrm set winrm/config/client/auth @{Basic="true"}
winrm set winrm/config/client @{AllowUnencrypted="true"}
winrm set winrm/config/service/auth @{Basic="true"}
winrm set winrm/config/service @{AllowUnencrypted="true"}
После настройки можно проверить работу OMI из консоли Windows:
winrm enumerate http://schemas.microsoft.com/wbem/wscim/1/cim-schema/2/OMI_Identify?__cimnamespace=root/omi -r:http://server:5985 -auth:Basic -u:root -p:"password" -skipcncheck -skipcacheck -encoding:utf-8 -unencrypted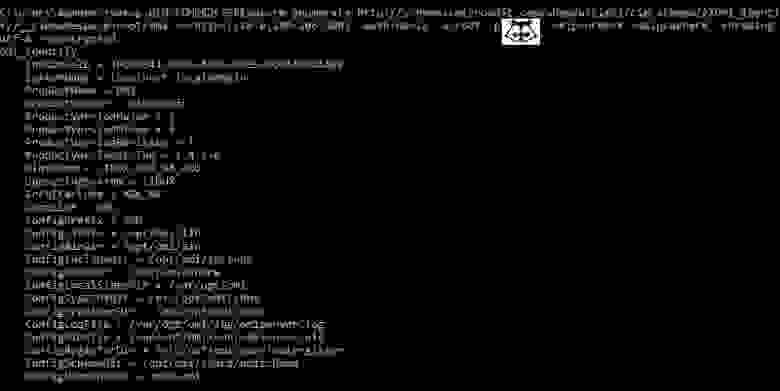
Подключаемся к CentOS из cmd.
Теперь проверим работу обратным подключением ― из Linux к Windows:
/opt/omi/bin/omicli ei root/cimv2 Win32_Environment --auth Basic --hostname server -u username -p password --port 5985 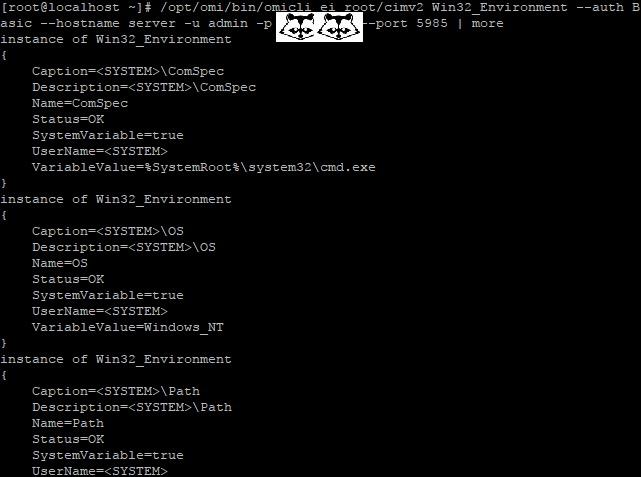
… а затем с CentOS подключаемся к Windows.
После того, как WMIOMI заработал, нужно установить и настроить PSRP. К сожалению и вопреки инструкции, бинарник отсутствует. Библиотеку пришлось компилировать, долго и нудно исправляя возникающие ошибки зависимостей:
yum groupinstall 'Development Tools'
yum install openssl-devel pam-devel
git clone --recursive [https://github.com/PowerShell/psl-omi-provider.git](https://github.com/PowerShell/psl-omi-provider.git)

cd psl-omi-provider/
make release
rpm -ihv target/Linux_ULINUX_1.0_x64_64_Release/psrp-1.4.1-0.universal.x64.rpm
Теперь мы сможем подключаться с Windows на Linux и наоборот при помощи PowerShell. Начнем с Windows на Linux:
$cred = Get-Credential

#пропустим проверку сертификата для нашей тестовой лаборатории
$o = New-PSSessionOption -SkipCACheck -SkipRevocationCheck -SkipCNCheck

#выполнение команды:
Invoke-Command -ComputerName server -ScriptBlock { Get-Process } -Authentication Basic -SessionOption $o -Credential $cred -UseSSL | Select-Object -First 5

#подключение к консоли
Enter-PSSession -ComputerName 'server' -Credential $cred -Authentication basic -UseSSL -SessionOption $o
С Windows на Linux.
Аналогичным образом можно провести и обратное подключение.
Invoke-Command можно «натравить» на список компьютеров, и с рабочей станции Windows создать пользователя на всех серверах Linux командой вида:
 Invoke-Command -ComputerName server1,server2,server3  -ScriptBlock { adduser admin;echo admin:password | chpasswd
 }
Надо сказать, что способ не самый удобный и эффективный. Минусов добавляет компиляция библиотек, разнообразные баги ― например, на момент написания статьи PSRP не позволял нормально подключиться из Linux в Windows.
Да и сами разработчики рекомендуют не плясать вокруг WS-Man, а обратиться к проверенному способу ― SSH. Что ж, попробуем и его.
Гора идет к Магомету
На этот раз машина с Windows получит чуть больше специфической подготовки ― нужно установить свежий PowerShell и OpenSSH.
После можно проверить синтаксис командлета New-PSSession. Если все произошло как надо, то командлет, помимо привычного параметра ComputerName, будет поддерживать и HostName.

PowerShell 6.0.0-beta.9 и обновленный синтаксис командлета.
Установка OpenSSH описана в отдельной инструкции.
Но под спойлером вы найдете все основные моменты.
Качаем последний релиз или используем пакет из репозитория Chocolatey. Все это разархивируем в Program FilesOpenSSH.
В консоли с правами администратора переходим в папку с разархивированным содержимым и запускаем установку командой:
powershell -ExecutionPolicy Bypass -File install-sshd.ps1
Теперь генерируем ключи:
.ssh-keygen.exe -A
.FixHostFilePermissions.ps1 -Confirm:$false
В тестовой среде мы будем использовать парольную аутентификацию, поэтому стоит убедиться что она включена в файле sshd_config:
```bash
PasswordAuthentication yes
```
Если вы также хотите автоматически запускать PowerShell при подключении по SSH, то в параметре subsystem нужно прописать путь к желаемой версии PS:
Subsystem powershell C:/Program Files (x86)/PowerShell/6.0.0-beta.9/pwsh.exe -sshs -NoLogo -NoProfileДля работы клиента SSH нужно добавить директорию в %PATH% любым удобным способом. Например, таким:
setx path "%path%;C:Program FilesOpenSSH"Остается только настроить и запустить службы:
Set-Service sshd -StartupType Automatic
Set-Service ssh-agent -StartupType Automatic
net start sshd
После установки уже можно наслаждаться подключением к серверу Windows по ssh.

C Windows через Putty на Linux, с Linux обратно на Windows по SSH.
На достигнутом останавливаться не будем и перейдем к настройке Linux. При настройке сервера SSH по умолчанию достаточно прописать PowerShell в Subsystem:
Subsystem powershell /usr/bin/pwsh -sshs -NoLogo -NoProfileТеперь проверим подключение через командлет New-PSSession и Invoke-Command.
Сначала Windows:
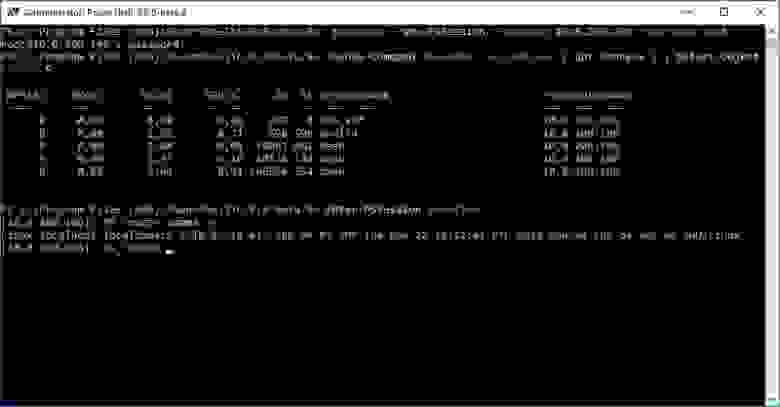
Работаем из PowerShell с Linux-сервером.
Теперь подключимся из Linux к Windows:

Работаем из PowerShell с Windows-сервером.
В отличие от WS-Man, SSH настраивается намного проще и работает стабильнее. Да и беспарольное подключение по ключам настраивать привычнее.
В хозяйстве пригодится
С однозначным «советом потребителю» все опять сложно: SSH проще в настройке и стабильнее, но WS-Man использует API и позволяет применять инструменты вроде JEA. На боевых серверах использовать WS-Man я бы не стал однозначно, а вот реализация OpenSSH в Windows как сервера, так и клиента мне понравилась. Для самопальной автоматизации вполне подойдет даже без PowerShell.
В любом случае, границы между Linux и Windows хоть и медленно, но начинают стираться, что безусловно радует.