1. Overview
SSH, the secure shell, is often used to access remote Linux systems. But its authentication mechanism, where a private local key is paired with a public remote key, is used to secure all kinds of online services, from GitHub and Launchpad to Linux running on Microsoft’s Azure cloud.
Generating these keys from Linux is easy, and thanks to Ubuntu on WSL, you can follow the same process from Windows 10. But even without Ubuntu, SSH keys can also be generated with the free and open source OpenSSH client built into Windows 10 or with PuTTY for Windows 8.1 and earlier.
Over the following few steps, we’ll guide you through the process of generating SSH keys using Ubuntu on WSL, OpenSSH, and PuTTY.
Requirements
All you need is a PC running Windows and one of the following installed:
- Ubuntu on WSL for Windows 10
- The OpenSSH client built into Windows 10
- The
puttygen.exeexecutable from PuTTY for Windows 7 or 8.1
If you don’t already have Ubuntu on WSL, take a look at our Install Ubuntu on WSL tutorial.
Originally authored by Graham Morrison.
2. Passphrase considerations
When creating the SSH key pair, as shown in the following steps, you can choose to either lock your private key with a passphrase or use no passphrase at all.
Adding a passphrase requires the same passphrase to be entered whenever the key pair is used. Not adding a passphrase removes this requirement. For this reason, creating a key pair without a passphrase is more convenient and potentially essential for certain scripts and automation tasks. But it’s also less secure.
If a third-party gains access to a private key without a passphrase they will be able to access all connections and services using the public key.
A good compromise between convenience and security is to generate a separate key pair for each service or connection you want to use, adding a passphrase only for critical services. If you suspect a key has been compromised, simply generate a new pair for that service and remove the less secure key.
3. Key generation with Ubuntu on WSL
Launch Ubuntu on WSL from the start menu and make sure SSH is installed by entering following command at the command prompt:
sudo apt install openssh-client
The key generation process is identical to the process on a native Linux or Ubuntu installation. With SSH installed, run the SSH key generator by typing the following:
ssh-keygen -t rsa

You will be asked two questions. The first asks where to save the key, and you can press return to accept the default value. The second question asks for the passphrase. As discussed, entering a passphrase will require you to use the same passphrase whenever the key is accessed.
However, the passphrase isn’t a requirement, and pressing return (twice) will generate a key pair without one. Consequently, you won’t be asked for a passphrase when using your key.
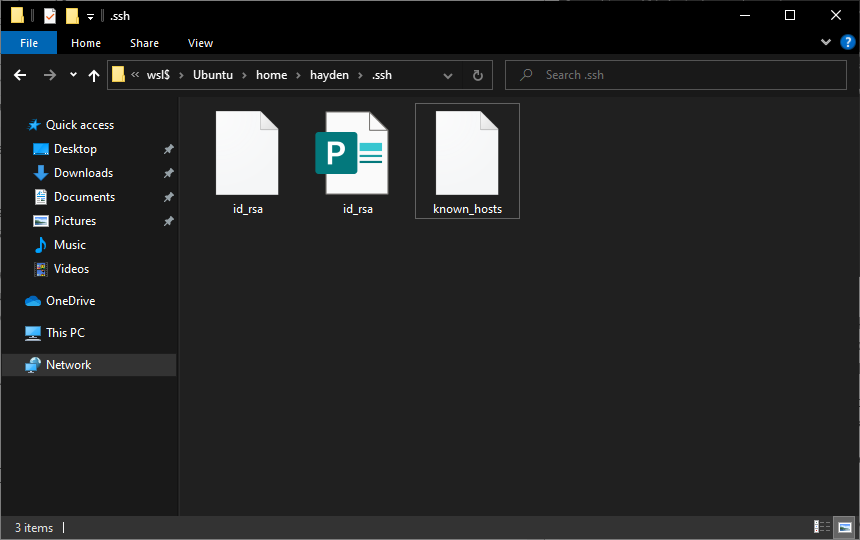
When the process has finished, the private key and the public key can be found in the ~/.ssh directory accessible from the Ubuntu terminal, or the following folder from Windows file manager:
\wsl$\Ubuntuhome<username>.ssh
4. Key generation with OpenSSH
Recent versions of Windows 10 include the OpenSSH client by default, but if yours does not or you’re unsure, follow these steps:
Open Settings and then navigate to Apps > Apps and Features > Optional Features:


Scan this list to see if OpenSSH client is already installed. If not, at the top of the page select Add a feature, then, to install the OpenSSH client, locate OpenSSH Client and click Install
Once the installation completes, return to Apps > Apps and Features > Optional Features and you should see the OpenSSH component(s) listed:

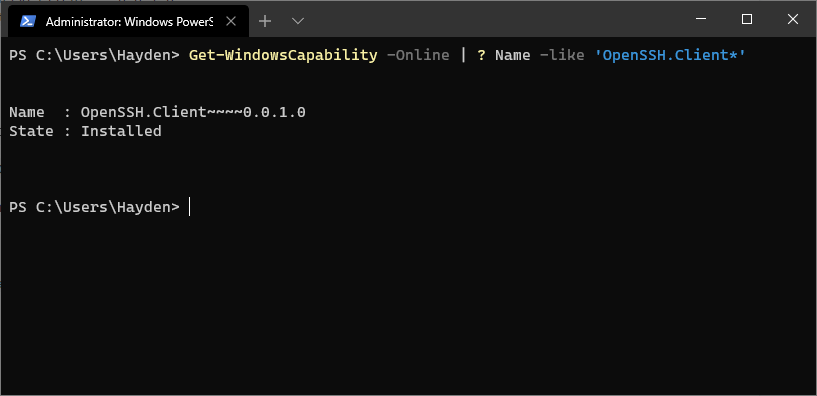
You can optionally install the OpenSSH client using PowerShell, first launch ‘Windows PowerShell’ as an Administrator. To check the status of the OpenSSH client type the command:
Get-WindowsCapability -Online | ? Name -like 'OpenSSH.Client*'
This should return:
Name  : OpenSSH.Client~~~~0.0.1.0
State : Installed
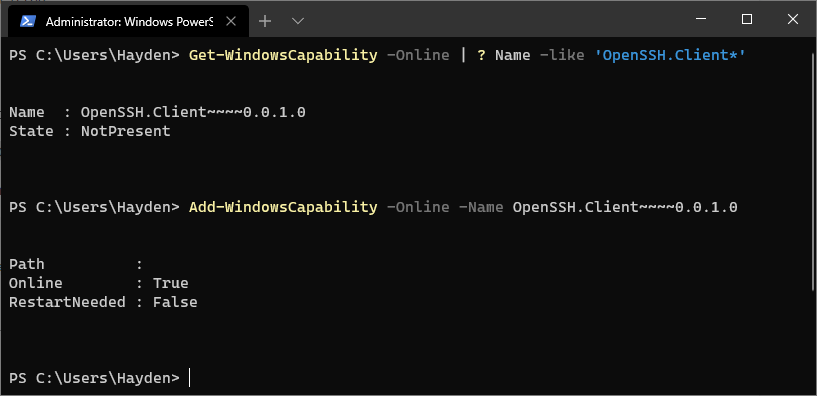
If OpenSSH client is listed as “NotPresent” you can install by typing:
Add-WindowsCapability -Online -Name OpenSSH.Client~~~~0.0.1.0
The command should return:
Path          :
Online        : True
RestartNeeded : False
Finally, to generate your keys, launch ‘Windows PowerShell’ as an Administrator, and type:
ssh-keygen

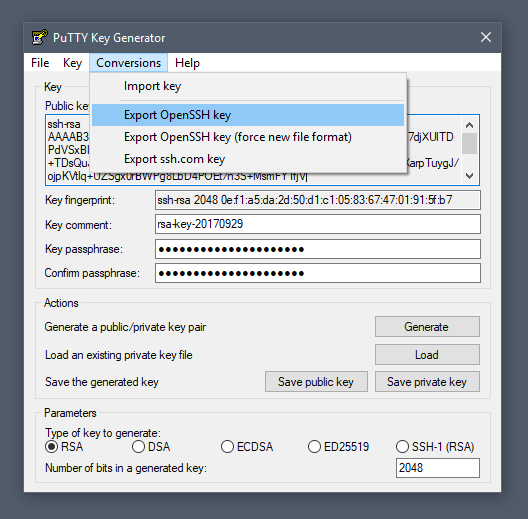
5. Key generation with Putty
To generate a key pair with the PuTTY key generator, simply run puttygen.exe and click the Generate button in the window that appears.
You will be asked to move the mouse and press keys to improve the random number generation at the heart of SSH security. After this, the raw contents of the public key will be displayed alongside its fingerprint and a timestamp comment.
Two important fields, Key passphrase and Confirm passphrase, allow you to enter a passphrase to protect the private key.
Finally, you will need to export both the private and public keys separately:
- to export the private key, select Export OpenSSH key from the Conversions menu
- to export the public key, click Save public key from the main window
Public keys typically use the .pub suffix. By convention, the private key is usually called id_rsa and the public key id_rsa.pub, but this isn’t a requirement. It’s common to have many keys with more descriptive filenames, for instance.
6. Getting help
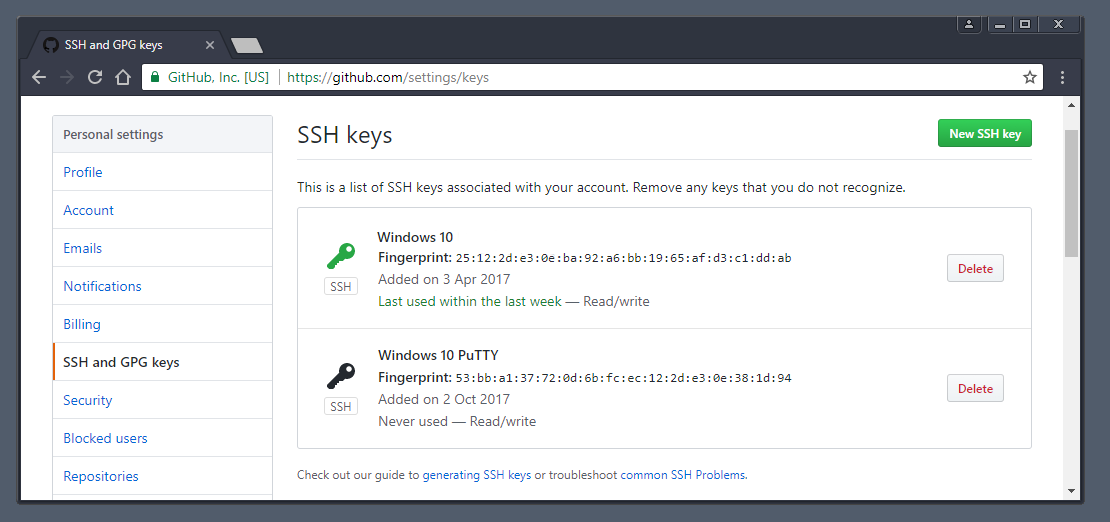
Congratulations! You have just generated a SSH key pair from Windows 10. You can now add the public key to those services you wish to authenticate.
If you need more details on using SSH keys, take a look at the Ubuntu community documentation, and if you get stuck, help is always at hand:
- Ask Ubuntu
- Ubuntu Forums
- IRC-based support
Was this tutorial useful?
Thank you for your feedback.
This tutorial is going to show you 3 ways to log into Linux server on Windows via SSH.
What’s SSH?
SSH stands for Secure Shell, which was invented in 1995 to replace the insecure Telnet (Telecommunication Network). It’s now the primary way for system administrators to securely log into remote Linux servers over the public Internet. Although it looks and acts the same as Telnet, all communications over the SSH protocol is encrypted to prevent packet sniffing.
If you are running a Linux or Mac computer, SSH client is installed by default. You can open up a terminal window and run the ssh command like below to connect to a remote Linux server.
ssh [email protected]
Now let’s discuss how to use SSH on Windows.
Method 1: Windows 10’s Built-in SSH Client
The Microsoft PowerShell team decided to port OpenSSH (both the client and the server) to Windows in 2015. It finally arrived in Windows 10’s Fall Creator Update in 2017 and is enabled by default in the April 2018 Update.
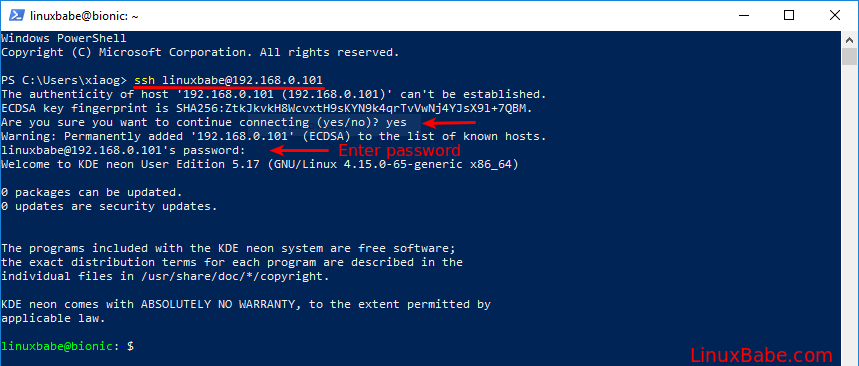
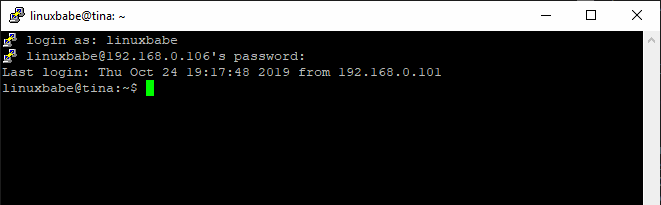
To use the OpenSSH client on Windows 10, simply open a PowerShell window or a command prompt window and run the ssh command. For example, if I want to connect to my Ubuntu desktop in the LAN, I would run
ssh [email protected]
linuxbabe is the username on my Ubuntu desktop and 192.168.0.101 is the private IP address for my Ubuntu desktop. The first time you connect to a Linux computer, you will be prompted to accept the host key. Then enter your password to login. After login, you can run Linux commands to do administrative tasks.
Note that if you want to paste a password into the PowerShell window, you need to right-click the mouse and press Enter.
To log out from the Linux box, run the exit command or press Ctrl+D.
The default font size in PowerShell Window is very small. To change it, right-click the titlebar and select properties, then you can change the font size, and the background color.

Method 2: Use SSH in Windows Subsystem for Linux
Windows Subsystem for Linux (WSL) enables you to run native Linux command-line tools directly on Windows 10. If you are a system administrator, WSL is probably an overkill for just using SSH because it would install and run a Linux distro (without graphical user interface) on your Windows 10 desktop. WSL is created for web developers or those who need to work on open-source projects. You can use not only SSH but also other Linux command line tools (Bash, sed, awk, etc).
Open the Microsoft Store and enter WSL in the search box. Select Run Linux on Windows and install a Linux distro of your choice.
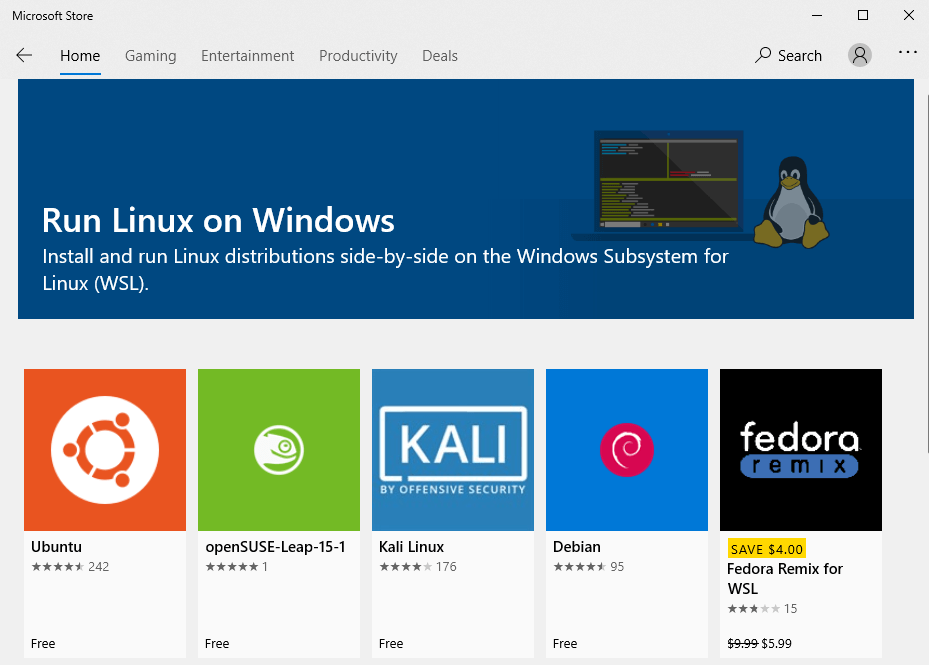
For example, I choose Ubuntu and click the Get button to install it.

Once your Linux distro is installed, open the Control Panel and select Programs -> Turn Windows features on or off. Tick on the checkbox of Windows Subsystem for Linux to enable this feature. (You may need to reboot your Windows PC for this change to take effect.)
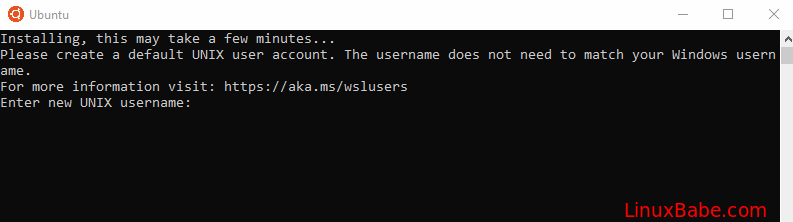
Next, you can launch the Linux distro from the start menu by search the distro’s name. The first time you launch it, you need to create a user and set a password.
After that, you can use the ssh command like below to connect to a Linux server or PC that runs a SSH server.
ssh [email protected]
Method 3: Use Putty
Putty is a well-known and the most popular SSH client on Windows before the arrival of Windows OpenSSH client and Windows Subsystem for Linux. To use SSH with Putty, you need to download the Putty program from the official website and install it.
Launch Putty from the Start menu. Then enter the IP address or hostname of the Linux box and click the Open button to connect to it.
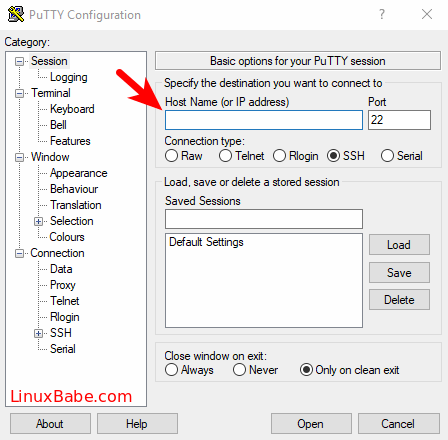
Accept the host key and you will be prompted to enter the username and password.
Please note that when you type in your password, the cursor doesn’t move, but it’s actually accepting your password. To paste text into Putty, first press Ctrl+C to copy the text, then go to Putty window and press the right button of your mouse.
How to Set Up SSH Key on Windows 10 (Optional)
There’re mainly two ways of authenticating user login with OpenSSH server:
- password authentication
- public-key authentication: also known as passwordless SSH login because you don’t need to enter your password.
To set up public-key authentication on Windows 10, follow the instructions below.
Open Windows Powershell, and run the following command to generate SSH keypair.
ssh-keygen -t rsa -b 4096
Where:
-tstands fortype. The above command generates an RSA type keypair. RSA is the default type.-bstands forbits. By default, the key is 3072 bits long. We use a 4096 bits key for stronger security.
When asked which file to save the key, you can simply press Enter to use the default file. Next, you can enter a passphrase to encrypt the private key, but you will need to enter this passphrase every time when you log into the Linux server. If you don’t want it, you can press Enter, so it will have no passphrase.

- The private key (your identification) will be saved in the .ssh/id_rsa file under your user directory.
- The public key will be saved in the .ssh/id_rsa.pub file.
Now we need to upload the public key to remote Linux server. You can display the public key in the Powershell with the following command.
cat .ssh/id_rsa.pub
Then log in to your server via password authentication, and run the following command to create a .ssh directory under your home directory.
sudo mkdir ~/.ssh
Create the authorized_hosts file
sudo nano ~/.ssh/authorized_keys
Copy your SSH public key and paste it to this file. Save and close the file. To save a file in Nano text editor, press Ctrl+O, then press Enter to confirm. To close a file, press Ctrl+X.
Next, change the permission of this file.
sudo chmod 600 ~/.ssh/authorized_keys
Log out of your Linux server.
exit
Now you can SSH into your server without entering a password.
Next Step
I hope this article helped you use SSH on Windows. You might also want to protect SSH service from hacking, I recommend setting up public-key authentication or two-factor authentication.
- 2 Simple Steps to Set up Passwordless SSH Login on Ubuntu
- Set Up SSH Two-Factor Authentication (2FA) on Ubuntu Server
Also, you can enable automatic security updates on your Linux server to patch vulnerabilities.
- Set Up Automatic Security Update (Unattended Upgrades) on Ubuntu
If you want FTP access to the Ubuntu server, you can set up pure-FTPd server.
- How to Set Up a Secure FTP Server with Pure-FTPd on Ubuntu
As always, if you found this post useful, then subscribe to our free newsletter to get more tips and tricks. Take care 🙂
I am trying to use ssh/scp from Windows to Linux without having to enter a password.
This is what I have done, and it doesn’t seem to work:
- generated public and private keys using Putty Key Generator (on Windows)
- saved the files as
id_rsa.pubandid_rsa - copied them into
~/.ssh - added id_rsa.pub to the Linux box in
~/.ssh/authorized_keys - I then try to
sshto the Linux box from Windows and I still have to enter a password
Am I missing something?
![]()
asked Jan 13, 2010 at 16:44
You have to run an authentication agent on Windows.
For example, Pageant, used in combination with PuTTY (graphical SSH client) or Plink (its command line equivalent).
You’ll need to tell Pageant your SSH server’s public key. After that it will deal with your server’s authentication requests while running in the background.
![]()
answered Jan 13, 2010 at 16:50
![]()
Silvio DonniniSilvio Donnini
8222 gold badges8 silver badges10 bronze badges
1
![]()
Giri
5592 silver badges7 bronze badges
answered Jan 13, 2010 at 16:49
![]()
EduardoEduardo
2272 silver badges5 bronze badges
4
I used this:
c:> type c:usersmy_name.sshid_rsa.pub | ssh root@172.110.1.171 "cat >> ~/.ssh/authorized_keys"
![]()
Mtl Dev
3351 gold badge3 silver badges12 bronze badges
answered Jun 9, 2019 at 19:53
![]()
2
Try Plink (part of PuTTY)
plink -v youruser@yourhost.com -pw yourpw "some linux command"
answered Jan 13, 2010 at 16:50
![]()
2
Setting up SSH key authentication can be a bit tricky. It sounds like you’re covering all your bases. One thing that often catches people off guard — you need to make sure the .ssh directory and its contents are owned by you and are read/writeably only by you.
Make sure to run this (on all your .ssh directories):
chmod -R 700 on ~/.ssh
If that doesn’t work, turn on verbose logging by adding -v to your ssh command (you can add up to three -vss for more verbosity).
![]()
answered Jan 13, 2010 at 16:57
![]()
rcw3rcw3
1413 bronze badges
1
I’m assuming your keys are not password protected, and what you’re getting is not a request for your key’s password.
~/.ssh isn’t used by putty on the windows side, and putty doesn’t have a default private key setting. If you’re using a command line ssh client such as cygwin, creating a .ssh directory off of your home would work. From putty, you’ll need to configure and save a session.
From the putty configuration dialog, look at connection -> data, and fill in the auto-login username field. Then go to connection -> ssh -> auth, and set your private key correctly. Then go back to the session dialog, and save this session. You can also set the hostname if you’d like.
Once you have a saved session, you can use ‘putty -load «savedsession»‘.
answered Jan 18, 2010 at 19:31
![]()
1
You may also need to change permissions on your home directory:
chmod 755 ~
answered Aug 4, 2010 at 12:18
![]()
HaydnHaydn
211 bronze badge
git for Windows installs the cross-platform ssh tools you need:
ssh-keygenssh-copy-id.
Depending your preference of bash or PowerShell,
Either do this from the git-installed bash shell:
#By default this puts keyfile pair in ~/.ssh/id_rsa & ~/.ssh/id_rsa.pub :

ssh-keygen.exe -t rsa -b 2048
ssh-copy-id -i ~/.ssh/id_rsa.pub  $remoteuser@$remotehost

# These two chmod lines are needed on unix platforms, probably not on Windows.
# typically ssh refuses to use a private key file
# if it is less-well protected than this:
chmod 700 ~/.ssh
chmod 640 ~/.ssh/id_rsa
Or run this script in PowerShell:
Param(
  [Parameter()][string]$keyfile="id_rsa",
  [Parameter()][string]$remotehost,
  [Parameter()][string]$remoteuser
  )
write-host "# ---------------------------------------------------------------------------------#"
write-host "# Create an RSA public/private key pair, and copy the public key to remote server  #"
write-host "#                                                                                  #"
write-host "# https://superuser.com/questions/96051                                            #"
write-host "#         ssh-from-windows-to-linux-without-entering-a-password/1194805#1194805    #"
write-host "#                                                                                  #"
write-host "# ---------------------------------------------------------------------------------#"

write-host "Keyfile pair will be saved at : ~/.ssh/$keyfile, ~/.ssh/$keyfile.pub"
write-host "And copied to $remoteuser@$remotehost"
write-host ""
write-host "You will need a password for the copy operation."
write-host ""

if( -not $(ls ~/.ssh) ) { mkdir ~/.ssh }
$sshdir=$(get-item ~/.ssh/).Fullname

#By default this puts keyfile pair in ~/.ssh/id_rsa & ~/.ssh/id_rsa.pub :
ssh-keygen.exe -t rsa -b 2048 -f "$sshdir$keyfile"

# ssh-copy-id somehow didn't work in Powershell so I called it via bash
bash -c "ssh-copy-id -i ~/.ssh/$keyfile.pub $remoteuser@$remotehost"

# I'm not sure if these two chmod lines work on windows but
# typically ssh refuses to use a private key file
# if it is less-well protected than this:
chmod.exe 700 $sshdir
chmod.exe 640 "$sshdir$keyfile"
After this, passwordless login should work for both ssh and scp.
answered Apr 2, 2017 at 17:28
![]()
I was able to do this exactly from Windows 7 by using the -i option for supplying an identity private key:
ssh -i X:win-pathtoprivate-key remoteuser@remote.host.com
except that on the remote host, my authorized keys are in /etc/ssh/authorized_keys/remoteuser and in /etc/ssh/sshd_config, I changed
#AuthorizedKeysFile     .ssh/authorized_keys
AuthorizedKeysFile      /etc/ssh/authorized_keys/%u
but I don’t know if the SSH remote config should matter.
answered Oct 25, 2017 at 21:46
![]()
amphibientamphibient
2,1139 gold badges29 silver badges41 bronze badges
The Windows 10 Anniversary update included a new beta feature — the Windows Subsystem for Linux. This enables us to run Linux software such as SSH natively on Windows.
To use this feature, you’ll need to:
- Install the Windows 10 Anniversary if you don’t already have it.
- Enable the Windows Subsystem for Linux.
What is SSH?
Secure Shell (SSH) is a protocol for secure remote login and other secure network services over an insecure network. It’s most commonly used to securely connect to remote Unix like operating system.
Generate an SSH key
First open a command prompt and start a Bash session:
bash
Next run this command to generate an SSH key:
ssh-keygen -t rsa
Press enter to save the key in the default location and enter a passphrase for your key when prompted.
In Bash, your key will be saved to /home/{username}/.ssh (also known as ~/.ssh) and in Windows %LOCALAPPDATA%lxsshome{username}.ssh.
Be sure not to change any files under
%LOCALAPPDATA%lxssin Windows or you risk corrupting your Linux system.
The public key is in the file called id_rsa.pub and the private key in id_rsa.
Copy the key to a remote machine
Now that we have an SSH key, it needs to be copied to a remote machine so that we can use it to authenticate instead of a password.
To do this, enter the following in a Bash session:
ssh-copy-id {username}@{host}
Where username is your username on the remote machine and host is the IP address or host name of your remote machine. For example:
ssh-copy-id kevin@192.168.0.100
Connect using the SSH key
To connect to the remote machine using the SSH key, from a bash session simply enter:
ssh {username}@{host}
For example:
ssh kevin@192.168.0.100
And you’ll be connected and authenticated using your SSH key instead of username and password.
References
- https://en.wikipedia.org/wiki/Secure_Shell
At the moment, Windows 10’s implementation of the OpenSSH client does not have the ssh-copy-id command available. However, a PowerShell one-line command can mimic the ssh-copy-id command and allow you to copy an SSH public key generated by the ssh-keygen command to a remote Linux device for passwordless login.
Generate an SSH Key
Note: If you have already generated an SSH keypair that you would like to use, skip this section and proceed to the Copy SSH Key to Remote Linux Device section.
First, open a new PowerShell window (not a Command Prompt window!) and generate a new SSH keypair with the ssh-keygen command. By default, the public and private keys will be placed in the %USERPROFILE%/.ssh/ directory. The public key file we are interested in is named id_rsa.pub.
1 2 3 4 5 6 7 8 9 10 11 12 13 14 15 16 17 18 19 20 21 22 23 |
PS C:UsersChristopher> ssh-keygen Generating public/private rsa key pair. Enter file in which to save the key (C:UsersChristopher/.ssh/id_rsa): Created directory 'C:UsersChristopher/.ssh'. Enter passphrase (empty for no passphrase): Enter same passphrase again: Your identification has been saved in C:UsersChristopher/.ssh/id_rsa. Your public key has been saved in C:UsersChristopher/.ssh/id_rsa.pub. The key fingerprint is: SHA256:/mjkrJOQbRzCAwlSPYVBNcuxntm/Ms5/MMC15dCRrMc [email protected] The key's randomart image is: +---[RSA 2048]----+ |oo.+o== o.o | |. o +. = o = | | o .+. . B | | +..+o o E | | *+.S. . | | o +...o | | o =. .o | | o.*o .. | | .=+++. | +----[SHA256]-----+ PS C:UsersChristopher> |
Copy SSH Key to Remote Linux Device
Next, we use the below PowerShell one-line command to copy the contents of the id_rsa.pub public key to a remote Linux device. Replace the {IP-ADDRESS-OR-FQDN} with the IP address or FQDN (Fully Qualified Domain Name) of the remote Linux device you would like to copy the public key to.
1 |
type $env:USERPROFILE.sshid_rsa.pub | ssh {IP-ADDRESS-OR-FQDN} "cat >> .ssh/authorized_keys"
|
An example of this command is shown below. In this example, I am copying the contents of the id_rsa.pub public key to a remote Linux device at IP address 192.168.30.31.
1 2 3 4 5 6 7 |
PS C:UsersChristopher> type $env:USERPROFILE.sshid_rsa.pub | ssh 192.168.30.31 "cat >> .ssh/authorized_keys" The authenticity of host '192.168.30.31 (192.168.30.31)' can't be established. ECDSA key fingerprint is SHA256:mTD0/WNCVZ/p/PFSkNDmLJtzIGb5eD7qj6erOQkomjM. Are you sure you want to continue connecting (yes/no)? yes Warning: Permanently added '192.168.30.31' (ECDSA) to the list of known hosts. [email protected]'s password: PS C:UsersChristopher> |
Test Passwordless SSH Connectivity to Remote Linux Device
Finally, verify that you can SSH to the remote Linux device with the ssh command. An example to a remote Linux device at IP address 192.168.30.31 is shown below. Note how a password did not need to be entered in order for us to establish SSH connectivity to the remote Linux device.
1 2 3 4 |
PS C:UsersChristopher> ssh 192.168.30.31 Last login: Sat May 23 12:44:51 2020 from 192.168.10.139 [[email protected] ~]$ who christopher pts/0 2020-05-24 19:35 (192.168.10.113) |
References
The instructions for this blog post were heavily inspired by Scott Hanselman’s blog post on the subject.
This post is licensed under
CC BY 4.0
by the author.

Использование SSH-ключа для подключения к серверу позволяет сделать работу более безопасной (снизится вероятность взлома учетной записи) и более удобной (не будет необходимости при каждом соединении вводить пароль).
Настройка авторизации по ключу состоит из создания ключа на локальном компьютере и копирования его на сервер.
Скопировать ключ на облачный сервер также можно с помощью панели управления — при создании нового VDS или переустановке системы. Кроме того, вы можете хранить ключи в панели управления, чтобы использовать их при создании серверов.
Linux, MacOS, Windows 10
Создание SSH-ключей
Эта инструкция подойдет для ОС Linux, MacOS, а также для версий Windows 10 начиная с 1809 — в них доступен встроенный SSH-клиент. Если у вас более ранняя версия Windows, воспользуйтесь инструкцией из пункта Старые версии Windows (без OpenSSH).
Запустите терминал или Windows PowerShell на вашем компьютере и выполните команду:
ssh-keygenВы увидите примерно следующее сообщение:
Generating public/private rsa key pair.
Enter file in which to save the key (/home/user/.ssh/id_rsa):
Нажмите Enter — ключ будет сохранен в указанную директорию по умолчанию.
Далее вам будет предложено задать пароль (кодовую фразу) для ключа. Вы можете задать ее или оставить пустой, просто нажав Enter. Обратите внимание, что если вы зададите кодовую фразу, ее потребуется вводить при каждой авторизации по ключу.
Процедура создания ключей завершена, ключи сохранены в директории ~/.ssh/ в файлах id_rsa и id_rsa.pub. Теперь публичный ключ необходимо скопировать на сервер.
Копирование ключа на сервер
Выполните в терминале следующую команду, указав вместо user имя пользователя, созданного на сервере, а вместо server — IP-адрес вашего сервера:
ssh-copy-id user@server# Например:
ssh-copy-id admin@2.59.43.145В результате содержимое файла с публичным ключом id_rsa.pub будет скопировано в файл ~/.ssh/authorized_keys на сервере, и в дальнейшем вы сможете устанавливать соединение с сервером, используя команду:
ssh user@server# Например:
ssh admin@2.59.43.145Старые версии Windows (без OpenSSH)
Если вы используете версию Windows без OpenSSH, вам потребуется специальная программа — PuTTYgen. Вы можете скачать дистрибутив puttygen.exe с официального сайта PuTTY.
Создание SSH-ключей
- Запустите программу, в открывшемся окне выберите RSA в блоке «Type of key to generate» и нажмите «Generate».
- Пока создается ключ, водите мышью в хаотичном порядке в пространстве под строкой загрузки для генерации случайных значений.
- После того, как ключ будет создан, в окне программы вы сможете задать «Key passphrase» (кодовую фразу) для ключа. Это необязательно, вы можете оставить строку пустой. Если вы решите задать кодовую фразу, обратите внимание, что ее потребуется вводить при каждой авторизации по ключу.
- Далее сохраните созданные ключи, нажав на кнопки «Save public key» и «Save private key», например, под именами id_rsa.pub и mykey.ppk.
- Также скопируйте и сохраните в любом текстовом файле содержимое окна «Public key for pasting…» — оно потребуется при копировании созданного ключа на сервер.
На этом процедура создания ключей завершена.
Копирование ключа на сервер
В процессе копирования ключей вам потребуется утилита pageant. Вы можете скачать дистрибутив pageant.exe с официального сайта PuTTY.
- Подключитесь к серверу по SSH и выполните команду для создания на сервере директории и файла для хранения ключей:
mkdir ~/.ssh
chmod 0700 ~/.ssh
touch ~/.ssh/authorized_keys
chmod 0644 ~/.ssh/authorized_keys- Откройте созданный файл с помощью текстового редактора:
nano ~/.ssh/authorized_keys- Вставьте в него текст public key, ранее скопированный из окна PuTTYgen, и сохраните файл.
- Запустите pageant — его иконка появится в трее. Щелкните по ней правой кнопкой мыши и выберите Add Key.
- В открывшемся окне укажите путь к приватному ключу mykey.ppk, сохраненному ранее, и нажмите Open. Если при создании ключа вы указывали кодовую фразу, pageant запросит ее на данном этапе.
- Для проверки работы авторизации по ключу снова запустите утилиту PuTTY, подключитесь к вашему серверу и введите свой логин. Если все настроено корректно, вы увидите подобный вывод в окне консоли:
Authenticating with public key "rsa-key-20151220" from agentОтключение доступа по паролю
Для того, чтобы доступ к серверу мог осуществляться только по ключу, необходимо запретить авторизацию по паролю. Для этого требуется внести правки в файл /etc/ssh/sshd_config.
- Откройте файл командой:
sudo nano /etc/ssh/sshd_config- Найдите в нем строку PasswordAuthentication и замените ее значение на: PasswordAuthentication no.
- Сохраните изменения, после чего перезапустите службу SSH:
sudo service ssh restart