In this tutorial, I will explain how to install the OpenSSH client and Server on Windows Server 2012R2 and 2016.
At the time of writing this tutorial, this feature is native to Windows 10 and Windows Server 2019 and you might also want to have OpenSSH client or server on an earlier version.
Personally, I use the SSH client very regularly through PowerShell or Command Prompt windows, it avoids having to install Putty.
- Recover Win32 OpenSSH
- “Installation” of files on the server
- Adding the environment variable
- Use the SSH client of Windows Server 2012R2 / 2016
- Install the OpenSSH server on Windows Server 2012R2 / 2016
- Connect to Windows on the SSH server
- Conclusion
Recover Win32 OpenSSH
The first step is to retrieve from the GitHub repository PowerShell/Win32-OpenSSH: Win32 port of OpenSSH (github.com), the latest version available.
Go to the realeases page and download the latest version available corresponding to the architecture of the Windows installation (32 or 64 bits).
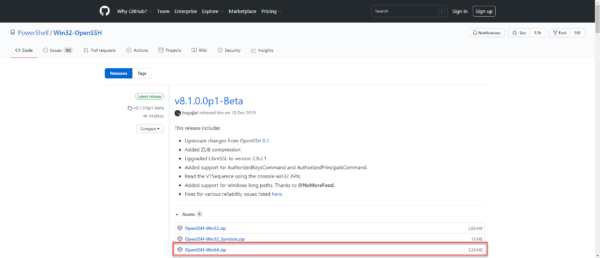
For me, it will be the 64 Bits version.
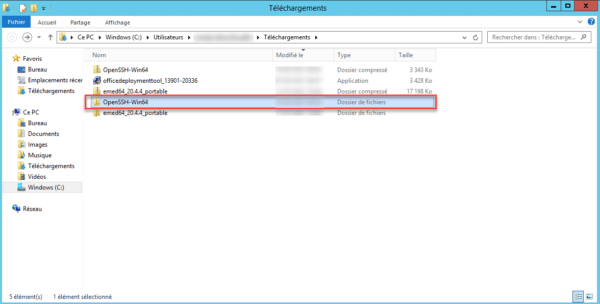
Once the archive has been downloaded, unzip it.
“Installation” of files on the server
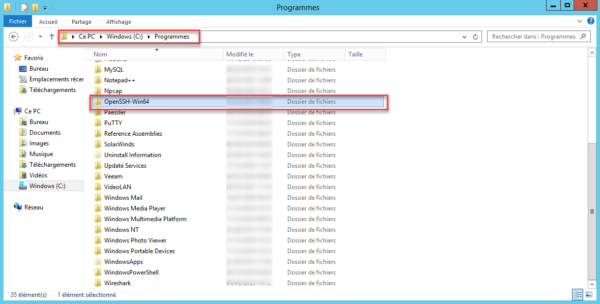
Now, we will copy the folder from the unzipped archive to the C: Program Files folder.
The SSH client is now functional, but for ease of use, we will configure its location in the environment variables so as not to have to call the executable by its full path.
Adding the environment variable
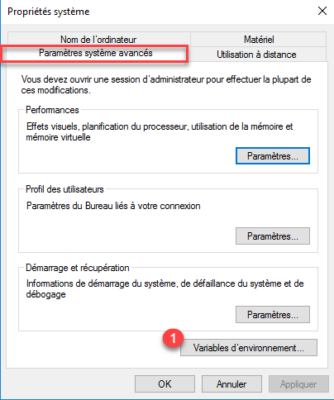
Open the system window and click on Advanced system settings 1.
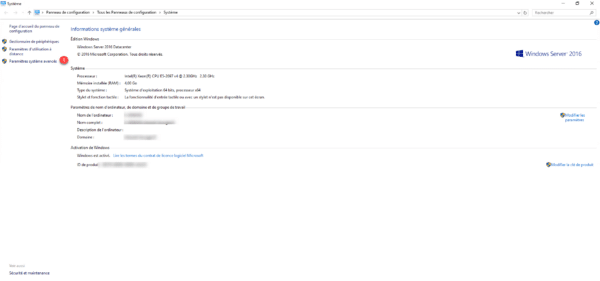
On the Advanced system parameters tab, click on the Environment variables 1 button.
In the System variable part, find the Path 1 variable, once selected, click on the Modify 2 button.
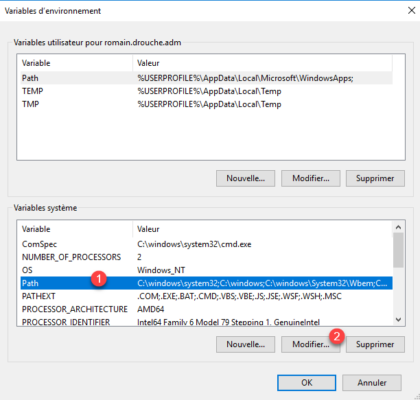
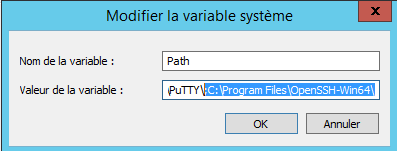
On Windows 2012R2, add at the end; C: Program FilesOpenSSH-Win64
On Windows 2016, click on New 1.
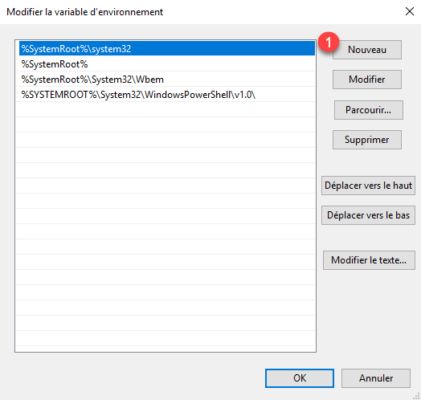
Add the location of the OpenSSH folder: C:Program FilesOpenSSH-Win64 1 and click on OK 2.
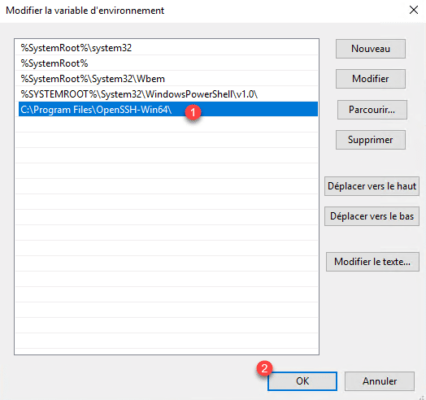
Close the various windows.
Use the SSH client of Windows Server 2012R2 / 2016
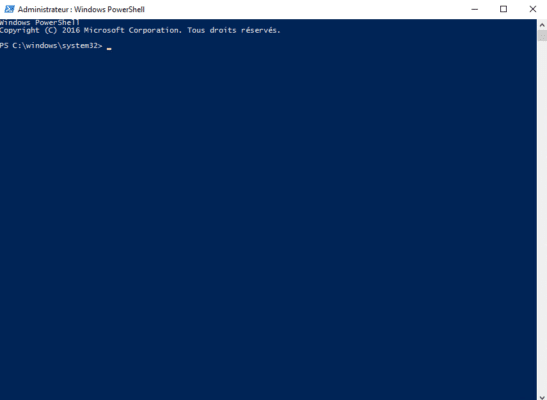
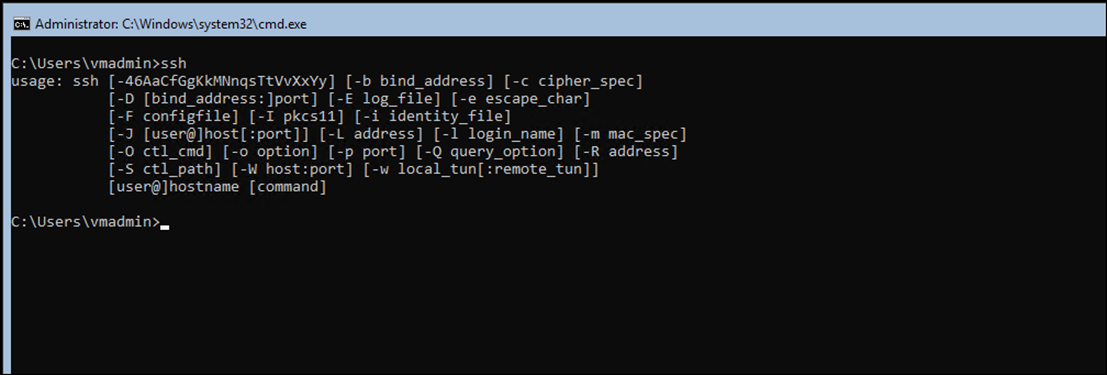
Open a command prompt or PowerShell.
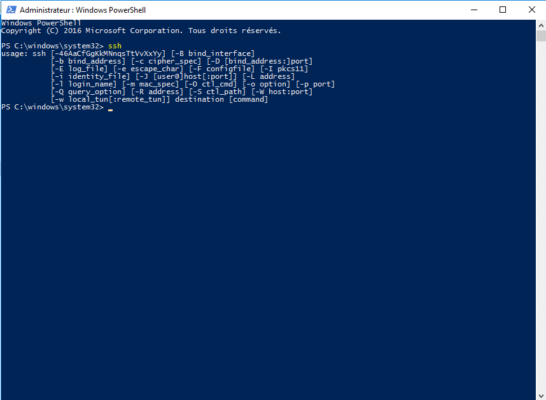
The easiest way to find out if it’s okay is to enter the ssh command. This command should return the various parameters of the SSH utility.
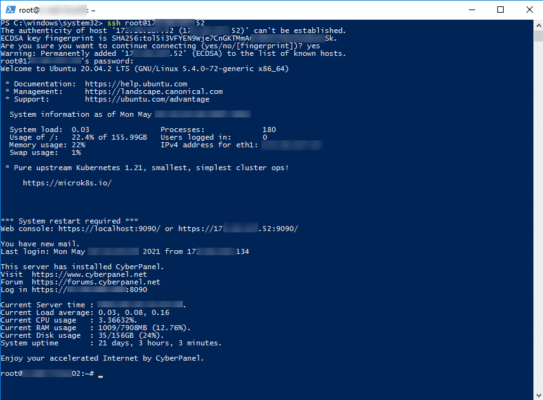
To connect to a server (Linux) enter the command ssh USER @ IP_SERVER
It is also possible to configure an OpenSSH server on Windows Server with Win32 OpenSSH which will allow you to connect to the Windows server in the same way as a Linux OS.
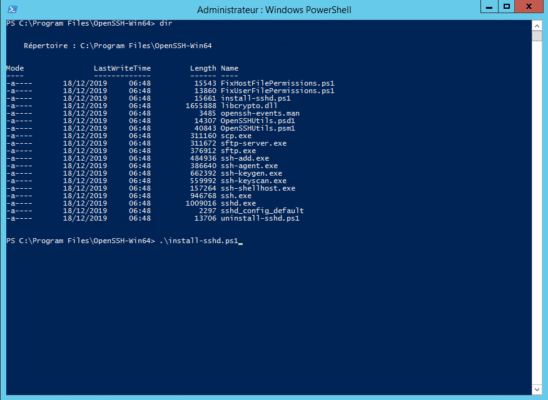
From a PowerShell window, go to the C: Program Files OpenSSH-Win64 folder, in the folder is a PowerShell script that will configure the server part.
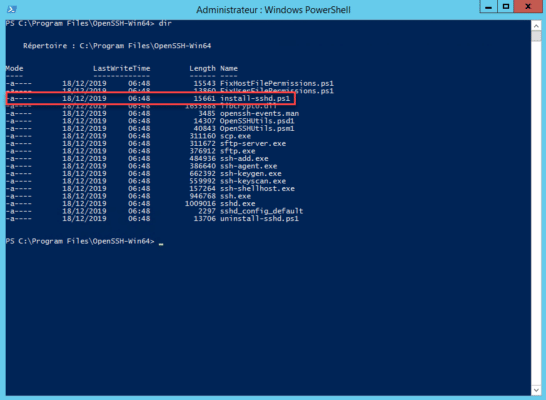
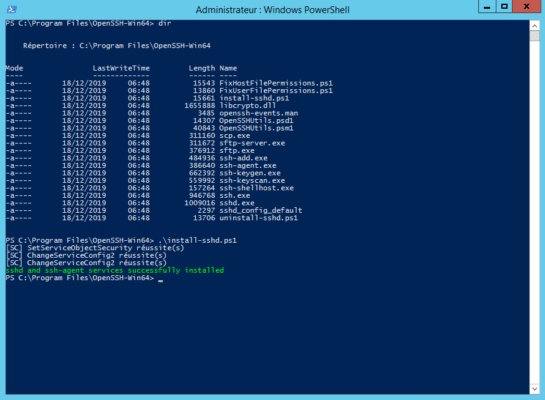
Run the install-sshd.ps1 PowerShell script
If the installation is successful, the message is displayed: sshd and ssh-agent services successfully installed.
Open Windows Service Manager and search for OpenSSH SSH Server, by default it is stopped. Start the service.
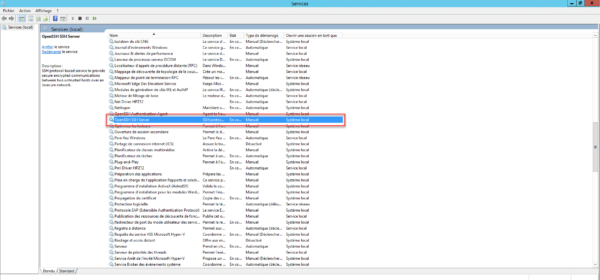
If necessary, configure the service to start automatically
Depending on your configuration, remember to allow incoming connections on port 22.
The server part is operational.
Connect to Windows on the SSH server
From another computer, use an SSH client to connect, being in an Active Directory environment, I just need to use the ssh IP_SERVER command and then enter my password.

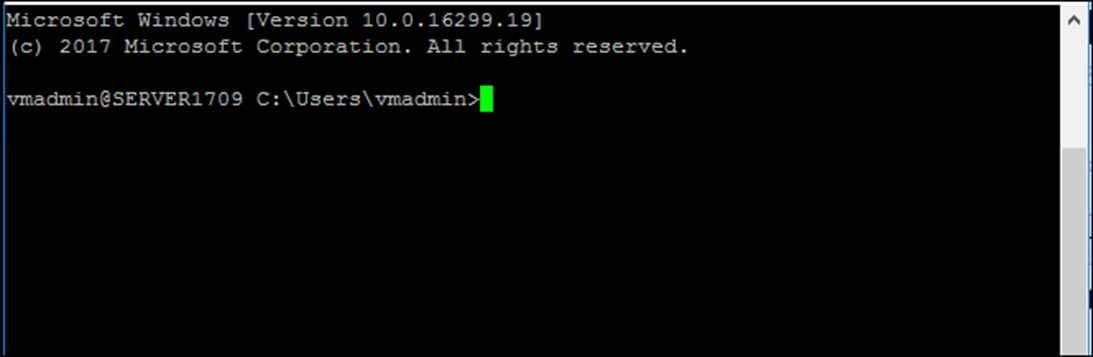
Once connected, enter a command such as ipconfig or hostname to validate that the command has been executed on the remote server.
Conclusion
For the client part, for my part, I find the use in native practical which avoids going through a third-party tool and we quickly get used to when we use Windows 10 and the SSH client I find, missing on Windows 2012R2 and Windows 2016 , the problem is now resolved 🙂
For the server part, I find it useful for non-domain servers, because configuring WinRM and PSSession for connection can quickly become “a headache”.
This week, The Windows Insider team announced that OpenSSH has arrived to Windows Server 2016 1709 and Windows 10 1709.
Note: A new version of this article has been published for Windows Server 2019.
In this article, I’ll show you how to Install the new OpenSSH Server and Client and how I configure OpenSSH Server on my Windows Server 2016 1709.
I’ll also show you how to use WinSCP and copy files from my Windows Server 2016 1709 Server using SSH.
I have to say that before doing this article and researching the topic, I saw 10 blogs and non-of them showed how to configure it properly and all articles were wrong.
On this blog, I always make sure that everything that I post works 100% and I’ve tried on real Servers, So you can be sure that If you follow this post thing will work.
Get Started
To get this thing working, I’m using Windows Server 2016 1709 on Microsoft Azure.
In my case, I’ll install both Server and client on 1703 a connect to it using WinSCP and SSH from another Windows Server 2016.
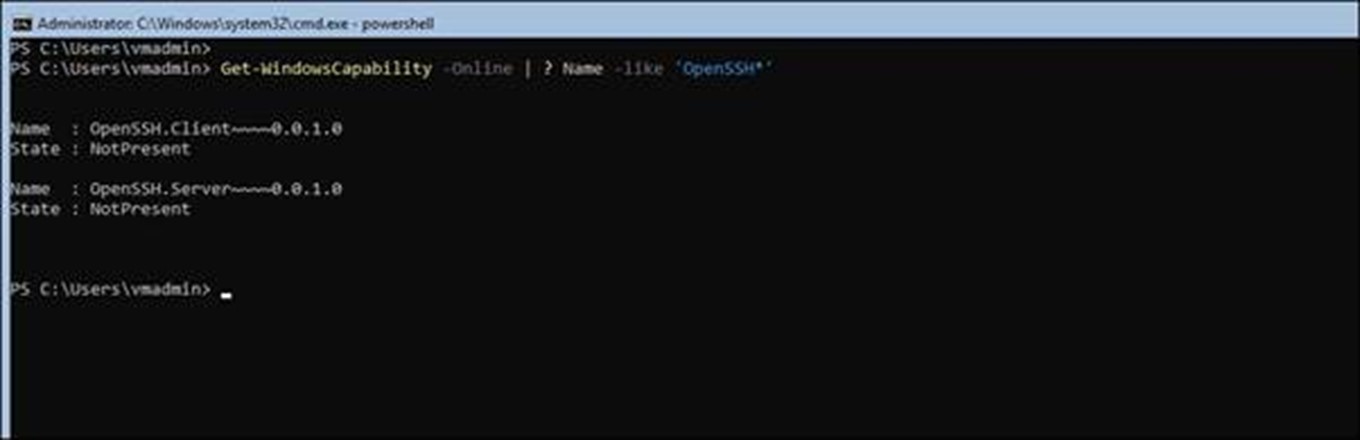
In the line below, I’ll first check that that OpenSSH Is not Installed on my Window Server 2016 1709 Server.
Get-WindowsCapability -Online | ? Name -like 'OpenSSH*'
As you can OpenSSH Is not Installed and I’ll go ahead and install it.
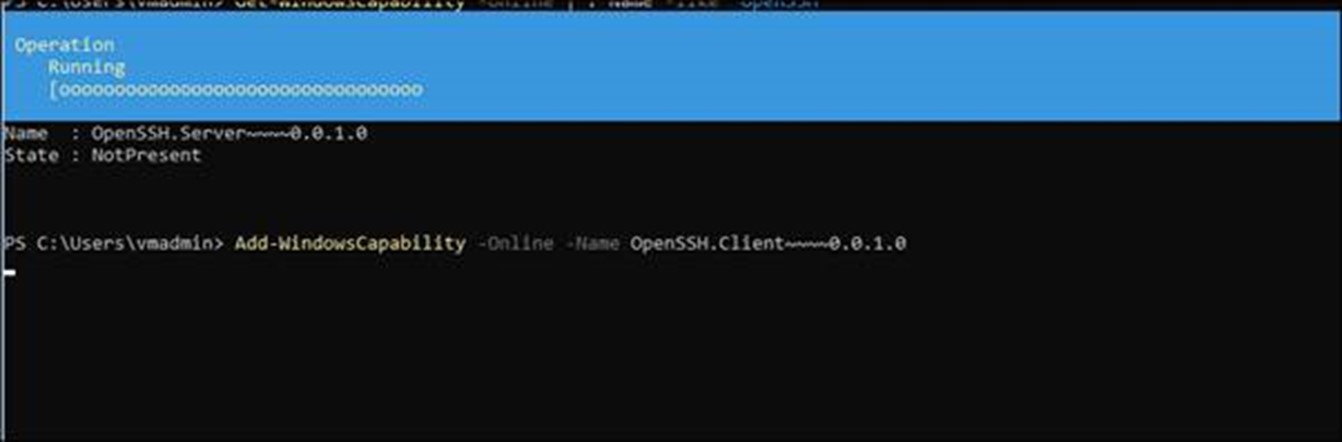
Install Client
To Install the OpenSSH Client, I’ll use the cmdlet below which, If you don’t Install the Server part just restart the server when done.
Add-WindowsCapability -Online -Name OpenSSH.Client~~~~0.0.1.0
Install SSH Server
This is the more important part of this post, and using the line below I’m installing the OpenSSH Server which will allow me to connect to my Windows Server using SSH and copy file using WinSCP.
To Install the OpenSSH Server I’m running the line below.
Add-WindowsCapability -Online -Name OpenSSH.Server~~~~0.0.1.0

Use Client
If you are just Installing the client, just restart the server and you’re ready to connect to other host using SSH with the line below.
Start-service ssh-agent
Once Installed, the two Services below will be Installed on my Server
- OpenSSH Client – SSH-Agent
- OpenSSH Server – sshd
Below, You will see the two Installed Services.
Get-service ssh*

Note – In order for the Server Service to work, I’ll need to configure it first.
Restart-server
Configure SSH Server
To configure the SSH Server to accept the connection, I’ll run the cmdlets below that will create a security key and will allow connections.
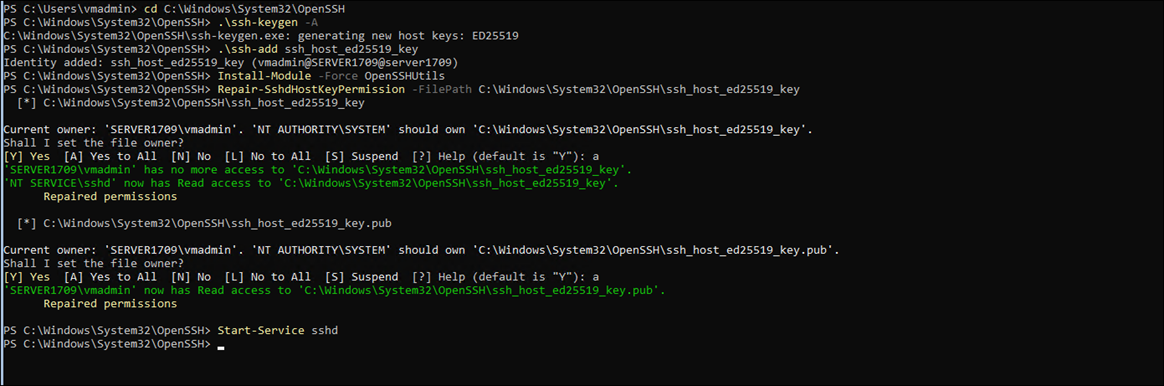
cd C:WindowsSystem32OpenSSH

.ssh-keygen -A

.ssh-add ssh_host_ed25519_key

Install-Module -Force OpenSSHUtils
Repair-SshdHostKeyPermission -FilePath
Start-Service sshd
Next, I’ll run the cmdlet below
Install-Module -Force OpenSSHUtils
Repair-SshdHostKeyPermission -FilePath C:WindowsSystem32OpenSSHssh_host_ed25519_key

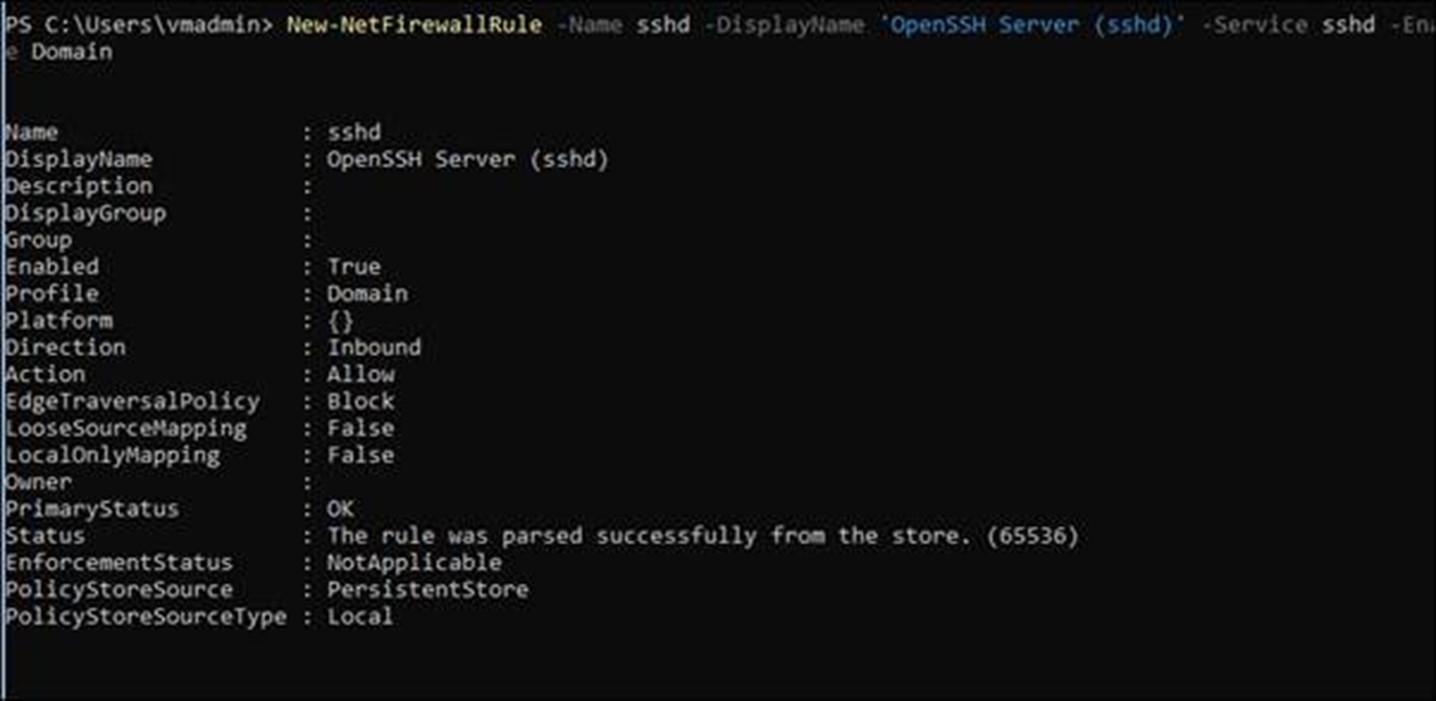
Open Firewall
The last part Is to open the Firewall port and allow SSH connections.
New-NetFirewallRule -Name sshd -DisplayName 'OpenSSH Server (sshd)' -Service sshd -Enabled True -Direction Inbound -Protocol TCP -Action Allow -Profile Domain
Connect
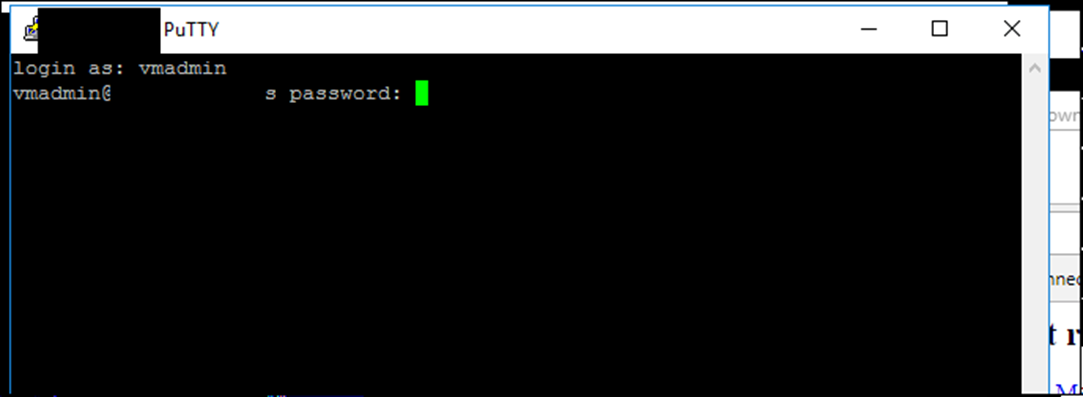
Now that my SSH Server Is up and running I test it by connecting to it from another server using PuTTY


Now, I’ll be asked to supply a username and password.

WinCSP
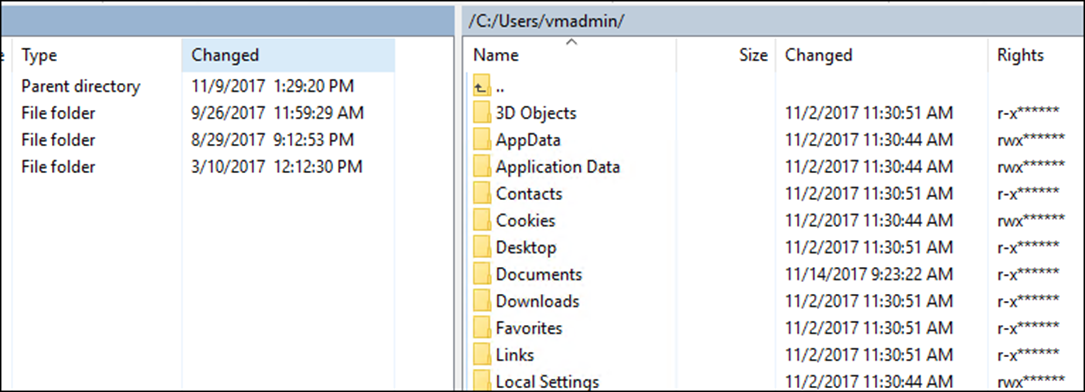
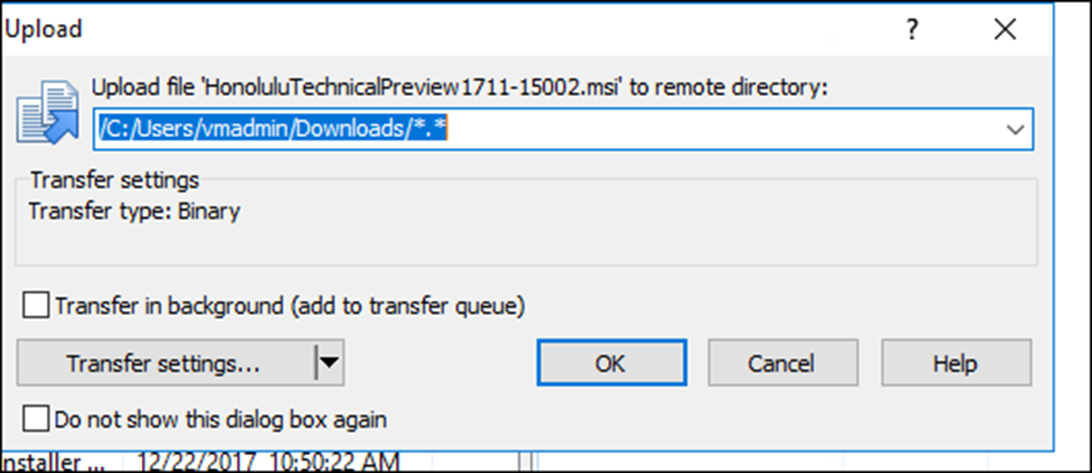
To use WinSCP to copy a file to and from my Windows Server 2016 1709, I’ll download the WinSCP client from the Internet and use it to connect.
All I need to do Is select a file from and copy
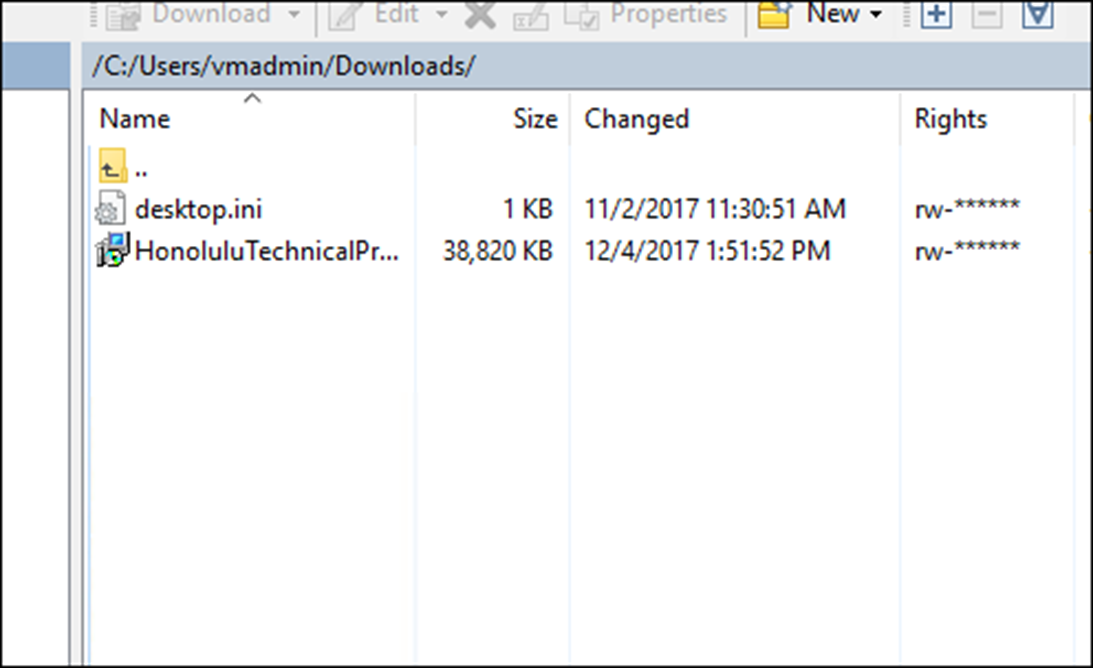
As you can see the file was copied successfully
By clicking submit, you agree to share your email address with the site owner and Mailchimp to receive marketing, updates, and other emails from the site owner. Use the unsubscribe link in those emails to opt out at any time.
Processing…
Success! You’re on the list.
| title | description | ms.date | ms.topic | ms.author | author | ms.custom |
|---|---|---|---|---|---|---|
|
Get started with OpenSSH for Windows |
Learn how to install and connect to remote machines using the OpenSSH Client and Server for Windows. |
01/11/2023 |
quickstart |
roharwoo |
robinharwood |
contperf-fy21q4 |
Get started with OpenSSH for Windows
Applies to: Windows Server 2022, Windows Server 2019, Windows 10 (build 1809 and later)
OpenSSH is a connectivity tool for remote sign-in that uses the SSH protocol. It encrypts all traffic between client and server to eliminate eavesdropping, connection hijacking, and other attacks.
An OpenSSH-compatible client can be used to connect to Windows Server and Windows client devices.
[!IMPORTANT]
If you downloaded the OpenSSH beta from the GitHub repo at PowerShell/Win32-OpenSSH, follow the instructions listed there, not the ones in this article. Some information in the Win32-OpenSSH repository relates to prerelease product that may be substantially modified before it’s released. Microsoft makes no warranties, express or implied, with respect to the information provided there.
Prerequisites
Before you start, your computer must meet the following requirements:
- A device running at least Windows Server 2019 or Windows 10 (build 1809).
- PowerShell 5.1 or later.
- An account that is a member of the built-in Administrators group.
Prerequisites check
To validate your environment, open an elevated PowerShell session and do the following:
-
Type winver.exe and press enter to see the version details for your Windows device.
-
Run
$PSVersionTable.PSVersion. Verify your major version is at least 5, and your minor version at least 1. Learn more about installing PowerShell on Windows. -
Run the command below. The output will show
Truewhen you’re a member of the built-in Administrators group.(New-Object Security.Principal.WindowsPrincipal([Security.Principal.WindowsIdentity]::GetCurrent())).IsInRole([Security.Principal.WindowsBuiltInRole]::Administrator)
Install OpenSSH for Windows
GUI
Both OpenSSH components can be installed using Windows Settings on Windows Server 2019 and Windows 10 devices.
To install the OpenSSH components:
-
Open Settings, select Apps, then select Optional Features.
-
Scan the list to see if the OpenSSH is already installed. If not, at the top of the page, select Add a feature, then:
- Find OpenSSH Client, then select Install
- Find OpenSSH Server, then select Install
-
Once setup completes, return to Apps and Optional Features and confirm OpenSSH is listed.
-
Open the Services desktop app. (Select Start, type services.msc in the search box, and then select the Service app or press ENTER.)
-
In the details pane, double-click OpenSSH SSH Server.
-
On the General tab, from the Startup type drop-down menu, select Automatic.
-
To start the service, select Start.
[!NOTE]
Installing OpenSSH Server will create and enable a firewall rule namedOpenSSH-Server-In-TCP. This allows inbound SSH traffic on port 22. If this rule is not enabled and this port is not open, connections will be refused or reset.
PowerShell
To install OpenSSH using PowerShell, run PowerShell as an Administrator.
To make sure that OpenSSH is available, run the following cmdlet:
Get-WindowsCapability -Online | Where-Object Name -like 'OpenSSH*'
The command should return the following output if neither are already installed:
Name  : OpenSSH.Client~~~~0.0.1.0
State : NotPresent

Name  : OpenSSH.Server~~~~0.0.1.0
State : NotPresent
Then, install the server or client components as needed:
# Install the OpenSSH Client
Add-WindowsCapability -Online -Name OpenSSH.Client~~~~0.0.1.0

# Install the OpenSSH Server
Add-WindowsCapability -Online -Name OpenSSH.Server~~~~0.0.1.0
Both commands should return the following output:
Path          :
Online        : True
RestartNeeded : False
To start and configure OpenSSH Server for initial use, open an elevated PowerShell prompt (right click, Run as an administrator), then run the following commands to start the sshd service:
# Start the sshd service
Start-Service sshd

# OPTIONAL but recommended:
Set-Service -Name sshd -StartupType 'Automatic'

# Confirm the Firewall rule is configured. It should be created automatically by setup. Run the following to verify
if (!(Get-NetFirewallRule -Name "OpenSSH-Server-In-TCP" -ErrorAction SilentlyContinue | Select-Object Name, Enabled)) {
    Write-Output "Firewall Rule 'OpenSSH-Server-In-TCP' does not exist, creating it..."
    New-NetFirewallRule -Name 'OpenSSH-Server-In-TCP' -DisplayName 'OpenSSH Server (sshd)' -Enabled True -Direction Inbound -Protocol TCP -Action Allow -LocalPort 22
} else {
    Write-Output "Firewall rule 'OpenSSH-Server-In-TCP' has been created and exists."
}
Connect to OpenSSH Server
Once installed, you can connect to OpenSSH Server from a Windows or Windows Server device with the OpenSSH client installed. From a PowerShell prompt, run the following command.
ssh domainusername@servername
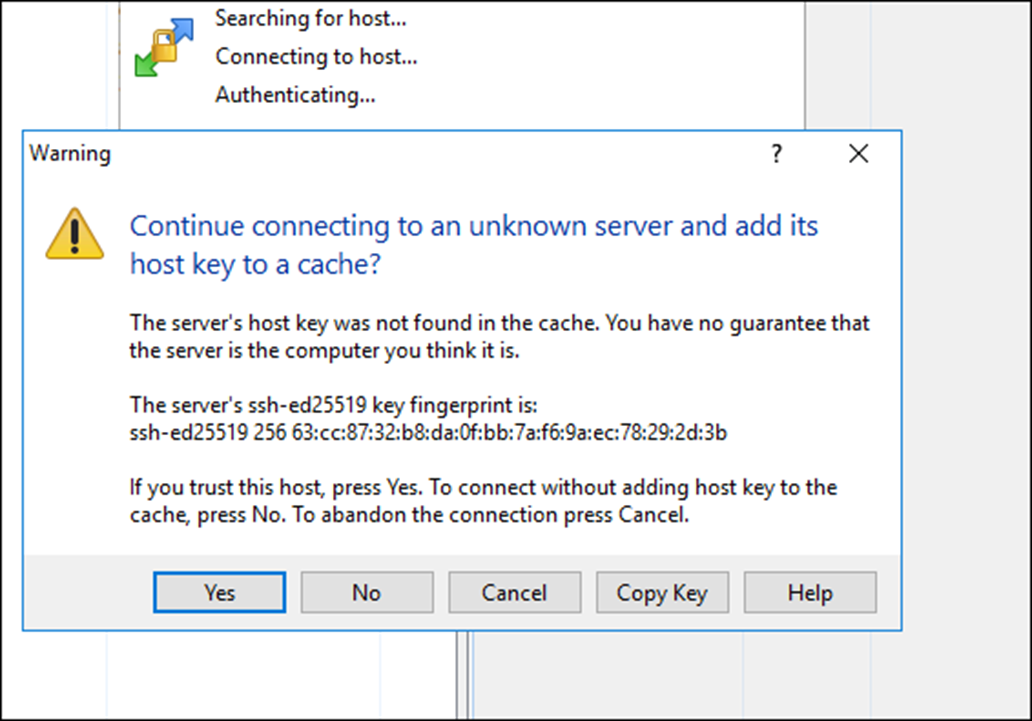
Once connected, you get a message similar to the following output.
The authenticity of host 'servername (10.00.00.001)' can't be established.
ECDSA key fingerprint is SHA256:(<a large string>).
Are you sure you want to continue connecting (yes/no)?
Entering yes adds that server to the list of known SSH hosts on your Windows client.
At this point, you’ll be prompted for your password. As a security precaution, your password won’t be displayed as you type.
Once connected, you’ll see the Windows command shell prompt:
domainusername@SERVERNAME C:Usersusername>
Uninstall OpenSSH for Windows
GUI
To uninstall OpenSSH using Windows Settings:
- Open Settings, then go to Apps > Apps & Features.
- Go to Optional Features.
- In the list, select OpenSSH Client or OpenSSH Server.
- Select Uninstall.
PowerShell
To uninstall the OpenSSH components using PowerShell, use the following commands:
# Uninstall the OpenSSH Client
Remove-WindowsCapability -Online -Name OpenSSH.Client~~~~0.0.1.0

# Uninstall the OpenSSH Server
Remove-WindowsCapability -Online -Name OpenSSH.Server~~~~0.0.1.0
You may need to restart Windows afterwards if the service was in use at the time it was uninstalled.
Next steps
Now that you’ve installed OpenSSH Server for Windows, here are some articles that might help you as you use it:
- Learn more about using key pairs for authentication in OpenSSH key management
- Learn more about the OpenSSH Server configuration for Windows
How to Install OpenSSH Server/Client on Windows Server 2016 1607 or Before
OpenSSH is the premier connectivity tool for remote login with the SSH protocol. It encrypts all traffic to eliminate eavesdropping, connection hijacking, and other attacks. In addition, OpenSSH provides a large suite of secure tunneling capabilities, several authentication methods, and sophisticated configuration options. Installation of OpenSSH server/client on Windows 2016 1709 onward is really easy. its just few powershell commands away from using it but for older versions it can be a time wasting activity. The easiest way to install is still very long but I would to wrap in few basic steps:
Download OpenSSH
First you need to Download OpenSSH using the attached URL. A zip file will be downloaded on your desired system. Unzip it and copy it under Windowssystem32 directory.
Open PowerShell ISE
Open PowerShell ISE with administrative privileges so that you can run the desired commands without any problem. Change the directory to c:windowssystem32openssh
Run the Commands
First you need to modify the required permission so run the under given command from OpenSSh Directory. The commands are given in the picture below:

Run the commands in the given order and OpenSSH server will be installed on the Windows Server 2016 1607 or earlier version.
Environment Variables
Copy the directory path and set the system environment variables so that the commands can work without giving the exact path. You can use PowerShell commands to set the path or go to system settings and manually set the path.
Start the services
Change the service startup type from manual to automatic and start the service to use OpenSSH server.
Windows Firewall Settings
SSH works on TCP port 22 so you need to open in-bound port in Windows firewall so that in-coming connections can be accepted. Opening firewall port is pretty simple and I think there is no need to share any command or process to do it.
Thanks for visiting. I hope you like the post.
You might find it useful to install OpenSSH on your Windows server. Running SSH on your Windows server means that you can transfer files using Secure Copy (SCP) or SFTP. Aside from SCP and SFTP, you can open a secure Powershell shell or a Bash shell if Windows Subsystem for Linux (WSL) is enabled on your Windows server.
By default, you will enter into a Windows CMD shell when you connect to the server using SSH.
This guide will explain the steps to install and configure OpenSSH in Windows Server 2016. It would be best if you were prepared to log in to your Hostwinds Windows Server to continue with this guide.
Step 1: Download and Install OpenSSH
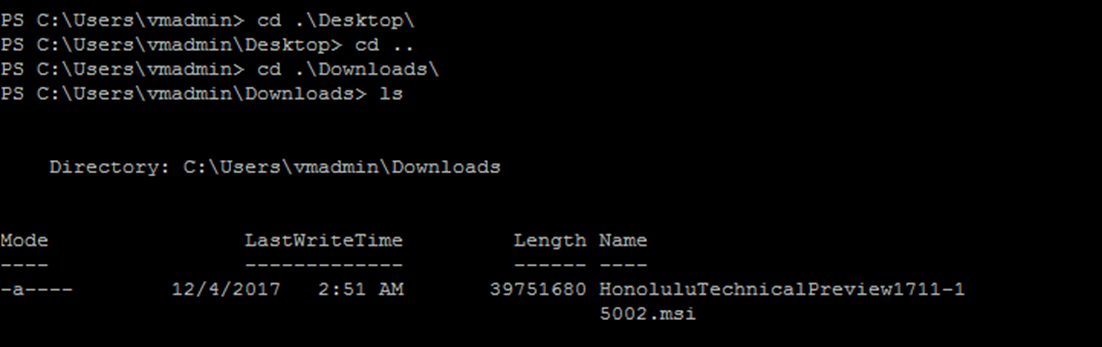
Start by accessing your server via RDP (from Mac), and download the latest release of OpenSSH (OpenSSH-Win64.zip).
Locate the downloaded file, right-click it, and Extract All to C:Program FilesOpenSSH-Win64.
Optional: To change the default SSH port to something other than 22, select the sshd_config_default file in the OpenSSH folder and open with a text editor:
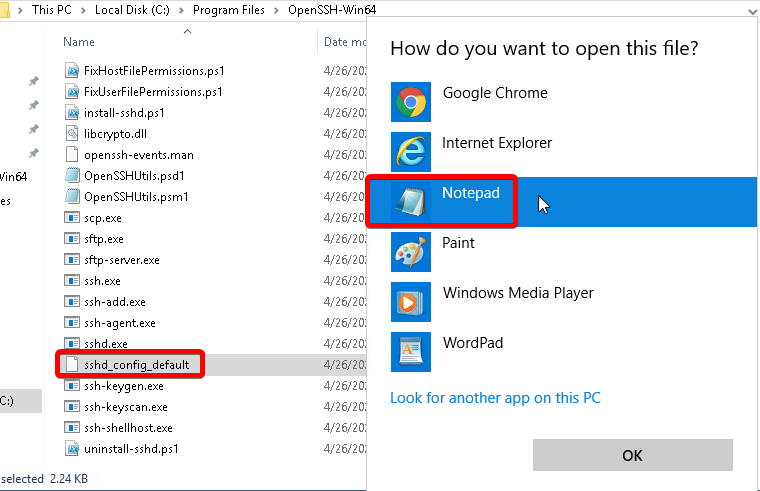
Uncomment Port 22 and change it to your desired port, then save the file:
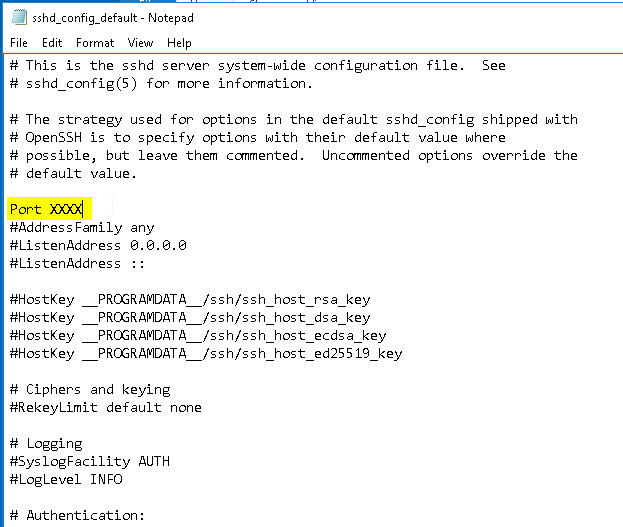
End optional step.
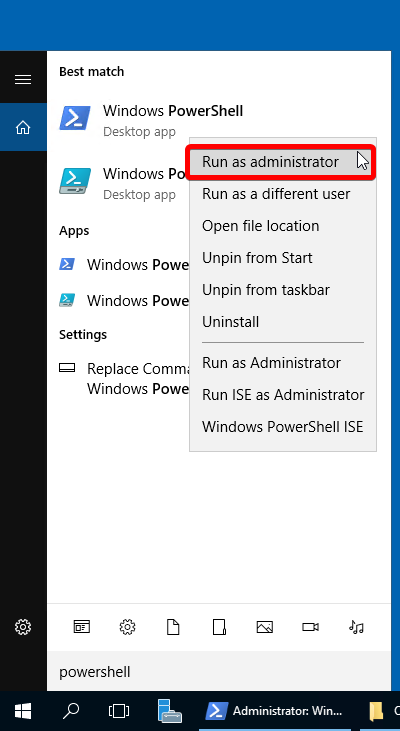
Next, search for and right-click Powershell to Run as administrator:
Modify the Path system environment variable by running the command:
setx PATH "$env:path;C:Program FilesOpenSSH-Win64" -m
You should see the following output:
SUCCESS: Specified value was saved.
Next, change to the OpenSSH directory:
cd "C:Program FilesOpenSSH-Win64"
Then run the install script:
.install-sshd.ps1
Next, enable automatic startup and start sshd and ssh-agent:
Set-Service sshd -StartupType Automatic; Set-Service ssh-agent -StartupType Automatic; Start-Service sshd; Start-Service ssh-agent
Step 2: Allow Access in Windows Firewall
Start by opening Control Panel > Windows Firewall:
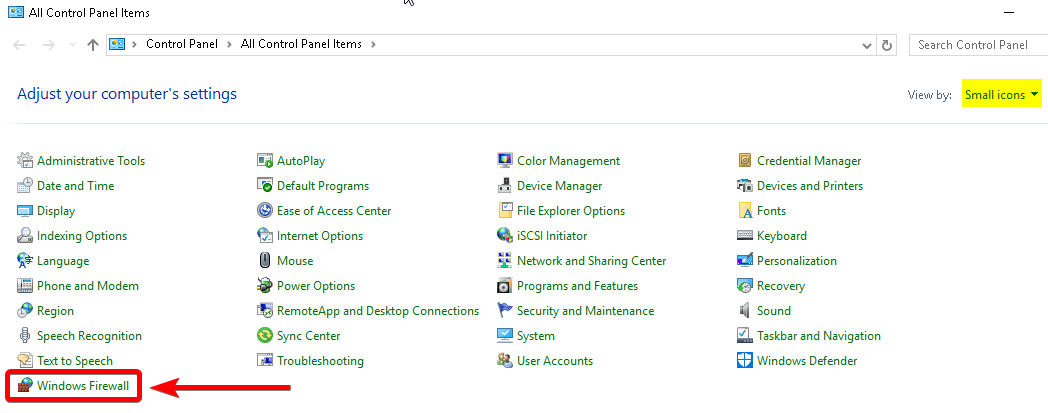
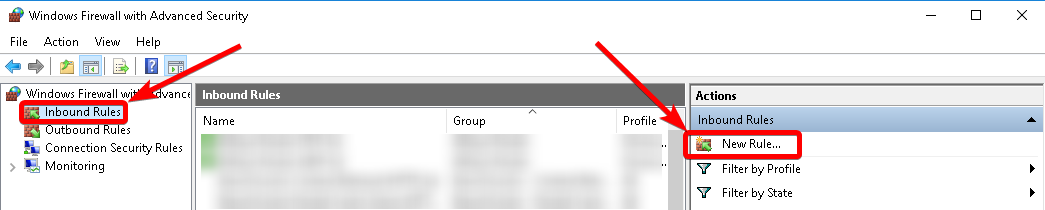
Select Advanced Settings on the left-hand side, then select Inbound Rules > New Rule…:
Under Rule Type, select Custom > Next.
Under Program, select All programs > Next.
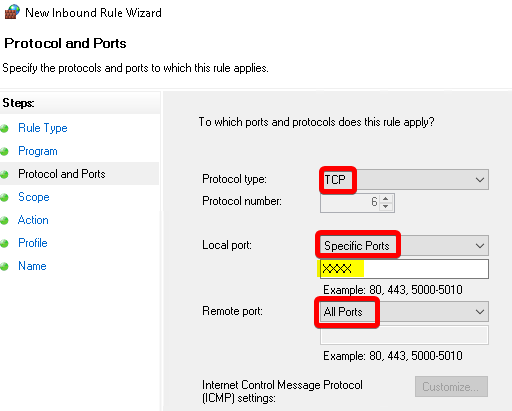
Under Protocols and Ports, enter your desired SSH port with the following selections:
Under Scope, let the rule apply to Any IP address for remote and local IP addresses, then Next.
Under Action, select Allow the connection > Next.
Under Profile, leave Domain, Private, and Public checked > Next.
Lastly, name the rule and select Finish.
Now you can access your Windows server using SSH!
With all the awesomeness of OpenSSH for Windows being included as a native Windows feature in 1803 and later, it’s become harder to find any relevant information on OpenSSH on older versions of Windows Server.
I’m working with a Windows Server 2016 box, and we now have a use case where we’d like to run an SSH command on a remote server as part of a task workflow. Basically right now, a scheduled task runs that executes a PowerShell script. I want to add a command to that script that will SSH to a remote server and execute a command, and wait for it to complete, and then continue the script.
The natural course of action (if native ssh existed, as it does on Windows Server 2019) would be to simply add the SSH command to the PowerShell script:
ssh -i privatekeyfile.pem ssh.host.internal /path/to/command
Since Server 2016 (build 1607) doesn’t have the SSH command as an installable feature, I’m trying to figure out how to best accomplish this.
Options I’ve considered:
-
PuTTY. Since it’s a GUI app, it’s not well suited for automation tasks and probably wouldn’t even work properly if running in the context of a service account.
-
Cygwin. It feels way too heavyweight for a server installation. It also tends to mess around with file permissions and local accounts in ways that might cause problems in our domain environment.
-
Compiling OpenSSH from source. I’m not familiar enough with building Unix apps on Windows to do this.
-
Find a binary compiled recent OpenSSH for Windows. This would be the ideal solution, but since 1803 has native OpenSSH it seems that it’s either impossible or damn hard to find binary builds of OpenSSH for Windows at all. Any guide out there simply shows you how to access «Optional Windows Features» to turn SSH on.
Since Server 2016 is still in common use, it seems like this scenario would be relatively common, but I’m having trouble finding good documentation on how to implement it.
OpenSSH is an ideal and secure way of performing remote maintenance & administration on your servers. Even on Windows Server!  Microsoft have released their OpenSSH port for Windows Server and Windows 10 back in 2015. Here is how to install the OpenSSH Server on Windows Server 2022, 2019 and 2016.
In this small tutorial, I’m not using PowerShell’s Add-WindowsCapability cmdlet, because it errors out on unsupported platforms. And I want to be able to customize the sshd installation directory. If you follow this post, you can install Microsoft OpenSSH Server on Windows Server 2022 through even Windows Server 2012 R2, in a folder of your choosing.

Please not that a lot has changed in recent years, like Microsoft releasing .msi Windows Installer installation files, and you no longer have to depend on PowerShell Add-WindowsCapability or .zip files. Wherever possible, use the OpenSSH .msi installation option.
Prerequisites
In order to be able to install OpenSSH on Windows, you need the software. Doh!
- Download the latest release from GitHub: https://github.com/PowerShell/Win32-OpenSSH/releases (OpenSSH-Win64.zip for example).
Install “Windows for OpenSSH” using PowerShell
- Unblock the downloaded OpenSSH archive if necessary:
Unblock-File .DownloadsOpenSSH-Win64.zip - Extract the archive:
Expand-Archive .DownloadsOpenSSH-Win64.zip -DestinationPath . - Copy the OpenSSH-Win64 folder to your desired location, e.g c:
Copy-Item -Recurse .OpenSSH-Win64 'C:' - The libcrypto.dll file has to be accessible for all users:
&icacls C:OpenSSH-Win64libcrypto.dll /grant Everyone:RX - Run
install-sshd.ps1to create the OpenSSH Authentication Agent and OpenSSH SSH Server services. It also sets some permissions and registers an Event Tracing (ETW) provider. - Change the service startup to Automatic. The OpenSSH SSH Server service is set to Manual startup, not automatic:
&sc.exe config sshd start= auto,&sc.exe config ssh-agent start= auto - Start the OpenSSH Authentication Agent and SSH Server services:
&sc.exe start sshd,&sc.exe start ssh-agent - Make sure your Windows Defender Firewall is open for port 22, rule OpenSSH-Server-In-TCP must be enabled. If this rule is not available, manually create it:
Code language: PHP (php)
New-NetFirewallRule -Name sshd -DisplayName 'OpenSSH SSH Server' -Enabled True -Direction Inbound -Protocol TCP -Action Allow -LocalPort 22 -Program "C:WindowsSystem32OpenSSHsshd.exe"
Replace C:WindowsSystem32OpenSSHsshd.exe with the actual path to the sshd.exe (C:OpenSSHsshd.exe, if you followed this instruction). Or go to Control Panel > System and Security > Windows Firewall > Advanced Settings > Inbound Rules and add a new rule for port 22.
![]()
Let’s connect!
PS C:> ssh -l janreilink localhost


Install Win32-OpenSSH Server using MSI Installer
If you have downloaded the .msi Windows Installer MSI-file of Microsoft OpenSSH (OpenSSH-Win64-v8.9.1.0.msi), you can install OpenSSH server and client easily. The following command installs both Server and Client:
msiexec /i path to OpenSSH-Win64-v8.9.1.0.msi
This, however installs OpenSSH in the location C:Program FilesOpenSSH, and doesn’t update your $env:path environment variable and there are some other caveats. You can follow my guide “install Microsoft OpenSSH Client properly in Windows 11 and Windows 10 to support FIDO/U2F security keys” on Windows Server 2022 / 2019 to install and configure OpenSSH Server and Client using .msi installer files.
sshd_config
Often you not only need to install OpenSSH, you also need to configure it. For this, OpenSSH on Windows uses an mechanism where the default sshd_config (called “sshd_config_default“) is located in the directory to where you’ve unpacked the OpenSSH-Win64.zip archive. When you start the service, the file is copied to C:ProgramDatasshsshd_config.
In Windows, sshd reads configuration data from %programdata%sshsshd_config by default, or a different configuration file may be specified by launching sshd.exe with the -f parameter. If the file is absent, sshd generates one with the default configuration when the service is started.
https://docs.microsoft.com/en-us/windows-server/administration/openssh/openssh_server_configuration#windows-configurations-in-sshd_config
So you can either make you configuration in the sshd_config_default file, that is copied when you start the service for the first time, or you start and stop OpenSSH, edit C:ProgramDatasshsshd_config and restart OpenSSH again.
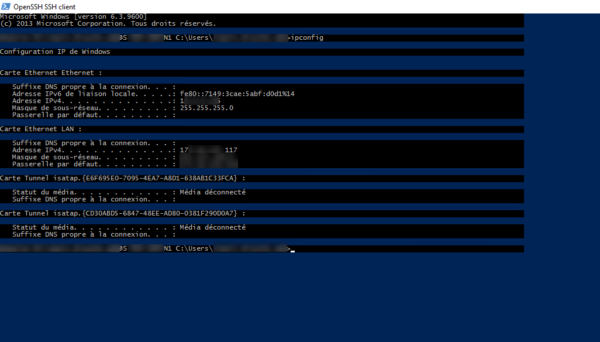
Install OpenSSH on Windows Server 2012
OpenSSH Server on Windows Server 2012 R2, you said? Yes, you can use the same method to install OpenSSH in Windows Server 2012 R2 (version 6.3.9600). Here is a screenshot of connecting to sshd on Windows version 6.3.9600:

Conclusion and giveaway
In this post I showed you how you can install OpenSSH server in various Windows Server versions, using the downloaded .zip file archive and PowerShell. You can use this approach to customize and streamline your Microsoft OpenSSH Server environment. This goes very well with SSH keys stored in Active Directory. If you want to use FIFO/U2F security keys like YubiKey in Windows OpenSSH, follow that guide.
In an other post I’ll show you how to install OpenSSH Client in Windows 11 and Windows 10. Using the OpenSSH-Win64-v8.9.1.0.msi file.
More OpenSSH in Windows Server and Windows 11 / Windows 10, the series
Here on Sysadmins of the North are more posts in a series of posts about OpenSSH in Windows. Whether it’s Windows Server or Windows 11 / 10. You may find these posts interesting:
- Tunnel RDP through SSH & PuTTY
- How to share OpenSSH keys with WSL in Windows 10
- Manually install OpenSSH in Windows Server
- Retrieve SSH public key from Active Directory for SSH authentication
- Windows 11/10 and WSL 2 DevOps environment
- YubiKey support in OpenSSH for Windows 11 and Windows 10
- Connect to a KVM host through an ssh tunnel and arbitrary port in Windows 11 and WSL 2
I hope you like it, let me know.

- Remove From My Forums
-
Question
-
I want to create a SSH Server using Server 2016.
What is Microsoft’s recommendation for setting up a SSH server? I’m asking because there are so many options.
I will be running this in a production environment transferring sensitive data from one government entity to another.
Thanks
All replies
-
If you are running Windows Server 1709 or higher, you can follow https://docs.microsoft.com/en-us/windows-server/administration/openssh/openssh_install_firstuse
Otherwise, you might want to consider https://github.com/PowerShell/openssh-portable or review recommendations at https://serverfault.com/questions/8411/what-is-a-good-ssh-server-to-use-on-windows (depending on your company’s position on open source/GitHub
sourced software)hth
Marcin
SSH is a remote management protocol and tool which provides secure command-line access to the remote system. SSH is created for Linux and Unix systems but gained popularity on other systems like Network Routers, Network Switches, etc. Different 3d party software is created to run SSH client and SSH server on Windows operating systems but they should be installed externally from other vendors. Recent versions of the Windows operating system also support SSH client and SSH server as built-in. In this tutorial, we will examine how to install or enable the built-in SSH server for Windows 10 and Windows Server 2016/2019.
Install/Enable SSH Server From Windows Features (GUI)
SSH server or OpenSSH server is available by Windows 10 and Windows 2019 which should be installed or enabled via the Windows Features. This can be done with 2 methods. In this part, we will install the SSH server by using the Windows Features GUI from the desktop. First, open the Windows Features with the following steps.
Type “Windows Features” to the Start Menu which will list the windows features shortcut.

Alternatively you can follow Settings -> Apps -> Apps and Features -> Manage Optional Features . Find the OpenSSH Client and OpenSSH Server in tick them. Then click the Apply which will install both the SSH server and SSH client.
Install/Enable SSH Server via PowerShell Command Line Interface
The Windows Features can be also installed from the PowerShell command-line interface by using the Add-WindowsCapability commands. We will use this command in order to install the SSH Server and Client. As the Windows Feature installation requires Administrative privileges the PowerShell should be opened with the Administrator account or Administrator privileges. First list the PowerShell from the Start Menu where select the “Run as administrator” like below.

The second step checking whether the SSH Server and Client are installed with the Get-WindowsCapability command like below.
Get-WindowsCapability -Online | ? Name -like '*SSH*'
This command list all currently installed or enable Windows Features and filter them with the “ssh” term where the SSH-related features will be listed below. We can also see that the available OpenSSH.Client and OpenSSH.Server packages version is 0.0.2.0 .
Name  : OpenSSH.Client~~~~0.0.2.0
State : NotPresent

Name  : OpenSSH.Server~~~~0.0.2.0
State : NotPresent
The State show whether it is installed or not. The “NotPresent” means it is not installed. As we can see from the output that both of the SSH server and SSH client is not installed.
Now we will install the SSH server and client by using the Add-WindowsCapability command line below. The SSH Server feature is named OpenSSH.Server and SSH Client feature is named as OpenSSH.Server.
Add-WindowsCapability -Online -Name OpenSSH.Client

Add-WindowsCapability -Online -Name OpenSSH.Server
When the SSH Server and SSH Client installation is completed the following output will be listed.
# Both of these should return the following output:

Path          :
Online        : True
RestartNeeded : False
Configure Firewall Ports For SSH Server
Windows enables the local Firewall by default which will only accept a limited number of ports for security reasons. The SSH server port is not allowed by default where we should enable it. This can be done via the Windows Firewall GUI but using the PowerShell is more practical as running the following PowerShell command will open the SSH server port for communication. The configuration contains the SSH Server executable file which is located under the C:System32OpenSSH with the name of sshd.exe .
New-NetFirewallRule -Name SSH -DisplayName 'OpenSSH SSH Server Port' -Enabled True -Direction Inbound -Protocol TCP -Action Allow -LocalPort 22 -Program "C:System32OpenSSHsshd.exe"The SSH service port firewall configuration will output following informations.
Name : SSH
DisplayName : OpenSSH SSH Server Port
Description :
DisplayGroup :
Group :
Enabled : True
Profile : Any
Platform : {}
Direction : Inbound
Action : Allow
EdgeTraversalPolicy : Block
LooseSourceMapping : False
LocalOnlyMapping : False
Owner :
PrimaryStatus : OK
Status : The rule was parsed successfully from the store. (65536)
EnforcementStatus : NotApplicable
PolicyStoreSource : PersistentStore
PolicyStoreSourceType : Local
Check SSH Server Service Status
After the installation and firewall configuration is complete we will check if the SSH server service is running. We will use the Get-Service command and provides the SSH service name which is sshd.
Get-Service sshdStart SSH Server Service
The SSH server service can be start with the Start-Service command of PowerShell easily.
Start-Service sshd Start SSH Server Service Automatically After Boot
Some services are started automatically without any command after boot. We can set the SSH server service to start automatically after boot with the following Set-Service command and -StartupType “Automatic” attributes and parameters.
Set-Service -Name sshd -StartupType 'Automatic'Uninstall/Disable SSH Server From PowerShell
If you do not need the SSH Server or Client you can uninstall or disable them which is the very same way as the installation. You can use the Windows Features screen by unticking the feature and then click on the “Apply” which will remove the SSH server and SSH client. An alternative way is using the PowerShell again with Administrator privileges which are explained in the installation part. We will use the Remove-WindowsCapability command and provide the -Name attribute as OpenSSH.Client and OpenSSH.Server. But we can also uninstall only the OpenSSH.Server though.
# Uninstall the OpenSSH Client
Remove-WindowsCapability -Online -Name OpenSSH.Client

# Uninstall the OpenSSH Server
Remove-WindowsCapability -Online -Name OpenSSH.Server
Connect SSH Server
By using a GUI client like Putty or the built-in Windows ssh client we can connect to the Windows SSH Server like below.
ssh ismail@192.168.10.10Uninstall OpenSSH Server in Windows via Windows Features (Optional Features)
The Windows built-in SSH server can be uninstalled by using the Windows Features screen. First open the Windows Features screen by typing “windows features” to the Start Menu. This is also described at the start of this tutorial. Then navigate to the “OpenSSH Server” line and uncheck the checkbox.