Installs both Personal Edition, free for personal and non-commercial use, or Standard Edition — 30-day evaluation with full functionality. Excellent terminal. Single virtual filesystem for SFTP, SCP, and terminal (when using BvShell) with multiple configurable mount points. Cryptography FIPS 140-2 compliant if enabled in Windows. Supports the latest Windows server and desktop versions, both 32-bit and 64-bit. Requires at least Windows XP SP3, Windows Server 2003, or newer.
The link is to Amazon CloudFront and should be very reliable. If it does not work, try alternative.
If the installer downloads but does not start, check below.
Our installers are cryptographically signed. Our most recent installers use an Extended Validation digital certificate from DigiCert. Here is how to verify. Do not run installers for Bitvise software that do not carry a valid digital signature by Bitvise.
Bitvise SSH Server is easy to uninstall.
Using Bitvise SSH Server requires you to read and agree with its License Terms.
Bitvise software does not contain ads, install product bundles or collect user data for sale. We are 100% supported by users who license our software. Thank you!
Upgrading from a previous version
To upgrade from a previous version, download the new installer, execute it, and follow the process. The installer will detect an existing installation and will automatically remove it before installing the new one. During this process, your settings will be preserved.
Upgrade access
Each Bitvise SSH Server license comes with 12 months of access to new versions included free of charge. Additional upgrade access can be purchased either with the initial license, or subsequently.
If your upgrade access has expired, you will need to purchase one or more license-years of upgrade access to get a new activation code. You can do this through your License Overview. The cost is $19.95 per SSH Server license and per year.
Help! The installer does not start?
Depending on your Windows version, security settings, and how the installer was downloaded, you may need to take an extra step to start it. On Windows Server 2016, right-click the installer executable in Windows Explorer, click Properties, and see if you need to check Unblock on the General tab.
В современных версиях Windows уже есть встроенный SSH сервер на базе пакета OpenSSH. В этой статье мы покажем, как установить и настроить OpenSSH сервер в Windows 10/11 и Windows Server 2022/2019 и подключиться к нему удаленно по защищенному SSH протоколу (как к Linux).
Содержание:
- Установка сервера OpenSSH в Windows
- Настройка SSH сервера в Windows
- Sshd_config: Конфигурационный файл сервера OpenSSH
- Подключение по SSH к Windows компьютеру
- Логи SSH подключений в Windows
Установка сервера OpenSSH в Windows
Пакет OpenSSH Server включен в современные версии Windows 10 (начиная с 1803), Windows 11 и Windows Server 2022/2019 в виде Feature on Demand (FoD). Для установки сервера OpenSSH достаточно выполнить PowerShell команду:
Get-WindowsCapability -Online | Where-Object Name -like ‘OpenSSH.Server*’ | Add-WindowsCapability –Online
Или при помощи команды DISM:
dism /Online /Add-Capability /CapabilityName:OpenSSH.Server~~~~0.0.1.0
Если ваш компьютер подключен к интернету, пакет OpenSSH.Server будет скачан и установлен в Windows.
Также вы можете установить сервер OpenSSH в Windows через современную панель Параметры (Settings -> Apps and features -> Optional features -> Add a feature, Приложения -> Управление дополнительными компонентами -> Добавить компонент. Найдите в списке OpenSSH Server и нажмите кнопку Install).
На изолированных от интернета компьютерах вы можете установить компонент с ISO образа Features On Demand (доступен в личном кабинете на сайте Microsoft: MSDN или my.visualstudio.com). Скачайте диск, извлеките его содержимое в папку c:FOD (достаточно распаковать извлечь файл
OpenSSH-Server-Package~31bf3856ad364e35~amd64~~.cab
), выполните установку из локального репозитория:
Add-WindowsCapability -Name OpenSSH.Server~~~~0.0.1.0 -Online -Source c:FOD
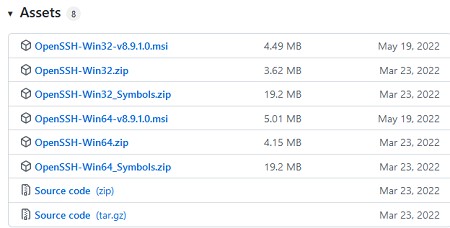
Также доступен MSI установщик OpenSSH для Windows в официальном репозитории Microsoft на GitHub (https://github.com/PowerShell/Win32-OpenSSH/releases/). Например, для Windows 10 x64 нужно скачать и установить пакет OpenSSH-Win64-v8.9.1.0.msi. Следующая PowerShell команда скачает MSI файл и установит клиент и сервер OpenSSH:
Invoke-WebRequest https://github.com/PowerShell/Win32-OpenSSH/releases/download/v8.9.1.0p1-Beta/OpenSSH-Win64-v8.9.1.0.msi -OutFile $HOMEDownloadsOpenSSH-Win64-v8.9.1.0.msi -UseBasicParsing
msiexec /i c:usersrootdownloadsOpenSSH-Win64-v8.9.1.0.msi
Также вы можете вручную установить OpenSSH сервер в предыдущих версиях Windows (Windows 8.1, Windows Server 2016/2012R2). Пример установки Win32-OpenSSH есть в статье “Настройка SFTP сервера (SSH FTP) в Windows”.
Чтобы проверить, что OpenSSH сервер установлен, выполните:
Get-WindowsCapability -Online | ? Name -like 'OpenSSH.Ser*'
State : Installed

Настройка SSH сервера в Windows
После установки сервера OpenSSH в Windows добавляются две службы:
- ssh-agent (OpenSSH Authentication Agent) – можно использовать для управления закрытыми ключами если вы настроили SSH аутентификацию по ключам;
- sshd (OpenSSH SSH Server) – собственно сам SSH сервер.
Вам нужно изменить тип запуска службы sshd на автоматический и запустить службу с помощью PowerShell:
Set-Service -Name sshd -StartupType 'Automatic'
Start-Service sshd

С помощью nestat убедитесь, что теперь в системе запущен SSH сервер и ждет подключений на порту TCP:22 :
netstat -na| find ":22"

Проверьте, что включено правило брандмауэра (Windows Defender Firewall), разрешающее входящие подключения к Windows по порту TCP/22.
Get-NetFirewallRule -Name *OpenSSH-Server* |select Name, DisplayName, Description, Enabled
Name DisplayName Description Enabled
---- ----------- ----------- -------
OpenSSH-Server-In-TCP OpenSSH SSH Server (sshd) Inbound rule for OpenSSH SSH Server (sshd) True

Если правило отключено (состоянии Enabled=False) или отсутствует, вы можете создать новое входящее правило командой New-NetFirewallRule:
New-NetFirewallRule -Name sshd -DisplayName 'OpenSSH Server (sshd)' -Enabled True -Direction Inbound -Protocol TCP -Action Allow -LocalPort 22
Рассмотрим, где храниться основные компоненты OpenSSH:
- Исполняемые файлы OpenSSH Server находятся в каталоге
C:WindowsSystem32OpenSSH
(sshd.exe, ssh.exe, ssh-keygen.exe, sftp.exe и т.д.) - Конфигурационный файл sshd_config (создается после первого запуска службы):
C:ProgramDatassh - Файлы authorized_keys и ssh ключи можно хранить в профиле пользователей:
%USERPROFILE%.ssh
Sshd_config: Конфигурационный файл сервера OpenSSH
Настройки сервере OpenSSH хранятся в конфигурационном файле %programdata%sshsshd_config. Это обычный текстовый файл с набором директив. Для редактирования можно использовать любой текстовый редактор (я предпочитаю notepad++). Можно открыть с помощью обычного блокнота:
start-process notepad C:Programdatasshsshd_config
Например, чтобы запретить SSH подключение для определенного доменного пользователя (и всех пользователей указанного домена), добавьте в конце файле директивы:
DenyUsers winitpro[email protected]
DenyUsers corp*
Чтобы разрешить подключение только для определенной доменной группы:
AllowGroups winitprosshadmins
Либо можете разрешить доступ для локальной группы:
AllowGroups sshadmins
По умолчанию могут к openssh могут подключаться все пользователи Windows. Директивы обрабатываются в следующем порядке: DenyUsers, AllowUsers, DenyGroups,AllowGroups.
Можно запретить вход под учетными записями с правами администратора, в этом случае для выполнения привилегированных действий в SSH сессии нужно делать runas.
DenyGroups Administrators
Следующие директивы разрешают SSH доступ по ключам (SSH аутентификации в Windows с помощью ключей описана в отдельной статье) и по паролю:
PubkeyAuthentication yes
PasswordAuthentication yes
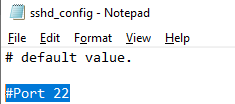
Вы можете изменить стандартный SSH порт TCP/22, на котором принимает подключения OpenSSH в конфигурационном файле sshd_config в директиве Port.
После любых изменений в конфигурационном файле sshd_config нужно перезапускать службу sshd:
restart-service sshd
Подключение по SSH к Windows компьютеру
Теперь вы можете попробовать подключиться к своей Windows 10 через SSH клиент (в этом примере я использую putty).
Вы можете использовать встроенный SSH клиентом Windows для подключения к удаленному хосту. Для этого нужно в командной строке выполнить команду:
ssh [email protected]
В этом примере
alexbel
– имя пользователя на удаленном Windows компьютере, и 192.168.31.102 – IP адрес или DNS имя компьютера.
Обратите внимание что можно использовать следующие форматы имен пользователей Windows при подключении через SSH:
-
[email protected]
– локальный пользователь Windows -
[email protected]@server1
–пользователь Active Directory (в виде UPN) или аккаунт Microsoft/ Azure(Microsoft 365) -
winitpro[email protected]
– NetBIOS формат имени
В домене Active Directory можно использовать Kerberos аутентификацию в SSH. Для этого в sshd_config нужно включить параметр:
GSSAPIAuthentication yes
После этого можно прозрачно подключать к SSH сервер с Windows компьютера в домене из сессии доменного подключается. В этом случае пароль пользователя не указывается и выполняется SSO аутентификация через Kerberos:
ssh -K server1
При первом подключении появится стандартный запрос на добавление узла в список известных SSH хостов.
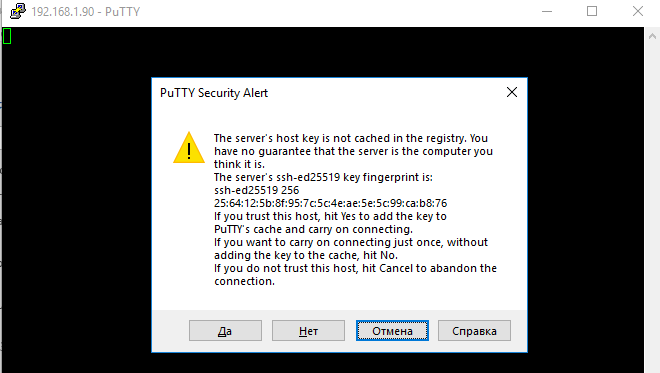
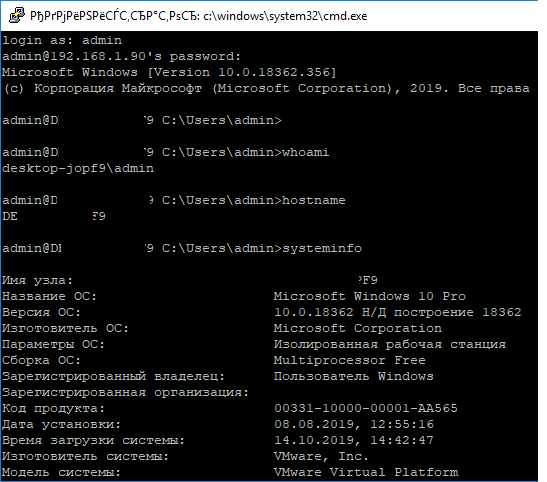
Нажимаем Да, и в открывшееся окне авторизуемся под пользователем Windows.
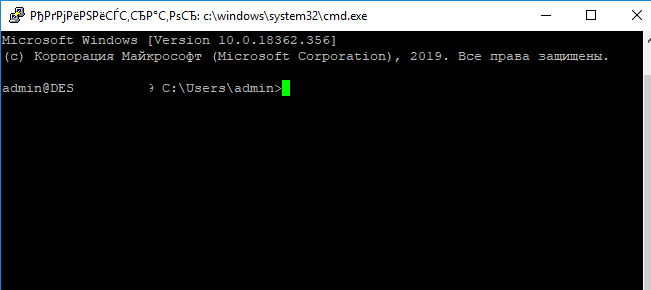
При успешном подключении запускается командная оболочка cmd.exe со строкой-приглашением.
[email protected] C:Usersadmin>
В командной строке вы можете выполнять различные команды, запускать скрипты и программы.
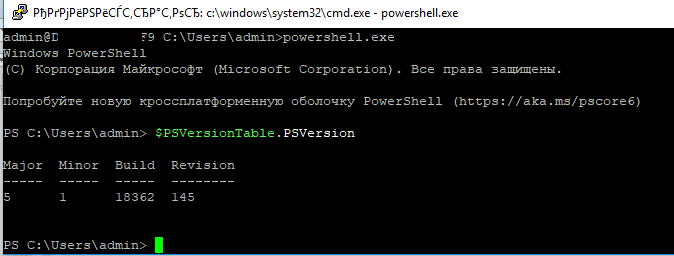
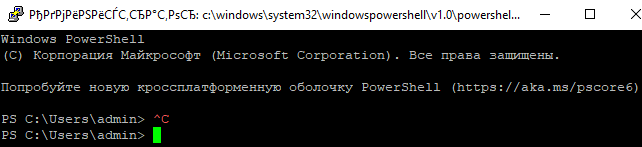
Я предпочитаю работать в командной строке PowerShell. Чтобы запустить интерпретатор PowerShell, выполните:
powershell.exe
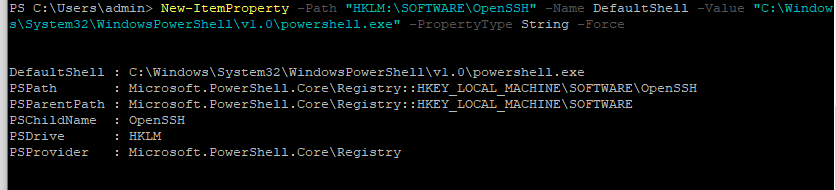
Чтобы изменить командную оболочку (Shell) по умолчанию в OpenSSH с cmd.exe на PowerShell, внесите изменение в реестр такой командой:
New-ItemProperty -Path "HKLM:SOFTWAREOpenSSH" -Name DefaultShell -Value "C:WindowsSystem32WindowsPowerShellv1.0powershell.exe" -PropertyType String –Force
Осталось перезапустить SSH подключение и убедиться, что при подключении используется командный интерпретатор PowerShell (об этом свидетельствует приглашение
PS C:Usersadmin>
).
В SSH сессии запустилась командная строка PowerShell, в которой работают привычные функции: авто дополнение, раскраска модулем PSReadLine, история команд и т.д. Если текущий пользователь входит в группу локальных администраторов, то все команды в его сессии выполняются с повышенными правами даже при включенном UAC.
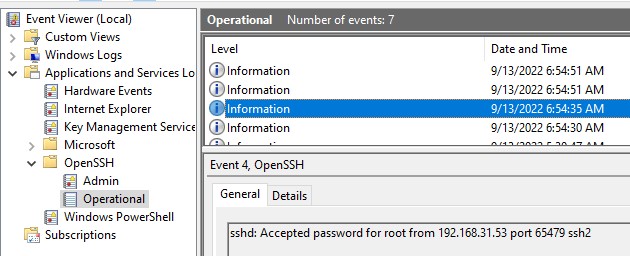
Логи SSH подключений в Windows
В Windows логи подключений к SSH серверу по-умолчанию пишутся не в текстовые файлы, а в отдельный журнал событий через Event Tracing for Windows (ETW). Откройте консоль Event Viewer (
eventvwr.msc
>) и перейдите в раздел Application and services logs -> OpenSSH -> Operational.
При успешном подключении с помощью к SSH серверу с помощью пароля в журнале появится событие:
EventID: 4
sshd: Accepted password for root from 192.168.31.53 port 65479 ssh2
Если была выполнена аутентификация с помощью SSH ключа, событие будет выглядеть так:
sshd: Accepted publickey for locadm from 192.168.31.53 port 55772 ssh2: ED25519 SHA256:FEHDEC/J72Fb2zC2oJNb45678967kghH43h3bBl31ldPs
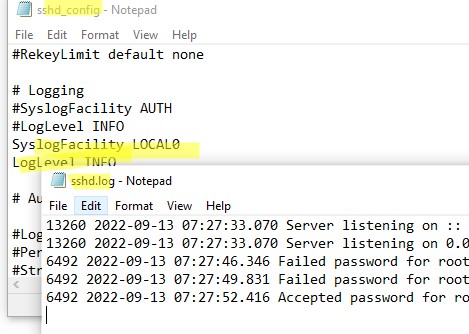
Если вы хотите, чтобы логи писались в локальный текстовый файл, нужно в файле sshd_config включить параметры:
SyslogFacility LOCAL0
LogLevel INFO
Перезапустите службу sshd и провеьте, что теперь логи SSH сервера пишутся в файл C:ProgramDatasshlogssshd.log
v9.1.0.0p1-Beta
This is a beta-release (non-production ready)
This release includes:
-
Upstream changes from OpenSSH 9.0 & OpenSSH 9.1.
-
Breaking changes — see upstream release notes for more information:
- Switches scp from using the legacy scp/rcp protocol to using the sftp protocol by default.
- SetEnv directives in ssh_config and sshd_config are now first-match-wins to match other directives. Previously if an environment variable was multiply specified the last set value would have been used.
- ssh-keygen -A (generate all default host key types) will no longer generate DSA keys.
-
Security Fixes:
- adds Mark of the Web (MOTW) to scp/sftp file transfers, when possible.
-
Fixes for various reliability issues listed here.
-
LibFido2 upgrade to version 1.12.0.
-
LibreSSL upgrade to version 3.6.1.
-
ZLib upgrade to version 1.2.13.
V8.9.1.0p1-Beta
This release includes
-
Security fixes
- Upgrade to LibreSSL 3.4.3. Please refer to #1917
-
Non-security fixes
- [FIDO] PIN is asked twice with keys generated with -O verify-required. #1918
- SSH-Agent installed through MSI is missing required privileges. #1914
- install-sshd.ps1 to allow silent installation #1916
V8.9.0.0p1-Beta
This release includes
-
Upstream changes from OpenSSH 8.9. Please note this release doesn’t have ssh-agent restriction feature. This is tracked as part of #1902.
-
Breaking change
- This release disables RSA signatures using the SHA-1 hash algorithm by default. For more information, refer to «Potentially-incompatible changes» here.
-
Security fixes
- Validate the ACLs of $env:programdatassh folder, it’s contents. This is not applicable for windows 10+ / windows server 2019+. For more information, refer to #1900
-
Non-security fixes
- FIDO/U2F hardware authenticators support to Win32-OpenSSH. Thanks to @martelletto, @akshayku.
- PKCS11 support to ssh-agent. Thanks to @yan4321.
- MSI installation package. Thanks to @tmeckel, @heaths.
- Fixes for various reliability issues listed here.
V8.6.0.0p1-Beta
This release includes
-
Upstream changes from OpenSSH 8.6. Please note this release doesn’t have FIDO support.
-
Breaking change
- SSH askpass requires
SSH_ASKPASS_REQUIREenvironment variable to be set as «prefer» (or) «force».
- SSH askpass requires
-
Security fixes
- For non en-us OS, enforce authorized keys for admin users are read from
$env:programdatasshadministrators_authorized_keys(#1757) - Ensure only admin users have access to modify the registry entries like DefaultShell (#1754)
- Use
$env:programdatasshssh_configonly if it has correct file permissions (non-admin users shouldn’t have write permissions)
(#1753)
- For non en-us OS, enforce authorized keys for admin users are read from
-
Non-security fixes
- Allow
authorizedKeysCommandto work with the System user. Thanks to @bkatyl, @NoMoreFood. - Add moduli support.
- Allow support to configure the custom shell arguments.
- Allow SSH connection when the machine name is the same as the user name. Thanks to @oldium.
- For downlevel OS (win10 below), fix the scrolling issue after reaching the end of the screen.
- Write non-English characters to ETW / logfile.
- X11 related bugs . Thanks to @riverar.
- Fixes for various reliability issues listed here.
- Allow
v8.1.0.0p1-Beta
This release includes
- Upstream changes from OpenSSH 8.1
- Added ZLIB compression
- Upgraded LibreSSL to version 2.9.2.1
- Added support for AuthorizedKeysCommand and AuthorizedPrincipalsCommand.
- Read the VTSequence using the console win32 APIs.
- Added support for windows long paths. Thanks to @NoMoreFood.
- Fixes for various reliability issues listed here.
v8.0.0.0p1-Beta
v7.9.0.0p1-Beta
v7.7.2.0p1-Beta
This is a pre-release (non-production ready)
UPDATE -We have updated ssh-shellhost.exe binary (fix for #1222) in V7.7.2.0 payload on 8/4/2018.
This release includes
- Support for auto updating known_hosts via ssh and ssh-keygen
- Optimized group membership resolution that results in vast performance improvement in processing simple user/group configuration rules.
- Fixed descriptor leaks in win32 fstat implementation(#1209) by @cbookg
- Support for handling user resolution in absence of explicit UPN (#1213) by @NoMoreFood
- Various other fixes listed here
Source — https://github.com/PowerShell/openssh-portable/releases/tag/v7.7.2.0
v7.7.1.0p1-Beta
This is a pre-release (non-production ready)
This release includes fixes for regressions introduced in v7.7.0.0.
Note
- If you configure a default shell, ensure that OpenSSH installation path is in system PATH. If not already present, amend system PATH and restart sshd service.
- Scp and Sftp are tested to work with Powershell and Cygwin’s bash as default shells. There are still issues with WSL bash (manifest as hung sessions), we are working on investigating these.
List of all issues fixed — here
Source — https://github.com/PowerShell/openssh-portable/releases/tag/v7.7.1.0
v7.7.0.0p1-Beta
This is a pre-release (non-production ready)
Regressions
- #1164 — scp and sftp won’t work if OpenSSH is installed in «Program Files» or any directory with a white space.
- Work around — install in a path with no white space — ex. c:openssh
- #1165 — SCP fails when using bash as alternative shell
Note
- This release introduces new rules for specifying user/group based configuration rules for domain principals — these should now adhere to NameSamCompatible format. For more info refer sshd_config manual.
This release includes
- OpenSSH 7.7 changes from upstream.
- Normalized user/group principal resolution — by @NoMoreFood
- Improvements to support nested groups while processing group based configuration rules — by @NoMoreFood
- Chroot support for sftp (and scp via custom shell). See sshd_config manual
- Support sshd in interactive mode (for testing and trouble shooting)
- various other fixes listed here
Source — https://github.com/PowerShell/openssh-portable/releases/tag/v7.7.0.0
SSH software downloads
Download SSH client and server software. Find trials and demos of other
software solutions.
If you are an SSH customer, you can log in and download your software
from our customer download center.


SSH Client/Server
Free trial download of Tectia SSH Client/Server — no credit card required.
Now available with Post-Quantum Cryptography (PQC) algorithms.

Privileged Access Management (PAM)
Test drive the lean PAM solution PrivX — no downloads or installation needed, browser-based interface.

SSH Key Management
Free test drive of the Universal SSH Key Manager — nothing to download, install, or configure.

SSH Key Discovery & Audit
Free SSH key and post-quantum resilience discovery and audit tool. Scan your entire SSH key estate or just a few selected servers.

Other software downloads
Windows SSH client alternatives
Mac SSH client alternatives
Free SSH servers
Most Linux systems come with the open source OpenSSH preinstalled.
What we do
PrivX®
Privileged Access Management (PAM)
PrivX is the next-generation PAM solution featuring unparalleled ease-of-use, cost-efficiency and automation.
PrivX is perfect for securing, managing and tracking superuser and power user access in the hybrid cloud — by also eliminating risky privileged passwords from critical infrastructures.

Universal SSH key manager®
Enterprise Key Management (EKM)
UKM Zero Trust is the leading full lifecycle SSH Encryption Key management solution trusted by many of the world’s largest enterprises.
UKM Zero Trust manages and automates the lifecycle of millions of encryption keys for risk mitigation and audit success — also by making access keyless.

NQX™
Quantum Safe Cryptography (QSC)
NQX is an ultra-secure quantum-safe encryption solution for transporting Ethernet and IP traffic across any network, private or public.
Software-based NQX features matchless performance and security using cost-effective off-the-shelf hardware for post quantum cryptography (PQC).

Tectia®
Fast and secure SSH file transfers
Tectia is the gold standard in secure remote access, encrypted file transfers and A2A tunneling, featuring enterprise-grade reliability, industry-leading efficiency and 24/7 support.
Available for all major operating systems, including Windows, Unix, Linux & z/OS.

SSH deltagon suite
Critical information sharing
Deltagon Suite protects your sensitive and confidential emails, signatures, webforms and shared files with a high level of security and encryption that also meets strict regulatory requirements like GDPR.
Share critical information between organizations in a secure fashion.

expertise for our customers
Professional services
We want to become your trusted advisors in all matters of encryption and secure access to ensure that your business runs without disruptions or security concerns.
We also provide 24/7 support for our products. Help is always just a phone call away.

Software demos and trials
We are happy to help with enterprise trials, POCs, demos, and comparisons for PrivX, UKM, Tectia, NQX, and Deltagon Suite.

Documentation » Using WinSCP » Guides » Other »
Recently, Microsoft has released a port of OpenSSH for Windows. You can use the package to set up an SFTP/SSH server on Windows.
- Installing SFTP/SSH Server
- On Windows 11 and Windows 10
- On earlier versions of Windows
- Configuring SSH server
- Setting up SSH public key authentication
- Connecting to the server
- Finding Host Key
- Connecting
- Further reading
Advertisement
Installing SFTP/SSH Server
On Windows 11 and Windows 10
- On Windows 11:
- Go to Settings > Apps > Optional features and click on View features.
- Locate “OpenSSH server” feature, select it, click Next, and then click Install.
- On Windows 10 (version 1803 and newer):
- Go to Settings > Apps > Apps & features > Optional features and click on Add a feature.
- Locate “OpenSSH server” feature, expand it, and select Install.
Binaries are installed to %WINDIR%System32OpenSSH. Configuration file (sshd_config) and host keys are installed to %ProgramData%ssh (only after the server is started for the first time).
You may still want to use the following manual installation if you want to install a newer version of OpenSSH than the one built into Windows.
On earlier versions of Windows
- Download the latest OpenSSH for Windows binaries (package
OpenSSH-Win64.ziporOpenSSH-Win32.zip) - As the Administrator, extract the package to
C:Program FilesOpenSSH - As the Administrator, install sshd and ssh-agent services:
powershell.exe -ExecutionPolicy Bypass -File install-sshd.ps1
Configuring SSH server
- Allow incoming connections to SSH server in Windows Firewall:
- When installed as an optional feature, the firewall rule “OpenSSH SSH Server (sshd)” should have been created automatically. If not, proceed to create and enable the rule as follows.
- Either run the following PowerShell command as the Administrator:
New-NetFirewallRule -Name sshd -DisplayName 'OpenSSH SSH Server' -Enabled True -Direction Inbound -Protocol TCP -Action Allow -LocalPort 22 -Program "C:WindowsSystem32OpenSSHsshd.exe"
Replace
C:WindowsSystem32OpenSSHsshd.exewith the actual path to thesshd.exe(C:Program FilesOpenSSHssh.exe, had you followed the manual installation instructions above). - or go to Windows Security > Firewall & network protection1 > Advanced Settings > Inbound Rules and add a new rule for port 22.
- Start the service and/or configure automatic start:
- Go to Control Panel > System and Security > Administrative Tools and open Services. Locate OpenSSH SSH Server service.
- If you want the server to start automatically when your machine is started: Go to Action > Properties (or just double-click the service). In the Properties dialog, change Startup type to Automatic and confirm.
- Start the OpenSSH SSH Server service by clicking the Start the service link or Action > Start in the menu.
Advertisement
These instructions are partially based on the official deployment instructions.
Setting up SSH public key authentication
Follow a generic guide for Setting up SSH public key authentication in *nix OpenSSH server, with the following difference:
- Create the
.sshfolder (for theauthorized_keysfile) in your Windows account profile folder (typically inC:Usersusername.ssh).2 - For permissions to the
.sshfolder and theauthorized_keysfile, what matters are Windows ACL permissions, not simple *nix permissions. Set the ACL so that the respective Windows account is the owner of the folder and the file and is the only account that has a write access to them. The account that runs OpenSSH SSH Server service (typicallySYSTEMorsshd) needs to have read access to the file. - Though, with the default Win32-OpenSSH configuration there is an exception set in
sshd_configfor accounts inAdministratorsgroup. For these, the server uses a different location for the authorized keys file:%ALLUSERSPROFILE%sshadministrators_authorized_keys(i.e. typicallyC:ProgramDatasshadministrators_authorized_keys).
Connecting to the server
Finding Host Key
Before the first connection, find out the fingerprint of the server’s host key by using ssh-keygen.exe for each file.
In Windows command-prompt, use:
for %f in (%ProgramData%sshssh_host_*_key) do @%WINDIR%System32OpenSSHssh-keygen.exe -l -f "%f"
Replace %WINDIR%System32 with %ProgramFiles%, if appropriate.
In PowerShell, use:
Get-ChildItem $env:ProgramDatasshssh_host_*_key | ForEach-Object { . $env:WINDIRSystem32OpenSSHssh-keygen.exe -l -f $_ }
Replace $env:WINDIRSystem32 with $env:ProgramFiles, if appropriate.
You will get an output like this:
C:WindowsSystem32OpenSSH>for %f in (%ProgramData%sshssh_host_*_key) do @%WINDIR%System32OpenSSHssh-keygen.exe -l -f "%f"
1024 SHA256:K1kYcE7GHAqHLNPBaGVLOYBQif04VLOQN9kDbiLW/eE martin@example (DSA)
256 SHA256:7pFXY/Ad3itb6+fLlNwU3zc6X6o/ZmV3/mfyRnE46xg martin@example (ECDSA)
256 SHA256:KFi18tCRGsQmxMPioKvg0flaFI9aI/ebXfIDIOgIVGU martin@example (ED25519)
2048 SHA256:z6YYzqGiAb1FN55jOf/f4fqR1IJvpXlKxaZXRtP2mX8 martin@example (RSA)
Connecting
Start WinSCP. Login dialog will appear. On the dialog:
- Make sure New site node is selected.
- On New site node, make sure the SFTP protocol is selected.
- Enter your machine/server IP address (or a hostname) into the Host name box.
- Enter your Windows account name to the User name box. It might have to be entered in the format
user@domainif running on a domain. - For a public key authentication:
- Press the Advanced button to open Advanced site settings dialog and go to SSH > Authentication page.
- In Private key file box select your private key file.
- Submit Advanced site settings dialog with the OK button.
- For a password authentication:
- Enter your Windows account password to the Password box.
- If your Windows account does not have a password, you cannot authenticate with the password authentication (i.e. with an empty password), you need to use the public key authentication.
- Save your site settings using the Save button.
- Login using Login button.
- Verify the host key by comparing fingerprints with those collected before (see above).
Advertisement
If you cannot authenticate to the server and use Windows 10 Developer mode, make sure that your OpenSSH server does not conflict with an internal SSH server used by the Developer mode. You may need to turn off the SSH Server Broker and SSH Server Proxy Windows services. Or run your OpenSSH server on a different port than 22.
Further reading
- Guide to Installing Secure FTP Server on Windows using IIS;
- Guide to uploading files to SFTP server;
- Guide to automating operations (including upload).
Last modified: 2022-10-24 by martin
SSH • Компьютерные истории • Конфигурирование • Windows • OpenSSH • Истории

Несколько лет назад я прочитал о том, что Microsoft собирается реализовывать настоящий SSH сервер в своей флагманской операционной системе, то бишь, в Windows 10. Если уж быть совсем точным, было это в 2015 году, сообщение было размещено в блоге команды, занимающейся развитием PowerShell. С тех пор сообщение «переезжало», но я, все-таки, оставлю актуальную (на данный момент) ссылку — для истории, так сказать.
Я тогда активно интересовался вопросами удаленного управления компьютерами, и мне было интересно, как с этим делом обстоят дела у Windows. Понятно, конечно, что можно использовать удаленный рабочий стол, его аналоги от Google или TeamViewer, или поставить сторонний софт, тот же OpenSSH. Но я, если честно, значительно чаще и с большим удовольствием отдаю предпочтение решениям, интегрированным в используемый продукт, будь то средство программирования, используемые библиотеки языка программирования или программы, предназначенные для решения каких-то проблем и вопросов.
Конечно, надо признать, что эти дополнительные встроенные возможности практически всегда проигрывают по набору каких-то характеристик сторонним специализированным разработкам, что, собственно, не удивительно: если вы разрабатываете узкоспециализированную программу, то вы заведомо лучше должны реализовывать различные требования, да и сам набор требований можете существенно расширить, обогатив тем самым конечный продукт; реализуя же какую-то встроенную функциональность, лежащую несколько в стороне от основного продукта, вы, чаще всего, идете на множество упрощений и допущений — ведь определяющим для вас в этом случае является ваш главный продукт, а дополнительные встроенные возможности — лишь приятный бонус для пользователей.
Но если у вас, как у потребителя, не самые требовательные запросы, и вам надо всего лишь удовлетворить свои весьма поверхностные «хотелки», то стоит ли устанавливать и настраивать супер-мега-комбайны? Вряд ли — пословица «из пушки по воробьям» актуальна значительно чаще, чем мы думаем. К тому же, в данном конкретном случае, все выглядело так, словно речь не идет о какой-то второстепенной вспомогательной функции — Microsoft анонсировала использование , в качестве основы, того самого OpenSSH, да еще и оформила все в виде open source проекта.
Так вот, изучая возможности удаленного управления Windows, я, как говорится, взял на карандаш, что планируется к реализации встроенный SSH сервер. Понятно, что когда речь идет о Microsoft, то ни в чем нельзя быть уверенным до конца. К счастью, сейчас уже можно утверждать, что не в этот раз. Несколько раз за прошедшие три года я вспоминал про эти обещания и проверял, так сказать, состояние дел, каждый раз убеждаясь в том, что процесс, в принципе, движется. Правда, когда я углублялся в тему, например, пытался прояснить для себя, что надо сделать, чтобы заставить все это хозяйство работать, то довольно быстро приходило осознание того, что продукт все еще довольно сырой и вряд ли текущая реализация позволит воспользоваться даже заявленным функционалом на все 100 процентов.
Но время шло, странностей и явных обходных маневров в различных описаниях процесса установки, настройки и использования становилось все меньше и меньше, и вот настал, наконец, момент, когда я решил, что можно попробовать со всем этим делом разобраться и попытаться таки запустить встроенный SSH сервер. Конечно, обострение интереса случилось не просто так, появилась причина, которая заставила меня несколько форсировать события.
Дело в том, что у меня постепенно заканчивается место на моем сетевом устройстве MyBookLiveDuo (на MyBookLive место закончилось уже давно). Пока есть еще около 500 гигабайт, но практика показывает, что к дедлайну лучше подготовиться заранее. Поэтому я достал из загашника USB диск на два терабайта и подключил его к своему серверу. После чего осталось понять, как теперь с этим диском взаимодействовать: до сих пор все мои хранилища были под управлением Linux, а этот оказался подключен к компьютеру с Windows 10 на борту. А я, если честно, уже привык и вполне освоился со всеми этими стандартными сценариям работы с Linux — SSH, монтирование удаленных каталогов и так далее и тому подобное. Отказываться от накопленных знаний не хотелось, и тут, очень кстати, вспомнились обещания Microsoft.
После непродолжительных поисков, в интернете нашлось более-менее внятное описание процесса установки и настройки, оно было относительно недавним и рассказывало про бета версию SSH сервера[1]. Не откладывая в долгий ящик, я принялся реализовывать описанный сценарий, мысленно приготовившись проходить очередной квест [2]. Каково же было мое искреннее удивление, когда выяснилось, что все значительно проще. Именно, что значительно. Но, обо всем по-порядку.
Итак, как уже писал выше, я стал по шагам проходить инструкцию. Несмотря на то, что уже некоторое время вожусь с Linux, я до сих пор так и не стал ярым приверженцем командной строки, и, когда есть такая возможность, проявляю слабость, пользуясь инструментами с GUI. Вот и в этот раз я отдал предпочтение первой части инструкции, хотя честно прочитал и ту часть, которая описывала установку SSH сервера с использованием командной строки PowerShell. Но GUI, значит GUI… Вот как все происходило:
Шаг 1. Открываем Настройки Windows. Сделать это можно через меню Пуск или Центр Уведомлений
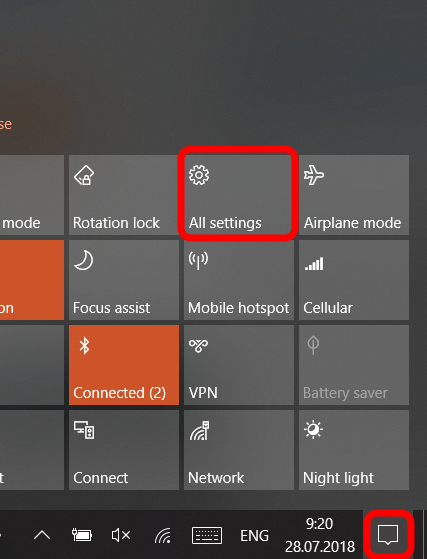
или же, еще проще — использовав комбинацию клавиш «`Win + I«`.
Шаг 2. В появившемся окне надо выбрать Приложения
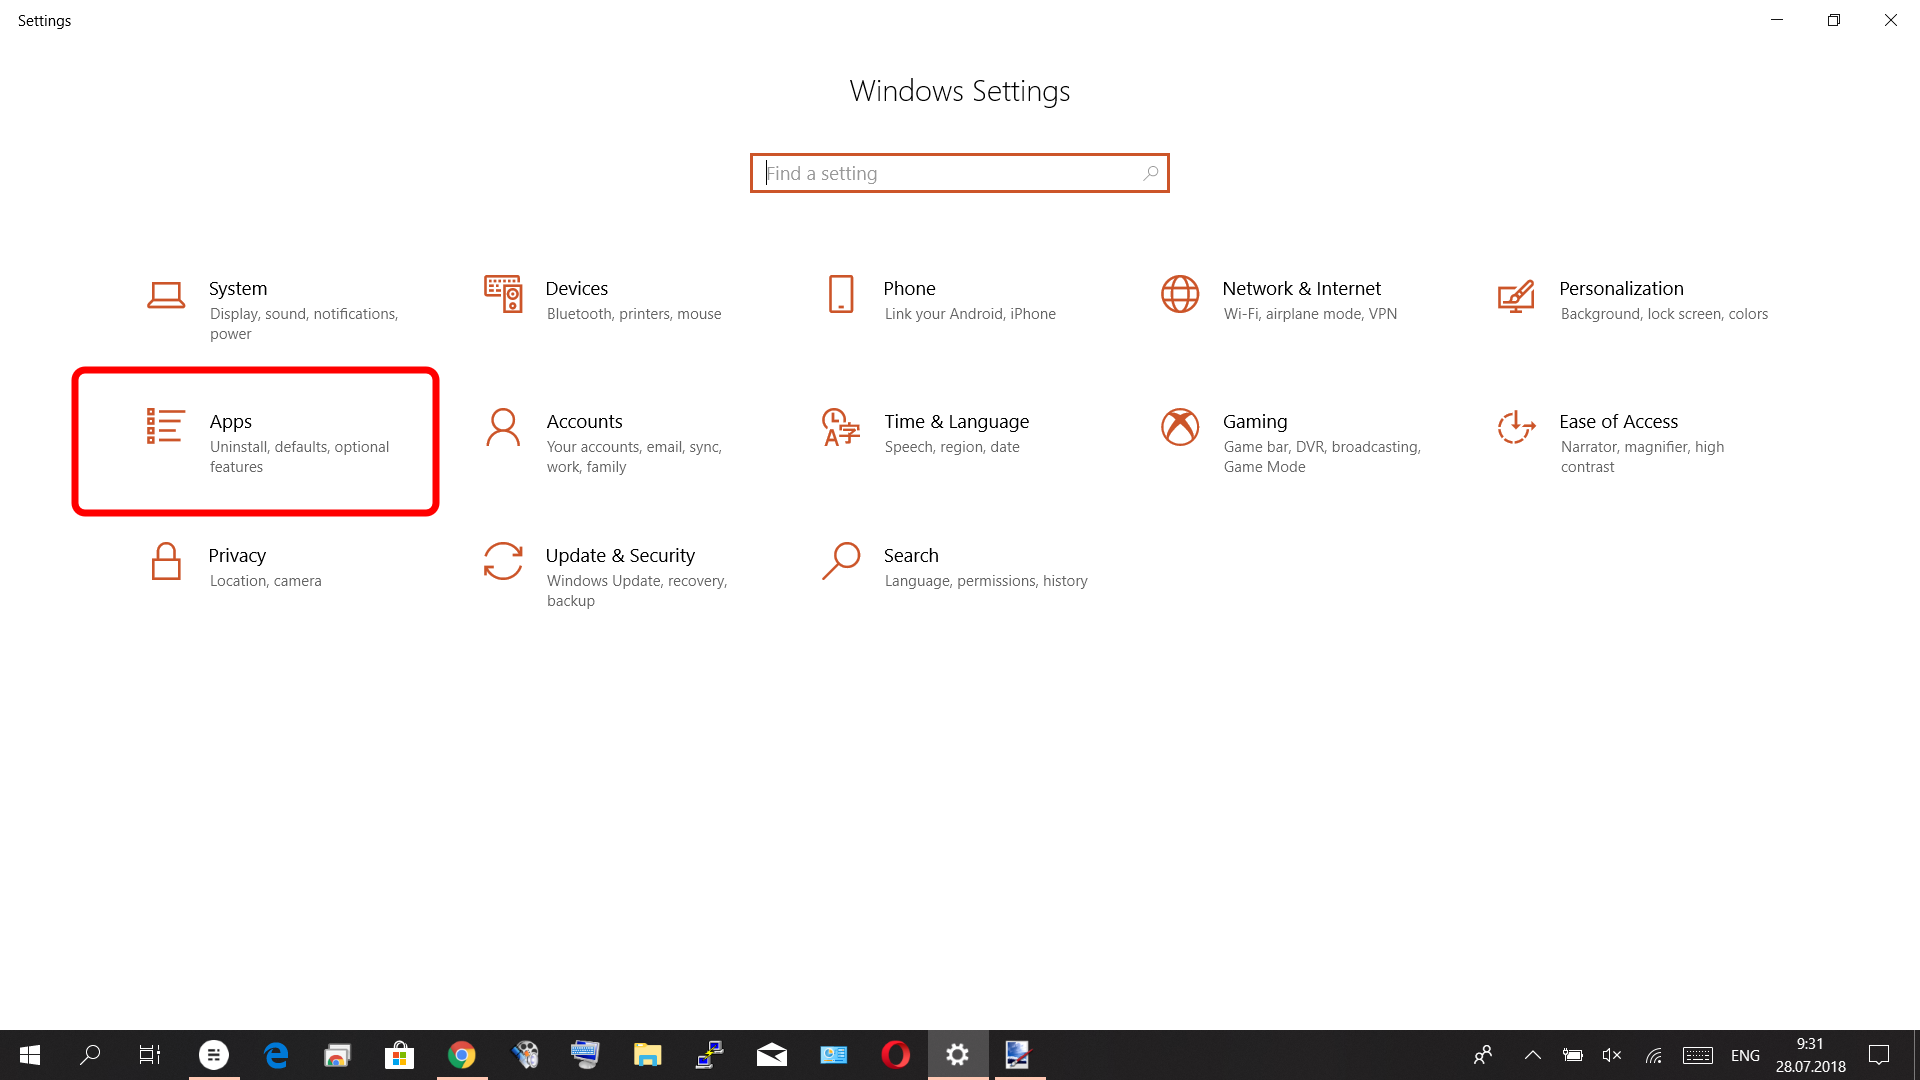
Шаг 3. В списке Приложения и возможности надо выбрать пункт Управление дополнительными компонентами.

Шаг 4. Теперь надо нажать кнопку Добавить компонент. Это откроет список дополнительных компонентов, которые могут быть установлены.
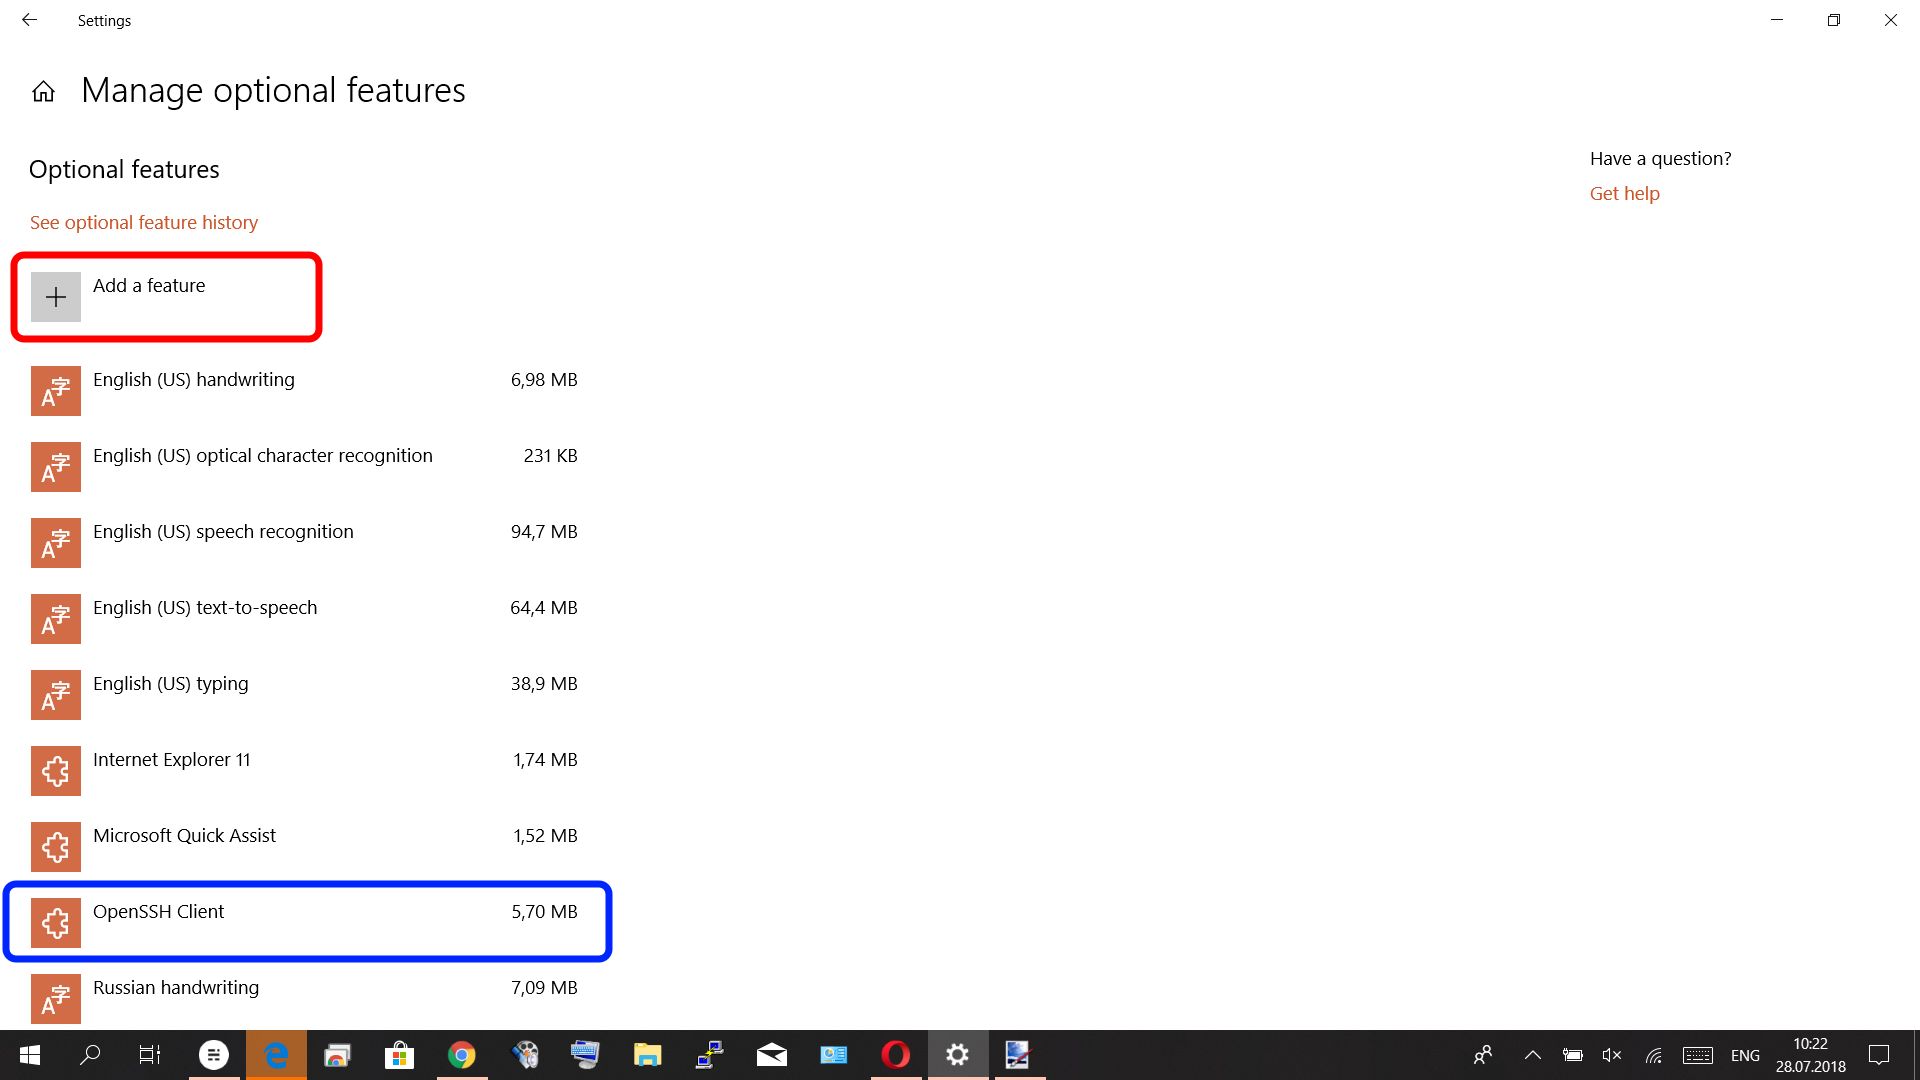
Обратите внимание на то, что в списке уже установленных дополнительных компонентов присутстует… SSH Client. Это меня немного насторожило, так как в используемом мною источнике рассказывалось не только об установке сервера, но и об установке клиента. А тут получалось, что клиента устанавливать не надо. Ладно, это, конечно, отличие, но оно косвенное и пока не критичное.
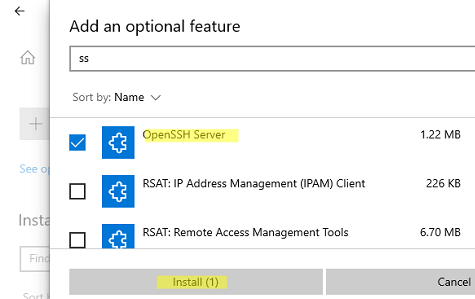
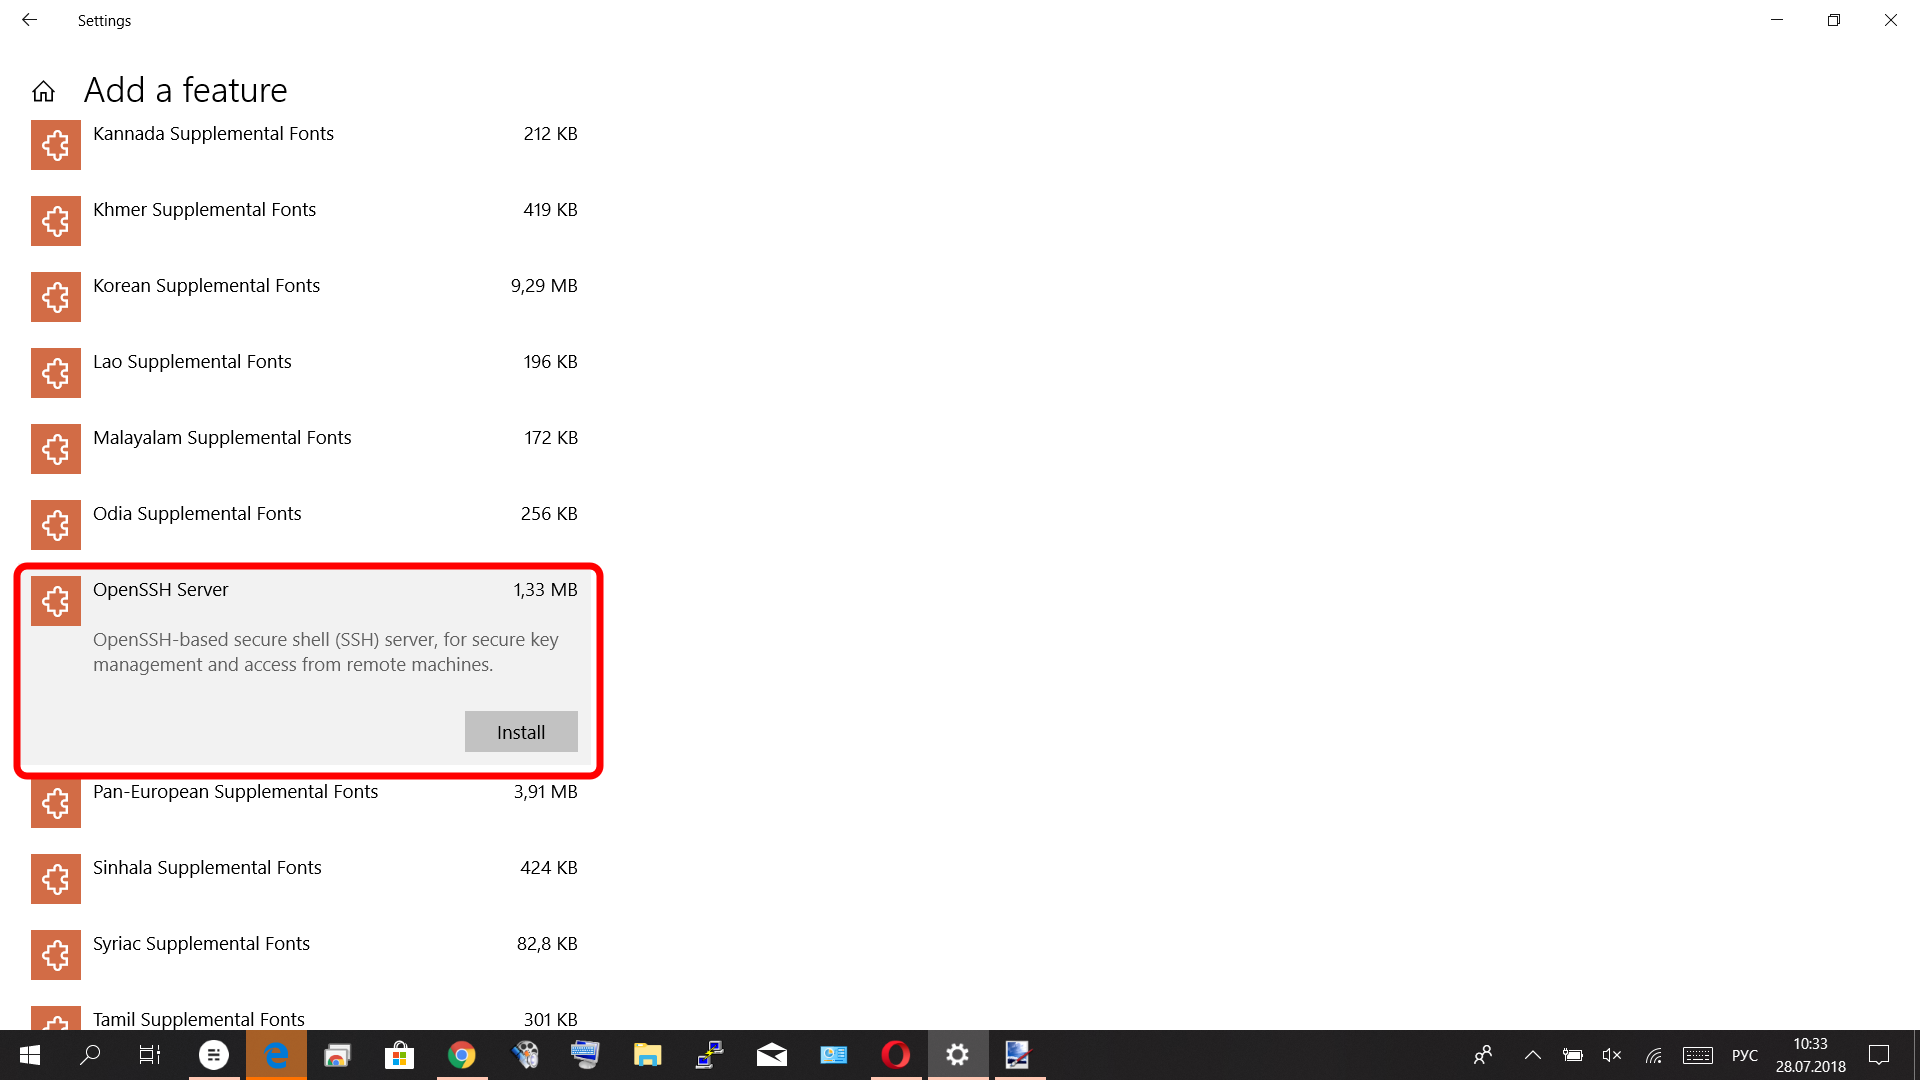
Шаг 5. Устанавливаем SSH Server. В списке дополнительных компонентов довольно много пакетов шрифтов, но, если прокрутить вниз, то можно увидеть OpenSSH Server.
И вот тут-то я окончательно понял, что инструкция устарела. Для наглядности приведу картинку из инструкции:
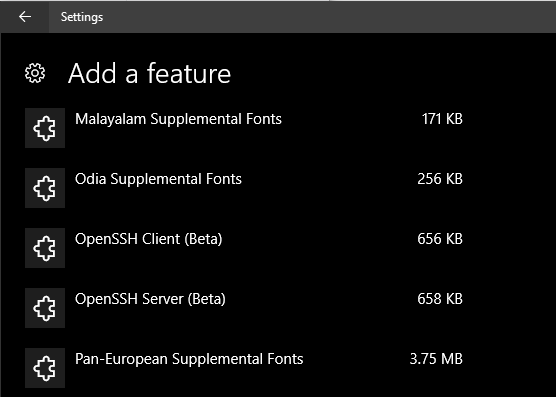
Eсли отбросить разницу в цвете фона, то бросается в глаза два факта:
- Есть возможность, как я уже говорил, установки и
SSH ClientиSSH Server - Оба этих компонента помечены, как
beta(!) версии, в моем же случае, у сервера (да и у уже установленного клиента) такой пометки нет
На этом месте меня начали одолевать сомнения — смогу ли я дойти до завершения процесса установки, пользуясь устаревшей инструкцией. Немного поразмыслив, я решил понадеяться на то, что раз программное обеспечение лишилось пометки beta, то хуже уж точно не стало, и… нажал кнопку Install.
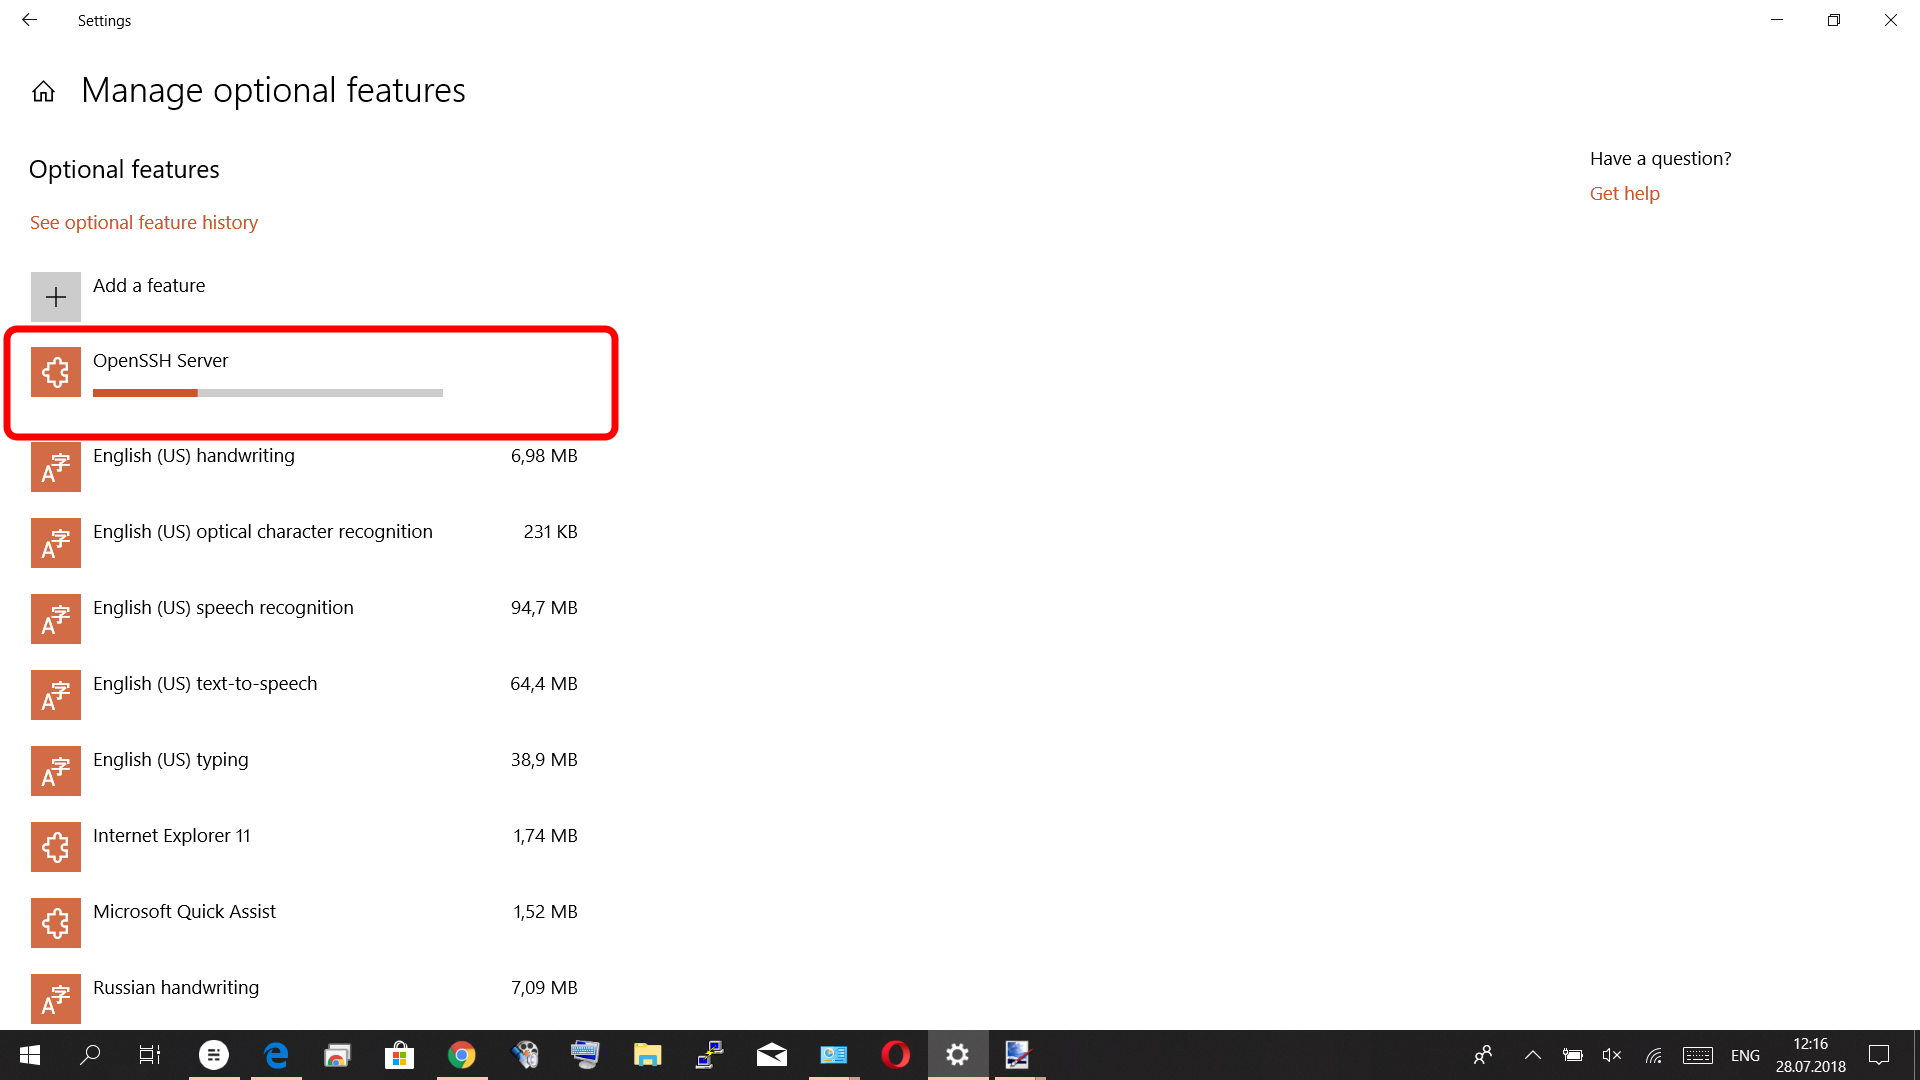
Как оказалось, этого было достаточно для завершения установки. То есть, через некоторое время установка завершилась и … все! Вот он, уже установленный SSH сервер, в списке дополнительных компонентов, рядом с клиентом:

Я перешел в список сервисов — там тоже красовался только что установленный SSH сервер:

До этого я встречал в интернете информацию о том, что существуют определенные проблемы с запуском сервиса, что надо вручную генерировать ключи, делать еще какие-то телодвижения. Учитывая все эти истории и особо не надеясь на успех, я, тем не менее, попробовал запустить сервис. Каково же было мое удивление и, честно говоря, радость, когда сервис просто молча запустился. Видимо, все шероховатости были устранены в процессе бета-тестирования и релиз вышел без явных видимых проблем.
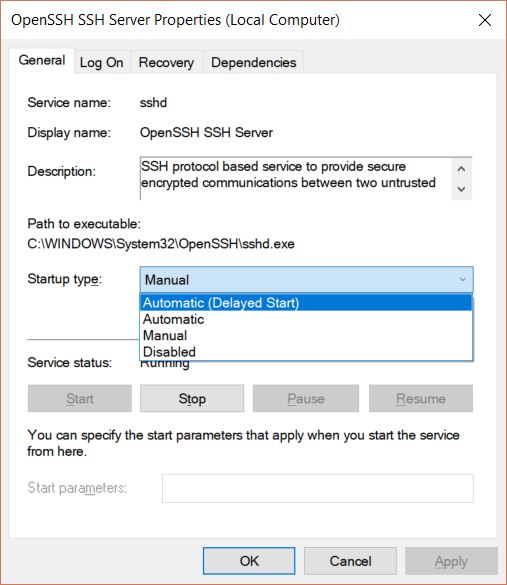
Так что, осталось лишь определиться, как мы хотим, чтобы сервис запускался. Так как установку я производил на сервере, то и запуск мне требовался не ручной, а автоматический. На всякий случай, я выбрал режим запуска Automatic (Delayed Start), то есть, запуск автоматический, но с задержкой, чтобы перед ним могли стартовать другие сервисы, наличие которых, возможно, потребуется для работы сервиса SSH Server (хотя, вкладка Dependencies пуста).
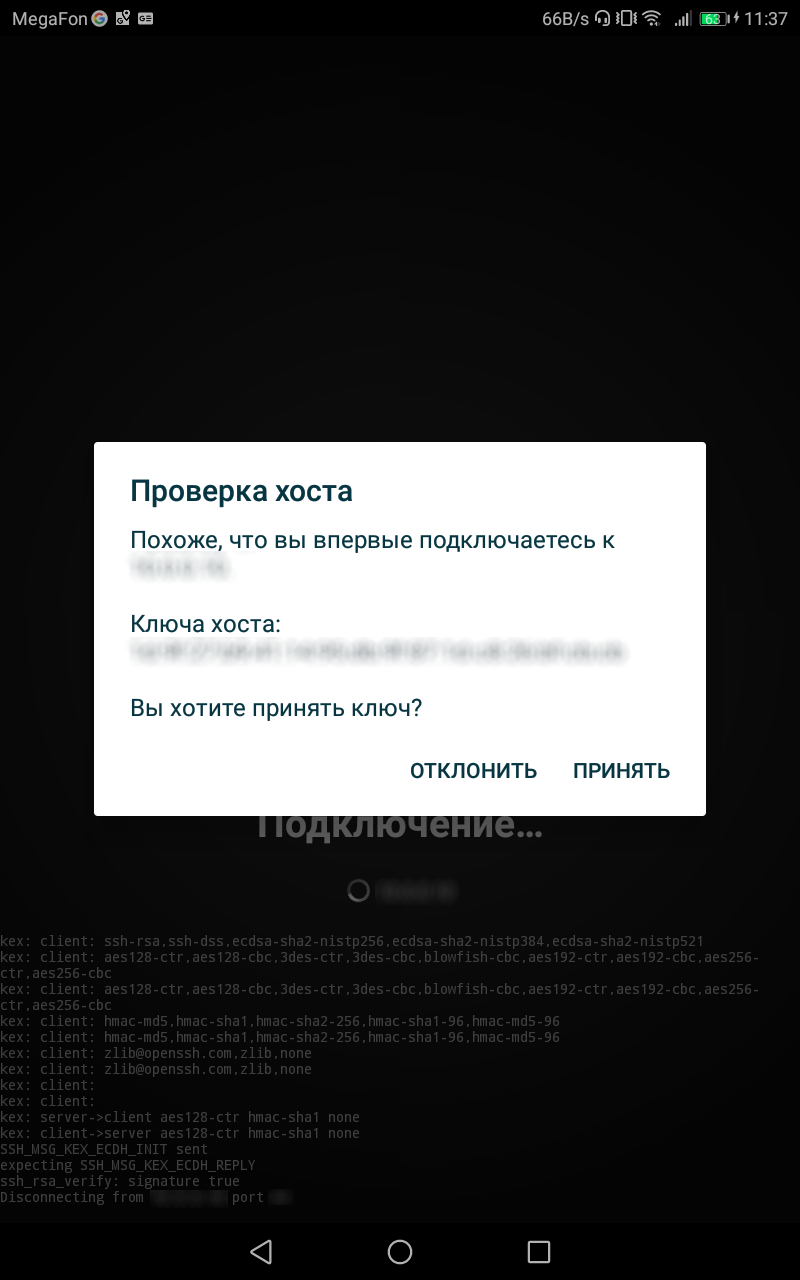
Я сделал попытку установить соединение по SSH с планшета — все было, как обычно: запрос на подтверждение принятия ключа сервера, согласие, ввод пароля — и вот я уже в командной строке. И да, это — командная строка Windows, хотя бы потому, что команда dir нормально распозналась и отработала.

Вот, пожалуй, и все, что следует знать про установку встроенного SSHсервера Windows. Конечно, есть еще масса вопросов, связанных с тем, как к нему подсоединяться, что и как можно делать в командной строке. Но это все темы для отдельного разговора (или, даже, разговоров 😉), так что, подождем…
-
Вот что меня действительно удивляет, так это то, что документации для актуальной версии мне так найти и не удалось ↩︎
-
отсылка к играм-головоломкам не случайна, довольно часто при такого рода действиях приходится решать много дополнительных задач и преодолевать неожиданные сложности ↩︎
Subscribe to Записки на полях
Get the latest posts delivered right to your inbox
Great! Check your inbox and click the link to confirm your subscription.
Please enter a valid email address!