Installing a Secure Sockets Layer (SSL) certificate on your WordPress site enables it to use HTTPS to ensure secure connections. Unfortunately, there are a variety of things that can go wrong in the process of confirming a valid SSL certificate and making a connection between your site’s server and a visitor’s browser.
If you’ve encountered an “SSL Handshake Failed” error message and are confused as to what it means, you’re not alone. It’s a common error that doesn’t tell you much on its own. While this can be a frustrating experience, the good news is that there are simple steps you can take to resolve the issue.
In this post, we’ll explain what the SSL Handshake Failed error is and what causes it. Then we’ll provide you with several methods you can use to fix it.
Let’s get started!
An Introduction to the SSL Handshake
Before we dig deeper into what causes a TLS or SSL handshake failure, it’s helpful to understand what the TLS/SSL handshake is. Secure Sockets Layer (SSL) and Transport Layer Security (TLS) are protocols used to authenticate data transfers between servers and external systems such as browsers.
SSL certificates are needed in order to secure your website using HTTPS. We won’t get too in-depth about the difference between TLS vs SSL since it’s a minor one. The terms are often used interchangeably, so for simplicity’s sake, we’ll use “SSL” to refer to both.
With that out of the way, an SSL handshake is the first step in the process of establishing an HTTPS connection. To authenticate and establish the connection, the user’s browser and the website’s server must go through a series of checks (the handshake), which establish the HTTPS connection parameters.
Let us explain: the client (typically the browser) sends a request for a secure connection to the server. After the request is sent, the server sends a public key to your computer and checks that key against a list of certificates. The computer then generates a key and encrypts it, using the public key sent from the server.
To make a long story short, without the SSL handshake, a secure connection won’t be made. This can pose a significant security risk. Plus, there are a lot of moving parts involved in the process.
That means there are many different opportunities for something to go wrong and cause a handshake failure, or even lead to the “your connection is not private” error, causing visitors to leave.
Confronted with the ‘SSL Handshake Failed’ error? 🤝 Get a grip on how to solve it with these 5 methods ⤵️Click to Tweet
Understanding What Causes SSL Handshake Failures
An SSL Handshake Failure or Error 525 means that the server and browser were unable to establish a secure connection. This can happen for a variety of reasons.
Generally, an Error 525 means that the SSL handshake between a domain using Cloudflare and the origin web server failed:

However, it’s also important to understand that SSL errors can happen on the client-side or the server-side. Common causes of SSL errors on the client-side include:
- The wrong date or time on the client device.
- An error with the browser configuration.
- A connection that is being intercepted by a third party.
Some server-side causes include:
- A cipher suite mismatch.
- A protocol used by the client that isn’t supported by the server.
- A certificate that is incomplete, invalid, or expired.
Typically, if the SSL handshake fails, the issue can be attributed to something wrong with the website or server and their SSL configurations.
How to Fix the SSL Handshake Failed Error (5 Methods)
There are several potential causes behind the “SSL Handshake Failed” error. So there’s no simple answer when it comes to how you should fix it.
Fortunately, there are a handful of methods you can use to begin exploring potential issues and resolving them one by one. Let’s take a look at five strategies you can use to try and fix the SSL Handshake Failed error.
1. Update Your System Date and Time
Let’s start with one of the more unlikely causes, but one that is incredibly easy to correct if it is the problem: your computer’s clock.
If your system is using the wrong date and time, that may interrupt the SSL handshake. When the system clock is different than the actual time, for example, if it’s set too far into the future, it can interfere with the SSL certificate verification.
Your computer’s clock might have been set incorrectly due to human error or simply due to a glitch in your settings. Whatever the reason, it’s a good idea to check and make sure your system time is correct, and update it if it’s not.
Of course, if your clock is showing the correct information, it’s safe to assume that this isn’t the source of the “SSL Handshake Failed” issue.
2. Check to See If Your SSL Certificate Is Valid
Expiration dates are placed on SSL certificates, to help make sure their validation information remains accurate. Generally, the validity of these certificates lasts for anywhere between six months and two years.
If an SSL certificate is revoked or expired, the browser will detect this and be unable to complete the SSL handshake. If it’s been more than a year or so since you installed an SSL certificate on your website, it might be time to reissue it.
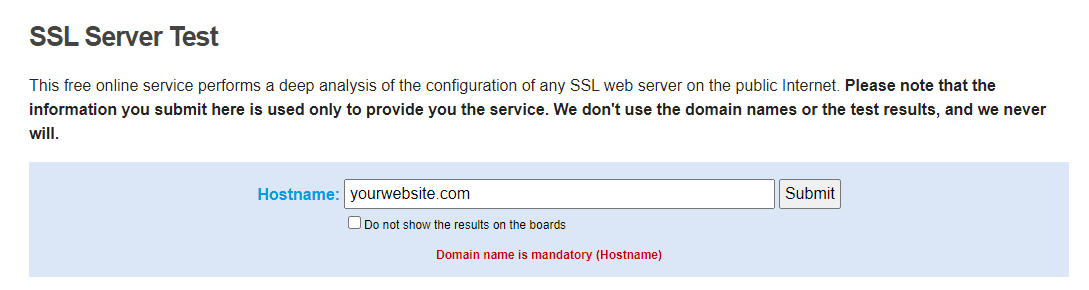
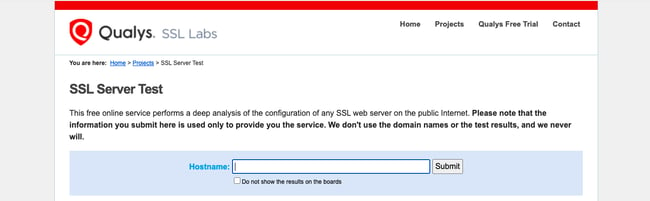
To view the status of your SSL certificate, you can use an SSL certificate checker tool such as the one offered by Qualys:
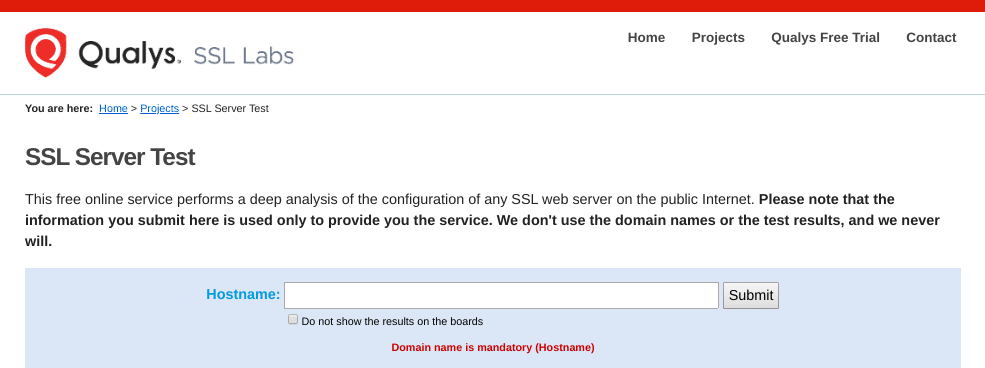
This tool is both reliable and free to use. All you need to do is input your domain name into the Hostname field, and then click on Submit. Once the checker is done analyzing your site’s SSL configuration, it will present you with some results:
On this page, you can find out if your certificate is still valid and see if it has been revoked for any reason.
In either case, updating your SSL certificate should resolve the handshake error (and is vital for keeping your site and your WooCommerce store secure).
3. Configure Your Browser for the Latest SSL/TLS Protocol Support
Sometimes the best way to determine the root cause of an issue is by process of elimination. As we mentioned earlier, the SSL handshake failure can often occur due to a browser misconfiguration.
The quickest way to determine whether a particular browser is the problem is to try switching to a different one. This can at least help narrow down the problem. You may also try disabling any plugins and resetting your browser back to its default settings.
Another potential browser-related issue is a protocol mismatch. For example, if the server only supports TLS 1.2, but the browser is only configured for TLS 1.0 or TLS 1.1, there’s no mutually-supported protocol available. This will inevitably lead to an SSL handshake failure.
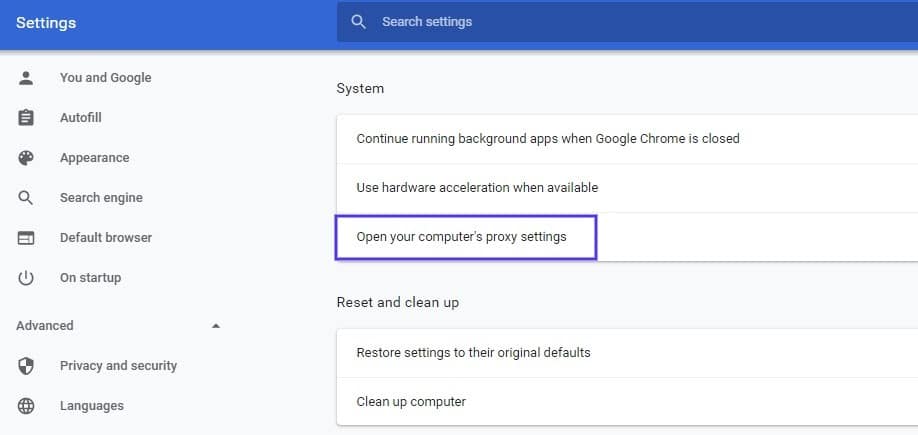
How you can check to see if this problem is occurring varies based on the browser you’re using. As an example, we’ll look at how the process works in Chrome. First, open your browser and go to Settings > Advanced. This will expand a number of menu options.
Under the System section, click on Open your computer’s proxy settings:
This will open up a new window. Next, select the Advanced tab. Under the Security section, check to see if the box next to Use TLS 1.2 is selected. If not, check that option:
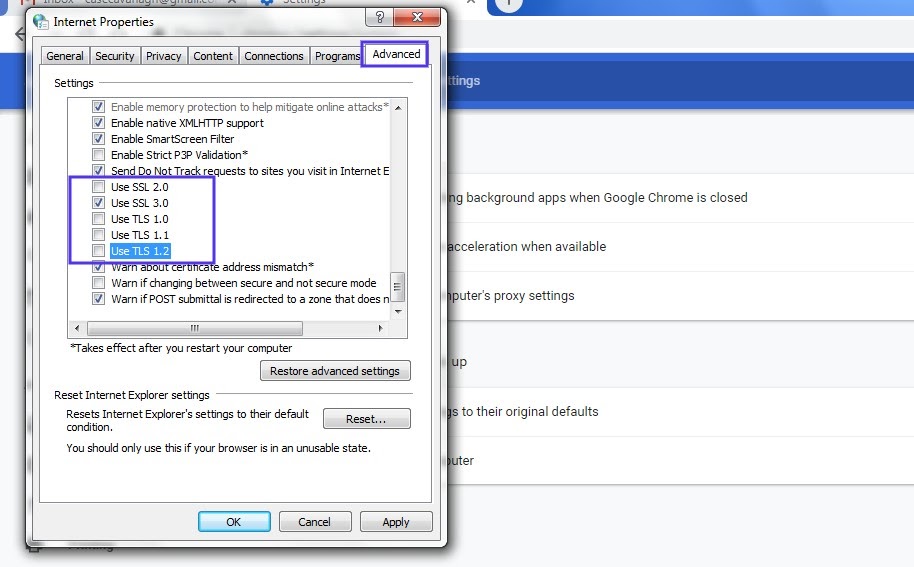
It’s also recommended that you uncheck the boxes for SSL 2.0 and SSL 3.0.
The same applies to TLS 1.0 and TLS 1.1 since they are being phased out. When you’re done, click on the OK button, and check to see if the handshake error has been resolved.
Note that if you’re using Apple Safari or Mac OS there isn’t an option to enable or disable SSL protocols. TLS 1.2 is automatically enabled by default. If you’re using Linux, you can refer to the Red Hat guide on TLS hardening.
4. Verify That Your Server Is Properly Configured to Support SNI
It’s also possible that the SSL handshake failure is being caused by improper Server Name Indication (SNI) configuration. The SNI is what enables a web server to securely host several TLS certificates for one IP address.
Each website on a server has its own certificate. However, if the server isn’t SNI-enabled, that can result in an SSL handshake failure, because the server may not know which certificate to present.
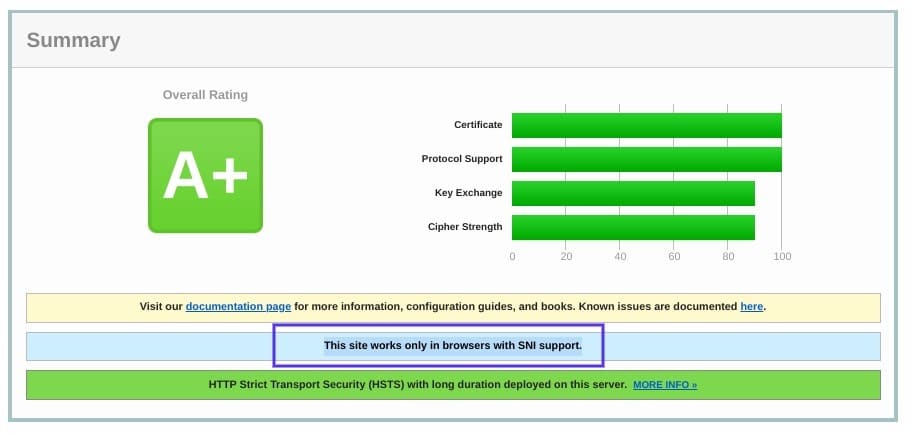
There are a few ways to check and see whether a site requires SNI. One option is to use Qualys’ SSL Server Test, which we discussed in the previous section. Input your site’s domain name, and then click on the Submit button.
On the results page, look for a message that reads “This site works only in browsers with SNI support”:
Another approach for detecting if a server is using SNI is to browse the server names in the ‘ClientHello’ message. This is a more technical process, but it can offer a lot of information.
It involves checking the extended hello header for a ‘server_name’ field, to see if the correct certifications are presented.
If you’re familiar with using tools such as the OpenSSL toolkit and Wireshark, you might find this method preferable. You can use openssl s_client with and without the -servername option:
# without SNI
 $ openssl s_client -connect host:port

 # use SNI
 $ openssl s_client -connect host:port -servername host
If you get two different certificates with the same name, it means that the SNI is supported and properly configured.
However, if the output in the returned certificates is different, or the call without SNI cannot establish an SSL connection, it indicates that SNI is required but not correctly configured. Resolving this issue may require switching to a dedicated IP address.
5. Make Sure the Cipher Suites Match
If you still haven’t been able to identify the cause of the SSL handshake failure, it might be due to a cipher suite mismatch. In case you’re unfamiliar with the term, ‘cipher suites’ refer to a set of algorithms, including ones for key exchange, bulk encryption, and message authentication code, that can be used for securing SSL and TLS network connections.
If the cipher suites that a server uses don’t support or match what’s used by Cloudflare, that can result in an “SSL Handshake Failed” error.
When it comes to figuring out whether there is a cipher suite mismatch, Qualys’ SSL Server Test proves yet again to be a useful tool.
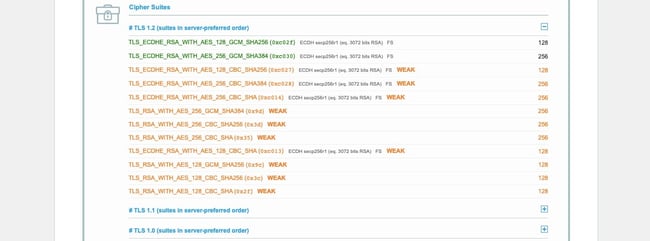
When you input your domain and click on Submit, you’ll see a summary analysis page. You can find the cipher information under the Cipher Suites section:
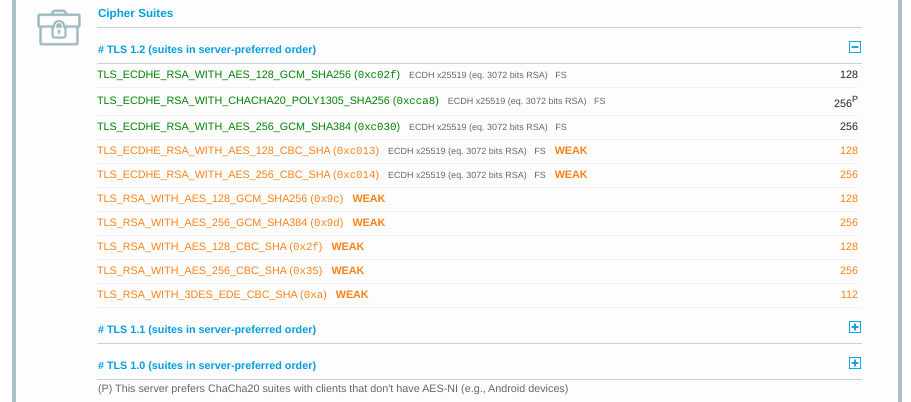
You can use this page to discover which ciphers and protocols the server supports. You’ll want to look out for any that display the ‘weak’ status. In addition, this section also details the specific algorithms for the cipher suites.
To correct this issue, you can compare the results against what your browser supports by using the Qualys SSL/TLS Capabilities of Your Browser tool. For more extensive information and guidance about cipher suites, we also recommend checking out the ComodoSSLStore guide.
Confused by the ‘SSL Handshake Failed’ error message? This guide explains what it is and, most importantly, 5 ways to fix it 🙌Click to Tweet
Summary
One of the most perplexing yet common types of SSL-related problems is the “SSL Handshake Failed” error. Dealing with this error can be stressful since it has many potential causes, including both client- and server-side issues.
However, there are some reliable solutions you can use to identify the problem and resolve it. Here are five ways you can use to fix the SSL Handshake Failed error:
- Update your system date and time.
- Check to see if your SSL certificate is valid (and reissue it if necessary).
- Configure your browser to support the latest TLS/SSL versions.
- Verify that your server is properly configured to support SNI.
- Make sure the cipher suites match.
Get all your applications, databases and WordPress sites online and under one roof. Our feature-packed, high-performance cloud platform includes:
- Easy setup and management in the MyKinsta dashboard
- 24/7 expert support
- The best Google Cloud Platform hardware and network, powered by Kubernetes for maximum scalability
- An enterprise-level Cloudflare integration for speed and security
- Global audience reach with up to 35 data centers and 275+ PoPs worldwide
Test it yourself with $20 off your first month of Application Hosting or Database Hosting. Explore our plans or talk to sales to find your best fit.
Installing a Secure Sockets Layer (SSL) certificate on your WordPress site enables it to use HTTPS to ensure secure connections. Unfortunately, there are a variety of things that can go wrong in the process of confirming a valid SSL certificate and making a connection between your site’s server and a visitor’s browser.
If you’ve encountered an “SSL Handshake Failed” error message and are confused as to what it means, you’re not alone. It’s a common error that doesn’t tell you much on its own. While this can be a frustrating experience, the good news is that there are simple steps you can take to resolve the issue.
In this post, we’ll explain what the SSL Handshake Failed error is and what causes it. Then we’ll provide you with several methods you can use to fix it.
Let’s get started!
An Introduction to the SSL Handshake
Before we dig deeper into what causes a TLS or SSL handshake failure, it’s helpful to understand what the TLS/SSL handshake is. Secure Sockets Layer (SSL) and Transport Layer Security (TLS) are protocols used to authenticate data transfers between servers and external systems such as browsers.
SSL certificates are needed in order to secure your website using HTTPS. We won’t get too in-depth about the difference between TLS vs SSL since it’s a minor one. The terms are often used interchangeably, so for simplicity’s sake, we’ll use “SSL” to refer to both.
With that out of the way, an SSL handshake is the first step in the process of establishing an HTTPS connection. To authenticate and establish the connection, the user’s browser and the website’s server must go through a series of checks (the handshake), which establish the HTTPS connection parameters.
Let us explain: the client (typically the browser) sends a request for a secure connection to the server. After the request is sent, the server sends a public key to your computer and checks that key against a list of certificates. The computer then generates a key and encrypts it, using the public key sent from the server.
To make a long story short, without the SSL handshake, a secure connection won’t be made. This can pose a significant security risk. Plus, there are a lot of moving parts involved in the process.
That means there are many different opportunities for something to go wrong and cause a handshake failure, or even lead to the “your connection is not private” error, causing visitors to leave.
Confronted with the ‘SSL Handshake Failed’ error? 🤝 Get a grip on how to solve it with these 5 methods ⤵️Click to Tweet
Understanding What Causes SSL Handshake Failures
An SSL Handshake Failure or Error 525 means that the server and browser were unable to establish a secure connection. This can happen for a variety of reasons.
Generally, an Error 525 means that the SSL handshake between a domain using Cloudflare and the origin web server failed:
However, it’s also important to understand that SSL errors can happen on the client-side or the server-side. Common causes of SSL errors on the client-side include:
- The wrong date or time on the client device.
- An error with the browser configuration.
- A connection that is being intercepted by a third party.
Some server-side causes include:
- A cipher suite mismatch.
- A protocol used by the client that isn’t supported by the server.
- A certificate that is incomplete, invalid, or expired.
Typically, if the SSL handshake fails, the issue can be attributed to something wrong with the website or server and their SSL configurations.
How to Fix the SSL Handshake Failed Error (5 Methods)
There are several potential causes behind the “SSL Handshake Failed” error. So there’s no simple answer when it comes to how you should fix it.
Fortunately, there are a handful of methods you can use to begin exploring potential issues and resolving them one by one. Let’s take a look at five strategies you can use to try and fix the SSL Handshake Failed error.
1. Update Your System Date and Time
Let’s start with one of the more unlikely causes, but one that is incredibly easy to correct if it is the problem: your computer’s clock.
If your system is using the wrong date and time, that may interrupt the SSL handshake. When the system clock is different than the actual time, for example, if it’s set too far into the future, it can interfere with the SSL certificate verification.
Your computer’s clock might have been set incorrectly due to human error or simply due to a glitch in your settings. Whatever the reason, it’s a good idea to check and make sure your system time is correct, and update it if it’s not.
Of course, if your clock is showing the correct information, it’s safe to assume that this isn’t the source of the “SSL Handshake Failed” issue.
2. Check to See If Your SSL Certificate Is Valid
Expiration dates are placed on SSL certificates, to help make sure their validation information remains accurate. Generally, the validity of these certificates lasts for anywhere between six months and two years.
If an SSL certificate is revoked or expired, the browser will detect this and be unable to complete the SSL handshake. If it’s been more than a year or so since you installed an SSL certificate on your website, it might be time to reissue it.
To view the status of your SSL certificate, you can use an SSL certificate checker tool such as the one offered by Qualys:
This tool is both reliable and free to use. All you need to do is input your domain name into the Hostname field, and then click on Submit. Once the checker is done analyzing your site’s SSL configuration, it will present you with some results:
On this page, you can find out if your certificate is still valid and see if it has been revoked for any reason.
In either case, updating your SSL certificate should resolve the handshake error (and is vital for keeping your site and your WooCommerce store secure).
3. Configure Your Browser for the Latest SSL/TLS Protocol Support
Sometimes the best way to determine the root cause of an issue is by process of elimination. As we mentioned earlier, the SSL handshake failure can often occur due to a browser misconfiguration.
The quickest way to determine whether a particular browser is the problem is to try switching to a different one. This can at least help narrow down the problem. You may also try disabling any plugins and resetting your browser back to its default settings.
Another potential browser-related issue is a protocol mismatch. For example, if the server only supports TLS 1.2, but the browser is only configured for TLS 1.0 or TLS 1.1, there’s no mutually-supported protocol available. This will inevitably lead to an SSL handshake failure.
How you can check to see if this problem is occurring varies based on the browser you’re using. As an example, we’ll look at how the process works in Chrome. First, open your browser and go to Settings > Advanced. This will expand a number of menu options.
Under the System section, click on Open your computer’s proxy settings:
This will open up a new window. Next, select the Advanced tab. Under the Security section, check to see if the box next to Use TLS 1.2 is selected. If not, check that option:
It’s also recommended that you uncheck the boxes for SSL 2.0 and SSL 3.0.
The same applies to TLS 1.0 and TLS 1.1 since they are being phased out. When you’re done, click on the OK button, and check to see if the handshake error has been resolved.
Note that if you’re using Apple Safari or Mac OS there isn’t an option to enable or disable SSL protocols. TLS 1.2 is automatically enabled by default. If you’re using Linux, you can refer to the Red Hat guide on TLS hardening.
4. Verify That Your Server Is Properly Configured to Support SNI
It’s also possible that the SSL handshake failure is being caused by improper Server Name Indication (SNI) configuration. The SNI is what enables a web server to securely host several TLS certificates for one IP address.
Each website on a server has its own certificate. However, if the server isn’t SNI-enabled, that can result in an SSL handshake failure, because the server may not know which certificate to present.
There are a few ways to check and see whether a site requires SNI. One option is to use Qualys’ SSL Server Test, which we discussed in the previous section. Input your site’s domain name, and then click on the Submit button.
On the results page, look for a message that reads “This site works only in browsers with SNI support”:
Another approach for detecting if a server is using SNI is to browse the server names in the ‘ClientHello’ message. This is a more technical process, but it can offer a lot of information.
It involves checking the extended hello header for a ‘server_name’ field, to see if the correct certifications are presented.
If you’re familiar with using tools such as the OpenSSL toolkit and Wireshark, you might find this method preferable. You can use openssl s_client with and without the -servername option:
# without SNI
 $ openssl s_client -connect host:port

 # use SNI
 $ openssl s_client -connect host:port -servername host
If you get two different certificates with the same name, it means that the SNI is supported and properly configured.
However, if the output in the returned certificates is different, or the call without SNI cannot establish an SSL connection, it indicates that SNI is required but not correctly configured. Resolving this issue may require switching to a dedicated IP address.
5. Make Sure the Cipher Suites Match
If you still haven’t been able to identify the cause of the SSL handshake failure, it might be due to a cipher suite mismatch. In case you’re unfamiliar with the term, ‘cipher suites’ refer to a set of algorithms, including ones for key exchange, bulk encryption, and message authentication code, that can be used for securing SSL and TLS network connections.
If the cipher suites that a server uses don’t support or match what’s used by Cloudflare, that can result in an “SSL Handshake Failed” error.
When it comes to figuring out whether there is a cipher suite mismatch, Qualys’ SSL Server Test proves yet again to be a useful tool.
When you input your domain and click on Submit, you’ll see a summary analysis page. You can find the cipher information under the Cipher Suites section:
You can use this page to discover which ciphers and protocols the server supports. You’ll want to look out for any that display the ‘weak’ status. In addition, this section also details the specific algorithms for the cipher suites.
To correct this issue, you can compare the results against what your browser supports by using the Qualys SSL/TLS Capabilities of Your Browser tool. For more extensive information and guidance about cipher suites, we also recommend checking out the ComodoSSLStore guide.
Confused by the ‘SSL Handshake Failed’ error message? This guide explains what it is and, most importantly, 5 ways to fix it 🙌Click to Tweet
Summary
One of the most perplexing yet common types of SSL-related problems is the “SSL Handshake Failed” error. Dealing with this error can be stressful since it has many potential causes, including both client- and server-side issues.
However, there are some reliable solutions you can use to identify the problem and resolve it. Here are five ways you can use to fix the SSL Handshake Failed error:
- Update your system date and time.
- Check to see if your SSL certificate is valid (and reissue it if necessary).
- Configure your browser to support the latest TLS/SSL versions.
- Verify that your server is properly configured to support SNI.
- Make sure the cipher suites match.
Get all your applications, databases and WordPress sites online and under one roof. Our feature-packed, high-performance cloud platform includes:
- Easy setup and management in the MyKinsta dashboard
- 24/7 expert support
- The best Google Cloud Platform hardware and network, powered by Kubernetes for maximum scalability
- An enterprise-level Cloudflare integration for speed and security
- Global audience reach with up to 35 data centers and 275+ PoPs worldwide
Test it yourself with $20 off your first month of Application Hosting or Database Hosting. Explore our plans or talk to sales to find your best fit.
SSL Handshake Failed error occurs when the client or server fails to establish a secure connection.
Has your SSL handshake failed? For someone who isn’t quite adept in technology, the term ‘SSL handshake’ might seem cryptic or out of the context. If you are in that zone and know nothing about why this error is popping up on your system, then read until the end.
In this article, we shall not only discuss what an SSL handshake is, but we shall also delve deeper into why this error shows up and what you can do to fix it.
What is an SSL handshake?
The SSL handshake involves algorithm agreement, certificate exchange, and the exchange of keys using the shared algorithm. So, the ‘SSL handshake’ is the name given to a securely devised process that helps encrypt client-server communication through cryptographic keys. These keys are exchanged between the server and the client using one out of the two shared algorithms that both the server and the client mutually agreed upon. So, if any glitch occurs during this process, then the ‘SSL handshake failed’ error shows up.
Why does the ‘SSL handshake failed’ error occur?
An SSL handshake error, also known as error 525 occurs when the two endpoints (server and client) are unable to establish a secure connection. This can happen due to several issues, which might be on the server side or the client side. If you are experiencing this error, there is not much to worry about and no matter what’s causing it, we’ll help you fix it in no time. Let us now discuss some ways in which you can fix the SSL handshake error.
How to Fix the “SSL Handshake Failed” Error?
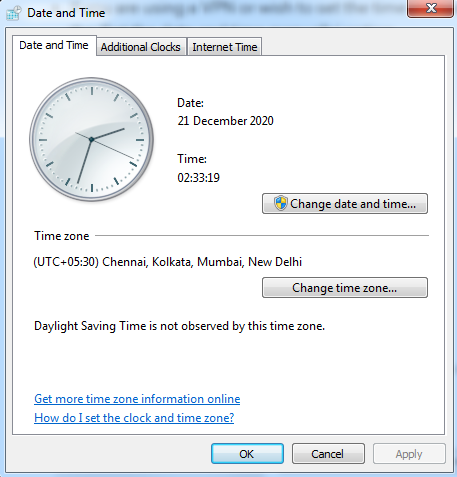
#1. Check your system’s time and date
Before you try any other fix for your SSL handshake error, we strongly recommend that you try correcting your system’s date and time. Silly as it may seem, this works for most people experiencing this sort of error. So, don’t undermine the power of your system’s date and time setting, which might be wrong due to many reasons.
It could be wrong due to pure neglect, a software glitch caused by malware, or simply because you are using a server located in another time zone through a VPN. If you are using a VPN, then it is recommended that you configure the date and time according to the server’s time zone. This refers to the date and time of the location in which the server is located, and not your physical location.
Windows user can reset the date and time in the following manner:
- Click on the ‘Windows’ button.
- Type ‘Date and Time Settings’ and choose the relevant option.
- If you wish to set the time automatically, toggle the ‘set time automatically’ button.
- If you are using a VPN or wish to set the time manually for any other reason, click on the ‘Set the date and time manually’ option.
On Mac, the same can be done by navigating to ‘Menu’ and then to ‘System Preferences’. You will find similar settings for all other Operating Systems.
#2. Update your Web Browser
At all times, you must keep your Operating System and applications up to date. This alone can prevent many errors, including the ‘SSL handshake failed’ error. Chrome users can check that by opening the Chrome browser and clicking on the three vertical dots in the top-right hand corner. Next, click on ‘More Tools’ and if your Chrome browser needs an update, then you’ll find one here. If you don’t, it only means that your Chrome browser is up to date.
#3. Deactivate recently installed plugins or extensions
Most browser plugins and extensions come from unknown developers and could very well be packed with malicious code. So, if you recently installed one of those and have been experiencing the SSL handshake error, then try uninstalling it and clearing your cache and cookies. After you’ve done that, try reconnecting to the same website and check if you can now establish a secure connection.
Chrome users can uninstall the extension by following the below mentioned steps:
- Click on the three vertical dots on the top-right corner
- Click on ‘Settings’
- Select ‘Extensions’
- Choose the extension you recently installed and click on remove

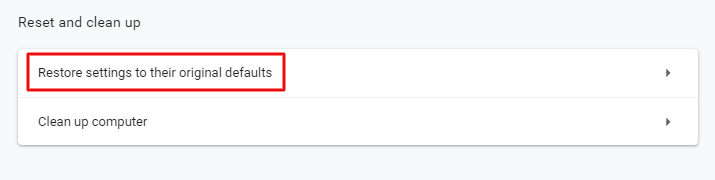
#4. Protocol Mismatch
Many people face the SSL handshake issue due to a protocol mismatch between the server and the client. Basically, there are multiple versions of the SSL/TLS protocol available and for a successful handshake, it is essential that the web server and the browser support the same version.
Often, the SSL handshake error shows up when the server runs on a protocol version that is much higher than that of the client computer. For instance, if the server uses the TLS 1.3 version but the browser’s using the TLS 1.1, then the SSL handshake is likely to fail because servers do not support previous versions. You can fix this by resetting your browser to its default settings and using it without any extensions.
To reset the browser settings to default on your Chrome browser, click on the three vertical dots on the top-right hand corner, choose ‘Settings’ and then ‘System’. Finally, click on the ‘reset settings to original default’ option and you are done.
#5. Expired Certificate
You could be facing the handshake issue simply because you are trying to access a website that does not have a valid SSL certificate. Use our free SSL Certificate checker tool to validate your SSL certificate.
Conclusion:
We have discussed some of the most effective solutions for the SSL handshake problem, which might occur due to the browser or the system settings. In most cases, correcting the time and date settings or removing the trouble-causing extensions from the browser solves the issue.
For server-related concerns, it is only the website owner or administrator who can fix the ‘SSL handshake failed’ problem. Some of the common server-side issues are an invalid SSL certificate, a free SSL certificate from a fraudulent website, problems with the cipher suite, and incorrect installation of the SSL Certificate. In that case, it is recommended that you contact the website owner or administrator for an effective resolution.
Recommended Reading:
- ERR_SSL_PROTOCOL_ERROR
- NET::ERR_CERT_COMMON_NAME_INVALID
- ERR_SSL_VERSION_OR_CIPHER_MISMATCH
- ERR_SSL_VERSION_INTERFERENCE
- ERR_BAD_SSL_CLIENT_AUTH_CERT
Setting up a Secure Sockets Layer (SSL) certificate for your website has never been easier. You can generate certificates for free, and many hosting providers will even set them up for you. However, if you don’t configure your certificate properly, you may encounter errors such as “SSL handshake failed”.
The “SSL handshake failed” error shows up when your browser and the server can’t establish a secure connection. This article will explain what an SSL handshake is and what to do if you fail to establish one.
Let’s get to it!
What Is an SSL Handshake?
As you may know, an SSL certificate validates your website’s “identity”. It does that using a cryptographic key that your browser checks to make sure the certificate is valid. Once you establish a connection, your browser can decrypt the content that the server sends it.
This process is called a “handshake”. Here’s how it works in more detail:
- You visit a website with an SSL certificate and your browser sends a request for data.
- The server sends the browser an encrypted public key.
- Your browser checks that key and sends its encrypted key back to the server.
- The server decrypts the key and sends encrypted content back to your browser.
- Your browser decrypts the content (hence completing the handshake).
All of this happens in seconds. SSL certificates and the HTTPS protocol enable your website to transmit data securely, without negatively impacting performance. That makes an SSL certificate vital for any website. However, like any element of your site, it can occasionally create unique problems.
What Causes the “SSL Handshake Failed” Error
The “SSL handshake failed” error tells you precisely what the problem is. It shows up when your browser fails to establish a connection with a website that has an SSL certificate:
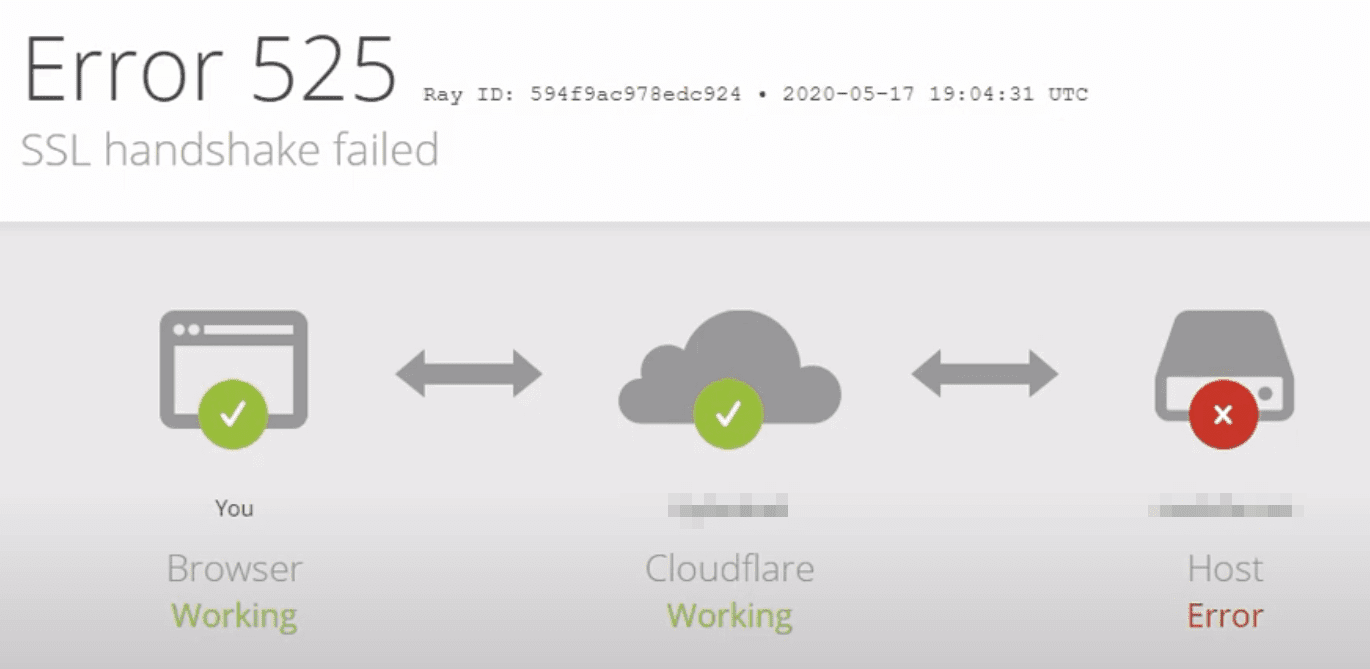
In this example from a website using Cloudflare, you can see that the “SSL handshake failed” error corresponds to the “525” code. Thus, the error can stem from both server- and client-side problems.
The most common causes of the “SSL handshake failed” error include:
- Your local device has the wrong date or time
- The browser doesn’t support the latest SSL protocol
- Your SSL certificate is invalid
- There’s a problem with your Server Name Identification (SNI) configuration
- There’s an issue with your Content Delivery Network (CDN), such as Cloudflare
That list includes two local issues, two that are related to your website’s server, and one that’s specific to a third-party service. In the next sections, we’ll explore how to tackle each of them.
How to Fix the “SSL Handshake Failed” Error (5 Ways)
Here, we’re going to start by showing you how to fix the client-side issues that can cause the “SSL handshake failed” error. Those solutions are pretty simple. In case they don’t work, however, we’ll then move on to more technical solutions you can try.
1. Update Your Local Device’s Date and Time
When your browser tries to establish an SSL handshake, it verifies the certificate against your computer’s date and time. It does this to verify that the SSL certificate is still valid.
If your local device’s date and time are off, that can lead to errors during the verification process (i.e., no handshake). Fortunately, this is an issue with a simple fix.
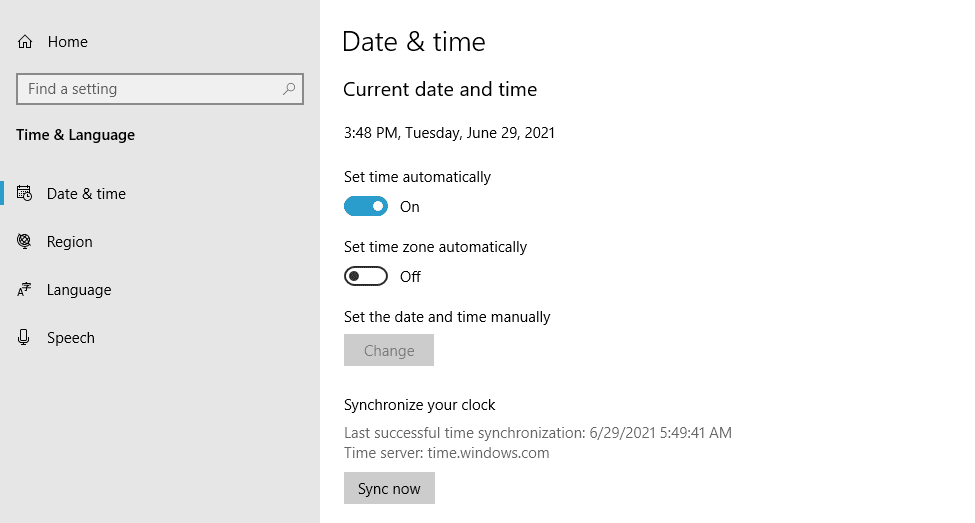
On a Windows device, open the Start menu and type in Date & Time settings. Select the option that appears, and a new window will pop up. Enable the setting Set time automatically, and ensure that your time zone is correct:
Verify that your date is now correct, and then try to reload the website.
Here’s how to fix your date and time on other Operating Systems (OSs):
- macOS
- iOS
- Android
If fixing the date and time on your local device doesn’t do the trick, you can move on to the next fix.
2. Ensure That Your Browser Supports the Latest TLS Protocol
In some cases, you may run into the “SSL handshake failed” error due to problems with your browser. The most common issue is that your browser doesn’t support the Transport Layer Security (TLS) protocol that your certificate uses.
To put it simply, both SSL and TLS are authentication protocols, and your certificate may use either one. Modern browsers support both protocols, but their older versions might not.
The easiest way to determine whether your browser is causing the issue is to use another one. If the “SSL handshake failed” error doesn’t appear in other browsers, the original one may be the problem.
To fix this issue in Windows, open the Start menu and type in Internet Options. Select the option that appears and go to the Advanced tab. Scroll down the list of settings until you find the options that correspond to SSL and TLS settings:
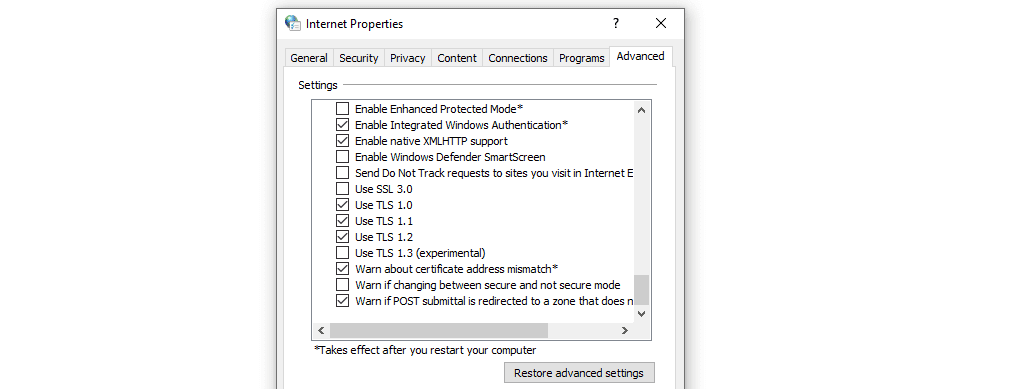
Ideally, you should un-check the box for SSL 3 and 2 (if you see those options). You only need to check the boxes for TLS 1, 1.1, and 1.2.
Then save the changes to your internet options and try re-accessing the website. Note that if you’re using macOS or iOS, TLS 1.2 should be enabled by default.
3. Make Sure Your SSL Certificate Is Valid
SSL certificates have expiration dates. That’s a built-in function that forces you to renew the certificate at some point, and validate your domain ownership.
If your SSL certificate expires, your browser won’t be able to establish a handshake. Depending on who your SSL certificate provider is, you’ll probably receive notifications well before it expires so you can renew it.
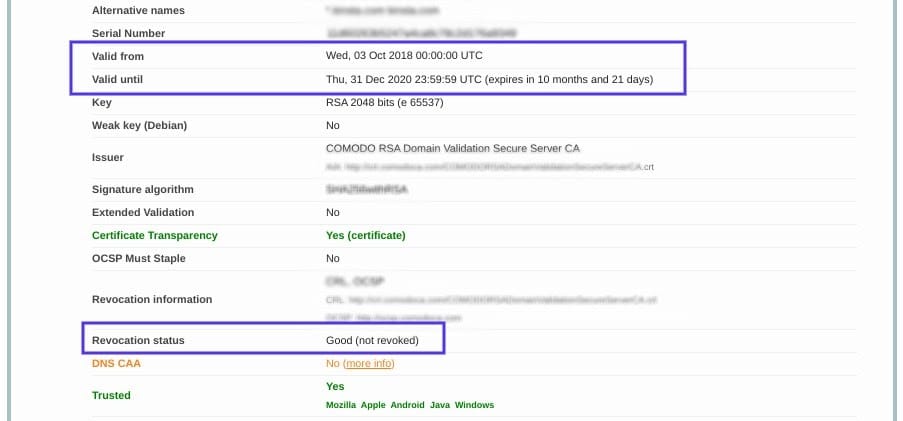
Even so, it doesn’t hurt to check if you’re not sure about your certificate’s expiration date. You can use a tool such as SSL Server Test to do so:
The service will return a lot of information about your website’s SSL certificate. If the certificate expired, you’ll see when its validity ran out:
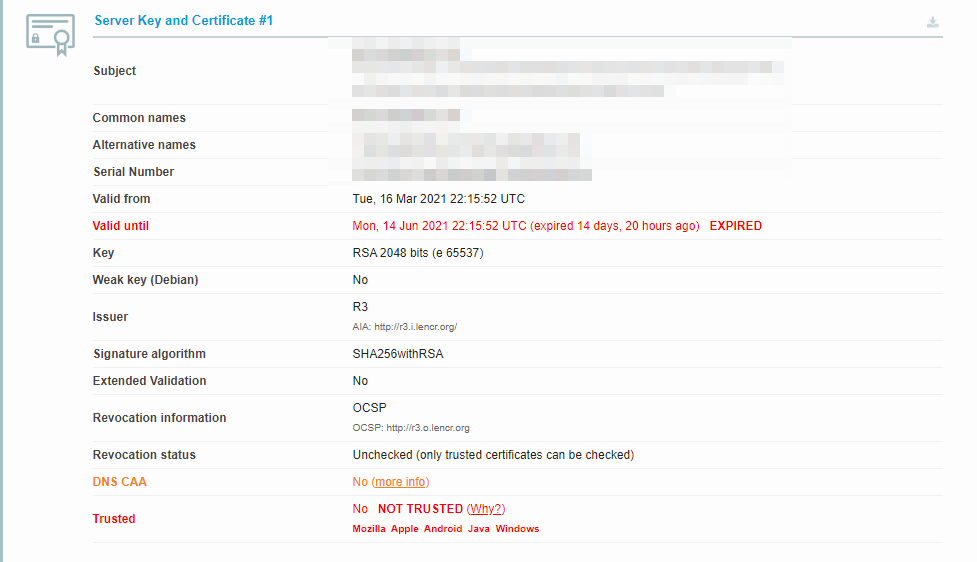
In this case, you’ll need to re-issue and install the SSL certificate on your website. Depending on who your hosting provider is, they might be able to help with that process.
4. Check Your Server’s Server Name Identification (SNI) Configuration
If you’re using a shared server to host your website, you can run into issues with multiple SSL certificates. Hosting providers use proper Server Name Identification (SNI) configuration to ensure that when visitors try to access your site, they get the correct SSL certificate (and not one from another property).
Generally speaking, most reputable hosting providers won’t present any issues with SNI configuration. Additionally, if you’re not using a shared server, you can move on to the next fix.
If you want to be 100% sure that your hosting provider isn’t presenting any issues with SNI configuration, you can contact its support for help. On a shared server, you won’t be able to access this configuration directly. If this turns out to be the problem, you may want to consider upgrading to a more robust hosting plan.
5. Pause Cloudflare to Test Your SSL Certificate
If you’re using Cloudflare, the “SSL handshake failed” error can be due to a problem with its connection to your website. The easiest way to test this is by temporarily disabling it.
Fortunately, Cloudflare offers a “pausing” feature you can use to disable the service at any time. Once you do this, we recommend clearing your browser’s cache before trying to access your website again.
If the SSL handshake error is gone, you’ll want to contact Cloudflare to see what the problem might be. While you wait for a response, keep the CDN disabled so other users can also access your website. On the other hand, if the SSL error persists, that means it’s probably due to an error with your server’s configuration (see above).
Conclusion
The “SSL handshake failed” error is relatively easy to fix, as long as you’re aware of what its potential causes are. The error might be due to an issue with your local device’s settings, your server’s configuration, or your CDN.
Here’s what you might need to do to fix the “SSL handshake failed” error:
- Update your local device’s date and time.
- Ensure that your browser supports the latest TLS protocol.
- Make sure your SSL certificate is valid.
- Check your server’s SNI configuration.
- Pause Cloudflare to test your SSL certificate.
Do you have any questions about how to fix the “SSL handshake failed” error? Let’s talk about them in the comments section below!
Featured Image via vladwel / shutterstock.com
In person, a handshake can be used to greet someone or finalize an agreement with them. The same is true online.

When devices on a network — say, a browser and a web server — share encryption algorithms, keys, and other details about their connection before finally agreeing to exchange data, it’s called an SSL handshake. During this handshake, the browser and server might ask to see each other’s SSL certificates to verify them.
This handshake is essential for establishing a secure connection before transferring data, so it’s important to understand what an SSL handshake is and what to do if it fails.

The SSL handshake is the process in which a client and server establish the encryption algorithms and secret keys they will use to communicate with each other securely, and exchange and validate each other’s digital certificates.
Note: SSL and TLS are both cryptographic protocols that enable clients and servers operating over a network to communicate with each other securely. TLS has replaced SSL, but SSL is still a more commonly used term so we’ll continue to use it in this post.
SSL Handshake Steps
The exact steps in an SSL handshake vary depending on the version of SSL the client and server decide to use, but the general process is outlined below.
- The client says hello. This “client hello” message lists cryptographic information, including the SSL version to use to communicate with each other. It also lists which encryption algorithms it supports, which are known as Cipher Suites.
- The server responds hello. This “server hello” message contains important information, like which CipherSuite it chose, and its digital certificate. It might also request the client’s certificate.
- The client verifies the server’s certificate. It also sends several byte strings, including one for allowing both the client and the server to compute a secret key for encrypting subsequent messages, including the “finished” messages. If the server sends a client certificate request, it will also send a byte string encrypted with its own private key and digital certificate.
- The server verifies the client’s certificate. This step only takes place if client authentication is required.
- The client says “I’m finished.” This “finished” message indicates that the client has completed its part of the handshake.
- The server says “I’m finished, too.” This “finished” message indicates that the sever has completed its part of the handshake.
For the remainder of the session, the server and client can now exchange messages that are encrypted with the same secret key, which was shared in step three. This is known as symmetric encryption. You can learn more about symmetric encryption, and how it differs from asymmetric encryption, in this post.
The steps above will occur if the process goes smoothly. But what if it doesn’t? Below we’ll walk through how to resolve an “SSL Handshake Failed” error message.
What is SSL Handshake Failed?
SSL Handshake Failed is an error message that occurs when the client or server wasn’t able to establish a secure connection.
This might occur if:
- The client is using the wrong date or time.
- The client is a browser and its specific configuration is causing the error.
- The connection is being intercepted by a third party on the client-side.
- The client and server do not support the same SSL version.
- The client and server are using different Cipher Suites.
- The client or server’s certificate is invalid.
The SSL Handshake Failed error message may appear differently, depending on the client application you’re using or server you’re trying to communicate with. For example, in GitHub, it will look something like this:
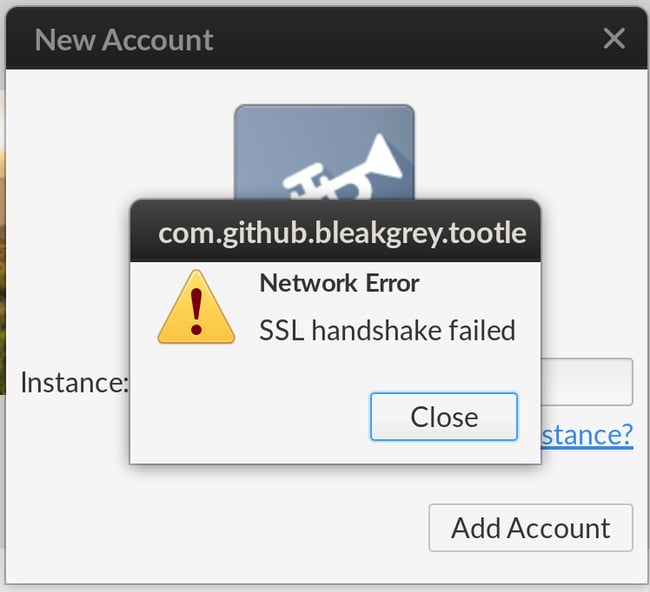
Image Source
If you’re using Cloudflare, on the other hand, an SSL Handshake Failed will appear as a 525 error that looks something like this:
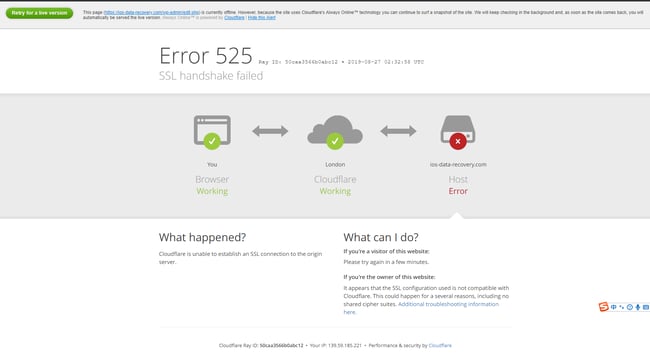
Image Source
Now that you know some of the causes of the SSL Handshake Failed error, let’s look at some solutions.
How to Fix SSL Handshake Failed
- Correct the time and date on the client device.
- Try another browser.
- Add website to allowlist.
- Update browser to use the latest SSL protocol.
- Check browser and server support for Cipher Suites.
- Verify your SSL certificate is accurate and valid.
1. Correct the time and date on the client device.
Let’s start with the easiest fix. If the system time and date is incorrect on your computer or device, then it can cause the SSL Handshake Failed error. That’s because time is essential when it comes to SSL certificates: they have finite lifespans and become invalid past their expiration date.
If you check your system time and date and it’s correct, then move on to the next step.
2. Try another browser.
It’s possible that the browser you’re using is causing the SSL Handshake Failed error. It could be your settings, browser plugins, or another issue. To see if this is the problem, just switch to another browser.
Let’s say you were trying to connect to a website using Google Chrome, and it works just fine in Safari. In that case, you’ll have to narrow down what the problem is. Go back and reset Google Chrome (or whatever browser you were using) to its default settings and disable all your plugins. Then re-configure your settings and enable your plugins one-by-one, testing your ability to connect to the website each time. You should be able to isolate the specific setting or plugin that caused the SSL Handshake Failed that way.
If you try another browser and you still see the SSL Handshake Failed error, then move on to the next step.
3. Add website to allowlist.
It’s also possible that your firewall is causing the SSL Handshake Failed error by intercepting your request for inspection. To rule it out as the cause, you can temporarily deactivate your firewall —but that can leave you vulnerable to attack.
Instead, try adding the website to your allowlist. Here’s the process for Google Chrome:
- On your admin console homepage, go to Devices > Chrome.
- Click Settings> Users & browsers.
- Leave the top organizational unit selected (it’s selected by default). This will apply the setting to all users and enrolled browsers.
- Scroll to URL Blocking and enter the website you are trying to access under Blocked URL exceptions.
- Click Save.
If you try visiting that site again and you still see the SSL Handshake Failed error, then move on to the next step.
4. Update browser to use the latest SSL protocol.
It’s possible that you’re getting the SSL Handshake Failed error because your device (the client) and server do not support the same SSL version, which is resulting in a protocol mismatch. For example, let’s say your browser only supports TLS 1.1 and your server only supports TLS 1.2 or 1.3 (the latest version). If these two try to establish a secure connection, then it will likely result in an SSL Handshake Failed error.
In that case, you’ll need to update your browser. Most updated versions of major browsers like Google Chrome have TLS 1.2 automatically enabled. However, even if it is updated, it’s important to make sure it’s configured to to support the latest TLS version.
Here’s the easiest way to check:
- Visit SSL Labs.
- Navigate to Projects.
- Click SSL Client Test.

- Under Protocol Support, it will tell you whether your browser supports the latest versions of TLS.

If you verify that your browser and server are using the same protocol, then move on to the next step.
5. Check browser and server support for Cipher Suites.
Another reason you could be getting the SSL Handshake Failed error is that the client and server are using different Cipher Suites. Just like a protocol mismatch, a client and server who do not have mutual support for the same CipherSuite will not be able to establish a secure connection.
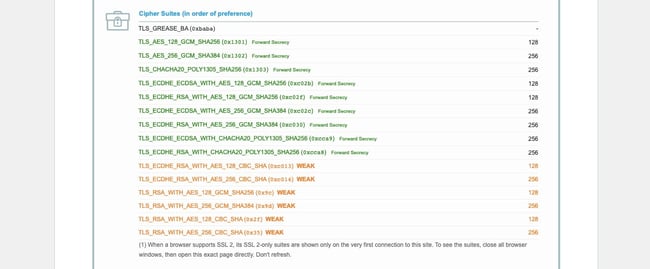
You can compare which Cipher Suites your browser support to which the server of the website you’re trying to visit supports by once again visiting SSL Labs.
- First, navigate to Projects.
- Click SSL Client Test.
- Scroll down to Protocol Features, where it will list which Cipher Suites your browser supports, in order of preference.
- Now, open SSL Labs in another tab, and navigate to Projects.
- Click SSL Server Test.
- Type in the domain name you are trying to visit that is resulting in the SSL Handshake Failed error.
- Scroll down to Configuration, where it will list which Cipher Suites the server supports, in order of preference.
If you verify that your browser and server are using the same CipherSuite, then move on to the next step.
6. Verify your SSL certificate is accurate and valid.
Any number of issues on an SSL certificate can prevent an SSL handshake from being completed. This may result in an SSL Handshake Failed error or another error message that ultimately means the handshake failed. For example, you might see something like this:
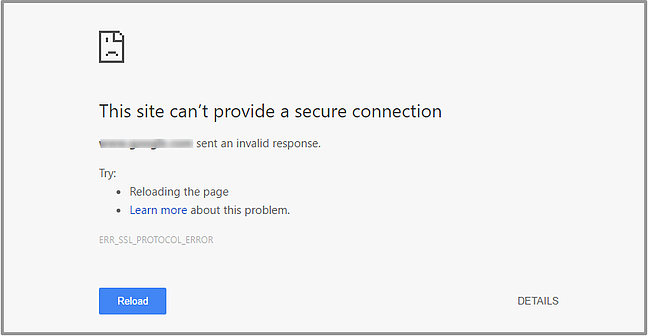
Image Source
If the SSL certificate has an incorrect host name, for example, or it’s past its expiration date, then the handshake will likely fail. So it’s important to ensure your SSL certificate is installed correctly and renewed when needed.
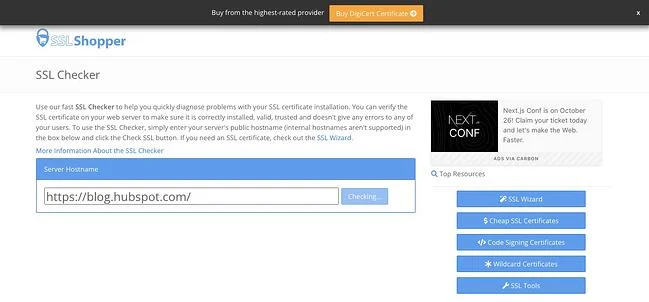
You can use an online tool like the above-mentioned SSL Server Test or SSL Shopper to test that your SSL configuration is installed, valid, and trusted in just a few minutes.
When a Client and Server Don’t Want to Shake Hands
Since an SSL handshake is an essential step in keeping data transferred over the internet secure, it’s important that users understand what the SSL Handshake Failed error means and how to fix it. By following the steps above, you should be able to resolve the issue and establish a secure connection between your device and the server you’re trying to connect to.

I recently did troubleshooting for, and managed to successfully fix, an issue where HTTPS connections to a specific remote server were failing to be made successfully. The client computers affected by the issue were a pair of servers, running Windows 2012 R2 and Windows 2008 R2, respectively.
For the purposes of this post, I’ll use https://tls.example.com as the URL of the remote server.
The Problem
Symptom 1: In a C# program, an attempt to establish an HTTPS (SSL / TLS) connection to https://tls.example.com failed. Error message: “The request was aborted: Could not create SSL/TLS secure channel.”
- The program did work fine to make connections to all other HTTPS URLs that we had tried.
- The exact same C# program worked fine when I ran it from my local workstation as the client PC (connecting to the same https://tls.example.com remote server).
Symptom 2: In Internet Explorer 11, attempting to connect to https://tls.example.com failed. Error message: “Turn on TLS 1.0, TLS 1.1, and TLS 1.2 in Advanced settings and try connecting to again. If this error persists, contact your site administrator.”

- However, connecting to https://tls.example.com using the Chrome browser from that same client PC worked fine.
- Connecting to https://tls.example.com from my local workstation using Internet Explorer 11 also worked fine.
The Solution
Note: This solution will only help if the remote server is configured with an SSL key that has an ECDSA (not RSA) signature, but all of the the cipher_suites that the client PC is configured to support are RSA (not ECDSA).
Note 2: If you’re reading this post after August 2016, check and make sure the new cipher_suites value that you add is one that’s still cryptographically valid. These things tend to change over time!
Note 3: Don’t use Registry Editor (as suggested here) unless you know what you’re doing. It can permanently damage your PC.
In my case, the problem was caused by there being no match between the set of cipher_suites supported by the client, and the set of values that the server was able to accept. Specifically, in my case, the server had an SSL key signed with ECDSA (not RSA), and my problematic client PCs were configured to use only ECDSA (not RSA) cipher_suites. This caused SSL handshaking to fail after the initial “Client Hello” step.
I was able to fix this by adding a ECDSA value to my client PC’s set of cipher_suites:
On the client PC:
- Open the Registry Editor.
- Navigate to HKLM/SOFTWARE/Policies/Microsoft/Cryptography/Configuration/SSL/0010002
- Edit the existing comma-separated value, and add a new value to the end that’s supported by the client OS, is cryptographically secure, and works with a key with an ECDSA signature. The value I used: TLS_ECDHE_ECDSA_WITH_AES_128_GCM_SHA256_P256
- Reboot.
Investigation Details
The remainder of this post details the investigation that led me to the above solution.
SSL / TLS protocol mismatch?
I’ve run into SSL handshaking problems before caused by a protocol mismatch. For example, the client specified that it would only connect using SSL 3.0 or TLS 1.0, but the server would only accept TLS 1.2. However, that did not seem to be the cause of the issue here (despite the Internet Explorer error message):
- In my C# program, I was specifying that the client accept any of TLS 1.2 | TLS 1.1 | TLS 1.0.
- In Internet Explorer’s Advanced Options dialog, I confirmed that the checkboxes for TLS 1.2, TLS 1.1, and TLS 1.0 were all already checked (again, despite the error message).
- In Firefox, by clicking on the green lock icon in the address bar after successfully connecting to the remote website, I confirmed that the connection was secured using TLS 1.2.

As far as I could tell, both the client and server should be agreeing on the use of TLS 1.2. Thus, probably not a protocol mismatch issue.
SSL certificate trust chain issue?
When I asked myself the question “So what’s different between my local PC (where things work fine) and my server PCs (not working)?”, the first answer I came up with was, maybe the installed trusted SSL root certificates?
However, that theory turned out to be a dead end in this case. When I used the “Manage server certificates” / “certlm” tool to look at the installed certificates on my PCs at Certificates > Trusted Root Certification Authorities, although there were some differences between the root certs on my local Windows 10 PC versus the root certs installed on the Windows Server 2012 R2 PC, that didn’t turn out to be the cause of the problem.
Additional symptom: System event log error
My first clue to the actual problem was a Windows System event log error that I noticed would be logged whenever I reproduced the HTTPS connection failure in Internet Explorer or my custom C# program:
“A fatal alert was received from the remote endpoint. The TLS protocol defined fatal alert code is 40.”
A helpful MDSN blog post defined that error code of 40 as “handshake_failure”.
Network traffic sniffing using Microsoft Message Analyzer
As suggested by another very helpful Microsoft blog post, I installed Microsoft Message Analyzer. (It turns out that I needed to install the 64-bit version of Analyzer to match my OS, even though as far as I know, browsers typically run as 32-bit processes.)
Using Message Analyzer turned out to be easy. I just did the following:
- In Analyzer, hit the “New Session” button;
- Selected “Local Network Interfaces”;
- Hit Start;
- Switched windows to my C# program, and reproduced the issue;
- Switched back to Analyzer, and hit the Stop button.

I filtered out all irrelevant events captured while my session was running by applying this filter:
(*Source == «www.example.com» or *Destination == «www.example.com») and *Summary contains «Handshake»
(Where both instances of “www.example.com” were replaced with the actual host to which I was connecting.)
On my local PC where the HTTPS connection was working, the Message Analyzer results included a “Handshake: [Client Hello]” message originating from my local PC, followed by a “Handshake: [Server Hello]” originating from the server.
However, on the Windows Server 2012 R2 machine where the the connection was failing, I could see the “Handshake: [Client Hello]” from the local machine was followed by an “Alert” reply from the server!
Doing a right-click | Show Details on the Alert reply, I could see that it contained a body message of “Level 2, Description 40”. This reply must have been what the System Event Log was picking up to generate that message that I’d noticed earlier.
Comparing the successful and unsuccessful Client Hello messages
At this point, I’d narrowed down the difference between the succeeding and failing environments to the differing server replies to the initial “Client Hello” step of SSL handshake.
Still in Message Analyzer, I did another Show Details to compare the contents of the “Client Hello” on my Windows 10 PC (working) and my Windows Server 2012 R2 machine (not working).
The significant difference turned out to be the cipher_suites parameter in the body of each PC’s “Client Hello” message.

As I learned, the cipher_suites parameter contains the list of encryption settings which the PC sending the message is able to handle. The idea is that the server picks the one from that list that it prefers, sends a “Server Hello” reply that includes the selected cipher suite, and the two sides use that to securely communicate.
It turns out that while my Windows 10 PC (working) was sending a selection of 33 cipher_suites values that it was able to support, the Server 2012 R2 PC (not working) was sending only 11 cipher_suites values!
Each cipher_suites value, while it appears in the raw message body as an integer, “translates” to a descriptive string value like: TLS_ECDHE_ECDSA_WITH_AES_256_GCM_SHA256. (Message Analyzer helpfully performs this translation when displaying the values in the cipher_suites value under the “body” value, as is mostly visible in the screenshot above.)
The Microsoft article Cipher Suites in TLS/SSL provides a very helpful picture of what the parts of those cipher_suites values mean, which I’ll borrow and display here:

Taking a closer look, the 33 cipher_suites values from the Client Hello message Windows 10 PC (working) included a mix of cipher_suites values contained a mix of RSA, DHE, and ECDSA as the Signature value. The 11 values from the Server 2012 R2 PC (not working) all had RSA as the Signature value!
A Certificate Signing Algorithm Mismatch?
Discovering that the not-working Server 2012 R2 PC was effectively saying that it would only support RSA as the cert signing method immediately suggested a new likely theory: If the server cert was signed with something other than RSA, the SSL handshaking would fail.
Sure enough, drilling further down into the cert details in Firefox showed that the cert was signed with not RSA, but ECDSA:

In essence, the failing SSL handshaking conversation was going like this:
- Client [Client Hello]: Hey, let’s talk securely, using any of these methods (…), as long as you’ve got an RSA-signed cert!
- Server [Alert]: Sorry, nope, I can’t do business along those parameters. Bye!
Getting the Server 2012 PC to accept an ECDSA certificate
A great blog post by Nartac Software on how their IIS Crypto tool works pointed me to the solution. A Windows registry key mentioned in that article contained the same set of cipher_suites values that I was seeing in the problem PC’s Client Hello SSL handshake message:
HKLMSOFTWAREPoliciesMicrosoftCryptographyConfigurationSSL0010002
In the Server Hello SSL handshake message on my working Windows 10 PC, I could see that the cipher_suites value that the server had selected to successfully communicate with was:
TLS_ECDHE_ECDSA_WITH_AES_128_GCM_SHA256
From that same article, another registry location has the list of supported cipher suites on the server:
HKLMSYSTEMCurrentControlSetControlCryptographyConfigurationLocalSSL0010002
Looking in that registry location on the Server 2012 R2 PC, I saw that one of the supported values was
TLS_ECDHE_ECDSA_WITH_AES_128_GCM_SHA256_P256
With the cipher suite portion of that key being a match for the accepted value that had been accepted by the server in the SSL handshake from my Windows 10 PC, I edited the comma-separated list of cipher suite values from the first 00010002 registry key above to include this additional cipher key value. Finally, I rebooted the Server 2012 R2 PC (since a reboot is required to make the change take effect).
After the reboot, the problems were solved! Internet Explorer was successfully able to connect to the target website, and my C# app was also able to successfully establish an HTTPS connection.
So how had this happened?
I posed the question to the failing client PCs’ hosting provider: Are Windows Server 2008 R2 and Windows Server 2012 R2 machines configured by default to only accept RSA SSL certs, or is this something that the hosting provider configures in their “default” images?
The answer, it turned out, was neither of the above. Instead, the missing non-RSA cipher suite values had been intentionally removed in an “server hardening” task performed some time in the past. This probably made sense originally, under an assumption that these servers would never themselves be acting as the client side of an HTTPS connection, and therefore for the sake of reducing attack surface, could have cipher suites with signature types other than the servers’ own cert signatures disabled.
-
MiniTool
-
MiniTool News Center
- How to Fix SSL Handshake Failed? 3 Methods Are Available
By Sonya | Follow |
Last Updated November 28, 2022
![]()
SSL handshake is used to build a secure connection, but sometimes you may meet the “SSL handshake failed” error, then what is SSL handshake failed and why does this error appear? If you want to know the answers, then read this post from MiniTool carefully and you can also know how to fix this error.
What is SSL handshake failed? It is an error message that means the browser’s connection to the webserver is not secure, then why does this error appear? Here are some possible causes listed below:
- The server does not support the requested SSL/TLS protocol.
- The server does not support the requested cipher suite.
- The hostname in the URL does not match the hostname on the certificate.
- The certificate chain is invalid or incomplete.
- The certificate has expired or is no longer valid.
- The client or server cannot communicate with the SNI server.
Then how to fix SSL handshake failed? Here are some methods for you.
Method 1: Update Your System Date and Time
You could meet the “SSL handshake failed” error when your system is using the wrong date and time. This is because it may interrupt the SSL handshake. Hence, you can check if your system date and time are set correctly. Here is the tutorial:
Step 1: Check if the time and date are correct at the bottom left corner of the screen.
Step 2: If the date and time are not correct, type date in the Search box and then click Date & time settings.
Step 3: Turn on Set time automatically and Set time zone automatically. Then click Sync now to sync the date and time with the Microsoft servers.
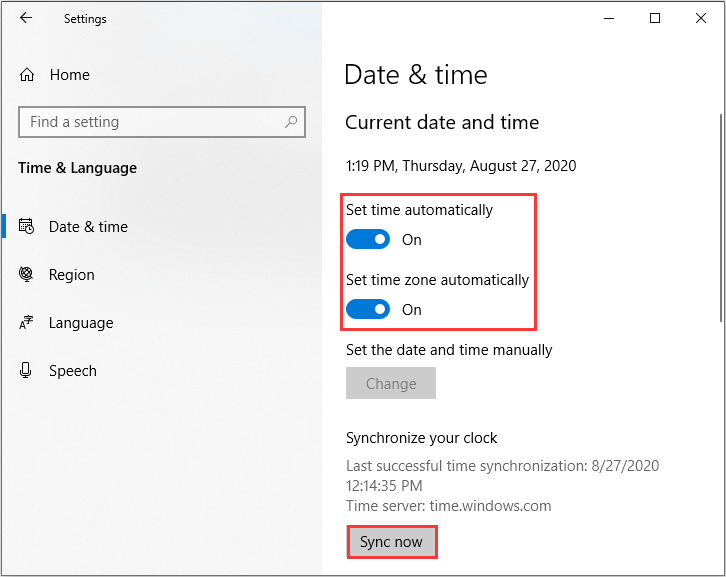
Step 3: Restart your computer and check if the problem is solved.
Related post: Fix Windows 10 Clock Disappeared from Taskbar — 6 Ways
Method 2: Check If Your SSL Certificate Is Valid
SSL certificate is valid for six months to two years, and the expiration date is placed on the SSL certificate. If the SSL certificate is revoked or expired, the browser will detect the certificate and fail to complete the SSL handshake. If it has been more than a year since you installed the SSL certificate on your website, it may be time to republish it.
Method 3: Configure Your Browser for the Latest SSL/TLS Protocol Support
The “SSL handshake failed” error may be triggered by browser misconfiguration. The quickest way to determine if there is a problem with a particular browser is to try switching to another browser. This can at least help narrow the scope of the problem. You can also try to disable all plug-ins and reset your browser to default settings.
Another potential problem related to the browser is a protocol mismatch. For example, if the server only supports TLS 1.2 and the browser is only configured for TLS 1.0 or TLS 1.1, there is no mutual support protocol. This will inevitably cause the SSL handshake to fail.
Therefore, you can configure your browser for the latest SSL/TLS protocol support. Here is how to do that:
Step 1: Type Internet Options in the Search bar and then click the best match one to open Internet Properties.
Step 2: Go to the Advanced tab, then check the box next to Use TLS 1.2. and it is recommended not to check the boxes next to Use SSL2.0 and SSL 3.0. Click Apply and OK to save changes.
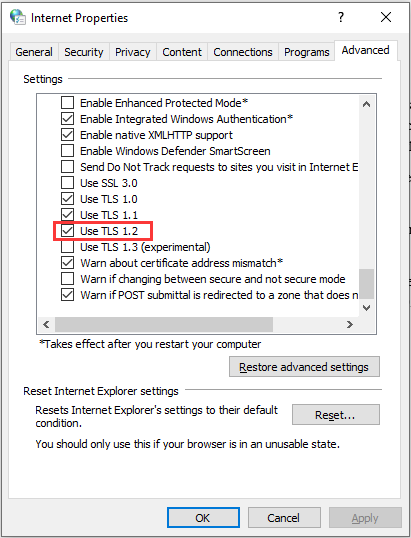
Step 3: Check if the error is fixed.
Related post: SSH VS SSL: Differences and Similarities Between Them
Final Words
In conclusion, this post has listed three methods for you to deal with the “SSL handshake failed” error. If you have any better advice or have any confusion about the methods, leave a comment below and we’ll reply to you as soon.
About The Author

Position: Columnist
Author Sonya has been engaged in editing for a long time and likes to share useful methods to get rid of the common problems of Windows computers, such as Windows Update error. And she aims to help more people to protect their data. What’s more, she offers some useful ways to convert audio and video file formats. By the way, she likes to travel, watch movies and listen to music.
Secure Sockets Layer (SSL): It is an internet security protocol based on encryption. It was developed in the year 1996 by Netscape to ensure privacy, authentication, and data integrity. It is the predecessor to TLS encryption. It provides a secure channel between two devices or machines communicating over the Internet or even an internal network. SSL is also used to secure communication between web browsers and web servers. This can be seen when a site’s address has HTTPS, where the ‘S’ stands for ‘secure’. It is also a transparent protocol and requires little to no interaction from the end user in establishing a secure session. Some examples of services protected by SSL are online payments, webmail servers, and system logins.
Transport Layer Security (TLS): It can be described as a more secure and updated version of SSL. It is a cryptographic protocol that allows end-to-end security of data exchanged between different applications over the Internet. It was specifically based on SSL 3.0 and was developed in the year 1999 by the Internet Engineering Task Force (IETF). As SSL has not been updated since the year 1996, TLS has been considered the industry standard for over 20 years. TLS is implemented on top of TCP to encrypt Application Layer protocols like HTTP, FTP, SMTP, and IMAP. It can also be implemented on UDP, DCCP, and SCTP. The main use of TLS is to encrypt the communication between web applications and servers. For example, web browsers loading a website.
An SSL/ TLS handshake error occurs when the client and server can’t establish communication over the SSL/TLS protocol (usually due to a protocol mismatch).
Some common fixes to the SSL/TLS handshake failed error:
1. Correcting System Time: It is one of the easiest and most obvious fixes. If the system date and time on your device are incorrect, it can cause an SSL/TLS handshake failed error. This error happens because the correct date and time are essential for SSL certificates; as they have finite lifespans and have an expiration date.
2. Using a different Browser: Sometimes, the browser in use can cause the SSL/TLS handshake failure. It may be due to a browser misconfiguration or a browser plugin, which can cause problems in connecting to legitimate websites. As finding out the exact misconfiguration can be time-consuming, you can simply try another browser. If you still face the SSL/TLS handshake failure even after changing the browser, the issue usually lies with the browser plugins. To verify whether this is the case, disable all installed plugins and check again.
3. Add website to allowlist: It may be possible that your firewall is intercepting your request for inspection, causing an SSL/TLS handshake failure. To fix this, add the website to your allowlist. For Google Chrome,
- Open the admin console homepage and go to Devices→Chrome.
- Settings→Users & browsers.
- Leave the top organizational unit selected (which it should be by default). This applies the setting to all users and enrolled browsers.
- Scroll down to URL Blocking and enter the website you want to access, under Blocked URL Exceptions.
- Hit Save.
4. Update browser to the latest SSL protocol: To check if your browser is using the latest SSL protocol:
- Visit SSL Labs.
- Click on Projects.
- Click on SSL Client Test.
- Under Protocol Support, check whether your browser supports the latest version of TLS.
Advantages of SSL/TLS:
- Improved Security.
- Easily deployed.
- Ability to use HTTP/2.
Disadvantages of SSL/TLS:
- Speed degradation.
- Allows insecure encryption.
- Plugin incompatibility.
Несколько пользователей видят код ошибки: SSL_ERROR_HANDSHAKE_FAILURE_ALERT при попытке доступа к некоторым сайтам, обычно это видно при доступе к веб-сайтам, которые должны проверять легитимность. В этой статье мы рассмотрим, что такое код ошибки и как его можно исправить.

Что такое SSL_ERROR_HANDSHAKE_FAILURE_ALERT?
Пользователи видят рассматриваемый код ошибки в большинстве браузеров, однако чаще всего Firefox является одним из распространенных браузеров, затронутых этой проблемой. Ошибка SSL Handshake возникает, когда сервер и клиент не могут связаться через SSL или протокол уровня защищенных сокетов.
Протокол SSL гарантирует, что данные, передаваемые между веб-браузером и сервером, защищены. Он в основном шифрует ссылку, которая, в свою очередь, защищает данные и гарантирует, что они не уязвимы для атак.
Есть много причин, которые могут вызвать ошибку в вопросах. Чаще всего это кеш вашего браузера, который повреждается и, как следствие, вызывает проблемы. Кроме того, проверьте сертификаты и убедитесь, что они не проблематичны, если они есть, вы увидите не только ошибки рукопожатия SSL, но и некоторые другие сообщения об ошибках и коды.
Мы также собираемся выяснить, что не так с компьютером, на котором вы просматриваете. Итак, не теряя времени, давайте прыгнем в него.
Вы можете решить Код ошибки: SSL_ERROR_HANDSHAKE_FAILURE_ALERT со следующими решениями.
- Перезагрузите браузер и компьютер
- Проверьте свой Интернет
- Обновите свой браузер
- Очистить кэш и данные просмотра
- Удалите проблемный сертификат вашего браузера
- Устранение неполадок в чистой загрузке
Поговорим о них подробно.
1]Перезагрузите браузер и компьютер.
Перед устранением неполадок вам следует перезапустить браузер и посмотреть, работает ли он. Если не получится, то попробуйте перезагрузить компьютер. Это закроет все процессы, которые могли помешать работе вашего компьютера, и, надеюсь, устранит проблему.
2]Проверьте свой Интернет
Вы также должны проверить Интернет в качестве предварительного решения. Достаньте тестер скорости интернета и проверьте пропускную способность. Если у вас медленный Интернет, проверьте, все ли устройства, подключенные к сети, имеют подобные проблемы или нет. В случае, если у всех устройств есть проблемы с Интернетом, попробуйте перезагрузить маршрутизатор и, если это не сработает, позвоните своему провайдеру.
Если у вас единственное устройство с проблемой Интернета. попробуй починить медленный интернет.
3]Обновите свой браузер
Вы должны начать устранение неполадок, обновив браузер. Это может быть неочевидным решением, но вы должны знать, что это может быть вызвано ошибкой. Чтобы устранить эту ошибку, разработчик, возможно, выпустил новое обновление, когда вы загрузите его, ваша проблема будет решена.
У каждого браузера свой способ обновления. У некоторых есть автоматические обновления, а некоторые нужно обновлять вручную. Если вы используете Edge или Chrome, просто перейдите в «Настройки» и нажмите «О Microsoft Edge» в первом и «О Chrome» во втором. В Firefox нажмите кнопку меню  и нажмите на Справка > О Firefox.
После обновления перезагрузите компьютер и проверьте, сохраняется ли проблема.
4]Очистить кеш и данные просмотра
Поврежденный кэш и данные просмотра могут вызвать рассматриваемую проблему. Таким образом, вы должны очистить их и решить проблему. Очистка данных никоим образом не повлияет на ваш браузер, на самом деле это решит некоторые другие проблемы, которые могли оказать негативное влияние на ваш браузер. Поэтому вам следует очистить кеш и данные просмотра Chrome, Firefox, Edge и Opera. Надеюсь, это решит проблему для вас.
5]Удалите проблемный сертификат в браузере.
Вы также должны проверить, есть ли какой-то проблемный сертификат, который вы установили. Под проблемным сертификатом мы подразумеваем поврежденные сертификаты. Мы рекомендуем удалять сертификаты один за другим и смотреть, поможет ли это. Но перед этим лучше Экспортировать эти сертификаты или иметь их копию.
Microsoft Edge
- Нажмите на три вертикальные точки и нажмите «Настройки».
- Перейти к Конфиденциальность, поиск и услуги.
- Прокрутите вниз и нажмите «Управление сертификатами» в разделе «Безопасность».
- Выберите свой сертификат и нажмите Удалить.
Fire Fox
- Откройте Firefox и откройте его настройки.
- Перейти к Конфиденциальность и безопасность.
- Найдите раздел «Сертификаты» и нажмите «Просмотреть сертификаты».
- Выберите свой сертификат и нажмите Удалить.
Гугл Хром
- Откройте настройки Chrome.
- Перейти к Безопасность и конфиденциальность > Безопасность.
- Щелкните Управление сертификатами.
- Выберите проблемный сертификат и нажмите Удалить.
Опера
- Откройте Opera и нажмите на значок настроек.
- Нажмите на раскрывающееся меню Дополнительно.
- Перейти к Конфиденциальность и безопасность > Безопасность.
- Выберите Управление сертификатами.
- Выберите проблемный сертификат и нажмите Удалить.
Надеюсь, это решит проблему.
6]Устранение неполадок в чистой загрузке
Иногда другая программа может мешать работе вашего браузера и вызывать проблему. Поэтому вам следует устранить неполадки в «Чистой загрузке» и выяснить, что это за программа.
Надеюсь, вы сможете решить проблему с помощью этих решений.
Как исправить ошибку безопасного подключения в Firefox?
Вы можете легко исправить ошибку безопасного подключения в Firefox, следуя решениям, упомянутым в этой статье. Все они обслуживают Chrome, Firefox, Edge, Opera и другие браузеры. Однако в Firefox есть две ошибки Secure Connection Failed, другая — SSL ERROR NO CYPHER OVERLAP.
Также проверьте: