В Windows 10 автозапуск программ и приложений, в соответствии с названием, контролирует автоматический запуск программ вместе с системой, тем самым упрощая работу с ними, но замедляя общее время полной загрузки системы. Чем больше приложений запускается с ОС, тем медленнее будет происходить её загрузка. В этой статье мы рассмотрим все возможные варианты настройки автозапуска программ Windows 10, как добавить и изменить программы, а также сторонние приложения для управления этой настройкой.

Настройка автозагрузки
Для начала разберем, как и где отключить автозапуск программ и приложений в Windows 10. Вы можете контролировать автозапуск используя системные настройки – окно Параметры Windows, диспетчер задач, папка автозагрузки или реестр системы. Разберём каждый вариант отдельно.
Параметры Windows 10
Начиная с версии системы Windows 10 под номером 1803, в параметрах Windows можно найти настройку автозагрузки приложений.

Чтобы открыть эти настройки, выполните следующее:
- Пройдите в Параметры Windows (нажмите на кнопку «Пуск» и нажмите на иконку шестерёнки) или нажмите сочетание клавиш Win+i.
- Пройдите в настройки «Приложения» и откройте вкладку автозагрузка
- На этой странице вы можете увидеть список приложений, которые включены в автозапуск, вместе с стартом Windows, их влияние на скорость загрузки, а также статус – включен или отключен.
Этот вариант отсутствует у пользователей версии Windows 10 1709 и ниже, так как был добавлен только в первом обновлении 2018 года. Если у вас такого пункта нет, обновите Windows 10 или используйте следующий способ – диспетчер задач.

Диспетчер задач
В Windows 7 автозапуск и его настройки, находились в окне Конфигурация системы, вместе с быстрыми доступами к службам (в Windows 10 они там и остались). Сейчас, начиная с Windows 8, эти настройки перекочевали в диспетчер задач. Если вы не знали, как включить автозапуск программ в Windows 10 наиболее простым способом, то этот вариант вам отлично подойдёт.

Для этого выполните следующее:
- Для открытия диспетчера задач, вам необходимо нажать одновременно клавиши «Ctrl+Shift+Ecs», или откройте окно быстрых настроек (нажмите сочетание Win+X) и выберите соответствующий пункт. Альтернативный вариант, вызвать окно блокировки и нажать на Диспетчер задач.
- Если окно имеет режим миниатюры и не отображает никакой информации, кроме открытых приложений, нажмите кнопку «Подробнее».
- Пройдите во вкладку «Автозагрузка», где вы сможете произвести отключение автозапуска программ в Windows 10 и настроить его..
В диспетчере задач вы можете увидеть производителя того или иного приложения, которое запускается с системой, а также воспользовавшись функцией «Поиск в Интернете» найти нежелательное ПО или вирус, который может мешать корректной работе системы. Продолжаем изучать возможности системы и переходим к папке автозапуска.

Папка Автозагрузка
Данная папка позволит узнать, как сделать автозапуск программы в Windows 10 самостоятельно и поставить нужное вам приложение. Стоит быть осторожным и не добавлять особо производительные приложения или игры, чтобы не нагрузить систему при её запуске.

Для того, чтобы открыть папку автозапуска, следуйте шагам:
- Откройте следующее расположение: «C:Users*Ваш_пользователь*AppDataRoamingMicrosoftWindowsStart MenuProgramsStartup»
- Или же можно воспользоваться таким способом, как открыть автозапуск программ на Windows 10 через командную строку. Для этого в окне Выполнить (Win+R) наберите shell:startup и нажмите ОК
- Во многих случаях папка будет пустая, так как программы прописывают автоматический запуск приложений в реестре системы, но это будет описано в следующем варианте.
- Чтобы добавить желаемое приложение, создайте ярлык исполнительного файла с места расположения (Например, из папки Program Files) или скопируйте ярлык с рабочего стола в эту папку. При следующей загрузке системы, ярлык добавленный в эту папку будет также запущен.

Перейдём к последнему, наиболее сложному для простого пользователя, способу – реестр системы.
Реестр Windows
Если вы не знаете, где найти управление автозапуском программ в Windows 10, то этот пункт вам поможет. Реестр содержит в себе все настройки системы, в виде древовидной базы данных со своими параметрами и значениями. Тут настраивается автозапуск как для конкретных пользователей, так и для всей системы Windows в целом.
- Для начала откройте окно Выполнить (Win+R), наберите regedit и нажмите OK.
- Далее автозапуск для конкретного пользователя, находится в ветке HKEY_CURRENT_USERSoftwareMicrosoftWindowsCurrentVersionRun

- Чтобы открыть настройки автозапуска всех пользователей, откройте этот же путь только в корне HKEY_LOCAL_MACHINE

- Как мы видим, количество и приложения тут разные. Какие-то устанавливались для конкретного пользователя, другие для всей системы.
- В значении каждого параметра указываются исполнительные файлы конкретных программ. Иногда может встречаться ссылка на интернет ресурс, чаще всего это рекламный вирус, его нужно удалить.
- Вы можете создать свой параметр с типом REG_SZ и указать в значении ссылку на нужное приложение, но, если вы ранее не работали с реестром, лучше вам воспользоваться прошлым способом – папка автозапуска.
Ознакомившись со средствами системы, перейдём к сторонним программам. Самым удобным будет – Ccleaner, а самым многофункциональным – Autoruns.
Сторонние приложения
Для некоторых пользователей, интерфейс стандартных приложений системы может быть сложным, особенно редактор реестра. Поэтому будет полезны программы с удобным и понятным интерфейсом.
CCleaner
Приложение оптимизатор и «чистильщик» системы. Очень популярное и мощное решение от компании Piriform. С этой утилитой вы узнаете, как можно просто оптимизировать и очистить систему или же как быстро убрать автозапуск программ или планировщика на Windows 10, без особых усилий.
Скачать CCleaner можно бесплатно с официального сайта.

Чтобы отобразить автозапуск, выполните следующее:
- Откройте CCleaner и пройдите во вкладку «Сервис»
- Откройте вкладку «Автозагрузка»
Вы можете редактировать автозапуск, запланированные задачи, а также выключать или удалять приложения из контекстного меню. Это только малый список возможностей CCleaner, основной функционал направлен на очистку и оптимизацию системы. Программа, основной функционал которой направлен на отображение и редактирование работы стороннего и встроенного ПО – Sysinternals Autoruns.
Autoruns
Autoruns – утилита с огромным потенциалом для анализа системы, которая позволяет отобразить наиболее полную информацию о запускаемых программах. С помощью этой утилиты, вы можете не только оптимизировать работу системы, отключив ненужные программы автозапуска, но и проанализировать систему на наличие вредоносного ПО (вирусы, трояны и малвари).

Как пользоваться Autoruns:
- Загрузите утилиту с официального сайта Microsoft – прямая ссылка (ссылка с описанием)
- Распакуйте загруженный архив и откройте утилиту Autoruns или Autoruns64, в зависимости от разрядности вашей системы (64 или 32-битная). Утилиту следует открывать от имени Администратора, чтобы использовать полный функционал поиска.
Разберем основные вкладки утилиты:
- Вкладка «Logon» отображает программы, которые запускаются при входе в профиль системы. Автозапуск сторонних приложений и утилит.
- Вкладка «Explorer» содержит в себе значения для контекстного меню, а именно отображаемые приложения для работы с конкретными форматами. Например, при нажатии ПКМ по файлу с .rar форматом, вам будет предложено распаковать или открыть данный файл с использованием WinRar, 7zip или другим установленным архиватором. Эти приложения и будут присутствовать во вкладке «Explorer».
- «Scheduled Tasks» — запланированные задачи конкретного ПО.
- «Services» службы Microsoft и стороннего ПО
- «Drivers» — драйвера для оборудования вашего устройства
Настройки этой утилиты не столь богаты, так как вся информация уже сразу отображается при открытии, а пользователь лишь фильтрует и анализирует полученные результаты. Именно потому неподготовленному пользователю будет сложно ориентироваться в Autoruns.
Всего фильтра 4:
- Hide Empty Locations – по умолчанию включена и исключает из выдачи пустые значения, которые не столь необходимы и не несут важной информации.
- Hide Windows Entries — по умолчанию включена и скрывает стандартные системные утилиты, так как тоже могут мешать анализу.
- Hide Microsoft Entries – скрывает ПО от Microsoft, например Office.
- Hide VirusTotal Clean Entries – очень полезный фильтр для поиска вредоносного ПО в системе. Данный фильтр скрывает из выдачи значения, которые по мета данным VirusTotal не являются вредосносным ПО или вирусом. (Для этого необходимо включить значение Check VirusTotal.com). В моём случае, было выявлено 2 угрозы – приложение для удалённого подключению к ПК TeamViewer и утилита создания быстрых скриншотов LightShot. Только один антивирус из 69 посчитали это ПО вредоносным, поэтому я могу считать, что это погрешность, так как эти приложения были скачаны с официальных источников.
Autoruns не только позволяет узнать, как посмотреть автозапуск программ в Windows 10, но и зайти в реестр и проанализировать работу всех приложений.
На деле, пускай вас не пугает странный интерфейс этого приложения. В трудных ситуациях, когда даже антивирус не справляется, Autoruns позволяет определять и анализировать автозапуск вредоносных модулей и в дальнейшем удалять их, без вреда Windows. Главное детально разобраться.
Дополнительно
Разберем также моменты, когда не работает автозапуск программ Windows 10, какие приложения следует отключать, а какие нет и стоит ли это делать вообще.

- Не работает автозапуск программ
Причин, по которым может не работать автозапуск — несколько, разберём наиболее частые:
- Приложение не запускается, хотя включено в автозапуск.
Убедитесь, что запуску приложения не мешает антивирус. Также, попробуйте удалить значение из реестра и создать его снова. На крайний случай, попробуйте переустановить программу. Антивирус «Защитник Windows» работает в рамках системы, как отдельный компонент, он не препятствует работе программ из автозапуска.
- Я добавил приложение в автозапуск, а оно не запускается.
На моей памяти, главной ошибкой в этом случае была невнимательность. Убедитесь, что в папку автозапуска добавляется Ярлык приложения, а не исполнительный файл (кроме случаев утилит, которые и являются исполнительными файлами). А в Реестре указывается путь именно к исполнительному файлу, а не ярлыку.
- Программа автоматически загружается, даже когда я везде его отключил.
Обратите внимание, что Антивирусы и программы защиты, обладают системой самозащиты и имеют повышенный приоритет у системы, который не позволяет просто так отключить защиту системы. Вам поможет отключение данной функции в настройках антивируса или же удаление ПО.
Для оптимальной работы Windows необходимо, чтобы работали не только стандартные службы системы, но и ПО, обеспечивающее корректную работу оборудования, именно поэтому Intel и AMD создают утилиты, которые поддерживают работу оборудования на оптимальном уровне. К этому относятся утилиты слежения за питанием, температурой, звуком, видеокартой и остальным. Поэтому не рекомендуется отключать программы и утилиты производителя оборудования или драйверов устройства, чтобы не мешать корректной работе.

Исключение составляют конфликты и ошибки тех самых приложений. Например, после обновления Windows 10 до новой сборки и пользователя пропал звук, а при чистой загрузке (без стороннего) ПО звук присутствовал. Проблема была в приложении Realtek старой версии, которая конфликтовала с новой версией системы, проблема была решена установкой последней версией драйвера звука.
В этой статье вы узнали, как выключить автозапуск программ в Windows 10, отменить или добавить ПО в автозагрузку, а также разобрали сторонние приложения и основные проблемы, с которыми сталкиваются пользователи. Если у вас возникнут сложности или вопросы, будем рады вам помочь в комментариях.
Отличного Вам дня!
While a number of apps you install on Windows 10 feature an option to launch automatically when your computer loads, you can also configure any app whether the option is available or not by simply adding its shortcut to the Startup folder.
Also, you’re not just limited to desktop applications. You can set Windows Store apps to start automatically as well as files, folders, and websites.
In this Windows 10 guide, we’ll walk you through the steps to automatically launch apps, files, folders, and websites on startup to speed up your daily tasks.
How to launch apps on startup
If you work with the same apps or launch the same websites on a regular basis, then use these steps to get them started automatically as you sign in to your Windows 10 account:
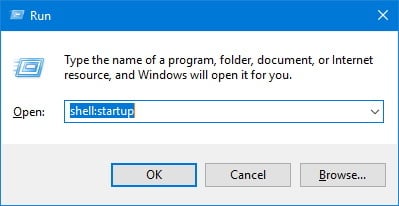
- Use the Windows key + R keyboard shortcut to open the Run command.
- Type the following command to open the Startup folder and press Enter:
shell:startup - Click OK.
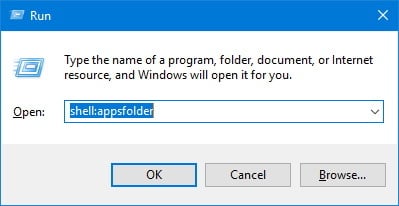
- Use the Windows key + R keyboard shortcut to open the Run command.
- Type the following command to open the Applications folder, which contains shortcuts of all your installed applications (including Windows Store apps), and press Enter:
shell:AppsFolder - Click OK.
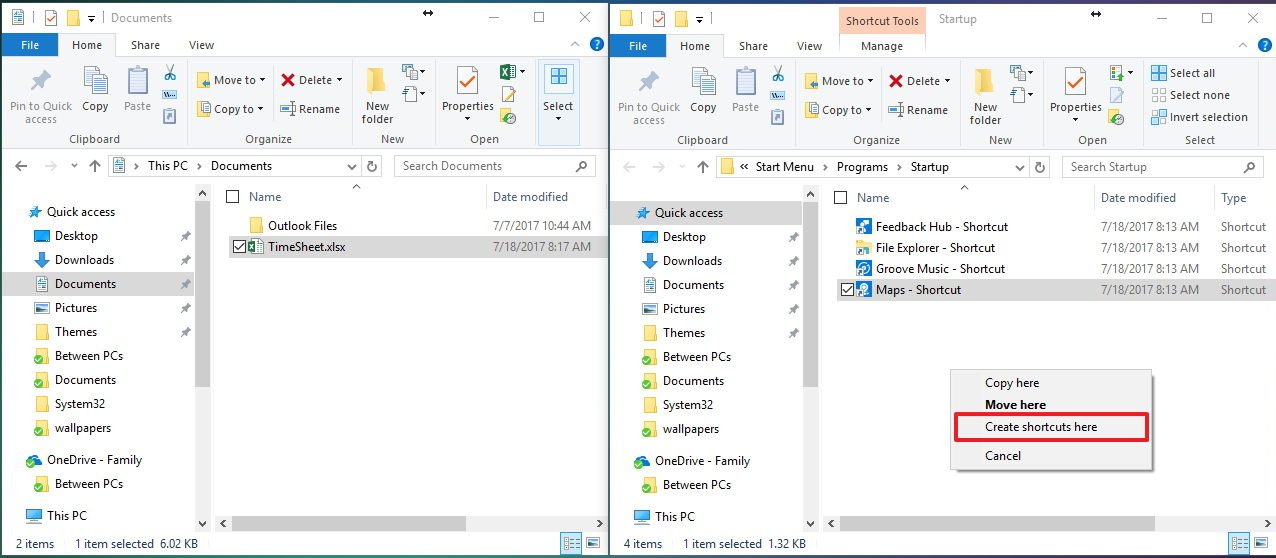
- Snap the Applications folder to the left, and the Startup folder to the right.
- Select the app you want from the Applications folders and drag and drop to the Startup folder.
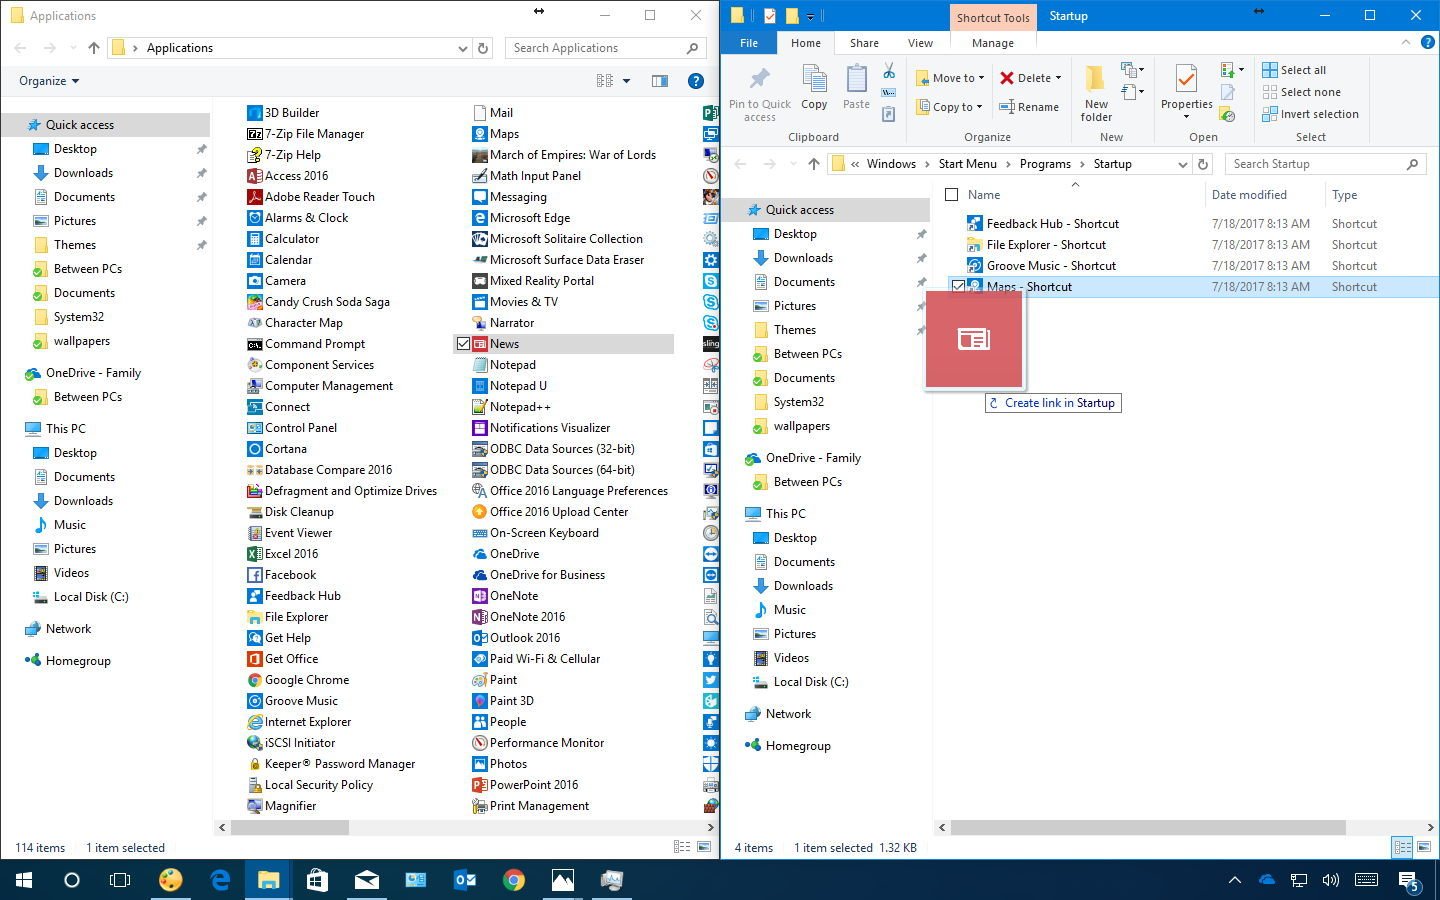
- Repeat step No. 8 for all the applications you want to launch after signing in to your account.
Once you completed the steps, every time you access your account apps will open automatically. If you want an app to start maximized, just click the maximize button, and then the app will remember the window size.
In the above instructions, we show the steps to add an app, but you can also add files, folders, and shortcuts to websites. For example, if you usually work with an Excel spreadsheet, you don’t need to add the shortcut to open Excel. It’s easier to right-click, drag, and drop the spreadsheet file in the Startup folder and select the Create shortcut here option from the context menu.
Just remember that each shortcut you include in the Startup folder will cause Windows 10 to take a bit longer to load, as such it’s only recommended to keep the list of items small as possible. (You can also refer you our guide to manage apps on startup.)
More Windows 10 resources
For more helpful articles, coverage, and answers to common questions about Windows 10, visit the following resources:
- Windows 10 on Windows Central – All you need to know
- Windows 10 help, tips, and tricks
- Windows 10 forums on Windows Central
Get the best of Windows Central in in your inbox, every day!
Mauro Huculak is technical writer for WindowsCentral.com. His primary focus is to write comprehensive how-tos to help users get the most out of Windows 10 and its many related technologies. He has an IT background with professional certifications from Microsoft, Cisco, and CompTIA, and he’s a recognized member of the Microsoft MVP community.
The more apps you install on your computer, the longer it will take to start up Windows. This is because many apps load at startup and slow down the boot process. The longer that list gets, the slower your OS loads after a restart or shutdown. In this article, we will review some basic ways to manage startup apps in Windows 10 so your OS remains more responsive. This article is also applicable to Windows 8.1 and Windows 8.
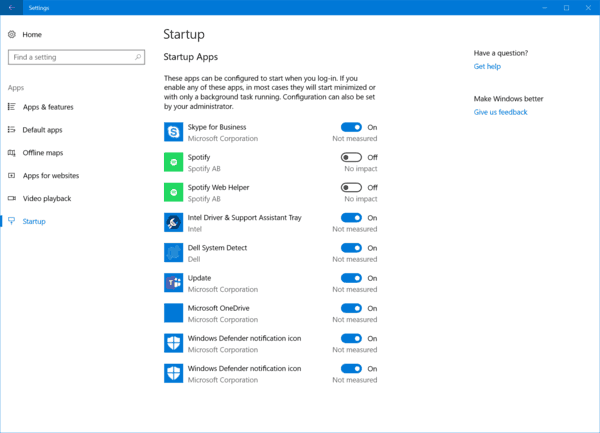
Update: Starting with Windows 10 build 17017, there is a special page in Settings to manage startup apps. You can find it under Settings — Apps — Startup. See the following screenshot:
To manage startup apps, you need to review all of them so you can turn off the ones you don’t want. This can be done via Task Manager in Windows 10. All you need to do is to open the Task Manager app and go to the Startup tab: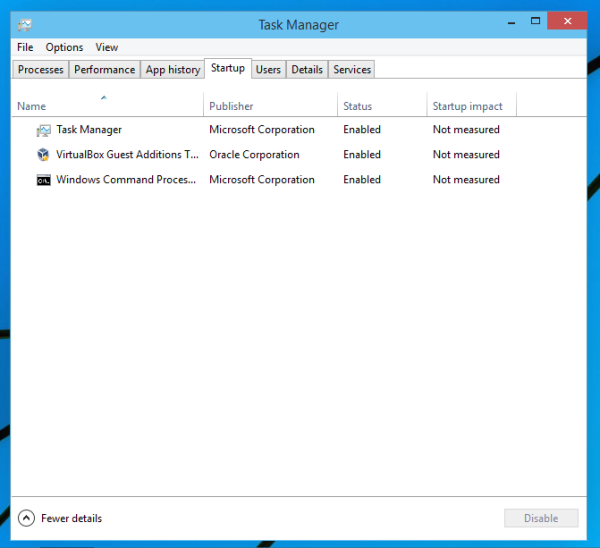
Tip: You open the Startup tab of Task Manager directly in Windows 10 by running the following command:
taskmgr /0 /startup
Press Win + R shortcut keys together on the keyboard and type the command mentioned above in the Run box. See the following article for more details: How to open the Startup tab of Task Manager directly in Windows 8.
On the Startup tab you will see the full list of apps which start with Windows.
Tip: You might be curious how Task Manager calculates the «Startup Impact» of Apps.
Using the Startup tab of Task Manager, you can easily prevent an app from starting with your OS. It is very easy — just right click the desired app and pick «Disable» from the context menu.
To enable the disabled app, you just need to right click it again and choose the «Enable» command from the context menu.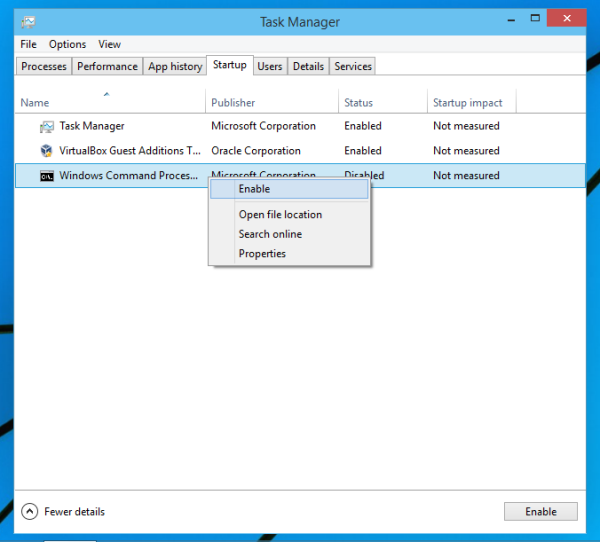
Now you know how to enable or disable startup apps. Let’s see how to add a new app to load at startup or remove an existing one.
How to add or remove startup apps for the current user
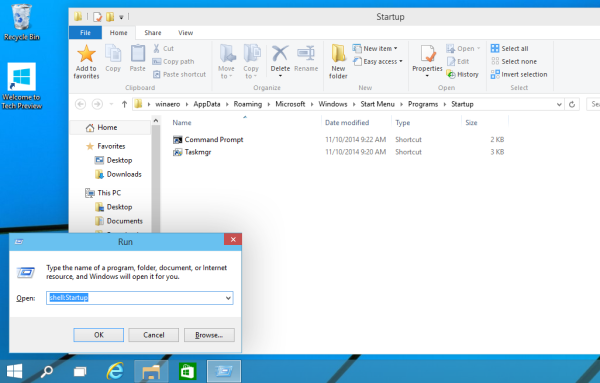
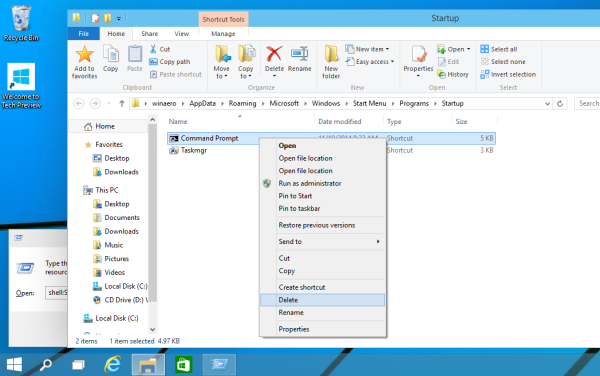
Startup items for the current user are stored usually at two locations: the Registry and the special «Startup» folder. The Startup folder is an easier way to manage apps. To add or remove an app from the Startup folder, you need to do the following:
- Press Win + R shortcut keys together and type the following into the Run box:
shell:Startup
The text above is a special shell command which will open the Startup folder for you directly.

The Startup folder is located here:
C:UsersYour user nameAppDataRoamingMicrosoftWindowsStart MenuProgramsStartup
Just copy and paste a shortcut in this folder so that the app loads when Windows boots. To remove the application from the Startup folder, delete the appropriate shortcut.

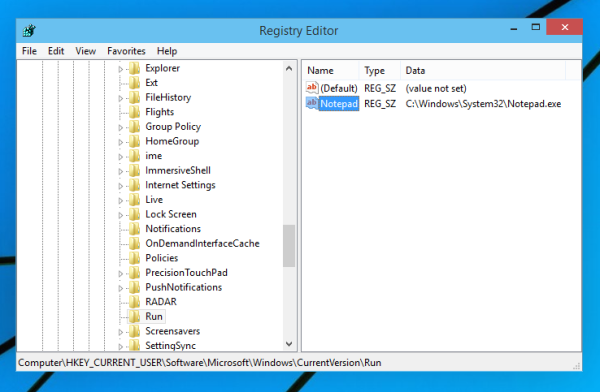
That’s it!To add or remove startup apps for the current user from the Registry, you need to follow the instructions below:
- Open Registry Editor.
- Go to the following key:
HKEY_CURRENT_USERSoftwareMicrosoftWindowsCurrentVersionRun
- There you will find startup items for current users which are stored in the Registry:

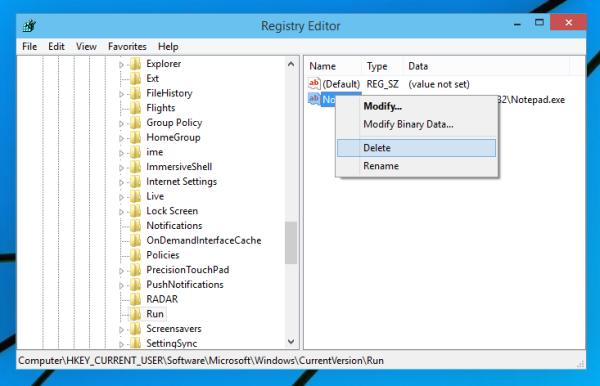
To delete an item, right click it and choose Delete from the context menu: To add a new startup item, you need to create a new string value with any desired name and set its value data to the full path of the application which you want to load at startup:
How to add or remove startup apps for all users
The method is pretty much the same as adding an app for a single user. The Startup folder and Registry key are different for All users.
To add or remove startup items for all users via the Startup folder, type the following shell command in the Run dialog:
shell:Common Startup
The following folder will be opened:
C:ProgramDataMicrosoftWindowsStart MenuProgramsStartup
There you can add or remove shortcuts for any app you want. Shortcuts from this folder will start with Windows for all users of your PC.
As for the All Users Registry key, you will need to go to the following key:
HKEY_LOCAL_MACHINESOFTWAREMicrosoftWindowsCurrentVersionRun
Here you need to create or delete string values as described above. The value name can be anything but the value data must contain the full path to the executable (.EXE) of the app that you wish to run at startup.
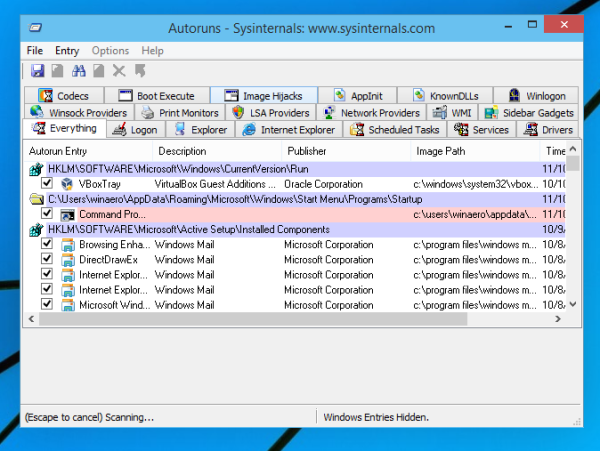
That’s it. For advanced management of startup apps, I recommend you to take a look at the excellent SysInternals Autoruns tool:

The Autoruns app is the most comprehensive startup management app and covers all locations. It not only allows you to manage Startup apps but also many other objects including shell extensions which load with the Explorer shell, Scheduled tasks, system services and other system components.
 To add a new startup item, you need to create a new string value with any desired name and set its value data to the full path of the application which you want to load at startup:
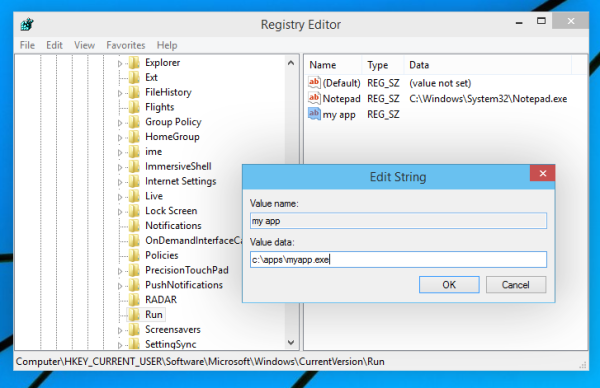
Add an app installed from the Windows Store to Startup
If you want to add an app installed from the Windows Store to Startup, you cannot use traditional methods. See how it can be done in the following article:
How to Add Store Apps to Startup in Windows 10
That’s it.
Support us
Winaero greatly relies on your support. You can help the site keep bringing you interesting and useful content and software by using these options:
If you like this article, please share it using the buttons below. It won’t take a lot from you, but it will help us grow. Thanks for your support!
79
79 people found this article helpful
Launch your favorite apps every time you boot up
What to Know
- Open the Run dialog box, enter shell:startup, then right-click inside the Startup folder and select New > Shortcut to add a program.
- If you can’t find the app, enter shell:appsfolder in the Run dialog box, then drag apps from that folder into the Startup folder.
- Some apps offer a ‘run at startup’ option, which is an easier way to add a program to startup in Windows 10.
This article explains how to add a program to startup in Windows 10. Applications that are designated as startup programs are launched as Windows 10 boots.
How to Add Programs to Startup in Windows 11
How to Add Programs to Startup in Windows 10
You can enable or disable apps from running on startup in the App Startup Control Panel and the taskbar, but the only place you can add new startup programs is through the Windows startup folder.
Some modern apps have a ‘run at startup’ capability built into their options. If your app has that option, then turning it on is a lot easier than the following method, which is designed to work with all programs.
-
Press the Windows key+R to open the run dialog box.
-
Type shell:startup in the run dialog box and press Enter on your keyboard.
-
Right click in the startup folder and click New.
-
Click Shortcut.
-
Type the location of the program if you know it, or click Browse to locate the program on your computer.
If you can’t find your app, try opening the run dialog box back up and typing shell:appsfolder. You can drag any app from that folder into the startup folder to instantly create a shortcut.
-
Click Next.
-
Type a name for the shortcut, and click Finish.
-
Create additional links for any other programs you want to run automatically when Windows starts.
-
Restart your computer, and the new programs will launch automatically.
What Is the Windows Startup Folder?
The Windows startup folder is a folder that Windows looks in for programs to run every time it starts. This was the only way to manage startup programs in older versions of Windows. Adding a program shortcut causes that program to launch when Windows starts, and removing a program shortcut stops it from launching when Windows starts.
While Windows 10 has moved to the newer app startup control panel as the primary way to manage which apps, the startup folder remains the best way for users to add their own startup programs.
Drawbacks to Adding Programs to the Startup Folder in Windows 10
The benefits of adding programs you use every day to the Windows 10 startup folder are obvious. Instead of waiting for Windows to start up and then manually clicking on everything you launch every day, all you have to do is turn your computer on and wait for everything to load.
The issue is that it takes time for programs to load along with Windows, and every program you load takes up resources like memory and processor power. Load too many unnecessary programs, and you’ll find that Windows 10 starts slow and may even remain sluggish after loading everything.
If you change your mind about programs you’ve added to the startup folder, you can simply delete the shortcuts to prevent those programs from launching whenever you turn on your computer. You can also change startup programs in Windows 10 using the task manager or the startup app control panel.
What to Do If You Have Too Many Windows 10 Startup Programs
If you have some essential programs that you use for work every day, or you mainly use your computer to play a specific game, try adding the programs that are important to you and then removing programs you don’t ever use.
Your computer probably came with bloatware you never actually use, and applications are often set to run when Windows starts up even if you don’t want them to. Disable those startup programs, add the ones you want, and you’ll enjoy both convenience and faster startup times.
FAQ
-
How do improve startup time in Windows 10?
To improve startup time in Windows 10, disable startup programs, run an anti-virus scan, disable hardware you don’t use, upgrade your RAM, or switch to an SSD.
-
How do I change my home page in Windows?
To change your home page in Microsoft Edge, go to the three-dot menu > Settings > On startup > Open a Specific page or pages > Add a new page. In Chrome, go to the three-dot menu > Settings > Show home button > Enter custom web address.
-
How do I access Windows Advanced Startup Options?
To access Windows Advanced Startup Options, hold down the Shift key and restart your computer. Keep holding Shift until you see the Advanced Startup Options menu. Alternatively, go to the Recovery options in Windows Settings.
-
How do I add shortcuts to my Windows 10 desktop?
To add desktop shortcuts, right-click anywhere on the desktop, then select New > Shortcut > Browse. You can use desktop shortcuts to access applications, navigate to a website, or open a file.
Thanks for letting us know!
Get the Latest Tech News Delivered Every Day
Subscribe