Resetting your PC lets you perform a clean reinstallation and update of Windows while keeping your personal data and most Windows settings intact. In some cases, a clean installation may improve your device’s performance, security, browsing experience, and battery life.
To reset your PC, go to Start > Settings > System > Recovery . Next to Reset this PC , select Reset PC. Then, select Keep my files, choose cloud or local, change your settings, and set Restore preinstalled apps? to No.
Open Recovery settings
Note: If you don’t see the option to Restore preinstalled apps, it means your PC doesn’t have preinstalled apps configured.
Related links
Recovery options in Windows
To reset your PC, go to Start > Settings > Update & Security > Recovery > Reset this PC > Get Started. Then, select Keep my files, choose cloud or local, change your settings, and set Restore preinstalled apps? to No.
Open Recovery settings
Note: If you don’t see the option to Restore preinstalled apps, it means your PC doesn’t have preinstalled apps configured.
In versions of Windows 10 prior to version 2004 this feature was called Fresh Start and to use it you’d select Start > Settings > Update & security > Windows Defender > Device performance & health. Under Fresh Start, select Additional info > Get Started.
Important: Resetting your PC (or using Fresh Start) will remove most of your apps, including Microsoft Office, third-party anti-virus software, and desktop apps that came pre-installed on your device. You will not be able to recover removed apps, and will need to manually reinstall these apps. You may also lose your digital licenses and digital content associated with apps, which may impact your ability to use these apps or app-related content you paid for.
Learn more about resetting your PC
Need more help?
(Image credit: Future)
A clean installation of Windows 10 is the process of erasing everything to start with a fresh copy of the operating system when a computer has problems. For example, this method can resolve performance, memory, startup, shutdown, and app issues. Also, it’s perhaps the best approach to remove viruses and other types of malware, and it can help to improve battery life.
In addition, it’s an excellent solution to remove preloaded bloatware (unnecessary preloaded software) from Windows 10. You can use this method to decommission a computer without giving away your personal information. Or you can set up a new installation after replacing the hard drive.
Furthermore, if you have had the same setup for some time, a clean installation is a great option to upgrade to the latest version of Windows 10 or upgrade from an older version (such as Windows 7 and Windows 8.1), minimizing the risks of problems during and after the process.
This guide will walk you through the complete process of performing a clean installation of Windows 10.
How to prepare PC for clean install of Windows 10
As you prepare to proceed with a clean installation of Windows 10, completing some essential tasks is recommended to minimize issues and potential data loss.
If you already have a backup of the computer and files. You have an activation product key. The device can start from a USB flash drive, and non-essential peripherals are disconnected. Then, you can skip this part and jump to the bootable media creation and a clean install process.
Create backup
The install process of Windows 10 deletes everything on the drive, which means that backing up the entire device (or at least your files) is a crucial step unless you don’t have anything important you want to keep.
Back up entire system
You should create a temporary backup to revert the settings or recover files if something goes wrong during the installation.
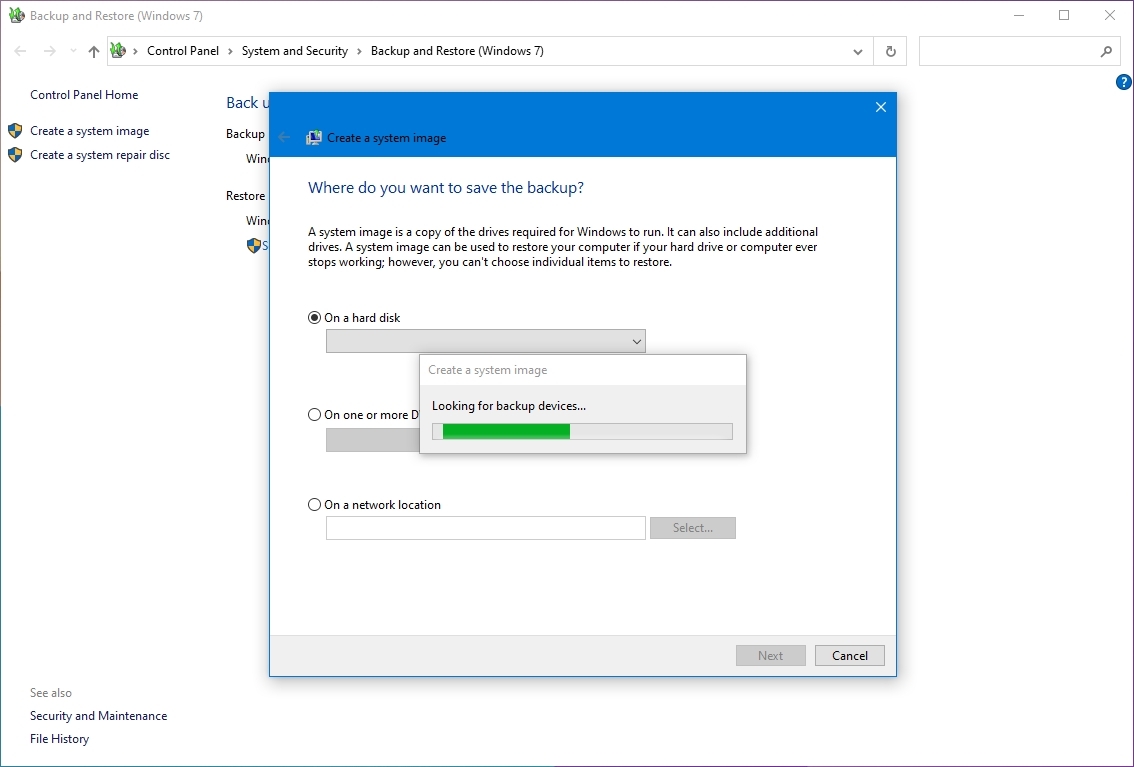
You can choose many different solutions, but the easiest way to create a full backup is to use the System Image Backup legacy tool available on Windows 10. It’s a deprecated feature, but it continues to work. The tool is also available for Windows 8.1 and Windows 7.
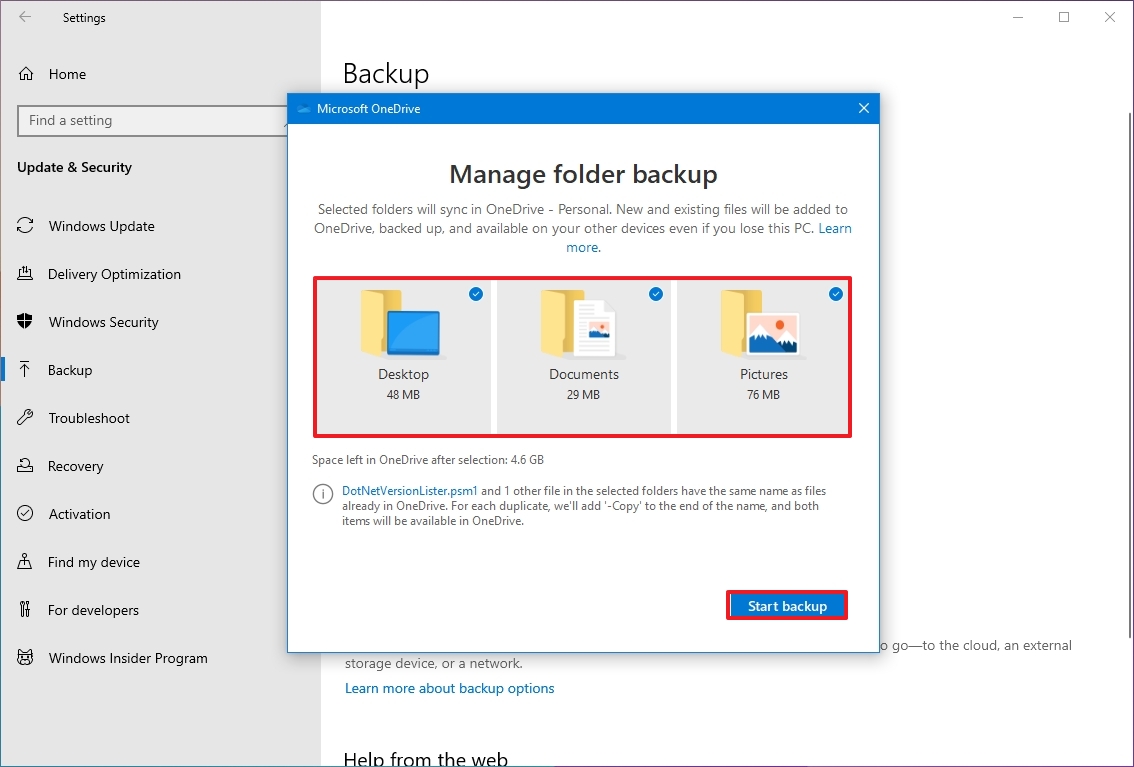
Back up files to OneDrive
If you need to back up your documents, pictures, and other important files, you can upload the data to OneDrive or another cloud storage service.
In case you use OneDrive, you can also use the backup settings page to sync your profile folders, including Documents, Pictures, and Desktop, to the cloud automatically.
To configure OneDrive backup on Windows 10, use these steps:
- Open Settings.
- Click on Update & Security.
- Click on Backup.
- Under the «Back up files to OneDrive» section, click the «Back up files» option.
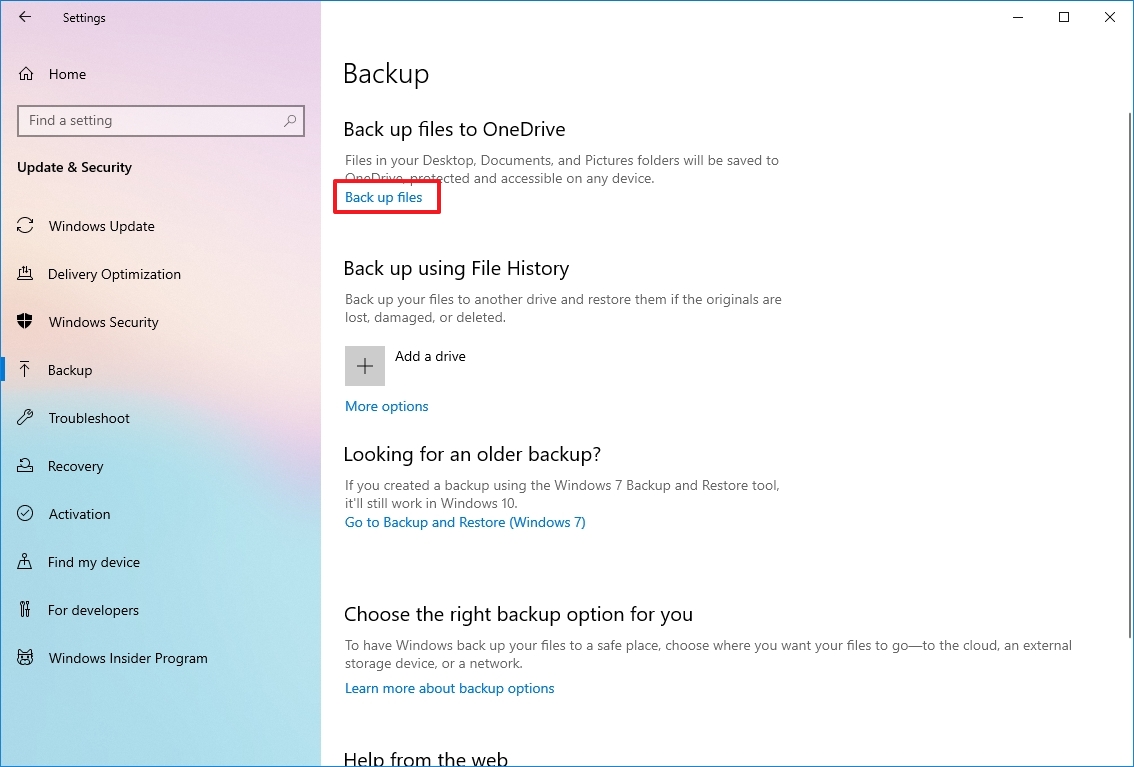
- (Optional) Click to clear the folder you don’t want to back up in the cloud.
- Click the Start backup button.
Back up files to external storage
If you have a lot of data, syncing the files to the cloud can be expensive and take a long time, and the available space may not even be enough. If this is the case, perhaps the best option would be to copy the files to an external USB hard drive.
To create a file backup manually, connect an external drive with enough storage space to your Windows 10 computer, and use these steps:
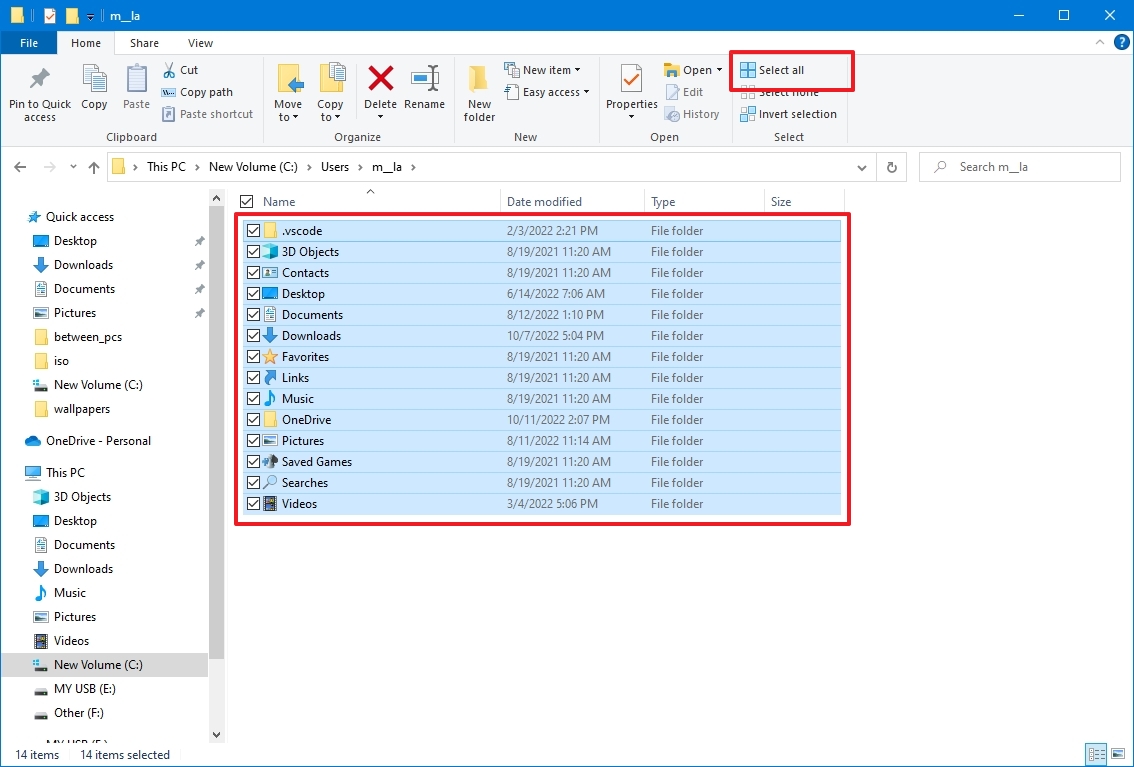
- Open File Explorer.
- Type the following path in the address bar and press Enter: %HOMEPATH%

- Click the Select all button from the «Home» tab.
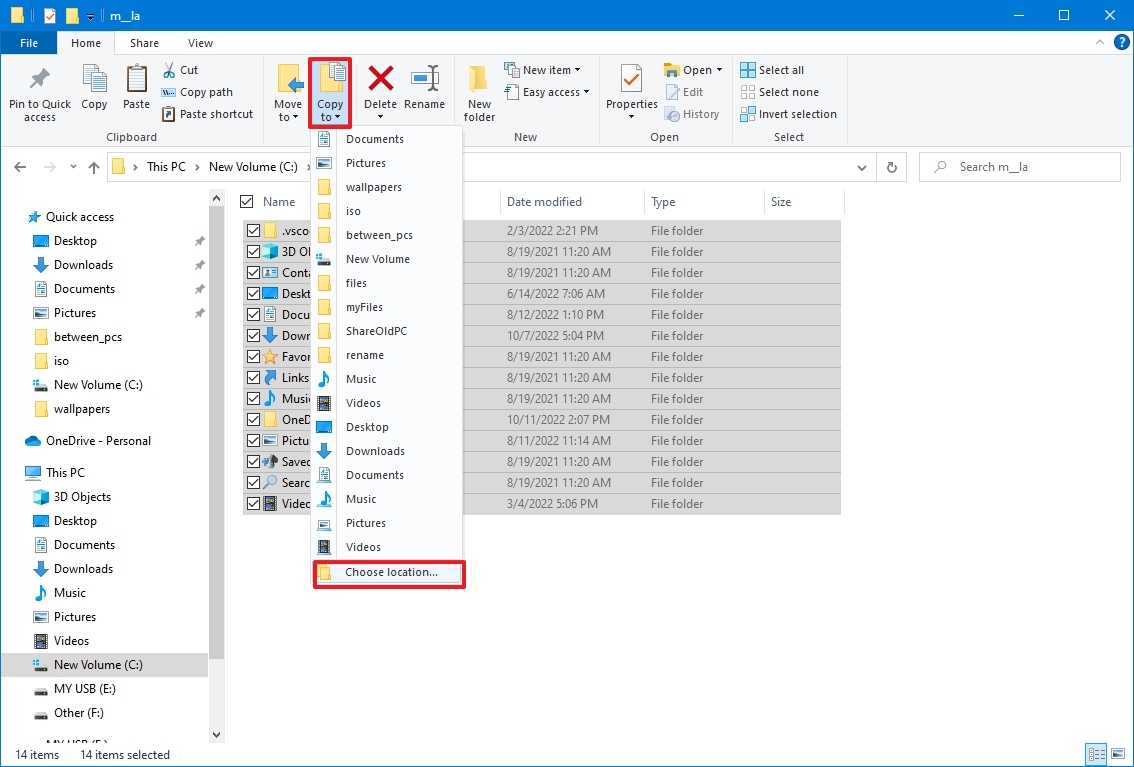
- Click the Copy to button from the «Home» tab.
- Select the Choose location option.
- Select the destination location.
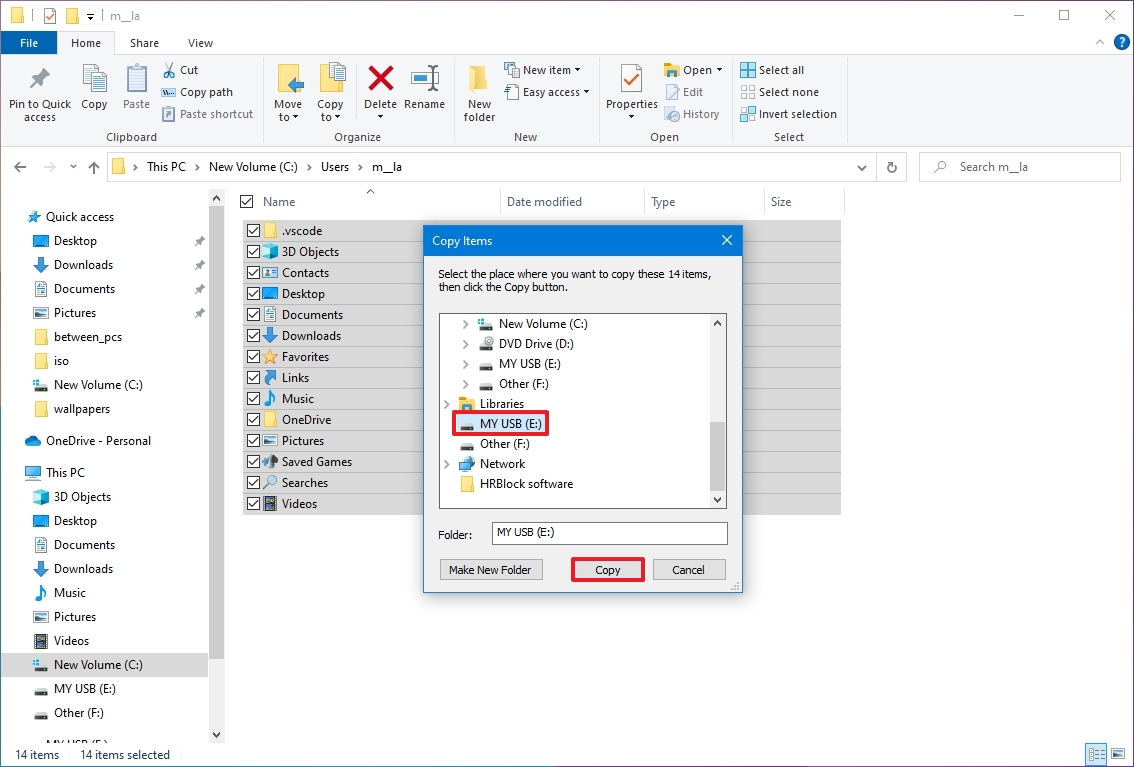
- Click the Copy button.
After you complete the steps, repeat the instructions to back up the remaining accounts (as necessary). In addition to copying your files, creating a list of the installed programs with their respective product keys (if applicable) is also a good idea to know the apps to reinstall after the installation.
If you usually don’t sync passwords and bookmarks with an online service, now’s a good time to export your browser credentials and links, as you’ll need them later to access your online services.
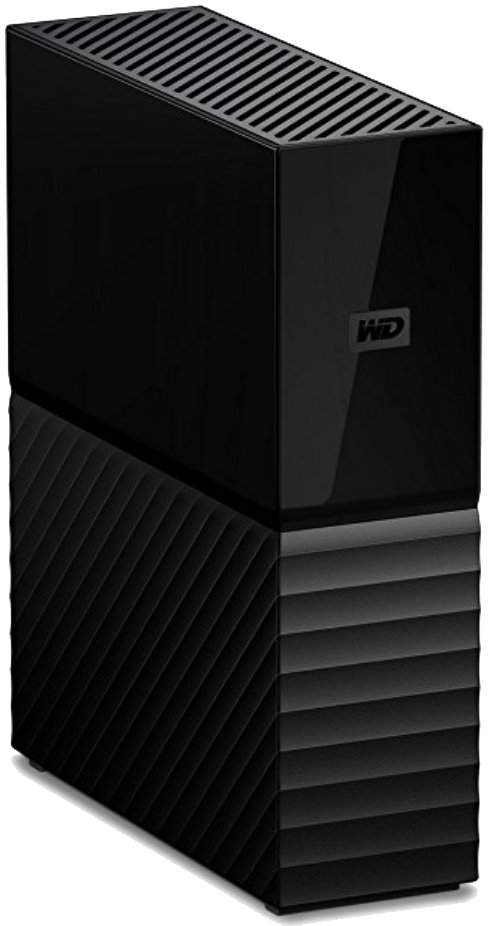
In case you don’t have an external hard drive or one without enough space, we recommend the Western Digital Elements Desktop Hard Drive because of its portability, capacity, and price.
(opens in new tab)
Western Digital Elements Desktop Hard Drive
Bulk storage
If you’re in the market for an external drive to store file backups, look no further than the Western Digital Elements Desktop Hard Drive. Get up to 18TB of storage and connect with USB-A 3.0 for fast file transfers.
Check Windows 10 activation
Although after activating Windows 10, you no longer have to provide a product key for reinstallation on the same computer. Once the new installation completes, the system will automatically reactivate when it connects to the internet.
To confirm whether Windows 10 is properly activated, use these steps:
- Open Settings.
- Click on Update & Security.
- Click on Activation.
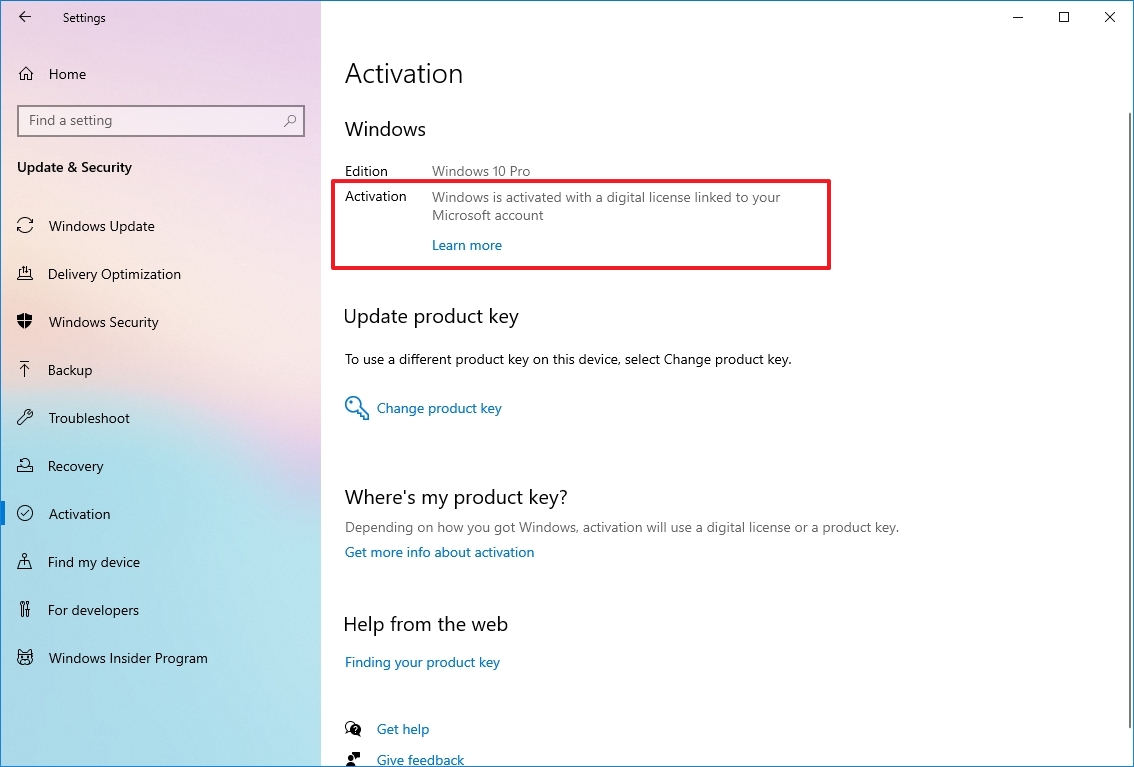
- Under the «Windows» section, confirm the activation. If the computer has been properly activated, you’ll see one of these messages:
- Windows is activated with a digital license: The installation has been activated, but it isn’t linked to your Microsoft account.
- Windows is activated with a digital license linked to your Microsoft account: The installation has been activated, and the license is linked to your Microsoft account.
After you complete the steps, Windows 10 should automatically reactivate after the clean installation if your current setup is activated.
Obtain Windows 10 genuine key
If you have to set up an installation on a computer that never had an activated version of Windows 10, or you plan to upgrade from Windows 8.1 or Windows 7, you will have to purchase a valid license from the Microsoft Store (opens in new tab), Amazon, or another retailer.
Download essential drivers
Windows 10 can detect and install most drivers automatically. However, it’s usually recommended to download at least the essential drivers before the process (such as for the network adapter and graphics card), as a precaution, in case the setup fails to add these drivers correctly, especially on custom computer builds.
You can use our guide to install device drivers on Windows 10.
Here’s a list of the most popular manufacturers to download the latest device drivers:
- Dell (opens in new tab)
- HP (opens in new tab)
- Lenovo (opens in new tab)
- ASUS (opens in new tab)
- Acer (opens in new tab)
- Samsung (opens in new tab)
- MSI
Confirm Windows 10 requirements
If the device already has Windows 10, the following major update will likely meet the minimum hardware requirements. However, if you’re about to upgrade a computer running Windows 7 or Windows 8.1, you want to check that the device meets the minimum requirements.
Here are the minimum requirements to install Windows 10 versions 21H2, 22H2, and higher:
- Processor: 1GHz or System on a Chip (SoC).
- Memory: 1GB for 32-bit or 2GB for 64-bit.
- Storage: 32GB for 64-bit or 32-bit.
- Graphics card: DirectX 9 or later with WDDM 1.0 driver.
- Display: 800×600.
You can use these instructions to check the device technical specifications to confirm you can do a clean install of Windows 10.
Change boot order on firmware
It’s also important to ensure the computer can boot from a USB flash drive. If this is not the case, you’ll need to change the Basic Input/Output System (BIOS) or Unified Extensible Firmware Interface (UEFI) on the motherboard.
Change boot order using UEFI
On computers already running Windows 10 or 8.1, you can access the settings to change the boot order within the desktop interface.
UEFI settings on Windows 10
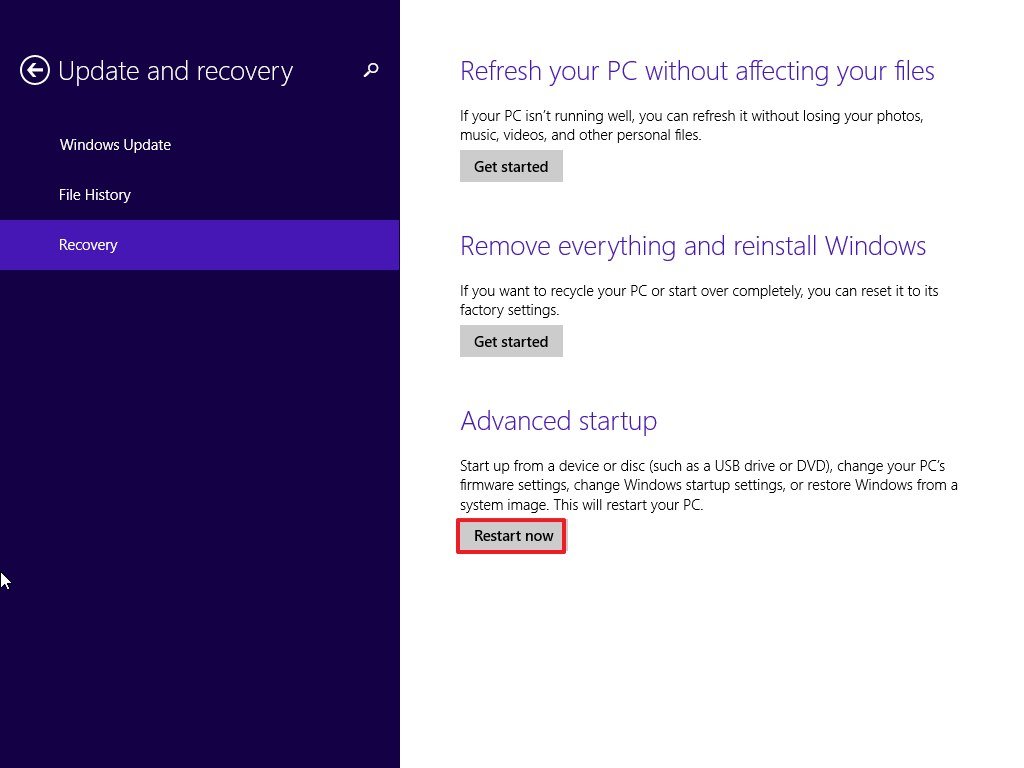
To change the UEFI settings on Windows 10, use these steps:
- Open Settings.
- Click on Update & Security.
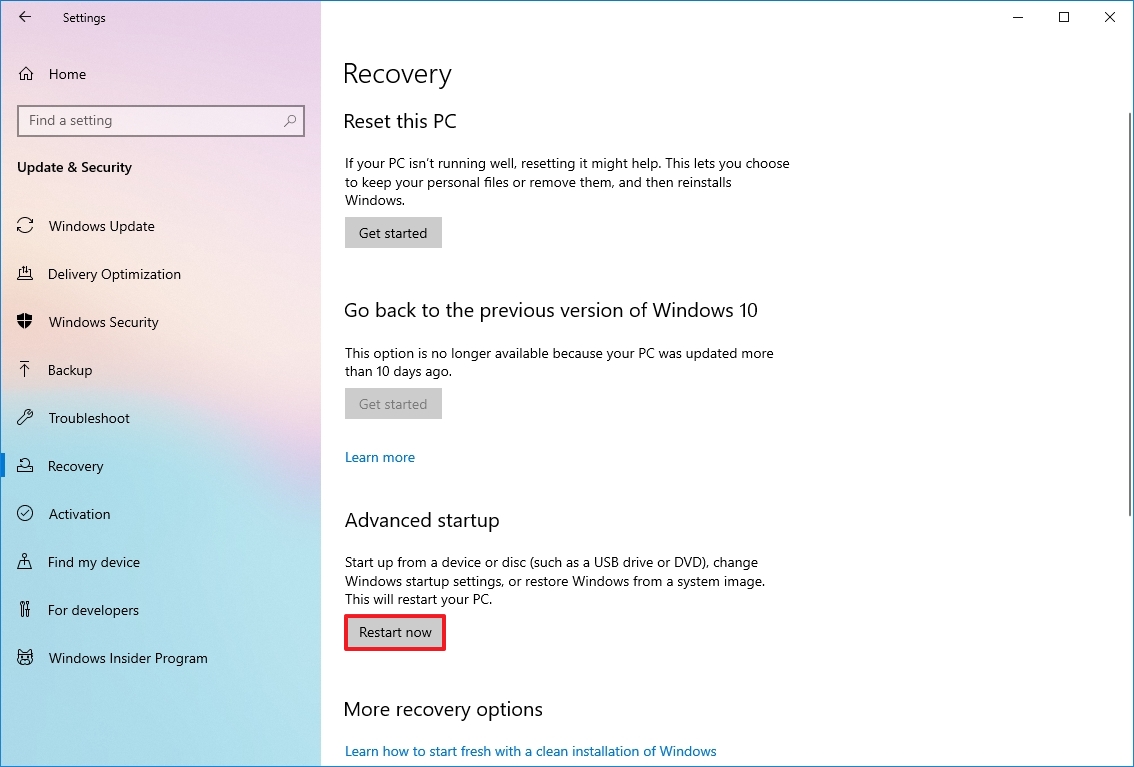
- Click on Recovery.
- Under the «Advanced startup» section, click the Restart now button.
- Click the Troubleshoot button.
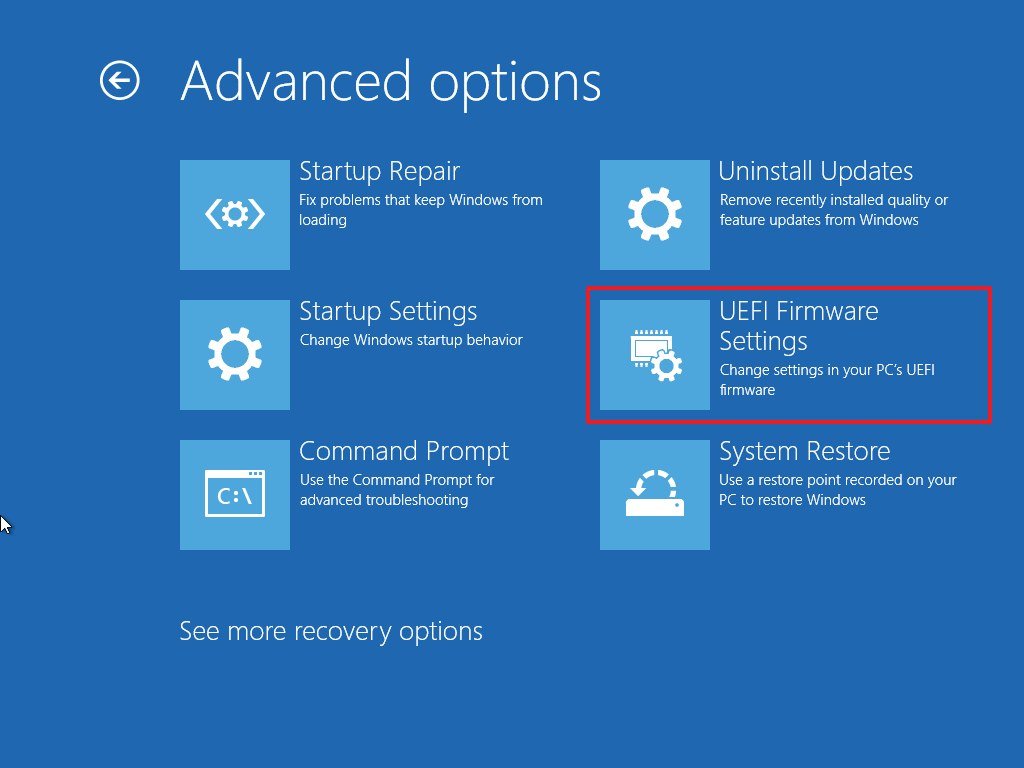
- Click on Advanced options.
- Click the «UEFI Firmware Settings» option.
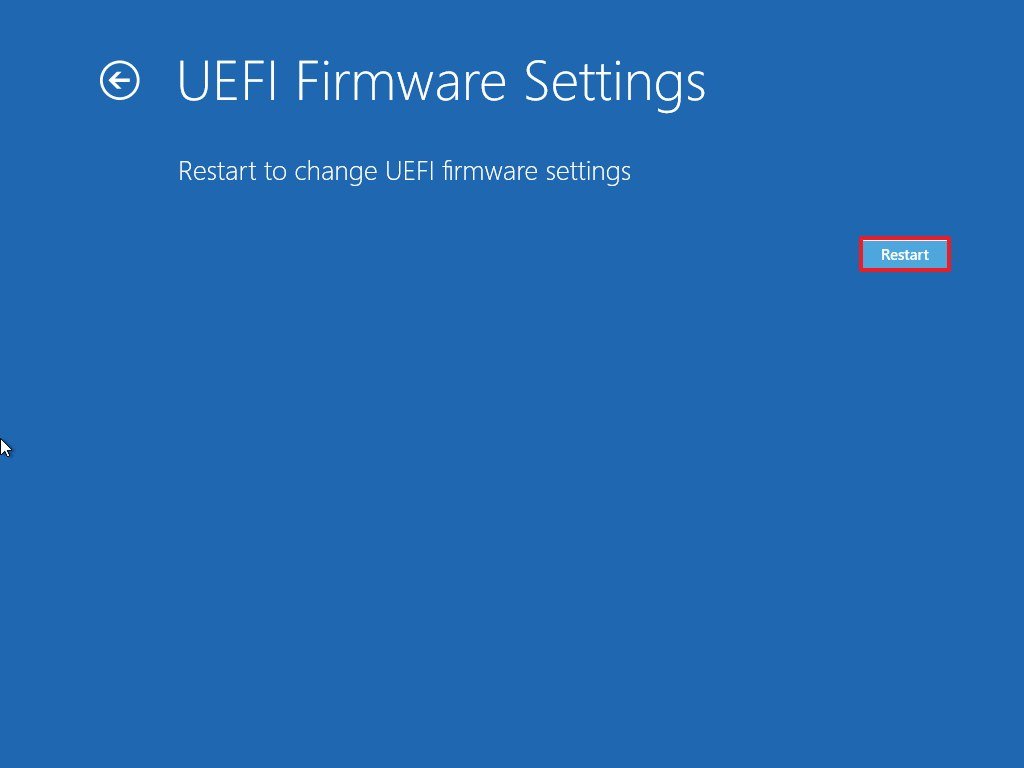
- Click the Restart button.
- Inside the motherboard firmware settings, open the Boot page.
- Set the boot order to start from the USB flash drive with the Windows 10 installation files.
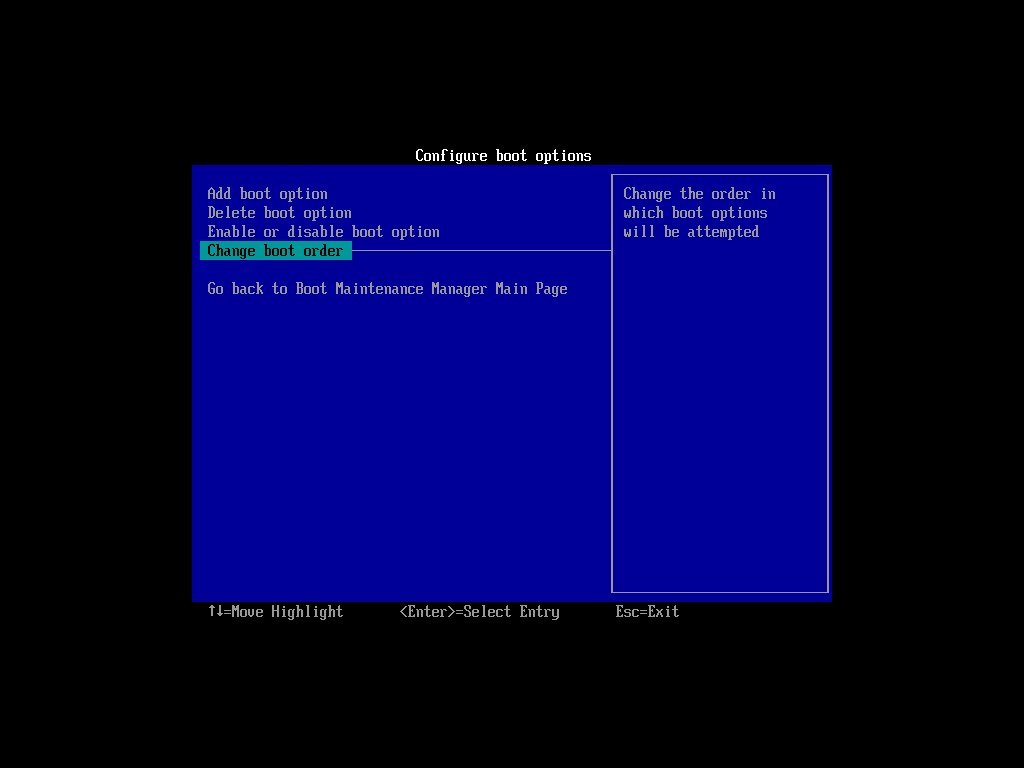
- Save the changes.
After you complete the steps, the computer should now be able to start from a USB bootable media.
UEFI settings on Windows 8.1
To change the UEFI settings on Windows 8.1, use these steps:
- Open Settings.
- Click on Update and recovery.
- Click on Recovery.
- Under the «Advanced Startup» section, click the Restart now button.
- Click the Troubleshoot option.
- Click on Advanced options.
- Click the UEFI Firmware Settings option.
- Click the Restart button.
- Inside the motherboard firmware settings, open the Boot page.
- Set the boot order to start from the USB media with the Windows 10 installation files.
- Save the changes.
Once you complete the steps, the device will start from a USB flash drive to proceed with the installation.
UEFI settings on Windows 7
To change the UEFI settings on Windows 7, use these steps:
- Start the PC.
- As soon as it starts, press the F1, F2, F3, F10, F12, Esc, or Delete keys to access the firmware.
- Quick tip: You may need to check your manufacturer support website for more specific steps to access the firmware settings.
- Inside the motherboard firmware settings, open the Boot page.
- Set the boot order to start with the Windows 10 installation files from the USB media.
After you complete the steps, you should be able to start the device using a bootable media.
Configure boot order using BIOS
If you have a legacy BIOS firmware, you can change the boot order with these steps:
- Start the PC.
- As soon as the computer starts booting up, press one of the function keys (F1, F2, F3, F10, or F12), Esc, or Delete key.
- Inside the motherboard firmware settings, open the Boot page.
- Set the boot order to start with the Windows 10 installation files from the USB media.
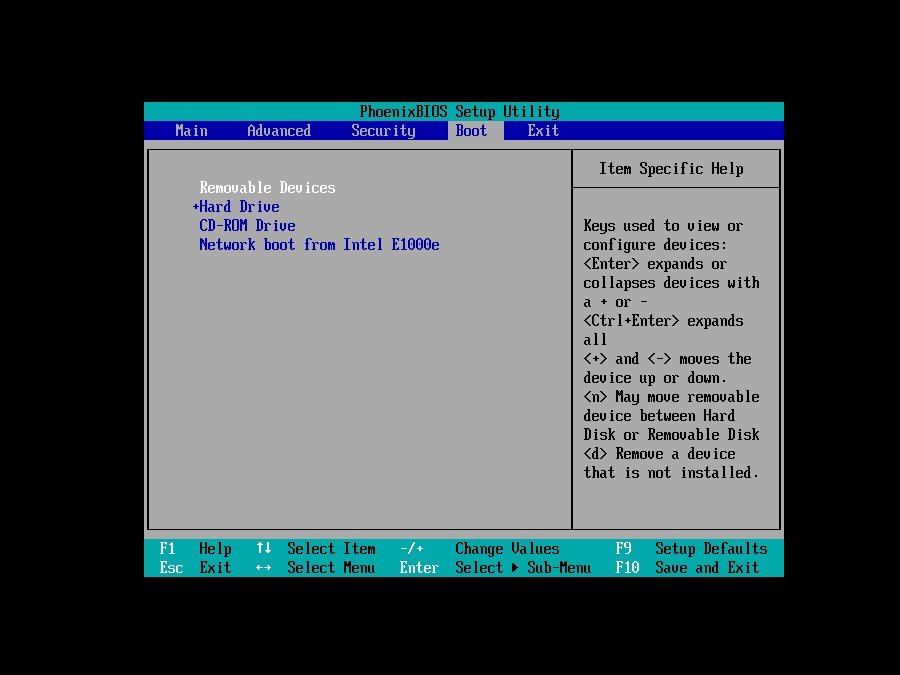
- Save the changes.
Once you complete the steps, the computer can now start from the USB flash drive to upgrade to Windows 10.
Disconnect non-essential peripherals
Typically, peripherals are among the most common reason for problems during a Windows 10 installation. If you have non-essential peripherals connected to the computer (such as removable storage and other USB and Bluetooth devices, printers, scanners, cameras, and others), it’s recommended to disconnect them.
You only need a monitor, keyboard, mouse, and internet connection. After the setup, you can reconnect the peripherals (one at a time) to ensure they don’t cause any issues.
How to create USB for clean install of Windows 10
You will need a USB bootable media to perform a clean installation of Windows 10. You can easily create one using many tools, including the Microsoft Media Creation Tool and Rufus.
Create Windows 10 USB with Media Creation Tool
To create an installation media using the Media Creation Tool, connect a USB flash drive of at least 8GB of space, and use these steps:
- Open the Windows 10 download page (opens in new tab).
- Under the «Create Windows 10 installation media» section, click the «Download tool now» button to save the file on the computer.
- Double-click the MediaCreationToolxxxx.exe file to launch the tool.
- Click the Accept button to agree to the Microsoft terms.
- Select the «Create installation media (USB flash drive, DVD, or ISO file) for another PC» option.
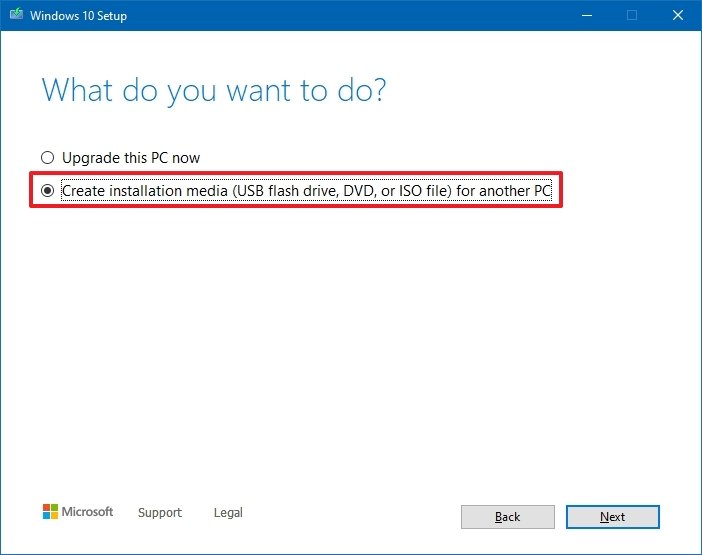
- Click the Next button.
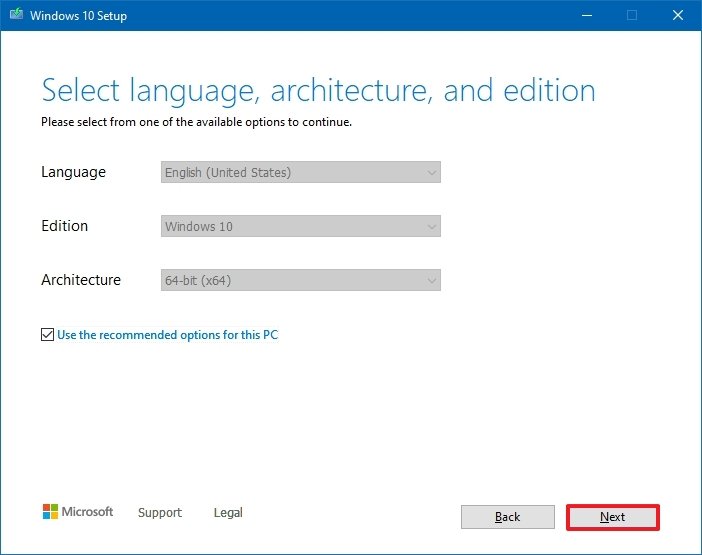
- (Optional) Clear the «Use the recommended options for this PC» option.
- Select the correct language, architecture, and edition of Windows 10.
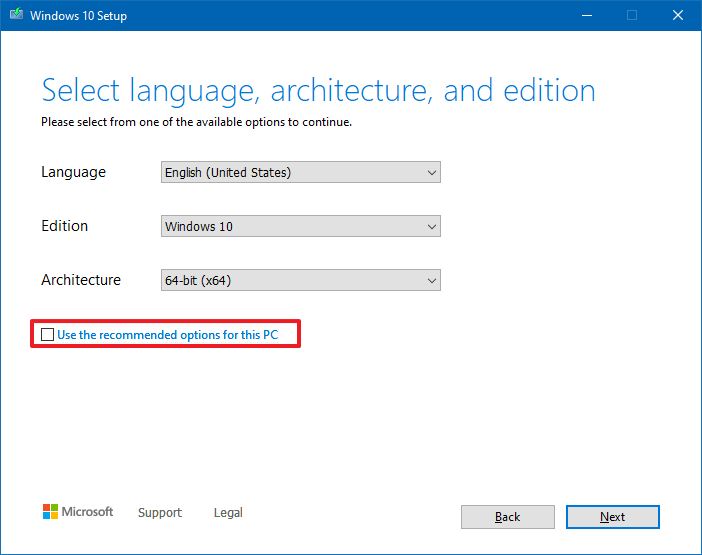
- Click the Next button.
- Click the Next button.
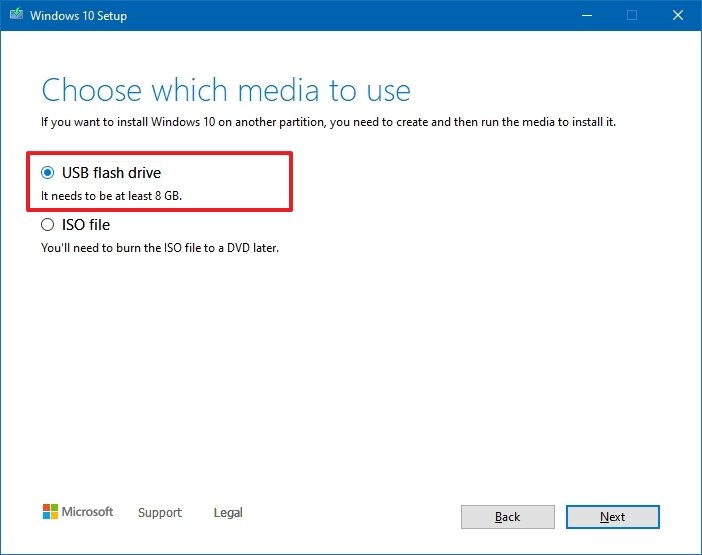
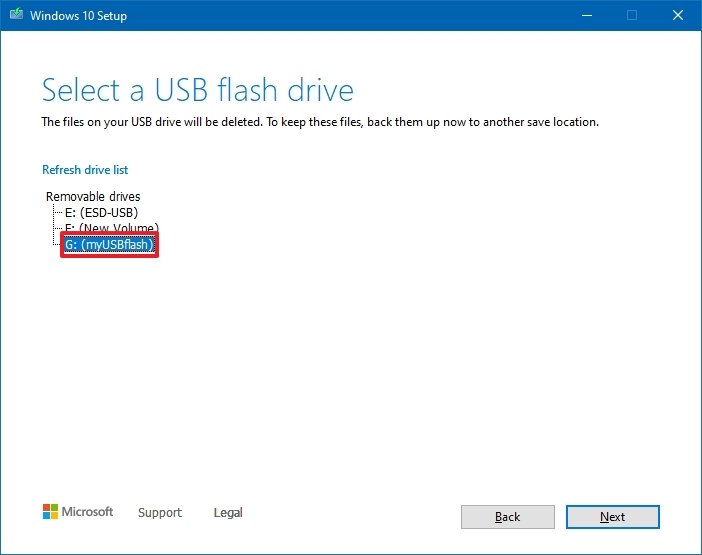
- Select the USB flash drive (or click the «Refresh drive list» option to make it available).
- Click the Next button.
- Click the Finish button.
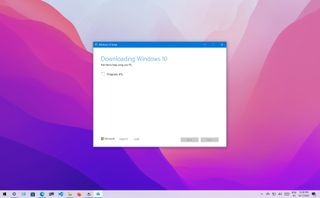
Once you complete the steps, the tool will download the files and create an installer with the latest installation files, which you can then use to start the device and configure a fresh copy of Windows 10.
Create Windows 10 USB with Rufus
Alternatively, the Rufus tool can help you create an installation media for computers with UEFI or BIOS firmware.
Rufus is a free tool with many options to help you create a bootable media of Windows 10 faster. However, it’s important to remember that it’s a third-party option, which Microsoft does not support. As a result, use it at your own risk.
To create a Windows 10 USB installer with Rufus, connect a USB flash drive of at least 8GB of space, and then use these steps:
- Open the Rufus download page.
- Under the «Download» section, click the link to save the latest release on the computer.

- Double-click the Rufus-x.xx.exe file to launch the tool.
- Click the Settings button (third button from the left) at the bottom of the page.
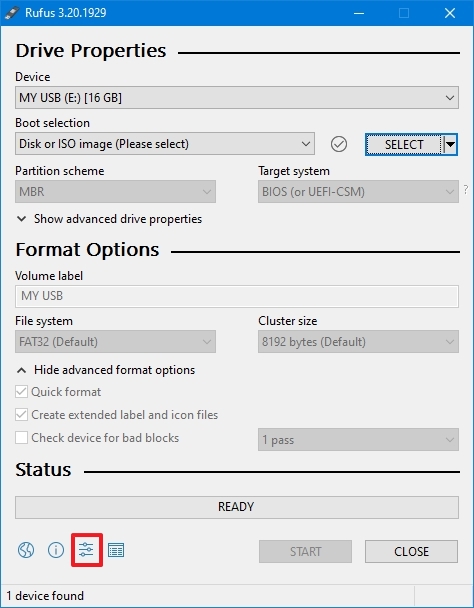
- Under the «Settings» section, use the Check for updates drop-down menu and select the Daily option.
- Quick tip: These steps are necessary to enable the option to use the tool to download the ISO file of Windows 10.
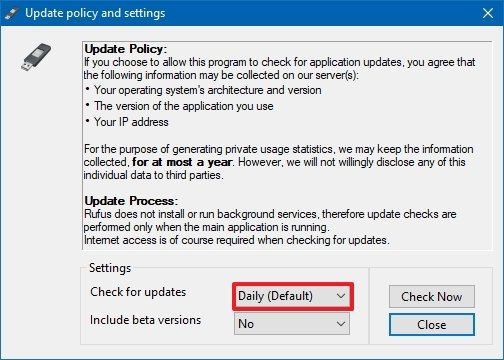
- Click the Close button.
- Close the Rufus tool.
- Relaunch the Rufus tool.
- Under the «Device» section, use the drop-down menu to select the USB flash drive.
- Under the «Boot selection» section, click the down arrow button on the right and select the Download option.
- Quick tip: If you already have an ISO file, click the Select button, choose the Windows 10 ISO file, and continue with step 20.
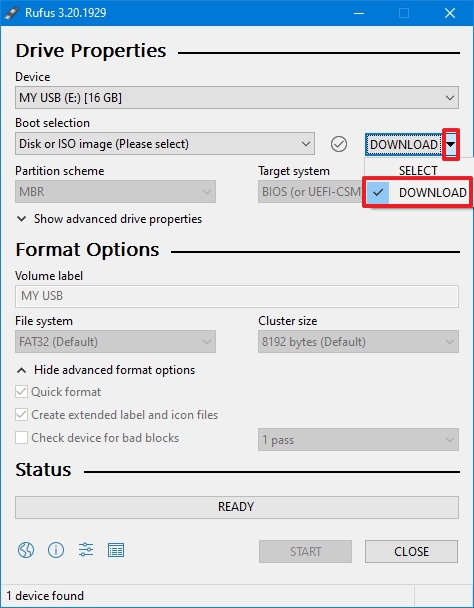
- Click the Download button.
- Use the «Version» drop-down menu and select the Windows 10 option.
- Click the Continue button.
- Select the 21H2 (Build 19044.xxx — xxxx.xx) option to download the Windows 10 November 2021 Update.
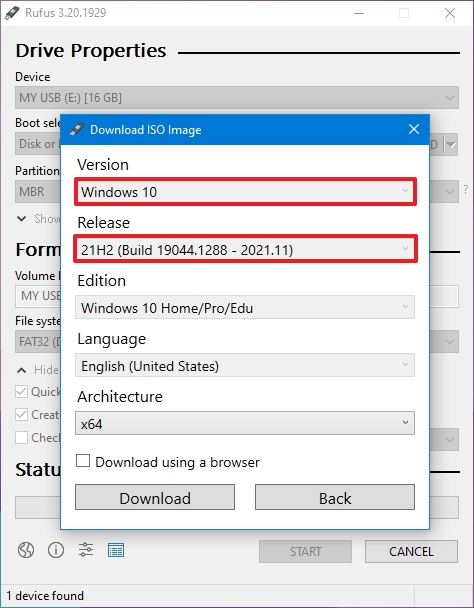
- Click the Continue button.
- Use the «Edition» drop-down menu and select the Windows 10 Home/Pro option.
- Click the Continue button.
- Use the «Language» drop-down menu and select the installation language.
- Quick tip: In the United States, choose the «English» option, not «English International.»
- Click the Continue button.
- Use the «Architecture» drop-down menu and select the 32-bit or 64-bit (recommended).
- Click the Download button.
- Select the location to download the ISO file.
- Click the Save button.
- Use the «Image option» drop-down menu to select the Standard Windows installation option.
- Use the «Partition scheme» drop-down menu to select the GPT option.
- Use the «Target system» drop-down menu to select the UEFI (non CSM) option.
- Quick note: If the computer includes a legacy BIOS, select the MBR option for partition scheme and BIOS (or UEFI-CSM) option target system.
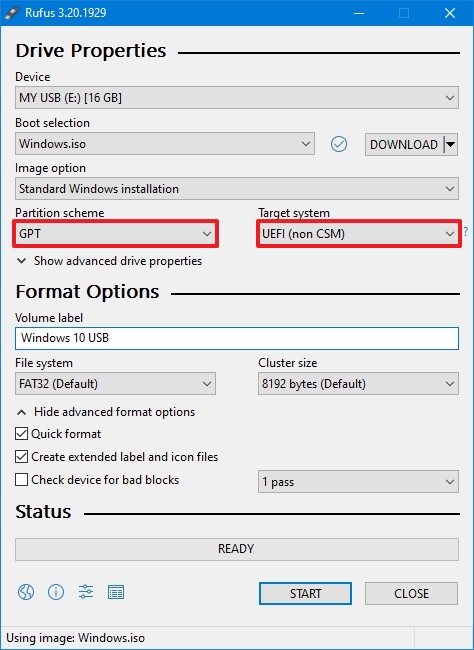
- Under the «Show Advanced drive properties» section, don’t change the default settings.
- (Optional) Under the «Volume label» field, enter a descriptive name for the drive — for example, «win10_usb.»
- Under the «File system» and «Cluster size» sections, don’t change the default settings.
- Click the Show advanced format options button.
- Select the Quick format and Create extended label and icon files options.
- Click the Start button.
- Click the OK button to confirm.
- Click the Close button.
After you complete the steps, Rufus will download the ISO file from the Microsoft servers, and it’ll create the bootable media to perform a clean install of Windows 10.
How to perform clean install of Windows 10
The installation process of Windows 10 has two main parts, including the setup and out-of-box experience (OOBE). In the setup process, that’s where you will select some of the basic settings, and you’ll find the options to erase the hard drive, configure the partitions, and install Windows 10. The out-of-box experience happens after the setup is complete, and it’s the stage where you’ll configure your settings, such as region, network, account, privacy, and other settings.
Windows 10 clean install process
After the preparation, you can proceed with the clean installation of Windows 10.
Warning: This is another friendly reminder that this process will erase everything on the computer. Before proceeding, making a temporary full backup of your PC is always recommended.
To do a clean installation of Windows 10, use these steps:
- Start the PC with Windows 10 USB media.
- On prompt, press any key to boot from the USB flash drive.
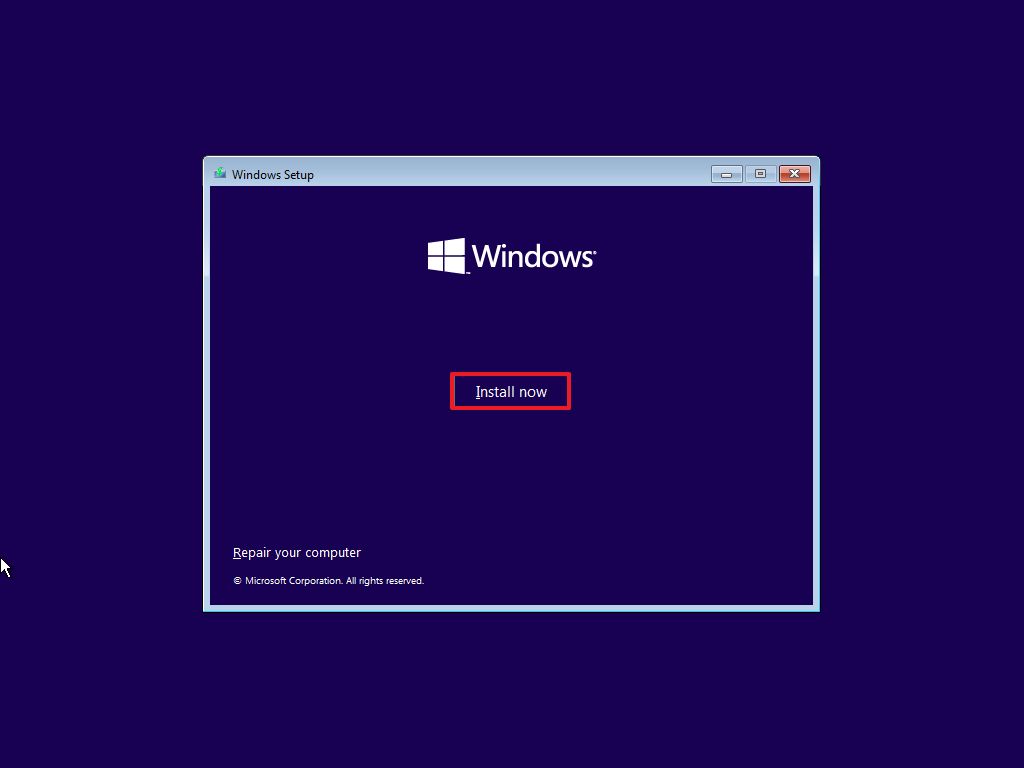
- On the «Windows Setup,» click the Next button.
- Quick tip: If your language, time and currency, and keyboard are different from the default selections, make sure to select the correct settings.

- Click the Install now button.
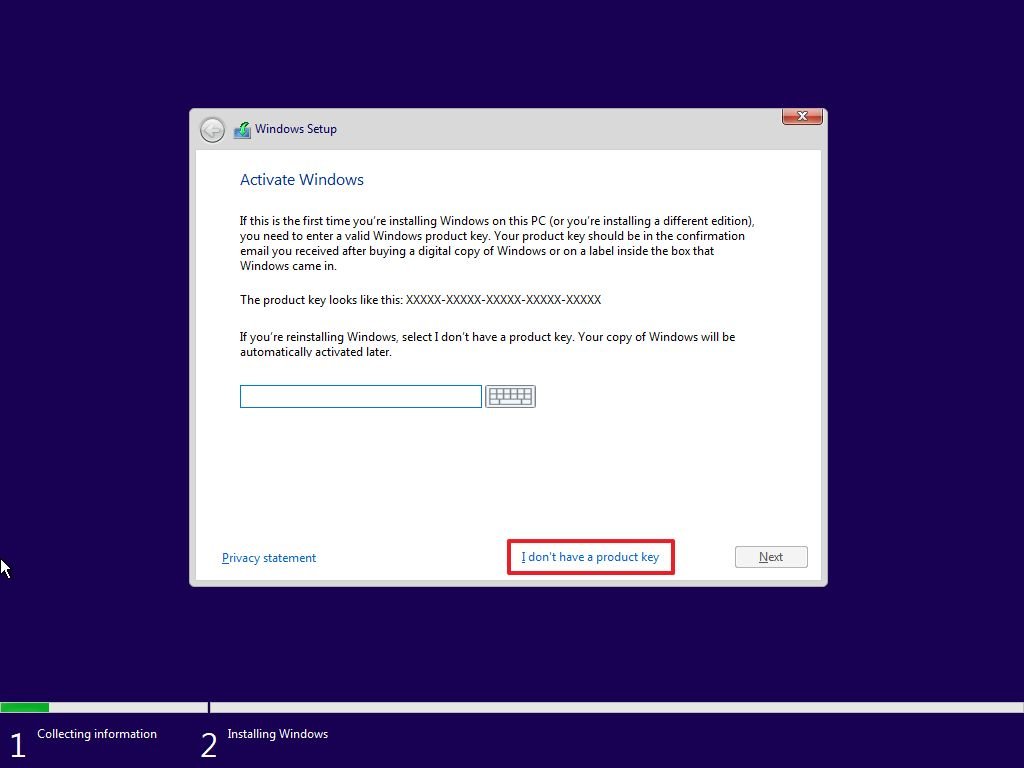
- On a reinstallation, click the «I don’t have a product key» option to continue (assuming your device was already activated). Otherwise, if this is your first time installing Windows 10, enter the product key.
- Click the Next button.
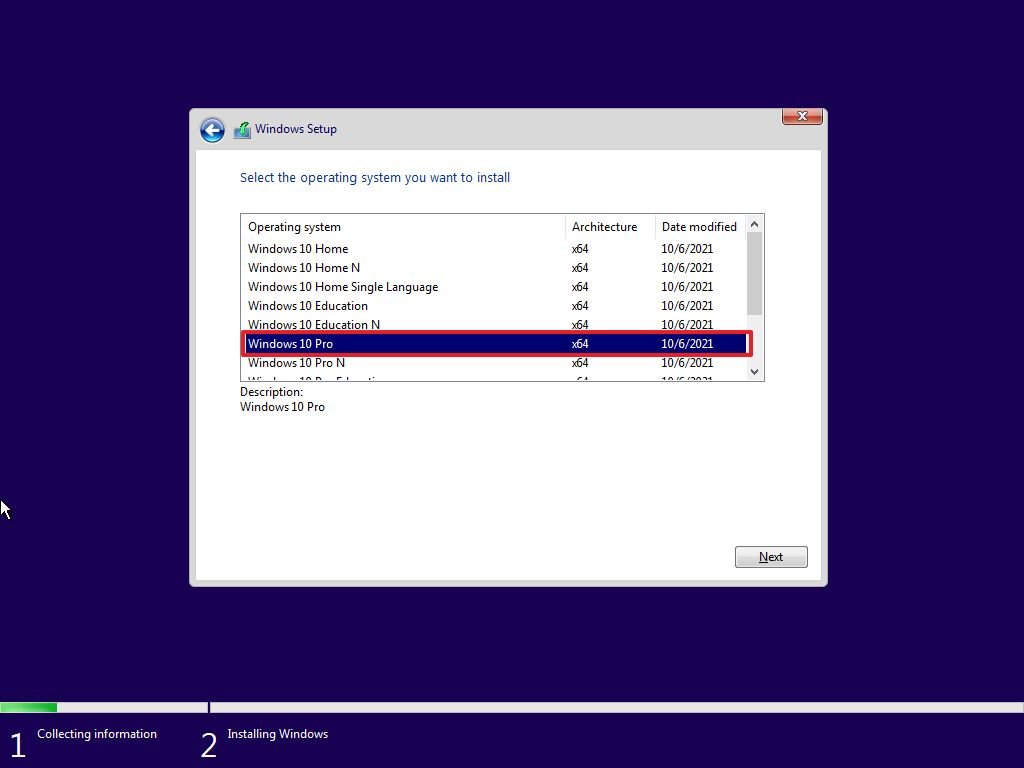
- Select the edition of Windows 10 (If applicable).
- Quick note: The selection has to match the edition of your product key. If you don’t select the correct edition, Windows 10 won’t activate, and you’ll have to redo the entire process.
- Click the Next button.
- Select the «I accept the license terms» option to continue.
- Click the Next button.
- Click the «Custom: Install Windows only (Advanced)» option to continue with a clean installation.
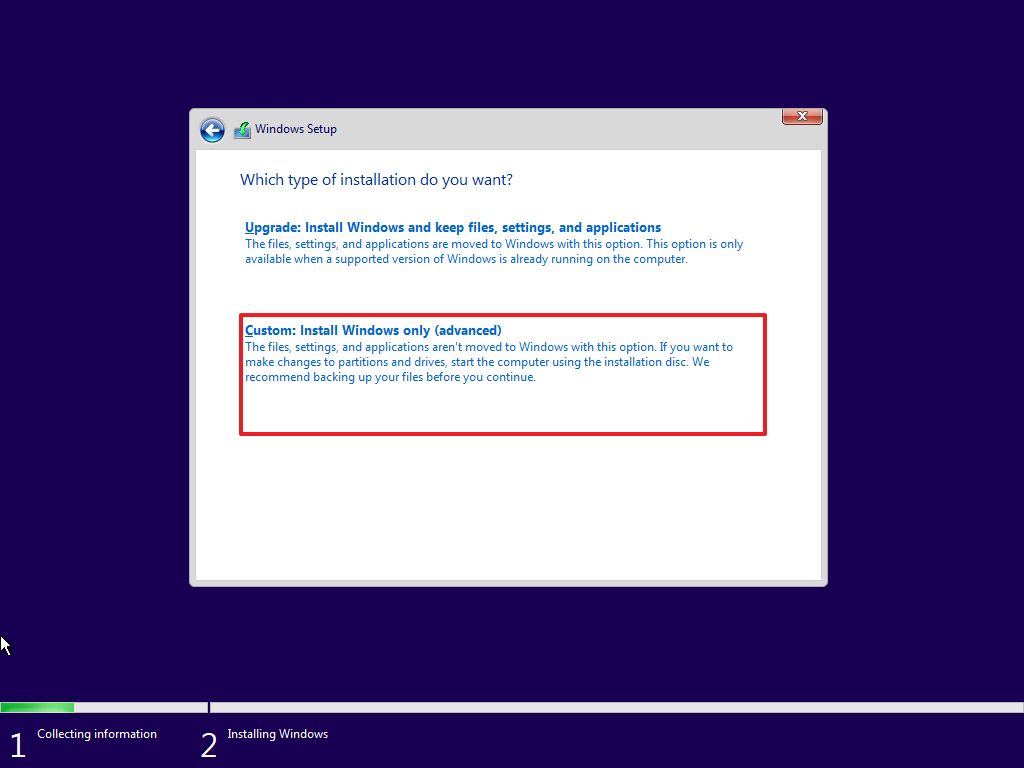
- Select the partition with the current installation (usually «Drive 0») and click the Delete button.
- Quick tip: If «Drive 0» has multiple partitions, you must select and delete each partition to allow the setup to use the entire hard drive for the new clean installation. The setup will create the required partitions automatically during the process. Also, it’s not necessary to delete the partitions on secondary drives.
- Click the Yes button.
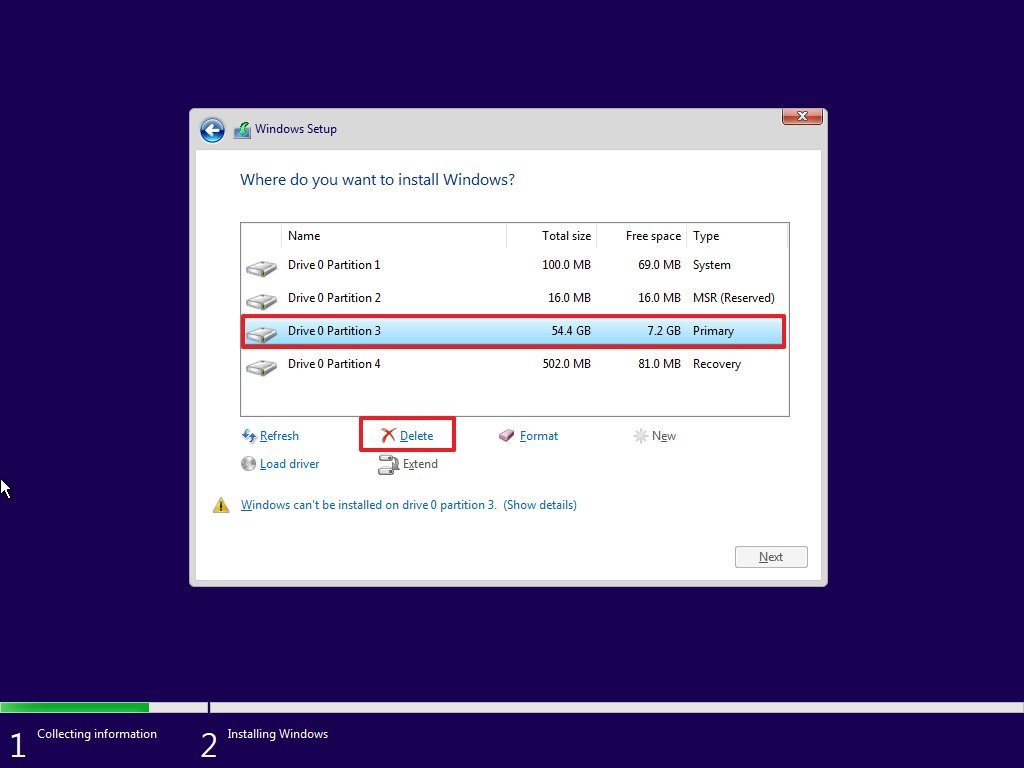
- Select the empty drive (Drive 0 Unallocated Space).

- Click the Next button.
Once you complete the steps, the setup will install a fresh copy of Windows 10 on the device.
If you plan to decommission the computer, you do not need to continue with the out-of-box experience. If this is an upgrade, continue with the instructions below.
Windows 10 out-of-box experience
After the setup, you must continue with the out-of-box experience to configure your preferences and create a new account.
To complete the OOBE on Windows 10, use these steps:
- Select your Region option.
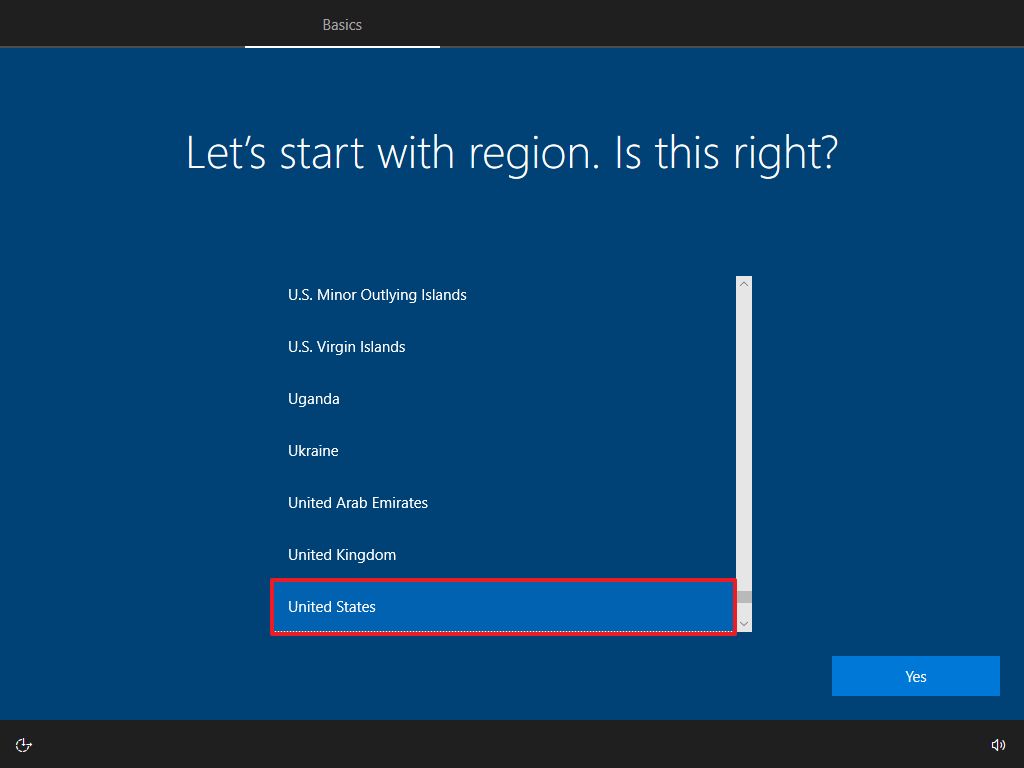
- Click the Yes button.
- Select your keyboard layout option.
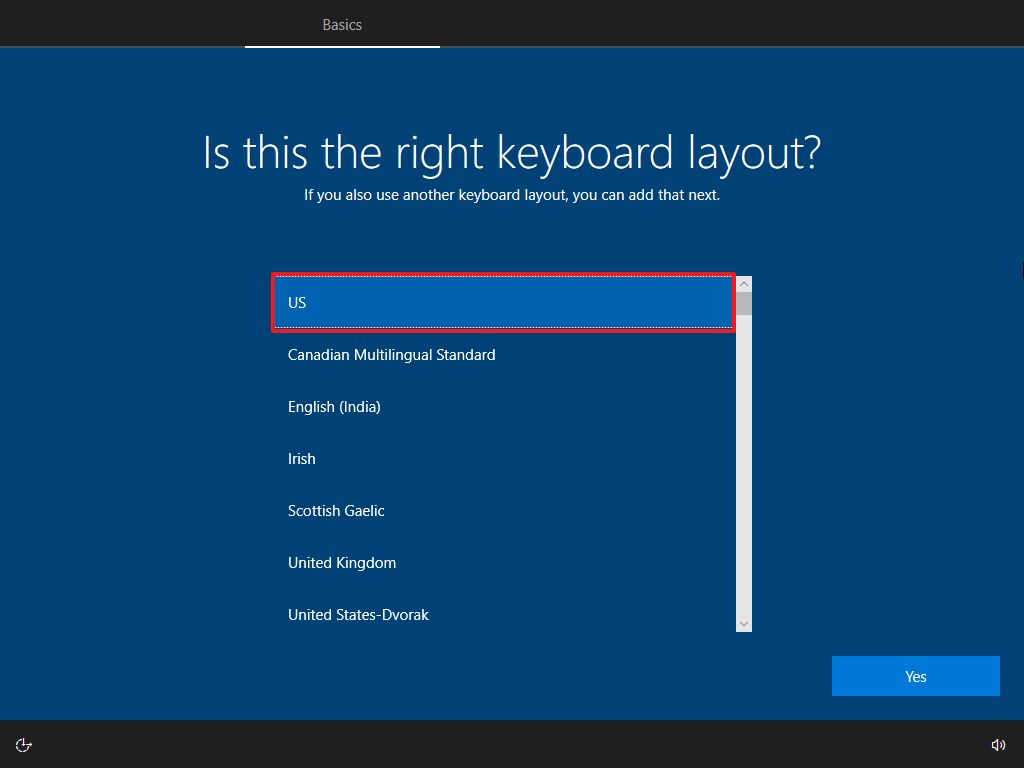
- Click the Yes button.
- Click the Skip button (unless you need to add a second keyboard layout).
- Quick note: If you don’t have a wired network connection, you’ll have to sign into the wireless network.
- Select the «Set up for personal use» option. (This option is only available on Windows 10 Pro.)
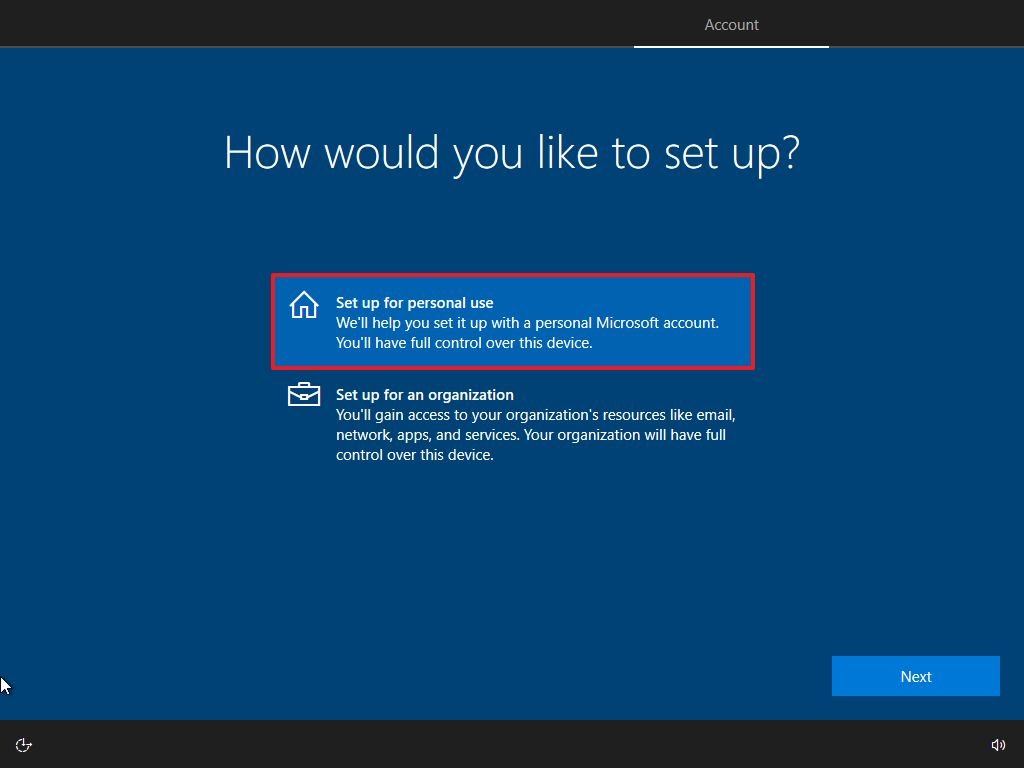
- Click the Next button.
- Confirm your Microsoft account information to create an account.
- Quick note: The recommended process is to use a Microsoft account. However, if you want to use a traditional local account, you’ll need to click the Offline account option from the bottom-left corner and continue with the on-screen directions.
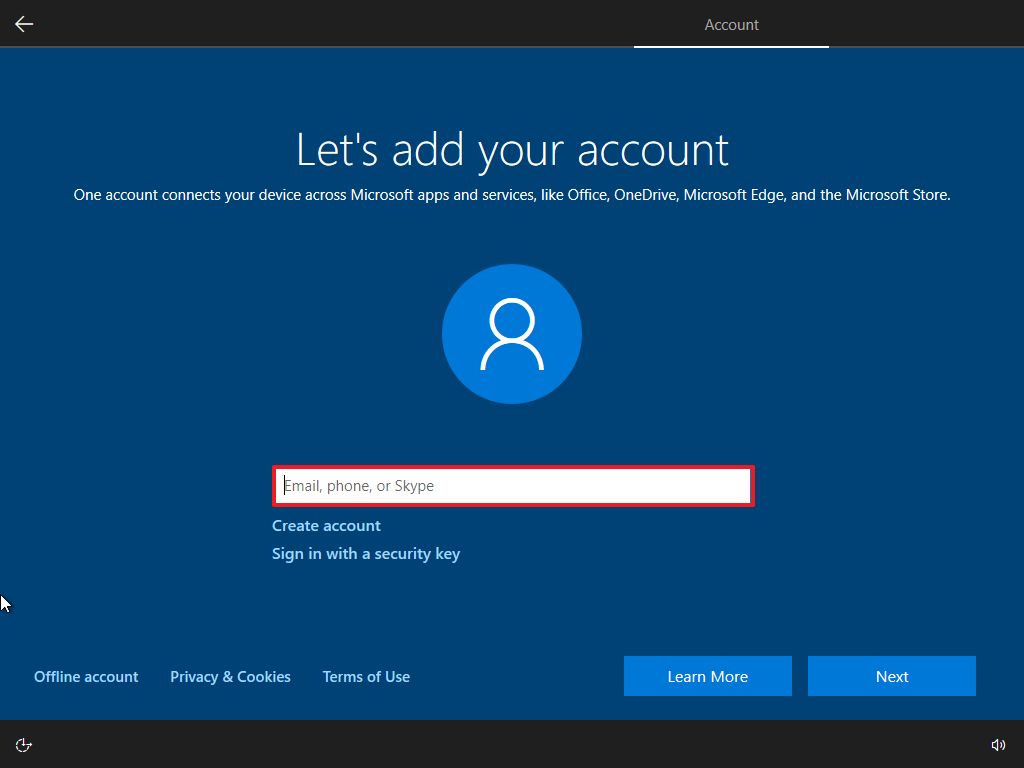
- Click the Next button.
- Confirm your account password.
- Click the Next button.
- Click the Create PIN button.
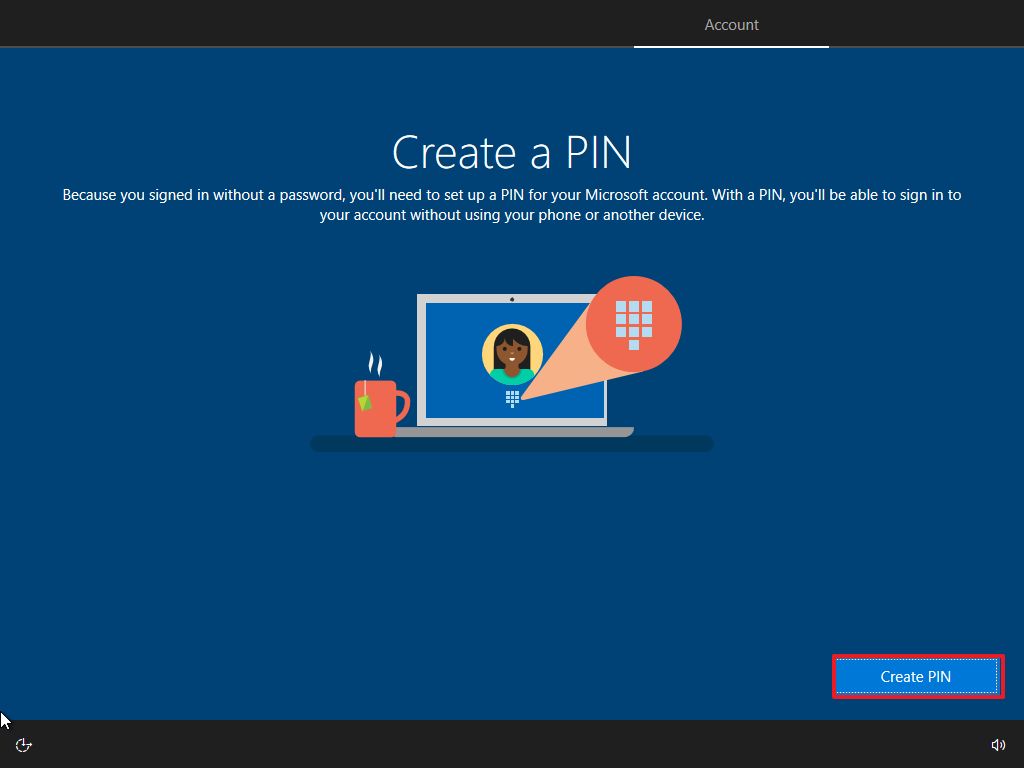
- Create a four-digit Windows Hello PIN.
- Quick tip: If you want to continue using a traditional password, click the Cancel button to skip the process.

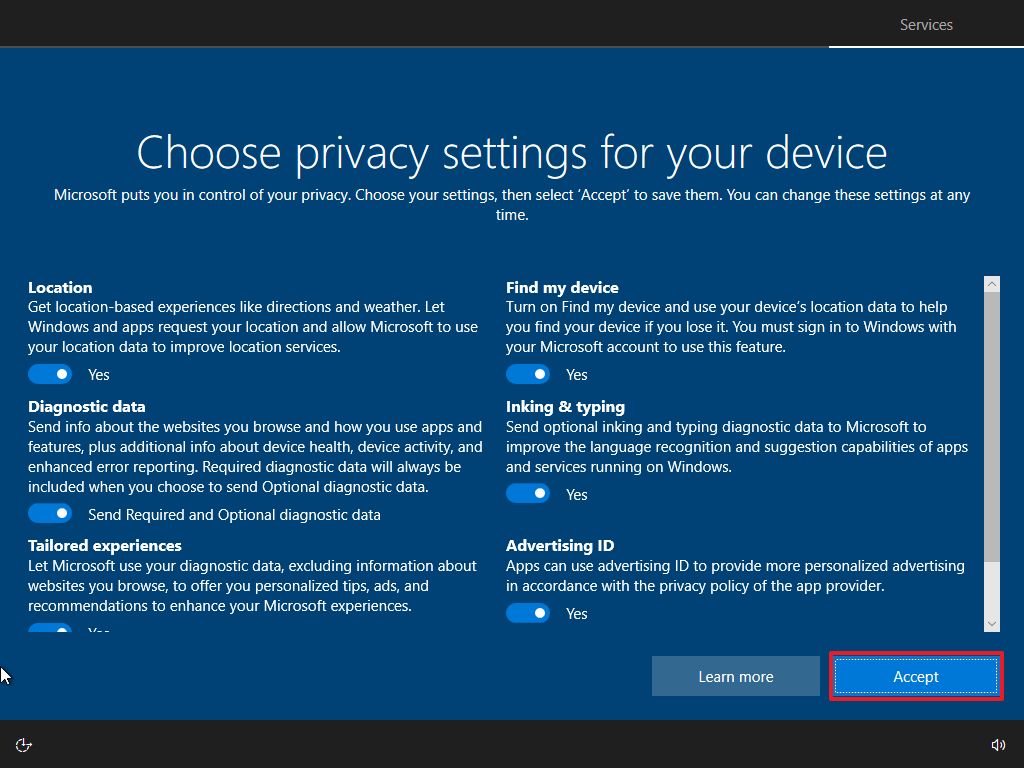
- Select the privacy settings for the device (and don’t forget to scroll down the page to review all the available settings).
- Click the Accept button.
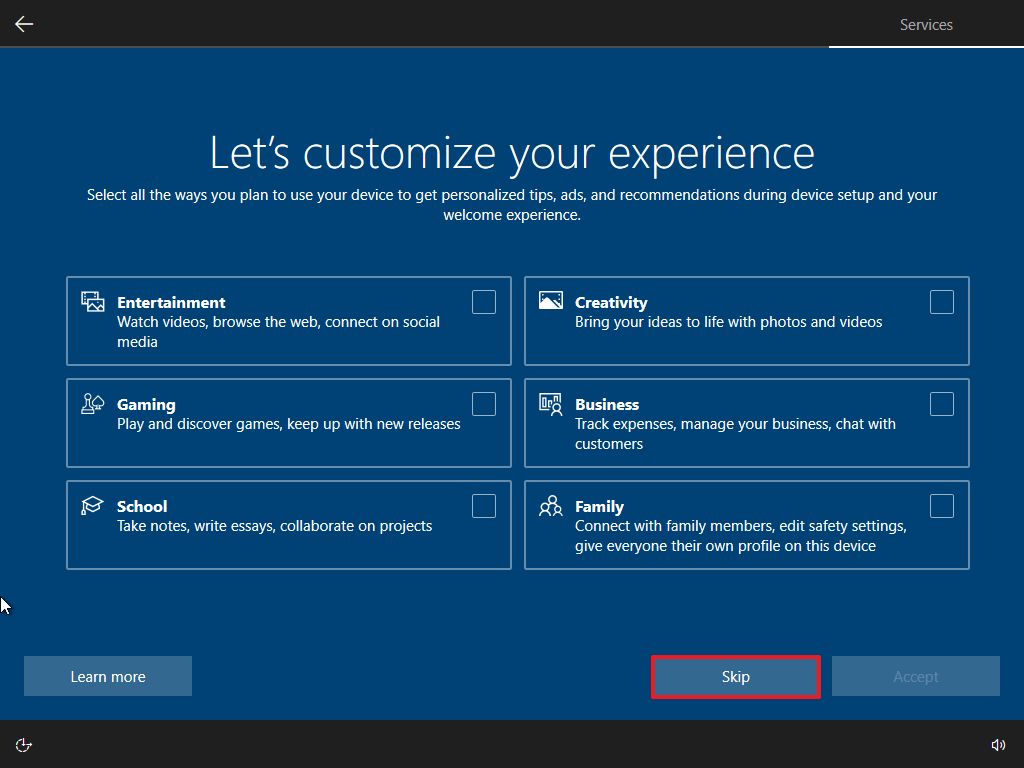
- (Optional) Click the Skip button, or select how you will be using the device to receive targeted ads, tips, and other recommendations and click the Accept button.
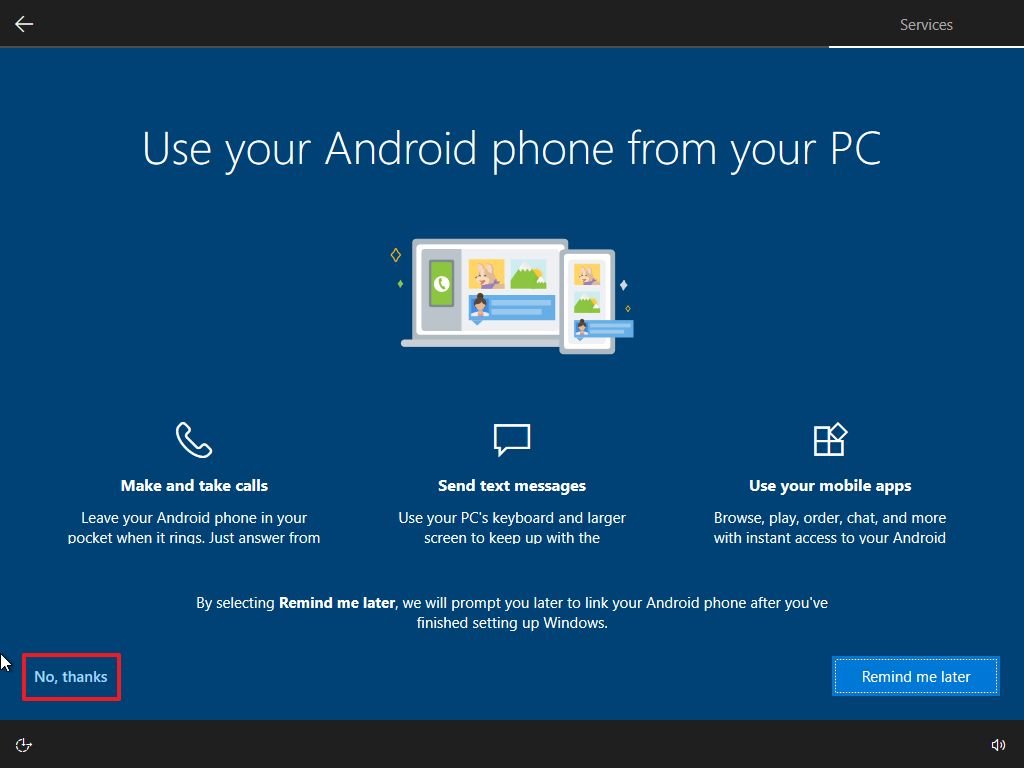
- (Optional) Click the «No, thanks» button to skip the phone link process.
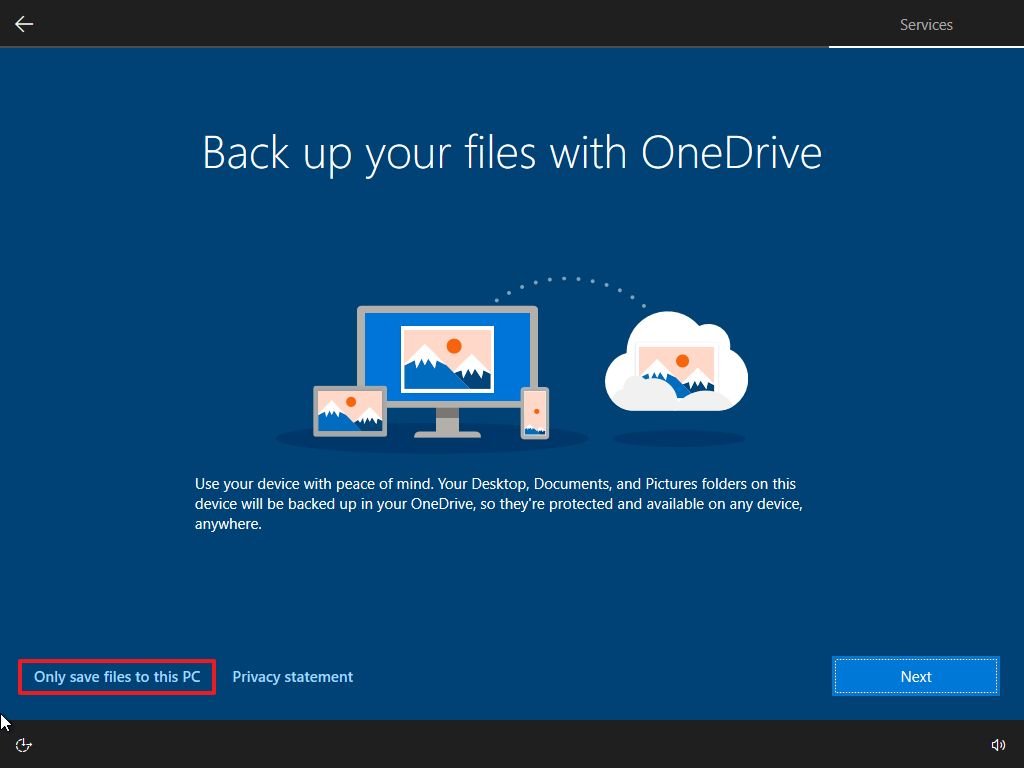
- (Optional) Click the Next button to allow OneDrive to back up the Desktop, Documents, and Pictures folders to the cloud. If you use another cloud service or prefer not to upload files to the cloud, click the «Only save files to this PC» option in the screen’s bottom-left corner.
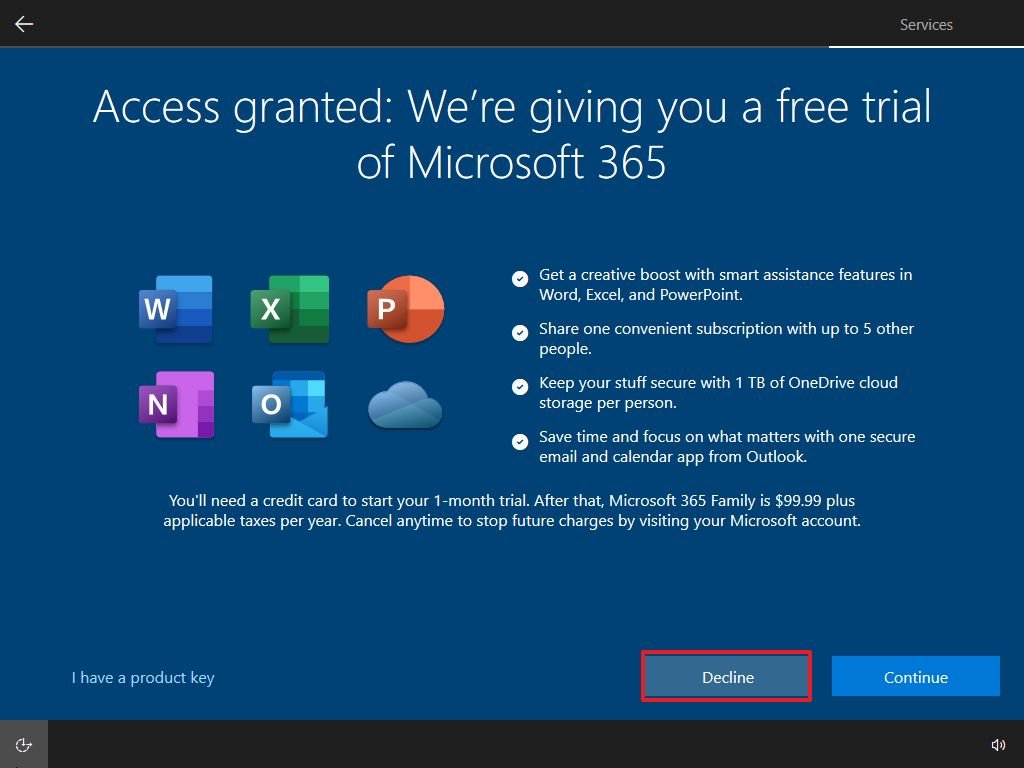
- Click the Decline button to skip the Microsoft 365 setup (if applicable).
- Quick tip: If you have an Office product key, you can click the «I have a product key» option, and then the apps will install automatically.
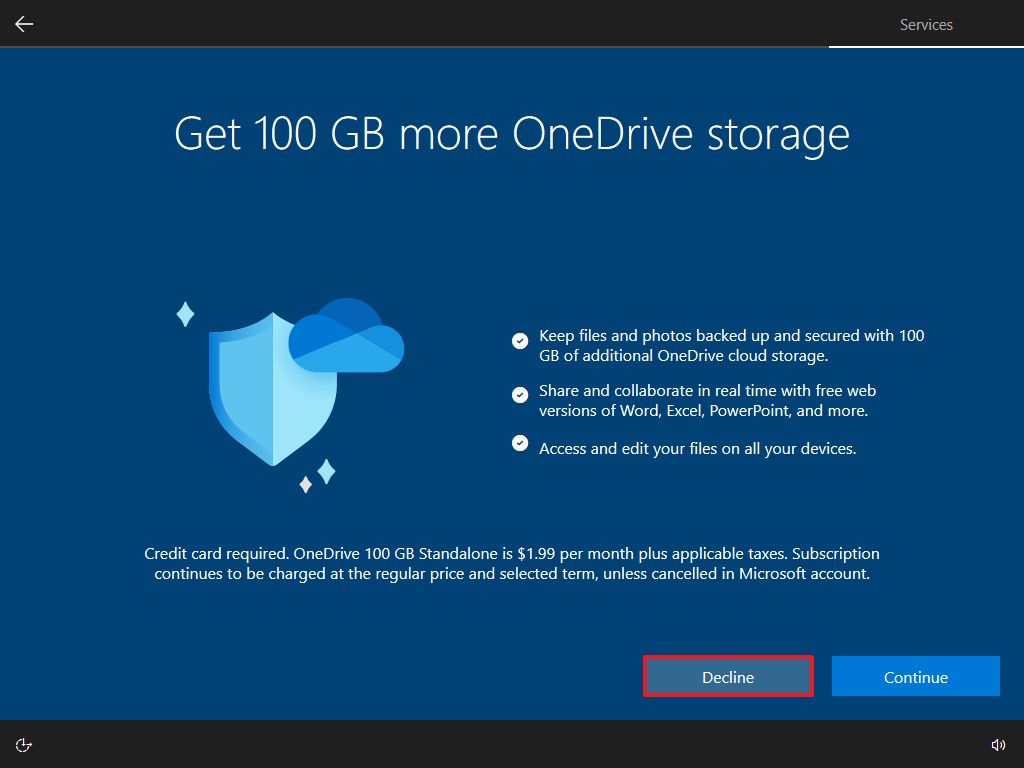
- Click the Decline button to skip the OneDrive storage promotion.
- Click the «No Thanks» button to skip the Game Pass promotion.

- (Optional) Click the «Not now» button to continue without setting up Cortana.

After you complete the steps, the settings will apply to the clean installation of Windows 10, and you should be able to see the default desktop experience.
How to complete setup after installation of Windows 10
Once the installation is complete, it’s also good to check that Windows 10 isn’t missing any critical updates or drivers and is properly activated.
Install updates
To download and install the latest updates, use these steps:
- Open Settings.
- Click on Update & Security.
- Click on Windows Update.
- Click the Check for updates button.
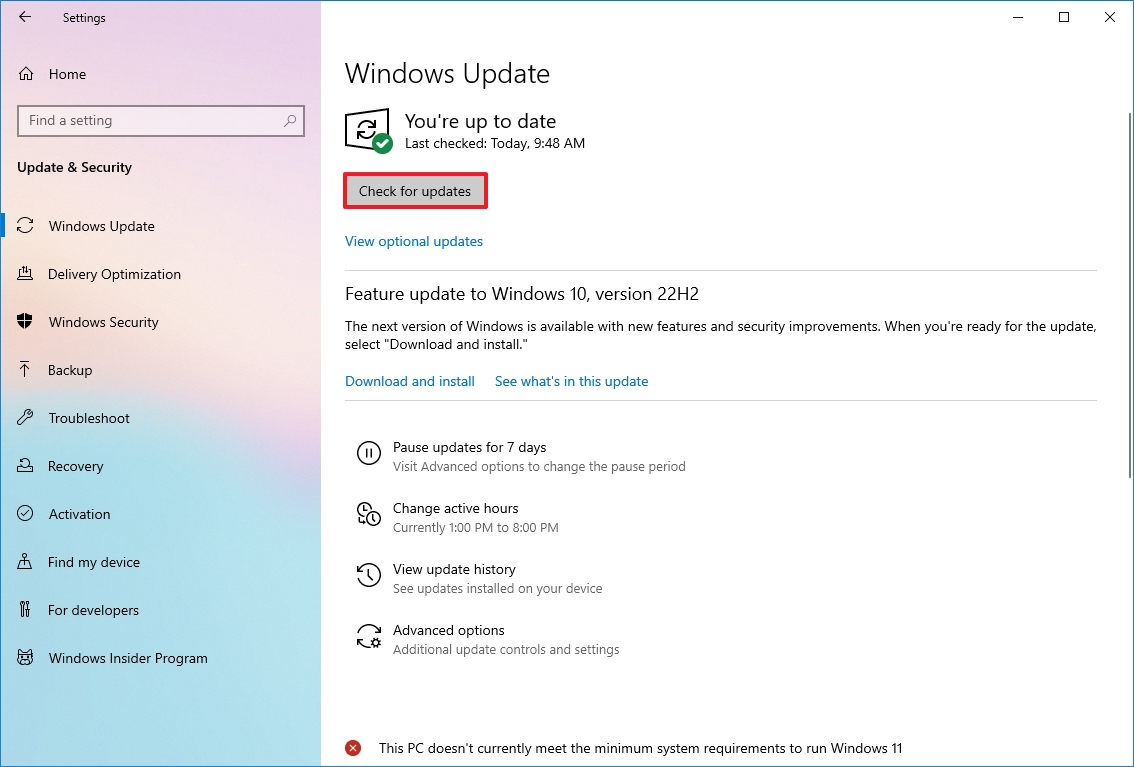
Once you complete the steps, any available updates will automatically download and install. Also, a restart may be required to complete the update process.
Check missing drivers
To determine whether drivers are missing on Windows 10, use these steps:
- Open Start.
- Search for Device Manager and click the top result to open the app.
- Confirm that none of the devices has a yellow or red mark, and make sure nothing is listed as unknown.
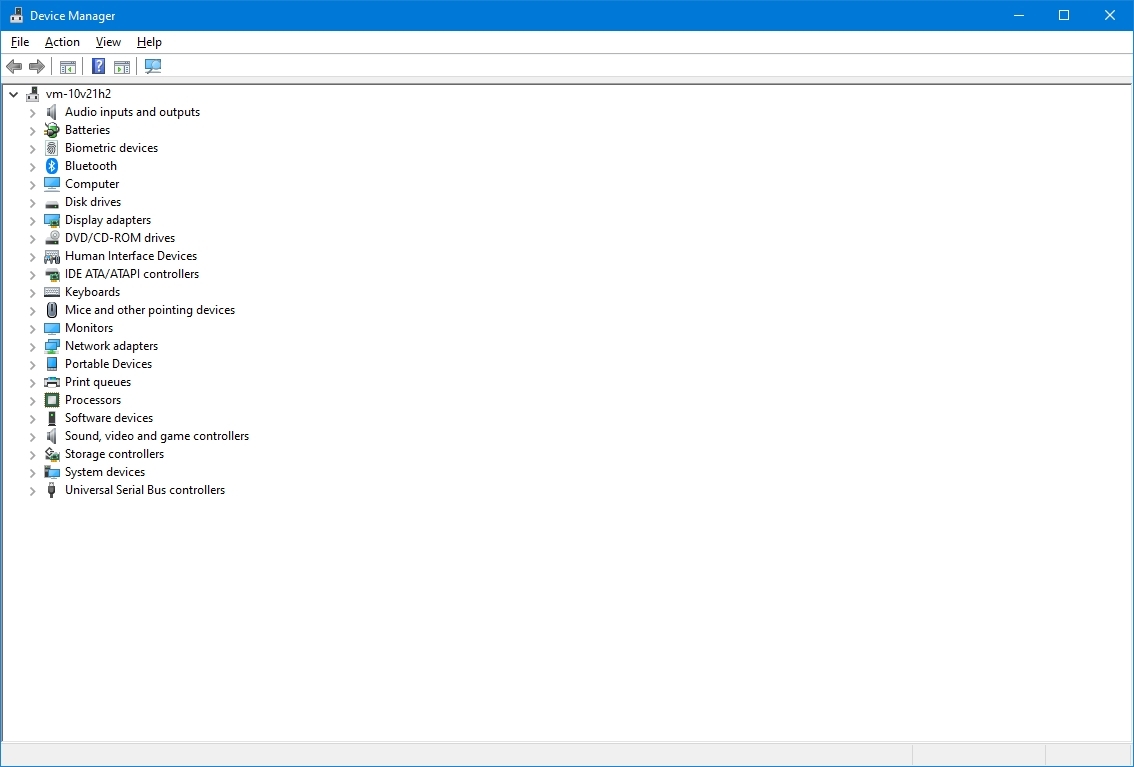
If some hardware components have problems, you may need to manually install the latest drivers from your computer manufacturer’s support website. You can use this guide to install device drivers on Windows 10.
Install missing drivers
On Windows 10, drivers can also be part of the optional updates. If the computer doesn’t have all the required drivers, you may be able to download them from Windows Update.
To download missing drivers on Windows 10, use these steps:
- Open Settings.
- Click on Update & Security.
- Click on Windows Update.
- Click the «View optional updates» option. If the option isn’t available, it means that Windows Update doesn’t have any driver updates for the computer.
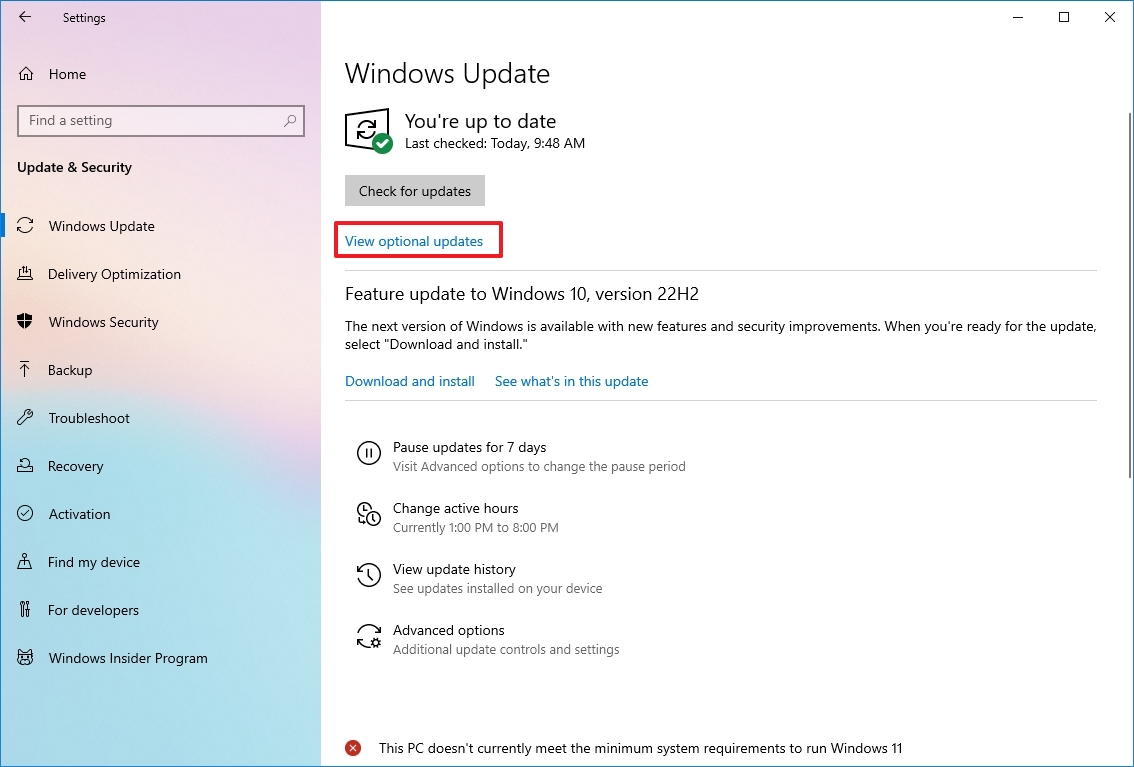
- Click the Driver updates section.
- Select the missing driver.
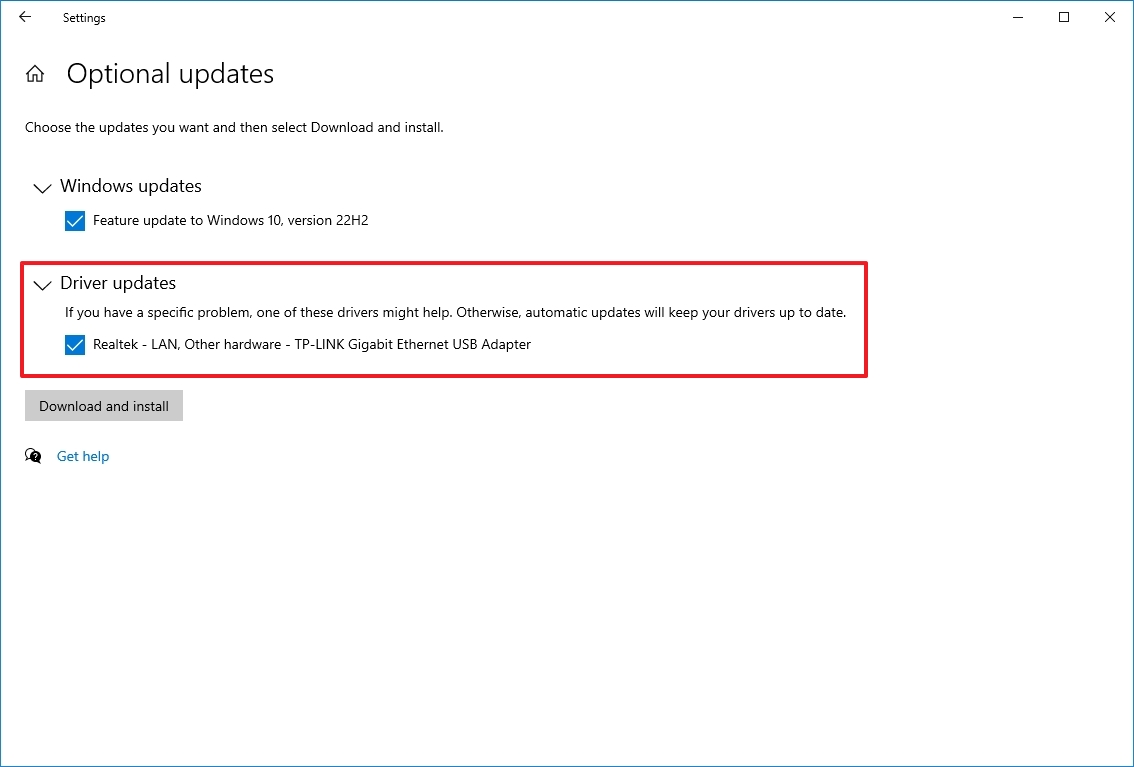
- Click the «Download and install» button.
After you complete the steps, Windows Update will download and install the missing drivers automatically.
Confirm activation
To confirm Windows 10 was activated correctly, use these steps:
- Open Settings.
- Click on Update & Security.
- Click on Activation.
- If Windows 10 is activated successfully, you will see one of these messages:
- Windows is activated with a digital license: The installation has been activated, but it isn’t linked to your Microsoft account.
- Windows is activated with a digital license linked to your Microsoft account: The installation has been activated, and the license is linked to your Microsoft account.
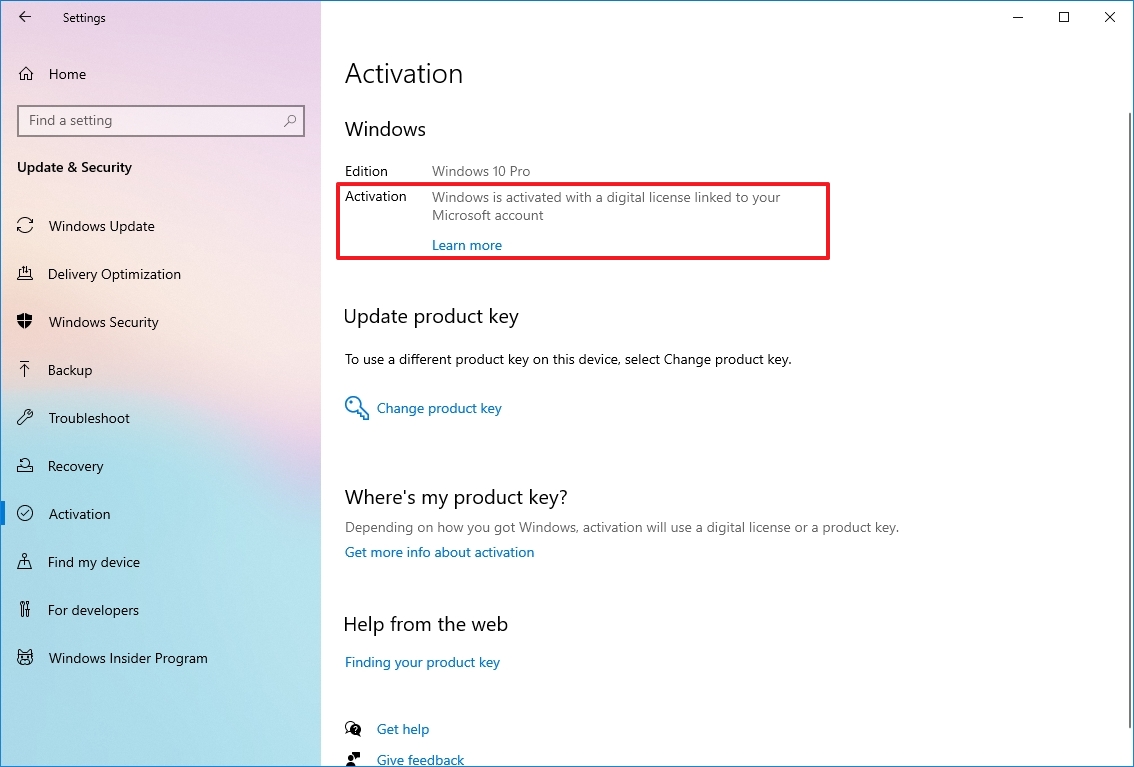
In case Windows 10 didn’t activate, the device will try to reactivate at a later time. If you’re still having issues after a couple of days, you can use the Activation Troubleshooter to activate.
Reinstall apps
Now, it’s time to reinstall the apps, including your preferred web browser, such as Google Chrome, Mozilla Firefox (opens in new tab), or Opera (opens in new tab), to browse the web.
If you use Spotify (opens in new tab) or iTunes (opens in new tab) to listen to tunes while working or surfing the internet, you can download these apps and others from the Microsoft Store.
Also, it’s now a good time to download and install the Microsoft Office apps (opens in new tab) to start working with Word, Excel, and PowerPoint and managing your emails with Outlook.
Restore files from backup
The last thing left is restoring your documents from a previous backup. If you previously configured file backup with OneDrive, the data should already be available inside the OneDrive folder, but if the app didn’t configure automatically, use this guide.
If you have a backup of your files on an external drive, reconnect the storage to restore the data into the default folders (Documents, Downloads, Pictures, etc.).
To restore files from a previous backup on Windows 10, use these steps:
- Open File Explorer.
- Under the This PC section in the left pane, select the external drive with the file backup.
- Select the folders with the file to restore.
- Click the Copy to menu from the «Home» tab.
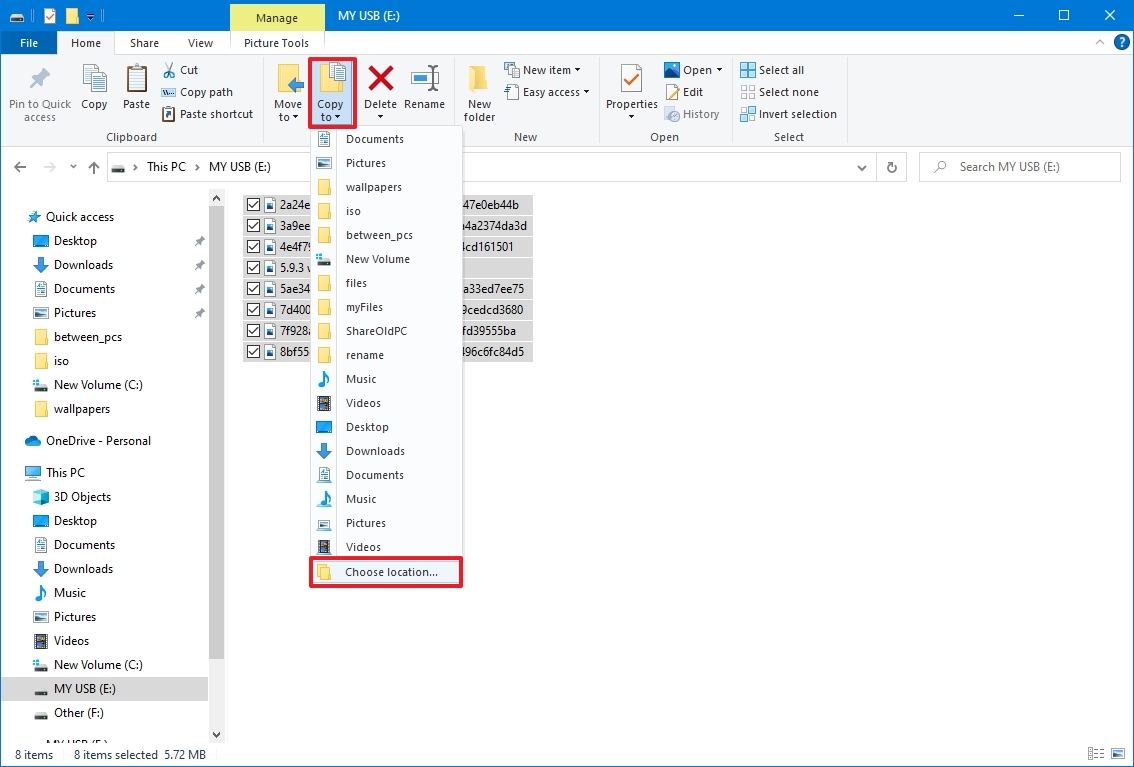
- Select the Choose location option.
- Select the destination to restore the files — for example, the Documents folder.
- Click the Copy button.
After you complete the steps, the files will restore to the new location.
Although you can start a clean installation using the Media Creation Tool without a USB media and even the «Reset this PC» option from the recovery settings, these methods have limitations and do not always work as expected. The bootable media is the alternative if you want the best possible clean installation method.
More resources
For more helpful articles, coverage, and answers to common questions about Windows 10 and Windows 11, visit the following resources:
- Windows 11 on Windows Central — All you need to know
- Windows 10 on Windows Central — All you need to know
Get the best of Windows Central in in your inbox, every day!
Mauro Huculak is technical writer for WindowsCentral.com. His primary focus is to write comprehensive how-tos to help users get the most out of Windows 10 and its many related technologies. He has an IT background with professional certifications from Microsoft, Cisco, and CompTIA, and he’s a recognized member of the Microsoft MVP community.

For Windows 10 PC users, there are times you may encounter issues caused by system file corruption, system settings changes, third-party software, malware, etc. In order to fix your device and to make it work as it uses to, you may need to reinstall the operating system. Microsoft offers you four options to reinstall Windows OS, including how to reset and reinstall Windows 10 locally, how to reset and reinstall Windows 10 from the cloud, Fresh start, and clean install by Windows installation media.
I will be highlighting the difference between Windows 10 reset, fresh install and the clean install below. Reset This PC is a repair tool for serious system problems and it is available from the Troubleshoot menu or the Recovery page in Windows 10 Settings. If your PC cannot run properly, resetting your PC may solve issues without requiring the internet connection to work. The feature offers you two options to reinstall OS: keep the personal files and remove everything. The first option removes all installed software and apps, resets all Windows settings, but personal files including documents, music, and more are not removed.
Fresh start: Fret Start lets you perform a clean reinstallation and update of Windows while keeping your personal data and most Windows settings intact. In some cases, a clean installation may improve your device’s startup and shutdown experience, memory usage, Microsoft Store apps performance, browsing experience, and battery life. It installs a fresh copy of the most recent version of Windows 10 by downloading it from the Microsoft website.
Clean Install: This refers to reinstalling Windows 10 by downloading the latest Windows 10 installation ISO file from the Microsoft website and burning it to a USB drive or CD/DVD disc. It also offers you a fresh system without any hidden corruption or problems. Here are similar examples of the clean install of Windows server 2019 and How to Windows Server 2016 Operating System.
Here are the steps to perform a Fresh Start installation.
Method 1: Search for Windows Security as shown below from the Start Menu through the Cortana search bar as shown below.

This will open the Windows security as shown below.
– Click on Device performance & health

This will open the Device performance & health Window
– Scroll down, under Fresh Start,
– Click on Additional Information

The Fresh start welcome screen will appear.
– Choose “Get started” and this will initiate Fresh start.

On the next Windows, click on Next to continue and follow through the prompts to complete your installation

The Windows 10 re-installation and update process takes about 20 minutes to complete. Fresh Start will give you a list of the apps that were removed so you know which apps to reinstall when you are done reinstalling a clean version of Windows 10. Now you have a “fresh start” with a clean installation of Windows 10.
Method 2: Alternatively click on Settings
- Click on Update & Security.
- Click o Windows Security.
- Choose Device performance & health.
The Windows Security app will automatically open.
- Under Fresh start, choose Additional Info. The Fresh start welcome screen will appear.
- Choose “Get started” and say yes to the UAC (User Account Control) prompt to initiate Fresh start.
I hope you found this blog post helpful. If you have any questions, please let me know in the comment session.
Системное средство «Новый запуск» Windows 10 («Начать заново» Windows 10) предназначено для выполнения автоматической чистой установки операционной системы самой последней версии на компьютере. Чистая установка Windows 10 поможет решить проблемы, возникшие на данном ПК, потому что пользователь в результате получит новейший чистый экземпляр системы.
Если на компьютере происходят сбои в работе программного обеспечения: операционной системы или установленных программ, пользователям приходится решать возникшие проблемы. Один из возможных вариантов исправления ситуации: переустановка Windows.
Содержание:
- Новый запуск Windows 10: что это?
- Как начать с чистой установки Windows (Новый запуск)
- Как переустановить Windows 10 — чистая установка «Новый запуск»
- Новый старт с чистой установкой Windows 10
- Удаление папки Windows.old с файлами старой системы
- Выводы статьи
- Новый запуск — автоматическая чистая установка Windows 10 (видео)
В Windows 10 имеется несколько способов для выполнения переустановки системы на ПК. Начиная с версии Windows 10 1703 в параметрах ОС появился новый способ для автоматической чистой установки Windows, запускаемый из работающей системы.
У пользователя есть возможность начать заново с чистой установки Windows. При помощи функции «Новый запуск» («Начать заново», «Новый старт», «Fresh Start») происходит сброс системы до последней версии Windows.
Новый запуск Windows 10: что это?
В Windows 10 функция Новый запуск выполняет переустановку операционной системы, обновляет ОС до последней версии.
Основные отличия Нового запуска от других способов установки (переустановки) Windows 10:
- В результате переустановки ОС, на ПК всегда будет установлена самая последняя версия Windows.
- Драйверы будут сохранены.
- Все пользовательские данные будут сохранены. Нет опции для удаления данных пользователя.
- Предустановленные приложения из Магазина Microsoft (Microsoft Store) сохраняются.
- Все программы, установленные пользователем, будут удалены.
- Приложения из Microsoft Store, установленные пользователем, будут удалены.
- Удаляются все приложения, установленные производителем устройства и некоторые драйверы.
- Защитник Windows становится антивирусом по умолчанию.
Если у пользователя возникают вопросы, как переустановить Windows 10, чистая установка (сброс системы), в некоторых ситуациях, станет оптимальным решением.
В дальнейшем, пользователю придется заново установить необходимые программы на компьютер. Пользователям ноутбуков стоит обратить внимание на то, что будут удалены приложения, установленные производителем устройства. Среди них, обычно, подавляющее большинство составляют ненужные программы. Впрочем, при установке Windows с флешки или DVD диска произошло бы тоже самое, единственное отличие: не были бы сохранены пользовательские данные.
Как начать с чистой установки Windows (Новый запуск)
Перед убедитесь, что ваш компьютер соответствует системным требованиям, предъявляемым к Windows 10.
В параметрах Windows выполните следующие действия:
- Откройте приложение «Параметры», нажмите на «Обновление и безопасность».
- Откройте раздел «Безопасность Windows», нажмите на кнопку «Открыть службу “Безопасность Windows”».
- В окне «Безопасность Windows» войдите в раздел «Производительность и работоспособность устройств».
- В разделе «Производительность и работоспособность устройств» найдите опцию «Новый запуск».
- Нажмите на ссылку «Дополнительные сведения».

- В разделе «Новый запуск» нажмите на кнопку «Начало работы».

Как переустановить Windows 10 — чистая установка «Новый запуск»
Переходим непосредственно к процессу установки Windows 10 на компьютере.
В открывшемся окне «Новый запуск» нас предупреждают о том, что будут удалены все приложения и программы, не входящие в состав поставки Windows. Об этом я уже писал в этом руководстве.
Процесс переустановки системы займет 20 минут или более в зависимости от работы компьютера. Нажмите на кнопку «Далее».
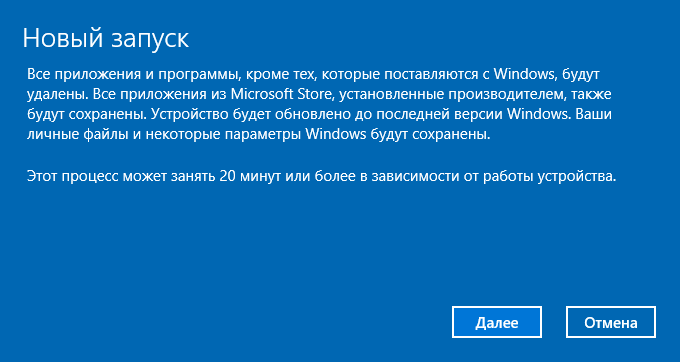
Откроется окно «Подготовка», во время которой собирается информация о системе.

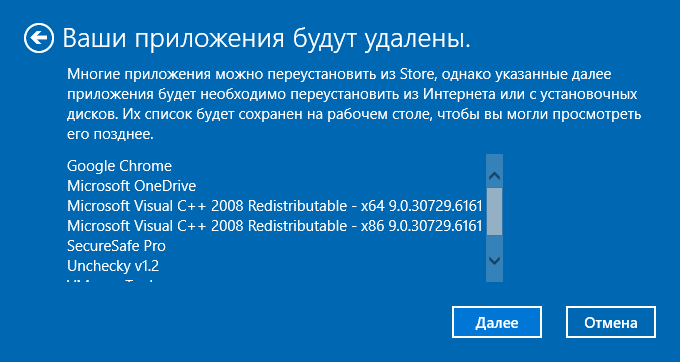
В окне «Ваши приложения будут удалены» перечислены программы, которые будут удалены с компьютера, их придется установить заново.
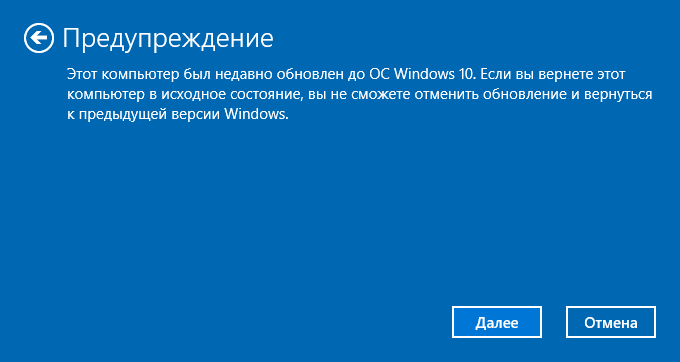
В окне «Предупреждение» сообщают, что компьютер был обновлен до Windows 10, поэтому при возврате в исходное состояние, нельзя будет отменить обновление и вернуться к предыдущей версии операционной системы.
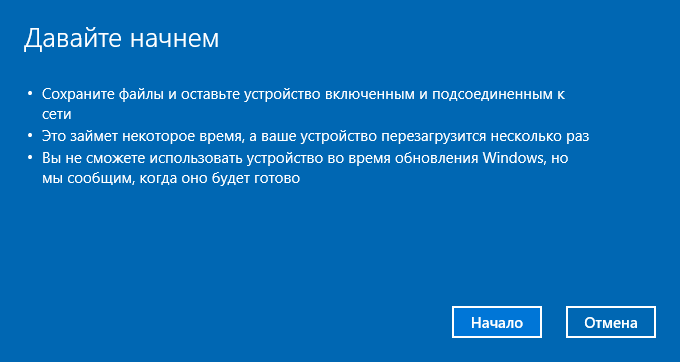
В окне «Давайте начнем» необходимо нажать на кнопку «Начало». Во время установки ОС компьютер нельзя будет использовать, а ПК перезагрузится несколько раз.
Начинается установка чистой версии Windows 10 в автоматическом режиме. На экране открывается окно «Восстановление компьютера».
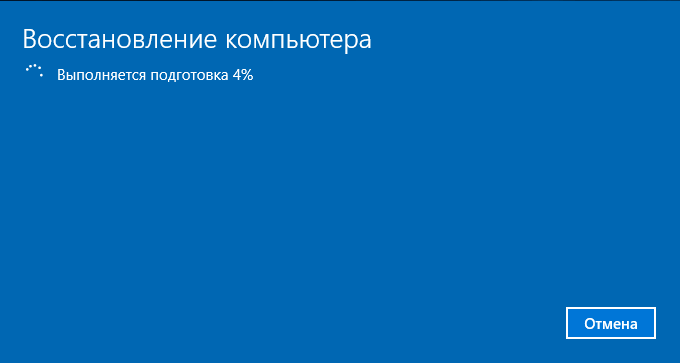
Затем происходит обновление устройства.
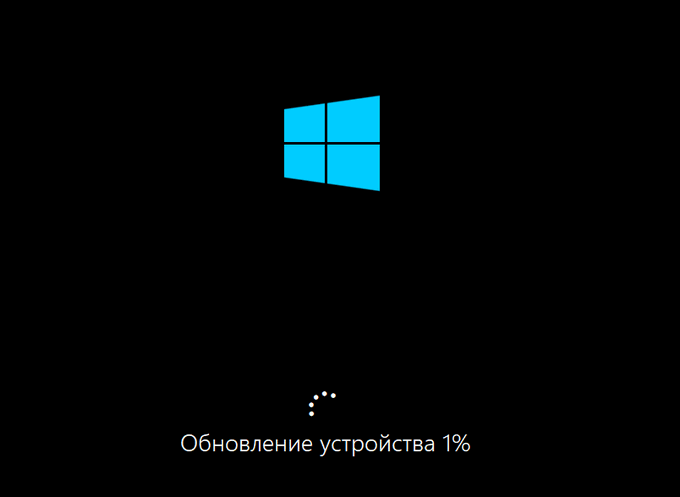
Происходит установка Windows. Вмешательство пользователя может понадобиться лишь для ввода данных от своей учетной записи Майкрософт, если она используется на данном компьютере.
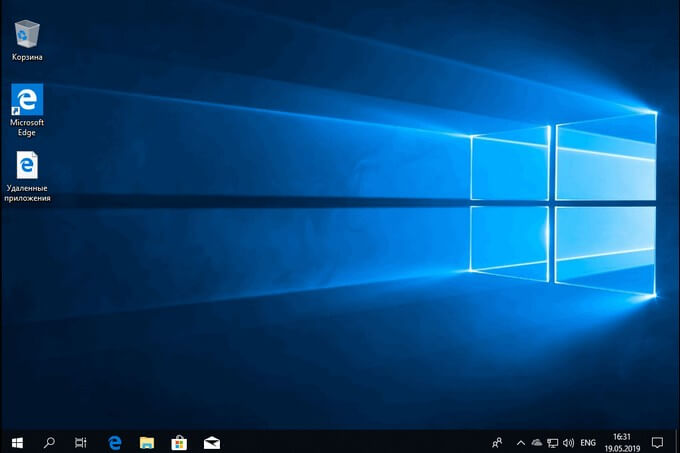
В завершение, на ПК загрузится чистая версия Windows 10.
В результате установки операционной системы этим способом, будут сохранены следующие файлы и параметры:
- личные данные пользователя;
- пользовательские настройки;
- данные об активации Windows.
На Рабочем столе компьютера сохранится файл «Удаленные приложения» в формате «HTML», со списком удаленных программ.
Новый старт с чистой установкой Windows 10
В версии Windows 10 1607 и в более поздних можно использовать подобное средство Refresh Windows Tool, которое нужно скачать с сайта Microsoft.
Для использования функции «Новый старт» с чистой установкой Windows, необходимо соблюсти следующие условия:
- Новый старт доступен для версий Windows 10 Домашняя (Windows 10 Home) и Windows 10 Профессиональная (Windows 10 Pro);
- обеспечение подключения к интернету;
- наличие свободного места на диске.
Наличие интернета необходимо для скачивания средства и образа Windows 10 с серверов Майкрософт. Убедитесь, что на диске, на котором будет переустановлена Windows, имеется достаточно места для файлов загружаемого образа. Размер загружаемого образа системы превышает 3 ГБ, в зависимости от версии ОС.
Обратите внимание на то, что некоторое время займет скачивание файла образа Windows. Если у вас медленный интернет, процесс загрузки займет немало времени.
«Новый старт» отличается от функции «Новый запуск» тем, что запуск установки ОС происходит при помощи приложения, а не из системы. Второе отличие: при новом старте можно выбрать полное удаление всех файлов с ПК, тогда как при новом запуске на компьютере остаются личные данные пользователя.
Перейдите на страницу официального сайта Майкрософт по ссылке: https://www.microsoft.com/ru-ru/software-download/windows10startfresh/, скачайте средство на свой компьютер.
Запустите на компьютере файл «RefreshWindowsTool.exe» от имени администратора. В окне «Условия лицензии» нажмите на кнопку «Принять».

В окне «Начните работу с компьютером с чистого листа» выберите один из вариантов:
- Сохранить только мои личные файлы — на компьютере будут сохранены личные данные пользователя, а параметры и приложения будут удалены.
- Ничего не сохранять — с ПК будут удалены все данные.
Выберите нужный способ, а затем нажмите на кнопку «Начать».

Далее начнется процесс установки Windows 10.
Удаление папки Windows.old с файлами старой системы
Файлы предыдущей ОС сохраняются в папке «Windows.old» на системном диске «C:». Если в работе компьютера нет проблем, эту папку можно удалить, потому что она занимает довольно много места.
Для удаления ненужных системных файлов предыдущей системы используйте утилиту «Очистка диска», которая встроена в операционную систему. Прочитайте подробную статью на моем сайте про удаление папки Windows.old.
Выводы статьи
С помощью функции «Начать заново» Windows 10 пользователь может вернуть работоспособность своему компьютеру. Этот способ позволит запустить чистую установку Windows. В результате, на ПК будет автоматически установлена последняя версия операционной системы, с сохранением пользовательских данных.
При использовании функции «Новый старт», с помощью утилиты Refresh Windows Tool, имеется возможность установить полностью «чистую» систему, без сохранения каких-либо данных на ПК. Для этого нужно выбрать соответствующую настройку в процессе переустановки Windows 10.
Новый запуск — автоматическая чистая установка Windows 10 (видео)
Похожие публикации:
- Удаление второй операционной системы в Windows
- Поддержка Windows 7 окончена: что делать
- Среда восстановления Windows (Windows RE)
- Проверка и восстановление системных файлов Windows в sfc scannow
- Восстановление загрузчика Windows 10 средствами системы

To start fresh with a clean copy of Windows 10, use these steps:
- Start your device with the USB bootable media.
- On “Windows Setup,” click Next to begin the process.
- Click the Install Now button.
- If you’re installing Windows 10 for the first time or upgrading an old version, you must enter a genuine product key.
Save your settings, reboot your computer and you should now be able to install Windows 10.
- Step 1 – Enter your computer’s BIOS.
- Step 2 – Set your computer to boot from DVD or USB.
- Step 3 – Choose the Windows 10 clean install option.
- Step 4 – How to find your Windows 10 license key.
- Step 5 – Select your hard disk or SSD.
Start it up and select the “Create installation media for another PC” option and follow the wizard to create installation media.
- After creating Windows 10 installation media, connect the installation disk to your computer.
- Select your SSD to install Windows.
- Install Windows to SSD with system clone software.
Select the appropriate version (Home, Pro) and the tool will generate an ISO for you. Let the tool help you burn the ISO to a DVD or USB memory stick. Now, proceed with a clean installation of Windows 10 (select “Custom: Install Windows only” when prompted.) When it asks you for a product key, click Skip.Recover Surface Laptop
- Turn off the Surface Laptop.
- Insert the USB recovery drive we just created into the USB port on the Surface Laptop.
- Hold the volume-down button and power button at the same time.
- When the Surface logo appears, let go of the buttons.
- Select your language and keyboard settings.
- Select Troubleshoot.
Select the drive and click Next.
- Click Finish after the media creation tool creates the media for you.
- Restart your PC with the USB drive or DVD inserted.
- Press any key to boot from the USB drive or DVD.
- Follow the prompts to set up Windows.
Can I reinstall Windows 10 for free?
With the end of the free upgrade offer, the Get Windows 10 app is no longer available, and you cannot upgrade from an older Windows version using Windows Update. The good news is that you can still upgrade to Windows 10 on a device that has a license for Windows 7 or Windows 8.1.
How do I install Windows 10 after replacing my hard drive?
Reinstall Windows 10 to a new hard drive
- Back up all of your files to OneDrive or similar.
- With your old hard drive still installed, go to Settings>Update & Security>Backup.
- Insert a USB with enough storage to hold Windows, and Back Up to the USB drive.
- Shut down your PC, and install the new drive.
How do I start a fresh install of Windows?
How to use the ‘Refresh Windows’ tool
- Use the Windows key + I keyboard shortcut to open the Settings app.
- Click Update & security.
- Click Recovery.
- Under More recovery options, click the “Learn how to start fresh with a clean installation of Windows”.
How do I reinstall Windows 10 from scratch?
Reinstall Windows 10 on a working PC. If you can boot into Windows 10, open the new Settings app (the cog icon in the Start menu), then click on Update & Security. Click on Recovery, and then you can use the ‘Reset this PC’ option. This will give you the choice of whether to keep your files and programs or not.
Can you install Windows 10 without a product key?
After you’ve installed Windows 10 without a key, it won’t actually be activated. However, an unactivated version of Windows 10 doesn’t have many restrictions. With Windows XP, Microsoft actually used Windows Genuine Advantage (WGA) to disable access to your computer. Activate Windows now.”
Can I install Windows 10 for free?
While you can no longer use the “Get Windows 10” tool to upgrade from within Windows 7, 8, or 8.1, it is still possible to download Windows 10 installation media from Microsoft and then provide a Windows 7, 8, or 8.1 key when you install it. If it is, Windows 10 will be installed and activated on your PC.
How do I install Windows 10 on a new hard drive?
Steps to add a hard drive to This PC in Windows 10:
- Step 1: Open Disk Management.
- Step 2: Right-click Unallocated (or Free space) and choose New Simple Volume in the context menu to continue.
- Step 3: Choose Next in the New Simple Volume Wizard window.
Can I buy a hard drive with Windows 10 installed?
Only if you also buy the machine the hard drive is installed in. You can buy Windows 10 on a USB stick and then use that stick to install Windows 10 to the hard drive. You should consider getting a good solid state disk SSD instead of a HDD for boot speed.
How do I install Windows on a new hard drive?
How to install Windows on a SATA drive
- Insert the Windows disc into the CD-ROM / DVD drive/USB flash drive.
- Power down the computer.
- Mount and connect the Serial ATA hard drive.
- Power up the computer.
- Choose language and region and then to Install Operating System.
- Follow the on-screen prompts.
Is reset this PC the same as clean install?
The Remove everything option of PC resetting is like a regular clean install and your hard drive is erased and a fresh copy of Windows is installed. But by contrast, a system reset is faster and more convenient. And a clean install must require an installation disc or USB drive.
How do I install Windows 10 without bloatware?
How to Reinstall Windows 10 Without All the Bloatware
- Click the Start menu and choose Windows Defender Security Center from the list of options.
- Choose Device performance & health.
- At the bottom, under Fresh start, click the Additional info link.
- Click the Get started button.
- When asked if you’d like to allow the app to make changes to your device, click Yes.
How long does it take to install Windows 10?
Summary/ Tl;DR / Quick Answer. Windows 10 Download time depends on your internet speed and how you download it. One to Twenty hours depending on internet speed. Windows 10 Install time can take anywhere from 15minutes to three hours based on your device configuration.
Do I need to reinstall Windows 10 new motherboard?
If you reinstall Windows 10 after you make a significant hardware change to your PC (such as replacing the motherboard), it may no longer be activated. If you were running Windows 10 (Version 1607) before the hardware change, you can use the Activation troubleshooter to reactivate Windows.
Can I reinstall Windows 10 without a disk?
Reset Computer to Reinstall Windows 10 Without CD. This method is available when your PC can still boot properly. Being capable of solving most system problems, it won’t be different from a clean install of Windows 10 via an installation CD. 1) Go to “Start” > “Settings” > “Update & Security” > “Recovery”.
Do you need to reinstall Windows 10 after replacing motherboard?
When reinstalling Windows 10 after a hardware change–especially a motherboard change–be sure to skip the “enter your product key” prompts while installing it. But, if you’ve changed the motherboard or just a lot of other components, Windows 10 may see your computer as a new PC and may not automatically activate itself.
How do I activate Windows 10 without a product key?
Activate Windows 10 without using any software
- Step 1: Select the right key for your Windows.
- Step 2: Right-click on the start button and open Command Prompt (Admin).
- Step 3: Use the command “slmgr /ipk yourlicensekey” to install a license key (yourlicensekey is the activation key you got above).
How can I get a Windows 10 product key for free?
How to Get Windows 10 for Free: 9 Ways
- Upgrade to Windows 10 from the Accessibility Page.
- Provide a Windows 7, 8, or 8.1 Key.
- Reinstall Windows 10 if You’ve Already Upgraded.
- Download Windows 10 ISO File.
- Skip the Key and Ignore the Activation Warnings.
- Become a Windows Insider.
- Change your Clock.
Do I need Windows 10 key to reinstall?
When you upgrade your OS to Windows 10, Windows 10 will be automatically activated online. This allows you to reinstall Windows 10 at any time without purchasing a license again. To reinstall Windows 10 after its free upgrade, you can choose to perform a clean install from a USB drive or with CD.
Is there a free download for Windows 10?
This is your one chance to get Microsoft Windows 10 operating system full version as a free download, with no restrictions. Windows 10 will be a device lifetime service. If your computer can run Windows 8.1 properly, you can find it easy to install Windows 10 – Home or Pro.
Can you still get Windows 10 for free?
You can still upgrade to Windows 10 for free in 2019. The short answer is No. Windows users can still upgrade to Windows 10 without shelling out $119. The assistive technologies upgrade page still exist and is fully functional.
How do I download Windows 10 with product key?
Find and install your Microsoft downloads from Microsoft Store
- Go to Order history, find Windows 10, and then select Product key/Install.
- Select Copy to copy the key, and then select Install.
- Select Download tool now, and follow the instructions.
- A wizard will help you through the steps to install.
How do I reinstall my free Windows 10 upgrade?
You Can Still Get Windows 10 for Free With a Windows 7, 8, or 8.1
- Microsoft’s free Windows 10 upgrade offer is over–or is it?
- Insert the installation media into the computer you want to upgrade, reboot, and boot from the installation media.
- After you’ve installed Windows 10, head to Settings > Update & Security > Activation and you should see that your PC has a digital license.
How do I install Windows from a USB drive?
Note:
- Download and install the Windows USB/DVD Download tool .
- Open the Windows USB/DVD Download tool.
- When prompted, browse to your .iso file, select it, and click Next.
- When asked to select the media type for your backup, make sure your flash drive is plugged in, and then choose USB device.
- Click Begin Copying.
How do I install Windows on a new SSD?
remove the old HDD and install the SSD (there should be only the SSD attached to your system during the installation process) Insert the Bootable Installation Media. Go into your BIOS and if SATA Mode is not set to AHCI, change it. Change the boot order so the Installation Media is top of the boot order.
Photo in the article by “Wikimedia Commons” https://commons.wikimedia.org/wiki/File:TeX_Live_advanced_install_Windows_install_progress.png
- To clean install Windows 10, boot PC with a USB bootable flash drive, continue with on-screen directions, skip activation, and select the “Custom” option. Then select the installation drive, click “Next,” and finish the out-of-the-box experience (OOBE).
- Also, you can do a clean installation of Windows 10 with the Media Creation Tool, Reset this PC feature, Advanced startup, or ISO file.
A clean install of Windows 10 is recommended for upgrading to the latest operating system version. The reason is that this method allows you to erase the hard drive and start with a fresh copy of Windows 10 without custom settings, drivers, apps, or files that may interfere with the upgrade process.
If you have had the same installation for a long time, this process can also help fix performance issues, problems shutting down and starting up, memory, and apps. Also, a clean installation is the process of choice to upgrade from an older version like Windows 7 or 8.1. Or you can use this option to delete all preloaded bloatware from the manufacturer image on a new computer.
Whatever the reason, Microsoft offers several ways to perform a clean install of Windows 10, including using a USB flash drive to set up the installation on an SSD (Solid-State Drive). You can use the Media Creation Tool to do a fresh install on a device already running Windows 10. It’s also possible to use the “Reset this PC” feature to quickly wipe out the hard drive and reinstall the operating system without additional tools. Or, if the computer does not start, you can use the Advanced startup options or mount the ISO file to File Explorer to complete a clean install.
This guide will teach you the different ways to perform a clean installation of Windows 10 on your computer, whether you plan to reinstall the same version or upgrade to a later release, including version 22H2, 21H2, 21H1, or 20H2.
- Clean install Windows 10 from USB
- Clean install Windows 10 from Media Creation Tool
- Clean install Windows 10 from Reset this PC (local)
- Clean install Windows 10 from Reset this PC (cloud)
- Clean install Windows 10 from WinRE
- Clean install Windows 10 from ISO file
Important: This process will delete everything on your device. It’s recommended to make a full backup of your computer before proceeding. You’ve been warned.
The best way to complete a fresh installation of Windows 10 is to use a USB flash drive, which you must first create using the Media Creation Tool, Command Prompt, or third-party tools like Rufus. Also, you must ensure the computer can start from USB, which means you may need to adjust the BIOS or UEFI settings. However, since most devices have different settings, you must check your manufacturer support website for more specific details.
To clean install Windows 10 from USB, use these steps:
-
Start the PC with the Windows 10 USB flash drive.
-
Press any key to continue.
-
Click the Next button.

-
Click the Install now button.

-
Click the “I don’t have a product key” option if you are doing a reinstallation. If Windows 10 was already activated after the installation, reactivation would happen automatically.

-
Select the edition of “Windows 10” that your license key activates (if applicable).

-
Check the “I accept the license terms” option.
-
Click the Next button.
-
Select the “Custom: Install Windows only (advanced)” option to perform a clean install.

-
Select each partition in the hard drive you want to install Windows 10 and click the Delete button. (Typically, the “Drive 0” is the drive that contains all the installation files.)
Warning: Deleting a partition also deletes all data on the drive. Also, it is not required to delete the partitions from a secondary hard drive.
-
Select the hard drive (Drive 0 Unallocated Space) to install Windows 10.

-
Click the Next button.
-
Select your region setting after the installation on the first page of the out-of-the-box experience (OOBE).

-
Click the Yes button.
-
Select your keyboard layout setting.
-
Click the Yes button.
-
Click the Skip button if you do not need to configure a second layout.
-
The computer will automatically connect to the network using an Ethernet connection. If you have a wireless connection, you must set up the link manually (a security key may be required).
-
Select the “Set up for personal use” option for Windows 10 Pro. (The “Home” edition does not have this option.)
-
Click the Next button.
-
Confirm your Microsoft account email, phone number, or Skype identification to create an account.
-
Click the Next button.
-
Confirm your Microsoft account password.
-
Click the Next button.
-
Click the “Create a PIN” button.
-
Create a new PIN password.
-
Click the OK button.
-
Confirm the privacy settings best suit your needs by turning on or off the toggle switch for each option.
-
Click the Accept button.
-
(Optional) On the “Customize your device” page, select one or more ways you plan to use the device to allow the setup to suggest tools and services customization during this experience.
-
Click the Accept button to continue. Or click the Skip button to skip this part of the setup.
-
Click the “No, thanks” button to skip linking your phone to your PC. (You can always do this from the Settings app.)
-
Click the Next button to allow OneDrive to automatically upload your Desktop, Pictures, and Documents folders to the cloud. Or click the “Only save files to this PC” option to skip this step.
-
Click the “No, thanks” button to skip the Microsoft 365 setup.
-
Click the Decline button to skip the OneDrive storage offer.
-
Click the “No Thanks” button to skip the Game Pass offer.
-
Click the “Not now” button to disable Cortana.


Once you complete the steps, Windows 10 will apply the settings and finish the setup.
Clean install Windows 10 from Media Creation Tool
You can also perform a clean installation using the Media Creation Tool with the option to keep nothing. This option is available for devices already using Windows 10, Windows 8.1, or Windows 7, and it provides an option to roll back to the previous installation.
To clean install Windows 10 with the Media Creation Tool, use these steps:
-
Open Microsoft support website.
-
Under the “Create Windows 10 installation media” section, click the “Download tool now” button.
-
Save the installer to the device.
-
Double-click the MediaCreationToolXXXX.exe file to launch the tool.
-
Click the Accept button.
-
Select the “Upgrade this PC now” option.

-
Click the Accept button again.
-
Click the “Change what to keep” option.
-
Select the Nothing option.
-
Click the Next button.
-
Click the Install button.
-
Select your region setting after the installation on the first page of the out-of-the-box experience (OOBE).
-
Click the Yes button.
-
Select your keyboard layout setting.
-
Click the Yes button.
-
Click the Skip button if you do not need to configure a second layout.
-
The computer will automatically connect to the network using an Ethernet connection. If you have a wireless connection, you must set up the link manually (a security key may be required).
-
Select the “Set up for personal use” option for Windows 10 Pro. (The “Home” edition does not have this option.)
-
Click the Next button.
-
Confirm your Microsoft account email, phone number, or Skype identification to create an account.
-
Click the Next button.
-
Confirm your Microsoft account password.
-
Click the Next button.
-
Click the “Create a PIN” button.
-
Create a new PIN password.
-
Click the OK button.
-
Confirm the privacy settings best suit your needs by turning on or off the toggle switch for each option.
-
Click the Accept button.
-
(Optional) On the “Customize your device” page, select one or more ways you plan to use the device to allow the setup to suggest tools and services customization during this experience.
-
Click the Accept button to continue. Or click the Skip button to skip this part of the setup.
-
Click the “No, thanks” button to skip linking your phone to your PC. (You can always do this from the Settings app.)
-
Click the Next button to allow OneDrive to automatically upload your Desktop, Pictures, and Documents folders to the cloud. Or click the “Only save files to this PC” option to skip this step.
-
Click the “No, thanks” button to skip the Microsoft 365 setup.
-
Click the Decline button to skip the OneDrive storage offer.
-
Click the “No Thanks” button to skip the Game Pass offer.
-
Click the “Not now” button to disable Cortana.


After you complete the steps, the setup will continue with the fresh installation of the operating system.
Clean install Windows 10 from Reset this PC (local)
Using the local image, you can also use the recovery settings to start fresh with a clean copy of Windows 10. However, unlike the USB, Media Creation Tool, and ISO file methods, you can only use this option to reinstall the same version of Windows 10 already on the computer. If you want to upgrade to a newer version, you will need to use one of the other alternative methods.
To clean install Windows 10 with the Reset this PC feature using the local image, use these steps:
-
Open Settings.
-
Click on Update & Security.
-
Click on Recovery.
-
Under the “Reset this PC” section, click the Get started button.

-
Click the “Remove everything” option to perform a fresh install of Windows 10.

-
Click the “Local reinstall” option.
-
(Optional) Click the Change settings option.
-
Configure the reinstallation options:
- Clean data: If this option is set to No (recommended), then the setup will only delete files, apps, and settings quickly. If the option is set to Yes, the setup will securely clean the drive before installing the operating system, but it will take longer.
- Delete files from all drives: Only the installation drive will be erased if the option is set to No (recommended). Otherwise, if this option is set to Yes, all the drives on the device will be deleted.
- Download Windows: If this option is set to No (recommended), the local image will be used for installation. If the option is set to Yes, the “Cloud download” option will be activated.
-
Click the Confirm button.
-
Click the Next button.
-
Click the Reset button.
-
Select your region setting after the installation on the first page of the out-of-the-box experience (OOBE).
-
Click the Yes button.
-
Select your keyboard layout setting.
-
Click the Yes button.
-
Click the Skip button if you do not need to configure a second layout.
-
The computer will connect to the network automatically if it uses an Ethernet connection. If you have a wireless connection, you must set up the link manually (a security key may be required).
-
Select the “Set up for personal use” option for Windows 10 Pro. (The “Home” edition does not have this option.)
-
Click the Next button.
-
Confirm your Microsoft account email, phone number, or Skype identification to create an account.
-
Click the Next button.
-
Confirm your Microsoft account password.
-
Click the Next button.
-
Click the “Create a PIN” button.
-
Create a new PIN password.
-
Click the OK button.
-
Confirm the privacy settings best suit your needs by turning on or off the toggle switch for each option.
-
Click the Accept button.
-
(Optional) On the “Customize your device” page, select one or more ways you plan to use the device to allow the setup to suggest tools and services customization during this experience.
-
Click the Accept button to continue. Or click the Skip button to skip this part of the setup.
-
Click the “No, thanks” button to skip linking your phone to your PC. (You can always do this from the Settings app.)
-
Click the Next button to allow OneDrive to automatically upload your Desktop, Pictures, and Documents folders to the cloud. Or click the “Only save files to this PC” option to skip this step.
-
Click the Decline button to skip the OneDrive storage offer.
-
Click the “No Thanks” button to skip the Game Pass offer.
-
Click the “No, thanks” button to skip the Microsoft 365 setup.
-
Click the “Not now” button to disable Cortana.


Once you complete the steps, a clean installation will be performed using the local image. If this is a branded computer, the setup will restore all the original settings previously available with the device. This means manufacturer-specific settings, drivers, applications, and tools. If you don’t want to reinstall the custom image provided by the manufacturer, use the “Cloud Download” option (see steps below).
Clean install Windows 10 from Reset this PC (cloud)
Windows 10 also includes the “Cloud Download” option in the “Reset this PC” feature, which allows you to reset the device with a clean installation, removing apps, files, and settings like the local image option. However, the difference is that when you select this option, the setup will download a fresh installation image from the Microsoft server.
This option has been designed to reinstall Windows 10 when the recovery feature is not working with the local image or using a branded computer with a custom image. If you choose this option, the setup will download the same version already installed on the device, which means you cannot use this method to upgrade the computer to a newer version. Also, if the device has a custom image from the manufacturer, this option will replace it with the one from Microsoft with all the standard settings and without custom drivers or trial software and tools.
To reinstall Windows 10 with the Reset this PC using the “Cloud Download” option, use these steps:
-
Open Settings.
-
Click on Update & Security.
-
Click on Recovery.
-
Under the “Reset this PC” section, click the Get started button.
-
Click the “Remove everything” option.
-
Click the “Cloud Download” option.
-
(Optional) Click the Change settings option.
-
Configure the reinstallation options: Clean data:
- Clean data: If this option is set to No (recommended), then the setup will only delete files, apps, and settings quickly. If the option is set to Yes, the setup will securely clean the drive before installing the operating system, but it will take longer.
- Delete files from all drives: Only the installation drive will be erased if the option is set to No (recommended). Otherwise, if this option is set to Yes, all the drives on the device will be deleted.
- Download Windows: If the option is set to Yes (recommended), the “Cloud download” option will be activated. If this option is set to No, then the local image will be used for installation.
-
Click the Confirm button.
-
Click the Next button.
-
Click the Reset button.
-
Select your region setting after the installation on the first page of the out-of-the-box experience (OOBE).
-
Click the Yes button.
-
Select your keyboard layout setting.
-
Click the Yes button.
-
Click the Skip button if you do not need to configure a second layout.
-
The computer will connect to the network automatically if it uses an Ethernet connection. If you have a wireless connection, you must set up the connection manually (a security key may be required).
-
Select the “Set up for personal use” option for Windows 10 Pro. (The “Home” edition does not have this option.)
-
Click the Next button.
-
Confirm your Microsoft account email, phone number, or Skype identification to create an account.
-
Click the Next button.
-
Confirm your Microsoft account password.
-
Click the Next button.
-
Click the “Create a PIN” button.
-
Create a new PIN password.
-
Click the OK button.
-
Confirm the privacy settings best suit your needs by turning on or off the toggle switch for each option.
-
Click the Accept button.
-
(Optional) On the “Customize your device” page, select one or more ways you plan to use the device to allow the setup to suggest tools and services customization during this experience.
-
Click the Accept button to continue. Or click the Skip button to skip this part of the setup.
-
Click the “No, thanks” button to skip linking your phone to your PC. (You can always do this from the Settings app.)
-
Click the Next button to allow OneDrive to automatically upload your Desktop, Pictures, and Documents folders to the cloud. Or click the “Only save files to this PC” option to skip this step.
-
Click the “No, thanks” button to skip the Microsoft 365 setup.
-
Click the Decline button to skip the OneDrive storage offer.
-
Click the “No Thanks” button to skip the Game Pass offer.
-
Click the “Not now” button to disable Cortana.


Once you complete the steps, the feature will take over and reset your device to the default settings by erasing and reinstalling a fresh copy of Windows 10 downloaded from the cloud.
Clean install Windows 10 from WinRE
If the computer does not start correctly and you want to reinstall Windows 10 to resolve the problem, the Windows Recovery Environment (WinRE) includes an option to perform a clean installation using the local or cloud image.
Technically, these are the same options available through the “Reset this PC” settings. However, you can also access the feature through the “Advanced startup” option, making it ideal for performing a clean installation of Windows 10 when the computer has problems. Or when you cannot boot the system to access the Settings app.
Again, you can only use this option to reinstall the same operating system version already installed on the computer. If you also want to upgrade to the latest version, you must use the Media Creation Tool, ISO file, or USB options.
To clean install Windows 10 from the Windows Recovery Environment, use these steps:
-
Start device.
-
Immediately after the Power-On Self-Test (POST), press the Power button again to shut down.
-
Repeat steps 1 and 2 twice, and in the third restart, the operating system should enter the Windows Recovery Environment (WinRE).
Quick note: Windows 10 has multiple ways to open the Advanced startup settings. You can use these other options if you cannot access the recovery environment.
-
Click the Advanced options button.

-
Click on Troubleshoot.

-
Click on the “Reset this PC” option.

-
Select the “Remove everything” option.

-
Click the Cloud download or Local reinstall option. Cloud download: Downloads a fresh image from the Microsoft servers and performs a fresh installation. Local reinstall: Uses the locally available image to install a clean copy of Windows 10.

-
Select the “Only the drive where Windows is installed” option. (The All drives option will delete the data on all drives. This option is usually recommended only when you want to decommission the device.)

-
Select the “Just remove my files or Full clean the drive” option.
- Just remove my files: Deletes the drive contents quickly.
- Full clean the drive: It also deletes everything on the drive but performs a secure erase that takes several hours—this option is suited when preparing to give away the device.

-
Click the Reset button.

-
Select your region setting after the installation on the first page of the out-of-the-box experience (OOBE).
-
Click the Yes button.
-
Select your keyboard layout setting.
-
Click the Yes button.
-
Click the Skip button if you do not need to configure a second layout.
-
The computer will connect to the network automatically if it uses an Ethernet connection. If you have a wireless connection, you must set up the connection manually (a security key may be required).
-
Select the “Set up for personal use” option for Windows 10 Pro. (The “Home” edition does not have this option.)
-
Click the Next button.
-
Confirm your Microsoft account email, phone number, or Skype identification to create an account.
-
Click the Next button.
-
Confirm your Microsoft account password.
-
Click the Next button.
-
Click the “Create a PIN” button.
-
Create a new PIN password.
-
Click the OK button.
-
Confirm the privacy settings best suit your needs by turning on or off the toggle switch for each option.
-
Click the Accept button.
-
(Optional) On the “Customize your device” page, select one or more ways you plan to use the device to allow the setup to suggest tools and services customization during this experience.
-
Click the Accept button to continue. Or click the Skip button to skip this part of the setup.
-
Click the “No, thanks” button to skip linking your phone to your PC. (You can always do this from the Settings app.)
-
Click the Next button to allow OneDrive to automatically create a backup of your Desktop, Pictures, and Documents folders to the cloud. Or click the “Only save files to this PC” option to skip this step.
-
Click the “No, thanks” button to skip the Microsoft 365 setup.
-
Click the Decline button to skip the OneDrive storage offer.
-
Click the “No Thanks” button to skip the Game Pass offer.
-
Click the “Not now” button to disable Cortana.


Once you complete the steps, the process will take over and reset your computer to the default settings by erasing and reinstalling a clean copy of Windows 10. The completion time will depend on your computer hardware configuration and selected reset configuration.
Clean install Windows 10 from ISO file
If you only have a Windows 10 ISO file, a USB flash drive or disc is not required to continue with the installation. You can always mount the ISO in File Explorer to launch a clean install or in-place upgrade on a device with the operating system already installed.
To clean install Windows 10 from an ISO file, use these steps:
-
Download the Windows 10 ISO without using the Media Creation Tool.
-
Right-click the ISO file and select the Mount option.

-
Select the virtual drive from the left navigation pane.
-
Double-click the Setup file to begin the Windows 10 installation.

-
(Optional) Click the “Change how Windows Setup downloads updates” option.
-
Select the “Not right now” option.
-
Click the Next button.
-
Click the Accept button to agree to the terms.
-
Click the “Change what to keep” option.
-
Select the Nothing option.
-
Click the Next button.
-
Click the Install button.
-
Select your region setting after the installation on the first page of the out-of-the-box experience (OOBE).
-
Click the Yes button.
-
Select your keyboard layout setting.
-
Click the Yes button.
-
Click the Skip button if you do not need to configure a second layout.
-
The computer will connect to the network automatically if it uses an Ethernet connection. If you have a wireless connection, you must set up the connection manually (a security key may be required).
-
Select the “Set up for personal use” option for Windows 10 Pro. (The “Home” edition does not have this option.)
-
Click the Next button.
-
Confirm your Microsoft account email, phone number, or Skype identification to create an account.
-
Click the Next button.
-
Confirm your Microsoft account password.
-
Click the Next button.
-
Click the “Create a PIN” button.
-
Create a new PIN password.
-
Click the OK button.
-
Confirm the privacy settings best suit your needs by turning on or off the toggle switch for each option.
-
Click the Accept button.
-
(Optional) On the “Customize your device” page, select one or more ways you plan to use the device to allow the setup to suggest tools and services customization during this experience.
-
Click the Accept button to continue. Or click the Skip button to skip this part of the setup.
-
Click the “No, thanks” button to skip linking your phone to your PC. (You can always do this from the Settings app.)
-
Click the Next button to allow OneDrive to automatically create a backup of your Desktop, Pictures, and Documents folders to the cloud. Or click the “Only save files to this PC” option to skip this step.
-
Click the Decline button to skip the OneDrive storage offer.
-
Click the “No Thanks” button to skip the Game Pass offer.
-
Click the “No, thanks” button to skip the Microsoft 365 setup.
-
Click the “Not now” button to disable Cortana.


Once you complete the steps, the clean installation process will begin, like using the Media Creation Tools or USB flash drive to upgrade the system.
 Ранее на сайте уже публиковалась инструкция о возврате системы к изначальному состоянию — Автоматическая переустановка или сброс Windows 10. В некоторых случаях (когда ОС устанавливалась вручную) описанное в ней равнозначно чистой установке Windows 10 на компьютер или ноутбук. Но: если выполнять сброс Windows 10 на устройстве, где система была предустановлена производителем, в результате такой переустановки вы получите систему в том состоянии, в котором она была при покупке — со всеми дополнительными программами, сторонними антивирусами и прочим ПО производителя.
В новых версиях Windows 10, начиная с 1703, появилась новая возможность сброса системы («Новый запуск», «Начать заново» или «Start Fresh»), при использовании которой автоматически выполняется именно чистая установка системы (причем последней актуальной версии) — после переустановки останутся только те программы и приложения, которые входят в оригинальную ОС, а также драйверы устройств, а все ненужные, а возможно и некоторые нужные, программы производителя будут удалены (равно как и установленные вами программы). О том, как выполнить чистую установку Windows 10 новым способом — далее в этом руководстве.
Обратите внимание: для компьютеров с HDD такая переустановка Windows 10 может занимать очень продолжительное время, поэтому если для вас ручная установка системы и драйверов не является проблемой, рекомендую проделать именно её. См. также: Установка Windows 10 с флешки, Все способы восстановления Windows 10.
Запуск чистой установки Windows 10 (функция «Начать заново» или «Новый запуск»)
Перейти к новой функции в Windows 10 можно двумя простыми способами.
Первый: зайти в Параметры (клавиши Win+I) — Обновление и безопасность — Восстановление и ниже простого сброса системы к исходному состоянию и особых вариантов загрузки, в разделе «Дополнительные параметры восстановления» нажать «Узнайте, как начать заново с чистой установкой Windows» (потребуется подтвердить переход в Центр безопасности Защитника Windows).
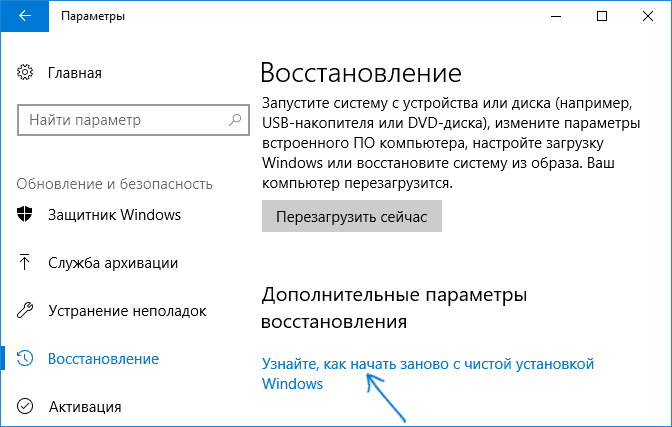
Второй способ — открыть центр безопасности Защитника Windows (с помощью значка в области уведомлений панели задач или Параметры — Обновление и безопасность — Защитник Windows), перейти в раздел «Работоспособность устройства», после чего нажать «Дополнительные сведения в разделе «Новый запуск» (или «Начать заново» в более старых версиях Windows 10).

Следующие шаги автоматической чистой установки Windows 10 выглядят следующим образом:
- Нажмите «Начало работы».

- Прочтите предупреждение о том, что все программы, не входящие в состав Windows 10 по умолчанию, будут удалены с компьютера (включая, например, Microsoft Office, который также не является частью ОС) и нажмите «Далее».

- Вы увидите список приложений, которые будут удалены с компьютера. Нажмите «Далее».
- Останется подтвердить начало переустановки (она может занять продолжительное время, если выполняется на ноутбуке или планшете, убедитесь, что он подключен к розетке).
- Дождитесь завершения процесса (компьютер или ноутбук будет перезагружаться в ходе восстановления).
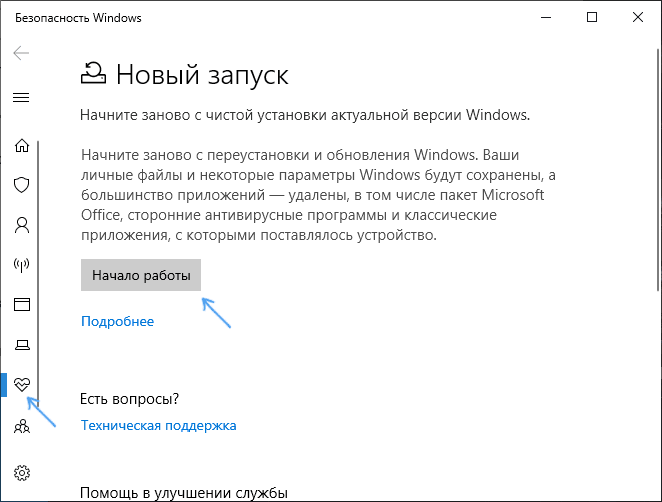
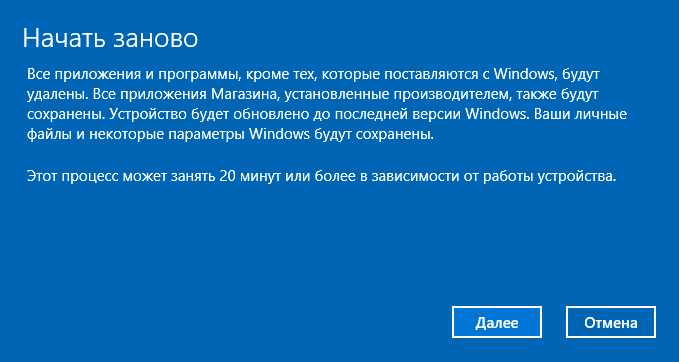
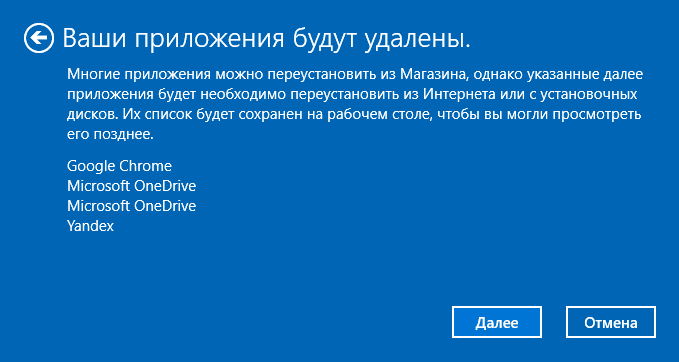
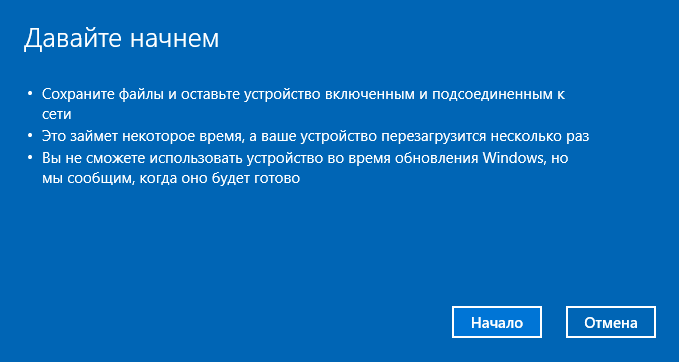

При использовании данного способа восстановления в моем случае (не самый новый ноутбук, но с SSD):
В целом, все оказалось работоспособным, но пришлось потратить 10-15 минут на установку необходимых системных программ от производителя ноутбука, чтобы вернуть часть функциональности.
Дополнительная информация
Для старой Windows 10 версии 1607 (Anniversary Update) также существует возможность выполнения такой переустановки, но реализована она в виде отдельной утилиты от Майкрософт, доступной для загрузки на официальном сайте https://www.microsoft.com/ru-ru/software-download/windows10startfresh/. Утилита будет работать и для последних версий системы.
Windows 10 has become a popular choice for laptops and desktops with users all over the globe. If you want to start using Windows 10 on your system, you may want to do a clean install to remove the bloat-wares and make the PC run smoothly and hassle-free with the latest upgrades. Get started with step one, below, to do a clean install of Windows 10.
Steps
-

1
Check whether your computer can run on Windows 10. Learning the capabilities of your computer system is the first thing to do while installing a desired operating system. Make sure that your computer meets the minimum requirements for installing Windows 10. The minimum requirements are:
- Processor: 1 gigahertz (GHz) or faster.
- RAM: 1 gigabyte (GB) (32-bit) or 2 GB (64-bit)
- Free hard disk space: 16 GB.
- Graphics card: Microsoft DirectX 9 graphics device with WDDM driver.
- A Microsoft account and Internet access.
-
2
Download the media creation tool. You will need this tool to download the iso file and burn it to a DVD. You can find it here Microsoft on the Microsoft site. Scroll to the bottom of the page and you will find the download link. Select the proper tool according to your processor’s architecture. To find out if your computer is running a 32-bit or 64-bit version of Windows, do the following:
- Right click on «This PC» on desktop, and select the «Properties» Tab.
- Under System, you can view the system type.
-
3
Install the Media Creation Tool. You can do this by double clicking on the file you downloaded. When a security prompt appears, click on «Yes» button.
- Select «Create installation media for another PC» button.
- Select the language and proper edition of Windows in the next window. Also, select proper architecture of your PC’s processor in which you are installing Windows 10.
- Choose the media for installation in the next window. Check the «ISO file» button. This will download the ISO file, or a disk image file. Select the desired location for the ISO file when you are prompted.
-
4
Burn the iso file to a DVD. Here are the steps to burn the ISO file to a DVD.
- Navigate to the ISO file you downloaded earlier.
- Right click on the file, and select «Burn Disc Image» option.
- Select the DVD drive in «Disc Burner» option.
- Click on «Burn».
-
5
Restart your device and boot using the DVD burned with Windows 10. You can do this using your BIOS.
-
6
Select language of your choice. Then select the option, «Install Windows Only». After that, format the partition you were using earlier for your operating system.
-
7
Install Windows 10 in that partition which you just successfully formatted, and wait for files to be copied. Note that Your computer may restart several times during the installation.
-
8
Provide your details and settings in the next processes. After successful installation, Windows will ask for information such as you email address, and ask you to customize settings. You can do that yourselves or choose the express settings for default settings.
-
9
After all is done, you are ready to use your clean-installed Windows 10. You can check out the new features of the latest Windows version to get the most out of it. Good luck!


Add New Question
-
Question
I have installed Windows 10 on my PC, but it needs an internet connection to log in. How can I connect it to a network without the login?

Zachery Calahan
Community Answer
In the bottom right corner, there is a button where you can connect to the network. If you have a desktop and are trying to connect to WiFi, make sure that you have a wireless adapter installed.
-
Question
What is the difference between the 64-bit and 32-bit version?
Zachery Calahan
Community Answer
This refers to the CPU and how much data it can use at a time. To sum it up, 32-bits can, in most cases, use up to 4 GB of RAM, while 64-bits can use way more GB. It also does it more effectively. Read up on How to Check if Windows Is 32 Bits or 64 Bits for more details.
Ask a Question
200 characters left
Include your email address to get a message when this question is answered.
Submit
-
You can also boot using a USB/drive if desired. The method is the same as above, but you have to select the «USB flash drive» option in the tool, and boot using USB Drive.
-
If you’re using Windows 8 or higher, hold the SHIFT key when clicking the restart button. This will allow you to select your boot device without using the BIOS. Select «Use a device», and then your boot device name.
-
If you’re using a laptop, plug in the power source.
-
Be careful while formatting partitions; select the correct partition or you might lose your data and files.
-
Do not turn off or unplug your machine while installing Windows 10 or formatting your disk; otherwise your disk may be corrupted or damaged.
Things You’ll Need
- A blank DVD or USB drive (an 8 GB USB disk will do fine)
- A product key for the Windows 10 version (not necessary but will be good to have)
- A smooth internet connection
- A working PC, or a laptop
About this article
Thanks to all authors for creating a page that has been read 51,093 times.
If you buy through links on our site, we may earn a commission.