In Microsoft Windows 10, Windows Update can be found in Settings >> Update & Security >> Windows Update, while in Windows 11, it can be found in Settings >> Windows Update.
Normally, Windows Update keeps on running in the background and will install new updates automatically.
Windows Update checks for new updates randomly every 22 hours. The reason behind the random check is that if all the systems in the world start checking for updates at the same time, this would put an extreme load on Microsoft servers. That’s why Microsoft came up with the idea of checking for updates randomly every day.
You can also run Windows Update manually to check for new updates at any time. Here are three ways to check for new Windows updates.
Table of contents
- Force Windows Update Check using Run Command Box
- Run Windows Update from PowerShell (Command-line)
- Deploy Updates on Remote Computers
- Install Specific Updates Only
- Prevent Specific Windows Updates from Installing
- Run Windows Update from Command Prompt (Command-Line)
- Check for Windows Updates using Windows Settings
- How to Force Windows Update to Download Already Downloaded Updates
- Manage Windows Updates using Wuinstall Command Line Tool
- How to Fix Corrupted Windows Update
Force Windows Update Check using Run Command Box
I found out that the easiest way to force a Windows update check is to use a command in the Run dialog box. There are other commands from CMD and PowerShell as well, but let’s start with the easiest way to do it.
-
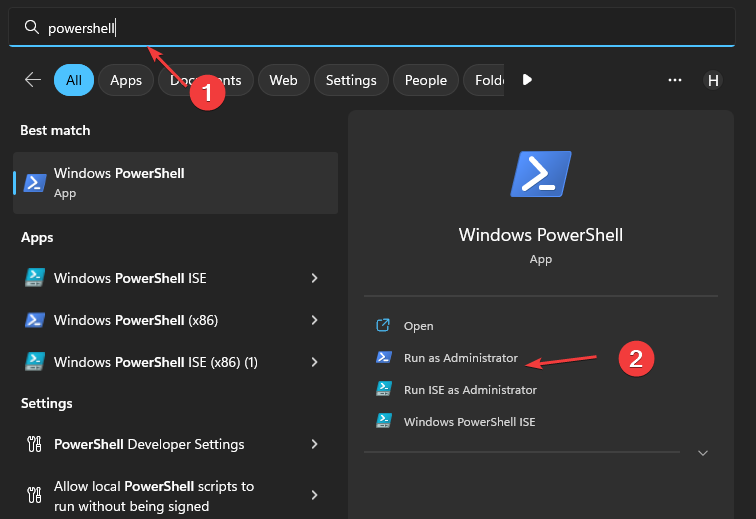
Open the Run Command box (Windows key + R).
-
Run the following command:
control update
Check Windows update from the Run Command box

This will trigger the Windows Update graphical user interface which will start checking for new updates. This method works on all versions of Windows including Windows 10 and Windows 11.
There is another command that will trigger the same effect but only works in Windows 10 and 11:
ms-settings:windowsupdate
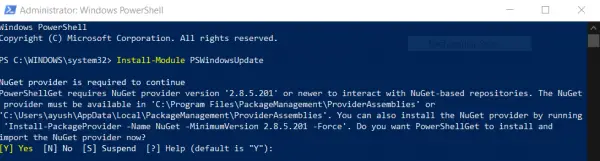
There is no official Windows PowerShell module for Windows Update. However, you can use “PSWindowsUpdate.” PSWindowsUpdate is a third-party module that can be used to configure Windows updates in Windows.
This module is not installed in Windows by default but you can download it from the PowerShell gallery, and install and run the module to check for new updates.
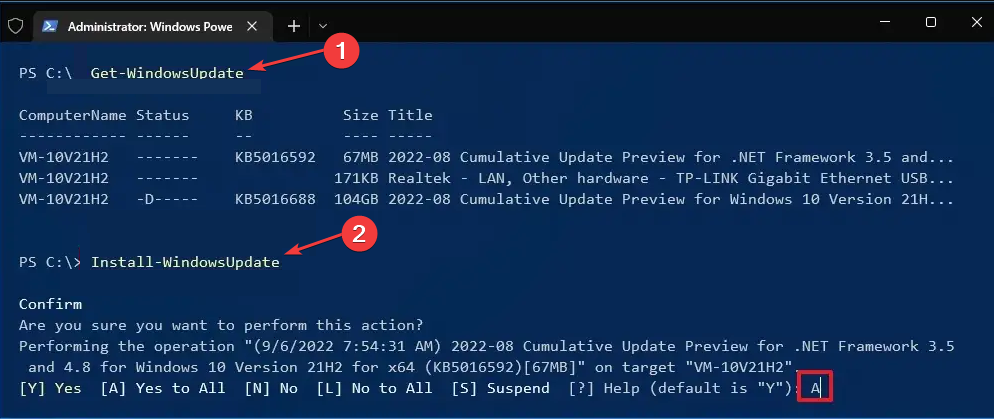
Here are the three steps to run Windows Update through PowerShell:
-
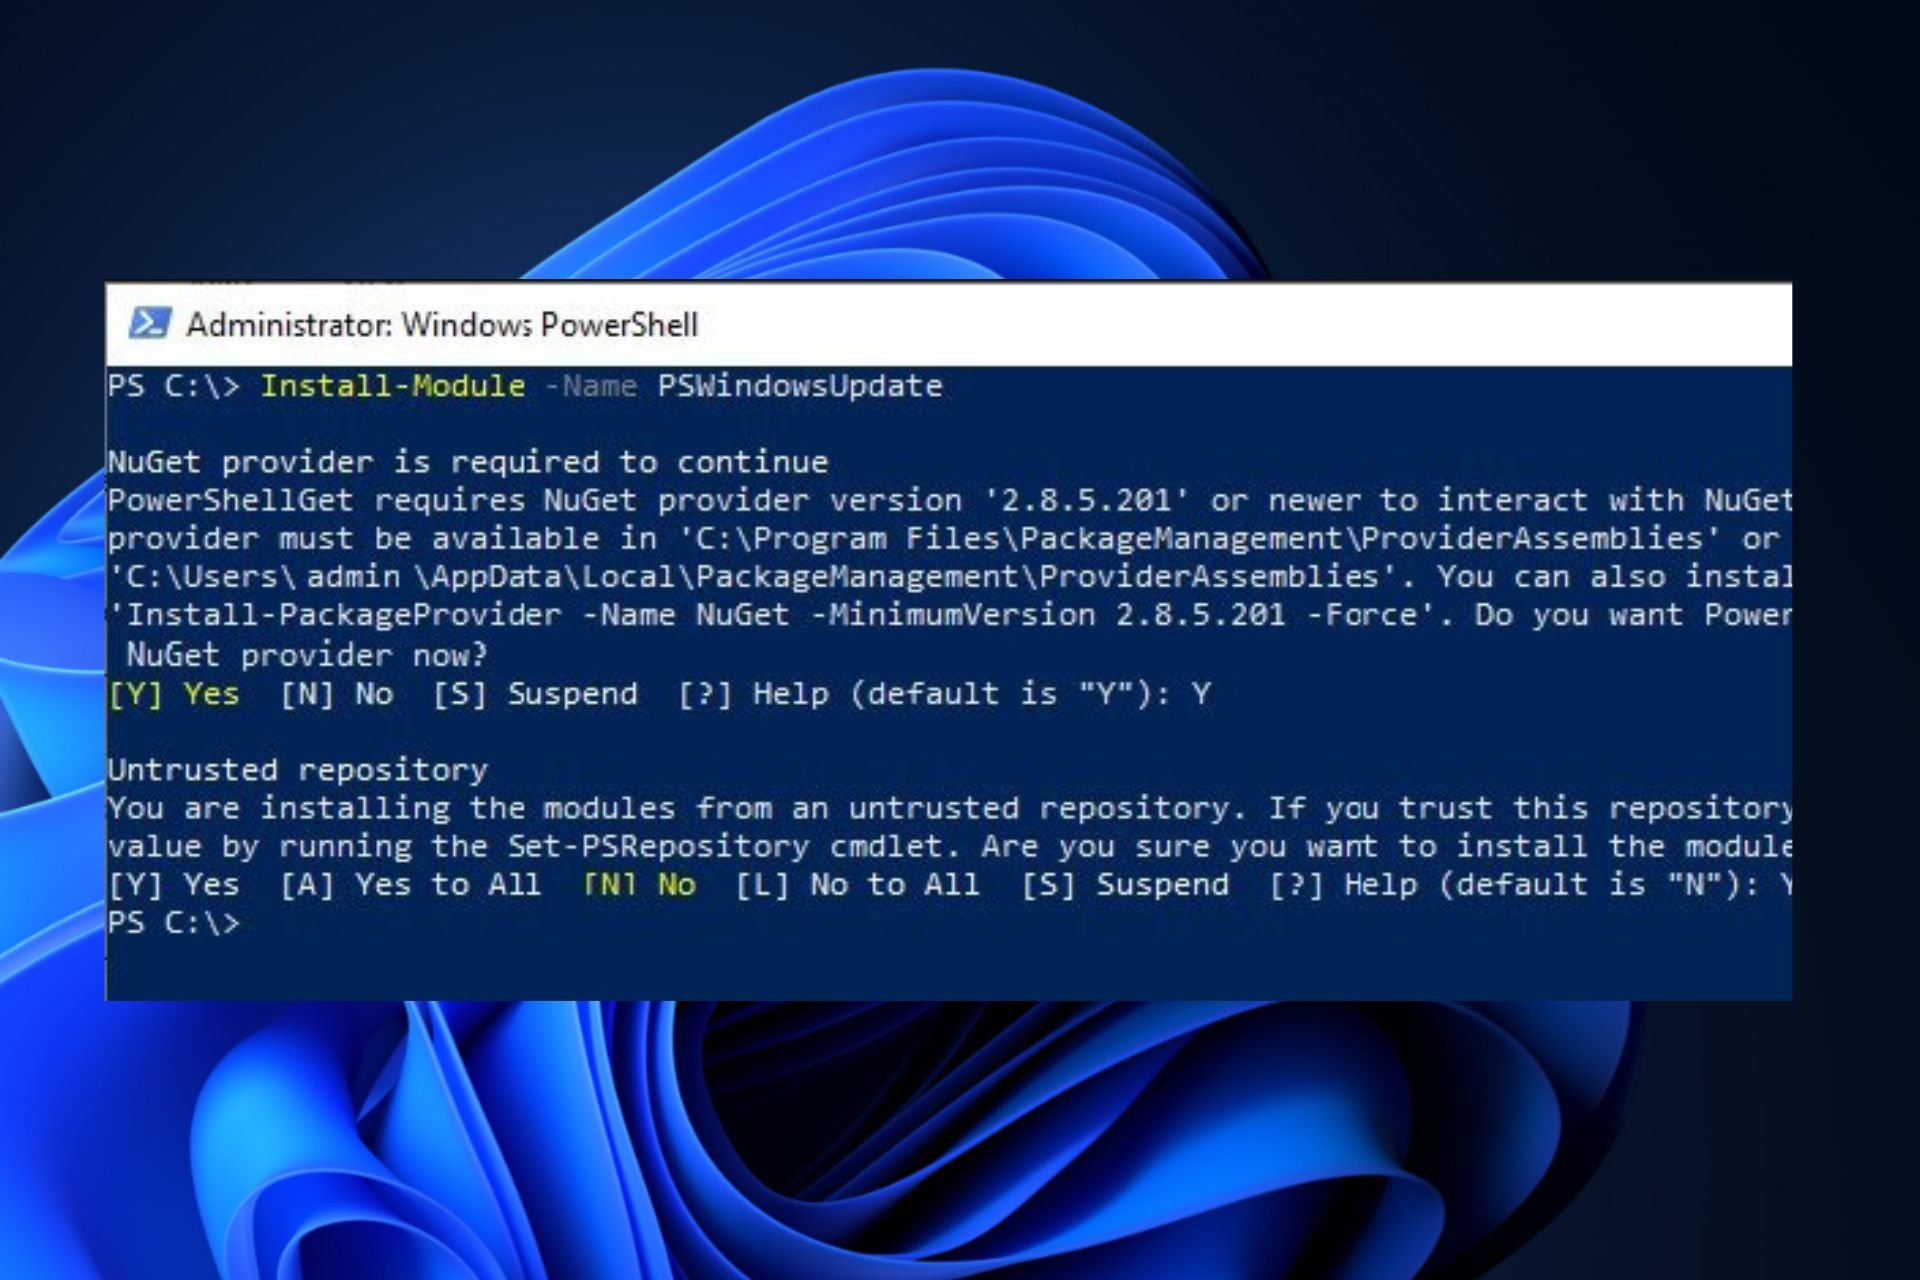
Run the following command to install PSWindowsUpdate:
Install-Module PSWindowsUpdate
Install PSWindowsUpdate module -
Now check for available updates by running this cmdlet:
Get-WindowsUpdate
Check for available Windows updates -
Now install these updates using this cmdlet:
Install-WindowsUpdate
Install available Windows updates


The above-mentioned commands will only install the Windows updates. If you want to update other Microsoft products as well, you’ll need to enable the Microsoft Update Service as well. It’s pretty easy to enable it using PowerShell:
Add-WUServiceManager -MicrosoftUpdateIf you want to automatically restart your computer after installing all the updates, you can run the following command instead:
Install-WindowsUpdate -MicrosoftUpdate -AcceptAll -AutoRebootDeploy Updates on Remote Computers
The PSWindowsUpdate PowerShell module can also be used to deploy Windows updates on remote computers. There are two commands involved in this process:
-
Create a list of computers and pass the list as a variable string using the computer names:
$computer = "comp1, comp2, comp3"You can add more computers to the string separated by commas. Replace “compX” with the name of each computer.
-
Run the following command to start checking for Windows updates on remote computers:
Invoke-WUJob -ComputerName $computer -Script {ipmo PSWindowsUpdate; Install-WindowsUpdate -MicrosoftUpdate -AcceptAll -AutoReboot} -RunNow -Confirm:$false | Out-File "serversharelogs$computer-$(Get-Date -f yyyy-MM-dd)-MSUpdates.log" -Force
Install Specific Updates Only
If you already know the article KB no. of the specific update you want to install, you can run the following command to install that particular update(s) only:
Get-WindowsUpdate - KBArticleID "KB5002324", "KB5002325" -InstallReplace the KB number with the one you want to install.
Prevent Specific Windows Updates from Installing
You can prevent specific updates from installing on your computer by replacing the KB numbers in the following command in PowerShell:
Install-WindowsUpdate -NotKBArticle "KB5002324, KB5002325" -AcceptAllRun Windows Update from Command Prompt (Command-Line)
Windows Update can also be run through legacy Command Prompt to get the latest updates. The only limitation of running Windows Update through the CMD is that it won’t show any progress. Only results are shown when the process is complete. Let’s see how to run it:
RestartDevice – Restart Windows after updates are installed
ScanInstallWait – Check for updates, download available updates, and install them
-
Launch Command Prompt with administrative privileges.
-
Run the following command to check for new updates:
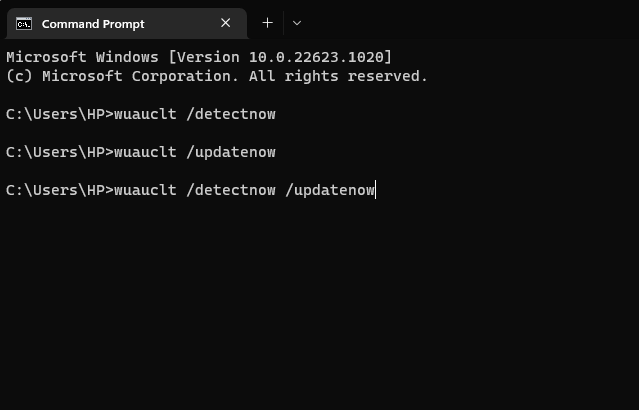
wuauclt /detectnow -
Run the following command to install new updates:
wuauclt /updatenow
Since the command prompt does not show any progress, a better approach would be to check and install updates at the same time. Here’s the command for this:
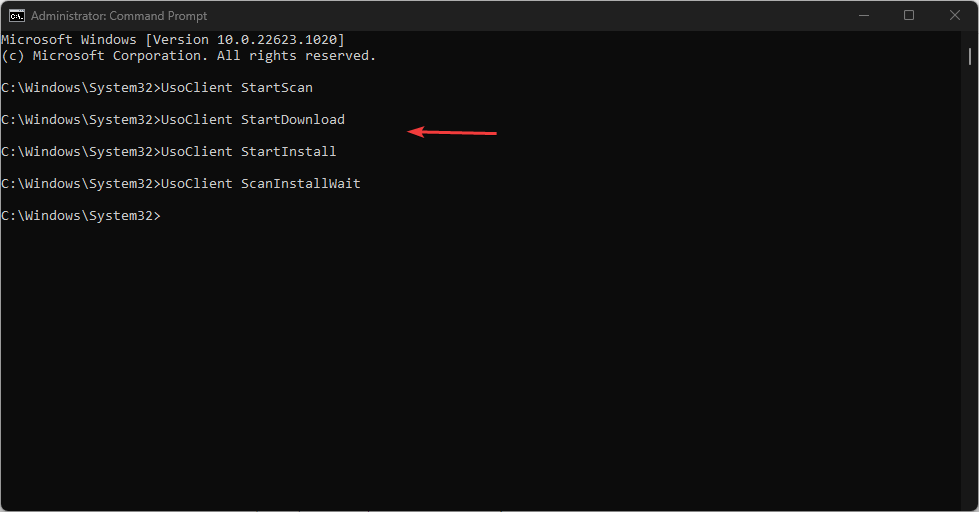
wuauclt /detectnow /updatenowThe above-mentioned command will work in all versions of Windows, including Windows 7 and Windows Server 2008 R2. But if you are using Windows 10 or Windows Server 2016, you can use the “UsoClient” command which has more options than “wuauclt.” You can run UsoClient with the following switches:
- StartScan – Start checking for updates
- StartDownload – Start downloading updates
- StartInstall – Start installing downloaded updates
Check for Windows Updates using Windows Settings
To check for new updates and configure your Windows Update settings, follow the steps below:
-
Navigate to:
-
In Windows 11:
Settings app >> Windows Update
-
In Windows 10:
Settings app >> Update & Security >> Windows Update
-
-
Click “Check for updates.”

Check for pending updates

How to Force Windows Update to Download Already Downloaded Updates
There will be times when the updates become corrupted or for other reasons, you just don’t want to install the downloaded updates. In that situation, you can easily delete the already-downloaded updates, which will force Windows Update to run again and check for and download the updates again.
The only caveat in this situation is that the update must not have been installed on your computer. If the update is already installed, Windows will detect it as installed and will not download it again. In that case, you will need to uninstall the update first and then force Windows Update to run again.
If you want to force Windows Update to re-download all the updates again, you can do this using the steps below.
-
Navigate to the following directory using File Explorer:
C:WindowsSoftwareDistributionDownload
This folder contains all the Windows update files that Windows OS is currently downloading or recently downloaded and installed.
-
Select and delete all the files from the “Download” folder.

Delete all files in the “Download” folder -
Run Windows Update again using the above-mentioned methods.
This will force Windows Update to check for the same updates and download them again. The download and install process for new updates is completely automated. You don’t need to do anything during the download and installation process.

Manage Windows Updates using Wuinstall Command Line Tool
Using WuInstall, IT Administrators can automate Windows updates. Wuinstall can be used to enforce Windows Updates inquiries, downloads, and installations at times when they deem them appropriate, enabling them to make the entire update process more controlled and user-friendly.
WuInstall is a strong and flexible system management tool that can be used in a WSUS-based or standalone environment. To download the latest updates using Wuinstall, you will need to download and install Wuinstall first. Follow the steps below:
-
Go to http://www.wuinstall.com/ and install the latest free version of Wuinstall on your computer.
-
Open an elevated Command Prompt.
-
Run the following cmdlet to search for the latest available Windows updates:
wuinstall /searchThis will not only look for new updates but will also list them in the command window.
-
To download the updates, run the following command:
wuinstall /downloadThis will download all the available updates from Microsoft servers.
-
To install the updates, run the following command:
wuinstall /install
There are a few more switches that you can use with the install command:
- /quiet – will install updates without showing anything.
- /disableprompt – Disable any input from Windows.
- /autoaccepteula – Auto-accept any agreement during the update installation.
- /rebootcycle – Install updates on the next computer reboot.
How to Fix Corrupted Windows Update
Sometimes Windows Update files get corrupted and the user is not able to download the files again or install the corrupted update files. In that case, we need to run a DISM command to fix the corrupted Windows Update. Here are the steps:
-
Launch the Command Prompt.
-
Run the following cmdlet:
dism.exe /Online /Cleanup-image /Restorehealth
After successfully running this command, try force downloading the updates again and the Windows Update should start working again.
Other things you can do with Windows Update:
Disable or bypass pending updates on Windows 10 (and Windows 11)
How to prevent a specific update from installing while allowing all others
How to view and save a list of installed updates in Windows 10 (and Windows 11)
View updates sizes in Windows 10 (and Windows 11)
Download any Windows 10 cumulative update
How to disable automatic restart after installing the updates
How to add update packages to Windows 10 ISO image
How to disable automatic updates
How to limit Windows Update bandwidth usage
How to install updates offline using CAB and MSU files
Hopefully, this will be useful in situations where you want to automate certain Windows functions. What other purposes do you want to use command line options to run Windows Update?
Also see:
Usman Khurshid is a seasoned IT Pro with over 15 years of experience in the IT industry. He has experience in everything from IT support, helpdesk, sysadmin, network admin, and cloud computing. He is also certified in Microsoft Technologies (MCTS and MCSA) and also Cisco Certified Professional in Routing and Switching.
Windows Updates can be run from PowerShell and Command Prompt in Windows 11/10. In this article, we will be checking out how to do it. Windows Update is one of the most highlighted features of Windows 10. Because with the release of Windows 10, Windows was offered to the customers as a service rather than a product. Under the scenario of Software as a Service, this led to the Windows Updates on Windows 10 being on by default and without an option for anyone to disable it.
Now, while some criticized this move by Microsoft, ultimately this is a step towards the customer’s greater good. Because Windows Update helps the users stay secured against all kinds of threats and provide them with the latest and the greatest from Microsoft. So, for those who appreciate this service, today we are going to talk about another way to run these updates.
The following methods will be carried out to run Windows Update from Command Line on Windows 11/10-
- Using Windows Powershell.
- Using Command Prompt.
1] Run Windows Update using Windows Powershell
Running Windows Updates on Windows Powershell will require you to manually Install the Windows Update module, Get Windows Updates downloaded and Install Windows Updates. And for this, open Windows Powershell by searching for Powershell in the Cortana search box and run it with Administrator level privileges.
Install the PSWindowsUpdate Module
Type in,
Install-Module PSWindowsUpdate
to install the Windows Update module for Windows Powershell.
Check for Updates
After that,
Get-WindowsUpdate
to connect to the Windows Update servers and download the updates if found.
Install Updates
Finally, type in,
Install-WindowsUpdate
to install the Windows Updates downloaded on your computer.
Check for Microsoft Updates
Add-WUServiceManager -MicrosoftUpdate
Install specific updates only
Get-WindowsUpdate -KBArticleID "KB1234567" -Install
Hide specific Update
Install-WindowsUpdate -NotKBArticle "KB1234567" -AcceptAll
Skip Updates belonging to specific categories
Install-WindowsUpdate -NotCategory "Drivers","FeaturePacks" -AcceptAll
Related: Command-line switches to deploy Microsoft software Update packages
2] Run Windows Update using Command Prompt
Command Prompt on Windows Operating Systems exists since a very long time whereas Windows Powershell is comparatively new. Hence, it has similar capabilities to run Windows Updates, but the highlighting point here is that you do not need to download any module for Windows Updates.
First, open Command Prompt by searching for cmd in the Cortana search box and run it with Administrator level privileges.
Click on Yes for the UAC Prompt that you get.
Finally, type in the following commands and hit the Enter key in order to perform the respective operations,

Start checking for updates:
UsoClient StartScan
Start downloading Updates:
UsoClient StartDownload
Start installing the downloaded updates:
UsoClient StartInstall
Restart your device after installing the updates:
UsoClient RestartDevice
Check, Download and Install Updates:
UsoClient ScanInstallWait
It is worth noting that, the Command Prompt commands mentioned above are just meant for Windows 11/10 only.
Related read: How to Update Drivers using Command Prompt.
Hope you find this post useful.
It’s always recommended to regularly update Windows as the updates solve any existing bugs and bring about new features.
Usually, users use the graphical interface on the OS to search for and install updates. However, there are some cases where you may want to run this process from the Command-line (CLI) tools such as Command Prompt and Windows PowerShell.
For instance, you may need to manage updates, especially for other users on a Windows server. Or, you may be creating a script where you need such commands.
There are a few ways to run Windows Update from the command line on a Windows system, which are as follows:
Using Command Prompt
On Windows 10 and 11, Microsoft uses the Update Session Orchestrator Client UsoClient.exe tool for updating your system components.
Previously, it was possible for users to use this program from the Command Prompt to check and install updates. However, in the latest versions, you can only check for updates. Regardless, you can try using the steps below and check if they work out for you:
- Open Run by pressing Win + R.
- Type
cmdand press Ctrl + Shift + Enter to open the Elevated Command Prompt.
- Enter the following commands depending on the corresponding operations:
UsoClient StartScan– Start the scan for available updatesUsoClient StartDownload– Download but not install the updates or patches you scanned for.UsoClient StartInstall– Install all downloaded updates.UsoClient ScanInstallWait– Scans, downloads, and installs the updatesUsoClient RestartDevice– Restarts your computer to complete the update installationUsoClient ResumeUpdate– Resumes the installation of update after rebootUsoClient RefreshSettings– Refresh the update settings to the default


You can also check which UsoClient commands you can use on your system by using the following command on the Elevated Windows PowerShell:
- Open Run.
- Type
powershelland press Ctrl + Shift + Enter to open the Elevated Windows PowerShell. - Copy and paste the following command and press Enter:
Get-ScheduledTask -TaskPath 'MicrosoftWindowsUpdateOrchestrator' | Select-Object @{Expression={$_.TaskName};Label="TaskName"}, @{Expression={$_.Actions.Execute + ' ' + $_.Actions.Arguments};Label="CommandLine"}

On older Windows versions, you could use the Windows Update Agent WUAUCLT.exe to update Windows.
First, you need to enable Automatic Updates with scheduled installation through the Group Policy. Otherwise using the Windows Update Agent from Command Prompt won’t work. To do so,
- Open Run and enter
gpedit.mscto open the Local Group Policy Editor. - Go to Computer Configuration > Administrative Templates > Windows Components > Windows Update.
- If it doesn’t contain policies but expands to further folders, go to Manage end user experience.

- Double-click on Configure Automatic Updates.
- Check Enabled and set Configuring automatic updating to 4 – Auto download and schedule the install.
- You can choose any schedule you want. Then, click Apply and OK.


Then, you can use the following commands on Prompt to update Windows using the Update Agent:
wuauclt /detectnow– Scans for available updateswuauclt /updatenow– Installs the available updateswuauclt /detectnow /updatenow– Combines both the processes above

Microsoft didn’t exactly create the WUAUCLT.exe and UsoClient.exe tools for end users. So you won’t get any additional information for whether the commands are actually running when you use them on the Command Prompt. The Prompt will show that these commands have finished running even when they are still operating in the background.
You have to estimate the time it may take and wait until then. So, instead of this method, we recommend using Windows PowerShell as you can get more detailed information during the process.
Using PowerShell
Windows PowerShell is a very powerful Windows CLI with which you can do everything that Command Prompt allows and many more. Naturally, you can use it to run windows updates. Here’s what you need to do:
- Press Win + R to open Run.
- Type
powershelland press Ctrl + Shift + Enter to open the Elevated PowerShell. If you use PowerShell 7, you can open it by enteringpwshinstead ofpowershell - Enter the command below to download and install the Windows Update Module, which you need to run the actual commands for updating Windows:
Install-Module PSWindowsUpdate - On the prompts, type
Yand press Enter. - After installing it, enter the following update commands to perform the corresponding actions:
Get-WindowsUpdate– Scans for available updates and displays themInstall-WindowsUpdate– Downloads and installs all the available updatesGet-WindowsUpdate -AcceptAll -Install -AutoReboot– Downloads and installs all the available updates while automatically rebooting the PC after the installation if necessary.Get-WindowsUpdate -Install -KBArticleID 'KB5017859'– Install the KB5017859 update. You need to replace the update ID ‘KB5017859’ with the KB Article ID of the available updates from theGet-WindowsUpdatecommand.


Using Visual Basic Script
While the above command line methods can run Windows Update, they are not interactive and user-friendly. Microsoft’s platform contains some Visual Basic Script (VB script) to run an interactive update process from the CLI, especially as a sample for developers. However, you can also use this script for your purpose.
- Open Run and enter
notepadto launch this text editor. - Then, open a web browser and go to the following Microsoft pages depending on whether you want to install a particular update or all updates at once:
- All Available Updates
- Specific Updates
- Copy the script from the page to the notepad you just opened.
- Press Ctrl + S to save the file.
- Set Save as type to All files and File name to
UpdateInstall.vbs. You can use any name, but remember to use the.vbsextension. - Save it on any location by navigating there and clicking on Save.

- Then, open the Elevated Command Prompt.
- Enter the following command while replacing the path:
cscript “<Path to the folder>UpdateInstall.vbs”
- You can also right-click on the script on your file explorer and select Copy as path. Then, paste it after typing
cscriptand the space to avoid manually typing the full path. - Then, follow the on-screen instructions on the CLI.


As you know, one of the most highlighted features of Windows 10 is Windows Updates. It was offered to the customers as a service rather than a product with the release of Windows 10 under the scenario of Software as a Service which led to Windows Updates being set by default on Windows 10 and without an option for any users to disable it. Although not all users are happy with what Microsoft did, this is an ultimate step towards the greater good of all its customers since Windows Updates helps users in keeping their computers secured against all kinds of threats as well as provide them with the greatest and latest updates from Microsoft. So if you are one of those users who approved of the Windows Updates service, then read on as this post will guide you in running Windows Updates from Command Line either via Command Prompt or Windows PowerShell. For the complete set of instructions, refer to the options given below.
Option 1 – Run Windows Update via Command Prompt
Command Prompt in the Windows operating system exists for a very long time now compared to the comparatively new Windows PowerShell. That’s why it has similar capabilities to run Windows Updates. However, the highlighting point here is that you don’t have to download any module for Windows Updates. To get started running Windows Updates using Command Prompt, refer to the steps below.
- First, type “cmd” in the Cortana search box, and from the search results, right-click on Command Prompt and select the Run as Administrator option to open it with Administrator privileges.
- If a User Account or UAC prompt appears, just click on Yes to proceed.
- Next, type in the commands listed below, and don’t forget to tap Enter right after you type each one of them.
- UsoClient StartScan – use this command to start checking for updates.
- UsoClient StartDownload – use this command to start downloading updates.
- UsoClient StartInstall – use this command to start installing the downloaded updates.
- UsoClient RestartDevice – use this command to restart your computer after you install.
- UsoClient ScanInstallWait – use this command to check, download and install updates.
Note: Keep in mind that the commands in Command Prompt listed above are only meant for Windows 10. On the other hand, if you are using an older Windows version, you can try using the following commands instead:
- wuauclt /detectnow – use this command to start checking for updates.
- wuauclt /updatenow – use this command to start installing the updates detected.
- wuauclt /detectnow /updatenow – use this command to check, download and install updates.
Option 2 – Run Windows Updates via Windows PowerShell
If you run Windows Updates in the Windows PowerShell, it will require you to install the Windows Update module manually. Hence, you have to get the Windows Updates downloaded and install Windows Updates.
- Search for PowerShell in the Cortana search box and then run it with administrator privileges.
- Once you’ve opened the Windows PowerShell, type the following command and hit Enter.
- Install-Module PSWindowsUpdate – use this command to install the Windows Update module for Windows PowerShell.
- Get-WindowsUpdate – use this command to connect to the servers of Windows Update and download the updates if found.
- Install-WindowsUpdate – use this command to install the Windows Updates you’ve downloaded to your computer.
Advanced System Repair Pro
One-click automated PC repair solution
![]()
With Advanced System Repair Pro you can easily
DOWNLOAD
Advanced System Repair Pro is compatible with all versions of Microsoft Windows including Windows 11
Share this article:
You might also like
Why combining hard drives with storage spaces? Ok, I will admit it, I am a modern digital hamster when it comes to digital goods. I like to collect stuff and more than anything else I like to have all of that at the tip of my fingers. And how digital goods grow in size themselves (movies on Blu-ray are like 50GB each) and the collection grows in size single hard drive is starting to be completely obsolete when it comes to storage.
Sometimes we will need large storage for these kinds of personal collections, sometimes we will need it for work reasons. Whatever your reason might be Windows 10 is offering us a solution via Storage spaces.
Storage spaces is an integral part of Windows and it is meant as a tool to provide you with a RAID environment without a RAID controller. Of course, combining multiple hard drives via storage paces instead of RAID will not be so fast or stable but for home use of storing a large quantity of data is perfectly enough.
With Storage Spaces you will also have an option to reduce some space for increased security of data loss if by any chance one of your HDD fails.
How to Create a Storage Space
To create storage space in Windows, press ⊞ WINDOWS + R to open the run dialog.
 In the run box type in Control Panel and press ENTER
 In Control Panel find Storage Spaces and left-click on it.
 Once storage spaces open, left-click on Create a new pool and storage space
 Once you click on create new, you will be greeted with a list of hard drives you can use for this operation.
 Please note that all hard drives you choose will be completely erased and formatted and then assign a single drive letter. Click on Create pool.
 You will find yourself in new storage options where you can assign a drive letter, give storage space a name, etc.
Storage spaces types
One thing I would like to focus on here is resiliency type, when you expand the resiliency type drop-down menu you will see 4 options inside. Simple, Two-way mirror, Three-way mirrors, and Parity.
Simple: If you choose Simple as an option, you will have maximum hard drive space but no resiliency at all, meaning that if by any chance any of your hard drives malfunction, you are losing your data from that drive completely.
Two-way mirror: This option will save your data if one of your drives fails but you need at least 2 drives and storage space will be limited since some of it will be a safe backup option for the case of a drive failure. However if one of your drives fails, you can replace it in a second and keep on working as nothing happened.
Three-way mirror: This option similar to the previous one will offer you safe data-keeping from a hard drive failure. this option will save your data even if 2 hard drives malfunction but it will require having 5 of them connected in order to be able to choose this option.
Parity: Maybe the most popular option among people who want to have 2 or 3 drives merged but do not want to lose too much space of the two-way mirror option. It offers some protection and it does not take so much space as two-way does, let us say it is a kind of win-win situation.
Conclusion
I personally go for simple and have an important backup on optical drives but only for reason I could use more space, know that this way is requiring from me to always have a backup in optical media and that I will need to restore all of it back if even one HDD fails which could take time. But if this way is ok with you, go for it, you will have more space to use.
Read More
There are not many applications for creating mind maps, even fewer that are completely free, so it is with great pleasure to present you with Freeplane. Freeplane is mind mapping, Knowledge Management, and Project Management software completely free and open source.
 You can it here: https://sourceforge.net/projects/freeplane/files/latest/download
And from developers git page and I quote:
Freeplane is a free and open-source software application that supports thinking, sharing information, and getting things done at work, in school, and at home. The core of the software is tools for mind mapping (also known as concept mapping or information mapping) and using mapped information. Freeplane is written in Java using OSGi and Java Swing. It runs on any operating system that has a current version of Java installed. It can be run locally or portably from removable storage like a USB drive.
We use Github only as of the main code repository, all other project parts are hosted at the source forge. So all bugs and feature requests are managed in a separate issue tracker. There is a drop-down box for selecting different types of issues. Other sources of inspiration are our new forum and old forum. Some users write their ideas there. Every contributor and every team member freely decides what task he is going to work on, but for making the best decision we can communicate our self-set goals in the above forum. It is supposed to enable early discussions and community feedback and also to motivate you and other people.
How to start hacking and contributing
People new to the project can start with implementing a new small feature or doing some refactoring or documentation and not with the bug fixing. Not all bug reports seem to be equally important, and if there are important bugs they usually get fixed by people who broke the functionality. I think you should first get there :).
For internal developer discussions, there is a private mailing list. It is held private to avoid spam mails. If you want to be subscribed let us know what mail address you are going to use with it. This list is the preferred way to ask all code-related questions because they usually get answered soon and by the most competent team member.
Some documentation for new developers is available in Freeplane wiki https://www.freeplane.org/wiki/index.php/How_to_build_Freeplane and also here and here. It is written for new guys and should also be maintained by the new guys to stay up to date.
Looking forward to any questions and contributions,
Freeplane development team
Read More
Error Code 0x80070057 – What is it?
Error code 0x80070057 occurs when Windows users are having problems installing updates on their machines. The error code may result due to issues affecting Windows Update, for instance, problems with system files or settings that can be accessed or modified using the registry in Windows. Error code 0x80070057 affects multiple versions of the Windows operating system including Windows 10. Common symptoms manifested when this error code and other update error codes occur include the following:
- Inability to complete the installation of updates via Windows Update
- Presence of error code message box
Error Causes
Update error codes like error code 0x80070057 occur when there are issues related to system files, programs or malicious software is present on one’s machine. To combat these issues, users may need to implement manual repair procedures, depending on the specific error code present on their device.
Solution
 Further Information and Manual Repair
 Further Information and Manual Repair
Windows users can fix error code 0x80070057 by manually repairing or deleting subkeys and values within the Windows registry. This enables Windows Update to function as the proper modification of settings and other information present in the registry can fix problems associated with certain error codes.
The manual repair procedures also enable users to address specific problems on the devices that may not be fixed through the use of other methods.
Method One: Back-Up Registry in Windows
The Windows registry contains information regarding applications installed on the version of Windows you use on your device. This information as well as settings related to hardware are all accessible to users and can be useful when combating problems like error code 0x80070057.
However, users will need to be very careful when making modifications within the registry in Windows. This is due to the fact that errors made while accessing the registry can lead to serious issues on your PC. Backing up your registry before you modify it is crucial since it will provide protection against any problems that may arise if you make an error. This is the first step in resolving error code 0x80070057. Follow the steps below to back up your registry properly.
- Step one: Type regedit.exe in the search box near the Start button.
- Step two: Type the appropriate password or provide confirmation if you are prompted to do so
- Step three: Locate Registry Editor
- Step four: Select registry key or subkey that you want to back up
- Step five: Click File > Export
- Step six: In the Export Registry File dialog box, choose a location where you will save the backup copy
- Step seven: Name the backup file then select Save.
In the case of fixing error code 0x80070057, the registry file or subkey you will need to back up relates to this: HKEY_LOCAL_MACHINE. This contains configuration details or information related to your machine regardless of the user. Also note that the registry, once you have created a backup file, will be protected, thus enabling you to move to the manual method mentioned below.
Method Two: Make Changes to the Windows Registry
The execution of modifications to the registry can be a complex procedure, especially if you are an average Windows 10 user who lacks technical knowledge. Thankfully, even non-technical users can access the solutions they need by simply following the instructions provided in this article.
You may also contact a Windows repair technician as well, in case you have trouble implementing the steps mentioned for modifying your Windows registry or if other problems arise while you are proceeding with these instructions.
Step one: Access the Windows Registry Editor by typing regedit.exe in the search box near the Start button.
Step two: Type the appropriate password or provide confirmation if you are prompted to do so
Step three: Locate Registry Editor
Step four: Enter the following:
[HKEY_LOCAL_MACHINESOFTWAREMicrosoftWindowsUpdateUX] «IsConvergedUpdateStackEnabled»=dword:00000000
[HKEY_LOCAL_MACHINESOFTWAREMicrosoftWindowsUpdateUXSettings] «UxOption»=dword:00000000
After making these modifications in the Windows registry, restart your machine. You can then check Windows Update to see if the problem has been resolved. If the modifications to the registry have proven successful, you will no longer see the error code 0x80070057 message box. You will also be able to complete all updates via Windows Update.
Method Three: Download an Automated Tool
If you wish to always have at your disposal a utility tool to fix these Windows 8 and other related issues when they do arise, download and install a powerful automated tool.
Read More
Photoviewer.dll Error — What is it?
Photoviewer.dll is a shared library for SampleRes.dll and x3daudio1_1.dll in computers installed with Microsoft Windows 7, 8, Vista, and XP including 32 bit and 64 bit operating systems. Photoviewer.dll is associated with 1728000 system files.
The Photoviewer.dll error occurs when you upgrade your Windows operating system to a new version like Windows 7 or 8 on which this shared library is used. Once you upgrade the Windows and you right-click on JPG images, the Photoviewer.dll error pops up.
This error message is displayed as the following:
- Photoviewer.dll missing/not found
- Photovewer.dll entry point not found/application can’t initiate
Solution
Error Causes
Photoviewer.dll error can pop up due to several reasons. These include:
- Modification of .dll files during Windows installation
- Infection of Trojan virus
- Photoviewer.dll missing /broken
- Photo Gallery was earlier your default image editor before you upgraded your system
It is advisable to repair this issue timely to avoid inconvenience and serious PC threats especially if the cause of this issue is viral infection or registry damage.
Further Information and Manual Repair
Here are some of the best ways to help you resolve Photoviewer.dll error on your system:
1. Rebuild the Windows Photo Gallery
If you were previously using Vista and then you upgraded your system to Windows 7, then try this:
- Go to the Start menu, click on the control panel and go to the folder options.
- Then select the view tab option. Here you’ll find the Advanced setting window, select the show hidden files and folders tab.
- Now click Ok to continue. Navigate to the following folder( %user% is the name of the account with the problem) C:UsersusernameAppDataLocalMicrosoftWindowsPhoto Gallery.
- Then copy files to another location as a backup and delete them from the Windows Photo directory. Once the files have been deleted, try to start Windows Photo Gallery again. If this seems difficult, install Windows Photo Gallery application from the internet on your system.
2. Repair Broken Photoviewer.dll files and Remove Malware
Another way to fix the photoviewer.dll error is to download Restoro.
This is an advanced, user-friendly, and multi-functional PC fixer smoothly integrated with a registry cleaner. By running it on your system you can resolve all Photoviewer.dll error causes in seconds.
Restoro has an easy-to-use interface and a neat layout. It is safe, efficient, and bug-free. In addition to this, it is compatible with all Windows versions.
The registry cleaning utility is deployed with an automated algorithm that scans your entire PC and detects Photoviewer.dll file errors in seconds.
It fixes damaged, misconfigured, and broken Photoviewer.dll files, clears up disk space from unnecessary and obsolete files like the files from the uninstalled Windows programs which could be generating Photoviewer.dll error on your system.
It repairs the registry and modifies the registry keys to their correct configuration thus repairing the Photoviewer.dll error on your PC.
The powerful privacy error detector is integrated with all the properties and characteristics of an anti-virus. It scans for malware and viruses like Trojans and removes them from your system right away.
Besides these utilities, other features integrated into this repair tool include a system stability scanner and Active X and class error detector. It resolves Photoviewer.dll error while optimizing your computer’s speed and performance.
Click here to download Total System Care on your system to resolve the Photoviewer.dll file error today!
Read More
As you know, storage devices are an important part of the computer system for porting, saving, and extracting data files. And for you to differentiate between storage devices on your computer system, each one of the storage devices is labeled with a unique number referred to as Disk Signature for identification.
The unique disk identifier is stored as a part of the MBR or Master Boot Record. Disk signature is used by operating systems in order to identify and set apart different data storage devices and hard disk drives in the computer for data access.
These days, Disk cloning has become a regular practice in upgrading to larger hard disk drives. Drives are cloned in order to produce a similar copy to use both the original drive and cloned copy together. Moreover, lots of virtualization tools are being used to virtualize the physical hard disk drives to create virtual hard disk drives and several virtual machine clones that are created with the existing virtual hard disk drives. And since these are identical copies, chances these copies may have identical disk signatures. As a result, when you use both disks that have identical signatures at the same time you run into the Disk Signature Collision problem. This kind of problem does not often occur as the Windows system does not really allow two disks to function simultaneously when they have the same disk signature.
When you encounter a Disk Collision problem in your Windows 10 computer, you may see the following error messages:
- The boot selection failed because a required device is inaccessible
- The disk is offline because it has a signature collision
- This disk is offline because it has a signature collision with another disk that is online
You can fix the disk collision problem by changing the disk signature which you can achieve using the command line utility diskpart in Windows PowerShell or Command Prompt or using Windows Disk Management utility.
To fix the disk collision problem, you can make use of the command-line utility called diskpart in Windows PowerShell or Command Prompt to view and change the signature, or can make use of Master Boot record in the Windows Registry. You can also make use of Windows Disk Management Utility to change the signature. Simply follow the given options below to change the disk signature either way.
Option 1 – Change Disk Signature via Diskpart
- Type “command prompt” in the Windows Search bar and then right-click on the related search result and select the “Run as administrator” option.
- After that, type the “diskpart” command and hit Enter to open Diskpart.
- Next, type the “list disk” command to display all the disks available in the system.
- Next, take note of the problematic disk number with the status Offline from the list and then type the “Select disk x” command where x is the offline disk to select the offline disk. For instance, if you type “select disk 1”, it will display the “Disk 1 is now the selected disk” message.
- Now type the “Uniqueid disk” command to display the disk signature and to change the disk’s signature and set the disk online, type the “unique disk ID= (New signature)” where (New signature) is the new ID in hexadecimal. For instance, you can set the new id as “unique disk ID= 1456ACBD”.
Note: If you have given the wrong format ID, the command prompt will display the following error:
“The specified identifier is not in the correct format. Type the identifier in the correct format: in hexadecimal form for an MBR disk or as a GUID for a GPT disk.”
- After you’re done, the disk will be online, and then restart your computer.
Option 2 – Change Disk Signature via Disk Management Utility
- Tap the Win + R keys to open the Run dialog box and then type “diskmgmt.msc” and hit Enter or click OK to open Disk Management.
- Next, right-click on the disk that is marked as Missing or Offline.
- After that, select the Online command from the drop-down menu.
- Then from the selecting option Online, Windows will generate a new disk signature.
Read More
As you know, each time you log out of your Windows 10 computer, it will take you to the login screen where you can switch users or log back in. But there are instances where Windows 10 remains stuck on the signing out screen, along with a blue spinning circle and all you can see is the process of your computer signing out, however, it does not progress and only gets stuck there. Thus, in this post, you will be guided on how you can resolve such an issue on your Windows 10 computer.
So if you are one of the users who experience the same problem, there are several fixes you can check out if your computer is stuck on the signing out screen with a blue spinning circle. You can try to force shutdown your computer or troubleshoot the problem in a Clean Boot State. You could also try to check the status of the User Profile Service or repair User Profile, as well as run System Restore. For more details, refer to each one of the suggestions provided below. But before you troubleshoot the problem, make sure that you are logged in to your computer as an administrator.
Option 1 – Try to force shutdown your computer
The first thing you can do is to force reboot your computer as this simple fix could help in fixing the problem. This option is quite simple, just make sure that before you do it, you have to save all your work.
- First, turn on your computer and press and hold the power button for at least 30 seconds. You might notice the screen flashing or making any changes, just ignore it.
- After that, plug out and plug in your computer and automatically turn it on.
- Once done, check if the issue is now fixed or not.
Option 2 – Put your computer in a Clean Boot State
It is possible that some third-party application is causing your computer to get stuck in the signing out screen. So you can try putting your computer in a Clean Boot State and see if it fixes the problem.
- Log onto your PC as an administrator.
- Type in MSConfig in the Start Search to open the System Configuration utility.
- From there, go to the General tab and click “Selective startup”.
- Clear the “Load Startup items” checkbox and make sure that the “Load System Services” and “Use Original boot configuration” options are checked.
- Next, click the Services tab and select the “Hide All Microsoft Services” checkbox.
- Click Disable all.
- Click on Apply/OK and restart your PC. (This will put your PC into a Clean Boot State. And configure Windows to use the usual startup, just simply undo the changes.)
- Once your computer is in a Clean Boot State, you should now be able to sign out or sign in without any problem.
Option 3 – Try checking the status of the User Profile Service
If forcing your computer to shut down or putting your computer in a Clean Boot State didn’t fix the problem, you can try to check the status of the User Profile Service since it is the one responsible for loading and unloading user profiles. Thus, if this service is disabled or stopped, you will no longer be able to sign out or sign in successfully.
- Tap the Win + R keys to launch the Run utility and type “services.msc” in the field and hit Enter to open the Services Manager.
- From there, look for the User Profile Service and make sure that its Startup Type is set to Automatic and that its status is “Started”.
- Once done, exit the Services Manager and see if the issue is resolved.
Option 4 – Try to repair your corrupted profile via Registry
In this second option, you can try to repair the corrupted profile using the Registry but before you proceed, make sure to create a System Restore Point and then follow the steps below.
- Tap the Win + R keys to open the Run dialog box.
- Then type “regedit” in the field and hit Enter or click OK to open the Registry Editor.
- Next, go to this registry key: ComputerHKEY_LOCAL_MACHINESOFTWAREMicrosoftWindows NTCurrentVersionProfileList
- Once you’ve opened the registry key, you should see a list of all the user profiles on your computer. Now click on each S-1-5 folder and look for the “ProfileImagePath” entry and double click on it to check which user account it is related to. You will see a path like “CUsersACK” where “ACK” is the username.
- You should know which of the user account is corrupted. Just look for a key named “RefCount” and change its Value data to “0” and click OK. And if it isn’t available, simply right-click on the right pane and create it.
- After that, double click on the key named “State” and make sure that the Value data is “0” and click OK.
- Exit the Registry Editor and restart your computer to apply the changes made and then check if it fixed the problem or not.
Option 5 – Run System Restore
- Tap the Win + R keys to open the Run dialog box.
- After that, type in “sysdm.cpl” in the field and tap Enter.
- Next, go to the System Protection tab then click the System Restore button. This will open a new window where you have to select your preferred System Restore point.
- After that, follow the on-screen instructions to finish the process and then restart your computer and check if the problem is fixed or not.
Read More
Recently, a number of Windows 10 users reported an issue wherein they try to print from their PCs but were unable to and got an error message instead that states, “Port in use, please wait”. However, no matter how long they waited, nothing changed and they were still unable to print from their computers.
On the other hand, when some of the users attempted to print wirelessly from their mobile devices, the printing continues which indicates that there is some issue between the computer and the printer. So if you are one of the users who are currently facing this problem, then this post should help.
To fix this issue with your Printer, here are some possible fixes you can try that might work.
Option 1 – Run the Printer Troubleshooter
The first thing you can do to fix the “Port in use, please wait” error is to run the Printer Troubleshooter. This built-in troubleshooter in Windows 10 can help you fix most print issues. It checks if you have the latest printer drivers and then tries to fix and update them automatically. Aside from that, it also checks if you have connectivity issues or if the Print Spooler and the required Services are running fine. To run it, follow the steps below.
- Tap the Win + R keys to open the Run dialog box.
- Next, type “msdt.exe /id PrinterDiagnostic” in the field and click OK or hit Enter to open the Printer Troubleshooter.
- Then click the Next button and follow the next on-screen instructions to fix the issue with the printer.
Option 2 – Try updating the Printer drivers
You might also want to try updating your printer drivers. All you have to do is locate the USB Composite Device. For complete details, follow the steps below.
- First, click the Start button and type “device manager”.
- Then click on the “Device Manager” from the search results to open it.
- From there, look for the USB Composite Device option and right-click on it, and select the Update Driver from the options.
- Restart your PC and then click the “Search automatically for updated driver software” option.
Note: You also have the option to download the latest version of your Printer from the manufacturer’s website.
Option 3 – Try selecting the correct port for your Printer
If the first two options given above didn’t work, then maybe it’s time to select a correct port for your printer since the wrong port has been selected which is why you’re getting the “Port in use, please wait” error.
- Open “Devices and Printers” from the Start search.
- Next, look for your printer from the list of devices and right-click on it, and then select Printer Properties.
- Now go to the Ports tab under the newly opened Properties window and make sure that the port type matches the connection on the list of ports currently in use.
Note: If your printer is using a USB connection then the port should have a USB or DOT 4 in its description but if your printer is using a network connection then it should have the following description:
- WSD
- Network
- IP
And if you notice that there are several listings for the same type of port, you have to change the selection to a different one and then click the OK button to save the changes made.
Read More
TPM or Trusted Platform Module version 2.0 is a must-have if you plan on upgrading your system to Windows 11. So what exactly is TPM and do you have it?
 What exactly is TPM?
 What exactly is TPM?
TPM is a tamper-resistant hardware technology tasked with generating and storing encryption keys inside it for better PC security.
It can be remotely used to authenticate hardware and software by utilizing a unique endorsement key placed into the hardware itself.
This technology can be used for example in BitLocker inside Windows in order to have data on a hard drive encrypted so if the mentioned drive is connected to another computer it would not be able to be accessed since the encryption key is stored in the TPM module.
Microsoft is pushing its agenda that Windows 11 must be and must feel like safety first OS which will protect user data and user information and requiring TPM means that each Windows 11 will be secure so no additional software patches will be required for an extra layer of security.
Windows 11 will assume that each user has TPM encryption enabled and will be built upon that.
Do you have TPM on your computer?
If your computer or hardware has been purchased in 2016 or later there are very high chances that you already have the required technology to run Windows 11.
Unfortunately, many gaming motherboards have not been placing TPM in their boards and you might not have it.
Also, there is the option of you having it but it is turned off in motherboard settings making Windows unable to detect it.
As you can clearly see there are a lot of scenarios around required tech and honestly it is a complete mess.
But lucky for you there are ways to find out do you possess the needed module in order to make an upgrade.
On your current computer on which you would like to make an upgrade in your current Windows OS press ⊞ WINDOWS + R to open the run dialog.
Inside run dialog type in TPM.msc and press ENTER to open Trusted Platform Module Management on Local Computer.
You will immediately receive information do you have the required module.
If everything is fine, you are good to go, however, if it says that compatible TPM cannot be found there is a chance that either you do not have needed hardware or it might be turned off inside motherboard settings.
Check motherboard UEFI
If you have a newer motherboard but Windows utility cannot detect TPM there is a chance that it might be turned off directly on your board.
In order to check this, you will have to boot up your PC into UEFI either by pressing the corresponding key when it is turned ON or from Windows reboot options.
Once you are inside UEFI you need to find security options and see if there is an option to turn ON or enable TPM.
Since every motherboard is different and has different UEFI software we cannot cover all of the permutations and the best we can do is hope that provided information is enough.
You can also visit your motherboard manufacturer to see instructions for your specific case.
Conclusion
TPM itself is generally an OK idea and I can surely see good sides of it but there is this lurking feeling that generally, Microsoft is not really concerned about the security of our data and that the real requirement for this is trying to battle software piracy.
I simply cannot trust company which introduced tons of telemetry tracking through ages and which has done everything in their power to battle non-legal use of their software.
I do not promote piracy but I support free choice and besides, who can tell me what will happen if TPM malfunctions, will I lose all of my data forever?
It is not so uncommon that TPM has malfunctioned in the past and it is only logical to presume it can do it again in the future but this time we will not have the choice not to use it, we will be forced into it.
Read More
Error 1512 — What is it?
Error 1512 is a type of runtime error code. This error may hamper your ability to run and load your desired programs on Windows PC. There are increased chances of runtime error 1512 occurring when system files go missing or get corrupt.
Symptoms of this error code include:
- Slow PC speed
- Window System freeze
Solution
Error Causes
There are several for the occurrence of runtime error 1512. These include:
- Faulty or outdated drivers
- Poor Program installation
- Damaged Windows Registry
- Viruses tampering the system settings/memory
- Broken or incorrect Registry entries
- Damaged Windows registry
Further Information and Manual Repair
To resolve this issue you don’t have to hire a professional and spend hundreds of dollars to get it fixed. Here are some of the best and easy do-it-yourself methods to repair error 1512 on your system in a few minutes.
These methods are very easy to work around and do not require any kind of technical expertise.
Method 1 — Uninstall and then reinstall the Same Program
Sometimes this runtime error may pop up due to poor program installation. In such an event, it is advisable to uninstall the program and then reinstall it again properly. To do so, go to the start menu, and click on control panel.
Now select the program & features option. Here you will find the option Add/Remove Program. Remove the program causing error 1512. Once the program is removed, reinstall it again.
Method 2 — Run an Antivirus Program
Computer viruses are capable of tampering with system settings. Due to this reason you might experience runtime errors like 1512 on your PC. These malicious programs usually enter the system through phishing emails or website downloads.
To resolve the issue, you need to run a powerful antivirus program. An antivirus removes all sorts of malicious programs hiding in your PC like malware, spyware, and malware that are responsible for generating runtime errors.
Method 3 — Update the Outdated Drivers on your PC
If the error still persists, then it is suggested to update outdated drivers. Faulty and outdated drivers can also trigger runtime error 1512. To do this, go to the Device Manager. Here use the Driver update wizard to make updates.
Method 4 — Remove the Invalid Registry Entries and Repair the Damaged Registry
The best way to perform both tasks is to download Restoro. It is embedded with a registry cleaner that is quite easy to use.
The registry cleaner removes all invalid entries in seconds, cleans the cluttered registry by wiping out all the redundant and unnecessary files. The damaged registry is then repaired and resumes its normal function.
Click here to download Restoro and resolve runtime error 1512.
Read More
EverydayLookup is a browser extension for Google Chrome developed by Mindspark Inc. This extension allows users to find what mobile network a certain number belongs to, to find out an area code of a country/town, or locate a town by zip code. While these features look promising and interesting, this extension comes with a downside.
When installed, this extension will change your default search engine, the home page, and new tab to search from MyWay.com, it will monitor user browsing activity, log searches, visited links, opened websites, and other information. This information is forwarded to Mindspark ad servers, then later sold/used to better target ads.
While browsing the internet with this extension you will see additional injected ads and sponsored content throughout your browsing sessions (even if the ads do not match your search queries). It can inject banners to websites, and sometimes even put an ad above website content making it extremely annoying to deal with.
About Browser Hijackers
Browser hijacking means that a malicious code has taken power over and modified the settings of your web browser, without your permission. Browser hijackers are capable of doing many different things on your computer. Typically, browser hijacking is used for earning ad revenue that comes from forced advert mouse clicks and site visits. Even though it might seem naive, all browser hijackers are damaging and thus always classified as security threats. Browser hijackers can also permit other destructive programs without your knowledge to further damage the computer.
How one can determine if your browser is hijacked
Signs that a browser is a hi-jacked include:
1. your home page is reset to some unknown webpage
2. new bookmarks pointing to pornographic websites have been added to your favorite pages
3. the essential web browser settings are modified and unwanted or unsafe resources are added to the trusted sites list
4. find new toolbars that you simply did not add
5. you find lots of pop-ups on your screen
6. your web browser starts running slowly or presents frequent errors
7. Inability to navigate to certain websites, particularly antivirus and other security software webpages.
Exactly how browser hijacker finds its way to your computer
Browser hijackers can get into a computer in some way or other, for instance via file sharing, downloads, and e-mail too. Many web browser hijackings come from add-on programs, i.e., browser helper objects (BHO), toolbars, or extensions added to browsers to give them additional features. Sometimes you may have mistakenly accepted a browser hijacker as part of a software bundle (generally freeware or shareware). A good example of some well-known browser hijackers includes Conduit, Anyprotect, Babylon, DefaultTab, SweetPage, Delta Search, and RocketTab, but the names are continually changing.
Browser hijackers can record user keystrokes to gather potentially invaluable information leading to privacy concerns, cause instability on computers, severely disrupt user’s browsing experience, and eventually slow down the computer to a stage where it becomes unusable.
How to get rid of a browser hijacker
Certain browser hijacking could be simply stopped by discovering and removing the corresponding malware application through your control panel. Many times, it could be a tough job to find and delete the malicious program because the associated file will be running as part of the operating system process. Moreover, manual removal requires you to perform many time-consuming and tricky procedures that are very hard to conduct for new computer users.
Industry experts always suggest users eliminate any malware including browser hijacker by using an automatic removal tool, which is easier, safer, and faster than the manual removal solution. If you’d like to eliminate persistent hijackers effectively, install the award-winning anti-malware software Safebytes Anti-Malware. And employ a system optimizer, such as Total System Care, to erase all related files from the registry and fix browser issues.
Can’t Install Safebytes Anti-malware because of a Virus? Try This!
Practically all malware is inherently harmful, but certain types of malware do a lot more damage to your computer than others. Some malware types modify browser settings by adding a proxy server or modify the computer’s DNS configuration settings. In such cases, you will be unable to visit some or all sites, and thus unable to download or install the required security software to remove the infection. So what to do if malicious software prevents you from downloading or installing Anti-Malware? There are some fixes you could try to get around with this problem.
Install in Safe Mode with Networking
In the event the malware is set to load at Windows startup, then booting in safe mode should avoid it. Since only the bare minimum applications and services launch in “Safe Mode”, there are rarely any reasons for issues to take place. To start your Windows XP, Vista, or 7 computers in Safe Mode with Networking, do as instructed below.
1) At power on, press the F8 key while the Windows splash screen starts to load. This will conjure up the Advanced Boot Options menu.
2) Choose Safe Mode with Networking with arrow keys and hit Enter.
3) Once you get into this mode, you should have an internet connection once again. Now, utilize your browser to download and install Safebytes Anti-malware.
4) After installation, run a full scan and let the program delete the threats it discovers.
Obtain the security software using an alternate browser
Malicious program code may exploit vulnerabilities on a specific browser and block access to all anti-malware software sites. In the event you suspect that your Internet Explorer has been hijacked by a computer virus or otherwise compromised by online hackers, the ideal approach would be to switch to a different internet browser like Mozilla Firefox, Google Chrome, or Apple Safari to download your chosen security software – Safebytes Anti-Malware.
Install and run anti-virus from your Thumb drive
Another way is to download and transfer anti-malware software from a clean PC to run a scan on the affected computer. Abide by these steps to run the anti-malware on the infected computer.
1) On a clean computer, install Safebytes Anti-Malware.
2) Insert the USB drive into the uninfected computer.
3) Double-click the executable file to open the installation wizard.
4) Pick the USB drive as the location when the wizard asks you exactly where you want to install the application. Follow the directions to complete the installation process.
5) Now, transfer the pen drive to the infected PC.
6) Double-click the EXE file to open the Safebytes software right from the pen drive.
7) Hit the “Scan Now” button to start the virus scan.
A Look at the Best AntiMalware Program
Today an anti-malware tool can protect your computer or laptop from different types of internet threats. But how to choose the right one amongst various malware protection application that’s available on the market? Perhaps you might be aware, there are numerous anti-malware companies and tools for you to consider. A few are well worth your money, but most aren’t. You need to be careful not to select the wrong application, particularly if you purchase a premium program. One of the highly recommended tools by industry leaders is SafeBytes Anti-Malware, the most dependable program for Windows computers.
SafeBytes anti-malware is a trustworthy tool that not only secures your computer permanently but is also quite easy to use for people of all ability levels. This program can easily identify, remove, and protect your personal computer from the latest malware attacks such as spyware, adware, trojan horses, ransomware, PUPs, worms, parasites along other potentially harmful software programs.
SafeBytes has excellent features when compared to various other anti-malware programs. Listed here are some of the great ones:
Anti-Malware Protection: Using its advanced and sophisticated algorithm, this malware elimination tool can detect and eliminate the malware threats hiding in your computer system effectively.
Active Protection: SafeBytes provides round-the-clock protection for your computer limiting malware attacks instantly. This software will constantly keep track of your computer for suspicious activity and updates itself continuously to keep current with the latest threats.
Web Protection: Through its unique safety rating, SafeBytes alerts you whether a website is safe or not to access it. This will assure that you’re always certain of your online safety when browsing the internet.
High-Speed Malware Scanning Engine: SafeBytes’s high-speed malware scanning engine lessens scan times and extends battery life. At the same time, it’ll effectively find and eradicate infected computer files or any internet threat.
Low Memory/CPU Usage: SafeBytes is renowned for its minimal influence on computer resources and great detection rate of diverse threats. It runs quietly and efficiently in the background so you’re free to use your computer or laptop at full power all of the time.
Premium Support: For any technical inquiries or product guidance, you can obtain 24/7 professional assistance via chat and e-mail.
To conclude, SafeBytes Anti-Malware is really great for securing your computer against all sorts of malware threats. Malware trouble will become a thing of the past once you put this software program to use. If you’re looking for the very best malware removal application out there, and when you don’t mind shelling out some dollars for it, go for SafeBytes Anti-Malware.
Technical Details and Manual Removal (Advanced Users)
If you’d like to manually get rid of EverydayLookup without using an automated tool, it might be possible to do so by removing the application from the Microsoft Windows Add/Remove Programs menu, or in cases of browser plug-ins, going to the browsers AddOn/Extension manager and uninstalling it. You will likely also want to reset your internet browser.
To be certain of complete removal, find the following registry entries on your computer and delete them or reset the values appropriately. However, this is a complicated task and only computer experts can perform it safely. Furthermore, certain malware is capable of replicating or preventing removal. It is recommended that you carry out the removal procedure in Windows Safe Mode.
Files:
%LOCALAPPDATA%EverydayLookup_d9
%UserProfile%Local SettingsApplication DataEverydayLookup_d9
%UserProfile%Local SettingsApplication DataGoogleChromeUser DataDefaultExtensionsfpeepicldbpmefboahpolegllmiglnai
%LOCALAPPDATA%GoogleChromeUser DataDefaultExtensionsfpeepicldbpmefboahpolegllmiglnai
%PROGRAMFILES%EverydayLookup_d9
%PROGRAMFILES(x86)%EverydayLookup_d9
%UserProfile%Local SettingsApplication DataEverydayLookupTooltab
Registry:
HKEY_LOCAL_MACHINESYSTEMControlSet001servicesEverydayLookup_d9Service
HKEY_LOCAL_MACHINESOFTWAREMicrosoftWindowsCurrentVersionRun, value: EverydayLookup EPM Support
HKEY_LOCAL_MACHINESOFTWAREWow6432NodeMicrosoftWindowsCurrentVersionRun, value: EverydayLookup EPM Support
HKEY_LOCAL_MACHINESOFTWAREMicrosoftInternet ExplorerToolbar, value: 0a7d3c2c-131d-4b0a-9c1b-2045f6bae42a
HKEY_LOCAL_MACHINESOFTWAREWow6432NodeMicrosoftInternet ExplorerToolbar, value: 0a7d3c2c-131d-4b0a-9c1b-2045f6bae42a
HKEY_LOCAL_MACHINESOFTWAREWow6432NodeMicrosoftInternet ExplorerSearchScopes3eb9a50f-f2ab-4d63-8e33-96d71f659640
HKEY_CURRENT_USERSoftwareMicrosoftInternet ExplorerSearchScopes3eb9a50f-f2ab-4d63-8e33-96d71f659640
HKEY_CURRENT_USERSoftwareMicrosoftInternet ExplorerApproved Extensions, value: 0A7D3C2C-131D-4B0A-9C1B-2045F6BAE42A
HKEY_LOCAL_MACHINESOFTWAREWow6432NodeEverydayLookup_d9
HKEY_CURRENT_USERSoftwareEverydayLookup_d9
HKEY_CURRENT_USERSoftwareAppDataLowSoftwareEverydayLookup_d9
HKEY_CURRENT_USERSoftwareEverydayLookup
Read More
![]()
Copyright © 2022, ErrorTools. All Rights Reserved
Trademarks: Microsoft Windows logos are registered trademarks of Microsoft. Disclaimer: ErrorTools.com is not affiliated with Microsoft, nor claim direct affiliation.
The information on this page is provided for information purposes only.
![]()
Repair your PC with one click
Please be aware that our software needs to be installed on a PC system with Windows on it, Open this website on a desktop PC and download the software for easy and quick elimination of your issues.
Follow these easy steps to install Windows updates via commands
by Henderson Jayden Harper
Passionate about technology, Crypto, software, Windows, and everything computer-related, he spends most of his time developing new skills and learning more about the tech world. He also enjoys… read more
Published on December 3, 2022
Reviewed by
Alex Serban

After moving away from the corporate work-style, Alex has found rewards in a lifestyle of constant analysis, team coordination and pestering his colleagues. Holding an MCSA Windows Server… read more
- You can update Windows from command lines via the Command Prompt and Windows PowerShell.
- Create a Restore Point where you can restore the system if there are any problems with the update process.
- Note that it is possible to download all Windows updates at once.
XINSTALL BY CLICKING THE DOWNLOAD FILE
This software will repair common computer errors, protect you from file loss, malware, hardware failure and optimize your PC for maximum performance. Fix PC issues and remove viruses now in 3 easy steps:
- Download Restoro PC Repair Tool that comes with Patented Technologies (patent available here).
- Click Start Scan to find Windows issues that could be causing PC problems.
- Click Repair All to fix issues affecting your computer’s security and performance
- Restoro has been downloaded by 0 readers this month.
Sometimes, running Windows updates the usual way may not work for you, so you need another way to go about it. However, an alternative is running Windows updates from the command line.
Also, it is possible for users to update Windows in Safe Mode on their devices.
Can I get all Windows updates at once?
Many users struggle to download a batch or all Windows updates because they don’t know the right way. However, it is possible to download all Windows updates at once on your PC.
Furthermore, before installing all Windows updates, you must be exposed to the right system environment. It is because the contemporary Windows update channels, such as Settings and others, don’t have the option to download all.
Hence, downloading Windows updates from the Command Prompt or Windows PowerShell makes it easier to install a batch or all updates at once. It is possible through designated command lines to invoke your Windows history and install all updates.
How do I run Windows updates using the command line?
We recommend you go through the following preliminary checks:
- Create a System image backup on your PC.
- Create a Restore Point on your computer.
- Turn off background apps.
The above steps will prepare your PC for the update process and also provide a resolution if you encounter any problems.
1. Run Windows update via the Command Prompt
1.1 For Windows 11 and Windows 10
- Left-click the Start button, type the command prompt, and click Run as administrator.

- Click Yes on the User Account Control prompt.
- Type the following command to start checking for updates:
UsoClient StartScan - To download updates, input the following and click Enter:
UsoClient StartDownload - You can install the downloaded updates by running this command:
UsoClient StartInstall - Alternatively, you can use this command to check, download, and install updates:
UsoClient ScanInstallWait
- Restart your PC after installing the updates.

1.2. For older versions of Windows
- Repeat steps 1 & 2 to open the Command Prompt.
- Type the following commands one by one to start checking for updates:
wuauclt /detectnowwuauclt /updatenowwuauclt /detectnow /updatenow
The computer will restart after the installation, and your updates should be installed.
If you encounter issues running the Command Prompt as an administrator, read our guide for quick fixes.
- How to Change Real Time Update Speed in Task Manager
- How to Check Your Windows Experience Index on Windows 11
- How to Password Protect Zip Files in Windows 11 [3 Tips]
- How to Use PowerShell ErrorAction? (A Guide with Examples)
2. Run Windows update via Windows PowerShell
- Left-click the Start button, type PowerShell, and click Run as administrator.

- Click Yes on the User Account Control prompt.
- Type the following command to install the Windows Update module and press Enter:
Install-Module PSWindowsUpdate - Run the following command to check for updates:
Get-WindowsUpdate
- Type this command and press Enter to install the available updates:
Install-WindowsUpdate
You should be able to install Windows updates via the above command lines without running into any problems.
You can check our guide about fixing Windows PowerShell if it stops working and PowerShell not showing full output on Windows 11.
The above steps are the two methods you can use to update Windows from the command line.
Conclusively, our readers can check some Windows update errors they can encounter. Read how to fix Windows update error code 0x800706BA and Windows Update error code 0X800f081f on your PC.
For more questions or suggestions, do not hesitate to use the comments section below.
Still having issues? Fix them with this tool:
SPONSORED
If the advices above haven’t solved your issue, your PC may experience deeper Windows problems. We recommend downloading this PC Repair tool (rated Great on TrustPilot.com) to easily address them. After installation, simply click the Start Scan button and then press on Repair All.
![]()
Newsletter
Do you want to update Windows? Maybe you can try Windows update Command Line. But before you upgrade Windows, you had better back up your operating system with MiniTool software. Of course, there are other methods for Windows update offered in this article.
Why Do You Need to Update Window?
Every year, Microsoft makes several updates to Windows. Especially Windows 10 has twice security updates every year. You may feel that Windows is so annoying to update so frequently, and you plan to ignore it, however, the risk to your computer will increase.
Most of the updates to Windows are designed to handle security issues. Security is the most important thing for you, because if the security is not enough, your computer can be easily attacked by malware or exploited by hackers.
By patching and improving vulnerabilities in the use of Windows, Microsoft adds new features in Windows Defender and Essentials program to resist malware and enhances Office security.
In addition to improving Windows security, Microsoft will also upgrade the existed programs or add new features to Windows, for example, the Cortana.
When Do You Need to Run Windows Update Command Line?
With the release of Windows 10, Windows is now available as a service rather than a product, so Windows Update on Windows 10 is turned on by default, and you can’t disable it, which is one of the highlights of Windows 10.
But sometimes there may be some problems with your computer, causing your Windows 10 not to update automatically. Therefore, you can run Windows update from Command Line.
What to Do Before Updating Windows from Command Line
Before running Windows update Command Line, the most important thing you need to do is to back up your operating system.
Some people will encounter some problems in reinstalling the system, causing the reinstallation system to fail. Similarly, some people will fail to upgrade Windows. The upgrade failure is likely to cause data loss, system file corruption, and so on.
So in order to avoid system corruption caused by the upgrade failure or the computer cannot start, you can back up the system to another hard drive in advance or make a bootable external hard drive.
But how to back up the operating system to another hard drive quickly and safely? Here I’m going to introduce a piece of professional and powerful backup software – MiniTool ShadowMaker.
You can back up the operating system, disk, partition, files, and folders. And then you can restore them when you need them. Besides, you can also sync files and folders using the software to avoid data loss as much as possible. It also enables you to clone disks, even simple volumes on dynamic disks.
And the best thing about this piece of software is that you can use it for free for 30 days, so why not download it and have a try?
Free Download
And now I will show you how to use MiniTool ShadowMaker to back up the operating system step by step.
Step 1: Launch MiniTool ShadowMaker at first, then choose Keep Trial.
Step 2: MiniTool ShadowMaker backs up the operating system and selects the destination by default. But if you want to change the destination, just click DESTINATION.

Step 3: As you can see, MiniTool ShadowMaker supports you to back up your data to five different destinations. You can choose the destination you want to save the backups, and then click OK to continue. It is recommended to choose an external hard drive.

There are three backup settings that are very useful for you.
- Schedule: You can set automatic backup here to avoid losing data by forgetting to back up when you are using your computer.
- Scheme: You can manage the space occupied by the backed-up files by deleting the specified backup image file versions here.
- Options: You can set some advanced parameters here, such as setting encryption mode, shutting down after successful backup, adding comments to backup data, etc.
Step 4: If you have confirmed the backup source and backup destination, then click Back Up Now.
Tip: You can also click Back Up Later, but you need to click Back Up Now to restart the backup task on the Manage page.
Then after MiniTool ShadowMaker has backed up your operating system successfully, you can run Windows update Command Line.
Tip: You can use MiniTool ShadowMaker to restore your operating system to another computer with only several steps.
After backing up your operating system, I highly recommend you to create bootable media using MiniTool ShadowMaker in case you cannot boot your computer because of a Windows update failure.
Click Media Builder under the Tools page after you have inserted a USB flash drive or CD/DVD, then just follow the instructions to create bootable media.
MiniTool ShadowMaker is really a piece of convenient and safe software to back up operating system.Click to Tweet
How to Run Windows Update Command Line?
After keeping data safe, it is time to run Windows update from Command Line. Actually, there are two powerful tools to run Windows update Command Line. One is Windows update Windows PowerShell, another one is Windows update Command Prompt.
Now let’s get started with Windows PowerShell to update Windows.
Windows Update Windows PowerShell
You can update your Windows by using Windows PowerShell, and it only takes four steps to get it done.
PowerShell, as a task-based command-line shell and scripting language, is designed for system administration. In PowerShell, cmdlet, designed to perform specific operations, also typically perform administrative tasks.
The reason administrators can perform administrative tasks on local and remote Windows systems as well as WS-Management and CIM is that PowerShell provides full access to COM and WMI.
Windows PowerShell can execute four kinds of named commands: cmdlets (.NET Framework programs designed to interact with PowerShell), PowerShell scripts (suffixed with .ps1), PowerShell functions, and stand-alone executable programs. PowerShell also provides an interactive command-line interface where you can enter commands and display their output.
Here’s how to update Windows with Windows PowerShell.
Step 1: Type powershell in the search box next Cortana, and right-click the top one, then choose Run as administrator and click Yes to continue.

Step 2: Enter Install-Module PSWindowsUpdate to install the Windows update module.
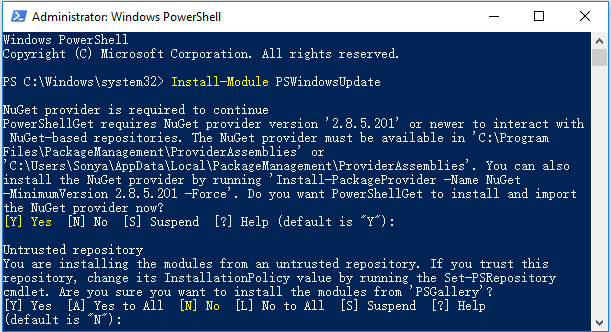
Step 3: Enter Get-WindowsUpdate to check for updates.
Step 4: Enter Install-WindowsUpdate to install the available updates.
Tip: If you lost data in the process of updating Windows, I highly recommend you to try MiniTool Power Data Recovery to recover lost data.
After the four steps, you can update Windows using Windows PowerShell.
Windows Update Command Prompt
Except using Windows PowerShell to update Windows, you can also use Command Prompt to update Windows, which has existed for a long time on Windows operating system. But there is a limitation using this method: it will only show the results without showing any progress.
Command Prompt, as a command line interpreter application in most Windows operating systems, is used to execute typed commands. Through scripts and batch files, many commands automate tasks, and can perform advanced administrative functions.
So how to use Command Prompt to update Windows? It depends on which operating system you are using.
1. If your operating system is Windows 10, you can do the following instructions to update Windows.
Step 1: Type cmd in the search box next to Cortana, and right-click the top one, then choose Run as administrator and click Yes to continue.

Step 2: Type UsoClient StartScan to check for updates.
Step 3: Type UsoClient StartDownload to download updates.
Step 4: Type UsoClient StartInstall to install the download updates.
Step 5: Type UsoClient RestartDevice to restart your device after installing the updates.
Step 6: Type UsoClient ScanInstallWait to check, download and install updates.
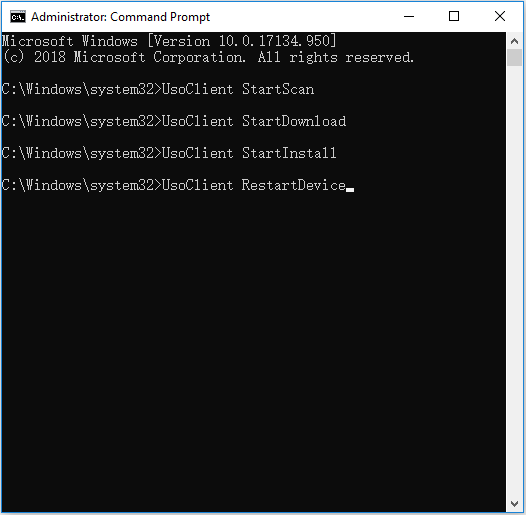
Tip: The UsoCLient.exe tool no longer works in certain versions. If you cannot use it for Windows updates, try other ways.
2. If you are using older versions’ operating system, you need to enter the following instructions in the Command Prompt window one by one.
Step 1: Enter wuauclt /detectnow to check for updates.
Step 2: Enter wuauclt /updatenow to start installing the detected updates.
Step 3: Enter wuauclt /detectnow /updatenow to check, download and install updates.
After doing these instructions step by step, you can update your Windows.
Other Ways to Update Windows
There are two other different methods you can use to update Windows.
Use Windows Update Feature
Besides Windows update Command Line, you can also use the Windows Update feature to update Windows.
But how to use Windows Update to update Windows? The detailed instructions are below.
Step 1: Open Settings to choose Update & Security to continue.
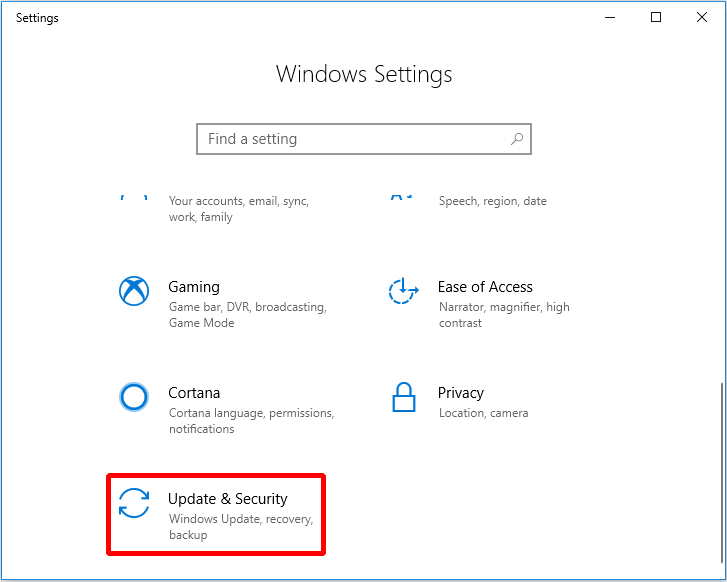
Step 2: Choose Windows Update and click Check for updates to continue.
Step 3: After the Windows finds the available updates, click Restart now.
Then you just need to wait for the Windows to update. With this method, you can also update Windows.
Reinstall Windows
Actually, you can also reinstall Windows to perform Windows update. Let’s take Windows 10 as an example.
Before reinstalling Windows 10, you need to create installation media for reinstalling.
You’d better back up all the files in the computer you want to an external storage device or upload them to OneDrive or other Clouds to keep data safe.
Then download Windows 10 installation media to a single external hard drive with at least 8 GB available space.
Tip: You’d better back up all the data on the drive because all the data on this drive will be deleted.
And here is the way to reinstall Windows 10 using the installation media.
Step 1: Insert the installation media to your computer, and then open File Explorer to continue.
Step 2: Select the drive with the installation media and double-click on it to continue.
Step 3: Double-click setup.exe at first, and then click Yes to continue.
Step 4: Select one of the following options, and then click Next to continue.
- Keep personal files and apps – This will preserve your personal data, apps, and settings.
- Keep personal files only – This will preserve your personal data and settings, but all your apps will be removed.
- Keep nothing – This will remove all personal data, settings, and apps.
Step 5: Click Install to start reinstalling Windows 10 on your computer.
Your computer will restart several times in the process of reinstallation.
From this article, I have known several ways to update my Windows, and I should update Windows as soon as possible to protect my data and operating system.Click to Tweet
Bottom Line
When you want to update your operating system, you should back up your operating system in advance to avoid data loss during the upgrade process. When upgrading Windows, you can use the Command Line to upgrade, or you can use other methods to upgrade Windows.
Finally, never ignore every update, because every update is for your computer to enhance your data protection.
If you have better advice or any confusion about this article, then you can leave a comment below or contact [email protected].
Windows Update Command Line FAQ
How do I manually update Windows?
- Press Win + I keys at the same time to open Settings, then click Update & Security.
- Click Windows Update and then click Check for updates in the right panel.
- If there are available updates, Windows will download it and install it automatically.
How do I open Windows Update in Windows 10?
Open Settings and then click Update & Security, then choose Windows Update. And you can click Advanced options to choose whether show you a notification when your PC requires a restart to finish updating and some other settings.
What is the use of Windows Update?
Windows Update is a built-in feature that makes your Windows system and other Microsoft programs up to date. And the updates usually contain security updates that can protect your operating system from being attacked by viruses and other things. Sometimes it also contains feature enhancements.
If you are wondering how to run Windows Update via command line then this post is for you. I will guide how you can run Windows Update using the command line on your system and install the latest updates. Although you can also use Windows 10 inbuilt option for the same. So, let’s start!

There are two methods to search, download and install updates in Windows 10
Run Windows Update Using Command Prompt
The easiest way to execute the Windows Update is to use the Command-Line. You will need Administrator access on the command prompt. Here are the steps:
1) Click on the Windows logo and type the command prompt.
2) In the user menu that pops up, select Command Prompt and right-click on it to choose “Run as administrator”

3) Click on “Yes” if the “User Account Control” dialogue box pops up. If not, follow the next step.
4) Once the command prompt window opens, type the following command to check if new updates are available and press the Enter key:
UsoClient StartScan

5) Now, for downloading new updates, type below text and press Enter button:
UsoClient StartDownload

6) Next, for installing those downloaded updates, type below command and hit Enter key
UsoClient StartInstall

7) Once the Windows update installed, you have to restart your system to save the new changes to the system. To do so, type given text and hit Enter again
UsoClient RestartDevice
Bonus Tip:
However if you want to check, download and install the updates altogether, then the command for that is
UsoClient SacnInstallWait
Now you can type exit to close the command prompt window.
Please note that while executing the above command line, you might not able to see any Windows update.
If you are receiving Windows update error code 0xc8000222 then you may read this to fix it.
Using PowerShell 2.0 or above
This is another method but very much similar to the command prompt to run the Windows Update on your system:
1) Go to the Start button (Windows logo) at the bottom left corner of your screen and right-click on it.
2) In the user menu that pops up, select Windows Powershell (Admin)
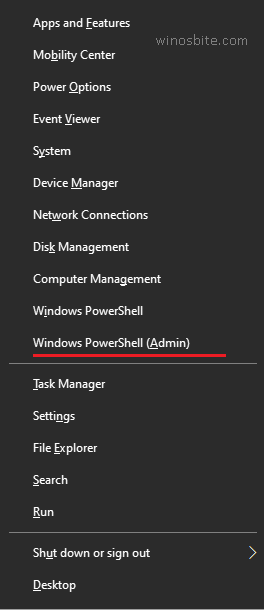
3) When the PowerShell window opens you will have to first install the module of Windows Update onto PowerShell for the commands to work. For this, type below command hit Enter key:
Install-Module PSWindowsUpdate
4) If you get the message “Do you want Powershell to install and import the NuGet provider now?”, type Y and press the Enter key.
4) If you are prompted again with a message “Are you sure you want to install the module from PSGallery”, type Y and press the Enter key.
5) To check for and simultaneously download any Windows Update, type
Get-WindowsUpdate
6) To install those downloaded updates, type
Install-WindowsUpdate
7) Type Y and hit Enter when prompted with the message “Confirm Are you sure you want to perform this action?”
Close the PowerShell window by clicking on the cross sign at the top right corner of the window.
So, this was the two ways to update the Windows Update using the command line. I hope, you find it useful.