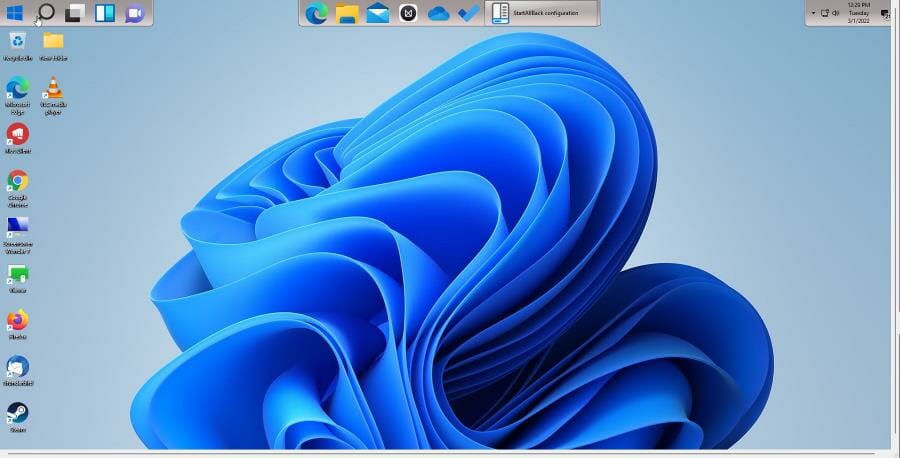
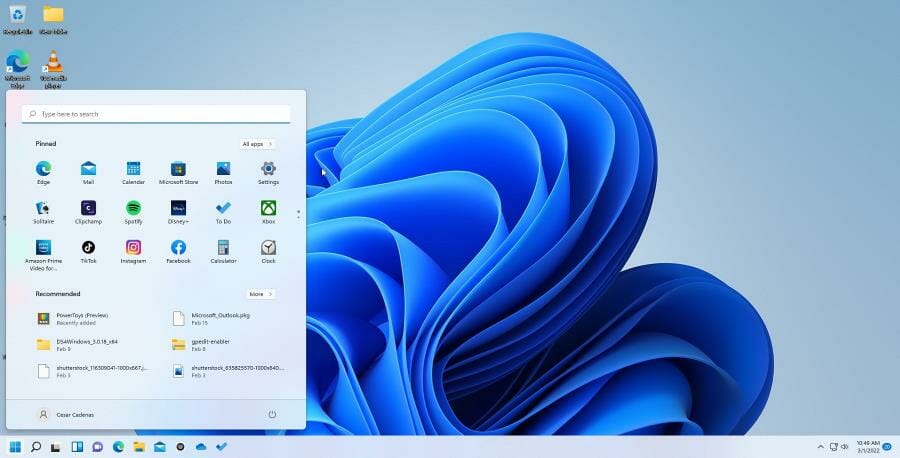
 Windows 11 кому-то нравится, кому-то — нет, но что о ней можно сказать точно: изменения в части меню Пуск, работы и настроек панели задач и некоторые другие интерфейсные решения сомнительны. Действия, которые ранее были привычны: изменение размера значков в панели задач, её перемещение наверх, влево или вправо, теперь просто так не выполнить.
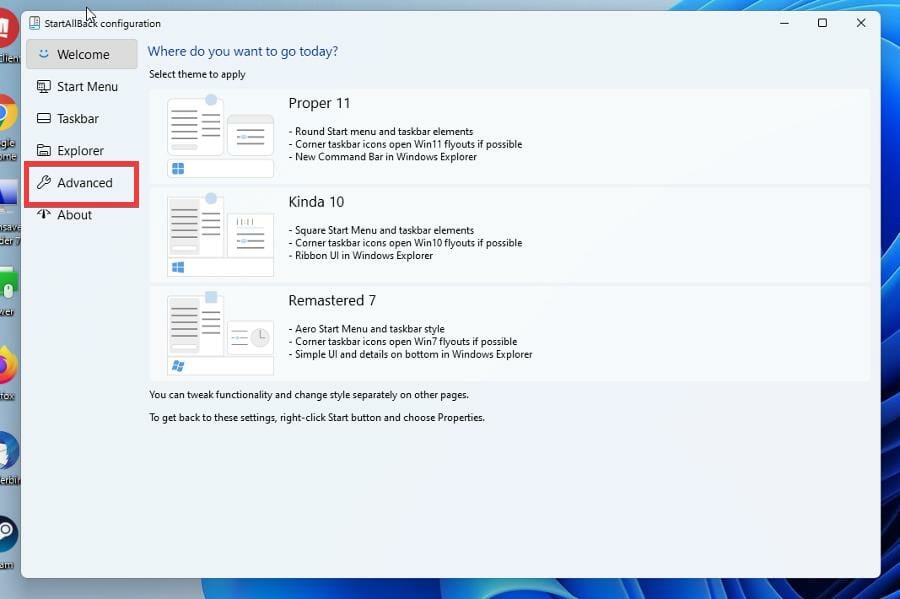
StartAllBack — простая в использовании и очень функциональная программа для тех, кто хочет настроить меню Пуск в Windows 11 под себя, вернув ему более «классический вид», а также вернуть возможность полноценно настраивать панель задач. Утилита не бесплатная, но первые 30 дней полностью функциональна, что позволит решить, нужна ли она вам. Другие программы для включения классического меню Пуск Windows 11.
Использование StartAllBack в Windows 11, доступные функции

Скачать бесплатную пробную версию StartAllBack можно с официального сайта — https://www.startallback.com. После почти моментальной установки программы, откроется её главное окно на русском языке, где вы можете выбрать один из предустановленных наборов настроек.
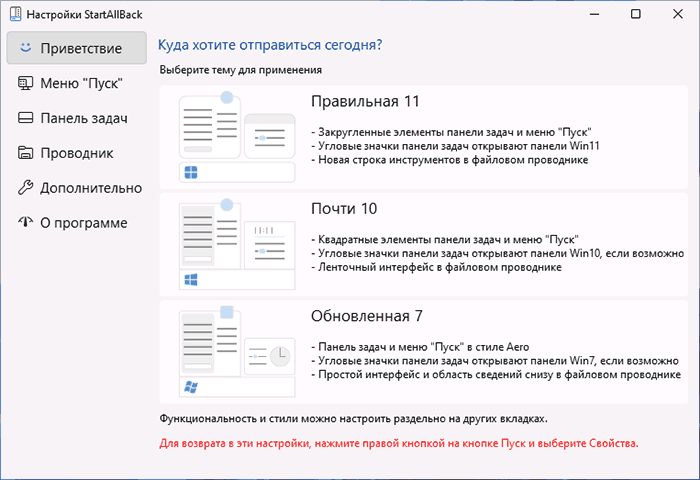
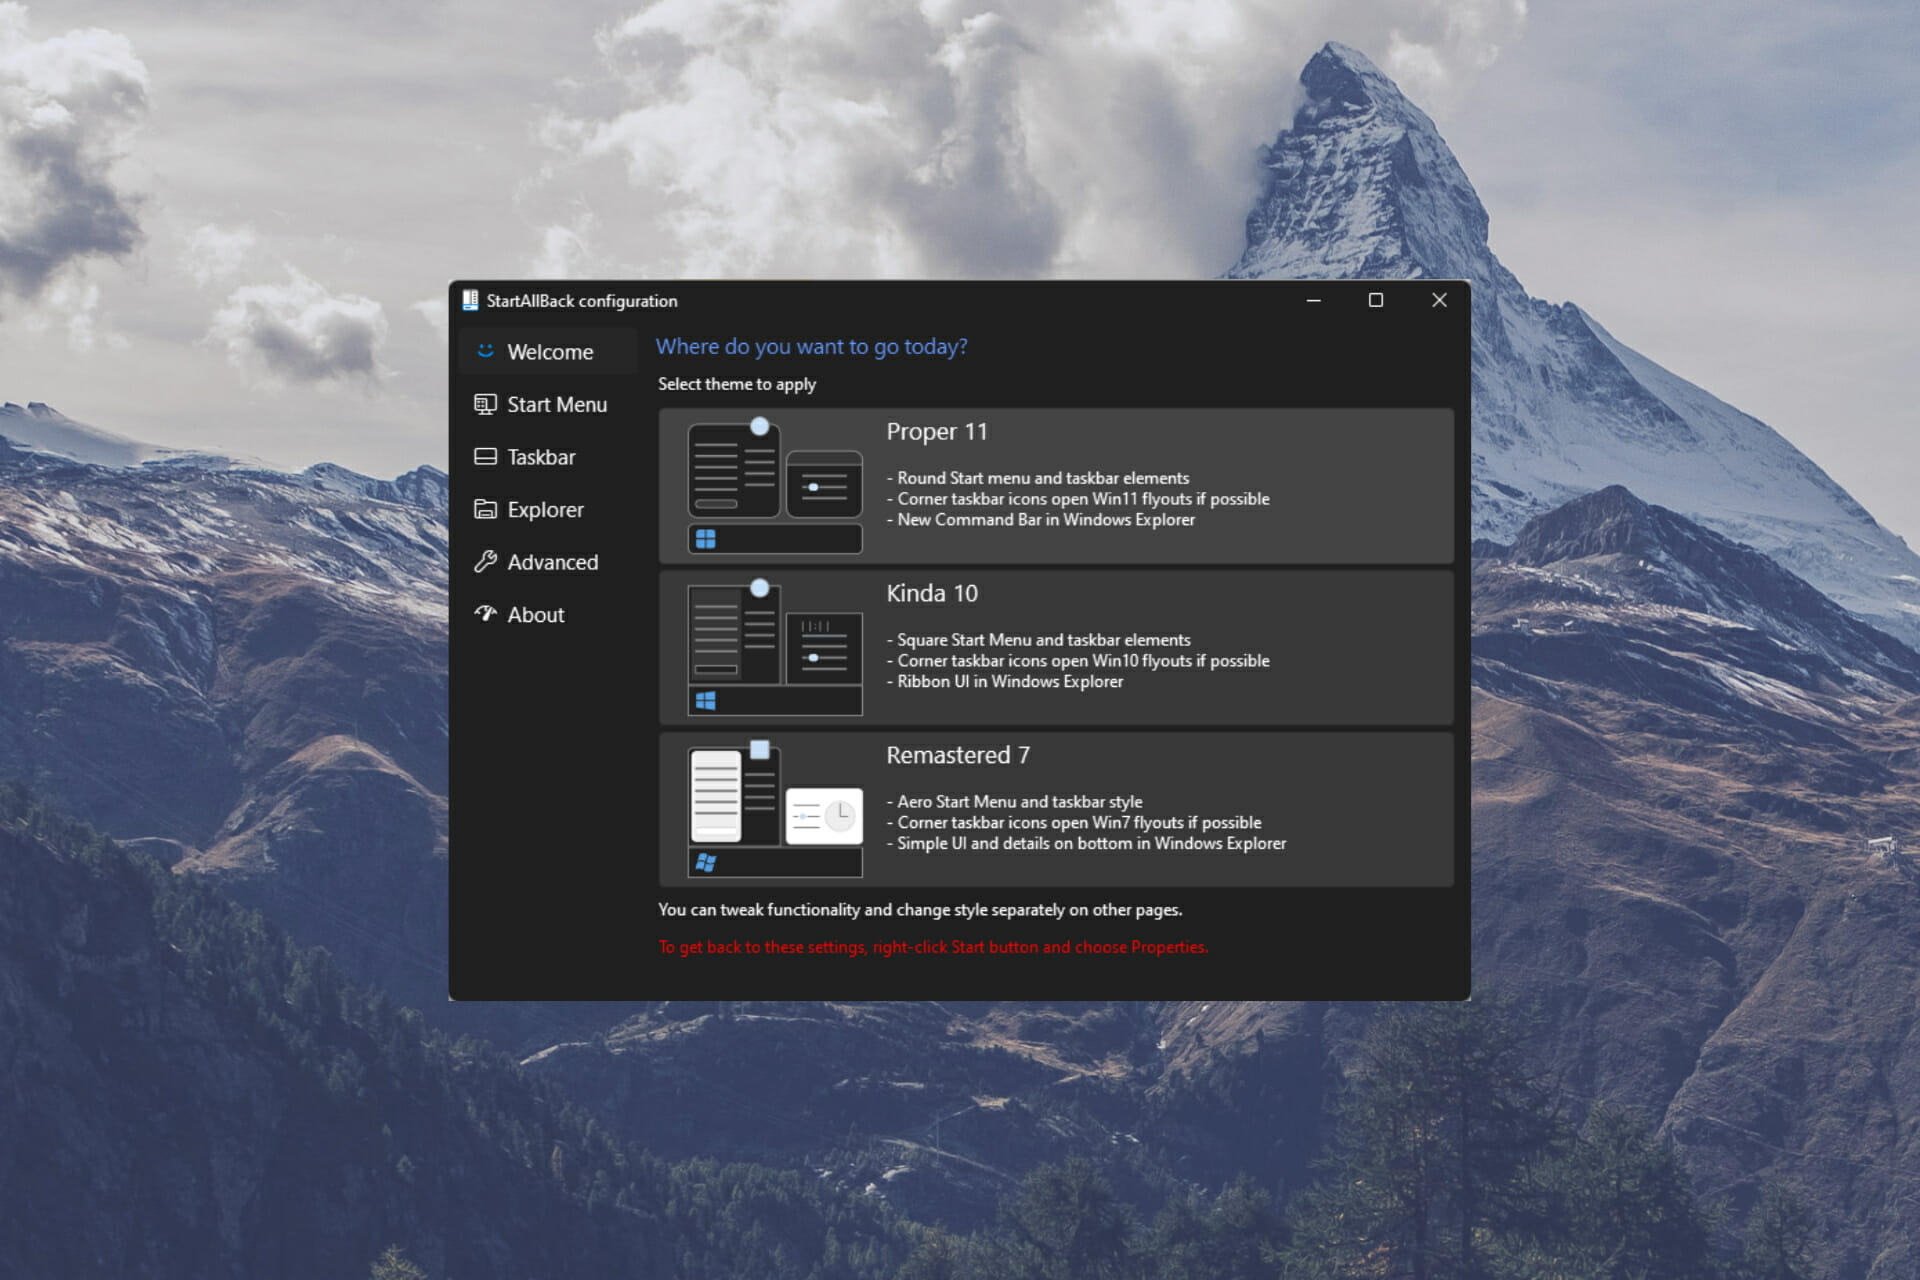
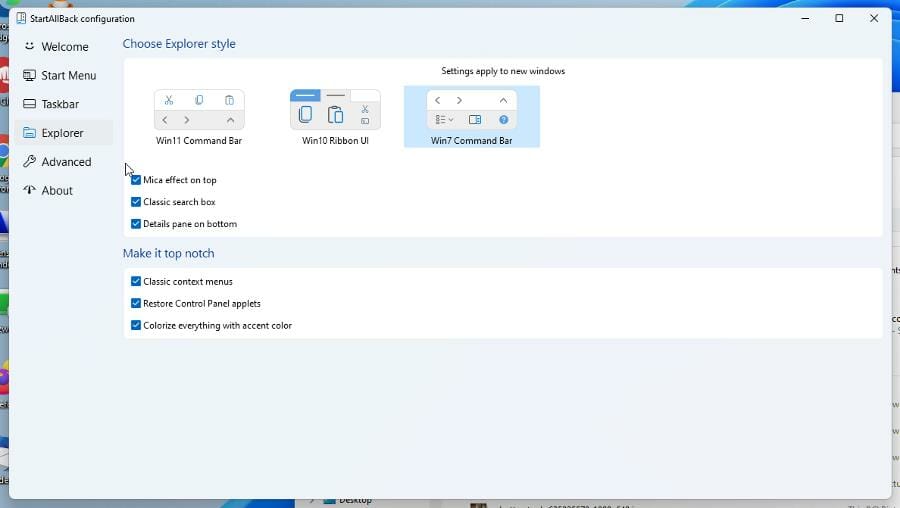
Темы, которые влияют на внешний вид меню Пуск, панели задач и оформление ленты действий в проводнике:
- Правильная 11 — меню пуск приобретает структуру меню Пуск Windows 7, сохраняя современное оформление, строка инструментов в Проводнике не меняется, панели, открываемые при нажатии по значкам в области уведомлений — тоже.
- Почти 10 — почти то же, что и в первом варианте, но меню Пуск без закругленных углов, а в Проводнике — ленточный интерфейс из Windows 10.

- Обновленная 7 — меню Пуск почти как в 7-ке, простой интерфейс действий и отображение области сведений в Проводнике, для части значков в области уведомлений (например, для даты и времени) всплывающие панели отображаются в «старом стиле».


Указанные предустановленные наборы настроек можно изменять на своё усмотрение в соответствующих разделах StartAllBack:
- Меню Пуск — выбор стиля оформления, изменение размера значков и их количества и другие настройки.

- Панель задач — размер значков на панели задач, внешний вид кнопки «Пуск» (можно загрузить свою), расположение панели задач: снизу, сверху или вертикальная панель задач Windows 11 — слева или справа, отключение группировки значков на панели задач, прозрачность, размещение значков по центру или ближе к кнопке «Пуск».
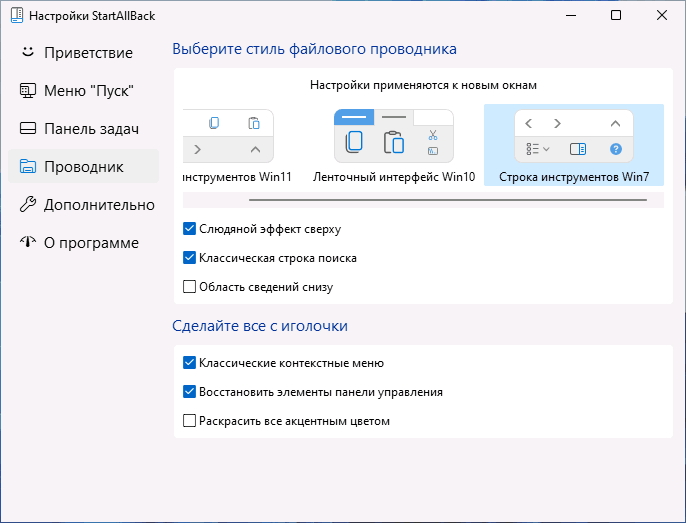
- Проводник — настройка вида ленты в проводнике, включение классического контекстного меню.
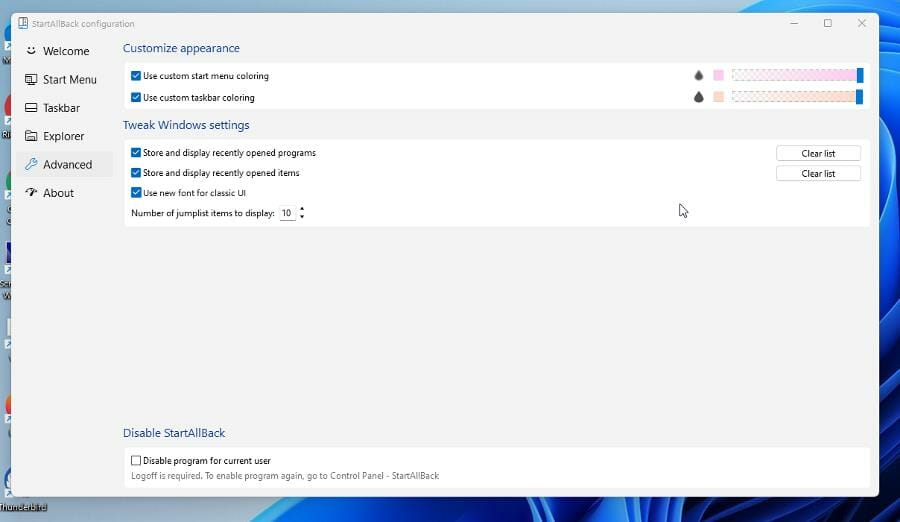
- Дополнительно — настройка цвета и прозрачности меню Пуск, настройка цвета и прозрачности панели задач, некоторые дополнительные параметры.


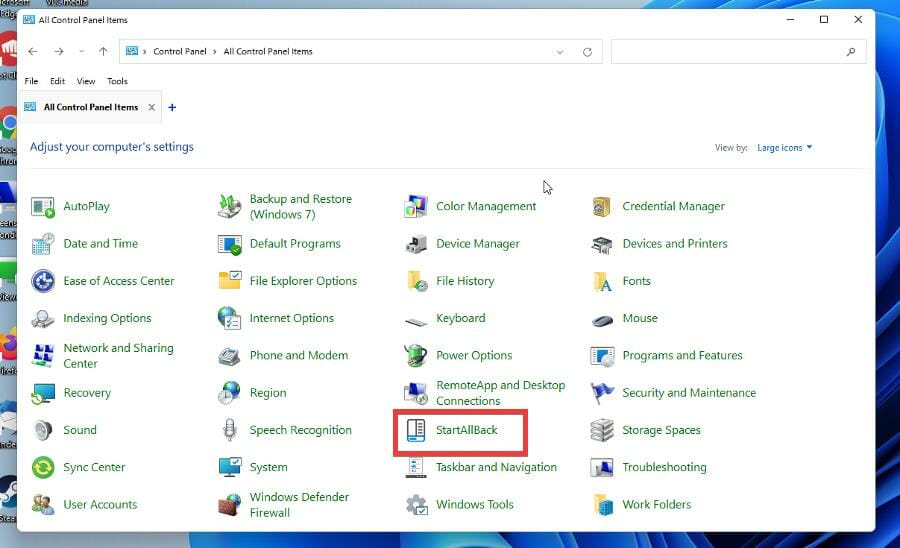
В любой момент времени вы можете вернуться к настройкам StartAllBack, нажав правой кнопкой мыши по кнопке «Пуск» и выбрав пункт «Свойства».
Как итог, если вы хотите вернуть более привычное меню Пуск и возможность настраивать панель задач в Windows 11 — StartAllBack будет одним из лучших вариантов для этих целей.
StartAllBack
для Windows

StartAllBack — отличная возможность вернуть в Windows 11 классическое стартовое меню Пуск и панели задач в стиле Windows 7 или Windows 10. Также программа позволяет значительно расширить меню различными дополнительными функциями, изменять внешний вид панели задач, контекстных меню и области уведомлений, Проводника и пр.
Ключевые особенности StartAllBack:
- Отображение ярлыков на иконках в панели задач.
- Настройка размера иконок.
- Перемещение панели задач к верхнему, левому или правому краю экрана.
- Перетаскивание элементов на панель задач.
- Центрирование значки в панели задач, но оставить кнопку «Пуск» слева.
- Использование динамической полупрозрачности.
- Изменение пользовательского интерфейса Проводника.
- Возможность включить старое окно поиска в Проводнике.
- Поддержка темного режима для большего количества диалоговых окон.
- Изменение внешнего вида контекстных меню.
- Новые шрифты, улучшенная поддержка сенсорного ввода
- Запуск приложений и переход к системным разделам в один клик в меню Пуск.
- Навигация по выпадающим меню.
- Быстрый и надежный поиск.
- Стилизация панели задач и стартового меню как в Windows 7, Windows 10.
- Возможность менять цвет пользовательского интерфейса во всех приложениях Windows.
- Малое потребление системных ресурсов.
ТОП-сегодня раздела «другое»
![]() MapKeyboard 2.1
MapKeyboard 2.1
MapKeyboard — небольшая бесплатная утилита с помощью которой можно легко переназначить или…
Отзывы о программе StartAllBack
Николай про StartAllBack 3.0.2 [30-10-2021]
А что тут добавлять, пока что версия 3.0.2 глючит с Windows 11
Если выбирать оформление проводника в стиле 11 то при переходе между папками в области адреса появляется некая моргающая черная область, что неприятно, так же периодически отказывается работать ряд быстрых клавиш в проводнике, например удаление папок через клавишу Del, если закрыть все окна и изменить оформление в тему 7/10, то потом все ок, так же глючат окна если оформление панели задач выбрать в стиле 11, при открытии свернутых окон, снова наблюдается черная полоса, может отказывать кнопка свернуть все окна, не отражается календарь при нажатии на часы, не отражается звук при нажатии на динамик, наверно есть и другие глюки, если выбрать оформление в стиле 7/10 то проблем особо не замечено
5 | 4 | Ответить
by Cesar Cadenas
Cesar has been writing for and about technology going on for 6 years when he first started writing tech articles for his university paper. Since then, his passion… read more
Published on March 6, 2022
- Some Windows 11 users have proclaimed how they wish they could change Windows 11’s user interface to suit their needs.
- StartAllBack is an app that allows you to change how the Start menu and taskbar look.
- This guide will show you how to download and use StartAllBack so you can customize your Windows 11 machine.
XINSTALL BY CLICKING THE DOWNLOAD FILE
- Download Restoro PC Repair Tool that comes with Patented Technologies (patent available here).
- Click Start Scan to find Windows 11 issues that could be causing PC problems.
- Click Repair All to fix issues affecting your computer’s security and performance
- Restoro has been downloaded by 0 readers this month.
As it has been stated before ad nauseam, the overall user interface of Windows 11 has been a point of contention for users since its release.
The changes made to the Start menu, right-click context menu, taskbar, and others have rubbed people the wrong way. People started to raise the question of why fix what wasn’t broken?
Why did Microsoft undo Windows 10’s user interface? People liked that version. It does appear that Microsoft took inspiration from macOS when it was developing Windows 11 and got rid of a lot of the customization options people expect to have.
If you have this issue, it’s recommended that you download and use StartAllBack, an app that some people consider a must-have for Windows 11.
What is the StartAllBack feature?
StartAllBack is a user interface app that intends to “fix” everything that’s wrong with the Windows 11 user interface. It does this by giving people the option to revert things to a Windows 10 style, or even a Windows 7 style for those who miss the old interface.
And it doesn’t stop there as there are a lot of customization options on StartAllBack. You can even make the user interface look like something straight out of a Chromebook.
Other customization options include an improved File Explorer, Control Panel, the ability to move the taskbar to the top of the screen, new menus, new fonts, fast search, and so much more. There’s something it for everyone.
Now, this isn’t a free app that you can download. You do have to purchase a license to get yourself a copy, and there are even Business versions for purchase that allow you to change up to 400 different PCs.
Fortunately, StartAllBack is cheap and there is a free trial available if you want to try out the app.
This guide will show you how to download the free trial of StartAllBack and take you through some of the key features available on that particular version, so you can decide for yourself if you want the full version. The guide will also show how to access the settings and how to uninstall them.
How do I use StartAllBack?
1. Download and install it
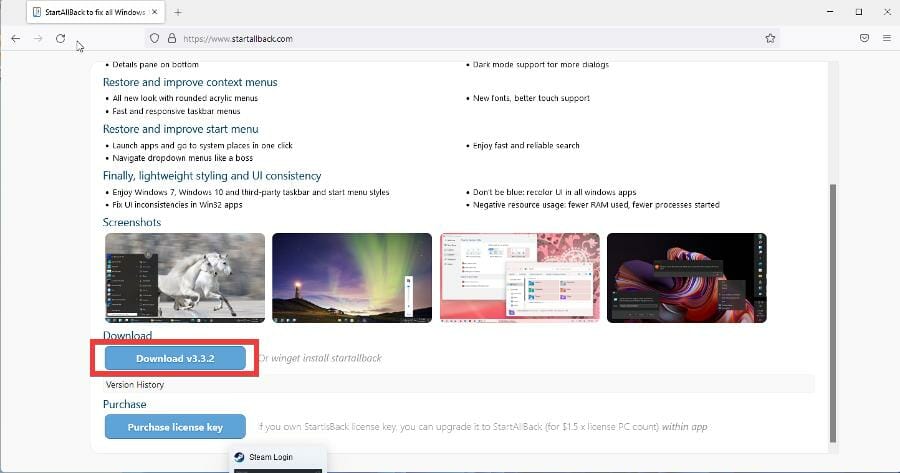
- Open the StartAllBack webpage.
- In the page, scroll down and click the Download button with the latest version of StartAllBack.

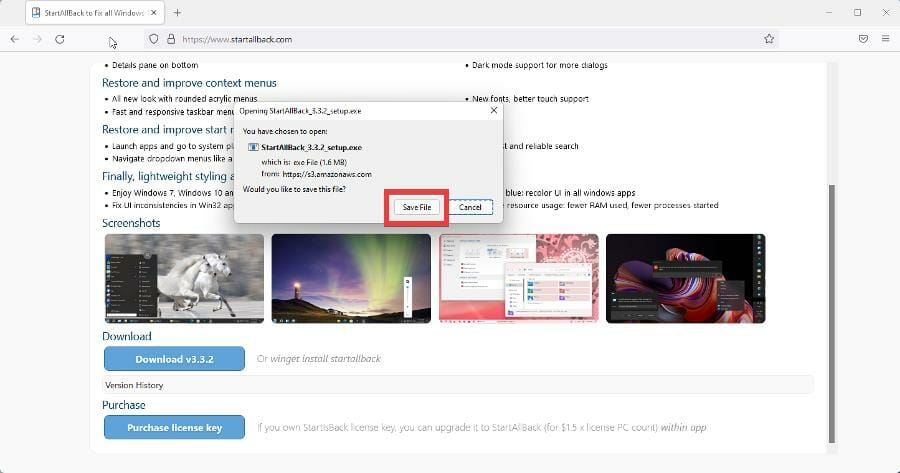
- Click Save File in the new window that appears.
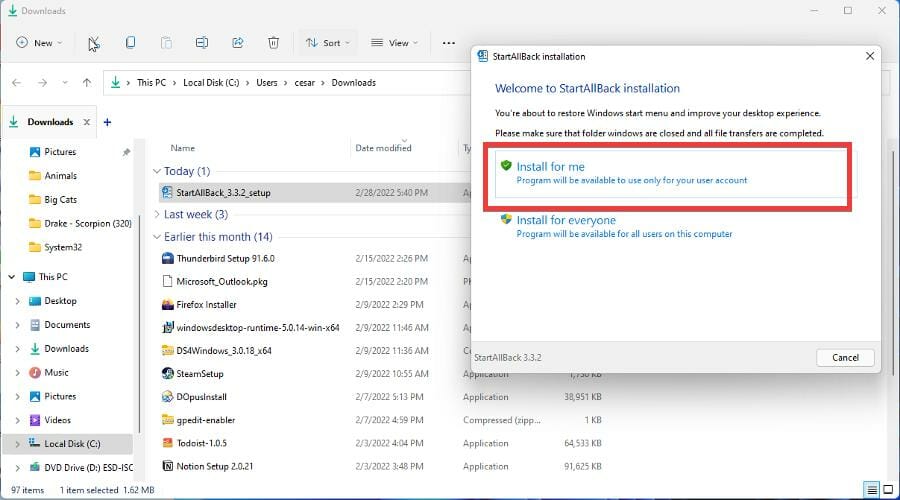
- Locate the file’s location and double-click it to begin installation. Then select Install For Me.

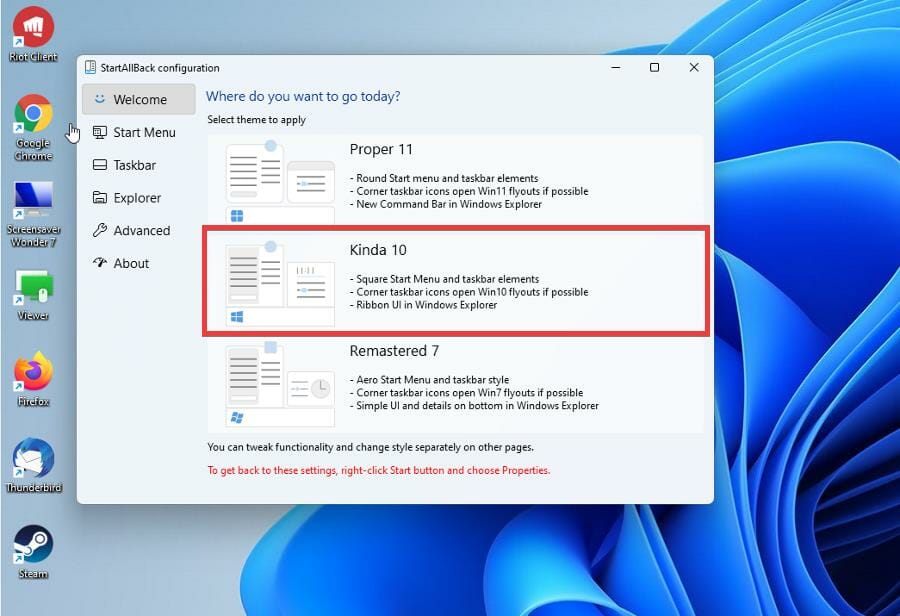
- Next, a window will asking you if you want to stick with Windows 11 look or switch to a Windows 7 or Windows 10 appearance.
- As an example, this guide will choose the Windows 10 option.

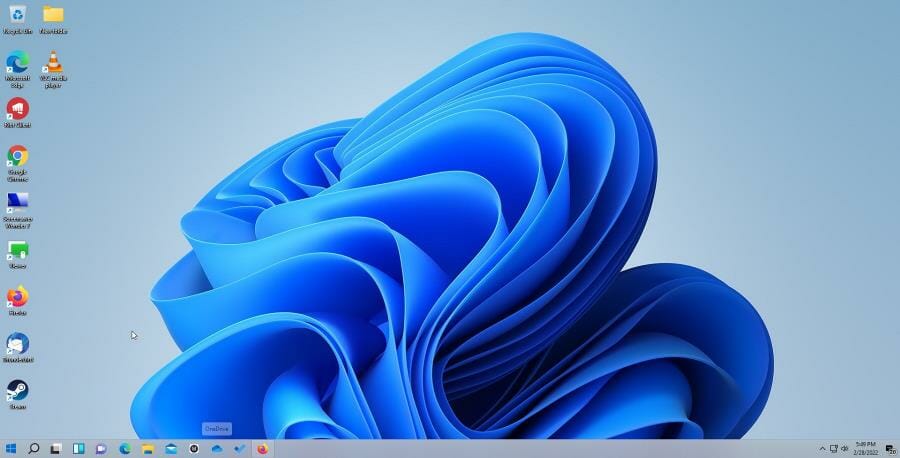
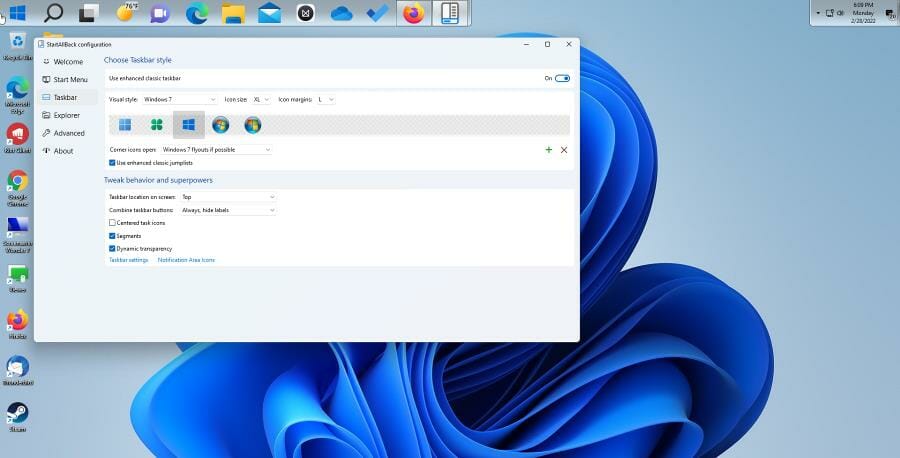
- As you can see from the taskbar, the style has changed to look similar to Windows 10.

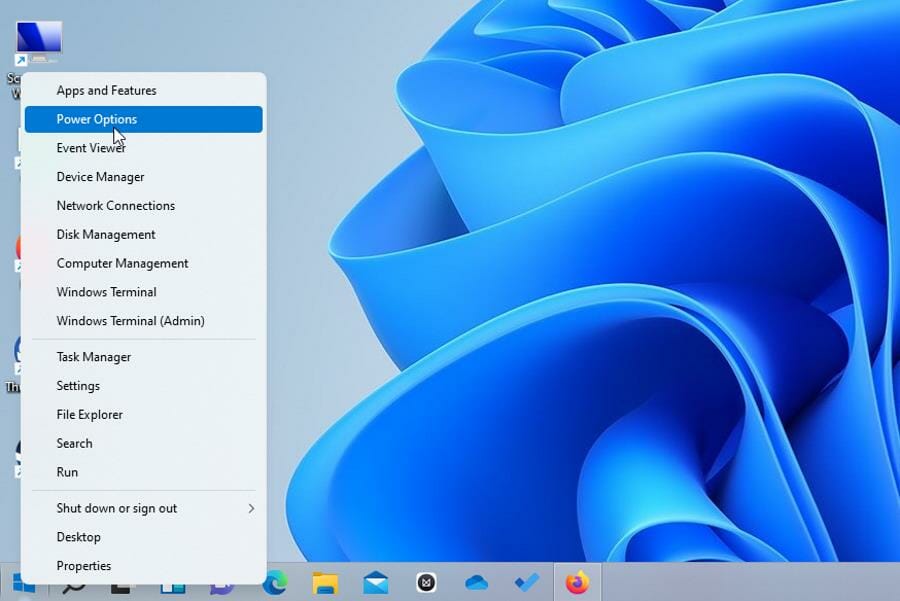
- To change the layout, right-click the Start menu and select Properties.

- StartAllBack appears and you can continue customizing.
2. Customize the settings
- The settings options for StartAllBack appears as the left hand menu.
- The Start Menu allows you to customize the Start menu.

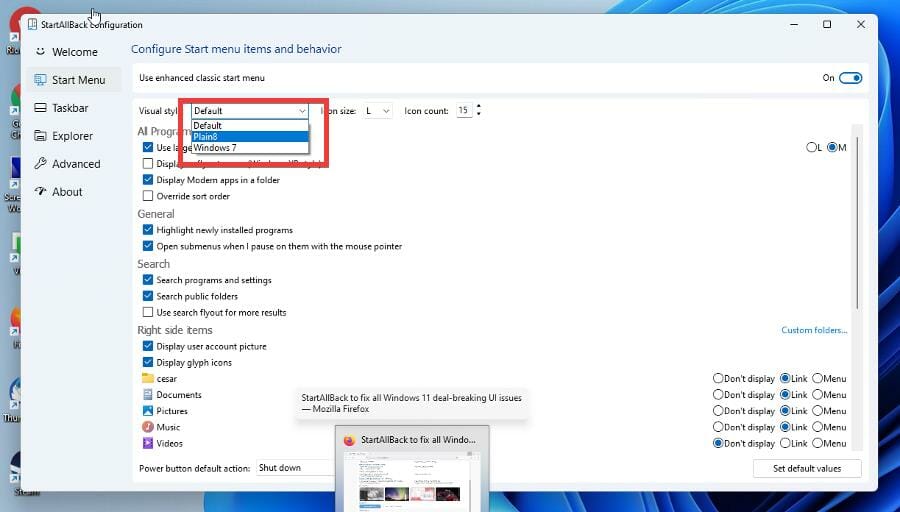
- You change the visual with the drop-down menu at the top. You can change it to match Windows 7, 8, or the default.

- You can also change how big the icon should be, what is displayed on the right, and what is highlighted.
- After configuring the settings, click the Start menu to see how it looks like.

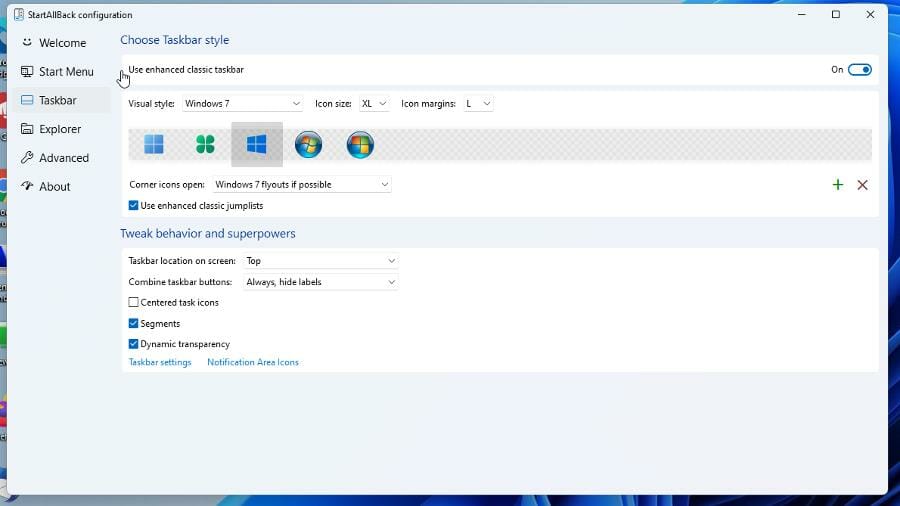
- Taskbar, as the name suggest, allows you to change the taskbar.

- You change the Start menu icon, where the taskbar sits, and how big the icons should be.
- Customize the settings however you like.
- Explorer customizes the File Explorer.

- Options include three different styles, context menus, and a details pane.
- The File Explorer options are admittedly a little difficult to gage.

- Advanced allows you to change the color of the Start menu and taskbar.

- It also includes options on how to store and display recently opened files.
- Once done, the Start menu and taskbar look very different.
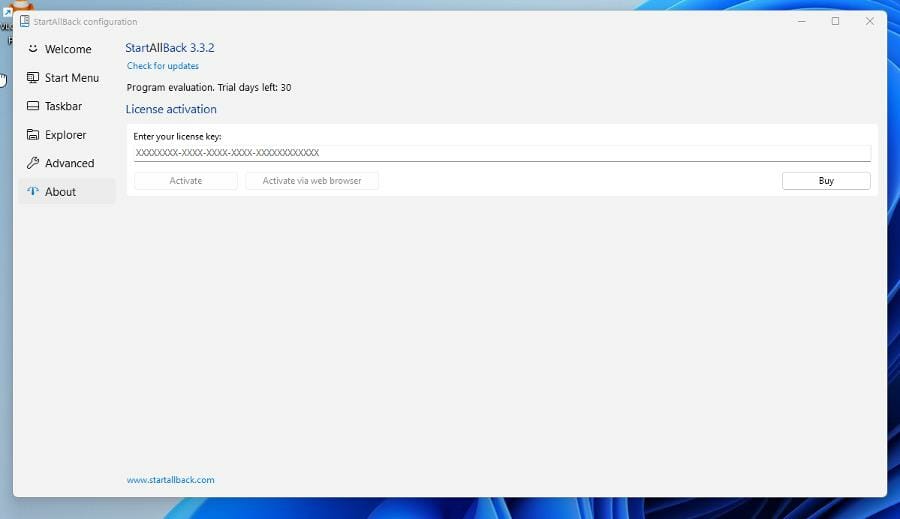
- About doesn’t offer any customization options other than giving the opportunity to purchase the full version and tell you how long you have in the free trial.


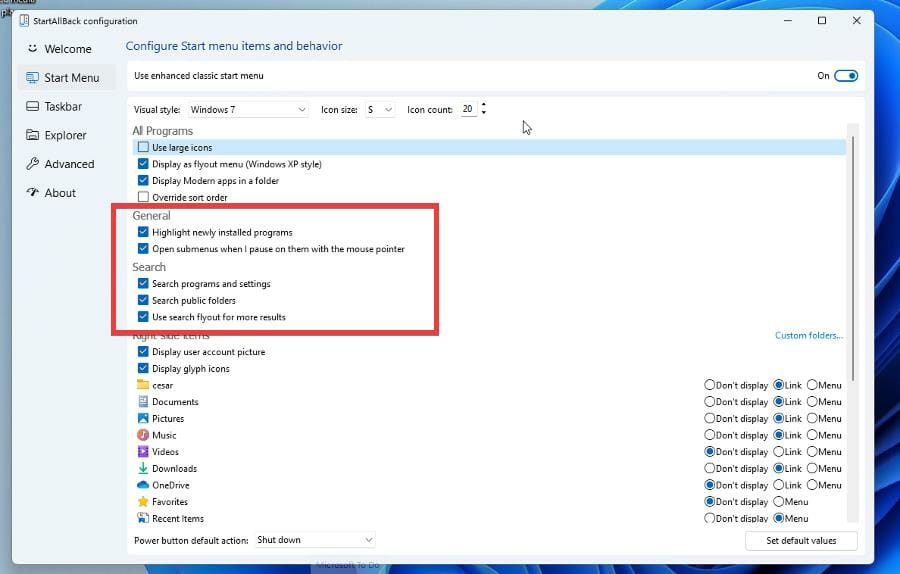
- To create your own Start menu, begin by selecting what style and how many icons you want.
- For example, the Start menu will be in a Windows 7 style with 20 small icons.

- You can allow what the Search function finds under Search and have the menu highlight new apps.
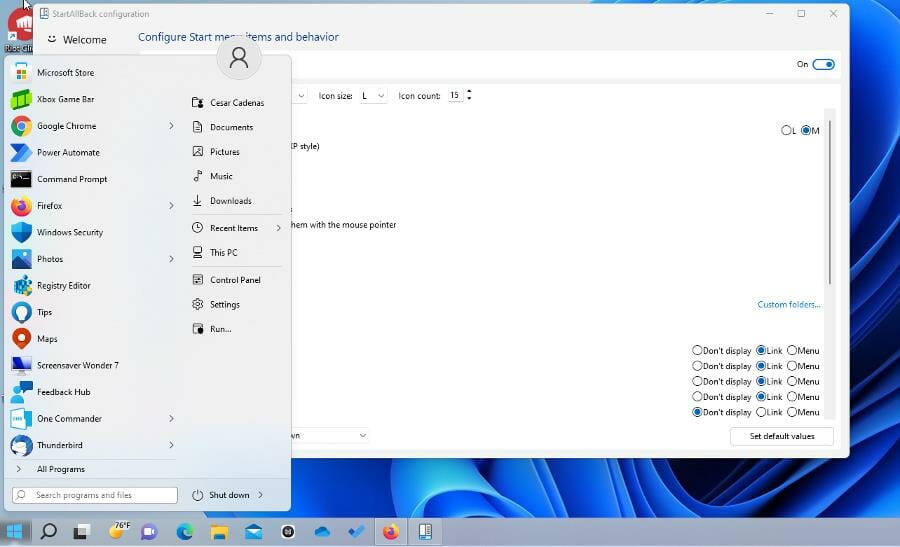
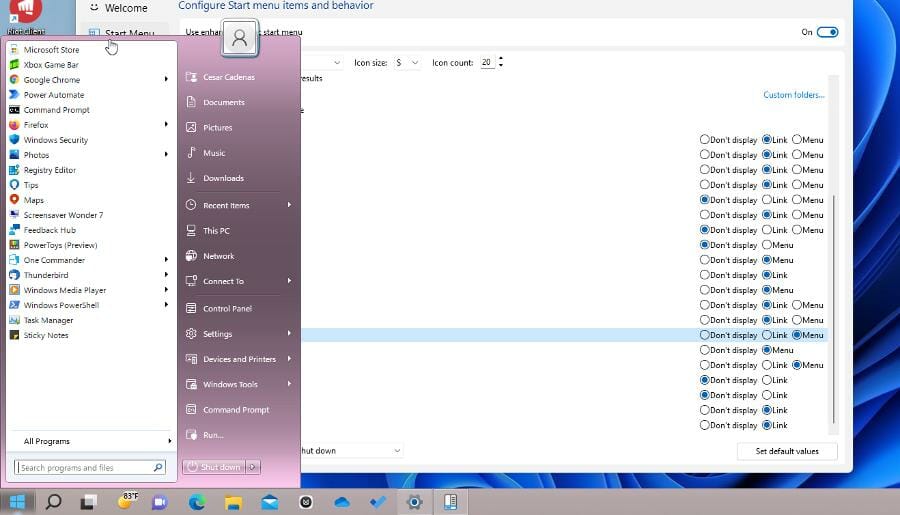
- Under Right Side Items, you can select which apps and feature appear in the Start menu. Selecting Link adds them to the left side and Menu adds them to the right side.

- Open your Start menu and see how it all looks.


4. Create a new taskbar
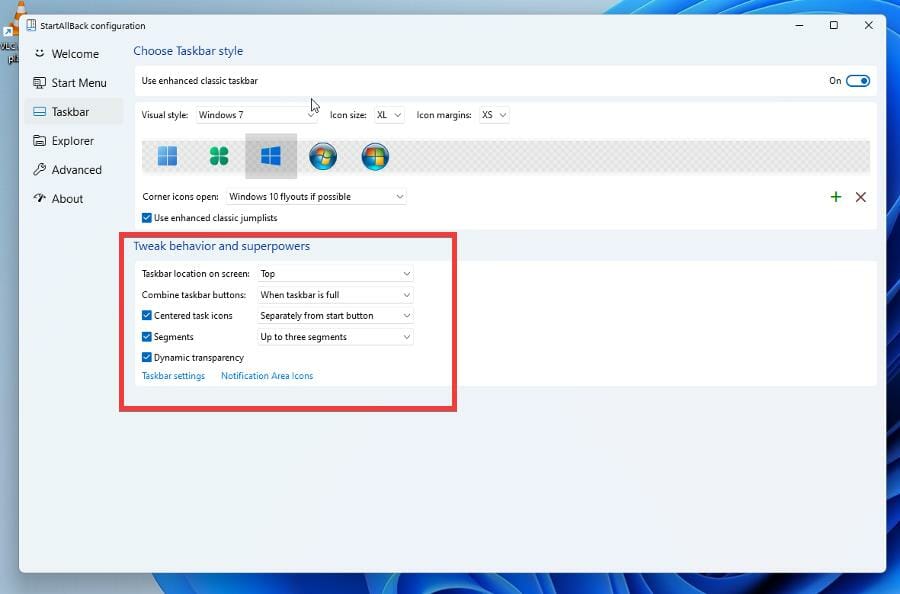
- Say for example, you want a segmented taskbar that sits at the top with its icons centered in a Windows 7 style with large icons.
- In the Taskbar section, go to the Tweak behavior and superpowers section.
- Make the changes you want like having the taskbar sit at the top segmented with dynamic transparency.

- Underneath Choose Taskbar style, select the changes you want like the visual style, icon size, and margins.

- Once done, the changes will appear immediatedly.

How can I get rid of StartAllBack?
You have two options when it comes to removing StartAllBack and getting back to the original version of Windows 11:
- Disabling the app – the quickest method from the two, and it also allows you to activate it with ease at any point in time if your choose to do so
- Uninstalling the app – this process can take a bit more time, and the process of re-installing the app again will also take extra time.
Some PC issues are hard to tackle, especially when it comes to corrupted repositories or missing Windows files. If you are having troubles fixing an error, your system may be partially broken.
We recommend installing Restoro, a tool that will scan your machine and identify what the fault is.
Click here to download and start repairing.
If you’re not sure which of these options suits you best, think about it like this: If you’re still undecided if you will want to use the app in the future, disable it, and then enable it whenever you need to.
In case you don’t plan on using the app anymore, simply uninstall it and remove the app entirely from your hard drive.
Below, you will find both of these methods described in a step-by-step fashion:
➡ Disable the app
- Go to the Advanced tab on StartAllBack.

- At the bottom of the window will be a box with text that reads Disable program for current user. Click it.

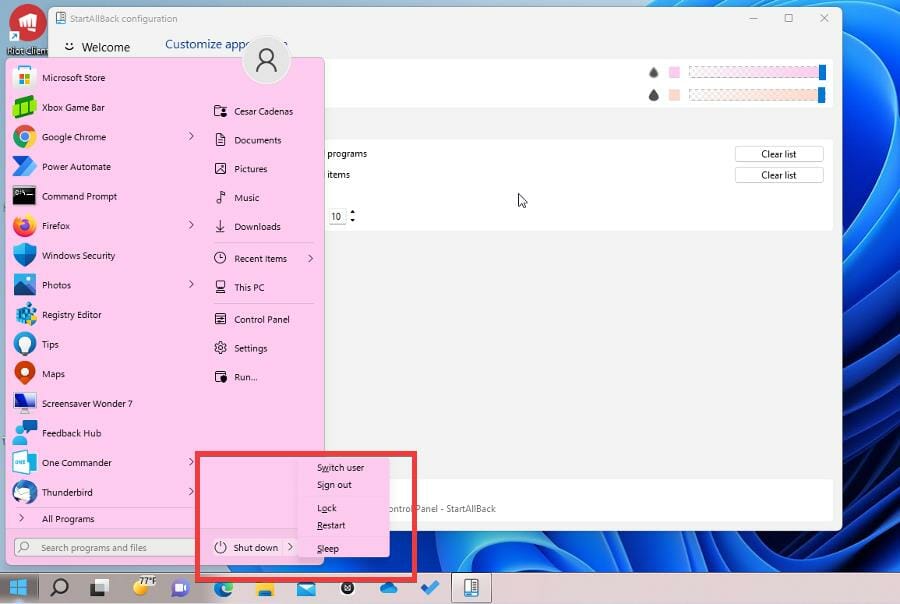
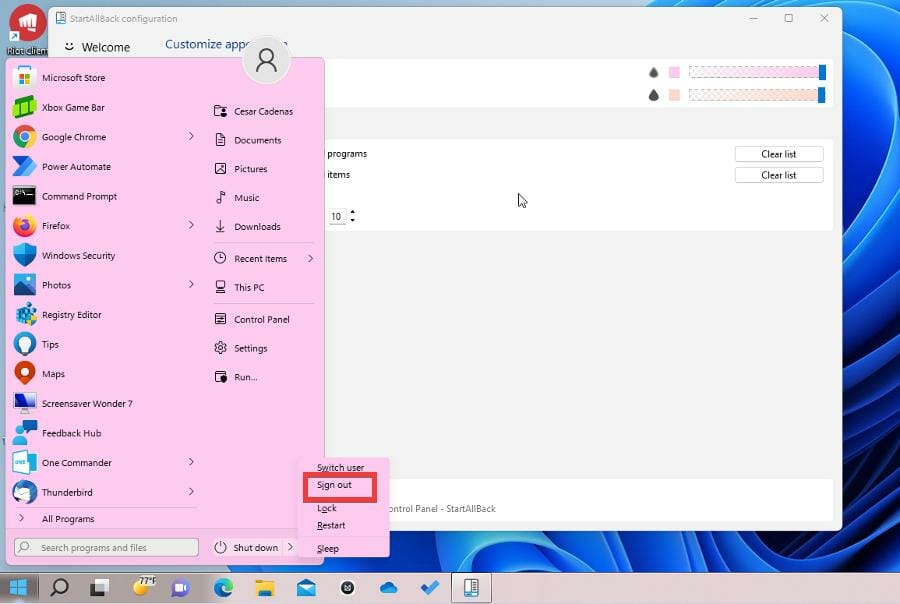
- Next, open the Start menu and click the arrow next to Shut down.

- Select Sign out.
- Sign back in to your Windows 11 computer.
- You will find that all the changes you made have now been disabled.

➡ Re-enable the app
- To enable StartAllBack again, go to the Control Panel.
- Click StartAllBar and the app will open again.

- If StartAllBar isn’t in the Control Panel, open the file explorer.
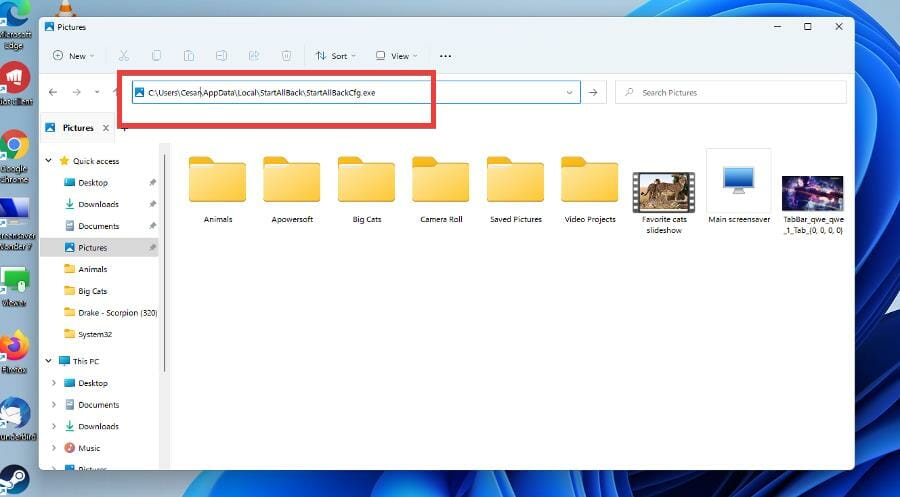
- In the address bar, type in C:UsersUSERNAMEAppDataLocalStartAllBackStartAllBackCfg.exe. Where it says USERNAME, type the name of your own.

- StartAllBack will appear. Return to Advanced and deselect the Disable option at the bottom.

- Sign out and back in again. The changes you made previously are now back.
- Conversely, you can uninstall StartAllBack.


➡ Uninstall the app entirely
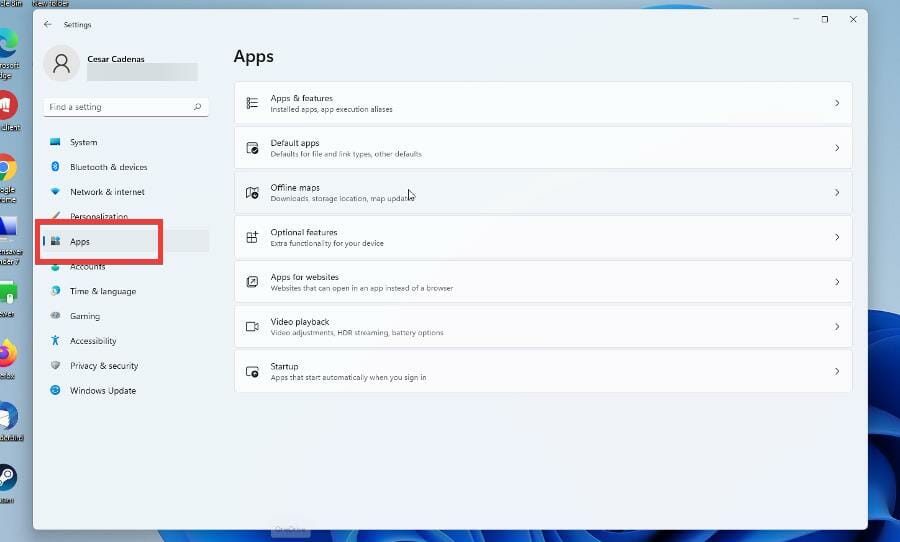
- Start by opening the Settings menu.
- Select Apps on the left hand side.

- Click Apps & features.
- Locate StartAllBack in the Apps list.

- Click the three dots on the right and select Uninstall.

If you want to avoid going through all these steps to uninstall software and want to ensure that all pieces of any software are removed from your device, we recommend that you use a specialized software uninstaller like CCleaner.
Are there other ways that I can customize my Windows 11 computer?
There are a lot of different ways to customize your machine. For example, you can customize what your Function Keys do thanks to an app called Microsoft PowerToys. After opening the app, you go to the Keyboard option, select which Function Key you want to change, and type in the command. Although, you can’t add CTRL+ALT+DEL to the app.
It’s also recommended that you purchase yourself a remote control software for your computer. It’s a useful app that gives you the ability to control another computer and certain aspects of it from anywhere, so long as the main computer has access to the host.

As for the future, a leak on Twitter has revealed that Windows 11 desktop stickers are making their way to the system. They’re stickers that allow you to pick and place decorative images of cute animals over your desktop. Nothing crazy or life-changing, but it’s certainly a cute way to change your computer’s look.
Feel free to leave a comment below if you have any questions on other Windows 11 apps. Also, leave comments about guides that you’d like to see or information on other Windows 11 features or list guides like this.
Still having issues? Fix them with this tool:
SPONSORED
If the advices above haven’t solved your issue, your PC may experience deeper Windows problems. We recommend downloading this PC Repair tool (rated Great on TrustPilot.com) to easily address them. After installation, simply click the Start Scan button and then press on Repair All.
![]()
Newsletter
by Cesar Cadenas
Cesar has been writing for and about technology going on for 6 years when he first started writing tech articles for his university paper. Since then, his passion… read more
Published on March 6, 2022
- Some Windows 11 users have proclaimed how they wish they could change Windows 11’s user interface to suit their needs.
- StartAllBack is an app that allows you to change how the Start menu and taskbar look.
- This guide will show you how to download and use StartAllBack so you can customize your Windows 11 machine.
XINSTALL BY CLICKING THE DOWNLOAD FILE
- Download Restoro PC Repair Tool that comes with Patented Technologies (patent available here).
- Click Start Scan to find Windows 11 issues that could be causing PC problems.
- Click Repair All to fix issues affecting your computer’s security and performance
- Restoro has been downloaded by 0 readers this month.
As it has been stated before ad nauseam, the overall user interface of Windows 11 has been a point of contention for users since its release.
The changes made to the Start menu, right-click context menu, taskbar, and others have rubbed people the wrong way. People started to raise the question of why fix what wasn’t broken?
Why did Microsoft undo Windows 10’s user interface? People liked that version. It does appear that Microsoft took inspiration from macOS when it was developing Windows 11 and got rid of a lot of the customization options people expect to have.
If you have this issue, it’s recommended that you download and use StartAllBack, an app that some people consider a must-have for Windows 11.
What is the StartAllBack feature?
StartAllBack is a user interface app that intends to “fix” everything that’s wrong with the Windows 11 user interface. It does this by giving people the option to revert things to a Windows 10 style, or even a Windows 7 style for those who miss the old interface.
And it doesn’t stop there as there are a lot of customization options on StartAllBack. You can even make the user interface look like something straight out of a Chromebook.
Other customization options include an improved File Explorer, Control Panel, the ability to move the taskbar to the top of the screen, new menus, new fonts, fast search, and so much more. There’s something it for everyone.
Now, this isn’t a free app that you can download. You do have to purchase a license to get yourself a copy, and there are even Business versions for purchase that allow you to change up to 400 different PCs.
Fortunately, StartAllBack is cheap and there is a free trial available if you want to try out the app.
This guide will show you how to download the free trial of StartAllBack and take you through some of the key features available on that particular version, so you can decide for yourself if you want the full version. The guide will also show how to access the settings and how to uninstall them.
How do I use StartAllBack?
1. Download and install it
- Open the StartAllBack webpage.
- In the page, scroll down and click the Download button with the latest version of StartAllBack.
- Click Save File in the new window that appears.
- Locate the file’s location and double-click it to begin installation. Then select Install For Me.
- Next, a window will asking you if you want to stick with Windows 11 look or switch to a Windows 7 or Windows 10 appearance.
- As an example, this guide will choose the Windows 10 option.
- As you can see from the taskbar, the style has changed to look similar to Windows 10.
- To change the layout, right-click the Start menu and select Properties.
- StartAllBack appears and you can continue customizing.
2. Customize the settings
- The settings options for StartAllBack appears as the left hand menu.
- The Start Menu allows you to customize the Start menu.
- You change the visual with the drop-down menu at the top. You can change it to match Windows 7, 8, or the default.
- You can also change how big the icon should be, what is displayed on the right, and what is highlighted.
- After configuring the settings, click the Start menu to see how it looks like.
- Taskbar, as the name suggest, allows you to change the taskbar.
- You change the Start menu icon, where the taskbar sits, and how big the icons should be.
- Customize the settings however you like.
- Explorer customizes the File Explorer.
- Options include three different styles, context menus, and a details pane.
- The File Explorer options are admittedly a little difficult to gage.
- Advanced allows you to change the color of the Start menu and taskbar.
- It also includes options on how to store and display recently opened files.
- Once done, the Start menu and taskbar look very different.
- About doesn’t offer any customization options other than giving the opportunity to purchase the full version and tell you how long you have in the free trial.
- To create your own Start menu, begin by selecting what style and how many icons you want.
- For example, the Start menu will be in a Windows 7 style with 20 small icons.
- You can allow what the Search function finds under Search and have the menu highlight new apps.
- Under Right Side Items, you can select which apps and feature appear in the Start menu. Selecting Link adds them to the left side and Menu adds them to the right side.
- Open your Start menu and see how it all looks.
4. Create a new taskbar
- Say for example, you want a segmented taskbar that sits at the top with its icons centered in a Windows 7 style with large icons.
- In the Taskbar section, go to the Tweak behavior and superpowers section.
- Make the changes you want like having the taskbar sit at the top segmented with dynamic transparency.
- Underneath Choose Taskbar style, select the changes you want like the visual style, icon size, and margins.
- Once done, the changes will appear immediatedly.
How can I get rid of StartAllBack?
You have two options when it comes to removing StartAllBack and getting back to the original version of Windows 11:
- Disabling the app – the quickest method from the two, and it also allows you to activate it with ease at any point in time if your choose to do so
- Uninstalling the app – this process can take a bit more time, and the process of re-installing the app again will also take extra time.
Some PC issues are hard to tackle, especially when it comes to corrupted repositories or missing Windows files. If you are having troubles fixing an error, your system may be partially broken.
We recommend installing Restoro, a tool that will scan your machine and identify what the fault is.
Click here to download and start repairing.
If you’re not sure which of these options suits you best, think about it like this: If you’re still undecided if you will want to use the app in the future, disable it, and then enable it whenever you need to.
In case you don’t plan on using the app anymore, simply uninstall it and remove the app entirely from your hard drive.
Below, you will find both of these methods described in a step-by-step fashion:
➡ Disable the app
- Go to the Advanced tab on StartAllBack.
- At the bottom of the window will be a box with text that reads Disable program for current user. Click it.
- Next, open the Start menu and click the arrow next to Shut down.
- Select Sign out.
- Sign back in to your Windows 11 computer.
- You will find that all the changes you made have now been disabled.
➡ Re-enable the app
- To enable StartAllBack again, go to the Control Panel.
- Click StartAllBar and the app will open again.
- If StartAllBar isn’t in the Control Panel, open the file explorer.
- In the address bar, type in C:UsersUSERNAMEAppDataLocalStartAllBackStartAllBackCfg.exe. Where it says USERNAME, type the name of your own.
- StartAllBack will appear. Return to Advanced and deselect the Disable option at the bottom.
- Sign out and back in again. The changes you made previously are now back.
- Conversely, you can uninstall StartAllBack.
➡ Uninstall the app entirely
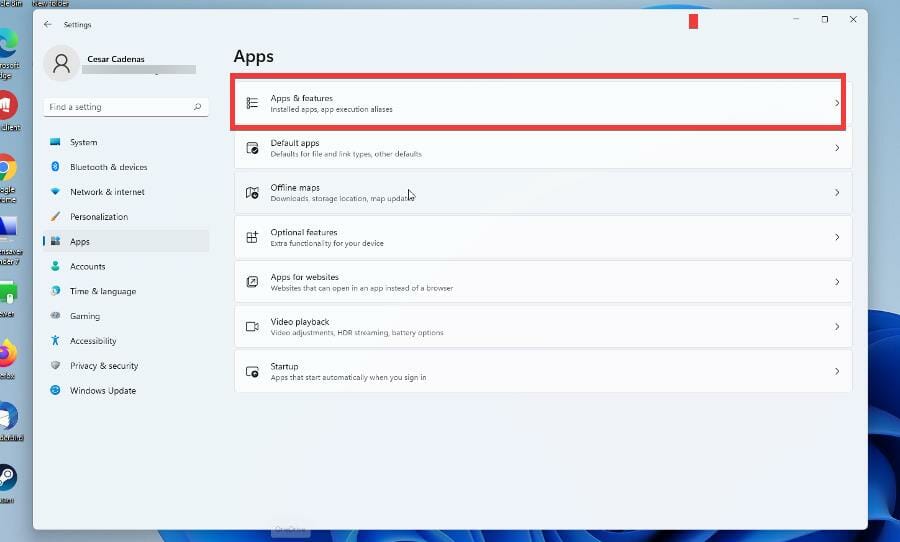
- Start by opening the Settings menu.
- Select Apps on the left hand side.
- Click Apps & features.
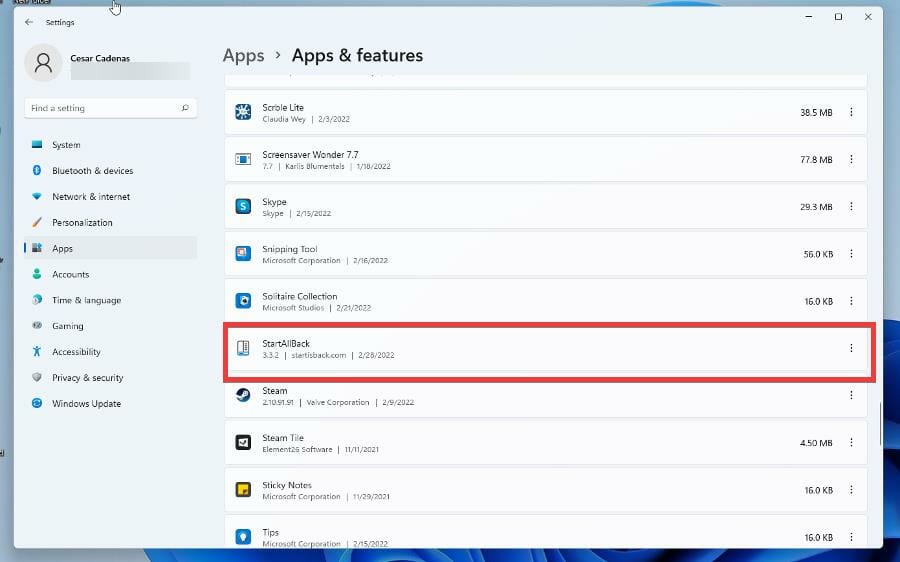
- Locate StartAllBack in the Apps list.
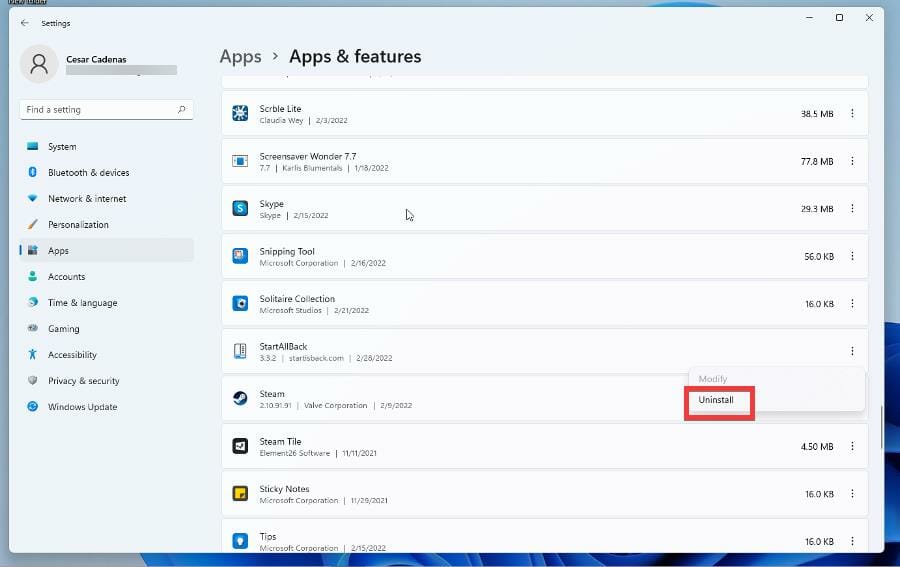
- Click the three dots on the right and select Uninstall.
If you want to avoid going through all these steps to uninstall software and want to ensure that all pieces of any software are removed from your device, we recommend that you use a specialized software uninstaller like CCleaner.
Are there other ways that I can customize my Windows 11 computer?
There are a lot of different ways to customize your machine. For example, you can customize what your Function Keys do thanks to an app called Microsoft PowerToys. After opening the app, you go to the Keyboard option, select which Function Key you want to change, and type in the command. Although, you can’t add CTRL+ALT+DEL to the app.
It’s also recommended that you purchase yourself a remote control software for your computer. It’s a useful app that gives you the ability to control another computer and certain aspects of it from anywhere, so long as the main computer has access to the host.
As for the future, a leak on Twitter has revealed that Windows 11 desktop stickers are making their way to the system. They’re stickers that allow you to pick and place decorative images of cute animals over your desktop. Nothing crazy or life-changing, but it’s certainly a cute way to change your computer’s look.
Feel free to leave a comment below if you have any questions on other Windows 11 apps. Also, leave comments about guides that you’d like to see or information on other Windows 11 features or list guides like this.
Still having issues? Fix them with this tool:
SPONSORED
If the advices above haven’t solved your issue, your PC may experience deeper Windows problems. We recommend downloading this PC Repair tool (rated Great on TrustPilot.com) to easily address them. After installation, simply click the Start Scan button and then press on Repair All.
![]()
Newsletter
Как было сказано ранее, общий пользовательский интерфейс Windows 11 был предметом разногласий для пользователей с момента его выпуска.
Изменения, внесенные в меню «Пуск», контекстное меню, вызываемое правой кнопкой мыши, панель задач и другие, вызвали недовольство пользователей. Люди начали поднимать вопрос, зачем чинить то, что не сломалось?
Почему Microsoft отменила пользовательский интерфейс Windows 10? Эта версия понравилась людям. Похоже, что Microsoft черпала вдохновение в macOS, когда разрабатывала Windows 11, и избавилась от многих параметров настройки, которые ожидают люди.
Если у вас возникла эта проблема, рекомендуется загрузить и использовать StartAllBack — приложение, которое некоторые считают обязательным для Windows 11.
Что такое функция StartAllBack?
StartAllBack — это приложение пользовательского интерфейса, которое намерено «исправить» все, что не так с пользовательским интерфейсом Windows 11. Он делает это, давая людям возможность вернуться к стилю Windows 10 или даже к стилю Windows 7 для тех, кто скучает по старому интерфейсу.
И это не останавливается на достигнутом, так как в StartAllBack есть много вариантов настройки. Вы даже можете сделать пользовательский интерфейс похожим на Chromebook.
Другие параметры настройки включают улучшенный проводник, панель управления, возможность перемещать панель задач в верхнюю часть экрана, новые меню, новые шрифты, быстрый поиск и многое другое. Там что-то это для всех.

Теперь это не бесплатное приложение, которое вы можете скачать. Вам нужно приобрести лицензию, чтобы получить себе копию, и есть даже бизнес-версии для покупки, которые позволяют вам заменить до 400 разных ПК.
К счастью, StartAllBack стоит дешево, и если вы хотите попробовать приложение, доступна бесплатная пробная версия.
Это руководство покажет вам, как загрузить бесплатную пробную версию StartAllBack, и познакомит вас с некоторыми ключевыми функциями, доступными в этой конкретной версии, чтобы вы могли сами решить, нужна ли вам полная версия. Руководство также покажет, как получить доступ к настройкам и как их удалить.
Как использовать StartAllBack?
1. Скачайте и установите его
- Откройте веб-страницу StartAllBack .
- На странице прокрутите вниз и нажмите кнопку «Загрузить» с последней версией StartAllBack.
- Нажмите « Сохранить файл» в появившемся новом окне.
- Найдите расположение файла и дважды щелкните его, чтобы начать установку. Затем выберите «Установить для меня».
- Затем появится окно с вопросом, хотите ли вы сохранить внешний вид Windows 11 или переключиться на внешний вид Windows 7 или Windows 10.
- В качестве примера в этом руководстве будет выбран вариант Windows 10.
- Как вы можете видеть на панели задач, стиль изменился и стал похож на Windows 10.
- Чтобы изменить макет, щелкните правой кнопкой мыши меню «Пуск» и выберите « Свойства».
- Появится StartAllBack, и вы сможете продолжить настройку.
2. Настройте параметры
- Параметры настройки для StartAllBack отображаются в виде меню слева.
- Меню «Пуск» позволяет настроить меню «Пуск».
- Вы меняете визуализацию с помощью раскрывающегося меню вверху. Вы можете изменить его, чтобы он соответствовал Windows 7, 8 или по умолчанию.
- Вы также можете изменить размер значка, что отображается справа и что выделено.
- После настройки параметров щелкните меню «Пуск», чтобы увидеть, как оно выглядит.
- Панель задач, как следует из названия, позволяет изменить панель задач.
- Вы меняете значок меню «Пуск», расположение панели задач и размер значков.
- Настройте параметры, как вам нравится.
- Проводник настраивает проводник.
- Опции включают три разных стиля, контекстные меню и панель сведений.
- Параметры File Explorer, по общему признанию, немного сложны для оценки.
- Дополнительно позволяет изменить цвет меню «Пуск» и панели задач.
- Он также включает в себя параметры хранения и отображения недавно открытых файлов.
- После этого меню «Пуск» и панель задач выглядят совсем по-другому.
- About не предлагает никаких вариантов настройки, кроме возможности приобрести полную версию и сообщить вам, сколько времени у вас есть в бесплатной пробной версии.
3. Создайте новое меню «Пуск».
- Чтобы создать собственное меню «Пуск», начните с выбора стиля и количества значков, которые вы хотите.
- Например, меню «Пуск» будет в стиле Windows 7 с 20 маленькими значками.
- Вы можете разрешить то, что функция поиска находит в разделе « Поиск », и выделить в меню новые приложения.
- В разделе «Элементы правой стороны» вы можете выбрать, какие приложения и функции будут отображаться в меню «Пуск». Выбор «Ссылка» добавляет их слева, а «Меню» — справа.
- Откройте меню «Пуск» и посмотрите, как все это выглядит.
4. Создайте новую панель задач
- Скажем, например, вам нужна сегментированная панель задач, расположенная вверху со значками по центру в стиле Windows 7 с большими значками.
- В разделе «Панель задач» перейдите в раздел « Настроить поведение и суперспособности ».
- Внесите нужные изменения, например, расположите панель задач в верхней части с динамической прозрачностью.
- В разделе « Выбрать стиль панели задач» выберите нужные изменения, такие как визуальный стиль, размер значков и поля.
- После этого изменения появятся сразу.
Как я могу избавиться от StartAllBack?
У вас есть два варианта удаления StartAllBack и возврата к исходной версии Windows 11:
- Отключение приложения — самый быстрый метод из двух, а также позволяет легко активировать его в любой момент времени, если вы решите это сделать.
- Удаление приложения — этот процесс может занять немного больше времени, и процесс повторной установки приложения также займет дополнительное время.
Если вы не уверены, какой из этих вариантов подходит вам лучше всего, подумайте об этом так: если вы все еще не решили, хотите ли вы использовать приложение в будущем, отключите его, а затем включите, когда вам нужно.
Если вы больше не планируете использовать приложение, просто удалите его и полностью удалите приложение с жесткого диска.
Ниже вы найдете пошаговое описание обоих этих методов:
➡ Отключить приложение
- Перейдите на вкладку « Дополнительно » в StartAllBack.
- В нижней части окна будет поле с текстом «Отключить программу для текущего пользователя». Нажмите на нее.
- Затем откройте меню «Пуск» и щелкните стрелку рядом с «Завершение работы».
- Выберите Выйти.
- Войдите снова на свой компьютер с Windows 11.
- Вы обнаружите, что все сделанные вами изменения теперь отключены.
➡ Повторно включите приложение
- Чтобы снова включить StartAllBack, перейдите в Панель управления.
- Нажмите StartAllBar, и приложение снова откроется.
- Если StartAllBar отсутствует на панели управления, откройте проводник.
- В адресной строке введите C:UsersUSERNAMEAppDataLocalStartAllBackStartAllBackCfg.exe. Там, где он говорит, USERNAME, введите свое имя.
- Появится StartAllBack. Вернитесь в раздел «Дополнительно» и снимите флажок «Отключить» внизу.
- Выйдите и снова войдите. Изменения, которые вы внесли ранее, теперь восстановлены.
- И наоборот, вы можете удалить StartAllBack.
➡ Полностью удалить приложение
- Начните с открытия меню настроек .
- Выберите Приложения с левой стороны.
- Щелкните Приложения и функции.
- Найдите StartAllBack в списке приложений.
- Нажмите на три точки справа и выберите Удалить.
Если вы хотите избежать выполнения всех этих шагов по удалению программного обеспечения и хотите убедиться, что все части любого программного обеспечения удалены с вашего устройства, мы рекомендуем вам использовать специализированный деинсталлятор программного обеспечения, такой как IObit Uninstaller Pro.
Существуют ли другие способы настройки моего компьютера с Windows 11?
Существует множество различных способов настройки вашей машины. Например, вы можете настроить действие своих функциональных клавиш благодаря приложению Microsoft PowerToys. После открытия приложения вы переходите к опции «Клавиатура», выбираете функциональную клавишу, которую хотите изменить, и вводите команду. Хотя вы не можете добавить CTRL+ALT+DEL в приложение.
Также рекомендуется приобрести программное обеспечение для удаленного управления своим компьютером. Это полезное приложение, которое дает вам возможность управлять другим компьютером и некоторыми его аспектами из любого места, если главный компьютер имеет доступ к хосту.

Что касается будущего, утечка в Твиттере показала, что стикеры рабочего стола Windows 11 проникают в систему. Это наклейки, которые позволяют вам выбирать и размещать декоративные изображения милых животных на рабочем столе. Ничего сумасшедшего или изменяющего жизнь, но это, безусловно, симпатичный способ изменить внешний вид вашего компьютера.
Не стесняйтесь оставлять комментарии ниже, если у вас есть какие-либо вопросы о других приложениях для Windows 11. Кроме того, оставляйте комментарии о руководствах, которые вы хотели бы видеть, или информацию о других функциях Windows 11, или перечисляйте руководства, подобные этому.
StartAllBack — программа для установки меню «Пуск» от Windows 7 в Windows 11 с возможностью его тонкой настройки. Это условно-бесплатное приложение с пробным периодом использования в 100 дней, предназначено для работы только в ОС Windows 11 (64 бит). Интерфейс программы имеет перевод на русский язык.
Программа StartAllBack предназначена для изменения стандартной темы оформления меню «Пуск» в Windows 11 на классическое оформление времен Windows 7. Кроме того, в приложении также предусмотрены настройки оформления и работы некоторых функций «Панели задач» и «Проводника».
Утилита StartAllBack не просто устанавливает в Windows 11 меню «Пуск» от Windows 7, но и позволяет пользователю тонко настроить его, а именно:
- Выбрать один из 3-х доступных стилей оформления, изменить размер значков и установить количество строк.
- Настроить размеры значков и стиль раздела «Все программы», изменить содержимое и тип сортировки.
- Изменить цвет и уровень прозрачности.
- Настроить опцию поиска меню «Пуск», указав, в каких разделах будет осуществляться поиск элементов по введенному пользователем тексту.
- Настроить содержимое правой колонки меню «Пуск», включив/выключив отображение стандартных элементов/разделов («Изображения», «Документы» и т.д.), а также настроив их поведение при клике мышью (либо открытие элемента в «Проводнике», либо вывод выпадающего меню с содержимым раздела).
- Добавить свои папки в правую колонку меню «Пуск» и присвоить им собственные значки/иконки.
Настройки для «Панели задач» в программе StartAllBack:
- Изменение стиля оформления, размеров значков и отступов между ними.
- Настройка цвета панели и уровня ее прозрачности.
- Изменение значка меню «Пуск», выбрав один из 5-ти доступных вариантов либо загрузив собственный значок.
- Изменение положения «Панели задач».
- Возможность выбора режима группировки элементов на «Панели задач», в т.ч. полностью отключить группировку, чего не хватало многим пользователям Windows
- Возможность расположения значков по центру «Панели задач», разбиения панели на сегменты (если закрыть все окна, видимыми останутся системный трей и значок меню «Пуск»), а также включения/выключения динамической прозрачности.
Настройки StartAllBack для «Проводника» и системы Windows 11:
- Выбор одного из 3-х вариантов стилей для верхней части файлового менеджера «Проводник» (строка инструментов, как в Windows 7 или Windows 11, либо ленточный интерфейс, как в Windows 10).
- Включение/выключение слюдяного эффекта в верхней части окна «Проводника».
- Активация/деактивация классической строки поиска и классического контекстного меню.
- Включение/выключение системного журнала недавно открывавшихся программ и/или документов с возможностью очистки истории.
Это не весь перечень функциональных возможностей утилиты StartAllBack.
Как пользоваться программой StartAllBack?
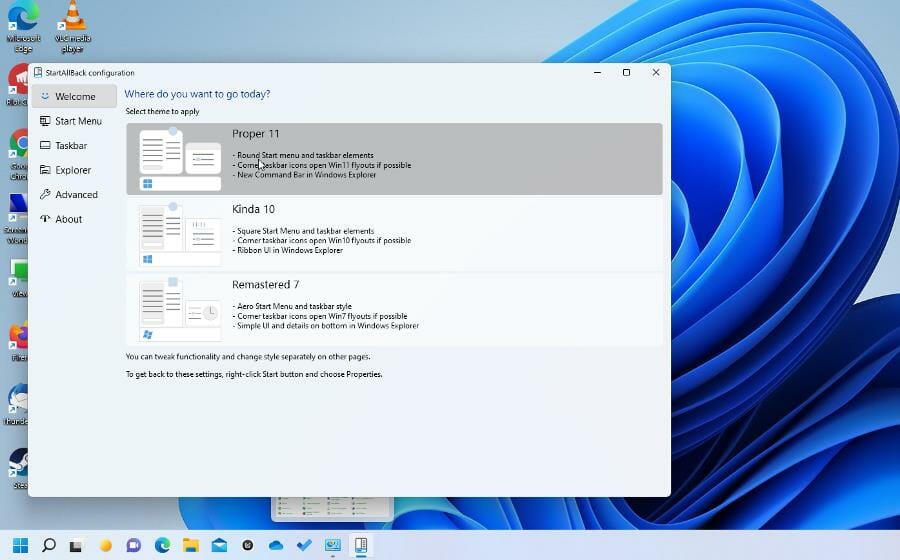
Для изменения оформления меню «Пуск» при помощи StartAllBack пользователю нужно лишь установить программу. Во вкладке «Приветствие» можно выбрать один из трех доступных стилей (Windows 7, 10 или 11), применяющихся одновременно к меню «Пуск» и «Панели задач». В остальных вкладках пользователь сможет внести более тонкие изменения для выбранного стиля, а также настроить функциональность меню «Пуск», «Панели задач» и «Проводника».
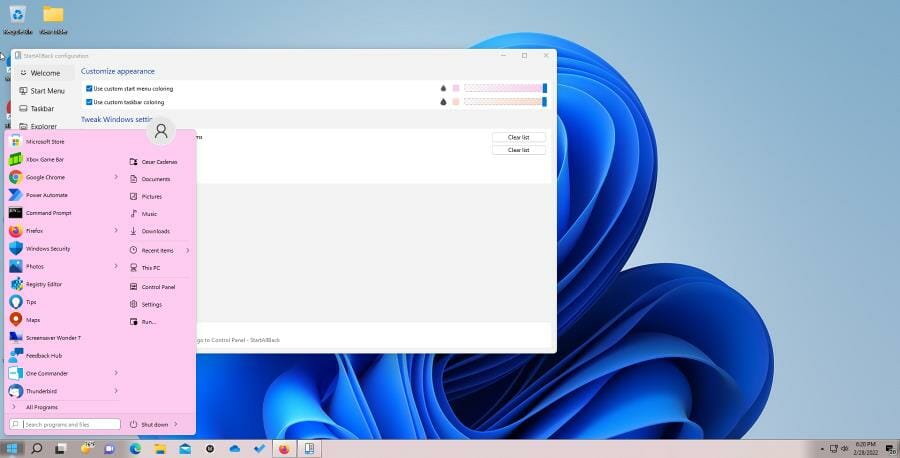
Утилита для кастомизации интерфейса StartAllBack (StartIsBack в прошлом) обновилась до версии 3.0, получив поддержку Windows 11, тем самым позволяя пользователям новой операционной системы добавить в неё дизайн Windows 7. Говоря точнее, программа скорее комбинирует дизайны Windows 11 и Windows 7, а не полностью возвращает дизайн «Семёрки».
К примеру, StartAllBack 3.0 добавляет старый дизайн «Пуска» и сдвигает его в левую часть панели задач, но при этом меню продолжает парить над таскбаром. Впрочем, панель задач можно прикреплять к любой из сторон экрана — в Windows 11 она находится снизу, и даже изменение реестра позволяет переместить её только наверх (левая и правая стороны недоступны).
Также утилита позволяет изменить дизайн «Проводника» подстать дизайну Windows 7. Впрочем, есть ещё и тема Win10 Ribbon UI, которая комбинирует дизайны Windows 11 и 10.
StartAllBack 3.0 привносит не только дизайн старых систем, но и функционал: к примеру, на панель задач снова можно перемещать файлы простым перетаскиванием (функцией Drag-and-Drop).
StartAllBack стоит 5 долларов, но пользователи старой версии в лице StartIsBack могут обновиться за 1,5 доллара.
- Windows 7 мертва. Как стала лучшей и почему осталась такой до сих пор
- 10 приложений, которые нужно сразу установить на новый компьютер
- Windows 11 должна была быть такой сразу: обзор крупнейшего обновления 22H2
- Сделал Linux из Windows 11. 10+1 тема, меняющая систему до неузнаваемости
- Вам придётся обновиться с Windows 7. Заставит не Microsoft, а видеокарта
Автор: Baguvix от 29-12-2022, 22:00, Посмотрело: 2 203, Обсуждения: 0

Версия программы: StartAllBack 3.5.7 / StartIsBack++ 2.9.17 / (2.9.1) StartIsBack + 1.7.6
Официальный сайт: startisback.com
Язык интерфейса: Русский, Английский и другие
Лечение: не требуется (инсталлятор уже пролечен)
Системные требования:
Windows® 8.1 | Windows 10 | Windows 11
Описание:
StartIsBack++ возвращает в операционные системы Windows 8.1 и Windows 10 полнофункциональную кнопку запуска меню Пуск, такую же как и в Windows 7. StartIsBack существенно улучшает удобство использования рабочего стола и делает новый экран упорядоченным, наиболее удобным.
Примечание!!! При установке, на первой странице установщика, будет предложено изменить домашнюю страницу браузера. Не забудьте снять галочку.
©Torrent-Soft.Pro


Загрузил: Baguvix (28 декабря 2022 06:30)
Взяли: 1226 | Размер: 3,17 Mb
Последняя активность: не наблюдалась
StartAllBack 3.5.7 (Windows 11) StartIsBack++ 2.9.17 (Windows 10) StartIsBack+ 1.7.6 (Windows 8.1) + Orb Pack RePack by KpoJIuK (2 файла)
![]() INSTALL.cmd (732 b)
INSTALL.cmd (732 b)![]() StartAllBack.v3.5.7.exe (3,17 Mb)
StartAllBack.v3.5.7.exe (3,17 Mb)
- 100
- 1
- 2
- 3
- 4
- 5
Категория: Иконки, Разное / Другое
Уважаемый посетитель, Вы зашли на сайт как незарегистрированный пользователь.
Мы рекомендуем Вам зарегистрироваться либо войти на сайт под своим именем.