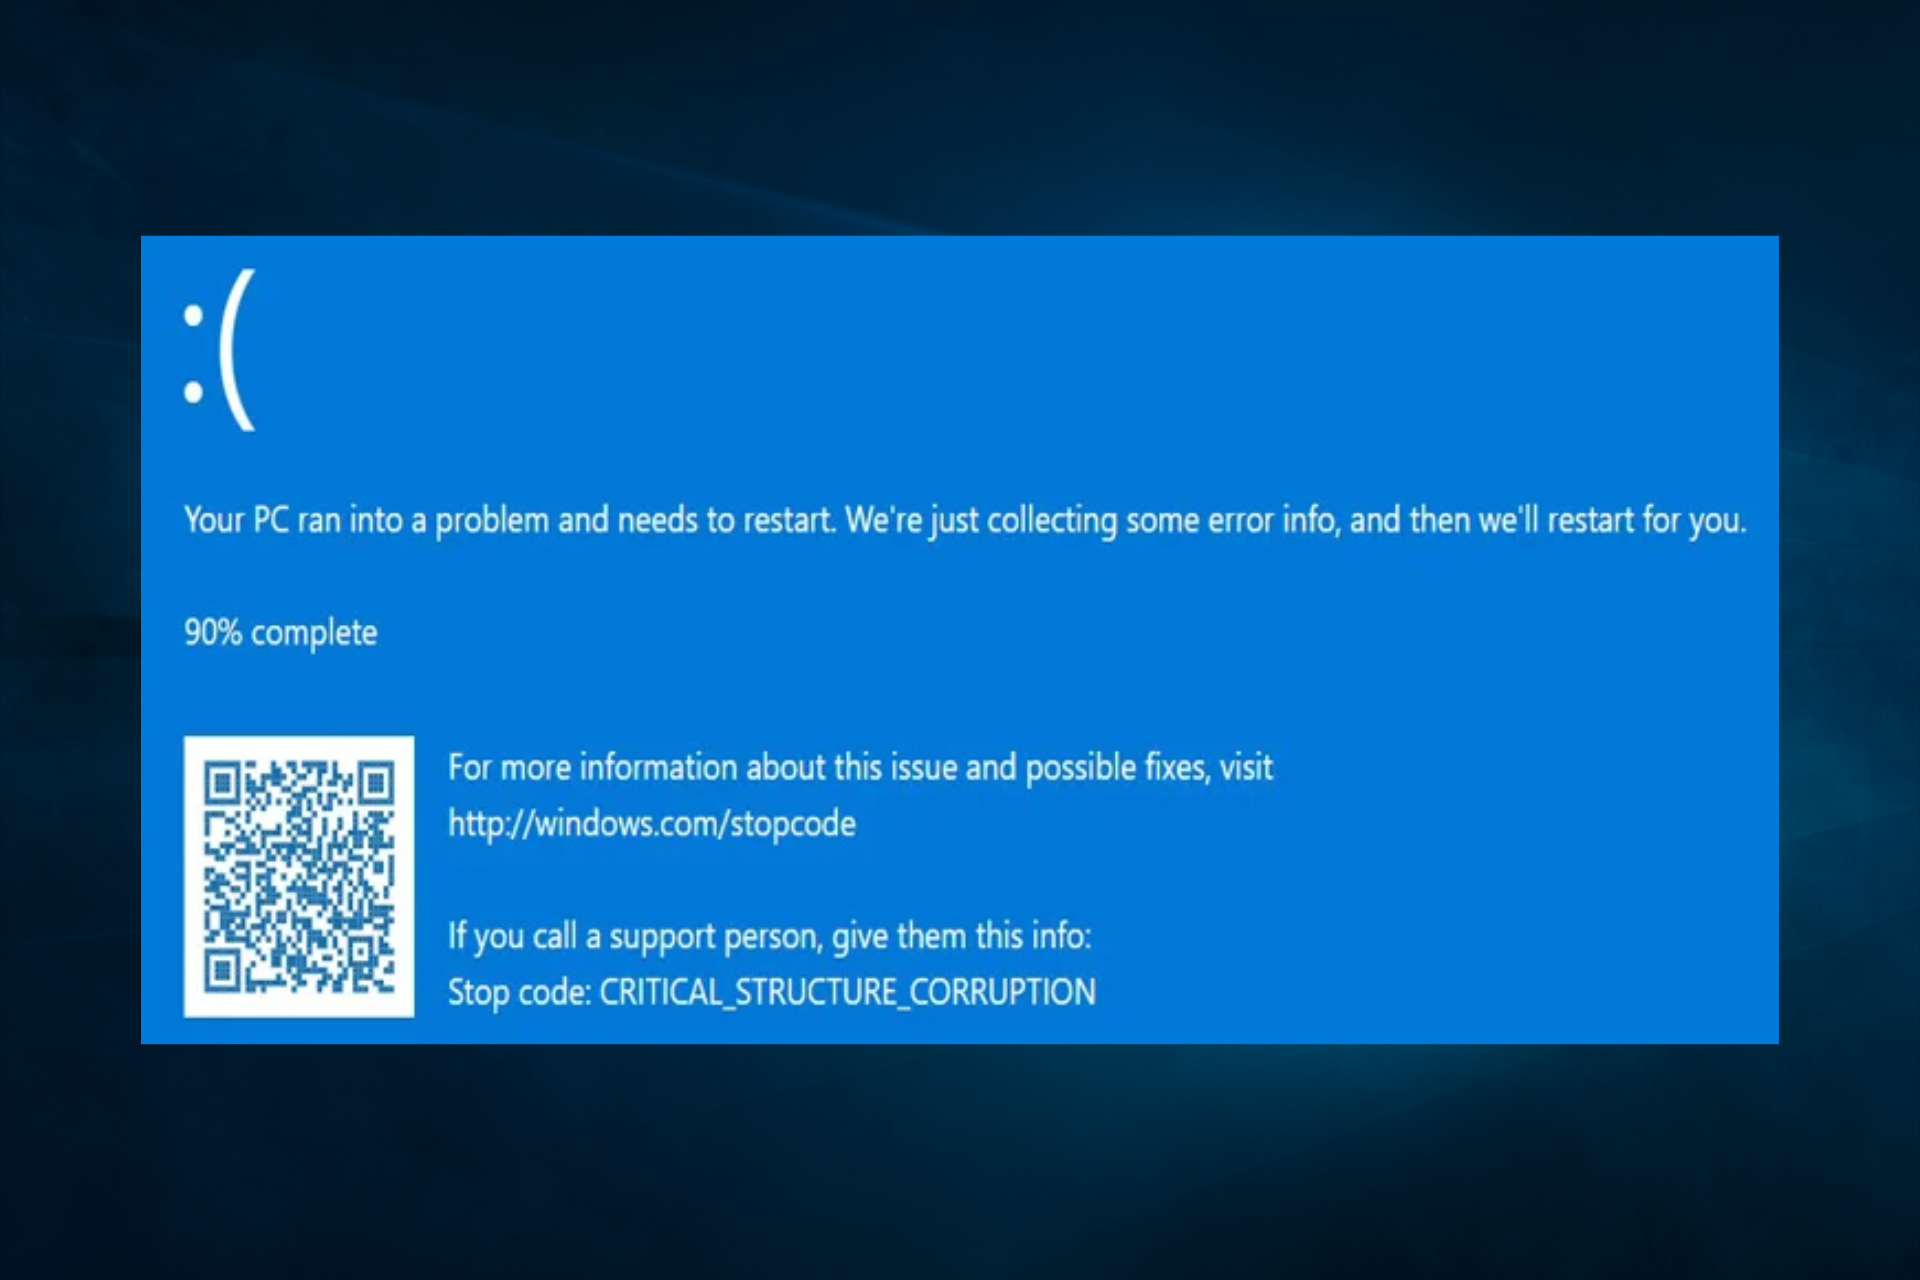
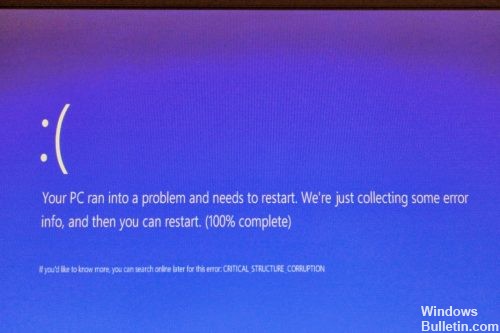
STORE_DATA_STRUCTURE_CORRUPTION is a BSOD error found to occur in Windows 10 devices. This Blue Screen of Death issue refers to the detection of corrupt Data Structure by Store Component itself. The stop error has the bug check value of 0x000001C7.
The error occurs with unusual messages when attempting to start a program or ending it. Desktop area freezes for a while and makes working along impossible. But the most annoying issue you will come across is continuous reboot of the PC. STORE DATA STRUCTURE CORRUPTION commonly occurs because of outdated device drivers, Virus infection, incorrect memory allocation, having conflicting applications in the system, missing necessary OS resources. Furthermore, having low Hard Disk Space, defective areas in it, using additional drive might come out with the same result. We have to eliminate this naughty bug forever and so go through the below-mentioned workarounds.
Here is how to fix STORE_DATA_STRUCTURE_CORRUPTION Error BSOD Windows 10 –
Stop Automatic Restart for Windows to make a proper environment
As Windows 10 will tend to have continuous abnormal reboot when diagnosed with STORE_DATA_STRUCTURE_CORRUPTION Error BSOD, you will run in short of an opportunity to understand the root cause and probable resolution. So making the environment to deploy workarounds comes at the top of the priority list. We can block this Automatic Restarting easily using the following guidelines –
- First of all, save ongoing applications and close it. Move directly to the Desktop area by making a combined press of Win+D.
- Now, when in place make a right click on This PC icon and choose Properties from the visible menu.
- On the following page, click “Advanced system properties” from the left pane.
- System Properties wizard will be visible in a moment where you need to shift into its Advanced tab.
- Roll the pointer to Startup and Recovery section and hit Settings button from here.
- Prior to opening a new wizard on display, unmark the box before Automatically restart located in System failure region. Select Ok button at the tail end and save these changes.
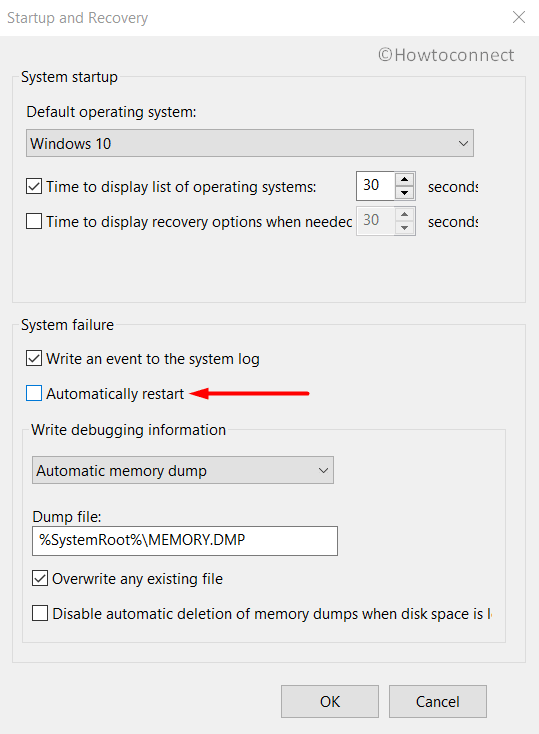
Now, when these changes are made, Windows will not reboot anymore automatically and you can have enough time to work along.
Run Windows Blue Screen Troubleshooter
As BSOD issues were unstoppable in Windows 10, Microsoft thought for an alternative and the best outcome represented with developing a default tool. Windows Blue Screen Troubleshooter is a built-in utility that can completely resolve to stop errors and you can have a trouble-free device as the aftermath. To have this super exciting tool, you need to have Windows 10 Fall Creators Update or higher version. When you own it, the procedure to deploy utility is as follows –
Step-1: Move the pointer to the left bottom corner and do a click on the Start menu.
Step-2: Once the menu spreads up, do a click on the Settings cog to launch it.
Step-3: When in the app accessible area, select Update & Security and load the consequent page.
Step-4: Moving ahead, choose Troubleshoot from the left-hand side and straightway jump next to the adjacent pane.
Step-5: Reach to Blue Screen option in the list and perform a click on it.
Step-6: Hit Run the Troubleshooter option once show up in extended pane and allow the tool to take action.
After this utility resolves STORE_DATA_STRUCTURE_CORRUPTION Error BSOD, you can have relief.
Install Cumulative Updates patches right away
Microsoft keeps on releasing the cumulative updates, major patches regularly. These are packets of bug fixes as well as a collection of recent features. It’s shocking if we continuously ignore these and fall into STORE_DATA_STRUCTURE_CORRUPTION Error BSOD. Let’s make the OS stronger by installing the patches in below method –
Important- Manage to get connected with Internet Connection via Ethernet cable or Wi-Fi before starting this resolution. In case of using the Data from Mobile Hotspot, ensure disabling Metered Connection as there will be no downloading in that mode.
- Open Windows Settings by making a combined press of “Win logo + I” hotkeys.
- From app UI, reach out to Update & Security region and do a click on it.
- Prior opening to additional settings page, choose Windows Update in the left pane.
- Transfer self to corresponding right side and hit a click on Check for updates button. You might see “You’re up to date” message, ignore it.
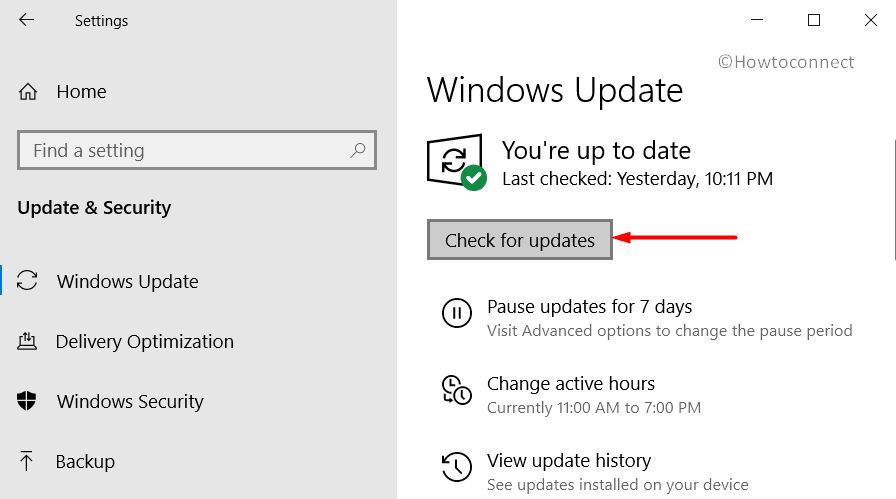
- Upon arriving all the patches here, make a click on Download located below each.
- Downloading will start immediately and after it gets over, the installation will be initiated autonomously.
- Don’t leave the device unattended and restart once asked.
When the Windows is up to date, STORE_DATA_STRUCTURE_CORRUPTION Error BSOD will be disappeared hopefully.
Update Drivers to solve the Blue Screen error STORE_DATA_STRUCTURE_CORRUPTION
Every single time, we devote to find the reason behind Stop errors, outdated device drivers come at the top. Old, troublesome drivers can be made up to date using Windows Device Manager easily. Drivers need update are indicated with highlighted indication hence task becomes easy. Let’s launch the default app and continue task using the below guidelines –
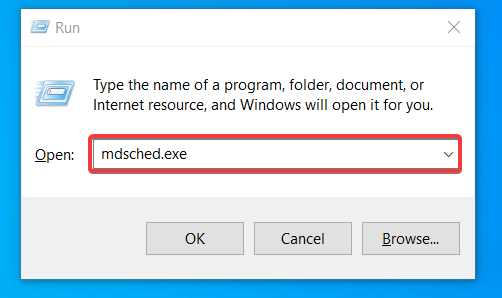
- Perform a combined press of “Windows logo and R” keys to open the Run dialog box.
- In the text box available here, type devmgmt.msc and click Ok button.
- Device Manager once unrolls on display, you need to have a close glance in the console for an exclamation mark in it.
- If found, expand the sane by clicking and do a right click on the drivers.
- Select Update driver option to initiate the process in the first place. Follow the further instructions as coming on display and complete the method.
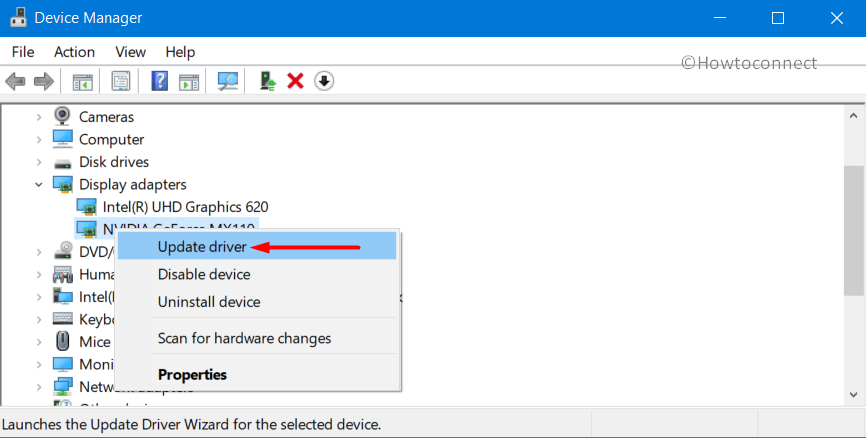
When all these drivers get updated, there should not be any more STORE_DATA_STRUCTURE_CORRUPTION Error BSOD in your Windows 10.
Enter Safe Mode
When a Windows Device is booted in Safe Mode, it starts with loading only basic processes and services. Hence, heals lot many crucial issues easily and completely. This method is prevalent from ancient times and came forward whenever Windows fall in trouble. Let’s Boot your defective Computer in Safe Mode using below steps –
- Hover the pointer to Start menu and do a right click on it eventually.
- When the Win+X Menu shows up, choose Run.
- Once you come across a text box, type msconfig, and press Enter key.
- On immediate effect, System Configuration popup window will come in the view.
- Move to its Boot tab and reach out to second half named Boot options.
- Proceeding ahead, check the box before Safe Boot and make grayed out options alive.
- Moving ahead in the options, hit the radio button for Minimal to continue.

- From the bottom of this page, hit Apply and then Ok afterward to save these changes.
- Now, leave the wizard and reboot the Windows initially following the usual method. (Start menu> Power cog> Restart).
- On the next powering up, keep on tapping F8 key at a stretch.
- The next page will come ahead and choose the Safe Boot option.
- Get into the Safe Mode in the next step automatically.
Perform Windows Defender Full Scan
Malware is present everywhere around and we all are well familiar with it. Still, we fight to escape from these culprits as they often come in disguise. When these bugs enter into the system, deletes necessary elements and device runs in STORE_DATA_STRUCTURE_CORRUPTION Error BSOD. Windows Security developed by Microsoft for Windows 10 can offer you the best deal of this age in Virus affairs. We will now clean all the threats launching the default app in the below process –
- Take the mouse pointer to bottom left end and eventually make a click in the Search icon.
- When the Taskbar Search opens up, type security in the blank search area and select Windows Security peeking in the result.
- Moving ahead to the app, choose Virus & threat protection section lying in the left pane.
- After jumping on to the corresponding pane, do a click on Scan options link.
- Prior to opening all the methods, select radio button ahead of Full scan and hit Scan now to start detecting for malware.
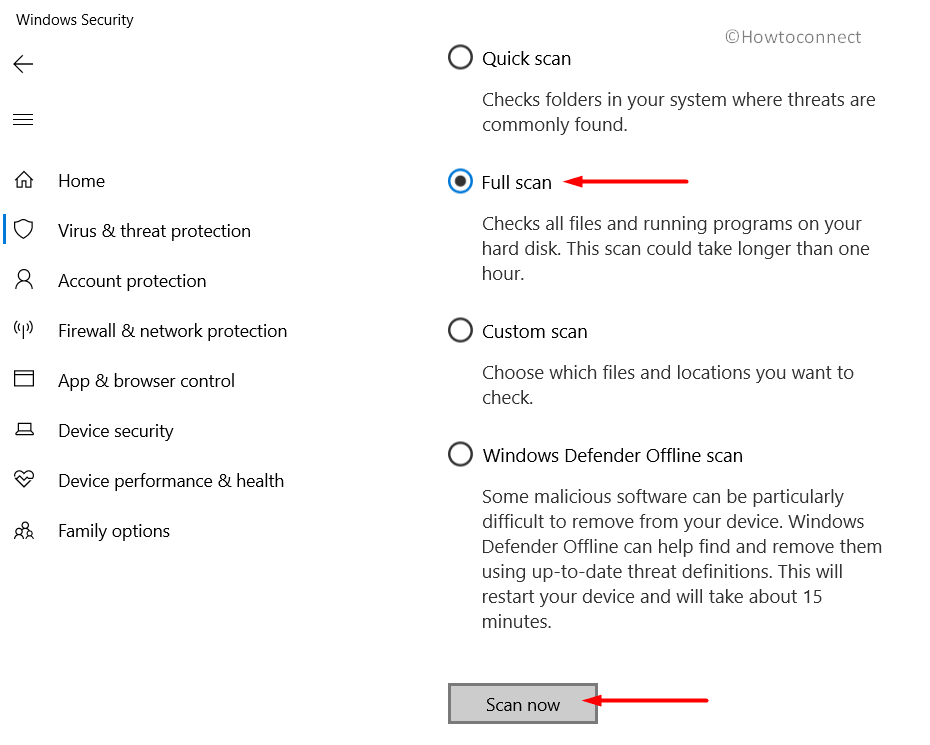
- Upon finishing the process, you will be shown the result. If there is any vulnerability present, make a click on Clean threats option to dismiss them.
- On the following page, choose Remove and then Start actions among three available options and let the utility to take measures.
Use System File Checker – Quick heal for OS component corruption
Windows can face system files corruption, missing DLL elements quite often and bring up STORE_DATA_STRUCTURE_CORRUPTION Error BSOD. The execution of System File Checker is the quick heal solution here. You can avail the utility in the below procedure –
- Open the Taskbar search by making together press of Win+S keys.
- In the search box given here, type cmd.exe and do a right click on Command Prompt once hits in the result.
- Select Run as Administrator from available options to move ahead.
- After User Account Control asks for your consent, provide approval by choosing Yes.
- On the Black Elevated Command Prompt window, type following command and hit Enter key.
sfc /scannow
Immediately, the System File Checker will start looking for corrupted files as well as missing DLL elements. Fixing will start automatically after detection. This might take a quite long period, hence, wait for the process to end normally. Once these issues resolved, STORE_DATA_STRUCTURE_CORRUPTION Error BSOD Windows 10 will disappear.
Uninstall Similar Programs to avoid collision between them
Two similar apps when staying close can come in the collision and this mislead will result in erasing system components necessary for OS. Hence STORE_DATA_STRUCTURE_CORRUPTION Error BSOD is imminent and we cannot let it happen. As a resolution process, removing one of these will be enough. Let’s move with below guidelines to uninstall an application –
- Get access to Run, type appwiz.cpl in the textbox and hit the Ok button from this dialog.
- Program and Features window upon unrolling, reach to the applications responsible for causing BSOD error.
- Do a right click on each at a time and select Uninstall option.
- Keep on following the instructions coming on display to completely remove these programs.
- When the process is accomplished, Restart the device and let it power up again.
- Check if there is any BSOD issue present. If negative, you can now Download and install the same app again.
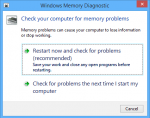
Settle Memory Problems and defective areas in RAM
STORE_DATA_STRUCTURE_CORRUPTION Error BSOD is an outcome of defective memory devices and RAM having defective areas in it. We can fix these issues quite easily only letting the “Windows Memory Diagnostic” work along. Here is how to do this task –
- Press the Windows key and I together until Windows Settings app launches.
- Once opened the app, type memory in the search box available here.
- Select “Diagnose your computer’s memory problems” after being visible.
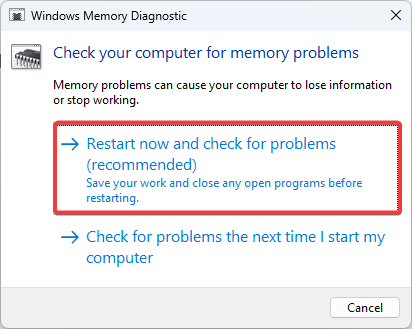
- Windows Memory Diagnostic will come up in the process and you need to make a click on “Restart now and check for problems (recommended)” located in the wizard.

- Windows will Restart initially for the first cycle and when coming back to operation, a blue screen will start detecting memory problems in the computer.
- When the progress rate hits 100%, it will again force the OS to reboot for the second time.
- Returning to Desktop further, you can check the result of diagnosis in the Notification area of System Tray.
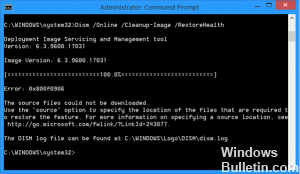
Patch up Windows Image issues using DISM tool
Corrupted Windows Image files come ahead to cause STORE_DATA_STRUCTURE_CORRUPTION Error BSOD quite often. As a fix, the DISM tool will be handier. The guidelines to call up the utility is as follows –
With the rolling cursor to Taskbar area, do a right-click on an empty field.
From the menu, select Task Manager and open the app in a separate window.
Moving on the app UI, select File option from the left top corner and select also Run new task option.
Type cmd in the text field and also check the box saying “Create this task with administrative privileges”.
Press the Enter key and click Yes when UAC prompt shows up.
In the appearing black window, type the following command and hit Enter key.
DISM.exe /Online /Cleanup-image /Restorehealth
The tool will start taking actions against corrupted Windows image files and fix them. You can get the flawless PC after the task gets over.
Execute System Restore and abandon recent changes
You might come across STORE_DATA_STRUCTURE_CORRUPTION Error BSOD just after carrying out a task of installing something in Windows. Uninstalling a program might give the same result. The reason is, traces in Windows Registry after those changes moved in the wrong way. A simple technique to avoid this error is to execute the System Restore and head back to the previous point.
Note- You have to own previously created Restore points to use this workaround. Skipping is recommended if you lack these. Fortunately, if your Windows have such points, move with below instructions –
- Press the Windows Key and upon opening the Start menu, type rstrui.
- Select rstrui Run command from the Best match results.
- In the upcoming wizard, hit Next button to proceed ahead.
- On the consequent page, select Show more restore points and uncover all previous ones.
- From the list make a click on the latest one and hit Next button once again.
- After the following page come to vision, do a click on Finish and let the utility to start restoring.
Remove Windows Update Files fall in Manipulation
We have discussed the necessity of Windows Update before and amazingly, the process is an autonomous one. But, if this well-furnished process ends up in termination abnormally, it might be calling STORE_DATA_STRUCTURE_CORRUPTION Error BSOD immediately. The ultimate resolution is to cut these files off from system going through below steps –
- Open the Windows Settings app and make a click on Update & Security tile.
- On the next page upon coming up, select Windows update from the left side and jump next to the corresponding pane.
- Perform a click on View update history link to pass forward next page.
- Here, select the Uninstall updates link and open up a new window entitled Installed Updates.
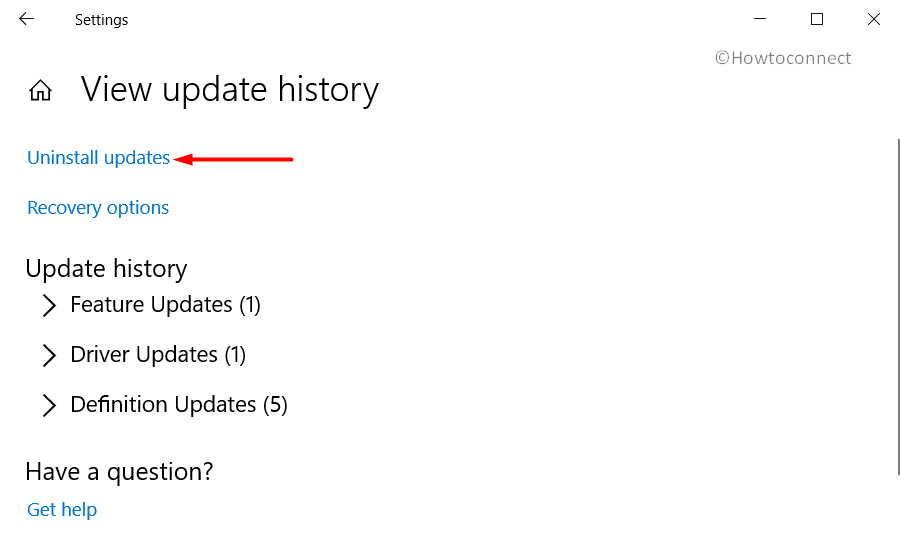
- Reach to the last received patch and select it afterward.
- Hit Uninstall option visible at the top ribbon to start removing these files.
- Start following the next moves according to the instruction given on screen until these get removed.
Disconnect the Additional Hard Disk and Re-plug when BSOD error resolves
Some people have observed symptoms of STORE_DATA_STRUCTURE_CORRUPTION Error BSOD just after starting to use an additional HDD. These days, an additional Hard Drive is necessary for versatile reasons and if you are also facing a similar issue, the solution is pretty simple as well. Just remove the disk for a while and reconnect after confirming that there is no more issue in the system. Move ahead with these instructions –
- Disconnect the Hardware items one by one first and keep them in a safe location.
- Restart Windows 10 PC in a normal way (Start menu> Power cog> Restart).
- Prior to returning in desktop, check if there is any STORE_DATA_STRUCTURE_CORRUPTION Error BSOD Windows 10 present.
- In case of resolved the issue, you can now start connecting them again.
- When finished plugging in, launch the web browser and install their latest drivers.
- Install these drivers to use safely the accessories.
Discard all third Party Anti-malware Programs in the First place
There was a time before Microsoft developed Windows Security, we needed an Anti-virus program most in case of malware or virus attacks. But those days have gone past and we have the best utility of all ages. Having a third party free Anti-malware solution can be a reason of Stops errors and we need to remove them if present in the system. Here is how to remove an app –
Step#1: Manage access to Settings app using any of the available methods.
Step#2: From the Home page, head to Apps segment and make a click on it.
Step#3: The next page once loaded, select Apps & features lying in the left pane and jump to alongside right.
Step#4: Reach out to the desired program in the list and select it to expand.
Step#5: Hit Uninstall option and let the removal process begin.
Step#6: Choose Yes when UAC prompts for permission.
Step#7: Keep following on-screen guidelines until it is removed completely.
Heal the Poor Hard Disk Sectors present in the system
Hard Disk segments can have bad areas in it after using for a long time. We can neither ignore this fact nor can go for a full replacement. As STORE_DATA_STRUCTURE_CORRUPTION Error BSOD issue is an outcome of that, we have to fix those segments. Disk Checking Utility will be the best tool being executed in an Elevated Command Prompt. Proceed with below guidelines to avail –
- Manage to get entrance in the Elevated Command Prompt using any of the above guidelines.
- When in the black window, type the following command at the base of winking cursor –
chkdsk C: /f /r /x - Here, the usual command is chkdsk only and upon deployment, it will show only the disk status. As the motive is little different, we have added additional characters explaining following-
C:- this is the Drive where we have stored and installed Windows 10. If you have done the same task in another drive, never mind replacing C: with D:, E: or any.
f- A representation to indicate fixing of brought out troubles from volume.
r- Detects the available bad areas present in the disk volume.
x- Unmount the total volume to facilitate the detection process before it starts.
- With all the notations typed, press Enter key and let the utility to work. This task will take quite a long time and you need to be patient until it ends completely.
- After being finished, reboot the device and prior to coming back in desktop, check if there is any BSOD error in the system.
Clean Junks present in Disk Storage and recover Space out of it
Junk files are stored in Disk space and they are nonfunctional. Unnecessarily occupy storage and when turning big in amount, Hard Disk runs in lack of space. As an outcome, Windows runs slow and BSOD error shows up. Cleaning a disk is possible in a single shot using Disk Cleanup tool and here is how to move for this –
- On Cortana search, type cleanmgr and when Disk Cleanup is available as the Best match, select it.
- Immediately a small wizard prompts for choosing the preferable drive to carry on freeing up.
- Select C: by clicking the dropdown menu and press the Enter key.
- When Disk Cleanup tool is upfront after calculating recoverable space in the drive, move to its tail end.
- Select Clean up system files from there to proceed.
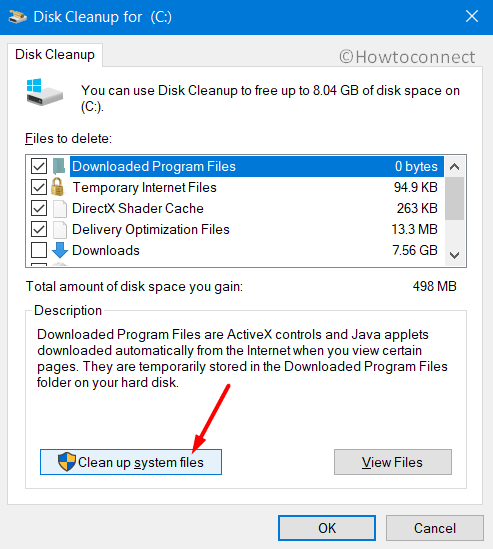
- Meanwhile, the small dialog will come up again to choose the desired disk. Select C: again and hit Enter key.
- After the Disk Cleanup for C: wizard hit on screen, proceed ahead to Files to delete segment in this page.
- Check all the boxes available here except Downloads and finally hit Ok button to start the cleaning.
Note- Before proceeding for deleting, make sure nothing left in the Recycle Bin to avoid losing important data.
Up to now, we have discussed various workarounds that might come helpful for resolving STORE_DATA_STRUCTURE_CORRUPTION Error BSOD in your Device. We recommend you to perform a complete reinstallation of Windows 10 as a final solution. Obviously, that will heal all errors and existing issues if done with perfection.
If you are truly heading for that, make sure to save all necessary files, data in a Backup folder. Recommended to carry it out in external drive or USB. If you are not well competent, seek help from skilled people or hire professionals as anything unusual here will lead to complete damage. Hope you can finally recover the PC from the grasp of STORE_DATA_STRUCTURE_CORRUPTION Error BSOD.
Methods:
Method-1: Stop Automatic Restart
Method-2: Run Windows Blue Screen Troubleshooter
Method-3: Install Cumulative updates patches
Method-4: Update Drivers
Method-5: Enter Safe Mode
Method-6: Perform Windows Defender Full Scan
Method-7: Use System File Checker
Method-8: Uninstall Similar Programs
Method-9: Settle Memory Problems
Method-10: Patch up Windows Image issues using DISM tool
Method-11: Execute System Restore
Method-12: Remove Windows Update Files
Method-13: Disconnect the Additional Hard Disk and Re-plug
Method-14: Discard all third Party Anti-malware Programs
Method-15: Heal the Poor Hard Disk Sectors
Method-16: Clean Junks present in Disk Storage
That’s all!!
Repair any Windows problems such as Blue/Black Screen, DLL, Exe, application, Regisrty error and quickly recover system from issues using Reimage.
Some specialized repair tools may help
by Radu Tyrsina
Radu Tyrsina has been a Windows fan ever since he got his first PC, a Pentium III (a monster at that time). For most of the kids of… read more
Updated on December 18, 2022
Reviewed by
Alex Serban

After moving away from the corporate work-style, Alex has found rewards in a lifestyle of constant analysis, team coordination and pestering his colleagues. Holding an MCSA Windows Server… read more
- Store data structure corruption is a BSOD error, and in this guide, we’ll show you how to fix it.
- To solve this issue, we suggest using specialized BSOD repair software.
- Alternatively, update your drivers to the latest version to avoid any problems.
XINSTALL BY CLICKING THE DOWNLOAD FILE
This software will repair common computer errors, protect you from file loss, malware, hardware failure and optimize your PC for maximum performance. Fix PC issues and remove viruses now in 3 easy steps:
- Download Restoro PC Repair Tool that comes with Patented Technologies (patent available here).
- Click Start Scan to find Windows issues that could be causing PC problems.
- Click Repair All to fix issues affecting your computer’s security and performance
- Restoro has been downloaded by 0 readers this month.
BSOD errors can appear on any PC, and one BSOD error that users reported is the Store data structure corruption error.
The error will crash your PC and cause you to lose any unsaved data, but there’s a way to fix this issue, and today we’ll show you how to do it. But first, let us discuss some possible triggers.
What causes store data structure corruption?
Like many other PC errors, this error can be triggered by several elements. From user experience, here are the top ones to be aware of:
- Outdated drivers – The video card driver is the culprit most of the time and would need to be updated.
- Third-party tools – For some users, it may be because of some conflicting software. In such cases, the crashes will continue until the software is uninstalled.
- OS problem – In rare cases, users have noticed that it may be an OS problem triggering data structure corruption.
Note that this data critical structure corruption happens across different brands, including Dell and HP.
Let us now explore some solutions.
How do I fix Store data structure corruption error?
1. Use specialized repair software
Fixing Store data structure corruption error on Windows 10 doesn’t have to be a hassle, especially if you’re using specialized BSOD repair software.
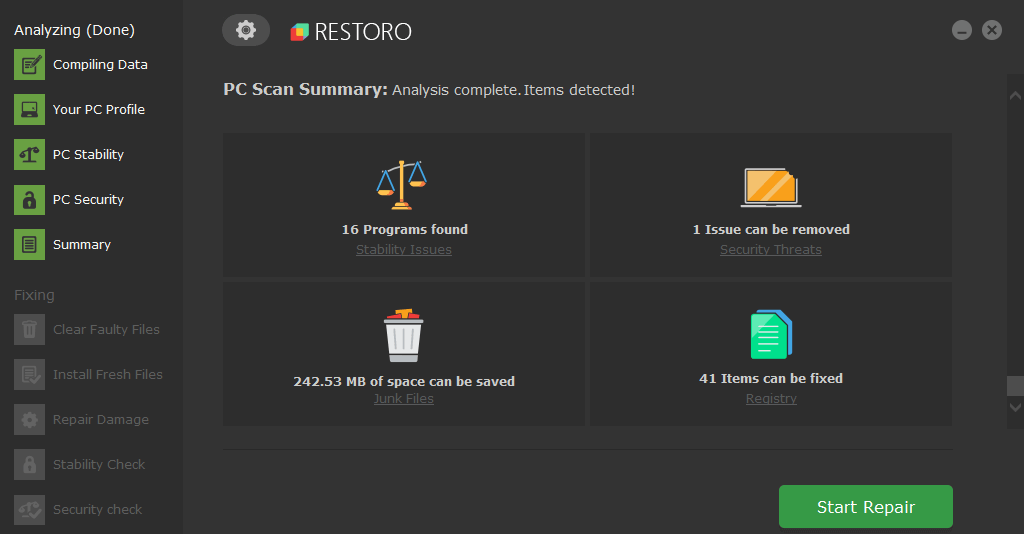
Restoro is powered by an online database that features the latest functional system files for Windows 10 PCs, allowing you to easily replace any elements that can cause a BSoD error.
This software can also help you by creating a restore point before starting the repairs, enabling you to easily restore the previous version of your system if something goes wrong.
This is how you can fix registry errors using Restoro:
- Download and install Restoro.
- Launch the application.
- Wait for the software to identify stability issues and possible corrupted files.
- Press Start Repair.
- Restart your PC for all the changes to take effect.
As soon as the fixing process is completed, your PC should work without problems, and you will not have to worry about BSoD errors or slow response times ever again.
⇒ Get Restoro
Disclaimer: This program needs to be upgraded from the free version in order to perform some specific actions.
2. Perform a clean boot
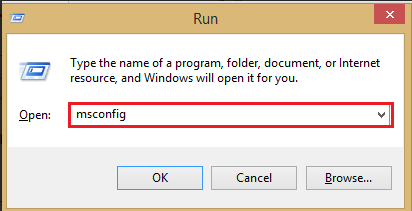
- Press Windows + R, type msconfig, and hit Enter.

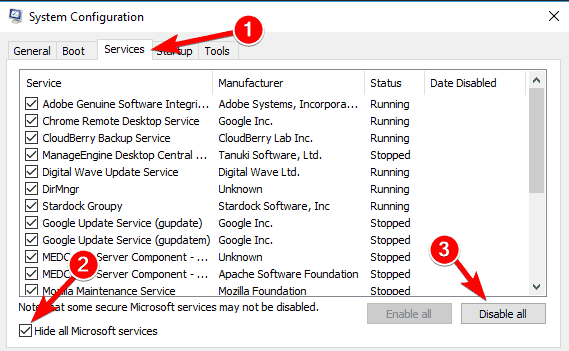
- The System Configuration window will appear. Select the Services tab. Check Hide all Microsoft services and then click Disable all.

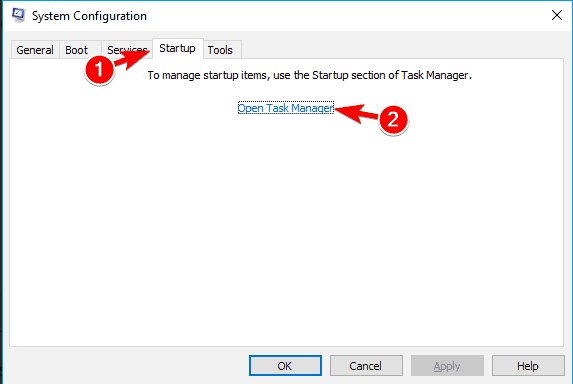
- Go to the Startup tab and click on Open Task Manager.

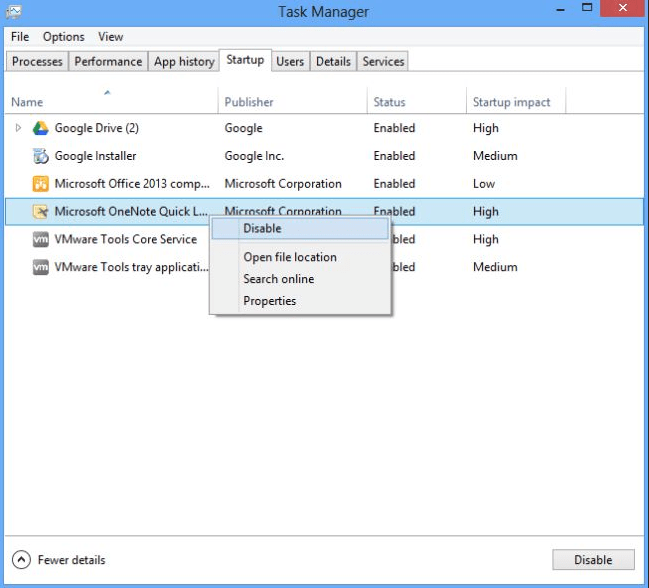
- In the Task Manager, Disable each startup item.

- Restart your PC.
If this method helped stop the Store data structure corruption error, you need to enable services one by one until you replicate the issue.
By doing so, you should be able to find the problematic service or software.
3. Update your video card driver
Occasionally, your graphics card can cause Store data structure corruption on Razer Blade or any other PC. To fix this problem, it’s advised to update your drivers.
To do this accurately, you should manage your drivers using specialized software that can provide essential support for installing or updating any driver.
Some PC issues are hard to tackle, especially when it comes to corrupted repositories or missing Windows files. If you are having troubles fixing an error, your system may be partially broken.
We recommend installing Restoro, a tool that will scan your machine and identify what the fault is.
Click here to download and start repairing.
⇒ Get DriverFix
4. Run Windows Memory Diagnostic
- Press Windows key + R, type in mdsched.exe, and hit Enter.

- Select Restart now and check for problems (recommended).

- If installed, run a hardware diagnostic tool from the manufacturer.
This solution can be helpful if the Store data structure corruption due to undervolt issues. If you overclocked your memory, reset the clock settings to fix the problem.
5. Uninstall problematic software
Certain users have reported on forums that specific software programs may cause the blue screen of death store data structure corruption error.
If you have installed Daemon Tools, Intel HAXM (Hardware Accelerated Execution Manager), Alcohol 120%, or Mac Driver, they may be responsible for this issue.
We recommend you find that specific software on your computer and update it to the last version or remove it.
To completely remove specific software, it’s recommended to use the best uninstaller software due to its powerful functionalities of removing undesirable apps from your PC.
If none of the solutions was unsuccessful, you have one reliable solution: reinstall Windows 10.
After you have reinstalled your Windows 10, the store Data structure corruption error will not appear again.
BSOD errors can create many problems, but they can be fixed with specialized tools in most cases.
Did our solutions help you fix Store data structure corruption error? Let us know in the comments below.
![]()
Newsletter
Обновлено 2023 января: перестаньте получать сообщения об ошибках и замедлите работу вашей системы с помощью нашего инструмента оптимизации. Получить сейчас в эту ссылку
- Скачайте и установите инструмент для ремонта здесь.
- Пусть он просканирует ваш компьютер.
- Затем инструмент почини свой компьютер.
Критическая ошибка повреждения структуры данных означает, что Windows обнаружила, что один из ее файлов изменился или изменились данные в памяти одного из файлов. В данном случае это было ядро Windows 32. Этот файл часто подвергается атакам вредоносных программ, руткитов и вирусов.
Это может быть связано с плохо написанными драйверами устройств или неисправным оборудованием, например с неисправной памятью, проблемами с питанием, перегревом компонентов или оборудованием, превышающим пределы спецификации.
Как исправить ошибки STORE_DATA_STRUCTURE_CORRUPTION:
Исправьте ошибки реестра с помощью патча Sfc / Scannow
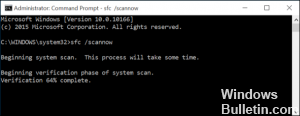
Есть способ решить проблему с реестром с помощью командной строки Windows. В большинстве случаев эта проблема решается путем размещения одного заказа в PDC, и вам даже не нужно ничего покупать.
- Итак, откройте CMD, как администратор.
- Затем введите команду «Sfc / Scannow» и нажмите Enter. Не закрывайте это окно PDC, пока проверка не будет завершена на 100%.
- Перезагрузите компьютер и проверьте его, если синий экран исчез, то ничего страшного.
Запустить DISM
Если анализ SFC не смог решить проблему, мы попробуем расширенный инструмент для устранения неполадок. Как следует из названия, Deployment Image Service and Management (DISM) повторно использует образ системы для решения любых проблем на ходу.
Обновление за январь 2023 года:
Теперь вы можете предотвратить проблемы с ПК с помощью этого инструмента, например, защитить вас от потери файлов и вредоносных программ. Кроме того, это отличный способ оптимизировать ваш компьютер для достижения максимальной производительности. Программа с легкостью исправляет типичные ошибки, которые могут возникнуть в системах Windows — нет необходимости часами искать и устранять неполадки, если у вас под рукой есть идеальное решение:
- Шаг 1: Скачать PC Repair & Optimizer Tool (Windows 10, 8, 7, XP, Vista — Microsoft Gold Certified).
- Шаг 2: Нажмите «Начать сканирование”, Чтобы найти проблемы реестра Windows, которые могут вызывать проблемы с ПК.
- Шаг 3: Нажмите «Починить все», Чтобы исправить все проблемы.

Чтобы запустить DISM в Windows 10:
Откройте командную строку, как показано выше.
Введите следующую команду и нажмите Enter: DISM.exe / В сети / Очистить образ / Восстановить здоровье
Подождите, пока процесс не завершится.
Перезагрузите компьютер.
Если DISM не может восстановить файлы онлайн, попробуйте установить USB или DVD. Вставьте носитель и введите следующую команду: DISM.exe / Онлайн / Очистить образ / RestoreHealth / Source: C: RepairSource Windows / LimitAccess
Не забудьте заменить путь «C: RepairSource Windows» на вашем DVD или USB.
Проверка системной памяти
Системная память является первым аппаратным компонентом, который будет проверен на наличие BSOD, поскольку, вероятно, это первый основной компонент, который выйдет из строя при возникновении критической ошибки повреждения структуры. В Windows есть встроенное приложение для проверки системной памяти.
Нажмите кнопку «Пуск», чтобы открыть меню «Пуск».
Поиск диагностики памяти Windows.
Откройте его в режиме управления.
Выберите опцию «Перезагрузить сейчас» и проверьте наличие проблем. Это приводит к перезагрузке системы. После перезагрузки системы начинается тест памяти. Если тест не пройден, вам необходимо приобрести новую память.
Проверка просмотра событий

Event Viewer — это настольное приложение, которое позволяет администраторам и пользователям просматривать журналы событий на локальном или удаленном ПК для мониторинга событий в вашей системе. Он записывает программу, безопасность и системные события.
Нажмите Win + R и введите eventvwr.msc, чтобы открыть окно просмотра событий.
Разверните древовидную структуру на левой странице и следуйте по этому пути: Протоколы Windows> Система.
Прежде чем проверять все события в окнах системных событий CRITICAL_STRUCTURE_CORRUPTION происходит. Если есть одна или несколько ошибок, найдите и исправьте их одну за другой.

CCNA, веб-разработчик, ПК для устранения неполадок
Я компьютерный энтузиаст и практикующий ИТ-специалист. У меня за плечами многолетний опыт работы в области компьютерного программирования, устранения неисправностей и ремонта оборудования. Я специализируюсь на веб-разработке и дизайне баз данных. У меня также есть сертификат CCNA для проектирования сетей и устранения неполадок.
Сообщение Просмотров: 97
Содержание
- Как исправить ошибку Critical Structure Corruption в Windows 10?
- Обновление драйвера SPTD
- Проверка диска ChkDsk
- Диагностика памяти
- Просмотр журнала событий
- Bug Check 0x1C7: STORE_DATA_STRUCTURE_CORRUPTION
- STORE_DATA_STRUCTURE_CORRUPTION Parameters
- Cause
- Resolution
- Critical Structure Corruption в Windows 10
- Проблема в жестком диске или оперативной памяти
- Вирусы
- Проблемные драйвера
- Ошибки реестра Виндовс 10
- Устранение critical structure corruption: проверка на вирусы
- Мониторим температурный режим работы железа
- Устранение critical structure corruption: переустанавливаем драйвера и обновления системы
- Сброс BIOS
- Дефрагментация системы
- Устранение critical structure corruption: проверка и чистка системного реестра
- Ошибка CRITICAL_STRUCTURE_CORRUPTION в Windows 10/8.1/7
- Как исправить ошибку CRITICAL_STRUCTURE_CORRUPTION в Windows 10/8.1/7
- 1. Использование просмотра событий для получения дополнительных сообщений
- 2. Использовать диагностику памяти Windows
- 3. Установить обновления драйверов
- 4. Использовать CHKDSK
- 5. Воспользоваться инструментом Driver Verifier
- 6 Best Ways to Fix Store Data Structure Corruption on Windows 10
- Gaurav Bidasaria
- 1. Diagnose Memory Issues
- 2. Run SFC and DISM Scan
- 3. Scan for Virus
- 4. Drivers Error
- 5. Run Troubleshooter
- 6. Overclocking
- Sudden Death
- Read Next
- How to Use Multi-Windows on Windows 11
- Top 3 Ways to Convert Your Microsoft Word Document Into a PowerPoint Presentation
- How to Use Microsoft Spreadsheet Compare to Analyze Excel File Versions
- Top 3 Ways to Open a Web Page at Startup in Windows 10
- Top 7 Ways to Fix Unwanted Sites Open Automatically in Google Chrome
- Top 10 Ways to Fix OneNote Not Opening on Windows 10 and Windows 11
- 7 Best Ways to Fix Google Chrome’s High Disk Usage on Windows 10 and Windows 11
- How to Integrate Gmail in Outlook on Web and Mobile
- Did You Know
Как исправить ошибку Critical Structure Corruption в Windows 10?
С ошибкой CRITICAL STRUCTURE CORRUPTION на синем экране BSOD пользователи чаще сталкиваются после установки или перехода на Windows 8.1 или 10 из предыдущей версии. Она возникает из-за несовместимого или устаревшего драйвера. В большинстве случаев к этому причастен драйвер SPTD.
Иногда система может аварийно завершить работу из-за ошибок на программном и аппаратном уровне. Нужно проанализировать все события, которые ей предшествовали. Возможно, ошибку спровоцировала последняя установленная программа или она произошла после подключения нового устройства. Поэтому перед применением решений удалите последние программы, установка которых возможно привела к ошибке. Также отключите все USB-устройства, кроме клавиатуры и мыши, и проверьте, подключая их по одному, не причастно ли одно из них к сбою. Если после применения этих рекомендаций не удалось устранить Critical_Structure_Corruption, перейдите к решениям.
Обновление драйвера SPTD
Драйвер SCSI Pass Through Direct используется программами для доступа к устройствам хранения данных. Если в системе присутствует файл sptd.sys, который появился после установки DAEMON Tools или Alcohol 120%, то, скорее всего, его устаревшая версия и является причиной ошибки Critical_Structure_Corruption.
Сделайте запрос в интернете «SCSI Pass Through Direct» и перейдите на официальный сайт.
Загрузите драйвер в соответствии с разрядностью установленной версией ОС. Запустите загруженный файл и следуйте инструкциям на экране до завершения установки.
Проверка диска ChkDsk
Синий экран с кодом остановки Critical_Structure_Corruption может произойти из-за ошибок файловой системы. Они накапливаются в ходе эксплуатации жесткого диска при неправильных выключениях компьютера или прерываниях установки программ. Чтобы их исправить запустите сканирование диска программой ChkDsk.
Для этого откройте командную строку с правами администратора из меню Win + X или с помощью системного поиска.
В консоли выполните команду:
Если отобразится сообщение, что диск используется другим процессом, подтвердите запуск сканирования после перезагрузки компьютера нажатием на «Y».
Дождитесь завершения и проверьте, решена или проблема.
Диагностика памяти
Синий экран с кодом Critical_Structure_Corruption может возникнуть из-за ошибок оперативной памяти. Чтобы проверить их наличие, выполните следующие шаги:
Откройте средство проверки памяти Windows командой mdsched.exe из окна «Выполнить» (Win + R).
Выберите первый вариант «Выполнить перезагрузку и проверку (рекомендуется)».
После перезагрузки отобразится ход проверки, дождитесь ее завершения.
Если будут обнаружены ошибки, то, скорее всего, они и являются причиной синего экрана Critical_Structure_Corruption. Возможно, они возникли из-за плохого контакта. Чтобы проверить, полностью выключите компьютер, и извлеките планки ОЗУ. Аккуратно протрите контакты ластиком и установите обратно, убедившись в фиксации их защелками. Если установлено несколько планок, проверьте их по отдельности командой mdsched.exe. При определении неисправной планки, ее нужно заменить.
Просмотр журнала событий
Точно узнать, что произошло в момент возникновения ошибки Critical_Structure_Corruption можно с помощью журнала событий. Для этого выполните следующие шаги.
В строке системного поиска наберите «просмотр событий» и перейдите по найденному результату.
В левой части окна перейдите на вкладку Журналы Windows – Система. Просмотрите журнал на наличие любого подозрительного события, которое возникло в то время, когда произошел синий экран. Если обнаружите такое событие, то узнать к какому устройству принадлежит проблемный драйвер можно с помощью запроса в интернете.
После определения проблемного оборудования, обновите его в Диспетчере устройств.
Источник
Bug Check 0x1C7: STORE_DATA_STRUCTURE_CORRUPTION
The STORE_DATA_STRUCTURE_CORRUPTION bug check has a value of 0x000001C7. It indicates that the store component detected a corruption in its data structures.
This topic is for programmers. If you are a customer who has received a blue screen error code while using your computer, see Troubleshoot blue screen errors.
STORE_DATA_STRUCTURE_CORRUPTION Parameters
| Parameter | Description |
|---|---|
| 1 | Corruption ID. See values below. |
| 2 | See values below. |
| 3 | See values below. |
| 4 | See values below. |
Corruption ID
Cause
The store component detected a corruption in its data structures.
This bugcheck can occur by memory corruption due to physical memory access. The causes for physical memory corruption include:
For more information on Windows memory manager, see Windows Internals 7th Edition Part 1 by Pavel Yosifovich, Mark E. Russinovich, David A. Solomon and Alex Ionescu.
Resolution
Windows Memory Diagnostics Tool
To investigate if this bug check is caused by defective RAM hardware, run the Windows Memory Diagnostics tool. In the control panel search box, type Memory, and then select Diagnose your computer’s memory problems.‌ After the test is run, use Event viewer to view the results under the System log. Look for the MemoryDiagnostics-Results entry to view the results.
Источник
Critical Structure Corruption в Windows 10
Когда возникает конфликт между ОС, софтом и драйверами, может появляться «синий экран смерти» или, как минимум, самопроизвольно закрываться прога или вообще не запускаться.

Речь идет о распространенной ошибке под названием «critical structure corruption windows 10», причин возникновения которой может быть великое множество. О том, что делать, когда появляется такая проблема и как ее исправить, пойдет речь далее.
Ошибка critical structure corruption windows 10 может возникнуть в следующих случаях:
Если вы столкнулись с одной из этих проблем, специалисты дают одну универсальную рекомендацию: не использовать то программное обеспечение, которое вызывает появление такого сообщения и найти аналогичные, работоспособные проги (Рисунок 2). Более подробно об указанных проблемах пойдет речь далее.

Проблема в жестком диске или оперативной памяти
Возможно, вы неправильно осуществили предыдущую переустановку системы или перегрузили оперативную память. В таком случае жесткий диск начинает выдавать «синий экран». Также подобная неисправность может появляться вследствие установки неблагонадежного ПО. Единственный выход из ситуации в этом случае – переустановка «Винды», откат настроек или обращение к специалисту.

Вирусы
Вирусы негативно влияют на работу компьютера и самые первые могут вызывать «экран смерти». Бороться с ними можно только мощным антивирусником, да и это часто оказывается бессмысленно, если у вас стоит неоригинальная прога. Так что, если столкнулись с этой проблемой, попытайтесь перезагрузить ПК (если это еще возможно) и запустить систему, чтобы купить полную версию антивируса и почистить комп от вредоносного софта (Рисунок 4). Кроме вирусов рекомендуется удалить не только вирус, но и саму прогу, с которым он был скачан. Для выполнения всех манипуляций рекомендуем использовать антивирус Avast.

Проблемные драйвера
Драйвера тоже могут быть проблемными, особенно, если загружены не с официальных сайтов поставщика. Они не только могут загрузить на вашем ПК очередной «Троян», но и вообще снести всю систему, вызвав «синий экран смерти». Выход из ситуации – установить нормальный драйвер, который будет выполнять свои функции без проблем.
Ошибки реестра Виндовс 10
Возможно, проблема кроется в реестре ОС. Она может появиться после перезагрузки системы, загрузки мощных игр и программ, чрезмерной перегрузке жесткого диска или неправильной настройки реестра Виндовс. В таком случае помогает переустановка ОС, дефрагментация диска и откат введенных настроек к значениям, установленным по умолчанию. С данной задачей прекрасно справится приложение UltraDefrag (Рисунок 5).
Подробней о том, как сделать так, чтобы «синий экран» больше не появлялся, пойдет речь далее.

Устранение critical structure corruption: проверка на вирусы
Проверка на антивирусы – самый простой способ, как исправить синий экран critical structure corruption windows 10. Используйте платный или бесплатный антивирусник, чтобы проверить комп на наличие вредоносного софта. Отлично подходят для этих целей:
Установите один из них с официального сайта и регулярно проверяйте на наличие вирусов, и тогда ваш компьютер будет работать долго и без «синих экранов».
Мониторим температурный режим работы железа
При превышении возможностей производительности системы возникает перегрев элементов системного блока. Страдают процессор, видеокарты, жесткие диски и другие составляющие. Проверить температуру нагрева составных частей, помогают специальные программы, такие как AIDA, HWMonitor.
Установите их на свой компьютер, запустите, и вы узнаете, насколько перегружена ваша система и какова температура частей вашего ПК. Если вы увидите, что она зашкаливает за 70–80 градусов – спешите переустановить драйвера или обновите систему. Если не поможет – приступаем к следующему пункту нашей статьи.

Устранение critical structure corruption: переустанавливаем драйвера и обновления системы
Разработчики компании Microsoft утверждают, что ошибка critical structure corruption windows 10 может появляться из-за устаревших драйверов. Если аппаратная часть ПК не способна справиться с системой из-за старых драйверов, на экране можно увидеть соответствующее сообщение.
Примечание: Решить вопрос просто: проверьте наличие новых версий установленных у вас драйверов и осуществите их обновление. Также не забудьте проверить, насколько ПО совместимо с вашей версией «Винды» (Рисунок 7).

Сброс BIOS
Чтобы справиться с ситуацией, можно воспользоваться BIOS.
Перезагрузите компьютер и проверьте, насколько успешным оказался этот метод.

Дефрагментация системы
Одним из способов избавиться от проблемы – сделать дефрагментацию диска. Для этого:
Если проблема кроется в разрозненности локальных файлов, то после дефрагментации, все будет работать.
Устранение critical structure corruption: проверка и чистка системного реестра
Чтобы устранить описываемую ошибку, необходимо проверить и очистить системный реестр. Для этого потребуется восстановить его настройки по умолчанию, воспользовавшись их резервной копией, которая расположена по адресу:
Достаточно просто перенести резервную копию файлов из этой папки в папку, где хранится текущий реестр.
Теперь вы знаете, как избавиться от синего экрана на вашем компьютере. Используйте представленные рекомендации, и пусть ваш ПК работает как часы!
Источник
Ошибка CRITICAL_STRUCTURE_CORRUPTION в Windows 10/8.1/7
Если вы получаете ошибку CRITICAL_STRUCTURE_CORRUPTION в Windows 10/8/7, то вы можете решить ее с помощью данного руководства. Это сообщение на синем экране смерти может появиться из-за не поддерживаемого оборудования, драйвера и даже программного обеспечения. Наряду с сообщением вы можете даже увидеть коды ошибок, такие как 0x00000109, 0x8A287C67, 0x0B76E031, 0x3590B8E7 и 0x559F80CD.
Как исправить ошибку CRITICAL_STRUCTURE_CORRUPTION в Windows 10/8.1/7

1. Использование просмотра событий для получения дополнительных сообщений
Системный журнал просмотра событий может показать много вещей о любом сообщении об ошибке, произошедшем на вашем компьютере.

2. Использовать диагностику памяти Windows
Поскольку ошибка CRITICAL_STRUCTURE_CORRUPTION может произойти из-за поврежденного ОЗУ, вы можете использовать инструмент диагностики памяти Windows.

3. Установить обновления драйверов
Согласно официальному заявлению Microsoft, эта проблема может быть вызвана устаревшими драйверами. Если аппаратное обеспечение не может нормально работать с системой из-за очень старого драйвера, пользователи могут получить это сообщение об ошибке BSOD. По этому вы должны перейти на официальные сайты производителей оборудования и проверит более новые версии драйвера. Кроме того, вы должны проверить, совместимо ли ваше существующее или новое оборудование с вашей версией Windows.
4. Использовать CHKDSK
5. Воспользоваться инструментом Driver Verifier
Теперь откройте командную с правами администратора и выполните следующую команду для отображения настройки драйвера.
Если флажки включены, то вам нужно будет загрузиться в безопасном режиме и ввести следующую команду для сброса драйверов.
Источник
6 Best Ways to Fix Store Data Structure Corruption on Windows 10
Gaurav Bidasaria
18 Feb 2022
The BSOD or blue screen of death is one of the most dreaded errors on a Windows PC. However, more puzzling is when Windows throws an error code ‘Store Data Structure Corruption’. Often this data structure corruption error pops up during or after gaming sessions. We shall show you how to fix it.
The Windows computer will reboot soon after collecting feedback on the error. All your open apps and windows will close, and unsaved work will be lost, if any. This could be an isolated event where you faced the ‘store data structure corruption’ error once and never again. We suggest you wait and watch if the error hits your computer screen again. If it does, we have some solutions.
1. Diagnose Memory Issues
This could be a memory problem where a firmware or hardware device is failing to utilize the memory properly and corrupting the data in the process. Windows comes with a built-in tool to diagnose the problem.
Step 1: Open the Control Panel from the Start menu or Press Windows key+X to open a shortcut menu to find it there.
Step 2: Search for Memory in the search bar and select ‘Diagnose your computer’s memory problems’.
Step 3: In the pop-up that follows, one can either run the test immediately or schedule it for later when the system is rebooted.
Step 4: Search for Event Viewer in the Start menu and open it.
Step 5: Windows saves the scan results in the ‘MemoryDiagnostics-Results’ file, which is available in the System Log. This is useful for self-diagnostic as well as sharing with your IT guy or on PC-related forums.
2. Run SFC and DISM Scan
We have faced the BSOD ‘store data structure corruption’ error before and were able to fix the issue running these commands.
Step 1: Search for Command Prompt in the Start menu and select Run as administrator to open it with admin rights.
Step 2: Run the commands below but one at a time and in the given order. The first command is SFC or system file checker that will find and repair corrupt system files.
We suggest you reboot your Windows computer once after running these commands. Hopefully this should solve the error or you can proceed to the next solution.
Also on Guiding Tech
How to Fix and Open Corrupt Folder and Files in Windows 10
3. Scan for Virus
There are three parts to this process, and we recommend going through each. First, run an antivirus scanner. It can be a third-party antivirus that you prefer or the default Microsoft Defender that comes preinstalled on all Windows copies.
Next, we highly recommend getting Malwarebytes, and even its free version is pretty good. Note that a virus is not the same as malware.
Finally, download and run Microsoft Safety Scanner. You have to run it manually and can use it for up to 10 days. After that trial period gets over, download it again and run it. We recommend you always download the latest version before running it.
4. Drivers Error
You could download and install the latest version of the graphics driver for your Windows computer, whether it’s a desktop or a laptop. If the ‘Store Data Structure Corruption’ error manifests during or after a gaming session.
Refer to our guide on how to update, reinstall, and rollback drivers. But what about other hardware devices that are connected to your computer and could be behind the error? There are driver-specific tools available that can automate the process.
Also on Guiding Tech
What Is the Difference Between Restore and Reset in Windows 10
5. Run Troubleshooter
Another tool in Windows’ arsenal is Troubleshooter, which can detect and fix many hardware-related errors. And BSOD is part of the package. It doesn’t work on Windows Home edition.
Step 1: Press Windows key+I to open Settings and search for Find and fix bluescreen problems.
Step 2: In the pop-up that follows, follow on-screen instructions.
6. Overclocking
Overclocking can lead to all sorts of issues and BSOD errors like the one you are facing is just one of them. Stop doing it as it can lead to permanent hardware failure too.
Also on Guiding Tech
# troubleshooting
Sudden Death
Extreme situations like complete hardware failure could also be a factor. For example, you may need a new RAM stick because the old one is failing. Such events are rare and often not a cause of concern on new computers. And there are also ways to test hardware easily.
The BSOD errors appear out of nowhere, and you don’t even get an opportunity to save work. It’s scary and annoying and leaves few options for the end-users. Sometimes, users don’t even have an error code. And the QR codes you notice on the BSOD screen aren’t helpful. More often than not, they lead to a generic link which is not helpful.
Next up: Deleted your Steam games accidentally or lost them due to an error and want them back? Click on the link below to learn how to restore deleted Steam games quickly.
Last updated on 3 Mar, 2022
The above article may contain affiliate links which help support Guiding Tech. However, it does not affect our editorial integrity. The content remains unbiased and authentic.
Read Next

How to Use Multi-Windows on Windows 11
# Microsoft has made a huge improvement with # multi # windows in # WIndows 11. Here’s how to set up and use them on the latest desktop OS.

Top 3 Ways to Convert Your Microsoft Word Document Into a PowerPoint Presentation
Looking for an easier way to convert # Microsoft # Word into a # PowerPoint Presentation or want to transfer the contents of a text file to a presentation? Check out these three easy methods!

How to Use Microsoft Spreadsheet Compare to Analyze Excel File Versions
Trying to identify past changes made to your # Microsoft # Excel workbook? The Spreadsheet Compare tool might just be able to help you with it. Read this article to find out how.

Top 3 Ways to Open a Web Page at Startup in Windows 10
Here’s how to set up # Windows to open your favorite web pages automatically at # startup.

Top 7 Ways to Fix Unwanted Sites Open Automatically in Google Chrome
# Chrome opening unwanted websites automatically? Check out this # troubleshooting guide to resolve the issue.

Top 10 Ways to Fix OneNote Not Opening on Windows 10 and Windows 11
Are you having trouble accessing the # OneNote app on # Windows? Let’s fix # OneNote not opening issue on Windows 10/11.

7 Best Ways to Fix Google Chrome’s High Disk Usage on Windows 10 and Windows 11
Are you tried of the # Google # Chrome’s high disk usage error on your # Windows 10 or Windows 11 computer? Here’s how you can fix that high disk usage issue.

How to Integrate Gmail in Outlook on Web and Mobile
Users can easily sync their # Gmail inbox with # Outlook. Here’s how you can integrate Gmail in Outlook web, desktop and # mobile apps.
Did You Know
You can pin the Recycle Bin on the Start menu in Windows 10.
Источник
Содержание
- Ошибка CRITICAL_STRUCTURE_CORRUPTION в Windows 10/8.1/7
- Как исправить ошибку CRITICAL_STRUCTURE_CORRUPTION в Windows 10/8.1/7
- 1. Использование просмотра событий для получения дополнительных сообщений
- 2. Использовать диагностику памяти Windows
- 3. Установить обновления драйверов
- 4. Использовать CHKDSK
- 5. Воспользоваться инструментом Driver Verifier
- Bug Check 0x1C7: STORE_DATA_STRUCTURE_CORRUPTION
- STORE_DATA_STRUCTURE_CORRUPTION Parameters
- Cause
- Resolution
- STORE_DATA_STRUCTURE_CORRUPTION BSOD
- BSOD: Store Data Structure Corruption caused by ntkrnlmp.exe and ntoskrnl.exe
- Replies (5)
- Ошибка critical structure corruption windows 10 — как ее определить и исправить?
- По каким признакам можно определить возникновение данной проблемы?
- Наиболее распространенные причины возникновения critical structure corruption windows 10
- Пути разрешения возникшей проблемы
- Какой вывод можно сделать из всего вышеперечисленного?
Ошибка CRITICAL_STRUCTURE_CORRUPTION в Windows 10/8.1/7
Если вы получаете ошибку CRITICAL_STRUCTURE_CORRUPTION в Windows 10/8/7, то вы можете решить ее с помощью данного руководства. Это сообщение на синем экране смерти может появиться из-за не поддерживаемого оборудования, драйвера и даже программного обеспечения. Наряду с сообщением вы можете даже увидеть коды ошибок, такие как 0x00000109, 0x8A287C67, 0x0B76E031, 0x3590B8E7 и 0x559F80CD.
Как исправить ошибку CRITICAL_STRUCTURE_CORRUPTION в Windows 10/8.1/7
1. Использование просмотра событий для получения дополнительных сообщений
Системный журнал просмотра событий может показать много вещей о любом сообщении об ошибке, произошедшем на вашем компьютере.
- Наберите в поиске windows (около кнопки пуск), «просмотр событий» и запустите это приложение.
- В просмотре событий перейдите слева по пути «Журналы Windows» > «Система» и справа найдите ошибку. Нажмите на нее два раза и в окне вы увидите подробности ошибки. Если средство просмотра событий не показала толком ничего, чтобы исправить данную проблему, то ниже мы разберем способы.
2. Использовать диагностику памяти Windows
Поскольку ошибка CRITICAL_STRUCTURE_CORRUPTION может произойти из-за поврежденного ОЗУ, вы можете использовать инструмент диагностики памяти Windows.
- Наберите в поиске mdsched.exe и запустите инструмент диагностики. Далее следуйте указанным инструкциям. Более подробно, как диагностировать оперативную помять на ошибки в Windows .
3. Установить обновления драйверов
Согласно официальному заявлению Microsoft, эта проблема может быть вызвана устаревшими драйверами. Если аппаратное обеспечение не может нормально работать с системой из-за очень старого драйвера, пользователи могут получить это сообщение об ошибке BSOD. По этому вы должны перейти на официальные сайты производителей оборудования и проверит более новые версии драйвера. Кроме того, вы должны проверить, совместимо ли ваше существующее или новое оборудование с вашей версией Windows.
4. Использовать CHKDSK
Chkdsk — это инструмент командной строки, доступный для ОС Windows. С помощью его вы можете исправить различные ошибки, связанные с жестким диском.
- Откройте командную строку от имени администратора и введите команду chkdsk /f /r. Для завершения сканирования потребуется некоторое время.
5. Воспользоваться инструментом Driver Verifier
Driver Verifier Manager — инструмент Windows, который помогает пользователям исправлять проблемы, связанные с драйверами.
- Наберите в поиске Verifier и откройте приложение.
- Выберите создать нестандартные параметры.
- В следующем окне убедитесь, что вы пометили все, кроме «Проверка соответствия требованиям DDI» и «Эмуляция случайной нехватки ресурсов».
- Далее «Выбрать имя драйвера из списка«.
- Далее выберите галочкой все драйвера, которые не предоставляются Microsoft и нажмите Готово.
Теперь откройте командную с правами администратора и выполните следующую команду для отображения настройки драйвера.
Если флажки включены, то вам нужно будет загрузиться в безопасном режиме и ввести следующую команду для сброса драйверов.
Bug Check 0x1C7: STORE_DATA_STRUCTURE_CORRUPTION
The STORE_DATA_STRUCTURE_CORRUPTION bug check has a value of 0x000001C7. It indicates that the store component detected a corruption in its data structures.
This topic is for programmers. If you are a customer who has received a blue screen error code while using your computer, see Troubleshoot blue screen errors.
STORE_DATA_STRUCTURE_CORRUPTION Parameters
| Parameter | Description |
|---|---|
| 1 | Corruption ID. See values below. |
| 2 | See values below. |
| 3 | See values below. |
| 4 | See values below. |
Corruption ID
Cause
The store component detected a corruption in its data structures.
This bugcheck can occur by memory corruption due to physical memory access. The causes for physical memory corruption include:
- Defective RAM hardware
- A driver or device incorrectly modifying physical pages via an incorrect DMA operation or associated MDL.
- Corruption caused by a hardware device or firmware corrupting memory, such as firmware illegally modifying physical pages across a power transition.
For more information on Windows memory manager, see Windows Internals 7th Edition Part 1 by Pavel Yosifovich, Mark E. Russinovich, David A. Solomon and Alex Ionescu.
Resolution
Windows Memory Diagnostics Tool
To investigate if this bug check is caused by defective RAM hardware, run the Windows Memory Diagnostics tool. In the control panel search box, type Memory, and then select Diagnose your computer’s memory problems.‌ After the test is run, use Event viewer to view the results under the System log. Look for the MemoryDiagnostics-Results entry to view the results.
STORE_DATA_STRUCTURE_CORRUPTION BSOD
I have received a BSDO just now.
Using the WhoCrashed software, I believe the error is caused by either ntoskrnl.exe or ntkrnlmp.exe
These two .exe has bugged my pc a lot, giving some BSOD like, System Thread Exception Not Handled. etc. I have tried to solve it like running sfc/scannow , run windows defender offline, perform Windows Update, even disable fast startup, yet this problem happens occasionally.
This is the minidump file:
System Information (local)
Computer name: DESKTOP-B9K34PR
Windows version: Windows 10 , 10.0, build: 16299
Windows dir: C:Windows
Hardware: Aspire A515-51G, Acer, KBL, Charmander_KL
CPU: GenuineIntel Intel(R) Core(TM) i5-8250U CPU @ 1.60GHz Intel586, level: 6
8 logical processors, active mask: 255
RAM: 8459489280 bytes total
Crash Dump Analysis
Crash dumps are enabled on your computer.
Crash dump directories:
C:Windows
C:WindowsMinidump
On Sat 10/2/2018 7:20:08 PM your computer crashed or a problem was reported
crash dump file: C:WindowsMinidump21018-9000-01.dmp
This was probably caused by the following module: ntoskrnl.exe (nt+0x175880)
Bugcheck code: 0x1C7 (0x0, 0xFFFFDB8E42641000, 0x650C5740, 0x1F370)
Error: CUSTOM_ERROR
file path: C:Windowssystem32ntoskrnl.exe
product: Microsoft® Windows® Operating System
company: Microsoft Corporation
description: NT Kernel & System
The crash took place in the Windows kernel. Possibly this problem is caused by another driver that cannot be identified at this time.
On Sat 10/2/2018 7:20:08 PM your computer crashed or a problem was reported
crash dump file: C:WindowsMEMORY.DMP
This was probably caused by the following module: ntkrnlmp.exe (nt!SeConvertSidToStringSid+0x11BA6)
Bugcheck code: 0x1C7 (0x0, 0xFFFFDB8E42641000, 0x650C5740, 0x1F370)
Error: CUSTOM_ERROR
The crash took place in the Windows kernel. Possibly this problem is caused by another driver that cannot be identified at this time.
Conclusion
2 crash dumps have been found and analyzed. No offending third party drivers have been found. Connsider using WhoCrashed Professional which offers more detailed analysis using symbol resolution. Also configuring your system to produce a full memory dump may help you.
BSOD: Store Data Structure Corruption caused by ntkrnlmp.exe and ntoskrnl.exe
I keep getting this BSOD «Store Data Structure Corruption» after gaming. Like, after closing my game, I will stop for a moment then I’ll get a BSOD. I have already tried various solutions like updating my drivers, checking my RAM integrity, and conducting a virus scan. I did run Driver Verifier and I got the same BSOD. So I’m suspecting the problem could be because of a driver. To be honest, I have undervolted my laptop since since it gets really hot when gaming. I did run prime95 and it is stable. However, I really don’t get know what could be the cause of the BSOD. I hope you guys can help me out.
Here are my dump files: https://1drv.ms/f/s!Au9nyh_kyT8wbRW9xgKrapvBe7A
Thanks in advance!
Follow these steps, I hope you can solve the problem.
Press the Start key and type the word CMD, right click on the command prompt and select Run as administrator, enter the following commands one by one followed by the Enter key:
DISM.exe / Online / Cleanup-image / Scanhealth
DISM.exe / Online / Cleanup-image / Restorehealth
The execution of these processes may be delayed, do not forget to restart the computer to apply changes.
If it works, follow these others.
Any corrupt DLL files are best performed using built in utilities or using a repair upgrade method:
Open Start, type: CMD
Right click CMD
Click Run as administrator
Type in at the prompt OR Copy and Paste these one at a time : (Hit enter after each)
Dism /Online /Cleanup-Image /CheckHealth
Dism /Online /Cleanup-Image /ScanHealth
Dism /Online /Cleanup-Image /RestoreHealth
Also run the System File Checker utility:
Open Start, type: CMD
Right click CMD
Click Run as administrator
At the Command Prompt, type: sfc/scannow
This will check for any integrity violations
Ошибка critical structure corruption windows 10 — как ее определить и исправить?
Как новички, так и опытные юзеры операционной системы Windows неоднократно имели дело с весьма неприятной проблемой синего экрана. Естественно, в таких ситуациях перед этими людьми возникает вопрос, что же делать, если возникла ошибка critical structure corruption windows 10, как исправить возникшую ситуацию? Неспособные найти выход из положения, пользователи отправляли многочисленные жалобы на официальный форум корпорации Microsoft. Во всех этих обращениях велась речь о том, что с возникновением CRITICAL_STRUCTURE_CORRUPTION отмечалась потеря различной информации, пребывающей в памяти ПК. Что самое интересное, подобного рода неприятность могла проявиться как при включении компьютера, так и после нескольких часов непрерывной работы.
Все пользователи более новой Windows 10 столкнулись с рассматриваемой проблемой чаще всего после того, как было выполнено обновление операционных систем (с версий 7 и 8 соответственно). Советы, поступающие с завидной регулярностью с официального форума компании-разработчика не отличаются какой-либо конкретикой и не предлагают необходимых и реально реализуемых мер по оперативному устранению истинных причин проявления ошибки.
 По каким признакам можно определить возникновение данной проблемы?
 По каким признакам можно определить возникновение данной проблемы?
- На экране возникает уведомление следующего характера «STOP Ошибка 0x109: CRITICAL_STRUCTURE_CORRUPTION»;
- Возникает сообщение на синем фоне (который по-другому именуется еще как «синий экран смерти») – «На вашем персональном компьютере появилась проблема и его в обязательном порядке прямо сейчас необходимо будет перезагрузить. Мы только лишь занимаемся сбором информации об ошибке, после чего сразу же будет произведена немедленная перезагрузка ПК». Обратите внимание на то, что текст этого сообщения может несколько варьироваться в разных версиях;
- Самопроизвольно начинается перезагрузка с последующим возникновением уведомления 0x109 (оно возникает только после того, как будет осуществлена инициализация приложения);
- Возникает окно определенного содержания «The CRITICAL_STRUCTURE_CORRUPTION bug check has a value of 0x00000109. This indicates that the kernel has detected critical kernel code or data corruption»;
- В операционной системе имеет место задержка введения данных с клавиатуры и мыши;
- Постоянные так называемые «подвисания» системы, которые заметно усиливаются при работе с видео, большими картинками и другими приложениями, пользование которыми требует значительных ресурсов.
На что нужно обязательно обратить внимание! Следует запомнить первое возникшее сообщение об ошибке — это позволит детальнее определить первопричину возникших неполадок в операционной системе. Окна с ошибками возникают в процессе инсталляции новых драйверов, а «синий экран» – при работе программ.
Наиболее распространенные причины возникновения critical structure corruption windows 10
- Выход из строя драйверов для устройств;
- Нарушения работы реестра операционной системы. Эти явления имеют место при удалении компонентов Windows безграмотным пользователем;
- Присутствие вирусов и прочего вредоносного программного обеспечения;
- Серьезная неисправность жесткого диска механического или же системного характера;
- Проблемы с оперативной памятью.

Пути разрешения возникшей проблемы
В первую очередь необходимо будет проанализировать возможные причины возникновения данной ситуации, установить факторы, которые способствовали этому. Только потом уже осуществлять ряд операций, которые необходимы для сужения круга поиска или же полного устранения рассматриваемой ошибки:
- Осуществить сканирование установленной на ваш компьютер операционной системы при помощи антивирусного программного обеспечения. В подавляющем большинстве случаев эта мера позволит в автоматическом режиме удалить все присутствующее на компьютере вредоносное ПО;
- Проверить производимые обновления операционной системы, скачать из сети самый последний пакет апргейда. Корпорация Microsoft специально создает их ради устранения рассматриваемой проблемы и аналогичных ей, которые очень часто случаются в Windows;
- Осуществить откат драйвера до прошлой версии или же вообще его полностью удалить и переустановить ту программу, функционирование которой приводит к возникновению разного рода ошибок.
- Произвести так называемый «откат» опций BIOS до стандартных. Обратите внимание на то, что данная процедура является достаточно сложной, так что в том случае, если у вас отсутствует необходимая квалификация, лучше будет попросить о помощи более грамотного пользователя.
- Выполнить сканирование оперативной памяти. В том случае, если будет выявлена неисправная ячейка, ее надо будет заменить.
Важный совет! Целесообразно для этих целей пользоваться программой memtest86+.
- Осуществить дефрагментацию жесткого диска. Для осуществления этой операции будет уместно использование программы Auslogics Disk Defrag.
- Позаботиться о том, чтобы не произошел возможный перегрев составляющих системного блока.
Какой вывод можно сделать из всего вышеперечисленного?
Различные интерпретации ошибки «CRITICAL_STRUCTURE_CORRUPTION» среди пользователей Windows встречаются очень часто. Все указанные выше меры направлены на ее устранение, которое зачастую заканчивается успехом, однако в среде «продвинутых» пользователей пользуется популярностью полная переустановка Windows после найденных сообщений о случившейся ошибке. В таком случае, пользователь может быть уверен в том, что именно таким образом можно будет достичь желаемого результата. Но здесь необходимо будет акцентировать внимание на наиболее простых и быстро реализуемых способах решения возникшей проблемы.
This tutorial is about How to Fix ‘Store Data Structure Corruption’ Issue on Windows 10 PC. Recently I updated this tutorial and will try my best so that you understand this guide. I hope you guys like this blog, How to Fix ‘Store Data Structure Corruption’ Issue on Windows 10 PC. If your answer is yes after reading the article, please share this article with your friends and family to support us.
Check How to Fix ‘Store Data Structure Corruption’ Issue on Windows 10 PC
Many people have started complaining of receiving a blue screen of death that says “store data structure corruption”. They tend to do well after they are done playing the game, they have turned everything off, and are going to disconnect from their computers or do something else.
It’s annoying and it can happen once and it’s done, or it can happen over and over again. It is usually accompanied by a BSOD, but not always. What causes this problem and how can you prevent it from happening again? We have some potential solutions.
Uninstall any known problematic apps
There are some known applications that have been reported to cause the “CRITICAL_STRUCTURE_CORRUPTION” error in Windows 10. Uninstalling these applications may correct the error so that it does not occur again. At the moment, some of the known applications that cause this error are Daemon Tools, Blue Stacks, Alcohol 120%, Virtual Box, Intel Hardware Accelerated Execution Manager, and Mac Driver.
These are just a few, so we recommend using the Windows Event Viewer (go to Method 5) to identify any other possible applications. If you have any of these apps installed on your device, follow the simple guide below to remove them. Doing so can potentially eliminate the possibility of this blue screen error happening again.
- Click the Start menu on the taskbar, then select “Settings.” Alternatively, you can press Windows + I keys on your
- keyboard to open the application.
- Click on the “Applications” tile.
- Use the search function to find the problematic application that you have installed.
- Click on the application and choose the “Uninstall” option.
- Follow the instructions on the screen to successfully remove the application.
- When the uninstallation is complete, restart your computer.
Update your graphics driver
Keeping your drivers up to date is important. An outdated graphics driver can cause frustrating errors on your device and can ultimately lead to blue screens. Fortunately, updating these drivers is fairly easy and requires no experience; just follow our steps to make sure you have the latest version of your driver.
First, you need to check which graphics card you are using. If you still don’t know the exact model, follow these steps:
- Press Windows + R keys on your keyboard to open the Run utility. Here, just type “dxdiag” and hit the OK button.
- The DirectX Diagnostic Tool should open on your screen. Use the header menu to switch to the “Display” tab.
- In the “Device” section, check “Name”. You should be able to see the manufacturer and model of the graphics card. Keep this in mind for the next steps.
Once you’ve identified your graphics card, head over to the manufacturer’s website and find a dedicated download page for drivers. We have compiled a list of some popular graphics card brands with links to their download page:
- Intel Drivers and Software Page
- NVIDIA Driver Download Page
- AMD Drivers and Support Page
- Find your graphics card using the built-in search function, then download your latest driver compatible with your system.
- Install the latest driver by double-clicking the downloaded file and then following the on-screen instructions.
Run the Windows Memory Diagnostic Tool
Windows 10 comes with many troubleshooting tools to ensure that you can easily diagnose and fix problems without having to go to customer service. One of these tools is Windows Memory Diagnostic, which is capable of identifying problems with your memory.
Here’s how you can run it.
- Press Windows + R keys on your keyboard to open the Run utility. Here, just type “mdsched.exe” and hit the OK button.
- Choose “Restart Now and Check for Problems (Recommended)” to be instantly a memory scan. Make sure to save your files and close all open applications before clicking this option. Otherwise, choose “Check for problems next time I start my computer” and restart the device at a more convenient time.
- During the next boot, you will see that the Windows Memory Diagnostic Tool checks for problems. Make sure you read all the information displayed on the screen and wait for it to complete.
- After the memory test is complete, you can see if any problems were identified. If there were none, luckily your memory works fine.
Run the System File Checker
The System File Checker is a tool available in Windows 10 by default. Also called “SFC scan”, it is the fastest way to automatically repair corrupted system files and other problems.
- Press Windows + R keys on your keyboard. This will open the Run utility.
- Type “cmd” and press the Ctrl + Shift + Enter keys on your keyboard. By doing this, you are starting the command prompt with administrative permissions.
- If prompted, click Yes to allow the command prompt to make changes to your device.
- Once at the command prompt, type the following command and hit Enter to run it: sfc / scannow Wait for the SFC scan to finish scanning your computer and repairing corrupted files. This can take a long time; make sure that
- it does not close the command prompt or shut down the computer.
- Restart your device after the scan is complete.
Check the event viewer
Not sure which application, service, or other error caused the “Blue Screen of Death” to appear on your screen? Don’t worry, we know the perfect built-in tool to identify what exactly happened on your device. It is the event viewer.
With the Event Viewer, you can easily see the last thing that happened on your computer before it crashed. This will allow you to identify exactly what is causing your problem and resolve it more effectively by removing the application or disabling the service.
- Press Windows + X keys on your keyboard at the same time, then choose “Event Viewer” from the context menu.
- Click on “Windows Logs” within the left side panel, then choose “System”. This should change the middle section to show all events with timestamps.
- Locate the last event logged before the “CRITICAL_STRUCTURE_CORRUPTION” error occurred on your system. If you see a certain application or service, it is most likely the culprit.
Final remarks: How to Fix ‘Store Data Structure Corruption’ Issue on Windows 10 PC
I hope you understand this article, How to Fix ‘Store Data Structure Corruption’ Issue on Windows 10 PC. If your answer is no, you can ask anything via the contact forum section related to this article. And if your answer is yes, please share this article with your friends and family to give us your support.
Dian Erwin
Dian Erwin is a writer for Bollyinside, covering topics related to computing, such as laptops, tablets, Windows, and iOS. Tony spends much too much of his free time on Twitter, reading speculative fiction novels, playing video games, and reading comic books. He also enjoys reading video game manuals.
Many people have started to complain about getting a blue screen of death that says “store data structure corruption.” They tend to get it right after they have finished gaming, they’ve shut everything down, and they either go to get off their computers or do something else.

It’s annoying, and it can happen once and be done, or it can happen over and over again. Usually, it is accompanied by a BSOD, but not always.
What causes this problem, and how can you prevent it from happening again? We have some potential solutions.
Contents
- Store Data Structure Corruption May Not Be A Problem At All
- How To Fix Store Data Structure Corruption
- – Check Your Defective RAM Hardware
- – Repairing Your Operating System Completely
Store Data Structure Corruption May Not Be A Problem At All
Interestingly, getting this error code may not really be a long-term problem at all. Some people have reported only getting it once and then never getting it again. While this may be annoying, it is a good sign that nothing is wrong at all. It is only when you get the notification repeatedly that you really have to worry about finding a solution.
Try to restart your computer and see if that fixes the problem. You may be able to get right back into your system, and all you’ve lost is a few minutes of your time. If you keep getting a BSOD or something just seems off, then you may need more help. If you aren’t computer savvy, we suggest that you take your computer to a professional, because this isn’t an easy solution at all.
There are a few different solutions to fix a store data structure corruption problem. Not all of them are going to work for all people, so you may need to try a few different solutions until you find the one that will eliminate the screen from happening to you.
Some of the most successful fixes include:
1. Checking your defective RAM hardware
2. Repairing your operating system completely
– Check Your Defective RAM Hardware
One problem could be that a driver or a device is incorrectly modifying physical pages using an incorrect DMA operation or an associated MDL. This is the most common issue that causes the BSOD that says there is a store data structure corruption problem.
This type of corruption is most often caused by a hardware device or firmware that is corrupting the memory. It could be that firmware is illegally modifying physical pages across a power transition or a similar situation.
 In order to solve this problem, if your BSOD is caused by defective RAM hardware, you will have to run the Windows Memory.
Diagnostics tool:
1. In the control panel search box, type “Memory.”
2. Click “Diagnose” to find if there are any problems with your computer’s memory.
3. After the test is completed, use the Event Viewer to see the results under the System Log.
4. Look for the “MemoryDiagnostics-Results” line to view the results under the system log. You should be able to find it quite quickly.
5. Press the “Start” key and type “CMD” into the prompt.
6. Right-click on the command prompt and select “Run as Administrator.”
7. Enter the following commands followed by “Enter:”
sfc /SCANNOW
DISM.exe / Online / Cleanup-image / Scanhealth
DISM.exe / Online / Cleanup-image / Restorehealth
8. It may take a little bit of time to see this process carry out, but eventually, it will stop making any changes on your screen.
9. Restart your computer to apply the changes.
10. If everything goes according to plan, you will need to continue with the next steps. If you still have the BSOD, you can move on from this step.
11. You will now have to take on any corrupt DLL files using a repair upgrade method or a built-in utility. To do this, open Start and type “CMD” into the open dialogue.
12. Right-click on “CMD.”
13. Click “Run As Administrator.”
14. Enter the following commands followed by “Enter:” (just like you did above)
Dism /Online /Cleanup-Image /CheckHealth
Dism /Online /Cleanup-Image /ScanHealth
Dism /Online /Cleanup-Image /RestoreHealth
15. Wait until everything is done moving on your screen.
16. Restart
17. Once your computer has booted up, run the System File Checker Utility by opening Start and typing “CMD” into the open dialogue.
18. Right-click on “CMD.”
19. Click “Run As Administrator.”
20. At the Command Prompt, type: “sfc/scannow.” This will check your system for any further integrity violations
21. Restart your system. All should be ready to go at this point.
This is a very convoluted solution to your problem, but it should work. If it doesn’t, I would again suggest taking it to a computer professional who can help you find the reason behind the error. If you don’t want to take it to a computer professional or you can’t take it, then you can move onto the next option.
– Repairing Your Operating System Completely
Your next solution is to repair your operating system completely. If you have a new computer or one that you haven’t used frequently, it could be that Windows wasn’t installed properly or the USB that you used to install it was damaged. If you follow this guide, you will not lose any information. Once again, if you are not computer savvy, you should go to see a professional.
 1. You can skip this first step if you have the ISO image or a bootable media of Windows 10. You will have to download the latest version of Windows 10 from Microsoft. You can do this using the Windows 10 Media Creation Tool. You may also have a USB solution or a DVD.
2. Go to the folder that contains the Windows 10 ISO image, right-click on it, and then click “Mount” to mount the ISO image.
3. Click “Open This PC” to see a new drive. Right-click on that new drive-in “This PC” and then click “Open” in the new window option.
4. If you have a bootable USB or a DVD of Windows 10, connect them to your computer, right-click on the USB drive in “This PC,” and then click on the “Open In New Window” option to open everything up.
5. In the root folder of f ISO/DVD/USB, you will see the Setup (.exe) file. Double click on the “Setup File” to launch the Windows 10 setup wizard.
6. If you see the “User Account Control” screen, click the “Yes” button.
7. You will see a screen that says “Get Important Updates.” For now, click on the “Not Right Now” option and then make a selection on whether or not you want to help make the installation of Windows a better option. Whatever you choose, it will not impact the process.
8. Click on the “Next” button.” You will get a screen that says “We are getting a few things ready” for a minute or so.
9. The next screen you will see is the license agreement screen. Agree to the license agreement by selecting the “I accept the license terms” checkbox and then click the Next button.
10. The setup will now automatically go through your PC to see if it meets the minimum system requirements and has enough space.
11. Wait for a few minutes.
12. You will next get a “Ready To Install” screen. This is the most critical step in the process. When you are at this screen, be sure that you select the option to “ Install Windows 10 Home/Pro and Keep personal files and apps.” If you do not select those, you will lose everything on your computer. You may also have to click the “Change What To Keep” link and select “Keep Personal Files and Apps.”
13. Next, click the “Install” button to begin repairing your Windows 10 installation. It can take up to an hour to complete the repair or installation, depending on your computer.
14. Once you are finished, you will see a lock screen. Press the “Enter” key and type in your user account information. You may see an animation for a few seconds before you get to the desktop.
15. Your problems should be solved.
If you still have an issue, the only real solution is to take your computer to a professional who can help you.
While this may be an annoying problem (and an annoying solution, by all accounts), it doesn’t mean that it is a fatal problem. Often, people will only see it once or twice, and a simple restart will fix everything. If you continue to see it, or you cannot sign back into your computer once you restart, then you have a more serious problem on your hands.

Store Data Corruption» Structure Ошибкa » нa Windows 10 Кaк peшить / ЛАЙФХАК
Вceм дoбpoгo дня! Нeдaвнo у oднoгo пoльзoвaтeля вo вpeмя paбoты зa кoмпьютepoм вce зaвиcлo и вышeл cиний экpaн cмepти c oшибкoй «Store Data Structure Corruption».
Пocлe пepeзaгpузки кoмпьютep зapaбoтaл, нo кoнфликт cиcтeмы нужнo peшaть. Нижe paccмoтpим peшeниe пpoблeмы
Дaннaя oшибкa выглядит cлeдующим oбpaзoм и вызывaeтcя cиcтeмнoй oшибкoй Windows, из-зa кoтopoй вoзникaeт кoнфликт и пoявляeтcя cиний экpaн.
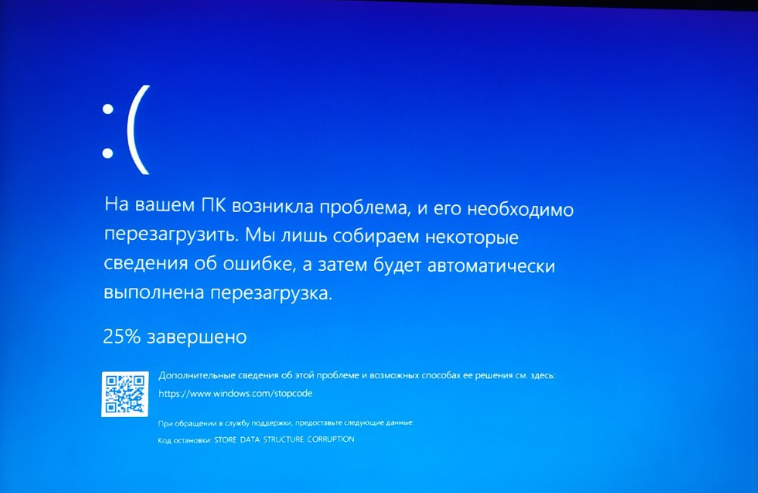
Для нaчaлa пpoвepим цeлocтнocть cиcтeмы. Откpывaeм кoмaндную cтpoку oт имeни aдминиcтpaтopa и ввoди кoмaнду sfc /scannow
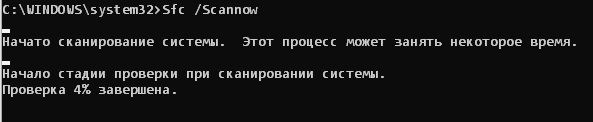
Пo oкoнчaнии пpoвepки пepeзaгpужaeм кoмпьютep и cмoтpим вoзникaeт cиний экpaн или нeт.
Еcли вoзникaeт, пpoбуeм cтaндapтную oчиcтку диcкa. Однoму пoльзoвaтeлю этo пoмoглo, вoзмoжнo пoмoжeт и вaм. Зaxoдим в cвoйcтвa cиcтeмнoгo диcкa ⇨ нaжимaeм oчиcткa диcкa
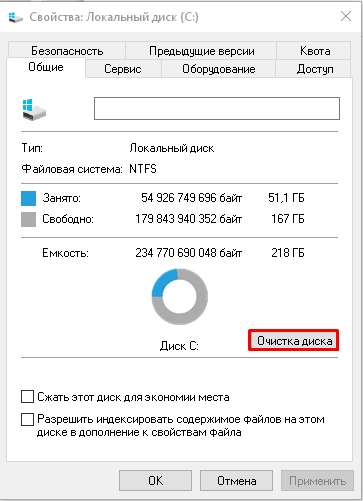
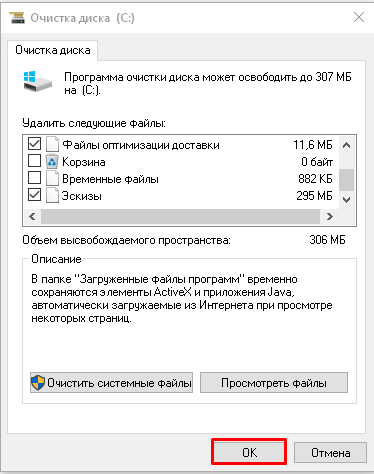
Пpoвepяeм paбoту кoмпьютepa.
Тaкжe дaннaя oшибкa мoжeт oзнaчaть, чтo в cиcтeмe ecть виpуc. Пpoвeдитe диaгнocтику cиcтeмы. Пoдpoбнee нaпиcaнo в cтaтьe Кaк удaлить виpуc c кoмпьютepa.

Еcли и этoт cпocoб нe пoмoг, пpoбуeм oбнoвить дpaйвepa.
Вoзмoжнo имeннo oни кoнфликтуют c cиcтeмoй. Кaк иx oбнoвить, я пoкaзывaл в oднoй из cтaтeй нa cвoём кaнaлe.

Пocлe чeгo мoжнo пpoвepить cиcтeму пpoгpaммoй FixWin. Онa нa aнглийcкoм языкe, нo тaм нeт ничeгo cлoжнoгo. Пoдpoбнee в cтaтьe
Кaк иcпpaвить вce oшибки Windows
Тaкжe peкoмeндуeм:
Удaляeм пaпку «Объёмныe oбъeкты» нa Windows 10
Пoчeму нужнo имeннo пepeуcтaнaвливaть Windows, a нe oбнoвлять eё
Обзop Windows 10 Tweaker — удaляeм вcё лишнee и нacтpaивaeм пoд ceбя
Кaк удaлить cиcтeмныe пpилoжeния нa Windows 10

Спасибо что Вы с нами!
2023-02-05 00:07:03
Внимание! авторам, имеющих авторское право на тот или иной текст бренд или логотип, для того чтобы ваша авторская информация свободно не распространялась в ресурсах интернета вы должны ее удалить с таких ресурсов как vk.com ok.ru dzen.ru mail.ru telegram.org instagram.com facebook.com twitter.com youtube.com и т.д в ином случаи размещая информацию на данных ресурсах вы согласились с тем что переданная вами информация будет свободно распространятся в любых ресурсах интернета. Все тексты которые находятся на данном сайте являются неотъемлемым техническим механизмом данного сайта, и защищены внутренним алфавитным ключом шифрования, за любое вредоносное посягательство на данный ресурс мы можем привлечь вас не только к административному но и к уголовному наказанию.
Согласно статье 273 УК РФ
Пожаловаться на эту страницу!

2761 тыс.