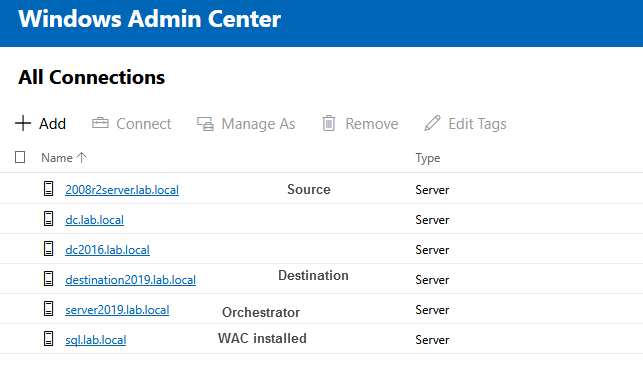
Introduction
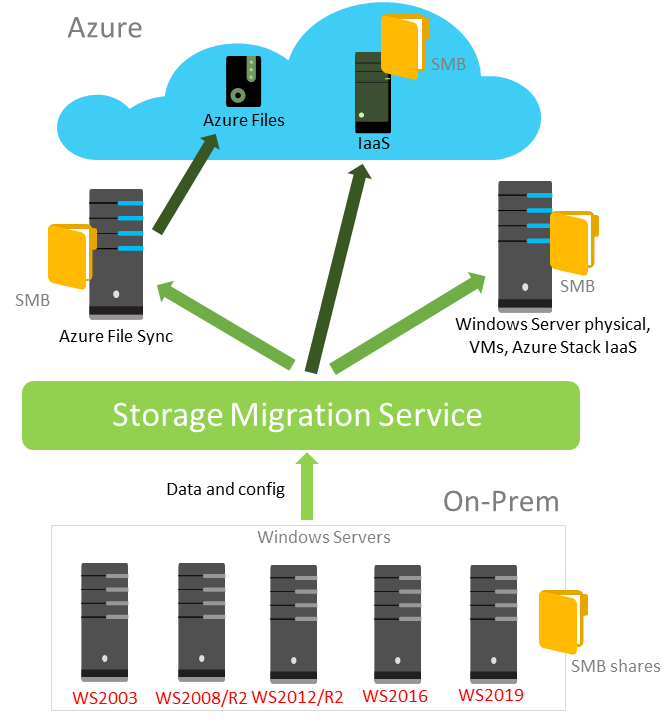
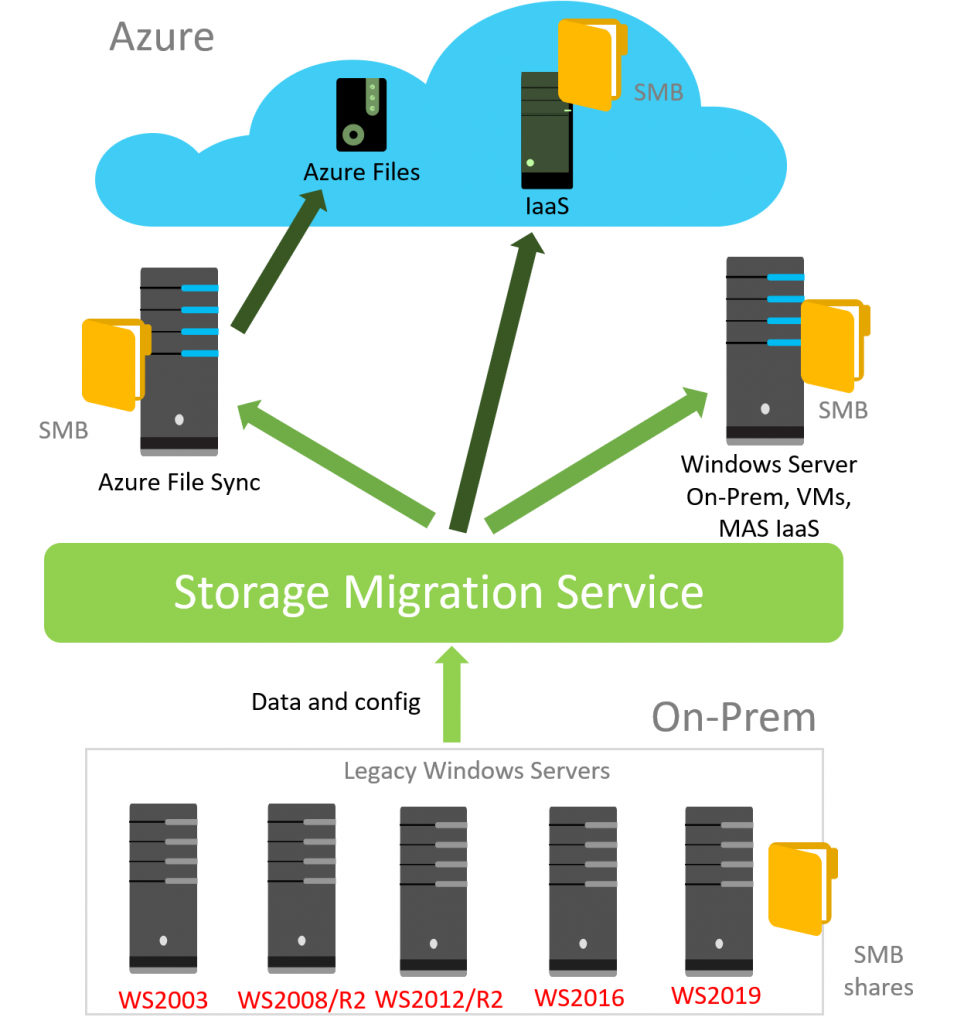
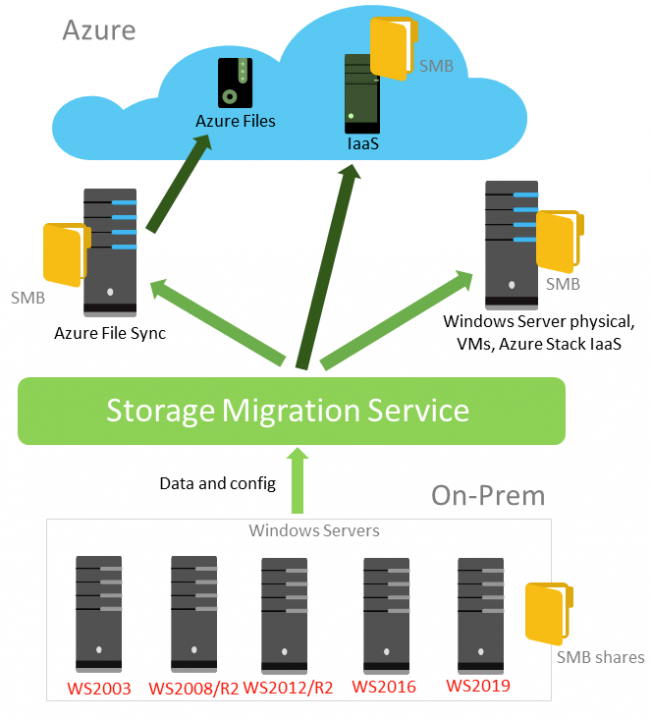
In Windows Server 2019, Microsoft introduced a brand new feature called Storage Migration Service (SMS). With SMS, you can migrate unstructured data from any Windows Server version (even Windows Server 2003 if you still have them around) into physical, virtual machines, Azure IaaS, and Azure Files. It’s super-fast, consistent, and scalable, it takes care of all the complexity such as permissions, share properties, encrypted, attributes, in-use files, network settings, names, and Active Directory membership. The following diagram from Microsoft shows all the supported scenarios for Storage Migration Service in Windows Server 2019. SMS leverages the SMB protocol to migrate your data.

Storage Migration Service in Windows Server 2019 [image credit: Microsoft]
Storage Migration Service ships in Windows Server 2019 (Standard and Datacenter edition), and Windows Admin Center (WAC) is the primary management tool for Storage Migration Service, Windows Admin Center (WAC) leverages PowerShell under the covers.
In this article, I will show you step by step how to migrate a file server from Windows Server 2016 build 14393 to Windows Server 2019 build 17763. This also can apply to different versions of Windows Server.
Prerequisites
The requirements are very simple, to use Storage Migration Service, you need the following:
5 Common Cat Behaviours And What Th…
Please enable JavaScript
1) A source server (Windows Server 2003, Windows Server 2008, Windows Server 2008 R2, Windows Server 2012, Windows Server 2012 R2, Windows Server 2016, Windows Server 2019, or Windows Server 2022).
2) A destination server (Windows Server 2012 R2, Windows Server 2016, Windows Server 2019, or Windows Server 2022). Destination servers running Windows Server 2022 or Windows Server 2019 have double the transfer performance of earlier versions of Windows Server. This performance boost is due to the inclusion of a built-in Storage Migration Service (SMS) Proxy service.
3) An orchestrator server (Windows Server 2019/2022 Standard or Datacenter). You need at least one Windows Server 2019/2022 to act as an orchestrator, but you don’t have to make your destination server 2019 or 2022, however, if your destination server is Windows Server 2019 or Windows Server 2022, then the transfer speed will be double compared to Windows Server 2012 R2, and Windows Server 2016. This performance boost is due to the built-in Storage Migration Service proxy service that was introduced in Windows Server 2019 and later release.
4) The source and the destination server must reside in the same domain and same forest as of today.
5) A PC or Server running Windows Admin Center (WAC) with minimum version 2103. Check my previous article on how to install Windows Admin Center.
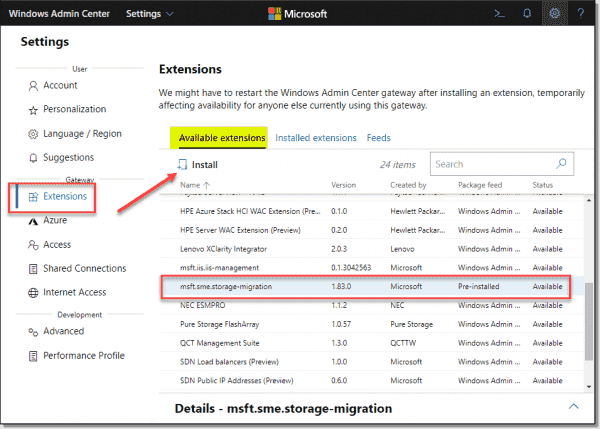
6) Last but not least, make sure you have installed the extension Windows Server Storage Migration Service (msft.sme.storage-migration) in Windows Admin Center. At the time of this writing, we are running Version 2.6.1 of the Storage Migration Service extension.
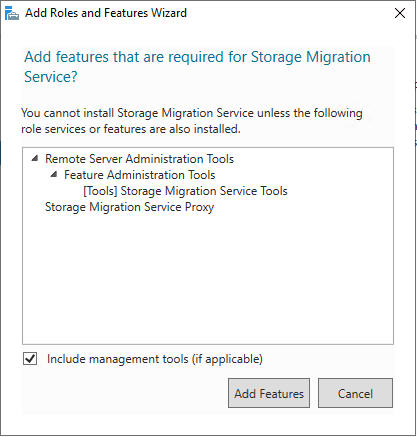
As a side note, if you are installing the Storage Migration Service (SMS) Proxy service in a DMZ, you must open and allow the following 4 inbound firewall rules (File and Printer Sharing (SMB-In), Netlogon Service (NP-In), Windows Management Instrumentation (DCOM-In), and Windows Management Instrumentation (WMI-In).
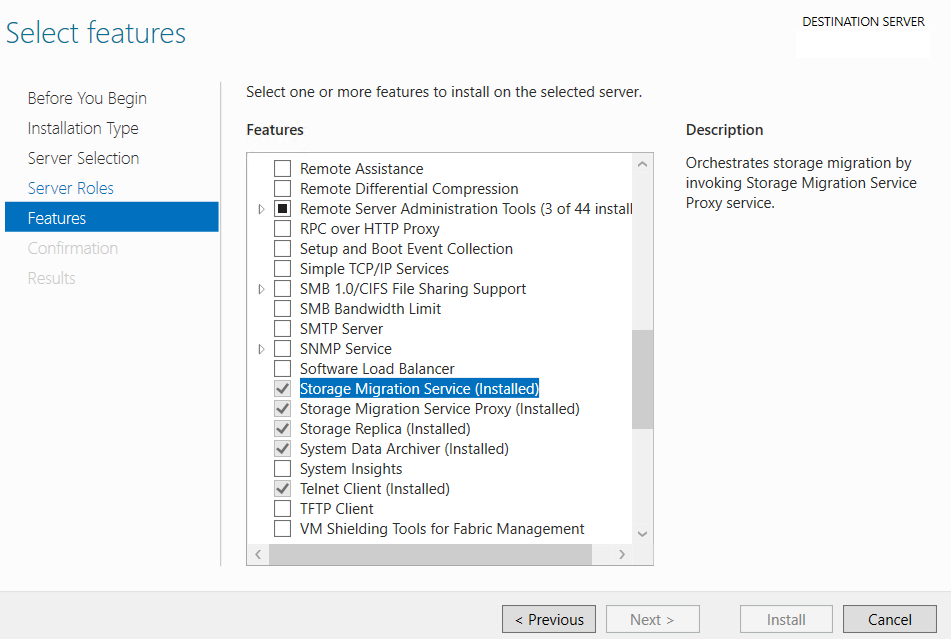
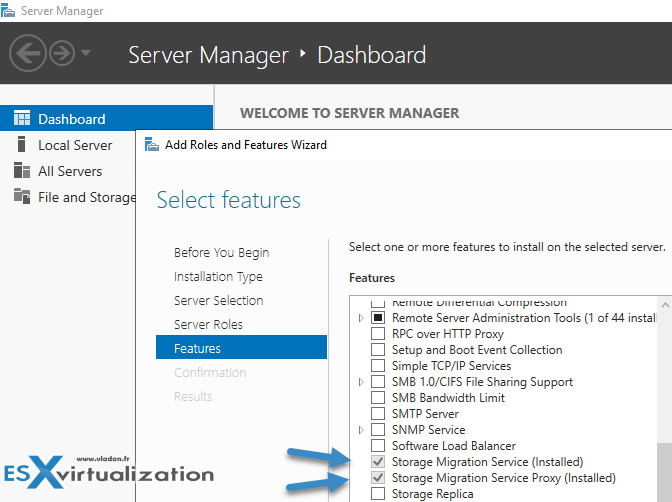
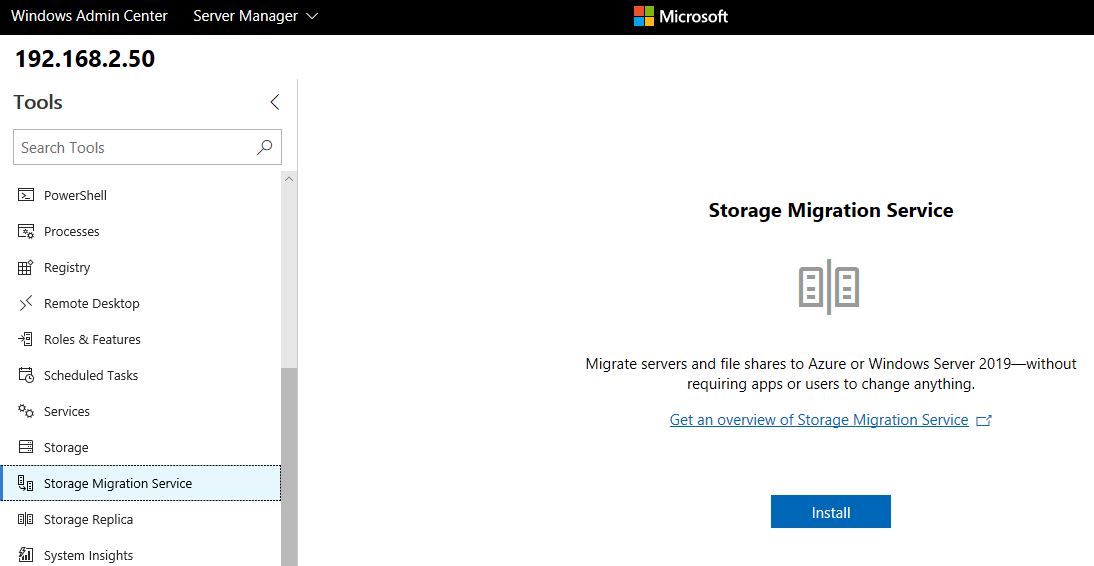
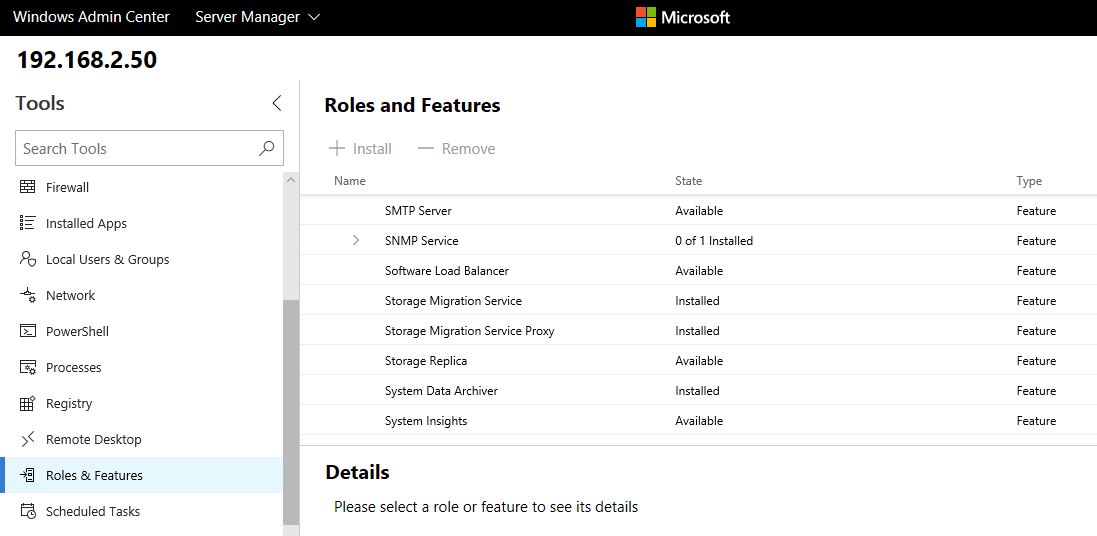
Please note that installing the Storage Migration Service Proxy service on a Windows Server 2019 or Windows Server 2022 computer automatically opens the necessary firewall ports on that computer. To do so, connect to the destination server in Windows Admin Center and then go to Server Manager (in Windows Admin Center) > Roles and features, select Storage Migration Service Proxy, and then click Install as shown in the figure below.

How to do it…
Launch Windows Admin Center portal and take the following steps, assuming you have already added the source and destination server:
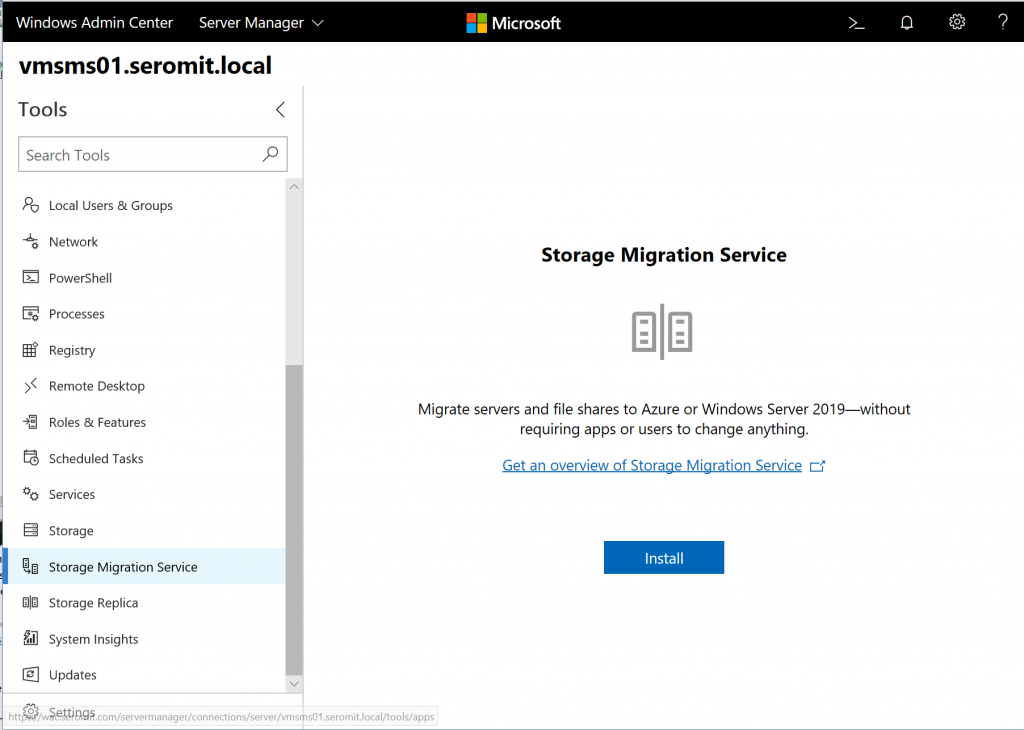
1) Choose the orchestrator server (Windows Server 2019 or Windows Server 2022), then select the Storage Migration Service from the left-hand side, and then click Install to install the Storage Migration Service feature.

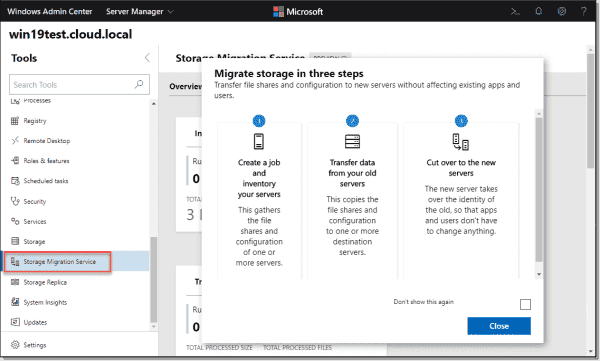
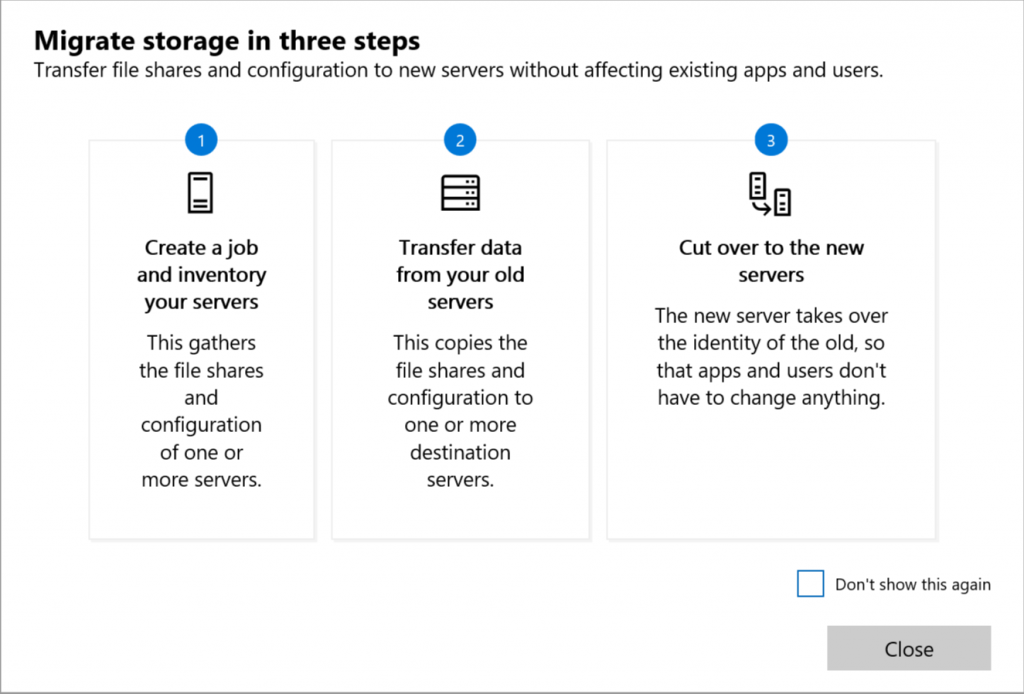
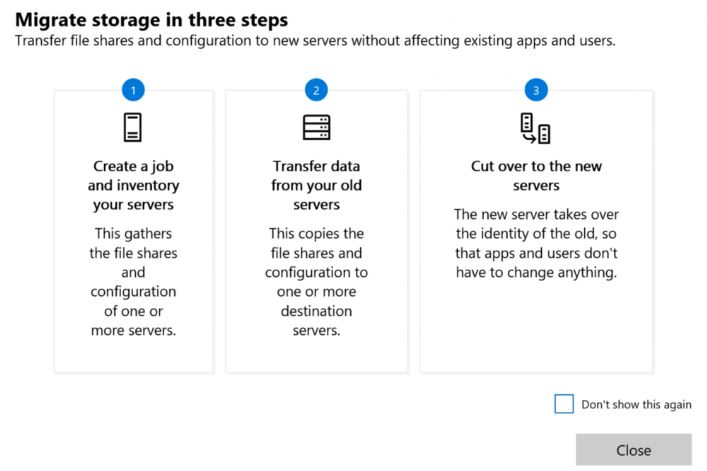
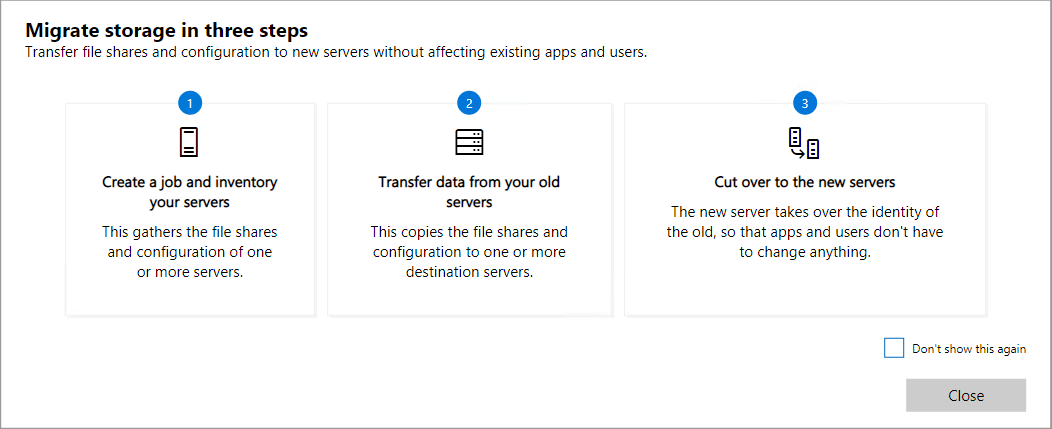
2) A new window will pop up describing the three easy steps that you will go through to migrate your file shares and configuration to new servers without affecting existing apps and users. Click Close.

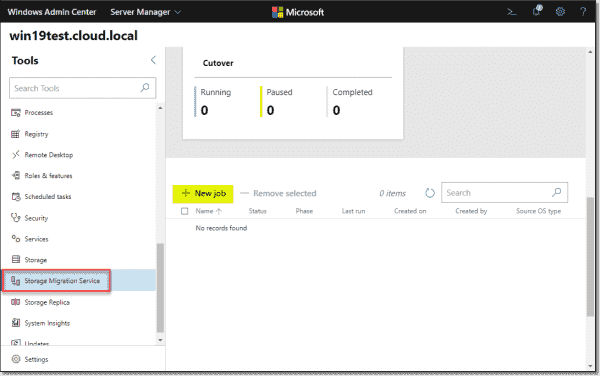
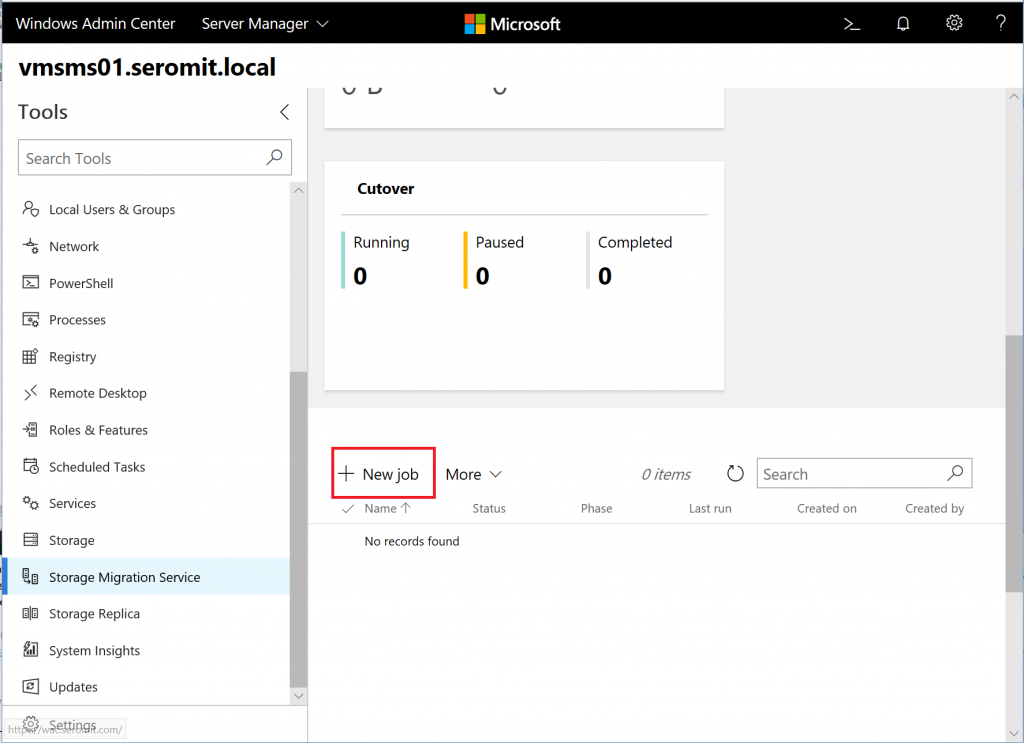
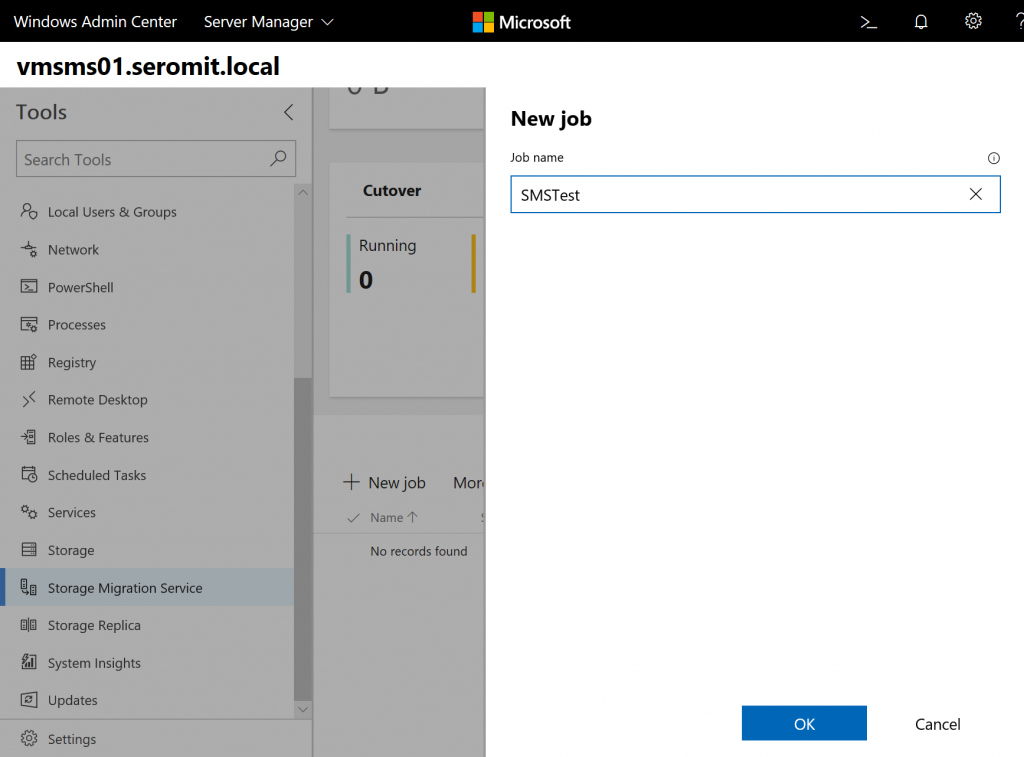
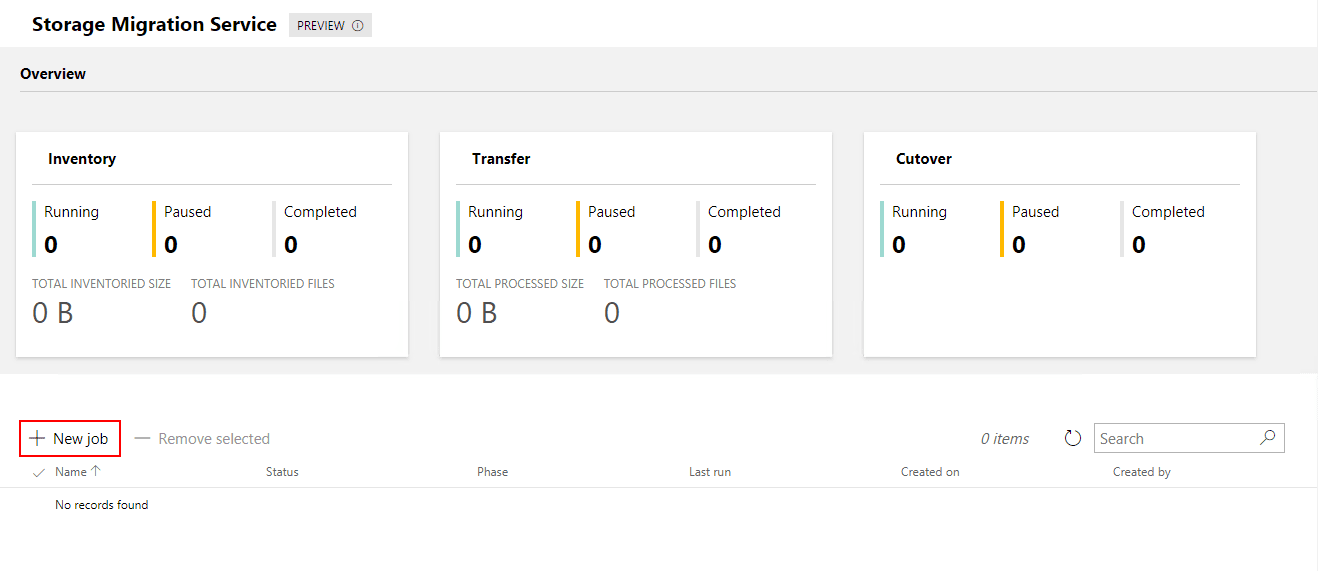
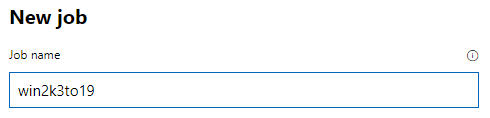
3) This is Phase 1, click +New job to create a new job, give it a name without any space (only alphanumeric), and then click OK.

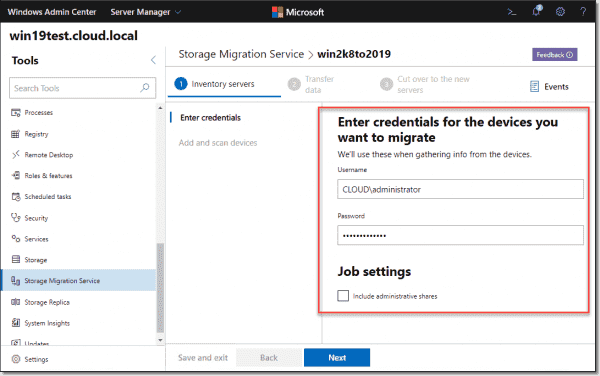
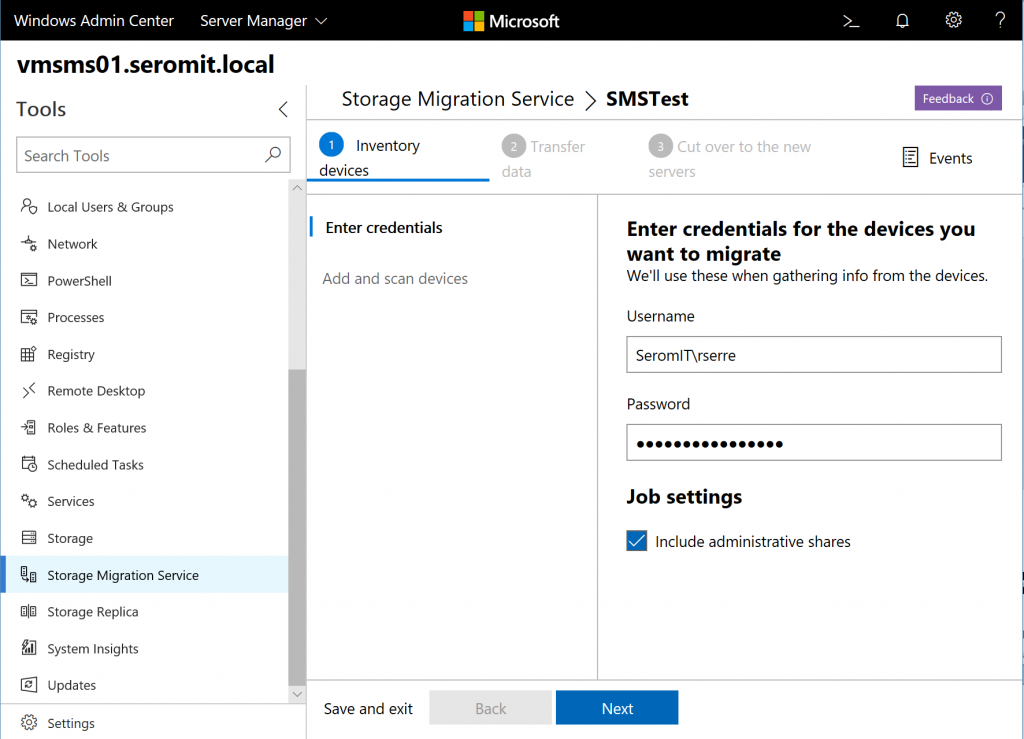
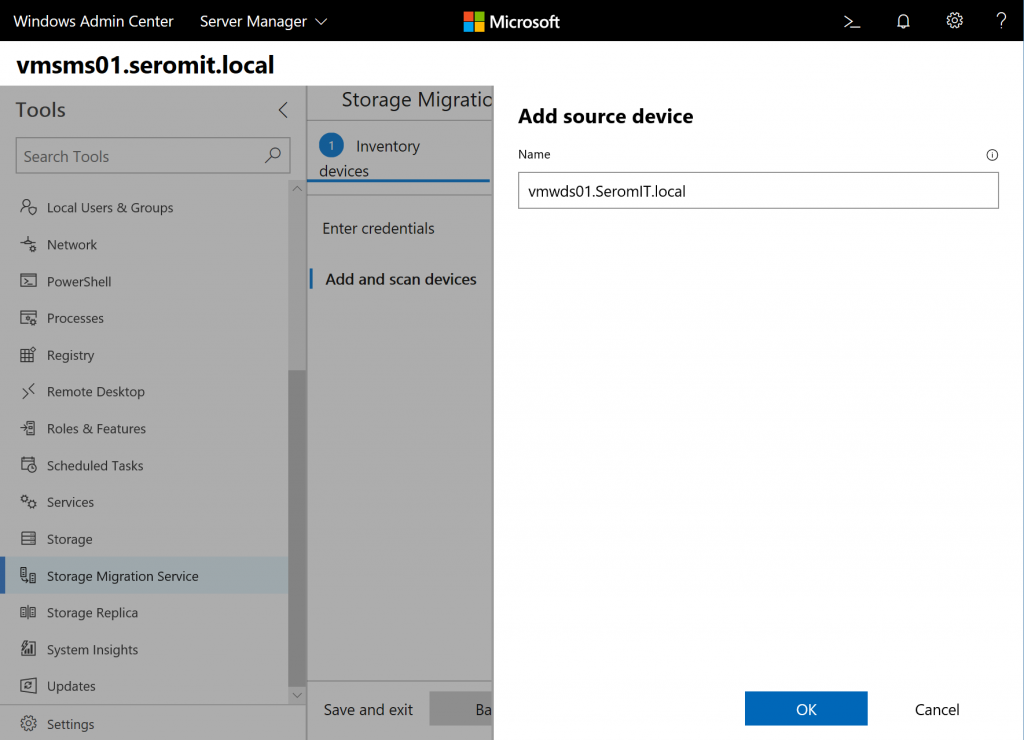
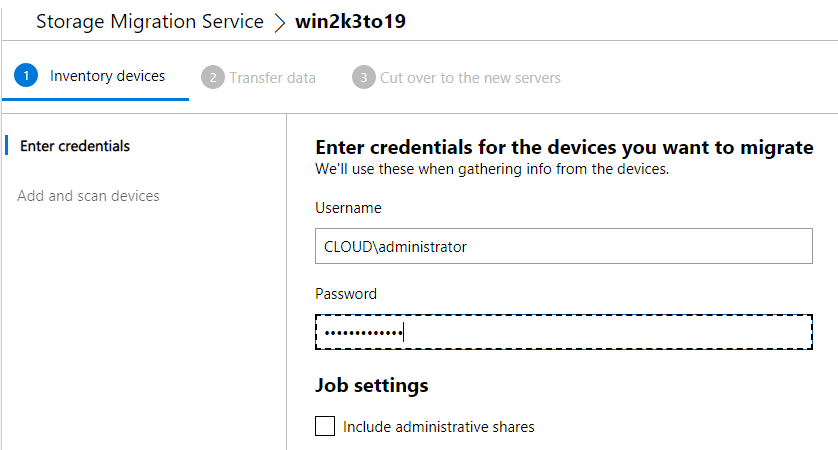
4) Enter the credentials for the source server that you want to migrate from, select if you want to include all admin shares, and then click Next.

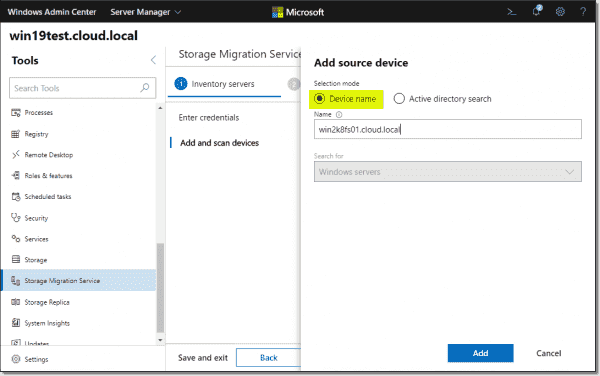
5) Click +Add a device, enter the source server, and then click OK. Please note that you can add more than one source server at a time. This is useful in the scenario where you want to migrate more than one file server to new Windows Servers, but not consolidate (more on this in the Summary section).

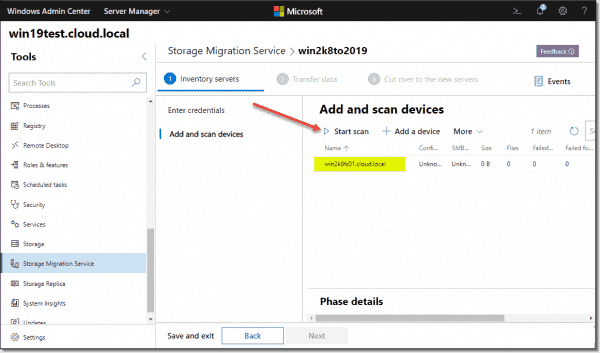
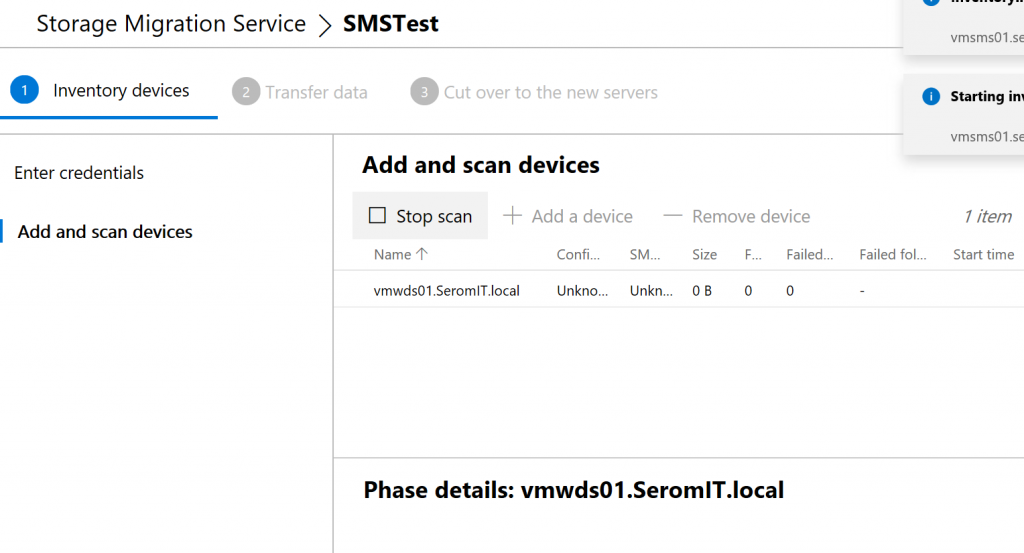
6) Click Start scan to start the inventory, in this step, the Storage Migration Service will start looking at all the configuration, network settings, and the data on the source server. This step may take some time depending on the amount of data you have on the source server.

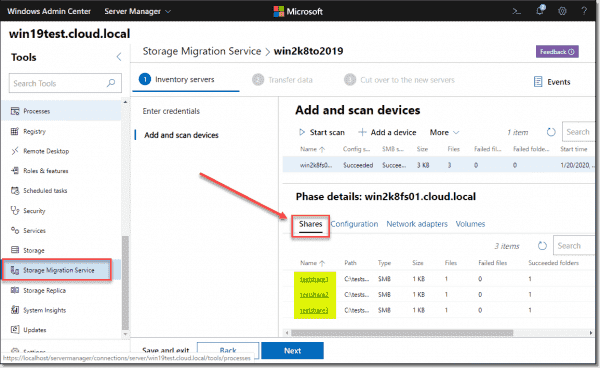
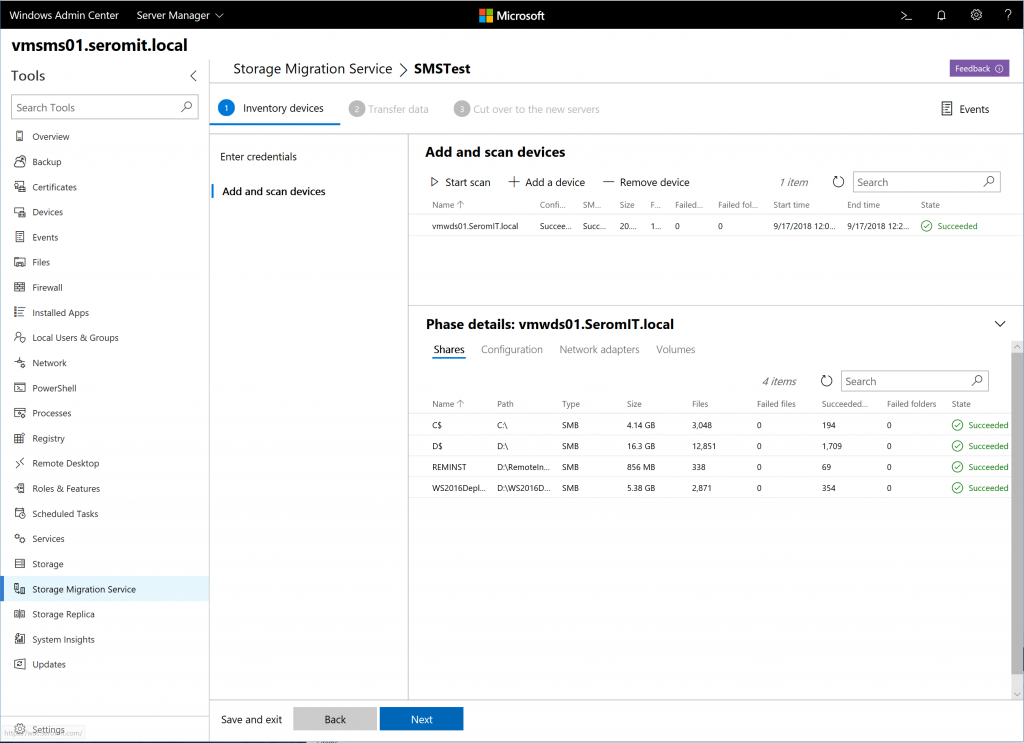
7) Once the scan is complete, you will see all the shares, their path, size, files, including the configuration, network adapters, and volumes on the source server. Click on Next to continue.

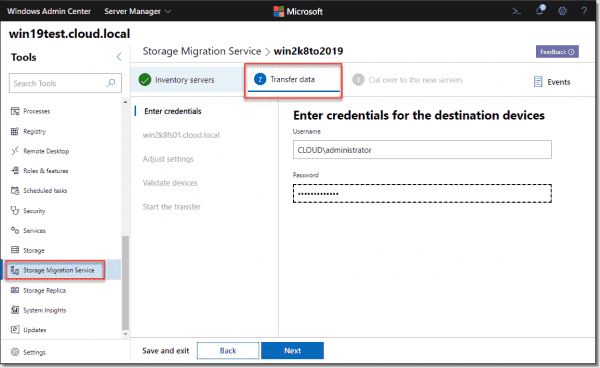
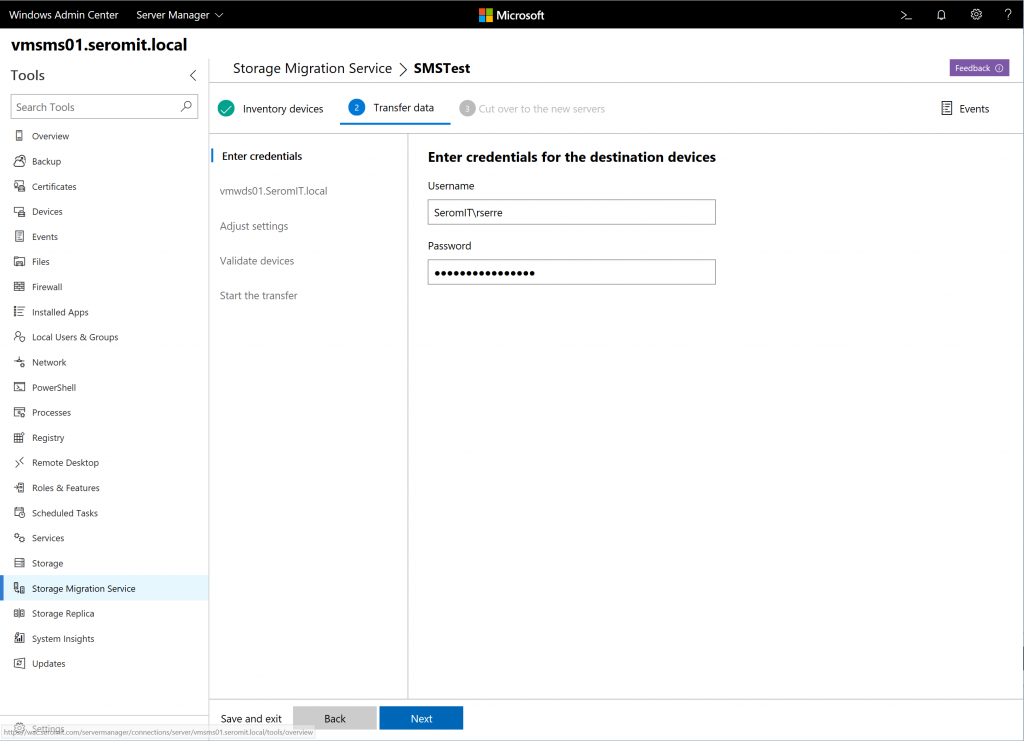
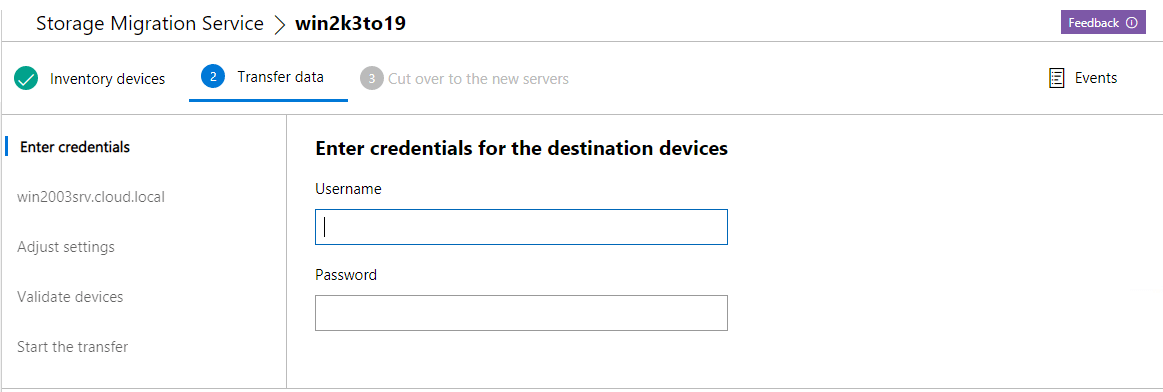
 Now we move to Phase 2, enter the credentials for the destination server that you want to migrate to, and then click Next.

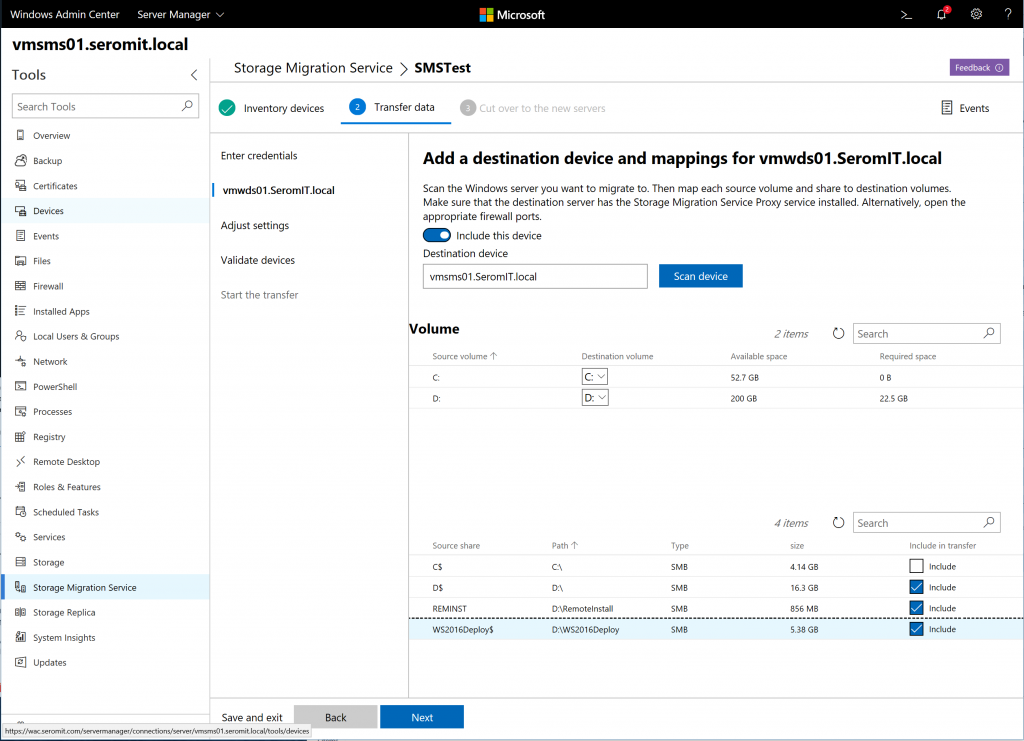
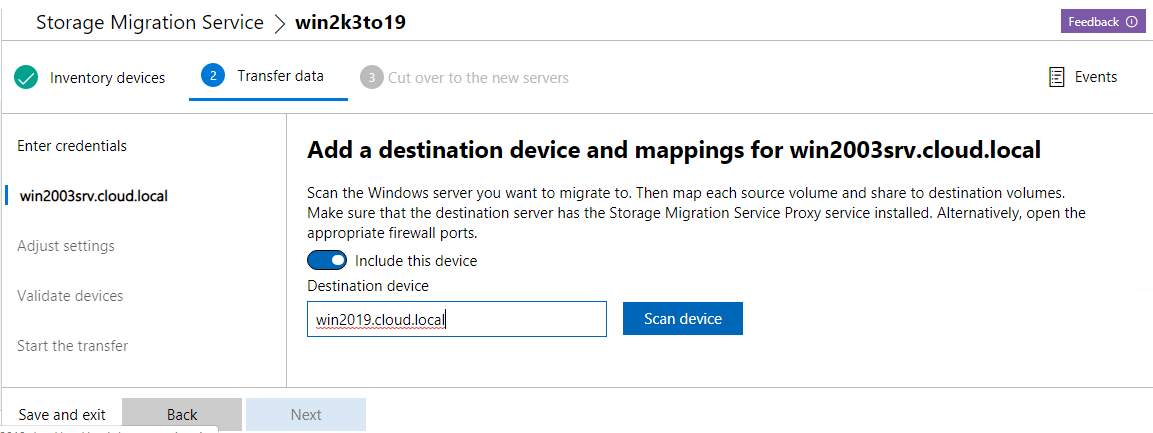
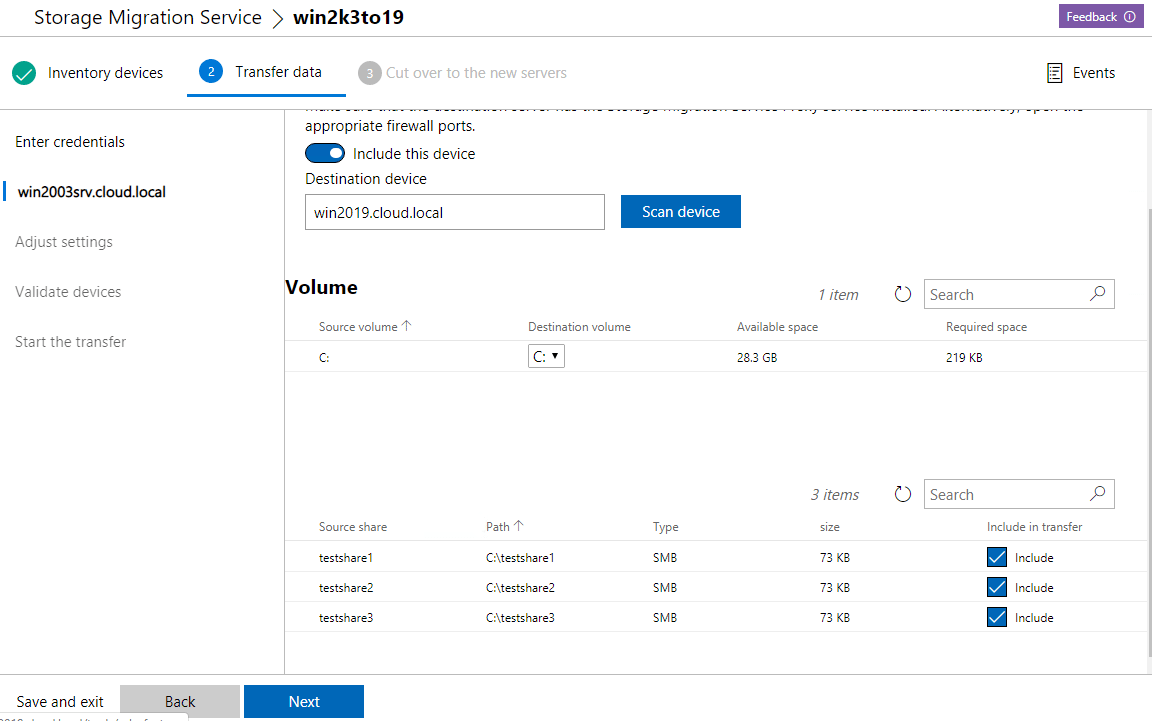
9) Add your destination server to map it against your source server, and then click Scan device. After a moment, you will see all the volumes on the destination server including their free space, you can change the destination volume if you wish to, and you can select which source share you want to include in the transfer. Make your selection and then click Next.

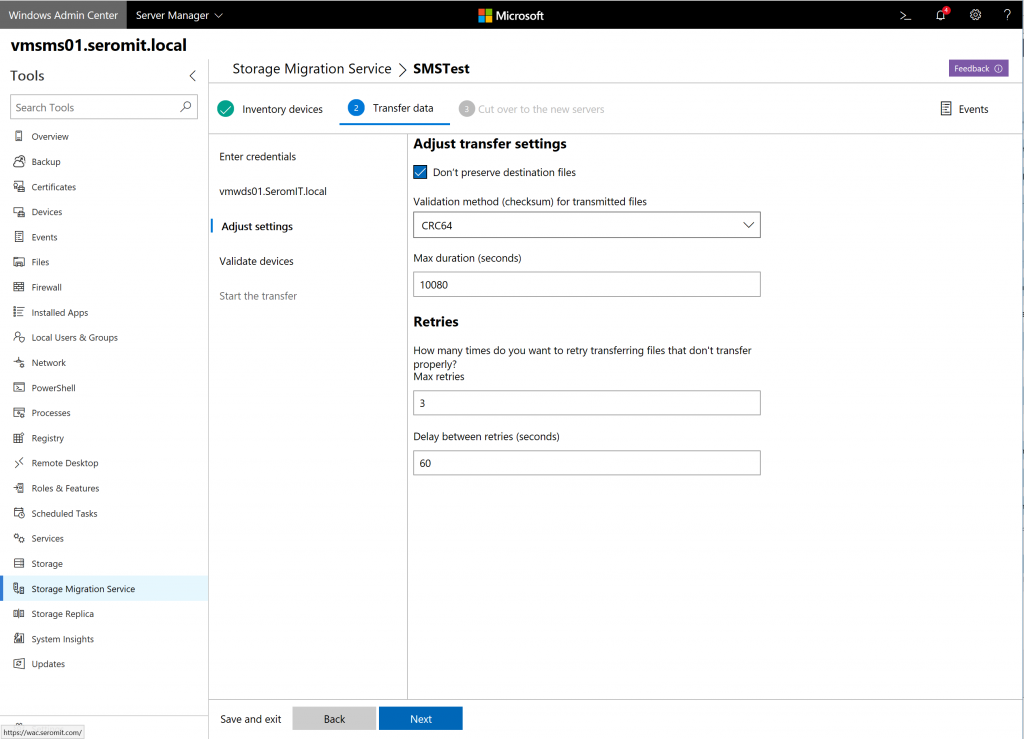
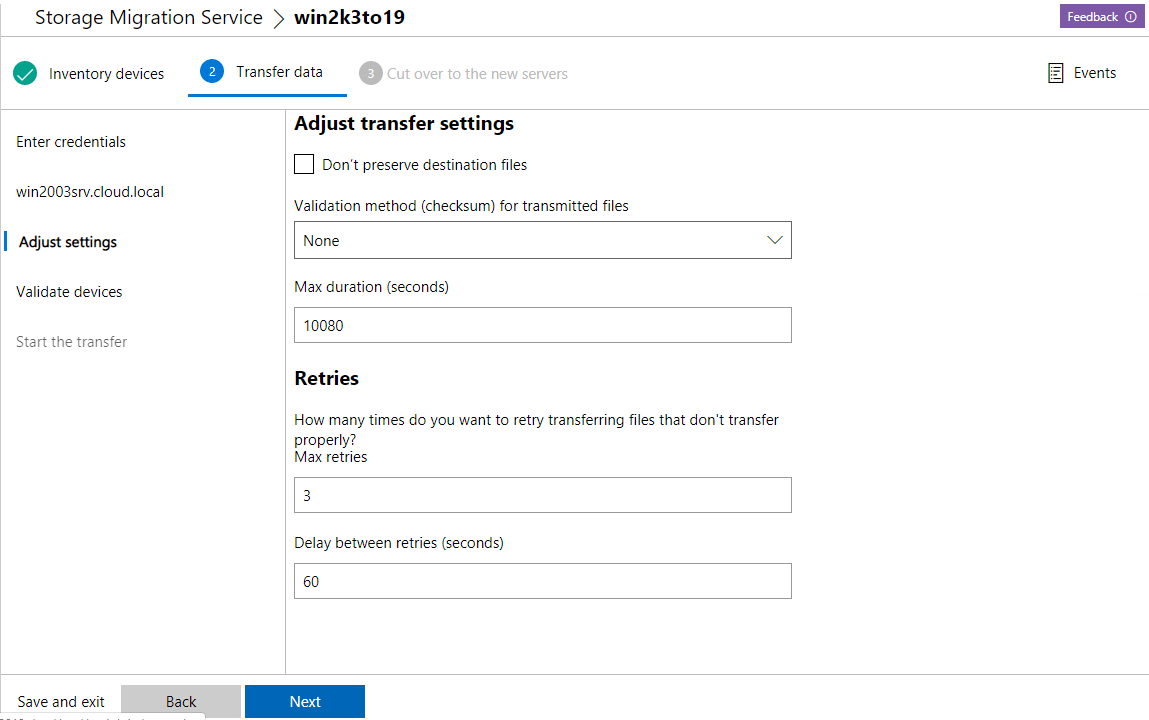
10) On the Adjust transfer settings page, you can set the Validation method (checksum), Max duration, and Retries, as well as whether to migrate local users and groups on the source servers. This is useful in case you have several local accounts on the Source server that you need to migrate. This lets you recreate any local users and groups on the destination servers so that file or share permissions set to local users and groups aren’t lost. Click on Next to continue.
> Please note that migrated user accounts are disabled on the destination server and assigned a 127-character password that’s both complex and random, so you’ll have to enable them and assign a new password when you’re finished to keep using them. This helps ensure any old accounts with forgotten and weak passwords on the source don’t continue to be a security problem on the destination.

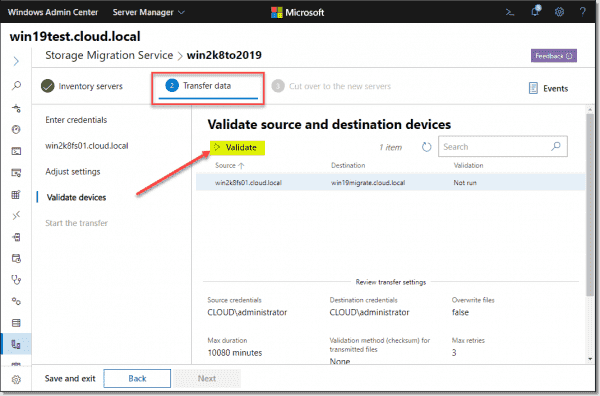
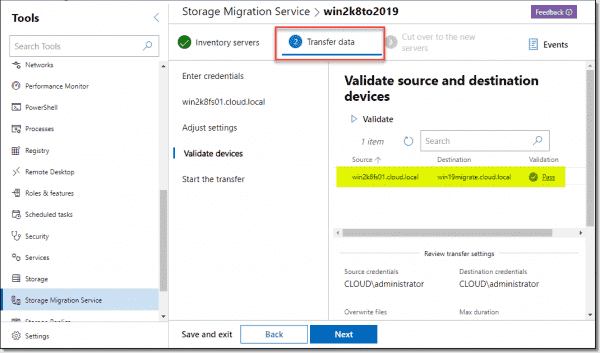
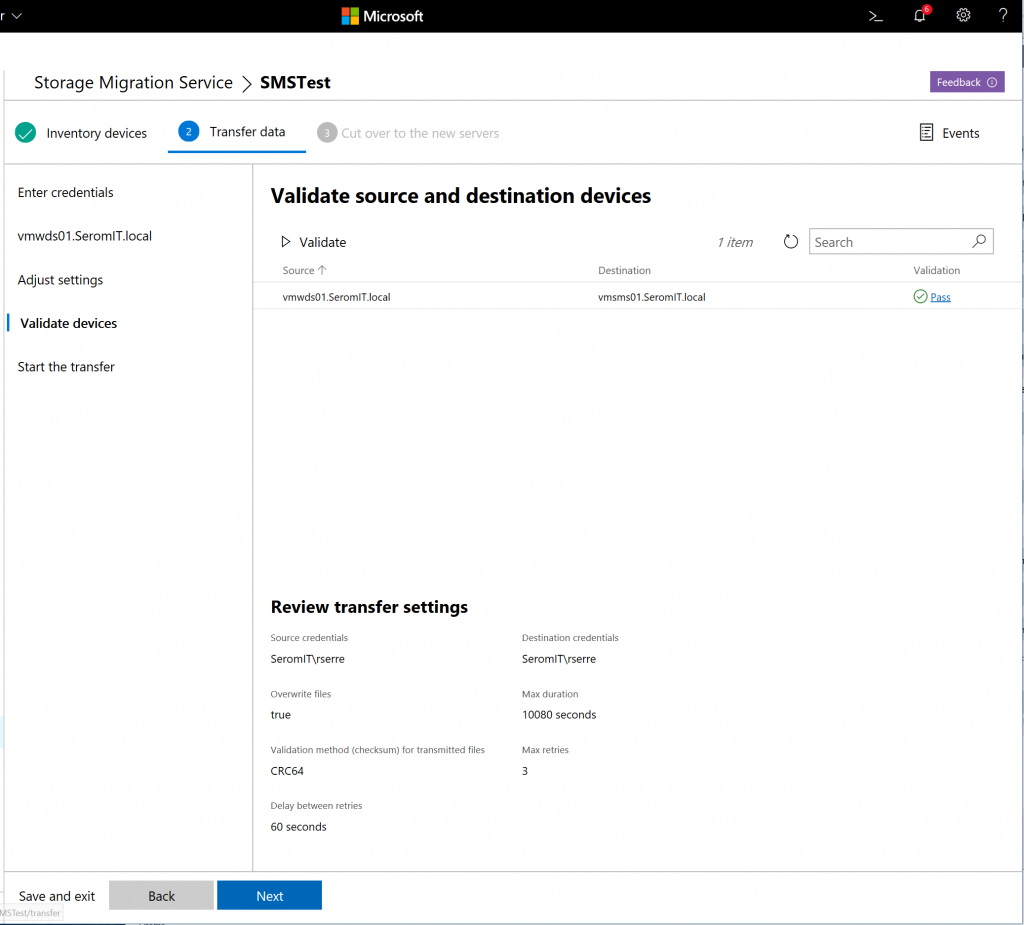
11) Then you need to validate to check if the transfer is going to work, so you can make sure that everything will work before you start the migration. This is the best feature! Click Validate. In my example, the validation passed.

12) If you click on the Pass link, you will see all the migration test results. Click Close and then click on Next to continue.

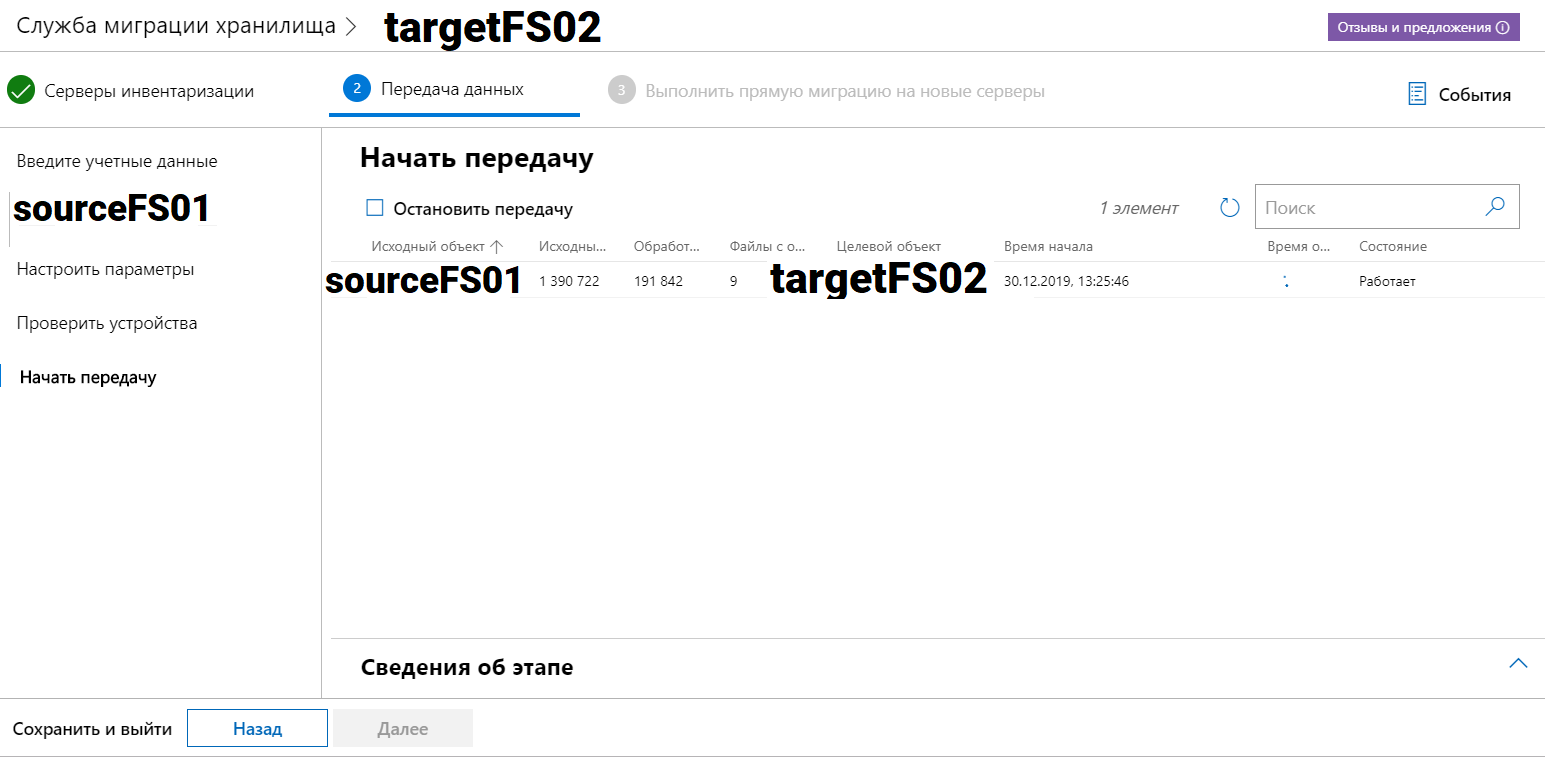
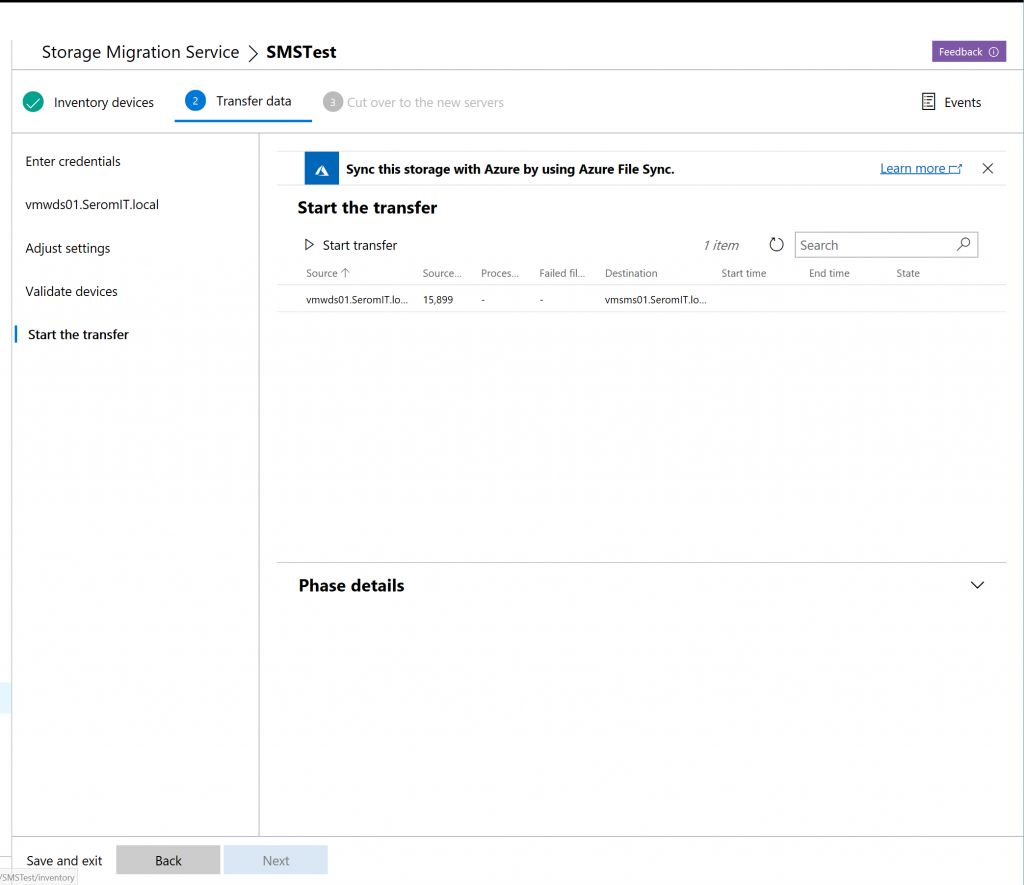
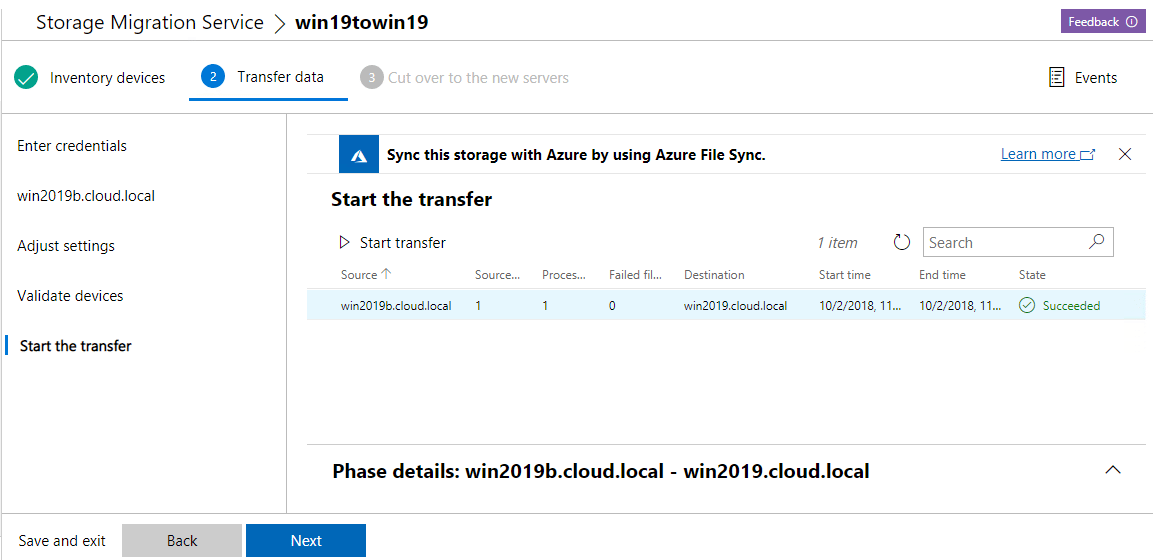
13) On the Start transfer page, click Start transfer. The transfer will kick in and take some time depending on the amount of data you are transferring. Get a cup of coffee and then come back 

14) If you switch back to the Storage Migration Service dashboard in Windows Admin Center, you will see the migration job in real-time including the network throughput in a beautiful chart view. This is awesome!

15) Once the transfer is completed, you will see the status is Succeeded. Click on the job name at the bottom.

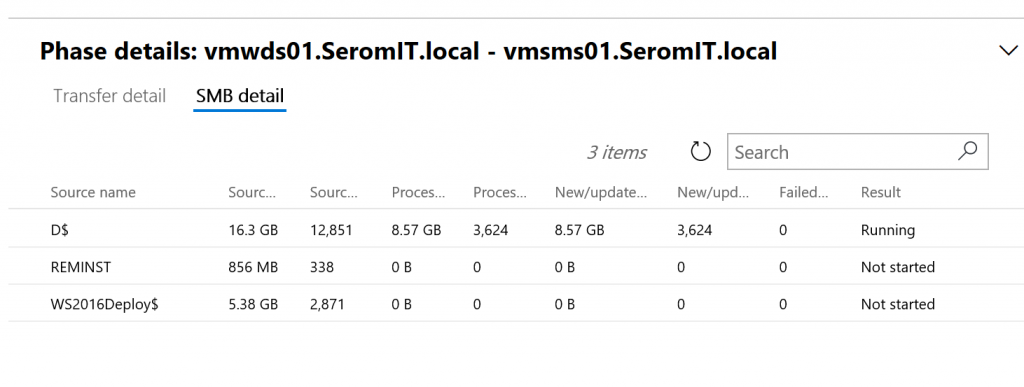
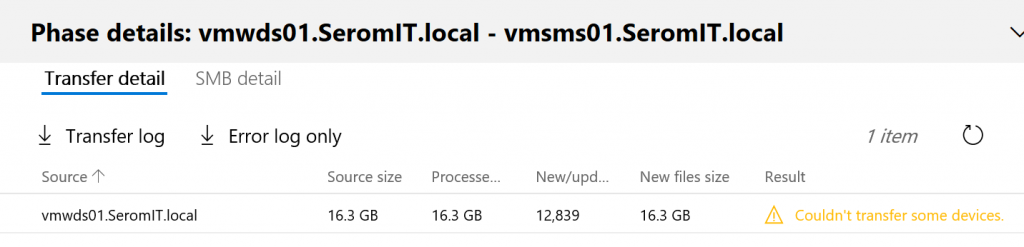
16) In the Start the transfer page, you will see transfer and error log details where you can download the logs as a CSV file and open it in Excel. This is so interesting because it will help you to cross-check that all files are migrated in case any user complains that he/she cannot see their files! Click on Next to continue.

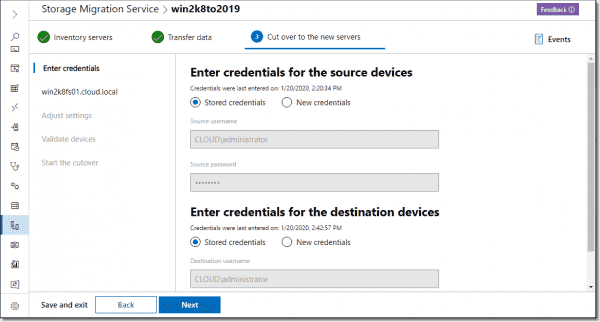
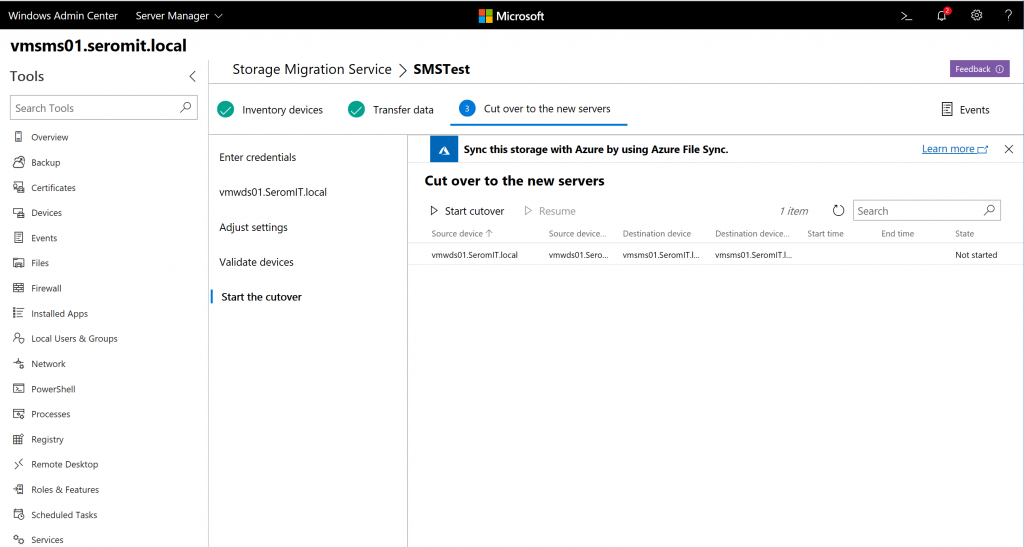
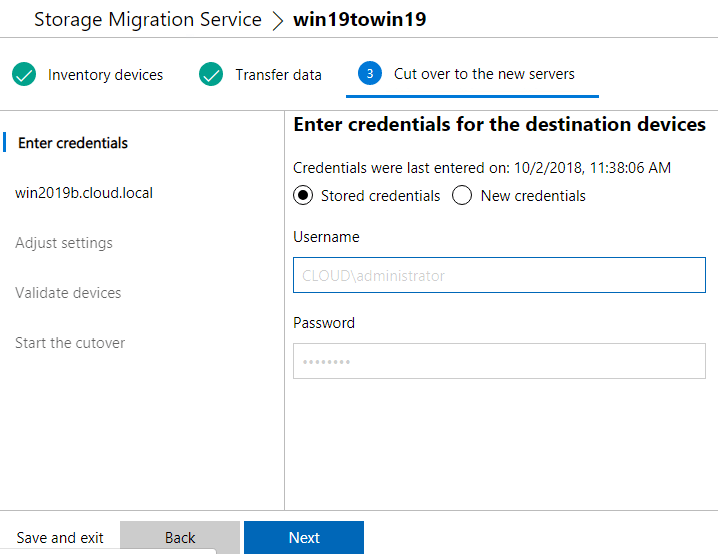
17) Now we reach the final step, Phase 3, Cutover to the new servers. In this step, you can use the stored credentials or enter new ones in case they are changed on the destination server. Click on Next to continue.

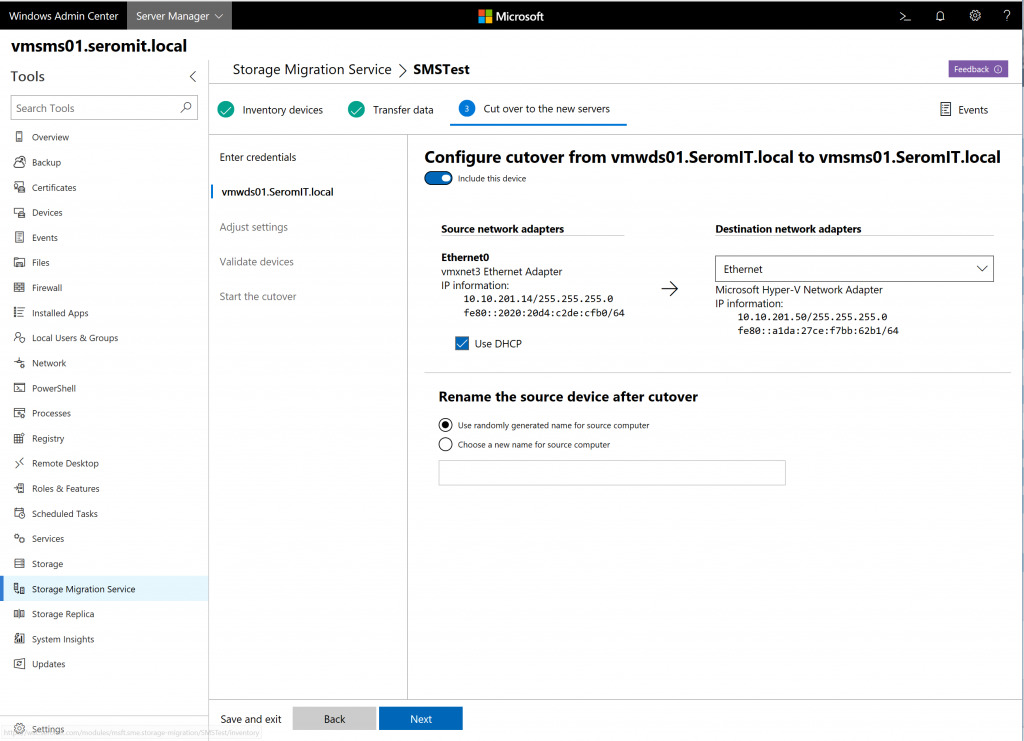
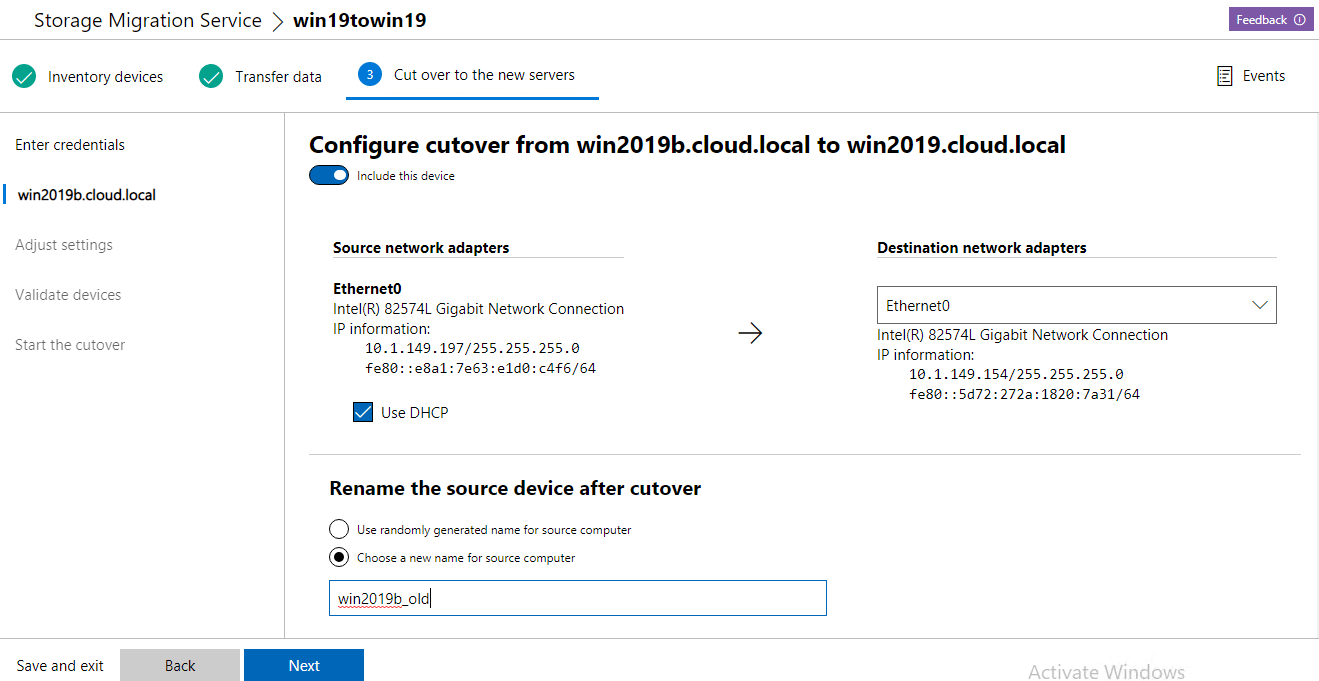
18) In the Configure cutover page, you will see the network adapter for the source server, you can map the network adapter on the destination server, you can set a new static IP address for the source server, or you can use DHCP. Last but not least, you can rename the source server by giving it a new name or using a random name. Click on Next to continue.

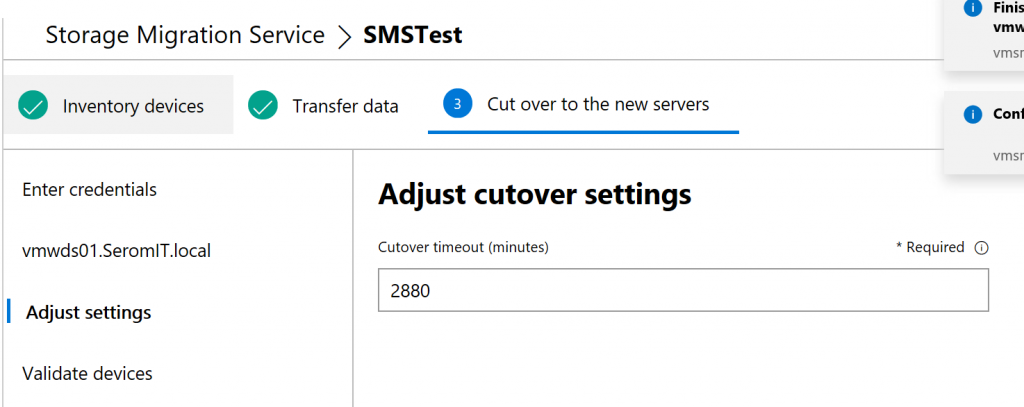
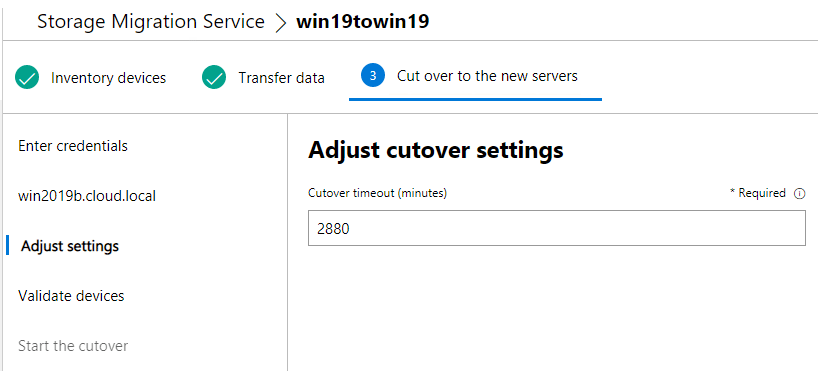
19) In the Adjust cutover settings page, you can specify the cutover timeout in minutes, the default is 2880 minutes (48 hours).

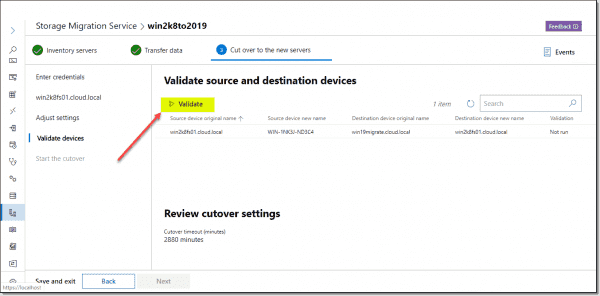
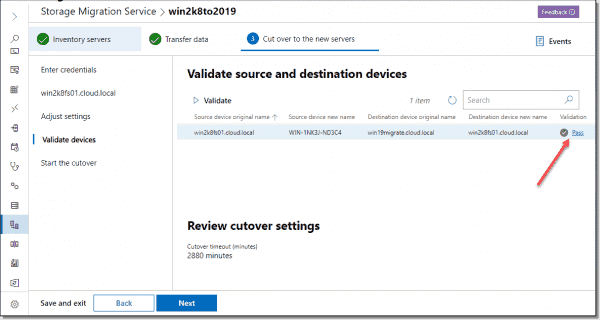
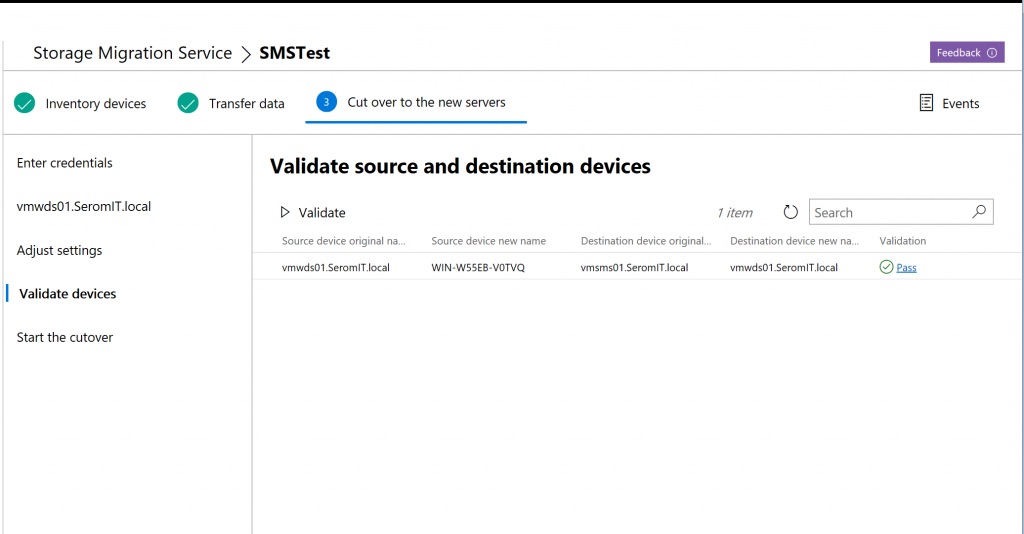
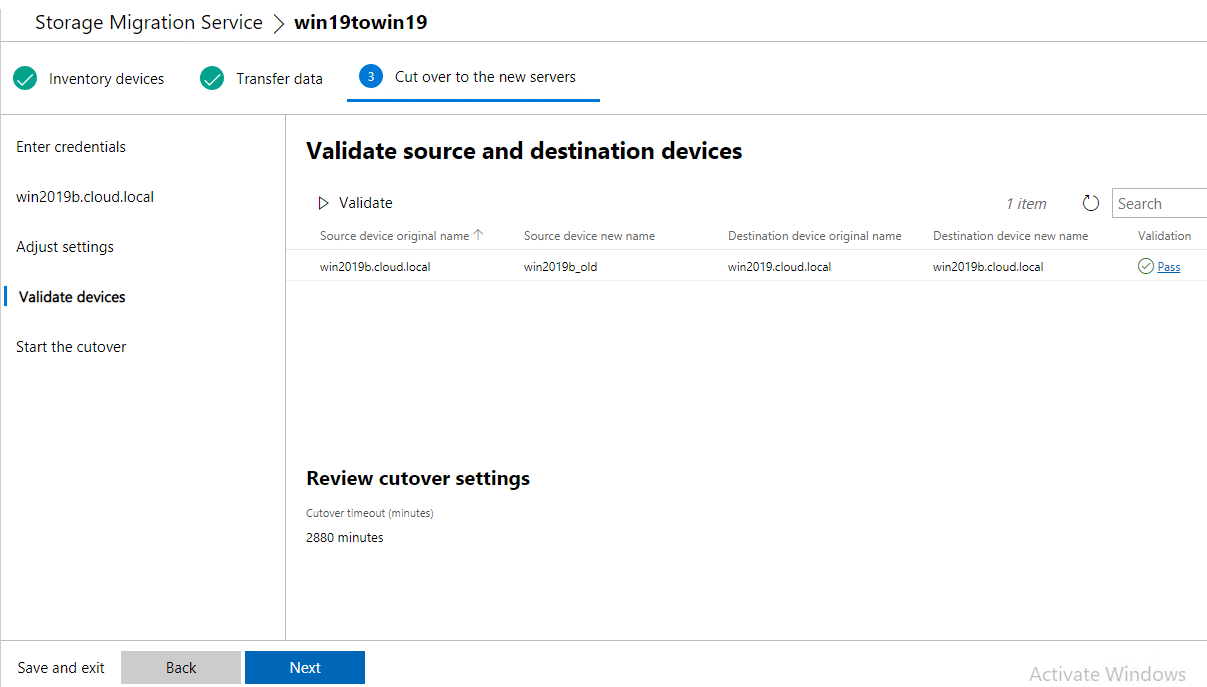
20) In the Validate source and destination devices page, click Validate. This step will validate that everything will work before you cut over and remove the old server. If you click on the Pass link, you will see all the migration test results. Click Close and then click on Next to continue.

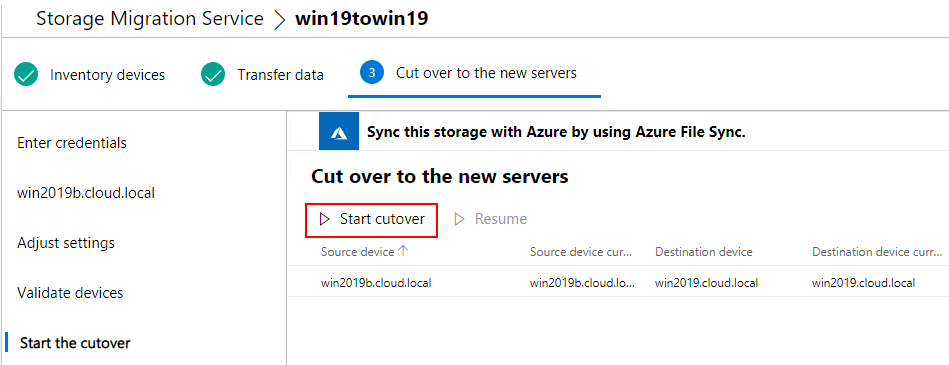
21) Finally, click Start cutover. Please note that this step requires downtime because it will reboot twice the source and the destination server, then map the network on the destination server, and renaming the source server, and change its IP address, so make sure to schedule a maintenance window before you proceed.

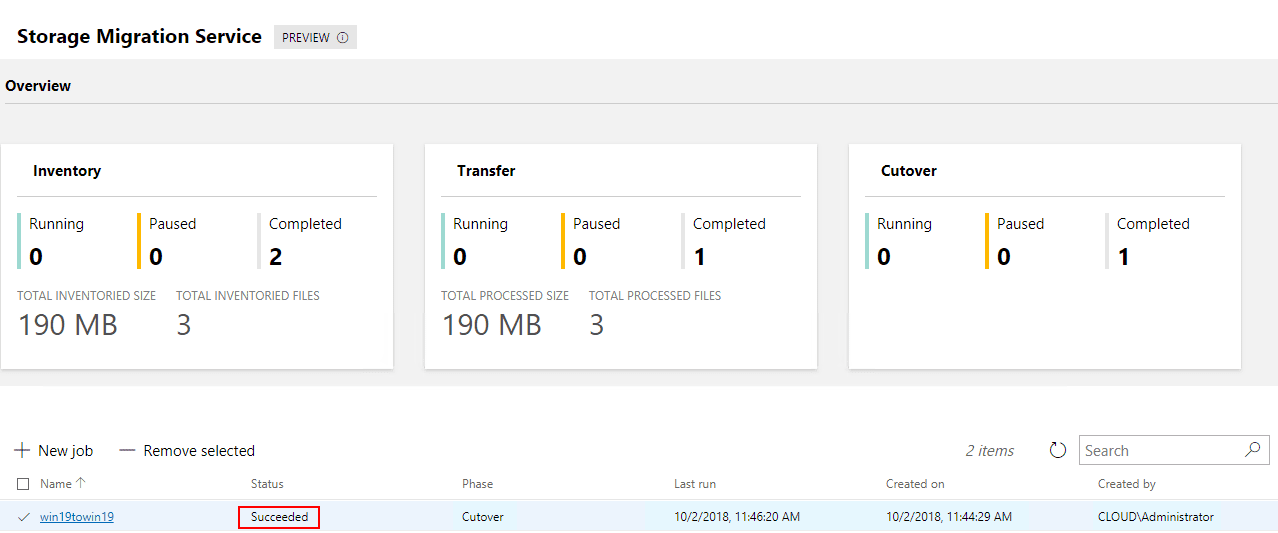
22) After the cutover process is succeeded. I was able to verify that the old server was renamed and the new server has the identity of the old server. Now if your destination server is Windows Server 2019, and is acting as an orchestrator as well as you are migrating to the same server as described in this example, then you need to connect to the old server name in Windows Admin Center because the name of the destination orchestrator server is changed to the source server name.

How it works…
The Storage Migration Service is three phases, inventory, transfer, and cutover.
The inventory phase is passive, there is no agent to install on the source or the destination server. You create a job, you add a server(s), then you start scanning, the discovery phase will scan the configuration, network settings, volumes, and OS info on the source server(s). This also includes SMB information, file count, file sizes, and their share properties. Once the scan is complete, you are ready to transfer.
In the transfer phase, you will map the destination volumes based on the list of sources you have from the inventory phase, you can skip shares not to be included in the transfer phase, you can also set retry flags, reservations, and checksum. Then you validate the transfer settings to see if it’s going to work, you proceed with the transfer (you can repeat the transfer as many times as you want and only the delta will be copied), by the end of the transfer you will get a CSV report, and finally, you are ready to cutover.
In the cutover phase, you will map the network adapter on the destination server, you can give your old file server a new set of IP addresses, and change its name if you want, you can specify the maximum duration of the cutover before it expires, then you validate the cutover settings to see if it’s going to work, and finally, you do the cutover and wait for the job to be complete.
Summary
Storage Migration Service (SMS) makes it easier to migrate your older Windows Server File Servers (2003 & later) to Windows Server 2016 and Windows Server 2019. SMS provides an elegant graphical UI (via Windows Admin Center) that inventories data on servers and then transfer the data and configuration to newer servers—all without apps or users having to change anything. This is a great feature!
SMS is designed to help by doing the following:
1) Inventory multiple servers and their data.
2) Rapidly transfer files, file shares, and security configuration from the source servers.
3) Optionally take over the identity of the source servers (also known as cutting over) so that users and apps don’t have to change anything to access existing data.
4) Manage one or multiple migrations from the Windows Admin Center user interface.
At the time of this writing, Storage Migration Service is in the second release, Microsoft is working to add additional features shortly such as:
> Full discovery option instead of typing source computer names.
> Add cluster support. The Storage Migration Service supports migrating from and to clusters after installation of cumulative update KB4513534 or subsequent updates on Windows Server 2019 and with Windows Server 2022 out of the box.
> Add support for NFS (Linux/Unix), Block, and NDMP protocol.
> Add support for Samba, NAS, and SAN devices.
> Azure File Sync integration. If you have Azure File Sync set up, you can sync this storage directly to Azure as well. The Storage Migration Services does support migration to a Windows Server or cluster running Azure File Sync with cloud tiering when using the latest version of Windows Admin Center and Windows Server 2022, or Windows Server 2019 after installation of cumulative update KB5006746.
> Add Azure Files support as a target (SMB/NFS).
> Consolidation. This is great for scenarios when you have many file servers and you want to consolidate them into one file server.
> Data analysis, reporting, and governance. This is interesting, but it will require having an agent installed on the source server.
__
Thank you for reading my blog.
If you have any questions or feedback, please leave a comment.
-Charbel Nemnom-
Microsoft has introduced the new Windows Server Storage Migration Service as part of Windows Admin Center (WAC). It automates the process of migrating from legacy Windows Server versions to supported platforms. Let’s look at the Storage Migration Service, installing it, and using it to perform a migration.
Contents
- What is Windows Server 2019 Storage Migration?
- Storage migration prerequisites
- Installing Windows Server Storage Migration Service
- Running the Windows Server Storage Migration Service
- Cutover phase
- Wrapping up
- Author
- Recent Posts

Brandon Lee has been in the IT industry 15+ years and focuses on networking and virtualization. He contributes to the community through various blog posts and technical documentation primarily at Virtualizationhowto.com.
Migrating from legacy servers has always been a difficult task for IT admins. Especially if the legacy server is a Windows Server file server, there may be many shares, permissions, files, folders, and other components you must duplicate on a new server to assume those resources properly in a seamless way.
What is Windows Server 2019 Storage Migration?
Windows Server 2008 and R2 went out of support earlier this month (January 2019), and older Windows Server operating systems like Windows Server 2003 are long out of support. Thus, if you are running these Windows Server releases, you need to think about how you can migrate to newer, supported Windows Server platforms.
Thankfully, Microsoft has realized the need to provide a tool to make this process seamless for IT admins. They can perform the migration process in a way that allows copying all data, shares, and permissions without resulting in missed permissions, resources, or even data loss.
A shocking number of legacy Windows Server operating systems are still out in production. For example, a surprising number of environments still have Windows Server 2003 installed.
Windows Server 2019 Storage Migration is a new extension available for installation inside WAC. What are its capabilities?
- Take inventory of your servers that are migration candidates (including files, users, permissions, etc.).
- Select a destination server.
- Transfer all files, file shares, and security permissions from the source to the destination server.
- Assume the identity of the source server on the destination server (cutover).
- Coordinate and manage multiple migration processes from a single WAC console.
The steps above all take place within a three-phase process:
- Inventory
- Transfer
- Cutover
Source servers can include:
- Windows Server 2003 and newer
Destination servers can include:
- Windows Server 2012 R2 and newer, including Semi-Annual Channel releases
Let’s look at installing the Windows Server 2019 Storage Migration extension inside WAC.
Storage migration prerequisites
A prerequisite for the Storage Migration service is to have WAC installed. As most are aware, WAC is the new method moving forward for managing Windows Server installations. In fact, with Windows Server 2019, Microsoft is certainly touting WAC as the tool for managing their latest Windows Server operating system.
In the walkthrough below, we have already installed WAC in Gateway Server mode as a designated gateway server for accessing and managing Windows Server connections.
With Storage Migration, the gateway server basically coordinates the entire operation between a legacy Windows Server and a modern Windows Server version like 2019. Also keep in mind that you can install WAC on the target Windows Server that will be the destination for migrating data from a legacy Windows Server. However, in this case, we will use a standalone WAC gateway mode server.
For an overview of the different WAC installation modes, check out the official overview of the installation options.
Installing Windows Server Storage Migration Service
To install Windows Server Storage Migration Service, launch WAC and navigate to Settings > Extensions. The available Storage Migration Service extension is a bit non-intuitive. WAC lists the extension as msft.sme.storage-migration.
Highlight the extension and click the Install button.
Installing the Storage Migration extension in WAC
WAC will install the extension and reload the WAC interface in your browser. After the interface reloads, navigate back to Settings > Extensions > Installed extensions. Verify you see the Storage Migration Service listed. You may have an Update available as shown below. If so, highlight the extension and click the Update button.

Update available for the Storage Migration Service
After updating, you will see the same behavior. The WAC interface will reload. Navigate back to the Installed extensions under Extensions. You should see the Windows Server Storage Migration Service at version 1.83.1. Microsoft seems to have gone through quite a few extension versions along the way.

After updating the Windows Server Storage Migration Service
Running the Windows Server Storage Migration Service
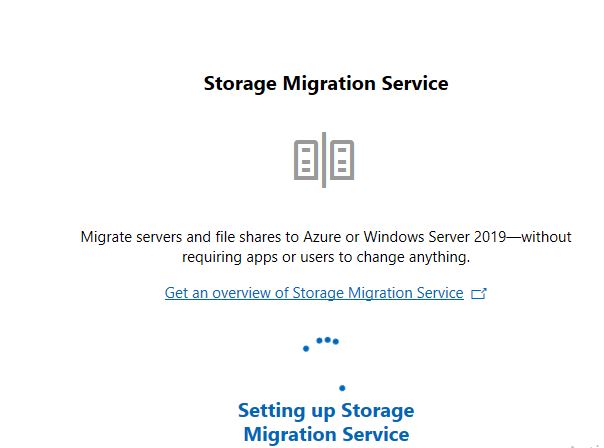
When you launch the Storage Migration Service on your WAC gateway, you will see the pop-up box giving an overview of the service. Note: You may see a box asking you to install the Storage Migration Service. Even though you have installed the extension, you may need to install the Windows Features. The WAC dashboard for the Storage Migration Service will install it for you when you initiate the install from there.
Launching the Storage Migration Service in WAC
Click the button to create a New job for the Storage Migration Service.
Create a new Storage Migration Service job
It will prompt you to enter the name of the source server you want to migrate.
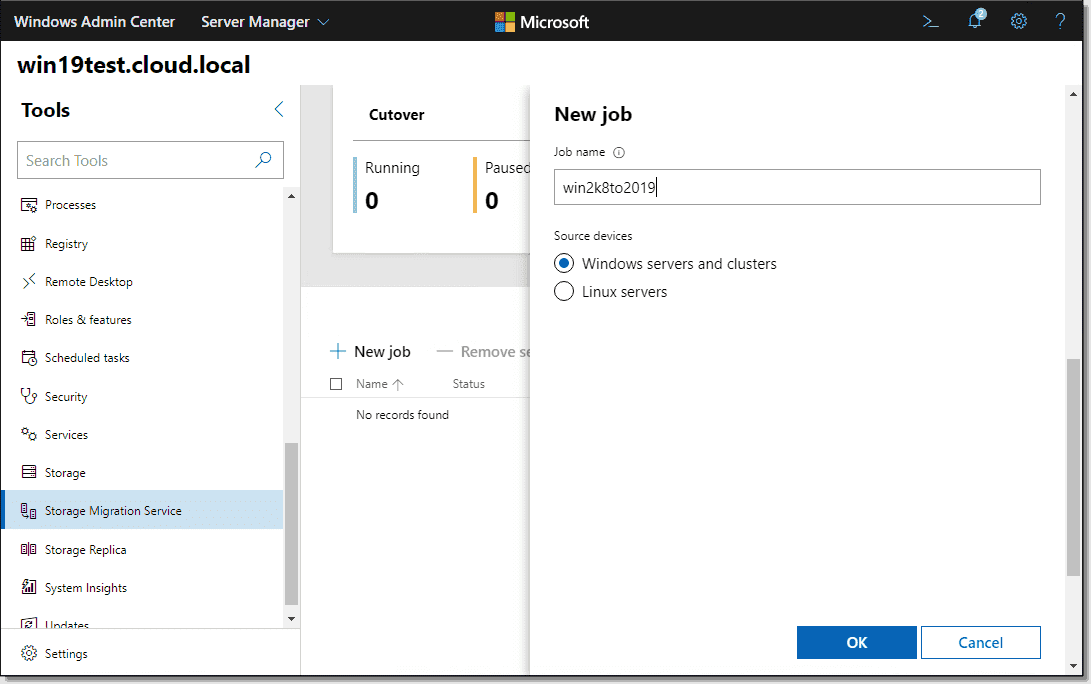
Enter a new Storage Migration job name
Enter credentials that will allow you to connect to the source server.
Enter credentials for the source device
Add the source device for the Storage Migration.

Add and scan the source device for Storage Migration
Enter the device name. In this case, it is a legacy Windows Server 2008 R2 server.
Enter the name of the source device
Scan the source Windows Server.
Start scanning the source server with Storage Migration
WAC enumerates shares on the source Windows Server.
Shares enumerated as part of the Storage Migration scan
Enter connection credentials for the destination Windows Server.
Enter credentials for the Storage Migration target
Enter the destination Windows Server name, scan the server, map the volumes, and proceed.

Specify the Storage Migration operation target
Decide how you want to handle any conflicts during data copy as well as retry values.

Adjust transfer settings
Validate the source and destination devices for any issues.
Validate source and destination devices
Validation of both servers completes successfully.
Validation is successful for the Storage Migration operation
Start the data transfer. This includes folders, shares, permissions, and users.

Start transferring files and resources using Storage Migration
The transfer finishes successfully.

Data transfer is successful
Cutover phase
For the cutover phase, enter the credentials for the source and destination devices. These will also be cached from previous steps.
Enter credentials for the cutover phase
Choose how you want to handle the network settings migration. The Storage Migration wizard will show current values on both servers and allow you to define the IP address you want to assume for the server. DHCP is also an option. You must choose the destination network adapter to assign settings to as well.
Network settings migration during the Storage Migration cutover phase
Validate the settings defined for the cutover process.
Validate source and destination devices for cutover
The validation process completes successfully.
Validation passes for cutover
Now you are ready to begin the cutover process. This will cut over resources from the source server to the destination server. It will rename the source server, and the target server will assume the identity of the source server.

Begin the Storage Migration cutover phase
The process will reboot the servers during the various rename operations.

Cutover progresses to restart the servers
After the migration finishes successfully, your target server will have assumed the identity of the source server and should answer to any file shares it has assumed. As you can see below, the target Windows Server 2019 server has assumed the legacy WIN2K8FS01 hostname.

Successful Windows Server Storage Migration Service migration between servers
Wrapping up
The Windows Server Storage Migration Service is a great new tool in the hands of IT admins who often have the challenging task of migrating from legacy platforms up to supported versions of Windows Server. The new tool is a great addition to the already powerful WAC.
As shown, it’s easy to install the extension via WAC. The actual Storage Migration process itself is very intuitive and «wizard driven» from the WAC interface. It performs all the heavy lifting of copying data, permissions, share names, and even assuming identity.
Subscribe to 4sysops newsletter!
If you have the task of migrating from legacy servers to supported platforms, be sure to test out the new Windows Server Storage Migration Service. It can make your life much easier!
![]()
![]()
| title | description | author | ms.author | manager | ms.date | ms.topic |
|---|---|---|---|---|---|---|
|
Storage Migration Service overview |
Storage Migration Service makes it easier to migrate storage to Windows Server or to Azure. It provides a graphical tool that inventories data on Windows, Linux, and NetApp CIFS servers and then transfers the data to newer servers or to Azure virtual machines. Storage Migration Service also provides the option to transfer the identity of a server to the destination server so that apps and users can access their data without changing links or paths. |
jasongerend |
jgerend |
elizapo |
03/25/2021 |
article |
Storage Migration Service overview
Applies to: Windows Server 2022, Windows Server 2019, Windows Server 2016, Windows Server 2012 R2
Storage Migration Service makes it easier to migrate storage to Windows Server or to Azure. It provides a graphical tool that inventories data on Windows, Linux, and NetApp CIFS servers and then transfers the data to newer servers or to Azure virtual machines. Storage Migration Service also provides the option to transfer the identity of a server to the destination server so that apps and users can access their data without changing links or paths.
This topic discusses why you’d want to use Storage Migration Service, how the migration process works, what the requirements are for source and destination servers, and what’s new in Storage Migration Service.
Why use Storage Migration Service
Use Storage Migration Service because you’ve got a server (or a lot of servers) that you want to migrate to newer hardware or virtual machines. Storage Migration Service is designed to help by doing the following:
- Inventory multiple servers and their data
- Rapidly transfer files, file shares, and security configuration from the source servers
- Optionally take over the identity of the source servers (also known as cutting over) so that users and apps don’t have to change anything to access existing data
- Manage one or multiple migrations from the Windows Admin Center user interface

Figure 1: Storage Migration Service sources and destinations
How the migration process works
Migration is a three-step process:
- Inventory servers to gather info about their files and configuration (shown in Figure 2).
- Transfer (copy) data from the source servers to the destination servers.
- Cut over to the new servers (optional).
The destination servers assume the source servers’ former identities so that apps and users don’t have to change anything.
The source servers enter a maintenance state where they still contain the same files they always have (we never remove files from the source servers) but are unavailable to users and apps. You can then decommission the servers at your convenience.

Figure 2: Storage Migration Service inventorying servers
Here’s a video showing how to use Storage Migration Service to take a server, such as a Windows Server 2008 R2 server that’s now out of support, and move the storage to a newer server.
[!VIDEO https://www.youtube.com/embed/h-Xc9j1w144]
Requirements
To use Storage Migration Service, you need the following:
- A source server or failover cluster to migrate files and data from
- A destination server running Windows Server 2019 or Windows Server 2022 (clustered or standalone) to migrate to. Windows Server 2016 and Windows Server 2012 R2 work as well but are around 50% slower
- An orchestrator server running Windows Server 2019 or Windows Server 2022 to manage the migration
If you’re migrating only a few servers and one of the servers is running Windows Server 2019 or Windows Server 2022, you can use that as the orchestrator. If you’re migrating more servers, we recommend using a separate orchestrator server. - A PC or server running the latest Windows Admin Center to run the Storage Migration Service user interface, along with the latest Storage Migration Service tool (extension) available from the feed. The Windows Admin Center must be at least version 2103.
We strongly recommend that the orchestrator and destination computers have at least two cores or two vCPUs, and at least 2 GB of memory. Inventory and transfer operations are significantly faster with more processors and memory.
Security requirements, the Storage Migration Service proxy service, and firewall ports
-
A migration account that is an administrator on the source computers and the orchestrator computer. This can be a domain or local account except in the case of a computer not joined to the domain, in which case it must be a local user.
-
A migration account that is an administrator on the destination computers and the orchestrator computer. This can be a domain or local account except in the case of a computer not joined to the domain, in which case it must be a local user.
-
The orchestrator computer must have the File and Printer Sharing (SMB-In) firewall rule enabled inbound.
-
The source and destination computers must have the following firewall rules enabled inbound (though you might already have them enabled):
- File and Printer Sharing (SMB-In)
- Netlogon Service (NP-In)
- Windows Management Instrumentation (DCOM-In)
- Windows Management Instrumentation (WMI-In)
[!TIP]
Installing the Storage Migration Service Proxy service on a Windows Server 2019 or Windows Server 2022 computer automatically opens the necessary firewall ports on that computer. To do so, connect to the destination server in Windows Admin Center and then go to Server Manager (in Windows Admin Center) > Roles and features, select Storage Migration Service Proxy, and then select Install. -
If the computers belong to an Active Directory Domain Services domain, they should all belong to the same forest. The destination server must also be in the same domain as the source server if you want to transfer the source’s domain name to the destination when cutting over. Cutover technically works across domains, but the fully-qualified domain name of the destination will be different from the source.
Requirements for source servers
The source server must run one of the following operating systems:
- Windows Server, Semi-Annual Channel
- Windows Server 2022
- Windows Server 2019
- Windows Server 2016
- Windows Server 2012 R2
- Windows Server 2012
- Windows Server 2008 R2
- Windows Server 2008
- Windows Server 2003 R2
- Windows Server 2003
- Windows Small Business Server 2003 R2
- Windows Small Business Server 2008
- Windows Small Business Server 2011
- Windows Server 2012 Essentials
- Windows Server 2012 R2 Essentials
- Windows Server 2016 Essentials
- Windows Server 2019 Essentials
- Windows Storage Server 2008
- Windows Storage Server 2008 R2
- Windows Storage Server 2012
- Windows Storage Server 2012 R2
- Windows Storage Server 2016
Note: Windows Small Business Server and Windows Server Essentials are domain controllers. Storage Migration Service can’t yet cut over from domain controllers, but can inventory and transfer files from them.
You can migrate the following additional source types if the orchestrator is running Windows Server 2019 with KB5001384 installed or Windows Server 2022:
- Failover clusters running Windows Server 2022, Windows Server 2019, Windows Server 2016, Windows Server 2012 R2, Windows Server 2012, or Windows Server 2008 R2 (Windows Server 2008 R2 only supports inventory and transfer, not cutover)
- Linux servers that use Samba. We’ve tested the following:
- CentOS 7
- Debian GNU/Linux 8
- RedHat Enterprise Linux 7.6
- SUSE Linux Enterprise Server (SLES) 11 SP4
- Ubuntu 16.04 LTS and 12.04.5 LTS
- Samba 4.8, 4.7, 4.3, 4.2, and 3.6
- NetApp FAS arrays hosting NetApp CIFS server, running NetApp ONTAP 9.
Requirements for destination servers
The destination server must run one of the following operating systems:
- Windows Server, Semi-Annual Channel
- Windows Server 2022
- Windows Server 2019
- Windows Server 2016
- Windows Server 2012 R2
The destination servers can be standalone servers or part of a Windows failover cluster. They cannot run Azure Stack HCI or use a non-Microsoft clustering add-on. While the Storage Migration Service does not support Azure Files as a destination, it fully supports servers running the Azure File Sync agent with cloud tiering.
[!TIP]
Destination servers running Windows Server 2022 or Windows Server 2019 have double the transfer performance of earlier versions of Windows Server. This performance boost is due to the inclusion of a built-in Storage Migration Service proxy service.
Azure VM Migration
Windows Admin Center integrates Azure IaaS deployment into Storage Migration Service. Instead of building new servers and VMs in the Azure Portal by hand prior to deploying your workload — and possibly missing required steps and configuration — Windows Admin Center can deploy the Azure IaaS VM, configure its storage, join it to your domain, install roles, and then set up your distributed system.
Here’s a video showing how to use Storage Migration Service to migrate to Azure VMs.
[!VIDEO https://www.youtube-nocookie.com/embed/k8Z9LuVL0xQ]
If you want to lift and shift virtual machines to Azure without migrating to a later operating system, consider using Azure Migrate. For more info, see Azure Migrate overview.
What’s new in Storage Migration Service
Windows Admin Center version 1910 added the ability to deploy Azure virtual machines. This integrates Azure VM deployment into Storage Migration Service. For more info, see Azure VM migration.
The following post-RTM features are available when running the Storage Migration Server orchestrator on Windows Server 2019 with KB5001384 installed or on Windows Server 2022:
- Migrate local users and groups to the new server
- Migrate storage from failover clusters, migrate to failover clusters, and migrate between standalone servers and failover clusters
- Migrate storage from a Linux server that uses Samba
- More easily sync migrated shares into Azure by using Azure File Sync
- Migrate to new networks such as Azure
- Migrate NetApp CIFS servers from NetApp FAS arrays to Windows servers and clusters
Additional References
- Migrate a file server by using Storage Migration Service
- Storage Migration Services frequently asked questions (FAQ)
- Storage Migration Service known issues
Рассмотрим технологию Storage Migration Service (служба миграции хранилища) на примере задачи переноса файлового сервера Windows Server 2008R2 на Windows Server 2019.
Начиная с Windows Server 2019 появилась возможность установки фич Storage Migration Services
Первая особенность, что если хочется воспользоваться графическим интерфейсом то придется установить новомодный Windows Admin Center, который на удивление не вшит в Windows Server 2019 и скачивается и ставится отдельно с Evaluation Center. без Windows Admin Center возможно использование через Power-Shell
A PC or server running Windows Admin Center to run the Storage Migration Service user interface, unless you prefer using PowerShell to manage the migration. The Windows Admin Center and Windows Server 2019 version must both be at least version 1809.
После установки управление возможно с веб-браузера, идея хороша, получаем extended Server Manager в веб-управлялке с агрегацией хостов.
Но первый «прикол» в неподдерживаемой Windows Admin Center версии нативного браузера в Windows Server 2019
После авторизации переходим на (первое ощущение, что очень медленно работает Windows Admin Center) службу миграции хранилища и видим plan по трехэтапной миграции:
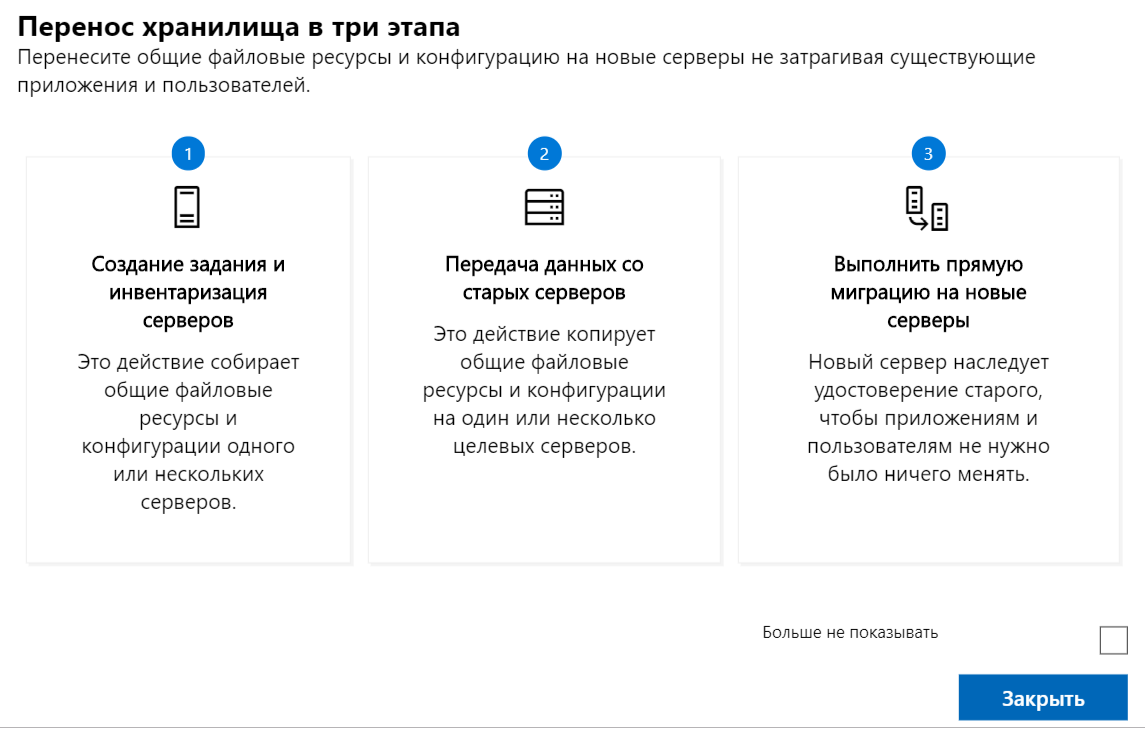
Отматываем вниз и создаём задание
В задании добавляем учетные данные и целевую систему (в нашем случае WIndows Server 2008 R2)
и приступаем к инвентаризации. Инвентаризация заняла около 15 минут для системы на 2 ТБ данных в нашем случае.
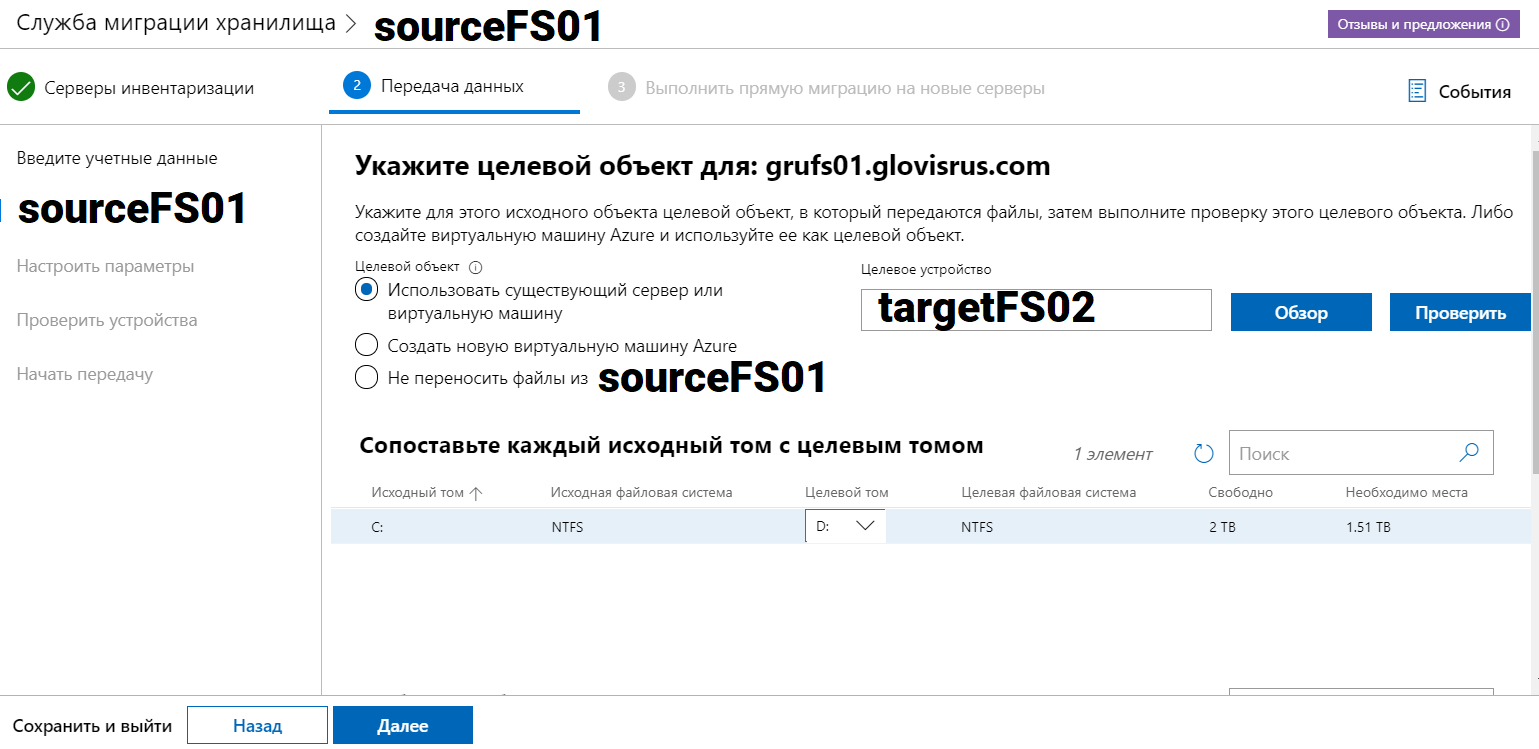
Второй этап — передача данных, требует повторного ввода учетных данных и идентификации, что странно.
Выбор целевого расположения так же порадовал, так как в нашем случае объекты данных переносятся в иное расположение (с C: на D: на новой машине)
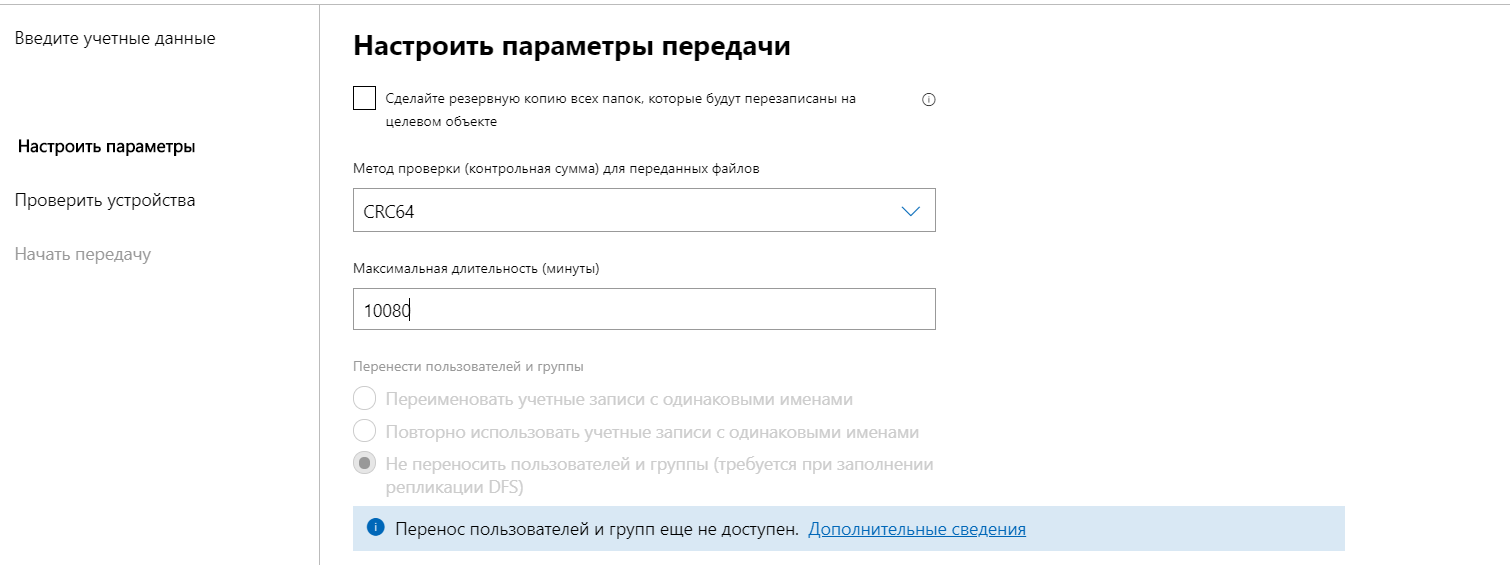
Настройки предлагают перезапись, резервную копию, контрольную сумму и длительность процессов.
Далее проверка и начало передачи данных, права файловой системы, как и ожидается сохраняются
Ну и потом момент SwitchOver
Система выводит старый сервер под старым именем из домена, меняет hostname и сетевые настройки.
Прежние настройки в переходят на новый сервер.
Разумный путь.
Подготовьте:
- Новый IP адрес для СТАРОГО сервера
- Новый HOSTNAME старого сервера
- Новый сетевой адаптер на НОВОМ сервере
Система всё сделает автоматически. Время простоя зависит от времени перезагрузки систем.
P.S.
Из плюсов отмечу, что развернутый один раз Windows Admin Center может использоваться для миграции множества различных серверов (или слития воедино), хоть все системы в одну/две последовательно. Удобно и просто.
Ничего технологически нового тут нет, можно обойтись ROBOCOPY или XCOPY, с последующими ручными манипуляциями и предварительным просмотром логов на предмет рассинхрона/ошибок, НО зачем, когда есть новые удобные остнаски Windows Admin Center, которые всё равно microsoft пропихнёт под множество иных задач в ИТ-инфраструктуре в качестве основного средства управления.
Posted by Romain Serre on
September 18, 2018
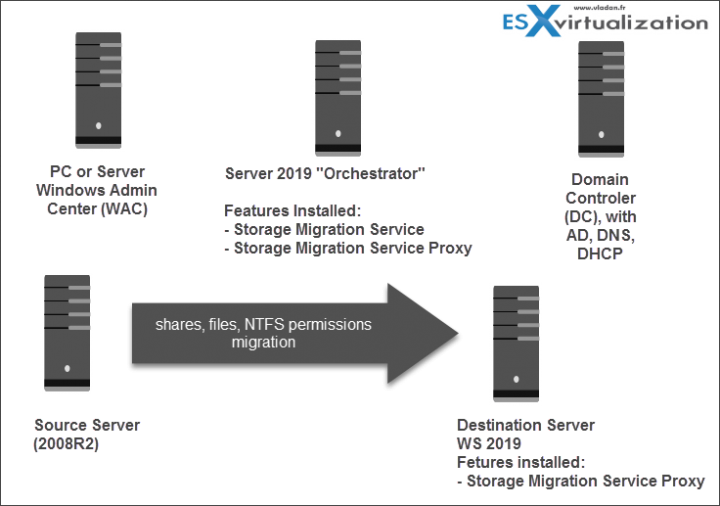
One new announced feature in Windows Server 2019 is Storage Migration Service (SMS). SMS enables to ease drastically the migration from a file server to another. Moreover, SMS is fully manageable from Windows Admin Center as Microsoft has released an extension for this feature.
The following diagram (source: Microsoft) introduces the available migration path with SMS. The source server can be Windows Server 2003 to Windows Server 2019. The destination can be Azure File Sync, an On-Prem Windows Server (2012-2019) or Azure.
A Windows Server 2019 server is required to migrate data from one server to another. The following components are required:
- Storage Migration Service: Job based orchestration
- Storage Migration Service Proxy, handle the migration process especially the cutover, the migration with SMB and by allowing administrators to inventory data, security and network settings.
How to migrate data with Storage Migration Service
First of all, you need a running Windows Admin Center and a Windows Server 2019 to install SMS components. Then open Windows Admin Center and add the Windows Server 2019 server to manage it. Navigate to Storage Migration Service tab and click on Install to deploy the SMS components.
Once Storage Migration Service is installed, the wizard introduces the three steps to migrate your data.
Then click on new job to prepare a migration process.
Give a name to the job.
Next specify credentials that are allowed to connect to the source servers. You can choose whether to include administrative shares.
Next provide the source device and click on next.
Once the source devices added, you can start to scan them. That is really powerful because you can migrate from many to one. If you have several file servers and you want to migrate them into a single machine, you can do it.
Once the scan is finished, the wizard discovered the shares.
Then specify credentials for the destination device.
Specify the device name to scan it. Then you can make the mapping between source and destination volumes. You can choose whether to include some shares. It’s not mandatory to migrate all shares.
Next specify some transfer settings such as the max duration, the retries and the checksum.
In the next screen you can validate the configuration. Once the settings are validated you can click on Next.
Then the transfer start and you can monitor the copy progress. Some logs are available to troubleshoot why some files are not copied (access denied for example).
Cut over to the new servers
Once you are ready to migrate to the new server, you can process the cut over. The following steps will be executed:
- A final copy between source and destination
- Rename the source machine
- Change the IP of the source machine
- Rename the destination device with the name of the source device
- Set the IP address of the destination device with the information of the source device
In this wizard, you can configure the name and the IP address of the source machine that will be applied by the cut over process.
You can set a cut over timeout. If this timer is reached, the cut over is cancelled.
In the next window click on Validate to check the configuration. Once it’s validated click on Next.
Finally you can run the cutover to put into production the destination server.
VSAN from StarWind is software-defined storage (SDS) solution created with restricted budgets and maximum output in mind. It pulls close to 100% of IOPS from existing hardware, ensures high uptime and fault tolerance starting with just two nodes. StarWind VSAN is hypervisor and hardware agnostic, allowing you to forget about hardware restrictions and crazy expensive physical shared storage.
Build your infrastructure with off-the-shelf hardware, scale however you like, increase return on investment (ROI) and enjoy Enterprise-grade virtualization features and benefits at SMB price today!
Conclusion
Microsoft has developed a powerful tool to ease the file server migration. Usually it’s a painful process where a lot of script must be created to map things between them. Storage Migration Service is there to simplify this process. You have no excuse anymore to keep an old file server under Windows Server 2003 / 2008 / 2012 in production. Finally, the integration with Windows Admin Center is perfect. No I’d like to use the same service to migrate from a SMB3 NAS capable 🙂
- Why you should consider Storage Spaces Direct in Windows Server 2019
- Simplify storage management with Microsoft Systems Center VMM (SCVMM) and SMI-S
Filed under:
All by Romain Serre
This post has been republished via RSS; it originally appeared at: Storage at Microsoft articles.
First published on TECHNET on Apr 12, 2018
Update! We shipped Windows Server 2019!!! Go to
https://aka.ms/storagemigrationservice
for all production support info on SMS! You don’t need this blog post anymore. ?
Hi Folks,
Ned
here again with big news:
Windows Server 2019 Preview
contains an entirely new feature!
The
Storage Migration Service
helps you migrate servers and their data without reconfiguring applications or users.
- Migrates unstructured data from anywhere into Azure & modern Windows Servers
- It’s fast, consistent, and scalable
- It takes care of complexity
- It provides an easily-learned graphical workflow
My team has been working on this critter for some time and today you’ll learn about what it can do now, what it will do at RTM, and what the future holds.
Did I mention that it comes in both Standard and Datacenter editions and has a road map that includes SAN, NAS, and Linux source migrations?

Come with me…
Why did we make this?
You asked us to! No really, I dug through endless data, advisory support cases, surveys, and first party team conversations to find that our #1 issue keeping customers on older servers was simply that migration is hard, and we don’t provide good tools. Think about what you need to get right if you want to replace an old file server with a new one, and not cause data loss, service interruption, or outright disaster:
- All data must transfer
- All shares and their configuration must transfer
- All share and file system security must transfer
- All in-use files must transfer
- All files you, the operator, don’t have access to must transfer
-
All files that changed since the
last
time you transferred must transfer -
All use of
local
groups and users must transfer - All data attributes, alternate data streams, encryption, compression, etc. must transfer
- All network addresses must transfer
- All forms of computer naming, alternate naming, and other network resolution must transfer
- Whew!
If you were to wander into this
Spiceworks
data on market share (a little old but still reasonably valid), you’ll see some lopsided ratios:

(
source
)
A year and a half later, there are a few million Windows Server 2016 nodes in market that have squeezed this balloon, but there’s even more Windows Server 2012 and still plenty of 2008 families, plus too much wretched, unsupported Windows Server 2003. Did you know that
Windows Server 2008 Support ends in January of 2020
? Just 20 months away from the end of life for WS2008 and we still have all this 2003!
The Storage Migration Service (Updated: August 30, 2018)
Important: This section of the blog post is going to change periodically, as with the Windows Insider preview system and Windows Admin Center’s preview extension system, I can give you new builds, features and bug fixes very rapidly. You’ll want to check back here often.
In this first version, the feature copies over SMB (any version). Targets like Azure File Sync servers, IaaS VMs running in Azure or MAS, or traditional on-prem hardware and VMs are all valid targets.

The feature consists of an orchestrator service and one or more proxy services deployed. Proxies add functionality and performance to the migration process, while the orchestrator manages the migration and stores all results in a database.
Storage Migration Service operates in three distinct phases:
- Inventory – an administrator selects nodes to migrate and the Storage Migration Service orchestrator node interrogates their storage, networking, security, SMB share settings, and data to migrate
- Transfer – the administrator creates pairings of source and destinations from that inventory list, then decides what data to transfer and performs one more or transfers
- Cutover – the administrator assigns the source networks to the destinations and the new servers take over the identity of the old servers. The old servers enter a maintenance state where they are unavailable to users and applications for later decommissioning, while the new servers use the subsumed identities to carry on all duties.
Walk through
Requirements
You’ll need the following to start evaluating this feature:
-
At least two
Windows Server 2019 Preview
computers or VMs with the Storage Migration Service features installed (
Build 17744 or later
). One will operate as the orchestrator and one as the destination of the migration.
Note: it is supported to make the orchestrator and destination the same computer, such as in a small environment with a single server to migrate. A larger environment will usually have a single Orchestrator and many destinations, however, so that’s how the steps are documented below.
-
The
Windows Admin Center
installed on some computer, such your laptop or desktop
-
The Storage Migration Service
preview extension for Windows Admin Center
installed

Supported
source
operating systems VM or hardware (to migrate
from)
:
- Windows Server 2003
- Windows Server 2008
- Windows Server 2008 R2
- Windows Server 2012
- Windows Server 2012 R2
- Windows Server 2016
- Windows Server 2019 Preview
Supported
destination
operating system VM or hardware (to migrate
to
):
- Windows Server 2012 R2
- Windows Server 2016
- Windows Server 2019 Preview*
*
Windows Server 2019 Preview will have double the data transfer performance due to its inclusion of the SMS Proxy service.
Security:
- All computers domain-joined
- You must provide a migration account that is an administrator on selected source computers
- You must provide a migration account that is an administrator on selected destination computers
-
The following firewall rules must be enabled INBOUND on source and destination* computers:
- “File and Printer Sharing (SMB-In)”
- “Netlogon Service (NP-In)»
- «Windows Management Instrumentation (DCOM-In)»
- «Windows Management Instrumentation (WMI-In)»
* Windows Server 2019 with the SMS Proxy installed will automatically open and close correct firewall ports during migrations
-
The following firewall rule must be enabled INBOUND on orchestrator computer only if you wish to download reports:
- “File and Printer Sharing (SMB-In)”
Install
Use the Windows Admin Center, Server Manager, or PowerShell to install the Storage Migration Service. The SMS extension allows this with a single click:

The features to install on the
orchestrator node
are:
- “Storage Migration Service”
-
“Storage Migration Service Proxy”
(installs automatically when orchestrator selected)
-
“Storage Migration Service tools” (
installs automatically when orchestrator selected, under Remote Server Administration Tools, Feature Administration Tools
)


The feature to install on the
Destination
nodes where you intend to migrate
to
:
- “Storage Migration Service Proxy”
Run your first test inventory and transfer
Now you’re ready to start migrating.
-
Logon to your
Windows Admin Center
instance and connect to the orchestrator node as an administrator.

2. Ensure the latest Storage Migration Service extension is in the Tools menu (if not,
install the extension
) and click it.
3. Observe the landing page. There is a summary that lists all active and completed jobs. Jobs contain one or more source computers to inventory, transfer, and cutover as part of a migration.
4. You are about to begin the
Inventory.
Click
New Job
. Enter a job name, click Next.
5. Enter
Source Credentials
that are an administrator on your source (to be migrated from) computers and click Next.
6. Click
Add Device
and add one or more source computers. These must be Windows Server and should contain SMB Shares with test data on them that you want to migrate.

7. Click
Start Scan
and wait for the inventory to complete.
8. Observe the results. You can open the
Details
at the bottom of the page with the caret in the lower right. When done reviewing, click
Finish Inventory
.

9. You are now in the
Transfer
You are always free to return to the Inventory phase and redefine what it gathers, get rid of the job, create a new job, or proceed forward to data transfer. As you can see, each phase operates in a similar fashion by providing credentials, setting rules, defining nodes, then running in a result screen.
10. Provide credentials, destination computers mapped to the source computers, ensure each server you wish to migrate is set to
Included
in transfer, review your settings,
validate
the proposed transfer, then proceed with
Start Transfer
.


11. Observe the migration. You will see data transfers occur in relative real time (periodically refreshed) as the orchestrator copies data between source and destination nodes. When complete, examine the destination server and you’ll find that Storage Migration Service recreated all shares, folders, and files with matching security, attributes, characteristics (see Known Issues below for not-yet-released functionality here). . Note the
Export
options that allows you to save a complete database dump of the transfer operations for auditing purposes.

12. Move to the cutover phase.
13. Note that the destination credentials are preserved (but can be changed).
14. Pair the network interfaces between source and destination NICs so that IP addresses can be moved. You have the option to move the old source computer to DHCP or use a new static IP address. You also have the option to randomly rename the old source computer or specify a new name, as the destination will take over the old name as part of cutover.

15.
Validate
the cutover preparedness, then begin the cutover and allow the destination computer to take over the network and names of the old source.
Both source and destination will reboot several times apiece.
The progress bar will show how far until the operation completes.


Cutover time to completion depends on:
a. Server reboot times
b. AD Replication time (for domain joins and computer accounts being known to all users)
c. DNS replication time
16. When cutover completes, migration is done. Your old servers are renamed and have new network configurations so that they are inaccessible to users and applications, but still retain all data and shares. The new servers now assume all duties of the computers they replaced, and users cannot tell that anything changed.
Known issues
Important! During the preview phase we need you to always run latest binaries before reporting bugs. To get the latest:
-
Windows Server 2019 Preview 17744 or later — download from
https://www.microsoft.com/en-us/software-download/windowsinsiderpreviewserver
-
Storage Migration Service extension for Windows Admin Center 17744 or later — download using the extension manager
https://docs.microsoft.com/en-us/windows-server/manage/windows-admin-center/configure/using-extensions
. If you already have a previous extension installed,
uninstall it
, then install the latest extension.
-
Missing Menu Option
— if you do not see the SMS tool listed in the left-hand menu of Windows Admin Center even with the extension installed, ensure that your Orchestrator server is running build 17744 or later
Applies to:
-
Windows Server 2019 Insider Preview Build
17744
-
Storage Migration Service Extension Version 0.0.
17744
Roadmap
What does the future hold? We have a large debt of work already accumulated for when we complete the SMB and Windows Server transfer options. Things on the roadmap –
not promised, just on the roadmap
?:
- Network range and AD source computer scanning for inventory
- Samba, NAS, SAN source support
- NFS for Windows and Linux
- Block copy transfers instead of file-level
- NDMP support
- Hot and cold data detection on source to allow draining untouched old files
- Azure File Sync and Azure Migrate integration
- Server consolidation
- More reporting options
Feedback and Contact
Please make sure the issue isn’t already noted above before filing feedback and bugs!
-
Use the Feedback Hub tool include in Windows 10 to file bugs or feedback. When filing, choose Category “
Server,
” subcategory “
” It helps routing if you put Storage Migration Service in the title. -
You can also provide feature requests through our UserVoice page at
https://windowsserver.uservoice.com/forums/295056-storage
. Share with colleague and industry peers in your network to upvote items that are important to you.
-
If you just want to chat with me privately about feedback or a request, send email to
smsfeed@microsoft.com
. Keep in mind that I may still make you go to feedback hub or UserVoice.
Now get to testing and keep an ear out for updates. We plan to send out new builds of Windows Server 2019 and the Storage Migration service very often until we get close to RTM. I will post announcements here and on
.
Here’s some background music to help
https://youtu.be/Dyx4v1QFzhQ
— Ned “reel 2 real” Pyle
Large migrations are not easy and so far, Microsoft did not have an efficient tool to do so. Admins had to use Robocopy at best in order to retain shares, NTFS permissions, and ownership of files and folders. In this post, we will discuss and details How To Migrate Shares and Files with ease by using Microsoft Storage Migration Service.
When you have many servers to migrate, you need a single tool manageable from a single pane of glass to proceed with migrations. Things are changing as Microsoft released Windows Server 2019 which introduced a new role called Storage Migration Service (SMS).
This new role will help you to seamlessly move off of legacy servers onto new targets on-premises and in Azure, without impacting your users, network, or security settings. You can migrate some old Windows servers (physical or virtual) into Azure IaaS, Azure File, on Prem, with this easy to use the tool.
It migrates permissions, share properties, encrypted attributes, network settings, names, and AD membership, but most importantly, files in-use.
There are some limitations
You can only transfer files within the same Microsoft Active Directory (AD) domain so you have to join the destination AD before launching the migration.
Also, currently SMS in this first release does not support migration between clusters in Windows server 2019.
SMS supports migrating from Windows Server 2003 and later operating systems. It cannot currently migrate from Linux, Samba, NetApp, EMC, or other SAN and NAS storage devices.
Also, migrating from the NTFS to REFS file systems isn’t supported. However, you can migrate from NTFS to NTFS and REFS to ReFS.
Overview of the service is below.
Storage Migration Service sources and destinations
What’s needed to get started?
- A Source server – 2003 Server or higher, with some shares you want to migrate
- A Destination server – 2012R2, 2016 or 2019
- An Orchestrator Server – Windows server 2019
- A PC or Server where you’ll install Windows Admin Center (WAC) – previously project Honolulu, which must be a minimum version of 1809. So, the best is to download a fresh copy as the product evolves rapidly.
As you can see, you do not need to migrate to Windows Server 2019 if you don’t want to. You can perfectly migrate to WS 2012R2 or WS 2016, however the transfer speeds will only operate at 50% of speed as the Storage Migration Services (SMS) proxy server Feature allows to boosts the file transfers when the WS 2019 is set as a destination.
And the only way is to install this feature at the WS 2019 as nor WS 2016 or WS2012R2 have it.
Firewall and security requirements:
Source and destination firewall requirements:
The source and destination computers must have some firewall rules enabled inbound
- File and Printer Sharing (SMB-In)
- Netlogon Service (NP-In)
- Windows Management Instrumentation (DCOM-In)
- Windows Management Instrumentation (WMI-In)
Orchestrator Firewall requirements:
- The Orchestrator server computer must have the File and Printer Sharing (SMB-In) firewall rule enabled inbound.
Accounts requirements:
- Admin Account on Source – You’ll need A migration account that is an administrator on the source computers.
- Admin Account on Destination – A migration account that is an administrator on the destination computers.
System Architecture Requirements
The source and the destination host must be attached in the same domain.
Note: If you’re migrating only a few servers and one of the servers is running Windows Server 2019, you can use that as the orchestrator. Which means you can use the Orchestrator as a destination. If you’re migrating more servers, we recommend using a separate orchestrator server.
After installing Windows Admin Center (WAC) onto your machine (note: Just to let you know, you cannot install WAC onto a domain controllers) you will need to choose an Orchestrator server where you can Add new role called Storage Migration Service which also includes a Storage Migration Service Proxy acting as an accelerator of transfers.
Storage Migration Service and Proxy Features
I’ll show you my setup below, but know that this is just one example. In your own scenario you might be using different setup.
My lab has:
- Orchestrator server VM – which is a Windows Server 2019 installed with SMS + SMS proxy. (Note that when you check the SMS feature, you have to check the sub-feature SMS proxy too.)
- Source server VM – Windows server 2008R2 with some file shares as a demo.
- Destination server VM – Windows Server 2019 (with SMS proxy)
- A Server running Windows Admin Center (WAC) – this is a Server 2016 VM where I installed the WAC.
Here is the view from WAC
View from WAC
Other than that, the lab has two domain controllers, DNS and DHCP infrastructure in place but this is usual.
The lab architecture is on the illustration below
The lab setup
The preparation steps:
Step 1: Check requirements (firewall, roles, servers, domain membership)
Step 2: Install WAC (if you haven’t done already)
Step 3: Install SMS and SMS proxy features on your Orchestrator server.
Step 4: (Optional) Install SMS proxy on your destination server (if it’s Server 2019 OS)
So, in this introductory post, I have explained the use cases for Microsoft Storage Migration Services (SMS) which is a really cool feature present in Windows Server 2019. We can clearly see that Microsoft wants us to embrace Azure, but listening to customers and allows the migration from “On-prem” to “On-prem” environments as well.
“How To Migrate Shares and Files with ease by using Microsoft Storage Migration Service – Part 2” is locked
How To Migrate Shares and Files with ease by using Microsoft Storage Migration Service – Part 2
This first release does not allow consolidating several servers (with the same share names) into one, but it may be added in future releases of Storage Migration Service. We’ll do a follow-up post where we’ll get into the details.
Source: Microsoft
More posts from ESX Virtualization:
- Windows Server 2019 What’s new?
- Free Tool – HammerDB Benchmark Tool New Release
- Chocolatey is a cool package manager for Windows
- What’s New in VMware Horizon 7.7
- Free Tools
- VMware Tools Offline VIB for ESXi Host – Bundle Download and Install
- Upgrade Windows Server 2012R2 AD to Server 2016
Stay tuned through RSS, and social media channels (Twitter, FB, YouTube)
Storage Migration Service in Windows Server 2019
Windows Server 2019 is released with many great features and Storage Migration Service (SMS) is one the best and very usefull for customers . SMS helps you to migrate servers and their data without reconfiguring applications or users to another . SMS is fully manageable from Windows Admin Center as Microsoft has released an extension for this feature.
Storage Migration Service makes it easier to migrate servers to a newer version of Windows Server. It provides a graphical tool that inventories data on servers and then transfers the data and configuration to newer servers—all without apps or users having to change anything.
Storage Migration Service is designed to help by doing the following:
- Inventory multiple servers and their data
- Rapidly transfer files, file shares, and security configuration from the source servers
- Optionally take over the identity of the source servers (also known as cutting over) so that users and apps don’t have to change anything to access existing data
- Manage one or multiple migrations from the Windows Admin Center user interface
How Storage Migration Service Operates ?
The feature consists of an orchestrator service and one or more proxy services deployed. Proxies add functionality and performance to the migration process, while the orchestrator manages the migration and stores all results in a database.
Storage Migration Service operates in three phases:
- Inventory – an administrator selects nodes to migrate and the Storage Migration Service orchestrator node interrogates their storage, networking, security, SMB share settings, and data to migrate
- Transfer – the administrator creates pairings of source and destinations from that inventory list, then decides what data to transfer and performs one more or transfers
- Cutover – the administrator assigns the source networks to the destinations and the new servers take over the identity of the old servers. The old servers enter a maintenance state where they are unavailable to users and applications for later decommissioning, while the new servers use the subsumed identities to carry on all duties.
Requirements
- Windows Server 2019 Preview computers or VMs with the Storage Migration Service features installed (Build 17744 or later). Note:-The orchestrator and destination the same computer for small environment with a single server to migrate. And for larger environment will usually have a single Orchestrator and many destinations , two or more windows server 2019 computers.
- The Windows Admin Center installed on some computer, such your laptop or desktop
- The Storage Migration Service preview extension for Windows Admin Center installed
Supported Source Operating Systems
- Windows Server 2003
- Windows Server 2008
- Windows Server 2008 R2
- Windows Server 2012
- Windows Server 2012 R2
- Windows Server 2016
- Windows Server 2019 Preview
Supported Destinations
- Windows Server 2012 R2
- Windows Server 2016
- Windows Server 2019 Preview*
- Azure File Sync
* Windows Server 2019 Preview will have double the data transfer performance due to its inclusion of the SMS Proxy service.
Security
- All computers domain-joined
- You must provide a migration account that is an administrator on selected source computers
- You must provide a migration account that is an administrator on selected destination computers
- The following firewall rules must be enabled INBOUND on source and destination* computers:
- “File and Printer Sharing (SMB-In)”
- “Netlogon Service (NP-In)”
- “Windows Management Instrumentation (DCOM-In)”
- “Windows Management Instrumentation (WMI-In)”
* Windows Server 2019 with the SMS Proxy installed will automatically open and close correct firewall ports during migrations
- The following firewall rule must be enabled INBOUND on orchestrator computer only if you wish to download reports:
- “File and Printer Sharing (SMB-In)”
Points to Noted Before Starting Migration
Cutover time to completion depends on below so make sure you have enough downtime before cutover .
- Server reboot times
- AD Replication time (for domain joins and computer accounts being known to all users)
- DNS replication tim
- When cutover completes, migration is done old server is renamed and network configurations are changed .
How to Enable Storage Migration Service
Login to Windows Admin Center to install the Storage Migration Service , the SMS extension allows this with a single click
Note :- If your machine done snot have Windows Admin Center Refer the article Windows Admin Center For Windows Server 2019 to understand how to install and connect the machines to WAC .
Navigate to Storage Migration Service and Click on Install
Installation will start and in a while it will be installed
Once Completed you will a popup message like below , now you can start creating jobs and migration
Let understand the which are the features to be installed and which node prior to start the migration if you have larger environment .
Features to install on the Orchestrator node
- “Storage Migration Service”
- “Storage Migration Service Proxy” (installs automatically when orchestrator selected)
- “Storage Migration Service tools” (installs automatically when orchestrator selected, under Remote Server Administration Tools, Feature Administration Tools)

Feature to install on the Destination nodes where you plan to migrate
- “Storage Migration Service Proxy”
Conclusion
Here we explained about storage migration service feature with Windows Admin Center . How to enable the storage migration service and what are roles required source and destination with small or large environment .
One of the fantastic new features of Windows Server 2019 is the Storage Migration service that allows easily migrating off an old server. Over the years Microsoft has introduced tools that allowed copying files and such, but there was always part of the desired functionality that you would want that was left out. Administrators have long wanted a tool that could fully automated the process of migrating off an old server over to a new server. This includes the ability to both move the files, shares, and permissions, but also assuming identity of the old server in cases where this is desired. The new Storage Migration tool found in the Windows Admin Center provides a powerful tool that allows this ability in an automated fashion. In this post, we will take a look at how to Migrate from Windows Server 2003 to Windows Server 2019 with Storage Migration.
Observations in Testing
So to begin with, I want to make a few observations of various things I noticed in testing. Keep in mind the testing I was able to perform involved the Windows Insider releases along with taking a look as well as the RTM code in Eval form. One of the interesting bits that I observed was the RTM code was missing the Storage Migration service and Proxy service. Additionally, the Datacenter release, in various forms in the Insider release did not have the Storage Migration Service.
The release and testing that I performed was in the form of the Windows Insider build 17744.1001 which is the latest version of the Windows insider release. Also, I noticed the Preview release of the Windows Admin center 1808 did not have the extension for the Storage Migration service by default. The test that I ran involved using the 1809 release of the Windows Admin Center on top of the Standard edition version of Windows Server 2019 17744 build. As you will see, I ran into some hurdles with testing Windows 2003 migration. Of course, everything is still so new with the Storage Migration service that it is very lightly documented if at all at this point.
In testing I had the following:

- Windows 2003 R2 x64 build – no patches installed
- Windows Server 2019 Standard – 17744 build
Let’s take a look at the process of running the storage migration service and the requirements and the outcome for me in the lab.
The first thing I needed to do is install the Storage Migration Service and Storage Migration Service Proxy on the 17744 build server.
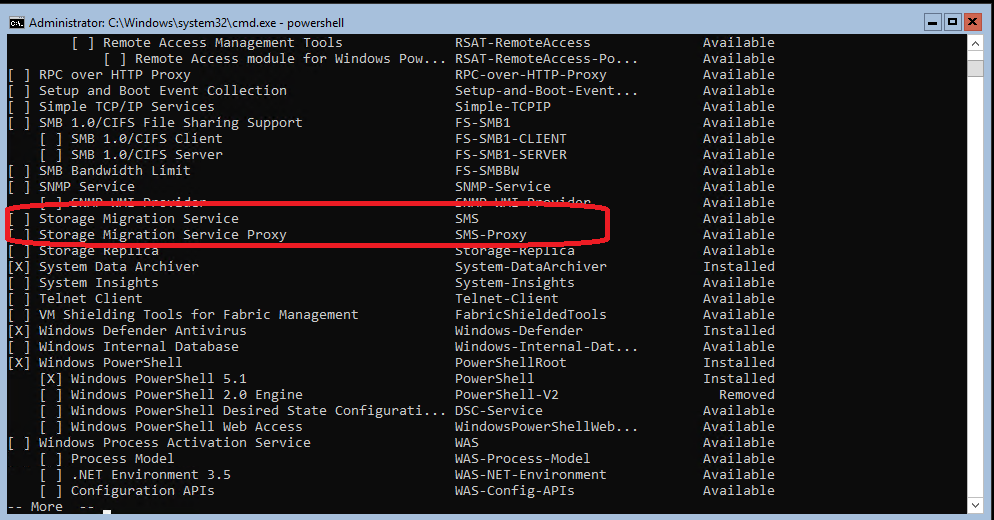
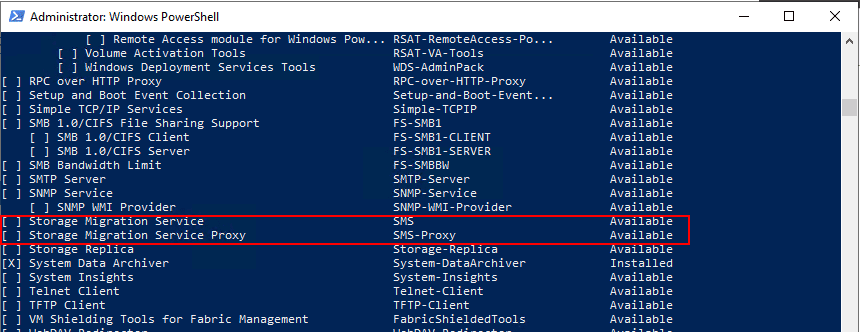
You can see it from a different view here in PowerShell.
Add the required subfeatures needed…
Added and ready to install…
Feature installation is successful. Now back to Windows Admin Center.
You now see the Storage Migration Service listed in Windows Admin Center.
WAC displays the overview of the process including the steps:
- Inventory
- Transfer
- Cut over
Create a New job in the Storage Migration Service dashboard.
Name the new job.
The first of the three step process involves the Inventory devices step. Enter credentials here.
Add the source device to scan. Click the Add a device button.
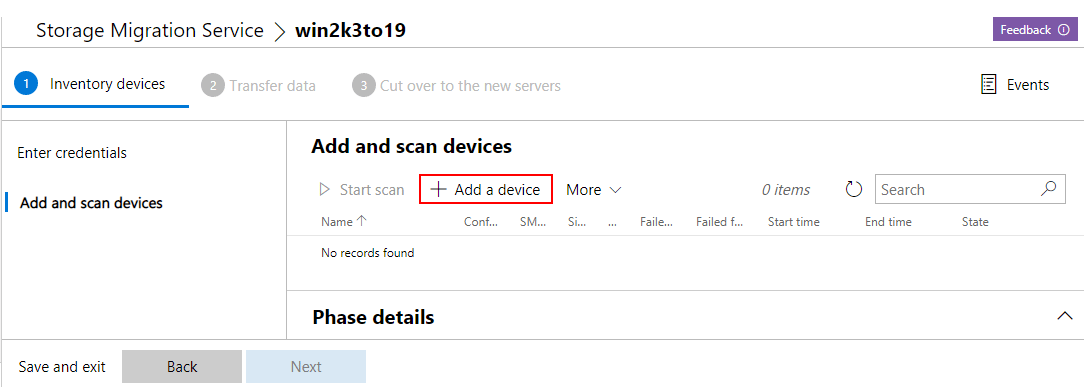
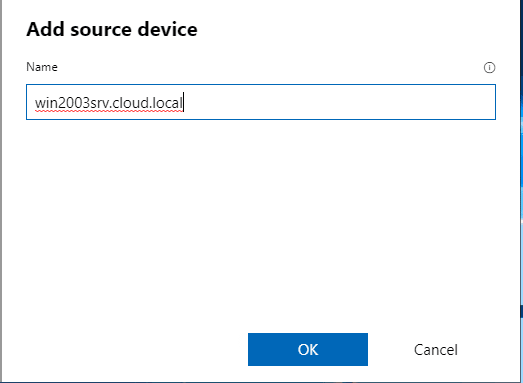
Add the source device – here using the FQDN.
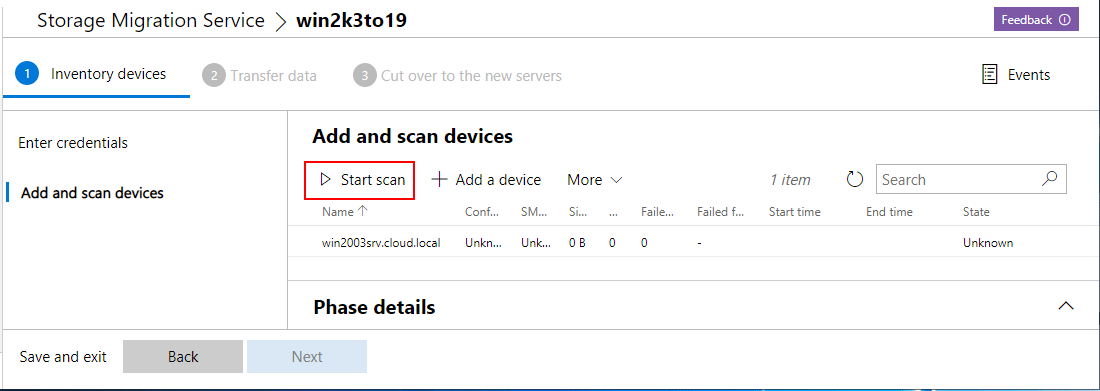
We need to scan the source device for shares, files, etc. Click the Start scan button.
The initial scan for me errored out. Just working on a theory I tried to simply connect to the admin share of the Windows 2003 server and received the following error, related to SMB 1.0.
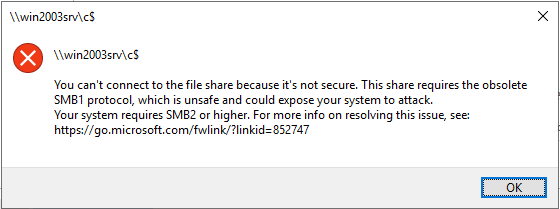
Enabling SMB 1.0/CIFS File Sharing Support
Working on a hunch here this is why the Storage Migration Service failed to inventory the service. I decided to add the SMB 1.0/CIFS support for Storage Migration to see if it gets me further.
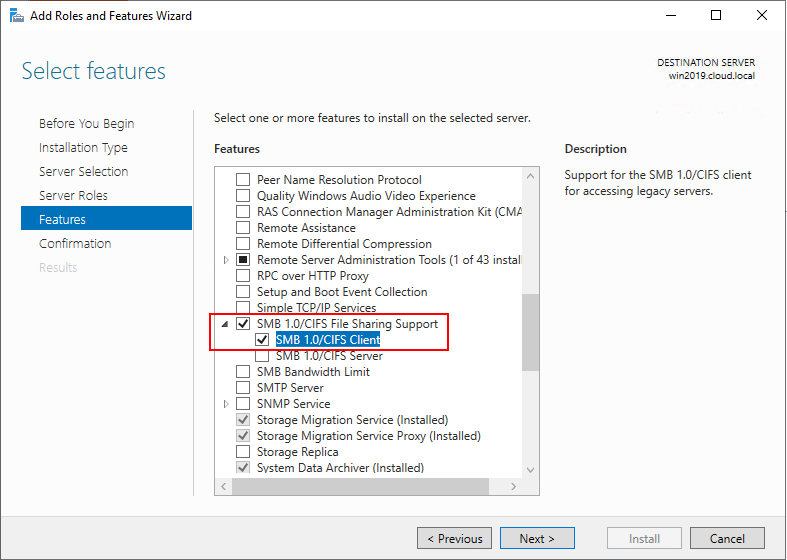
After adding SMB 1.0 you will need to restart.
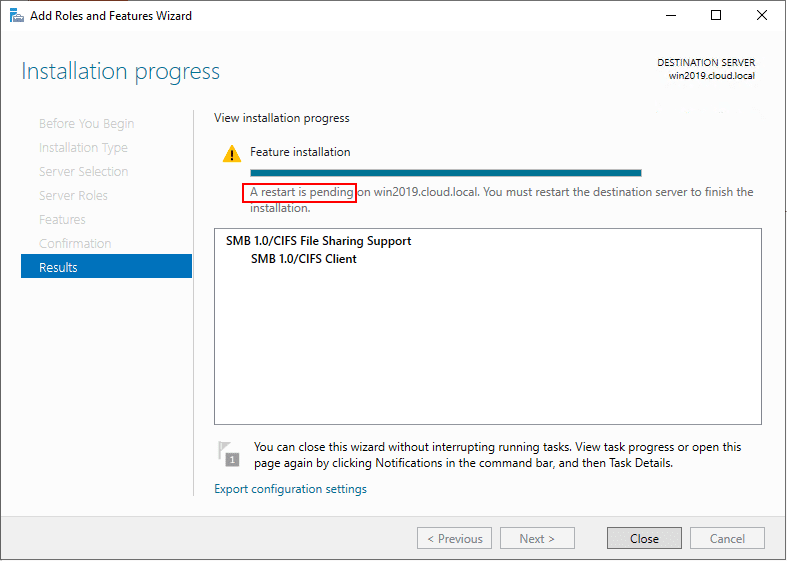
After restarting, i tried again and was able to successfully connect to Windows 2003.
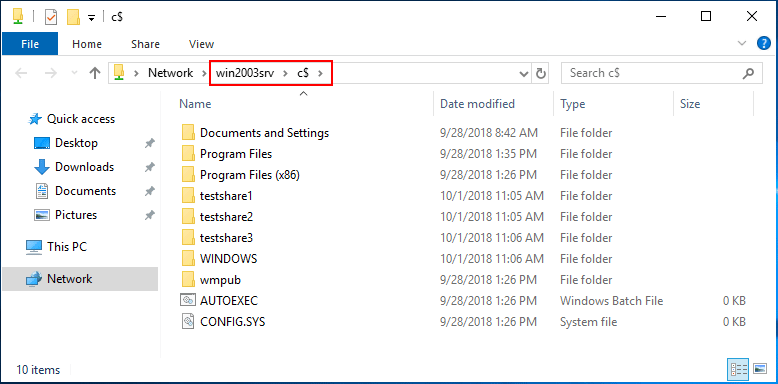
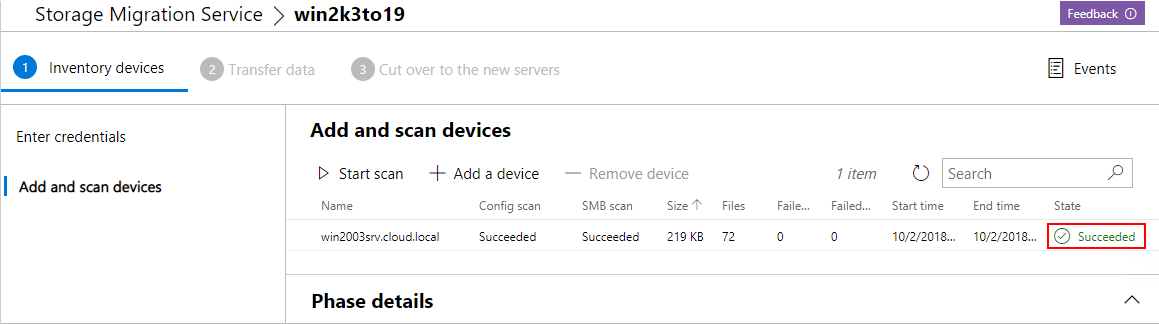
Now, the inventory process is successful.
Moving along to the Transfer data step, enter the credentials.
Enter the destination device name and scan the device.
After scanning, you will see the list of shares, path, type, size and you can choose to include the share or not. Also, you can map the destination server drive if different.
Adjust transfer settings including retries, etc.
Validate the settings by clicking the Validate button
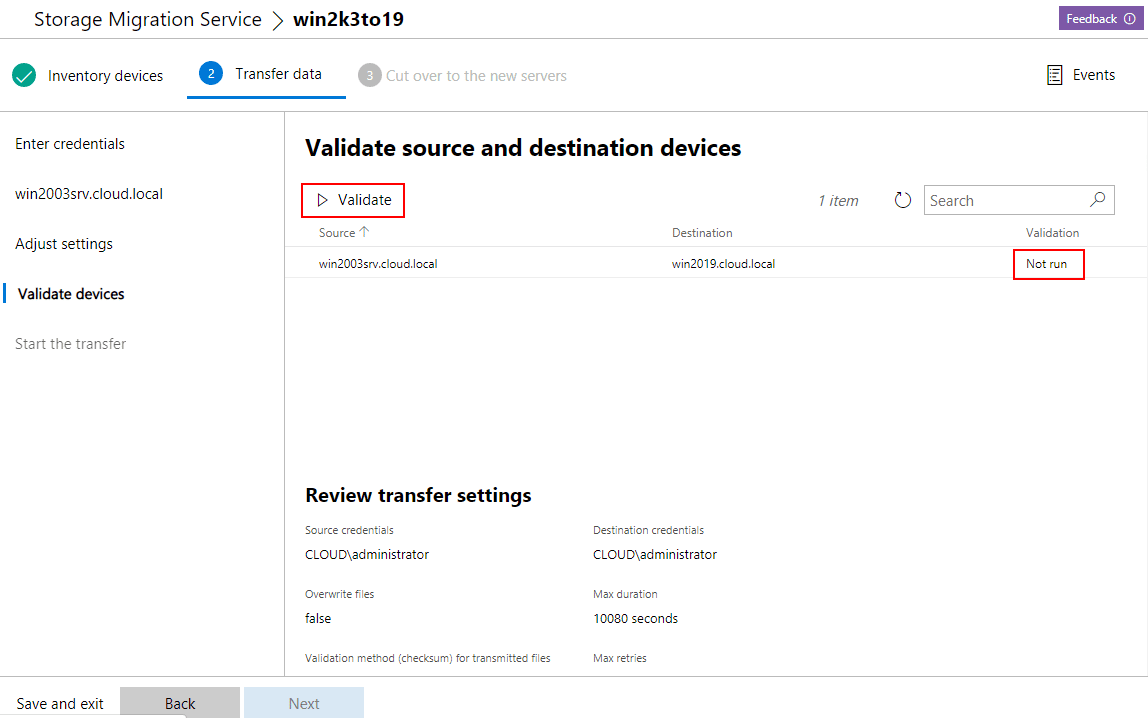
Next, you are down to the Start the transfer step. Click the Start transfer button.
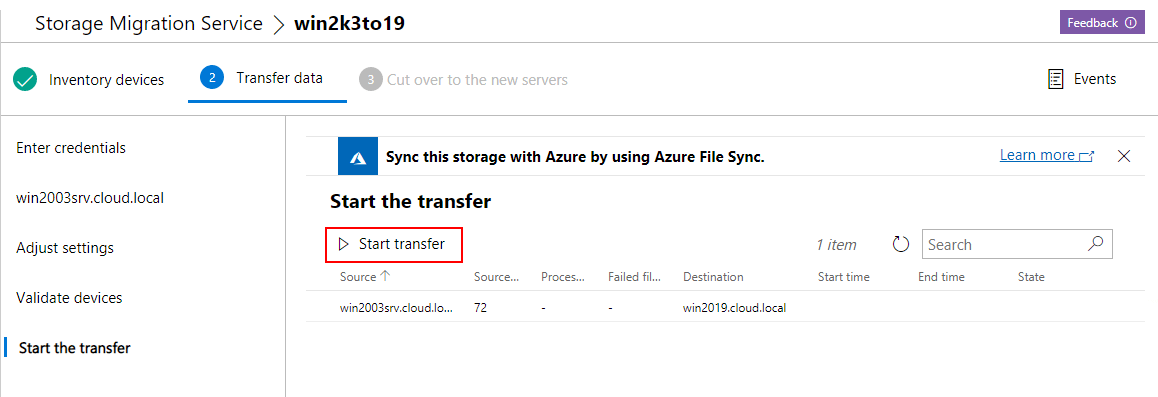
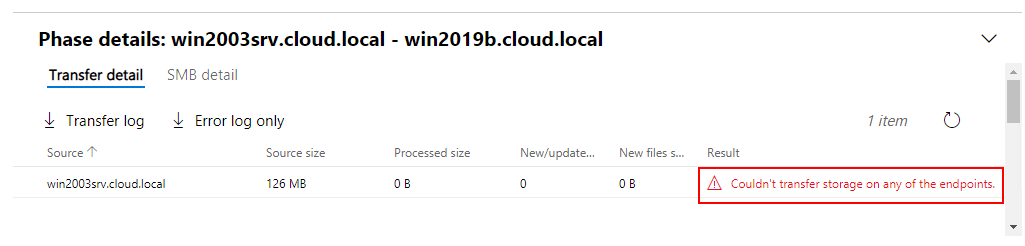
In trying multiple times to get this to work with Windows 2003, I ran into the error below: Couldn’t transfer storage on any of the endpoints. Things tried below:
- Enabled server component of SMB 1.0 (didn’t think this was necessary but tried it anyway)
- Disabled UAC in Windows Server 2019
- Rebooted Windows 2003 and Windows Server 2019 servers
- Tried different files inside the shares
- Added a new virtual disk and targeted this drive instead of the system drive.
The weird thing is the folders get created and files, but they are “0” file size.
The following error is displayed in event view for Windows Server 2019.
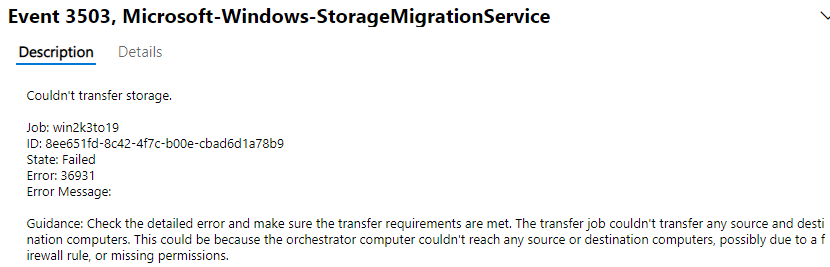
I am sure I am missing something required here with Windows 2003, however, there is literally no information out there at this point for this functionality so working on trial and error. I will keep this post updated as I continue to test.
So to feel good about at least getting to test the functionality, I tried Windows Server 2019 to Windows Server 2019. As you can see below, the transfer of the same files is successful, albeit on the Windows Server 2019 platform.
Shares are properly created and NTFS permissions are brought across as well.
Now, for the cutover stage. This allows actually assuming the identity of the old server if you need. Again, credentials.
Configure what you want to do with the network. You can assume IP as well if you want. Additionally, you can choose to generate a random computer name or specify what you want the old server to be renamed too after the new server assumes identity.
Adjust the cutover time.
Validate the source and destination.
Start the cutover process. This will reboot both servers a few times as each identity is changed.
After the cutover process is successful. I was able to verify that the old server was renamed and the new server assumed the identity of the old server. Very cool!
Takeaways
I generally don’t like to create posts showing things I couldn’t get to work, however, this is showing preview functionality at this point and I know I am missing something for Windows 2003 functionality. It is great to see that Microsoft is working on making this process to Migrate from Windows Server 2003 to Windows Server 2019 with Storage Migration as simple and easy as they can. There is a ton of Windows 2003 servers still out in production environments according to Microsoft! One documented and ironed out, this will eliminate all excuses to migrate off Windows 2003 up to Windows Server 2019 for file server platforms. More to come…again, stay tuned to the post as I will keep it updated with findings. Please comment if you have been experimenting with this also and have the key here that I am missing.