Storage Spaces Direct (S2D) – новая технология распределенного хранения данных, представленная в Windows Server 2016. Благодаря использованию Storage Spaces Direct локальные диски нескольких серверов можно организовать в отказоустойчивое, масштабируемое хранилище, защищенное от выхода из строя как отдельных дисков, так и целых серверов. Цена такого «программного» хранилища получается значительно меньше, чем стоимость организации полноценного SAN или NAS, а за счет простого масштабирования (до 16 серверов и 400 дисков) и возможности использовать различных накопителей (в том числе SSD и NVMe) можно обеспечить значительную производительность.
Содержание:
- Что такое Storage Spaces Direct (S2D)
- Требования к Storage Spaces Direct
- Включаем Storage Spaces Direct
Что такое Storage Spaces Direct (S2D)
S2D является дальнейшим развитием технологии Storage Spaces и позволяет объединить локальные диски узлов (серверов) кластер Hyper-V в пулы хранения (Storage Pool). На данных пулах можно создать виртуальные тома (диски) и использовать их в качестве общего тома кластера Cluster Shared Volume (CSV) для хранения файлов виртуальных машин Hyper-V и файловых шар SOFS-серверов. При необходимости расширить размер хранилища достаточно добавить в S2D новый сервер или накопитель. По сути, технология Storage Spaces Direct является ответом Microsoft на VMware vSAN.
Требования к Storage Spaces Direct
В S2D поддерживаются следующие типы устройств хранения:
- Обычные HDD диски (SAS)
- SATA / SAS SSD диски
- NVMe (Non-Volatile Memory Express) — SSD диски, подключенные не через классический интерфейс SATA/SAS, а через более скоростную шину PCI Express
В дальнейшем разные типы дисков можно комбинировать в различные массивы (по скорости и емкости), например, логично расположить кэш и транзакционные логи приложений на скоростных NVMe SSD, медленные и недорогие диски лучше использовать для хранения больших файлов, доступ к которым не требует повышенной производительности и т.д.
Для работы S2D нужно организовать отказоустойчивый кластер, к узлам которого выдвигаются следующие требования:
Требования к узлам кластера S2D
- Редакция Windows Server 2016 — DataCenter
- На серверах нужно установить следующие компоненты: роли Hyper-V, File Services и фичу Failover Clustering
Примечание. Не забудьте отключить SMB 1:
Remove-WindowsFeature –Name FS-SMB1 -Verbose -Restart - Как минимум два сервера в кластере (в идеале не менее 4 для обеспечения высокой отказоустойчивости)
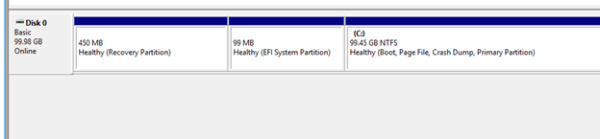
- Наличие дисков. Помимо системного должен иметь как минимум один физический диск на каждом узле. Все диски, которые планируется добавить в хранилище Storage Spaces Direct должны быть не размечены (не должны быть разбиты и не содержать таблицы разделов)
Итак, предполагаем, что у нас уже собран отказоустойчивый кластер из двух серверов с Windows Server 2016 (можно собрать такой кластер даже в рабочей группе).
Примечание. Если в кластере четное число серверов, придется настроить ресурс-свидетель. Если количество узлов нечетное – свидетель не нужен.
Перед тем, как включить Storage Spaces Direct, проверьте, что ваши диски можно объединить в такой пул.
Get-PhysicalDisk –CanPool $True | Sort Model

Включаем Storage Spaces Direct
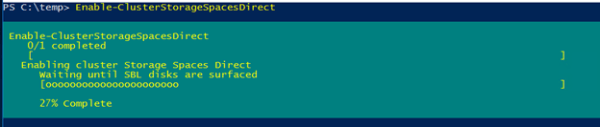
Активируем S2D с помощью командлета:
Enable-ClusterStorageSpacesDirect
Командлет отрабатывает довольно долго (около 10 минут), в течении которых будет проанализированы все доступные диски и их производительность, и автоматически создан кластерный пул. Также автоматически создаются два тира: Performance и Capacity с разным типом отказоустойчивости хранения: mirror и parity соответственно.
Всего поддерживаются 3 типа организации отказоустойчивого хранения данных:
- Mirrored (3) – данные синхронно реплицируются между 3 (или 2 в минимальной конфигурации) узлами. Высокая скорость чтения обеспечивается распределением операции между всеми серверами.
- Parity (2) – данные с хранением четности распределены между разными дисками. Данные хранятся более эффективно, т.к. не надо как в первом случае хранить несколько копий одних и тех же данных.
- Tiered (1) – используется комбинация обоих техник.
Примечание 1. В том случае, если при выполнении команды Enable-ClusterS2D появится ошибка «no disks with supported bus types found to be used for S2D», скорее всего тип шины (BusType) ваших дисков – RAID (что с точки зрения S2D – неподдерживаемая конфигурация). Проверим тип шины
Get-Disk | select Number, FriendlyName, OperationalStatus, Size, PartitionStyle, BusType | sort Number | ft -AutoSize
 Так и есть – во всех случаях это RAID. Решение — обновить драйверы/ firmware контроллеров (в случае серверов HP установить последний HPE Support Pack). Проверим тип BusType еще раз (теперь он сменился на SAS).
 Кроме того, есть небольшой трюк позволяющий в реестре изменить тип шины на SATA для нужного типа контроллера:HKEY_LOCAL_MACHINESYSTEMCurrentControlSetServicesarcsasParameters
«BusType»=dword:0000000b (вместо 00000008)Другие примеры использования командлетов PowerShell для управления локальными дисками приведены в статье Управление дисками и разделами из PowerShell.
Примечание 2. Если в массиве обнаружен диск типа дисков SSD, NVMe, он автоматически используется в качестве диска для хранения кэша. Если таких дисков нет, в процессе создания S2D будут появляться предупреждения. Можно отключить кэш с помощью параметра
-CacheState Disabled
.
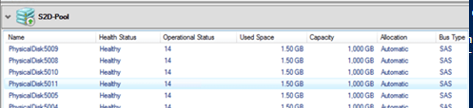
Откроем консоль управления кластером и убедимся, что в разделе Storage новый появился Cluster Pool 1.

Выбрав пул, можно увидеть из каких дисков он состоит.
В случае необходимости, имя пула можно изменить:
Set-StoragePool –FriendlyName “Cluster Pool 1” –NewFriendlyName “S2D”
Если нужно создать том из определенных дисков, можно воспользоваться к примеру, такой командой. Сначала выбираем все диски с LUN 3, а затем собираем из них пул.
$HDDs = Get-PhysicalDisk | ? PhysicalLocation -like "*LUN 3"
New-StoragePool -StorageSubSystemFriendlyName *Cluster* -FriendlyName S2DPool -ProvisioningTypeDefault Fixed -PhysicalDisk $HDDs
Вывести список дисков в пуле:
Get-StoragePool -FriendlyName S2D | Get-PhysicalDisk | ft PhysicalLocation

Добавить в пул новый диск:
$HDDs = Get-PhysicalDisk | ? PhysicalLocation -like "*LUN 4"
Add-PhysicalDisk -PhysicalDisks $HDDs -StoragePoolFriendlyName S2D
Диски, помеченные как S2D, в консоли управления дисками более не отображаются, это нормально.
При наличии разнородных накопителей можно использовать тиринг (не обязательно). Тир типа зеркало из SSD дисков создается так:
New-StorageTier -StoragePoolFriendlyName S2D -FriendlyName "Mirror_Tier" -MediaType SSD -ResiliencySettingName Mirror
Тир из обычных HDD с хранением четности:
New-StorageTier -StoragePoolFriendlyName S2D -FriendlyName "Parity_Tier" -MediaType HDD -ResiliencySettingName Parity
Теперь можно создать том CSV (Cluster Shared Volume):
New-Volume –StoragePoolFriendlyName S2D –FriendlyName CSV001 –PhysicalDiskRedudancy 2 -FileSystem CSVFS_ReFS -Size 200GB
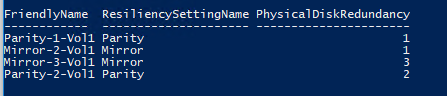
Список томов и типом избыточности можно вывести так
Get-VirtualDisk | ft FriendlyName, ResiliencySettingName, PhysicalDiskRedundancy
Новый CSV том появится в консоли управления дисками.

Данный том можно использовать для размещения виртуальных машин Hyper-V или сетевого хранилища Scale-out File Server.
Итак, при использовании Storage Spaces Direct из нескольких серверов с локальными дисками можно с легкостью создать программное сетевое хранилище данных. За счет технологии S2D обеспечивается как защита от одновременного выхода из строя любых двух дисков или двух серверов (4+ нодовый кластер). Кластер S2D автоматически запускает процесс перераспределения данных между оставшимися устройствами в случае обнаружения неполадок с дисками или серверами. В тестовой среде можно убедится, что при отключении двух любых дисков хранилище продолжает быть доступным, а ВМ, запущенные на нем штатно работают. Процедура замены неисправного диска в хранилище S2D описана в следующей статье.
Пока некоторые читатели (да что уж там, и писатели — например, я) наслаждались в отпуске теплыми летними денечками, известный автор нашего англоязычного блога Адам Бертрам подготовил краткий обзор Windows Storage Spaces. В него он включил, в частности, сведения о настройке Windows Storage Spaces на популярных конфигурациях. Перевод его статьи я и предлагаю вашему вниманию.
Во многих дата-центрах и серверных фермах для хранения данных используются HDD и SSD. Статистика, однако, сообщает о том, что после трёх лет работы 10% дисков становятся негодными.
Конечно, те организации, которые заботятся о целостности и сохранности своих данных, держат руку на пульсе, а также отслеживают и другие факторы риска — будь то человеческий фактор, железо или софт. И тут тем, кто работает с Windows-инфраструктурой, могут помочь Windows Storage Spaces. Ведь их RAID-подобная функциональность (то, что мы видим в File Explorer как виртуальные диски) весьма полезна в деле обеспечения резерва мощностей хранения.

Гибкие возможности масштабирования тоже привлекательны: можно объединить 3 и более драйвов в единый сторадж-пул и затем формировать на его основе “стораджики” нужного размера. А поскольку при работе с пулом формируются и сохраняются дополнительные копии для ваших данных, то проблемы с одним из дисков не приведут к потере всего и вся. А если понадобилось больше места? Просто добавь воды еще дисков в пул.
Storage Spaces для Windows 10
— Он забирается на самую высокую сосну и оттуда планирует.
— Ага, простите, что планирует?
— Он прыгает и планирует.
(“День радио”)
Даже если сценарий развертывания, который вы хотите воплотить, входит в число самых популярных, и инструкция к нему коротка и вроде даже сходу понятна, этап подготовки и планирования все равно никто не отменял. Итак:
Если вы используете дисковые пространства Storage Spaces на машине с Windows 10, то рекомендуется обеспечить наличие минимум 2 дисков помимо системного. Эти диски могут быть как встроенными, так и внешними. Поддерживаются SSD; можно комбинировать SATA, USB и SAS.
Количество дисков рассчитывается исходя из того, какой метод обеспечения отказоустойчивости вы хотите применить. Есть вот такие варианты:
-
Simple (простой) — требует наличия минимум двух дисков. Хоть этот метод и дает хорошую производительность, но ничем вам не поможет в случае отказа. Его можно использовать, например, если вы настраиваете storage space для хранения временных данных (например, файлов видео-рендеринга, файлов-черновиков в графических редакторах, и так далее).
-
Mirror (зеркальный) — позволяет сохранять несколько копий данных на случай отказа. Так, Two-way mirror spaces хранят две копии данных, и с ними вы переживете отказ одного из дисков. Для их организации потребуется минимум два диска. Three-way mirror spaces позволят пережить отказ двух дисков, а для их организации потребуется минимум пять. Зато хранить в таких storage spaces можно самые разнообразные данные.
-
Parity (с контролем четности) — рекомендуется для хранения архивных и стриминговых данных. Хранят несколько копий на случай отказа. Если вы хотите обеспечить отказоустойчивость в случае проблемы с одним диском, то в сценарии с Parity spaces вам понадобится минимум три диска, а на случай проблемы с двумя — минимум семь дисков.
После того, как вы все рассчитали и подготовили, можно организовать собственно Storage Spaces. Для этого в Windows 10 нужно выполнить вот такие шаги:
-
Проверить, что диски, которые вы планируете задействовать, у вас подключены.
Важно! Если вы укажете, что в сторадж-пул хотите включить размеченный диск, имейте в виду, что Windows безвозвратно удалит все разделы и файлы на нём. До начала работы сделайте резервную копию всего, что вам дорого на этом диске!
-
Для простоты в поле поиска в панели задач вводим Storage Spaces и из полученного списка выбираем Storage Spaces.
-
Кликаем Create a new pool and storage space.
-
Выберем нужные нам диски и затем кликнем Сreate new storage pool.
-
Указываем имя, буквенное обозначение и файловую систему для нового сторадж пула.
-
На случай сбоя рекомендуется выбрать метод обеспечения отказоустойчивости (Resiliency) как одну из следующих опций: Two-way mirror, Three-way mirror или Parity.
Важно! Помните про количество дисков, которые потребуются в каждом из указанных вариантов, о чем мы говорили выше. Если, допустим, вы предпочтете Two-way mirror, то для нового storage space будет создаваться две копии данных. Так что для такого сценария понадобится минимум два диска (помимо системного).
-
Затем задайте максимальный размер стораджа для Storage Spaces.
Примечание: Можно указать значение, превышающее размер сторадж-пула — когда место будет заканчиваться, вы просто добавите еще один диск.
-
Когда с настройками покончено, нажимаем Create storage space.
Оптимизация работы
Рекомендуется своевременно оптимизировать работу с дисками. Вот что советует делать Microsoft:
При добавлении новых дисков в существующий пул рекомендуется оптимизировать использование диска. При этом некоторые данные будут перемещены на новый диск, чтобы оптимизировать использование емкости пула. Это стандартное действие при добавлении нового диска в обновленный пул в Windows 10: флажок Optimize to spread existing data across all drives будет установлен по умолчанию.
Однако если вы сняли этот флажок или добавили диски до обновления пула, вам нужно вручную оптимизировать использование диска. Для этого в поле поиска на панели задач введите Storage Spaces, выберите Storage Spaces из списка результатов поиска, а затем щелкните Optimize drive usage.
Автономный сервер
Если у вас один отдельно взятый сервер, то для настройки на нем дисковых пространств Storage Spaces есть подробная инструкция от Microsoft, на русском языке и даже с картинкой. Storage Spaces поддерживаются для Windows Server 2019, Windows Server 2016, Windows Server 2012 R2 и Windows Server 2012.
Обратите внимание: до начала настройки нужно обеспечить наличие одного или нескольких пулов, а также проверить конфигурацию на соответствие ряду требований (они перечислены в разделе «Предварительные условия»).
На базе сторадж-пула можно создать несколько виртуальных дисков. (Windows идентифицирует их как обычные диски, которые могут быть отформатированы.)
Для их создания можно использовать File and Storage Services; в настройках можно указать thin provisioning либо fixed provisioning, а также размер. Дополнительные настройки можно задать с помощью команд PowerShell.
Кластеры и Storage Spaces Direct
Если вы работаете с кластером и используете для каждой его ноды СХД с прямым подключением (DAS), то Storage Spaces Direct могут оказаться вполне разумным и эффективным вариантом по сравнению с NAS и SAN. Storage Spaces Direct отличаются хорошей масштабируемостью и возможностями управления. Технология Storage Spaces работает наряду с кэшированием, RDMA и поддержкой СХД для разных уровней (tiers). Помимо этого, поддерживаются диски NVMe.
Storage Spaces Direct поддерживаются для Windows Server 2019 Datacenter, 2016 Datacenter и Insider Preview Builds. Можно создать конвергентное или гипер-конвергентное пространство.
Вкратце, основные этапы развертывания Storage Spaces Direct — это:
-
Развертывание Windows Server — установка и настройка ОС, добавление доменных учеток, настройка ролей и необходимых фич.
-
Настройка сети (этот этап не относится к сценарию развертывания Storage Spaces Direct на виртуальных машинах).
-
Конфигурация собственно Storage Spaces Direct — очистка дисков и разделов, настройка кластеров, настройка Storage Spaces Direct, создание томов, развертывание необходимых виртуальных машин.
-
Для конвергентной инфраструктуры — развертывание масштабируемых файловых серверов, настройка ролей, создание шар, настройка ограниченного делегирования Kerberos.
Все эти этапы очень подробно описаны здесь (на русском языке).
Возможен сценарий, при котором все физические диски содержатся в enclosures с общим доступом — это т.н. JBOD enclosure. Такая инфраструктура должна соответствовать требованиям Windows Certification, а также включать в себя идентичные SAS HBA (имеющие сертификацию Storage Spaces). Такие диски в кластере не должны иметь встроенную функциональность RAID.
Storage Spaces vs. RAID
Как водится, у Windows Storage Spaces и RAID есть свои преимущества и свои недостатки. Об этом уже написана не одна сотня строк (например, здесь). Вкратце:
-
У RAID есть два аспекта: аппаратный и программный — а Windows Storage Spaces, так сказать, является software-driven, настраивается целиком через графический интерфейс или командную строку.
-
Для программных RAID, как и для Storage Spaces отсутствуют ограничения по числу сокетов (у традиционных RAID они есть).
-
ОС по-разному “видит” диски в RAID и в Storage Spaces — диски RAID предстают как цельный юнит (даже если у физических дисков разная емкость), что может приводить к неоптимальному использованию свободного пространства. Для Storage Spaces такой проблемы нет, так как есть доступ к отдельным дискам.
-
Если говорить о производительности, то RAID 0 превосходит Storage Spaces с режимом simple mode примерно вдвое. Однако на скоростях 4K они уже сравнимы. RAID 1 быстрее выполняет последовательные операции чтения, зато Storage Spaces в режиме two-way mirror mode вдвое быстрее выполняет операции записи, нежели RAID 1. Что касается hardware RAID, то операции чтения и записи для них гораздо быстрее, чем Storage Spaces в режиме parity mode.
Ссылки
Общие сведения о дисковых пространствах Storage Spaces
Развертывание Storage Space Direct
Дисковые пространства в Windows 10
Кейс о развертывании Storage Space Direct компанией-провайдером Veeam

Содержание
- Как устроен Storage Spaces
- Термины
- Ограничения
- Storage Spaces в кластерах
- Варианты отказоустойчивости и минимальное количество дисков
- Настройка Storage Spaces на Server 2016
- Powershell commands
Как устроен Storage Spaces
Storage Spaces — технология виртуализации дискового пространства, которая впервые появилась в Microsoft Windows Server 2012. Storage Spaces является дальнейшим развитием механизма управления динамическими дисками в Windows. Основой является широко применяемая в решениях различных вендоров концепция дисковых пулов: отдельные физические диски сервера объединяются в один или несколько пулов, на базе которых создаются тома с различными уровнями производительности и отказоустойчивости. Использование Storage Spaces вместо аппаратного RAID-контроллера имеет ряд преимуществ и недостатков, которые будут подробно рассмотрены ниже.
Термины
- Storage pool (пул хранения) — набор физических дисков. В одном пуле могут находится диски, отличающиеся по объёму, производительности и интерфейсу подключения.
- Virtual disk (виртуальный диск) — термин для определения логический том в Storage Spaces. Для создания виртуального диска используется ёмкость выбранного дискового пула. При этом доступны несколько вариантов отказоустойчивости (их можно комбинировать в пределах одного пула), большинство из которых являются аналогами традиционных RAID-массивов различных уровней.
- Simple (простой) — аналог RAID-0. Поток данных разбивается на страйпы (по умолчанию размером в 256КиБ), которые распределяются по дискам в пуле. Виртуальный диск simple обеспечивает оптимальное использование ёмкости дисков и является самым производительным, но не предполагает никакой отказоустойчивости.
- Mirror (зеркальный): для каждого страйпа в зеркальном виртуальном диске записывается дополнительно одна (двойное зеркало, 2-way mirror) или две (тройное зеркало, 3-way mirror) копии. Аналогом в плане использования ёмкости дисков для двойного зеркала является RAID-10 (или 1E для нечётного числа дисков). Зеркальный ВД защищён от потери одного или двух дисков соответственно.
- Parity (виртуальный диск с контролем чётности): запись страйпов на диски чередуется с записью контрольной суммы. В Windows Server 2012 R2 появились диски с двойной чётностью (dual parity), в которых дополнительно пишется вторая контрольная сумма. Как и аналогичные RAID-5 и RAID-6 ВД с контролем чётности допускают потерю одного или двух дисков соответственно и обеспечивают минимальную потерю дискового пространства (-1 или -2 диска соответственно). Традиционным недостатком любых реализаций томов с контрольными суммами является низкая производительность на запись из-за необходимости модификации всего полного страйпа вместе с контрольными суммами. Отсутствие фиксированного размещения страйпов в Storage Spaces и RAM-кэша на контроллере (используются обычные HBA) усугубляет данную проблему, сравнение производительности ВД single parity и dual parity с RAID-5 и RAID-6 будет ниже.
- В Windows Server 2012 R2 появился функционал enclosure awareness: при размещении страйпов учитывается размещение дисков по различным дисковым полкам (SAS JBOD’ам) для получения отказоустойчивости на уровне дисковых полок. Например, ВД с двойным зеркалированием (2-way mirror), размещенный на трёх дисковых полках, допускает потерю одной дисковой полки целиком.
- Параллельность распределения страйпов в виртуальном диске определяется числом т.н. столбцов (columns). Для получения максимальной производительности число столбцов для виртуальных дисков с уровнем отказоустойчивости simple и parity должно соответствовать количеству физических дисков, но в настройках по умолчанию максимальное число столбцов, например, для simple равно 8. Это связано с особенностями механизма расширения ёмкости пула: для оптимального использования ёмкости число добавляемых дисков должно соответствовать максимальному числу столбцов, которое используется виртуальными дисками, а для зеркальных дисков — числу столбцов * числу копий страйпа (2 для 2-way mirror, 3 для 3-way mirror).
- Storage tiers (ярусное хранение данных). В Windows Server 2012 R2 появилась поддержка 2-ярусного (SSD и HDD) размещения данных на виртуальных дисках Storage Spaces. Приоретизация доступа к быстрому ярусу из SSD возможна путём управления ёмкостью (при создании ВД указываются комбинация объёмов SSD и HDD ярусов) либо на файловом уровне: необходимый файл можно привязать к SSD-ярусу для обеспечения гарантированной производительнности.
- Write-back cache (кэш на запись). Для компенсации низкой производительности на случайную запись небольшая часть SSD в пуле используется для кэширования записи. При этом оставшаяся часть ёмкости SSD может быть использована для ярусного хранения.
Ограничения
Количество дисков и ёмкость:
- До 240 дисков одном пуле (в Windows Server 2012R2, ранее — до 160-ти), но пулов может быть несколько.
- До 80-ти дисков в кластеризованном пуле, до 4-х пулов на кластер.
- До 64-х виртуальных дисков в одном пуле.
- Общая ёмкость пула — до 480ТиБ.
Storage Spaces в кластерах
Одна из самых востребованных возможностей Storage Spaces — использование в failover-кластере Windows. Архитектура решения предельно проста: требуются диски SAS (см. дополнительные требования к дискам и организации томов), SAS JBOD (дисковая полка) с двумя SAS-экспандерами и минимум двумя разъемами для подключения к каждому из экспандеров (для двухузлового кластера). На серверах в качестве контроллеров используются обычные SAS HBA. Мы рекомендуем LSI (любые SAS2 и SAS3 HBA с внешними портами, например LSI 9207-8e), но можно использовать и Adaptec серий 6H и 7H.
Минимальной конфигурация выглядит так: два сервера, в каждом из них двухпортовый SAS HBA с подключением к 2-экспандерному SAS JBOD’у на базе корпуса Supermicro и SAS диски.

Для использования в качестве SAS JBOD’а можно использовать любой корпус Supermicro с двумя экспандерами (E26 или E2C в наименовании для SAS2 и SAS3 соответственно). Каждый экспандер в корпусах Supermicro имеет минимум два разъема x4 SAS (SFF-8087 или SFF-8643), которые можно использовать в качестве входов. При наличии третьего разъема его можно использовать для каскадирования (подключения дополнительных дисковых полок) или для построения топологии с тремя узлами в кластере.
Существуют варианты в одном корпусе, т.н. Cluster-in-a-box (CiB): готовые комплекты SSG-6037B-CIB032 и SSG-2027B-CIB020H на базе Supermicro Storage Bridge Bay с предустановленным Windows Storage Server 2012 R2 Standard, которые отлично подходят для построения отказоустойчивых файловых и/или iSCSI серверов:
Варианты отказоустойчивости и минимальное количество дисков

Настройка Storage Spaces на Server 2016
Настраивать мы будем в виртуальной лабаратории , где существуют 2 сервера , DC1( как контроллер домена с предустановленной Windows Server 2016 Standart) , и сервер Storage Spaces с названием SERVER1 ( с предустановленной Windows Server 2016 Datacenter) . Также на сервер добавлены 5 виртуальных SAS дисков , емкостью по 10gb.
- Переходим Server Manager > File and Storage Services > Servers > Storage Pools


Powershell commands
Удаление сломанного диска из пула
$disk = get-physicaldisk -friendlyname "generic physical disk"remove-physicaldisk -physicaldisks $disk -storagepoolfriendlyname storagepool1
Get physical disks that can be pooled
Get-physicaldisk | ? {$_.canpool -eq $true}
or$canpool = get-physicaldisk -canpool $true
Create a new pool
New-StoragePool -FriendlyName Pool1 -StorageSubSystemFriendlyName (Get-StorageSubSystem).FriendlyName -PhysicalDisks (Get-PhysicalDisk -CanPool $True)
orNew-StoragePool -FriendlyName Pool1 -StorageSubSystemFriendlyName "Windows Storage" -PhysicalDisks (Get-PhysicalDisk -CanPool $True)
Rename DiskGet-PhysicalDisk | Select-Object friendlyname,UniqueID,size
Get-PhysicalDisk -UniqueId 60022480F0D1DE600607F4F2B10A2917 | Set-PhysicalDisk -newFriendlyName HDDTEST
Rename Virtual DiskGet-VirtualDisk | Set-VirtualDisk -NewFriendlyName Vdisk1
Get disk on Storage Pool
get-storagepool -friendlyname StoragePool1 | get-physicaldisk | select friendlyname , mediatype, usage , bustype
Get physical disk info in the pool
Get-StoragePool Pool1 | Get-PhysicalDisk | Select FriendlyName,MediaType,UniqueId
New non-tiered thin size virtual disk
New-VirtualDisk -StoragePoolFriendlyName Pool1 -FriendlyName vDisk1 -Size 3TB —ResiliencySettingName Simple -ProvisioningType Thin
New non-tiered fixed size virtual disk with write-back-cache
New-VirtualDisk -StoragePoolFriendlyName Pool1 -FriendlyName vDisk1 -Size 3TB -ResiliencySettingName Simple -ProvisioningType Fixed -WriteCacheSize 92GB
Change disk MediaType in pool using FriendlyName (Распределить диски на быстрые и медленные)
Перед применением диск не должен быть участником Виртуального диска или будет ошибка Failed
Set-PhysicalDisk -FriendlyName PhysicalDisk1 -MediaType SSD
Set-PhysicalDisk -FriendlyName PhysicalDisk2 -MediaType HDD
Change disk FriendlyName in pool using UniqueId
Set-PhysicalDisk -UniqueId “{8433b759-314d-11e5-94f3-806e6f6e6963}” -NewFriendlyName “SSD1”
New tiered disk witch custom write-back-cache
New-VirtualDisk -StoragePoolFriendlyName “My Storage Pool” -FriendlyName TieredSpace -StorageTiers @($ssd_tier, $hdd_tier) -StorageTierSizes @(50GB, 300GB) -ResiliencySettingName simple -WriteCacheSize 2GB
Extend virtual disk
Get-VirtualDisk vDisk1 | Resize-VirtualDisk -Size 4TB
Assign a frequent accessed file permanently to the SSD Tier
Set-FileStorageTier -FilePath F:disk.vhd -DesiredStorageTier ($vdisk1 | Get-StorageTier -MediaType SSD)
ORNew-StorageTier -StoragePoolFriendlyName storagepool1 -FriendlyName HDD_tier -MediaType HDD
New-StorageTier -StoragePoolFriendlyName storagepool1 -FriendlyName SSD_tier -MediaType SSD
Информация взята из источников
https://www.truesystem.ru/solutions/khranenie_danny/360884/
https://habr.com/ru/company/etegro/blog/257089/
https://social.technet.microsoft.com/wiki/contents/articles/11382.storage-spaces-frequently-asked-questions-faq.aspx
| title | manager | ms.author | ms.topic | ms.assetid | author | ms.date | description |
|---|---|---|---|---|---|---|---|
|
Deploy Storage Spaces Direct on Windows Server |
femil |
inhenkel |
how-to |
20fee213-8ba5-4cd3-87a6-e77359e82bc0 |
stevenek |
11/16/2021 |
Step-by-step instructions to deploy software-defined storage with Storage Spaces Direct in Windows Server as either hyperconverged infrastructure or converged (also known as disaggregated) infrastructure. |
Deploy Storage Spaces Direct on Windows Server
Applies to: Windows Server 2022, Windows Server 2019, Windows Server 2016
This topic provides step-by-step instructions to deploy Storage Spaces Direct on Windows Server. To deploy Storage Spaces Direct as part of Azure Stack HCI, see What is the deployment process for Azure Stack HCI?
[!Tip]
Looking to acquire hyperconverged infrastructure? Microsoft recommends purchasing a validated hardware/software Azure Stack HCI solution from our partners. These solutions are designed, assembled, and validated against our reference architecture to ensure compatibility and reliability, so you get up and running quickly. To peruse a catalog of hardware/software solutions that work with Azure Stack HCI, see the Azure Stack HCI Catalog.
[!Tip]
You can use Hyper-V virtual machines, including in Microsoft Azure, to evaluate Storage Spaces Direct without hardware. You may also want to review the handy Windows Server rapid lab deployment scripts, which we use for training purposes.
Before you start
Review the Storage Spaces Direct hardware requirements and skim this document to familiarize yourself with the overall approach and important notes associated with some steps.
Gather the following information:
-
Deployment option. Storage Spaces Direct supports two deployment options: hyper-converged and converged, also known as disaggregated. Familiarize yourself with the advantages of each to decide which is right for you. Steps 1-3 below apply to both deployment options. Step 4 is only needed for converged deployment.
-
Server names. Get familiar with your organization’s naming policies for computers, files, paths, and other resources. You’ll need to provision several servers, each with unique names.
-
Domain name. Get familiar with your organization’s policies for domain naming and domain joining. You’ll be joining the servers to your domain, and you’ll need to specify the domain name.
-
RDMA networking. There are two types of RDMA protocols: iWarp and RoCE. Note which one your network adapters use, and if RoCE, also note the version (v1 or v2). For RoCE, also note the model of your top-of-rack switch.
-
VLAN ID. Note the VLAN ID to be used for management OS network adapters on the servers, if any. You should be able to obtain this from your network administrator.
Step 1: Deploy Windows Server
Step 1.1: Install the operating system
The first step is to install Windows Server on every server that will be in the cluster. Storage Spaces Direct requires Windows Server Datacenter Edition. You can use the Server Core installation option, or Server with Desktop Experience.
When you install Windows Server using the Setup wizard, you can choose between Windows Server (referring to Server Core) and Windows Server (Server with Desktop Experience), which is the equivalent of the Full installation option available in Windows Server 2012 R2. If you don’t choose, you’ll get the Server Core installation option. For more information, see Install Server Core.
Step 1.2: Connect to the servers
This guide focuses the Server Core installation option and deploying/managing remotely from a separate management system, which must have:
- A version of Windows Server or Windows 10 at least as new as the servers it’s managing, and with the latest updates
- Network connectivity to the servers it’s managing
- Joined to the same domain or a fully trusted domain
- Remote Server Administration Tools (RSAT) and PowerShell modules for Hyper-V and Failover Clustering. RSAT tools and PowerShell modules are available on Windows Server and can be installed without installing other features. You can also install the Remote Server Administration Tools on a Windows 10 management PC.
On the Management system install the Failover Cluster and Hyper-V management tools. This can be done through Server Manager using the Add Roles and Features wizard. On the Features page, select Remote Server Administration Tools, and then select the tools to install.
Enter the PS session and use either the server name or the IP address of the node you want to connect to. You’ll be prompted for a password after you execute this command, enter the administrator password you specified when setting up Windows.
Enter-PSSession -ComputerName <myComputerName> -Credential LocalHostAdministrator
Here’s an example of doing the same thing in a way that is more useful in scripts, in case you need to do this more than once:
$myServer1 = "myServer-1"
$user = "$myServer1Administrator"

Enter-PSSession -ComputerName $myServer1 -Credential $user
[!TIP]
If you’re deploying remotely from a management system, you might get an error like WinRM cannot process the request. To fix this, use Windows PowerShell to add each server to the Trusted Hosts list on your management computer:
Set-Item WSMAN:LocalhostClientTrustedHosts -Value Server01 -ForceNote: the trusted hosts list supports wildcards, like
Server*.To view your Trusted Hosts list, type
Get-Item WSMAN:LocalhostClientTrustedHosts.To empty the list, type
Clear-Item WSMAN:LocalhostClientTrustedHost.
Step 1.3: Join the domain and add domain accounts
So far you’ve configured the individual servers with the local administrator account, <ComputerName>Administrator.
To manage Storage Spaces Direct, you’ll need to join the servers to a domain and use an Active Directory Domain Services domain account that is in the Administrators group on every server.
From the management system, open a PowerShell console with Administrator privileges. Use Enter-PSSession to connect to each server and run the following cmdlet, substituting your own computer name, domain name, and domain credentials:
Add-Computer -NewName "Server01" -DomainName "contoso.com" -Credential "CONTOSOUser" -Restart -Force
If your storage administrator account isn’t a member of the Domain Admins group, add your storage administrator account to the local Administrators group on each node — or better yet, add the group you use for storage administrators. You can use the following command (or write a Windows PowerShell function to do so — see Use PowerShell to Add Domain Users to a Local Group for more info):
Net localgroup Administrators <DomainAccount> /add
Step 1.4: Install roles and features
The next step is to install server roles on every server. You can do this by using Windows Admin Center, Server Manager), or PowerShell. Here are the roles to install:
- Failover Clustering
- Hyper-V
- File Server (if you want to host any file shares, such as for a converged deployment)
- Data-Center-Bridging (if you’re using RoCEv2 instead of iWARP network adapters)
- RSAT-Clustering-PowerShell
- Hyper-V-PowerShell
To install via PowerShell, use the Install-WindowsFeature cmdlet. You can use it on a single server like this:
Install-WindowsFeature -Name "Hyper-V", "Failover-Clustering", "Data-Center-Bridging", "RSAT-Clustering-PowerShell", "Hyper-V-PowerShell", "FS-FileServer"
To run the command on all servers in the cluster as the same time, use this little bit of script, modifying the list of variables at the beginning of the script to fit your environment.
# Fill in these variables with your values
$ServerList = "Server01", "Server02", "Server03", "Server04"
$FeatureList = "Hyper-V", "Failover-Clustering", "Data-Center-Bridging", "RSAT-Clustering-PowerShell", "Hyper-V-PowerShell", "FS-FileServer"

# This part runs the Install-WindowsFeature cmdlet on all servers in $ServerList, passing the list of features into the scriptblock with the "Using" scope modifier so you don't have to hard-code them here.
Invoke-Command ($ServerList) {
    Install-WindowsFeature -Name $Using:Featurelist
}
Step 2: Configure the network
If you’re deploying Storage Spaces Direct inside virtual machines, skip this section.
Storage Spaces Direct requires high-bandwidth, low-latency networking between servers in the cluster. At least 10 GbE networking is required and remote direct memory access (RDMA) is recommended. You can use either iWARP or RoCE as long as it has the Windows Server logo that matches your operating system version, but iWARP is usually easier to set up.
[!Important]
Depending on your networking equipment, and especially with RoCE v2, some configuration of the top-of-rack switch may be required. Correct switch configuration is important to ensure reliability and performance of Storage Spaces Direct.
Windows Server 2016 introduced switch-embedded teaming (SET) within the Hyper-V virtual switch. This allows the same physical NIC ports to be used for all network traffic while using RDMA, reducing the number of physical NIC ports required. Switch-embedded teaming is recommended for Storage Spaces Direct.
Switched or switchless node interconnects
- Switched: Network switches must be properly configured to handle the bandwidth and networking type. If using RDMA that implements the RoCE protocol, network device and switch configuration is even more important.
- Switchless: Nodes can be interconnected using direct connections, avoiding using a switch. It is required that every node have a direct connection with every other node of the cluster.
For instructions to set up networking for Storage Spaces Direct, see the Windows Server 2016 and 2019 RDMA Deployment Guide.
Step 3: Configure Storage Spaces Direct
The following steps are done on a management system that is the same version as the servers being configured. The following steps should NOT be run remotely using a PowerShell session, but instead run in a local PowerShell session on the management system, with administrative permissions.
Step 3.1: Clean drives
Before you enable Storage Spaces Direct, ensure your drives are empty: no old partitions or other data. Run the following script, substituting your computer names, to remove all any old partitions or other data.
[!Warning]
This script will permanently remove any data on any drives other than the operating system boot drive!
# Fill in these variables with your values
$ServerList = "Server01", "Server02", "Server03", "Server04"

Invoke-Command ($ServerList) {
    Update-StorageProviderCache
    Get-StoragePool | ? IsPrimordial -eq $false | Set-StoragePool -IsReadOnly:$false -ErrorAction SilentlyContinue
    Get-StoragePool | ? IsPrimordial -eq $false | Get-VirtualDisk | Remove-VirtualDisk -Confirm:$false -ErrorAction SilentlyContinue
    Get-StoragePool | ? IsPrimordial -eq $false | Remove-StoragePool -Confirm:$false -ErrorAction SilentlyContinue
    Get-PhysicalDisk | Reset-PhysicalDisk -ErrorAction SilentlyContinue
    Get-Disk | ? Number -ne $null | ? IsBoot -ne $true | ? IsSystem -ne $true | ? PartitionStyle -ne RAW | % {
        $_ | Set-Disk -isoffline:$false
        $_ | Set-Disk -isreadonly:$false
        $_ | Clear-Disk -RemoveData -RemoveOEM -Confirm:$false
        $_ | Set-Disk -isreadonly:$true
        $_ | Set-Disk -isoffline:$true
    }
    Get-Disk | Where Number -Ne $Null | Where IsBoot -Ne $True | Where IsSystem -Ne $True | Where PartitionStyle -Eq RAW | Group -NoElement -Property FriendlyName
} | Sort -Property PsComputerName, Count
The output will look like this, where Count is the number of drives of each model in each server:
Count Name                          PSComputerName
----- ----                          --------------
4     ATA SSDSC2BA800G4n            Server01
10    ATA ST4000NM0033              Server01
4     ATA SSDSC2BA800G4n            Server02
10    ATA ST4000NM0033              Server02
4     ATA SSDSC2BA800G4n            Server03
10    ATA ST4000NM0033              Server03
4     ATA SSDSC2BA800G4n            Server04
10    ATA ST4000NM0033              Server04
Step 3.2: Validate the cluster
In this step, you’ll run the cluster validation tool to ensure that the server nodes are configured correctly to create a cluster using Storage Spaces Direct. When cluster validation (Test-Cluster) is run before the cluster is created, it runs the tests that verify that the configuration appears suitable to successfully function as a failover cluster. The example directly below uses the -Include parameter, and then the specific categories of tests are specified. This ensures that the Storage Spaces Direct specific tests are included in the validation.
Use the following PowerShell command to validate a set of servers for use as a Storage Spaces Direct cluster.
Test-Cluster -Node <MachineName1, MachineName2, MachineName3, MachineName4> -Include "Storage Spaces Direct", "Inventory", "Network", "System Configuration"
Step 3.3: Create the cluster
In this step, you’ll create a cluster with the nodes that you have validated for cluster creation in the preceding step using the following PowerShell cmdlet.
When creating the cluster, you’ll get a warning that states — «There were issues while creating the clustered role that may prevent it from starting. For more information, view the report file below.» You can safely ignore this warning. It’s due to no disks being available for the cluster quorum. Its recommended that a file share witness or cloud witness is configured after creating the cluster.
[!Note]
If the servers are using static IP addresses, modify the following command to reflect the static IP address by adding the following parameter and specifying the IP address:-StaticAddress <X.X.X.X>.
In the following command the ClusterName placeholder should be replaced with a netbios name that is unique and 15 characters or less.New-Cluster -Name <ClusterName> -Node <MachineName1,MachineName2,MachineName3,MachineName4> -NoStorage
After the cluster is created, it can take time for DNS entry for the cluster name to be replicated. The time is dependent on the environment and DNS replication configuration. If resolving the cluster isn’t successful, in most cases you can be successful with using the machine name of a node that is an active member of the cluster may be used instead of the cluster name.
Step 3.4: Configure a cluster witness
We recommend that you configure a witness for the cluster, so clusters with three or more servers can withstand two servers failing or being offline. A two-server deployment requires a cluster witness, otherwise either server going offline causes the other to become unavailable as well. With these systems, you can use a file share as a witness, or use cloud witness.
For more info, see the following topics:
- Configure and manage quorum
- Deploy a Cloud Witness for a Failover Cluster
Step 3.5: Enable Storage Spaces Direct
After creating the cluster, use the Enable-ClusterStorageSpacesDirect PowerShell cmdlet, which will put the storage system into the Storage Spaces Direct mode and do the following automatically:
-
Create a pool: Creates a single large pool that has a name like «S2D on Cluster1».
-
Configures the Storage Spaces Direct caches: If there is more than one media (drive) type available for Storage Spaces Direct use, it enables the fastest as cache devices (read and write in most cases)
-
Tiers: Creates two tiers as default tiers. One is called «Capacity» and the other called «Performance». The cmdlet analyzes the devices and configures each tier with the mix of device types and resiliency.
From the management system, in a PowerShell command windows opened with Administrator privileges, initiate the following command. The cluster name is the name of the cluster that you created in the previous steps. If this command is run locally on one of the nodes, the -CimSession parameter is not necessary.
Enable-ClusterStorageSpacesDirect -CimSession <ClusterName>
To enable Storage Spaces Direct using the above command, you can also use the node name instead of the cluster name. Using the node name may be more reliable due to DNS replication delays that may occur with the newly created cluster name.
When this command is finished, which may take several minutes, the system will be ready for volumes to be created.
Step 3.6: Create volumes
We recommend using the New-Volume cmdlet as it provides the fastest and most straightforward experience. This single cmdlet automatically creates the virtual disk, partitions and formats it, creates the volume with matching name, and adds it to cluster shared volumes – all in one easy step.
For more information, check out Creating volumes in Storage Spaces Direct.
Step 3.7: Optionally enable the CSV cache
You can optionally enable the cluster shared volume (CSV) cache to use system memory (RAM) as a write-through block-level cache of read operations that aren’t already cached by the Windows cache manager. This can improve performance for applications such as Hyper-V. The CSV cache can boost the performance of read requests and is also useful for Scale-Out File Server scenarios.
Enabling the CSV cache reduces the amount of memory available to run VMs on a hyper-converged cluster, so you’ll have to balance storage performance with memory available to VHDs.
To set the size of the CSV cache, open a PowerShell session on the management system with an account that has administrator permissions on the storage cluster, and then use this script, changing the $ClusterName and $CSVCacheSize variables as appropriate (this example sets a 2 GB CSV cache per server):
$ClusterName = "StorageSpacesDirect1"
$CSVCacheSize = 2048 #Size in MB

Write-Output "Setting the CSV cache..."
(Get-Cluster $ClusterName).BlockCacheSize = $CSVCacheSize

$CSVCurrentCacheSize = (Get-Cluster $ClusterName).BlockCacheSize
Write-Output "$ClusterName CSV cache size: $CSVCurrentCacheSize MB"
For more info, see Using the CSV in-memory read cache.
Step 3.8: Deploy virtual machines for hyper-converged deployments
If you’re deploying a hyper-converged cluster, the last step is to provision virtual machines on the Storage Spaces Direct cluster.
The virtual machine’s files should be stored on the systems CSV namespace (example: c:ClusterStorageVolume1) just like clustered VMs on failover clusters.
You can use in-box tools or other tools to manage the storage and virtual machines, such as System Center Virtual Machine Manager.
Step 4: Deploy Scale-Out File Server for converged solutions
If you’re deploying a converged solution, the next step is to create a Scale-Out File Server instance and setup some file shares. If you’re deploying a hyper-converged cluster — you’re finished and don’t need this section.
Step 4.1: Create the Scale-Out File Server role
The next step in setting up the cluster services for your file server is creating the clustered file server role, which is when you create the Scale-Out File Server instance on which your continuously available file shares are hosted.
To create a Scale-Out File Server role by using Server Manager
-
In Failover Cluster Manager, select the cluster, go to Roles, and then click Configure Role….
The High Availability Wizard appears. -
On the Select Role page, click File Server.
-
On the File Server Type page, click Scale-Out File Server for application data.
-
On the Client Access Point page, type a name for the Scale-Out File Server.
-
Verify that the role was successfully set up by going to Roles and confirming that the Status column shows Running next to the clustered file server role you created, as shown in Figure 1.

Figure 1 Failover Cluster Manager showing the Scale-Out File Server with the Running status

[!NOTE]
After creating the clustered role, there might be some network propagation delays that could prevent you from creating file shares on it for a few minutes, or potentially longer.
To create a Scale-Out File Server role by using Windows PowerShell
In a Windows PowerShell session that’s connected to the file server cluster, enter the following commands to create the Scale-Out File Server role, changing FSCLUSTER to match the name of your cluster, and SOFS to match the name you want to give the Scale-Out File Server role:
Add-ClusterScaleOutFileServerRole -Name SOFS -Cluster FSCLUSTER
[!NOTE]
After creating the clustered role, there might be some network propagation delays that could prevent you from creating file shares on it for a few minutes, or potentially longer. If the SOFS role fails immediately and won’t start, it might be because the cluster’s computer object doesn’t have permission to create a computer account for the SOFS role. For help with that, see this blog post: Scale-Out File Server Role Fails To Start With Event IDs 1205, 1069, and 1194.
Step 4.2: Create file shares
After you’ve created your virtual disks and added them to CSVs, it’s time to create file shares on them — one file share per CSV per virtual disk. System Center Virtual Machine Manager (VMM) is probably the handiest way to do this because it handles permissions for you, but if you don’t have it in your environment, you can use Windows PowerShell to partially automate the deployment.
Use the scripts included in the SMB Share Configuration for Hyper-V Workloads script, which partially automates the process of creating groups and shares. It’s written for Hyper-V workloads, so if you’re deploying other workloads, you might have to modify the settings or perform additional steps after you create the shares. For example, if you’re using Microsoft SQL Server, the SQL Server service account must be granted full control on the share and the file system.
[!NOTE]
You’ll have to update the group membership when you add cluster nodes unless you use System Center Virtual Machine Manager to create your shares.
To create file shares by using PowerShell scripts, do the following:
-
Download the scripts included in SMB Share Configuration for Hyper-V Workloads to one of the nodes of the file server cluster.
-
Open a Windows PowerShell session with Domain Administrator credentials on the management system, and then use the following script to create an Active Directory group for the Hyper-V computer objects, changing the values for the variables as appropriate for your environment:
# Replace the values of these variables
$HyperVClusterName = "Compute01"
$HyperVObjectADGroupSamName = "Hyper-VServerComputerAccounts" <#No spaces#>
$ScriptFolder = "C:ScriptsSetupSMBSharesWithHyperV"

# Start of script itself
CD $ScriptFolder
.ADGroupSetup.ps1 -HyperVObjectADGroupSamName $HyperVObjectADGroupSamName -HyperVClusterName $HyperVClusterName
-
Open a Windows PowerShell session with Administrator credentials on one of the storage nodes, and then use the following script to create shares for each CSV and grant administrative permissions for the shares to the Domain Admins group and the compute cluster.
# Replace the values of these variables
$StorageClusterName = "StorageSpacesDirect1"
$HyperVObjectADGroupSamName = "Hyper-VServerComputerAccounts" <#No spaces#>
$SOFSName = "SOFS"
$SharePrefix = "Share"
$ScriptFolder = "C:ScriptsSetupSMBSharesWithHyperV"

# Start of the script itself
CD $ScriptFolder
Get-ClusterSharedVolume -Cluster $StorageClusterName | ForEach-Object {
    $ShareName = $SharePrefix + $_.SharedVolumeInfo.friendlyvolumename.trimstart("C:ClusterStorageVolume")
    Write-host "Creating share $ShareName on "$_.name "on Volume: " $_.SharedVolumeInfo.friendlyvolumename
    .FileShareSetup.ps1 -HyperVClusterName $StorageClusterName -CSVVolumeNumber $_.SharedVolumeInfo.friendlyvolumename.trimstart("C:ClusterStorageVolume") -ScaleOutFSName $SOFSName -ShareName $ShareName -HyperVObjectADGroupSamName $HyperVObjectADGroupSamName
}
Step 4.3 Enable Kerberos constrained delegation
To setup Kerberos constrained delegation for remote scenario management and increased Live Migration security, from one of the storage cluster nodes, use the KCDSetup.ps1 script included in SMB Share Configuration for Hyper-V Workloads. Here’s a little wrapper for the script:
$HyperVClusterName = "Compute01"
$ScaleOutFSName = "SOFS"
$ScriptFolder = "C:ScriptsSetupSMBSharesWithHyperV"

CD $ScriptFolder
.KCDSetup.ps1 -HyperVClusterName $HyperVClusterName -ScaleOutFSName $ScaleOutFSName -EnableLM
Additional References
- Storage Spaces Direct overview
- Understand the cache in Storage Spaces Direct
- Planning volumes in Storage Spaces Direct
- Storage Spaces Fault Tolerance
- Storage Spaces Direct Hardware Requirements
- To RDMA, or not to RDMA – that is the question (TechNet blog)
| title | manager | ms.author | ms.topic | ms.assetid | author | ms.date | description |
|---|---|---|---|---|---|---|---|
|
Deploy Storage Spaces Direct on Windows Server |
femil |
inhenkel |
how-to |
20fee213-8ba5-4cd3-87a6-e77359e82bc0 |
stevenek |
11/16/2021 |
Step-by-step instructions to deploy software-defined storage with Storage Spaces Direct in Windows Server as either hyperconverged infrastructure or converged (also known as disaggregated) infrastructure. |
Deploy Storage Spaces Direct on Windows Server
Applies to: Windows Server 2022, Windows Server 2019, Windows Server 2016
This topic provides step-by-step instructions to deploy Storage Spaces Direct on Windows Server. To deploy Storage Spaces Direct as part of Azure Stack HCI, see What is the deployment process for Azure Stack HCI?
[!Tip]
Looking to acquire hyperconverged infrastructure? Microsoft recommends purchasing a validated hardware/software Azure Stack HCI solution from our partners. These solutions are designed, assembled, and validated against our reference architecture to ensure compatibility and reliability, so you get up and running quickly. To peruse a catalog of hardware/software solutions that work with Azure Stack HCI, see the Azure Stack HCI Catalog.
[!Tip]
You can use Hyper-V virtual machines, including in Microsoft Azure, to evaluate Storage Spaces Direct without hardware. You may also want to review the handy Windows Server rapid lab deployment scripts, which we use for training purposes.
Before you start
Review the Storage Spaces Direct hardware requirements and skim this document to familiarize yourself with the overall approach and important notes associated with some steps.
Gather the following information:
-
Deployment option. Storage Spaces Direct supports two deployment options: hyper-converged and converged, also known as disaggregated. Familiarize yourself with the advantages of each to decide which is right for you. Steps 1-3 below apply to both deployment options. Step 4 is only needed for converged deployment.
-
Server names. Get familiar with your organization’s naming policies for computers, files, paths, and other resources. You’ll need to provision several servers, each with unique names.
-
Domain name. Get familiar with your organization’s policies for domain naming and domain joining. You’ll be joining the servers to your domain, and you’ll need to specify the domain name.
-
RDMA networking. There are two types of RDMA protocols: iWarp and RoCE. Note which one your network adapters use, and if RoCE, also note the version (v1 or v2). For RoCE, also note the model of your top-of-rack switch.
-
VLAN ID. Note the VLAN ID to be used for management OS network adapters on the servers, if any. You should be able to obtain this from your network administrator.
Step 1: Deploy Windows Server
Step 1.1: Install the operating system
The first step is to install Windows Server on every server that will be in the cluster. Storage Spaces Direct requires Windows Server Datacenter Edition. You can use the Server Core installation option, or Server with Desktop Experience.
When you install Windows Server using the Setup wizard, you can choose between Windows Server (referring to Server Core) and Windows Server (Server with Desktop Experience), which is the equivalent of the Full installation option available in Windows Server 2012 R2. If you don’t choose, you’ll get the Server Core installation option. For more information, see Install Server Core.
Step 1.2: Connect to the servers
This guide focuses the Server Core installation option and deploying/managing remotely from a separate management system, which must have:
- A version of Windows Server or Windows 10 at least as new as the servers it’s managing, and with the latest updates
- Network connectivity to the servers it’s managing
- Joined to the same domain or a fully trusted domain
- Remote Server Administration Tools (RSAT) and PowerShell modules for Hyper-V and Failover Clustering. RSAT tools and PowerShell modules are available on Windows Server and can be installed without installing other features. You can also install the Remote Server Administration Tools on a Windows 10 management PC.
On the Management system install the Failover Cluster and Hyper-V management tools. This can be done through Server Manager using the Add Roles and Features wizard. On the Features page, select Remote Server Administration Tools, and then select the tools to install.
Enter the PS session and use either the server name or the IP address of the node you want to connect to. You’ll be prompted for a password after you execute this command, enter the administrator password you specified when setting up Windows.
Enter-PSSession -ComputerName <myComputerName> -Credential LocalHostAdministrator
Here’s an example of doing the same thing in a way that is more useful in scripts, in case you need to do this more than once:
$myServer1 = "myServer-1"
$user = "$myServer1Administrator"

Enter-PSSession -ComputerName $myServer1 -Credential $user
[!TIP]
If you’re deploying remotely from a management system, you might get an error like WinRM cannot process the request. To fix this, use Windows PowerShell to add each server to the Trusted Hosts list on your management computer:
Set-Item WSMAN:LocalhostClientTrustedHosts -Value Server01 -ForceNote: the trusted hosts list supports wildcards, like
Server*.To view your Trusted Hosts list, type
Get-Item WSMAN:LocalhostClientTrustedHosts.To empty the list, type
Clear-Item WSMAN:LocalhostClientTrustedHost.
Step 1.3: Join the domain and add domain accounts
So far you’ve configured the individual servers with the local administrator account, <ComputerName>Administrator.
To manage Storage Spaces Direct, you’ll need to join the servers to a domain and use an Active Directory Domain Services domain account that is in the Administrators group on every server.
From the management system, open a PowerShell console with Administrator privileges. Use Enter-PSSession to connect to each server and run the following cmdlet, substituting your own computer name, domain name, and domain credentials:
Add-Computer -NewName "Server01" -DomainName "contoso.com" -Credential "CONTOSOUser" -Restart -Force
If your storage administrator account isn’t a member of the Domain Admins group, add your storage administrator account to the local Administrators group on each node — or better yet, add the group you use for storage administrators. You can use the following command (or write a Windows PowerShell function to do so — see Use PowerShell to Add Domain Users to a Local Group for more info):
Net localgroup Administrators <DomainAccount> /add
Step 1.4: Install roles and features
The next step is to install server roles on every server. You can do this by using Windows Admin Center, Server Manager), or PowerShell. Here are the roles to install:
- Failover Clustering
- Hyper-V
- File Server (if you want to host any file shares, such as for a converged deployment)
- Data-Center-Bridging (if you’re using RoCEv2 instead of iWARP network adapters)
- RSAT-Clustering-PowerShell
- Hyper-V-PowerShell
To install via PowerShell, use the Install-WindowsFeature cmdlet. You can use it on a single server like this:
Install-WindowsFeature -Name "Hyper-V", "Failover-Clustering", "Data-Center-Bridging", "RSAT-Clustering-PowerShell", "Hyper-V-PowerShell", "FS-FileServer"
To run the command on all servers in the cluster as the same time, use this little bit of script, modifying the list of variables at the beginning of the script to fit your environment.
# Fill in these variables with your values
$ServerList = "Server01", "Server02", "Server03", "Server04"
$FeatureList = "Hyper-V", "Failover-Clustering", "Data-Center-Bridging", "RSAT-Clustering-PowerShell", "Hyper-V-PowerShell", "FS-FileServer"

# This part runs the Install-WindowsFeature cmdlet on all servers in $ServerList, passing the list of features into the scriptblock with the "Using" scope modifier so you don't have to hard-code them here.
Invoke-Command ($ServerList) {
    Install-WindowsFeature -Name $Using:Featurelist
}
Step 2: Configure the network
If you’re deploying Storage Spaces Direct inside virtual machines, skip this section.
Storage Spaces Direct requires high-bandwidth, low-latency networking between servers in the cluster. At least 10 GbE networking is required and remote direct memory access (RDMA) is recommended. You can use either iWARP or RoCE as long as it has the Windows Server logo that matches your operating system version, but iWARP is usually easier to set up.
[!Important]
Depending on your networking equipment, and especially with RoCE v2, some configuration of the top-of-rack switch may be required. Correct switch configuration is important to ensure reliability and performance of Storage Spaces Direct.
Windows Server 2016 introduced switch-embedded teaming (SET) within the Hyper-V virtual switch. This allows the same physical NIC ports to be used for all network traffic while using RDMA, reducing the number of physical NIC ports required. Switch-embedded teaming is recommended for Storage Spaces Direct.
Switched or switchless node interconnects
- Switched: Network switches must be properly configured to handle the bandwidth and networking type. If using RDMA that implements the RoCE protocol, network device and switch configuration is even more important.
- Switchless: Nodes can be interconnected using direct connections, avoiding using a switch. It is required that every node have a direct connection with every other node of the cluster.
For instructions to set up networking for Storage Spaces Direct, see the Windows Server 2016 and 2019 RDMA Deployment Guide.
Step 3: Configure Storage Spaces Direct
The following steps are done on a management system that is the same version as the servers being configured. The following steps should NOT be run remotely using a PowerShell session, but instead run in a local PowerShell session on the management system, with administrative permissions.
Step 3.1: Clean drives
Before you enable Storage Spaces Direct, ensure your drives are empty: no old partitions or other data. Run the following script, substituting your computer names, to remove all any old partitions or other data.
[!Warning]
This script will permanently remove any data on any drives other than the operating system boot drive!
# Fill in these variables with your values
$ServerList = "Server01", "Server02", "Server03", "Server04"

Invoke-Command ($ServerList) {
    Update-StorageProviderCache
    Get-StoragePool | ? IsPrimordial -eq $false | Set-StoragePool -IsReadOnly:$false -ErrorAction SilentlyContinue
    Get-StoragePool | ? IsPrimordial -eq $false | Get-VirtualDisk | Remove-VirtualDisk -Confirm:$false -ErrorAction SilentlyContinue
    Get-StoragePool | ? IsPrimordial -eq $false | Remove-StoragePool -Confirm:$false -ErrorAction SilentlyContinue
    Get-PhysicalDisk | Reset-PhysicalDisk -ErrorAction SilentlyContinue
    Get-Disk | ? Number -ne $null | ? IsBoot -ne $true | ? IsSystem -ne $true | ? PartitionStyle -ne RAW | % {
        $_ | Set-Disk -isoffline:$false
        $_ | Set-Disk -isreadonly:$false
        $_ | Clear-Disk -RemoveData -RemoveOEM -Confirm:$false
        $_ | Set-Disk -isreadonly:$true
        $_ | Set-Disk -isoffline:$true
    }
    Get-Disk | Where Number -Ne $Null | Where IsBoot -Ne $True | Where IsSystem -Ne $True | Where PartitionStyle -Eq RAW | Group -NoElement -Property FriendlyName
} | Sort -Property PsComputerName, Count
The output will look like this, where Count is the number of drives of each model in each server:
Count Name                          PSComputerName
----- ----                          --------------
4     ATA SSDSC2BA800G4n            Server01
10    ATA ST4000NM0033              Server01
4     ATA SSDSC2BA800G4n            Server02
10    ATA ST4000NM0033              Server02
4     ATA SSDSC2BA800G4n            Server03
10    ATA ST4000NM0033              Server03
4     ATA SSDSC2BA800G4n            Server04
10    ATA ST4000NM0033              Server04
Step 3.2: Validate the cluster
In this step, you’ll run the cluster validation tool to ensure that the server nodes are configured correctly to create a cluster using Storage Spaces Direct. When cluster validation (Test-Cluster) is run before the cluster is created, it runs the tests that verify that the configuration appears suitable to successfully function as a failover cluster. The example directly below uses the -Include parameter, and then the specific categories of tests are specified. This ensures that the Storage Spaces Direct specific tests are included in the validation.
Use the following PowerShell command to validate a set of servers for use as a Storage Spaces Direct cluster.
Test-Cluster -Node <MachineName1, MachineName2, MachineName3, MachineName4> -Include "Storage Spaces Direct", "Inventory", "Network", "System Configuration"
Step 3.3: Create the cluster
In this step, you’ll create a cluster with the nodes that you have validated for cluster creation in the preceding step using the following PowerShell cmdlet.
When creating the cluster, you’ll get a warning that states — «There were issues while creating the clustered role that may prevent it from starting. For more information, view the report file below.» You can safely ignore this warning. It’s due to no disks being available for the cluster quorum. Its recommended that a file share witness or cloud witness is configured after creating the cluster.
[!Note]
If the servers are using static IP addresses, modify the following command to reflect the static IP address by adding the following parameter and specifying the IP address:-StaticAddress <X.X.X.X>.
In the following command the ClusterName placeholder should be replaced with a netbios name that is unique and 15 characters or less.New-Cluster -Name <ClusterName> -Node <MachineName1,MachineName2,MachineName3,MachineName4> -NoStorage
After the cluster is created, it can take time for DNS entry for the cluster name to be replicated. The time is dependent on the environment and DNS replication configuration. If resolving the cluster isn’t successful, in most cases you can be successful with using the machine name of a node that is an active member of the cluster may be used instead of the cluster name.
Step 3.4: Configure a cluster witness
We recommend that you configure a witness for the cluster, so clusters with three or more servers can withstand two servers failing or being offline. A two-server deployment requires a cluster witness, otherwise either server going offline causes the other to become unavailable as well. With these systems, you can use a file share as a witness, or use cloud witness.
For more info, see the following topics:
- Configure and manage quorum
- Deploy a Cloud Witness for a Failover Cluster
Step 3.5: Enable Storage Spaces Direct
After creating the cluster, use the Enable-ClusterStorageSpacesDirect PowerShell cmdlet, which will put the storage system into the Storage Spaces Direct mode and do the following automatically:
-
Create a pool: Creates a single large pool that has a name like «S2D on Cluster1».
-
Configures the Storage Spaces Direct caches: If there is more than one media (drive) type available for Storage Spaces Direct use, it enables the fastest as cache devices (read and write in most cases)
-
Tiers: Creates two tiers as default tiers. One is called «Capacity» and the other called «Performance». The cmdlet analyzes the devices and configures each tier with the mix of device types and resiliency.
From the management system, in a PowerShell command windows opened with Administrator privileges, initiate the following command. The cluster name is the name of the cluster that you created in the previous steps. If this command is run locally on one of the nodes, the -CimSession parameter is not necessary.
Enable-ClusterStorageSpacesDirect -CimSession <ClusterName>
To enable Storage Spaces Direct using the above command, you can also use the node name instead of the cluster name. Using the node name may be more reliable due to DNS replication delays that may occur with the newly created cluster name.
When this command is finished, which may take several minutes, the system will be ready for volumes to be created.
Step 3.6: Create volumes
We recommend using the New-Volume cmdlet as it provides the fastest and most straightforward experience. This single cmdlet automatically creates the virtual disk, partitions and formats it, creates the volume with matching name, and adds it to cluster shared volumes – all in one easy step.
For more information, check out Creating volumes in Storage Spaces Direct.
Step 3.7: Optionally enable the CSV cache
You can optionally enable the cluster shared volume (CSV) cache to use system memory (RAM) as a write-through block-level cache of read operations that aren’t already cached by the Windows cache manager. This can improve performance for applications such as Hyper-V. The CSV cache can boost the performance of read requests and is also useful for Scale-Out File Server scenarios.
Enabling the CSV cache reduces the amount of memory available to run VMs on a hyper-converged cluster, so you’ll have to balance storage performance with memory available to VHDs.
To set the size of the CSV cache, open a PowerShell session on the management system with an account that has administrator permissions on the storage cluster, and then use this script, changing the $ClusterName and $CSVCacheSize variables as appropriate (this example sets a 2 GB CSV cache per server):
$ClusterName = "StorageSpacesDirect1"
$CSVCacheSize = 2048 #Size in MB

Write-Output "Setting the CSV cache..."
(Get-Cluster $ClusterName).BlockCacheSize = $CSVCacheSize

$CSVCurrentCacheSize = (Get-Cluster $ClusterName).BlockCacheSize
Write-Output "$ClusterName CSV cache size: $CSVCurrentCacheSize MB"
For more info, see Using the CSV in-memory read cache.
Step 3.8: Deploy virtual machines for hyper-converged deployments
If you’re deploying a hyper-converged cluster, the last step is to provision virtual machines on the Storage Spaces Direct cluster.
The virtual machine’s files should be stored on the systems CSV namespace (example: c:ClusterStorageVolume1) just like clustered VMs on failover clusters.
You can use in-box tools or other tools to manage the storage and virtual machines, such as System Center Virtual Machine Manager.
Step 4: Deploy Scale-Out File Server for converged solutions
If you’re deploying a converged solution, the next step is to create a Scale-Out File Server instance and setup some file shares. If you’re deploying a hyper-converged cluster — you’re finished and don’t need this section.
Step 4.1: Create the Scale-Out File Server role
The next step in setting up the cluster services for your file server is creating the clustered file server role, which is when you create the Scale-Out File Server instance on which your continuously available file shares are hosted.
To create a Scale-Out File Server role by using Server Manager
-
In Failover Cluster Manager, select the cluster, go to Roles, and then click Configure Role….
The High Availability Wizard appears. -
On the Select Role page, click File Server.
-
On the File Server Type page, click Scale-Out File Server for application data.
-
On the Client Access Point page, type a name for the Scale-Out File Server.
-
Verify that the role was successfully set up by going to Roles and confirming that the Status column shows Running next to the clustered file server role you created, as shown in Figure 1.
Figure 1 Failover Cluster Manager showing the Scale-Out File Server with the Running status
[!NOTE]
After creating the clustered role, there might be some network propagation delays that could prevent you from creating file shares on it for a few minutes, or potentially longer.
To create a Scale-Out File Server role by using Windows PowerShell
In a Windows PowerShell session that’s connected to the file server cluster, enter the following commands to create the Scale-Out File Server role, changing FSCLUSTER to match the name of your cluster, and SOFS to match the name you want to give the Scale-Out File Server role:
Add-ClusterScaleOutFileServerRole -Name SOFS -Cluster FSCLUSTER
[!NOTE]
After creating the clustered role, there might be some network propagation delays that could prevent you from creating file shares on it for a few minutes, or potentially longer. If the SOFS role fails immediately and won’t start, it might be because the cluster’s computer object doesn’t have permission to create a computer account for the SOFS role. For help with that, see this blog post: Scale-Out File Server Role Fails To Start With Event IDs 1205, 1069, and 1194.
Step 4.2: Create file shares
After you’ve created your virtual disks and added them to CSVs, it’s time to create file shares on them — one file share per CSV per virtual disk. System Center Virtual Machine Manager (VMM) is probably the handiest way to do this because it handles permissions for you, but if you don’t have it in your environment, you can use Windows PowerShell to partially automate the deployment.
Use the scripts included in the SMB Share Configuration for Hyper-V Workloads script, which partially automates the process of creating groups and shares. It’s written for Hyper-V workloads, so if you’re deploying other workloads, you might have to modify the settings or perform additional steps after you create the shares. For example, if you’re using Microsoft SQL Server, the SQL Server service account must be granted full control on the share and the file system.
[!NOTE]
You’ll have to update the group membership when you add cluster nodes unless you use System Center Virtual Machine Manager to create your shares.
To create file shares by using PowerShell scripts, do the following:
-
Download the scripts included in SMB Share Configuration for Hyper-V Workloads to one of the nodes of the file server cluster.
-
Open a Windows PowerShell session with Domain Administrator credentials on the management system, and then use the following script to create an Active Directory group for the Hyper-V computer objects, changing the values for the variables as appropriate for your environment:
# Replace the values of these variables
$HyperVClusterName = "Compute01"
$HyperVObjectADGroupSamName = "Hyper-VServerComputerAccounts" <#No spaces#>
$ScriptFolder = "C:ScriptsSetupSMBSharesWithHyperV"

# Start of script itself
CD $ScriptFolder
.ADGroupSetup.ps1 -HyperVObjectADGroupSamName $HyperVObjectADGroupSamName -HyperVClusterName $HyperVClusterName
-
Open a Windows PowerShell session with Administrator credentials on one of the storage nodes, and then use the following script to create shares for each CSV and grant administrative permissions for the shares to the Domain Admins group and the compute cluster.
# Replace the values of these variables
$StorageClusterName = "StorageSpacesDirect1"
$HyperVObjectADGroupSamName = "Hyper-VServerComputerAccounts" <#No spaces#>
$SOFSName = "SOFS"
$SharePrefix = "Share"
$ScriptFolder = "C:ScriptsSetupSMBSharesWithHyperV"

# Start of the script itself
CD $ScriptFolder
Get-ClusterSharedVolume -Cluster $StorageClusterName | ForEach-Object {
    $ShareName = $SharePrefix + $_.SharedVolumeInfo.friendlyvolumename.trimstart("C:ClusterStorageVolume")
    Write-host "Creating share $ShareName on "$_.name "on Volume: " $_.SharedVolumeInfo.friendlyvolumename
    .FileShareSetup.ps1 -HyperVClusterName $StorageClusterName -CSVVolumeNumber $_.SharedVolumeInfo.friendlyvolumename.trimstart("C:ClusterStorageVolume") -ScaleOutFSName $SOFSName -ShareName $ShareName -HyperVObjectADGroupSamName $HyperVObjectADGroupSamName
}
Step 4.3 Enable Kerberos constrained delegation
To setup Kerberos constrained delegation for remote scenario management and increased Live Migration security, from one of the storage cluster nodes, use the KCDSetup.ps1 script included in SMB Share Configuration for Hyper-V Workloads. Here’s a little wrapper for the script:
$HyperVClusterName = "Compute01"
$ScaleOutFSName = "SOFS"
$ScriptFolder = "C:ScriptsSetupSMBSharesWithHyperV"

CD $ScriptFolder
.KCDSetup.ps1 -HyperVClusterName $HyperVClusterName -ScaleOutFSName $ScaleOutFSName -EnableLM
Additional References
- Storage Spaces Direct overview
- Understand the cache in Storage Spaces Direct
- Planning volumes in Storage Spaces Direct
- Storage Spaces Fault Tolerance
- Storage Spaces Direct Hardware Requirements
- To RDMA, or not to RDMA – that is the question (TechNet blog)
Posey’s Tips & Tricks
How To Use Storage Spaces in Windows Server 2016, Part 1
In this introduction to Microsoft’s Storage Spaces technology, Brien walks you through the steps of creating a storage space and a virtual disk.

- Read Part 2 here.
Storage Spaces (not to be confused with Storage Spaces Direct) has been a part of Windows Server since the days of Windows Server 2012, and provides an easy way for you to create software-defined storage using a server’s local storage resources.
To set up Windows Storage Spaces, open Server Manager and click on the File and Storage Services tab, and then click on Storage Pools.
As you can see in Figure 1, Windows Server is initially equipped with a primordial pool. The primordial pool is created by default, and is essentially a repository for disks that are available for use in a storage pool that you create. A disk can only belong to a single storage pool.
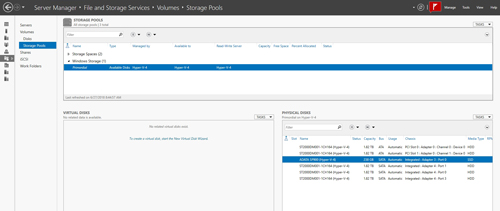
Incidentally, if a disk is missing from the primordial pool, you can add it by choosing the Add Physical Disk option from the Task drop-down.
To create a storage pool, choose the New Storage Pool option from the Task drop-down. This will cause Windows to launch the New Storage Pool Wizard. Click Next to bypass the wizard’s Welcome screen, and you will be asked to enter a name for the storage pool that you are creating. You will also be prompted to select the primordial pool that you want to use. In most cases, though, there will only be one primordial pool available for your use.
Click Next, and you will be taken to a screen that asks you to select the physical disks that you want to include in the storage pool. For each disk, there is a drop-down that you can use to configure the disk allocation. You can choose to automatically allocate a disk, use it as a hot spare or manually allocate the disk, as shown in Figure 2.
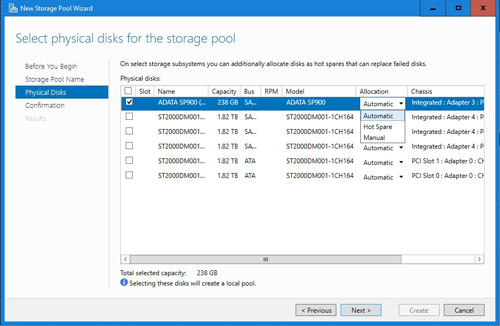
Click Next, and you will see a confirmation of the choices that you have made. Assuming that everything appears to be correct, go ahead and click the Create button to create the new storage pool.
When you finish creating the storage pool, you should see the storage pool listed in the window’s upper pane. If you select your storage pool, you should see the lower-right pane display the disks that make up the storage pool, as shown in Figure 3.

Now that the storage pool has been created, the next step in the process is to create one or more virtual disks. A virtual disk is really just a logical storage structure, and is not the same thing as a Hyper-V virtual disk. To create a virtual disk, choose the New Virtual Disk command from the Task drop-down that is located in the Virtual Disks section.
At this point, you will be prompted to choose the storage pool on which you wish to create the virtual disk. Make your selection and click OK. Now, Windows will launch the Virtual Disk Wizard.
Click Next to bypass the wizard’s Welcome screen. You will now be taken to a screen that asks you to provide a name for the virtual disk. This screen also contains a checkbox that you can select if you wish to create tiered storage. You would select this checkbox if your storage pool contains a mixture of SSDs and HDDs, and you want to create a high-speed tier and a standard tier.
Click Next, and you will be taken to a screen that asks if you want to use enclosure resiliency. Make your selection, and click Next.
Now, you will see a screen asking you to select the storage layout. The choices that are presented here depend on the number and type of disks in the storage pool, and whether or not you have opted to use tiered storage. You will typically be able to choose between simple, mirrored and parity storage. Make your selection and click Next.
The next screen that you will see asks if you want to use thin or fixed provisioning. One thing to keep in mind is that if you opted to use tiered storage, then you will have to use fixed provisioning.
Click Next, and you will be taken to a screen that asks you to choose the size for the virtual disk that you want to create. If you look at Figure 4, you will notice that I am able to specify the size of both the fast tier and the standard tier. It is also possible to specify the size manually, or to select the Maximum Size option.
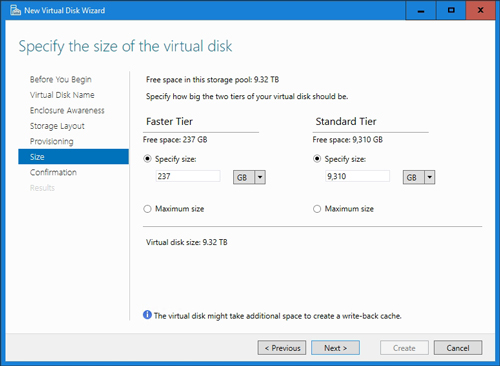
Click Next, and you will be taken to a summary screen that you can use to review the choices that you have made. Assuming that everything on this screen looks good, click the Create button to create the virtual disk.
Even though we have created a virtual disk, it is not quite ready to use yet. I will show you the rest of the setup process in Part 2 here.
About the Author
Brien Posey is a 21-time Microsoft MVP with decades of IT experience. As a freelance writer, Posey has written thousands of articles and contributed to several dozen books on a wide variety of IT topics. Prior to going freelance, Posey was a CIO for a national chain of hospitals and health care facilities. He has also served as a network administrator for some of the country’s largest insurance companies and for the Department of Defense at Fort Knox. In addition to his continued work in IT, Posey has spent the last several years actively training as a commercial scientist-astronaut candidate in preparation to fly on a mission to study polar mesospheric clouds from space. You can follow his spaceflight training on his Web site.
Technology description
Storage Spaces enables cost-effective, highly available, scalable, and flexible storage solutions for business-critical (virtual or physical) deployments. Storage Spaces delivers sophisticated storage virtualization capabilities, which empower customers to use industry-standard storage for single computer and scalable multi-node deployments. It is appropriate for a wide range of customers, including enterprise and cloud hosting companies, which use Windows Server for highly available storage that can cost-effectively grow with demand.
With Storage Spaces the Windows storage stack has been fundamentally enhanced to incorporate two new abstractions:
- Storage pools. A collection of physical disks that enable you to aggregate disks, expand capacity in a flexible manner, and delegate administration.
- Storage spaces. Virtual disks created from free space in a storage pool. Storage spaces have such attributes as resiliency level, storage tiers, fixed provisioning, and precise administrative control.
Storage Spaces is integrated with failover clustering for high availability, and it’s integrated with cluster shared volumes (CSV) for scale-out file server deployments. You can manage Storage Spaces through:
- System Center Virtual Machine Manager
- Failover Cluster Manager
- Server Manager
- Windows PowerShell
- Windows Management Instrumentation (WMI)
Important functionality Storage Spaces includes the following features:
- Storage pools. Storage pools are the fundamental building blocks for Storage Spaces. Storage administrators are already familiar with this concept, obviating the need to learn a new model. They can flexibly create storage pools based on the needs of the deployment. For example, given a set of physical disks, an administrator can create one pool (by using all the available physical disks) or multiple pools (by dividing the physical disks as required). Furthermore, to maximize the value from storage hardware, the administrator can combine hard disks and solid-state drives (SSDs) in the same pool, using storage tiers to move frequently accessed portions of files to SSD storage, and using write-back caches to buffer small random writes to SSD storage. Pools can be expanded dynamically by simply adding additional disks, thereby seamlessly scaling to cope with data growth.
- Resilient storage. Storage Spaces provides three storage layouts (also known as resiliency types):
- Mirror. Writes data in a stripe across multiple disks while also writing one or two extra copies of the data. Use the mirror layout for most workloads – it helps protect your data from disk failures and provides great performance, especially when you add some SSDs to your storage pool and use storage tiers.
- Parity. Writes data in a stripe across physical disks while also writing one or two copies of parity information. Use the parity layout for archival and streaming media workloads, or other workloads where you want to maximize capacity and you’re OK with lower write performance.
- Simple (no resiliency). Writes data in a stripe across physical disks without any extra copies or parity information. Because the simple layout doesn’t provide any protection from disk failures, use it only when you require the highest performance and capacity and you’re OK with losing or recreating the data if a disk fails. You can also use the simple layout when your application provides its own data protection.
Additionally, Storage Spaces can automatically repair mirror and parity spaces in which a disk fails by using dedicated disks that are reserved for replacing failed disks (hot spares), or more rapidly by using spare capacity on other disks in the pool. Storage Spaces also includes background scrubbing and intelligent error correction to allow continuous service availability despite storage component failures. In the event of a power failure or cluster failover, the integrity of data is preserved so that recovery happens quickly without lost data.
- Continuous availability. Storage Spaces is integrated with failover clustering, which allows it to deliver continuously available service deployments. One or more pools can be clustered across multiple nodes within a single cluster. Storage spaces are accessed by one node, and the storage will seamlessly fail over to a different node when necessary (in response to failure conditions or due to load balancing). Integration with CSVs permits scale-out access to data.
- Storage tiers. Storage tiers combine the best attributes of SSDs and hard disk drives (HDDs) by letting you create virtual disks with two tiers of storage – an SSD tier for frequently accessed data, and a HDD tier for less-frequently accessed data. New data is generally written to the HDD tier and then Storage Spaces transparently moves data at a sub-file level between the two tiers based on how frequently data is accessed. As a result, storage tiers can dramatically increase performance for the most used (“hot”) data by moving it to SSD storage, without sacrificing the ability to store large quantities of data on inexpensive HDDs.
- Write-back cache. Storage Spaces in Windows Server 2016 supports creating a write-back cache that uses a small amount of space on existing SSDs in the pool to buffer small random writes. Random writes, which often dominate common enterprise workloads, are directed to SSDs and later are written to HDDs.
- Operational simplicity. The Windows Storage Management API, WMI, and Windows PowerShell permit full scripting and remote management. Storage Spaces can also be easily managed through the File and Storage Services role in Server Manager and through System Center Virtual Machine Manager. Storage Spaces also provides notifications when the amount of available capacity in a storage pool hits a configurable threshold.
- Multitenancy. Administration of storage pools can be controlled through access control lists (ACLs) and delegated on a per-pool basis, thereby supporting hosting scenarios that require tenant isolation. Storage Spaces follows the familiar Windows security model; therefore, it can be fully integrated with Active Directory Domain Services.
For this Demo, I’m using my DC-CLOUD.Windows.ae server.
So lets get started. be patient.. this going to be a long step by step,
01 – Create a storage from six disks on Hyper-v server. (Please Refer to the Pictures)
1 – Hard Drive and click Add.

2 – Now we need to create a new virtual hard disk. Click new to create new virtual harddisk.

3 – Just Click Next.

4 – You have three options to choose disk type – Fixed Size, dynamically expanding and Differencing. In this case, I am going with dynamically.

5 – Specify Name and location.


6 – You can create a blank virtual hard disk or copy the contents of an existing physical disk.

7 – Summary of your new virtual hard disk which we are creating and click
Okay below to create your new virtual hard disk.

8 – Once Hyper-V completed it process of creating new virtual hard disk, this is how you should see the end result.

02 – Create a storage pool from six disks that are attached to the server
1 – On Dc-CLOUD, click Start, and then click Server Manager.

2 – In Server Manager, in the left pane, click File and Storage Services, and then in the Servers pane, click Storage Pools.

3 – In the STORAGE POOLS pane, click TASKS, and then, in the TASKS drop-down list, click New Storage Pool.

4 – In the New Storage Pool Wizard, on the Before you begin page, click Next.

5 – On the Specify a storage pool name and subsystem page, in the Name text box, type
StoragePool1, and then click Next.

6 – On the Select physical disks for the storage pool page, select the first six disks in the Physical disks list and then click Next.


7 – On the Confirm selections page, click Create.

8 – On the View results page, wait until the task completes, and then click Close.

03 – Create a three-way mirrored virtual disk (need at least five physical disks)
1 – On DC-CLOUD, in Server Manager, in the Storage Pools pane, click StoragePool1.

2 – In the VIRTUAL DISKS pane, click TASKS, and then, from the TASKS drop-down list, click New Virtual Disk.

3 – Click Okay.

4 – In the New Virtual Disk Wizard, on the Before you begin page, click Next.

5 – On the Specify the virtual disk name page, in the Name text box, type Mirrored Disk, and then click Next. 
6 – On the Specify enclosure resiliency page, click Next.

7 – On the Select the storage layout page, in the Layout list, click Mirror, and then click Next.

8 – On the Configure the resiliency settings page, click Three-way mirror, and then click Next.

9 – On the Specify the provisioning type page, click Thin, and then click Next.

10 – On the Specify the size of the virtual disk page, in the Specify size text box, type 10, and then click Next.

11 – On the Confirm selections page, click Create.

12 – On the View results page, wait until the task completes.
 Ensure that the Create a volume when this wizard closes check box is selected, and then click Close.
13 – In the New Volume Wizard window, on the Before you begin page, click Next.

14 – On the Select the server and disk page, in the Disk pane, click the Mirrored Disk virtual disk, and then click Next.

15 – On the Specify the size of the volume page, click Next to confirm the default selection.

16 – On the Assign to a drive letter or folder page, in the Drive letter drop-down list, ensure that E is selected, and then click Next.

17 – On the Select file system settings page, in the File system drop-down list, click ReFS, in the Volume label text box, type New Volume, and then click Next.

18 – On the Confirm selections page, click Create.

19 – On the Completion page, wait until the creation completes, and then click Close.

04 – Copy a file to the volume, and verify it is visible in File Explorer
1 – On DC-CLOUD, click Start, on the Start screen, type command prompt, and then press Enter.

2 – When you receive the command prompt, type the following command, and then press Enter:
Copy C:windowssystem32write.exe E:
3 – Close Command Prompt.

4 – On the taskbar, click the File Explorer icon.

5 – In the File Explorer window, in the navigation pane, click New Volume (E:). and Verify that write.exe is visible in the file list.
 Close File Explorer.
05 – Remove a physical drive to simulate drive failure (Please Refer to the Pictures)
1 – On the host computer, open Hyper-V Manager. the Virtual Machines pane, right-click DC-Server=Win 2016, and then click Settings.

2 – In Settings for DC-Server=Win 2016, in the Hardware pane, click the hard drive that begins with DC-Server=Win 2016–Hard Disk 06.

4 – In the Hard Drive pane, click Remove, click OK, and then click Continue.


06 – Verify that the file is still available
1 – Switch to DC-CLOUD SERVER, and On the taskbar, click the File Explorer icon.
2 – In the File Explorer window, in the navigation pane, click New Volume (E:).
In the file list pane, verify that write.exe is still available. then Close File Explorer.
3 – In Server Manager, in the STORAGE POOLS pane, on the menu bar, click Refresh “Storage Pools”.

4 – In the VIRTUAL DISK pane, right-click Mirrored Disk, and then click Properties.

5 – In the Mirrored Disk Properties dialog box, in the left pane, click Health.
 Notice that the Health Status indicates a warning. The Operational Status should indicate one or more of the following: Incomplete, Unknown, or Degraded.
07 – Add a new disk to the storage pool and remove the broken disk
1 – On DC-CLOUD, in Server Manager, in the STORAGE POOLS pane, on the menu bar, click Refresh “Storage Pools”, In the STORAGE POOLS pane, right-click StoragePool1, and then click Add Physical Disk.

2 – In the Add Physical Disk window, click the first disk in the list, and then click OK.

3 – Right-click Start, and then click Windows PowerShell (Admin).

4 – In Windows PowerShell, type the following command, and then press Enter:
Get-PhysicalDisk
5 – Note the FriendlyName for the disk that shows an OperationalStatus of Lost Communication.

6 – In Windows PowerShell, type the following command, and then press Enter:
$Disk = Get-PhysicalDisk -FriendlyName “diskname”

Replace diskname with the name of the disk that you noted in Step 6.
7 – In Windows PowerShell, type the following command, and then press Enter:
Remove-PhysicalDisk -PhysicalDisks $disk -StoragePoolFriendlyName StoragePool1

8 – In Windows PowerShell, type A, and then press Enter.

9 – In Server Manager, in the STORAGE POOLS pane, on the menu bar, click the Refresh “Storage Pools” button to see the warnings disappear.

Results: After completing this exercise, you will have successfully created a storage pool and added five disks to it. Additionally, you should have created a three-way mirrored, thinly-provisioned virtual disk from the storage pool. You also should have copied a file to the new volume and then verified that it is accessible. Next, after removing a physical drive, you should have verified that the virtual disk was still available and that you could access it. Finally, you should have added another physical disk to the storagepool.
that’s all for now.., any Doubts type a commend.. 🙂