Sublime Text provides build systems to allow users to run external programs.
Examples of common uses for build systems include: compiling, transpiling,
linting, and executing tests.
Build systems are specified via JSON and saved in a file with the
extension .sublime-build. A new build system can be created by
the menu item or the Build: command palette entry.
New Build System
Build systems have various ways they can associate themselves with files and
projects. Using this information, Sublime Text can intelligently display only
viable build systems to the user. The built-in exec target
provides common options to get up and running quickly. For more complex
requirements, build systems can target custom Sublime Text commands written in
Python.
-
Basic Example
-
Usage
-
Options
-
exec Target Options
-
Custom Options
-
Variables
-
Advanced Example
Basic Example🔗
The following is a basic example of a build system. This build system will
execute the currently-open Python file.
{
    "cmd": ["python", "$file"],
    "selector": "source.python",
    "file_regex": "^\s*File "(...*?)", line ([0-9]*)"
}
The Usage and Options sections will discuss how to use and customize a
build system.
Usage🔗
Build systems include the following functionality:
-
Automatic selection of a build system based on file type
-
Remembering the last used build system
-
Navigation of build system results
-
Ability to cancel a build
Running a Build🔗
A build can be run by one of the following methods:
|
Keyboard |
Menu |
||
|---|---|---|---|
|
Windows/Linux |
Mac |
All |
|
|
Ctrl+B |
⌘+B |
F7 |
Output will be shown in an output panel displayed at the bottom of the Sublime
Text window.
Selecting a Build System🔗
By default, Sublime Text uses automatic selection of build systems. When a user
invokes a build, the current file’s syntax and filename will be used to pick
the appropriate build system.
If more than one build system matches the current file type, the user will be
prompted to pick the build system they wish to use. Once a build system has
been selected, Sublime Text will remember it until the user changes their
selection.
To manually choose a build system, use:
To change the build system, within the viable options, use one of the following
methods:
|
Keyboard |
Menu |
Command Palette |
|
|---|---|---|---|
|
Windows/Linux |
Mac |
|
|
|
Ctrl+Shift+B |
⇧+⌘+B |
Navigating Results🔗
Build systems allow navigation of files specified in the build output. Typically
this is used to jump to the location of errors. Navigation can be performed
via:
|
Command |
Keyboard |
Menu |
|---|---|---|
|
Next Result |
F4 |
|
|
Previous Result |
Shift+F4 |
Cancelling a Build🔗
An in-process build can be cancelled via:
|
Keyboard |
Menu |
Command Palette |
|
|---|---|---|---|
|
Windows/Linux |
Mac |
|
|
|
Ctrl+Break |
Ctrl+C |
Options🔗
All build systems may use the following top-level keys in
the .sublime-build file:
- «selector» string🔗
-
A selector to match the syntax that this build system should
be enabled for.Example:
"source.python"
- «file_patterns» array of strings🔗
-
Patterns of file names the build system should be enabled
for.Example:
["*.py"]
- «keyfiles» array of strings🔗
-
File names, if present in one of the opened folders, that will cause the
build system to be enabled.Example:
["Makefile"]
- «variants» array of objects🔗
-
Subsidiary build systems that will inherit the options from the top-level
build system. Each variant needs to specify a"name"key, and may
override or add options to the top-level build system.Example:
[
    {
        "name": "Debug Symbols",
        "cmd": ["my_command", "-D", "$file"]
    }
]
- «cancel» string, array of strings🔗
-
A string command name, or an array of string options.
If a string is specified, the command specified will be used to cancel the
build.If an array of strings, the primary
"target"will be called, with these
options added on. This only needs to be specified when using a custom
"target".Examples:
"cancel_my_build"or{ "kill": true }
- «target» string🔗
-
The command to run when the build system is invoked. The default value of
execallows use of the additional options specified in exec Target
Options.If a value other than
"exec"is specified, none of the options in exec
Target Options will do anything.See the Advanced Example for a complete example.
Example:
"my_build"
- «windows» object🔗
-
Options to use when the build system is being executed on a Windows
machine.Example:
{
    "cmd": ["my_command.exe", "/D", "$file"]
}
- «osx» object🔗
-
Options to use when the build system is being executed on a Mac machine.
Example:
{
    "cmd": ["/Applications/MyProgram.app/Contents/MacOS/my_command", "-d", "$file"]
}
- «linux» object🔗
-
Options to use when the build system is being executed on a Linux machine.
Example:
{
    "cmd": ["/usr/local/bin/my_command", "-d", "$file"]
}
exec Target Options🔗
The default target of exec is used by the majority of build systems. It
provides the following options to control what program to execute, and how to
display the results.
- «cmd» array of strings🔗
-
The executable to run, plus any arguments to pass to it. Shell constructs
such as piping and redirection are not supported – see"shell_cmd".May use variables.
Example:
["my_command", "-d", "$file"]
- «shell_cmd» string🔗
-
A shell command to execute. Unlike the
"cmd"option, this does allow
piping and redirection. Will usebashon Mac and Linux machine, and
cmd.exeon Windows.This takes precedence over
"cmd". If you want to override the
"shell_cmd"in a build variant with a"cmd"then also set the
"shell_cmd"tonull.May use variables.
Example:
"my_command "$file" | other_command"
- «working_dir» string🔗
-
The directory to execute the
"cmd"or"shell_cmd"within.May use variables.
Example:
"$file_path"
- «file_regex» string🔗
-
A regular expression to run on the build output to match file information.
The matched file information is used to enable result navigation. The regex
should capture 2, 3 or 4 groups.The capture groups should be:
-
filename
-
line number
-
column number
-
message
Example:
"^s*(\S[^:]*)\((\d+):(\d+)\): ([^\n]+)" -
- «line_regex» string🔗
-
A regular expression to run on the build output to match line information.
The matched file information is used to enable result navigation. The regex
should capture 1, 2 or 3 groups.The groups should capture:
-
line number
-
column number
-
error message
This regular expression is only necessary when some results contain strictly
a line number, line and column numbers, or line and column numbers with a
message. When such a match is made, the"file_regex"option will be used
to search backwards to find the appropriate file name.Example:
"^s*line (\d+) col (\d+): ([^\n]+)" -
- «encoding» string🔗
-
The encoding of the build system output. Uses Python codec names. Defaults to
"utf-8".Example:
"iso-8859-1"
- «env» object🔗
-
Environment variable values to use when running the
"cmd"or
"shell_cmd".Example:
{
    "PYTHONIOENCODING": "utf-8"
}
- «quiet» boolean🔗
-
Reduces the amount of output about the build system invocation.
Example:
true
- «word_wrap» boolean🔗
-
Turns on word wrapping in the build system output panel.
Example:
true
- «syntax» string🔗
-
The syntax file to use to highlight the build system output panel.
Example:
"Packages/JavaScript/JSON.sublime-syntax"
Custom Options🔗
When implementing a command to act as a build system target, the command’s
keyword arguments are available via options in the .sublime-build file.
However, certain parameter names will not work since they conflict with
built-in build system functionality.
The following names will not be passed as arguments to commands. This also
applies to other situations, such as options specified in the "cancel",
"linux", "osx" and "windows" options.
-
"cancel" -
"file_patterns" -
"keyfile" -
"keyfiles" -
"linux" -
"osx" -
"save_untitled_files" -
"selector" -
"target" -
"variants" -
"windows"
Variables🔗
The following variables will be expanded within any string specified in the
"cmd", "shell_cmd" or "working_dir" options.
If a literal $ needs to be specified in one of these options, it must be
escaped with a . Since JSON uses backslashes for escaping also, $ will
need to be written as \$.
Please note that this substitution will occur for any <span
class=”key”>”target”</span>. If a custom target is used, it may implement
variable expansion for additional options by using
sublime.expand_variables() with the result from
self.window.extract_variables(). </p>
|
Variable |
Description |
|---|---|
|
|
The path to the Packages/ folder. |
|
|
The platform Sublime Text is running on: |
|
|
The full path, including folder, to the file in the active view. |
|
|
The path to the folder that contains the file in the active view. |
|
|
The file name (sans folder path) of the file in the active view. |
|
|
The file name, exluding the extension, of the file in the active view. |
|
|
The extension of the file name of the file in the active view. |
|
|
The full path to the first folder open in the side bar. |
|
|
The full path to the current project file. |
|
|
The path to the folder containing the current project file. |
|
|
The file name (sans folder path) of the current project file. |
|
|
The file name, excluding the extension, of the current project file. |
|
|
The extension of the current project file. |
Advanced Example🔗
The following example shows a custom target command, with the ability to
cancel a build and navigate results.
A target for a build system should be a sublime_plugin.WindowCommand. This
will provide the instance variable of self.window to allow interaction with
the current project, window and active view.
Please note that the following example is somewhat simplistic in its
implementation, and it won’t handle many common edge cases.
The following Python can be saved to a file
named Package/User/my_example_build.py:
import sublime
import sublime_plugin

import subprocess
import threading
import os


class MyExampleBuildCommand(sublime_plugin.WindowCommand):

    encoding = 'utf-8'
    killed = False
    proc = None
    panel = None
    panel_lock = threading.Lock()

    def is_enabled(self, lint=False, integration=False, kill=False):
        # The Cancel build option should only be available
        # when the process is still running
        if kill:
            return self.proc is not None and self.proc.poll() is None
        return True

    def run(self, lint=False, integration=False, kill=False):
        if kill:
            if self.proc:
                self.killed = True
                self.proc.terminate()
            return

        vars = self.window.extract_variables()
        working_dir = vars['file_path']

        # A lock is used to ensure only one thread is
        # touching the output panel at a time
        with self.panel_lock:
            # Creating the panel implicitly clears any previous contents
            self.panel = self.window.create_output_panel('exec')

            # Enable result navigation. The result_file_regex does
            # the primary matching, but result_line_regex is used
            # when build output includes some entries that only
            # contain line/column info beneath a previous line
            # listing the file info. The result_base_dir sets the
            # path to resolve relative file names against.
            settings = self.panel.settings()
            settings.set(
                'result_file_regex',
                r'^File "([^"]+)" line (d+) col (d+)'
            )
            settings.set(
                'result_line_regex',
                r'^s+line (d+) col (d+)'
            )
            settings.set('result_base_dir', working_dir)

            self.window.run_command('show_panel', {'panel': 'output.exec'})

        if self.proc is not None:
            self.proc.terminate()
            self.proc = None

        args = ['my_cli']
        if lint:
            args.append('-l')
        elif integration:
            args.append('-i')
        args.append(vars['file_name'])
        self.proc = subprocess.Popen(
            args,
            stdout=subprocess.PIPE,
            stderr=subprocess.STDOUT,
            cwd=working_dir
        )
        self.killed = False

        threading.Thread(
            target=self.read_handle,
            args=(self.proc.stdout,)
        ).start()

    def read_handle(self, handle):
        chunk_size = 2 ** 13
        out = b''
        while True:
            try:
                data = os.read(handle.fileno(), chunk_size)
                # If exactly the requested number of bytes was
                # read, there may be more data, and the current
                # data may contain part of a multibyte char
                out += data
                if len(data) == chunk_size:
                    continue
                if data == b'' and out == b'':
                    raise IOError('EOF')
                # We pass out to a function to ensure the
                # timeout gets the value of out right now,
                # rather than a future (mutated) version
                self.queue_write(out.decode(self.encoding))
                if data == b'':
                    raise IOError('EOF')
                out = b''
            except (UnicodeDecodeError) as e:
                msg = 'Error decoding output using %s - %s'
                self.queue_write(msg  % (self.encoding, str(e)))
                break
            except (IOError):
                if self.killed:
                    msg = 'Cancelled'
                else:
                    msg = 'Finished'
                self.queue_write('n[%s]' % msg)
                break

    def queue_write(self, text):
        sublime.set_timeout(lambda: self.do_write(text), 1)

    def do_write(self, text):
        with self.panel_lock:
            self.panel.run_command('append', {'characters': text})
The custom MyExampleBuildCommand can be configured as a build system using
the following JSON saved to a file named Packages/User/My Example
Build.sublime-build:
{
    "target": "my_example_build",
    "selector": "source.mylang",
    "cancel": {"kill": true},
    "variants": [
        {
            "name": "Lint",
            "lint": true
        },
        {
            "name": "Integration Tests",
            "integration": true
        }
    ]
}
I want to configure Sublime Text 3 to build Python 3, but I don’t seem to understand how the builds work. Many tutorials have told me to make a build file containing code such as:
{
    'cmd': ['/usr/bin/python3', '-u', '$file'],
    'file_regex': '^[ ]*File "(…*?)", line ([0-9]*)',
    'selector': 'source.python'
}
and save it as a file called Python.sublime-build or python3.sublime-build (much of the information I found was conflicting). One tutorial suggested creating a new folder in the ST3 Packages folder called Python and add the build file in there, whilst other tutorials suggested leaving it in the folder called User.
One tutorial explained how I had to change the Environment Variable path on my operating system to get it to work. That didn’t seem to help either.
I added a folder Python to Packages (since it wasn’t there already) and added in a build file with the name Python.sublime_build which featured only the code I posted above in it. Now when I attempt to run Sublime Text it gives me this error:
Error trying to parse build system:
Expected value in PackagesPythonPython.sublime-build:2:5
![]()
Veedrac
56.7k14 gold badges109 silver badges168 bronze badges
asked May 19, 2014 at 6:19
![]()
6
The reason you’re getting the error is that you have a Unix-style path to the python executable, when you’re running Windows. Change /usr/bin/python3 to C:/Python32/python.exe (make sure you use the forward slashes / and not Windows-style back slashes ). Once you make this change, you should be all set.
Also, you need to change the single quotes ' to double quotes " like so:
{
    "cmd": ["c:/Python32/python.exe", "-u", "$file"],
    "file_regex": "^[ ]*File "(...*?)", line ([0-9]*)",
    "selector": "source.python"
}
The .sublime-build file needs to be valid JSON, which requires strings be wrapped in double quotes, not single.
answered May 19, 2014 at 15:11
![]()
MattDMoMattDMo
99.4k21 gold badges238 silver badges229 bronze badges
3
Steps to Make Sublime Text a Python IDE (Windows)
Tested successfully on Sublime Text 3. Assuming Sublime Text and package control are already installed . . .
-
Install Python (python.org) and pay attention to where it is installed or choose a simple location like the C drive, agreeing to remove character limit at the end of the installation.
-
Install package SublimeREPL (Cntrl + Shift + P, Package Control — Install Package, SublimeREPL, Enter).
-
Go to Preferences, Package Settings, SublimeREPL, Settings — User.
-
Paste in the following, updating the file path to your python installation folder, as needed. You may customize these and choose whatever syntax you like (last line) but I prefer my output in plain text.
{ "default_extend_env": {"PATH":"C:\Program Files\Python36\"}, "repl_view_settings": { "translate_tabs_to_spaces": false, "auto_indent": false, "smart_indent": false, "spell_check": false, "indent_subsequent_lines": false, "detect_indentation": false, "auto_complete": true, "line_numbers": false, "gutter": false, "syntax": "Packages/Text/Plain text.tmLanguage" } } -
Save and close the file (SublimeREPL.sublime-settings).
-
Go to Tools, Build System, New Build System.
-
Replace all existing text with the following:
{ "target": "run_existing_window_command", "id": "repl_python_run", "file": "config/Python/Main.sublime-menu" } -
Cntrl + S or save as «C:Users[username]AppDataRoamingSublime Text 3PackagesUserSublimeREPL-python.sublime-build» updating username or path as needed. This should be wherever your settings and builds are stored by Sublime Text.
-
Go to Tools, Build System, select SublimeREPL-python.
-
All done—now to test. Open or create a simple python file, having a *.py extension and save it wherever desired.
-
Make sure the file is open and selected in Sublime Text. Now, when you press Cntrl + B to build and run it, it will open another tab, titled «REPL [python]», executing and displaying the results of your python code.
If you would like to go a step further, I highly recommend making the follow changes, to allow Sublime to reload your executed python in the same window, when you press Cntrl+B (Build), instead of it opening a new tab each time:
Add the following line in the «repl_python_run» command in (Preferences, Browse Packages) SublimeREPLconfigPythonMain.sublime-menu, right before the «external_id»: «python» argument:
"view_id": "*REPL* [python]",
and then to change the line:
if view.id() == view_id
into:
if view.name() == view_id
in SublimeREPLsublimerepl.py.
answered Sep 9, 2017 at 16:28
![]()
DanielDaniel
4954 silver badges12 bronze badges
4
If you are using PyQt, then for normal work, you should add «shell»:»true» value, this looks like:
{
  "cmd": ["c:/Python32/python.exe", "-u", "$file"],
  "file_regex": "^[ ]*File "(...*?)", line ([0-9]*)",
  "selector": "source.python",
  "shell":"true"
}
answered Feb 22, 2017 at 8:34
![]()
DmitryRomDmitryRom
611 silver badge1 bronze badge
1
Run Python Files in Sublime Text3
For Sublime Text 3,
First Install Package Control:
- Press Ctrl + Shift + P, a search bar will open
-
Type Install package and then press enter
Click here to see Install Package Search Pic -
After the package got installed. It may prompt to restart SublimeText
- After completing the above step
- Just again repeat the 1st and 2nd step, it will open the repositories this time
- Search for Python 3 and Hit enter.
- There you go.
- Just press Ctrl + B in your python file and you’ll get the output.
Click here to see Python 3 repo pic
It perfectly worked for me. Hopefully, it helped you too.
For any left requirements, visit https://packagecontrol.io/installation#st3 here.
answered Feb 21, 2019 at 23:25
![]()
Steps for configuring Sublime Text Editor3 for Python3 :-
- Go to preferences in the toolbar.
- Select Package Control.
- A pop up will open.
- Type/Select Package Control:Install Package.
- Wait for a minute till repositories are loading.
- Another Pop up will open.
- Search for Python 3.
- Now sublime text is set for Python3.
- Now go to Tools-> Build System.
- Select Python3.
Enjoy Coding.
answered Jun 24, 2020 at 13:16
![]()
1
Version for Linux. Create a file ~/.config/sublime-text-3/Packages/User/Python3.sublime-build with the following.
{
 "cmd": ["/usr/bin/python3", "-u", "$file"],
 "file_regex": "^[ ]File "(...?)", line ([0-9]*)",
 "selector": "source.python"
}
answered May 16, 2019 at 8:40
![]()
And to add on to the already solved problem, I had installed Portable Scientific Python on my flash drive E: which on another computer changed to D:, I would get the error «The system cannot find the file specified». So I used parent directory to define the path, like this:
From this:
{
    "cmd": ["E:/WPy64-3720/python-3.7.2.amd64/python.exe", "$file"],
    "file_regex": "^[ ]*File "(...*?)", line ([0-9]*)",
    "selector": "source.python"
}
To this:
{
    "cmd": ["../../../../WPy64-3720/python-3.7.2.amd64/python.exe","$file"],
    "file_regex": "^[ ]*File "(...*?)", line ([0-9]*)",
    "selector": "source.python"
}
You can modify depending on where your python is installed your python.
![]()
apaderno
27.9k16 gold badges76 silver badges87 bronze badges
answered May 26, 2019 at 19:31
![]()
first you need to find your python.exe location, to find location run this python script:
import sys
print(sys.executable)
Then you can create your custom python build:
{
"cmd": ["C:\Users\Sashi\AppData\Local\Programs\Python\Python39\python.exe", "-u", "$file"],
"file_regex": "^[ ]File "(...?)", line ([0-9]*)",
"selector": "source.python"}
You can change the location, In my case it is C:UsersSashiAppDataLocalProgramsPythonPython39python.exe
Then save your new build. Don’t change the file extension while saving.
answered Nov 27, 2020 at 3:37
![]()
1
I’d like to add just one point to the accepted answer:
when you edit the cmd portion of the snippet below, make sure to add the file address (with forward slash) where python is kept on your computer.
{
"cmd": ["c:/Python32/python.exe", "-u", "$file"],
"file_regex": "^[ ]*File "(...*?)", line ([0-9]*)",
"selector": "source.python"
}
How to know where python is installed on your system? Two ways for windows users:
- Open Command prompt and do the following query:
where python
If it shows the path to python.exe, copy and paste it with/. If it shows some error, then follow process below: - Go to start -> Search for python shortcut (not IDLE) -> Right Click -> More -> Open file location -> Right click the shortcut -> Properties -> Target -> Path is now visible -> Copy and paste it in the field above.
answered May 22, 2021 at 9:18
![]()
lousycoderlousycoder
4115 silver badges10 bronze badges
Here is a very simple Python Sublime Text build system that works when python scripts are invoked with py file_name.py.
Just create py.sublime-build by Tools > Build System > New Build System and add the contents below:
{
    "cmd": ["python3", "$file"]
}
You can select it in Sublime Text editor by going to Tools > Build System > py and building with Ctrl + b.
Note: If your filesystem doesn’t python3 than you need to provide path/to/python3 and it should work.
answered Apr 4, 2019 at 9:01
![]()
jackw11111jackw11111
1,3671 gold badge19 silver badges34 bronze badges
1
![]()
Hi, can I user #!python3 or #!python2 in the first line of the py script to let Sublime which python build config to use?
![]()
![]()
On windows (replace my user id ‘masia’ — with your user):
C:UsersmasiaAppDataRoamingSublime Text 3PackagesUser
{
«cmd»: [«C:UsersmasiaAppDataLocalProgramsPythonPython38python.exe», «-u», «$file»],
«file_regex»: «^ ]File «(…?)», line ([0-9]*)»,
«selector»: «source.python»
}
![]()
![]()
Hi
I am trying this in Linux (LXLE), and get the following error message when trying the print(sys.version) command:
/usr/bin/python3: can’t find ‘main‘ module in »
[Finished in 0.3s with exit code 1]
[cmd: [‘python3’, ‘-u’, »]]
[dir: /opt/sublime_text]
[path:
/usr/local/sbin:/usr/local/bin:/usr/sbin:/usr/bin:/sbin:/bin:/usr/games:/usr/local/games:/snap/bin]
I would be really grateful if anyone could help me correct this.
Thanks in advance.
![]()
Hi
I am trying this in Linux (LXLE), and get the following error message when trying the print(sys.version) command:
/usr/bin/python3: can’t find ‘main‘ module in »
[Finished in 0.3s with exit code 1]
[cmd: [‘python3’, ‘-u’, »]]
[dir: /opt/sublime_text]
[path:
/usr/local/sbin:/usr/local/bin:/usr/sbin:/usr/bin:/sbin:/bin:/usr/games:/usr/local/games:/snap/bin]I would be really grateful if anyone could help me correct this.
Thanks in advance.
«cmd»: [«python3», «-u», «$file»],
![]()
Hi
I am trying this in Linux (LXLE), and get the following error message when trying the print(sys.version) command:
/usr/bin/python3: can’t find ‘main‘ module in »
[Finished in 0.3s with exit code 1]
[cmd: [‘python3’, ‘-u’, »]]
[dir: /opt/sublime_text]
[path:
/usr/local/sbin:/usr/local/bin:/usr/sbin:/usr/bin:/sbin:/bin:/usr/games:/usr/local/games:/snap/bin]
I would be really grateful if anyone could help me correct this.
Thanks in advance.«cmd»: [«python3», «-u», «$file»],
Hi
Thanks for the response; i should have posted the code that gave rise to the error — apologies.
I think I had the right line — this is the file that resulted in the error:
{
«cmd»: [«python3», «-u», «$file»],
«file_regex»: «^[ ]File «usr/bin/python3″, line ([0-9])*)»,
«selector»: «source.python»
}
Can I ask you to let me know what I am doing wrong?
![]()
Hi
I am trying this in Linux (LXLE), and get the following error message when trying the print(sys.version) command:
/usr/bin/python3: can’t find ‘main‘ module in »
[Finished in 0.3s with exit code 1]
[cmd: [‘python3’, ‘-u’, »]]
[dir: /opt/sublime_text]
[path:
/usr/local/sbin:/usr/local/bin:/usr/sbin:/usr/bin:/sbin:/bin:/usr/games:/usr/local/games:/snap/bin]
I would be really grateful if anyone could help me correct this.
Thanks in advance.«cmd»: [«python3», «-u», «$file»],
Hi
Thanks for the response; i should have posted the code that gave rise to the error — apologies.
I think I had the right line — this is the file that resulted in the error:
{
«cmd»: [«python3», «-u», «$file»],
«file_regex»: «^[ ]File «usr/bin/python3″, line ([0-9])*)»,
«selector»: «source.python»
}Can I ask you to let me know what I am doing wrong?
Have you saved the file before you tried to run it?
![]()
Hi
I am trying this in Linux (LXLE), and get the following error message when trying the print(sys.version) command:
/usr/bin/python3: can’t find ‘main‘ module in »
[Finished in 0.3s with exit code 1]
[cmd: [‘python3’, ‘-u’, »]]
[dir: /opt/sublime_text]
[path:
/usr/local/sbin:/usr/local/bin:/usr/sbin:/usr/bin:/sbin:/bin:/usr/games:/usr/local/games:/snap/bin]
I would be really grateful if anyone could help me correct this.
Thanks in advance.«cmd»: [«python3», «-u», «$file»],
Hi
Thanks for the response; i should have posted the code that gave rise to the error — apologies.
I think I had the right line — this is the file that resulted in the error:
{
«cmd»: [«python3», «-u», «$file»],
«file_regex»: «^[ ]File «usr/bin/python3″, line ([0-9])*)»,
«selector»: «source.python»
}
Can I ask you to let me know what I am doing wrong?Have you saved the file before you tried to run it?
I did, I saved it in the directory that I was prompted to save into.
![]()
please which plugin do i need to install to make the console interactive
![]()
Working on Ubuntu 18.04, SublimeText3. Python 3.6.9
![]()
![]()
Thank you for this sharing, although I don’t understand the Regex, I saw other blogs write the same thing so I give it a try. Now the Command + B will build my .py file with python3 command. Thank you so much.
![]()
Thank you, it is a nice solution!
![]()
actually after I installed the Anaconda package a new option popped up, its called «Anaconda Python Builder» which works fine on my Python 3 files without any changes, of course my default python_interpreter is python3
{
«name»: «Anaconda Python Builder»,
«shell_cmd»: «»${python_interpreter}» -u «$file»»,
«file_regex»: «^[ ]File «(…?)», line ([0-9]*)»,
«selector»: «source.python»
}
![]()
![]()
hi, can you help me install PySigmoid Package? on Python3. pip install PySigmid is not providing any help.
thanks
![]()
Hey Zaemiel, this worked fine, thank you very much
![]()
![]()
![]()
No Build System
On Linux: NO BUILD SYSTEM FOUND.
Because I first had this (check the ASTERISKS!):

Changed to this:

![]()
thank you so much! other versions of this code do not work on python 3.9
![]()
Am trying to use Sublime Text 3 (Build3211) with Python 3.9.0 on Windows 10.
Have downloaded both successfully and
- Gone to Sublime Text to: Tools -> Build System -> New Build System
and put the next lines:
{
«cmd»: [«python3», «-u», «$file»],
«file_regex»: «^[ ]File «(…?)», line ([0-9]*)»,
«selector»: «source.python»
}
Then saved it with a meaningful name like: python3.sublime-build
But when I write a program like:
print(«Help») and run under Sublime Text to Tools Python 3, I get the following message:
Python was not found but can be installed from the Microsoft Store: https://go.microsoft.com/fwlink?linkID=2082640[Finished in 0.3s]
Am just beginning to learn how to code… PLEASE HELP!
![]()
Am trying to use Sublime Text 3 (Build3211) with Python 3.9.0 on Windows 10.
Have downloaded both successfully and
1. Gone to Sublime Text to: Tools -> Build System -> New Build System
   and put the next lines:
{
«cmd»: [«python3», «-u», «$file»],
«file_regex»: «^[ ]File «(…?)», line ([0-9]*)»,
«selector»: «source.python»
}Then saved it with a meaningful name like: python3.sublime-build
But when I write a program like:
print(«Help») and run under Sublime Text to Tools Python 3, I get the following message:
Python was not found but can be installed from the Microsoft Store: [https://go.microsoft.com/fwlink?linkID=2082640Finished in 0.3s]
Am just beginning to learn how to code… PLEASE HELP!
Did you install Python?
Go to the https://www.python.org/downloads/
Download and install (when it will ask you to include the path to Python to the PATH environment variable you should agree).
Open cmd and input python…
Also Windows has no ‘python3’, only ‘python’ — the command you use to get the Python’s shell.
![]()
![]()
![]()
Hi, I get this message: [Errno 2] No such file or directory
Any idea how to fix this?
Try this code:
{ "shell_cmd": "gnome-terminal --working-directory=$file_path -- bash -c 'python3 -u "$file" && read -n 1 -s -r'", "working_dir": "$file_path", "selector": "source.python", "env": {"PYTHONIOENCODING": "utf-8"} }
![]()
![]()
thank you its work to me! but i change code a little bit. if you guys still have a problem like the code not build, you can try this code
{
«cmd»: [«C:PythonPython397python.exe», «-u», «$file»],
«file_regex»: «^[ ]File «(…?)», line ([0-9]*)»,
«selector»: «source.python»
}
i hope this will help you guys 
Improve Article
Save Article
Improve Article
Save Article
Written by a Google engineer sublime text is a cross-platform IDE developed in C++ and Python. It has basic built-in support for Python. Sublime text is fast and you can customize this editor as per your need to create a full-fledged Python development environment. You can install packages such as debugging, auto-completion, code linting, etc. There are also various packages for scientific development, Django, Flask, and so on.
Downloading and Installation
Sublime Text 3 can be downloaded from its official site sublimetext.com. To install sublime text 3 on Windows, go through How to install Sublime Text 3 in Windows?
Setting up Environment Variable
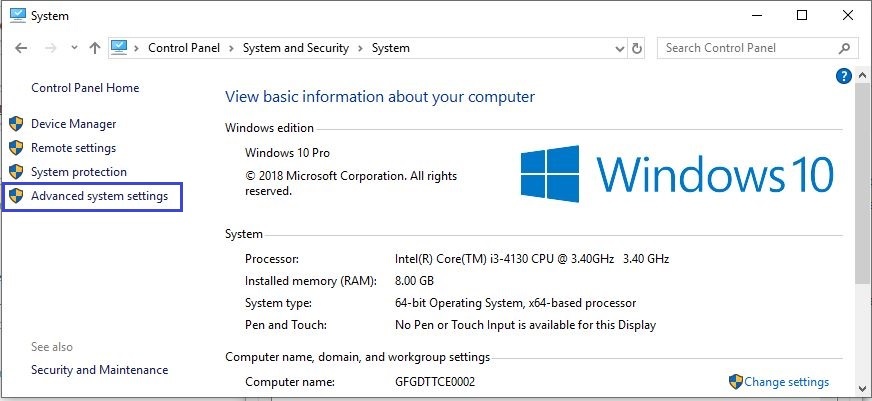
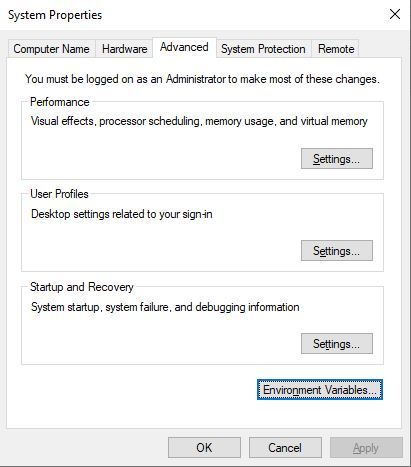
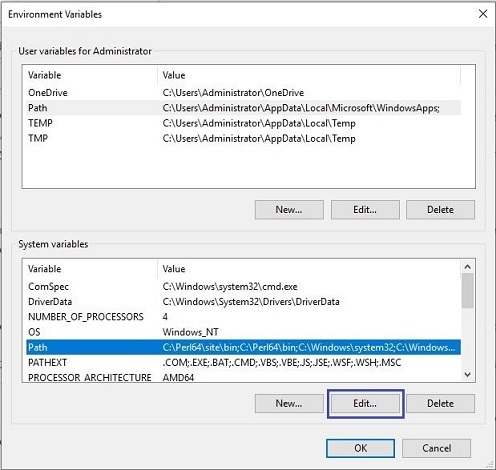
- Step 1: Click the Advanced system settings link.

- Step 2: Click Environment Variables. In the section System Variables, find the PATH environment variable and select it. Click Edit. If the PATH environment variable does not exist, click New.


- Step 3: In the Edit System Variable (or New System Variable) window, specify the value of the PATH environment variable. Click OK. Close all remaining windows by clicking OK.
Working on Sublime Text3
Step 1: Create a new file and save it with extension .py for example save it as checkversion.py. Now, Go to Tools -> Build System -> Python then type on your checkversion.py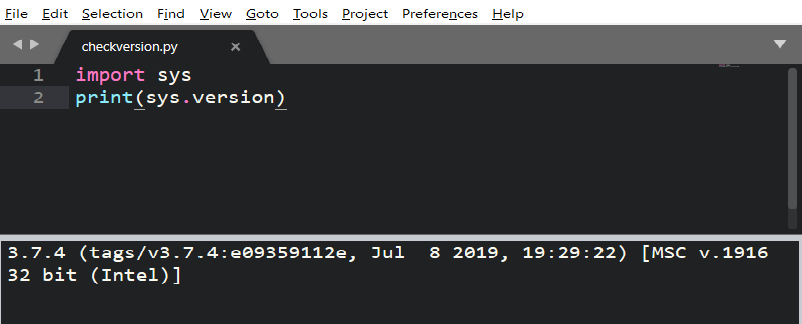
This is showing the version of python. This means python is successfully installed and added in Environment Variable.
Step 2: Add new build system on your Sublime Tools -> Build System -> New Build System and make sure that the new build system has this following command
{
"cmd":["C:/Users/<user>/AppData/Local/Programs/Python/Python37-32/python.exe", "-u", "$file"],
"file_regex": "^[ ]File "(...?)", line ([0-9]*)",
"selector": "source.python"
}
Select your new system build newPython3 and re-run the checkversion.py and now it should be using Python 3
ALL Done…
Now create any file and save it with .py extension
Now you can run your Python code by using CTRL+SHIFT+B and choose from the 2 options.

Steps to Make Sublime Text a Python IDE (Windows)
Tested successfully on Sublime Text 3. Assuming Sublime Text and package control are already installed . . .
-
Install Python (python.org) and pay attention to where it is installed or choose a simple location like the C drive, agreeing to remove character limit at the end of the installation.
-
Install package SublimeREPL (Cntrl + Shift + P, Package Control — Install Package, SublimeREPL, Enter).
-
Go to Preferences, Package Settings, SublimeREPL, Settings — User.
-
Paste in the following, updating the file path to your python installation folder, as needed. You may customize these and choose whatever syntax you like (last line) but I prefer my output in plain text.
{ "default_extend_env": {"PATH":"C:\Program Files\Python36\"}, "repl_view_settings": { "translate_tabs_to_spaces": false, "auto_indent": false, "smart_indent": false, "spell_check": false, "indent_subsequent_lines": false, "detect_indentation": false, "auto_complete": true, "line_numbers": false, "gutter": false, "syntax": "Packages/Text/Plain text.tmLanguage" } } -
Save and close the file (SublimeREPL.sublime-settings).
-
Go to Tools, Build System, New Build System.
-
Replace all existing text with the following:
{ "target": "run_existing_window_command", "id": "repl_python_run", "file": "config/Python/Main.sublime-menu" } -
Cntrl + S or save as «C:Users[username]AppDataRoamingSublime Text 3PackagesUserSublimeREPL-python.sublime-build» updating username or path as needed. This should be wherever your settings and builds are stored by Sublime Text.
-
Go to Tools, Build System, select SublimeREPL-python.
-
All done—now to test. Open or create a simple python file, having a *.py extension and save it wherever desired.
-
Make sure the file is open and selected in Sublime Text. Now, when you press Cntrl + B to build and run it, it will open another tab, titled «REPL [python]», executing and displaying the results of your python code.
If you would like to go a step further, I highly recommend making the follow changes, to allow Sublime to reload your executed python in the same window, when you press Cntrl+B (Build), instead of it opening a new tab each time:
Add the following line in the «repl_python_run» command in (Preferences, Browse Packages) SublimeREPLconfigPythonMain.sublime-menu, right before the «external_id»: «python» argument:
"view_id": "*REPL* [python]",
and then to change the line:
if view.id() == view_id
into:
if view.name() == view_id
in SublimeREPLsublimerepl.py.
The reason you’re getting the error is that you have a Unix-style path to the python executable, when you’re running Windows. Change /usr/bin/python3 to C:/Python32/python.exe (make sure you use the forward slashes / and not Windows-style back slashes ). Once you make this change, you should be all set.
Also, you need to change the single quotes ' to double quotes " like so:
{
    "cmd": ["c:/Python32/python.exe", "-u", "$file"],
    "file_regex": "^[ ]*File "(...*?)", line ([0-9]*)",
    "selector": "source.python"
}
The .sublime-build file needs to be valid JSON, which requires strings be wrapped in double quotes, not single.
AlexKorablev.ru
Александр Кораблев о разработке ПО, ИТ-индустрии и Python.
Опубликовано 07 December 2015 в Редакторы и IDE
Пока на RealPython разжигают войну IDE и объясняют как настроить под разработку на Python под Sublime, VIM и Emacs, я расскажу почему я переехал (пока) на Sublime Text 3, как я его настроил. А также отмечу чего в нем не хватает для счастливой разработки.
PyCharm замечательная IDE для Python. Это несомненно, но если нужно разрабатывать full-stack, то им одним не обойтись. На работе это не проблема. Но вот дома покупать лицензию на все продукты JetBrains ради экспериментов накладно. Две недели назад я решил посмотреть альтернативы. Vim и Emacs отвалились из-за их идеологии и сложности в настройке. Eclipse заставляет тормозить даже очень мощные компьютеры, что говорить про мой слабенький домашний лэптоп. По факту в кандидатах остался только Sublime Text.
Он у меня и так открыт постоянно. В нем я веду TODO-листы, в нем пишу в блог. В нем же открываю большую часть файлов, которые не являются частью проекта. При этом больших требований к IDE у меня нет. Нужны в общем-то только эти вещи:
- Подсветка синтаксиса
- Умный автокомплит
- Переход к определениям
- Проверка файла на ошибки
- Автоимпорт
Подсветка синтаксиса в Sublime есть из коробки. Остальное настраивается достаточно легко. Pycharm’овский дебагер легко заменяется.
Мои настройки саблайма похожи на предложенный вариант от RealPython. В качестве базы для IDE я использую Anaconda. Настройки не менял. Только в пользовательских настройках прописал интерпретатор, иначе не работал переход к определению, да выключил линтинг:
Анаконда использует pyflakes в качестве линтера. Он работает прекрасно. Но я предпочитаю использовать SublimeLinter-pyflakes (требует для своей работы SublimeLinter). Подойдет если нужны одинаковые настройки линтеров под разные языки.
Для проверки форматирования я использую SublimeLinter-pep8 с такими настройками:
Проверка на достаточно большом и сложном проекте показала, что автокомплит и переход к определениям работает не хуже, чем в PyCharm.
Интеграция с Git обеспечивают Git и GitGutter. Первый помогает в простых случаях взаимодействовать с гитом не выходя из редактора, добавляя команды гита в Control Panel. Второй — подсвечивает измененные строки в файле.
По итогам двух недель единственная сложность, которая возникла — разрешение конфликтов мерджа. Инструмент для мерджа в Pycharm незаменим. И пока похоже, что только он сможет заставить меня отказаться от использования Sublime Text.
Step 1: Make sure you already have Python 3xx on your computer!
If your computer says that you don’t have Python3, you can download it from the Python website https://www.python.org/downloads/ and installed it on your computer.
Step 2: Make sure you already have Sublime Text on your computer!
At the time of this writing, the latest sublime is Sublime Text 3 you can download it from https://www.sublimetext.com and install it right away

Step 3: Let’s setting Python3 on your Sublime Text
Create a new file and save it with extension .py for example save it as checkversion.py
Go to Tools -> Build System -> Python then type on your checkversion.py
then press CTRL + B to run the code on Sublime
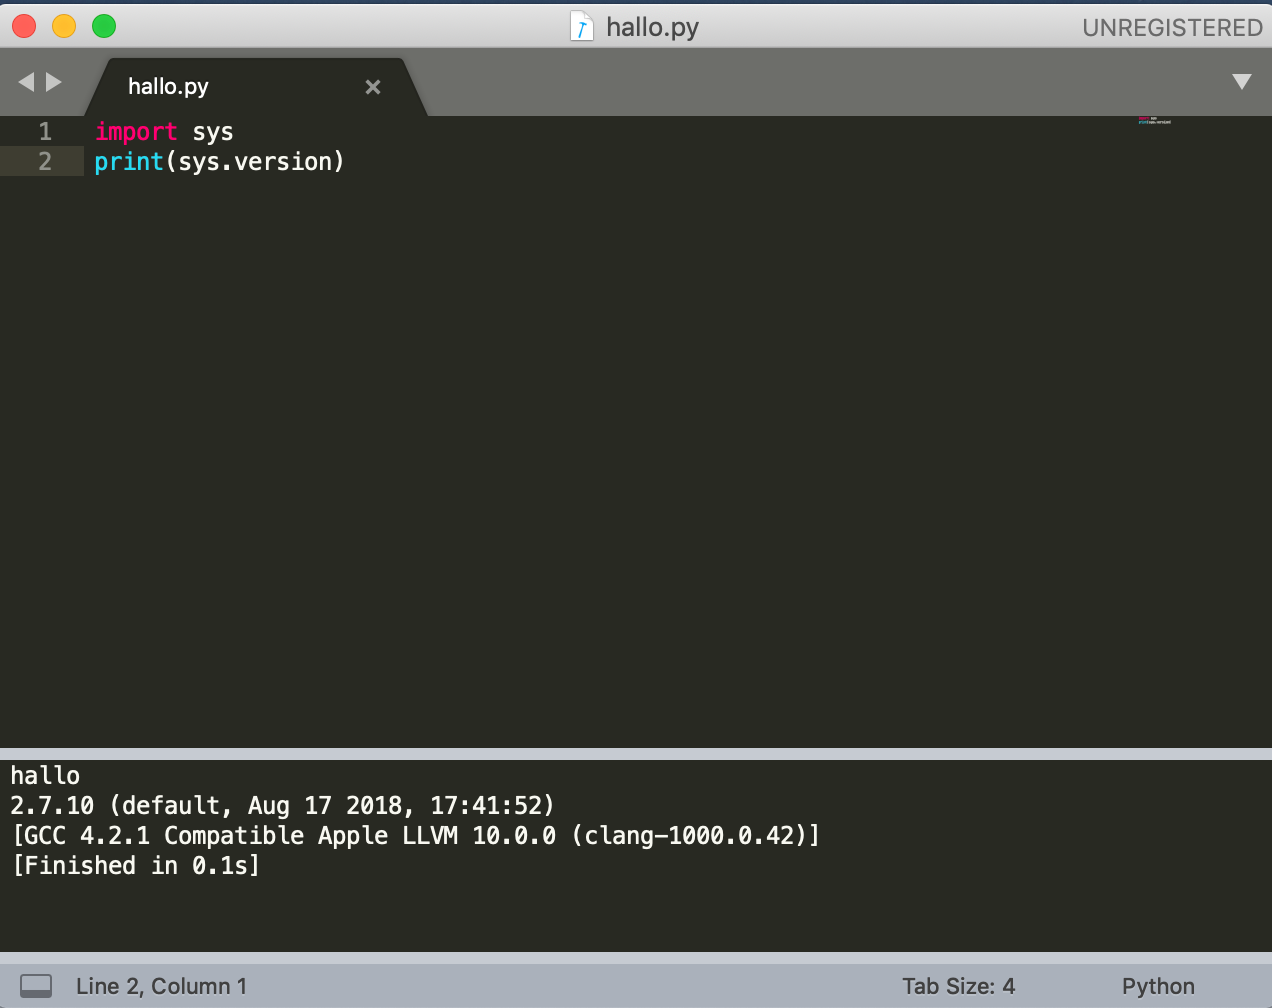
As you see, the version on the sublime is Python 2.7 we need to use Python 3 . Then we can set the Sublime Text to use Python3 instead of Python2. Here’s the step:
First: Check where is your Python3 path using this command
UNIX STYLE
WINDOWS STYLE
Second: Add new build system on your Sublime
Tools -> Build System -> New Build System and make sure that the new build system has this following command
Sublime Text 3
На первый взгляд Sublime Text это просто удобный и быстрый текстовый редактор с подсветкой синтаксиса. Хотя, пока не прочитаешь про хитрости и быстрые кнопки, не такой и удобный. Но немного пошаманив c плагинами получается неплохая IDE.
Установка
Тут все просто, качаем для нужной ОС и ставим.
Хитрости
О хитростях можно почитать в этой статье, хотя она и для Sublime Text 2, но актуально и для версии 3. Могу добавить отображение всех классов и методов через Ctrl+R, переход на конкретную строку — Ctrl+G. Ну и многое можно посмотреть в меню.
Установка плагинов
Плагины — это то, что поможет сделать из Sublime Text IDE. Для начала установим Sublime Package Control, он поможет легко управлять плагинами.
После установки в меню появился пункт Package Control . Большинство плагинов можно уже найти в списке предложенных для установки. Опишу те, которые я уже успел опробовать и которые понравились. Если нет линка или описания на установку, значит можно найти в списке Package Control .
Djaneiro
Плагин добавляет подсветку для шаблонов Django и кучу снипетов для быстрого кодинга.
Babel
Подсветка синтаксиса для ES6 JavaScript и React JSX.
Python Improved
Улучшенная подсветка синтасиса для Python 2 и 3. Чтобы работало с SublimeLinter, необходимо в настройке syntax_map последнего добавить:
SublimeLinter 3
Просто «must have». Документация. Устанавливаем через Package Control.
Теперь необходимо установить необходимые вам валидаторы. Выполняем уже известный Package Control: Install Package , набираем SublimeLinter- и ищем необходимые. Валидаторы обычно требуют установки необходимых библиотек в систему, при установке валидатора вас отошлют на инструкцию по установке всего необходимого, просто следуйте ей. Sublime Text 3 использует Python 3, так что не забываем ставить все необходимое для Python 3.
Список валидаторов, которые я обычно использую: SublimeLinter-pep8, SublimeLinter-pylint, SublimeLinter-jshint(или SublimeLinter-eslint для ES6 и JSX), SublimeLinter-pyflakes.
pylinter обычно показывает большое количество предупреждений. В документациия SublimeLinter можно найти описание настроек проверки. Пример настроек для проверялок:
Terminal
Через контекстное меню открываем терминал в любой папке.
SublimeJEDI
Добавляет полноценное автодополнение для Python. Настройки описаны в документации.
Настройка spell checker
Для английского языка уже все есть, достаточно только добавить в настройки:
Как добавить другие словари можно прочитать здесь. Кнопкой F6 можно включать/отключать.
Основы работы
Открываем папку с проектом. Через меню Projects сохраняем. Теперь можно его можно найти в Recent Projects . Там же можно добавить папку в проект, например для просмотра исходников стороннего приложения, используемого в проекте.
Note: This post is strictly about setting up Sublime Text 3 to build and run Python scripts with multiple versions of Python installed. IDE’s such as PyCharm are outside the scope of this topic.
One of the most irritating things about coding Python or other interpreted languages in a text editor is the lack of ability to build or run the program. Programming in a text editor like Notepad or similar requires the use of multiple applications to create and test your code. For instance, you need to have your editor open to write your code and a console of your choice to run and test the code. This can be a bit of a pain to a programmer’s workflow, constantly switching back and forth and entering commands to see a result.
This problem is further compounded when working on a Windows system with multiple versions of Python, like Python 2.7 and 3.5. In this situation where there isn’t a Python PATH variable set, you have to use the Py Launcher to run scripts:
# py -v script.py where -v denotes Python version number ie -2, -2.7, -3, -3.5
> py -3 script.py
# -v can be omitted when using "shebangs", which is explained later.
Sublime Text Support
For users of Sublime Text, though, this is a non-issue. ST comes with a set of pre-made extensions that allow a programmer to quickly build many different types of languages. The results, errors, and build time will be displayed in the built in build console.

Cuda-C++ is not included by default, but installed with the CUDA plugin
For a user with a PATH variable set for Python, everything should be good to go!
But, for those like me with multiple installations and no PATH, we have some work to do. We’ll look at how to set up Sublime to use the Py Launcher. First, we need to access a build file. One can either create a new build system, or modify a default built-in build file.
Create a New Build System
This is useful for if you want to have separate builds for different Python versions or for builds that accomplish different tasks. For those who want to go that route, I’ve placed the base Python build code below (as of Build 3114). Make sure you save your build as BuildName.sublime-build and it is placed in your AppDataRoamingSublime Text 3Packages directory.
{
 "shell_cmd": "python -u "$file"",
 "file_regex": "^[ ]*File "(...*?)", line ([0-9]*)",
 "selector": "source.python",

"env": {"PYTHONIOENCODING": "utf-8"},

"variants":
 [
 {
 "name": "Syntax Check",
 "shell_cmd": "python -m py_compile "${file}"",
 }
 ]
 }
Accessing a Default Build System
The other way is to edit the original Python build file, which is what I’ve done and what I’ll show you. To do this, there are a few requirements. As Sublime’s build files are stored in .sublime-package archives, we’ll need a plugin that can open these (or an archive manager such as 7-Zip). First, you need to have Package Control installed to easily add and maintain any plugins Sublime Text. Once you have done that, ctrl+shift+P to bring up the Command Palette or go to Tools > Command Palette. Type install and select Package Control: Install Package. From there, search for PackageResourceViewer (PRV) and press enter to install the plugin.
After you have PRV installed open up the Command Palette again, type prv then select PackageResourceViewer: Open Resource. Search for Python and then build. Select Python.sublime-build to open the file. If you went the way of using an archive manager like 7-Zip, the build files can be found by opening the Python.sublime-package in C:Program FilesSublime Text 3Packages.
Editing the Build File
Once you have the build file open (regardless of method used above), there is only one word that needs to be changed. In the first line change python to py , press save and you’re done! Ignore the "variants" section, as it’s unnecessary to change. For a while I had “variants” changed and not the overall “shell_cmd” and it would not let me build GUI applications.
Running your script from Sublime Text
Now you can ctrl+B to your heart’s content and watch builds fly by without ever leaving the app. It should be noted that Sublime Text’s build console has one minor/major limitation: It does not accept user input. So if you have input() or raw_input() anywhere in your script, the build system will fail. You will have to go back to the command line and use the py script.py command for this to work.*
How does py launcher and Sublime Text know what version of Python to use? The magic is in the shebang line. At the top of each file that can be executed independently, use the line #! pythonX where the X is the version of Python you wish to use. Based on this shebang value, the py launcher will determine the correct version of Python to use. Otherwise, it will pick it’s own version to use, for me that’s 2.7. If you still need to run scripts from a command line, you can simply use py script.py when using the shebang method.
To confirm this is indeed working, from a command line run the following script with and without shebang lines using the py command:
#! pythonX
import sys
print(sys.version)
If you have any questions, concerns, or suggestions regarding the topic at hand feel free to leave a comment down below! For those looking for even greater Python support in Sublime Text 3, please check out this post by Real Python on Setting Up Sublime Text 3 for Full Stack Python Development.
* It is possible for you to use the Python Interactive Shell with support for user input in Sublime Text 3 through the use of SublimeREPL, but that will be for a future post.

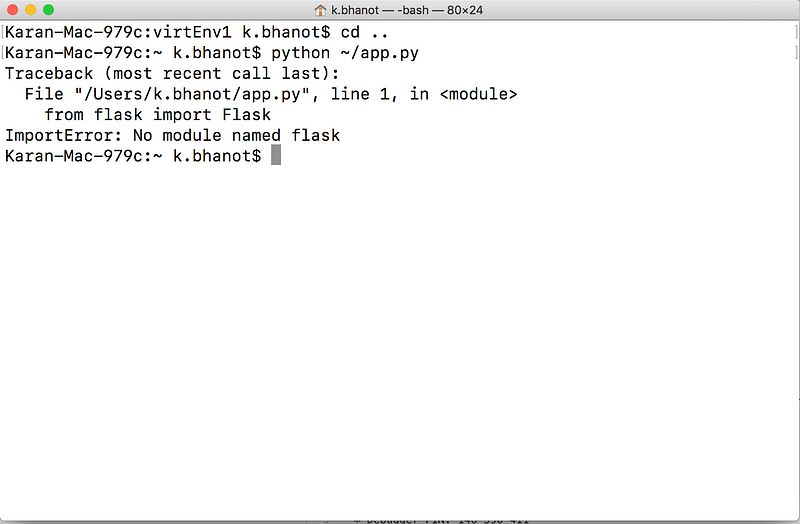
В процессе работы над проектом мне потребовалось проверить, работает ли пакет Flask с установленным у меня Python. При запуске команды для установки Flask я получил предупреждение, что пакет уже установлен, поскольку у меня установлен Anaconda.

Однако при попытке запустить Hello World в приложении Flask на Sublime Text 3, консоль выдала ошибку модуля Flask. Я решил почитать об этом в интернете. Выяснилось, что в Anaconda установлен модуль Flask, а в Python, который использовался в Sublime Text, этот модуль отсутствует. Я решил разобраться в том, как правильно настроить Python, установить необходимые пакеты и настроить Sublime Text build system. В результате поисков я обнаружил Virtual Environments, с которыми не сталкивался ранее.
В этой статье я решил поделиться своими знаниями о том, как установить Виртуальные Окружения в Python с использованием Терминала.

На данный момент в сообществе поддерживаются две версии: 2.x и 3.x. Некоторые пакеты работают с Python 3.x, однако у других нет поддержки 3.x и они работают только с 2.x. Таким образом, в некоторых случаях используется Python 2.x, а в других — Python 3.x. Начнем с установки обеих версий Python. Для этого можно использовать установщик пакетов, например Homebrew.
Python 3.X
brew install [email protected]
Python 2.X
brew install [email protected]
Здесь также устанавливается pip, с помощью которого можно установить пакеты Python.
Virtual Environment

В начале работы над проектом выберите версию Python и укажите необходимое количество библиотек/пакетов. Имеет смысл установить эти пакеты вне рамок всей системы. Если вы работаете с несколькими версиями Python на одном компьютере или несколькими пакетами, которые работают только с определенными версиями Python, то можно установить несколько виртуальных окружений (Virtual Environments).
Каждое окружение представляет собой отдельное виртуальное пространство. Пакеты, установленные в рамках одного пространства, не пересекаются с пакетами вне его и находятся только внутри этого пространства.
Определение место установки Python
В зависимости от используемого метода, Python может быть установлен в разные расположения.
Установка Python с официального сайта
/Library/Frameworks/Python.framework/Versions/Здесь находится установленная версия. У меня версия 3.6, поэтому путь для Python выглядит следующим образом:
/Library/Frameworks/Python.framework/Versions/3.6/bin
Установка Python с помощью Homebrew
/usr/local/Cellar/
Затем нужно выбрать версию в каталоге python или [email protected]. Для python и версии 3.7.2_1 место расположения будет:
/usr/local/Cellar/python/3.7.2_1/bin
Установка virtualenv
Работаем с Python 3, установленным с помощью Homebrew. Устанавливаем virtualenvс использованием pip3.
pip3 install virtualenvСоздание Виртуального Окружения
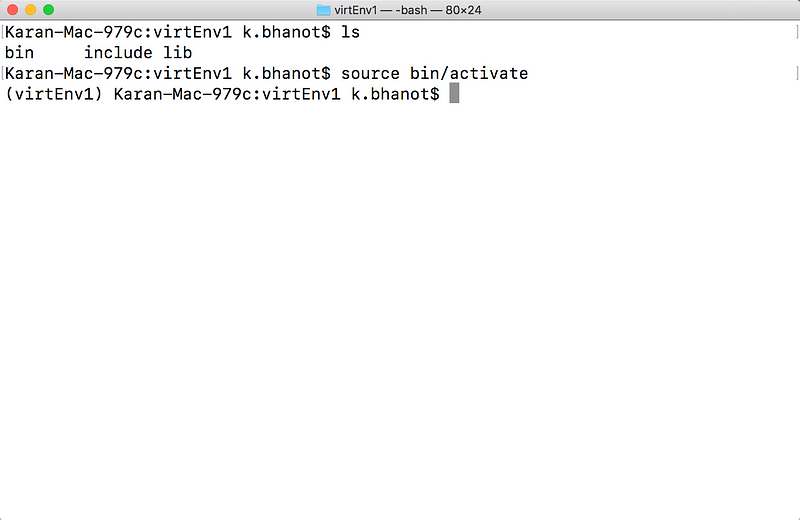
Установка пакетов завершена, теперь можно перейти к Виртуальному Окружению. Для начала определим место расположения и название окружения. Я разместил его в домашнем каталоге под названием virtEnv1.
virtualenv -p python3 ~/virtEnv1
Последний аргумент в команде выше определяет путь для окружения вместе с его названием. Теперь можно начать работу с окружением.
Активация окружения
Чтобы начать работу внутри окружения, его нужно активировать. После установки окружения внутри папки bin создается файл activate. Устанавливаем этот файл в качестве источника. Теперь мы находимся внутри виртуального окружения.
cd ~/virtEnv1
source bin/activate
Название виртуального окружения отображается в скобках, указывая на то, что мы работаем внутри окружения.
Установка пакетов и создание файла
Устанавливаем Flask.
pip install flask
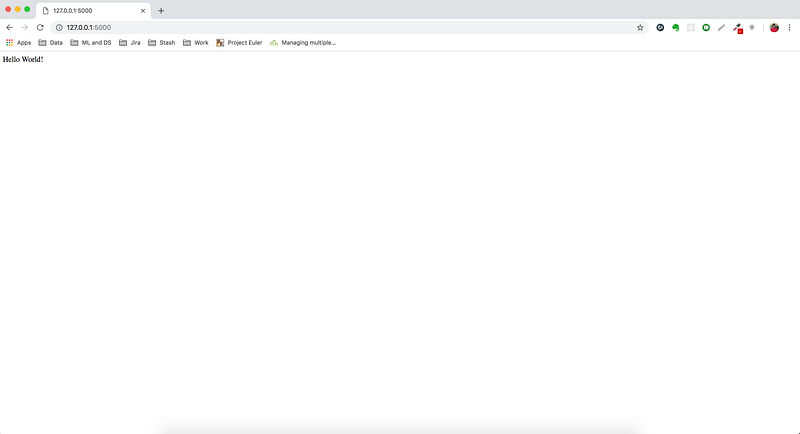
Также создаем файл app.py в домашнем каталоге, который обладает самым базовым кодом Hello World в Flask.
from flask import Flaskapp = Flask(__name__)
@app.route("/")
def hello():
return "Hello World!"if __name__ == '__main__':
app.run(debug=True)
При запуске кода внутри окружения получаем следующий результат.
python ~/app.py
Со стороны клиента
Со стороны сервера
* Serving Flask app "app" (lazy loading)
 * Environment: production
   WARNING: Do not use the development server in a production environment.
   Use a production WSGI server instead.
 * Debug mode: on
 * Running on http://127.0.0.1:5000/ (Press CTRL+C to quit)
 * Restarting with stat
 * Debugger is active!
 * Debugger PIN: 146-590-411
127.0.0.1 - - [26/Jan/2019 11:55:45] "GET / HTTP/1.1" 200 -
127.0.0.1 - - [26/Jan/2019 11:55:46] "GET /favicon.ico HTTP/1.1" 404 -
Деактивация окружения
Чтобы выйти из окружения просто введите deactivate в терминале.
Поскольку окружение отключено, то используется Python, установленный в рамках системы. Поскольку в системе не установлен Flask, то при попытке запуска того же кода, произойдет ошибка.
Аналогичным образом, можно создать окружения и повторить те же действия в Python 2.
Использование Python в Sublime Text 3

Я предпочитаю работать с Sublime Text, когда не использую Jupyter notebooks. Чтобы установить Sublime Text для Python, нужно создать новую систему сборки (build system). Перейдите к:
Tools > Build System > New Build System...
И введите следующий код:
{
    "cmd": ["/Users/<username>/virtEnv1/bin/python", "$file"],
    "file_regex": "^[ ]File "(...?)", line ([0-9]*)",
    "selector": "source.activate"
}
Замените <username> своим именем пользователя.
Сохраним все в качестве virtEnv1Python. Откройте файл app.py в Sublime Text. Установите систему сборки как virtEnv1Python. Для проверки работы приложения нажмите Command + B. Приложение начнет работу, в чем можно убедиться, перейдя по ссылке http://127.0.0.1:5000/.
Заключение
Мы рассмотрели использование virtualenv для создания Виртуальных Окружений в Python и установки пакетов внутри этих окружений.
Перевод статьи Karan Bhanot: Python Virtual Environments made easy
We’ll learn how to download and install Sublime Text 3 and run Python scripts in the Sublime Text 3 editor. We will also examine the installation of packages. So let’s get started.
Running Python code in Sublime Text 3
Python code can be run using a variety of IDEs and text editors. It’s OK to use a text editor if you’re a newbie, but if you’re a developer, you’re probably aware of the value of IDEs. Although Sublime Text 3 is primarily a text editor, it has IDE-like features such as projects and “builds,” which allow you to run other applications from within the editor.
Now we’ll look at some valuable facts about the Sublime Text 3 editor.
Getting started programming with Sublime Text
- It’s a developer’s lightweight editor.
- Among developers, it is one of the most popular.
- The best part about Sublime Text 3 is that it doesn’t take up much space on your computer and that working with it is convenient and comfortable.
- It comes with built-in support for a variety of programming and markup languages.
Sublime Text 3 Cross-Platform Features
Sublime Text 3 is compatible with Windows, Linux, and Mac OS X.
You only need one license to use Sublime Text 3 on any machines you want to use it on, regardless of the operating system they are running.
Sublime Text 3 has a robust Python API that allows plugins to extend the capabilities of the editor.
Sublime Text has an Application Programming Interface (API) that programmers can use with the Python programming language to interface with its internals.
The editor comes with an embedded Python interpreter. While developing plugins, the embedded interpreter helps inspect the editor’s settings and fast testing API calls.
Split Layouts enable you to divide your files into multiple split screens. This is beneficial while working on the front end (HTML on one screen, CSS and/or JavaScript on another) or undertaking test-driven development (Python code on one screen, test scripts on another).
Vintage Mode gives you vi commands that you can use in ST3.
Tabs, which are similar to Chrome, make navigating and editing multiple files much easier.
The automatic reload of the previous session reopens all files and folders that were open when you last closed the editor. We have ST3 open all the time, with several projects available, so that when we restart the computer, the files and folders are automatically restored.
Code Snippets boost your productivity by allowing you to construct standard code with just a single keyword. Several default snippets are available. Open a new file, type lorem, and press Tab to see for yourself. A paragraph of lorem ipsum content should enough. In a Python file, typing defs and then pressing the tab will create a generic function.
Downloading and Installing Sublime Text 3
To begin, you must first download it. After that, sublime Text 3 is available for download. After that, you will see different version descriptions for different operating systems and the available ways for distribution.
You must now choose one as per your machine requirement. For instance, if your computer is 64-bit, download the 64-bit version and 32-bit version when the opposite is true. Go ahead and Install the downloaded file now by running the executable file if you are on windows. Or Linux repos such as .deb for Debian distros and .rpm.
Alternatively, on Linux based operating system like Ubuntu, we can install Sublime Text 3 via the terminal by running the following commands.
Step 1:
sudo apt update
sudo apt install apt-transport-https ca-certificates curl software-properties-common
The above commands will facilitate updating the apt package list and ensure that the necessary dependencies are collected from their sources and are available for use.
Step 2:
curl -fsSL https://download.sublimetext.com/sublimehq-pub.gpg | sudo apt-key add –
The use of the curl command is necessary for the importation of the repository’s GPG key. Successively, use the following command,
sudo add-apt-repository "deb https://download.sublimetext.com/ apt/stable/"
To add to your operating system’s software repository, the Sublime Text Apt repository.
Step 3:
sudo apt update
sudo apt install sublime-text
It is the final stage involving enabling and updating apt sources. Finally, it concludes by adding sublime text 3 to your system.
You are now ready to use.
Choosing a Direction
After installing it, you’ll need to set an environment variable to point to the python installation directory. If your path is already set, you can skip to the next section; otherwise, look at setting the path. The latter is a requirement, especially when running on the Windows operating system. However, it is not a show stopper because we are running it on the Ubuntu operating system.
Sublime Text 3 Customization
ST3 can be customized once it has been downloaded. First, Install the command-line tool subl.
Sublime Text offers a command-line tool called subl that allows you to open a single file, folders from the terminal, or an entire directory like TextMate’s mate command.
To enable this command, first establish a symbolic link to the subl.
sudo ln -s /Applications/Sublime Text.app/Contents/SharedSupport/bin/subl /usr/bin/subl
To make sure the link works, open Sublime by running the following command on the terminal.
If it doesn’t work, you’ll need to include /bin in your path:
tuts@codeunderscored:~$ echo "export PATH=~/bin:$PATH" >> ~/.profile
You may now use the following commands to open a file or directory:
But, first, go to the current directory and open it.
tuts@codeunderscored:~$ Subl .
Create a codeunderscored.txt file and open it.
tuts@codeunderscored:~$ subl codeunderscored.txt
If the path contains spaces, double quotes must be used to enclose the complete path:
tuts@codeunderscored:~$ subl "~/Desktop/code underscored file.txt."
Open the help file to see all the commands:
tuts@codeunderscored:~$ subl --help

Installing Package Control
To begin using the numerous packages for expanding Sublime’s capability, you must first manually install Package Control, package management. You can use it to establish, delete, and update all other ST3 packages once it’s installed.
First, open the command palette using the following combination of keys simultaneously on both Windows and Linux.
or
In Mac.
Subsequently, start typing install and keep going until you get to Package Control: Install Package. Press Enter when the dialog box appears to look for available packages.
To access the ST3 console, go to View > Show Console. First, copy the piece of code, then paste it into the console. Enter the code. ST3 should be restarted.
Here are a few more useful commands:
List
All of your installed packages are listed in List Packages.
remove
Remove Package is a command that deletes a specified package.
Upgrade
Upgrade Package improves the performance of a given package.
Upgrade/Overwrite All
All of your installed packages are upgraded when you choose Upgrade/Overwrite All Packages.
Themes
ST3 also allows you to adjust the general theme to fit your personality better. Make your own. If you’re not artistically inclined, you can use Package Control to get one of the many custom themes created by the Sublime community. ColorSublime is an excellent tool for previewing themes before installing them.
My faves are the ever-popular Soda Dark Theme, Predawn, and the minimalist Flatland.
After installing a theme, go to Sublime Text > Preferences > Settings – User: and edit your base settings. Or, if you wish to switch from one theme to the next, then go to Sublime Text > Preferences > Select Theme …

Goto
It is Sublime Text 3’s most powerful feature. With this capability, you can open files with just a few keystrokes.
It also allows you to jump to symbols, lines, or phrases in an instant.
To use this feature, press Ctrl+P and then type – If you want to open a file, type the first few letters of the file name. Suppose you want to jump to symbols, type @. If you wish to search anything within a file, type #, and if you directly access or jump to a particular line number, for instance, typing tp:54 will take you to line 54 of the file.
Palette of Commands
Sublime Text 3 has another proper function that allows you to do various functions such as sorting, modifying syntax, and changing identity settings.
The command palette will enable you to accomplish many things, such as manage sublime projects, change file syntax, and run package commands, among other things.
Hit ctrl+shift+p to open the command palette, then choose command and press Enter.
several options

It’s one of Sublime Text 3’s best features. For instance, you will alter many lines and manipulate files more quickly if you use this function.
It can be used as a rapid replacement for finding and replacing or applying the same set of modifications to numerous lines simultaneously.
Press Ctrl+Shift+L after selecting a block of text to break it into one selection per line, then Ctrl+D to determine the next occurrence of the selected word.
Go to the Definition page
The most awaited feature of Sublime Text 3 was the “Goto Definition” functionality. Goto Definition uses the symbol index provided by sublime Text.
To utilize Goto Definition, hit alt+g on your keyboard.

Snippets
Users can save blocks of commonly used code and attach keywords to them using Snippets. After that, the user can type the term and hit the tab to paste the code block whenever they need it.
Other Characteristics
Aside from the features listed above, Sublime Text 3 also includes the following:
- Checking for misspellings
- Save automatically
- Keybindings that can be changed
- Split editing with macros
- Anything can be customized.
So now we’ll talk about using Sublime Text 3 to run Python scripts.
Run Your First Program using Sublime Run Python
Without question, Sublime Text is the most popular text editor among developers, and it can also be used to edit Python code. Now we’ll look at how to use it in Python.
Testing a simple program
Now we’ll examine how a Python program runs in Sublime Text 3. What we must do to achieve this is –
To begin, launch your sublime editor.
Create a new file using the procedures below. You can create a new file by initially accessing the to file menu then choosing New File or using ctrl+N,
After that, save it as testing.py. Note that the filename must end in.py. After that, write your code.
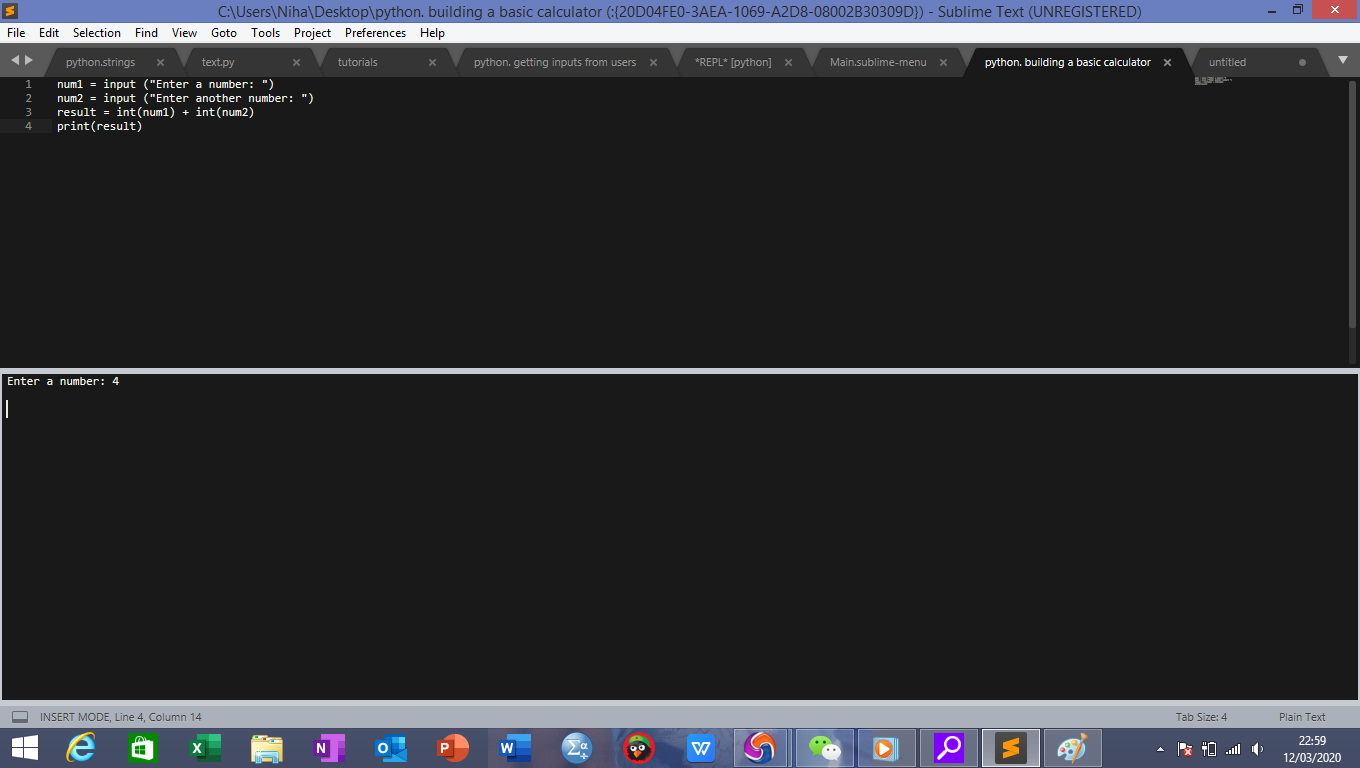
This example is the essential software that adds two numbers. As such, code is —
first_number = 12
second_number = 8

# addition of the two numbers
sum = float(first_number) + float(second_number)

# show the sum of the two numbers
print('The sum of {0} and {1} is {2}'.format(first_number, second_number, sum))

Putting the code to work
Choose Tool from the menu bar, then Build System, and then Python from the drop-down menu. Subsequently, access the menu “Tool” and choose the option “Build.” The latter is responsible for running your code. So, if we run the preceding code now, we’ll receive the following result.

Taking User Input
Now we’ll look at how to capture user input in sublime text 3.
In Python, taking input is a breeze. However, while working with sublime text 3, we need to make a few adjustments. So, let’s dive in and explore what they are –
Installing SublimeREPL Plugin
SublimeREPL is a Sublime Text plugin that allows you to run interactive interpreters in many languages from within a regular editor tab. It also allows you to use a telnet port to connect to a remote interpreter that is running (for example, Clojure/Lein).
SublimeREPL comes with built-in support for command history and transferring code from open buffers to interpreters for evaluation, making it possible to program interactively.
The sample program that runs on sublime is not intended to be used as a comment prompt; rather, it is intended for output. Therefore, PackageManager is used to accomplish this.
Copy the code from Package Control according to your sublime version.
Return to exquisite Text and select View->Show Console. Now you must put the copied code into this box and press enter. Your package will be installed in a few seconds.

Select Preferences->Package Control from the drop-down menu. You’ll see that there are a plethora of exquisite packages inside. Now select Install Packages from the drop-down menu.
A dialog will occur when you click Install Package, as seen below.

Now write SublimeREPL into this textbox, then select the first option and press Enter. The plugin will be installed as a result of this.
During the installation, you will see the installing package at the bottom.
To run the current file, navigate to Tools->SublimeREPL->Python->Python-RUN current file. This will run the existing file. So, let’s see what the result is.

It’s pretty extraordinary to be able to run Python scripts in Sublime Text 3. So instead of having to go to Tools->SublimeREPL->Python->Python-RUN current file every time, we can now create a shortcut.
Go to Preferences->Key Bindings and put your shortcut as illustrated in the “Keyboard Shortcuts” section below.
So now you don’t have to deal with a long-running procedure; all you have to do is hit ctrl+alt+b or something of the sort. That’s fantastic!!!!
Adding Python 3 as a build system
To get started, go to Tools -> Build System -> New Build Methodology.

You’ll notice that you can juggle between Python and Python 3 in your list of Build Systems if you have both versions. Python is installed automatically and is version 3.9. We’re going to include Python 3.
You’ll be taken to a new window called untitled. sublime-build after clicking New Build System as shown above.
The wording between the curly brackets needs to be changed. Remove the code between the brackets first. After that, copy and paste the code below:
"cmd": ["python3", "-i", "-u", "$file"],
"file_regex": "^[ ]File "(...?)", line ([0-9]*)",
"selector": "source.python"
To indent the second and third lines, you may need to hit the tab. Now hit Command S to save the file. Rename the file to whatever you want your Build System to be called. Something succinct and easy to comprehend. MyBuild is the name we gave to ours. It’s important to note that the extension must MyBuild.sublime-build. Also, don’t deviate from the course. Sublime Text will automatically place it in the correct location.
Close the file once you’ve clicked save to return to your scratch.py file. Now pick MyBuild from Tools -> Build System (or whatever you named your Build System). If you don’t see your new build system, you may need to close and reopen Sublime Text.
Keyboard Shortcuts
Python makes it simple to create your custom commands using key bindings. For example, to set your shortcut, access the key bindings by going to Preferences →key bindings.
You can define your key bindings on the resultant empty list by entering the following code to cancel the build.
{"keys":["ctrl+alt+c"], "command":"cancel_build"},
You can also change any of the existing key bindings from the current key bindings. Then press Ctrl + S to save the changes. You may even need to restart sublime for the changes to use the shortcut to cancel the build.
Shortcuts on the Keyboard
Cmd+P
Cmd+P is used to search and open files rapidly. You can easily open a file by typing a portion of a path and filename within a project. This is useful for opening files in massive Django projects rapidly.
Ctrl+G
Go to Line No. Ctrl+G navigates to a specific line number in a currently open file.
Cmd+R
The Symbol Cmd+R makes it easier to find functions and classes within a file; press Cmd+R. Then, simply begin entering the name of the one you desire.
Cmd+Left and Cmd+Right
You can navigate within lines by pressing Cmd+Left to go to the beginning of a line and Cmd+Right to go to the end.
Ctrl+Shift+K
Delete the currently selected line The current line is deleted by pressing Ctrl+Shift+K.
Cmd+D
Multi-Edit is, without a doubt, my favorite keyboard shortcut: Select a word and then press Cmd+D to go on to the next one. Then press Cmd+D to choose the following same word, and so on. In addition, to generate a cursor for editing anywhere you click, press Cmd+Left Button.
To select a block of text, press the Option+Left Button combination. When formatting a CSV file, it’s ideal for reducing blank space.
Conclusion
We hope that this article was not just educative but also informative and thus valuable for your endeavors. As a result, we are confident that you could improve your workflow by combining some of the approaches and tricks we have mentioned herein, besides adopting some of the packages and custom settings with your own based on your unique preferences.
If you have any more questions or recommendations, we would be glad to hear them in the comments section below.