Часто нам нужен удаленный (через интернет) доступ к нашей сети или серверу. Или объединить две локальных сети физически находящихся в разных местах используя общедоступные сети, например интернет. Простой способ это реализовать VPN (Virtual Private Network «виртуальная частная сеть»).
Простыми словами это частная сеть по верх общедоступной сети (интернет). Можно себе это представить как тунель между двумя устройствами. А для безопасности передаваемых данных используется шифрование.

В этой статье мы настроим VPN Server на Windows Server 2019. Сервер к которому будут подключаться клиенты для доступа к нашей сети. Мы будем использовать протокол L2TP для создания туннеля и IPSec для шифрования трафика. Для этого протокола нам не потребуется специального клиента, его поддержка уже есть в Windows и Android.
Установка службы.
- Откройте Диспетчер серверов .
- Выберите Управление> Мастер добавления ролей и компонентов .
- Установите флажок « Удаленный доступ » и нажмите «Далее».
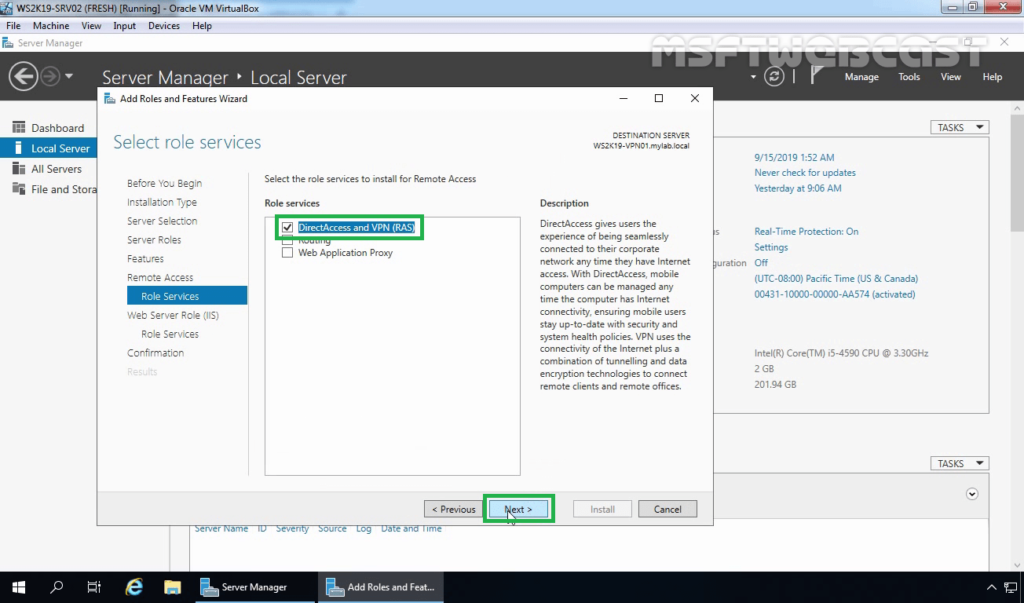
- В разделе «Службы ролей» установите флажок « DirectAccess и VPN (RAS) » и нажмите Далее .
- Наконец, нажмите Установить . Это может занять некоторое время, и это требует перезагрузки сервера.


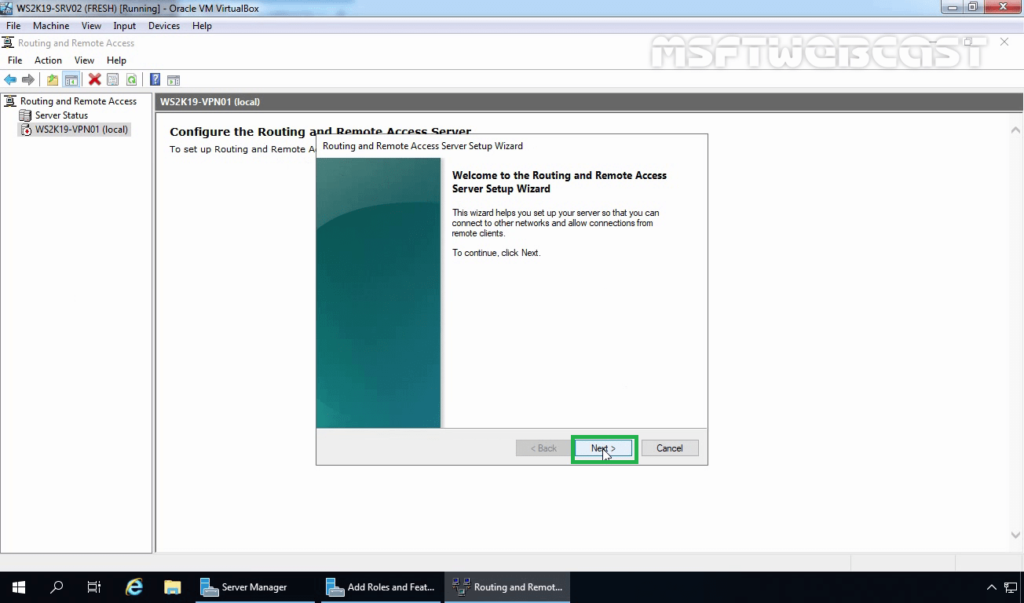
После установки роли Удаленный доступ ее следует настроить, проще всего это сделать, нажав на значок с желтым треугольником в Диспетчере серверов и выбрать в появившемся списке пункт Запуск мастера начальной настройки.


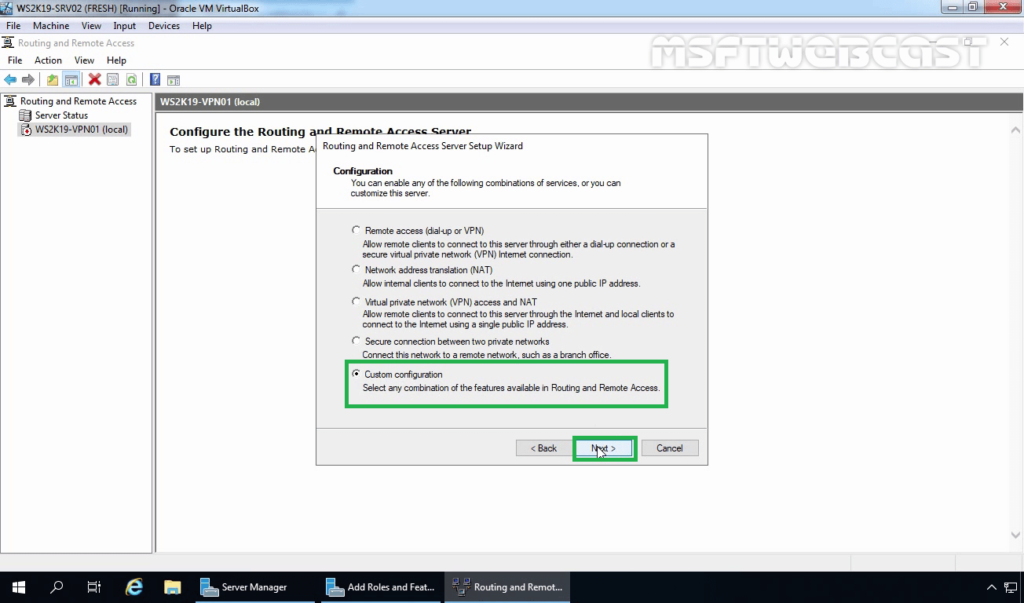
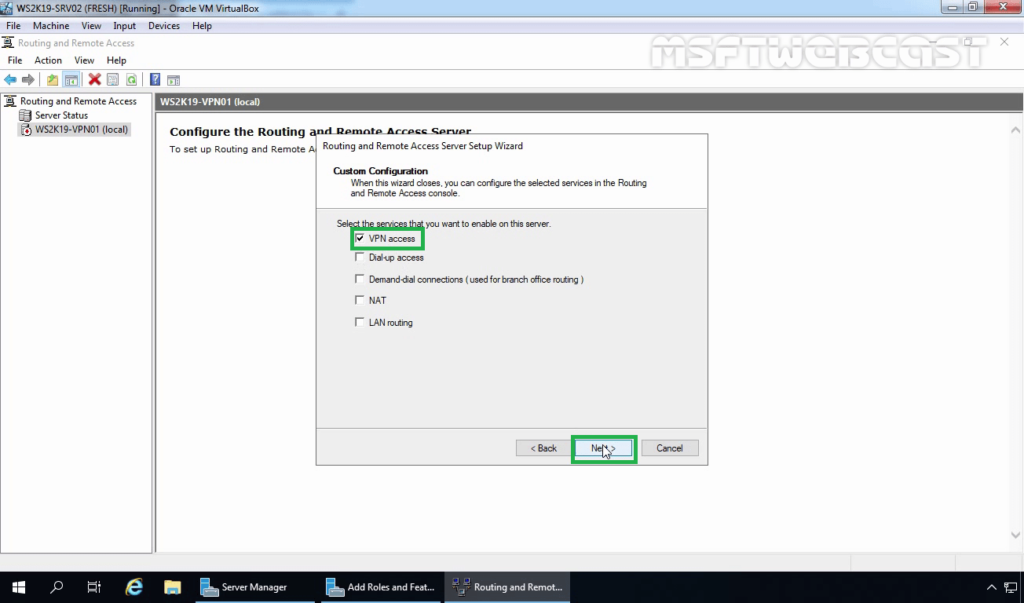
Настройки — Особая конфигурация — VPN
- Выбираем наш сервер. Правой кнопкой мыши переходим в Настроить.
- Выбираем особая конфигурация.
- VPN.


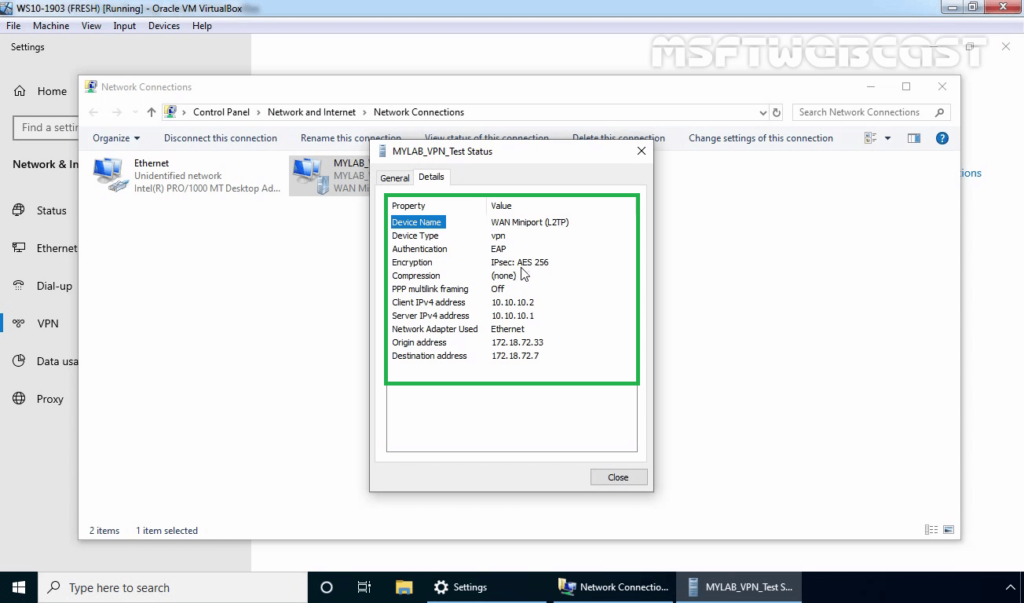
Теперь нужно настроить свойства подключения по L2TP:
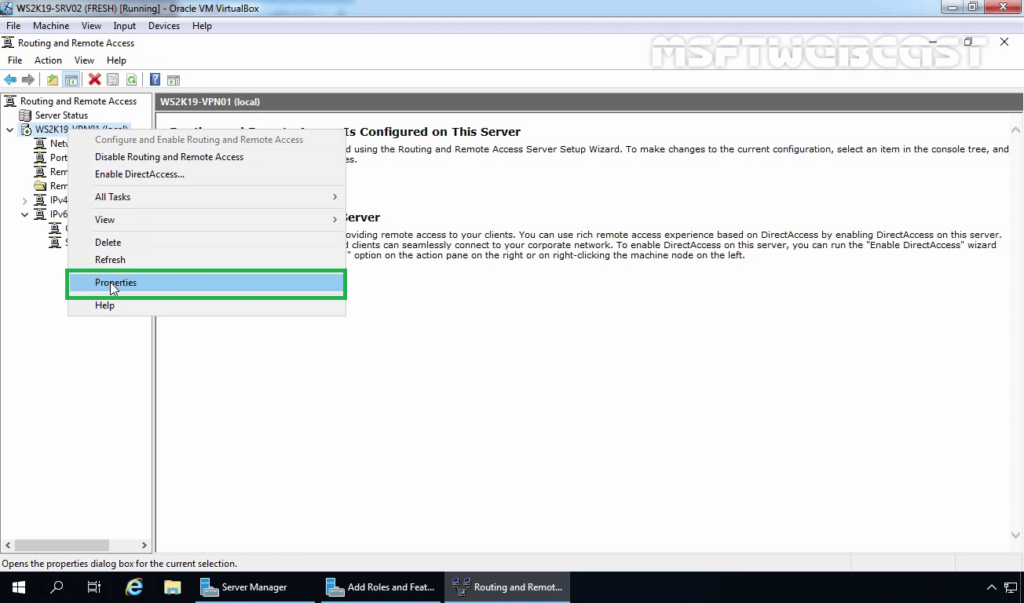
- Выбираем наш сервер. Правой кнопкой мыши переходим в Свойства.
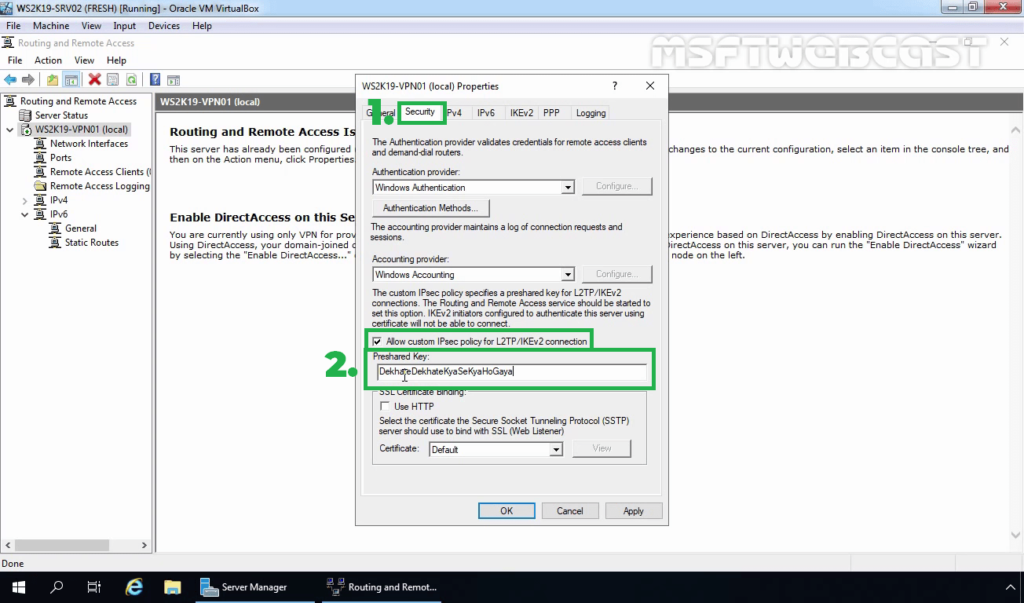
- Безопасность и вводим Общий Ключ для IPSec . Можно использовать и сертификаты.
- Переходим во вкладку IPv4 и вводим пул адресов который будет выдаваться клиентам.
- Отключаем IPv6.


На этом настройка VPN в целом завершена. Осталось только разрешить пользователю подключаться по VPN :
- Администрирование — Управление компьютером — Пользователи
- Выбираем пользователя — Свойство — Входящие звонки.

Настройка подключения к VPN в Windows.

Ошибка в тексте? Выделите её и нажмите «Ctrl + Enter»
A Virtual Private Network (VPN) is used to securely create a tunnel for data between your local computer to a remote server. On Windows Server 2019, you can configure a VPN to provide network access to connected clients and allow connected devices to communicate securely.
This guide explains how to set up a fresh Windows Server 2019 as an L2TP over IPSec, or a PPTP VPN, using the routing and remote access feature. Layer 2 Tunneling Protocol (L2TP) with IPSec offers robust encryption for connections to the server. On the other hand, the Point to Point Tunneling Protocol (PPTP) is simple to deploy but not as secure.
To set up the VPN server, we shall use the built-in Routing and Remote access feature, which offers a graphic interface to configure remote networking features such as Dial-up, LAN routing, NAT, and VPN.
Requirements
-
Deploy a Windows Server 2019 Instance on Vultr
-
Remotely connect to the server and log in as an Administrator
Create a New VPN User
For the VPN service to work well, it must authenticate with a valid user account to the server. So, you need to create a new user on the server.
Click Tools under server manager and select Computer Management from the drop-down list to create a new user.
Once the computer management window pops up, expand Local Users and Groups from the left pane and right-click Users to select New User on the sub-menu.

Under the New User dialog box, enter a username, full name, and password for the VPN user, then click create and close the window.

The new user will now be listed on the list of active server users, right-click on the new user and select properties.
Under the user properties window, navigate to the Dial-in tab and click Allow access under Network Access Permission. Click OK for changes to take effect.

Install the Routing and Remote Access Features
Procedure 1: Through Server Manager
From the Windows start menu, open Server Manager, click Manage, then select Add Roles and Features from the drop-down list.
From the open window, click next and select Role-based or feature based installation, then select your server from the pool. Select Remote Access, Remote Access Administration from the list of server roles.

Next, select DirectAccess and VPN (RAS) and Routing from the features list, then click to Install IIS, which is required for remote access to work well.

Procedure 2: Using Windows PowerShell
You can also install Remote Access from Windows Powershell.
From the Windows start menu, open an Administrative Powershell, then install Remote access by pasting the following code to the console.
Install-WindowsFeature RemoteAccess

Install-WindowsFeature DirectAccess-VPN -IncludeManagementTools

Install-WindowsFeature Routing -IncludeManagementTools


Your output should be similar to:


PS C:UsersAdministrator> Install-WindowsFeature RemoteAccess

>> Install-WindowsFeature DirectAccess-VPN -IncludeManagementTools

>> Install-WindowsFeature Routing -IncludeManagementTools


Success Restart Needed Exit Code      Feature Result

------- -------------- ---------      --------------

True    No             Success        {Remote Access}

True    No             Success        {RAS Connection Manager Administration Kit...

True    No             Success        {Routing}
Configure Routing and Remote Access
Open Server Manager and click Tools on the top toolbar. From the drop-down list, select Remote Access Management.

In the open Routing and Remote Access window, right click on your server name just below Server status, then select Configure and Enable Routing and Remote Access from the drop-down menu.
Now, select Custom configuration to configure remote access manually.

Select VPN Access and NAT as services you want to enable on your server, click next to finish the configuration, and start the service.

Setup a PPTP VPN
Now that Remote Access is running, you can set up your PPTP VPN. To get started, you must assign connected clients** static IP Addresses to avoid possible connection issues. To do this, right-click on your server under the Routing and Remote Access window and select Properties from the drop-down list.

Click IPV4 in the Open Window, then select Static address pool. Now, click Add to craft a new IP Address range from the open pop-up window. In this guide, we use the range 10.0.0.1 to 10.0.0.50, and the server will automatically calculate the number of available addresses.

Click OK to save your static IP Address configuration. You will be prompted to restart Routing and Remote Access for changes to apply; simply click OK.
Configure NAT and enable PPTP
We need to configure Network Address Translation (NAT) for connected clients to use the Internet. On the left pane of the same routing and remote access window, expand the IPv4 options under your server. Right-click on NAT and select New Interface.

Under the open dialog window, select Public interface and enable NAT on the interface.
Next, navigate to Services and Ports and click VPN Gateway (PPTP) from the drop-down list.

Click Edit to set a Private address for the VPN service, change the current address 0.0.0.0 to 127.0.0.1, and click OK to save.

Finally, click OK to save all changes, then right-click on your server from the left pane and click Restart under the All Tasks sub-menu.

This will restart routing and remote access services making your server ready for incoming VPN connections.
Configure Windows Firewall to accept Incoming PPTP VPN Connections
Click Tools from the Windows server manager and select Windows Defender Firewall with Advanced Security from the drop-down list.
Under the open Windows Defender Firewall with Advanced Security window, select Inbound Rules on the left pane, then click New Rule on the right pane.

In the open new Inbound rule wizard, click Predefined and select Routing and Remote Access from the list.

Under predefined rules, choose Routing and Remote Access (PPTP-In), click next to allow the connection, then finish for the new Firewall rule to be applied and test your new PPTP VPN server.

Test your PPTP VPN
Using your personal computer (PC) or Smartphone, go to Networks, Add a new VPN and select PPTP as the VPN type. Then, enter the VPN username and password created earlier to connect.
In this guide, we cover and test the PPTP VPN on a Windows 10 PC. To get started, click the start menu and search for Control Panel, then, click Network and Internet.
Under Network and Internet, open the Network and Sharing Center and click Set up a new connection or network.

Under the open window, select Connect to a workplace and click Use my Internet connection (VPN).
Then, enter your server’s public IP Address (Check your Vultr server dashboard), assign the connection a name, and click create.

Now, on the left pane, click Change adapter settings, then right click your created VPN interface and select Properties.

Under the pop-up, click Security, then choose Point to Point Tunneling Protocol (PPTP) under Type of VPN.
Finally, under Allow these protocols, select CHAP and MS-CHAP v2, then click OK to apply changes.

Your new VPN is configured successfully. Click the network connection icon on the taskbar, select your VPN on the list and click Connect to enter the VPN username and password created earlier to establish a connection to your new PPTP VPN server.

Setup L2TP with IPSEC
Open server manager, click Tools, and open Remote Access Management, then right-click your server on the left pane to select Properties from the drop-down list.
Under server properties, navigate to the Security tab, and click Allow custom IPSec policy for L2TP/IKEv2 connection to enter your new pre-shared key.
In this guide, we use 12345678, choose something stronger, then navigate to IPV4 to set a static address pool and click OK to apply changes.

Keep note of the pre-shared key (PSK) since it will be required for every user establishing a connection to the VPN server.
From the left pane, expand the IPV4 sub-menu and right-click on NAT, then select New Interface. If you set PPTP earlier, click NAT and edit the existing interface you already created.
Navigate to the Services and Ports tab and select VPN Gateway [L2TP/IPSec], then click edit to change the private address from 0.0.0.0 to 127.0.0.1. Click OK to save changes and restart remote access from the left pane under All Tasks.
This will restart Routing and Remote Access, then save the applied L2TP configurations.
Allow L2TP Connections through Windows Firewall
Open Windows Defender with Firewall, select inbound rules and add a new rule. Select Predefined and from the list, choose Routing and remote access.
Under Predefined rules, select Routing and Remote Access [L2TP-In] and click next.

Finally, allow the connection and click Finish to apply the new Firewall rule.
Connect and Test Your L2TP VPN server
In this guide, we test the new L2TP with IPSec VPN on a mac. To get started, open System Preferencesand click Network.
Under the Network Preferences window, click the + sign and select VPN under the Interface dialog box. Then, choose L2TP with IPSec as the VPN Type and assign your connection a name.

Click create, then enter your public server IP Address (server address) and username (Account name). Next, click Authentication Settings to enter your account password and Pre-shared key (Shared secret) created earlier.

Next, click Advanced and select Send all Traffic over VPN Connection, then click Apply, and finally click Connect to establish a connection with your new L2TP VPN server.

Conclusion
You have set up a VPN on your Windows server 2019 instance; you can choose to create both PPTP and L2TP VPNs with different users connecting through your server without any limitations.
For every connected device, they will be able to access the Internet through your server and interact with other connected computers.
Содержание
- Как установить виртуальную частную сеть на Windows Server 2019
- Шаги по установке VPN на Windows Server 2019
- Шаг 1 – Начните с установки Удаленного доступа через Диспетчер серверов
- Шаг 2 – Перейти к установке и настройке VPN
- Шаг 3 – Настройка VPN-доступа
- Записки IT специалиста
- Настраиваем PPTP или L2TP VPN-сервер при помощи RRAS в Windows Server
- Установка и настройка службы маршрутизации и удаленного доступа
- Настройка PPTP и/или L2TP сервера удаленного доступа
- Proxy ARP
- VPN-сервер за NAT
- Настройка VPN-подключения в Windows
- Настройка VPN-подключения в Linux
- Дополнительные материалы:
- Настройка VPN на Windows Server 2019.
- Установка службы.
- Настройка VPN сервера.
- Теперь нужно настроить свойства подключения по L2TP:
- Настройка подключения к VPN в Windows.
- Как настроить VPN на Windows Server и перестать ходить на работу?
Как установить виртуальную частную сеть на Windows Server 2019
Использование VPN на вашем Windows Server имеет много преимуществ для всех сторон, и это позволяет пользователям в небольшой среде доступ к удаленным клиентам или брандмауэрам к Windows Server. Мы постарались объяснить, как установить и настроить виртуальную частную сеть на Windows Server 2019.
Шаги по установке VPN на Windows Server 2019
Шаг 1 – Начните с установки Удаленного доступа через Диспетчер серверов
Чтобы установить VPN-сервер в небольшой среде, нам нужно начать с установки удаленного доступа. Вы можете использовать либо Диспетчер серверов, либо Power Shell для установки и настройки удаленного доступа.
Шаг 2 – Перейти к установке и настройке VPN
После установки Remote Access для Windows Server 2019 мы можем безопасно установить и настроить VPN-сервер. Это делается с помощью специального мастера.
Выполните следующие действия для установки и настройки VPN-сервера на Windows Server 2019:
Шаг 3 – Настройка VPN-доступа
Наконец, остается только настроить пользователя VPN и доступ к сети. Для этого необходимо открыть порты брандмауэра и перенаправить их на сервер Windows.
Это порты, которые вам нужно открыть на основе протоколов:
Если у вас нет DHCP-сервера, вы всегда можете установить статический пул IPv4-адресов. Это можно сделать, выполнив следующие действия:
Это оно. Если у вас есть какие-либо вопросы или предложения, не стесняйтесь спрашивать нас в разделе комментариев ниже.
Источник
Записки IT специалиста
Технический блог специалистов ООО»Интерфейс»
Настраиваем PPTP или L2TP VPN-сервер при помощи RRAS в Windows Server
 Платформа Windows Server остается одной из наиболее популярных серверных платформ, в том числе и для реализации решений удаленного доступа. Служба маршрутизации и удаленного доступа (RRAS) позволяет быстро и достаточно просто развернуть VPN-сервер практически для любых нужд. Сегодня мы еще раз вернемся к этому вопросу и рассмотрим, как создать на базе Windows Server PPTP или L2TP сервер для удаленного доступа, как наиболее востребованный сценарий на сегодняшний день.
Почему именно эти типы подключения? Потому что они наиболее просты в реализации и поддерживаются широким спектром клиентов что называется «из коробки». Однако следует помнить, что PPTP не является на сегодняшний день безопасным и имеет слабые алгоритмы шифрования, но при этом он наиболее производительный из VPN-протоколов и имеет минимальные накладные расходы. Кроме того, его поддержка исключена из операционных систем Apple.
Оптимальным вариантом будет использование L2TP/IPsec подключения, которое сочетает в себе простоту, поддержку практически любыми клиентскими ОС и устройствами вместе с неплохим уровнем безопасности, обеспечиваемым IPsec. А так как настройка сервера для этих видов подключений практически идентична, то мы решили объединить их в одну статью.
Установка и настройка службы маршрутизации и удаленного доступа
Для начала работы с VPN в среде Windows Server вам потребуется установить роль Удаленный доступ, это делается стандартными средствами и не должно вызвать затруднений.
 В Службах ролей выбираем Маршрутизация, роль DirectAccess и VPN (RAS) будет добавлена автоматически.
 После установки роли Удаленный доступ ее следует настроить, проще всего это сделать, нажав на значок с желтым треугольником в Диспетчере серверов и выбрать в появившемся списке пункт Запуск мастера начальной настройки.
 В появившемся окне выбираем пункт Развернуть только VPN.

Затем в оснастке Маршрутизация и удаленный доступ щелкаем правой кнопкой мыши по строке с сервером и выбираем в выпадающем меню Настроить и включить маршрутизацию и удаленный доступ.
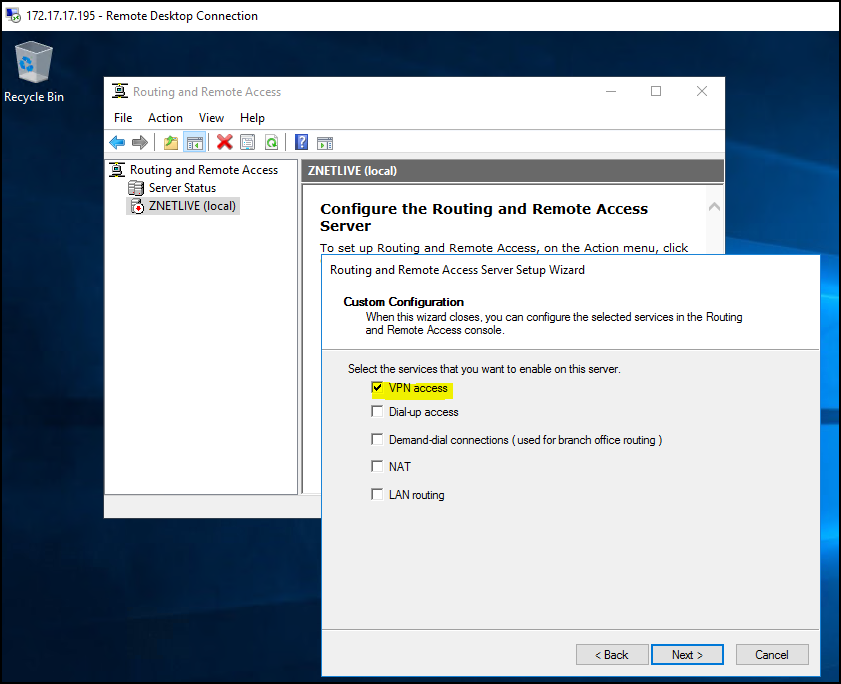
 В следующем окне достаточно поставить галочку Доступ к виртуальной частной сети (VPN) и завершить работу мастера.
 После завершения работы мастера служба Маршрутизации и удаленного доступа будет запущена и можно приступить к настройке сервера удаленного доступа. Если же данная служба у вас уже установлена и настроена в иной конфигурации, то щелкните правой кнопкой по строке сервера и выберите Свойства, в открывшемся окне на закладке Общие установите опции: IPv4-маршрутизатор локальной сети и вызова по требованию и IPv4-сервер удаленного доступа.
 Настройка PPTP и/или L2TP сервера удаленного доступа
 Настройка PPTP и/или L2TP сервера удаленного доступа
 Нажав на кнопку Методы проверки подлинности откроем окно, в котором выберем только Протокол EAP и Шифрованная проверка (Microsoft, версия 2, MS-CHAP v2), остальные протоколы не являются безопасными и должны быть отключены.

На этом настройка сервера может считаться законченной, следующим шагом следует разрешить подключения нужным пользователям, для этого в свойствах пользователя перейдем на закладку Входящие звонки и в блоке Права доступа к сети укажем Разрешить доступ. Теперь указанный пользователь может подключаться к нашему серверу используя свои учетные данные.
 Также не забудьте проверить настройки брандмауэра, чтобы убедиться, что правила Маршрутизация и удаленный доступ GRE-входящий, PPTP-входящий (для PPTP) и L2TP-входящий (для L2TP) включены.
Proxy ARP
 Proxy ARP
Для решения данной проблемы используется технология Proxy ARP, которая, как понятно из названия, представляет прокси-сервер для ARP-запросов, позволяя удаленным клиентам работать так, как будто бы они действительно находились в одной сети, без каких-либо дополнительных настроек. При использовании RRAS никаких дополнительных действий делать не нужно, Proxy ARP работает по умолчанию.
VPN-сервер за NAT
Так как мы используем Windows Server, то с большой долей вероятности он будет находиться внутри сетевого периметра и нам понадобится настроить проброс портов на маршрутизаторе. Для этого нужно четко понимать, как работает VPN-соединение и какие порты и протоколы следует передавать.
Начнем с PPTP, прежде всего клиент устанавливает управляющее TCP-соединение на порт 1723, затем, после успешной аутентификации создается соединение для передачи данных с использованием протокола GRE.
Таким образом для работы PPTP-сервера за NAT нужно:
С первым понятно, а вот с GRE могут возникнуть затруднения. Если вы используете маршрутизатор на базе Linux, то обратитесь к следующей нашей статье, если оборудование Mikrotik, настроенное по нашей инструкции, то достаточно пробросить только 1723 TCP, прохождение GRE будет разрешено конфигурацией брандмауэра, в остальных случаях следует обратиться к документации на свою модель маршрутизатора.
С L2TP сложнее, точнее не с ним самим, а с IPsec, который не поддерживает NAT. Для обхода этих ограничений используется протокол NAT-T, который инкапсулирует пакеты IPsec в UDP, позволяя успешно проходить через NAT. Поддержка данного протокола включена по умолчанию практически во всех ОС, кроме Windows. Для включения поддержки NAT-T следует внести изменения в реестр, найдите ветку:
И создайте в ней параметр DWORD c именем AssumeUDPEncapsulationContextOnSendRule и значением 2.
Это можно быстро сделать при помощи PowerShell:
После чего систему следует перезагрузить. Данные изменения нужно внести как на сервере, так и на клиенте.
При установлении L2TP/IPsec соединения между узлами прежде всего создается зашифрованный IPsec-канал, для этого используется протокол обмена ключами IKE (порт 500 UDP) и протокол NAT-T (порт 4500 UDP), затем уже внутри безопасного IPsec-соединения поднимается L2TP-туннель на порт 1701 UDP и происходит аутентификация пользователя.
Обратите внимание, аутентификация пользователя в L2TP, в отличии от PPTP, происходит внутри защищенного IPsec-канала, что делает данный тип соединения более безопасным.
Таким образом для работы L2TP/IPsec сервера за NAT нужно:
Вопреки распространенному заблуждению порт 1701 UDP пробрасывать не нужно.
Настройка VPN-подключения в Windows
 И наконец на закладке Сеть перейдите в свойства протокола IP версии 4 (TCP/IP 4) и нажмите Дополнительно, в открывшемся окне снимите флаг Использовать основной шлюз в удаленной сети, в противном случае весь исходящий трафик будет направлен в туннель.
 После чего можем подключаться и пробовать получить доступ к ресурсам удаленной сети, если вы все сделали правильно, то проблем возникнуть не должно.
Настройка VPN-подключения в Linux
 Заполняем основные настройки: адрес сервера, имя и пароль пользователя.
 Затем нажимаем кнопку Дополнительно и в открывшемся окне в разделе Аутентификация оставляем только MSCHAPv2, обязательно включаем Использовать шифрование MPPE и выбираем ниже 128 бит (наиболее защищенное), также устанавливаем флаг Включить Stateful Encryption для уменьшения накладных расходов на шифрование. Флаги сжатия оставляем включенными.

Закрываем данное окно с сохранением данных и переходим на закладку IPv4, где в разделе Маршрутизация устанавливаем флаг Использовать это подключение только для ресурсов этой сети, в противном случае в туннель пойдет весь трафик узла.

На этом настройка подключения завершена, можно подключаться.
Для работы с L2TP потребуется установить дополнительные пакеты:
После чего в доступных типах подключения появится L2TP. Основные настройки ничем не отличаются от PPTP, также адрес сервера, имя и пароль пользователя.
 Затем откроем Настройки PPP, в разделе Аутентификация также выберем только MSCHAPv2, а вот опции шифрования оставляем выключенными, так как чистый L2TP шифрования не использует, для защиты канала здесь применяется IPsec. Флаги сжатия также оставляем установленными по умолчанию.
Также имеет смысл установка флага Enforce UDP Encapsulation, который принудительно включает NAT-T, в случае если вы точно знаете, что ваш сервер находится за NAT, без этой опции протокол включается автоматически при обнаружении первого устройства с NAT.

Сохраняем настройки и переходим на вкладку IPv4, где также в разделе Маршрутизация ставим флаг Использовать это подключение только для ресурсов этой сети, чтобы направить в туннель только трафик для сети офиса.
 На этом настройка закончена, можно подключаться.
Дополнительные материалы:
Помогла статья? Поддержи автора и новые статьи будут выходить чаще:

Или подпишись на наш Телеграм-канал: 
Источник
Настройка VPN на Windows Server 2019.
Часто нам нужен удаленный (через интернет) доступ к нашей сети или серверу. Или объединить две локальных сети физически находящихся в разных местах используя общедоступные сети, например интернет. Простой способ это реализовать VPN (Virtual Private Network «виртуальная частная сеть»).
Простыми словами это частная сеть по верх общедоступной сети (интернет). Можно себе это представить как тунель между двумя устройствами. А для безопасности передаваемых данных используется шифрование.
В этой статье мы настроим VPN Server на Windows Server 2019. Сервер к которому будут подключаться клиенты для доступа к нашей сети. Мы будем использовать протокол L2TP для создания туннеля и IPSec для шифрования трафика. Для этого протокола нам не потребуется специального клиента, его поддержка уже есть в Windows и Android.
Установка службы.
Настройка VPN сервера.
После установки роли Удаленный доступ ее следует настроить, проще всего это сделать, нажав на значок с желтым треугольником в Диспетчере серверов и выбрать в появившемся списке пункт Запуск мастера начальной настройки.
Далее в Средства выбираем Маршрутизация и Удаленный доступ.
Настройки — Особая конфигурация — VPN
Теперь нужно настроить свойства подключения по L2TP:
На этом настройка VPN в целом завершена. Осталось только разрешить пользователю подключаться по VPN :
Настройка подключения к VPN в Windows.
Если вы нашли ошибку, пожалуйста, выделите фрагмент текста и нажмите Ctrl+Enter.
Источник
Как настроить VPN на Windows Server и перестать ходить на работу?
 Zip File, мои юные любители сисадминства. Нынче мы затронем такую балдёжную тему, как настройка VPN. Эта аббревиатура означает виртуальную частную сеть. С её помощью можно осуществлять подключение к рабочей сети вашего предприятия через безопасный канал. Такая схема позволяет использовать все внутренние ресурсы ЛВС, такие как общие папки, принтеры, почту и т.д. находясь за тысячи километров от офиса.
Для работы нам понадобится Windows Server, который имеет белый IP и выход за NAT. Т.к. данный урок я снимаю преимущественно для слушателей закрытой академии Kurets.Ru, весь процесс поднятия VPN будет продемонстрирован на версии сервера 2016 года. Данный релиз является наиболее актуальным и распространённым на сегодняшний день.
Однако тот же алгоритм действий вполне применим, как более новой версии 2019 года, так и к устаревшим 2012 и 2008 года соответственно. В качестве клиента будет использоваться стандартная рабочая станция с Windows 10. Такие дела. Что ж, ребятки, меньше слов, больше дела. Не будем сёдня долго запрягать. Погнали настраивать.
Шаг 1. Первым делом заходим на сервер в корпоративной сети и в оснастке «Диспетчер серверов» кликаем по пункту «Добавить роли и компоненты».

Шаг 2. Далее.

Шаг 3. Оставляем параметр «Установка ролей и компонентов».

Шаг 4. В данном окне выбираем сервер, на котором собираемся поднимать службу VPN. У нас выбор не велик. Жмём «Далее».

Шаг 5. Отмечаем пункт «Удалённый доступ». Next.

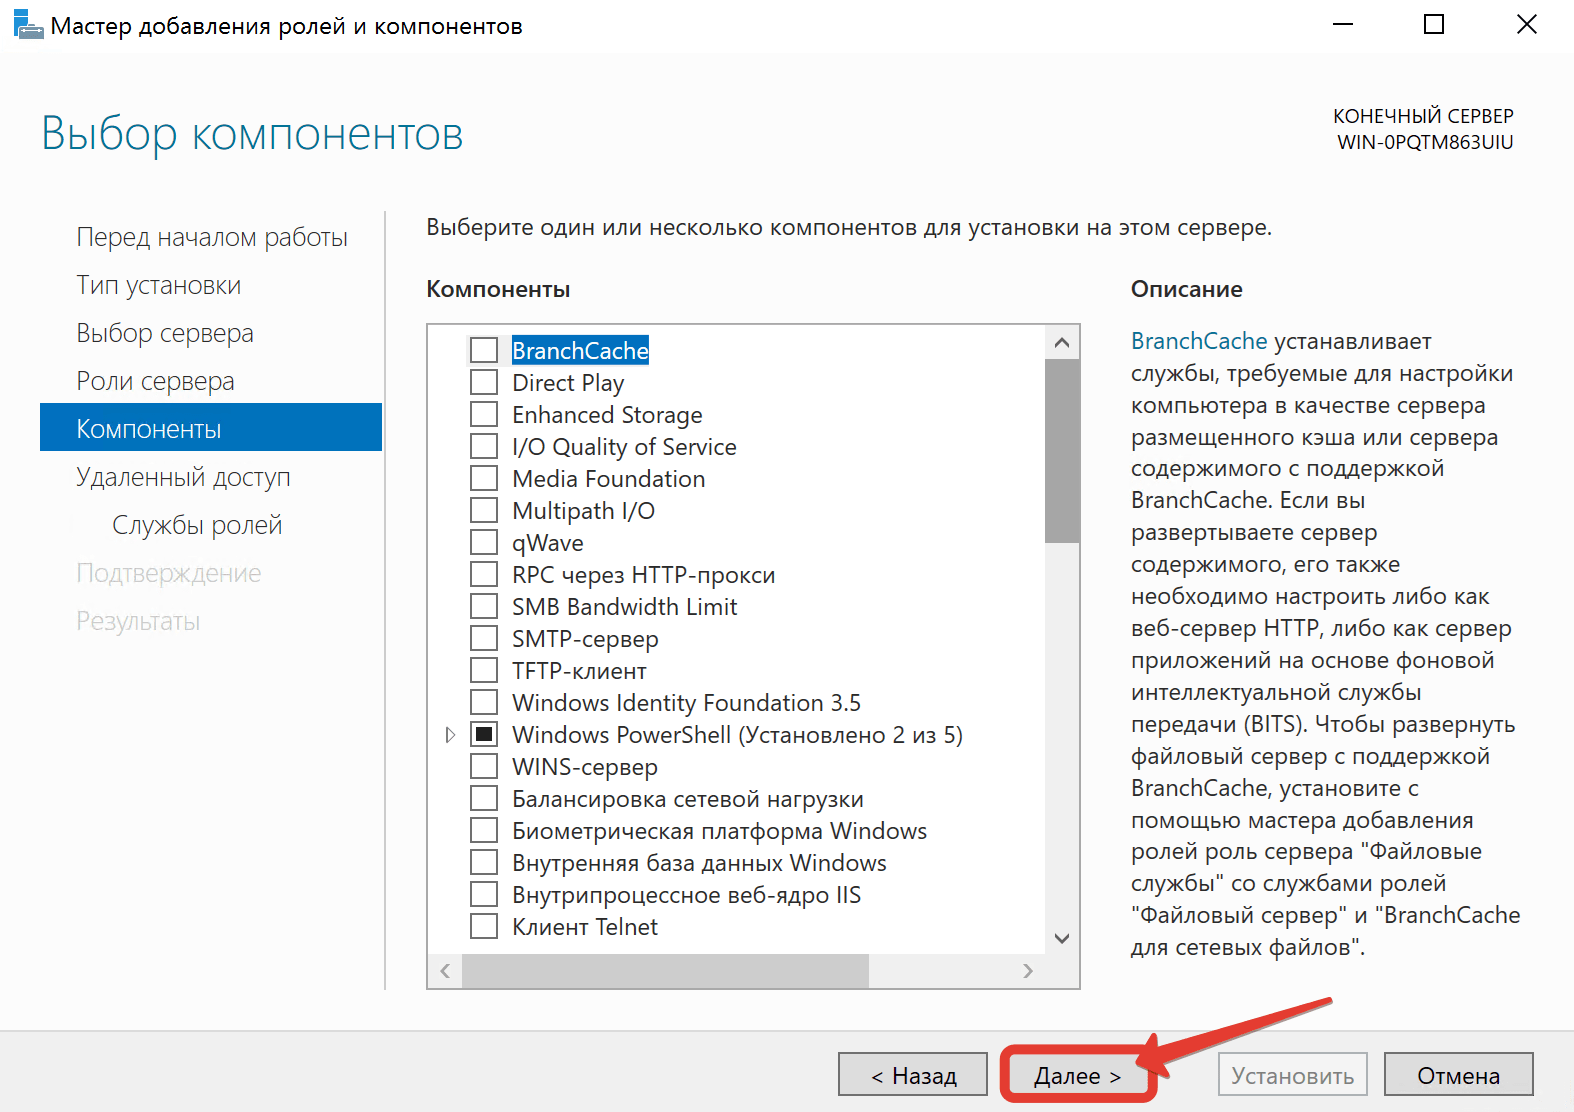
Шаг 6. В компонентах ничего не меняем.

Шаг 7. Знакомимся с информацией о том, что такое в принципе VPN и зачем нужен удаленный доступ.

Шаг 8. Отмечаем галочкой параметр «DirectAccess и VPN» и добавляем необходимые компоненты.

Шаг 9. Далее.

Шаг 10. Далее.

Шаг 11. Всё. Можно приступить к установке. Кликаем по соответствующей кнопке и идём заваривать чай.

Шаг 12. По завершению установки закрываем данную оснастку.

Шаг 13. В диспетчере серверов раскрываем «Средства» и ищем пункт «Маршрутизация и удаленный доступ».

Шаг 14. Видим слева наш сервер, отмеченный красной меткой. Данный цвет кружка свидетельствует о том, что сервер VPN не настроен и соответственно не функционирует. Исправим это недоразумение. Кликаем правой кнопкой. «Настроить и включить маршрутизацию и удаленный доступ».

Шаг 15. Выбираем пункт «Особая конфигурация».

Шаг 16. Отмечаем «Доступ к виртуальной частной сети (VPN)».

Шаг 17. И после нажатия на «Готово» в последнем окне кликаем по кнопке «Запустить службу».

Шаг 18. Сервер взлетел. Остались нюансы. Вызываем контекстное меню. «Свойства».

Шаг 19. У меня на учебном сервере не настроен DHCP, поэтому на вкладке IPv4 укажем статический пул адресов. Из этого диапазона будут получать настройки наши рабочие станции, которые мы далее будем подключать извне.

Шаг 20. Отлично. Диапазон задали. Теперь затронем вопрос безопасности. Переходим на соответствующую вкладку и отмечаем параметр «Разрешить пользовательские политики IPsec для L2TP». Вводим секретный ключ, который будет использоваться для подключения к нашей корпоративной сети из интернета. Жмём «Применить» и в появившемся окне соглашаемся с предупреждением о важности перезапуска службы маршрутизации.


Шаг 22. Ищем в длинном списке «Маршрутизация и удаленный доступ» и вызвав контекстное меню, перезапускаем эту историю.

Шаг 23. Осталось подумать, каким пользователям будет предоставлен доступ к нашей частной сети. У меня данная тачка не в домене. Т.к. подразумевается, что она выполняет исключительно роль общей шары. Поэтому будем мудрить с локальными пользюками. Открываем в пуске «Управление компьютером» и на соответствующей вкладке отмечаем нужного пользователя. Я заранее создал одного Юзверя.

Шаг 24. Заходим в свойства данной учётки и на вкладке «Входящие звонки» разрешаем «Права доступа к сети». Применяем наши изменения.

Шаг 25. И переходим к настройке клиентского компьютера. У меня это комп на Windows 10. Отмечу, что он не находится в одной сети с сервером, но при этом имеет выход в Интернет. Открываем «Центр управления сетями и общим доступом» и далее «Создание и настройка нового подключения или сети».

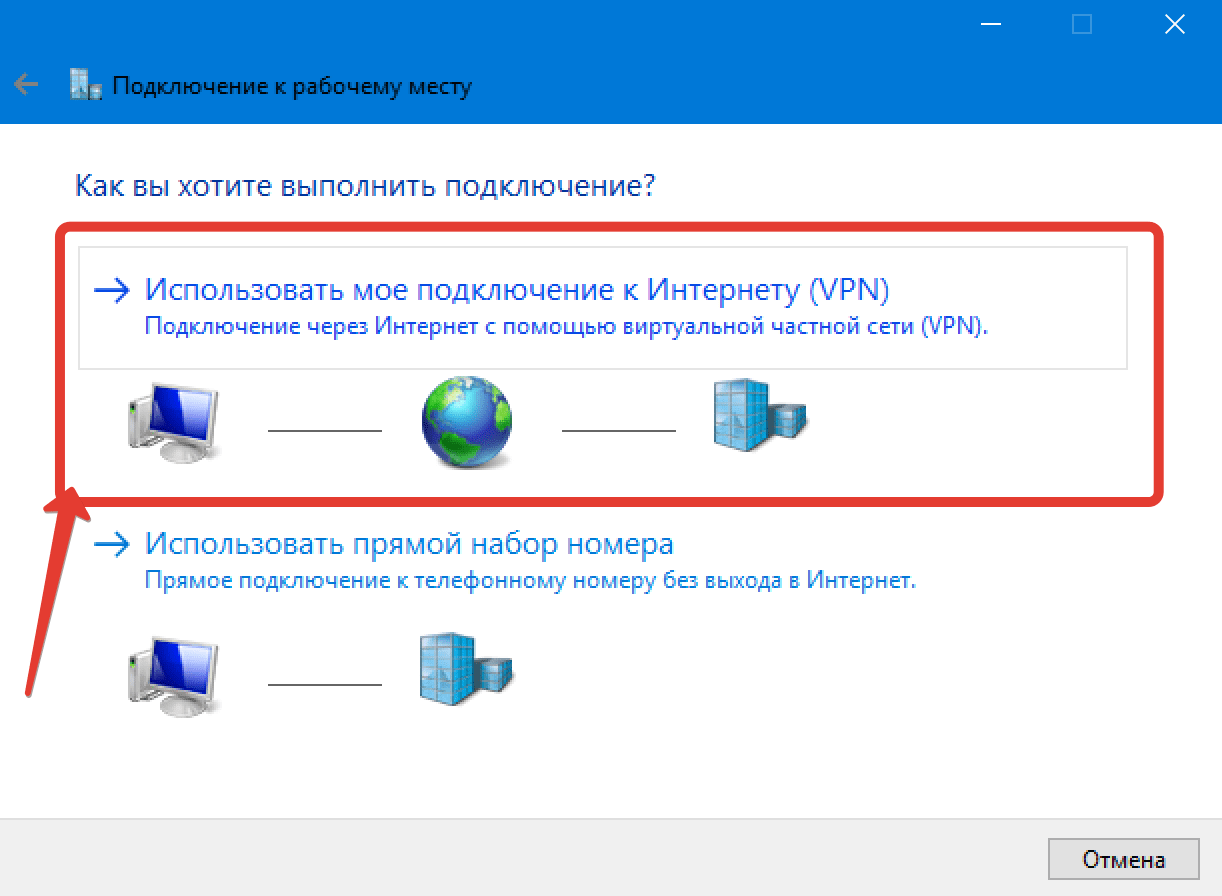
Шаг 26. В открывшемся окне помощника выбираем пункт «Подключение к рабочему месту».

Шаг 27. «Использовать моё подключение к интернету».

Шаг 28. Вводим белый ip-адрес нашего сервера, который выведен за NAT. И при желании изменяем название подключения. Я оставлю по умолчанию. Ждём «Создать».

Шаг 29. Хорошо. Далее заходим в «Свойства» созданного подключения.

Шаг 30. И на вкладочке «Сеть» раскрываем «Свойства» компонента IPv4. Жмём «Дополнительно» и снимаем галочку с пункта «Использовать основной шлюз в удаленной сети». Это очень важный момент. Если этого не сделать, то сразу после подключения к корпоративной сети, ваше локальное подключение к Интернету на компьютере пропадёт, ибо по умолчанию VPN использует шлюз удалёнки. Так что будьте предельно внимательны и не пропускайте данный шаг при настройке внешних рабочих станций.

Шаг 31. Сохраняем изменения и переходим на вкладочку «Безопасность». Тут нам необходимо изменить тип протокола на «L2TP» и в дополнительных параметрах задать «Ключ для проверки подлинности», который мы ранее указывали на сервере.

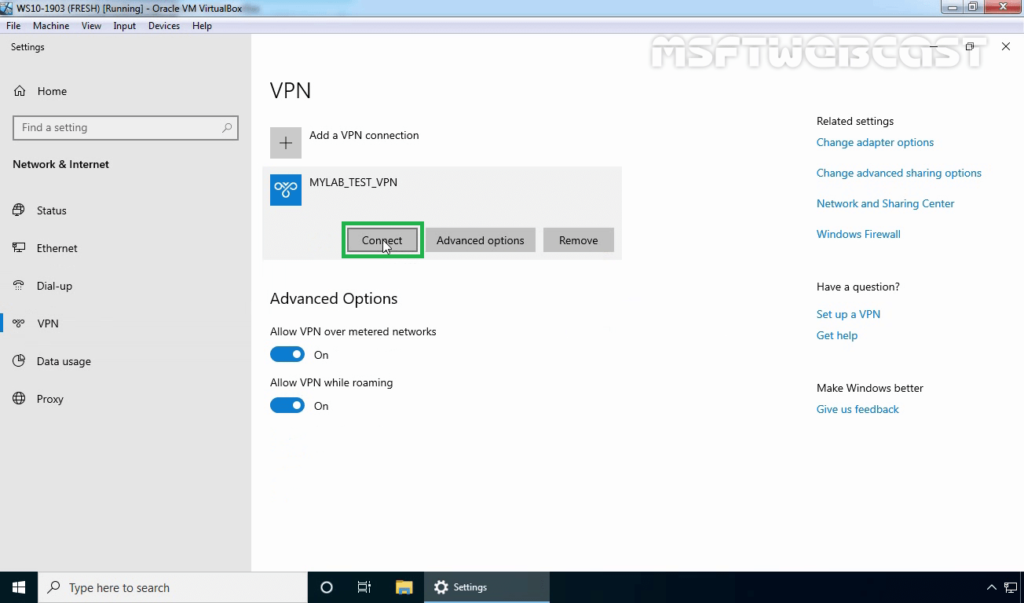
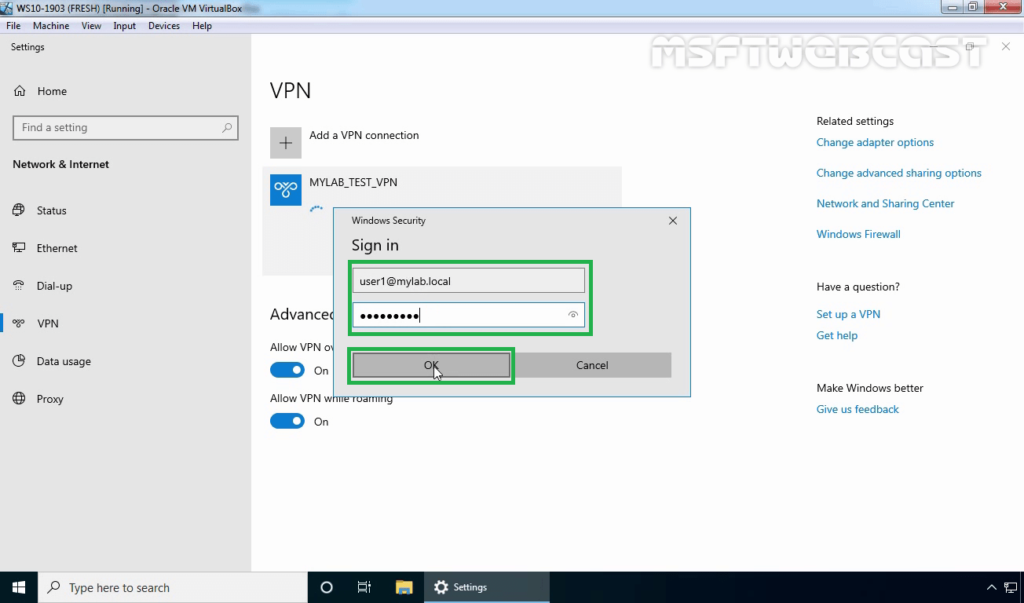
Шаг 32. Всё, братцы. Теперь смело можно подключаться. Кликаем по значку сети на панели задач и выбираем наше подключение.

Шаг 33. Вводим данные от учетной записи пользователя. Помним, что в данном примере мы разрешали доступ к нашей сети извне только одному Юзверю.

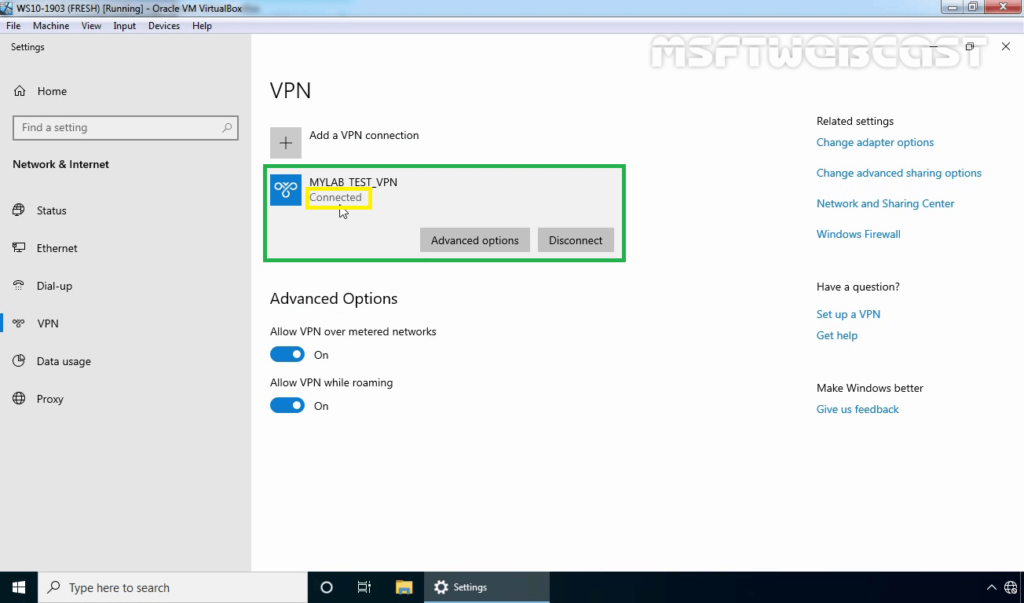
Шаг 34. И дожидаемся статуса «Подключено». С этого момента мы находимся в корпоративной сети, а следовательно можем пользоваться её ресурсами.

Шаг 35. Давайте попробуем проверить функционал общих папок. Открываем проводник и в адресной строке вводим ip сервера.

Шаг 36. Через некоторое время видим расшареную папку «Общий обмен». Это свидетельствует о том, что наше VPN-подключение к серверу сконфигурировано корректно.

Более подробно о том, как создавать общие папки, настраивать квоты и в целом производить полную настройку виндового сервера, что называется, под ключ. Вы можете узнать в нашем полноценном обучающем курсе по администрированию Windows Server 2016.

>>>КЛИКНИТЕ, ЧТОБЫ УЗНАТЬ ПОДРОБНОСТИ
Друзья, сегодня мы научились создавать защищённое VPN-соединение. С его помощью вы сможете не только наладить свою собственную работу на удалёнке и выполнять большую часть задач прямо из дома, но также при возникновении соответствующей потребности объединить сети нескольких филиалов в единый канал.
Если урок оказался полезным, то не забудьте поставить лайк этому видео и оформить подписку с колокольчиком. Таким образом вы первыми будете получать информацию о новых выпусках. В заключении, традиционно, хочу пожелать вам удачи, успеха и самое главное отличного настроения. Берегите себя и свои сервера. До новых встреч.
Источник
This blog post is a step by step guide how to install and configure VPN on Windows Server 2019. The blog post shows you how you can easily set up a VPN server for a small environment, branch office, or for a hosted server scenario. This VPN (Virtual Private Network) server allows you to connect from remote clients or firewalls to the Windows Server.
I already did a similar post for other versions of Windows
- How to Install VPN on Windows Server 2008 R2
- How to Install VPN on Windows Server 2012
- How to Install VPN on Windows Server 2012 R2
- How to Install VPN on Windows Server 2016
To install VPN access to a Windows Server 2019, simply follow this step by step guide:
Install Remote Access Role
First, install the “Remote Access” via Server Manager or PowerShell.
Open Server Manager and select Add Roles and Features
Select the Remote Access Role and click next through the wizard.
On the step Role Services, select the DirectAccess and VPN (RAS)
On the final step, select install to install the Remote Access role.
This might requires a reboot of the server.
Install and Configure VPN on Windows Server 2019
After you have successfully installed, now you can start the wizard to install and configure the VPN server in Windows Server 2019.
After the features are installed, which can take a while to finish, you see the link for the Getting Started Wizard. Click on “Open the Getting Started Wizard“.
This opens a new wizard which will help you to configure the server. On the first screen, select “Deploy VPN only“.
This opens the Routing and Remote Access Management Console
Right click on the Server name and click on “Configure and Enable Routing and Remote Access“.
On the new wizard select “Custom configuration“.
Select “VPN Access“.
After you have click finish, you can now start the Routing and Remote Access service.
Configure VPN Access Users and Network
If you have a firewall between the internet and your Windows Server you have to open the following Firewall port sand forward them to your Windows Server:
For PPTP: 1723 TCP and Protocol 47 GRE (also known as PPTP Pass-through)
For L2TP over IPSEC: 1701 TCP and 500 UDP
For SSTP: 443 TCP
After the installation Users have to be enabled for Remote Access to connect to your VPN Server. On a standalone server this can be done in the Computer Management MMC, in a domain environment this can be done in the user properties of an Active Directory user.
If you don’t have a DHCP Server in your environment, you have to add a static IP address pool. This is often needed if you have a single server hosted at a service provider. In the properties of your VPN server, you can click on the IPv4 tab and enable and configure the “Static address pool”.
You now have to add an IP address from the same subnet as your static address pool to the network interface of your server so that users can access the server.
I hope this helps you to set up a VPN server in a small environment, lab, or hosted server. You can find more information about Windows Server in the Microsoft Docs.
Tags: DirectAccess, Install VPN Server on Windows Server, Microsoft, Remote Access, Virutal Private Network, VPN, VPN Server, Windows Server, Windows Server 2019, Windows Server 2019 VPN, Windows VPN Last modified: July 7, 2019
About the Author / Thomas Maurer

Thomas works as a Senior Cloud Advocate at Microsoft. He engages with the community and customers around the world to share his knowledge and collect feedback to improve the Azure cloud platform. Prior joining the Azure engineering team, Thomas was a Lead Architect and Microsoft MVP, to help architect, implement and promote Microsoft cloud technology.
If you want to know more about Thomas, check out his blog: www.thomasmaurer.ch and Twitter: www.twitter.com/thomasmaurer
![]()
How to install VPN on Windows Server 2019 using Routing and Remote Access
-
View Larger Image


In this blog article we are discussing about How to install and configure a VPN on Windows Server 2019 using Routing and Remote Access server role. A VPN is short form of virtual private network, which gives us a privacy, anonymity and security over public internet. A VPN service masks our ISP IP so your online actions are virtually untraceable. A VPN can also be used to connect computers to isolated remote computer networks that is usually inaccessible, by using the Internet or another intermediate network. Another Use of VPN is the client computers can browse websites through VPN server even if they are in the restricted internal network.
Routing and Remote Access Service is a Windows proprietary server role, that supports remote user or site-to-site connectivity by using virtual private network (VPN) or dial-up connections. So using RRAS we can convert a regular Windows Server as VPN server. Microsoft RRAS server and VPN client supports PPTP, L2TP/IPSec, SSTP and IKEv2 based VPN connection.
By default the VPN connections are made using PPTP which is a VPN Point-to-Point Tunnelling Protocol. We can also convert our VPN server to support SSTP. The PPTP protocol connection are established over TCP port 1723. PPTP also uses GRE and it supports encryption keys up to 128-bits. PPTP is a very fast VPN protocol and very easy to setup. Its supported by most operating systems like windows, Mac and Linux PC and android and IOS mobile devices.
System Configuration We Used.
Used Windows server 2019 which is covert as a VPN SSTP server.
Used Windows 10 client PC for connecting to Windows VPN server 2019.
Another thing is we are settings up VPN on windows server 2019 which only have one Network interface and its configured with Static Public IP address not NAT enabled. So this blog article can be implemented on Most of VPS ( Virtual Private Server) provided by Hosting Providers or with the Cloud Windows VMs.
Since its a VPS server, we only have RDP access using the VPS public IP address. So lets get started.
Here I have divided the whole steps in to different parts. Lets get started. Even though we are performing the install on Windows server 2019, you can refer this article for Windows server 2016 and windows server 2012.
Part:1 Install Remote Access Server role on Windows Server 2019
Log into the Windows Server 2019 > Click Windows Start Icon >> Click Server Manager.

Click Add Roles And Features

Click Next

Choose the Installation Type as ” Role based or feature based installation and click Next.

From Server selection, choose “select a server from the server pool” and click Next.

From Server Role choose ” Remote Access” and click Next.

Leave Features section as it is and click Next.

Click Next on Remote Access section.

Under Role Services choose “Direct Access and VPN (RAS) and Routing and click Next. A popup window will appear for confirming the features that need to be installed for Direct Access and VPN. Confirm it by clicking “Add Features”.


Under Web Server Role (IIS) Section click Next.

Under IIS Role services section leave the default one and Click Next.

Under Final Confirmation section click Install.

The Remote Access server role install will start automatically and normally it will get completed with in few Minutes. Once the installation succeeded click close.

Part:2 Create Additional Loopback Network Adaptor On Windows Server 2019
Its for skipping the error while running Configuring Remote Access Wizard and the error will be like below.
Less than two network interfaces were detected on this machine. For standard VPN server configuration at least two network interfaces need to be installed. Please use custom configuration path instead.
Under Server Manager click Tools >> Computer Management.

From Computer Management window Click Device Manager >> Click VM name from Right side.

Under Actions tab >> Click “Add legacy Hardware”

A add Hardware wizard will open and click Next.

Choose option ” Install the hardware that I manually select from a list ” and click Next.

Choose “Network Adaptors” and click Next.

Choose “Microsoft” as Manufacturer and ” Microsoft KM-TEST Loopback Adaptor ” as Model. Click Next.

Confirm the Install by clicking Next.

Once the install got completed close the install wizard by clicking Finish.

Now, we can confirm the new network adaptor install from the Computer Management panel itself. For that click Device Manager >> Click VM name >> Expand Network Adaptors, there we can see the newly added LoopBack Network adaptor available.

Part:3 Configuring Remote Access Service on VPN Server.
From Server Manager Choose Remote Access >> Right click the Server name >> Choose Remote Access Management.

Under “Direct Access And VPN” Click “Run the Remote Access Setup Wizard”

The Configure remote Access wizard will open Click “Deploy VPN only”

In the Routing and Remote Access Console , right click server name and choose ” configure and Enable routing and remote access ” option.

Click Next on Routing and Remote access server setup wizard.

Choose Virtual private network( VPN) access and NAT option. Click Next.

In the select Network Interface section, choose the network adaptor where our public IP configured and click Next.

In the IP address Assigned section, choose ” from a specified range of address” and Click Next. Here we are trying to define the private IP address that server give to remote VPN click PC after successful connection.

Click New button.

Give the starting and ending private IP range in the corresponding fields. Click Ok. We are giving IPs starting from 192.168.3.150 to 192.168.3.160.

Now we will see the assigned range and click Next.

In the Do you want to setup this server to work with a radius server question section, select “No, use Routing and Remote Access to authenticate connection requests” and Click next.

Click Finish on Completing the Routing and Remote Access server setup wizard.

Click Ok.

This completes the configuration of Routing and Remote Access Server. Now we can see a green up arrow next to server hostname and which shows the Routing and Remote access server service started successfully.

Part:4 Allow Remote Access to our VPN server through Public Network Adaptor.
For maintain the access to the VPN server over remote desktop we need to allow the remote access port over our public network adaptor itself through routing and remote access properties section. Otherwise we will loss the access to the server through remote desktop because we only have one Network interface available on server for both VPN traffic and for the remote access.
In the Routing and Remote Access Manager , Expand Server name >> Expand IPv4 >> Choose NAT >> Right Click Our Public Network Adaptor and choose Properties.

Select ” Remote Access” , A pop up window will appear, in the Private Address filed give our server public IP address and click OK. After that click Apply and OK.
If you have different RDP port, you need to create a new allow rule by clicking add option.


Part:5 Allow VPN remote access for the Users.
In this part we are giving a existing user on VPN server for remote access. Then only if we give the logins of these server users to remote VPN clients, they can successfully connect to server through VPN.
Go to the Computer Management Section >> Expand Local users and Groups >> Choose Users >> Right click a user where we wish to give VPN access and choose properties.

Under “Dial- In” tab >> Choose “Allow Access”. Click Apply and Ok.

Part:6 Allow VPN ports on Windows Firewall.
In this part we are allowing the ports used by the VPN server for communication on windows firewall. Otherwise the remote VPN clients won’t be able to communicate with the VPN server. Below are the ports we need to allow in VP server firewall.
- For PPTP: 1723 TCP and Protocol 47 GRE (also known as PPTP Pass-through
- For L2TP over IPSEC: 1701 TCP and 500 UDP
- For SSTP: 443 TCP
Now issue below power shell commands to allow ports in windows firewall.
Now if we look at the windows firewall inbound section , we can see the ports are allowed.


This Completes the PPTP VPN server setup on Windows server 2019. Now Lets Proceed with the Remote VPN Client on Windows 7 PC setup and Try to Establish a VPN server connection.
Step:7 Test VPN Connection.
Open Network and Sharing Center of your local PC/Laptop. Click on ‘Set up a new Connection or Network‘. Please note the screenshots are from a Windows 7 PC.

Click on Connect to a workplace.

Click on Use my Internet connection (VPN)

Enter IP address of VPN server (External network’s Primary/static IP which has Internet connection) and click on next.

Enter the user login details of VPN server, the user we created in VPN server or existing one with enabled VPN access and click on Connect.

Now you can see the client machine is trying to connect to the VPN server. Normally the connections are established using PPTP protocol. After successful connection, you can see a new VPN network adapter is created in Client PC Network adapters section.
If you right click on the VPN Network adapter and select “Properties” , you can see many tabs with different settings. Below are the default settings of my Client PC VPN network Adapter.
Refer below screenshots if you have any issues with VPN connection from client side.


Two other ways to confirm the VPN connection is successful is go back to VPN server 2019 and Open Routing and Remote Access Manager >> From there Expand our server name >> Choose Remote Access client, and in the right side we can see a active connection.

Another option to confirm the successful VPN connection is , open a browser in Windows 7 PC and search the what is my IP and it will show the public ISP IP as VPN server IP. Which means all the internet traffic from client side is routing through our VPN server.

This Concludes the settings up PPTP VPN on Windows server 2019. I hope this blog article is informative. Leave your thoughts in the comment box.
If you are Looking to Convert our PPTP VPN to support SSTP refer our below article.
Share This Story, Choose Your Platform!
Related Posts
9 Comments
-
 Maximiliano Ramos
August 27, 2020 at 1:54 am — ReplyHello. I followed this guide to create a VPN network from my clients to our server, but despite all the configurations have been properly completed, the clients are not able to connect nor by SSTP SSL or PPTP. They will not reach out the server public ip address.
Is it possible to get some assistance to get this working?Thanks in advance.
-
admin
August 27, 2020 at 5:17 am — ReplyOkay, we can together find out what causing the issue. Email me the details and error.
-
Mark Fogel
October 13, 2021 at 12:48 pm — ReplyHi thanks for the guide, I have a successful connection to the VPN server however I am unable to connect to anything beyond. Is this a routing issue? Any idea what I should look out for?
Many Thanks,
-
admin
October 13, 2021 at 5:14 pm — ReplyHi Mark, Most probably routing issue. My suggestion is check your local network settings from your PC and make sure there is no Network conflict.
-
-
Tom Phillips
December 3, 2021 at 7:54 pm — ReplyHi,
How do I set this up with machine that is behind our company firewall and is configured with private IP address (access to internet and internal resources). So, basically I can’t configure public IP on this server, we need to use NAT, Firewall public IP -> Windows VPN server private IP. Also, can I use any private IP address for “Address range assignment” or do IPs need to be in the same network as the servers NIC? Thanks, 1st time trying to set this up.-
admin
December 3, 2021 at 8:48 pm — Replyokay, try to choose your private interface which is connected to your Firewall public IP while selecting interface and see if that works.
Also you can use any private IP range in the IP address Assigned section.
-
-
Jason
March 16, 2022 at 11:59 pm — ReplyAwesome guide, the only one I found that works!!
Keep up the good work. -
Aris Repolles
July 29, 2022 at 8:25 am — ReplyHi can you help about VPN connection on the server 2019. i already follow you guide but i enconter an error 807. can you help me?. thank you
-
Aris Repolles
July 29, 2022 at 8:26 am — ReplyHi, can you help with VPN connection on the server 2019? i already follow your guide but i encounter an error 807. can you help me?. thank you


Page load link
Go to Top
On Windows Server 2019, a virtual private network (VPN) is a convenient method to allow users to access resources using an encrypted connection from a remote location and through the internet.
Typically, organizations use VPN to extend their private network to allow employees to work from home or another remote location to access files, apps, intranet websites, printers, and other resources through a public network as if they were directly connected into the company’s network.
The way you set up a VPN server hasn’t really changed in many years, which means that the same instructions to configure a virtual private network on Windows Server 2019 applies to older versions, including Windows Server 2016, 2012 R2, and older versions. If you have a Windows 10 device, you can use the “Incoming Connection” feature to set up a VPN server to connect remotely to your home network to access your computer’s files and peripherals, and even other computers in the network.
In this guide, you’ll learn the steps to set up a VPN server on Windows Server 2019.
- How to add VPN role feature on Windows Server
- How to set up VPN server on Windows Server
- How to allow VPN connections through firewall on Windows Server
- How to allow users access through VPN on Windows Server
- How to set up port forwarding on router to enable VPN access
- How to set up a VPN connection on Windows 10
- How to set up a VPN server on Windows 10
How to add VPN role feature on Windows Server
To add the Routing and Remote Access role to set up a VPN server on Windows Server 2019, use these steps:
-
Open Start.
-
Search for Server Manager and click the top result to open the utility.
-
Click the Manage menu button from the top-right corner and select the Add Roles and Features option.

Windows Server add roles option -
Click the Next button.
-
Select the Role-based or feature-based installation option.

Role-based or feature-based installation option -
Click the Next button.
-
Choose the Select a server from the server pool option.
-
Select the server name.
Select destination server option -
Click the Next button.
-
Check the Remote Access option.
Remote access server role option -
Click the Next button.
-
Click the Next button again.
-
Click the Next button one more time.
-
Check the DirectAccess and VPN (RAS) option.
DirectAcess and VPN RAS option -
Click the Add features button.
-
Click the Next button.
-
Click the Next button again.
-
Click the Next button one more time.
-
Click the Install button.
Windows Server 2019 install VPN server option -
Click the Close button.


Once you complete the steps, the VPN server module will install on the device, and you can proceed to configure the remote access feature.
To configure a VPN server on Windows Server 2019, use these steps:
-
Open Start.
-
Search for Server Manager and click the top result to open the utility.
-
Click the Manage menu button from the top-right corner and select the Routing and Remote Access option.

Windows Server 2019 Routing and Remote Access option -
Right-click the server name and select the Configure and Enable Routing and Remote Access option.

Configure and Enable Routing and Remote Access -
Select the Custom configuration option.

Custom configuration option -
Click the Next button.
-
Check the VPN access option.
Windows Server 2019 VPN access option -
Click the Next button.
-
Click the Finish button.
-
Click the Start service button.
-
Right-click the server name and select the Properties option.
Windows Server 2019 VPN properties option -
Click the IPv4 tab.
-
Under the “IPv4 address assignment” section, check the Static address pool option (recommended).

VPN server static address pool option Quick note: If you have DHCP server configured, you can use the Dynamic Host Configuration Protocol (DHCP) option to handle the distribution addresses. However, if you want to control the access to the network, or you don’t have a DHCP server, then the static pool option is your best option. When using this option, make sure to assign an IP range it won’t assign to other devices in the local network.
-
Click the Add button.
-
Specify a start IP address.
-
Specify an end IP address.
VPN address range setup -
Click the OK button.
-
Click the Apply button.
-
Click the OK button.
-
Right-click “Remote Access Logging & Policies” and select the Launch NPS option.
Windows Server 2019 launch NPS -
Select the Network Policies option from the left pane.

Network Policies -
Double-click the Connections to Microsoft Routing and Remote Access server policy.
-
Under the “Access Permission” section, select the Grant access. Grant access if the connection request matches this policy option.

Connection to VPN policy -
Click the Apply button.
-
Click the OK button.
-
Double-click the Connections to other access servers policy.
-
Under the “Access Permission” section, select the Grant access. Grant access if the connection request matches this policy option.
Connection to other server policy -
Click the Apply button.
-
Click the OK button.
-
Close the Network Policy Server console.


After you complete the steps, the VPN server will be created on Windows Server 2019, but you’ll still need to configure the users who are allowed to connect, and you need to configure the firewall to allow connections.
Windows Server 2019, 2016, 2012 R2 and older versions include more options to set up a more secure and advanced VPN server. In this guide, we’re only covering the fast and secure way to get started with the remote access feature.
How to allow VPN connections through firewall on Windows Server
While configuring the Routing and Remote Access feature on Windows Server should automatically open the necessary Windows Firewall ports, you want to make sure the firewall is properly configured.
To allow VPN connections through the firewall on Windows Server 2019, use these steps:
-
Open Start on Windows Server 2019.
-
Search for Allow an app through Windows Firewall, and click the top result to open the experience.
-
Click the Change settings button.
-
Scroll down and make sure Routing and Remote Access is allowed on Private and Public.

-
click the OK button.

After you complete the steps, the Windows Server VPN server should be able to receive connections remotely from other computers.
How to allow users access through VPN on Windows Server
To allow users access through the virtual private network, use these steps:
-
Open Start.
-
Search for Server Manager and click the top result to open the utility.
-
Select the Active Directory Users and Computers option.
Quick note: If you don’t have Active Directory configured on your server, select the Computer Management option, expand the Local Users and Groups branch from the left pane.
-
Click on Users from the left pane.
-
Double-click the user you want allow remote access.
-
Click the Dial-in tab.
-
Under the “Network Access Permission” section, select the Allow access option.

Windows Server 2019 enable user VPN access -
Click the Apply button.
-
Click the OK button.

Once you complete the steps, you may need to repeat the steps to enable other users to access the network using a VPN connection.
These instructions show you the steps to allow remote access on each user individually. If you need to configure access for a lot users, you can also create a group to configure VPN access for users more easily.
How to set up port forwarding on router to enable VPN access
To be able to connect through a public network (such as the internet) to the VPN server, you’ll need to forward port 1723 (Point to Point Tunneling Protocol (PPTP)) to allow VPN connections.
Here are the instructions that will help you set up port forwarding on a router. You can also visit your router’s manufacturer website for more assistance to configure Port Forwarding.
In addition to the forwarding the required port, you’ll also need to know the public IP address assigned to you by your Internet Service Provider (ISP). You will need this information to contact your VPN server remotely.
To find out if your current public IP address, open your web browser, and using any search engine, perform a search for “What’s my IP”, and your information will appear in the first result.
If the network uses a dynamic public IP address, which can change at any time, then you’ll need to configure DDNS (Dynamic Domain Name System) in your router to avoid having to configure the VPN setup every time your public IP address changes.
Here are the instructions that will help you set up DDNS on your router. You can also visit your router’s manufacturer website for additional help to configure DDNS.
How to set up a VPN connection on Windows 10
After setting up the VPN server on Windows Server 2019, you’ll need to configure the devices that will be accessing your local network remotely. You can set up any device, including your desktop, laptop, tablet, and even phone (for example, Android and iPhone). Here are the instructions to set up a VPN connection on Windows 10.
After adding a VPN connection on your computer, you have to adjust the settings with these steps:
-
Open Control Panel.
-
Click on Network & Internet.
-
Click on Network and Sharing Center.
-
Click the Change adapter settings link from the left pane.
-
Right-click the VPN adapter and select the Properties option.

-
In the General tab, make sure you’re using the correct domain you created while configuring DDNS — or at least you’re using the correct public IP address.

-
Click on the Security tab.
-
Under “Type of VPN,” select the Point to Point Tunneling Protocol (PPTP) option.
-
Under “Data encryption,” select the Maximum strength encryption (disconnect if server declines) option.
-
Click the OK button.
-
Click on the Networking tab.
-
Uncheck the Internet Protocol Version 6 (TCP/IPv6) option.
-
Check the Internet Protocol Version 4 (TCP/IPv4) option.
-
Select the Internet Protocol Version 4 (TCP/IPv4) option.
-
Click the Properties button.
-
Click the Advanced button.

-
Clear the Use default gateway on remote network option.

Important: We’re disabling this option to prevent your web traffic to go through the remote connection, which can slow down your internet connection. However, if you’re looking to access the internet through a VPN connection, then don’t change this last setting.
-
Click the OK button.
-
Click the OK button again.
-
Click the OK button once more.
-
Open Settings.
-
Click on Network & Internet.
-
Click on VPN.
-
Select the VPN connection option and click the Connect button.

Windows 10 remote connection using VPN


Once you complete the steps, the device should be able to connect to VPN server from a remote location.
In this article, we will learn the steps on How to Setup L2TP/IPsec VPN with a Pre-Shared key on Windows Server 2019.
What is a VPN?
A Virtual Private Network (VPN) is a secure network tunnel that allows you to connect to your private network from internet locations. So, you can access and use your internal resources based on assign permission.
Layer 2 Tunneling Protocol (L2TP):
L2TP is the industry standard when setting up secure VPN tunnels. L2TP supports either computer certificates or a Pre-shared key as the authentication method for IPsec. L2TP/IPsec VPN connections provide data confidentiality, data integrity, and data authentication.
Understanding the SSTP Test Lab:
- WS2K19-DC01: Domain Controller and DNS.
- WS2K19-VPN01: Member Server.
- WS10-CLI01: Windows 10 Client Machine.
Step:1 Install Remote Access Server role on Windows Server 2019:
1. The first step is the installation of the Remote Access Server role. Open Server Manager Console and start role and feature installation wizard. Select the Remote Access Server role.

2. On select role services, select DirectAccess and VPN (RAS) role service. Click Next and finish the installation.
3. When the installation finished, click on close.
Step:2 Configure L2TP/IPsec VPN on Windows Server 2019:
4. On Member Server, Open Server Manager. Click on Tools and select Routing and Remote Access Console.
5. Right-click on the Server name and select Configure and Enable Routing and Remote Access.

6. On Welcome screen, click Next.
7. On the Configuration page, select the Custom configuration radio button. Click Next.
8. On select the service page, select VPN Access. Click Next.
9. After clicking on the Finish, it will ask you to start the service. Click on Start service.
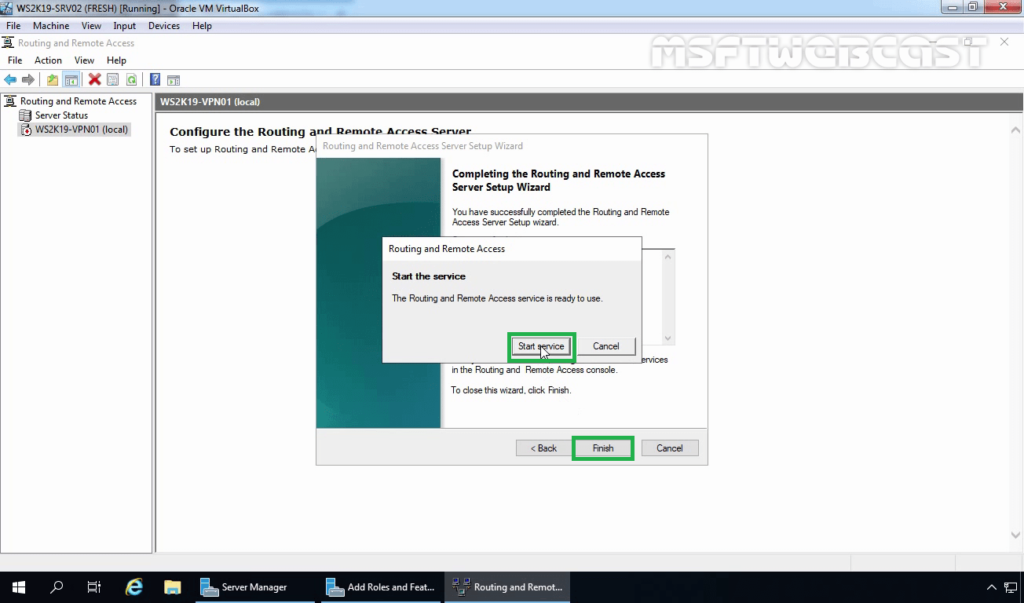
10. Now you will see a green up arrow beside your server name.
Step:3 Configure Pre-Shared Key for IPsec Authentication.
To configure the Pre-shared Key for L2TP/IPsec VPN, we need to set up specific settings in the VPN server’s properties section.
11. Right-click on the server name and click on Properties.
12. On the Security tab, select the checkbox Allow Custom IPsec Policy for L2TP/IKEv2 Connection. Specify a strong Pre-Shared Key for L2TP/IPsec VPN connection.
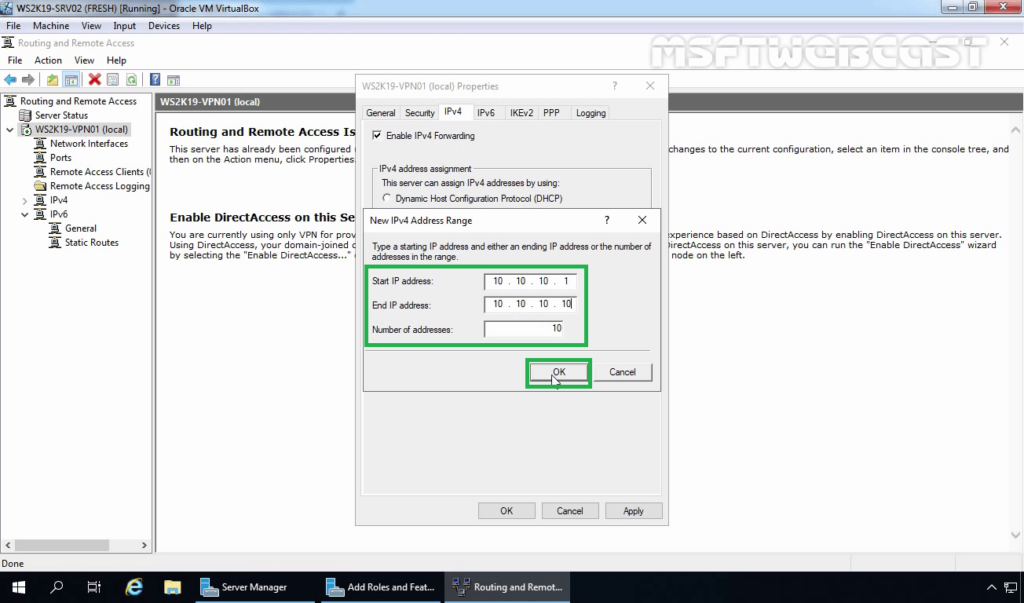
13. Click on IPv4 Tab. Select the Static Address Pool radio button. Click on Add button.
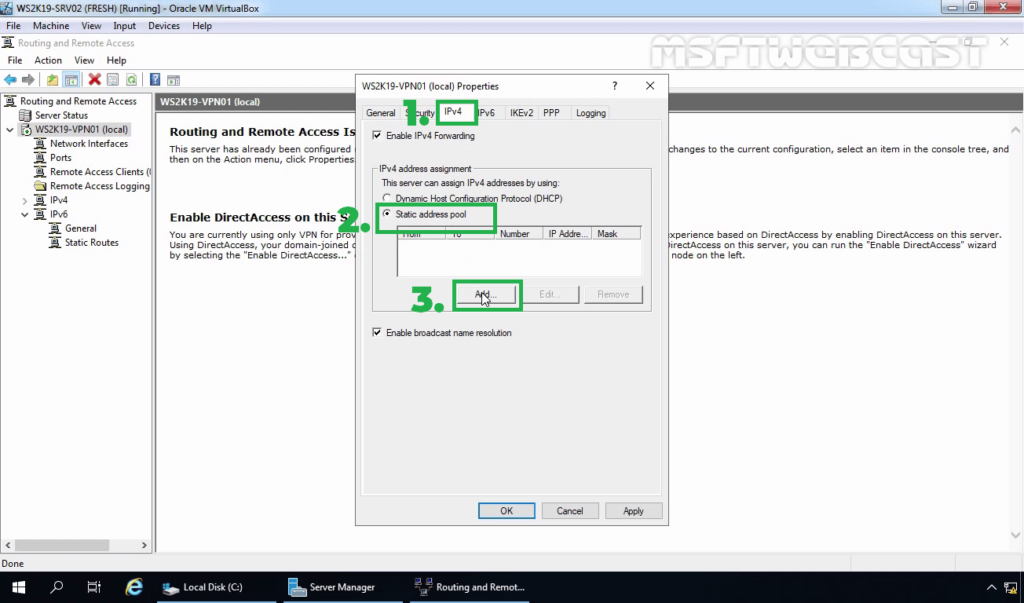
14. Specify the IP address range. Click on OK.
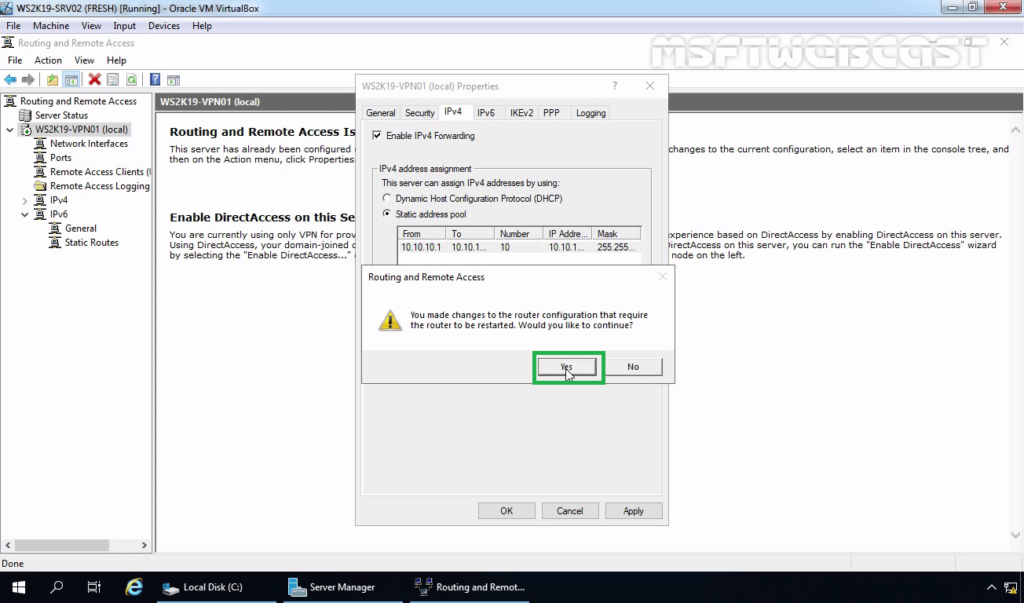
15. Click on Apply to save the changes to the VPN server. It will ask to restart the Routing and Remote Access service. Click on yes to do so.
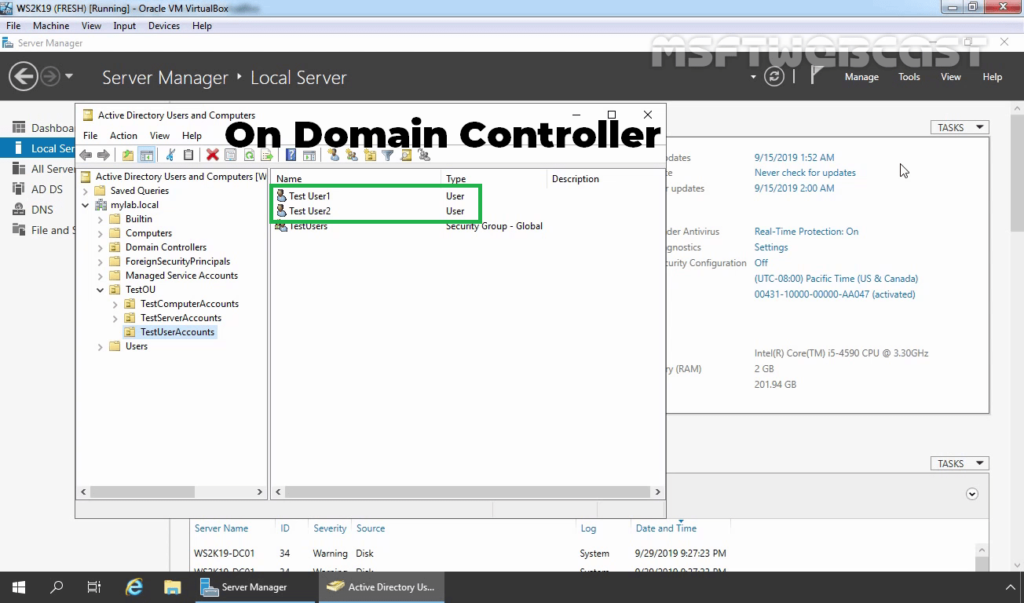
Step:4 Create AD User and allow dial-in access:
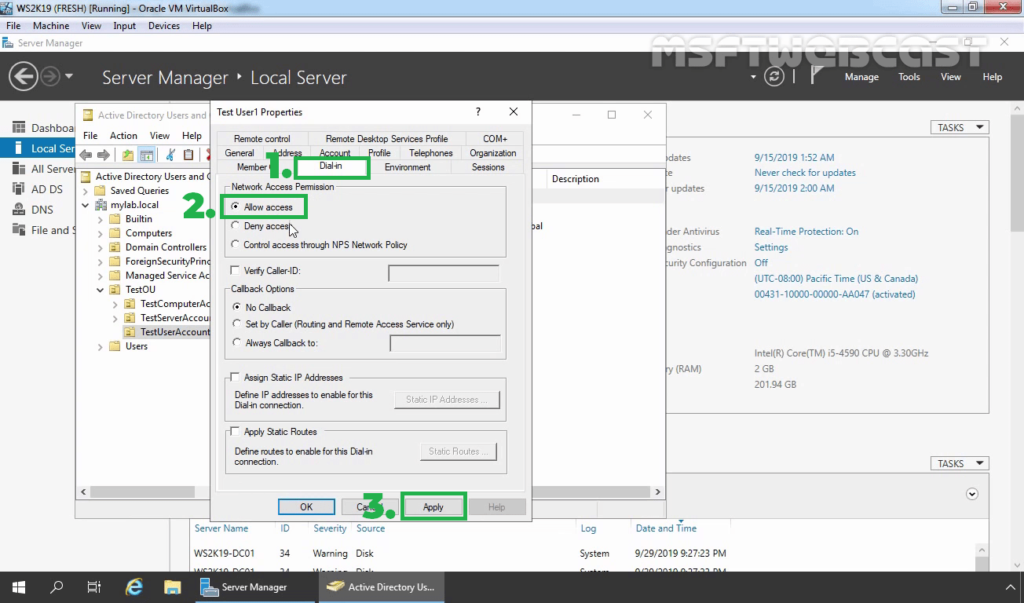
16. On Domain Controller, Open Active Directory Users and Computers snap-ins. Create AD users name Test User1 and Test User2.
17. Enable dial-in access for selected VPN users by opening the user properties and selecting Allow access on the tab Dial-in.
Note: If you want, you can configure Network Policy Server to allow VPN users to connect to the VPN server running on Windows Server 2019.
Step:5 Setup a VPN Connection for L2TP/IPsec VPN:
On Windows 10 client machine, we need to create a new VPN connection.
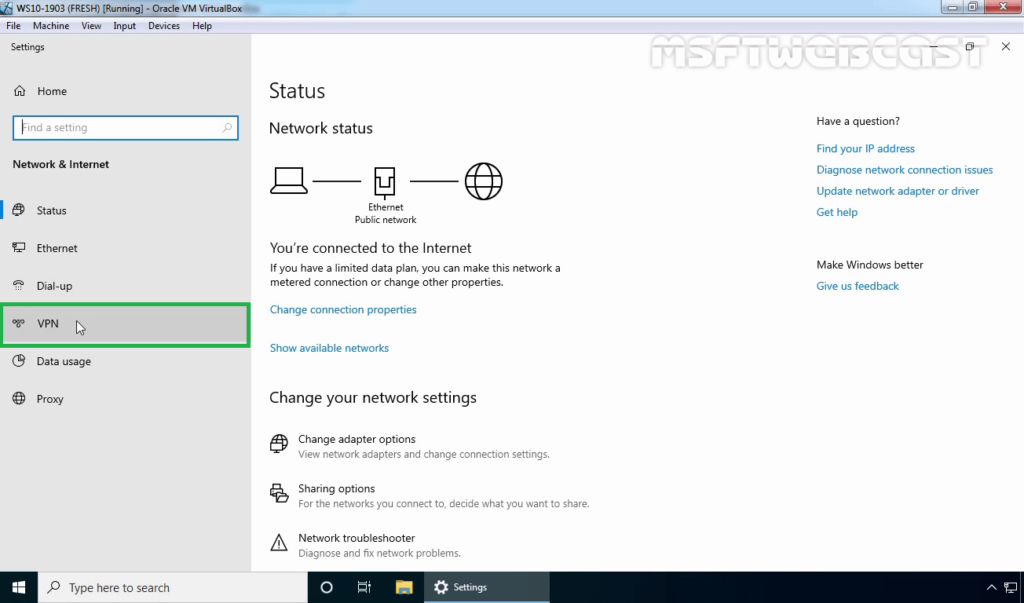
18. Right-click on the Start button and select Network Connections.
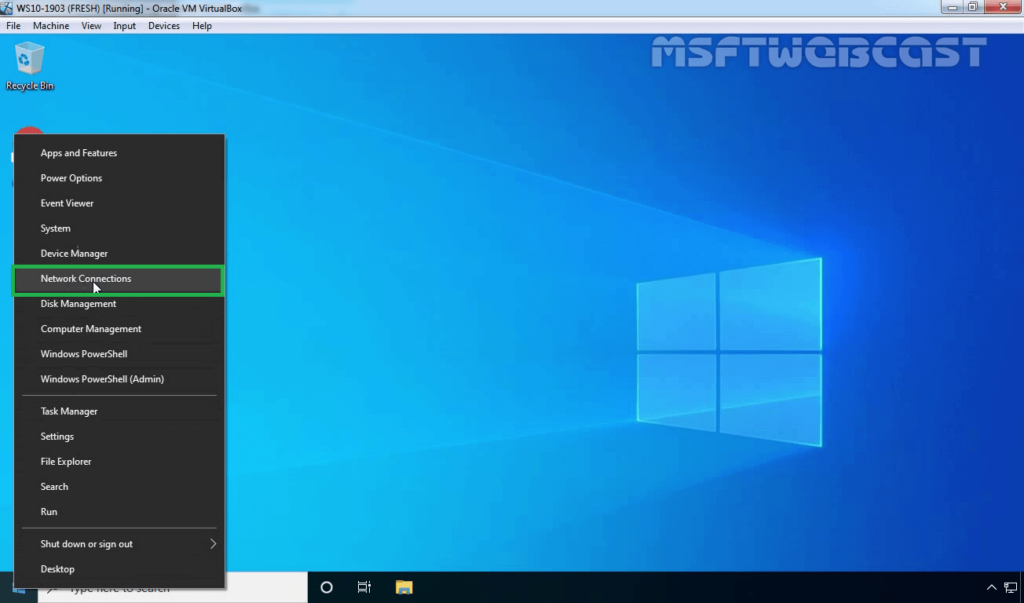
19. On left-pane, click on VPN.
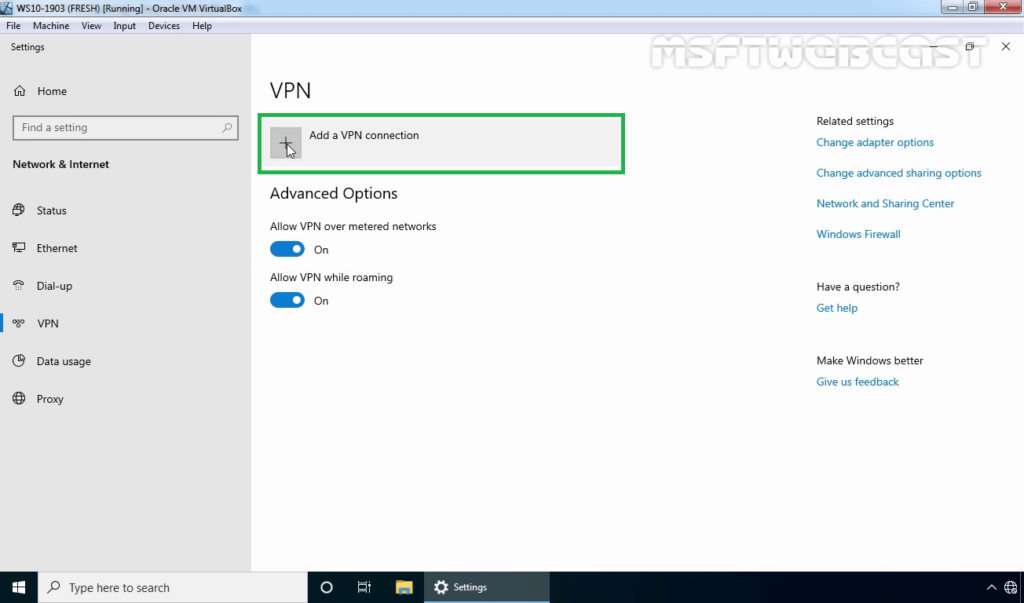
20. Click on add a new VPN connection.
21. Specify the required information for the VPN connection.
- VPN Provider: Windows (Built-in)
- Connection Name: Name of your choice
- Server Name or IP Address: Public IP Address of VPN server
- VPN Type: L2TP/IPsec with Pre-shared key
- Pre-Shared Key: Specify the key which we had assign on VPN Server.
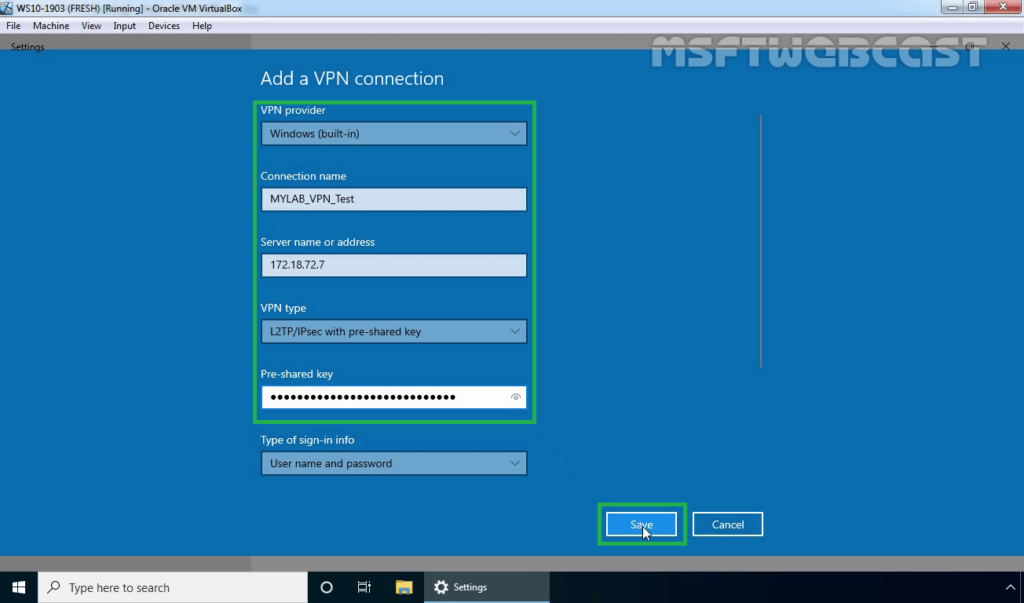
22. Click on Save.
Step:6 Test L2TP/IPsec VPN Connection:
23. Click on VPN connection and select Connect.
24. Specify a username and password to connect the VPN server. Click OK to connect.
25. Verify the VPN connection is successfully connected with the VPN server using the L2TP/IPsec protocol.
Step:7 Monitor L2TP/IPsec VPN Connection:
On Windows 10 Client Machine:
26. Press Windows Key and R key together. At Run menu type ncpa.cpl and press enter to open Network Connection console.
27. Right-click on VPN connection and click on the Status button.
28. Click on details to see information about VPN connection like Authentication Method, Encryption Mod, etc.
On VPN Server:
29. Press Windows Key and R key together. At Run menu type wf.msc and press enter to open Windows Defender Firewall and Advanced Security console.
30. Expand Monitoring, Expand Security Associations. Expand and Click on Main Mode.
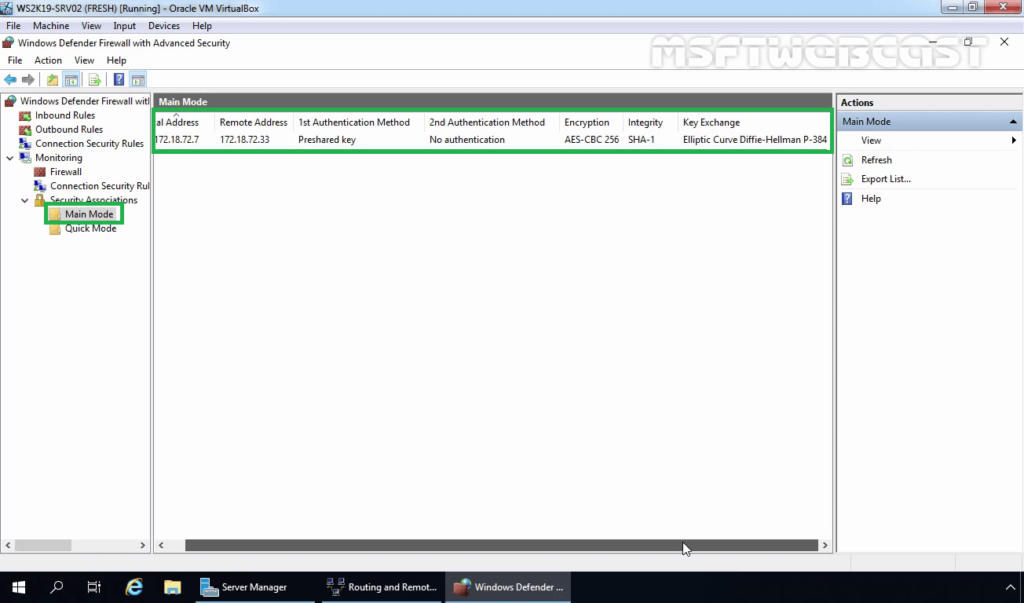
You can verify the authentication method and Encryption Standard for IPsec main mode connection.
- Authentication Method: Pre-Shared Key.
- Encryption Standard: AES-CBC 256 Bit
- Integrity Algorithm: SHA-1
- Key-Exchange Mode: Elliptic Curve Diffie-Hellman P-384.
31. Also, check Quick Mode Tunnel Information.
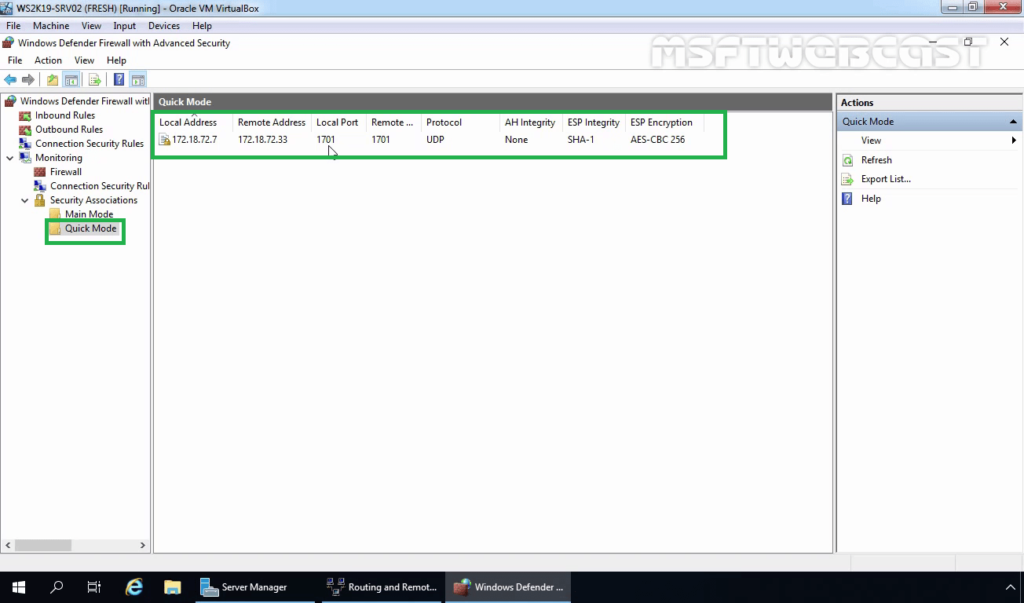
- Local Address: Local IP Address of VPN Server.
- Remote Address: VPN Client IP Address.
- Local Port: UDP 1701
- Remote Port: UDP 1701
- ESP Integrity Mode: SHA-1
- ESP Encryption Mode: AES -CBC 256 Bit
In this post, we have learned the steps to setup L2TP/IPsec VPN with a Pre-shared key on Windows Server 2019 and Windows 10.
Thank you for reading. Have a nice day.
Post Views: 3,687
This step by step tutorial will help you configure a VPN server on Windows server 2019 easily.
First of all, please install the Remote Access Role through Windows PowerShell or Server Manager as highlighted in the screenshot.

Next select DirectAccess and VPN (RAS) in Role services.

For the next steps, use default settings. When the installation completes, a wizard to configure VPN server opens. After that, below window will open. In this, click on Deploy VPN only.

This will open the Routing and Remote Access window.

In the below window, right-click on the server name and then on Configure and Enable Routing and Remote Access.

This will take you to the window as shown below. Click on Next.

In the Routing and Remote Access Server Setup Wizard window, you need to select Custom Configuration, as highlighted in the screen below.

Next, select the VPN access to enable it on the server and click on Next button.

After clicking on the Finish, it will ask you to start the service.

Once the service is started, as shown in the screen below, you will be able to see green colored Hostname in the left pane under Routing and Remote Access.

Now you need to set up the IP address which will be used in the VPN connections. For this, you can choose whatever DHCP and static address you want.
Also Read: What is Digital Information Security in Healthcare Act (DISHA) in India?
Here, we are demonstrating further steps using the static addresses.


Now create a user which will access the VPN service and allow him to have Network Access Permission.

Here Server configuration is completed.
Now go to the Client Machine.
Open Network settings and Click on VPN and Add a VPN connection.


Next, provide relevant details in the fields shown in the screen below.

The VPN connection will now begin to show on the client machine.

When you click on Connect, it will communicate with the VPN server and retrieve VPN access with proper user credentials.
You can also check the Client connection status at Routing and Remote Access Management. Follow the screenshots given below for this.


That’s it! You are done with VPN server setup on the Windows server.
“Acronis is directly responsible for saving our company 1200 hours per year for IT operations staff in backup and recovery workflows.” CIO, high performance IT company.
Read details in a report by Forrester.
[ninja_form id=1]
In case you have any feedback regarding this blog, let me know via the comments section. I’ll be happy to help.
Update: This post has been updated on 29th January 2019.
Services ZNetLive offer:
Domain Name Registration
Best Shared Hosting
WordPress Hosting Plan
VPS Hosting Plans
Buy Dedicated Server
 Zip File, мои юные любители сисадминства. Нынче мы затронем такую балдёжную тему, как настройка VPN. Эта аббревиатура означает виртуальную частную сеть. С её помощью можно осуществлять подключение к рабочей сети вашего предприятия через безопасный канал. Такая схема позволяет использовать все внутренние ресурсы ЛВС, такие как общие папки, принтеры, почту и т.д. находясь за тысячи километров от офиса.
Для работы нам понадобится Windows Server, который имеет белый IP и выход за NAT. Т.к. данный урок я снимаю преимущественно для слушателей закрытой академии Kurets.Ru, весь процесс поднятия VPN будет продемонстрирован на версии сервера 2016 года. Данный релиз является наиболее актуальным и распространённым на сегодняшний день.
Однако тот же алгоритм действий вполне применим, как более новой версии 2019 года, так и к устаревшим 2012 и 2008 года соответственно. В качестве клиента будет использоваться стандартная рабочая станция с Windows 10. Такие дела. Что ж, ребятки, меньше слов, больше дела. Не будем сёдня долго запрягать. Погнали настраивать.
Шаг 1. Первым делом заходим на сервер в корпоративной сети и в оснастке «Диспетчер серверов» кликаем по пункту «Добавить роли и компоненты».

Шаг 2. Далее.

Шаг 3. Оставляем параметр «Установка ролей и компонентов».

Шаг 4. В данном окне выбираем сервер, на котором собираемся поднимать службу VPN. У нас выбор не велик. Жмём «Далее».

Шаг 5. Отмечаем пункт «Удалённый доступ». Next.

Шаг 6. В компонентах ничего не меняем.
Шаг 7. Знакомимся с информацией о том, что такое в принципе VPN и зачем нужен удаленный доступ.

Шаг 8. Отмечаем галочкой параметр «DirectAccess и VPN» и добавляем необходимые компоненты.

Шаг 9. Далее.

Шаг 10. Далее.

Шаг 11. Всё. Можно приступить к установке. Кликаем по соответствующей кнопке и идём заваривать чай.

Шаг 12. По завершению установки закрываем данную оснастку.

Шаг 13. В диспетчере серверов раскрываем «Средства» и ищем пункт «Маршрутизация и удаленный доступ».

Шаг 14. Видим слева наш сервер, отмеченный красной меткой. Данный цвет кружка свидетельствует о том, что сервер VPN не настроен и соответственно не функционирует. Исправим это недоразумение. Кликаем правой кнопкой. «Настроить и включить маршрутизацию и удаленный доступ».

Шаг 15. Выбираем пункт «Особая конфигурация».

Шаг 16. Отмечаем «Доступ к виртуальной частной сети (VPN)».

Шаг 17. И после нажатия на «Готово» в последнем окне кликаем по кнопке «Запустить службу».

Шаг 18. Сервер взлетел. Остались нюансы. Вызываем контекстное меню. «Свойства».

Шаг 19. У меня на учебном сервере не настроен DHCP, поэтому на вкладке IPv4 укажем статический пул адресов. Из этого диапазона будут получать настройки наши рабочие станции, которые мы далее будем подключать извне.

Шаг 20. Отлично. Диапазон задали. Теперь затронем вопрос безопасности. Переходим на соответствующую вкладку и отмечаем параметр «Разрешить пользовательские политики IPsec для L2TP». Вводим секретный ключ, который будет использоваться для подключения к нашей корпоративной сети из интернета. Жмём «Применить» и в появившемся окне соглашаемся с предупреждением о важности перезапуска службы маршрутизации.

Шаг 21. Перезапускать мы её будем прямо сейчас. В диспетчере привычным движением раскрываем «Средства» — «Службы».

Шаг 22. Ищем в длинном списке «Маршрутизация и удаленный доступ» и вызвав контекстное меню, перезапускаем эту историю.

Шаг 23. Осталось подумать, каким пользователям будет предоставлен доступ к нашей частной сети. У меня данная тачка не в домене. Т.к. подразумевается, что она выполняет исключительно роль общей шары. Поэтому будем мудрить с локальными пользюками. Открываем в пуске «Управление компьютером» и на соответствующей вкладке отмечаем нужного пользователя. Я заранее создал одного Юзверя.

Шаг 24. Заходим в свойства данной учётки и на вкладке «Входящие звонки» разрешаем «Права доступа к сети». Применяем наши изменения.

Шаг 25. И переходим к настройке клиентского компьютера. У меня это комп на Windows 10. Отмечу, что он не находится в одной сети с сервером, но при этом имеет выход в Интернет. Открываем «Центр управления сетями и общим доступом» и далее «Создание и настройка нового подключения или сети».

Шаг 26. В открывшемся окне помощника выбираем пункт «Подключение к рабочему месту».

Шаг 27. «Использовать моё подключение к интернету».
Шаг 28. Вводим белый ip-адрес нашего сервера, который выведен за NAT. И при желании изменяем название подключения. Я оставлю по умолчанию. Ждём «Создать».

Шаг 29. Хорошо. Далее заходим в «Свойства» созданного подключения.

Шаг 30. И на вкладочке «Сеть» раскрываем «Свойства» компонента IPv4. Жмём «Дополнительно» и снимаем галочку с пункта «Использовать основной шлюз в удаленной сети». Это очень важный момент. Если этого не сделать, то сразу после подключения к корпоративной сети, ваше локальное подключение к Интернету на компьютере пропадёт, ибо по умолчанию VPN использует шлюз удалёнки. Так что будьте предельно внимательны и не пропускайте данный шаг при настройке внешних рабочих станций.

Шаг 31. Сохраняем изменения и переходим на вкладочку «Безопасность». Тут нам необходимо изменить тип протокола на «L2TP» и в дополнительных параметрах задать «Ключ для проверки подлинности», который мы ранее указывали на сервере.

Шаг 32. Всё, братцы. Теперь смело можно подключаться. Кликаем по значку сети на панели задач и выбираем наше подключение.

Шаг 33. Вводим данные от учетной записи пользователя. Помним, что в данном примере мы разрешали доступ к нашей сети извне только одному Юзверю.

Шаг 34. И дожидаемся статуса «Подключено». С этого момента мы находимся в корпоративной сети, а следовательно можем пользоваться её ресурсами.

Шаг 35. Давайте попробуем проверить функционал общих папок. Открываем проводник и в адресной строке вводим ip сервера.

Шаг 36. Через некоторое время видим расшареную папку «Общий обмен». Это свидетельствует о том, что наше VPN-подключение к серверу сконфигурировано корректно.

Более подробно о том, как создавать общие папки, настраивать квоты и в целом производить полную настройку виндового сервера, что называется, под ключ. Вы можете узнать в нашем полноценном обучающем курсе по администрированию Windows Server 2016.

Друзья, сегодня мы научились создавать защищённое VPN-соединение. С его помощью вы сможете не только наладить свою собственную работу на удалёнке и выполнять большую часть задач прямо из дома, но также при возникновении соответствующей потребности объединить сети нескольких филиалов в единый канал.
Если урок оказался полезным, то не забудьте поставить лайк этому видео и оформить подписку с колокольчиком. Таким образом вы первыми будете получать информацию о новых выпусках. В заключении, традиционно, хочу пожелать вам удачи, успеха и самое главное отличного настроения. Берегите себя и свои сервера. До новых встреч.

Установим и настроим OpenVPN сервер. На сервере используется операционная система Windows Server 2019.
OpenVPN — бесплатная реализация технологии виртуальной частной сети (VPN) для создания зашифрованных каналов связи между компьютерами типа точка-точка или сервер-клиенты за NAT и Firewall.
Установка OpenVPN Server
Скачиваем дистрибутив для установки OpenVPN:
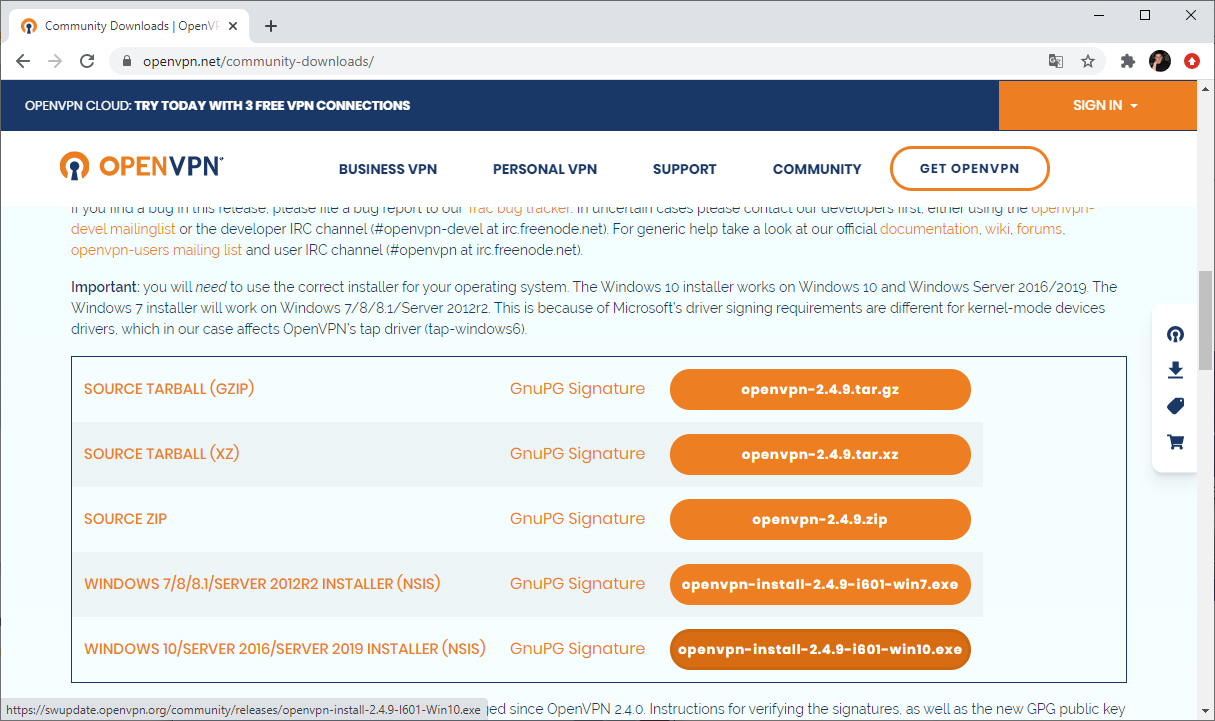
Прокручиваем вниз, выбираем стабильную версию. Я буду использовать версию 2.4.9.
Для операционной системы Windows доступны два пакета:
- WINDOWS 7/8/8.1/SERVER 2012R2 INSTALLER (NSIS)
- WINDOWS 10/SERVER 2016/SERVER 2019 INSTALLER (NSIS)
Для Windows Server 2019 подходит второй вариант, скачиваю.
Запускаем инсталлятор OpenVPN.
Открывается мастер установки. Next.
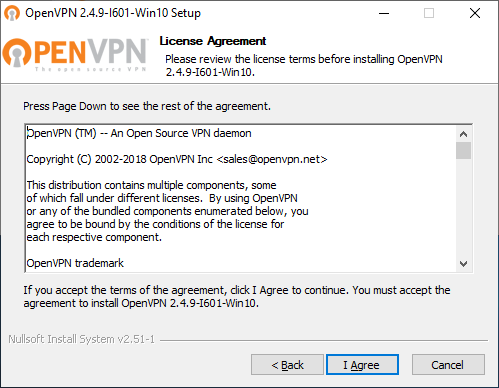
Принимаем лицензионное соглашение. I Agree.
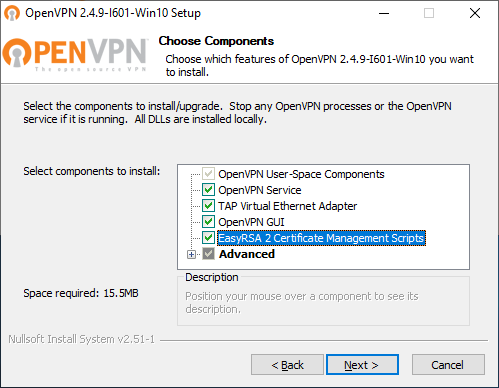
Выбираем компоненты. Выделите EasyRSA 2 Certificate Management Scripts. Для сервера OpenVPN GUI можно не устанавливать, если вы планируете запускать OpenVPN в качестве службы. Next.
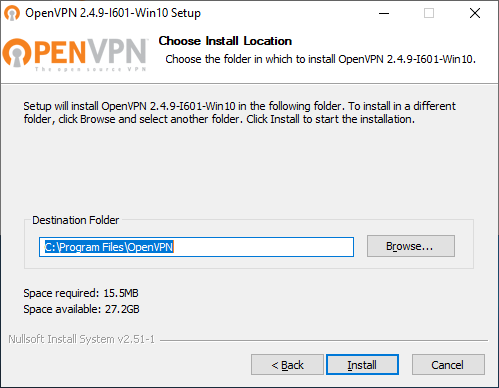
Выбираем путь установки, я оставляю по умолчанию C:Program FilesOpenVPN. Install.
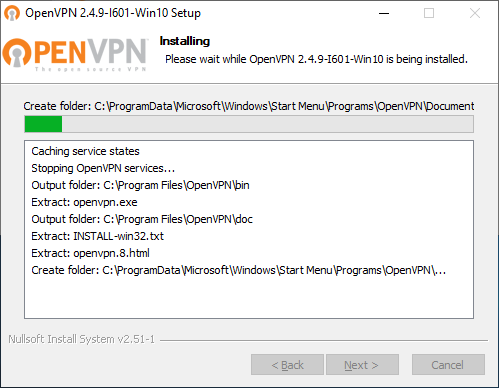
Начинается процесс установки OpenVPN.
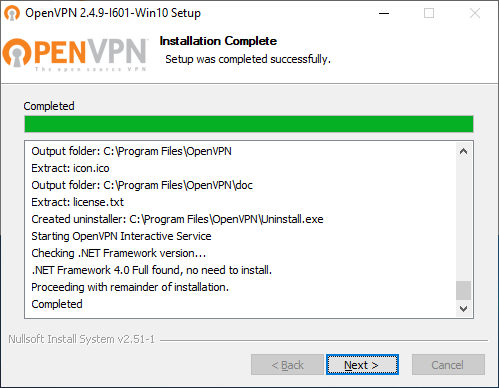
Установка успешно завершена. Next.
Finish.
Установка выполнена в директорию C:Program FilesOpenVPN.

После установки у нас появляется новый сетевой адаптер TAP-Windows Adapter V9.
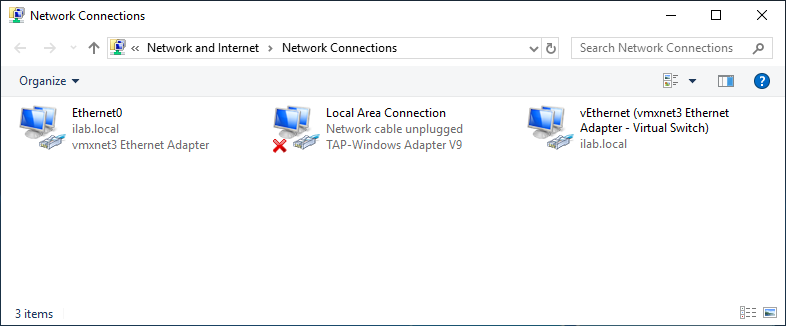
Адаптер отключён. Если по каким-то причинам нужно добавить несколько таких адаптеров, то загляните в папку C:Program FilesTAP-Windowsbin.
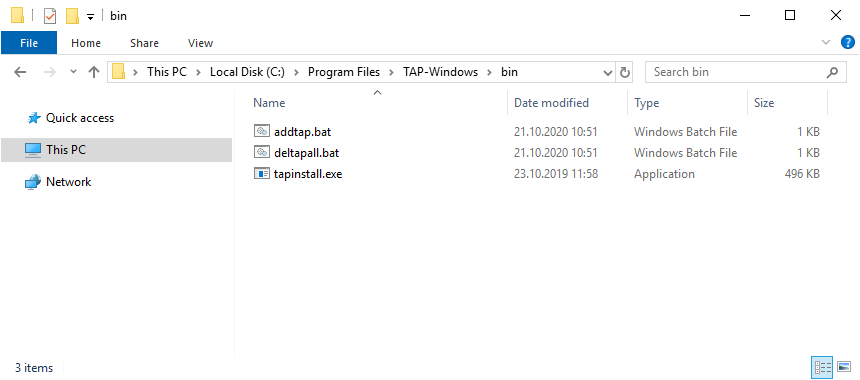
Здесь есть скрипты для установки адаптера, добавления адаптера и удаления всех адаптеров.
Пример установки адаптера. В командной строке под администратором:
cd "C:Program FilesTAP-Windowsbin"
"C:Program FilesTAP-Windowsbintapinstall.exe" install "C:Program FilesTAP-WindowsdriverOemVista.inf" tap0901
В большинстве случаев дополнительно настраивать сетевой адаптер не требуется.
Создание ключей и сертификатов
Запускаем командную строку под администратором и переходим в рабочую директорию C:Program FilesOpenVPNeasy-rsa.
cd C:Program FilesOpenVPNeasy-rsaВ этой папке есть всё необходимое для генерации сертификатов.
Выполняем:
init-config.bat
copy vars.bat.sample vars.bat
Создаётся файл vars.bat с настройками и примером готовых параметров для создания CSR запроса сертификатов. Заполним его. Открываем vars.bat блокнотом.
notepad vars.bat
Открывается vars.bat.
Здесь стоит обратить внимание на пути к рабочим директориям. Например, вы можете указать свой путь к openssl.exe, если установили OpenVPN в другую директорию. Здесь же можно изменить длину ключей шифрования.
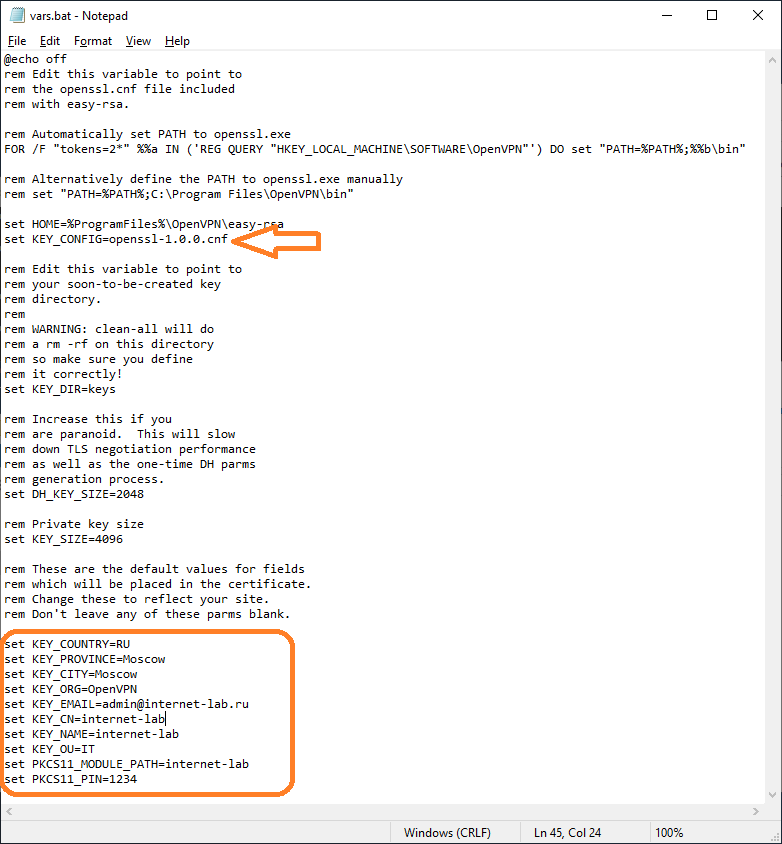
Заполняем переменные в нижней части файла, указываем:
- KEY_COUNTRY — страна
- KEY_PROVINCE — область
- KEY_CITY — город
- KEY_ORG — организация
- KEY_EMAIL — e-mail
- KEY_CN — (Common Name) имя сервера
- KEY_NAME — (Name) имя сервера
- KEY_OU — (Organization Unit) отдел
- PKCS11_MODULE_PATH — для токенов двухфакторной аутентификации, нам не требуется, укажу имя сервера
- PKC11_PIN — ПИН для токенов двухфакторной аутентификации, нам не требуется, укажу 1234
Для каждого сертификата нужно будет указывать свои NAME и COMMON NAME, можно их не указывать в vars.bat, потому как при генерации все параметры будут запрашивать.
Обращаем внимание на строку:
set KEY_KONFIG=openssl-1.0.0.cnf
Это имя конфигурационного файла. Находим его в рабочей директории.
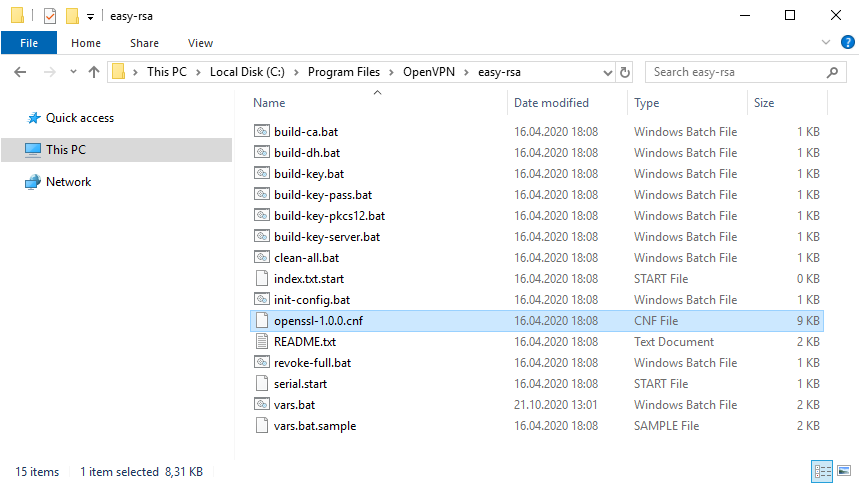
Откроем блокнотом.

Внутри есть параметр default_days, в котором можно указать срок действия будущих сертификатов. По умолчанию у меня стоит 3650 дней, это 10 лет. Меня устраивает. Вероятно, кому-то при генерации клиентских сертификатов может понадобиться уменьшить этот срок.
Сохраняем все изменения и возвращаемся к командной строке. Подгружаем утверждённые нами переменные:
vars.bat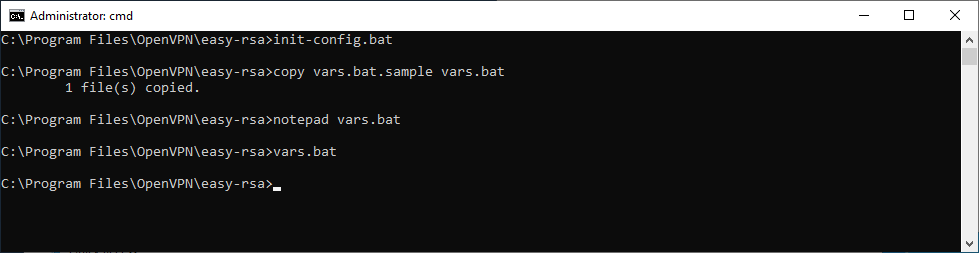
Очищаем директорию с ключами:
clean-all.bat
Сертификаты, которые мы будем создавать, появятся в папке C:Program FilesOpenVPNeasy-rsakeys. Сейчас эта папка очистилась, в ней два файла: index.txt и serial.
Генерируем ключ и сертификат центра сертификации:
build-ca.bat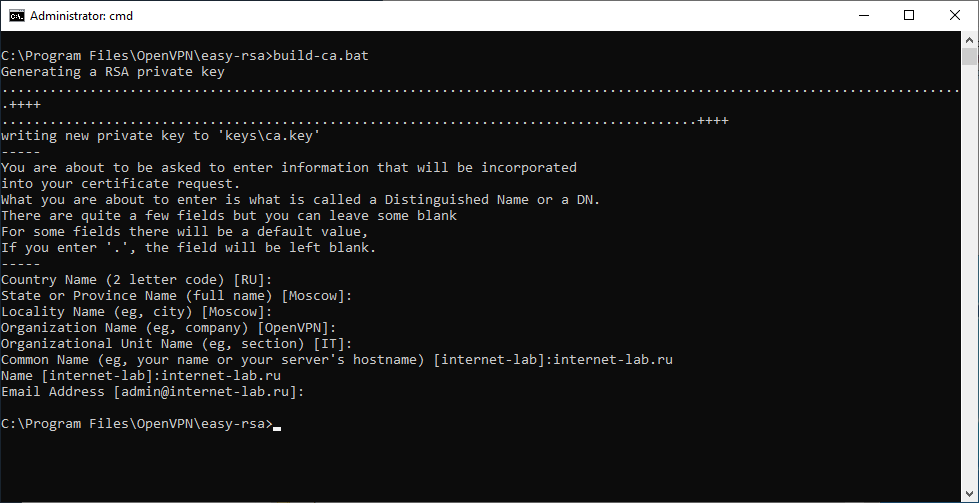
В процессе генерации сертификата нас будут спрашивать все те же параметры, которые мы указали в vars.bat. Если параметр нас устраивает (а он нас устраивает), просто нажимаем ввод и переходим к следующему вопросу. После завершения работы скрипта в папке C:Program FilesOpenVPNeasy-rsakeys появляется два файла:
- ca.crt — сертификат центра сертификации
- ca.key — ключ центра сертификации
Ключ секретный, никому не передавайте, он будет храниться на сервере.
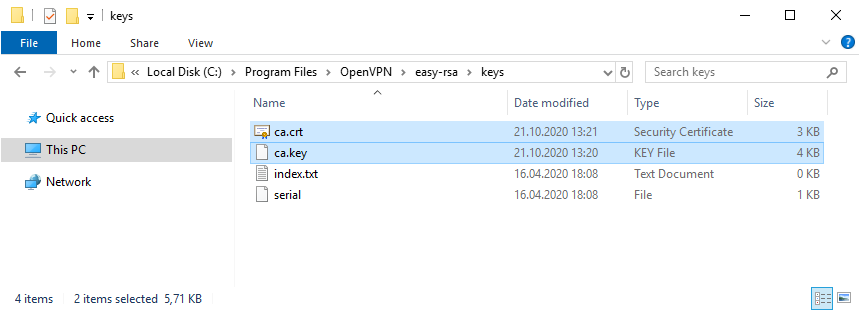
Генерируем ключ Диффи-Хеллмана:
build-dh.bat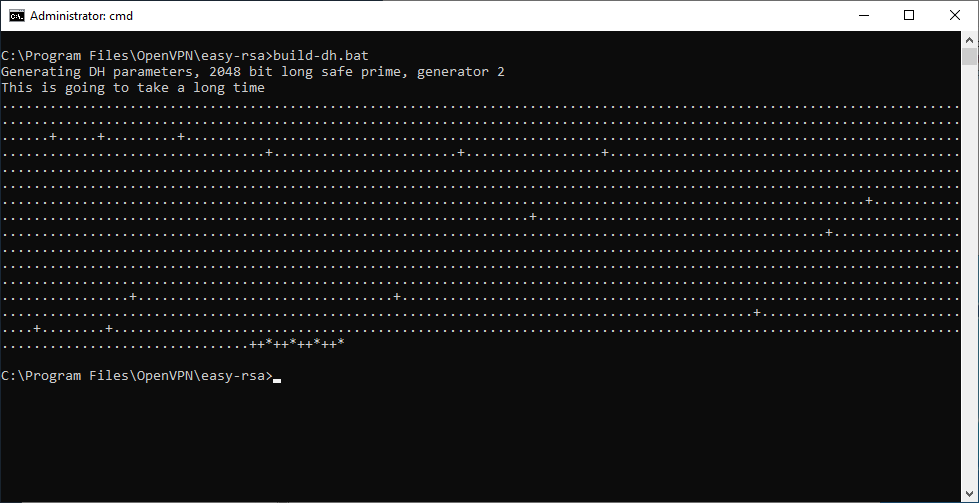
В папке C:Program FilesOpenVPNeasy-rsakeys появляется файл:
- dh2048.pem

Генерируем ключ и сертификат сервера, назовём сервер именем «server«:
build-key-server.bat server
В процессе генерации серверного сертификата нас будут спрашивать те же параметры, которые мы указали в vars.bat. Если параметр нас устраивает (а он нас снова устраивает), просто нажимаем ввод и переходим к следующему вопросу. На вопрос Sign the certificate отвечаем y. На вопрос 1 out of 1 certificate requests certified, commit отвечаем y.
После завершения работы скрипта в папке C:Program FilesOpenVPNeasy-rsakeys появляется четыре файла:
- 01.pem — не понадобится
- server.crt — сертификат сервера
- server.csr — запрос сертификата сервера, не понадобится
- server.key — ключ сервера
Ключ секретный, никому не передавайте, он будет храниться на сервере.
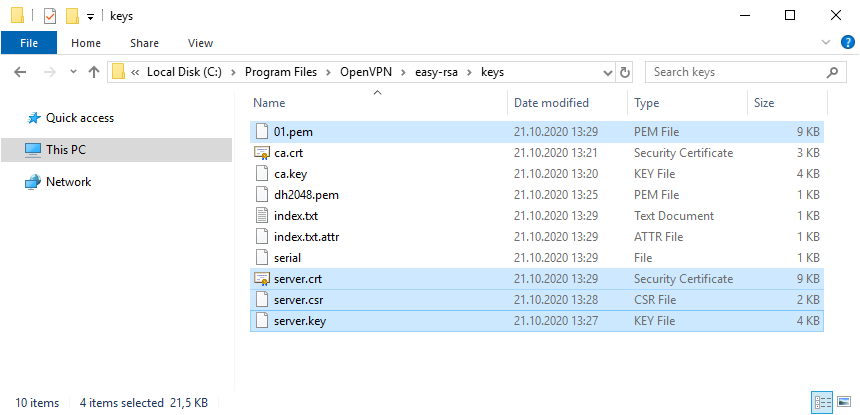
Генерируем ключ и сертификат первого клиента. Для каждого клиента нужно указывать своё имя файла, Name и Common Name. Назовём первого клиента именем «client«:
build-key.bat client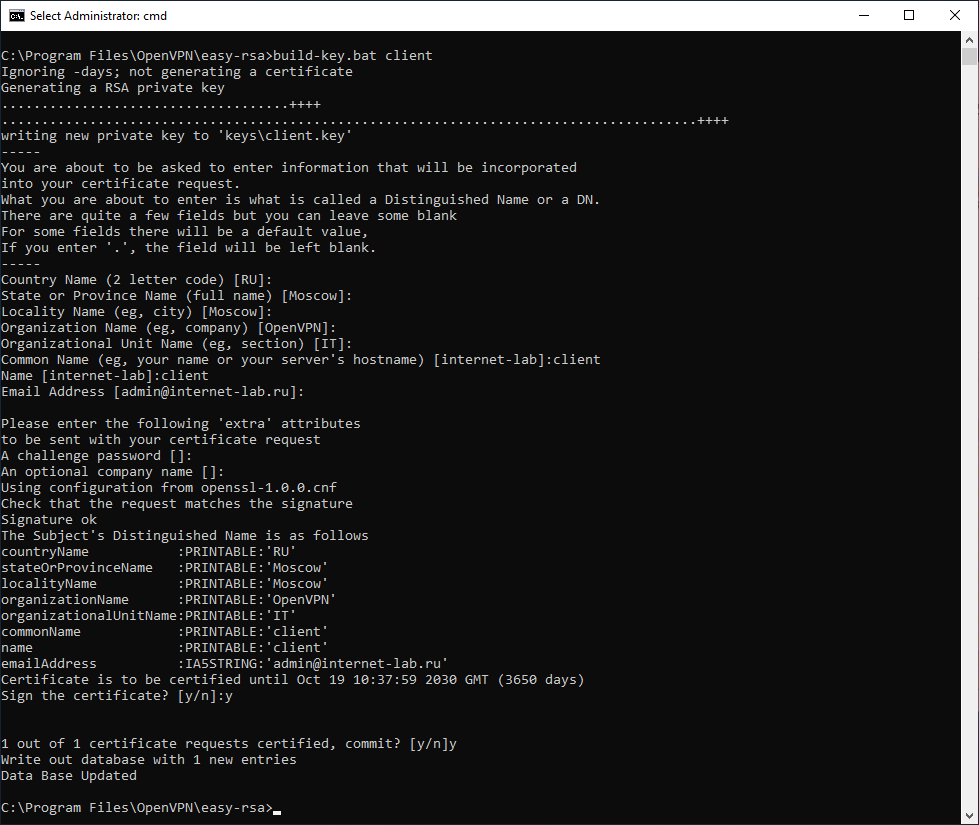
В процессе генерации клиентского сертификата нас будут спрашивать те же параметры, которые мы указали в vars.bat. Нас устраивают все параметры кроме NAME и COMMON NAME, на них отвечаем client. Помним, что для другого клиента имя должно быть другим. На вопрос Sign the certificate отвечаем y. На вопрос 1 out of 1 certificate requests certified, commit отвечаем y.
После завершения работы скрипта в папке C:Program FilesOpenVPNeasy-rsakeys появляется четыре файла:
- 02.pem — не понадобится
- client.crt — сертификат первого клиента
- client.csr — запрос сертификата первого клиента, не понадобится
- client.key — ключ первого клиента
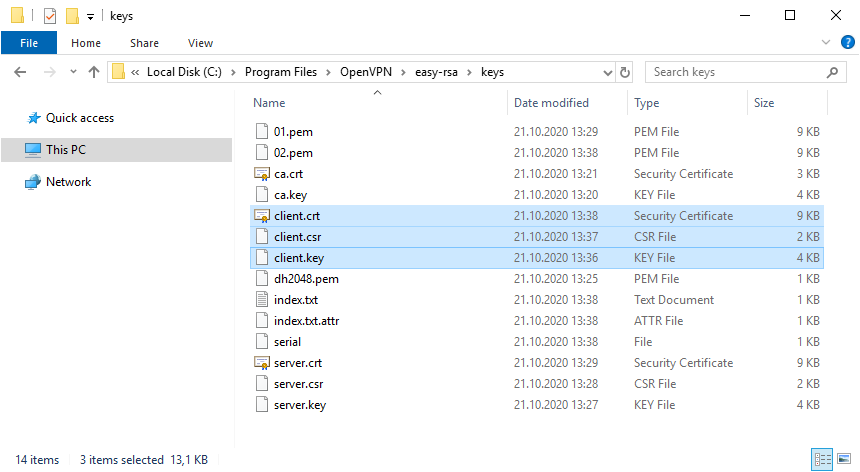
Для каждого нового клиента, который будет подключаться к серверу OpenVPN необходимо сгенерировать свой клиентский сертификат. Но это можно сделать позже, пока добьёмся подключения хотя бы одного клиента.
В настройках сервера можно потом включить настройку duplicate-cn, которая позволяет подключаться всем клиентам по одному общему сертификату, но это небезопасно и не рекомендуется. Используйте только в тестовых целях.
# Uncomment this directive if multiple clients
# might connect with the same certificate/key
# files or common names. This is recommended
# only for testing purposes. For production use,
# each client should have its own certificate/key
# pair.
#
# IF YOU HAVE NOT GENERATED INDIVIDUAL
# CERTIFICATE/KEY PAIRS FOR EACH CLIENT,
# EACH HAVING ITS OWN UNIQUE «COMMON NAME»,
# UNCOMMENT THIS LINE OUT.
;duplicate-cn
Я на сервере собираюсь использовать tls-auth для дополнительной проверки целостности, это обеспечит дополнительный уровень безопасности протокола SSL/TLS при создании соединения:
- Сканирование прослушиваемых VPN-сервером портов
- Инициация SSL/TLS-соединения несанкционированной машиной на раннем этапе
- DoS-атаки и флуд на порты OpenVPN
- Переполнение буфера SSL/TLS
При использовании tls-auth на клиенте не понадобится ключ Диффи-Хеллмана, но пусть будет. Генерируем ключ tls-auth:
openvpn --genkey --secret keys/ta.key
В папке C:Program FilesOpenVPNeasy-rsakeys появляется файл:
- ta.key
Минимальный набор сертификатов сгенерирован.
Настройка OpenVPN сервера
Чтобы случайно всё не удалить, создадим папку C:Program FilesOpenVPNssl и скопируем в неё сертификаты. Это будет рабочая папка сервера.
mkdir "C:Program FilesOpenVPNssl"
copy "C:Program FilesOpenVPNeasy-rsakeys" "C:Program FilesOpenVPNssl"
Создадим конфигурационный файл сервера C:Program FilesOpenVPNconfigserver.ovpn:
copy "C:Program FilesOpenVPNsample-configserver.ovpn" "C:Program FilesOpenVPNconfigserver.ovpn"Открываем блокнотом и редактируем:
notepad "C:Program FilesOpenVPNconfigserver.ovpn"Лучше изучить конфигурационный файл, я предлагаю свой вариант конфига:
port 1194
proto udp
dev tun
ca "C:\Program Files\OpenVPN\ssl\ca.crt"
cert "C:\Program Files\OpenVPN\ssl\server.crt"
key "C:\Program Files\OpenVPN\ssl\server.key"  # This file should be kept secret
dh "C:\Program Files\OpenVPN\ssl\dh2048.pem"
server 10.8.0.0 255.255.255.0
tls-auth "C:\Program Files\OpenVPN\ssl\ta.key" 0 # This file is secret
keepalive 10 120
comp-lzo
persist-key
persist-tun
cipher AES-256-CBC
status "C:\Program Files\OpenVPN\log\status.log"
log "C:\Program Files\OpenVPN\log\openvpn.log"
verb 4
mute 20
Указываем параметры сервера, пути к ключам и сертификатам. Здесь же пути к логам. Для тестирования можно использовать tcp протокол:
proto tcpПереходим к службам:
services.msc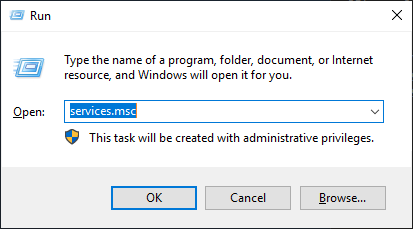
Находим службу OpenVPNService.
Настраиваем на автоматический запуск при загрузке сервера.
Запускаем службу.

Согласно настройкам сервера в папке C:Program FilesOpenVPNlog должны появиться логи. Это один из инструментов администратора OpenVPN сервера.
Активировался сетевой адаптер TAP-Windows Adapter V9.
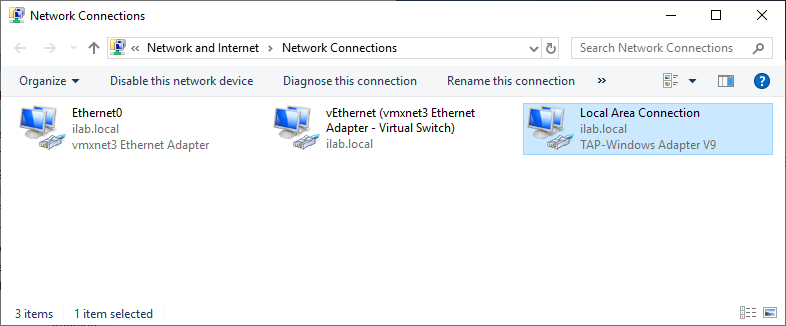
Согласно настройкам сервера IP адрес 10.8.0.1.
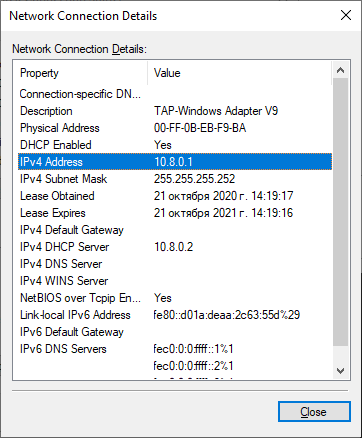
Проверяем поднялся ли порт tcp 1194:
netstat -tan | find "1194"Порт должен прослушиваться.

Теперь нужно настроить firewall. Открываем Windows Defender Firewall with Advanced Security.
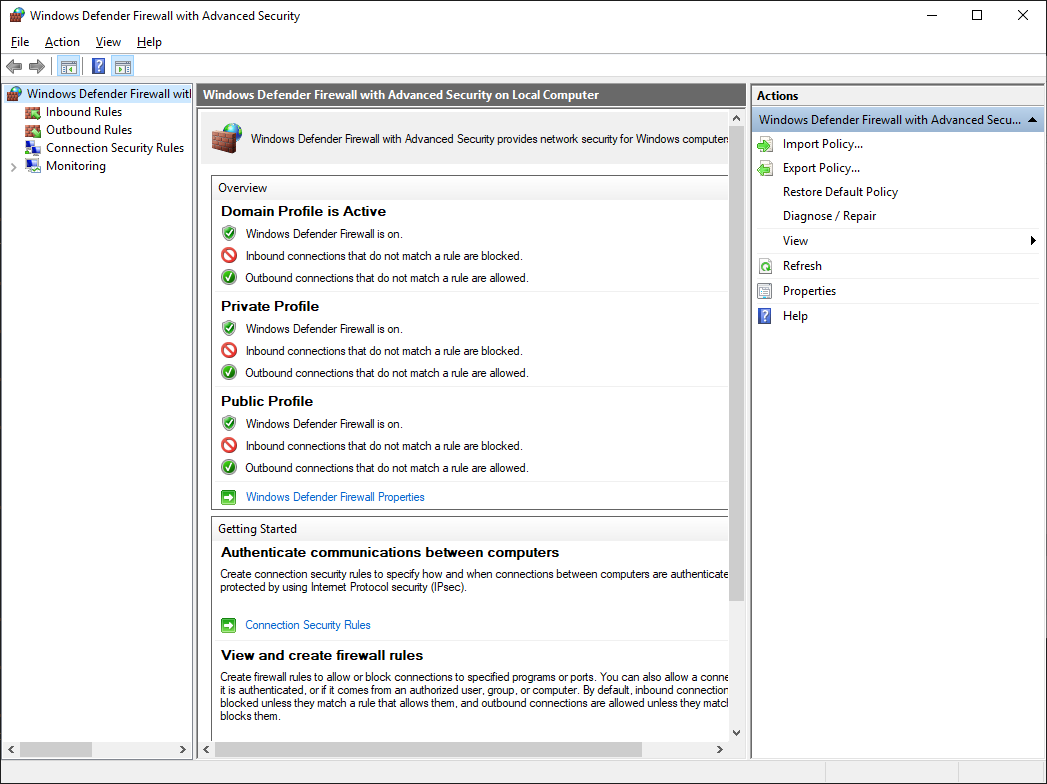
Переходим в Inbound Rules.
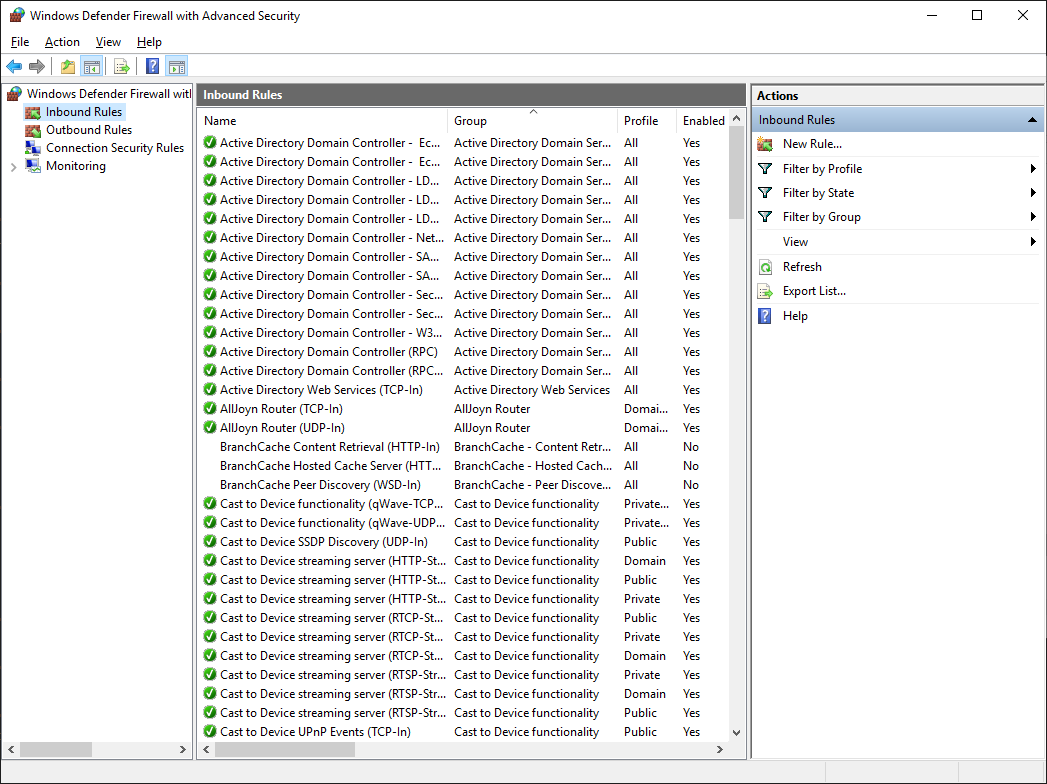
Создаём правило — New Rule…
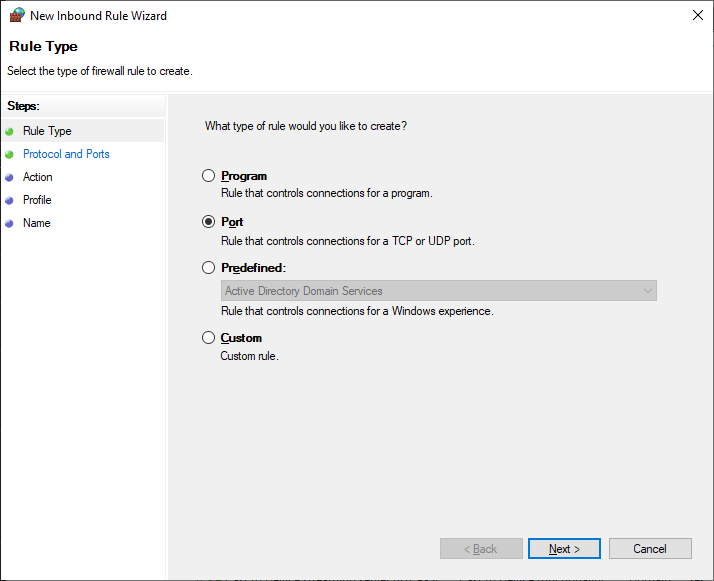
Тип правила — Port. Next.
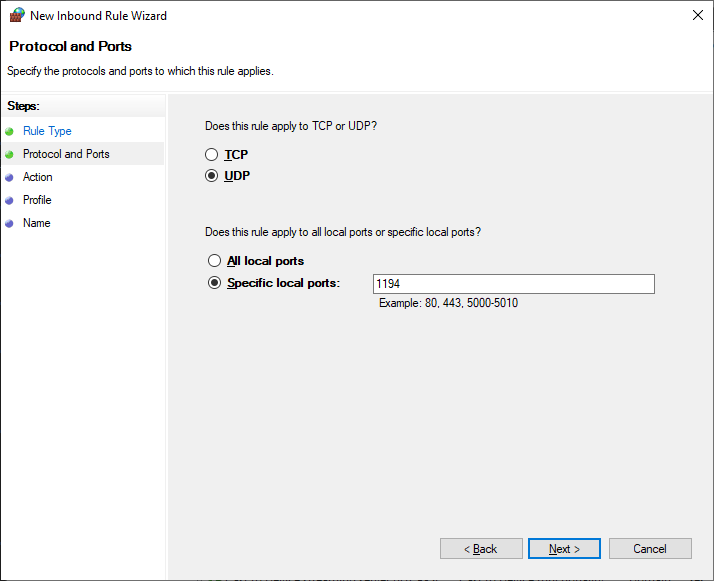
Протоколы и порты — UDP 1194. Как в настройках сервера. Next.
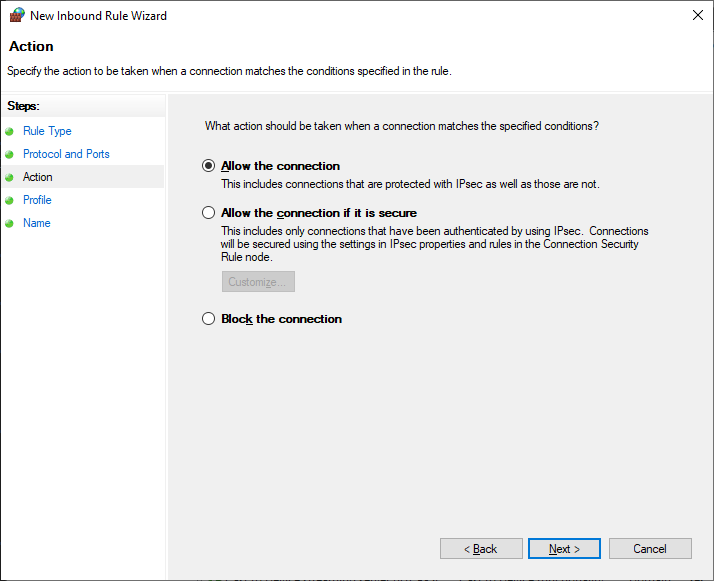
Действия — Allow the connection. Next.
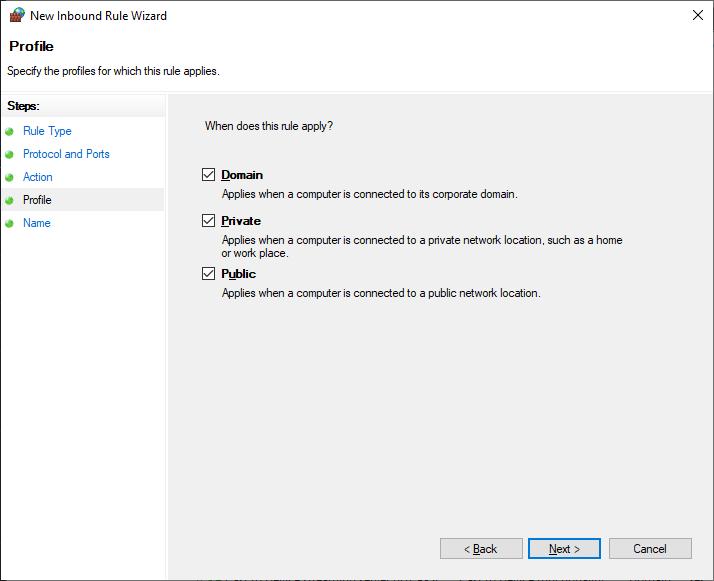
Для всех сетей. Next.
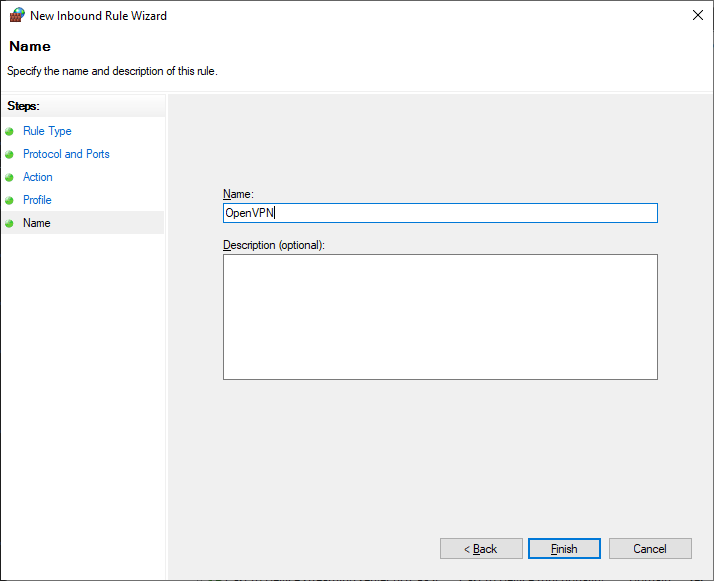
Указываем название правила — OpenVPN. Next.
Правило создано, теперь firewall не блокирует входящие UDP соединения на 1194 порту.
Настройка OpenVPN клиента
На компьютере клиента устанавливаем OpenVPN точно также как на сервер. Галку EasyRSA 2 Certificate Management Scripts не указываем. Галку OpenVPN GUI указываем.
Я устанавливаю OpenVPN на клиенте в папку по умолчанию. C:Program FilesOpenVPN.
Копируем в отдельную папку for_client (её содержимое отправим потом на компьютер клиента) на сервере файлы для клиента:
- ca.crt
- client.crt
- client.key
- dh2048.pem
- ta.key

Туда же из папки C:Program FilesOpenVPNsample-config копируем client.ovpn
Переименовываю client.ovpn в config.ovpn. Можно использовать любое имя, лучше созвучное с названием организации. Вот такой получился набор.
Редактируем файл config.ovpn.
client
dev tun
proto udp
remote internet-lab.ru 1194
resolv-retry infinite
nobind
persist-key
persist-tun
ca "C:\Program Files\OpenVPN\config\ca.crt"
cert "C:\Program Files\OpenVPN\config\client.crt"
key "C:\Program Files\OpenVPN\config\client.key"
tls-auth "C:\Program Files\OpenVPN\config\ta.key" 1
#dh "C:\Program Files\OpenVPN\config\dh2048.pem"
cipher AES-256-CBC
comp-lzo
verb 0
connect-retry-max 25
Здесь указываем пути к ключам и сертификатам клиента. Не забываем про адрес и порт сервера, куда подключаться, для примера я указал internet-lab.ru UDP 1194.
Отправляем подготовленные файлы на компьютер клиента и копируем в C:Program FilesOpenVPNconfig.
На клиента запускаем OpenVPN GUI.
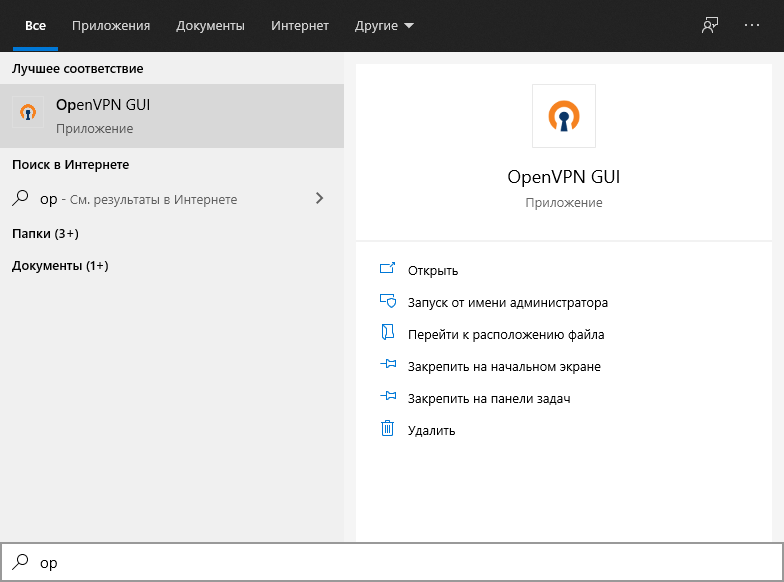
В трее появляется значок OpenVPN.

Правой кнопкой — подключиться.

Устанавливается соединение.

Значок позеленел, назначен адрес 10.8.0.6.
Можно подключаться к серверу, если есть доступы.
Для второго и последующего клиента генерируем свой набор клиентских сертификатов.
Отзыв сертификата
Иногда нужно отозвать сертификат, выданный клиенту. Кто-то увольняется, кто-то палит сертификаты.
cd "C:Program FilesOpenVPNeasy-rsa"
vars.bat
revoke-full client
Где client — это имя клиента.
В папке C:Program FilesOpenVPNkeys появляется файл:
- crl.pem
Копируем его с заменой в рабочую директорию сервера C:Program FilesOpenVPNssl.
Добавляем строчку в конфигурационный файл сервера:
crl-verify "C:\Program Files\OpenVPN\keys\crl.pem" Перезапускаем службу OpenVPN сервера.
net stop OpenVPNService
net start OpenVPNService
Если в конфигурационном файле уже был ранее указан путь к crl.pem, то службу можно не перезапускать, OpenVPN перечитывает CRL один раз в час. Но в течении этого часа клиенты с отозванными сертификатами смогут продолжать подключаться и работать.
Для клиента с отозванным сертификатом процесс подключения будет «зависать». В логе можно увидеть:
TLS Error: TLS key negotiation failed to occur within 60 seconds (check your network connectivity)
TLS Error: TLS handshake failed
Чтобы клиент не стучался постоянно на сервер, у него в конфиге есть опция:
connect-retry-max 25Передать эту опцию при отзыве сертификата нельзя, поэтому указывайте её всем клиентам заранее.
Ссылки
OpenVPN 2.5.1 сервер на Windows