01.02.2022
Просмотров: 1074
Начиная с Windows 10, компания Майкрософт внедрила в состав операционной системы новую опцию Swift Pair, которая позволяет намного быстрее подключать к компьютеру устройства посредством Bluetooth технологии. Не является исключением и Windows 11, в которой также можно включить Swift Pair, приблизив устройство к Windows 11 и выполнив краткие шаги сопряжения.
Читайте также: Как в Windows 11 включить и отключить Bluetooth?
Где находятся настройки Bluetooth Swift Pair в Windows 11?
Для того, чтобы включить Swift Pair в Windows 11, стоит выполнить следующие действия:
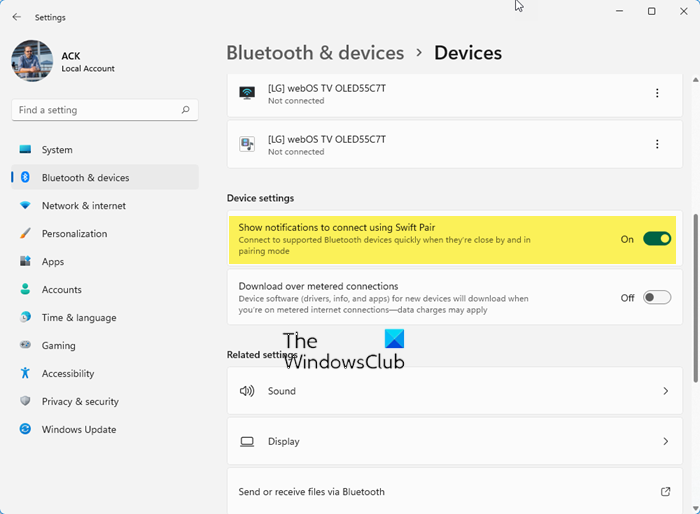
- Открываем «Параметры» и выбираем «Bluetooth и устройства».
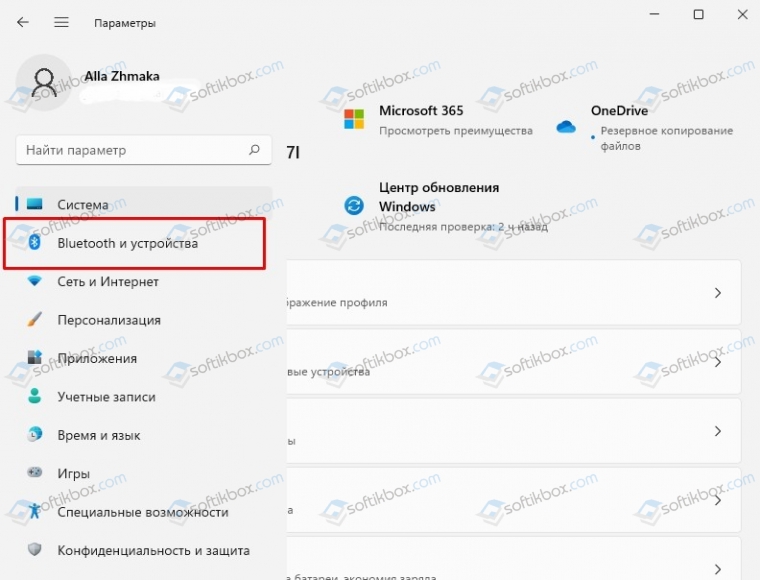
- Выбираем вновь «Устройства».
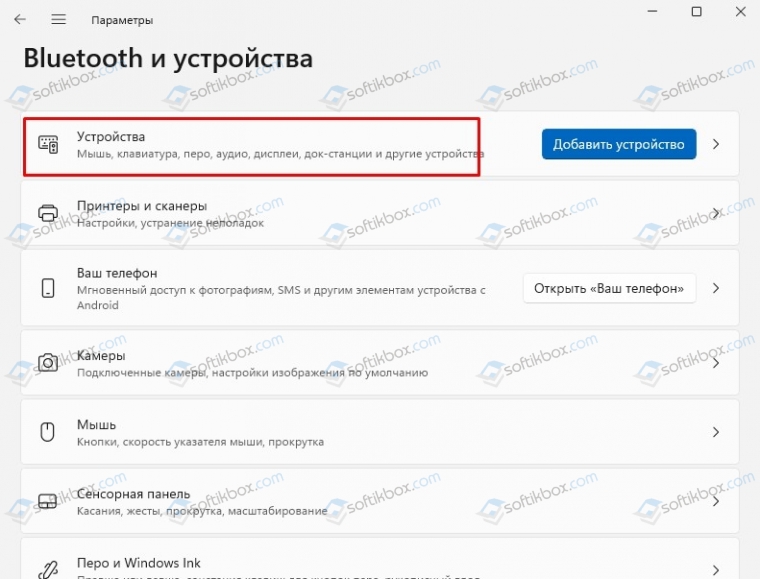
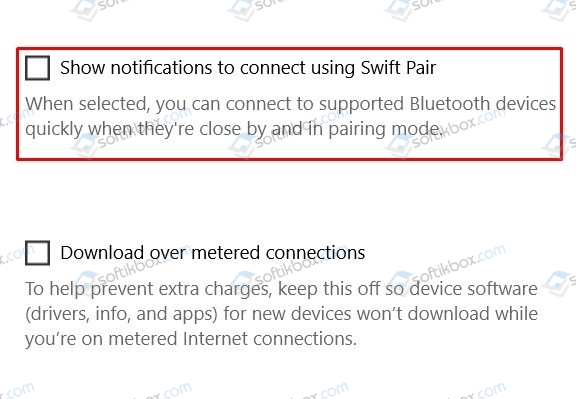
- В новом окне находим параметр «Показывать уведомления для подключения с помощью переключателя Swift Pair» и отмечаем галочкой или перетаскиваем ползунок в положение «Включено».
- Функция активирована.
В случае, если такого пункта в параметрах вашей ОС нет и вы не можете включить или отключить Swift Pair, тогда стоит внести несколько изменений в системный реестр. Для этого выполняем следующее:
- Жмем «Win+R» и вводим «regedit».

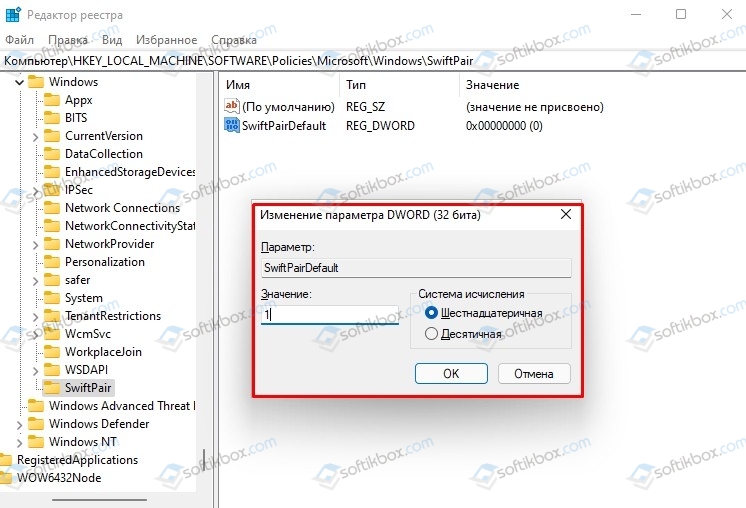
- Теперь переходим по ветке HKEY_LOCAL_MACHINESoftwarePoliciesMicrosoftWindowsSwiftPair. Здесь находим параметр «SwiftPairDefault» и задаем ему значение «1».
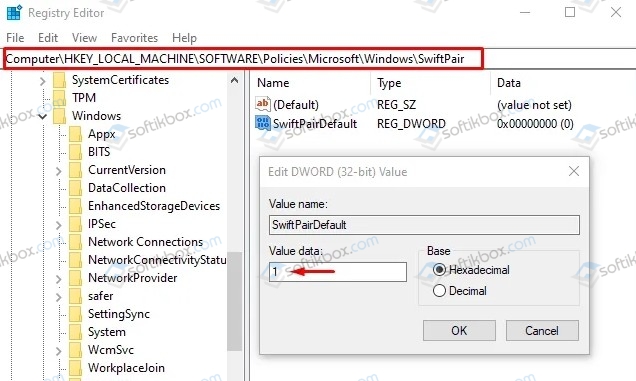
- Если такого раздела нет, то нужно нажать на папке Windows в древовидном меню реестра и выбрать «Создать», «Раздел».
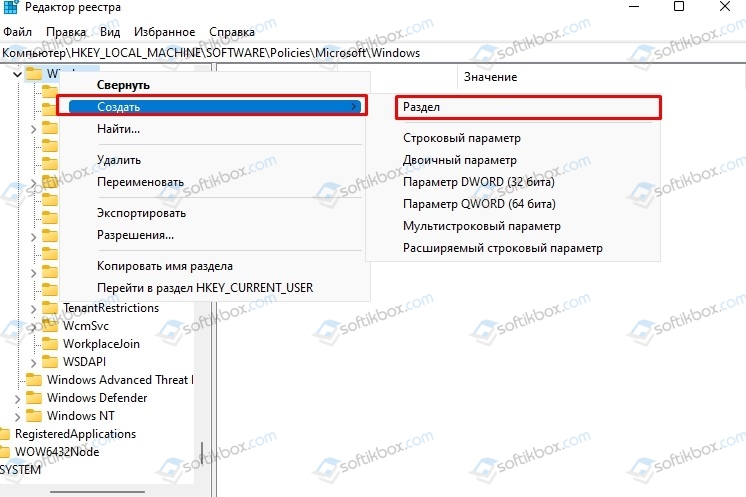
- Присваиваем разделу название «SwiftPair».
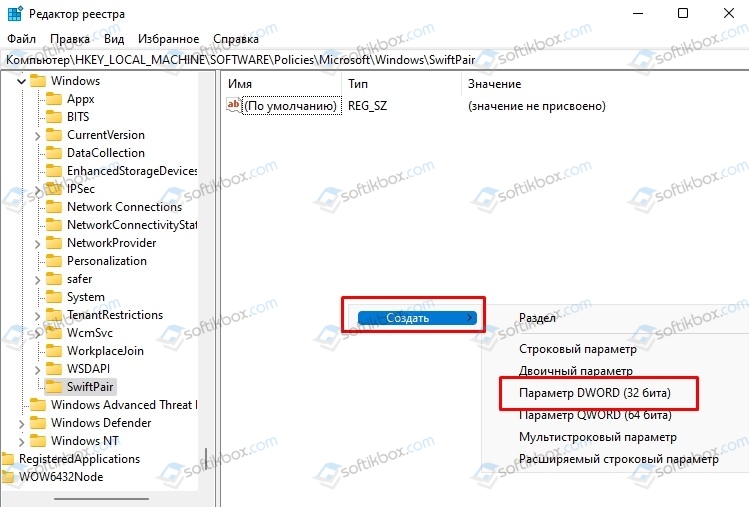
- В нем нажимаем на пустом месте правой кнопкой мыши и выбираем «Создать», «Параметр DWORD 32-бит».
- Теперь перезагружаем систему, чтобы изменения вступили в силу и повторяем попытку включения SwiftPair.
Как связать два устройства по Bluetooth Swift Pair в Windows 11?
Для того, чтобы подключить устройство Bluetooth Swift Pair в Windows 11, стоит выполнить следующие действия:
- Включаем Bluetooth на обоих устройствах.
- Подносим второй гаджет к ПК настолько близко, чтобы он попал в зону видимости блютуза.
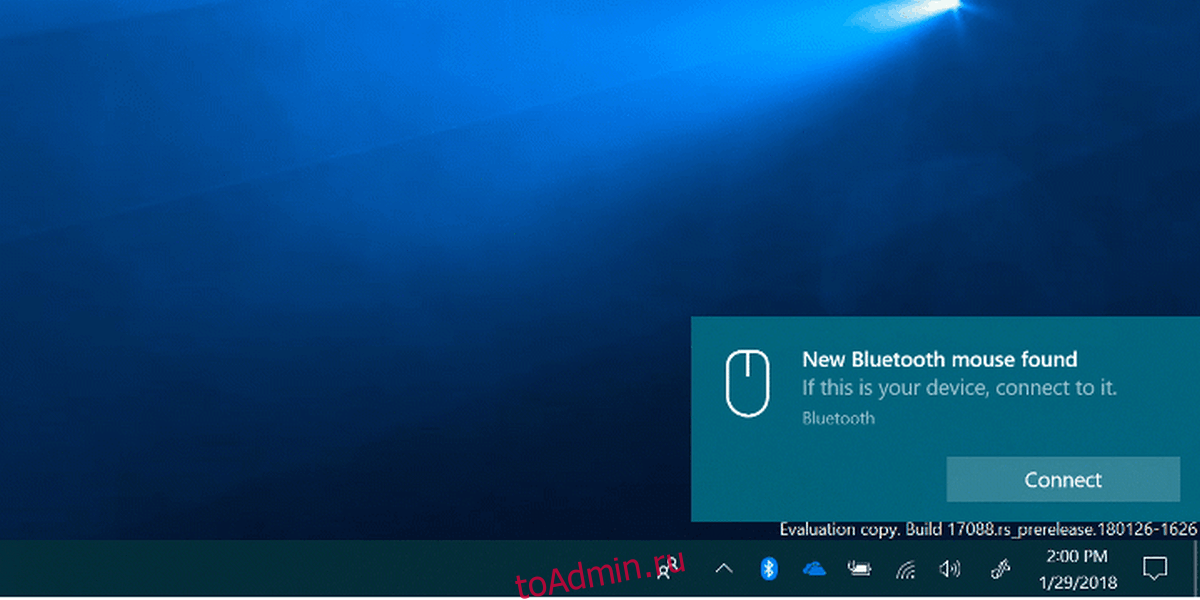
- Появится небольшое уведомление. Нажимаем «Подключиться». Далее выполняем инструкции с экрана (всего два шага).
Невзирая на то, что Sift Pair позволяет быстрее подключить гаджет к ПК посредством технологии Bluetooth, все же его совместимость только с ограниченным кругом устройств является минусом. На данный момент с Sift Pair совместимы Surface Precision Mouse, наушники Surface, Bluetooth-клавиатура Microsoft и другие гаджеты бренда Surface и Microsoft.
Windows 11 Windows 10 Windows 8.1 Windows 7 More…Less
You can pair all kinds of Bluetooth devices with your PC—including keyboards, mice, phones, speakers, and a whole lot more. To do this, your PC needs to have Bluetooth. Some PCs, such as laptops and tablets, have Bluetooth built in. If your PC doesn’t, you can plug a USB Bluetooth adapter into the USB port on your PC to get it.
Before you start, make sure that your Windows 11 PC supports Bluetooth. For more info on how to check, see Fix Bluetooth problems in Windows. If you need help adding a device without Bluetooth capabilities, see Add a device to a Windows PC.
Turn on Bluetooth
After you’ve checked that your Windows 11 PC supports Bluetooth, you’ll need to turn it on. Here’s how:
-
In Settings: Select Start > Settings > Bluetooth & devices , and then turn on Bluetooth .
-
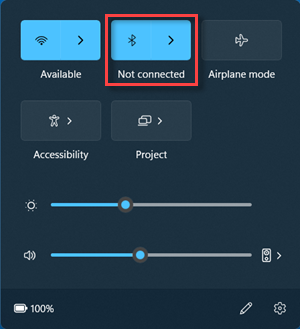
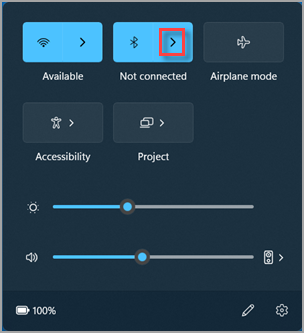
In quick settings: To find the quick setting for Bluetooth, select the Network, Sound, or Battery icons ( ) next to the time and date on the right side of your taskbar. Select Bluetooth to turn it on. If it’s turned on without any Bluetooth devices connected, it might appear as Not connected .

If you don’t see Bluetooth in quick settings, you might need to add it. For more info, see Change notifications and quick settings in Windows 11.
To pair a Bluetooth device
-
Turn on your Bluetooth device and make it discoverable. The way you make it discoverable depends on the device. Check the device or visit the manufacturer’s website to learn how.
-
On your PC, select the Network , Sound, or Battery icons ( ) next to the time and date on the right side of your taskbar.
-
Select Manage Bluetooth devices on the Bluetooth quick setting, then select your device under Not paired.
-
Follow additional instructions if they appear, then select Done.
Your Bluetooth device and PC will usually automatically connect anytime the two devices are in range of each other with Bluetooth turned on.
To pair a Bluetooth printer or scanner
-
Turn on your Bluetooth printer or scanner and make it discoverable. The way you make it discoverable depends on the device. Check the device or visit the manufacturer’s website to learn how.
-
Select Start > Settings > Bluetooth & devices > Printers & scanners > Add device. Wait for it to find nearby printers, choose the one you want to use, then select Add device.
If you’re having problems installing your printer or scanner, see either Fix printer problems or Install and use a scanner in Windows.
To pair a Bluetooth device using Swift Pair
Swift Pair in Windows 11 lets you quickly pair a supported Bluetooth device with your PC. If the Bluetooth device supports Swift Pair, you’ll receive a notification when it’s nearby and you put it into pairing mode to make it discoverable.
-
Turn on a Bluetooth device that supports Swift Pair and make it discoverable. The way you make it discoverable depends on the device. Check the device or visit the manufacturer’s website to learn more.
-
If this is your first time using Swift Pair, select Yes when asked if you want to get notifications and use Swift Pair.
-
When a notification appears that a new Bluetooth device was found, select Connect.
Before you start, make sure that your Windows 10 PC supports Bluetooth. For more info on how to check, see Fix Bluetooth problems in Windows 10. If you need help adding a device without Bluetooth capabilities, see Add a device to a Windows 10 PC.
Turn on Bluetooth
After you’ve checked that your Windows 10 PC supports Bluetooth, you’ll need to turn it on. Here’s how:
In Settings: Select Start > Settings > Devices > Bluetooth & other devices, and turn on Bluetooth.
Turn on Bluetooth in Settings
In action center: Action center can be found next to time and date on your taskbar. On the taskbar, select action center ( or ), then select Bluetooth to turn it on. If it’s turned off, it might appear as Not connected.
If you don’t see Bluetooth in your action center, here’s how you can change it:
-
Expand quick actions. On the taskbar, select action center ( or ) > Expand. Bluetooth should appear here. It will appear as Bluetooth or Not connected.
-
Add Bluetooth to action center. Select Start > Settings > System > Notifications & actions > Quick actions. Go to Add or remove quick actions and turn on Bluetooth.
To pair a Bluetooth headset, speaker, or other audio device
-
Turn on your Bluetooth audio device and make it discoverable. The way you make it discoverable depends on the device. Check the device or visit the manufacturer’s website to learn how.
-
On your PC, select Start > Settings > Devices > Bluetooth & other devices > Add Bluetooth or other device > Bluetooth. Choose the device and follow additional instructions if they appear, then select Done.
Your Bluetooth device and PC will usually automatically connect anytime the two devices are in range of each other with Bluetooth turned on.
To pair a Bluetooth keyboard, mouse, or other device
-
Turn on your Bluetooth keyboard, mouse, or other device and make it discoverable. The way you make it discoverable depends on the device. Check the device or visit the manufactur’s website to learn how.
-
On your PC, select Start > Settings > Devices > Bluetooth & other devices > Add Bluetooth or other device > Bluetooth. Choose the device and follow additional instructions if they appear, then select Done.
To pair a Bluetooth printer or scanner
-
Turn on your Bluetooth printer or scanner and make it discoverable. The way you make it discoverable depends on the device. Check the device or visit the manufacturer’s website to learn how.
-
Select Start > Settings > Devices > Printers & scanners > Add a printer or scanner. Wait for it to find nearby printers, then choose the one you want to use and select Add device.
If you’re having installation issues with your printer or scanner, see either Fix printer problems or Install and use a scanner in Windows 10.
To pair a Bluetooth device using Swift Pair
Swift Pair in Windows 10 lets you quickly pair a supported Bluetooth device with your PC. If the Bluetooth device supports Swift Pair, you’ll receive a notification when it’s nearby and you put it into pairing mode to make it discoverable.
-
Turn on a Bluetooth device that supports Swift Pair and make it discoverable. The way you make it discoverable depends on the device. Check the device or visit the manufacturer’s website to learn more.
-
If this is your first time using Swift Pair, select Yes when asked if you want to get notifications and use Swift Pair.
-
When a notification appears that a new Bluetooth device was found, select Connect.
-
After it’s connected, select Close.
Before you start, make sure that your Windows 8 PC supports Bluetooth.
-
Turn on your Bluetooth device and make it discoverable.
The way you make it discoverable depends on the device. Check the device or visit the manufacturer’s website to learn how.
-
Select Start > type Bluetooth > select Bluetooth settings from the list.
-
Turn on Bluetooth > select the device > Pair.
-
Follow any instructions if they appear. Otherwise, you’re done and connected.
Your Bluetooth device and PC will usually automatically connect anytime the two devices are in range of each other with Bluetooth turned on.
Before you start, make sure that your Windows 7 PC supports Bluetooth.
-
Turn on your Bluetooth device and make it discoverable.
The way you make it discoverable depends on the device. Check the device or visit the manufacturer’s website to learn how.Turn on your Bluetooth device and make it discoverable. The way you make it discoverable depends on the device. Check the device or visit the manufacturer’s website to learn how.
-
Select Start
> Devices and Printers. -
Select Add a device > select the device > Next.
-
Follow any other instructions that might appear. Otherwise, you’re done and connected.
 > Devices and Printers.
Your Bluetooth device and PC will usually automatically connect anytime the two devices are in range of each other with Bluetooth turned on.
Need more help?
Download PC Repair Tool to quickly find & fix Windows errors automatically
Bluetooth is a wireless technology that provides a ‘wire-free’ way to connect peripherals over a short distance directly to your computer system. Previous versions of Windows came with a simple Bluetooth pairing process that involved scanning for the peripherals, then entering a pairing code, and finally completing a wizard.
If you use Bluetooth devices on your system often you may have experienced cases where pairing your device and the computer takes a couple of more seconds to complete. Basically, pairing Bluetooth devices on Windows 11/10 can continue to be one time-consuming task – but Microsoft’s Bluetooth feature, Swift Pair, makes things easy.
What is this new Bluetooth Swift Pair feature?
Microsoft wanted to make the experience of pairing Bluetooth devices on Windows 11/10 smooth – this is exactly why they released Swift Pair with Windows 10 April 2018 Update. Swift Pair cuts through the steps of conventional Bluetooth pairing on Windows 11/10 and turns it into one seamless process that demands a single click. In simple words, Swift Pair is an option for pairing Bluetooth devices more quickly in Windows 11/10. This feature clips up your Bluetooth peripherals to your computer in a timely manner; also, your devices can connect to Windows 11/10 PCs in no time if they are into active pairing mode.
The limitation:
Users need to note that Microsoft’s Swift Pair feature is limited by devices. This means it supports only certain devices which include:
- Microsoft Bluetooth Keyboard
- Microsoft Bluetooth Mouse
- Surface Ergonomic Keyboard
- Surface Precision Mouse
- Microsoft Modern Mobile Mouse
- Surface Mobile Mouse
- Microsoft Arc Mouse
- Surface Arc Mouse
- Surface Headphones
So, whatever Bluetooth peripheral you have, if your Bluetooth device is not a Microsoft product, or maybe an exceptionally popular product, it will not be compatible with the Swift Pair feature and won’t be available for you at all when trying to pair over Bluetooth.
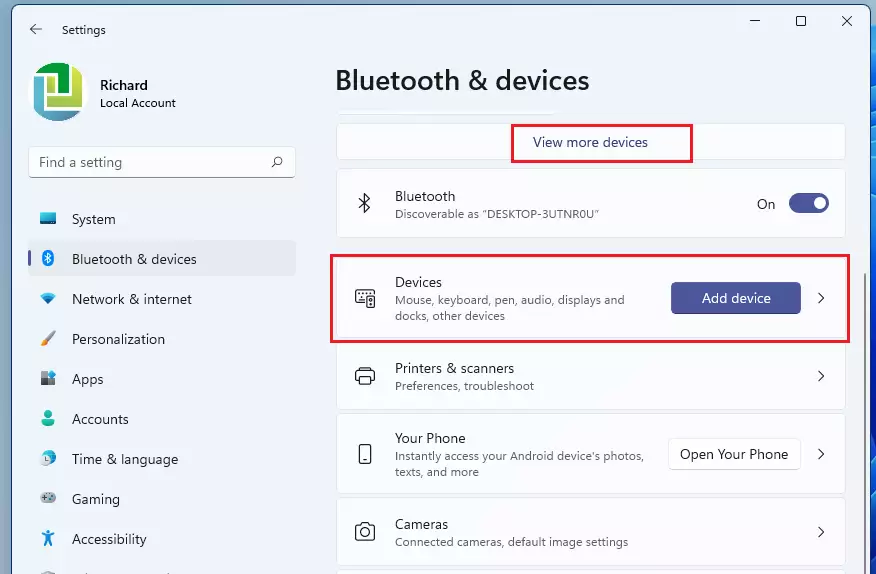
To enable Swift Pair on Windows 11, follow these steps:
- Open Windows 11 Settings
- Click on Bluetooth and devices settings
- On the right side, click on View more devices
- Locate Device settings for your device
- Toggle On the switch against Show notifications to connect using Swift Pair
- Now you can enable Pairing Mode and Connect the device.
Enable Bluetooth Swift Pair on Windows 10
Swift pair released starting with Windows 10 version 1803 but was not turned on automatically for users. To start using Swift Pair on your Windows 10 system you will need to enable it from the settings app. Use the below steps:
- Go to the Windows ‘Settings’ app from the Start Menu
- Click on ‘Devices’
- Select ‘Bluetooth & other devices’
- Check the option ‘Show notifications to connect using Swift Pair’
Done! Once these steps are completed you will be able to connect Bluetooth devices (compatible ones) directly from the toast notifications.
Read: Bluetooth speaker paired, but no Sound or Music.
How to use Bluetooth Swift Pair on Windows 11/10
Follow these steps to pair a Bluetooth device with the Swift Pair feature:
- To use the Swift Pair feature, make sure your Bluetooth device is on pairing mode.
- Now get the device near your Windows 10 system to automatically trigger the setup.
- When the peripheral is close by, Windows will show a notification to the user.
- Hit the ‘Connect’ button from the notification popup; this starts pairing the peripheral.
Please note: In most cases, pairing mode can be enabled by pressing a physical button on the device for around 10 seconds. When the pairing mode is enabled, a light on the device starts blinking letting the user know that it is ready to be connected to the system. For any further instructions, you can go through the instruction manual of the device or contact the manufacturer.
Once you complete the above steps, your Bluetooth device will be ready to use on your system. Also, when the device is not nearby or when the pairing mode is not enabled, Windows 10 will remove it from Action Center.
Related: How to boost or extend Bluetooth Signal Range.
How to disable Bluetooth Swift Pair on Windows 11/10
If for any reason you wish to disable the Swift Pair Feature (like security concerns), you can do it from the ‘Settings’ app in the ‘Bluetooth & other devices’ section. Simply uncheck the ‘Show notifications to connect using Swift Pair’ option.
Final words
Swift Pair makes the process of pairing Bluetooth devices quick. But again, just because your device is not compatible it does not mean you cannot connect your device to your PC. You can always connect it through the conventional pairing menu.
TIP: This post will help you if Bluetooth devices are not showing, pairing, or connecting.

Anand Khanse is the Admin of TheWindowsClub.com, a 10-year Microsoft MVP (2006-16) & a Windows Insider MVP (2016-2022). Please read the entire post & the comments first, create a System Restore Point before making any changes to your system & be careful about any 3rd-party offers while installing freeware.
Подключить устройство Bluetooth к компьютеру с Windows 10 очень просто, и это дает вам удобство беспроводной среды. Но прежде чем вы сможете это сделать, вам необходимо сначала подключить устройство Bluetooth к компьютеру, что иногда может стать сложным процессом.
В последний год Microsoft выпустила новую функцию, которая революционизирует способ подключения устройств Bluetooth к ПК с Windows 10. Эта классная новая функция называется Быстрая пара.
Как следует из названия, Swift Pair предлагает простой способ сопряжения ваших устройств Bluetooth. Вам не нужно будет сканировать периферийные устройства поблизости, а затем вводить код для сопряжения. Swift Pair меняет все это, устраняя традиционный трудоемкий процесс сопряжения Bluetooth.
На данный момент Swift Pair поддерживает довольно ограниченное количество устройств. Если вы используете продукт Bluetooth от Microsoft, то это устройство поддерживается. Но для всех остальных устройств они должны стать суперпопулярными, прежде чем Microsoft добавит их в список совместимых продуктов.
Однако не о чем беспокоиться, если ваше устройство несовместимо со Swift Pair. Все, что он делает, — это самый быстрый способ сопряжения вашего устройства с Windows 10 и не более того. Учитывая это, вы все равно можете подключить свое устройство к компьютеру, используя старые методы. Вы по-прежнему можете использовать приложение «Настройки» или панель управления для сопряжения устройства.
Некоторые из устройств, которые в настоящее время поддерживают Swift Pair, включают:
- Клавиатура Microsoft Bluetooth
- Мышь Microsoft Bluetooth
- Эргономичная клавиатура Surface
- Мышь Surface Precision
- Современная мобильная мышь Microsoft
- Мобильная мышь Surface
- Мышь Microsoft Arc Mouse
- Мышь Surface Arc Mouse
- Наушники Surface
- Поверхностные наушники
- Samsung Galaxy Buds
Список обязательно будет пополняться в будущем.
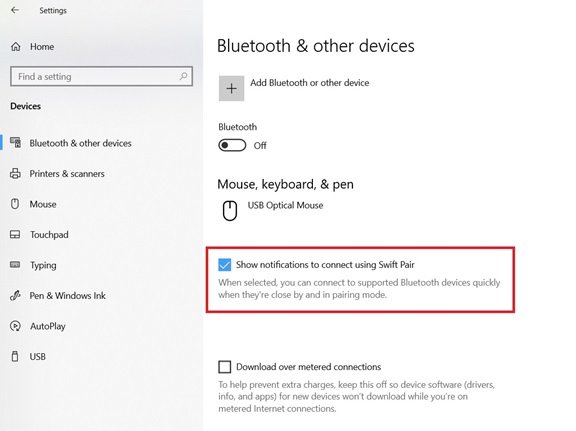
Как включить Bluetooth Swift Pair в Windows 10

Функция быстрой пары не включается автоматически, когда пользователи пытаются получить к ней доступ в первый раз. Вам необходимо включить его в своей системе Windows 10, прежде чем вы сможете начать его использовать.
- Откройте приложение «Настройки» из меню «Пуск».
- Щелкните «Устройства».
- Затем выберите в меню «Bluetooth и другие устройства».
- Установите флажок «Показывать уведомления для подключения с помощью Swift Pair», чтобы включить его.
После этого вы сможете подключать совместимые устройства Bluetooth и периферийные устройства прямо из меню всплывающих уведомлений.
Как подключить устройство Bluetooth с помощью Swift Pair в Windows 10

Следуйте этому методу, чтобы подключить и подключить совместимое устройство Bluetooth к компьютеру с Windows 10 с помощью Swift Pair:
- На совместимом устройстве Bluetooth включите режим сопряжения, чтобы начать работу. Возможно, вам потребуется нажать кнопку, чтобы включить устройство.
- Обязательно поднесите устройство к компьютеру с Windows 10, чтобы запустить настройку сопряжения.
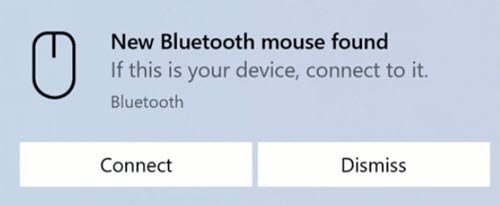
- Чтобы выполнить сопряжение устройства, нажмите кнопку «Подключить» в следующем уведомлении.
Когда ваше устройство Bluetooth не находится в режиме сопряжения или находится рядом, Windows 10 удалит его из Центра поддержки.
Вот и все! Теперь ваше устройство будет подключено мгновенно при включении рядом с компьютером с Windows 10.
Swift Pair on Windows 11 allows you to quickly connect Bluetooth peripherals to your computer. The feature isn’t new, it’s been available since Windows 10, and it has been designed to reduce the steps to pair peripherals to your laptop or desktop computer.
Once enabled, you only have to approach the Bluetooth peripheral in pairing mode close to the computer for Windows 11 to detect it and display a notification to complete the setup. Swift Pair should be enabled by default on supported hardware, but if it’s not. You have to enable it from the Settings app before using it.
In this guide, you will learn the steps to enable Swift Pair to connect Bluetooth devices on Windows 11 without even having to open the Settings app.
- Enable Bluetooth Swift Pair on Windows 11
- Connect Bluetooth Swift Pair on Windows 11
To enable Swift Pair on Windows 11, use these steps:
-
Open Settings.
-
Click on Bluetooth & other devices.
-
Click the Devices page on the right side.
-
Turn on the Show notifications to connect using Swift Pair toggle switch.


Once you complete the steps, Swift Pair will turn on, and Windows 11 will now be able to detect and show a quick notification to pair Bluetooth devices.
Connect Bluetooth Swift Pair on Windows 11
To pair a Bluetooth device with Swift Pair on Windows 11, use these steps:
-
Enable the pairing mode on the Bluetooth device.
-
Get the device closer to Windows 11 to trigger the setup.
-
Select the Connect button from the notification to pair it.
After you complete the steps, you can start using the Bluetooth peripheral on your computer.
While Sift Pair is a convenient feature, only a few devices support this feature, some of which include select Surface and Microsoft branded keyboards and mice like the Surface Precision Mouse, Surface Headphones, Microsoft Bluetooth Keyboard, and others.
We may earn commission for purchases using our links to help keep offering the free content. Privacy policy info.
All content on this site is provided with no warranties, express or implied. Use any information at your own risk. Always backup of your device and files before making any changes. Privacy policy info.

Использование устройства Bluetooth — это двухэтапный процесс; сначала вам нужно соединить его с вашим ПК, а затем вы должны подключить его. Сопряжение — это действительно то, что занимает больше времени, в то время как для подключения требуется нажатие кнопки (или нажатия сочетания клавиш) и ничего более. Спаривание действительно отнимает много времени. В Windows 10 есть удобная функция под названием Swift Pair, которая упрощает сопряжение устройств Bluetooth, находящихся в режиме «спаривания». Вот как это работает.
Эта функция существует как минимум год, поэтому, если вы все еще ждете Windows 10 1903, вы все равно сможете ее использовать. Откройте приложение «Настройки» и выберите группу настроек «Устройства». Перейдите на вкладку Bluetooth и найдите параметр «Показывать уведомления для подключения с помощью Swift Pair». Убедитесь, что он включен.
Это все, что нужно сделать. Единственное, что вам нужно сделать сейчас, это включить устройство Bluetooth, которое вы хотите подключить. Если он не настроен на подключение к другому устройству поблизости, он включится в режиме «сопряжения». Теперь вы должны увидеть уведомление, подобное приведенному ниже (любезно предоставлено Microsoft), о том, что поблизости есть устройство, готовое к сопряжению. Щелкните по нему, и устройство будет сопряжено и подключено.
Совместимые устройства
У Microsoft есть отличные функции Bluetooth, но они ограничены устройством. Swift Pair будет работать только с совместимыми устройствами, и список этих устройств будет небольшим. Скорее всего, какое бы периферийное устройство Bluetooth у вас ни было, если оно не является продуктом Microsoft или исключительно популярным продуктом, оно несовместимо со Swift Pair.
Microsoft добавила в Windows 10 функцию для просмотра процента заряда батареи устройств Bluetooth, и она тоже была ограничена. И это несмотря на то, что существуют сторонние приложения, которые могут выполнять эту работу. Дело не в том, что технология недоступна, просто Microsoft использует технологию, которая не так широко используется.
Swift Pair работает быстрее, когда дело доходит до сопряжения устройства и ничего больше. Тот факт, что ваше устройство несовместимо, не означает, что вы не сможете подключить его к компьютеру. Он будет сопрягаться и подключаться нормально через меню сопряжения. Если у вас возникли проблемы с подключением устройства из приложения «Настройки», попробуйте использовать панель управления, поскольку она намного стабильнее, чем приложение «Настройки». Трудно не отметить, что Apple делает это намного лучше на macOS.
Что вы думаете об этой статье?

На ПК с Windows 10 Swift Pair — это функция, позволяющая быстро подключать периферийные устройства Bluetooth к компьютеру. Эта функция доступна начиная с Windows 10 версии 1803 (обновление за апрель 2018 г.). Это сокращает шаги, необходимые для сопряжения устройства. Когда функция быстрой пары включена, установите периферийное устройство Bluetooth ближе к компьютеру, чтобы обнаружить его и отобразить уведомление о завершении сопряжения. Однако эта функция не включена по умолчанию, а это означает, что вам необходимо включить ее в приложении «Настройки» перед ее использованием.
Предыдущие версии Windows 10 были оснащены простым процессом сопряжения Bluetooth, который включал сканирование периферийных устройств. Вам необходимо ввести код сопряжения, чтобы завершить работу мастера, если это необходимо.
Технология Swift Pair сокращает этапы традиционного сопряжения Bluetooth в Windows 11/10 и превращает его в один бесшовный процесс, требующий одного щелчка мыши. Проще говоря, Swift Pair — это вариант для более быстрого сопряжения устройств Bluetooth в Windows 11/10. Эта функция быстро подключает периферийные устройства Bluetooth к компьютеру; Кроме того, ваши устройства могут мгновенно подключаться к ПК с Windows 11/10, если они находятся в активном режиме сопряжения.
Хотя Swift Pair является удобной функцией, в настоящее время совместимы следующие устройства Bluetooth:
Таким образом, какое бы периферийное устройство Bluetooth у вас ни было, если ваше устройство Bluetooth не является продуктом Microsoft, оно не будет совместимо с функцией Swift Pair. Более того, он будет недоступен для вас при попытке сопряжения по Bluetooth.
В этой статье gearupwindows мы расскажем вам, как включить Swift Pair для настройки устройств Bluetooth в Windows 11/10, даже не открывая приложение «Настройки».
Как включить Bluetooth Swift Pair в Windows 10?
Чтобы включить Swift Pair на компьютере с Windows 10, выполните следующие действия:
Шаг 1. Откройте приложение «Настройки».

Шаг 2. Затем нажмите Устройства.
Шаг 3. После этого выберите Bluetooth и другие устройства вариант на левой боковой панели.

Шаг 4. Наконец, установите или снимите флажок Показывать уведомления для подключения с помощью Swift Pair чтобы включить или отключить эту функцию.
После выполнения вышеуказанных шагов вы сможете быстро подключать поддерживаемые устройства Bluetooth из всплывающего уведомления.
Как подключить Bluetooth Swift Pair в Windows 10?
Чтобы подключить устройство Bluetooth к Swift Pair, выполните следующие действия:
Шаг 1. Включите режим сопряжения на устройстве Bluetooth.
Шаг 2. Когда устройство будет ближе к Windows 10, оно запустит установку.
Шаг 3. Нажмите кнопку Соединять кнопку в уведомлении, чтобы выполнить сопряжение.
 Источник: https://docs.microsoft.com/en-us/windows-hardware/design/component-guidelines/bluetooth-swift-pair.
Выполнив вышеуказанные шаги, вы сможете начать использовать устройство Bluetooth. Когда периферийное устройство не находится в режиме сопряжения или поблизости, Windows 10 автоматически удалит его из Центра уведомлений.
Как включить Bluetooth Swift Pair в Windows 11?
Чтобы включить Bluetooth Swift Pair в Windows 11, сделайте следующее:
Шаг 1. Сначала откройте приложение «Настройки».

Шаг 2. Затем выберите Bluetooth и устройства категорию в окне настроек.
Шаг 3. После этого нажмите Посмотреть больше устройств ссылка на правой боковой панели.

Шаг 4. Наконец, включите/выключите тумблер Показывать уведомления для подключения с помощью Swift Pair чтобы включить или отключить эту функцию в Windows 11.

Как подключить Bluetooth Swift Pair в Windows 11?
Чтобы подключить устройство Bluetooth к Swift Pair, выполните следующие действия:
Шаг 1. Сначала включите режим сопряжения на устройстве Bluetooth.
Шаг 2. Когда устройство окажется ближе к вашему ПК с Windows 11, оно запустит установку.
Шаг 3. Нажмите кнопку Соединять кнопку в уведомлении, чтобы выполнить сопряжение.
This post shows students and new users the steps to enable or disable Swift Pair in Windows 11. Windows comes with a feature known as Swift Pair that allows one to connect a Bluetooth device to Windows quickly.
With Swift Pair enabled, Windows 11 will pop up a notification when a new peripheral is nearby and in pairing mode. Users can simply use the notification fly-out window to connect the device to Windows 11. This reduces the steps required to pair a Bluetooth device.
The next time you want to pair the same device, you no longer need to navigate the Settings App and find their peripheral to pair. You’ll now be able to quickly pair the device from the fly-out notification window.
Swift Pair is not enabled by default. To use it, you must first enable it from the Settings app, in the Bluetooth and devices section. Below, we’ll show you how to enable it in Windows 11 to allow quick pairing of your Bluetooth devices.
How to turn on Swift Pair in Windows 11
As mentioned above, Swift Pair is the newest way to pair your Bluetooth peripherals to Windows devices. By default, Swift Pair is not automatically enabled. To use it, you must first turn it on.
Below is how to do that.
Windows 11 has a centralized location for the majority of its settings. From system configurations to creating new users and updating Windows, all can be done from the System Settings pane.
To get to System Settings, you can use the Windows key + I shortcut or click on Start ==> Settings as shown in the image below:

Alternatively, you can use the search box on the taskbar and search for Settings. Then select to open it.
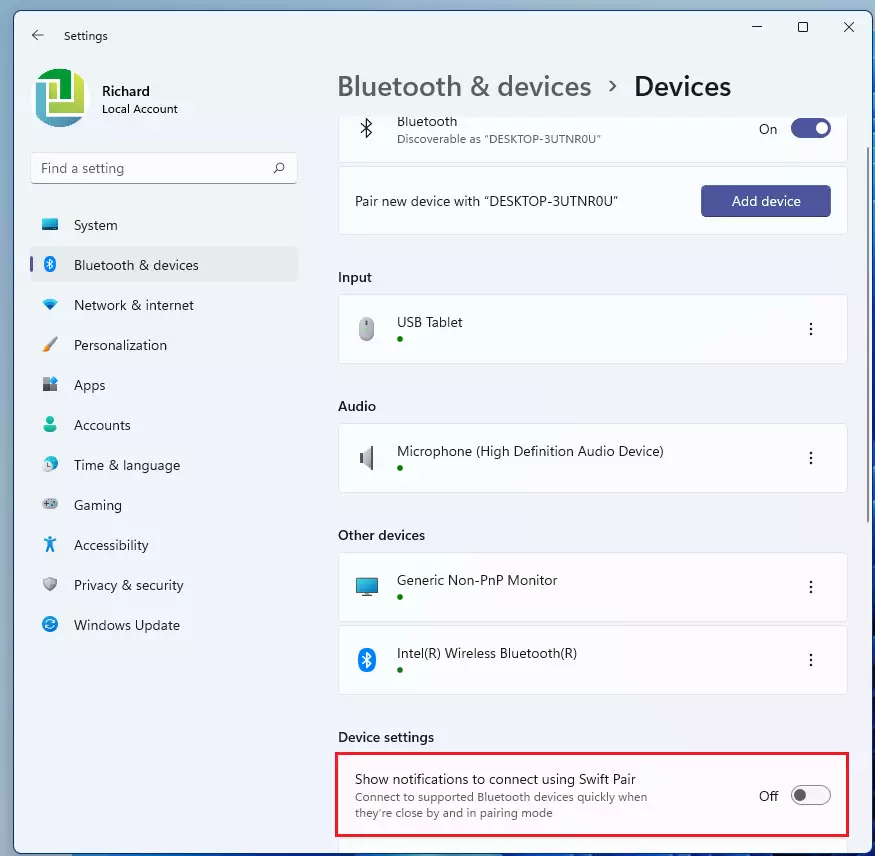
Windows Settings pane should look similar to the image below. In Windows Settings, click Bluetooth & devices, then on the right pane, select the “View more devices” link, or click the Devices tile to expand and list Bluetooth devices.
On the Devices settings tile, under Device settings, click on the tile at the bottom that reads “Show notifications to connect using Swift Pair“, then toggle the button to the On position to enable.
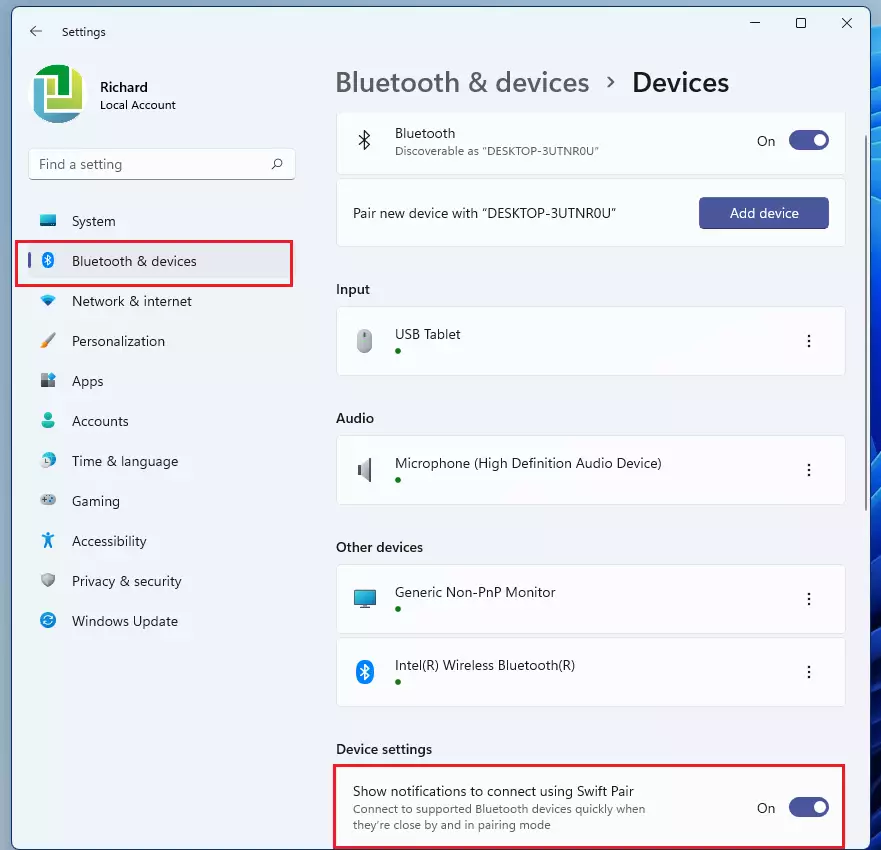
That should enable Swift Pair in Windows 11.
How to disable Swift Pair in Windows 11
If Swift Pair is enabled in Windows 11 and you want to disable it, simply reverse the steps above by going to the Start menu ==> Settings ==> Bluetooth & devices ==> expand Devices, and toggle the button to the Off position on the tile at the bottom of the page that reads “Show notifications to connect using Swift Pair“.
That should do it!
Conclusion:
This post showed you how to turn on or off Swift Pair in Windows 11. If you find any error above or have something to add, please use the comment form below.
Swift Pair allows you to pair and connects Bluetooth-compatible devices, like keyboards and headsets, almost immediately by detecting them when they’re in close proximity to your Windows 11 computer. If your device supports Swift Pair, you no longer have to use the Settings app and look for your Bluetooth peripherals in the list in order to pair and connect them.
If you use Bluetooth devices like mice, keyboards, or headsets on your Windows 11 PC, then this allows you to quickly and easily pair and connect to them. Nevertheless, not many users are familiar with this feature.
But, today, here we will explain to you how to enable the enable Bluetooth Swift Pair feature in Windows 11. Therefore, make sure to follow the steps given below carefully. So, let’s get started with it.

Also Read: How to Fix Bluetooth Not Working in Windows 11
Swift Pair helps you pair compatible Bluetooth devices to your PC almost instantly just by bringing them close together. Well, it is not a special feature that is available for only Windows 11 as the feature is also available on the previous version of Windows.
But, in case you are still not familiar with this feature and have no idea about how to enable the Bluetooth Swift Pair on your Windows 11 PC, then follow the steps we have mentioned below:
- Initially, press the Win+I button to open the Windows Settings.
- Then, shift to the Bluetooth & Devices option and click on the View more devices option.
- After that, hit the Devices tile and navigate to the Device settings section.
- Now, toggle the button located in front of the Show Notifications to Connect Using Swift Pair to on position.
That’s it. Now, you have enabled the Bluetooth Swift Pair on your Windows 11 PC. However, if you don’t like this feature and after using it for some time, you can disable it by following the same steps, but this time toggle the button to the Off position.
Anyway, that’s it from my side on how to enable the Bluetooth Swift Pair feature on your Windows 11. We hope this guide has helped you. Suppose in case you have any doubt or queries on your mind, let us know in the comment section. Also, make sure to visit our website and check out more informational guides. Well, do you like gaming? If yes, then did you know whether Windows 11 is Best Optimised For Gaming or not? If not, you can check out the link.