⚠️ This repo is read-only ⚠️
We consider the System.Windows.Forms.DataVisualization deprecated and we only provide it to ease porting to .NET Core 3. We’re not going to innovate in this component and subsequently will not accept any issues and/or PRs.
You’re welcome to fork the source, and update it as you see fit.
Data Visualization
This repository contains partial source code of the System.Windows.Forms.DataVisualization namespace that provides charting for WinForms. We ported and open sourced those components to enable charting features for WinForms applications that are developed on .NET Core 3.
Getting started with Chart Controls
The best way to learn about Chart Controls is by looking at the sample solution where via interactive experience with the app you can learn about every chart type and every major feature. While modifying the control parameters and instantly seeing how that affects the look of the control, you can also get the generated C# or Visual Basic code to use in your apps.

There is also a .NET Framework version of this sample available on Microsoft samples portal.
Pre-release version of this package is available from NuGet Gallery
“
В этом уроке поговорим о том, как можно визуализировать информацию с помощью графиков. Для этого будем использовать приложение WPF и элементы Windows Forms.
Для успешного освоения материала рекомендуем вам изучить следующие понятия:
DB (Database), БД. Организованная структура, предназначенная для хранения, изменения и обработки взаимосвязанной информации, преимущественно больших объемов
Framework. Программная платформа, определяющая структуру программной системы; программное обеспечение, облегчающее разработку и объединение разных компонентов большого программного проекта
Windows Presentation Foundation. Аналог WinForms, система для построения клиентских приложений Windows с визуально привлекательными возможностями взаимодействия с пользователем, графическая (презентационная) подсистема в составе .NET Framework (начиная с версии 3.0), использующая язык XAML
Демонстрация работы с графиками в Windows Forms
На данном занятии будет разработано простое приложение Windows Forms для визуализации расходов пользователей. Пользователи распределяют затраты по разным категориям и хранят их в общей базе данных. Итогом работы приложения будет служить работающая форма, в которой для каждого пользователя можно построить диаграммы различных типов для визуализации их расходов по категориям. Основные шаги построения приложения:
- Разработка интерфейса приложения
- Настройка взаимодействия с базой данных
- Реализация обработки данных

Важно
В рамках примера используется готовая база данных с информацией о пользователях, их платежах и категориях расходов
Разработка интерфейса приложения
1. Устанавливаем структуру формы

Важно
Интерфейс приложения будет состоять из двух основных частей: области построения и области настройки параметров просмотра
2. Добавляем элементы настройки параметров просмотра

Важно
Элементами настройки параметров просмотра будут являться выпадающие списки, позволяющие выбрать пользователя и тип диаграммы
3. Подключаем библиотеки для просмотра диаграмм

Важно
Диаграмма будет визуализироваться с помощью элемента Chart из WindowsForms. Воспользоваться данным элементом можно после подключения библиотеки System.Windows.Forms.DataVisualization, расположенного во вкладке Assemblies (сборки)
4. Добавляем элементы управления диаграммой

Важно
Диаграмма будет располагаться внутри элемента WindowsFormsHost. Данный элемент добавляется из окна ToolBox простым перетаскиванием
5. Добавляем пространство имен для работы с элементом Chart

6. Добавляем дополнительные параметры просмотра

Важно
Дополнительными параметрами являются имя диаграммы, а также легенда
Настройка взаимодействия с базой данных
1. Реализуем взаимодействие с базой данных

Важно
Взаимодействие реализуется путем добавления элемента «ADO.NET Entity Data Model»
2. Настраиваем свойства подключения базы данных

3. Добавляем подключение к базе данных

Реализация обработки данных
1. Создаем область построения графиков

Важно
Сперва создается поле для контекста EntityFramework с инициализацией. Затем создается область построения диаграммы ChartArea и добавляется в соответствующую коллекцию в конструкторе MainWindow
2. Добавляем наборы данных

Важно
Для каждого набора данных (например, данные линии на графике) необходимо добавлять в коллекцию Series. В данном случае есть одна серия данных для отображения сумм платежей по категориям. Объект Series создается с указанием названия и необходимости отображения на диаграмме
3. Загружаем данные из базы

Важно
Данные о пользователях загружаются в выпадающий список. Также загружаются типы диаграммы из перечисления SeriesChartType
4. Реализуем адаптивное изменение интерфейса

Важно
При выборе другого значения в ComboBox будет вызываться метод UpdateChart()
5. Получаем выбранные значения в выпадающих списках

Важно
Значения получаются как currentUser и currentType
6. Обрабатываем данные диаграммы

Важно
Приведенный код описывает получение серии данных диаграммы из соответствующей коллекции Series, установку типа диаграммы и очистку предыдущих данных
7. Обрабатываем список категорий

Важно
Список категорий получается из базы данных. Далее, в цикле foreach для каждой категории значение точки диаграммы добавляется в Points. Координата X будет названием категории, а координата Y будет суммой платежа для выбранного пользователя в текущей категории
Результат работы программы

“
Вы познакомились с тем, как использовать основные элементы Windows Forms в приложении WPF. Теперь давайте перейдем от теории к практике!
Для закрепления полученных знаний пройдите тест
Для взаимодействия с базами данных используется технология
Для размещение элемента управления Windows Forms на странице WPF используется
WindowsFormsIntegration является
К сожалению, вы ответили неправильно
Прочитайте лекцию и посмотрите видео еще раз
Но можно лучше. Прочитайте лекцию и посмотрите видео еще раз
Вы отлично справились. Теперь можете ознакомиться с другими компетенциями
27
Jun
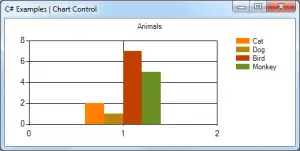
This example shows how to display your data in your Windows Forms program as a bar graph or spline chart. To achieve this, you use Chart class in System.Windows.Forms.DataVisualization.Charting. Chart control can be found in Toolbox(.NET Framework 4.0 or newer). Older versions will not have the Chart control available.
To add a chart control to your application,
- In design view, open the Toolbox.
- From the Data category, drag a Chart control to the design area.
If you cannot see the Chart control in the Toolbox, right click in the Toolbox, select Choose Items, and then select the following namespaces in the .NET Framekwork Components tab:
- System.Web.UI.DataVisualization.Charting
- System.Windows.Forms.DataVisualization.Charting

Usage:
        void FrmChartExample_Load(object sender, EventArgs e)
        {
            BarExample(); //Show bar chart
            //SplineChartExample();
        }
This method shows how to add a bar chart.
        public void BarExample()
        {
            this.chartControl.Series.Clear();

            // Data arrays
            string[] seriesArray = { "Cat", "Dog", "Bird", "Monkey" };
            int[] pointsArray = { 2, 1, 7, 5 };

            // Set palette
            this.chartControl.Palette = ChartColorPalette.EarthTones;

            // Set title
            this.chartControl.Titles.Add("Animals");

            // Add series.
            for (int i = 0; i < seriesArray.Length; i++)
            {
                Series series = this.chartControl.Series.Add(seriesArray[i]);
                series.Points.Add(pointsArray[i]);
            }
        }
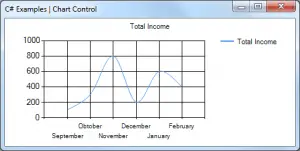
This method shows how to add a spline chart.
        private void SplineChartExample()
        {
            this.chartControl.Series.Clear();

            this.chartControl.Titles.Add("Total Income");

            Series series = this.chartControl.Series.Add("Total Income");
            series.ChartType = SeriesChartType.Spline;
            series.Points.AddXY("September", 100);
            series.Points.AddXY("Obtober", 300);
            series.Points.AddXY("November", 800);
            series.Points.AddXY("December", 200);
            series.Points.AddXY("January", 600);
            series.Points.AddXY("February", 400);
        }
static class Program{[STAThread]static void Main(){Application.EnableVisualStyles();Application.SetCompatibleTextRenderingDefault(false);using (var chartForm = new ChartForm()){FillData(chartForm.Chart);chartForm.Show();//savechartForm.Chart.SaveImage(@"Chart.png", ChartImageFormat.Png);chartForm.Close();}}public static void FillData(Chart chart){chart.Titles[0].Text = "Price/Volume Chart";chart.Series[0].Name = "Price";chart.Series[1].Name = "Volume";var random = new Random();for (int i = 0; i < 10; i++){var date = DateTime.Today.AddDays(i);chart.Series[0].Points.Add(new DataPoint(date.ToOADate(), random.NextDouble() * 1e3));chart.Series[1].Points.Add(new DataPoint(date.ToOADate(), random.Next() / 1e3));}}}//Designer Codeprivate void InitializeComponent(){System.Windows.Forms.DataVisualization.Charting.ChartArea chartArea1 = new System.Windows.Forms.DataVisualization.Charting.ChartArea();System.Windows.Forms.DataVisualization.Charting.ChartArea chartArea2 = new System.Windows.Forms.DataVisualization.Charting.ChartArea();System.Windows.Forms.DataVisualization.Charting.Legend legend1 = new System.Windows.Forms.DataVisualization.Charting.Legend();System.Windows.Forms.DataVisualization.Charting.Series series1 = new System.Windows.Forms.DataVisualization.Charting.Series();System.Windows.Forms.DataVisualization.Charting.Series series2 = new System.Windows.Forms.DataVisualization.Charting.Series();System.Windows.Forms.DataVisualization.Charting.Title title1 = new System.Windows.Forms.DataVisualization.Charting.Title();this.chart1 = new System.Windows.Forms.DataVisualization.Charting.Chart();((System.ComponentModel.ISupportInitialize)(this.chart1)).BeginInit();this.SuspendLayout();//// chart1//chartArea1.AxisX.LabelStyle.Enabled = false;chartArea1.Name = "ChartArea1";chartArea2.AlignWithChartArea = "ChartArea1";chartArea2.Name = "ChartArea2";this.chart1.ChartAreas.Add(chartArea1);this.chart1.ChartAreas.Add(chartArea2);this.chart1.Dock = System.Windows.Forms.DockStyle.Fill;legend1.Alignment = System.Drawing.StringAlignment.Center;legend1.Docking = System.Windows.Forms.DataVisualization.Charting.Docking.Top;legend1.Name = "Legend1";this.chart1.Legends.Add(legend1);this.chart1.Location = new System.Drawing.Point(0, 0);this.chart1.Name = "chart1";series1.BorderWidth = 2;series1.ChartArea = "ChartArea1";series1.ChartType = System.Windows.Forms.DataVisualization.Charting.SeriesChartType.Line;series1.Color = System.Drawing.Color.Red;series1.Legend = "Legend1";series1.Name = "Series1";series1.XValueType = System.Windows.Forms.DataVisualization.Charting.ChartValueType.Date;series2.ChartArea = "ChartArea2";series2.Color = System.Drawing.Color.Blue;series2.Legend = "Legend1";series2.Name = "Series2";series2.XValueType = System.Windows.Forms.DataVisualization.Charting.ChartValueType.Date;this.chart1.Series.Add(series1);this.chart1.Series.Add(series2);this.chart1.Size = new System.Drawing.Size(466, 248);this.chart1.TabIndex = 0;this.chart1.Text = "chart1";title1.Name = "Title1";title1.Text = "<TITLE>";this.chart1.Titles.Add(title1);//// ChartControl//this.AutoScaleDimensions = new System.Drawing.SizeF(6F, 13F);this.AutoScaleMode = System.Windows.Forms.AutoScaleMode.Font;this.Controls.Add(this.chart1);this.Name = "ChartControl";this.Size = new System.Drawing.Size(466, 248);((System.ComponentModel.ISupportInitialize)(this.chart1)).EndInit();this.ResumeLayout(false);}

        //populate dataset with some demo data..
        DataSet dataSet = new DataSet();
        DataTable dt = new DataTable();
        dt.Columns.Add("Name", typeof(string));
        dt.Columns.Add("Counter", typeof(int));
        DataRow r1 = dt.NewRow();
        r1[0] = "Demo";
        r1[1] = 8;
        dt.Rows.Add(r1);
        DataRow r2 = dt.NewRow();
        r2[0] = "Second";
        r2[1] = 15;
        dt.Rows.Add(r2);
        dataSet.Tables.Add(dt);


        //prepare chart control...
        Chart chart = new Chart();
        chart.DataSource = dataSet.Tables[0];
        chart.Width = 600;
        chart.Height = 350;
        //create serie...
        Series serie1 = new Series();
        serie1.Name = "Serie1";
        serie1.Color = Color.FromArgb(112, 255, 200);
        serie1.BorderColor = Color.FromArgb(164, 164, 164);
        serie1.ChartType = SeriesChartType.Column;
        serie1.BorderDashStyle = ChartDashStyle.Solid;
        serie1.BorderWidth = 1;
        serie1.ShadowColor = Color.FromArgb(128, 128, 128);
        serie1.ShadowOffset = 1;
        serie1.IsValueShownAsLabel = true;
        serie1.XValueMember = "Name";
        serie1.YValueMembers = "Counter";
        serie1.Font = new Font("Tahoma", 8.0f);
        serie1.BackSecondaryColor = Color.FromArgb(0, 102, 153);
        serie1.LabelForeColor = Color.FromArgb(100, 100, 100);
        chart.Series.Add(serie1);
        //create chartareas...
        ChartArea ca = new ChartArea();
        ca.Name = "ChartArea1";
        ca.BackColor = Color.White;
        ca.BorderColor = Color.FromArgb(26, 59, 105);
        ca.BorderWidth = 0;
        ca.BorderDashStyle = ChartDashStyle.Solid;
        ca.AxisX = new Axis();
        ca.AxisY = new Axis();
        chart.ChartAreas.Add(ca);
        //databind...
        chart.DataBind();
        //save result...
        chart.SaveImage(@"c:myChart.png", ChartImageFormat.Png);
Add this declaration on top of your class:
using System.Windows.Forms.DataVisualization.Charting;
Example. Now we can use the Chart. In the next step, we will use the Form1_Load event handler to initialize the Chart we just added. To add Form1_Load, double-click on the Form window in Visual Studio.
Array: In Form1_Load, we assign an array of strings (Series) and an array of integers (Points).
For: In the for-loop, we add the strings to the Series collection and add the integers to the Points collections on those Series.
For
Tip: The loop results in two Series: a Cats series with a Point of 1, and a Dogs series with a Point of 2.
Info: These are reflected in a bar graph, which is shown in this page’s screenshot.
Example that sets Chart control up: C#
using System;
using System.Windows.Forms;
using System.Windows.Forms.DataVisualization.Charting;
namespace WindowsFormsApplication1
{
public partial class Form1 : Form
{
public Form1()
{
InitializeComponent();
}
private void Form1_Load(object sender, EventArgs e)
{
// Data arrays.
string[] seriesArray = { «Cats», «Dogs» };
int[] pointsArray = { 1, 2 };
// Set palette.
this.chart1.Palette = ChartColorPalette.SeaGreen;
// Set title.
this.chart1.Titles.Add(«Pets»);
// Add series.
for
(int i = 0; i < seriesArray.Length; i++)
{
// Add series.
Series series = this.chart1.Series.Add(seriesArray[i]);
// Add point.
series.Points.Add(pointsArray[i]);
}
}
}
}
- Download local copy — 7.7 MB
- Download latest Repository Archive
Rought porting to .NET5 of dotnet/winforms-datavisualization project and the sample solution as well.
Data Visualization
This repository contains partial source code of the System.Windows.Forms.DataVisualization namespace that provides charting for WinForms. Microsoft ported and open sourced those components to enable charting features for WinForms applications that are developed on .NET Core 3.
I’ve made the porting to .NET 5:
- Updating references
- Updating project files
- Moving deprecated controls like
ContextMenu,MenuItemsto new ones (ContextMenuStrip,ToolStripMenuItems) and relative methods - …
Application Running .NET 5:
Points of Interest
Removed Controls starting With .NET Core 3.1
Starting with .NET Core 3.1, various Windows Forms controls are no longer available. Replacement controls that have better design and support were introduced in .NET Framework 2.0. The deprecated controls were previously removed from designer toolboxes but were still available to be used (source).
The following types are no longer available:
ContextMenuDataGridDataGrid.HitTestTypeDataGridBoolColumnDataGridCellDataGridColumnStyleDataGridLineStyleDataGridParentRowsLabelStyleDataGridPreferredColumnWidthTypeConverterDataGridTableStyleDataGridTextBoxDataGridTextBoxColumnGridColumnStylesCollectionGridTablesFactoryGridTableStylesCollectionIDataGridEditingServiceIMenuEditorServiceMainMenuMenuMenu.MenuItemCollectionMenuItemToolBarToolBarAppearanceToolBarButtonToolBar.ToolBarButtonCollectionToolBarButtonClickEventArgsToolBarButtonStyleToolBarTextAlign
RECOMMENDED ACTION
| Removed control (API) | Recommended replacement |
ContextMenu |
ContextMenuStrip |
MenuItem |
ToolStripMenuItem |
That’s what has been performed on the project.
References
The original port to .NET Core 3.0 used very old and still in Beta/Preview references:

and moving away from them was a bit tricky, now they’re all actualized:

In a future release, maybe the use of System.Data.SqlClient should be avoided …
CSProj
The CSProj files were also modified according to the new target / Platform (Windows):
Original (Relavant Portion):
<Project Sdk="Microsoft.NET.Sdk.WindowsDesktop">
  <PropertyGroup>
    <TargetFramework>netcoreapp3.0</TargetFramework>
    <AssemblyName>System.Windows.Forms.DataVisualization</AssemblyName>
    <AllowUnsafeBlocks>true</AllowUnsafeBlocks>
    <CLSCompliant>false</CLSCompliant>
    <NoWarn>$(NoWarn);618</NoWarn>
    <DefineConstants>$(DefineConstants);WINFORMS_CONTROL</DefineConstants>
    <!-- <Win32Manifest>ResourcesSystemWindowsFormsXPThemes.manifest</Win32Manifest> -->
  </PropertyGroup>
Ported Version (Relavant Portion):
<Project Sdk="Microsoft.NET.Sdk.WindowsDesktop">
  <PropertyGroup>
    <TargetFramework>net5.0-windows</TargetFramework>
    <AssemblyName>System.Windows.Forms.DataVisualization</AssemblyName>
    <AllowUnsafeBlocks>true</AllowUnsafeBlocks>
    <CLSCompliant>false</CLSCompliant>
    <NoWarn>$(NoWarn);618</NoWarn>
    <UseWindowsForms>true</UseWindowsForms>
    <ImportWindowsDesktopTargets>true</ImportWindowsDesktopTargets>
    <DefineConstants>$(DefineConstants);WINFORMS_CONTROL</DefineConstants>
  </PropertyGroup>
You have to pay attention to this directive<UseWindowsForms>true</UseWindowsForms>:
The UseWindowsForms property controls whether or not your application is built to target Windows Forms.
This property alters the MSBuild pipeline to correctly process a Windows Forms project and related files. The default value is false. Set the UseWindowsForms property to true to enable Windows Forms support. You can only target the Windows platform when this setting is enabled (source).
Getting Started with Chart Controls
The best way to learn about Chart Controls is by looking at the sample solution where via interactive experience with the app, you can learn about every chart type and every major feature. While modifying the control parameters and instantly seeing how that affects the look of the control, you can also get the generated C# or Visual Basic code to use in your apps.

With the sample project, you can see every property and parameters in action:

and then copy the relavant portion of the code (C# or VB.NET):

History
- 8th April: Initial porting to .NET 5
Hope this helps!
This article, along with any associated source code and files, is licensed under The MIT License