Nice article Marc,
I would like to contribute a few things I have discovered.
Firstly, we are using Hyper-v 2012 R2 in a Failover Cluster managed by SCVMM
The customer had a requirement for a Citrix vDisk based upon Windows 7 (Both 32 & 64 bit)
They wanted to use Dynamic disks and have these as small as possible.
I did some research on the best format for Citrix vDisk and due to their smaller sizes, compact vDisks are the way to go.
The problems arose after, doing multiple Windows updates on the original images.
The vDisk expanded to the full size of the Dynamic VHDX file. 60GB in my case.
(OK 60GB is too big, but as it was going to be Dynamic, it shouldn’t have been an issue)
So the steps I have followed are
1. If you have a slipstreamed image of Windows 7 with Service Pack 1, then use that instead of applying SP1 later.
(This saves time and will reduce the increase in size of the VHDX file considerably)
2. Run Windows Update many times. Even after it says it has no more updates, reboot and check again.
3. Run a clone or backup of the VM, so I don’t get blamed for any corruptions or mistakes. 
4. Check Device Manager (devmgmt.msc). If you have more than 2 Unknown devices, update the Integration Services
From Hyper-v Virtual connection console, select Action Menu, “Insert Integration Services Setup Disk”, run through setup, reboot.
(You will then have 2 unknown Devices, that are used for Automatic Windows Virtua Machine Activation, but not supported on Windows 7, so leave these or research elsewhere)
The next steps are to unlock the System files that by to their nature, will not move as part of a defrag and prevent the disk from being resized.
4. Delete System restore files and disable system restore (Can be turned back on later, but not really required for a Citrix vDisk)
Right click Computer, Properties, System Protection, Configure, Delete, Turn Off System Protection and accept warnings.
5. Set paging file to “No Paging File” (Should be turned back on later)
Right click Computer, Properties, Advanced System Settings, Settings under Performance, Advanced tab,
Change, untick Automatically manage… , select No paging file, hit OK, reboot.
6. Stop the Windows Search service
7. Run Windows defrag, (dfrgui) multiple times within the VM itself. Then run Disk Cleanup and select System files.
8. Check Application Event Log (eventvwr.msc) and look for Defrag Event 259 which identifies the unmovable files.
(Mine was to do with Windows search, so that is why I disabled it and ran defrag again) You will need to google this to work out what yours are.
9. Shutdown VM
10. Defrag & Compact VHDx file.
This is done with a combination of Defrag on the Hyper-v Host & Diskpart.
10a. Run Diskpart, from an administrative command prompt.
Type select vdisk file = “path to virtual disk file”
E.g. select vdisk file = “C:ClusterStorageVOL001WIN764WIN764_1.vhdx”
attach vdisk readonly
compact vdisk
detach vdisk
exit
10b. Double click VHD file on the Hyper-v host to mount it.
(In my case this was C:ClusterStorageVOL001WIN764WIN764_1.vhdx)
Run Defrag on the host (dfrgui)
Select the mounted drive (Usually E or F) and optimise a few times.
(You will then see the space efficiency increase. You will probably not get 100%)
In Computer, right click the mounted drive and select eject.
10c. Rerun the 10a and 10b commands until the size of the file stops decreasing.
(make sure you refresh in Windows Explorer)
11. Start the Virtual Machine and re-enable the Swap file and the system restore if required.
12. Shutdown the VM and then clone the VM as a backup.
13. Make you template (This gets rid of the VM, so this is why I made a clone)
My VM went down from 60GBs to under 15.
Динамическое изменение размеров дисков виртуальных машин доступно, начиная с версии Hyper-V в Windows Server 2012 R2. Функция Online VHDX Resize позволяет вам увеличить или уменьшить размер vhdx диска виртуальной машины онлайн (без остановки ВМ). В этой статье мы рассмотрим, как увеличить или уменьшить (сжать) размер диска виртуальной машины в Hyper-V, запущенном в Windows 10 или Windows Server 2016 (инструкции применима для всех поддерживаемых версий Hyper-V, в том числе бесплатного Hyper-V Server).
Содержание:
- Увеличиваем размер виртуальный VHDX диска в Hyper-V
- Как сжать виртуальный VHDX диск в Hyper-V?
- Изменить размер виртуального диска Hyper-V с помощью PowerShell
Основные возможности и ограничений Online VHDX Resize в Hyper-V:
- Вы можете изменить размер виртуального диска Hyper-V любого типа: фиксированного, динамического, и дифференциального.
- Вы можете изменить размер VHDX диска (в том числе системного диска гостевой ОС) на-лету. Останавливать виртуальную машину не нужно;
- VHDX диск должен быть подключен к ВМ через виртуальный SCSI контролер (не поддерживается онлайн расширение дисков на IDE контроллере, такую ВМ придется выключить для изменения размера диска);
- Online VHDX Resize работает как на первом, так и втором поколении виртуальных машин Hyper-V;
- В качестве гостевой ОС может выступать, как Windows, так и Linux;
- Поддерживается как расширение виртуальных дисков (extend), так и их сжатие (shrink);
- Вы можете изменить размер vhdx диска из графической консоли Hyper-V, PowerShell или Windows Admin Center;
- Не поддерживается изменение размера общих VHDX файлов или VHD Set (VHDS/AVHDX) дисков, используемых в гостевых кластерах;
- Нельзя изменить размер виртуального диска, для которого создан снапшот (например при резервном копировании).
Увеличиваем размер виртуальный VHDX диска в Hyper-V
Рассмотрим, как увеличить размер виртуального VHDX диска с помощью консоли Hyper-V Manager.
- В менеджере виртуальных машин Hyper-V выберите виртуальную машину, перейдите в ее настройки (Settings) -> SCSI Controller;
- Выберите нужный виртуальный диск и нажмите кнопку Edit;

Если кнопка Edit неактивна, и внизу указано Edit is not available because checkpoint exist for this virtual machine, нужно удалить снапшоты. Возможно необходимо отключить Production Checkpoint в свойствах ВМ.

- В запустившемся мастере выберите пункт Expand;

- Укажите новый размер виртуального жесткого диска (в нашем примере мы расширим диск до 170 Гб);

- Теперь нужно подключится к гостевой ОС, диск которой был расширен. Рассмотрим, как увеличить диск в гостевой ОС Windows. Откройте консоль диспетчера управления дисками Disk Manager. На диске должна появиться дополнительная неразмеченная область 43 Гб (Unallocated);

- Щелкните по разделу, который нужно растянуть и выберите Extend Volume (можно расширить только раздел, находящийся слева от неразмеченной области). Укажите на сколько нужно расширить этот раздел за счет неразмеченного места (подробнее процедура расширения описана здесь);

- После выполнения процедуры Extend, размер диска будет увеличен.
В гостевой Linux можно расширить диск с помощью утилиты Parted.


Как сжать виртуальный VHDX диск в Hyper-V?
Рассмотрим теперь как уменьшить размер виртуального vhdx диска на Hyper-V.
- Перед тем как сжать виртуального диска из консоли Hyper-V, необходимо внутри гостевой ОС уменьшить размер логического раздела на диске, освободить часть места, преобразовав его в неразмеченную область. Для этого внутри гостевой ОС откройте диспетчер управления дисков, выберите нужный раздел и выберите пункт Shrink Volume (Сжать том);

Примечание. Пункт Shrink Volume будет доступен только в том случае, если на диске есть свободное место.
- Укажите на сколько нужно уменьшить размер раздела (в нашем примере, мы указали 50 Гб);

- После уменьшения размера раздела в гостевой ОС, нужно открыть консоль Hyper-V и перейти в настройки виртуального диска. Нажмите кнопку Edit;
- В мастере Edit Virtual Hard Disk выберите пункт Shrink, затем укажите новый размер vhdx файла. Обратите внимание, что вы не можете сделать размер диска меньше, чем размер данных на нем. В нашем случае можно уменьшить диск с 40 до 31 Гб.

Прежде чем уменьшать размер VHDX файла, попробуйте дефрагментировать его с помощью оптимизации Hyper-V. Выберите пункт Compact в предыдущей форме. Либо для оптимизации и дефрагментации динамического диска Hyper-V можно использовать команду PowerShell:
Optimize-VHD -Path 'D:Hyper-Vfs01.vhdx'

- Готово


Изменить размер виртуального диска Hyper-V с помощью PowerShell
Можно изменить размер VHDX диска с помощью PowerShell. Для этого используется командлет Resize-VHD (не путать с
Resize-VirtualDisk
, который относится к командлетам модуля управления дисками Storage).
Примечание. В современных версиях Hyper-V для изменения размера виртуального диска с помощью командлета Resize-VHD не обязательно выключать виртуальную машину.
Сначала нужно получить полный путь к VHDX диску виртуальной машины:
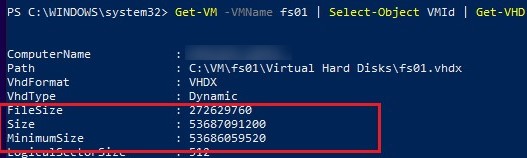
Get-VM -VMName fs01 | Select-Object VMId | Get-VHD
Здесь же можно увидеть реальный размер VHDX файла на диске (FileSize) и максимальный размер, который он может занять (Size).
MinimumSize – это минимальный размер VHDX диска, до которого можно уменьшить файл виртуального диска.
Чтобы увеличить размер VHDX диска нужно указать его новый размер:
Resize-VHD -Path 'C:VMfs01Virtual Hard Disksfs01.vhdx' -SizeBytes 50Gb
Если вы указали размер виртуального диска меньше, чем он занимает на диске, появится ошибка:
Resize-VHD : Failed to resize the virtual disk
.
Вам осталось расширить диск в гостевой ОС.
Можно сделать это удаленно через PowerShell Remoting. Подключитесь к виртуальной машины с помощью Invoke-Command или Enter-PSSession (по сети или через PowerShell Direct)
Enter-PSSession -ComputerName fs01
Получим информацию о том, на сколько можно расширить раздел и расширим его до максимального размера:
$MaxSize = (Get-PartitionSupportedSize -DriveLetter C).SizeMax
Resize-Partition -DriveLetter L -Size $MaxSize
Если нужно уменьшить размер виртуального диска до минимально-возможного, выполните:
Resize-VHD -Path 'C:VMfs01Virtual Hard Disksfs01.vhdx' -ToMinimumSize
Данная команда уменьшила максимальный размер VHDX файла на 6 Гб.
Инструкции по изменению размера виртуальных дисков в других гипервизорах доступны по ссылкам: KVM, VMWare.
,
last updated January 6, 2016, in
Virtual hard disks have the same tendency to grow in size as regular disks have to fill up. Deduplication is a great way to battle this, but unfortunately it is not available for Windows 8 Client Hyper-V. I know that hacks are available describing how to transfer the relevant DLLs from Server 2012 but I value my data too much to try that. The only thing left in order to regain valuable (SSD) disk space is to compact the VHDX. That, however, is more difficult than it should be.
This article shows how to compact Windows VMs. For a description of how to compact Ubuntu Linux VMs take a look at this post.
Start Inside
Before bringing out the heavy guns do the obvious:
- Make sure KB2852386 is installed
- Run Disk Cleanup with admin permissions
These simple things unearth treasures like the following:
Do a full reboot after running Disk Cleanup because part of the removal happens when the system next starts up.
Zero, Defragment and Shrink
Zero
Run Sysinternals’ Sdelete tool to zero all the deleted bits on disk:
sdelete -s -z c:
Defragment
While defragmenting is not strictly necessary it increases the chances that the shrinking process in the next step is successful.
Shrink
Go to Disk Management and shrink your partition(s) as much as possible. This is the most important part. Without this Hyper-V unfortunately is not able to compact the VHDX significantly.
Compact VHDX from the GUI
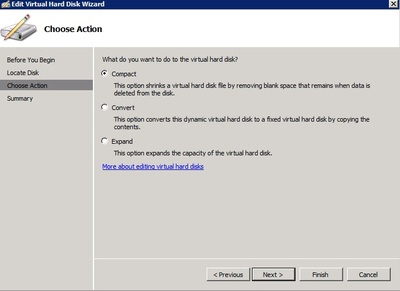
When you go to a virtual machine’s settings and edit the hard drive, you are presented with a dialog box offering to compact the disk:
That is exactly what you want. You select it, click next and … the wizard finishes after a few (too few) seconds and the VHDX size remains unchanged.
Compact VHDX from PowerShell
I am not a big fan of dumbing down or even breaking the UI by making relevant functionality only available through PowerShell as seems to be the trend these days. This seems to be such a case. For some strange reason the Compact VHDX UI does nothing and you have to resort to PowerShell to do the job. Sad.
The relevant command is Optimize-VHD. In order for the optimization to succeed the virtual hard disk needs to be mounted first with Mount-VHD (both commands work on VHD and VHDX files).
Automation
You probably have more than one virtual machine on your PC or laptop. In order to shrink them all manually shut them down first. Then run the following command, replacing D:VMs with the base path for your VHDX files:
gci -File -Filter *.vhd* -Path D:VMs -Recurse | % {Mount-VHD $_.FullName -ReadOnly; Optimize-VHD $_.FullName -Mode full; Dismount-VHD $_.FullName}
Errors
The PowerShell code may report errors. Possible causes include
- The VHDX is in use (the VM is probably not turned off)
- The VHDX is a differencing disk and the parent disk is not properly connected any more
Analysis & Conclusion
The implementation of dynamically expanding virtual disks in Hyper-V leaves room for improvement, at least when looking at disk space requirements. Reclaiming (host) disk space by compacting the VHDX files succeeds only when there is unpartitioned space at the end of the virtual hard disk. That typically involves shrinking a partition from inside the VM.
A more efficient implementation could make use of the trim command to keep track which parts of a disk are not needed any more and use that information to reduce the size of the VHDX upon request.
Lacking such a more advanced algorithm be prepared to throw disk space at the problem of expanding VHDX files that won’t compact (much). Host-based deduplication would be the answer – if only it were available on client versions of Windows.
Hyper-V Windows Server 2012 R2 has a function that allows dynamic VHDX resizing of virtual disks in Windows server 2012 r2.
As a part of our Server Management Services, we help our customers to resize virtual disks on Windows server 2012.
Today, let’s see what our Support Engineers do to resize virtual disks on Hyper-V Windows Server 2012 R2.

How to do dynamic resizing of virtual disks in Windows server 2012 r2?
Windows Server 2012 R2 uses ‘Online VHDX Resize’ which allows both to extend and to compact (shrink) a virtual disk.
Using Online VHDX Resize we can change the disk size on-wire without turning off the virtual machine. Both Windows and Linux can act as a guest OS.
We should keep in mind that only VHDXs can be dynamically resized
Steps to Extend VHDX in Windows Server 2012 R2:
Online VHDX Resize allows extending VHDX in Windows Server 2012 R2, the steps followed by our Support Engineers to do this are given below:
- Choose the virtual machine in the virtual machine manager Hyper-V
- And go to its Settings.
- Choose the virtual disk.
- Click the Edit button.
- In the appearing wizard, choose Expand.
- Specify the new size of the virtual hard disk as required.
- Then click Finish.
- Go to the console of the guest OS of the disk extended.
- Open the console of the Disk Manager, we can see unallocated space appearing in the system.
- Right-click the partition we want to extend.
- Choose Extend Volume, then specify the size of the extension.
- After completing the Extend procedure, the disk size will be increased.
[Need further assistance? We are here for you!]
Steps to Shrink VHDX in Hyper-V 2012 R2:
We can shrink the size of VHDX in Windows Server 2012 R2 few easy steps given below:
- Before shrinking the virtual disk, we should “cut a piece” from one of the volumes, thus making some space unallocated.
- To do this, open the Disk Manager of the guest OS.
- Select a volume and click Shrink Volume. (Shrink Volume becomes available only if there is some free space on the disk.)
- Specify the amount of space to shrink the partition.
- Once the partition of the guest OS has been shrunk, go to the Settings in the Hyper-V console.
- Click the Edit button again.
- Click Shrink in the wizard that appears.
- Specify the amount of space to shrink the VHDX file.
- After this step, we can see that space has shrunk.
[Need assistance to Shrink VHDX? We are here for you!]
VHDX Resizing with PowerShell (Alternative method):
We can change the size of the VHDX in PowerShell with the cmdlet Resize-VirtualDisk.
Resize-VirtualDisk -FriendlyName “ISCSIVHD1” -Size (50GB)
Earlier the cmdlet resize-vhd was used to resize the virtual disks. However, the virtual machine had to be turned off.
We can change the size of the file system in the guest OS partition using the command:
resize-partition -driveletter C -size (50GB)
Conclusion
In short, we’ve discussed how to do dynamic resizing of virtual disks in Windows server 2012 r2. Also, we saw the steps followed by our Support Engineers do this.
PREVENT YOUR SERVER FROM CRASHING!
Never again lose customers to poor server speed! Let us help you.
Our server experts will monitor & maintain your server 24/7 so that it remains lightning fast and secure.
GET STARTED
var google_conversion_label = «owonCMyG5nEQ0aD71QM»;
Dynamic resizing of virtual machine hard disks is available starting with Hyper-V in Windows Server 2012 R2. Online VHDX Resize feature allows you to increase or shrink the size of the vhdx file of a virtual machine online (without stopping the VM). In this article, we will look at how to extend or reduce (shrink) the size of a virtual machine hard disk in Hyper-V running on Windows 10 or Windows Server 2016 (instructions apply to all supported versions of Hyper-V, including free Hyper-V Server).
Contents:
- Expanding VM Hard Disk in Hyper-V
- How to Shrink the Size of Hyper-V Virtual Disk (VHDX)?
- Resizing Virtual Hard Disk Files in Hyper-V with PowerShell
Key features and limitations of Online VHDX Resize in Hyper-V:
- You can resize any type of Hyper-V virtual disk: fixed, dynamic, and differential;
- You can resize the VHDX disk (including the system drive of the guest OS) on the fly. You don’t need to stop the VM;
Only VHDXs can be dynamically resized. VHDs are not supported and have to be converted into the VHDX format.
- VHDX disk must be connected to the VM through a virtual SCSI controller (online extension of disks on the IDE controller is not supported, such a VM will have to be turned off to change the disk size);
- Online VHDX Resize works both on the first and the second generation of virtual machines Hyper-V;
- Both Windows and Linux can act as a guest OS;
- Both extension and shrinking of virtual disks are supported;
- You can resize vhdx disk from Hyper-V graphical console, PowerShell or Windows Admin Center;
- Resizing of shared VHDX (AVHDX) disks used in clusters is not supported;
- You cannot change the size of the virtual disk for which the snapshot was created (for example, during a backup).
Expanding VM Hard Disk in Hyper-V
You can increase the size of the virtual VHDX disk using the Hyper-V Manager console.
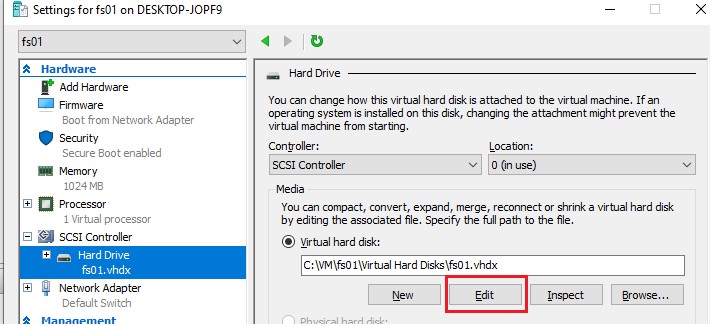
- Select the virtual machine in the Hyper-V virtual machine manager, go to VM Settings -> expand SCSI Controller;
- Choose the virtual disk and click the Edit button;

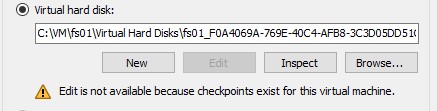
If the Edit button is inactive, and the warning says “Edit is not available because checkpoint exist for this virtual machine”, you need to delete all snapshots. It may be necessary to disable the Production Checkpoint option in VM properties.

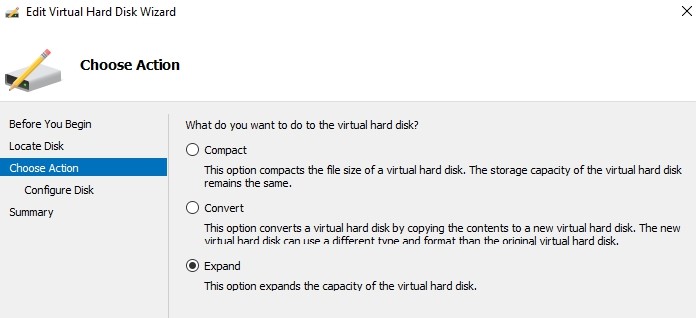
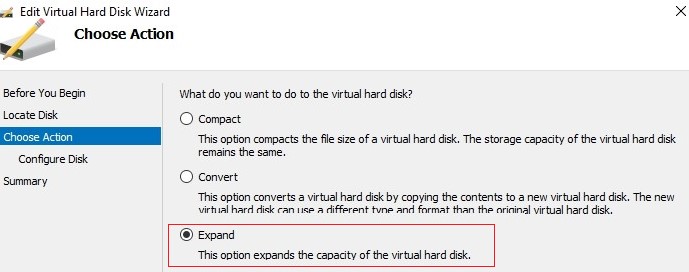
- In the appearing Edit Virtual Hard Disk wizard choose Expand;

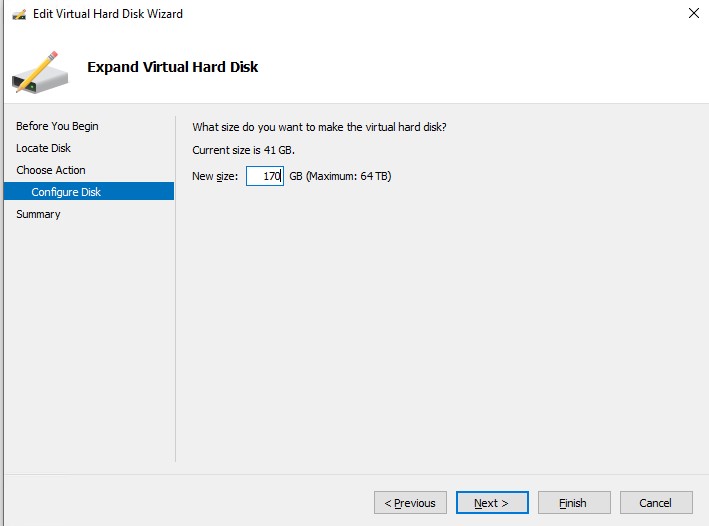
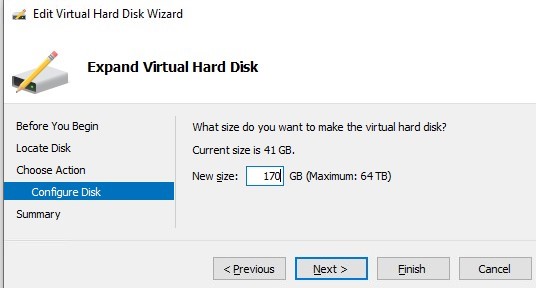
- Specify the new size of the virtual hard disk (in our example we’ll expand the disk size to 170 GB);

- Go to the console of the guest OS, which disk was extended. Let’s take a look at how to increase a system partition in a Windows guest OS. Open the Disk Manager console. As you can see, extra 43 GB of unallocated space appeared on the disk;

- Right-click the partition you want to extend and choose Extend Volume (you can only expand the volume to the left of the unallocated area). Specify how much you want to increase the current volume size;

- After completing the Extend procedure, the volume size will be increased.
In a guest Linux OS, you can expand the disk using the parted tool.


How to Shrink the Size of Hyper-V Virtual Disk (VHDX)?
Now let’s look at how to reduce the size of a virtual vhdx disk on Hyper-V.
- Before shrinking a virtual disk from the Hyper-V console, it is necessary to reduce the size of the logical partition on the disk inside the guest OS. Free up some space and convert it to the unallocated volume. To do it, open the Disk Manager in the guest OS, select a volume and click Shrink Volume;

Note. Shrink Volume option becomes available only if there is some free space on the partition.
- Specify the amount of space to shrink the partition by (in our example we specified 50GB);
- After reducing the size of the partition in the guest OS, you need to open the Hyper-V console and go to the virtual disk settings. Press the Edit button;
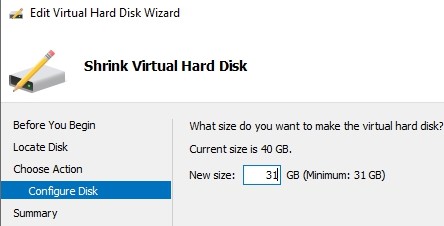
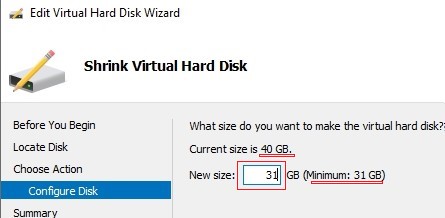
- In the Edit Virtual Hard Disk wizard, select Shrink, then specify a new size for the vhdx file. Please note that you cannot make the disk smaller than the data on it (check the Minimum value). In our case, you can reduce the disk size from 40 to 31 GB;

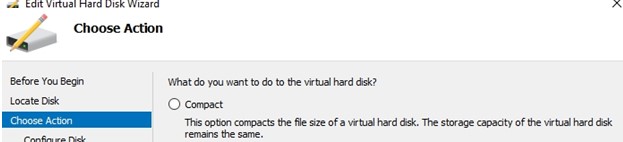
Before shrinking the VHDX file, try defragmenting it with Hyper-V Optimization. In the previous form, select the Compact option. Alternatively, you can use the PowerShell command to optimize and defragment a Hyper-V dynamic virtual disk.:
Optimize-VHD -Path 'C:VMVHDHyper-Vfs01.vhdx'
- Done.


Resizing Virtual Hard Disk Files in Hyper-V with PowerShell
You can resize the VHDX disk on Hyper-V host using PowerShell. To do this, use the Resize-VHD cmdlet (not to be confused with Resize-VirtualDisk cmdlet, which belongs to the built-in Windows disk management cmdlets).
Note. You don’t need to turn off the virtual machine in order to resize a virtual disk using the Resize-VHD cmdlet in current versions of Hyper-V.
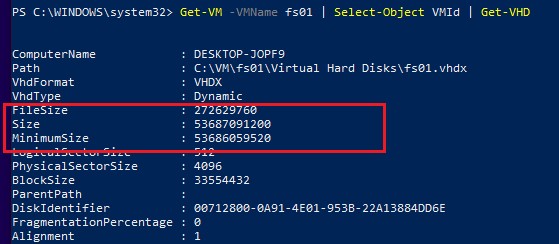
First, you need to get the full path to the VHDX disk of the virtual machine:
Get-VM -VMName fs01 | Select-Object VMId | Get-VHD
These cmdlets also returns the actual size of the VHDX file on the storage (FileSize) and the maximum size that it can take (Size). MinimumSize is the minimum VHDX disk size to which a virtual disk file can be reduced.
In order to increase the size of the VHDX disk, you need to specify its new size:
Resize-VHD -Path 'C:VMfs01VHDfs01.vhdx' -SizeBytes 50Gb
If you specified the new size of the virtual disk less than it takes on the disk, an error will appear: Resize-VHD : Failed to resize the virtual disk.
You just need to resize the partition in the guest OS.
You can expand a disk on Windows remotely using PowerShell Remoting. Connect to the remote VM using the Invoke-Command or Enter-PSSession cmdlet (over the network or via Hyper-V PowerShell Direct):
Enter-PSSession -ComputerName fs01
You need to get information on how much you can expand the partition and expand it to the maximum available size:
$MaxSize = (Get-PartitionSupportedSize -DriveLetter C).SizeMax

Resize-Partition -DriveLetter L -Size $MaxSize
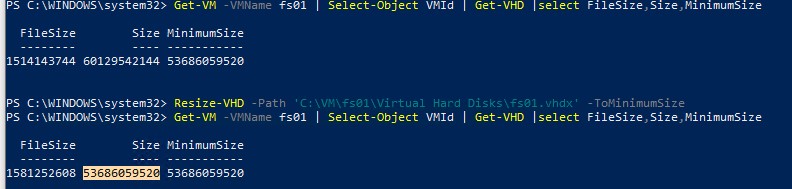
If you need to shrink the size of the virtual disk to the smallest possible size, run:
Resize-VHD -Path 'C:VMfs01VHDfs01.vhdx' -ToMinimumSize

This command will reduce the maximum VHDX file size by 6 GB.
Instructions for resizing virtual disks in other hypervisors are available at the following links: KVM, VMWare.
Sometimes you over provision a server and need the space back on your cluster shared volume or use a full fixed size disc and later want a dynamic one and then need to shrink it. Or it could simply be you are making a template and want to compact the disk as much as possible for faster deployments and less disk space consumed on your VMM server.
Some of the steps here are also useful if you just want to find additional space on a windows server. Step 1 outlines how to cleanup the component store and remove installation files for unused windows features. (e.g. why keep the source files for the Remote desktop session host server role on a web server?) You can skip step 4 if you are just looking to shrink the file temporarily, if the VHDX is for a VMM template or if you are just cleaning up a working server for more free space.
Here is the process:
1. Clean up the disk first and remove any files or data you don’t need so that you can compact the disk as much as possible.
Here are a few options:
You can remove the source installation files for any roles and features you don’t need to save on disk space. This can make it difficult or sometimes impossible to enable the features later though so proceed only if you are sure you don’t need other roles to be added later. Make sure to run this in an Admin powershell window.
Get-WindowsFeature | Where-Object {$_.Installed -match “False”} | Uninstall-WindowsFeature –Remove
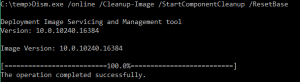
For 2012 R2 and other later windows versions you can also clean up the component store with DISM. This does mean you won’t be able to remove existing service packs and updates however future updates will be removable.
Dism.exe /online /Cleanup-Image /StartComponentCleanup /ResetBase
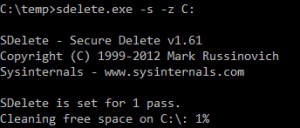
Clean up any temporary files, old profiles and all the other places you would usually look to free up more space. 2. Grab a copy of the sysinternal Sdelete tool and use it to zero the deleted files on the disk. This step is not essential but you will get better results if you do it. I would recommend skipping this step if you are using an SSD on a physical machine.
https://technet.microsoft.com/en-us/sysinternals/bb897443.aspx
This command assumes you are on the machine you want to shrink:
C:pathtofilesdelete.exe -s -z c:
3. Defragment the disk. You can run this from within the guest OS but you may get better results shutting down the VM and mounting the VHDX file on another system. This way all the files can be defragmented.
defrag C: -w –v

4. Consider shrinking the partition. It maybe if you are making a template you want to keep a large partition as you expect and want the VHDX to grow after it is deployed. (If that is the case skip this step) If you are looking for a more permanent shrink then you should now shrink the partition to the desired size. This is best accomplished in the disk management GUI or with PowerShell.
This assumes you only have one local disk and know the size you want to resize to, if this isn’t the case use get-partition to work out the correct numbers for your situation and use Get-PartitionSupportedSize to view the possible sizes you could shrink to.
Resize-Partition -DiskNumber 1 -PartitionNumber 1 –size 30GB 5. Now use the Hyper-V, VMM or failover cluster manager GUI to compact the VHD.
5. Compact the VHDX. The quickest method is to use the Hyper-V, VMM or failover cluster manager GUI to compact the VHD. e.g. right click on the VM>Select settings>Left click on the disk>click “Edit”>Click “Next”>Select “Compact”>Click “Next”>Review the change summary screen and click on “Finish.” This might take some time if there is a lot to shrink. The VM also needs to be powered off for this final step.

Happy shrinking!
Starting with Windows Server 2012 R2, it is possible to re-size a Virtual Hard Disk for a running Virtual Machine on Hyper-V! It was not possible to do so before for an online Virtual Machine running on Windows Server 2012 and earlier Hyper-V versions.
Let’s have a look at some of the benefits this feature offers and requirements before you dive in and use it.
[thrive_leads id=’16356′]
Benefits
The re-sizing feature allows expanding or shrinking a Virtual Machine hard disk while the Virtual Machine is running. Storage administrators can avoid downtime to perform virtual hard disk maintenance tasks and there is no impact to end users. Users can still access Virtual Machine and its volumes. This feature reduces the maintenance costs associated with downtime of critical Virtual Machines.
There is also a Resize-VirtualDisk PowerShell cmdlet available which can be used to script the re size operation on multiple virtual hard disks quickly. There is no need to use or enable any component to use this feature. This functionality is available out of the box using “Edit Virtual Hard Disk” wizard.
Requirements
Since it is a feature of Hyper-V running on Windows Server 2012 R2, make sure to perform this task on a Windows Server 2012 R2 Hyper-V Server. You must also be using a VHDX format and this must be connected to a SCSI controller before you can expand or shrink a Virtual Hard Disk. However, Disk type can be fixed, differencing or dynamic.
So, let’s see how you actually Expand and Shrink virtual hard disks without powering off Virtual Machines. I’m not going to explain the step-by-step process but provide you the necessary screenshots for your understanding.
How to Expand?
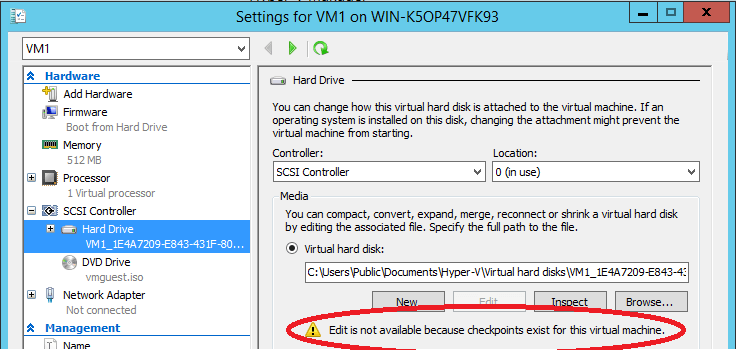
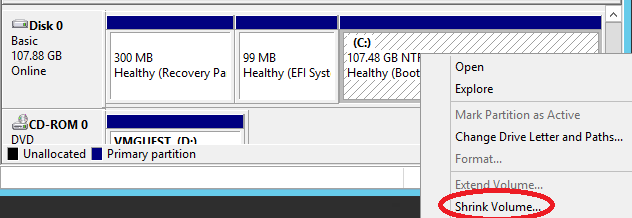
To expand, Right Click on the Virtual Machine and then click on “Settings”. Click on the Virtual Hard Drive you want to extend in the “Settings” page. Note: You cannot extend/compact a Virtual Machine hard drive if a snapshot exists. A warning message will be shown stating that “Edit is not available because checkpoints exist for this Virtual Machine”. This is also shown in the red circle of the below screenshot.
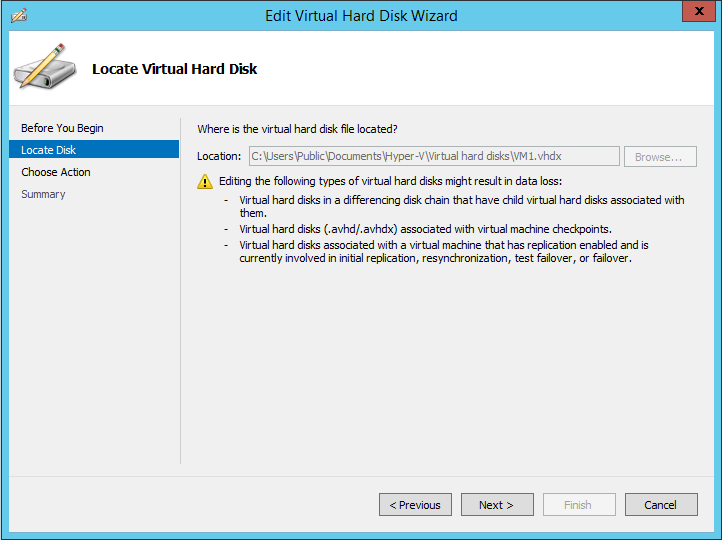
Next click on “Edit” button to launch the “Edit Virtual Hard Disk” wizard as shown below:
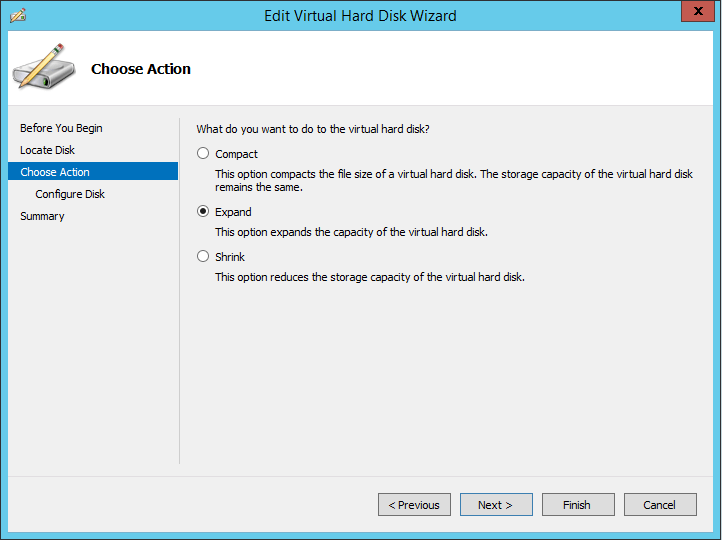
Click “Next” to select “Expand” action as shown below:
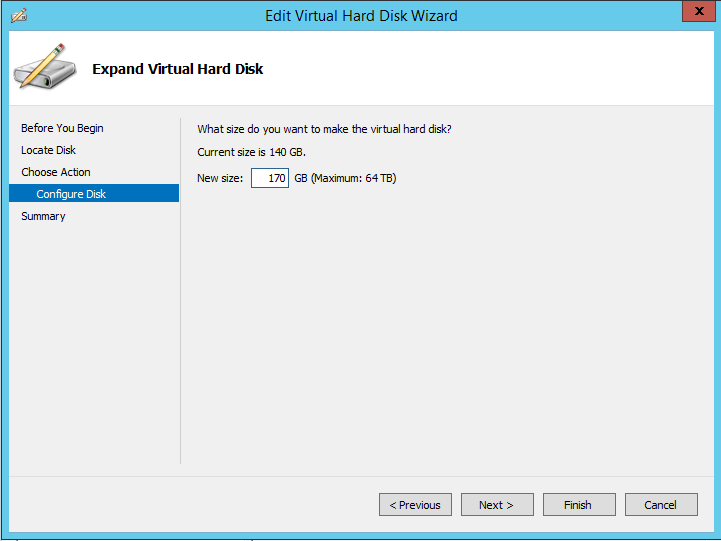
Specify the size of the virtual hard drive to expand and then click on Finish.
At this point, Virtual Machine hard disk size has been expanded, now you need to launch “Disk Manager” in Virtual Machine and then use the “Extend the Volume” wizard to make un-allocated space available to the Virtual Machine. When you open “Disk Manager”, you will see the expanded size as un-allocated space as shown in the below screenshot of the Virtual Machine:

Right Click on the volume you want to extend and then select “Extend Volume” wizard as shown in the below screenshot and then follow the on-screen steps to complete the process.

How to Shrink?
To shrink the storage capacity, you must first initiate the “shrink” action from within the Operating System of Virtual Machine using “Disk Manager”. Using the “Disk Manager”, Right Click on the volume you want to shrink and then select “Shrink Volume” action as shown in the below the screenshot:
Note: “Extend Volume” action is available only if you have un-allocated space available in the Operating System. Next, specify the amount of space you want to shrink as shown below and then hit “Shrink” button:
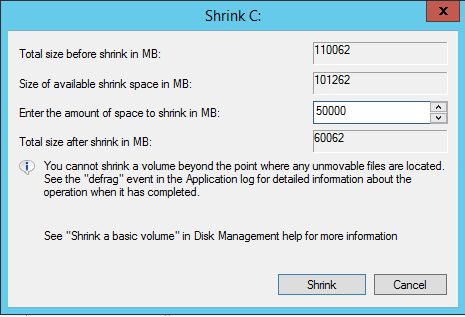
Once shrunk from within the Operating System of Virtual Machine, initiate the final shrink action using the “Edit Virtual Machine” wizard. Click on “Edit” button on the Virtual Machine’s setting page to specify the new size for the virtual hard disk as shown in the below screenshot. “Edit Virtual Machine” wizard will not allow you to specify the new size value lesser than the size being used by the Operating System inside the Virtual Machine. As you can see in the below screenshot, the C: volume is about 58.6 GB in size and “Edit Virtual Hard Disk” wizard also specifies the minimum required size which is 60 GB. This is shown in the red circles in the below screenshots:

Once you have specified the size to shrink, click “Finish” button for VMWP.exeto process the change and reduce the size of the VHDX file on the Host storage.
Limitations
- Does not work on virtual hard disks using VHD format.
- The re-sizing feature does not work on Virtual Hard Disks which are attached to IDE Controllers.
- Does not work for Virtual Hard Disks which have snapshots/checkpoints associated.
- Expanding and Shrinking process is not visible to the Virtual Machine Operating System. You must take some extra steps.
- Once the virtual hard disk has been expanded, the extra space is shown as un-allocated in the Disk Manager in the Operating System of the Virtual Machine. You must make the extra space available to Virtual Machine by using the “Extend Volume Wizard” within the Disk Manager of the Virtual Machine.
- Shrinking reduces the storage capacity of the Virtual Hard Disk. If you want to shrink the size, you must use the “Disk Manager” in Operating System of the Virtual Machine. Finally, use the “Edit Virtual Hard Disk” wizard to reduce the size of the virtual hard disk.
How to Compact Dynamic VHD and VHDX Files in Hyper-V 2012 and Newer
-
May 23, 2018
Users of Hyper-V virtual machines with virtual hard disk files need to consider how much storage these files take up. VHD and VHDX files can grow unwieldy over time, as new content expands their file size. However, deleting content from a VHD does not shrink its file size. This means that virtual machine users are wasting storage and costs with blank data. This is especially problematic in thin provisioning setups. Don’t fret, though; there is a way to compact VHD and VHDX files to reclaim that missing space. It is possible to do this with a Compact function and three commands in PowerShell.
First, be sure to shut down the VM with the VHD/VHDX to be compacted. Open up PowerShell as an Administrator by pressing WinKey+X, and then choose PowerShell (Run as Administrator). Accept the User Account Control prompt either by clicking Yes or pressing Alt+Y.
In PowerShell, run the commands below, in this order, to mount the VHD locally. Next optimize its file size and then dismount the virtual hard disk file.
Mount-VHD -Path “C:ClusterStorageVolume1VM1Virtual Hard DisksVM1.vhdx” -ReadOnly
Optimize-VHD -Path “C:ClusterStorageVolume1VM1Virtual Hard DisksVM1.vhdx” -Mode Full
Dismount-VHD “C:ClusterStorageVolume1VM1Virtual Hard DisksVM1.vhdx”
Be sure to replace the file names in the commands with the VHD or VHDX file you are looking to optimize. Users can maximize the free space they reclaim by defragmenting the hard disk and emptying the Recycle Bin. Third-party tools that “zero out” deleted data can reclaim even more space.
While Hyper-V’s Edit Virtual Hard Disk Wizard offers a Compact disk option, this will not actually shrink the VHD or VHDX in use. Unless the user mounts the virtual hard disk locally beforehand, running the Compact command will have no effect.
These steps will ensure that dynamic VHD and VHDX files will not use up excess storage and save on costs with running virtual machines. Have more virtualization questions? Contact our team of Sikich experts to help.
This publication contains general information only and Sikich is not, by means of this publication, rendering accounting, business, financial, investment, legal, tax, or any other professional advice or services. This publication is not a substitute for such professional advice or services, nor should you use it as a basis for any decision, action or omission that may affect you or your business. Before making any decision, taking any action or omitting an action that may affect you or your business, you should consult a qualified professional advisor. You acknowledge that Sikich shall not be responsible for any loss sustained by you or any person who relies on this publication.
SIGN-UP FOR INSIGHTS
Join 14,000+ business executives and decision makers
Upcoming Events
Latest Insights
About The Author

John Branch
John has over 30 years of experience working with technology. His career began in the US Navy where he contributed to several communities including Naval Aviation, Naval Special Warfare, and Naval Cryptography. Upon transitioning to the private sector, he delivered technical training on foundational networking technologies including switching and routing as a Certified Cisco Systems Instructor (CSSI). For over 15 years, John has been working as a network consultant assisting clients in achieving their business objectives through technology and trusted advice. John’s operational expertise includes complex network design and implementation (routing, switching, wireless, and security) with Cisco, Meraki, Juniper, and HPE Aruba networking equipment. John has considerable experience with server virtualization using Microsoft Hyper-V and Azure. He also has actively worked in cybersecurity developing assessment and testing methodologies for his clients. He holds several certifications from industry leaders including Cisco, Microsoft, Citrix, and SonicWall.