TAP-Windows driver (NDIS 6)
This is an NDIS 6.20/6.30 implementation of the TAP-Windows driver, used by
OpenVPN and other apps. NDIS 6.20 drivers can run on Windows 7 or higher except
on ARM64 desktop systems where, since the platform relies on next-gen power
management in its drivers, NDIS 6.30 is required.
Build
The prerequisites for building are:
- Python 2.7
-
- Microsoft Windows 10 EWDK (Enterprise Windows Driver Kit)
-
- Visual Studio+Windows Driver Kit works too. Make sure to work from a «Command Prompt for Visual Studio» and to call buildtap.py with «—sdk=wdk».
-
- The devcon source code directory (setup/devcon) from Windows-driver-samples (optional)
-
- If you use the repo from upstream remember to include our patch to devcon.vcxproj to ensure that devcon.exe is statically linked.
- Windows code signing certificate
- Git (not strictly required, but useful for running commands using bundled bash shell)
- MakeNSIS (optional)
- Prebuilt tapinstall.exe binaries (optional)
- Visual Studio 2019 and WiX Toolset for MSM packaging (optional)
Make sure you add Python’s install directory (usually c:python27) to the PATH
environment variable.
Tap-windows6 has been successfully build on Windows 10 and Windows Server 2016 using
CMD.exe, Powershell and Git Bash.
View build script options:
$ python buildtap.py
Usage: buildtap.py [options]

Options:
  -h, --help           show this help message and exit
  -s SRC, --src=SRC    TAP-Windows top-level directory, default=<CWD>
  --ti=TAPINSTALL      tapinstall (i.e. devcon) directory (optional)
  -d, --debug          enable debug build
  --hlk                build for HLK tests (test sign, no debug)
  -c, --clean          do an nmake clean before build
  -b, --build          build TAP-Windows and possibly tapinstall (add -c to
                       clean before build)
  --sdk=SDK            SDK to use for building: ewdk or wdk, default=ewdk
  --sign               sign the driver files
  -p, --package        generate an NSIS installer from the compiled files
  -m, --package-msm    generate a MSM installer from the compiled files
  --cert=CERT          Common name of code signing certificate,
                       default=openvpn
  --certfile=CERTFILE  Path to the code signing certificate
  --certpw=CERTPW      Password for the code signing certificate/key
                       (optional)
  --crosscert=CERT     The cross-certificate file to use, default=MSCV-
                       VSClass3.cer
  --timestamp=URL      Timestamp URL to use, default=http://timestamp.verisign
                       .com/scripts/timstamp.dll
  --versionoverride=FILE
                       Path to the version override file
Edit version.m4 and paths.py as necessary then build:
$ python buildtap.py -b
On successful completion, all build products will be placed in the «dist»
directory as well as tap6.tar.gz. The NSIS installer package will be placed to
the build root directory.
Building tapinstall (optional)
The easiest way to build tapinstall is to clone the Microsoft driver samples
and copy the source for devcon.exe into the tap-windows6 tree. Using PowerShell:
$ git clone https://github.com/OpenVPN/Windows-driver-samples.git
$ Copy-Item -Recurse Windows-driver-samples/setup/devcon tap-windows6
$ cd tap-windows6
$ python.exe buildtap.py -b --ti=devcon
The build system also supports reuse of pre-built tapinstall.exe executables.
To make sure the buildsystem finds the executables, create the following
directory structure under tap-windows6 directory:
devcon
├── Release
│   └── devcon.exe
├── x64
│   └── Release
│       └── devcon.exe
└── ARM64
    └── Release
        └── devcon.exe
This structure is equal to what building tapinstall would create. Then call
buildtap.py with «—ti=devcon». Replace «Release» with your build configuration;
for example, when using —Hlk you’d use «Hlk».
Please note that the NSIS packaging (-p) step will fail if you don’t have
tapinstall.exe available. Also don’t use the «-c» flag or the above directories
will get wiped before MakeNSIS is able to find them.
Developer Mode: Installing, Removing and Replacing the Driver
The driver can be installed using a command-line tool, tapinstall.exe, which is
bundled with OpenVPN and tap-windows installers. Note that in some versions of
OpenVPN tapinstall.exe is called devcon.exe. To install, update or remove the
tap-windows NDIS 6 driver follow these steps:
- place tapinstall.exe/devcon.exe to your PATH
- open an Administrator shell
- cd to dist
- cd to amd64, i386, or arm64 depending on your system’s processor architecture.
If you are actively developing the driver (e.g.: Edit, Compile, Debug, Loop…), you may not be signing your driver each time, thus you need to be aware of the following additional items.
Disable Secure Boot:
Unsigned drivers require disabling secure boot.
- Secure Boot: Varies depending on PC Maker and/or the BIOS setting on your test machine.
- https://docs.microsoft.com/en-us/windows-hardware/manufacture/desktop/disabling-secure-boot
- VMWare (one example): https://docs.vmware.com/en/VMware-vSphere/7.0/com.vmware.vsphere.vm_admin.doc/GUID-898217D4-689D-4EB5-866C-888353FE241C.html
- Virtual Box: SecureBoot is not supported on Virtual Box
- Parallels (MacOS) https://kb.parallels.com/en/124242 [With Parallels 15, it is enabled by default, use 0 to disable]
Enable Windows Test Mode:
Test mode is also required.
- Enable Windows Test Mode via BCEDIT
- For details: https://docs.microsoft.com/en-us/windows-hardware/manufacture/desktop/bcdedit-command-line-options
- Specifically,
bcdedit /set testsigning offorbcdedit /set testsigning on - The result should be
Test Modein the bottom right corner of the windows screen.
Driver Installation:
Notes
- The command
tapinstall install OemVista.inf TAP0901installs the driver - Because your driver is not signed, the
tapinstall installstep will pop up the «Big Scary Unsigned Driver Warning», you’ll need to click OK. - As a result, the driver will be copied into the Windows Driver Store
Updating the Driver, and the Windows Driver Store:
At some point, you will build a shinny new driver and need to test it.
- The command
tapinstall remove TAP0901— removes the driver - However, the previously approved driver is still in the Windows Driver Store
- Typing
tapinstall install ...now, only re-installs the old driver that was copied into the driver store.
Key step: The driver needs to be removed from the driver store also.
- Details: https://docs.microsoft.com/en-us/previous-versions/windows/it-pro/windows-server-2008-R2-and-2008/cc730875(v=ws.11)
There is a script to do this, but it only works if you have not changed the text strings in your driver package
- Script Location: https://github.com/mattock/tap-windows-scripts
The manual steps are:
- Step 1 — Obtain a list of Installed drivers via the command:
pnputil -e, this will list all of theoemNUMBER.inffiles that are in the driver store. - Step 2 — Find your driver in that list, it will be some
oem<NUMBER>.inffile - Step 3 — To delete, use
pnputil.exe /d oemNUMBER.inf
Finally use tapinstall install OemVista.inf TAP0901 to install your driver
Important:
If you do not see the Big Scary Unsigned Driver Warning — Windows will use the old (not new) driver.
Troubleshooting:
Examining the SetupAPI log file helps, see C:WindowsINFsetupapi.dev.log.
Build for HLK tests
A test-signed version of tap-windows6 driver should be used for the HLK tests.
The recommended procedure is to use pre-built, cross-signed devcon.exe and use
the WDK-generated key for signing the driver.
First setup the directory with prebuilt devcon as described above.
Then run the build with the —hlk option:
$ python.exe buildtap.py -c -b --ti=devcon-prebuilt --hlk
Release process and signing
Microsoft’s driver signing requirements have tightened considerably over the
last several years. Because of this this buildsystem no longer attempts to sign
files by default. If you want to sign the files at build time use the —sign
option. The «sign» directory contains several Powershell scripts that help
produce release-signed tap-windows6 packages:
- Cross-Sign: cross-sign tap-windows6 driver files and tapinstall.exe
- Create-DriverSubmission: create architecture-specific attestation signing submission cabinet files
- Extract-DriverSubmission: extract attestation-signed zip files
- Sign-File: sign files (e.g. tap-windows6 installer or driver submission cabinet files)
- Sign-tap6.conf.ps1: configuration file for all the scripts above
- Prepare-Msm.ps1: take Win7- and Win10-signed «dist» directories and produce a «dist» directory that MSM packaging can consume
Most of these scripts operate directly on the «dist» directory that
tap-windows6 build system produces. Below it is assumed that building and
signing is done on the same computer.
First produce cross-signed drivers for (Windows 7/8/8.1/Server 2012r2):
$ python.exe buildtap.py -c -b --ti=devcon
$ signCross-Sign.ps1 -SourceDir dist -Force
Note that the «-Force» option for Cross-Sign.ps1 is required except in the
unlikely case that you’re appending a signature.
Next produce a driver submission cabinet files for attestation signing:
$ signCreate-DriverSubmission.ps1
$ Get-ChildItem -Path disk1|signSign-File.ps1
Three architecture-specific (i386, amd64, arm64) cabinet files are created.
Submit these to Windows Dev Center for attestation signing. Note that unsigned
cabinet files will be automatically rejected.
When submitting the drivers to Microsoft take care to only request signatures
applicable for each architecture.
At this point move the cross-signed «dist» directory away:
$ Move-Item dist dist.win7
Download the attestation-signed drivers as zip files put them into a temporary
directory (e.g. tap-windows6tempdir). Then run Extract-DriverSubmission.ps1:
$ Get-ChildItem -Path tempdir -Filter "*.zip"|signExtract-DriverSubmission.ps1
This extracts the drivers into the «dist» directory. Move that directory to dist.win10:
$ Move-Item dist dist.win10
After this you can start creating the installers and/or MSM packages.
If you’re creating NSIS packages do:
$ Move-Item dist.win7 dist
$ python.exe buildtap.py -p --ti=devcon
$ Move-Item dist dist.win7
Followed by:
$ Move-Item dist.win10 dist
$ python.exe buildtap.py -p --ti=devcon
$ Move-Item dist dist.win10
Finally sign both installers:
$ Get-Item tap-windows*.exe|signSign-File.ps1
On the other hand if you’re creating MSM packages do:
$ signPrepare-Msm.ps1
$ python buildtap.py -m --sdk=wdk
$ Get-Item tap-windows*.msm|signSign-File.ps1
For additional instructions and background information please refer to
this article on OpenVPN community wiki.
Overriding setting defined in version.m4
It is possible to override one or more of the settings in version.m4 file with
the —versionoverride <file> option. Any settings given in the override file
have precedence over those in version.m4.
This is useful when building several tap-windows6 drivers with different
component ids for example.
Notes on proxies
It is possible to build tap-windows6 without connectivity to the Internet but
any attempt to timestamp the driver will fail. For this reason configure your
outbound proxy server before starting the build. Note that the command prompt
also needs to be restarted to make use of new proxy settings.
MSM packaging
In order to build the MSM packages build and sign the driver first:
- Build the TAP driver with buildtap.py and «-b» flag.
- EV-sign the drivers
- WHQL/Attestation-sign the drivers
Place the signed drivers in a directory structure under tap-windows6
directory. Each platform directory should contain the EV-signed driver with a
«win10» subdirectory containing WHQL/Attestation signed driver for that
platform:
dist
├── amd64
│   ├── win10
│   │   ├── OemVista.inf
│   │   ├── tap0901.cat
│   │   └── tap0901.sys
│   ├── OemVista.inf
│   ├── tap0901.cat
│   └── tap0901.sys
├── arm64
│   ├── win10
│   │   ├── OemVista.inf
│   │   ├── tap0901.cat
│   │   └── tap0901.sys
│   └── (Note: EV-signed driver for arm64 is not used.)
├── include
│   └── tap-windows.h
└── i386
    ├── win10
    │   ├── OemVista.inf
    │   ├── tap0901.cat
    │   └── tap0901.sys
    ├── OemVista.inf
    ├── tap0901.cat
    └── tap0901.sys
Building MSM packages requires Visual Studio 2019 (EWDK is not sufficient) and
the WiX Toolset installed. In a Developer Command Prompt for Visual Studio
2019, run:
$ python buildtap.py -m --sdk=wdk
This will compile the installer.dll file with embedded drivers and package it
as a platform-dependent tap-windows-<version>-<platform>.msm files.
As the WiX Toolset does not support the arm64 platform yet, only amd64 and
i386 MSM files are built.
Optional: Consider EV-signing the MSM packages before deploying them. Thou,
MSM signature is ignored when merging MSM into MSI package, users get a choice
to validate the integrity of the downloaded MSM packages manually.
License
See the file COPYING.
OpenVPN users occasionally report tap driver installation issues like Windows 7 OpenVPN TAP driver unsigned.
This can have a great impact when it comes to using VPN software to prevent any third parties online from gathering and using your data.
BEST VPN RECOMMENDATIONS — VETTED BY OUR EXPERTS
There are multiple reasons behind an install failure such as broken driver, invalid or expired driver signature, and conflicting drivers, just to name a few.
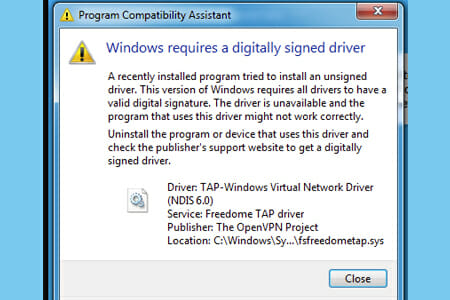
No matter the reason behind your problem, we have a quick troubleshooting guide that will allow you to easily install the OpenVPN tap driver. Check out our solutions below.
Does OpenVPN work on Windows 7?
Yes, OpenVPN is compatible with older versions of Windows, including Windows 7.
The VPN client offers dedicated support for the operating system, and the configuration is pretty straightforward.
Moreover, the OpenVPN file and system impact are pretty small, so you should have no reason to worry about it affecting your PC’s performance, even if you use an older device.
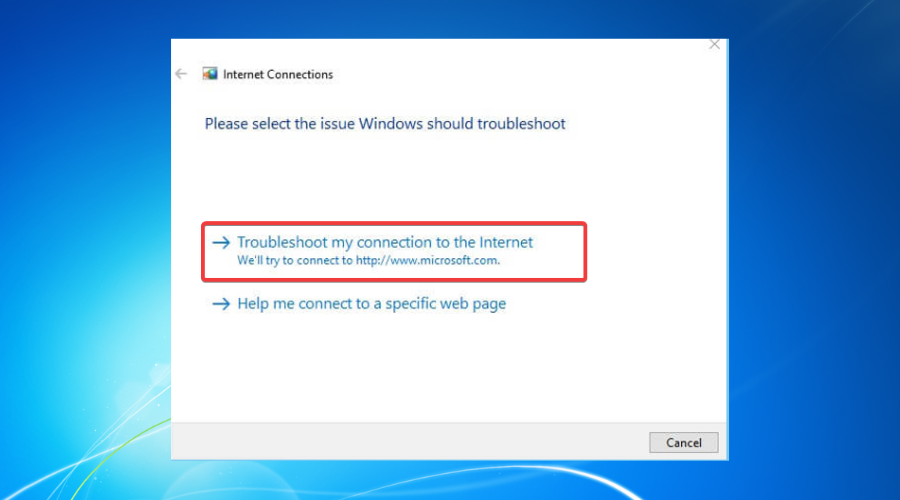
1. Use the Internet Connections Troubleshooter
- Press the Win key.
- Type troubleshoot.
- Select Available Recommended troubleshooting.
- Click the Available troubleshooters’ hyperlink.
- Select Internet Connections and click Run the troubleshooter.
- Select Troubleshoot my connection to the internet.

- Go through the troubleshooting wizard’s steps.
2. Reset the TAP-Windows Adapter Connection
- Press the Start button from your taskbar.
- Type network in the search box.
- Select Network status.
- Click on the Network and Sharing Center button.
- Select the Change adapter settings option.

- Right-click the TAP-Windows Adapter.
- Select Disable.
- Right-click the TAP-Windows Adapter again.
- Select Enable.
- Restart your PC and check if the issue still there.

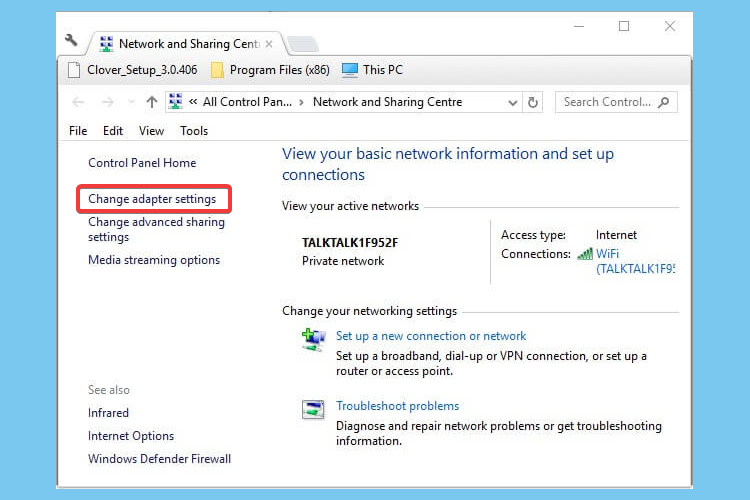
This trick can also help with the All TAP-Windows adapters are currently in use error that many Windows users encounter.
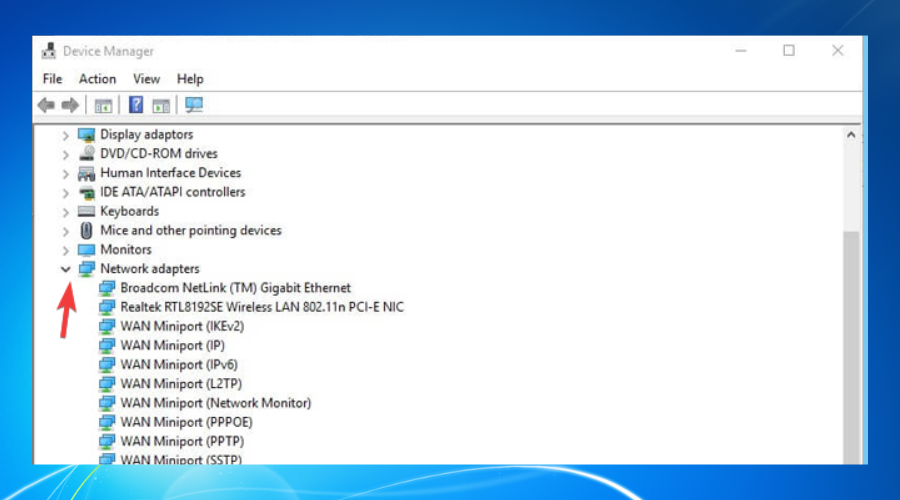
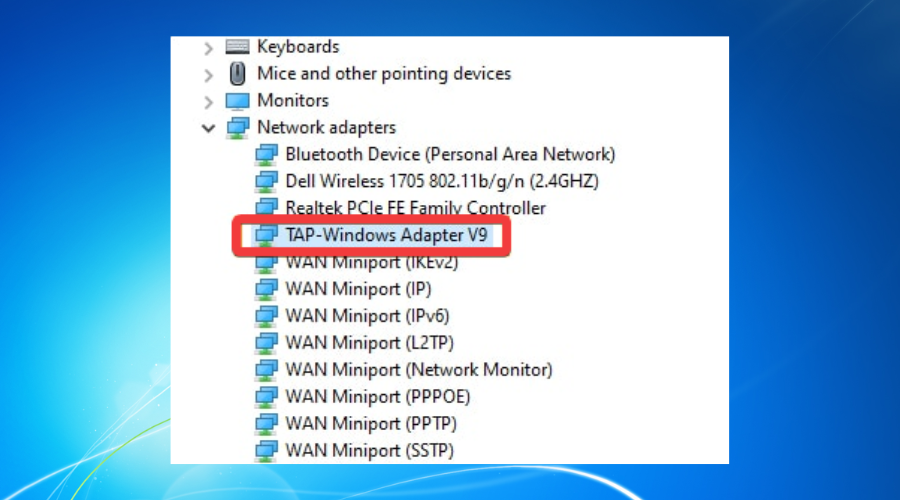
3. Reinstall TAP-Windows Adapter and VPN client
- Right-click on the Computer.
- Choose Manage.
- Expand the Network adapters category.
- Right-click the TAP-Windows Adapter V9.
- Click on Uninstall device.
- Select Uninstall to confirm.
- Press the Windows key + R key combination.
- Type appwiz.cpl and press Enter.
- Select your OpenVPN software.
- Click on the Uninstall button to remove it.
- Restart your PC shortly after uninstalling both services.
- Reinstall your OpenVPN software + TAP adapter driver.

4. Download and install OpenVPN TAP drivers for Windows 7
Windows 7 users report they fixed this issue with the KB4474419 security update that automatically updates your Tap drivers.
- Download the KB4474419 Windows 7 security update.
- Follow the installation prompts and wait for the process to complete.
- Check your OpenVPN Tap drivers.
This update installs SHA-2 code sign support and remediates the Windows that cannot verify the digital signature tap driver error.
Another option is to download an older OpenVPN Tap driver version:
- Uninstall your TAP-Windows Adapter V9 driver from the Device Manager (as presented in the third solution).
- Download OpenVPN Windows 7 signed tap driver (version 2.1.1.)
- Open and run the installer wizard.
Now the signed driver error should be remediated, as users report having issues with the 2.1.2. version. This previous version should work just fine.
If you have any problems manually installing the OpenVPN Tap drivers or want to speed up the process, you can use a dedicated third-party tool such as DriverFix.
5. Change to a more reliable VPN
If you tried all the previous solutions and still get the windows 7 OpenVPN tap driver unsigned issue, you might consider a better VPN alternative.
Private Internet Access, for instance, is a great VPN service that comes with its own TAP driver.
Furthermore, even if it stops working at some point, you can easily reinstall it directly from the VPN client’s configuration screen.

Private Internet Access
Benefit from advanced VPN options and dedicated support for OpenVPN and other protocols!
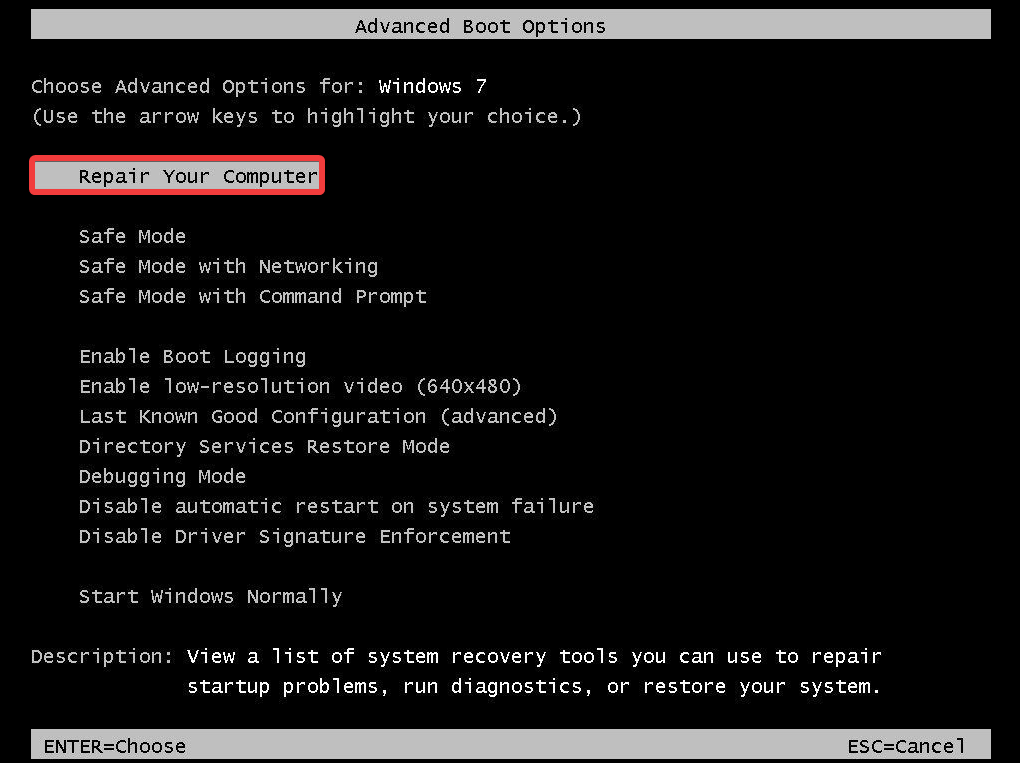
6. Reset Windows 7
- Start the computer.
- Press and hold the F8 key.
- In the Advanced Boot Options menu, choose Repair Your Computer.
- Press Enter.
- Select a keyboard language and click Next.
- If prompted, log in with an administrative account.
- At the System Recovery Options, choose System Restore or Startup Repair (if this is available).
To sum up, if you notice that your OpenVPN tap driver fails to install, there are some steps that you can try from our troubleshooting guide.
However, reinstalling the TAP driver and VPN client will usually fix your issue.
If you need additional help with this VPN service, we have a guide on what to do if OpenVPN is not forwarding traffic.
In case you have an alternative solution we didn’t mention or any questions regarding the ones we listed, feel free to share it with us, in the comments section below
На днях понадобилось мне настроить клиентскую часть OpenVPN на компьютере с установленной Windows 7.
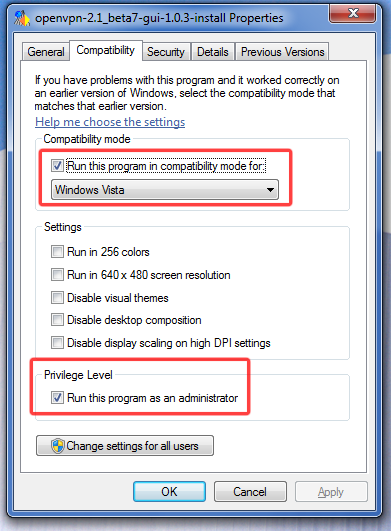
Я предвидел проблемы и потому сразу погуглил на эту тему. Нашел несколько советов, суть которых сводилась к тому, что отличий от установки на Vista мало, и главное из них — в свойствах инсталятора предварительно установить режим совместимости с Vista, а также запуск от имени администратора.
Сразу оговорюсь — в силу своей ленности использую вариант OpenVPN GUI, который мне очень полюбился по практике использования на Windows XP/2003.
Сделал предлагаемые действия и начал установку. На первый взгляд всё нормально, но не работает :(. Полез разбираться — Windows 7 не может запустить драйвер виртуальной сетевой карты TAP/TUN v8 необходимый для работы OpenVPN
А вот про это Гугль уже молчал. Путем нехитрых логических построений пришел к решению накатать поверх установки OpenVPN GUI оригинальную версию OpenVPN. Потому как поглядев на содержимое инсталятора OpenVPN увидел что там идет более новая версия этого драйвера v9.
Собственно на этом и сказочке конец — после установки OpenVPN поверх OpenVPN GUI все завелось с пол-оборота и радует стабильной работой и по сей день.

Надеюсь этот краткий рассказ сохранит чьи-нибудь нервы 
Ссылки:
OpenVPN GUI: openvpn.se/files/install_packages/openvpn-2.1_beta7-gui-1.0.3-install.exe
OpenVPN: openvpn.net/release/openvpn-2.1_rc15-install.exe
When I try to connect to my work VPN using OpenVPN, the connection fails with the message:
All TAP-Win32 adapters on this system are currently in use.
Many sources suggest to look in Control PanelNetwork and InternetNetwork Connections an enable the TAP adapter, but when I look there, there is none. Now I’ve run addtap.bat which is provided with OpenVPN, but I still don’t get to see any TAP adapter, and logging in in VPN still fails. The output of addtap.bat is
C:Windowssystem32>"C:Program Files (x86)OpenVPNbintapinstall.exe" install
"C:Program Files (x86)OpenVPNdriverOemWin2k.inf" tap0801
Device node created. Install is complete when drivers are updated...
Updating drivers for tap0801 from C:Program Files (x86)OpenVPNdriverOemWin2k
.inf.
Drivers updated successfully.
I’ve Run As Administrator both the setup of OpenVPN and addtap.bat.
I’ve run deltapall.bat to remove any (maybe hidden) adapters. It said it removed three of them, after which I ran addtap.bat again to try to create another one.
I also run OpenVPN itself as administrator. What’s wrong?
Running Windows 7 Home Premium on a HP Pavilion dv7 4050ed. It has worked before, but I recently had to reinstall my laptop, for which I used the restore disks I created when I just got it. Everything else seems to work fine.
== UPDATE ==
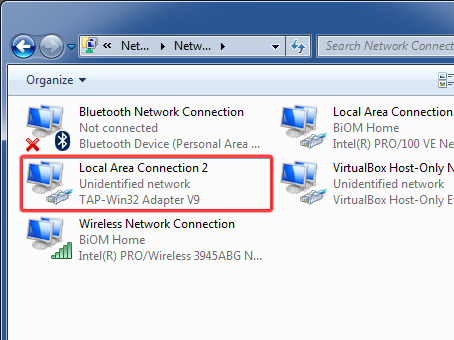
The TAP adapter is found in Device Manager, but apparently it is disabled because it is incompatible with Windows 7 64bit. I’ve deïnstalled OpenVPNGui, downloaded a version that should be 64bit compatible, and installed that. Still no cigar.
Then I found a tip to install OpenVPN (version 9) after installing OpenVPNGui, because that installs OpenVPN version 8. Now I got a v9 TAP driver in Device Manager, but it still doesn’t work and shows up in device manager with an exclamation mark, and not at all in my network devices.
OpenVPN – это набор open source программ, который заслуженно является одним из самых популярных и легких решений для реализации защищенной VPN сети. OpenVPN позволяет объединить в единую сеть сервер и клиентов (даже находящиеся за NAT или файерволами), или объединить сети удаленных офисов. Серверную часть OpenVPN можно развернуть практически на всех доступных операционных системах (пример настройки OpenVPN на Linux). Вы можете установить OpenVPN сервер даже на обычный компьютер с десктопной редакцией Windows 10.
В этой статье, мы покажем, как установить OpenVPN сервер на компьютер с Windows 10, настроить OpenVPN клиент на другом Windows хосте и установить защищенное VPN подключение.
Содержание:
- Установка службы OpenVPN сервера в Windows
- Создаем ключи шифрования и сертификаты для OpenVPN
- Конфигурационный файл OpenVPN сервера в Windows
- Настройка OpenVPN клиента в Windows
Установка службы OpenVPN сервера в Windows
Скачайте MSI установщик OpenVPN для вашей версии Windows с официального сайта (https://openvpn.net/community-downloads/). В нашем случае это OpenVPN-2.5.5-I602-amd64.msi (https://swupdate.openvpn.org/community/releases/OpenVPN-2.5.5-I602-amd64.msi).
Запустите установку.
Если вы планируете, OpenVPN сервер работал в автоматическом режиме, можно не устанавливать OpenVPN GUI. Обязательно установите OpenVPN Services.
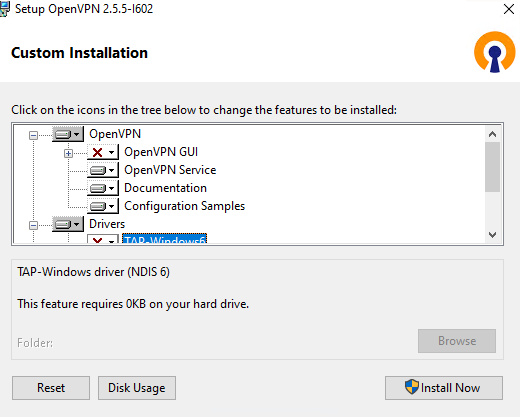
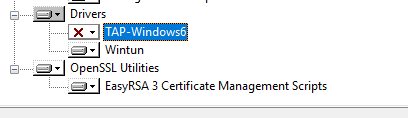
Начиная с версии OpenVPN 2.5, поддерживается драйвер WinTun от разработчиков WireGuard. Считается, что этот драйвер работает быстрее чем классический OpenVPN драйвер TAP. Установите драйвер Wintun, откажитесь от установки TAP-Windows6.
Установите OpenSSL утилиту EasyRSA Certificate Management Scripts.
Запустите установку.
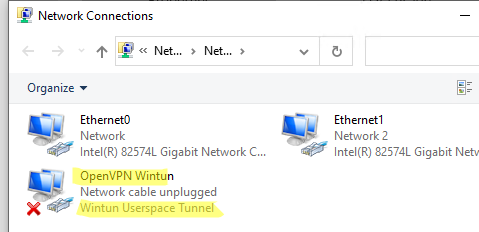
По умолчанию OpenVPN устаналивается в каталог C:Program FilesOpenVPN.
После окончания установки появится новый сетевой адаптер типа Wintun Userspace Tunnel. Этот адаптер отключен, если служба OpenVPN не запущена.
Создаем ключи шифрования и сертификаты для OpenVPN
OpenVPN основан на шифровании OpenSSL. Это означает, что для обмена трафиком между клиентом и серверов VPN нужно сгенерировать ключи и сертификаты с использованием RSA3.
Откройте командную строку и перейдите в каталог easy-rsa:
cd C:Program FilesOpenVPNeasy-rsa
Создайте копию файла:
copy vars.example vars
Откройте файл vars с помощью любого текстового редактора. Проверьте пути к рабочим директориям.
Обязательно поправьте переменную EASYRSA_TEMP_DIR следующим образом:
set_var EASYRSA_TEMP_DIR "$EASYRSA_PKI/temp"

Можете заполнить поля для сертификатов (опционально)
set_var EASYRSA_REQ_COUNTRY "RU"
set_var EASYRSA_REQ_PROVINCE "MSK"
set_var EASYRSA_REQ_CITY "MSK"
set_var EASYRSA_REQ_ORG "IT-Company"
set_var EASYRSA_REQ_EMAIL " [email protected] "
set_var EASYRSA_REQ_OU " IT department "

Срок действия сертификатов задается с помощью:
#set_var EASYRSA_CA_EXPIRE 3650
#set_var EASYRSA_CERT_EXPIRE 825
Сохраните файл и выполните команду:
EasyRSA-Start.bat
Следующие команды выполняются в среде EasyRSA Shell:
Инициализация PKI:
./easyrsa init-pki
Должна появится надпись:
init-pki complete; you may now create a CA or requests.
Your newly created PKI dir is: C:/Program Files/OpenVPN/easy-rsa/pki
Теперь нужно сгенерировать корневой CA:
./easyrsa build-ca
Задайте дважды пароль для CA:
CA creation complete and you may now import and sign cert requests.
Данная команда сформировала:
- Корневой сертификат центра сертификации: «C:Program FilesOpenVPNeasy-rsapkica.crt»
- Ключ центра сертификации «C:Program FilesOpenVPNeasy-rsapkiprivateca.key»
Теперь нужно сгенерировать запрос сертификата и ключ для вашего сервера OpenVPN:
./easyrsa gen-req server nopass
Утилита сгенерирует два файла:
req: C:/Program Files/OpenVPN/easy-rsa/pki/reqs/server.req
key: C:/Program Files/OpenVPN/easy-rsa/pki/private/server.key
Подпишем запрос на выпуск сертификата сервера с помощью нашего CA:
./easyrsa sign-req server server
Подтвердите правильность данных, набрав yes.
Затем введите пароль CA от корневого CA.
В каталоге issued появится сертификат сервера («C:Program FilesOpenVPNeasy-rsapkiissuedserver.crt»)

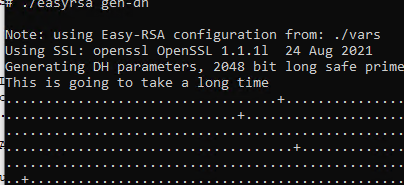
Теперь можно создать ключи Диффи-Хеллмана (займет длительное время):
./easyrsa gen-dh
Для дополнительной защиты VPN сервера желательно включить tls-auth. Данная технология позволяет использовать подписи HMAC к handshake-пакетам SSL/TLS, инициируя дополнительную проверку целостности. Пакеты без такой подписи будут отбрасываться VPN сервером. Это защитит вас от сканирования порта VPN сервера, DoS атак, переполнения буфера SSL/TLS.
Сгенерируйте ключ tls-auth:
cd C:Program FilesOpenVPNbin
openvpn --genkey secret ta.key
Должен появиться файл «C:Program FilesOpenVPNbinta.key». Переместите его в каталог C:Program FilesOpenVPNeasy-rsapki
Теперь можно сформировать ключи для клиентов OpenVPN. Для каждого клиента, который будет подключаться к вашему серверу нужно создать собственные ключи.
Есть несколько способов генерации ключей и передачи их клиентам. В следующем примере, мы создадим на сервере ключ клиента и защитим его паролем:
./easyrsa gen-req kbuldogov
./easyrsa sign-req client kbuldogov

Данный ключ («C:Program FilesOpenVPNeasy-rsapkiprivatekbuldogov.key») нужно передать клиенту и сообщить пароль. Клиент может снять защиту паролем для ключа:
openssl rsa -in "C:Program FilesOpenVPNeasy-rsapkiprivatekbuldogov.key"-out "C:Program FilesOpenVPNeasy-rsapkiprivatekbuldogov_use.key"

Если вы хотите сгенерировать ключ, не защищенный паролем, нужно выполнить команду:
./easyrsa gen-req имяклиента nopass
На сервере с OpenVPN вы можете создать неограниченное количество ключей и сертификатов для пользователей. Аналогичным образом сформируйте ключи и сертфикаты для других клиентов.
Вы можете отохвать скомпрометированные сертификаты клиентов:
cd C:Program FilesOpenVPNeasy-rsa
EasyRSA-Start.bat
./easyrsa revoke kbuldogov
Итак, мы сгенерировали набор ключей и сертификатов для OpenVPN сервера. Теперь можно настроить и запустить службу OpenVPN.
Конфигурационный файл OpenVPN сервера в Windows
Скопируйте типовой конфигурационный файл OpenVPN сервера:
copy "C:Program FilesOpenVPNsample-configserver.ovpn" "C:Program FilesOpenVPNconfig-autoserver.ovpn"
Откройте файл server.ovpn в любом текстовом редакторе и внесите свои настройки. Я использую следующий конфиг для OpenVPN:
# Указываем порт, протокол и устройство
port 1194
proto udp
dev tun
# Указываем пути к сертификатам сервера
ca "C:\Program Files\OpenVPN\easy-rsa\pki\ca.crt"
cert "C:\Program Files\OpenVPN\easy-rsa\pki\issued\server.crt"
key "C:\Program Files\OpenVPN\easy-rsa\pki\private\server.key"
dh "C:\Program Files\OpenVPN\easy-rsa\pki\dh.pem"
# Указываем настройки IP сети, адреса из которой будет будут получать VPN клиенты
server 10.24.1.0 255.255.255.0
#если нужно разрешить клиентам подключаться под одним ключом, нужвно включить опцию duplicate-cn (не рекомендуется)
#duplicate-cn
# TLS защита
tls-auth "C:\Program Files\OpenVPN\easy-rsa\pki\ta.key" 0
cipher AES-256-GCM
# Другая параметры
keepalive 20 60
persist-key
persist-tun
status "C:\Program Files\OpenVPN\log\status.log"
log "C:\Program Files\OpenVPN\log\openvpn.log"
verb 3
mute 20
windows-driver wintun
Сохраните файл.
OpenVPN позволяет использовать как TCP, так и UDP для подключения. В этом примере я запустил OpenVPN на 1194 UDP. Рекомендуется использовать протокол UDP, это оптимально как с точки зрения производительности, так и безопасности.
Не забудьте открыть на файерволе порты для указанного вами порта OpenVPN на клиенте и на сервере. Можно открыть порты в Windows Defender с помощью PowerShell.
Правило для сервера:
New-NetFirewallRule -DisplayName "AllowOpenVPN-In" -Direction Inbound -Protocol UDP –LocalPort 1194 -Action Allow
Правило для клиента:
New-NetFirewallRule -DisplayName "AllowOpenVPN-Out" -Direction Outbound -Protocol UDP –LocalPort 1194 -Action Allow
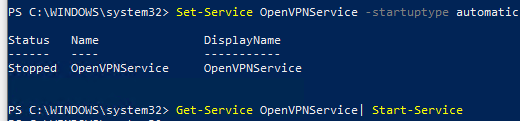
Теперь нужно запустить службу OpenVPN и изменить тип ее запуска на автоматический. Воспользуйтесь таким командами PowerShell, чтобы включить службу:
Set-Service OpenVPNService –startuptype automatic –passthru
Get-Service OpenVPNService| Start-Service
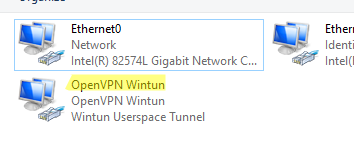
Откройте панель управления, и убедитесь, что виртуальный сетевой адаптер OpenVPN Wintun теперь активен. Если нет, смотрите лог «C:Program FilesOpenVPNlogserver.log»
Если при запуске OpenVPN вы видите в логе ошибку:
Options error: In C:Program FilesOpenVPNconfig-autoserver.ovpn:1: Maximum option line length (256) exceeded, line starts with..
Смените в файле server.ovpn символы переноса строки на Windows CRLF (в notepad++ нужно выбрать Edit -> EOL Conversion -> Windows CR LF). Сохраните файл, перезапустите службу OpevVPNService.
Данный конфиг позволит удаленным клиентам получить доступ только к серверу, но другие компьютеры и сервисы в локальной сети сервера для них недоступны. Чтобы разрешить клиентам OpenVPN получить доступ к внутренней сети нужно:
Включить опцию IPEnableRouter в реестре (включает IP маршрутизацию в Windows, в том числе включает маршрутизацию меду сетями Hyper-V): reg add «HKLMSYSTEMCurrentControlSetServicesTcpipParameters» /v IPEnableRouter /t REG_DWORD /d 1 /f
Добавьте в конфгурационный файл сервера OpenVPN маршруты до внутренней IP сети:
push "route 10.24.1.0 255.255.255.0"
push "route 192.168.100.0 255.255.255.0"
Если нужно, назначьте клиенту адреса DNS серверов:
push "dhcp-option DNS 192.168.100.11"
push "dhcp-option DNS 192.168.100.12"
Если нужно завернуть все запросы клиента (в том числе Интернет трафик) на ваш OpenVPN сервер, добавьте опцию:
push "redirect-gateway def1"
Настройка OpenVPN клиента в Windows
Создайте на сервере шаблонный конфигурационный файла для клиента VPN (на базе iшаблона client.ovpn) со следующими параметрами (имя файла kbuldovov.ovpn)
client
dev tun
proto udp
remote your_vpn_server_address 1194
resolv-retry infinite
nobind
persist-key
persist-tun
ca ca.crt
cert kbuldogov.crt
key kbuldogov.key
remote-cert-tls server
tls-auth ta.key 1
cipher AES-256-GCM
connect-retry-max 25
verb 3
В директиве remote указывается публичный IP адрес или DNS имя вашего сервера OpenVPN.
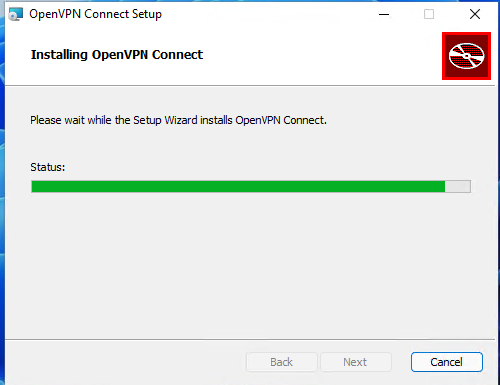
Скачайте и установите клиент OpenVPN Connect для Windows (https://openvpn.net/downloads/openvpn-connect-v3-windows.msi).
Теперь на компьютер с клиентом OpenVPN нужно с сервера скопировать файлы:
- ca.crt
- kbuldogov.crt
- kbuldogov.key
- dh.pem
- ta.key
- kbuldogov.ovpn

Теперь импортируйте файл с профилем *.ovpn и попробуйте подключиться к вашему VPN серверу.
Если все настроено правильно, появится такая картинка. 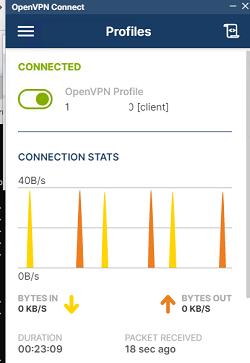
Проверьте теперь лог OpenVPN на клиенте «C:Program FilesOpenVPN Connectagent.log»
Mon Dec 27 08:09:30 2021 proxy_auto_config_url
Mon Dec 27 08:09:31 2021 TUN SETUP
TAP ADAPTERS:
guid='{25EE4A55-BE90-45A0-88A1-8FA8FEF24C42}' index=22 name='Local Area Connection'
Open TAP device "Local Area Connection" PATH="\.Global{25EE4A55-BE90-45A0-88A1-8FA8FEF24C42}.tap" SUCCEEDED
TAP-Windows Driver Version 9.24
ActionDeleteAllRoutesOnInterface iface_index=22
netsh interface ip set interface 22 metric=1
Ok.
netsh interface ip set address 22 static 10.24.1.6 255.255.255.252 gateway=10.24.1.5 store=active
IPHelper: add route 10.24.1.1/32 22 10.24.1.5 metric=-1
Клиент успешно подключится к OpenVPN серверу и получил IP адрес 10.24.1.6.
Проверьте теперь лог на сервере («C:Program FilesOpenVPNlogopenvpn.log»). Здесь также видно, что клиент с сертификатом kbuldogov успешно подключится к вашему серверу.
2021-12-27 08:09:35 192.168.13.202:55648 [kbuldogov] Peer Connection Initiated with [AF_INET6]::ffff:192.168.13.202:55648
2021-12-27 08:09:35 kbuldogov/192.168.13.202:55648 MULTI_sva: pool returned IPv4=10.24.1.6, IPv6=(Not enabled)
2021-12-27 08:09:35 kbuldogov/192.168.13.202:55648 MULTI: Learn: 10.24.1.6 -> kbuldogov/192.168.13.202:55648
2021-12-27 08:09:35 kbuldogov/192.168.13.202:55648 MULTI: primary virtual IP for kbuldogov/192.168.13.202:55648: 10.24.1.6
Содержание
- Особенности установки OpenVPN GUI под Windows 7
- OpenVPN Support Forum
- Installing TAP driver on Windows x64 fails [solved]
- Installing TAP driver on Windows x64 fails [solved]
- Re: TAP driver on Windows x64
- Re: TAP driver on Windows x64
- Re: TAP driver on Windows x64
- Re: Installing TAP driver on Windows x64 fails [solved]
- Re: Installing TAP driver on Windows x64 fails [solved]
- Re: Installing TAP driver on Windows x64 fails [solved]
- Re: Installing TAP driver on Windows x64 fails [solved]
- OpenVPN Support Forum
- TAP Device driver will not install in Win7 64bit
- TAP Device driver will not install in Win7 64bit
- Re: TAP Device driver will not install in Win7 64bit
- Re: TAP Device driver will not install in Win7 64bit
- Re: TAP Device driver will not install in Win7 64bit
- Сбой адаптеров TAP-Windows с VPN: как исправить
- Что такое адаптеры TAP-Windows
- Как исправить проблемы с TAP-Windows
- Перезагрузите адаптер TAP-Windows
- Переустановите адаптер
- Создайте новый адаптер TAP-Windows
Особенности установки OpenVPN GUI под Windows 7
На днях понадобилось мне настроить клиентскую часть OpenVPN на компьютере с установленной Windows 7.
Я предвидел проблемы и потому сразу погуглил на эту тему. Нашел несколько советов, суть которых сводилась к тому, что отличий от установки на Vista мало, и главное из них — в свойствах инсталятора предварительно установить режим совместимости с Vista, а также запуск от имени администратора.
Сразу оговорюсь — в силу своей ленности использую вариант OpenVPN GUI, который мне очень полюбился по практике использования на Windows XP/2003.

Сделал предлагаемые действия и начал установку. На первый взгляд всё нормально, но не работает :(. Полез разбираться — Windows 7 не может запустить драйвер виртуальной сетевой карты TAP/TUN v8 необходимый для работы OpenVPN
А вот про это Гугль уже молчал. Путем нехитрых логических построений пришел к решению накатать поверх установки OpenVPN GUI оригинальную версию OpenVPN. Потому как поглядев на содержимое инсталятора OpenVPN увидел что там идет более новая версия этого драйвера v9.
Собственно на этом и сказочке конец — после установки OpenVPN поверх OpenVPN GUI все завелось с пол-оборота и радует стабильной работой и по сей день.
Надеюсь этот краткий рассказ сохранит чьи-нибудь нервы 🙂
Источник
OpenVPN Support Forum
Community Support Forum
Installing TAP driver on Windows x64 fails [solved]
Installing TAP driver on Windows x64 fails [solved]
Post by sjoller » Mon Dec 27, 2010 11:27 am
I’ve tried running the installers in compability mode set to Vista, aswell.
I’ve tried downloading the x64 driver (tap0801), from openvpn.se, and installing it manually (from a dos prompt, run as administrator, from a destination folder that isn’t named with troublesome characters like space), and between the installs, i’ve even made sure to uninstall the «unknown» TAP network adaptor, the installations leaves behind.
I’ve tried extracting the driver (tap0901) from the installer and manually install it, using same procedure as above.
. I’m fresh out of ideas on how to get OpenVPN running on Windows 7 Ultimate x64, please help.
Regards
Mads Jensen

Re: TAP driver on Windows x64
Post by gladiatr72 » Mon Dec 27, 2010 5:21 pm
I’m not a Windows Guy(tm), but what sort of errors are being emitted when the installation fails?
After the error, is there anything left in the installation target directory?
Check if the following path exists and contains any files: (I think) C:program files (x86)openvpnbin
Specifically, I’m looking for the tapinstall.exe binary. If it doesn’t it might be getting cleaned up if you exit the installer. If this is the case, try running the installation again but not exiting the installer after it pukes.
If you can get an admin CLI with the tapinstall binary present, from openvpnbin, run the following command and post the output:
Re: TAP driver on Windows x64
Post by sjoller » Tue Dec 28, 2010 9:38 pm
Thanks for replying.
After a looong time trying to install the TAP driver, the installation pops an error message saying that «An error occured installing the TAP device driver». After accepting this, the installation finishes withour further errors.
This is what is logged:
As you might have guessed from above, everything besides the driver is installed as it should. Manually running the tabinstall as you describe, gives me yet another «Unknown device» in Network adapters, but fails.
Today, I tried to install v2.1.4 on a Windows 7 x64 box at work, and it installed flawlessly. The two boxes have pretty much the same software on them, but varies in hardware. I don’t think it’s a hardware problem, so the only major difference I can think of, is that I’m running Ultimate at home, and the work box has a OEM Home Premium.
Regards
Mads Jensen
Re: TAP driver on Windows x64
Post by sjoller » Tue Dec 28, 2010 10:50 pm
I tried to update the driver using Windows device manager, and it told me that the driver file was locked due to being used by another process. Googling for a solution to this problem yielded no solution (quelle surprise), but the the universal Windows problem fixer solution (A.K.A. reboot) released the lock on the file, and I was then able to install the driver with success.
I feel a little silly for not trying this in the first place, but atleast thing are working for me again.
Regards
Mads Jensen.
Re: Installing TAP driver on Windows x64 fails [solved]
Post by Goykie » Thu Oct 06, 2011 9:50 am
The new OpenVPN versions work on 64 bit.
Uninstall all Open VPN. Restart PC. Follow link http://openvpn.net/index.php/open-source/downloads.html and install the newest version. (I installed version 2.1.4 and it works)
Btw when you uninstall you don’t have to delete your config folders.
Re: Installing TAP driver on Windows x64 fails [solved]
Post by unkim » Sat Apr 14, 2012 4:34 pm
i have the same problem of the tap adapter in win7.
but!
i have 2 computers both with win7 (one is 100%legal bought in europe, and the other one is bought is china so who knows. )
curiously, i dont have any problem installing the adapter on the chinese one, but i have it in the legal one.
so must to be a software issue right?
my laptop asus A53S is the one which dont allow me to install the adapter.
ps: why the thread shows solved??
Re: Installing TAP driver on Windows x64 fails [solved]
Post by tazz602 » Wed Oct 03, 2012 3:27 pm
I don’t know why this was marked as solved because no one answered the question.
Re: Installing TAP driver on Windows x64 fails [solved]
Post by razvezlo » Tue Jan 08, 2013 12:20 am
Источник
OpenVPN Support Forum
Community Support Forum
TAP Device driver will not install in Win7 64bit
TAP Device driver will not install in Win7 64bit
Post by DavidAlegria » Mon Feb 21, 2011 6:56 pm
The senior Astrill tech tried installing a new version of OpenVPN, but had the same result.
I have 2 different mfgr laptops, 1 yr old, running Win7 64bit and firefox, both up dated.
Sorry that I have certainly made mistakes, but I tried to do the best i can.

Re: TAP Device driver will not install in Win7 64bit
Post by janjust » Mon Feb 21, 2011 9:41 pm
please try the 2.1.4 installer, which is the latest version.
Make sure the installer is run with elevated privileges.
If there is an error during installation try to copy the installation log from the installer and post it here.
Re: TAP Device driver will not install in Win7 64bit
Post by DavidAlegria » Mon Feb 21, 2011 10:46 pm
Re: TAP Device driver will not install in Win7 64bit
Post by DavidAlegria » Tue Feb 22, 2011 3:56 pm
Thanks for everyone’s help.
I am not trying to be a smart ass. If I ever seem to be, it is just that I am a poor emailer and you can’t hear my “Please help me if you can” tone.
Since we last spoke I have tried several things that did not work.
(It seems to be loading as a 32 BIT, is there a 64 BIT and I have just been barking up the wrong tree? I always get C:Program Files (x86)Astrill.
I think I should get C:Program FilesAstrill)
(Is there a 64bit version of OpenVPN? Searching
http://openvpn.net/index.php/open-source/downloads.html
yields no results. Bad search engine or what?)
(I found http://openvpn.se/download.html which says in part)
Installation Package (Both 32-bit and 64-bit TAP driver included):
openvpn-2.0.9-gui-1.0.3-install.exe
>>>>>>>>>>>>>>>
But here is what I have done so far.
I went to
http://openvpn.net/index.php/open-source/downloads.html
I downloaded openvpn-2.1.4-install.exe again and used HashCalc to compare MD5s. About 8 or 10 times a year, when I download a file it gets slightly corrupted and used to cause nightmares when I used it. Now, I nearly always download everything twice and use HashCalc to compare MD5 etc.
I now catch the errors and re-download until I get 2 alike. The better websites provide the MD5 which saves me a lot of time if the file is large. I assume that the corruption is due to the poor WiFi networks that I use.
I ran openvpn-2.1.4-install.exe again and took a movie of the install. Same error. I did it yet again after first going to Properties, Compatibility, Change settings for all users, Run in compatibility mode for Windows Vista SP2, as Administrator.
Same result. Ditto in Safe Mode.
The Astrill Development tech asked me to:
boot into Safe Mode
then you will navigate to c:Program Files (x86)Astrill
and run install.bat file
I created it for you
you will just run it and please save any output
so I can see if there is any error
I hope it will have success in safe mode
maybe NOD is interfering (I am using ESET SmartSecurity 4.0.474.0 aka NOD)
but I really dont think so
we have users with NOD and it works just fine
so let me show how you will do it
1. Boot into Safe Mode
2. open CMD.EXE as administrator
3. cd to that folder
4. run install.bat
Here are the results from that:
>>>>>>>>>>>
Microsoft Windows [Version 6.1.7600]
Copyright (c) 2009 Microsoft Corporation. All rights reserved.
C:UsersDavid>cd c:Program Files (x86)Astrill
c:Program Files (x86)Astrill>install.bat
c:Program Files (x86)Astrill>tapinstall.exe install OemWin2k.inf tap0901
Device node created. Install is complete when drivers are installed.
Updating drivers for tap0901 from c:Program Files (x86)AstrillOemWin2k.inf.
UpdateDriverForPlugAndPlayDevices failed, GetLastError=1450
tapinstall.exe failed.
Here are the results from the movie, the relevant screen (the upper/lower case is as found):
>>>>>>>>>>>>>>>>
TAP REMOVE OLD TAP
No devices were removed.
tapinstall remove TAP0801 returned: 0
TAP INSTALL (tap0901)
Device node created. Install is complete when drivers are installed…
Updating drivers for tap0901 from C:Program Files (x86)OpenVPNdriverOemWin2…
UpdateDriverForPlugAndPlayDevices failed, GetLastError=1450
tapinstall.exe failed.
tapinstall returned: 2
tapinstall cumulative status: 2
(Error window shows)
OpenVPN 2.1.4 Setup
An error occurred installing the TAP device driver.
>>>>>>>>>>>>>>>>>>>>>>
I also tried without success the ‘solution’ found at the bottom of the postings at
topic7441.html
Источник
Ошибка установки openvpn на Windows 10 выглядела следующим образом. Инсталлятор после выбора дефолтных настроек задумывается на несколько минут и в итоге выдает ошибку:

При этом сам клиент openvpn успешно устанавливается. Можно запустить GIU, но ясное дело, подключиться к серверу openvpn не получится, так как в системе не появляется TAP адаптера. В интернете нашел много советов по данной проблеме, но мне ни один не помог. Перечислю их, может вам поможет что-то из этого:
Два первых действия нужно выполнять от администратора. С помощью них можно добавить несколько tap адаптеров в систему, чтобы одновременно поднимать несколько openvpn туннелей.
После того, как ничего из предложенного не подошло, я крепко призадумался. Openvpn я использую постоянно. Ставил его на разные системы десятки раз и всегда все проходило успешно, либо проблема быстро решалась. Тут быстрого и простого решения не получалось.
Помогло в итоге вот что. Я открыл диспетчер устройств и посмотрел на сетевые адаптеры. В списке был TAP-Windows Adapter V9, что намекало на то, что все должно работать. Но не работало. В панели управления в списке адаптеров TAP адаптера не было.
После этого Openvpn заработал. Я смог подключиться к серверу и организовать туннель. После того, как я удалил openvpn на этой же системе и установил заново, все прошло без ошибок с первого раза. Появился только один TAP-Windows Adapter V9. Проверил еще на парочке тестовых виртуальных машин. Тоже все прошло без ошибок, так что не смог собрать актуальные скрины по проблеме, а сразу их не сделал.

Надеюсь моя инфа будет кому-нибудь полезной при разборе такой же ошибки при установке openvpn client на Windows 10. Я в русскоязычном интернете не видел этой информации. Моя статья по установке и настройке openvpn сервера.
Источник
Сбой адаптеров TAP-Windows с VPN: как исправить
Иногда у нас могут возникнуть проблемы с управлением нашими сетевыми картами. У нас могут быть проблемы в системах, особенно при использовании VPN инструменты и что они дают отказы. В этой статье мы поговорим о проблеме с НАЖМИТЕ-Windows адаптеры при использовании VPN. Мы собираемся объяснить, что мы можем сделать, чтобы этого избежать и иметь возможность нормально перемещаться.
Что такое адаптеры TAP-Windows
Многие пользователи замечают, что при использовании VPN в Windows устанавливается что-то под названием TAP-Windows V9. Это может вызвать проблемы при использовании VPN или при обычном подключении.
Этот виртуальный адаптер позволяет VPN подключаться к вашим серверам. По крайней мере, на бумаге пользователям не нужно прикасаться ни к одному из этих компонентов. Им просто нужно оставить все как есть, и все. Но иногда возникают проблемы.
Как исправить проблемы с TAP-Windows
Перезагрузите адаптер TAP-Windows
Для этого мы должны щелкнуть правой кнопкой мыши значок подключения в правом нижнем углу и выбрать «Открыть настройки сети и Интернета».
Здесь мы должны ввести параметры изменения адаптера. Там мы увидим значок адаптера TAP-Windows, и мы должны щелкнуть второй кнопкой над ним, мы нажимаем «Деактивировать», и мы повторно активируем его позже. Таким образом он перезапускается.
Переустановите адаптер
Если это по-прежнему не дает решения, мы переустановим адаптер TAP-Windows. Для этого щелкаем правой кнопкой мыши по кнопке Пуск и открываем Диспетчер устройств. Мы идем в Cеть адаптеры, и когда мы покажем это, он появится. Мы должны щелкнуть правой кнопкой мыши по адаптеру и нажать «Удалить».
Позже мы запускаем VPN, и он может попросить нас снова установить адаптер TAP-Windows. Мы также можем скачать и установить его вручную.
Создайте новый адаптер TAP-Windows
В конечном счете, это шаги, которые мы должны предпринять в случае, если у нас возникнут проблемы с использованием VPN в Windows, и ошибка связана с адаптером TAP-Windows. Мы можем повторно включить его, переустановить или создать новый, чтобы увидеть, можно ли легко решить эту проблему.
Источник