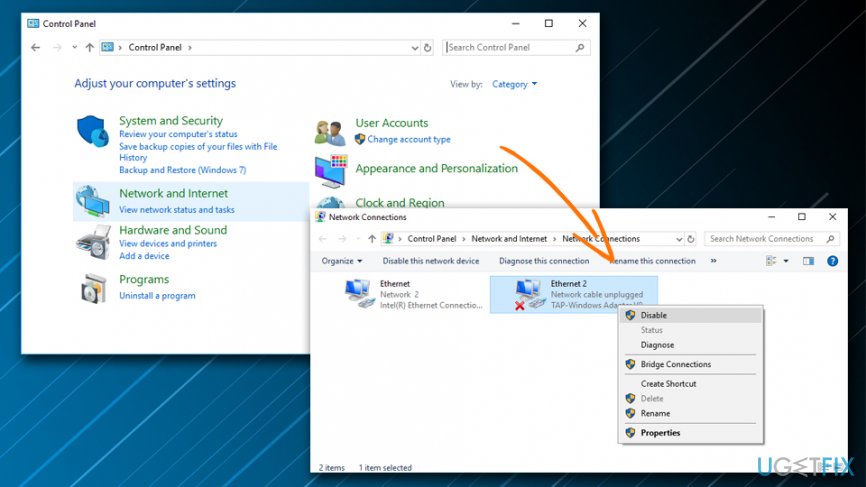
TAP-Windows Adapter V9 — это сетевой драйвер, необходимый для VPN-подключений. Таким образом, этот сетевой драйвер автоматически устанавливается вместе с программным обеспечением VPN. Путь к папке по умолчанию для драйвера TAP-Windows Adapter V9: C: / Program Files / Tap-Windows.
Однако некоторые пользователи заявляют на форумах, что их интернет-соединения не работают с включенным адаптером TAP-Windows. Даже если они отключают сетевой драйвер TAP, он автоматически включается сам. Таким образом, пользователи по-прежнему не могут подключиться. Вот некоторые решения для этой ошибки адаптера TAP-Windows V9.
Как исправить ошибку отключения сетевого кабеля TAP-Windows Adapter v9?
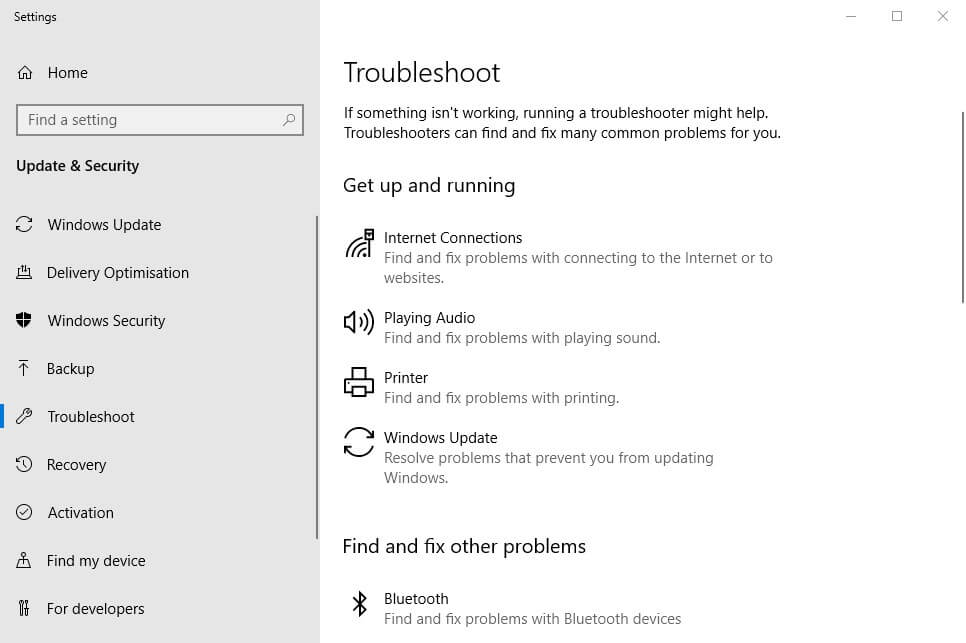
- Откройте средство устранения неполадок с подключением к Интернету
- Сброс подключения адаптера TAP-Windows
- Удалите адаптер TAP-Windows и программное обеспечение VPN
- Сбросить Windows 10
1. Откройте средство устранения неполадок с подключением к Интернету.
Во-первых, пользователи могут проверить средства устранения неполадок подключений к Интернету в Windows. Это средство устранения неполадок, которое может исправить все виды проблем с подключением. Таким образом, возможно, стоит проверить, может ли средство устранения неполадок предоставить какие-либо разрешения для ошибки подключения адаптера TAP-Windows V9.
Следуйте приведенным ниже инструкциям, чтобы открыть средство устранения неполадок подключений к Интернету в Windows 10.
- Нажмите клавишу Windows + горячую клавишу Q , которая открывает Cortana .
- Введите ключевое слово для устранения неполадок в Cortana и откройте « Устранение неполадок» .
- Выберите «Подключения к Интернету» и нажмите « Запустить средство устранения неполадок», чтобы открыть окно, расположенное ниже.
- Выберите вариант Устранить неполадки моего подключения к Интернету .
- Затем просмотрите разрешения, которые предоставляет средство устранения неполадок.
2. Сброс подключения адаптера TAP-Windows
Сброс адаптера TAP путем его отключения и повторного включения приведет к сбросу его сетевых функций. Таким образом, это также может исправить ошибку TAP-Windows Adapter V9.
Пользователи могут сбросить адаптер TAP следующим образом.
- Откройте окно поиска Кортаны.
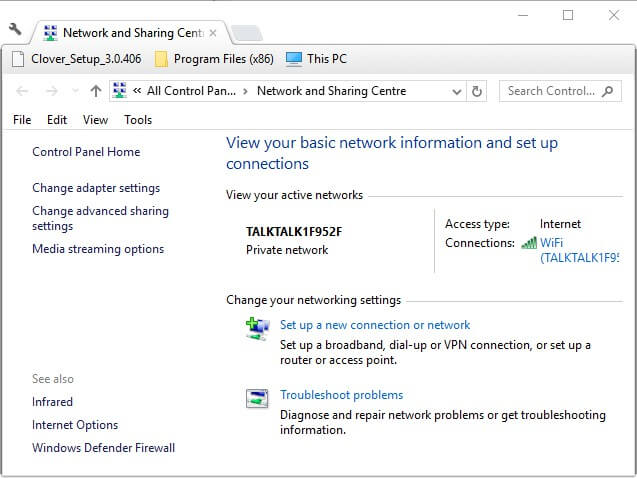
- Введите сеть в текстовом поле Cortana и выберите « Состояние сети», чтобы открыть окно, показанное ниже.
- Нажмите Центр управления сетями и общим доступом, чтобы открыть окно на снимке экрана ниже.
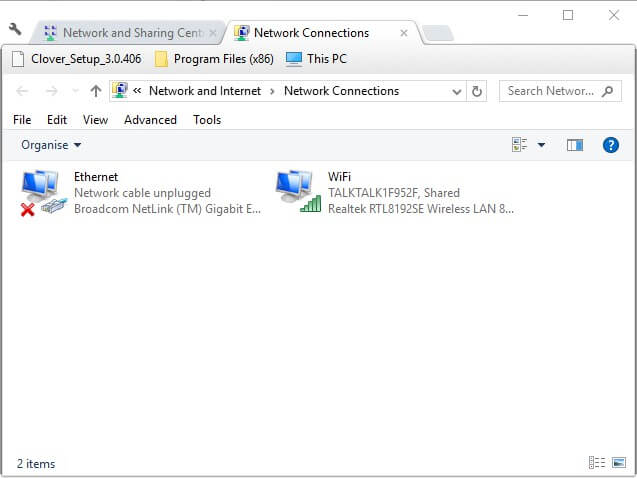
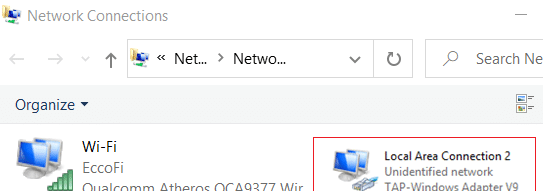
- Затем нажмите « Изменить настройки адаптера», чтобы открыть аплет панели управления, показанный ниже.
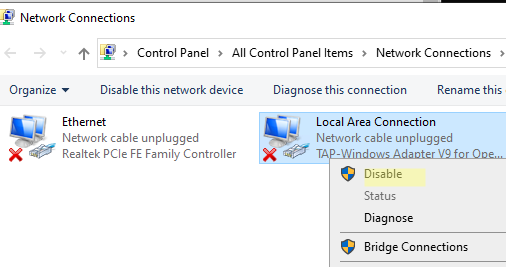
- Щелкните правой кнопкой мыши адаптер TAP-Windows и выберите « Отключить» .
- Подождите минуту, а затем щелкните правой кнопкой мыши Адаптер TAP-Windows и выберите Включить .
3. Удалите адаптер TAP-Windows и программное обеспечение VPN.
Наилучшим решением для ошибки TAP-Windows Adapter V9 может быть удаление адаптера TAP, который в конечном итоге является источником проблемы с подключением. Однако не всегда достаточно просто удалить этот адаптер, поскольку установленное программное обеспечение VPN может переустановить отсутствующий сетевой драйвер, в котором он нуждается.
Таким образом, пользователям также необходимо удалить программное обеспечение VPN. Таким образом пользователи могут удалить адаптер TAP и программное обеспечение VPN.
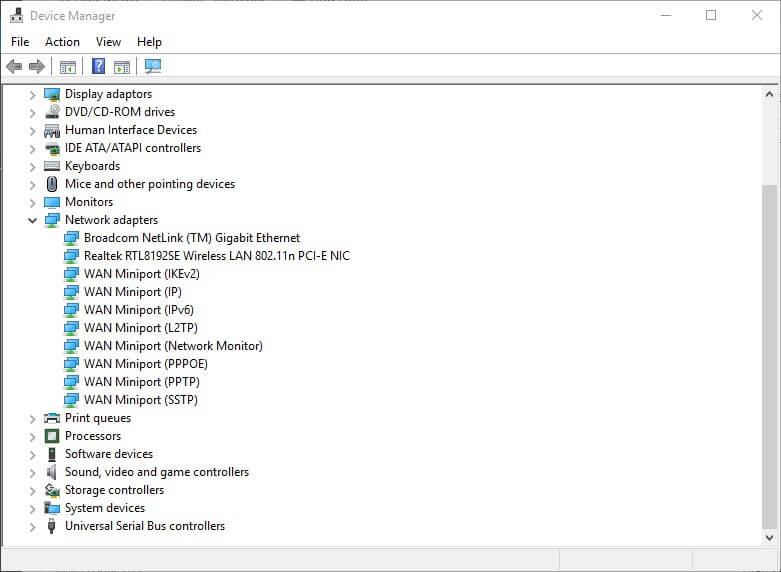
- Щелкните правой кнопкой мыши кнопку «Пуск» и выберите « Диспетчер устройств» .
- Дважды щелкните Сетевые адаптеры, чтобы развернуть эту категорию.
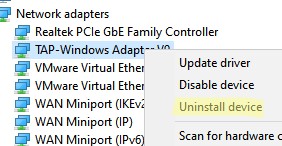
- Щелкните правой кнопкой мыши TAP-Windows Adapter V9 и выберите «Удалить устройство».
- Затем нажмите кнопку Удалить , чтобы удалить устройство.
- Чтобы удалить программное обеспечение VPN, нажмите горячую клавишу Windows + R.
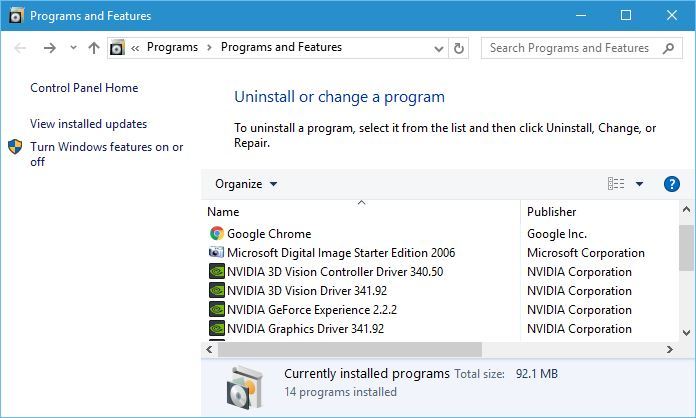
- Введите appwiz.cpl в Run и нажмите клавишу Return .
- Затем выберите программное обеспечение VPN, указанное в апплете «Панель управления программами и функциями» .
- Нажмите кнопку Удалить , чтобы удалить выбранное программное обеспечение VPN.
- Нажмите Да для дальнейшего подтверждения.
- Затем перезапустите Windows после удаления адаптера TAP и программного обеспечения VPN.
Пользователи, которые предпочли бы сохранить программное обеспечение VPN, могут попробовать переустановить его. Переустановка программного обеспечения также может устранить ошибку подключения. Для этого загрузите самую последнюю версию программного обеспечения VPN-клиента и установите его. Это также переустановит адаптер TAP.
Если ваш VPN-клиент доставляет вам неприятности, возможно, вам следует удалить его и переключиться на другой. CyberGhost VPN — это быстрый и надежный VPN-клиент, поэтому, если вам нужен новый VPN-клиент, обязательно попробуйте его.
Почему стоит выбрать CyberGhost?

- 256-битное шифрование AES
- Более 5600 серверов по всему миру
- Отличные ценовые планы
- Отличная поддержка
4. Сбросить Windows 10
Некоторые пользователи также подтвердили, что сброс Windows 10 исправляет ошибку адаптера TAP-Windows V9. Пользователи могут сбросить Windows 10 и сохранить свои файлы. Тем не менее, они должны будут переустановить приложения и программное обеспечение, которые не были предварительно установлены.
Кроме того, вам может понадобиться снова установить подключение к Интернету по умолчанию. Пользователи могут сбросить Windows 10 следующим образом.
- Откройте приложение Cortana и введите сброс в качестве ключевого слова для поиска.
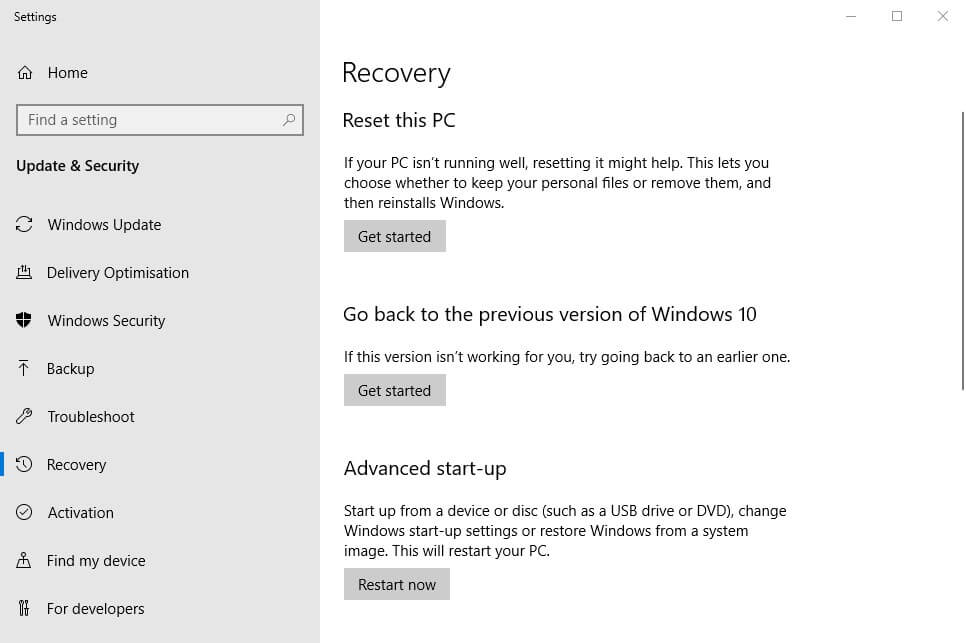
- Нажмите Reset this PC, чтобы открыть окно, показанное ниже.
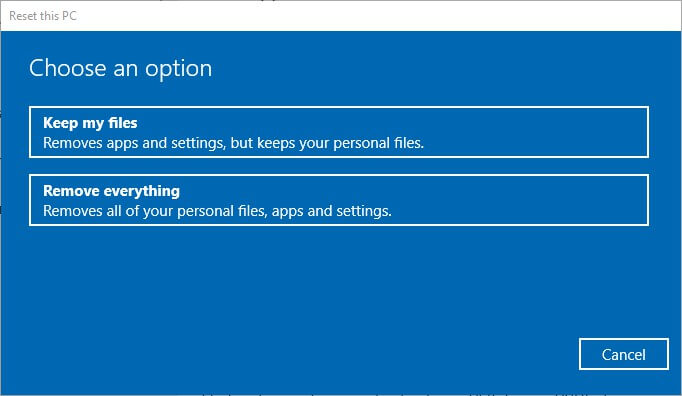
- Нажмите « Начать», чтобы открыть окно «Сбросить этот компьютер».
- Нажмите кнопку Сохранить мои файлы .
- Нажмите кнопку « Далее» и выберите пункт « Сброс» .
Таким образом, пользователи могут исправить ошибку TAP-Windows Adapter V9 для восстановления своих соединений. Удаление адаптера TAP и программного обеспечения VPN обычно решает проблему. Затем пользователи могут попытаться переустановить либо оригинальный пакет VPN, либо альтернативный клиент VPN .
СВЯЗАННЫЕ СТАТЬИ, ЧТОБЫ ПРОВЕРИТЬ:
- Исправлено: ошибка VPN в Windows 10
- Исправлено: проблемы с VPN
by Vlad Constantinescu
Vlad might have a degree in Animal Husbandry and Livestock Management, but he’s currently rocking anything software related, ranging from testing programs to writing in-depth reviews about them…. read more
Updated on January 18, 2022
- The TAP-Windows Adapter V9 is a network driver that VPNs require in order to establish secure connections.
- From time to time, the TAP adapter driver may fail to work as it should. We’ll teach you how to fix it in no time.
- Visit our VPN Troubleshooting section to discover more user-friendly VPN tutorials.
- Check out our Network Hub for more tips on fixing common network issues.
The TAP-Windows Adapter V9 is a network driver that’s essential for VPN connections.
More often than not, this network driver gets automatically installed along with VPN clients.
Usually, the driver’s default path is: C:/Program Files/Tap-Windows
However, certain users noticed that their internet connections don’t always work while the TAP-Windows Adapter driver is enabled.
What’s even more strange is that even disabling it wouldn’t work, as the TAP network driver would re-enable itself shortly after.
Therefore, users were still unable to establish a connection.
If that ever happened to you, check out some easy-to-follow suggestions that could fix your TAP-Windows Adapter V9 error.
How can I fix the TAP-Windows Adapter v9 error?
Use the Internet Connections Troubleshooter
The easiest fix would be using Windows’ built-in Internet Connections troubleshooter.
This tool can usually fix various connectivity issues, so it might be worth checking out.
Here’s what you need to do:
- Press the Win key
- Type troubleshoot
- Select Available Recommended troubleshooting
- Click the Available troubleshooters hyperlink
- Select Internet Connections and click Run the troubleshooter
- Select Troubleshoot my connection to the internet
- Go through the troubleshooting wizard’s steps
Reset the TAP-Windows Adapter Connection

Disabling and re-enabling the TAP adapter driver will (or better yet should) reset its network functions.
Furthermore, it may also fix the TAP-Windows Adapter V9 error and it’s a really simple task.
All you have to do is:
- Press the Win key on your keyboard
- Type network
- Select Network status
- Click on the Network and Sharing Center button
- Select the Change adapter settings option
- Right-click the TAP-Windows Adapter
- Select Disable
- Right-click the TAP-Windows Adapter once more
- Select Enable
- Restart your PC and check if there’s any improvement
Reinstall TAP-Windows Adapter and VPN client

The best resolution for the TAP-Windows Adapter V9 error might be to reinstall the driver altogether.
However, considering that most TAP adapter drivers are a dependency for VPN clients, most VPN providers come with their own version.
Getting the All TAP-Windows adapters are currently in use error? Check our guide and learn how you can fix it.
Thus, it would be easier to just uninstall the TAP driver and your VPN client, and perform a clean install of both services after you’re done.
This is how you should reinstall your TAP driver and VPN client:
- Right-click the Start button
- Select Device Manager
- Expand the Network adapters category
- Right-click the TAP-Windows Adapter V9
- Click on Uninstall device
- Select Uninstall to confirm
- Press the Windows key + R key combination
- Type appwiz.cpl and press Enter
- Select your VPN software in the window
- Press the Uninstall button to remove it
- Proceed with the uninstallation
- Restart your PC shortly after uninstalling both services
- Reinstall your VPN software + TAP adapter driver
If you notice that reinstalling your VPN client and TAP adapter driver didn’t work, you might consider switching to a better alternative.
Private Internet Access, for instance, is an excellent VPN service that comes with its own TAP driver.
Furthermore, even if it stops working at some point, you can easily reinstall it directly from the VPN client’s configuration screen.

Private Internet Access
Did your TAP adapter driver stop working? Try using PIA as an alternative.
Reset Windows 10
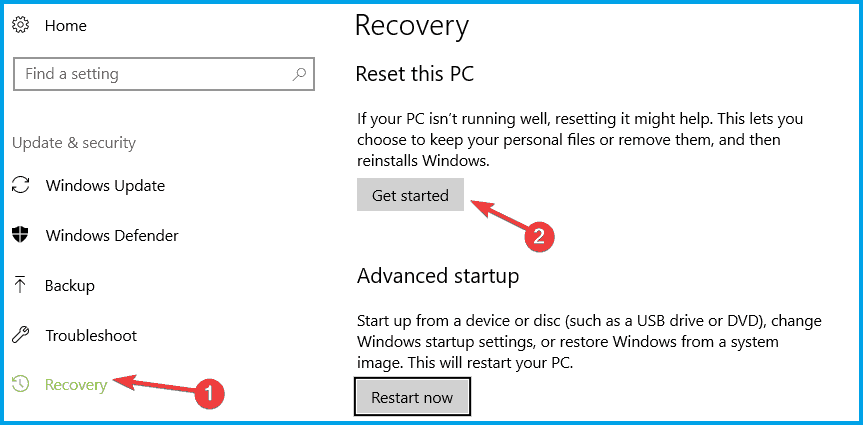
Apparently, resetting Windows 10 fixes the TAP-Windows Adapter V9 error in most cases.
You can reset Windows 10 and also keep your files. However, you’ll need to reinstall all the apps and drivers, as those will be swept clean from your PC.
Additionally, you’ll lose any configuration you did before resetting your PC.
Granted, this method is one of the most drastic ones, but it also gets the job done most of the time.
Follow these steps to reset your Windows 10 PC:
- Press the Win key on your keyboard
- Type Reset PC
- Click on the Reset this PC option
- Select Get started
- Press the Keep my files button
- Click the Next button
- Select the Reset option to proceed
- Wait for the process to complete
Conclusion
To wrap things up, if you notice that your TAP-Windows Adapter V9 triggers various connectivity errors, there are some things you could try.
More often than not, reinstalling the TAP driver and VPN client will fix the issue.
However, you may need to go as far as resetting your PC altogether, so buckle up and don’t lose hope.
Newsletter
by Vlad Constantinescu
Vlad might have a degree in Animal Husbandry and Livestock Management, but he’s currently rocking anything software related, ranging from testing programs to writing in-depth reviews about them…. read more
Updated on January 18, 2022
- The TAP-Windows Adapter V9 is a network driver that VPNs require in order to establish secure connections.
- From time to time, the TAP adapter driver may fail to work as it should. We’ll teach you how to fix it in no time.
- Visit our VPN Troubleshooting section to discover more user-friendly VPN tutorials.
- Check out our Network Hub for more tips on fixing common network issues.
The TAP-Windows Adapter V9 is a network driver that’s essential for VPN connections.
More often than not, this network driver gets automatically installed along with VPN clients.
Usually, the driver’s default path is: C:/Program Files/Tap-Windows
However, certain users noticed that their internet connections don’t always work while the TAP-Windows Adapter driver is enabled.
What’s even more strange is that even disabling it wouldn’t work, as the TAP network driver would re-enable itself shortly after.
Therefore, users were still unable to establish a connection.
If that ever happened to you, check out some easy-to-follow suggestions that could fix your TAP-Windows Adapter V9 error.
How can I fix the TAP-Windows Adapter v9 error?
Use the Internet Connections Troubleshooter
The easiest fix would be using Windows’ built-in Internet Connections troubleshooter.
This tool can usually fix various connectivity issues, so it might be worth checking out.
Here’s what you need to do:
- Press the Win key
- Type troubleshoot
- Select Available Recommended troubleshooting
- Click the Available troubleshooters hyperlink
- Select Internet Connections and click Run the troubleshooter
- Select Troubleshoot my connection to the internet
- Go through the troubleshooting wizard’s steps
Reset the TAP-Windows Adapter Connection

Disabling and re-enabling the TAP adapter driver will (or better yet should) reset its network functions.
Furthermore, it may also fix the TAP-Windows Adapter V9 error and it’s a really simple task.
All you have to do is:
- Press the Win key on your keyboard
- Type network
- Select Network status
- Click on the Network and Sharing Center button
- Select the Change adapter settings option
- Right-click the TAP-Windows Adapter
- Select Disable
- Right-click the TAP-Windows Adapter once more
- Select Enable
- Restart your PC and check if there’s any improvement
Reinstall TAP-Windows Adapter and VPN client

The best resolution for the TAP-Windows Adapter V9 error might be to reinstall the driver altogether.
However, considering that most TAP adapter drivers are a dependency for VPN clients, most VPN providers come with their own version.
Getting the All TAP-Windows adapters are currently in use error? Check our guide and learn how you can fix it.
Thus, it would be easier to just uninstall the TAP driver and your VPN client, and perform a clean install of both services after you’re done.
This is how you should reinstall your TAP driver and VPN client:
- Right-click the Start button
- Select Device Manager
- Expand the Network adapters category
- Right-click the TAP-Windows Adapter V9
- Click on Uninstall device
- Select Uninstall to confirm
- Press the Windows key + R key combination
- Type appwiz.cpl and press Enter
- Select your VPN software in the window
- Press the Uninstall button to remove it
- Proceed with the uninstallation
- Restart your PC shortly after uninstalling both services
- Reinstall your VPN software + TAP adapter driver
If you notice that reinstalling your VPN client and TAP adapter driver didn’t work, you might consider switching to a better alternative.
Private Internet Access, for instance, is an excellent VPN service that comes with its own TAP driver.
Furthermore, even if it stops working at some point, you can easily reinstall it directly from the VPN client’s configuration screen.

Private Internet Access
Did your TAP adapter driver stop working? Try using PIA as an alternative.
Reset Windows 10

Apparently, resetting Windows 10 fixes the TAP-Windows Adapter V9 error in most cases.
You can reset Windows 10 and also keep your files. However, you’ll need to reinstall all the apps and drivers, as those will be swept clean from your PC.
Additionally, you’ll lose any configuration you did before resetting your PC.
Granted, this method is one of the most drastic ones, but it also gets the job done most of the time.
Follow these steps to reset your Windows 10 PC:
- Press the Win key on your keyboard
- Type Reset PC
- Click on the Reset this PC option
- Select Get started
- Press the Keep my files button
- Click the Next button
- Select the Reset option to proceed
- Wait for the process to complete
Conclusion
To wrap things up, if you notice that your TAP-Windows Adapter V9 triggers various connectivity errors, there are some things you could try.
More often than not, reinstalling the TAP driver and VPN client will fix the issue.
However, you may need to go as far as resetting your PC altogether, so buckle up and don’t lose hope.
Newsletter
What is the Tap Windows Adapter?
Tap Windows Adapter V9 is a driver for a network that enables a VPN connection to connect to the company’s servers. The original installation location is C:/Program Files/tap Windows.
It may be found in the Network adapter category in Device management. When Tap Windows Adapter V9 is activated.
Some users have reported connectivity issues, even if the device is disabled. It will re-enable itself once the machine is rebooted.
TAP Adapter V9 may show on your device shortly after the installed VPN client. The majority of VPN clients use this adapter to establish a secure connection to the server. As a result, consumers may be perplexed and unsure of where the application originated.
Unlike TAP Provider V9 for Private Tunnel, this driver is safe and secure. It’s used to keep the VPN running smoothly.
Users should not tamper with this component at first. However, if connectivity problems emerge, there are a few options. You can either restart the adapter or entirely remove it and reinstall it. Issues with it usually go away, as the root of the problem is a residual adapter from a prior VPN service.
There are two versions of Windows TAP drivers, depending on your Windows version:
- On Windows XP, use the NDIS 5 driver (tap windows, version 9.9.x).
- On Windows 10 / 8 / 7 / Vista, use the NDIS 6 driver (tap windows, version 9.21.x).
What is VPN Software?
Virtual Private Network majority of times referred to as VPN. Its features let you visit websites that are restricted in your country. It also protects you from internet providers, hackers, ISPs, and data-gathering websites. Speed up your server connections by using private, direct channels.
Several IT professionals recommend using a VPN since it minimizes the risk of many online and espionage threats. The benefits of a private connection may be enjoyed by both home and business users, making VPNs a beneficial tool for many.
When To Delete Or Reinstall The Tap Windows Adapter V9
In general, if you access the internet over a VPN network connection, there are few reasons to remove the adapter. If you’re having difficulty connecting to the VPN when it’s active, check for a faulty driver. Also, reinstall the Tap Windows Adapter.
It’s entirely likely that the remaining Tap Adapter is causing internet troubles. If you previously used a VPN connection but stopped using it in the interim. The issue will most likely be resolved by removing the adaptor. If you select to retain the VPN installed on your device, you may notice that the adapter is reinstalled.
Solutions to Fix The “Tap Windows Adapter V9” Error
- Reset the Tap Windows Adapter Connection
- Use the Internet Connection Troubleshooter
- Re-install Tap Windows Network Adapters Driver
- Uninstall The Windows Tap Adapter Driver From Windows 10
- Reset your Windows 10 OS
Methods To Fix The “Tap Windows Adapter V9” Error
Tap windows adapter V9 error messages are standard errors many users have faced. Here we have provided some easy remedies to solve this error message.
1. Reset the Tap Windows Adapter Connection
Reset the TAP windows adapter V9 error by disabling and re-enable. It will reset its network functions. It may also resolve the Adapter V9 issue, and it is a relatively straightforward procedure.
All you have to perform is complete the following steps:
- On your keyboard, press the Win key.
- Type network in the search area.
- Select the network status from the search results.
- Select Network and Sharing Center from the drop-down menu.

- Select the “Change adapter settings” from the network setting window as shown in the image.
- Right-click the local area connection, using tap Windows Adapter and select Disable.

- Right-click the tap Windows Adapter again and select Enable.
- Restart your personal computer to see if things have improved.
2. Use the Internet Connection Troubleshooter
If you’re just encountering problems with your Windows PC, your network settings are most likely to blame. While the built-in Windows troubleshooter isn’t always practical, it’s worth a shot before moving on.
Using Windows’ built-in Internet Connections troubleshooter is the simplest solution.
This program can usually cure a variety of connectivity issues, so it’s worth a look.
It is what you must do:
- Press the Win key on your keyboard.
- Type troubleshoot into the search box.
- Select Troubleshoot settings and from the search results.

- Access the Additional Troubleshooters from the link given below in the same window.
- To run the troubleshooter, go to Internet Connections and select Run the Troubleshooter.

- Choose Please troubleshoot my internet connection.
- Follow the instructions in the troubleshooting wizard.

3. Re-install Tap Windows Network Adapters Driver
It’s possible that reinstalling the Adapter V9 driver will solve the problem.
However, because VPN clients require most TAP adapter drivers, most VPN companies provide their version.
As a result, it would be simpler to simply uninstall the TAP and your VPN client, then reinstall both services from scratch.
The following steps will help you reinstall your TAP driver and VPN client:
- Close your VPN and disconnect all VPN connections. It is crucial to ensure that the tap Windows V9 may be safely removed without causing any problems or issues.
- Use the Windows + S keyboard shortcut to bring up the Search functionality, or click the Search icon in your taskbar.
- Enter “Device Manager” in the search box.

- Expand the section Network Adapters.
- Locate the tap Windows Adapter V9 on your computer. The file name may also include the name of a VPN service, such as “TurboVPN TAP Adapter.” If a yellow exclamation mark is visible next to the driver icon, it implies you need to reinstall it.
- Uninstall the driver by right-clicking on it and selecting Uninstall device.

- Open the VPN you’re using after the driver has been successfully uninstalled.

- Depending on your VPN, you may be prompted to replace the TAP Adapter V9 or install the missing Network Driver.

- When the installation is finished, check to see if your connection problems have been repaired.
Note: If your VPN software merely displays a missing driver error and fails to reinstall Adapter V9, you should reinstall the VPN client. The installer will then be prompted to install the missing driver as well.
If re-installing your VPN and TAP adapter network does not resolve the issue, you should consider moving to a better option.
4. Uninstall The Windows Tap Adapter Driver From Windows 10
You’d think that deleting the Tap Windows Adapter driver from Device Manager would be simple. Depending on the VPN software you have installed on your system.
The adapter may reappear in Device management each time your computer starts up. It occurs because some VPN programs include a starting function that scans for missing drivers. Also, it immediately installs those drivers that are missing.
- To launch the Run dialogue box, press Windows + R.
- Press Enter after typing the following text.
- devmgmt.msc
- Double-click on the Network adapters in the Device Manager window to expand it.
- Select Properties from the context menu of tap Windows Adapter V9.
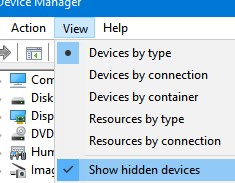
- If you can’t find tap Windows Adapter V9 under Network adapter, go to View > Show hidden devices from the top menu bar.
- Click Uninstall device on the Driver tab.

- Make a check. To continue, delete the driver program for this device and click OK.
5. Reset your Windows 10 OS
You can restore Windows 10 while retaining your files. However, because your PC will be wiped clean, you’ll need to reinstall all of your software and drivers.
It is one of the most extreme methods, but it works the majority of the time.
To reset your Windows 10 computer, follow these steps:
- On your keyboard, press the Win key.
- Restart your computer by typing Reset PC.
- Select the option to Reset this PC.

- Choose “Get started.”

- Select “Keep my files” from the displayed menu.

- Then press the Next button.
- To continue, select the Reset option.
- Wait for the procedure to finish.
Conclusion
We aim this article to give you a better understanding of the tap Windows Adapter 9.21.2. Suppose your tap Windows Adapter V9 error is causing various connectivity errors. We recommend contacting your VPN provider’s customer care.
Reinstalling the TAP driver and VPN client will usually solve the problem. However, you may need to reset your computer completely, so stay calm and don’t give up.
Every VPN user needs to know what TAP-Windows is, as the issues associated with TAP-Windows 9.21.2 Adapter can be a bit worrisome.
Many users have reported trouble connecting to the internet while the TAP-Windows Adapter was enabled.
You need not worry anymore as we will tell you how to manage the TAP-Windows Adapter in this article.
What is TAP-Windows Adapter?
If you have been using the Windows VPN to safeguard the personal data stored on the PC, you must be aware of the role of the TAP-Windows Adapter V9.
Essentially, the Adapter acts as a virtual network interface that lets the VPN clients fetch the desired VPN connection by making all the necessary functionalities available.
The TAP-Windows 9.21.2 Adapter can be found as an installed program at the location C:Program FilesTap-Windows.

Many VPN software runs only after installing a specific network driver, known as TAP-Windows. You can find this Adapter mainly in the Device Manager once installed by any VPN client like SoftEther, Cyberghost, Hamachi, etc.
The VPN suites mostly use it as a helping medium for establishing a private connection to any internet network nearby.
You will find two different types of driver versions of TAP-Windows that operate only on the specific Windows OS version running on the PC. The two types are:
- The Windows XP version uses the NDIS 5 driver for TAP-Windows and version 9.9.x
- The Windows 10/ 8/ 7/ Vista versions use the NDIS 6 driver for TAP-Windows and version 9.21.x

Note: An amazing VPN facilitating software for your Windows PC or laptop would be PureVPN. This software is compatible with Windows 8, 8.1, and 10. It has a very simple-to-use interface, and the streaming speed is blazing fast. PureVPN will be your best bet for making your PC a VPN hotspot with high-security features like IPv6 Leak protection and DNS.
PS: Learn more about the full TigerVPN review.
Why would you need to remove TAP-Windows?
Whether you use TAP-Windows 9.21.2 or the other version, there are chances of an error in the drivers. Suppose you use the VPN with the help of the internet frequently, and you experience connectivity problems during that process when the VPN connection is running.
In that case, there is a possibility that the driver associated with the TAP-Windows might have gone corrupted. You should better start with an investigation of the problem.
The major and best solution to help you in this scenario would be reinstalling the TAP-Windows Adapter. Another situation might be where you have been using a VPN connection for a long time but have discontinued the usage in the present for a while.
In this case, the leftover data from the TAP-Windows Adapter might be the potential culprit behind the internet connectivity issues. It may have gone corrupted in the time being and started causing trouble.

In both the cases mentioned above, removing the particular Adapter is the best fix. A thing to note here is that if you decide not to uninstall the VPN software from the PC or laptop, then there are chances that the TAP-Windows Adapter will get reinstalled automatically.
If you see the following error message – “All TAP-Windows adapters on this system are currently in use,” then it is time for you to restart the TAP-Windows fox adapter to fix such issues.
Now that the air is clear on the possible issue that might happen. Let us take you through the methods for removing, restarting, and reinstalling the TAP-Windows adapter.
Method for removing the TAP-Windows 9.21.2 Adapter V9
As we have already discussed, removing the TAP-Windows Adapter is not as easy as it may seem once you have uninstalled it from the Device Manager. You may find the Adapter reinstalled into the Device manager as per the VPN software installed on the system.
This will happen every time you boot the system. The main reason behind this is the startup service that is associated with some of the VPN programs. This service looks for the missing drivers and automatically installs the required ones.
Once you decide to remove the driver associated with the TAP-Windows Adapter V9, follow the given steps:
Open the window of Program Files.
Navigate through and find the option of TAP-Windows.
Hit double-click over the option uninstall.exe. Now keep following the instructions as they appear on the screen for finally deleting the driver from the system.
If you decide to terminate the process at this stage, remember that the next time you start the device, the driver will return once again and reinstall upon opening the VPN software.
You have to fully shut the software off the system to ensure that the driver is barred from getting reinstalled on the PC.
Follow the steps below to do so:
Press the keys Windows + R together to launch the Run window. Enter the command appwiz.cpl into the box. Hit OK now. This will open the window of Programs and Features.

Find the relevant VPN client from the given list and then uninstall it.

Note that if you have previously been a user of more than one VPN solution, ensure that you d the same removal process with every other client on the list.
Make sure that there is no such software left that can cause trouble again, and reinstall the TAP-Windows Adapter.
Method for restarting the TAP-Windows 9.21.2 Adapter V9
Suppose you don’t wish to remove the Adapter altogether and think there is a possible chance of its recovery by removing any minor issue. In that case, you may try it by just performing a restart of the Adapter.
As we know that when the error message tells you that every Adapter is currently being used, restarting the TAP-Windows is a good option to try.
We will tell you how to do so in the steps given below:
Open the Control Panel of the PC.
Click the option of Network and Internet.

At this stage, hit the tab Change Adapter options.

In the next Network Connections window, hit a right-click on the local area connection associated with your TAP-Windows Adapter V9. Then click on the tab Disable.

Wait for some time. Hit a right-click again on the same option and then click Enable.
Try running your VPN client once again and see if the error is resolved.
Method for reinstalling the TAP-Windows 9.21.2 Adapter V9
Suppose you face difficulties establishing a connection with any VPN network (it doesn’t matter which program you are using).
In that case, you may have to first start your troubleshooting operation by running a check on the TAP-Windows Adapter primarily.
If installed correctly, reinstall the adapter from scratch if you encounter any incorrect settings.
The steps given below are going to be your guide to do so:
It would be best if you first terminated your VPN connection and shut down the related program of the VPN client simultaneously.
Now press the keys Windows + R together to launch the Run window. Enter the command devmgmt.msc into the box. Hit Enter now. This will open the window of Device Manager.

In this window, navigate the options and select the Network Adapters tab. Open the menu that drops down.
Now, find the option TAP-Windows Adapter V9. Look for an exclamation mark that might appear over the icon adjacent to the option.
If the exclamation mark is there, your next move would be to reinstall the particular driver that will fix the problem. To do that, right-click over the icon and click the tab Uninstall device.

Once you successfully remove the TAP-Windows 9.21.2 Adapter V9 from the Device Manager, open the VPN client again. Now keeping in mind the VPN software you use, you may have to face two situations over here.
Either a prompt will emerge asking you to install the missing Network Driver, or the Client will automatically install the driver again without asking for permission.
Note: If you see a “missing driver error” message on the VPN software when it has not automatically reinstalled the driver, you may have to remove the VPN Client. All the installation kits associated with the VPN client come with the TAP-Windows Adapter.
If you do not wish to reinstall the VPN client, then visit the website of OpenVPN. Scroll down and stop at TAP-Windows. Now download the right installer as per the windows version of the PC.
Go back and open Device Manager. Check if the exclamation mark is gone from the icon. If it is still there, you may resort to expert support from the VPN client or go for another VPN provider.
Conclusion
We hope this article dealt with all your queries related to TAP-Windows and the TAP-Windows 9.21.2 Adapter.
We gave you a thorough guide to help you better manage the adapter and prevent it from hindering your internet connection.
This website uses cookies to ensure you get the best experience on our website
-
rsk
- OpenVpn Newbie
- Posts: 4
- Joined: Thu Dec 09, 2021 8:31 pm
TAP-Windows Adapter «cannot verify signature» (Code 52)
I downloaded and installed
Code: Select all
openvpn-connect-3.3.3.2562_signed.msion a Windoze 7 (64-bit) desktop.
The TAP-Windows Adapter V9 for OpenVPN Connect shows up in the Device manager with a warning symbol and the status notation
Windows cannot verify the digital signature for the drivers required for this device. A recent hardware or software change might have installed a file that is signed incorrectly or damaged, or that might be malicious software from an unknown source. (Code 52)
The signature verification log also shows this:
Code: Select all
tap_ovpnconnect.sys 11/12/2021 9.24.2.601 Not Signed N/A
However, in the Powershell, I see this when I run Get-AuthenticodeSignature .tap_ovpnconnect.cat in the driverstapamd64win7 directory:
Code: Select all
SignerCertificate                         Status                                                                                       Path
-----------------                         ------                                                                                       ----
478646B53E3F991A02E8A04D36B178DB1AFFF851  Valid                                                                                        tap_ovpnconnect.cat
And if I «run»
from a command line, up pops a window which suggests that everything is in order.
After searching this forum for answers, I see this is a perennial problem that goes back a long ways, but I cannot find any very recent instructions on how to correct the difficulty.
I’ve installed openvpn connect on other machines, even under Windows XP, and just the other day, had no difficulty installing and running the Android version on a new phone.
I’d be grateful for some guidance.
-
rsk
- OpenVpn Newbie
- Posts: 4
- Joined: Thu Dec 09, 2021 8:31 pm
Re: TAP-Windows Adapter «cannot verify signature» (Code 52)
Post
by rsk » Fri Dec 10, 2021 1:34 am
TinCanTech wrote: ↑
Thu Dec 09, 2021 9:09 pm
rsk wrote: ↑
Thu Dec 09, 2021 8:47 pm
on a Windoze 7 (64-bit) desktopMake sure it is up to date with Micro-shaft, otherwise, it will not recognise the driver signing certificate.
At some point, I found a thread on this subject that pointed to a particular KB patch from them, but when I attempted to apply it, it said it wasn’t applicable to my version.
I still don’t quite understand how I can get past this and run OpenVPN on this machine, or just what I need to do to make the driver-signing certificate recognizable.
-
openvpn_inc
- OpenVPN Inc.
- Posts: 1133
- Joined: Tue Feb 16, 2021 10:41 am
Re: TAP-Windows Adapter «cannot verify signature» (Code 52)
Post
by openvpn_inc » Sat Dec 11, 2021 9:52 pm
Hello rsk,
Just to state this outright — Windows 7 is no longer supported by Microsoft. You should switch to an updated version.
With that out of the way, OpenVPN Connect v3.3.3 does work and install just fine on Windows 7. However there is an important thing to note about Windows 7. It did not originally start out supporting drivers with SHA2 signed certificates. Microsoft eventually switched from SHA1 to SHA2 and brought out updates for Windows 7 to add that support. If your system doesn’t have that, then it can’t verify the driver.
This page on the Microsoft website explains more about this https://support.microsoft.com/en-us/top … a4cde8e64f
I can report that when I tried it just now on Windows 7 Home Premium Server Pack 1 64 bit OS, it installed correctly. There was a popup asking me if I wanted to install the driver, and I clicked install, and now it is installed and working. When I look up the driver in device management it shows up as working correctly. I attached a screenshot as proof.
I advise that you upgrade to an operating system that is actually supported today for security updates. Windows 7 no longer is getting updates. If you insist on sticking with Windows 7 then I can at least advise you that, yes, it still works. However, you may need to figure out which updates you’re missing to get the necessary support for SHA2 signed drivers in your Windows 7 installation. Or figure out what’s wrong in your OS that’s preventing things from being verified correctly.
Kind regards,
Johan
OpenVPN Inc.
Answers provided by OpenVPN Inc. staff members here are provided on a voluntary best-effort basis, and no rights can be claimed on the basis of answers posted in this public forum. If you wish to get official support from OpenVPN Inc. please use the official support ticket system: https://openvpn.net/support
-
rsk
- OpenVpn Newbie
- Posts: 4
- Joined: Thu Dec 09, 2021 8:31 pm
Re: TAP-Windows Adapter «cannot verify signature» (Code 52)
Post
by rsk » Sun Dec 12, 2021 8:20 pm
Yes, now that I understand the difficulty is that my present system cannot verify using the SHA-2 algorithm, I located the update, and will let you know after install and restart.
Thank you for taking the time and trouble to explain what is the matter so clearly.
-
rsk
- OpenVpn Newbie
- Posts: 4
- Joined: Thu Dec 09, 2021 8:31 pm
Re: TAP-Windows Adapter «cannot verify signature» (Code 52)
Post
by rsk » Mon Dec 13, 2021 12:34 am
openvpn_inc wrote: ↑
Sat Dec 11, 2021 9:52 pm
. . . OpenVPN Connect v3.3.3 does work and install just fine on Windows 7. However there is an important thing to note about Windows 7. It did not originally start out supporting drivers with SHA2 signed certificates. Microsoft eventually switched from SHA1 to SHA2 and brought out updates for Windows 7 to add that support. If your system doesn’t have that, then it can’t verify the driver.This page on the Microsoft website explains more about this https://support.microsoft.com/en-us/top … a4cde8e64f
. . .
Kind regards,
Johan
Thank you, Johan, that guidance got to me to the update patch which I needed to apply, specifically, for my system:
Security Update for Windows 7 for x64-based Systems (KB4474419)
windows6.1-kb4474419-v3-x64_b5614c6cea5cb4e198717789633dca16308ef79c.msu
I uninstalled the TAP-Windows Adapter, applied the patch, rebooted, and re-ran the OpenVPN Connect installation, chose the «repair» option, and as you said, it installed just fine, and OpenVPN Connect is now operating as expected (although I still need to configure it to use an appropriate DNS server, as it seems unable to locate certain sites—but that’s a different problem altogether.
Once again thank you very much for responding thoroughly to my naive inquiry, and pointing me toward what I needed to do. You got me past the problem and I’m up and running.
-
ivan.p
- OpenVpn Newbie
- Posts: 5
- Joined: Fri Apr 01, 2022 10:54 am
Re: TAP-Windows Adapter «cannot verify signature» (Code 52)
Post
by ivan.p » Fri Apr 01, 2022 11:18 am
Hello,
I have the same problem on Windows 7 x64. The question is why SHA1 hash for tap_ovpnconnect.sys file in the catalog is wrong?
Here’s the list of files extracted from MSI (latest openvpn-connect-3.3.6.2752_signed.msi ):
Tha CAT file signature is fine. You can see that CAT file contains 2 hashes:
INF — 4EA7EFACF8D968C662F43AE4723A816B53293EBC
SYS — 58CCFDF3B3A9D56CFEB36658AAEEB83220FD8A03
As you can see in the picture above, the actual SHA1 hash for INF-file is the same, but for SYS file it is different.
It’s 3CE2079895230254E1627D435365ACD3CC3E440E (and that is the hash of tap_ovpnconnect.sys located in c:windowssystemdrivers after installation)
So I believe the problem is not in that Win7 doesn’t have an update for SHA256 hashes, but in that SYS-file in the distribution doesn’t correspond the CAT-file.
Could someone look into this issue?
-
ivan.p
- OpenVpn Newbie
- Posts: 5
- Joined: Fri Apr 01, 2022 10:54 am
Re: TAP-Windows Adapter «cannot verify signature» (Code 52)
Post
by ivan.p » Fri Apr 01, 2022 6:15 pm
Ahhh, my bad. Before calculating hash for driver I need to exlude PE checksum and PE certificate table reference. After doing that hashes matched.
But in this case I don’t understand why it doesn’t work: I have a plenty of unsigned sys-files in my win 7, and they do work. Maybe the timestamp of signing matters
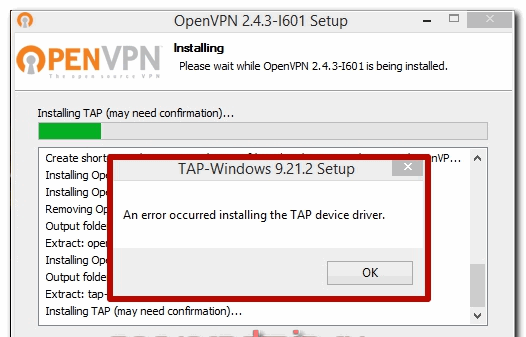
Столкнулся с неожиданной проблемой при установке клиента популярной реализации vpn. Не устанавливался openvpn клиент на Windows 10, выдавая ошибку установки TAP интерфейса: «An error occurred installing the TAP device driver«.
Ошибка установки openvpn на Windows 10 выглядела следующим образом. Инсталятор после выбора дефолтных настроек задумывается на несколько минут и в итоге выдает ошибку:
При этом сам клиент openvpn успешно устанавливается. Можно запустить GIU, но ясное дело, подключиться к серверу openvpn не получится, так как в системе не появляется TAP адаптера. В интернете нашел много советов по данной проблеме, но мне ни один не помог. Перечислю их, может вам поможет что-то из этого:
- Запустить скрипт на добавление TAP интерфейса — C:Program FilesTAP-Windowsbinaddtap.bat. У меня он так же не отрабатывал. Висел несколько минут, потом выдавал ошибку.
- Зайти в Пуск -> TAP Windows -> Add a new TAP virtual ethernet adapter. Это тоже не помогло.
- Повторить установку openvpn с выключенным антивирусом или защитником windows.
Два первых действия нужно выполнять от администратора. С помощью них можно добавить несколько tap адаптеров в систему, чтобы одновременно поднимать несколько openvpn туннелей.
После того, как ничего из предложенного не подошло, я крепко призадумался. Openvpn я использую постоянно. Ставил его на разные системы десятки раз и всегда все проходило успешно, либо проблема быстро решалась. Тут быстрого и простого решения не получалось.
Помогло в итоге вот что. Я открыл диспетчер устройств и посмотрел на сетевые адаптеры. В списке был TAP-Windows Adapter V9, что намекало на то, что все должно работать. Но не работало. В панели управления в списке адаптеров TAP адаптера не было.
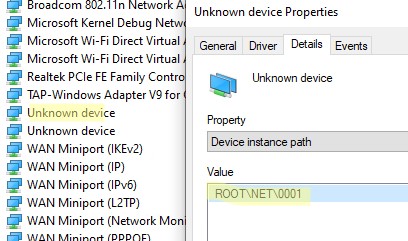
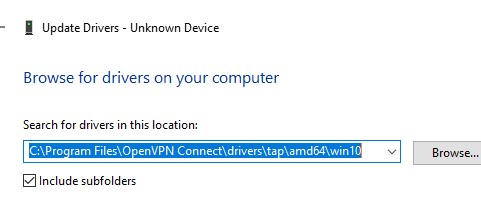
Я включил отображение скрытых устройств и увидел там же в сетевых адаптерах неизвестное устройство (unknown device). Открыл у него вкладку Сведения. Путь к экземпляру устройства был следующий — ROOTNET000. Я нажал обновить драйвер для этого устройства и указал, что он должен быть найден автоматически. После этого устройство получило название TAP-Windows Adapter V9 #2 и в панели управления появился TAP адаптер.
После этого Openvpn заработал. Я смог подключиться к серверу и организовать туннель. После того, как я удалил openvpn на этой же системе и установил заново, все прошло без ошибок с первого раза. Появился только один TAP-Windows Adapter V9. Проверил еще на парочке тестовых виртуальных машин. Тоже все прошло без ошибок, так что не смог собрать актуальные скрины по проблеме, а сразу их не сделал.
Если решение не поможет, то обратите внимание на следующее, берите бубен и танцуйте:
Драйвер для TAP адаптера должен быть в директории C:WindowsSystem32DriverStoreFileRepositoryoemvista.inf_amd64_*. В конце могут быть разные символы. На той системе, где был глюк, были созданы 2 подобных директории с разными символами на конце. Когда проблем нет — только одна.
https://github.com/midnight47/
При запуске OpenVPN сервера или подключения из клиента OpenVPN вы можете столкнуться с ошибкой:
All TAP-Windows adapters on this system are currently in use
Exiting due to fatal error
Или
All wintun adapters on this system are currently in use or disabled
Или
No TAP Adapter Available
Вы можете увидеть эту ошибку логе OpenVPN сервера (файл C:Program FilesOpenVPNlogopenvpn.log) или в клиенте OpenVPN GUI/
Это известная ошибка, связанная с тем что в Windows не установлены или некорректно работают виртуальные сетевые адаптеры TAP или wintun.
В OpenVPN 2.5+ вместо сетевых адаптеров TAP можно использовать WinTun от разработчиков WireGuard. По словам разработчиков, wintun драйвер работает быстрее чем классический OpenVPN драйвер TAP. Вы можете выбрать какой сетевой драйвер использовать при установке OpenVPN (TAP-Windows6 или Wintun).
Чтобы исправить эту ошибку нужно выполнить один из следующих шагов (расположены в порядке от самого простого к самому сложному):
- Перезапустить TAP-Windows/WinTun через панель управления.
- Переустановить драйвер TAP-Windows/Wintun;
- Создать новый сетевой адаптер для OpenVPN (или другого VPN клиента)
Выведите список всех TAP адаптеров, доступных клиенту OpenVPN:
cd "c:Program FilesOpenVPNbin"
“C:Program FilesOpenVPNbinopenvpn.exe” --show-adapters
В нашем случае установлен как Wintun, так и TAP адаптер:
'OpenVPN Wintun' {1199219C-C5AD-4722-B195-C80332101710} wintun
'OpenVPN TAP-Windows6' {9C6B25CA-0AF0-4752-AD4A-032947F6A6FD} tap-windows6
Для устранения ошибки обычно достаточно включить и отключить TAP адаптер в панели управления Windows, перезагрузить компьютер или переустановить клиент OpenVPN.
Вы можете включить и отключить сетевой адаптер WinTap из панели управления ncpa.cpl. Щелкните в панели управления по нужному адаптеру (TAP-Windows или Wintun Userspace Tunnel) и выберите Disable. Затем включите его (Enable.)
Также вы можете перезапустить все сетевые интерфейсе OpenVPN TAP с помощью PowerShell:
$TapAdapter= Get-NetAdapter| where {$_.InterfaceDescription -like "*TAP-Windows*"}
Disable-NetAdapter -Name $TapAdapter -Confirm:$false
Enable-NetAdapter -Name $TapAdapter -Confirm:$false
Если предыдущий способ не помог, попробуйте переустановить драйвера для вашего виртуального TAP адаптера вручную
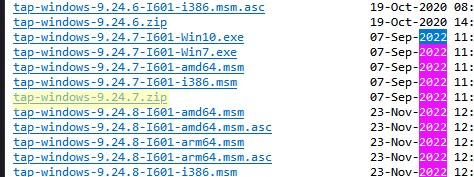
- Скачайте последнюю версию TAP драйвера для Windows здесь (http://build.openvpn.net/downloads/releases/). Например, tap-windows-9.24.7.zip или wintun-amd64-0.8.1.
- Распакуйте архив, запустите Device Manager (
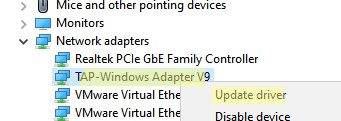
devmgmt.msc), щелкните правой кнопкой по сетевому адаптеру TAP-Windows Adapter v9 в секции Network Adapters и выберите Update driver; - Укажите путь к каталогу с драйвером TAP.
Если вы не видите в панели управления TAP-Windows Adapter V9, откройте консоль Device Manager и включите опцию View-> Show hidden device.
Если в секции Network adapters есть устройства типа unknown device, откройте его свойства, перейдите на вкладку Details и проверьте значение свойства Device instance path.
Если здесь указано ROOTNET000, значит попробуйте выполнить авматотический поиск дрвйвера или вручную укажите путь к INF файлу (например C:Program FilesOpenVPN Connectdriverstapamd64win10OemVista.inf). После этого в панели управления появится ваш TAP адаптер.
В Windows 7 драйвер TAP, подписанный с помощью SHA256, не будет работать корректно, пока вы вручную не установите обновление KB4474419.
В самых редких случаях может помочь полное пересоздание TAP/Wintun адаптера.
Перед установкой нужно удалить существующий сетевой адаптер TAP и его драйвер. Для этого запустите программу C:Program FilesTAP-WindowsUninstall.exe или просто удалите устройство из Device Manager (Uninstall device).
Для установки TAP драйвера используется утилита tapinstall.exe.
Распакуйте архив и запустите установочный файл с правами администратора.
В новых версиях OpenVPN для управления виртуальными сетевыми адаптерами используется утилита c:Program FilesOpenVPNbintapctl.exe.
Вывести список сетевых адаптеров OpenVPN:
tapctl.exe list
Удалить адаптер:
tapctl.exe delete "OpenVPN TAP-Windows6"
Создать новый адаптер TAP:
tapctl.exe create
Создать новый wintun адаптер:
tapctl.exe create --hwid wintun
Обязательно проверьте, что новый сетевой адаптер TAP-Windows Adapter появился в списке сетевых подключения в панели управления Windows (консоль ncpa.cpl).
Также ошибка “ All TAP-Windows adapters on the system are currently in use” может возникнуть, если вы пытаетесь установить несколько OpenVPN подключений с одного компьютера. Для каждого VPN подключения нужно создать свой адаптер.
Вы можете создать дополнительный WinTap сетевой адаптер с помощью скрипта (bat файл) %ProgramFiles%TAP-Windowsbinaddtap.bat.
Или с помощью команды (в современных версиях клиента OpenVPN):
c:Program FilesOpenVPNbintapctl.exe.tapctl.exe create
В результате в панели управления появится два (или более) сетевых адаптеров TAP-Windows Adapter V9, и вы сможете одновременно установить несколько одновременных OpenVPN сессий с разными серверами.
Теперь вы можете использовать ваше OpenVPN подключение в Windows и настроить автоматическое подключение к VPN. [/alert]
Question
Issue: How to fix Tap Windows Adapter V9?
Hello, I started using VPN recently, and I noticed that I have something called Tap Windows Adapter V9 installed on my Windows 10 computer. The worst part is that I cannot connect to the internet when the device is enabled. I am not sure what to do, as I do want to use VPN, but I also want my stable internet connection back. I tried to disable it but it simply re-enabled itself. Is there any way to fix this annoying issue?
Solved Answer
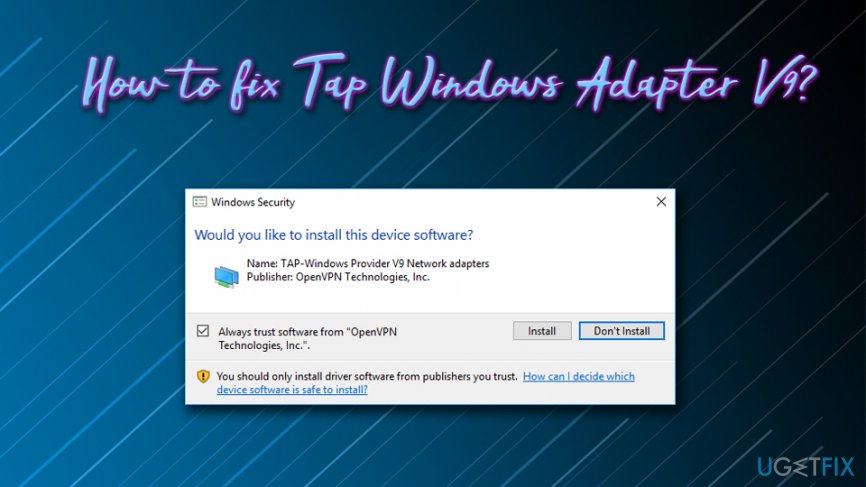
TAP-Windows Adapter V9 is a network driver[1] that allows VPN[2] to connect to its servers. The default installation location is C:/Program Files/Tap-Windows, and it appears in Device Manager under Network Adapters[3] category. Unfortunately, some users reported that they have connection problems when TAP Windows Adapter V9 is enabled, and even if the device is disabled, it does enable itself after the reboot of the computer.
TAP-Windows Adapter V9 can appear on your device soon after the installation of VPN client (ExpressVPN, CyberGhost, NordVPN, etc.). Most of the VPN clients use this adapter for private connection to the server.[4] Therefore, users can be a little confused and not realize where the program came from. Unlike TAP Provider V9 for Private Tunnel, this driver is secure and is used to provide a proper operation for the VPN.
Initially, users should not tamper with this component. However, if issues with connectivity arise, several things could be done. You can restart or completely remove the adapter and then install it again. Typically, issues with it go away, as the cause of this problem is the leftover adapter left from previously used VPN service.
TIP: If you are having issues with your system and error messages keep popping up, we suggest you download and install ReimageMac Washing Machine X9. This software is capable of scanning, detecting and automatically fixing issues on operating systems.
Now let’s fix TAP-Windows Adapter V9 issues – follow the tips below.
Tip 1. Disable and re-enable the adapter
Fix it now!
Fix it now!
To repair damaged system, you have to purchase the licensed version of Reimage Reimage.
If you are having problems with the TAP adapter we suggest to first restart it the following way:
- In the taskbar search box, type in Control Panel
- Then go to Network and Intrnet > Network sharing Center
- On the right side of the window, click on Change adapter settings
- Right-click on the local area connection which is using TAP Windows Adapter V9 and select Disable
Reset the Adapter and see if it helps
- Wait a few moments, right-click it again and pick Enable
Tip 2. Re-install the TAP Windows Adapter V9 driver
Fix it now!
Fix it now!
To repair damaged system, you have to purchase the licensed version of Reimage Reimage.
If you cannot connect to the internet while using the VPN, try re-installing the TAP Windows Adapter V9:
As soon as the driver is gone, try starting your VPN client. Depending on the VPN you use, it might prompt you to install the missing network drivers. If the software shows you the “driver missing” error, simply go to developer’s website and re-install the newest version of the VPN client.
Repair your Errors automatically
ugetfix.com team is trying to do its best to help users find the best solutions for eliminating their errors. If you don’t want to struggle with manual repair techniques, please use the automatic software. All recommended products have been tested and approved by our professionals. Tools that you can use to fix your error are listed bellow:
do it now!
Download Fix
Happiness
Guarantee
do it now!
Download Fix
Happiness
Guarantee
Compatible with Microsoft Windows
Compatible with OS X
Still having problems?
If you failed to fix your error using Reimage, reach our support team for help. Please, let us know all details that you think we should know about your problem.
Reimage — a patented specialized Windows repair program. It will diagnose your damaged PC. It will scan all System Files, DLLs and Registry Keys that have been damaged by security threats.Reimage — a patented specialized Mac OS X repair program. It will diagnose your damaged computer. It will scan all System Files and Registry Keys that have been damaged by security threats.
This patented repair process uses a database of 25 million components that can replace any damaged or missing file on user’s computer.
To repair damaged system, you have to purchase the licensed version of Reimage malware removal tool.
Private Internet Access is a VPN that can prevent your Internet Service Provider, the government, and third-parties from tracking your online and allow you to stay completely anonymous. The software provides dedicated servers for torrenting and streaming, ensuring optimal performance and not slowing you down. You can also bypass geo-restrictions and view such services as Netflix, BBC, Disney+, and other popular streaming services without limitations, regardless of where you are.
Malware attacks, particularly ransomware, are by far the biggest danger to your pictures, videos, work, or school files. Since cybercriminals use a robust encryption algorithm to lock data, it can no longer be used until a ransom in bitcoin is paid. Instead of paying hackers, you should first try to use alternative recovery methods that could help you to retrieve at least some portion of the lost data. Otherwise, you could also lose your money, along with the files. One of the best tools that could restore at least some of the encrypted files – Data Recovery Pro.


